
2024-01-16
3 min read
Blog
Now you can’t run your application because another process already uses the port. How can you find that process? How to kill it?
Table of Contents
Just a second! 🫷
If you are here, it means that you are a software developer.
So, you know that storage, networking, and domain management have a cost .If you want to support this blog, please ensure that you have disabled the adblocker for this site.
I configured Google AdSense to show as few ADS as possible — I don’t want to bother you with lots of ads, but I still need to add some to pay for the resources for my site.Thank you for your understanding.
— Davide
Sometimes, when trying to run your ASP.NET application, there’s something stopping you.
Have you ever found a message like this?
Failed to bind to address https://127.0.0.1:7261: address already in use.
You can try over and over again, you can also restart the application, but the port still appears to be used by another process.
How can you find the process that is running on a local port? How can you kill it to free up the port and, eventually, be able to run your application?
In this article, we will learn how to find the blocking port in Windows 10 and Windows 11, and then we will learn how to kill that process given its PID.
How to find the process running on a port on Windows 11 using PowerShell
Let’s see how to identify the process that is running on port 7261.
Open a PowerShell and run the netstat command:
NETSTAT is a command that shows info about the active TCP/IP network connections. It accepts several options. In this case, we will use:
-n: Displays addresses and port numbers in numerical form.-o: Displays the owning process ID associated with each connection.-a: Displays all connections and listening ports;-p: Filter for a specific protocol (TCP or UDP)
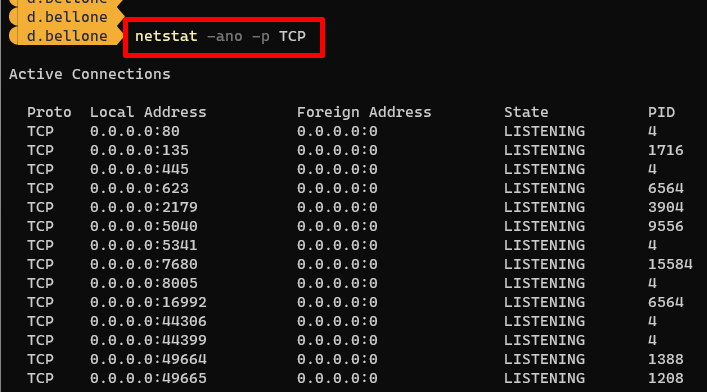
Notice that the last column lists the PID (Process ID) bound to each connection.
From here, we can use the findstr command to get only the rows with a specific string (the searched port number).
netstat -noa -p TCP | findstr 7261

Now, by looking at the last column, we can identify the Process ID: 19160.
How to kill a process given its PID on Windows or PowerShell
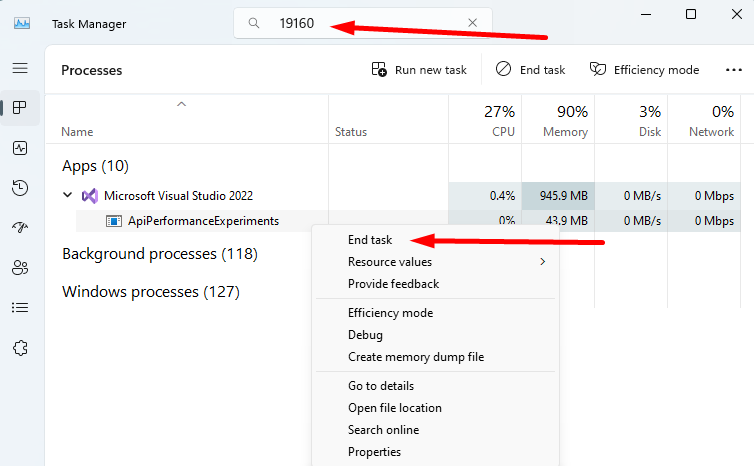
Now that we have the Process ID (PID), we can open the Task Manager, paste the PID value in the topmost textbox, and find the related application.
In our case, it was an instance of Visual Studio running an API application. We can now kill the process by hitting End Task.
If you prefer working with PowerShell, you can find the details of the related process by using the Get-Process command:
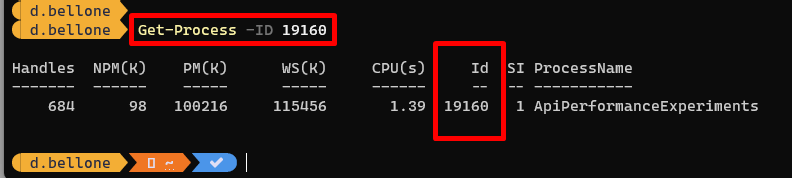
Then, you can use the taskkill command by specifying the PID, using the /PID flag, and adding the /F flag to force the killing of the process.
We have killed the process related to the running application. Visual Studio is still working, of course.
Further readings
Hey, what are these fancy colours on the PowerShell?
It’s a customization I added to show the current folder and the info about the associated GIT repository. It’s incredibly useful while developing and navigating the file system with PowerShell.
🔗 OhMyPosh and CascadiaCode not working on PowerShell? How to fix it in Windows 10 and Windows 11 Integrated Terminal
This article first appeared on Code4IT 🐧
Wrapping up
As you can imagine, this article exists because I often forget how to find the process that stops my development.
It’s always nice to delve into these topics to learn more about what you can do with PowerShell and which flags are available for a command.
I hope you enjoyed this article! Let’s keep in touch on Twitter or LinkedIn! 🤜🤛
Happy coding!
🐧
As software developers, we are constantly developing new projects on our computer.
While developing our Backend or Frontend projects, we run these projects on a port of our computer and in this way we can test our project.
Sometimes, while running our projects on a local server, the port where we will host our application may be already in use. This requires us to change the configuration of our application and assign a new port address. Of course, this is also an option, but in this article, we will learn how to terminate the process in the already occupied port.
For Linux Users
First of all, I will explain step by step how we can terminate a process running on a port for linux users. Linux users can terminate a process running on a specific port using a single command line.
kill -9 $(lsof -t -i tcp:<port>)
In this command you should replace <port> with port number that you want to kill/terminate. In addition, sometime you might have to add sudo command to beginning of this command.
For MacOS Users
In macOs you need to execute two commands. In first command you will get a PID value for specific port that you wanna kill/terminate. For this you need to execute this command on your terminal.
Again in this command you need to replace <port> with port number that you want to kill/terminate. After executing this command you will get a PID value. Copy or store this PID value to somewhere to use in the next command.
In second command we will terminate specific port with PID value that store earlier. To do this execute below command.
Again replace <PID> with PID value that we get from previous command. After executing this command process that working in that specific port will be terminated immidiately.
Note: Sometimes we do not want to terminate process that working on a specific port immidiately. In this command -9 argument describe instant termination. And this argument kills the process immediately, and gives it no chance of cleaning up after itself, and this may cause problems. Use it on your own risk. You can consider using -15 or -3 for a softer termination which allows the process to clean up after itself.
For Windows Users
These couple of steps are almost same for Windows users. To terminate a process on a specific port on windows, we need to first find the id of that process and then terminate that process.
We can use Windows CMD, Terminal or Powershell for these operations. You can use any of these. First open one of these. And then write this command.
netstat -ano | findstr :<PORT>
Similar to before, you need to replace <PORT> with port number that you want to terminate. After executing this command you will get a list of process that working on that specific port. The list item has an id value on the far right. Copy that id value and use this value in the next command to terminate a process.
Again use that id value that we copied in the previous step. And replace it with <PID> in this command. After executing this command, you will terminate the working process on that specific port.
Basically, I tried to explain how we can stop processes running in various operating systems. Thanks for reading this far. I hope this article was helpful. See you next time…
Sometimes, you may encounter a situation where you need to free up a specific port that is being used by a process. Here’s a step-by-step guide on how to identify and kill a setup»>process running on a particular port.
Steps to kill a process running on a specific port
1. Identify the process ID (PID) associated with the port:
On Windows:
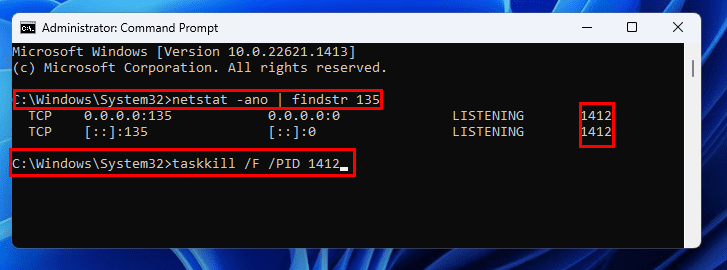
- Open Command Prompt as administrator.
- Run the command:
netstat -ano | findstr :<port_number> - For example, to find the process running on port 3000, run:
netstat -ano | findstr :3000 - Note down the process ID (the last column) associated with the port.
On macOS/Linux:
- Open the terminal.
- Run the command:
lsof -i :<port_number> - For example, to find the process running on port 3000, run:
lsof -i :3000 - Note down the process ID (the second column) associated with the port.
2. Kill the process using the identified PID:
On Windows:
- Open Command Prompt as administrator.
- Run the command:
taskkill /F /PID <pid> - For example, if the process ID is 1234, run:
taskkill /F /PID 1234 - The
/Fflag is used to forcefully terminate the process.
On macOS/Linux:
- Open the terminal.
- Run the command:
kill <pid> - For example, if the process ID is 1234, run:
kill 1234 - By default, the
killcommand sends a termination signal (SIGTERM) to the process, allowing it to perform any cleanup operations before shutting down gracefully.
It’s important to exercise caution when terminating processes, especially if they are critical or running important tasks. Make sure you are terminating the correct process associated with the desired port.
Example:
Let’s say you have a process running on port 3000, and you want to free up that port. To identify the process ID, open Command Prompt (Windows) or terminal (macOS/Linux) and run the command netstat -ano | findstr :3000 (Windows) or lsof -i :3000 (macOS/Linux). Suppose the process ID is 1234. To kill the process, run taskkill /F /PID 1234 (Windows) or kill 1234 (macOS/Linux). This will forcefully terminate the process running on port 3000.
Remember to replace <port_number> with the actual port number you want to free up, and <pid> with the process ID you obtained from the previous step.
Happy Coding!
Tired of struggling with processes that won’t terminate on their own, jamming valuable ports, and causing critical services and applications to malfunction? Your search end here! In Windows 11, you can easily terminate these stubborn processes and free up ports by using various methods to kill processes on a port.
Your Windows 11 creates many ports virtually where internet connections start and end. Various software, services, and apps on your device use these ports to communicate with its online server on the developers’ end or any cloud databases. While in most cases these apps clear the ports when you close them, some apps keep the ports busy even after the service has been stopped. When you start another app that must use the same port, you either face delays in initialization or the app won’t start at all. Want to fix such awful moments? Keep reading!
Contents
- 1 Why Do You Need to Kill a Process on Port?
- 2 How to Kill a Process on a Port on Windows 11
- 2.1 1. Kill Process on Port Using Command Prompt
- 2.2 2. Stop a Process on a Port Using Resource Monitor
- 2.3 3. Kill a Process on Port Using PowerShell
- 2.4 4. Kill a Process on Port Using Microsoft Apps
- 2.5 5. Kill Processes on Ports by Using the TCP/IP Reset Tool
- 3 Conclusion
Why Do You Need to Kill a Process on Port?
Sometimes, a software process running on a specific port may not terminate on its own, even after you’ve closed the associated application or service. This can happen due to reasons, like a bug in the software or service, a network trouble, or a conflict with another application.
To free up the port and allow other processes to use it, you may need to manually terminate the process that’s occupying it. This is where killing a process on a specific port comes in. By killing the process, you can release the port and allow other processes to use it.
Here are the all reliable and proven methods to kill a process on a port on any Windows 11 PC. Also, you must know that the same methods would work on earlier Windows PCs like Win 10, Win 8.1, Win 7, etc.
Also read: How to See Logical Processor Usage in Task Manager
1. Kill Process on Port Using Command Prompt
- Click Start and type command to bring up the Command Prompt tool.
- Select the Run as administrator link to open the Command Prompt utility with elevated rights.
- Now, copy and paste this command inside the tool and hit Enter:
netstat -ano | findstr :<port_number>
- You must replace the <port_number> placeholder text with an actual port number that you want to clear.
- The above command should fetch the process ID (PID) for the process you want to kill.
- Once you’ve got the PID, run the following code on the same CMD window:
taskkill /F /PID <process_id>
- Hit Enter to forcefully terminate the target PID at the desired port on Windows 11.
- You must replace the <process_id> placeholder text with an actual PID retrieved by running the previous command.
2. Stop a Process on a Port Using Resource Monitor
Since the Windows Vista operating system, expert Windows PC users like developers and IT network engineers have been using the Resource Monitor utility to track Windows PC resource usage like CPU, RAM, HDD, SSD, Network, and so on.
Using the same tool, one can also track the port usage on a Windows PC. That’s not all! You can manage the usage, kill processes, clear ports, and more on the same utility. This is a built-in app on Windows PCs so you don’t need to get any third-party app. Find below how to use this method on your end:
- Hit the Windows + R keys together to bring up the Run tool.
- There, execute the following command to open the Resource Monitor app:
resmon
- On the Resource Monitor app, click the Network tab.
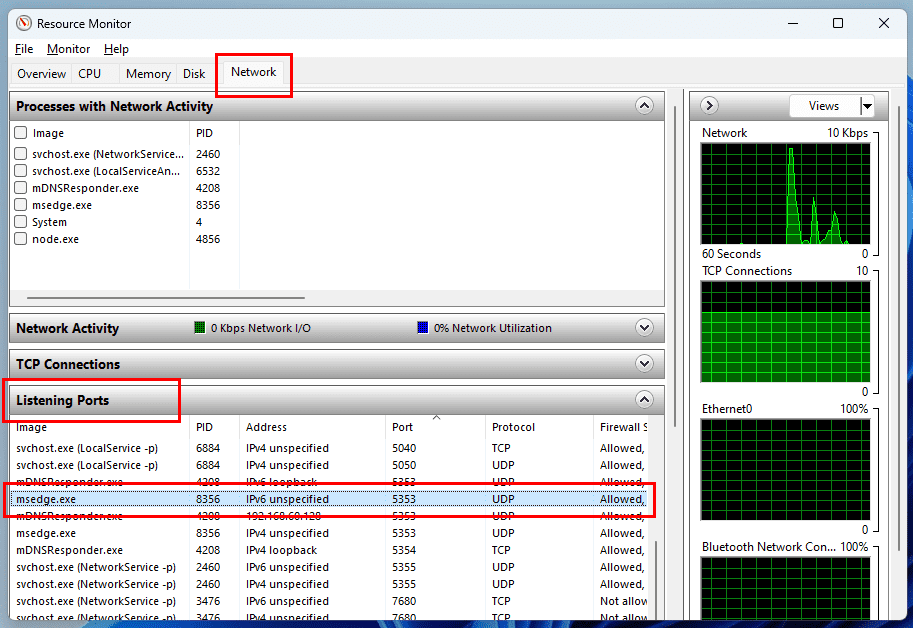
- Inside the Network tab, click the Listening Ports menu.
- There you go! All the ports, their protocols, PID, occupying apps, etc., are in front of you.
- The codes under the Image column of the Listening Ports menu are Task Manager processes.
- Open the Task Manager app by pressing Ctrl + Shift + Esc.
- Now, find the port you want to clear on Resource Manager.
- Also, look for the relevant app under the Image column.
- Then, find the task in Task Manager under the Processes column.

- Right-click the process and choose End task from the context menu that pops up.
That’s it! You’ve cleared the occupied port by ending the process linked to it from Task Manager.
3. Kill a Process on Port Using PowerShell
If you like to automate Windows 11 tasks using PowerShell, then you’ll also want to know how to kill a process on a port using this powerful command line tool of a Windows PC. Then, you can implement the codes in your existing automation to fully automate the port-killing process. Find below the PowerShell commands and how they work on a Windows 11 PC:
- Open PowerShell with elevated rights. For this, you can search Power in the Start menu and click Run as administrator.
- Then, copy and paste the following cmdlet on the PowerShell terminal:
Get-Process -Id (Get-NetTCPConnection -LocalPort <port_number>).OwningProcess
- On the above cmdlet, you must replace the <port_number> placeholder text with an actual port that you want to be cleared off the existing process.
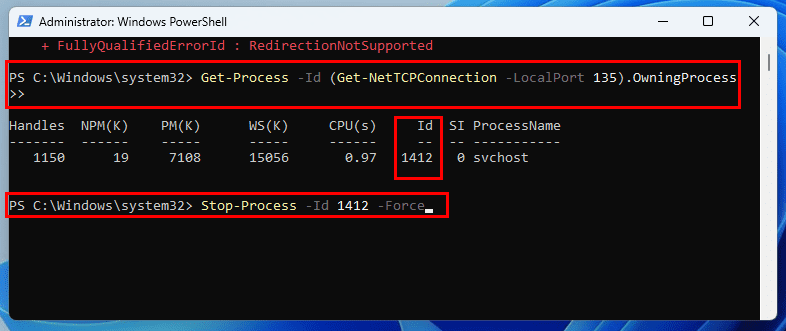
- Now that you’ve got the PID you need, you’re ready to run the command that kills a port on PowerShell. Here’s the script:
Stop-Process -Id <process_id> -Force
- Don’t forget to replace the <process_id> text with an actual PID. Now, hit the Enter key to execute the code.
4. Kill a Process on Port Using Microsoft Apps
You can use the following Microsoft Sysinternals system apps to find engaged ports, and linked processes, and stop them conveniently with a few clicks:
- TCPView v4.19
- Process Explorer v17.04
For example, if you’re running the TCPView app, you need to try the following steps:
- Download the tool from the above web portal and open it.
- The downloaded folder might be compressed so you need a Zip or RAR tool to unzip it.
- Now, you can run the EXE files inside it like tcpview64.exe for a 64-bit Win 11 PC.
- Hit the Agree button and the app would show up.
- There, you can browse between TCP and UDP protocol ports.
- You can identify all the engaged ports and their processes right from the app interface.
- Pinpoint the port that you need to be cleared by clicking on it.
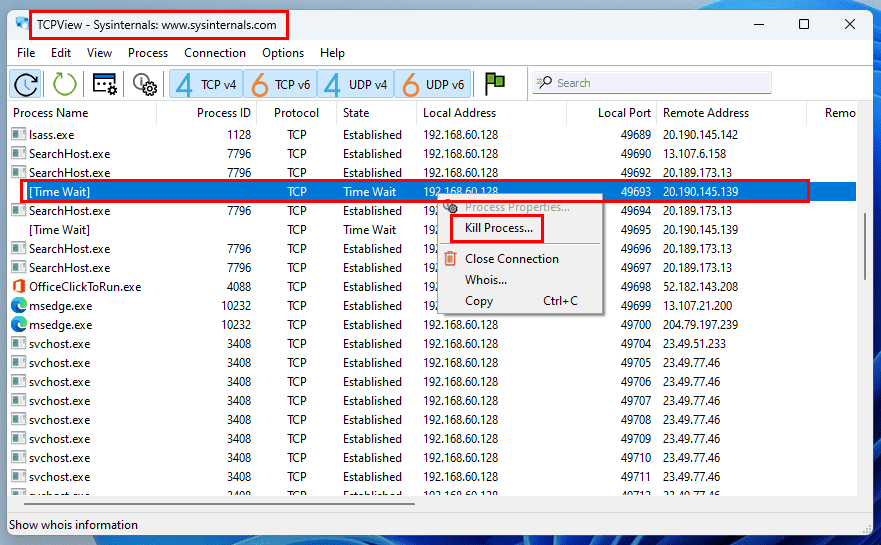
- Simply right-click on the selected port and choose Kill Process on the context menu.
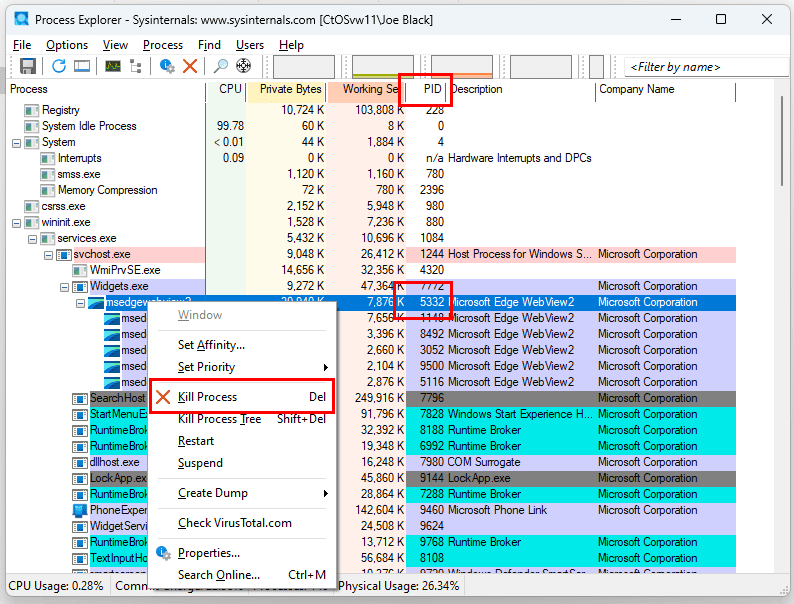
Similarly, you can download and run the Process Explorer app. It shows the PID for all the processes and apps that use a port on your PC. So, you can use any of the codes on Method 1 or 3 to find a PID you need to kill. Then, right-click on the same PID on the Process Explorer app and hit the Kill Process option. This should clear the required port instantly.
Also read: How to Convert RAR File to ZIP in Windows
5. Kill Processes on Ports by Using the TCP/IP Reset Tool
If none of the above works for you, this is the ultimate method you can try out. This method resets all the open TCP and UDP com ports for networking. Thus, you can easily start the next application that would use a port previously used by a troubling program. Here’s how you can accomplish this:
- Open the Command Prompt utility with elevated rights.
- Now, run the following commands one by one:
netsh int ipv4 reset
netsh int ipv6 reset
netsh winsock reset
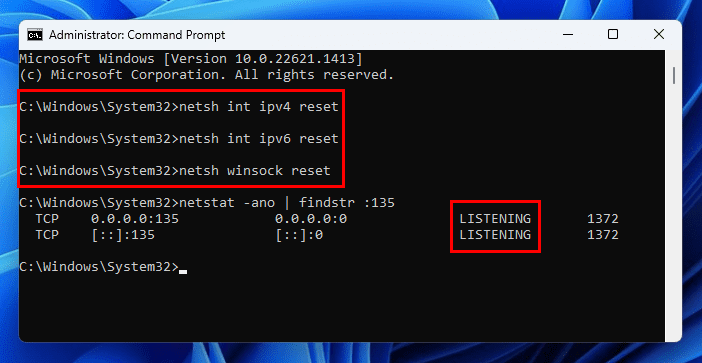
- When all the above commands have been run, execute the following command to check the status of the target port:
netstat -ano | findstr :<port_number>
- Don’t forget to replace the <port_number> text with an actual port number you want to monitor.
Conclusion
So, these are pretty much the most popular and common methods to kill a process on any port on a Windows 11 PC. You can give any of the above methods a try and share your experience below in the comment box. Also, if you know a better way, don’t hesitate to share that in your comment. Do share this article with your friends, colleagues, and followers to help them out when they face the same port-occupied error on Windows 11.
As a developer, I often run into issues where a process is already using a port that my application needs. This can prevent my application from starting or cause conflicts. I’m writing this article as a quick reference for myself, but I hope it can help others who face the same issue. I’ll walk you through how to identify and kill a process occupying a specific port on Windows, macOS, and Linux.
Step 1: Finding and Killing the Process on Windows
First, let’s look at how to do this on Windows.
Finding the Process ID (PID)
To identify the process using a specific port (e.g., 5672), use the netstat command in the Command Prompt.
netstat -ano | findstr :5672
Enter fullscreen mode
Exit fullscreen mode
This will display something like:
TCP 127.0.0.1:5672 0.0.0.0:0 LISTENING 1234
Enter fullscreen mode
Exit fullscreen mode
Here, 1234 is the PID of the process using port 5672.
Killing the Process
To kill the process, use the taskkill command with the PID obtained above.
taskkill /PID 1234 /F
Enter fullscreen mode
Exit fullscreen mode
Replace 1234 with the actual PID. The /F flag forces the termination of the process.
Step 2: Finding and Killing the Process on macOS and Linux
On macOS and Linux, the process is slightly different but follows the same basic steps.
Finding the Process ID (PID)
Use the lsof command to find the process using the port. For example, to find the process using port 5672:
sudo lsof -i :5672
Enter fullscreen mode
Exit fullscreen mode
This will display output similar to:
COMMAND   PID USER   FD   TYPE             DEVICE SIZE/OFF NODE NAME
node     1234 user   23u  IPv4 0x8a96d8      0t0  TCP *:5672 (LISTEN)
Enter fullscreen mode
Exit fullscreen mode
In this example, 1234 is the PID of the process using port 5672.
Killing the Process
To kill the process, use the kill command with the PID:
kill -9 1234
Enter fullscreen mode
Exit fullscreen mode
Replace 1234 with the actual PID. The -9 flag sends the SIGKILL signal, forcibly terminating the process.
Why This Is Useful
As developers, we often need to free up ports for new applications or resolve conflicts where multiple applications try to use the same port. This method provides a quick and straightforward way to manage processes on various operating systems, ensuring your development environment runs smoothly.
Caution
Always ensure you know the process before terminating it. Killing essential system processes or those that are performing critical operations can lead to system instability or data loss.