
Одно из наиболее доступных и простых решений на рынке бесшовного WiFi можно реализовать на базе оборудования и ПО Ubiquiti серии Unifi. Рассмотрим базовый сценарий развертывания бесшовной беспроводной сети.
Установка Ubiquiti Unifi Controller
Ubiquiti Unifi Controller поддерживает сразу 3 платформы: Windows, Linux и Mac OS. Мы будем рассматривать его развертывание под Windows.
Cкачаем свежую версию контроллера с сайта Ubiquiti — https://www.ubnt.com/download/unifi — и запустим установку:
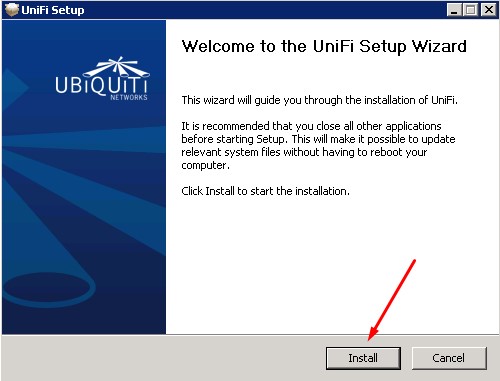
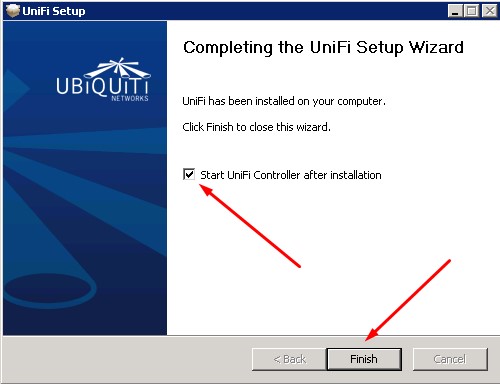
Процесс минималистичен, нельзя даже выбрать каталог для установки контроллера (к слову, он устанавливается в каталог %USERPROFILE%\Ubiquiti UniFi). После завершения установки, жмем Finish:
Настройка Ubiquiti Unifi Controller с помощью мастера UniFi Setup Wizard
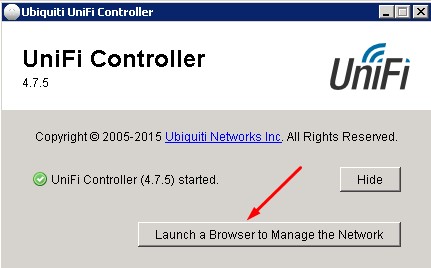
В открывшемся окне контроллера жмем Launch a Browser to Manage the Network:
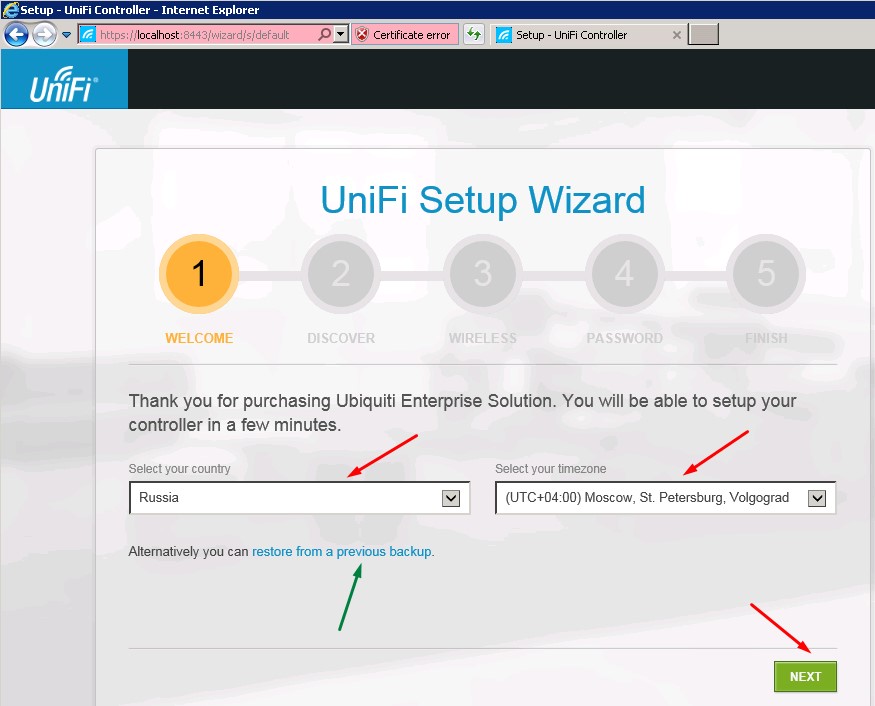
При первом запуске контроллера запускается мастер настройки. Выбираем страну и часовой пояс. При необходимости в этом же диалоговом окне можно запустить восстановление контроллера из резервной копии (см. зеленую стрелку на скриншоте). Жмем Next:
Контроллер сразу же обнаружит доступные точки доступа, подключенные к сети (если точки доступа присоединены к другому контроллеру, то в этом списке они не появятся). Отмечаем нужные нам точки доступа галочками и жмем Next:

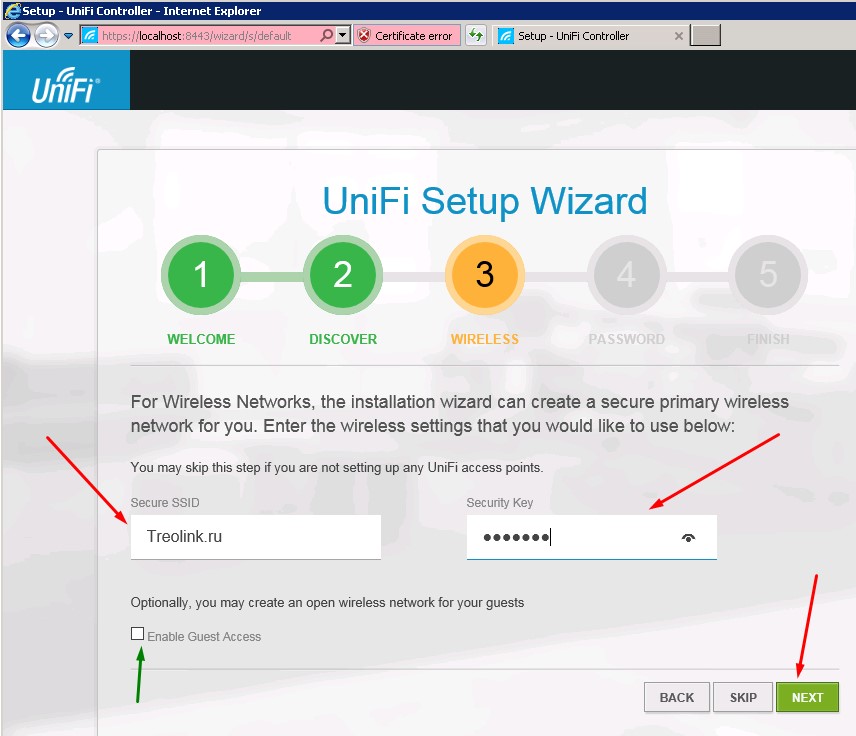
На следующем шаге можно настроить первую WiFi сеть. Вводим ее SSID и ключ доступа. При необходимости можно сразу настроить гостевой доступ (см. зеленую стреку на скриншоте). Жмем Next:
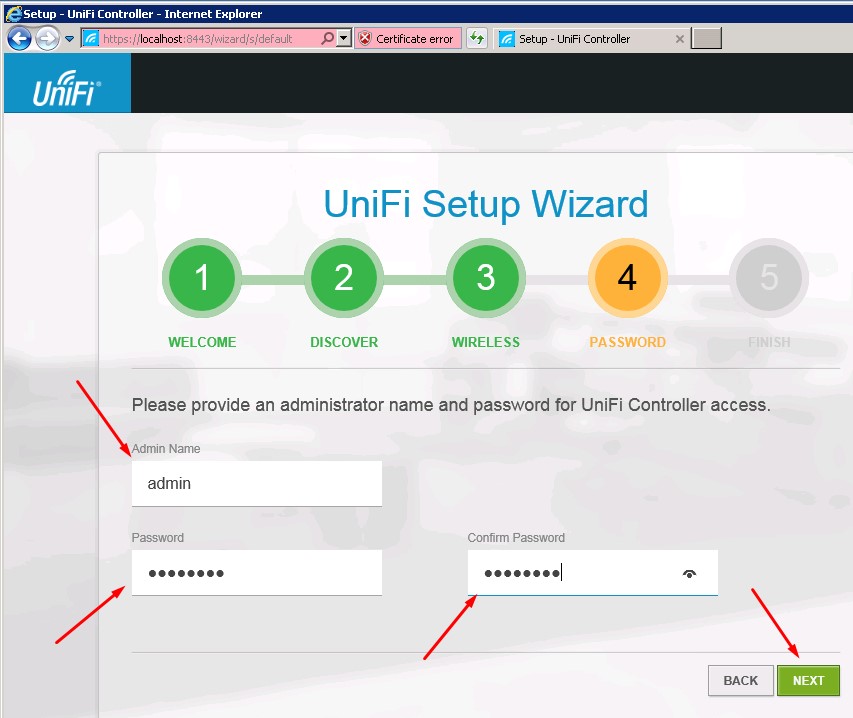
Теперь создаем аккаунт администратора: вводим название учетной записи и пароль дважды. Next:
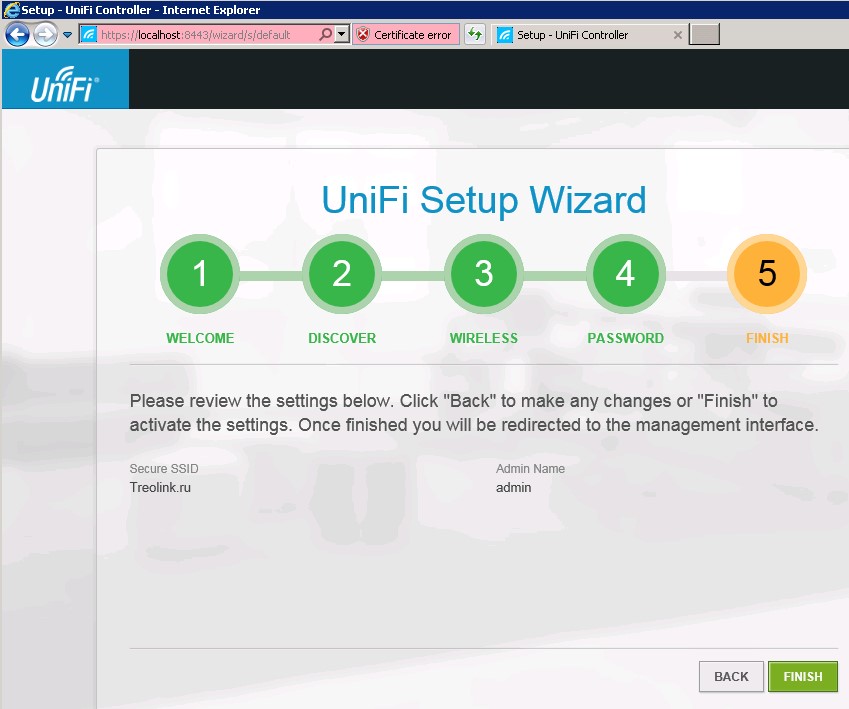
И завершаем работу мастера нажатием Finish:
Присоединение новых точек доступа к Ubiquiti Unifi Controller
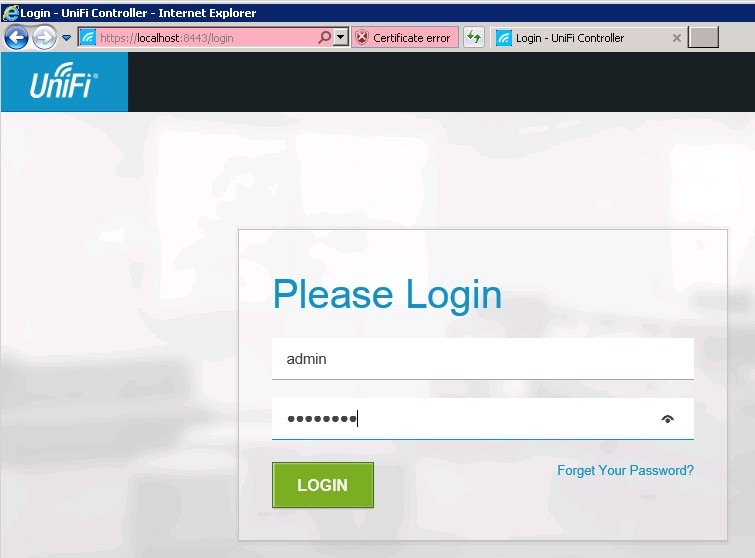
После завершения работы мастера настройки, входим в контроллер под ранее созданной учетной записью администратора:
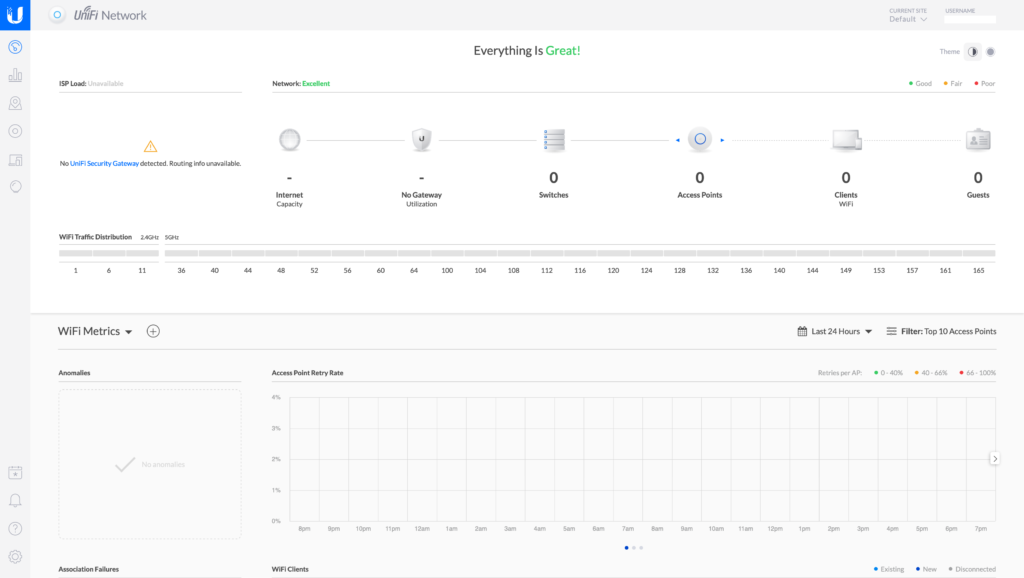
И попадаем в панель управления контроллером:

Доприсоединим точки доступа к контроллеру. Нужная нам точка доступа находится под управлением другого контроллера. Установим над ней контроль: войдем в меню Devices, кликнем по ней, в появившемся справа окне свойств нажмем Advanced Options:
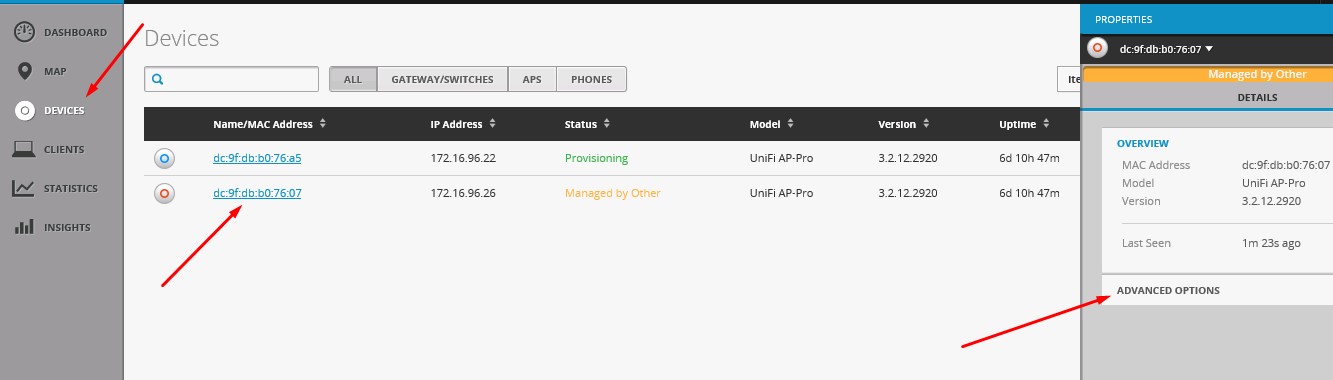
Введем ее логин и пароль (по умолчанию — ubnt/ubnt) и нажмем Adopt:
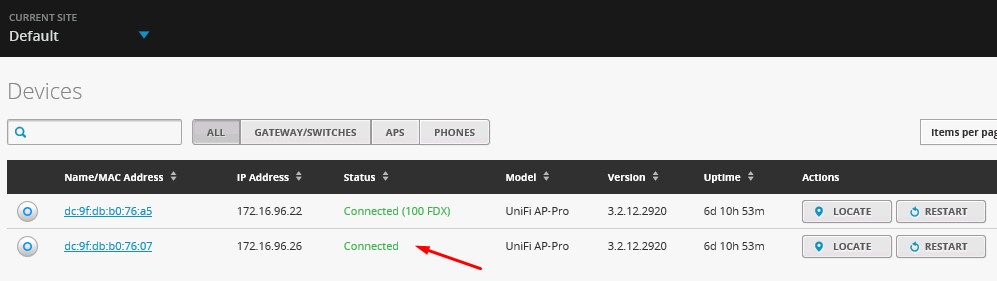
Спустя полминуты точка доступа присоединится к нашему контроллеру:
Новые точки доступа, подключенные к сети, подключаются аналогичным образом, только для них не нужно вводить логинов и паролей — достаточно просто скомандовать Adopt.
Теперь между точками доступа уже работает роуминг клиентов. WiFi-сеть уже вещается, клиенты могут переходить из зоны покрытия одной точки доступа в зону покрытия другой, при этом не теряя соединение.
Легкий тюнинг
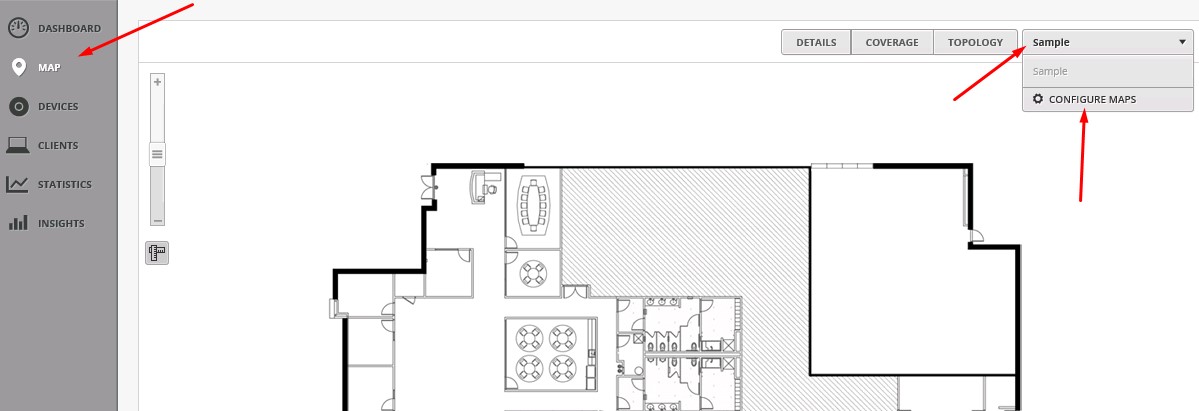
Если у вас есть план помещений/местности, где будет развернута беспроводная сеть, то его можно использовать полезным для обслуживания сети образом. Зайдем в меню Map, кликнем на Sample в правом верхнем углу, затем на Configure Maps:
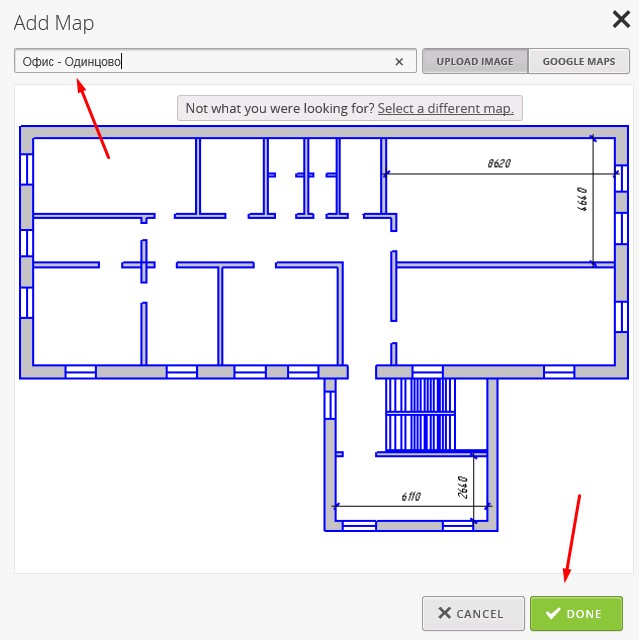
В появившемся окне нажмем Add a map:
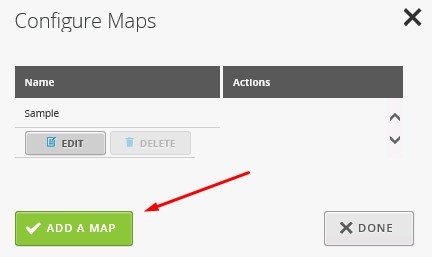
Откроется диалоговое окно проводника Windows, где можно выбрать графический план помещения. После подтверждения выбора мы окажемся в окне Add Map. Вверху вводим название и жмем Done:
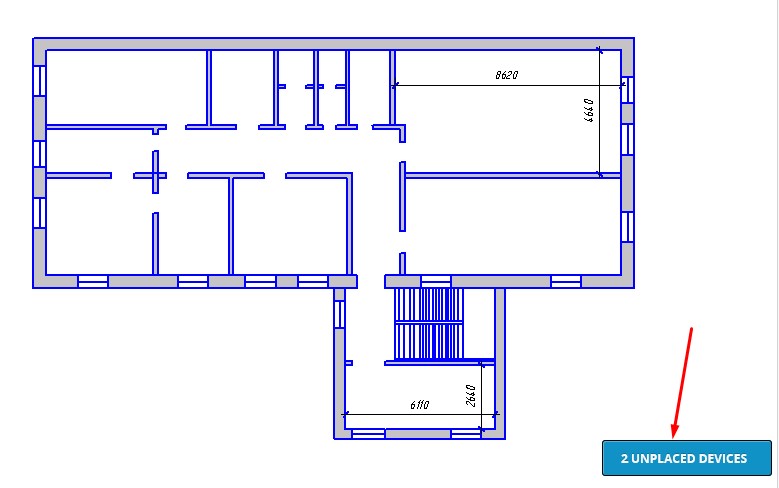
Теперь на нашей карте размещен наш план. Раскидаем по нему точки доступа. Жмем по кнопке .. Unplaced Devices и перетягиваем точки доступа из открывшегося окошка на план:
Вверху плана можно включить отображение зоны покрытия точек доступа (кнопка Coverage) и частотный диапазон. Сами точки доступа кликабельны. Жмем на одну из точек доступа, затем на шестеренку. Справа откроются ее свойства. В меню Configuration можно задать Alias (название, которое будет отображаться в списке устройств и на плане местности). Наша первая точка доступа получила имя «1 этаж — офисный блок»:
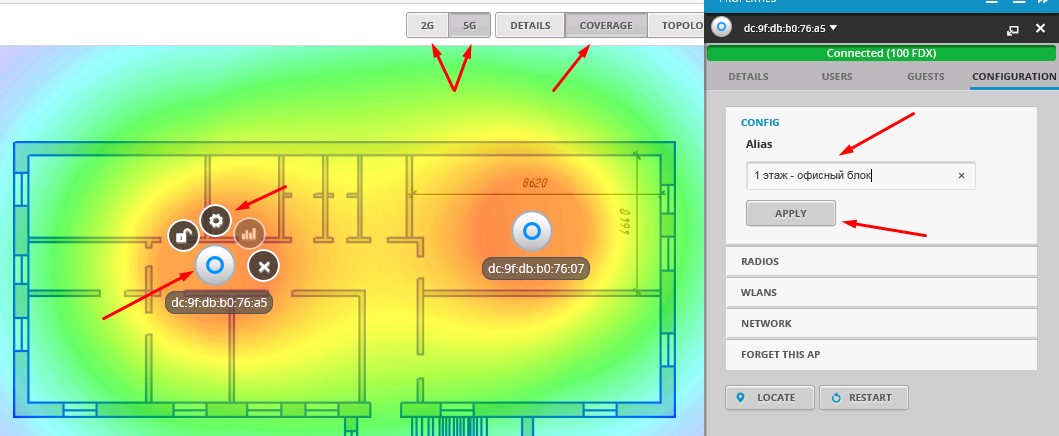
В свойствах Radios можно выбрать каналы WiFi, частотный спектр и мощность передатчика:

В свойствах WLAN выбираются WLAN-группы, а также назначаются WiFi-сети, которые будут вещать точки доступа (для двухдиапазонных точек доступа наподобие Ubiquiti Unifi AP Pro, будет 2 набора опций для обоих частотных диапазонов). Нажмем Override:
Тут можно отключить вещание сети на точке доступа и задать VLAN:
Вернемся в режим конфигурации точки доступа и заглянем в секцию Network. Тут можно задать способ получения сетевых настроек точки доступа: статические или получаемые по DHCP. Нас вполне устраивает вариант с DHCP:
Обзор настроек Ubiquiti Unifi Controller
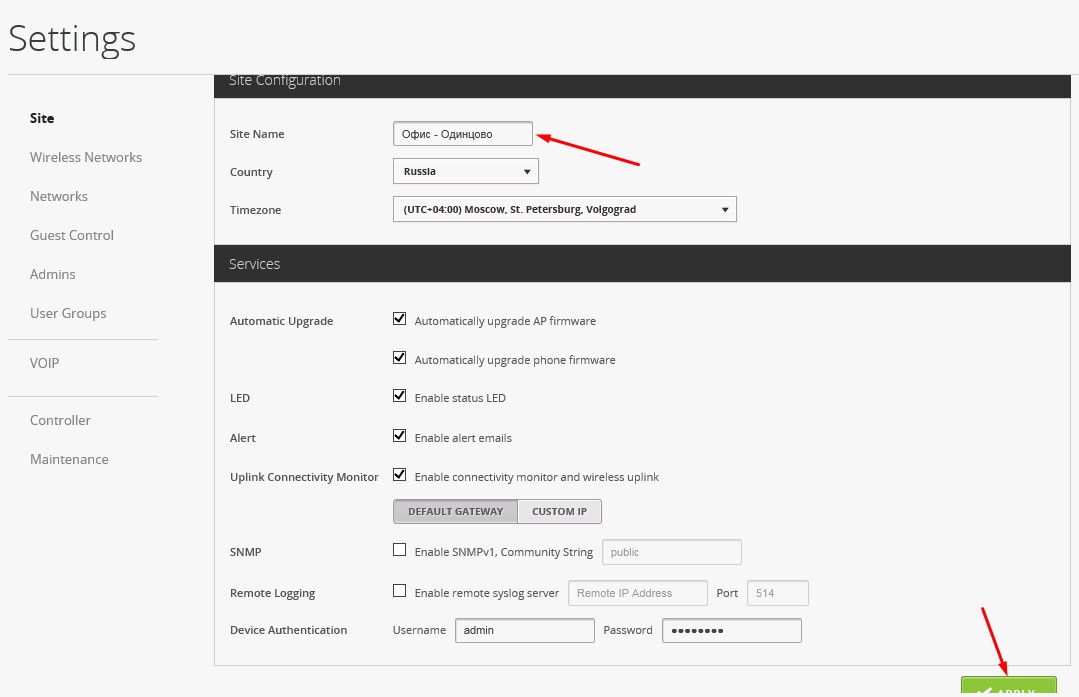
Посмотрим, что таится в глубинах конфигурации контроллера. Внизу слева кликнем по Settings:
В появившемся окне настроек есть 9 секций. Начнем с Site. Тут:
1. задается название т.н. «сайта». Параметр носит косметический характер. Для удобства администрирования мы предпочитаем использовать наши внутренние наименования локаций. Свой «сайт» мы назовем «Офис — Одинцово». Понятное название упрощает управление ИТ-ресурсами: не надо вспоминать, какой конкретно контроллер открыт. Видно сразу. Также точки доступа Ubiquiti Unifi могут «передаваться» между контроллерами (функцией Move). Контроллеры в одном широковещательном домене видят друг друга, видят имена друг друга, что позволяет перемещать точки доступа, не ломая себе голову, куда именно осуществляется перемещение;
2. включается/отключается автоматическое обновление прошивок точек доступа и IP-телефонов Ubiquiti;
3. включаются/отключаются светодиодные подсветки точек доступа;
4. включаются/отключаются email-оповещения;
5. включается/отключается монитор соединений точек доступа и Wireless Uplink;
6. настраивается SNMP и логирование событий на выделенный сервер syslog:
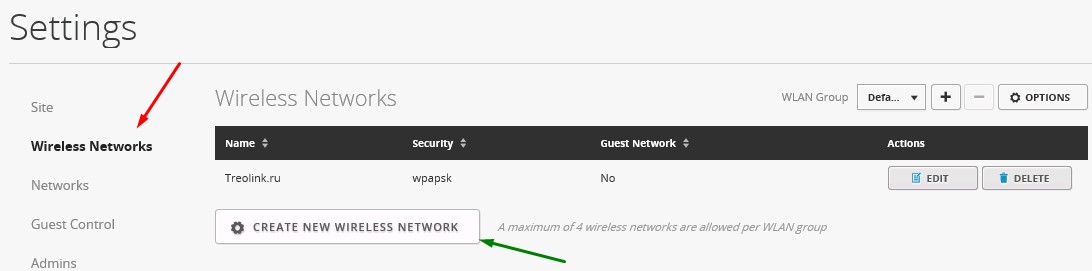
В секции Wireless Networks, как ни странно, осуществляется управление беспроводными сетями. Здесь можно создавать новые SSID и управлять уже созданными. Также тут осуществляется настройка шифрования и ключей безопасности сетей, сокрытие SSID, настройка VLAN, выбор групп, на основе которых можно настраивать политики доступа, о чем мы еще вспомним чуть ниже, и настройка расписаний работы беспроводных сетей:
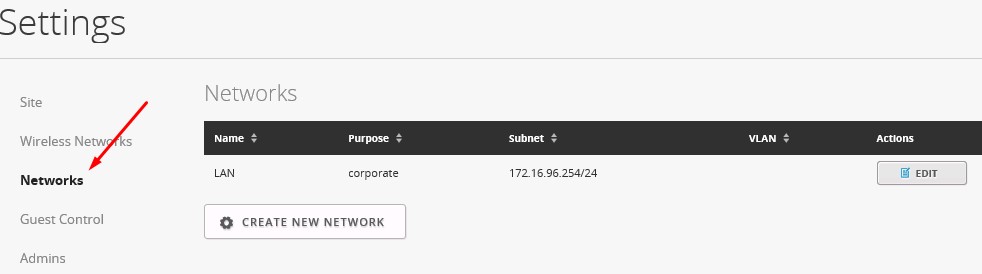
В секции Networks можно настроить IP-сети. Тут же включаются DHCP, настраиваются WINS, настраиваются сетевые диапазоны IP для гостевых сетей, VPN и VLAN’ы. Для базовой настройки достаточно указать используемую подсеть, а также включить/выключить DHCP (в зависимости от того, есть ли он в вашей сети):
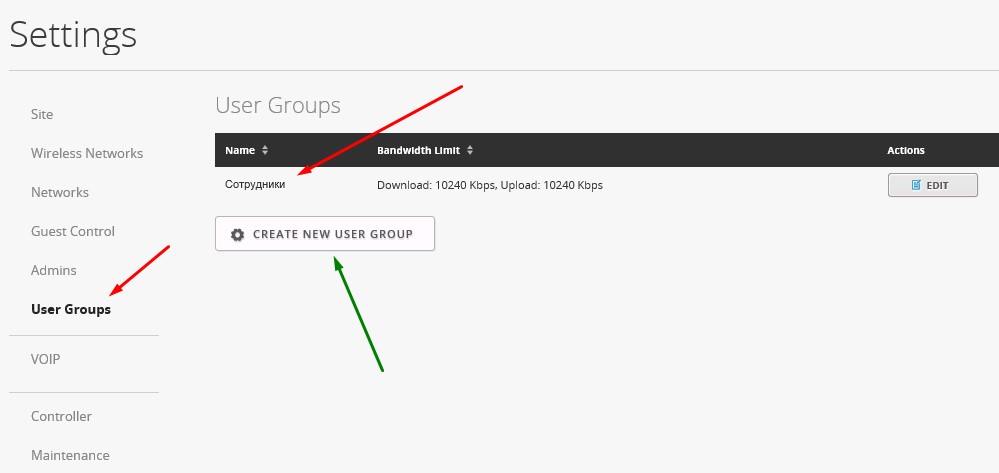
Теперь перейдем в секцию User Groups. Тут можно создавать группы пользователей и управлять ими, а также задавать им ограничения полосы пропускания. Хорошей практикой считается выделение полос пропускания для сотрудников (среднюю), гостей (минимально возможную для комфортного использования браузера и электронной почты) и руководства (максимально возможную):
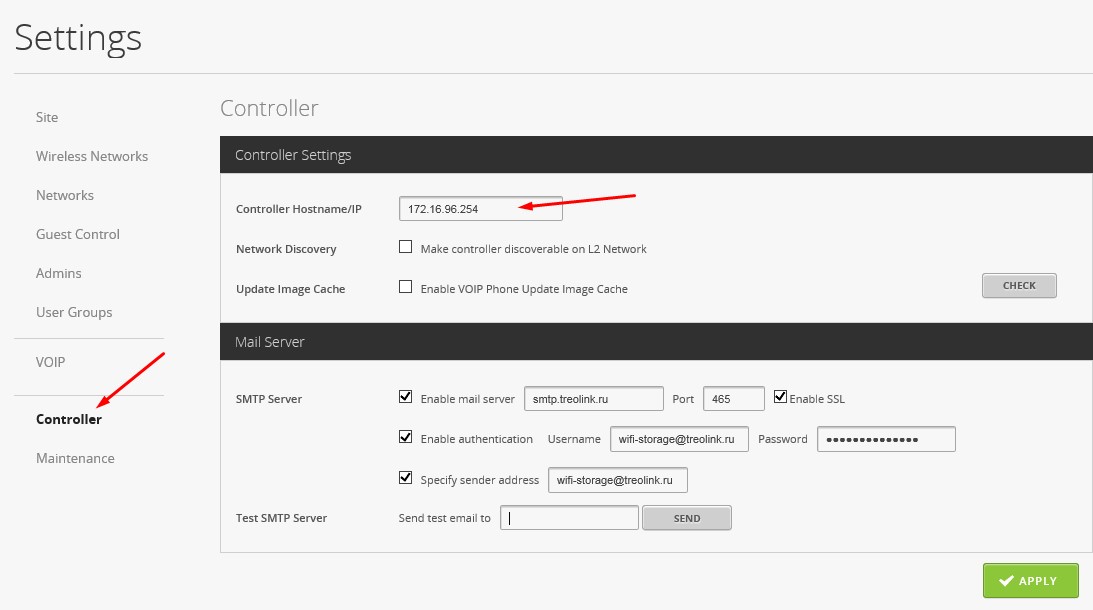
Перейдем в секцию Controller. Тут можно нужно задать ему hostname или IP, включить его обнаружение на уровне L2 (широковещание), настроить параметры SMTP для отправки уведомлений на почту:
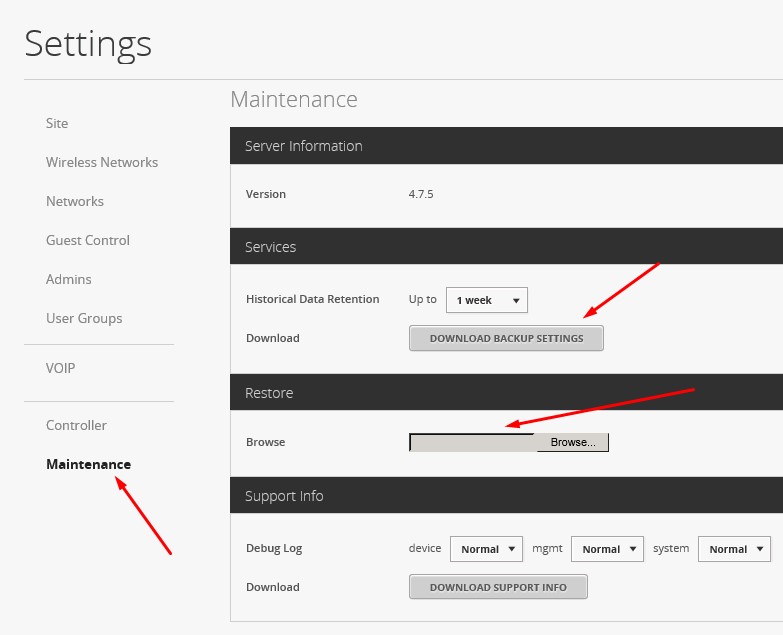
В секции Maintenance скрываются возможности сделать/восстановить резервную копию, а также настроить уровень подробности ведения логов.
На этом, пожалуй, наш мини-обзор можно считать оконченным.
Одно из главных преимуществ решений Ubiquiti в области бесшовного WiFi — это простота их реализации. А в сочетании с более чем доступной ценой оборудования, можно смело говорить о том, что конкурентов по соотношению цена/качество у Ubiquiti не так уж и много. Если они вообще есть.
If you are looking to install your UniFi Controller on Windows, you’ve come to the right place. In the article below, I walk you through how to do this step by step. We also created a video in which our own Fernando goes through the installation.
Lets dive in!
🚨 Before we dive in, please don’t host your UniFi Controller on windows if you work with clients. Sooner or later this will cause issues! It’s fine for home users, but definitely not recommended for businesses. If you need secure, reliable and a scalable hosting solution check out UniHosted.
Table of Contents
- Explainer video
- The UniFi Controller
- Downloading the UniFi Controller Software
- Installing the UniFi Controller
- Initial Setup of the UniFi Controller
- Post-Installation Tips
- Final Thoughts
Explainer video
In this video our own Fernando shows exactly how to install your UniFi Controller on Windows. If you prefer to a written guide continue below:
The UniFi Controller
Let’s start at the start. The UniFi Controller is a software application from Ubiquiti that allows you to manage your UniFi network devices from a single interface. Installing it on Windows brings the network management capabilities on your desktop
Before beginning the installation, please make sure your Windows machine meets the following requirements:
- A compatible version of Windows (Windows 7, 8, 10, or later).
- Sufficient RAM and storage for smooth operation (at least 2GB of RAM and 20GB of free disk space).
- A network connection for downloading the software and managing devices.
Downloading the UniFi Controller Software
- Visit the Ubiquiti Website: Go to the download page here.
- Select the Software: Choose the UniFi Controller software version for your Windows version.
- Download the Installer: Click the download link and save the installer file to your machine.
Installing the UniFi Controller
- Run the Installer: Double-click the downloaded installer file to start the installation process.
- Follow the Installation Wizard: The wizard will guide you through the setup. Accept the license agreement, choose the installation folder, and configure any necessary settings.
- Complete the Installation: Once the installation is complete, click ‘Finish.’ The UniFi Controller software will launch automatically in your default web browser.
Initial Setup of the UniFi Controller
Alright, almost there. Here is how the initial setup of the UniFi Controller works
- Access the Controller: The first time you open the UniFi Controller, it will ask you to set up your controller.
- Create an Admin Account: Set up an admin username and password. This account will be used to manage your UniFi devices.
- Configure the Network Settings: Follow the on-screen instructions to configure basic network settings, such as country and timezone etc.
- Adopt UniFi Devices: If you have UniFi devices on your network, the Controller will detect them. You can then adopt and configure these devices through the Controller interface.
Post-Installation Tips
-
Update Firmware: Make sure that your UniFi devices are running the latest firmware for optimal performance with the Controller. This is also important for security reasons. Running your controller on an outdated version can be open for exploits. At UniHosted, we make sure you’re always on the right version running your network at peak performance.
-
Secure Your Network: Implement strong passwords and consider enabling two-factor authentication for added security.
Final Thoughts
Installing the UniFi Controller on a Windows machine is a great step for better network management. Just note that Windows is not the only option. There are multiple ways to host your UniFi Controller. At UniHosted, we provide a managed hosting solution to take this off your plate.
Check it out if you don’t want the hassle of installing, updating and securing your network yourself. We offer fully managed UniFi Controllers with automatic backups, worry-free SSL setup, and support.
Feel free to give it a try.
If you would like me to personally walk you through UniHosted, you can schedule a call with me here.
Разница между UniFi Network Application и UniFi Network Controller заключается в том, что с версии 6.2 Ubiquiti переименовал UniFi Controller в UniFi Network Application. Это изменение не затрагивает функциональность программного обеспечения, а лишь обновляет его название для более точного отражения его возможностей и применения. Оба термина обозначают одно и то же программное обеспечение для управления сетевыми устройствами UniFi, но с момента обновления пользователи должны использовать новое название — UniFi Network Application. Это связано с желанием компании упростить и унифицировать терминологию в своих продуктах.
Любое устройство серии Ubiquiti UniFi не является самостоятельной единицей, и по умолчанию, может работать только в комплексе и под управлением программного обеспечения UniFi Network, которое должно быть установлено на персональном компьютере или сервере расположенном в пределах сети L2.
При создании беспроводных сетей корпоративного уровня необходим единый сервер управления. Оборудования UniFi в качестве подобного сервера управления используется универсальный многофункциональный программный комплекс «UniFi Network Application», устанавливающийся на любой PC, удовлетворяющий минимальным системным требованиям. Разработчики Ubiquiti постоянно совершенствуют UniFi Networks и выпускают обновления, дополняя его функционал а так же исправляя замеченные ошибки.
Установить UniFi Network Application на маршрутизатор Ubiquiti EdgeRouter X невозможно, так как EdgeRouter не совместим с UniFi OS. EdgeRouter работает на операционной системе EdgeOS, которая отличается от UniFi OS, используемой в UniFi Network Application и других устройствах UniFi.
Если вы хотите централизованно управлять точками доступа UniFi, вам потребуется использовать одно из следующих решений:
-
UniFi Cloud Key: Это устройство, которое функционирует как контроллер UniFi и позволяет управлять вашей сетью через облачный интерфейс.
-
UniFi Dream Machine: Это интегрированное устройство, которое сочетает в себе маршрутизатор, точку доступа и контроллер UniFi в одном корпусе.
-
UniFi Controller на отдельном сервере: Установите UniFi Controller на ПК или сервер с поддерживаемой операционной системой (Windows, Linux или Mac).
Эти решения позволят вам управлять вашими точками доступа UniFi централизованно и эффективно.
Ubiquiti UniFi Controller установка в Debian 7.10.
-
Скачиваем
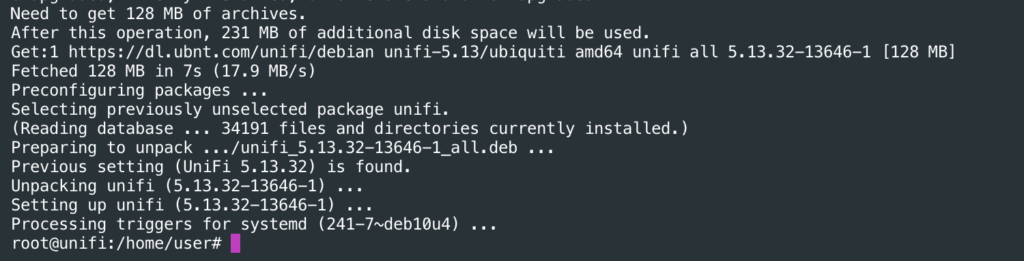
wget -c http://dl.ubnt.com/unifi/4.8.18/unifi_sysvinit_all.deb
-
Устанавливаем зависимости и сам пакет
apt install mongodb-server openjdk-7-jre-headless mongodb-10gen jsvc
dpkg -i unifi_sysvinit_all.deb
Если точка доступа определяется как manage by other, значит, она раньше подключалась к другому контроллеру. В этом случае нужно UniFi сбросить к заводским настройкам. Зажмите кнопку Reset на корпусе UniFi, пока она не моргнет индикатором. После этого точка сбросится к заводским настройкам и ее можно подключать к контроллеру.
Переходим на страницу https://www.ui.com/download/unifi/, в разделе SOFTWARE находим контроллер под Windows и скачиваем его.
Устанавливаем как обычную программу, предварительно у вас должна быть установлена Java jre-8u281-windows-x64, если нет инсталлятор запросит установить.
Настраиваем локального администратора вашей точки.
Консоль UniFi OS — это центр управления сетью, на котором работает последняя версия UniFi OS, на которой размещаются ваши приложения UniFi, такие как Network, Protect, Access и Talk. Консоли UniFi OS обеспечивают центральную платформу для расширения возможностей развертывания. Консоль UniFi OS содержит одно или несколько приложений UniFi:
-
UDM Pro и Cloud Key Plus поддерживают все приложения UniFi: Network, Protect, Access и Talk.
-
Cloud Key поддерживает только UniFi Network.
-
UNVR и UNVR Pro предназначены для приложения UniFi Protect.
Есть несколько способов сброса настроек точек доступа Ubiquiti UniFi AP. Способ ниже применяются для UAP, UAP-LR, UAP-Pro, UAP-AC, UAP-Outdoor, UAP-Outdoor+. Здесь рассмотрим только самый простой сброс настроек, при помощи кнопки RESET и SSH Reset.
На задней части Ubiquiti UniFi расположено небольшое отверстие, нажав на которое с помощью скрепки, пользователь сможет сбросить UAP к заводским настройкам по умолчанию. Пошагово:
-
Нажмите и удерживайте кнопку сброса в течение 10-15 секунд.
-
Отпустите кнопку. Светодиоды на UAP прекратят светиться или начнут мигать.
-
Не отключайте UAP (точку доступа) от ее POE инжектора в процессе перезагрузки. В процессе сброса отключать точку доступа от питания нельзя!
-
Ожидаем перезагрузки точки доступа.
SSH Reset — метод подойдет, если нет возможности взять UniFi в руки.
-
Зайдите по SSH на точку и выполните команду syswrapper.sh restore-default. Для Windows нужно использовать программу SSH клиента, например PuTTY.
-
Введите IP-адрес точки доступа (по умолчанию это default ap ip 192.168.1.20), настройки порта оставьте стандартными (22). Убедитесь, что в качестве протокола выбрано SSH и нажмите Enter.
-
Примите сертификат, затем введите имя пользователя и пароль и нажмите Enter. Unifi AP controller логин и пароль по умолчанию это ubnt и ubnt, также подойдут UBNT и UBNT. Пароль не подошел? Сбрасывайте настройки до заводских, при помощи кнопки RESET.
-
Введите вручную команду syswrapper.sh restore-default.
Точки доступа UniFi для внутреннего использования:
Для настройки UniFi AP-LR без контроллера нам понадобится смартфон на Android или iOS с подключением к интернет.
-
Устройство должно быть сброшено до заводских настроек, как сбросить UniFi смотрите выше.
-
Подключаем точку в сеть (к интернету и источнику питания). Напомним, что в сети обязательно должен быть маршрутизатор (роутер) или управляемый коммутатор с функцией DHCP сервера, без него точка UniFi работать не будет. Роутер может быть любой, не обязательно роутер Ubiquiti.
-
Идем в App Store или Google Play и скачиваем приложение UniFi Network для Android, или для iOS.
-
Запускаем приложение, переходим в режим Standalone (нужно кликнуть на пиктограмме пользователя)
-
Ждем, когда в разделе «Devices» появится наша точка. Можно пойти другим путем: нажать «Connect to AP» и отсканировать QR-код на задней крышке нашей UniFi AP.
-
Заходим в настройки точки и настраиваем все, что нам нужно (имя точки, SSID, ширину канала, пароль, мощность точки). Отметим, что standalone — это упрощенный режим настройки, поэтому в нем вам будут недоступны многие функции. Кроме того, в нем можно настроить только точки доступа UniFi. Настройка коммутаторов и других устройств серии в этом режиме не предусмотрена.
Do you have a new Ubiquiti switch, router, or access point you’re itching to get set up? If so, you’re in luck. In this article, you’re going to learn how to set up a Ubiquiti Unifi controller and use the Ubiquiti discovery tool to get your Ubiquiti networking equipment install in no time.
Let’s get started installing and configuring the UniFi controller. While we’re at it, you’re also going to learn how to upgrade a controller!
Installing the Ubiquiti Controller
To manage Ubiquiti networking devices, you must set up the Ubiquiti discovery tool and controller. This controller connects to and manages all of the devices on your network. Let’s set one up.
Since the controller supports Windows, Mac OS X, and some distros of Linux, we’re going to cover two different options for installing the controller; installing on Windows and Linux.
Installing the Unifi Controller on Windows Server
Using Windows Server or even a Windows desktop is a common host for a Unifi Controller. To use get it the controller set up is as easy as installing the software and launching it. The installer will install a basic web server that you can log in and start managing devices.
By default, the webserver that the controller software installs will run as an application. By default, a user has to be logged in for the controller to run. To fix this, you will learn how to set it up to run as a service thus removing the logged-in requirement.
Prerequisites
Before you start, be sure you have the following prerequisites:
- Windows Server 2019 – All of these steps will also work on most other Windows versions.
- Unifi Controller Software for Windows – This article will use version 5.13.29.
- Amazon Corretto 8 – Java 8 is also acceptable assuming you meet the licensing requirements or other OpenJDK package.
- An account for unifi.ui.com.
Installing the Controller
To run the Ubiquiti discovery tool, you must first install the controller software, you’ll first need to install Java if you don’t have it already. The controller software requires Java. In this article, you’re going to install Amazon Corretto rather than the typical Java download from Oracle. If you need to remove Java for some reason, check out this article.
Amazon Corretto is a pre-packaged OpenJDK installer. Since Oracle changed their licensing requirements for Java in a non-home use many organizations will opt to use OpenJDK instead of Oracle’s Java SE.
Assuming you’ve already downloaded Corretto, run the MSI to install OpenJDK and follow the prompts ensuring you leave everything as default to finish the installation of OpenJDK.
Once you’ve installed Coretto, now run the Unifi Controller software you should already have downloaded. Accept all of the defaults and finish the install. The Unifi Controller software will launch and after a minute or so it will show that it is started.
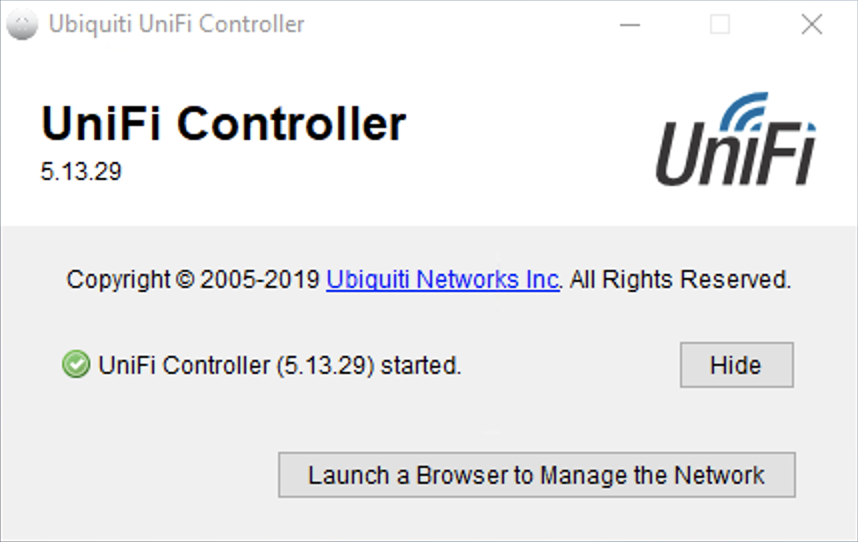
Once the controller shows as started (see above), close the window and click Yes on the confirmation to close the controller. This stops the controller so you can install the service.
Creating the Windows Service
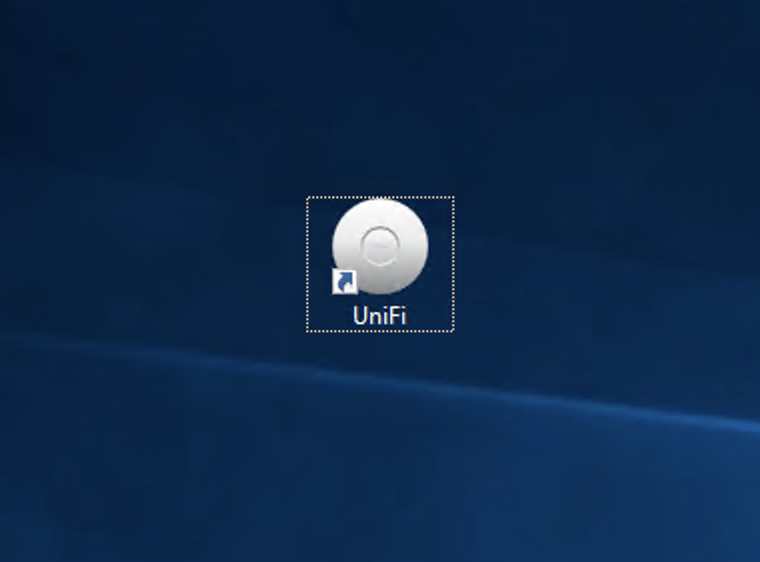
Once the controller software is installed, it will only work if someone is logged in. To force it to run all of the time, you need to set it up to run as a Windows service. But first, be sure to remove the Unifi shortcut on the desktop.
If you run the default shortcut on your desktop, you can unknowingly stop the service by closing the application launched with the shortcut.
To create the service, open an administrative command prompt and run the below commands. You can see what each command does in the comments.
Changes to the default Unifi Controller directory
 cd "%UserProfile%\Ubiquiti UniFi\"
 Configures Java to run the controller as a service and to start on boot
 java -jar lib\ace.jar installsvc
 Starts the Unifi service
 net start unifi
Now that you have configured the service, validate that it is running using the command sc query unifi. You should not receive an error and see that the service is running.
Installing on Linux
While you can use a Windows Server for the Unifi controller, Ubiquiti also offers an option to run the controller on Linux. Let’s dig in and discover how to do that.
Prerequisites
If you’re installing on Linux, be sure you have the following ahead of time:
- A current Debian or Ubuntu OS with root access – The steps will use Debian 10
- An account for unifi.ui.com
And that’s it. Everything else will be handled during the install process.
Installing the Ubiquiti Discovery Tool and Controller
To get the controller installed on Linux you have many options. Ubiquiti has some instructions on how to install the controller on their website but it only covers the install for a couple of specific versions of Linux. To use Debian, use the script that has been posted on the Unifi forums by member AmazedMender16.
To start the install, first ssh into the Debian server or access the server from the console. Log in either as root or as another user that has root access and then run su.
Update the apt repos.
Next, install the ca-certificates and wget packages.
> apt-get update && apt-get install ca-certificates wget -yDownload and run the Unifi Controller installer script. This script will handle the install of the dependencies and controller software for many different distros of Linux including the Debian 10 server we are using.
## Downloads the Shell script
> wget https://get.glennr.nl/unifi/install/install_latest/unifi-latest.sh
## Executes the script
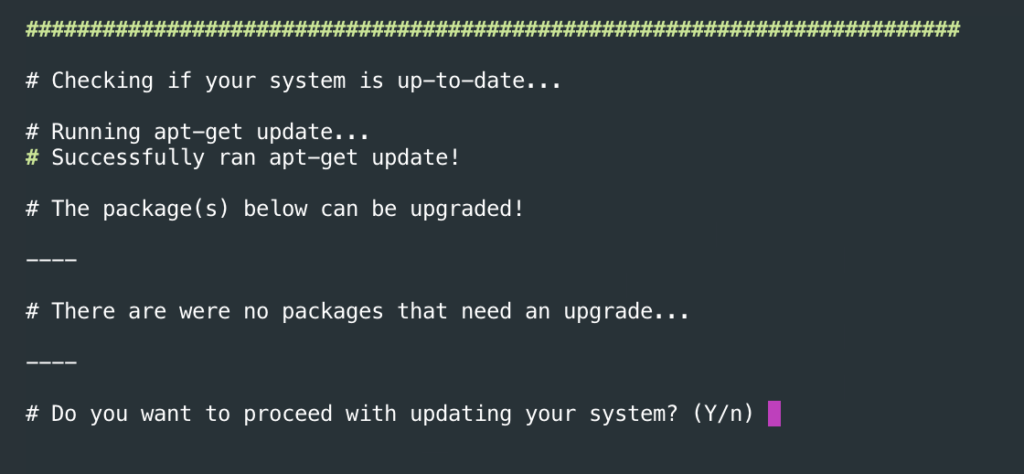
> bash unifi-latest.shYou will be prompted for a few things while the script runs. First, it will ask if you want to keep the script downloaded after the install. In most cases this is not required, so you should enter n and then press enter.

You may receive a prompt to update packages during the install. Enter y and then press enter.
Finally, you will be prompted to add the apt repo for Unifi to update the controller from apt. Enter y and press enter as this will make upgrades serviceable through apt.

Once the install completes, the script will output the version of the controller installed and the URL to use to start configuring the controller.
Once you have the controller software installed on whatever server you are using the setting will be the same.
Go to the website https://<ServerIP>:8443/ and you will be presented with a window like below.
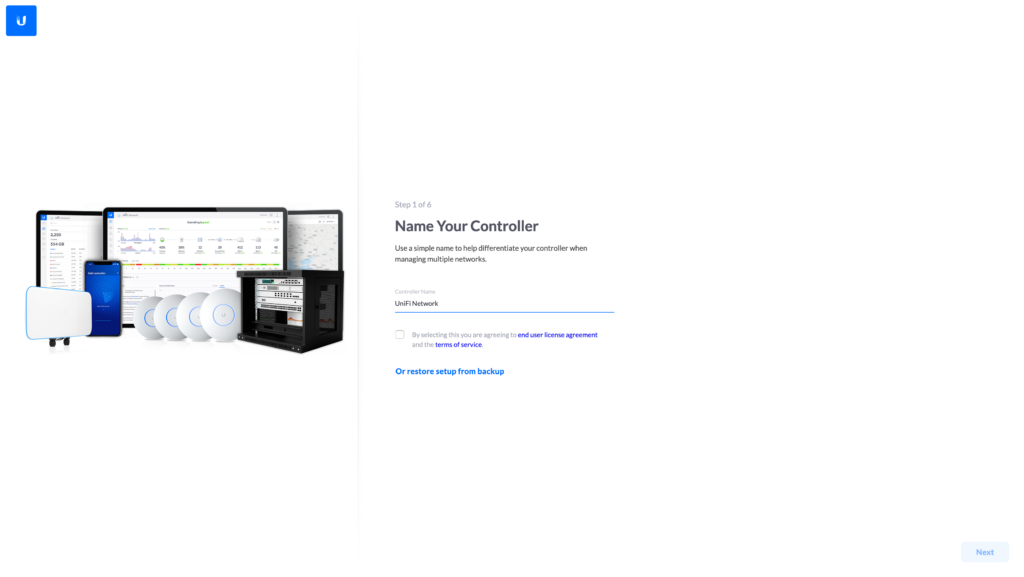
Enter the name of the controller or leave it as the default Unifi Network, accept the EULA and license then click the Next button.
Next, you will be presented with a login prompt where you will enter your username and password for unifi.ui.com. Authenticating with a Ubiquiti acccount is the default.
If you would like to use a local account click on Switch to Advanced Setup and uncheck the option for Use your Ubiquiti account for local access. Note that you will still need a Ubiquiti account, you would just be using a different account to log in locally.
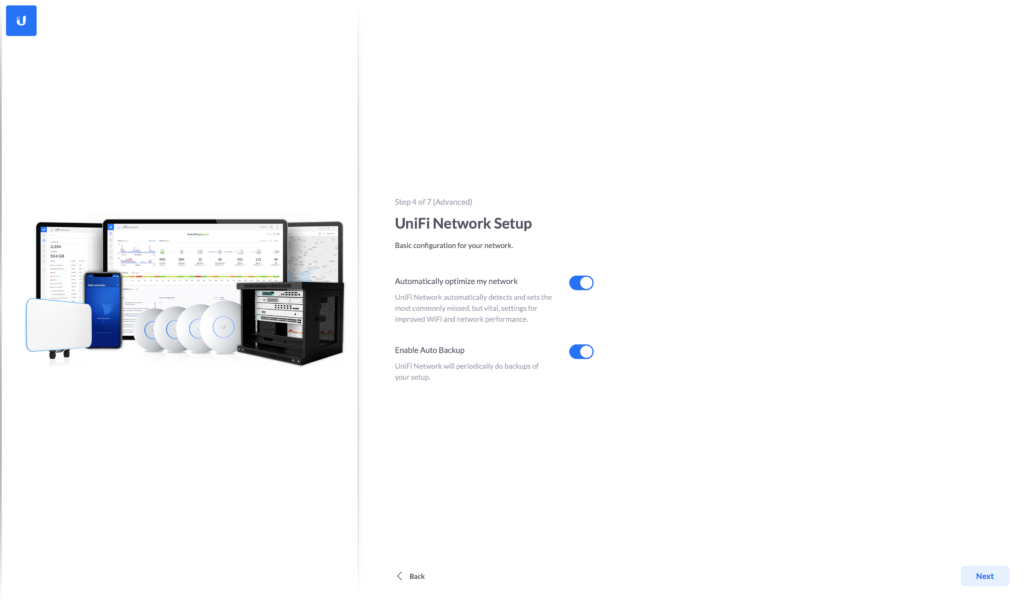
You’ll then be presented with two options. If you’re setting up a Wifi access point, by default, the Unifi Controller will attempt to boost wifi performance in a heavily loaded network with your Unifi products. This includes shutting down broadcast and multicast when the access point(s) are overloaded. You can control this setting by toggling the Automatically optimize my network option.
At this screen, you can also choose to automatically backup your controller. If you choose this option, you can configure a server to backup to and restore from the settings menu in the controller. If you would like to disable either of these you can uncheck them.
Once you’ve defined the settings above, you will be prompted to adopt any Unifi devices that are pending adoption on your network. If you are setting up the controller with a new Unifi device they should appear in the list.
If they have already been adopted by another controller or the Unifi mobile app, they need to be forgotten before you can adopt them with this new Unifi Controller. For troubleshooting adoption, you can reference Ubiquiti’s documentation here.
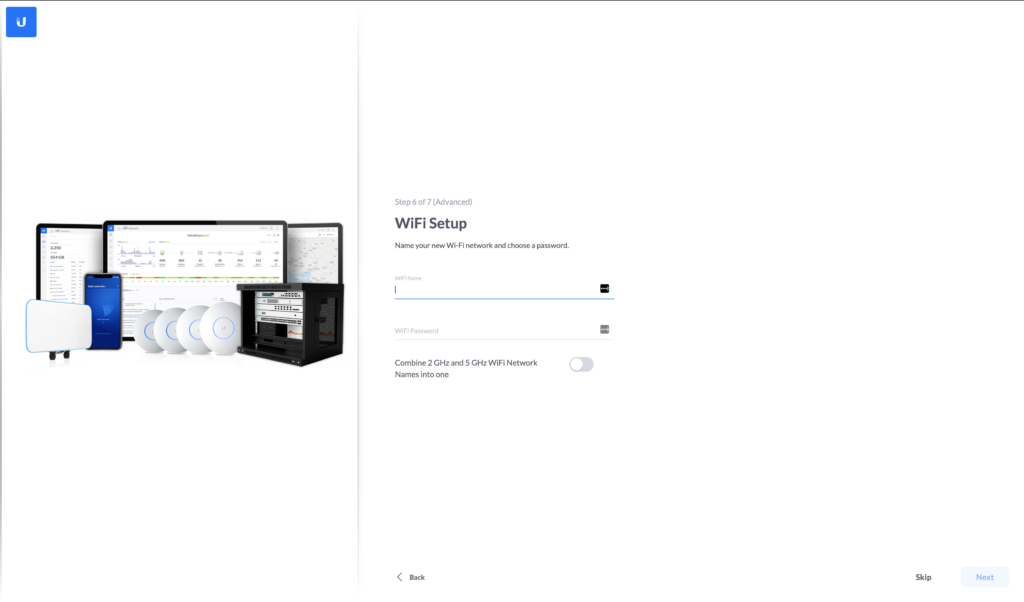
After device adoption, set up your Wifi network by providing the SSID and password. You can skip this set to be completed later by clicking the Skip button too. You also have the option to use the same SSID and password for both 2.4GHz and 5GHz wifi networks. All of these settings can also be changed within the controller after the setup.
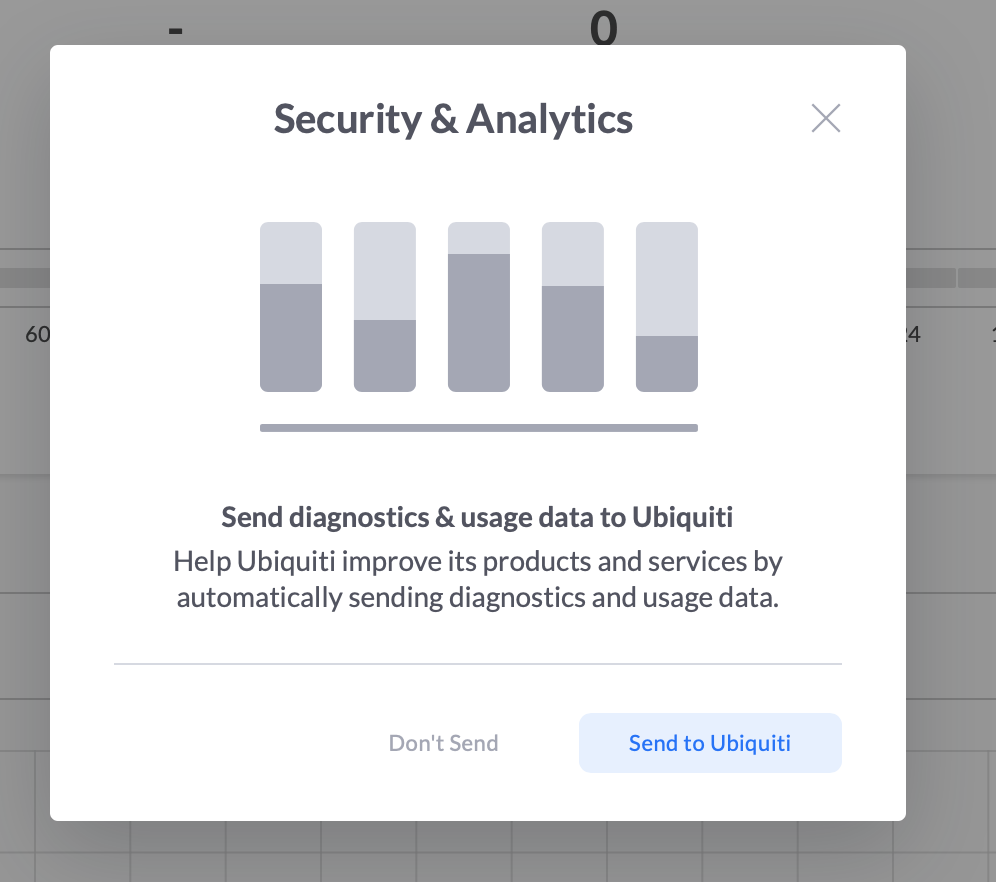
Next, validate the setup settings and click Finish. This will log you into the controller and ask if you would like to provide usage data to Ubiquiti. If you do not mind providing anonymized data, select Send to Ubiquiti or to opt-out of the data select Don’t Send. This can also be changed in the settings pages later.
Once you’re logged into the Unifi Controller, go to the Unifi Cloud Site to access your controller from the internet using your Unifi account. You can use the Unifi Cloud site to access your controller even if you are on the same network. Here you can Ubiquiti discovery tool to discover devices and manage all aspects of your Ubiquiti devices!
That’s it! You’ve got a brand new, Unifi Controller all set up and ready to go!
Upgrading the Controller
Let’s assume you already have a controller installed. It’s been a while since you’ve installed it and some updates have come out. You need to know how to upgrade it.
Updating a controller differs a little between operating systems. Regardless, updates are something that needs to be planned for to stay on current and supported versions of the controller.
Updating Unifi Controller on Windows Server
To update the Unifi Controller on Windows, first head over to Unifi’s download page and download the Unifi Network Controller for Windows. This will download the newest version of the controller software. If you need to move to an older version you can select See Past Software to download an older version of the controller also.
Once you have the installer downloaded, uninstall the service that was installed during the setup by opening an administrative command prompt and running the following.
## Changes to the default directory of the controller
> cd "%UserProfile%\Ubiquiti UniFi\"
## Removes the Windows service
> java -jar lib\ace.jar uninstallsvc
This will ensure all of the processes are functioning as expected and that all of the files get updated.
Once the uninstall is finished, run the installer downloaded in the previous step. After it is complete, launch the controller via the desktop shortcut that was automatically created during the upgrade and close it.
Now go to your command prompt and run the below commands.
## Runs the new version of the controller as a service
> java -jar lib\ace.jar installsvc
## Starts the service
> net start unifi
After the service is installed again, log back into the controller through the web page at https://<ServerIP>:8443/.
Updating Unifi Controller on Linux
To update the Unifi Controller in Linux is much less hassle than Windows.
Log into the server that is running the controller as root or as a user that has root access.
Run sudo apt upgrade unifi -y and wait for it to complete. This command will use apt to upgrade the Unifi package to the newest version. After it outputs that the update has been completed you can log back into the controller through the web page.
Conclusion
While there are many differences between Windows and Linux Unifi Controllers during the install and upgrade process of a Unifi Controller, the final result has no noticeable differences. Deciding whether you want to use a Windows Server or Linux Server comes down to personal preference and the licensing model for the operating system.
For home or lab use, Linux provides a small footprint that is free to use. For an business that requires OS level support and already has an existing support contract with Microsoft, Windows Server may be the better option.