
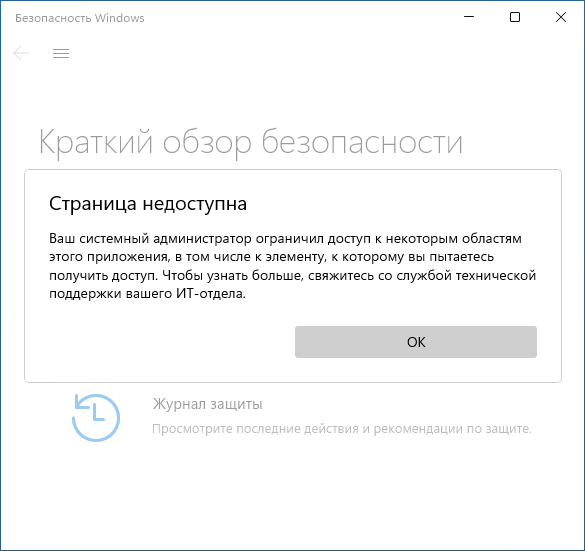
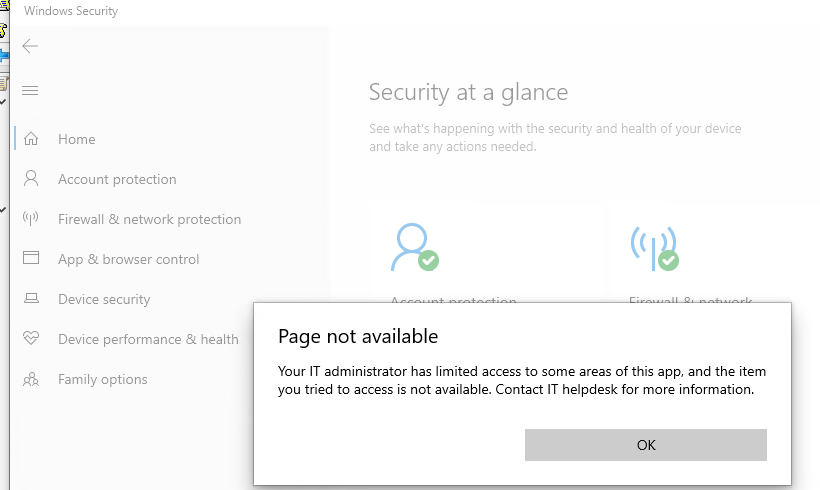
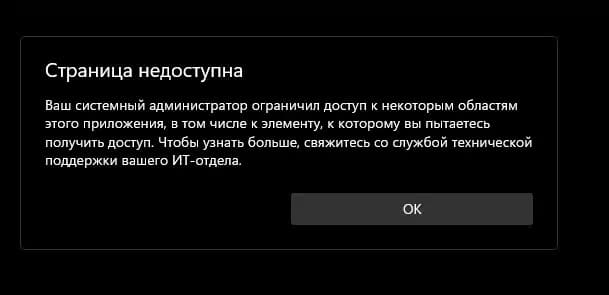
При открытии отдельных параметров встроенного антивируса Windows 11 и Windows 10, известного как Microsoft Defender или Защитник Windows, вы можете увидеть сообщение «Страница недоступна. Ваш системный администратор ограничил доступ к некоторым областям этого приложения, в том числе к элементу, к которому вы пытаетесь получить доступ».
В этой инструкции подробно о способах исправить ситуацию и получить доступ к нужным настройкам, а также о том, почему это может происходить.
Возможные причины
Сначала о возможных причинах, по которым пользователь может получать сообщение о том, что «администратор ограничил доступ к некоторым областям этого приложения» в «Безопасность Windows»:
- Был установлен сторонний антивирус, заблокировавший часть функций и настроек Microsoft Defender. Обычно это выполняется в целях обеспечения стабильной работы и в такой ситуации, возможно, не следует предпринимать каких-либо действий.
- Вы использовали какие-либо средства для отключения Защитника Windows 11 и Windows Как и в предыдущем случае: если это было сделано вами целенаправленно, может иметь смысл оставить всё как есть.
- Вами или сторонним ПО на компьютере (иногда — вредоносным) были настроены локальные политики Microsoft Defender, отключающие доступ к отдельным его параметрам.
- Политики, ограничивающие доступ к настройкам, действительно были настроены вашим системным администратором (если речь идёт о компьютере организации). В такой ситуации, если есть необходимость в изменении параметров, возможно, действительно следует обратиться к системному администратору.
Не исключены и другие сценарии появления проблемы, например, в какой-либо «сборке» Windows соответствующие политики могут быть настроены изначально.
Для выполнения всех далее описанных действий вы обязательно должны иметь права администратора на компьютере. Если это не так, потребуется либо зайти под учетной записью администратора, либо каким-то образом получить необходимые права, например, включив скрытую системную учетную запись «Администратор».
Способы снять ограничения доступа в Microsoft Defender
Почти во всех случаях ограничения в окне «Безопасность Windows» задаются политиками Microsoft Defender, изменить которые можно в редакторе локальной групповой политики (если у вас Windows 11/10 Pro или Enterprise) или редакторе реестра (для любой версии Windows).
Прежде чем приступать, рекомендую проверить, есть ли точки восстановления системы на дату, когда проблемы ещё не было. Если есть — используйте их в первую очередь, а уже затем переходите к далее описанным подходам к решению. В частности, это может помочь, когда причиной ошибки стали обновления системы безопасности Windows, прецеденты чему уже были.
Windows Powershell (Терминал Windows)
Перед тем как прибегать к далее описанным методам решения проблемы, попробуйте следующий быстрый метод решения, иногда он оказывается работоспособным:
- Закройте окно «Безопасность Windows».
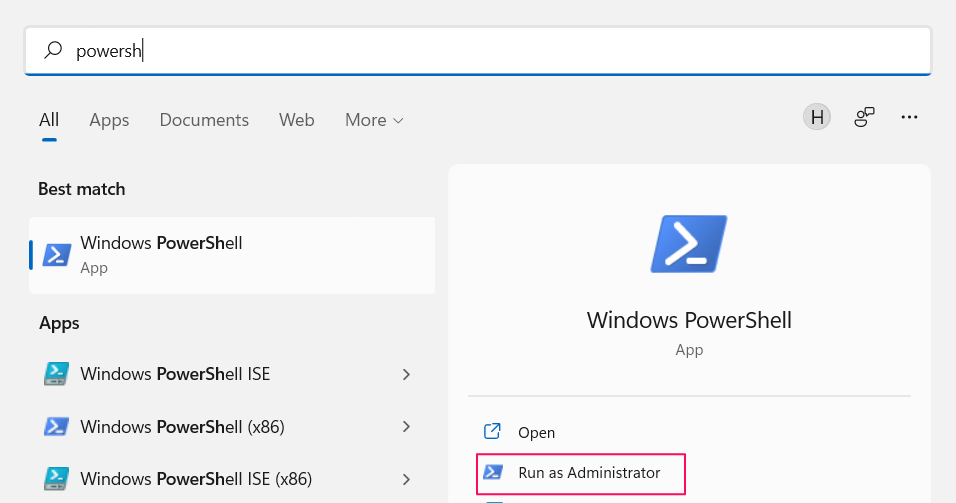
- Запустите Windows PowerShell или Терминал Windows от имени администратора, сделать это можно через меню по правому клику на кнопке Пуск.
- Введите команду
Set-MpPreference -UILockdown 0
и нажмите Enter.

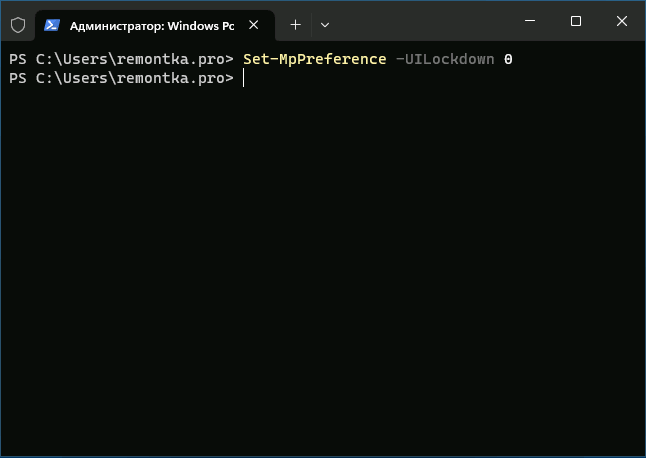
После успешного выполнения команды закройте окно консоли и проверьте, была ли решена проблема.
В реестре
Рекомендую начать с редактора реестра:
- Нажмите правой кнопкой мыши по кнопке «Пуск», выберите пункт «Выполнить», введите regedit и нажмите Enter.
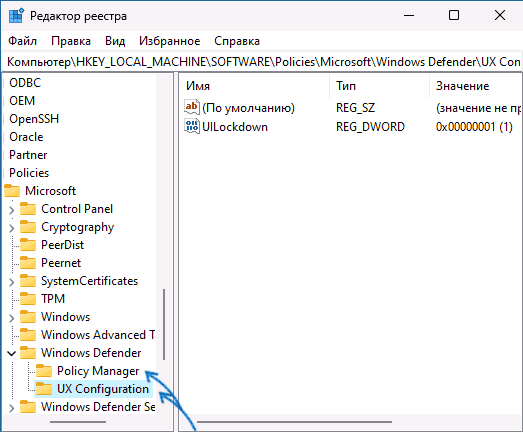
- В редакторе реестра перейдите к разделу
HKEY_LOCAL_MACHINE\SOFTWARE\Policies\Microsoft\Windows Defender\
- По умолчанию в этом разделе должен быть лишь один подраздел — Policy Manager, при этом пустой. Если в нём есть значения кроме «По умолчанию» — удалите их (выбираем значение, правый клик — удалить). Если в этом расположении есть другие подразделы, например, UX Configuration — удалите их тоже.

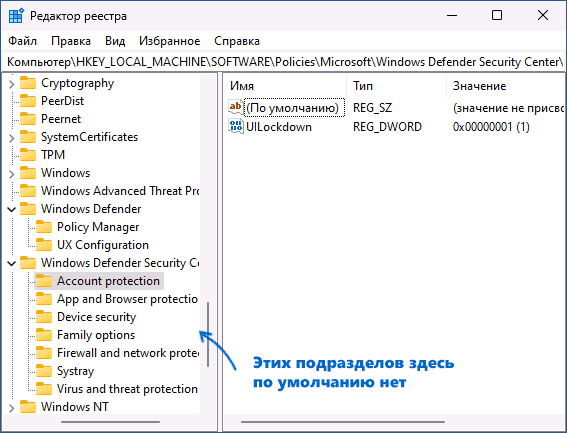
- Проверьте, существует ли раздел реестра
HKEY_LOCAL_MACHINE\SOFTWARE\Policies\Microsoft\Windows Defender Security Center\
Если он присутствует в реестре и содержит какие-либо значения или подразделы, удалите их тоже.

- Закройте редактор реестра и перезагрузите компьютер, затем проверьте, решило ли это проблему.
В ситуации, когда после перезагрузки компьютера проблема не решена, при этом какие-то из указанных разделов или значений реестра вы удаляли, проверьте: не появились ли они снова.
Если вы снова их там наблюдаете, при этом речь идёт о личном компьютере с личной учётной записью, есть вероятность что какое-то стороннее программное обеспечение добавляет эти изменения в реестр. Возможно, это антивирус, а возможно — наоборот. Если есть подозрения о наличии чего-то вредоносного, имеет смысл выполнить проверку с помощью таких средств как Dr.Web CureIt!, AdwCleaner и других.
В редакторе локальной групповой политики
В Windows 11 и Windows 10 Pro или Enterprise, можно использовать редактор локальной групповой политики для проверки настроенных политики и их отключения:
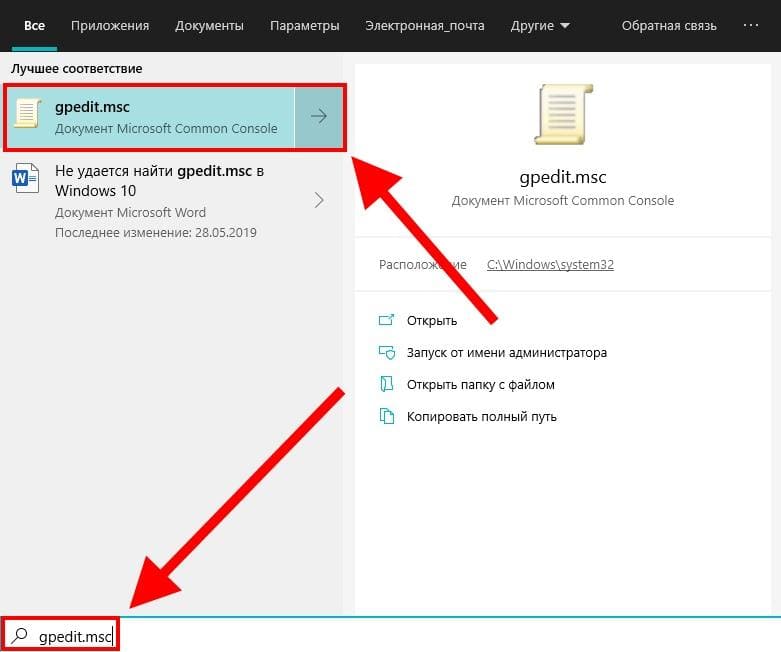
- Нажмите клавиши Win+R на клавиатуре, введите gpedit.msc и нажмите Enter.
- В редакторе локальной групповой политики перейдите в раздел «Конфигурация компьютера» — «Административные шаблоны» — «Компоненты Windows».
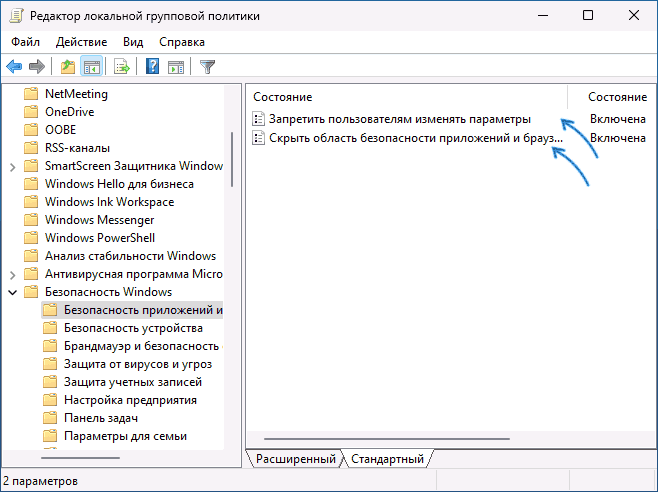
- Поочередно зайдите в подразделы «Безопасность Windows», «Центр обеспечения безопасности», «Антивирусная программа Microsoft Defender» и изучите политики в этих разделах и их подразделах: по умолчанию состояние всех должно быть «Не задана». Если для каких-то из политик вы видите «Включена» или «Отключена», дважды нажмите по такой политики и установите «Не задано», примените настройки.

- После выполнения этих действий, перезагрузите компьютер и проверьте, решило ли это проблему.
Также здесь может оказаться полезным материал: Как сбросить локальные групповые политики и политики безопасности в Windows.
Удаление всех настроенных политик, имеющих отношение к Защитнику Windows и не только к нему
При отсутствии желаемого результата после выполнения описанных выше шагов можно попробовать удалить вообще все настроенные политики из реестра.
Учитывайте, если в них было настроено что-то полезное, оно также будет потеряно, возможны и нежелательные последствия. Выполняйте эти действия только под свою ответственность. Желательно создать точку восстановления системы перед выполнением далее описанных действий.
Запустите командную строку от имени администратора, затем по порядку введите следующие команды, нажимая Enter после каждой. Выполнение некоторых из указанных команд может завершаться с ошибкой, в этом случае просто переходим к следующей.
reg delete "HKLM\Software\Microsoft\Windows\CurrentVersion\Policies" /f
reg delete "HKLM\Software\Microsoft\WindowsSelfHost" /f
reg delete "HKLM\Software\Policies" /f
reg delete "HKLM\Software\WOW6432Node\Microsoft\Policies" /f
reg delete "HKLM\Software\WOW6432Node\Microsoft\Windows\CurrentVersion\Policies" /f
reg delete "HKLM\SOFTWARE\Policies\Microsoft\Windows Defender" /v
reg delete "HKLM\SOFTWARE\Policies\Microsoft\Windows Defender Security Center" /v
reg delete "HKCU\Software\Microsoft\Windows\CurrentVersion\Policies" /f
reg delete "HKCU\Software\Microsoft\WindowsSelfHost" /f
reg delete "HKCU\Software\Policies" /f
reg delete "HKLM\Software\Microsoft\Policies" /f
Перезагрузите компьютер после выполнения команд и проверьте, была ли решена проблема.
Если описанные выше варианты не сработали, можно попробовать следующие подходы:
- Запустить Терминал Windows или Windows PowerShell от имени администратора по правому клику на кнопке Пуск и выполнить команду
Get-AppxPackage Microsoft.SecHealthUI -AllUsers | Reset-AppxPackage
- Скачать обновление KB5007651 из каталога обновлений Майкрософт и установить его.
- Один из читателей в комментариях предлагает следующий способ, который помог не только ему: нажать Win+R, ввести secpol.msc, перейти в раздел Локальные политики — Параметры безопасности — Учётные записи: Состояние учетной записи Администратор, включить опцию.
Если есть основания полагать, что сообщение «Ваш системный администратор ограничил доступ к некоторым областям этого приложения» — результат работы вируса или другого вредоносного ПО, предпримите меры для его поиска и удаления. Здесь может оказаться полезной инструкция: Что делать, если вирус блокирует сайты, установку и запуск антивирусов.
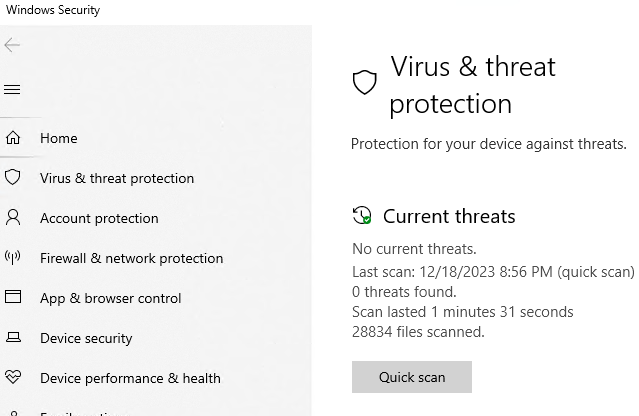
На одном из компьютеров в настройках встроенного антивируса Windows Defender (Защитник Windows) пропала вкладка «Защита от вирусов и угроз», а при попытке открыть окно с настройками появилось сообщение:
Страница недоступна. Ваш системный администратор ограничил доступ к некоторым областям этого приложения, в том числе к элементу, к которому вы пытаетесь получить доступ. Чтобы узнать больше, свяжитесь со службой технической поддержки вашего ИТ-отдела.
Page not available. Your IT administrator has limited access to some areas of this app, and the item you tried to access is not available. Contact IT helpdesk for more information.
В моем случае в приложении Windows Security отсутствовала вкладка Virus and Threat Protection. Эта проблема встречается в версиях Windows 10 и 11 начиная с билда 22H2.
Это может произойти:
- Если на компьютере установлен сторонний сертифицированный антивирус. В этом случае некоторые функции панели управления Security отключаются;
- Параметры защитника Windows заданы администратором через групповые политики (выполните команду
rsop.msc
или
GPResult /h GPResult.html & GPResult.html
чтобы посмотреть примененные настройки GPO); - Включена блокировка графического интерфейса Защитника Windows
Чтобы проверить включена ли блокировка Windows Defender UI, выполните команду:
Get-MpPreference|select UILockdown
Чтобы разблокировать UI защитника выполните команду:
Set-MpPreference -UILockdown $false

После этого вкладка Virus and Thread у меня отобразилась в интерфейсе Windows Security.
Также можно заблокировать/разблокировать UI в Windows Defender через реестр. Если команда выше не помогла, проверьте следующее:
- Откройте
regedit.exe
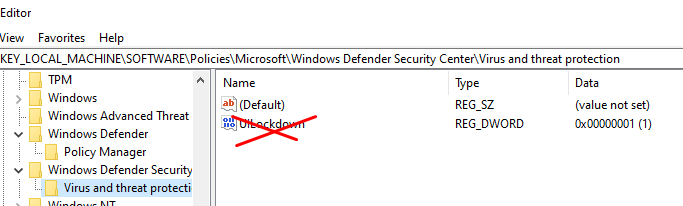
; - Перейдите в HKLM\SOFTWARE\Policies\Microsoft\Windows Defender\
- Проверьте, что во вложенных ветках отсутствует параметра реестра UILockdown со значением 1;
- Если этот параметр присутствует, удалите его;
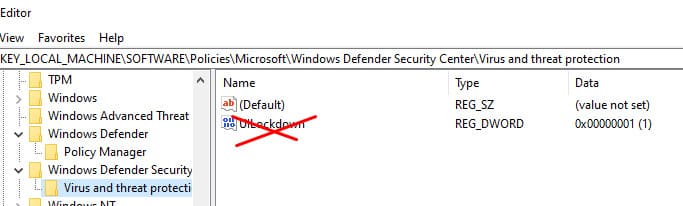
- Аналогично проверьте ветку HKLM\SOFTWARE\Policies\Microsoft\Windows Defender Security Center\Virus and threat protection и удалите параметр UILockdown, если имеется.

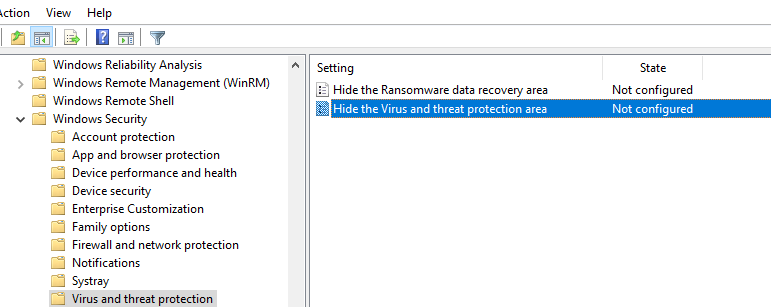
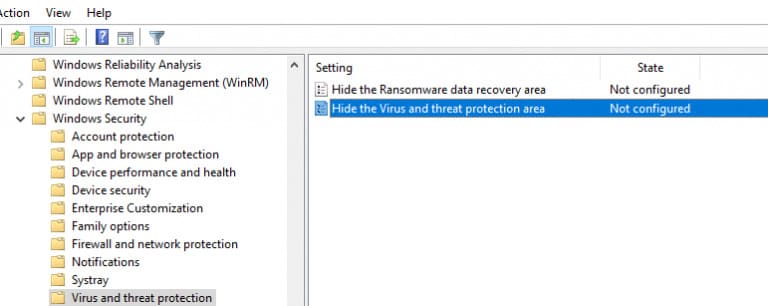
Этот параметр реестра может включаться политикой Hide the Virus and threat protection area in Windows Security в разделе редактора GPO (
gpedit.msc
) Computer Configuration -> Administrative Templates -> Windows Components -> Windows Security -> Virus and Thread Protection. Проверьте, что этот парамтер GPO не настроен или отключен.
Если эта команда не помогла, попробуйте сбросить настройки приложения Безопасность Windows:
Get-AppxPackage Microsoft.SecHealthUI -AllUsers | Reset-AppxPackage
Если ни один из способов не помог попробуйте сбросить настройки Windows Defender в реестре, сбросить настройки локальной GPO, и перезагрузить компьютер:
reg delete "HKLM\SOFTWARE\Policies\Microsoft\Windows Defender" /v
reg delete "HKLM\SOFTWARE\Policies\Microsoft\Windows Defender Security Center" /v
 RMDIR /S /Q "%WinDir%\System32\GroupPolicyUsers"
RMDIR /S /Q "%WinDir%\System32\GroupPolicy"
Getting the “Your IT administrator has limited access” error when accessing the Windows Security program in Windows 11 is pretty common. It could appear for various reasons. But despite that, it could also be easily fixed. And, this is what this guide will show you.
If you’re getting the same error when using Windows Security on the PC, read this in-depth fixes guide to know how to fix “Your IT administrator has limited access” error in Windows 11.
Why Does “Your IT Administrator Has Limited Access” Appear in Windows 11?
Your user account may not have administrative privileges, because of which the “Your IT administrator has limited access” error message is appearing. But besides this, there could be several more reasons for it. Below, we’ve listed all other potential reasons for this issue:
- Interruptions by Third-Party Antivirus
- Unnecessary School Accounts on the PC
- Enabled Turn Off Microsoft Defender Antivirus Policy
- Buggy Windows Security App
- Interference From Microsoft Defender Firewall
- Bugs and Glitches in the PC
- Viruses and Malware
- Outdated Windows 11
- Limitations From the IT Desk
Fix “Your IT Administrator Has Limited Access” Error in Windows 11
In this section, we’ll share some working fixes to fix this error in Windows 11. You can follow the mentioned ways to fix “Your IT administrator has limited access” in Windows 11:
1. Change Your User Account to an Admin Account
One of the most common reasons for the “Your IT administrator has limited access” error in Windows 11 is the lack of admin rights. Thus, we suggest you change your current user account to an admin account. Follow the below-mentioned steps to know how to do this:
1. Open the Settings app and move to the Accounts section from the left navigation menu.
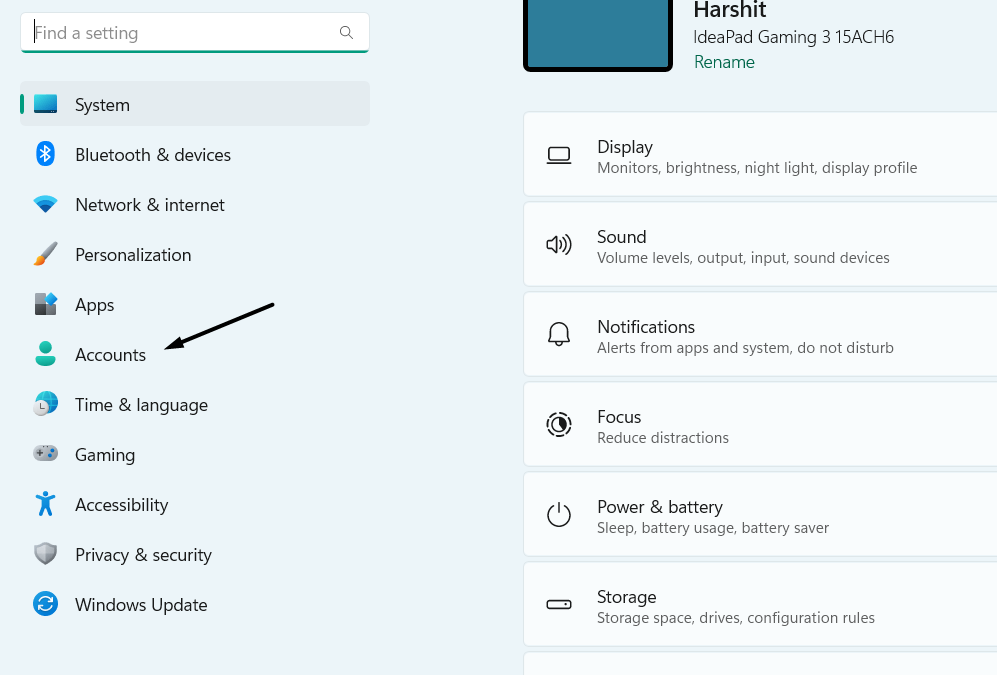
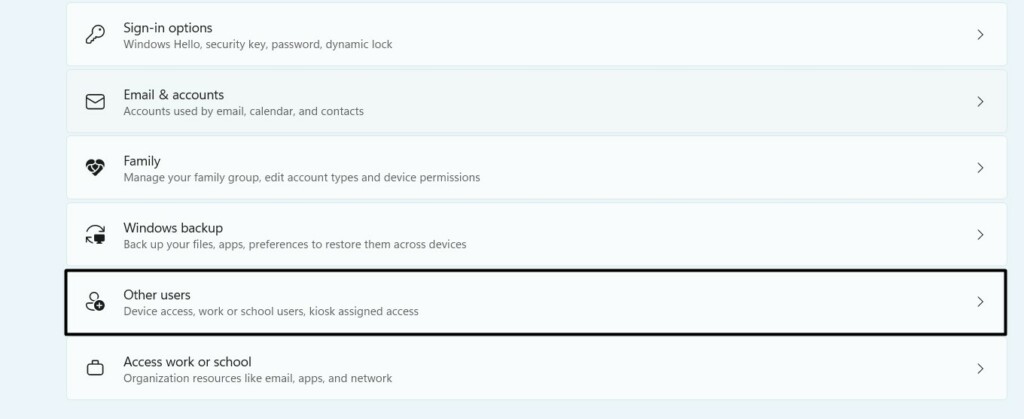
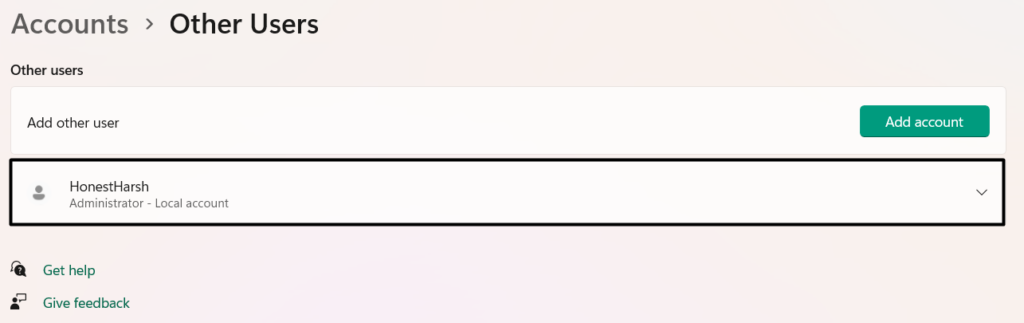
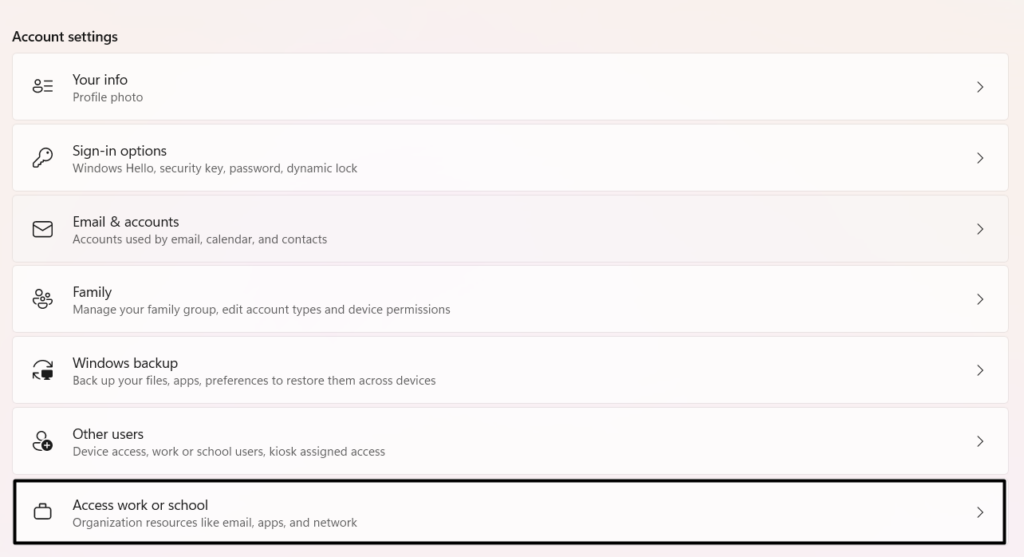
2. In the Accounts section, choose Other users under Account settings to view the active accounts.
3. On the next screen, select your user account, and check if Administrator is added under it.
4. If not, click the Change account type button, and choose Administrator from the dropdown.
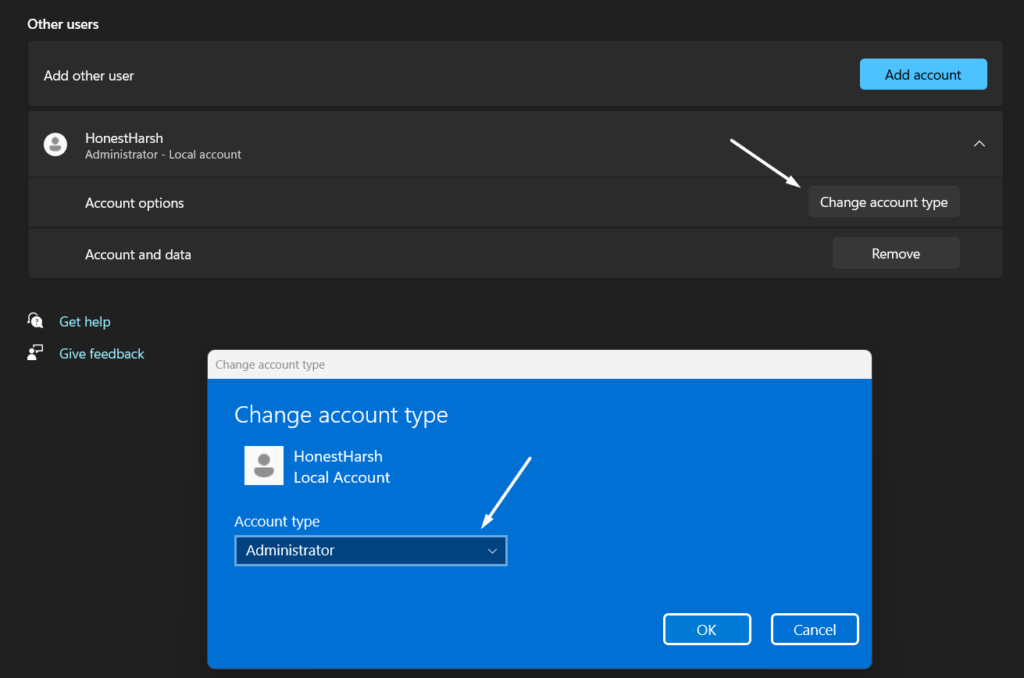
5. Once done, click OK to apply this change, and then simply restart your Windows 11 PC.
2. Create Another Administrator Account
If the issue is still there, create a new administrator account on your PC, as it could be possible that the current account has some issues. So try the same on your PC. You can check the below-mentioned steps to learn how to create another administrator account on your PC:
1. To create a new admin account on your Windows 11 system, go to the Accounts section of it.
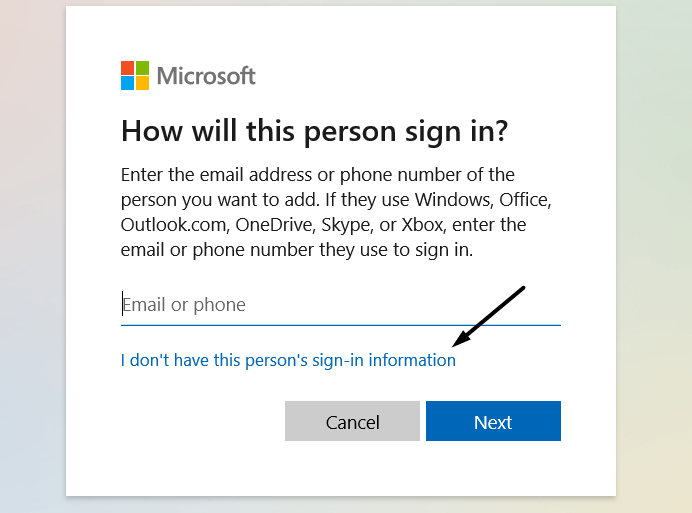
2. In the Accounts window, choose Other users, and then click Add account to get a new prompt.
3. In the Microsoft account window, select the I don’t have this person’s sign-in information text.
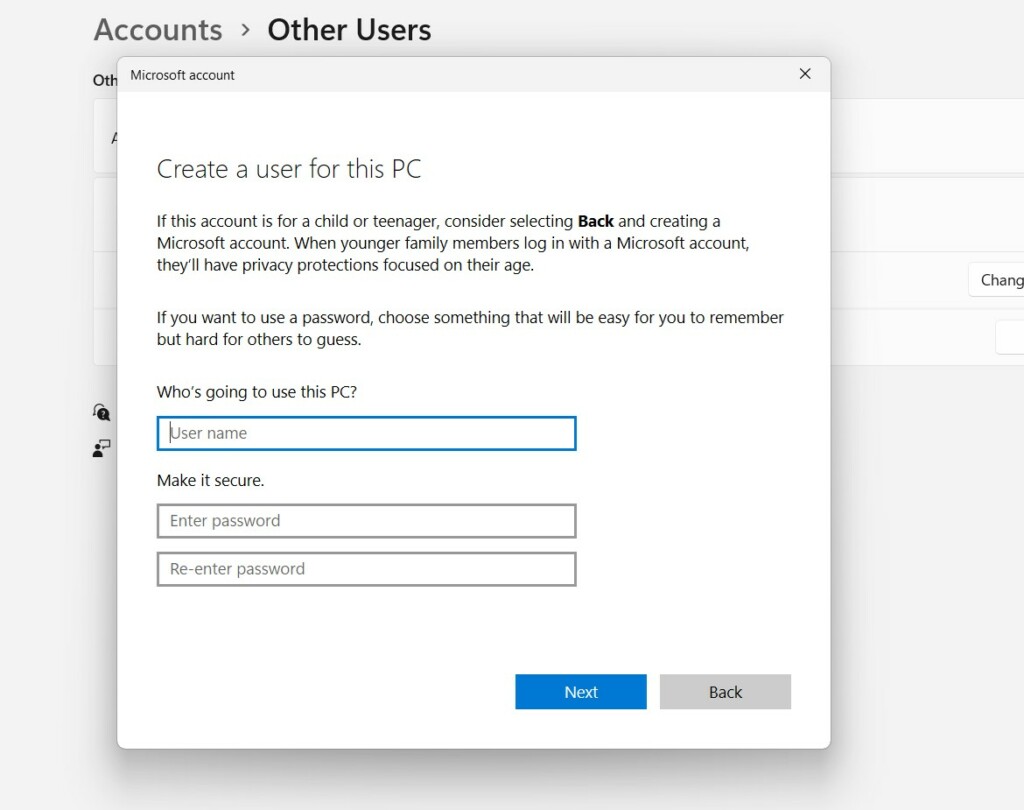
4. On the next screen, select Add a user without a Microsoft account and then enter the required details.
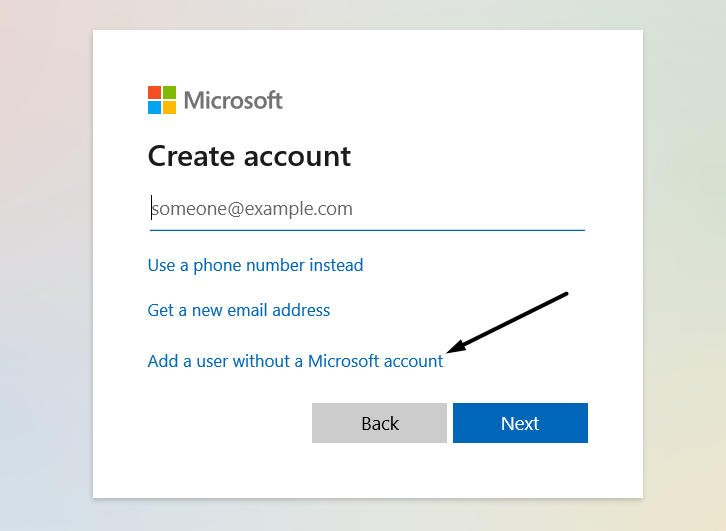
5. Follow the on-screen instructions to create a new admin account on your Windows 11 PC.
6. Finally, log in with the new account on your PC and check whether the issue is gone now.
3. Turn On the Hidden Administrator Account
Even if creating a new admin account doesn’t fix the issue on the PC, consider enabling the hidden admin account on it. You can easily enable it by running a few simple commands in Command Prompt. Check the mentioned prompts to know how to easily turn it on:
1. To enable the hidden admin account, boot your Windows 11 PC into Safe mode using any method.
2. Once you’re in Safe mode, open Command Prompt and copy-paste the below command in it:
net user administrator /active:yes
3. Once done, hit the Enter key to immediately ON the hidden administrator user account.
4. Reboot your Windows PC and choose the hidden admin account when logging into the PC.
4. Remove Any Work or School Accounts
Before trying other fixes, we want to give you a small suggestion, which is deleting any work or school accounts from the PC. It could be possible that your PC is connected to any other account, which doesn’t have rights to access Windows Security. Follow the below steps to do so:
1. Go to the Accounts category of Settings and then scroll to Access work or school navigation.
2. Under Access work or school navigation, look for the connected work or school account, and select it.
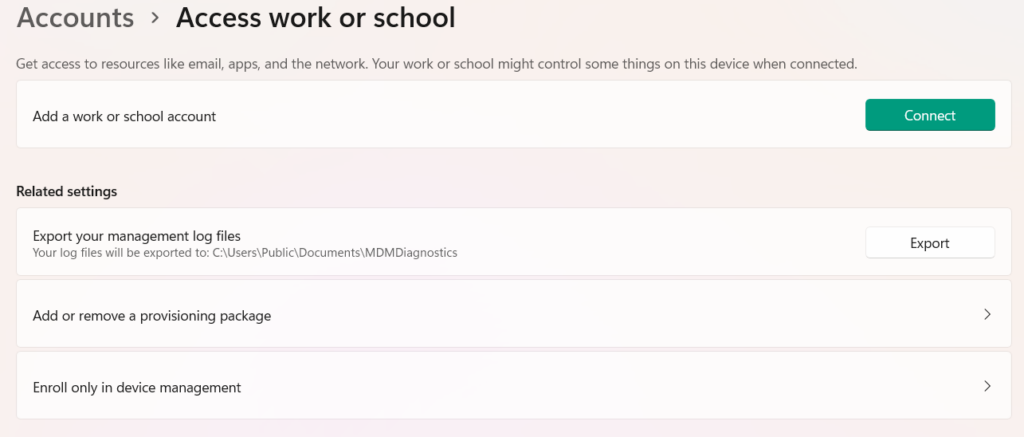
3. Hit Disconnect next to the account to disconnect it and once done, reboot your system.
5. Uninstall Other Security Apps
If you’ve recently installed a third-party security app on your PC, consider uninstalling it, as it could be possible that it’s interrupting the Windows Security app’s working and causing this issue. To know how to uninstall apps and programs in Windows 11, check the below steps:
1. Type the security app in the Windows Search Box, and choose Uninstall from the search results.
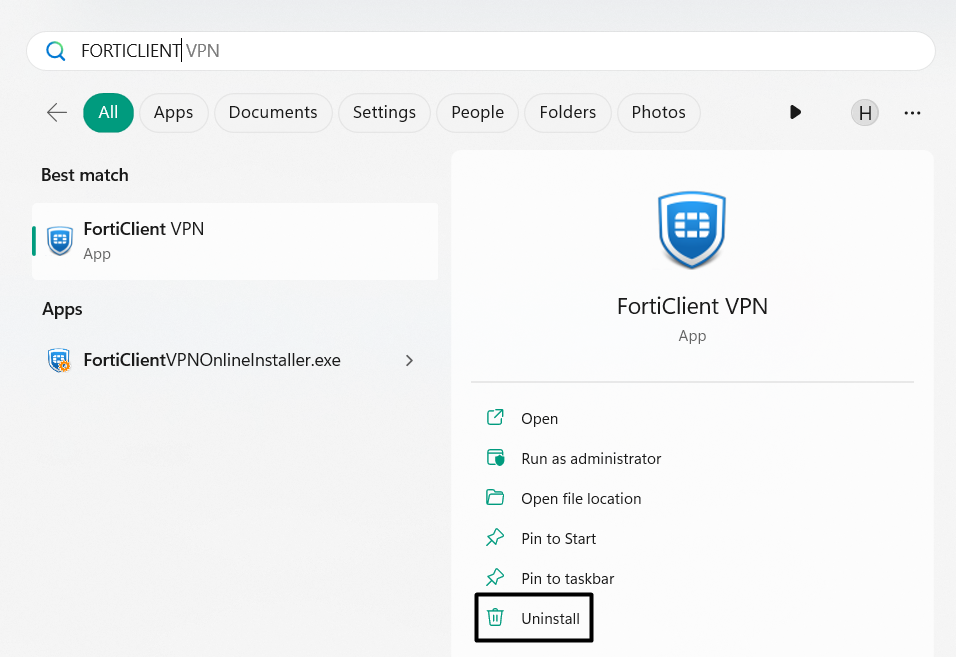
If you don’t see the Uninstall option in the search results, go to the below path in the Settings app:
Settings App > Apps > Installed Apps > Search for the App > Click Three-Dots (…) > Uninstall

2. Choose the Uninstall button in the next prompt that appears after following any above methods.
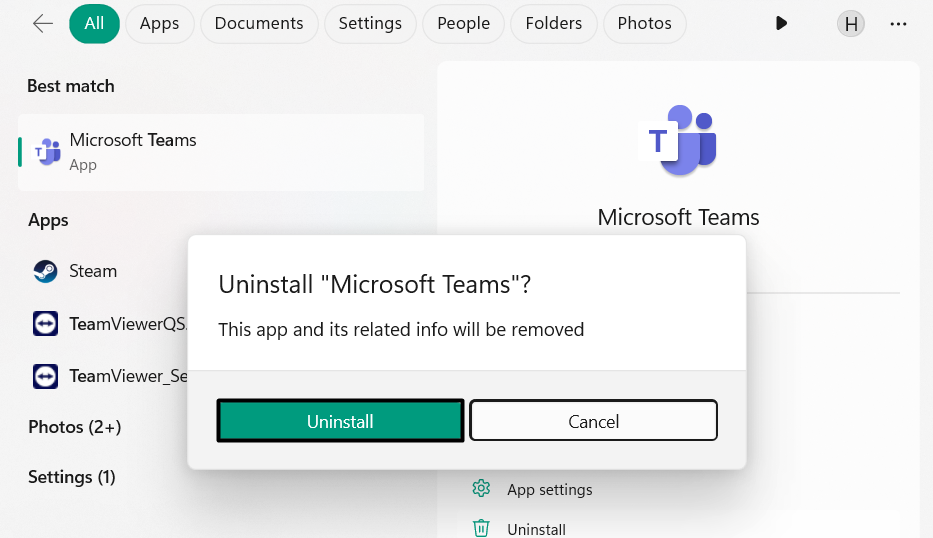
3. After uninstalling the app, restart your Windows 11 PC and check whether the issue is still there.
6. Disable the Turn Off Microsoft Defender Antivirus Policy
Some Windows Pro and Enterprise users in the Microsoft forum mentioned that they’re getting the “Page not available” error. If you’re also one of them, you need to disable the Turn Off Microsoft Defender Antivirus Policy in the Group Policy Editor on your PC. You can do this on your Windows 11 PC by taking the help of the below-mentioned steps:
1. Open the Group Policy Editor app and double-click the Computer Configuration option.
2. Select Administrative Templates in the app’s side menu and expand Windows Components.
3. Click Microsoft Defender Antivirus and open Turn off Microsoft Defender Antivirus on the left.
4. In the Turn off Microsoft Defender Antivirus window, choose the Disabled radio button and then select OK.
5. Open the Allow antimalware to startup with normal priority policy and then disable that too.
6. Choose the Client Interface policy in the same folder, and then double-click Enable headless UI mode.
7. Choose the Disable option to turn off this policy, and then click Apply to apply this change.
8. Lastly, close the opened window, and then restart your PC to check if the issue is fixed.
7. Run this PowerShell Command
One easy way to fix the “Your IT administrator has limited access” error is to run some commands in PowerShell. If you also get this error or “Page not available” error when trying to open Windows Security, do the same and check if it helps. Follow the added steps:
1. Open the Windows Search Box on your PC and then type Windows PowerShell in it.
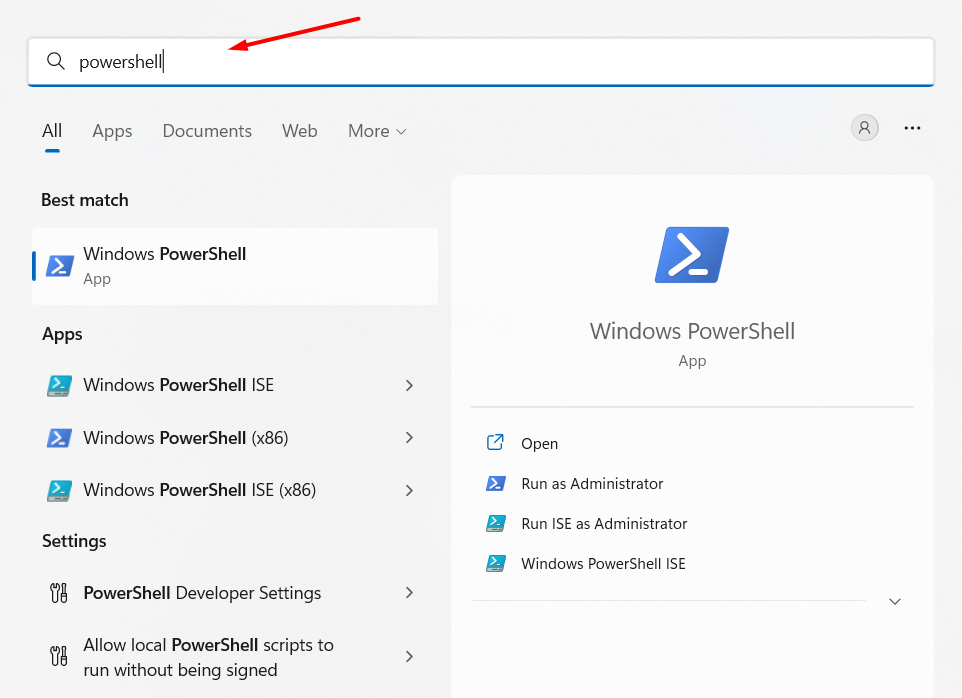
2. Choose Windows PowerShell from the search results under Best match to open the console.
3. In the PowerShell window, copy-paste the following command, and then press enter to run MpPreference:
set-MpPreference -UILockdown4. Finally, exit Windows PowerShell and then reboot your PC to get rid of this error message.
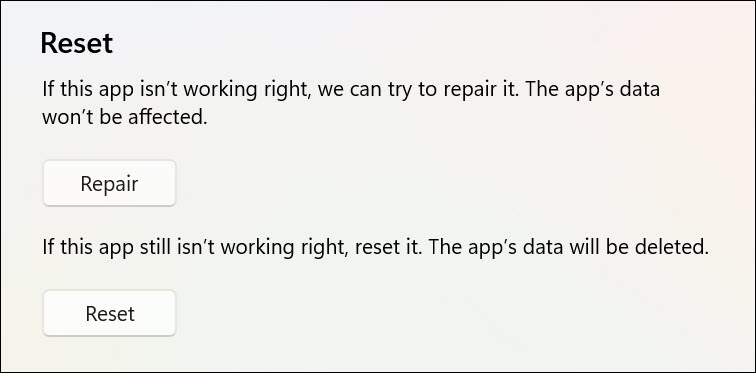
8. Repair or Reset the Windows Security App
Another way to get rid of the “Your IT administrator has limited access” error in Windows 11 is to repair and reset the Windows Security app. This will fix all the temporary bugs and glitches with it, and, also eliminate the error. So check the below steps to know the process:
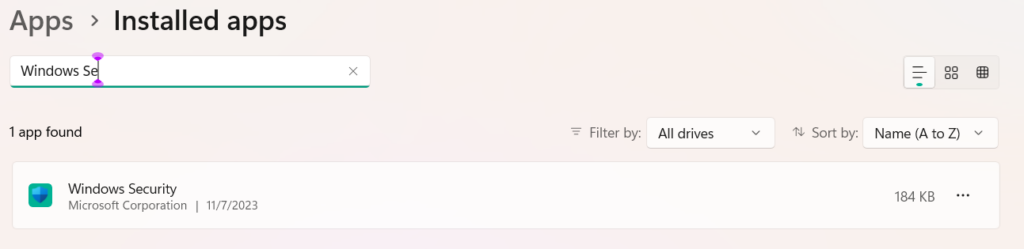
1. Open the Settings app on your Windows 11 PC and from the left navigation pane, choose Apps.

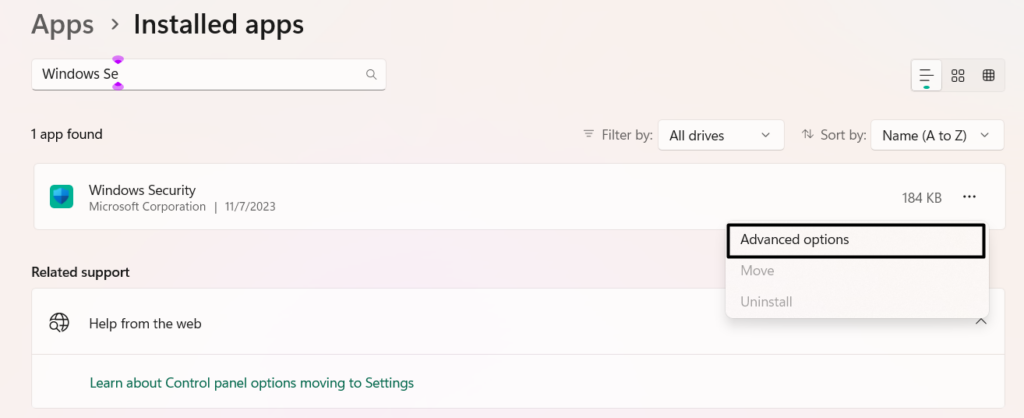
2. Choose Installed apps and on the next screen, find Windows Security and click three dots (…) next to it.
3. From the dropdown, choose Advanced options, go to the Reset section, and click Reset.
4. Once done, click Repair in the same section to begin repairing the Windows Security app now.
5. Exit the Settings app, and then check if the “Your IT administrator has limited access” error still appears.
9. Modify the Registry via Command Prompt
Some users in the online forums mentioned that they eliminated the “Your IT administrator has limited access” error by running some simple commands in Command Prompt. We suggest you implement the same by following the mentioned steps:
1. Type Command Prompt in the search box, and choose Run as administrator from the results.

2. In the Command Prompt window, execute the following commands one by one to make the changes:
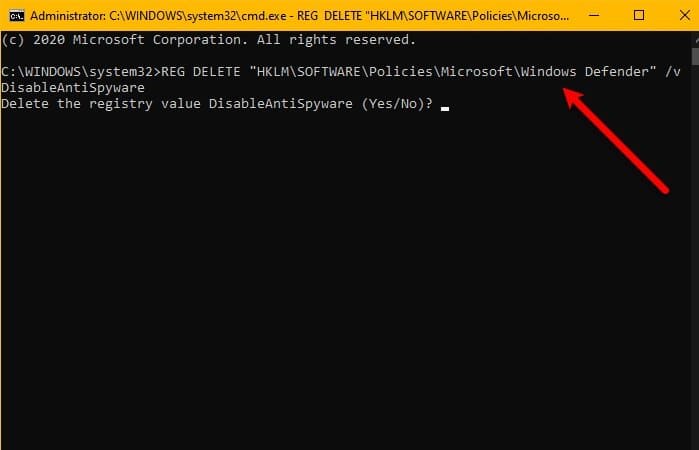
reg delete "HKLM\Software\Microsoft\Windows\CurrentVersion\Policies" /freg delete "HKLM\Software \Microsoft\WindowsSelfHost" /freg delete "HKLM\Software\Policies" /freg delete "HKLM\Software\WOW6432Node\Microsoft\Policies" /freg delete "HKLM\Software\WOW6432Node\Microsoft\Windows\CurrentVersion\Policies" /freg delete "HKLM\SOFTWARE\Policies\Microsoft\Windows Defender" /v DisableAntiSpywarereg delete "HKCU\Software\Microsoft\Windows\CurrentVersion\Policies" /freg delete "HKCU\Software\Microsoft\WindowsSelfHost" /freg delete "HKCU\Software\Policies" /freg delete "HKLM\Software\Microsoft\Policies" /f3. Once done, type exit in the same window to close the console and get rid of this error message.
10. Search for Viruses and Malware
Malware and viruses in the PC could also be the reason for the “Your IT administrator has limited” access error in Windows 11. This could be the same in your case. Thus, we suggest you make sure that your PC is malware-free. Follow the below steps to ensure this:
1. As Windows Security isn’t working well, you need to use another method to run the antivirus scan on it. So, open Command Prompt with admin rights on your PC to do the same.
2. In the Command Prompt window, type in the below-mentioned command to open the antivirus tool:
cd C:\ProgramData\Microsoft\Windows Defender\Platform\4.18*3. Type in the below command in it and then hit the Enter key to run the antivirus scan right now:
MpCmdRun -SignatureUpdate4. Lastly, wait for the antivirus scan to complete on the PC, and once done, check the issue’s status.
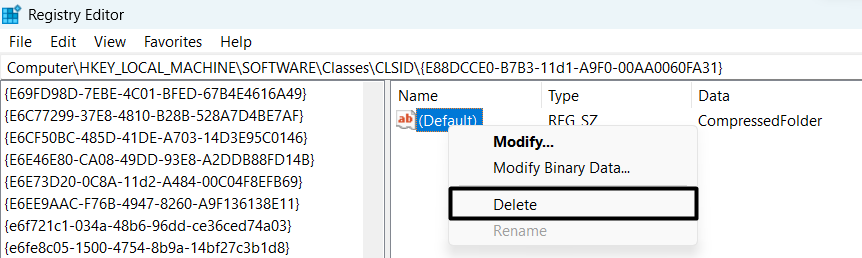
11. Erase Windows Defender Records
An easy solution to fix “Your IT administrator has limited access” is to erase the Windows Defender records. You need to delete them in Registry Editor. Try the steps to do so:
1. To delete the Windows Defender records from your Windows 11 PC, open Registry Editor on it.
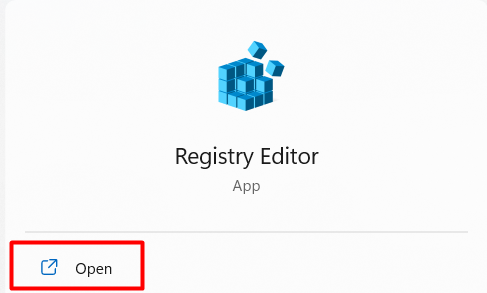
2. In the Registry Editor program, navigate to the below-mentioned location using the address bar at the top:
HKEY_LOCAL_MACHINE\SOFTWARE\Policies\Microsoft\WindowsDefender\Policy Manager
3. Once you’re there, delete all the files in it, and then restart your PC to check the issue’s status.
12. Turn Off Microsoft Defender Temporarily
It may be possible that the Microsoft Defender Firewall is constantly interrupting the Windows Security app’s working, which is why the “Your IT administrator has limited access” error is appearing.
In that case, we suggest you turn off the firewall temporarily to check if it’s the cause of this error on the PC. You can simply follow the below-mentioned steps to know how to disable Windows Defender Firewall in Windows 11:
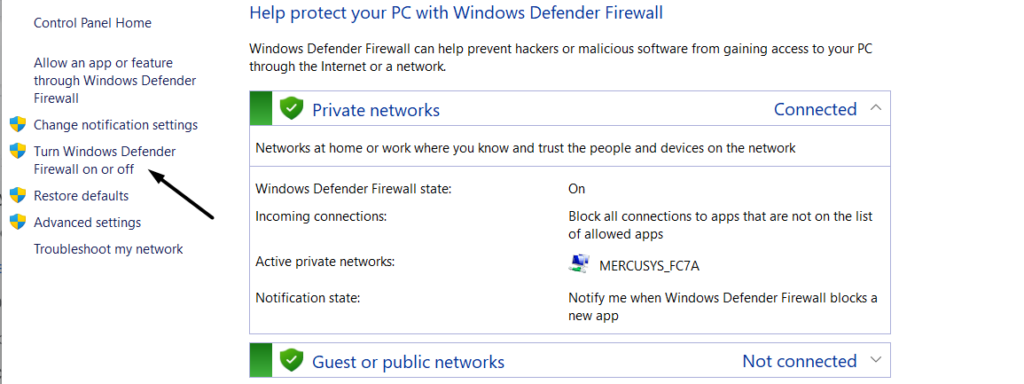
1. As we’re unable to launch the Windows Security app, we’ll use the Control Panel app to turn it off. So open Control Panel on your computer and go to System and Security.
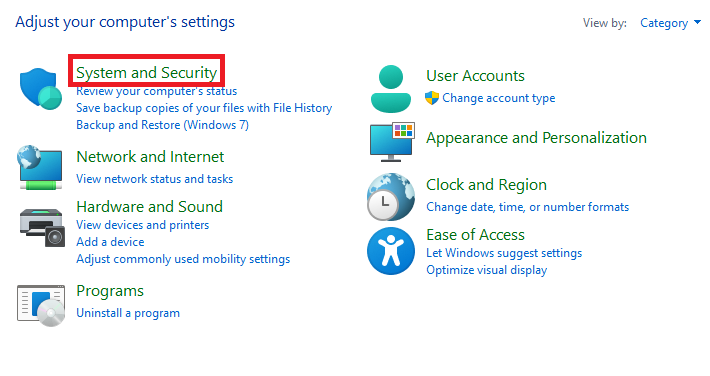
2. In the System and Security window, choose Windows Defender Firewall and then select Turn Windows Defender Firewall on or off on the left navigation menu of the utility.
3. On the next screen, under both sections, choose Turn off Windows Defender Firewall (recommended).
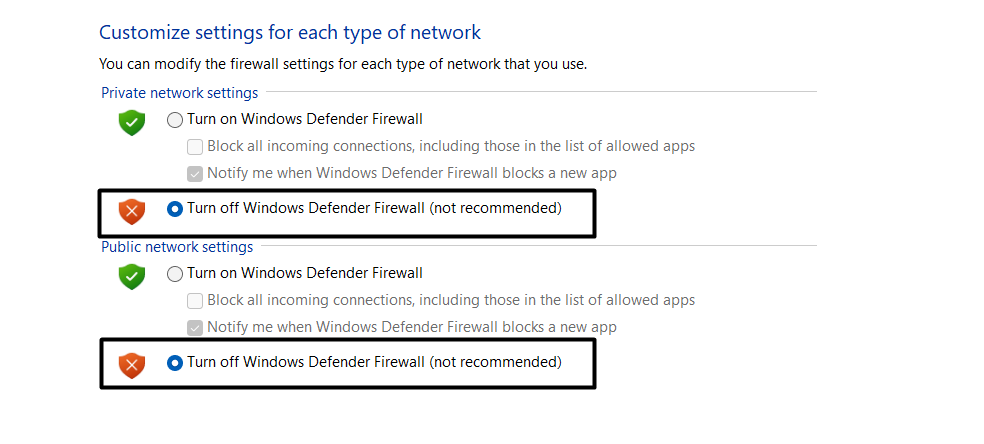
4. In the end, click OK to apply all the changes and then restart your Windows 11 PC or laptop.
13. Contact Your IT Helpdesk
It may be possible that your IT administrator has put restrictions on your user account, which is why the “Your IT administrator has limited access” error is appearing when accessing the Windows Security app on your PC.
In that case, you need to contact your IT helpdesk and ask them if that’s true. If yes, then ask them to give you the right permissions to use the Windows Security app on your Windows 11 PC without any issues.
14. Reset the PC
If none of the mentioned solutions help you get rid of the “Your IT administrator has limited access” error, then you’ve no other option left than resetting the Windows 11 PC back to default. Also, you don’t need to sacrifice your valuable data in this process. If you’re ready to reset your Windows 11 PC, follow the below-mentioned steps to do the same:
1. To reset your Windows 11 PC, open the Settings app and go to Recovery section of it.

2. In the Recovery section of the Settings app, hit the Reset PC button next to Reset this PC.

3. In the next window, choose the Keep my files option and then the Cloud install option.
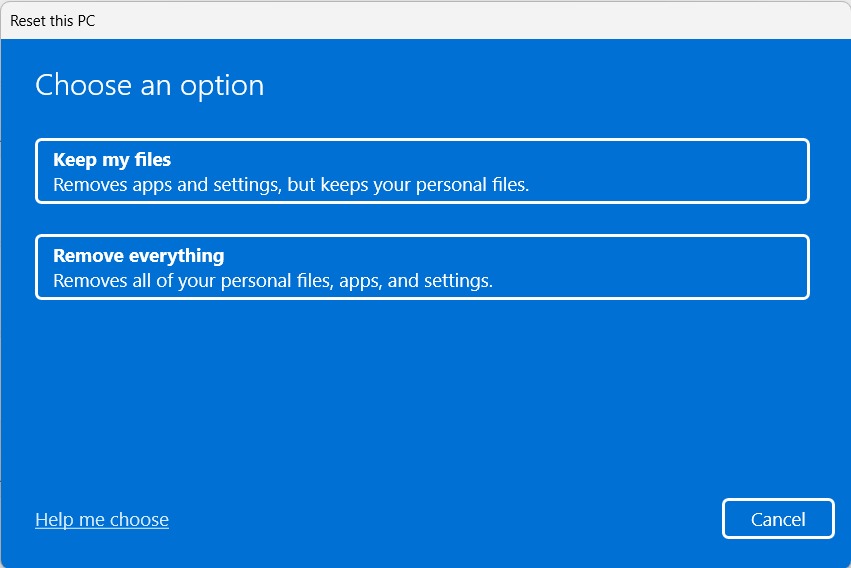
4. In the end, follow the on-screen instructions to reset your Windows 11 PC back to default.
FAQs
How Do You Fix Your IT Administrator Has Limited Access to Some Areas of This App?
It could be possible that your user account doesn’t have admin rights, which is why “Your IT administrator has limited access to some areas of this app” is appearing when trying to open it.
How Do I Fix Page Not Available in Windows 11?
If you’re getting an error when trying to open a page in Windows 11, consider restarting your Windows 11 PC. In case this doesn’t resolve the issue, update the particular app on your PC.
How Do I Enable Headless UI Mode?
You need to enable the Headless UI mode on your Windows 11 PC in the Registry Editor app.
How Do I Disable Antivirus on Windows 11?
Follow the below path to enable the integrated antivirus utility on your Windows 11 PC or laptop:
Open the Windows Security App > Choose Virus & Threat Protection App > Manage Settings > Toggle off Real Time Protection.
How Do I Allow Administrator Permission in Windows 11?
You can assign your user account admin rights in the Accounts section of the Settings program on your PC.
Final Words
So, these are some good solutions (at least, according to us) that can quickly and easily fix the “Your IT administrator has limited access” error message in Windows 11. Here in this guide, we mentioned some great fixes to get rid of the “Your IT administrator has limited access” error.
We hope the fixes we shared in this guide helped you get rid of it with ease. If yes, do let us know which mentioned workarounds helped you resolve this issue.
For those who are for any reason facing an error on their system while accessing the Microsoft default Antivirus, here is the solution. You may get some errors like the Virus and threat protection page is not available because your IT administrator has restricted that in Windows 11…
Method 1: Disable Windows Defender UI LockdownMethod 2: Using RegeditMethod 3: Check for Windows UpdatesMethod 4: Reset the Windows Security AppMethod 5: Use Windows PowerShellMethod 6: Perform Windows 11 Repair
I was using Windows 11 which is the latest operating system of Microsoft with the latest security features. But after installing a few software and activating the Windows, a key feature that is built-in security to protect your PC from various threats vanished. One of these features is “Virus and Threat Protection,” which provides real-time protection against malware, viruses, and other security risks. However, somehow I recovered that and there would be other users who may encounter the same issue where the “Virus and Threat Protection” page is not available or inaccessible. So, In this article, I will provide a few ways to resolve it.
Error:
Page not available
Your IT administrator has limited access to some areas of this, and the item you tried to access is not available. Contact the IT helpdesk for more information.

Method 1: Disable Windows Defender UI Lockdown
Maybe because of any reason the User Interface of the Windows Defender that also includes the “Virus and Threat Protection” page is disabled. So, first let’s run a command that can enable it again, if that is the problem.
- For that, open PowerShell as Admin. You can right-click on the Windows start button to select it.
- After that, run the following command in the PowerShell
Set-MpPreference -UILockdown 0- Now, open your Windows Defender or Virus and Threat Protection page.
- Quite good chances that you will have access to your system’s default Antivirus.

Method 2: Using Regedit
If the above method doesn’t work then you can follow the following in which we use Regedit to add a few values.
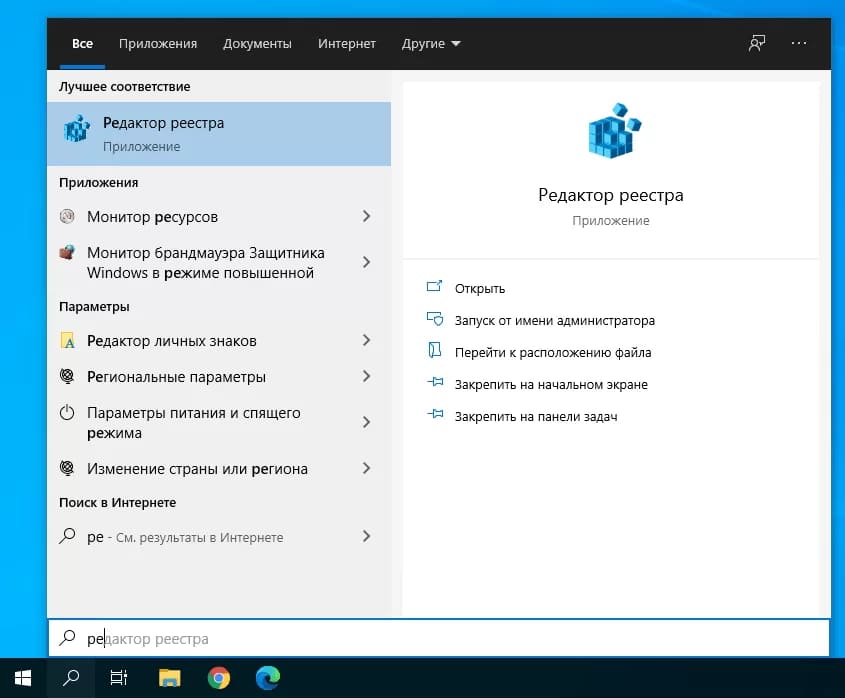
- Open Regedit. Press Win+R and type – regedit after that press the Enter key.

- Navigate to HKEY_LOCAL_MACHINE\Software\Policies\Microsoft\Windows Defender
- Right-click on the empty area and select New -> DWORD (32-bit ) value

- Give it a name – DisableAntispyware
- Similarly again create a value with the name – DisableRealtimeMonitoring
- Let the value default value 0 as it is. Close the Registry Editor and restart your system.
- Now, check if Windows Defender is available with its apps.
Method 3: Check for Windows Updates
Outdated or missing Windows updates can sometimes cause issues with security features. To ensure that your system is up to date:
- Press
Win+Ito open the Windows Settings. - Click on “Windows Update.”
- Select “Check for updates.” If updates are available, install them.
- Reboot your computer if prompted.
Method 4: Reset the Windows Security App
Sometimes, issues with security services can cause the “Virus and Threat Protection” page to become unavailable. To reset the app:
- Press Win + I and select the Apps.
- Type – windows in the search box window.
- Click the three dots given in front of the Windows Security App and select Advanced options.
- Click on the Repair button first, if after that you don’t have the Virus and Threat page then Reset the App.
- Now, try accessing the “Virus and Threat Protection” page again through Windows Security.


Method 5: Use Windows PowerShell
If the issue persists, you can try using Windows PowerShell to reset the security components:
- Right-click on the Start button and select “Windows Terminal (Admin)” to open an elevated PowerShell window.
- In the PowerShell window, copy and paste the following commands one by one and press Enter after each:
Get-AppXPackage -AllUsers -Name Microsoft.Windows.SecHealthUI | Foreach {Add-AppxPackage -DisableDevelopmentMode -Register "$($_.InstallLocation)\AppXManifest.xml"}Get-AppXPackage -AllUsers -Name Microsoft.Windows.SecHealth | Foreach {Add-AppxPackage -DisableDevelopmentMode -Register "$($_.InstallLocation)\AppXManifest.xml"}Restart your computer after running these commands…
Method 6: Perform Windows 11 Repair
If none of the above methods work, you can try repairing your Windows installation:
- Open the Windows Settings (Win + I).
- Click on “System.”
- Select “Recovery” from the left-hand menu.
- Under “Advanced startup,” click on “Restart now.”
- When your PC restarts, select “Troubleshoot” > “Advanced options” > “Startup Repair.“
- Follow the on-screen instructions to complete the repair process.

Other Articles:
- How to install BetterCap on Windows 11 or 10
- How to download and add new widgets to Windows 11
- Single command to install VMware Workstation on Windows 11
- Install Windows 11 without an internet connection?
Если вы столкнулись с сообщением «Ваш системный администратор ограничил доступ к некоторым областям этого приложения». Это может быть связано с политиками безопасности, установленными в вашей организации. В этой статье мы рассмотрим решения этой проблемы, чтобы помочь вам восстановить доступ к необходимым функциям и ресурсам.
Как исправить:
Решение 1. Отключить или удалить установленные антивирусы, так как зачастую антивирусы управляют политиками безопасности системы, когда они включены. Отключите антивирус и проверьте, сохраняется ли ошибка.
Решение 2. Попробовать установить обновление, после перезагрузить ПК и проверить наличие ошибки.
Решение 3. Если не помогли предыдущие варианты, попробуйте разблокировать UI Защитника Windows.
Откройте меню «Пуск», введите PowerShell и откройте его с правами администратора.
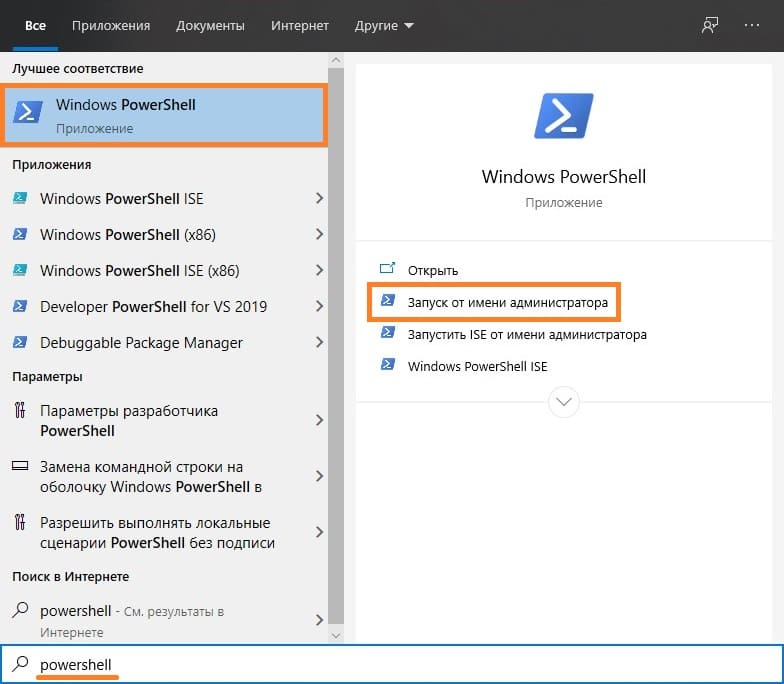
Далее введите следующую команду в PowerShell:
Set-MpPreference -UILockdown $false

Команда Set-MpPreference -UILockdown позволяет разблокировать графический интерфейс Защитника Windows. После выполнения этой команды вкладка «Virus and Threat» отобразится в интерфейсе Windows Security.
Решение 4. Вы также можете заблокировать или разблокировать UI в Windows Defender через реестр. Если команда выше не помогла, выполните следующие действия:
1. Введите в поиске «Редактор реестра» и откройте его.
2. Перейдите в HKLM\SOFTWARE\Policies\Microsoft\Windows Defender.
3. Убедитесь, что в вложенных ветках отсутствует параметр реестра UILockdown со значением 1. Если этот параметр присутствует, удалите его.
4. Аналогично, проверьте ветку HKLM\SOFTWARE\Policies\Microsoft\Windows Defender Security Center\Virus and threat protection и удалите параметр UILockdown, если он имеется.
Решение 5. Этот параметр реестра может быть включен политикой Hide the Virus and threat protection area in Windows Security в редакторе групповых политик.
Введите в поиске Windows: gpedit.msc
Далее пройдите по пути:
Computer Configuration -> Administrative Templates -> Windows Components -> Windows Security -> Virus and Thread Protection.
Убедитесь, что данный параметр GPO не настроен или отключен.
Решение 6. Если окно «Безопасность Windows» не открывается и при запуске появляется ошибка «Вам понадобится новое приложение, чтобы открыть эту ссылку WindowsDefender», попробуйте переустановить приложение Microsoft.SecHealthUI через PowerShell:
Get-AppxPackage Microsoft.SecHealthUI -AllUsers | Reset-AppxPackage

Решение 7. Если ни один из способов не помог, попробуйте сбросить настройки Windows Defender через командную строку:
reg delete "HKLM\SOFTWARE\Policies\Microsoft\Windows Defender" /v
reg delete "HKLM\SOFTWARE\Policies\Microsoft\Windows Defender Security Center" /v
Далее сбросить настройки локальной GPO:
RMDIR /S /Q "%WinDir%\System32\GroupPolicyUsers"
RMDIR /S /Q "%WinDir%\System32\GroupPolicy"
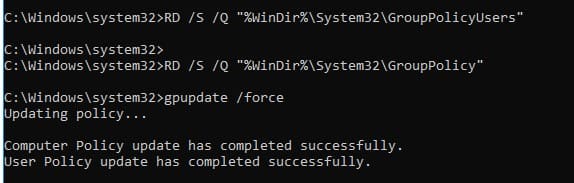
После чего перезагрузить компьютер.
Эти действия должны помочь восстановить доступ к необходимым функциям и ресурсам Windows Defender.
Лицензионный ключ активации Windows 11 от