
Readers help support Windows Report. We may get a commission if you buy through our links.
Read our disclosure page to find out how can you help Windows Report sustain the editorial team. Read more
There’s an error making the rounds on forums regarding the TWAIN driver installation on Windows 10. Users get this message There is no TWAIN-compliant device installed while using their scanners or printers.
Because the TWAIN software acts as a bridge between the scanner hardware and graphic software, it needs to allow an imaging device to acquire an image, and then proceeds to save that image directly into a TWAIN-compliant imaging software application.
If any kind of imaging device is installed without a TWAIN driver, the device will either not work at all, or the OS will freeze or crash.
Continue reading and find all the possible ways to successfully install the TWAIN driver on your OS.
How do I install the Twain driver on Windows 10?
1. Download and install the driver
- Go to the manufacturer’s official website and search for the latest drivers matching your printer or scanner.
- Locate and download the driver.
- Follow the on-screen installation instructions.
- Restart your computer after the installation process is complete.
2. Remove and reinstall the printer/scanner
- Go to Start and click on Settings.
- Go to Devices.

- Select Printers & scanners.
- On the right-hand pane, under Printers & scanners, locate your device.
- Click on it and then select Remove device.
- To reinstall it, select Add a printer or scanner from the same window, Printers & scanners.
- Wait for your device to find it, then select Add device.
- You may be asked to select a name for your printer and enter your Wi-Fi password in order to sync it to your PC.


3. Use an automated software
To this day, the best way to deal with any kind of installation, especially when it comes to a driver, is with the help of third-party software.
No risk involved, safe and easy, all is automated so you don’t even need any computer skills. This know-it-all software will install any outdated, broken, or missing drivers for you.
Even if something goes wrong with installing or fixing the drivers you can perform driver backup to restore the previous version and start from the beginning. However, these are rare cases so you are covered regarding drivers’ matters.
Moreover, using such a tool will help your system to be more optimized and have the latest driver versions running without any difficulties.
⇒ Get Outbyte Driver Updater
4. Update your OS
- Go to Start and click on Settings.
- Go to Update & Security.
- Select Windows Update and click on Check for updates.
- If you see any Windows updates are available, install them.
- Now, install the previously downloaded driver and check if it’ll work.


5. Use the Printer Driver Selection
- Go to Start and click on Settings.
- Go to Devices.
- Select Printers & scanners.
- On the right-hand pane, scroll down to Related Settings, select Print server properties.
- Go to the Drivers tab.
- Click on Add.
- In the Welcome to the Add Printer Driver Wizard, select Next.
- In the Processor Selection dialog box, select your device’s architecture, and then click on Next.
- In the Printer Driver Selection dialog box, select your printer manufacturer from the left and your printer driver from the right.
- Click on Next, then Finish, and follow the on-screen instructions to add your driver.


There you have it, 5 possible methods to successfully install the TWAIN driver on your Windows 10. Let us know in the comment section below which method worked out best for you.
Also, if you have any suggestions, questions, or just want to say a quick thank you, feel free to write it below, and be sure we’ll get back to you.
Vladimir Popescu
Being an artist his entire life while also playing handball at a professional level, Vladimir has also developed a passion for all things computer-related.
With an innate fascination for research and analysis, and realizing many other people share his passion for this subject, he delved into writing Windows-related articles, so other people can also benefit from the acquired information.
When not writing kick-ass articles, Vladimir likes to spend his time doing Crossfit and creating art.
If you have a scanner, you probably know about the TWAIN standard. Today, most scanning devices support TWAIN drivers so that users can enjoy a hassle-free experience while scanning the images. In this article, we will describe what TWAIN is and how you can install TWAIN driver on Windows 11/10 computers.

What is TWAIN and How did it make the image scanning easy?
TWAIN is a standard for scanning devices. It was first released in 1992 for the computers running on Windows and Macintosh operating systems. The release of TWAIN has made the process of image scanning hassle-free. Before TWAIN, users have to select a special application to receive the image from the scanner, then save the image to the disk. After that, they were able to open that image in the software of their choice to work with.
With TWAIN, there is no need to save the scanned image on the disk. TWAIN establishes a communication link between the image processing software and the devices such as scanners, digital cameras, etc. This lets users open the scanned image directly in the software which they use for image processing, provided they have installed a TWAIN driver on their system.
Every brand develops its own TWAIN drivers that support the scanners of that brand. You can download the drivers from the official website of the brand, the scanner of which you are using. Here, we will describe the process to install the TWAIN driver on Windows 11/10 for the five most popular brands:
- HP
- Cannon
- Epson
- Brother
- Xerox
1] HP TWAIN Scan
HP TWAIN Scan is a TWAIN-compliant software developed by HP enterprise for its MFP (Multifunction Printer). It is a free software that allows users to scan their documents and files from their computer connected to a network. The installation package of HP TWAIN Scan includes:
- HP Scan TWAIN driver.
- HP Device Selection tool.
- HP scan software.
Before you begin, make sure that you have updated the firmware of your printer to the latest version. You can find more information about updating the printer firmware from HP.com. After updating the firmware, you have to configure the network and security settings via EWS (Embedded Web Server).
When you are done, follow the below-listed instructions:
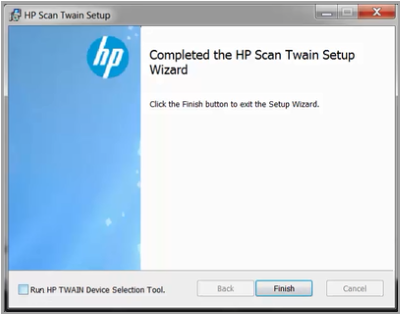
- First, you have to download the HP Scan TWAIN driver from its official website. Please note the location where you save the scan driver file.
- Double-click the downloaded file to run. it will launch the installation wizard.
- Accept the license agreement and follow the on-screen instructions.
- On the HP Scan Twain Setup Wizard window, you will see Run HP TWAIN Device Selection Tool option at the bottom left side. If you select the checkbox adjacent to it, the HP TWAIN Device Selection tool will be installed automatically. If you deselect the checkbox, you have to install the tool manually.
- Click Finish to complete the setup.
HP TWAIN Scan is now installed on your computer.
2] Canon ScanGear Tool
Canon ScanGear tool is a TWAIN-compliant driver for the Canon scanner. Different versions of this tool support different Windows 10 architecture. You can visit Canon’s official website for more information. Follow the below-listed steps to install the Canon ScanGear tool on your computer:
- Visit Canon’s official website and download the Canon ScanGear Tool.
- The file will be downloaded in the self-extracting format.
- After downloading the file, double-click on it and the file will decompress automatically.
- The decompressed file will be available in a new folder of the same name as the compressed file.
- Open the folder containing the decompressed file. Double-click on the file to run.
- Follow the on-screen instructions to install the Canon ScanGear Tool.
3] Epson Scan and Epson Scan 2
Epson Scan and Epson Scan 2 are TWAIN-compliant drivers. The former supports 32-bit Windows architecture and the latter supports both 32-bit and 64-bit Windows architectures. You can download the web installer of these drivers from Epson’s official website or order a software CD.
Do note that you cannot use both Epson Scan and Epson Scan 2 on the same computer. For example, if you have installed Epson Scan on your system and you want to install Epson Scan 2, you have to uninstall the Epson Scan before installing Epson Scan 2.
Follow the below-listed instructions:
- Insert the software CD that you have ordered from Epson into the CD-ROM of your system.
- Click on the installation file and follow the on-screen instructions.
If you have downloaded the Epson Scan or Epson Scan 2 driver software from Epson’s official website, first, extract it if it is downloaded in the zip format. Then, click on the installation file to run it and follow the on-screen instructions.
4] Brother MFL-Pro Suite
Brother MFL-Pro Suite software comes with a TWAIN-compliant scanner driver. You can download either MFL-Pro USB or MFL-Pro Wireless scanner driver depending on your scanning device. We will explain here the installation instructions for both USB and wireless Brother scanner drivers.
Brother MFL-Pro Suite USB installation instructions
- Download the complete driver and software package from Brother’s official website and double-click on the installation file to run it. If you have ordered Brother CD, insert it into the CD ROM of your system.
- Accept the license agreement and click Next.
- Now, select Local Connection (USB) and then click Next.
- Now, you will be asked to connect the Brother machine to your computer via a USB cable. But before that make sure that you have turned ON the Brother machine.
- Select your Brother device model from the list and click Next.
- Select the Standard (Recommended) option and click Next.
- On the “Additional Software” screen, you can select any software from the list or leave it blank. Click Next.
- On the “Additional Options” screen, select the checkbox adjacent to the Desired optional software and click Next.
- Click Finish. The installation process is now complete.
Brother MFL-Pro Suite Wireless installation instructions
Download the software from Brother’s official website or run software CD. Run the installation file. You will see the installation wizard. Accept the license agreement and click Next.
Select the wireless network (Wi-Fi) and click Next. Connect your Brother machine to the Wi-Fi network and select your machine from the list. When done, click Next. You should connect your computer and Brother machine to the same Wi-Fi network, otherwise, you will not see your machine in the list.
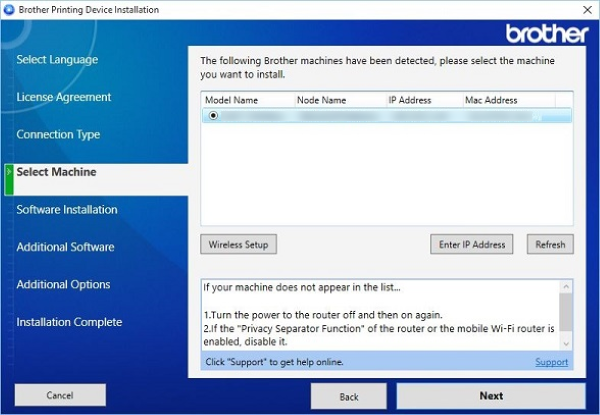
If despite connecting both computer and Brother device to the same network, you will not see Brother machine in the list, restart your router and wait for a minute. After that click Refresh.
Read: How to connect a Wireless Printer to Windows PC.
The remaining steps are the same as steps 6 to 9 of the Brother MFL-Pro Suite USB installation process described above.
5] Xerox WorkCenter Pro TWAIN Scan Driver
Visit Xerox’s official website and download the WorkCenter Pro TWAIN Scan driver. The file will be downloaded in a zip format. Extract it. This will create a new folder of the same name as the zip file. This folder contains the WorkCenter Pro TWAIN Scan driver file.
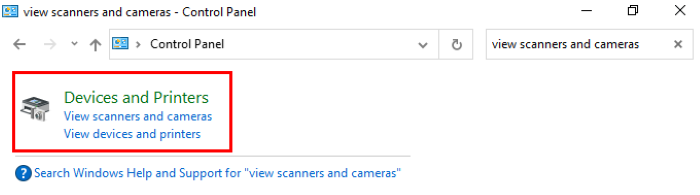
Launch the Run dialog box. Type Control Panel and click OK. Type View scanners and cameras in the search box and click on the respective link.
A new window will open. Click on the Add Device button. Click Yes if the UAC window prompts. This will open the Scanner and Camera Installation Wizard.
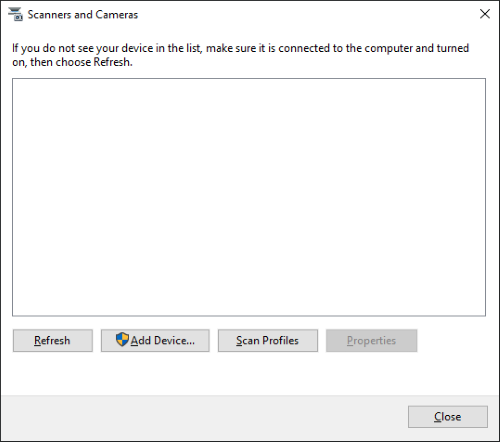
Now, click Next and then click on the Have Disk button.

Now, click on the Browse button and select the TWAIN driver file. Click Open and then OK. Now, you will see the Xerox WorkCenter Pro TWAIN Scan driver in the installation wizard window. Click Next. In the Name field, you can enter a new name or go with the default name. After that, click Next.
Now, Windows will display the Hardware Update Wizard. Click Next. If you get a warning message “The software you are installing has not passed Windows Logon testing,” select Continue Anyway.
Enter the printer’s Host Name or IP address in the required field and click Confirm. Click Next and then Finish. The driver is now installed on your computer.
There is no TWAIN-compliant device installed
After installing the TWAIN driver on your system, you can start scanning your documents and files. But, some users have reported that they were unable to scan their documents and files even after installing and configuring the TWAIN driver due to the following error message:
There is no TWAIN-compliant device installed
If you are also experiencing the same error on your system, the following troubleshooting steps may help you:
- Run the Hardware and Devices Troubleshooter.
- Disable the security software temporarily.
- Uninstall and reinstall the printer or scanner.
1] Run Hardware and Devices Troubleshooter
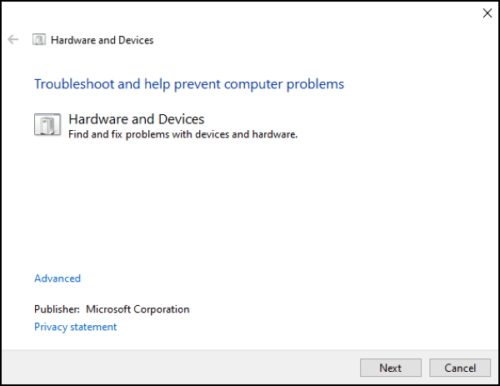
Windows troubleshooter is a built-in tool that scans for errors and fixes them if possible. You can run Hardware and Devices Troubleshooter on your system and see if it helps. This tool is hidden in Windows 10. Hence, you will not find it in the Settings app.
2] Disable your security software temporarily
Sometimes antivirus software blocks some programs from running. This may also be the cause of the error “no TWAIN-compliant device installed.” You can try disabling the Windows Defender or your antivirus software temporarily and check if it helps.
Do not forget to enable the security software again.
3] Uninstall and reinstall the printer or scanner
Please follow the instructions listed below:
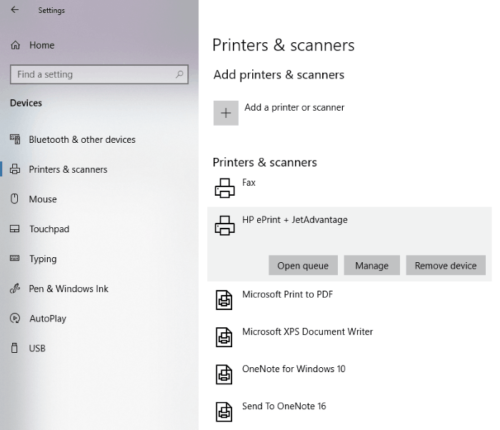
- Open the Settings app and click on Devices.
- Select Printers & Scanners from the left pane.
- Select the printer or scanner on the right side and then click on the Remove device button.
- Visit the manufacturer’s website and download the latest printer or scanner driver.
- Install the drivers and restart your system.
- Open Printers & Scanners in the Settings app again and click on the Add a printer or scanner button. Windows will detect the device automatically. If it does not detect the device, click on the link “The printer that I want isn’t listed.”
- Select your printer or scanner and follow the on-screen instructions.
Hope this helps.
Related posts:
- Why is my printer offline?
- Scanner is not working on Windows.
У многих возникает вопрос: как настроить сканирование на МФУ Kyocera с помощью TWAIN-драйвера. Давайте разберём этот вопрос.
1. Скачайте и установите драйвер сканера
Первым делом необходимо скачать сам драйвер сканера. Сделать это можно в разделе «Центр поддержки» на официальном сайте Kyocera. Перейдя по ссылке, найдите Ваше МФУ с помощью поля поиска, после чего перейдите на страницу устройства, в раздел «Драйверы»
Найдите в списке драйверов «TWAIN scanner driver» (может называться иначе, однако в названии нужного вам файла всегда будет слово «TWAIN»), скачайте его и установите.
После установки драйвера, запустите утилиту «Kyocera TWAIN Driver», которая устанавливается вместе с драйверами. Найти её можно в списке всех программ в меню Пуск — папка «Kyocera».
2. Добавьте новое устройство
Нажмите кнопку «Добавить…»:
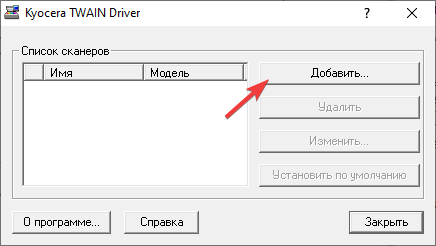
В окне добавления устройства:
- В поле «Имя» введите произвольное имя, которое будет отображаться в списке устройств в программах сканирования. Во избежание путаницы в будущем, рекомендуем вводить в это поле модель вашего МФУ
- В выпадающем списке «Модель» выберите модель Вашего устройства, чтобы утилита правильно подобрала параметры работы со сканнером.
Обратите внимание: сетевые модели в списке числятся дважды, например «ECOSYS M2540dn» и «ECOSYS M2540dn (USB)». Если МФУ подключено по Wi-Fi или интернет-кабелю – выбирайте модель без приписки «(USB)», а если по USB – с припиской. - Если МФУ подключено к локальной сети через интернет-кабель или Wi-Fi, то в поле «Адрес сканера» укажите IP-адрес или хост-имя МФУ.
При подключении через интерфейс USB – указывать IP-адрес не нужно.
После завершения настройки драйвера сканера, нажмите кнопку «ОК».
3. Пользуйтесь
На этом настройка сканера Kyocera завершена. Некоторым компьютерам требуется перезагрузка для начала работы с TWAIN-устройствами, так что если сканирование будет недоступно (часто это происходит с ошибкой «Сканер занят» или при попытке сканирования бесконечно висит сообщение «Ожидание сканера»), в первую очередь перезагрузите компьютер.
Для сканирования Вы можете использовать любую программу для сканирования с поддержкой TWAIN, например:
- NAPS2
- PaperScan
- HippoScan
Сразу ответим на несколько насущных вопросов:
- Сканирование не работает даже после установки и настройки драйвера, убедитесь в том, что:
- Вы выбрали корректную модель устройства в настройке драйвера, а также верно задали её тип подключения (сетевое или USB)
- Убедитесь, что МФУ в принципе включено

- В случае сетевой модели Kyocera (работающей по Wi-Fi или интернет-кабелю), убедитесь, что компьютер видит ваше МФУ. Для этого откройте командную строку и выполните следующую команду:
ping X.X.X.X
Вместо X.X.X.X подставьте IP-адрес устройства или его хост-имя. В результате выполнения этой команды, все пакеты должны быть отправлены и получены. Потерь быть не должно. Если потери есть, но несколько пакетов дошло (или задержка при отправке пакетов более 100мс) – вероятно, плохое качество сигнала Wi-Fi или проблемы с интернет-кабелем. Если все пакеты потеряны, скорее всего МФУ не подключено к сети или имеет другой IP-адрес. - В программе сканирования вы выбрали нужное МФУ, с которого будет производиться сканирование. Например в NAPS для этого необходимо создать профиль сканирования, выбрать «TWAIN» и выбрать созданное в настройках драйвера устройство.
- На МФУ не отображается ошибок на экране и не активны световые индикаторы ошибок на передней панели, поскольку некоторые модели МФУ Kyocera не позволяют запускать процесс сканирования при наличии ошибок. Некоторые ошибки на МФУ Kyocera можно временно сбросить (обычно до первой перезагрузки МФУ) нажатием на передней панели кнопок Отмена – ОК (Cancel – OK)
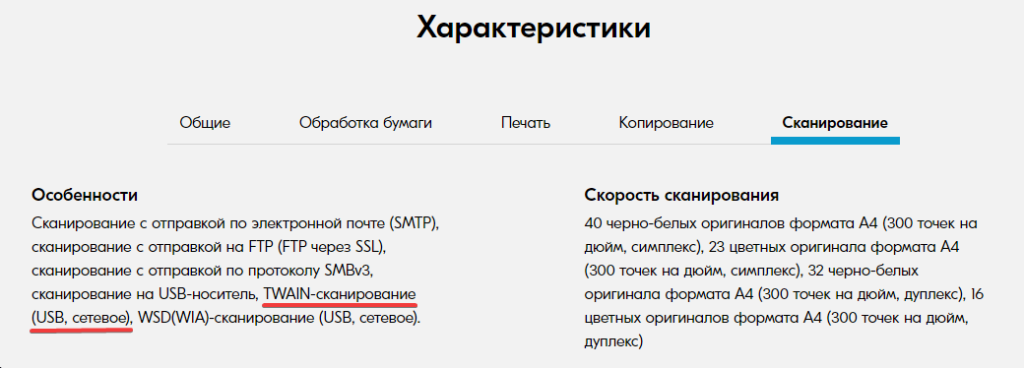
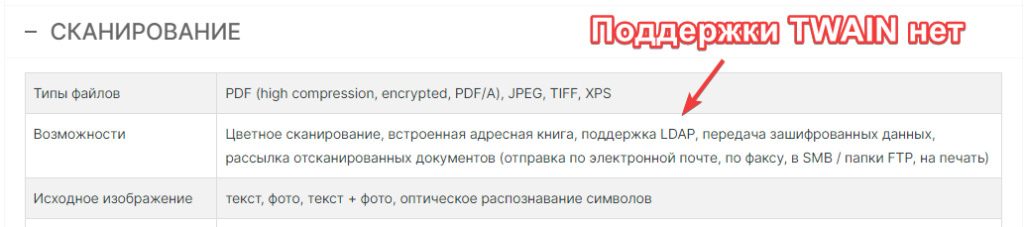
- Убедитесь, что у устройства в принципе есть поддержка TWAIN. Некоторые, в особенности старые устройства Kyocera, не имеют поддержки TWAIN, или же умеют сканировать через TWAIN только по локальной сети (не по USB).
Данную информацию можно найти на официальном сайте Kyocera, в характеристиках продукта, в разделе «Сканирование», например:
Для старых устройств, которых нет на официальном сайте, придётся искать информацию на сторонних сайтах:
Также на всякий случай проверьте работу в другой программе для сканирования. На нашем опыте бывало так, что одна программа по какой-то причине не хочет работать с конкретным устройством, а другая – работает корректно и полноценно.
- Есть ли у Kyocera своя полноценная программа для сканирования, например как у Canon, Xerox или HP?
Для некоторых моделей своих МФУ, компания Kyocera добавляет поддержку ПО для сканирования. Данное ПО называется «Kyocera Quick Scan». Найти его можно на странице драйвера, в разделе «Программное обеспечение»:
- В процессе установки драйвера, установились драйвера и на WIA, и на TWAIN. Какой лучше использовать?
В случае с Kyocera, по нашему опыту, лучше использовать TWAIN драйвер, так как в подавляющем большинстве случаев у данного производителя он работает менее проблематично, нежели WIA. Если по какой-то причине TWAIN-драйвер всё-таки проявляет проблемы при своей работе, можно попробовать использовать WIA или установить другую версию драйвера TWAIN. - Сканер то сканирует, то выдаёт ошибки. Печать при этом всегда работает без проблем.
В случае USB-сканирования, чаще всего данная проблема происходит, если кабель USB изношен, плохого качества или слишком длинный. Мы рекомендуем приобретать USB-кабели длиной не более 1.5 метра, с ферритовыми фильтрами, которые защитят кабель от наводок и помех, либо экранированные кабели длиной до 3 метров.
В случае сканирование по сети, данная проблема может быть связана с плохим сигналом Wi-Fi, проблемами с интернет-кабелем или сетевым оборудованием, либо же с большой загрузкой локальной сети.
Дело в том, что сканирование на всех МФУ более привередливо, нежели печать, поскольку механизм передачи информации между МФУ и компьютером при этих действиях отличается, и сканирование может «запнуться» буквально из-за малейших помех при передаче информации с МФУ на компьютер, что выдаст ошибку сканирования.


В случае, если вы не можете самостоятельно «победить» настройку сканера Kyocera, или же вам нужна какая-либо помощь с устройством данного производителя, вы можете связаться с нами по телефону +7 (84635) 3-84-52 или через сообщения Jivo (в правом нижнем углу этой страницы). Мы попробуем оказать вам информационную поддержку или удалённую помощь (вам будет необходимо установить программу удалённого доступа, чтобы мы могли подключиться к вашему компьютеру).
When it comes to managing various scanning devices, the TWAIN driver plays an essential role. It acts as a bridge between the software applications on your computer and your imaging devices, such as scanners and cameras. If you’re looking to install the TWAIN driver on your Windows 11 or Windows 10 machine, you’ve come to the right place. This article will provide a comprehensive guide on TWAIN driver installation, complete with troubleshooting tips and recommendations for optimal use.
Understanding TWAIN and Its Importance
Before diving into the installation process, let’s clarify what TWAIN is. TWAIN is a standard protocol that facilitates communication between software applications and imaging devices. It was developed in the 1990s to standardize the way in which applications can interact with scanners and cameras, ensuring compatibility across different hardware and software platforms.
The Role of TWAIN Drivers
TWAIN drivers enable your computer to communicate effectively with your hardware devices. Without them, your scanner would not be recognized by your software, rendering it impossible to capture images, documents, or other forms of media. By installing the correct TWAIN driver, you not only gain access to your imaging devices but also unlock various functionalities that can enhance your productivity.
Prerequisites for Installation
Before you install the TWAIN driver, there are a few prerequisites you should have in place:
- Compatible Operating System: Ensure your computer runs Windows 11 or Windows 10.
- Scanner or Image Capture Device: You should have a supported scanner or camera that has a TWAIN interface.
- USB or Network Connection: Make sure your scanner is properly connected to your computer either via USB or over your local network.
- Administrative Rights: You may need to have administrative privileges on your machine to complete the installation successfully.
Step-by-Step Guide to Installing TWAIN Driver on Windows 11/10
1. Confirm the Compatibility of Your Scanner
Before installing any drivers, it’s crucial to ensure that your scanner or imaging device is compatible with Windows 10 or 11. Visit the manufacturer’s website to check for Windows compatibility. Often, the most recent models will have updated drivers that natively support newer operating systems.
2. Download the TWAIN Driver
Once you’ve confirmed compatibility, it’s time to obtain the TWAIN driver. The best way to do this is through the manufacturer’s website. Follow these steps:
- Find the Support or Download Section: Navigate to the ‘Support’, ‘Download’, or ‘Drivers’ section of the manufacturer’s website.
- Select Your Scanner Model: Locate your specific scanner model. Ensure you select the correct model to avoid issues with an incorrect driver.
- Choose the Right Operating System: Select Windows 10 or Windows 11 as your operating system.
- Download the Driver: Click the download button to obtain the TWAIN driver. This file will usually be in ZIP or EXE format.
3. Prepare for Installation
After you have downloaded the driver:
- Check for Antivirus Software: Temporarily disable any antivirus or firewall software to avoid interference during the installation process.
- Extract Files (if necessary): If the driver is downloaded as a ZIP file, right-click the file and choose “Extract All,” saving it to a known location on your computer.
4. Install the TWAIN Driver
Now that you have the necessary files ready, here’s how you can install the driver:
- Run the Installer: If the driver downloaded as an EXE file, locate it and double-click to run the setup.
- Follow the Installation Wizard: A wizard will guide you through the installation process. Usually, you will need to agree to the license agreement and select the installation location.
- Connect Your Scanner: If prompted, connect your scanner to the computer. Make sure the scanner is powered on.
- Complete the Installation: Once you’ve followed all the prompts, finish the wizard. Restart your computer to ensure that all changes take effect.
5. Verify the Installation
After restarting your computer, it’s time to confirm that the TWAIN driver is properly installed:
- Open the Device Manager: Right-click on the Start menu and select «Device Manager.»
- Locate Your Scanner: Expand the “Imaging devices” section to see if your scanner is listed there.
- Test the Scanner: You can also perform a simple test by opening a scanning application (like Windows Fax and Scan or a third-party scanning program) and trying to scan a document.
6. Troubleshooting Common Issues
Sometimes, you may encounter issues during or after the installation of the TWAIN driver. Below are some common problems and how to resolve them:
Driver Not Found
If your scanner is not recognized, follow these steps:
- Verify Connection: Check that the USB cable or network connection is secure.
- Check Compatibility: Ensure your device is listed as compatible on the manufacturer’s website.
- Reinstall the Driver: If issues persist, uninstall the driver and try reinstalling it following the steps outlined above.
Scanner Shows ‘Offline’
If your scanner shows an offline status:
- Restart the Scanner: Sometimes, simply turning the device off and back on can solve connection issues.
- Check Network Configuration: If you are using a network scanner, ensure that the network settings are correct.
Quality Issues During Scans
If you notice that the scans are of poor quality, make sure to:
- Adjust Scanner Settings: Open the scanning software and adjust resolution/settings for optimal results.
- Clean the Scanner: Dust and debris on the scanner bed can affect the quality of the scan. Clean the surface carefully with a lint-free cloth.
Keeping Your TWAIN Driver Updated
After successfully installing your TWAIN driver, it is equally important to keep it updated. Manufacturers often release updates to enhance functionality and fix bugs. Here’s how to stay up to date:
1. Regular Checks
Periodically visit the manufacturer’s website to check if there is a new version of the TWAIN driver available for your device.
2. Enable Automatic Updates
For some devices, you can enable automatic updates. This way, your computer will automatically receive the latest drivers whenever they are released.
3. Use Device Manager
You can also use Device Manager to check for updates:
- Right-click on the Start menu and select «Device Manager.»
- Locate your scanner, right-click, and select «Update driver.»
- Follow the prompts to automatically search for the latest driver software.
Additional Tips for Smooth Scanning
To optimize your scanning experience, consider the following tips:
- Choose the Right Software: While TWAIN allows your hardware and software to communicate, choosing dedicated scanning software can enhance performance. Research the best scanning software for your needs.
- Regular Maintenance: Keep your scanner clean and perform regular calibrations if your device supports it. This can help ensure an extended lifespan for your machine.
- Explore Features: Many scanners have advanced features like auto-cropping, OCR (Optical Character Recognition), and color adjustments. Make sure to explore these features to maximize productivity.
Conclusion
Installing the TWAIN driver on Windows 11 or Windows 10 is essential for ensuring seamless communication between your scanning device and software applications. Following the steps outlined in this article will help you successfully install the driver and troubleshoot any issues that may arise. By keeping the driver updated and maintaining your scanner regularly, you can enjoy a smooth scanning experience tailored to your needs.
In an ever-evolving digital landscape, understanding and leveraging tools like the TWAIN driver is crucial for efficient workflows. So whether you’re scanning family photos, important documents, or artwork, a well-installed TWAIN driver will ensure that you achieve the results you desire.
TWAIN is a useful software that serves as a bridge between the scanner hardware and graphic software. With it, you can have all your scanned images in a graphic editor within several minutes. In this article, we will explain how to install and use a TWAIN driver.
What is the TWAIN driver?
TWAIN is a handy application designed to automatically scan the images into different graphic programs such as Photoshop, Illustrator, InDesign and many more.
With TWAIN driver installed you can have your image in a program to work with it in one click without having to save it first and wait for the upload. Often the TWAIN driver software comes with scanner hardware.
If for some reasons you don’t have an installation CD, you can also download the software on the official website of your scanner manufacturer or try similar built-in programs, such as ImageKit for Mac OS or built-in WIA (Windows Image Acquisition) for Windows OS. You can also use third-party scanning software such as VueScan or SilverFast
How to Install TWAIN Driver?
To install the TWAIN driver first you will need to verify that your scanner is well installed on your PC. To do so, go to Start > Settings > Control Panel and double-click on the System. If the model of your scanner appears here, it means that it is well connected.
Insert the CD with TWAIN driver into the CD-ROM of your computer and follow the installation instructions. The process will take up to 10 minutes and after this, you can restart your PC and use your scanner as well as TWAIN driver.
How to use TWAIN Driver Windows 10?
If you successfully installed the TWAIN Driver you can start using it.
Load the original document into your scanner and open Adobe Photoshop (or any other graphic program compatible with TWAIN) and go to File > Import > TWAIN driver.
In the new prompt window select the device (your scanner) and click on Connect, then perform scanning. When the document will be scanned it will automatically appear in your Photoshop and you can work with it.
Need more help with drivers? Check out our Forum!