
INTRODUCTION
The Windows Update Web site provides security updates for Microsoft Windows operating systems. The Microsoft Update Web site provides these updates in addition to updates for other Microsoft programs, such as Microsoft Office. By default, your Microsoft Windows 2000-based, Microsoft Windows Server 2003-based or Microsoft Windows XP-based computer will access the Windows Update Web site. If you would like to receive updates for other Microsoft programs please perform the steps that are listed below.
More Information
I am currently using Windows Update. How can I access Microsoft Update?
To use Microsoft Update instead of Windows Update, follow these steps:
-
Visit the following Microsoft Web site:
http://update.microsoft.com/microsoftupdate
-
Click Start Now.
-
On the Review the license agreement page, click Continue.
-
Click Install.
Note You may not be prompted to install the Microsoft Update software if this software is already available on the computer.
After you successfully install the software, a Microsoft Update shortcut is added to the All Programs menu on the Start menu.
I am currently using Microsoft Update. How can I access Windows Update?
To stop using the Microsoft Update Web site and start using the Windows Update Web site, follow these steps:
-
On the Microsoft Update site, click Change Settings.
-
Scroll down the page, click to select the Disable Microsoft Update software and let me use Windows Update only check box, and then click Apply changes now.
-
You receive the following message:
Windows Automatic Updates will not be able to deliver updates from Microsoft Update Service.
Are you sure you want to continue?Click Yes.
For more information about a related topic, click the following article number to view the article in the Microsoft Knowledge Base:
327838 How to schedule automatic updates in Windows Server 2003, in Windows XP, and in Windows 2000
Need more help?
Want more options?
Explore subscription benefits, browse training courses, learn how to secure your device, and more.
In this post, we will show you how to effectively and completely block, stop, disable, and turn off Windows Update in Windows 11/10 so that you can install it when you want to. You will need to disable Windows Update Service, WaaSMedicSVC, Set the Network as a Metering connection, or use a Tool.
Some background information before you proceed!
There is no option to stop or turn off Windows Updates using the Control Panel or Settings app in Windows 11/10, as it used to be with earlier versions of Windows. But there is a workaround to disable or turn off Windows Update in Windows 11/10, that we’ll talk about in this post.
First, let us take a look at why people may want to turn off Windows updates.
Turn off Automatic Windows Update in Windows 8.1 and earlier versions
With Windows 8.1 and earlier versions, we had Windows Update giving us options to:
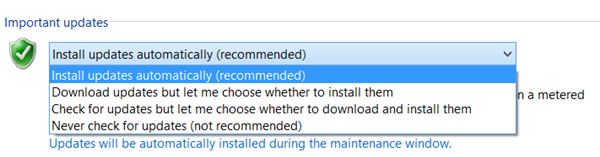
- Install updates automatically (Recommended)
- Download Updates but choose when to install them
- Check for updates but let me choose whether to download and install them
- Never check for updates (Not Recommended)
These options provided a way to defer updates until we had enough time to download and install them or to have them downloaded automatically and then install them at a time we wish. These options are not present in Windows 11/10 Update & Security Settings now.
Turn off or Pause Automatic Windows Update in Windows 10
Now in Windows 10, open Settings app > Update and Security > Windows Update > Advanced Options, you will see the following settings:
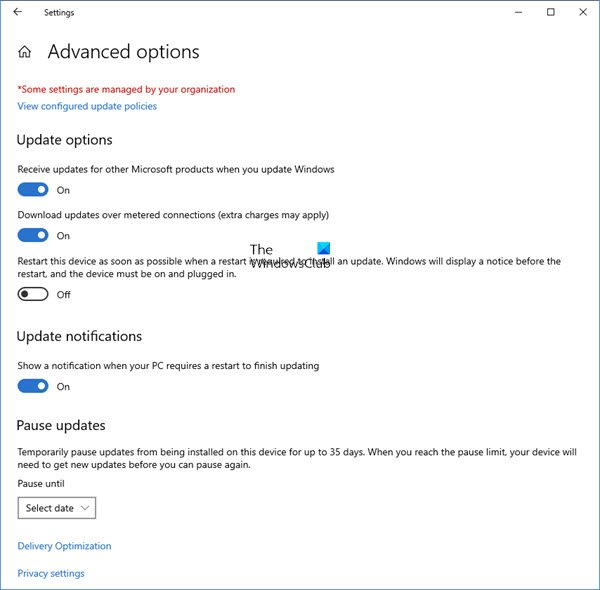
Microsoft has explained that it will provide updates in two distinct methods for its two distinct types of clients.
The Home users now have the option to pause Windows Updates. Earlier they did not have this option. Windows 10 will also let you defer restart, but that is not enough because a download in the background might slow down your browsing in some cases.
The other ring of users are Enterprise users who will have the option to delay updates so that they can hold it to the time when they are free. Microsoft said it would push updates to such users less frequently so that they are faced with minimum downtime. These are the corporates and real-time users such as hospitals and ATMs etc.
Coming back to Home users and Professional users, there is not even the option to delay the updates. They will be downloaded as soon as they are available. The availability of Windows Updates for normal users means that the updates have already been tested by Windows Insiders. If you are a Windows Insider, running Windows 10 Home or Pro, you will be in priority to receive updates. After a few days of you testing the updates and if it doesn’t pose any problems, it will be released to the normal ring of users.
Thus, you are stuck. Windows 11/10 will keep on downloading updates as soon as they are available and will occupy your computer resources, when you may not want it too. Some of us will want to keep the automatic downloads to be stopped so that we can install the updates manually when free – when we are not working on something urgent. That is to say; some users would want the liberty and option to download and install updates when they want and not when Microsoft provides them.
Since there is no option to turn off Windows updates from Control Panel or PC Settings, here is a workaround.
Read: Windows Update enables itself even after turning it Off.
Pause or Stop Automatic Updates in Windows 11
It is good to keep your computer up to date, but sometimes, you may want to manually update your computer instead of allowing the system to install it automatically. Therefore, in this article, we are going to see how to stop Automatic Updates in Windows 11. These are the following ways by which you can stop or defer or pause automatic updates in Windows 11 via Settings.

First of all, the easiest way to stop automatic updating of Windows for a few days would be to change your Windows Settings and in this section, we are going to see how to do the same.
To pause automatic updates from Windows Settings, follow the given steps.
- Open Settings by Win + I.
- Go to Windows Updates.
- Click Pause for 1 week.
After this, your computer will not automatically install new updates for a week, but in the meantime, you can manually update your computer.
Completely Turn off Windows Updates in Windows 11 or Windows 10
To completely stop or disable automatic Windows Updates in Windows 11/10, you will have to:
- Disable Windows Update & Windows Update Medic Services
- Change WU settings using the Group Policy Editor
- Set your network connection to ‘Metered’
- Use a free tool that lets you disable automatic updates.
Now let us see each of these suggestions in detail.
1] Disable Windows Update & Windows Update Medic Services
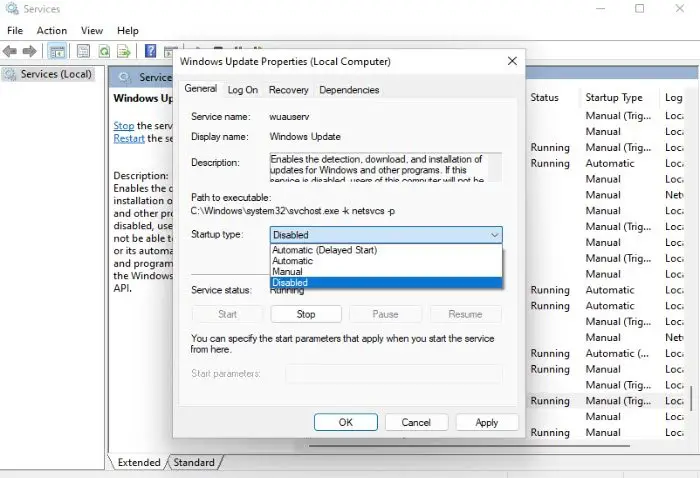
Next up, we have another method for you to turn off automatic updates, that is, by stopping the Windows Update service.
If you want to stop Windows Update Service, use the following steps.
- Open Services from the Start Menu.
- Look for the ‘Windows Update’ service.
- Right-click on it and select Properties.
- Change the Startup type to Disabled and click Apply > Ok.
You need to also disable the Windows Update Medic Service or WaaSMedicSVC. The Windows Update Medic Service is a new Windows Service introduced in recent versions of Windows 10. This Service has been introduced to repair Windows Update components from damage so that the computer can continue to receive updates. We recommend you try this method first.
You can disable the Windows Update Medic Service via Windows Services Manager. In the Services window, scroll down to Windows Update Medic Service and turn off the Service. To turn it off, right-click on the process, click on Properties and select Disabled. That will take care of Windows Updates not being installed on your machine.
Now, if you ever want to enable the Service, follow the aforementioned steps, but this time, change the Startup types to Automatic.
Do remember to install updates though!
Since Windows is a Service now onwards, you have to keep your computer updated. To be able to install the next set of features or a newer build, you will require the earlier updates to be installed. That’s why if you use the above workaround, you will have to go to the Windows Services Manager and turn it on once in a while to download and update your copy of Windows.
After you turn on the Windows Update Service, when you open Windows Update in Settings, you will see a message that updates were not installed because the computer was stopped. You will have to click on Retry so that all the available updates are downloaded and installed. This may take two or three “Check for Updates” tries. You will have to keep on clicking “Check for updates” until it says your computer is up to date. Then you can go back and turn off the Windows Update service until the next time you feel you are free enough to spend time updating your copy of Windows 11/10.
2] Change WU settings using the Group Policy Editor
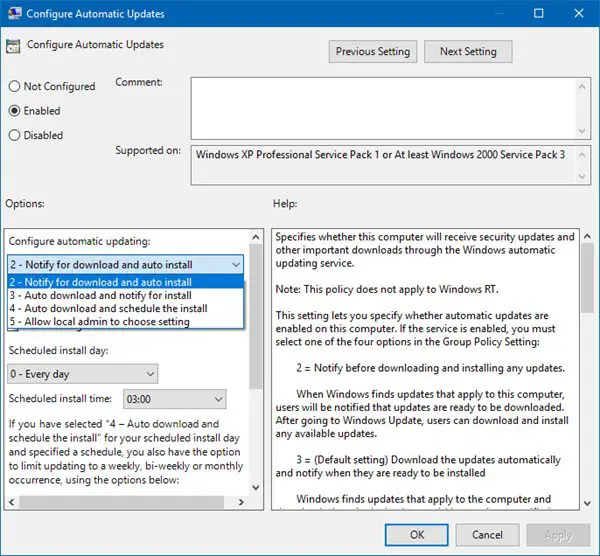
If your version of Windows 11/10 has Group Policy, you can also change some settings using the Group Policy Editor. Run gpedit and navigate to the following policy setting:
Computer Configuration > Administrative Templates > Windows Components > Windows Update.
On the right side, double-click on Configure Automatic Updates and change its settings to suit your requirements.
In Windows 11 23H2 and later, you may see this Configure Automatic Updates policy under the Manage end user experience folder on the right side.
Once you configure the settings, you will see the result in the Settings app as follows:
Read: How to configure Windows Updates using Registry.
We do not recommend that you disable automatic Windows Update in Windows 11/10. If your computer is fine with downloads in the background and doesn’t affect your work, it is not advisable to do it. But if you face a slowdown of the computer due to updates downloading and installing in the background, the above tip to turn off Windows updates in Windows 10 will be of some help.
3] Set your network connection to ‘Metered’
Setting your network connection to ‘Metered’, can also stop Windows 11/10 from automatically downloading the Updates. You can do it as follows – Settings app > Network & Internet > WiFi > Advanced options. Move the slider to On position for Set as metered connection.
Windows 10 users: This post will show you how to set Metered Connection in Windows.
Windows 11 users: If you enable Metered Connection on a network, your Windows 11 computer won’t automatically download the update when connected to that particular network. Follow the given steps to do the same.
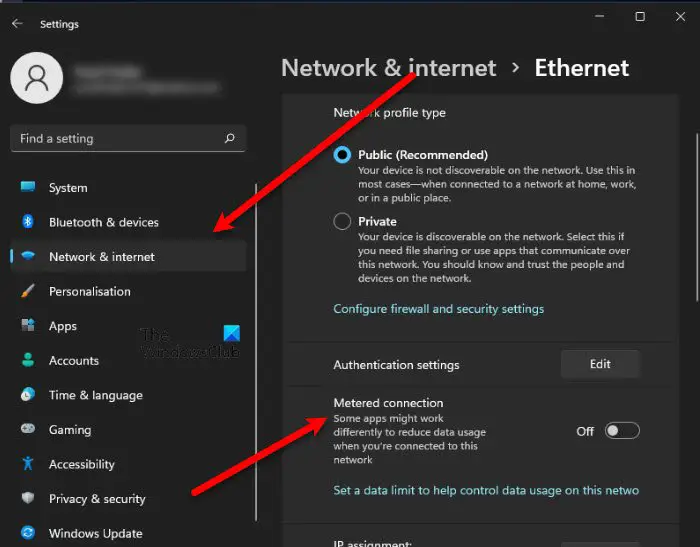
- Open Settings from the Start Menu.
- Click Network & Internet > Properties.
- Now use the toggle to enable Metered connection.
Now, your computer will download updated automatically when you are connected to that network.
4] Tools that help you block automatic Windows Updates
Here is a list of some free Windows Update Blocker tools to Stop Automatic Windows Updates. You might want to take a look at them as they allow you to control Windows 11/10 Updates with a click.
- Windows Update Blocker
- StopUpdates10
- Wu10Man
- Kill-Update
- WuMgr
- Win Update Stop
- Win Updates Disabler
- WAU Manager.
Incidentally, Microsoft has released a tool called Show or Hide Updates that allows users to hide or block specific unwanted Windows Updates. Using it, you can stop Windows 11/10 from downloading specific updates.
Is it safe to turn off Windows Update in progress?
No, you should never turn off your computer when installing the update. Doing so can lead to serious issues, such as BSOD or corrupted Windows. If you are not sure whether you want to use the update in question, you can always roll back to the previous version. But stopping the ongoing update should not be an option.
What if I don’t update Windows?
Updates are primarily used by Windows to roll out bug fixes and add new features to the Operating System. However, if you are happy with your OS’s current features and stability, you can skip updates for some time.
But eventually, you have to update as you can’t afford to run an outdated OS. Otherwise, some of the applications will stop working and you will experience other failures. Even some of the games want the latest version of Windows. Therefore, it is always recommended to keep your system up to date.
Related reads:
- Make Windows 11/10 notify you before downloading Updates
- How to configure Windows Updates using Registry in Windows Server
- How to stop automatic Driver updates
- Stop Windows 11/10 from upgrading your computer automatically.
Key Points
- Pause Updates Temporarily: Go to Settings > Windows Update > Pause updates for up to 5 weeks.
- Disable via Group Policy (Windows Pro & Enterprise): Open gpedit.msc, navigate to Computer Configuration > Administrative Templates > Windows Components > Windows Update, then enable Configure Automatic Updates and select Disabled.
- Turn Off via Registry Editor: Open regedit, navigate to
HKEY_LOCAL_MACHINE\SOFTWARE\Policies\Microsoft\Windows\WindowsUpdate\AU, create or modify NoAutoUpdate (DWORD) and set it to1. - Disable Windows Update Service: Open Services (
services.msc), find Windows Update, set Startup type to Disabled, and stop the service.
Are you searching for how to disable Windows updates in Windows 10 or 11? This guide can help.
Windows updates are essential to keeping your system safe with access to the latest tools and features. Updates provide bug fixes, performance improvements, and, perhaps most importantly, security patches that protect your device from potential threats.
Still, there are a few reasons why you may want to disable Windows updates—either temporarily or permanently.
Automate Windows Update Management
Managing Windows updates can be complex and time-consuming. Try NinjaOne for free and automate your update processes to ensure your systems are always up-to-date and secure.
How to disable Windows update in Windows 10
Windows 10 offers several methods to disable Windows updates. Let’s explore four of the most effective ways:
Option 1: Disable the Windows update service
One way to disable Windows updates is by stopping the Windows Update service. Here’s how you can do it:
- Press the Windows key + R on your keyboard to open the Run dialog box.
- Type “services.msc” and press Enter to open the Services window.
- Scroll down and locate the “Windows Update” service.
- Right-click on the service and select “Properties.”
- In the Properties window, change the “Startup type” to “Disabled.”
- Click on “Apply” and then “OK” to save the changes.
By disabling the Windows Update service, you prevent Windows from automatically checking for and installing updates. However, remember that this method only disables the service temporarily and will not prevent updates from being installed when the service is enabled again.
Option 2: Change Group Policy Editor settings
Learning to stop Windows Updates through the Group Policy Editor is also helpful. Here’s how you can use this method:
- Press the Windows key + R on your keyboard to open the Run dialog box.
- Type “gpedit.msc” and press Enter to open the Group Policy Editor.
- Navigate to “Computer Configuration” > “Administrative Templates” > “Windows Components” > “Windows Update.”
- Double-click on “Configure Automatic Updates” to open the settings.
- Select the “Disabled” option to turn off automatic updates.
- Click on “Apply” and then “OK” to save the changes.
Using the Group Policy Editor allows you to have more granular control over Windows updates. You can choose to disable automatic updates entirely or configure specific update settings according to your preferences.
Option 3: Meter your network connection
Windows 10 includes a feature called “Metered Connection,” which can be used to limit the data usage of certain network connections. By setting your network connection as metered, you can effectively prevent Windows from automatically downloading and installing updates. Here’s how you can do it:
- Open the “Settings” app by pressing the Windows key + I on your keyboard.
- Click on “Network & Internet” and select “Wi-Fi” or “Ethernet,” depending on your connection type.
- Scroll down and click on “Advanced Options.”
- Toggle the switch under “Metered Connection” to turn it on.
When your network connection is set as metered, Windows will not automatically download or install updates. However, keep in mind that this method can also prevent other apps from downloading updates or syncing data, so use it judiciously.
Option 4: Use the Windows Registry
The Windows Registry allows you to turn off automatic updates by modifying various system settings. Here’s how you can disable Windows updates using the Registry Editor:
- Press the Windows key + R on your keyboard to open the Run dialog box.
- Type “regedit” and press Enter to open the Registry Editor.
- Navigate to the following key: HKEY_LOCAL_MACHINE\SOFTWARE\Policies\Microsoft\Windows\WindowsUpdate
- Right-click on the “WindowsUpdate” folder and select “New” > “DWORD (32-bit) Value.”
- Name the new value “AUOptions” and set it to “2” to disable automatic updates.
- Click on “OK” to save the changes.
Using the Windows Registry to disable Windows updates provides a more advanced method for controlling update behavior. However, modifying the Registry can be risky if not done correctly, so exercise caution and create a backup of your Registry before making any changes.
Need Help with Windows Update Management?
Have questions about managing Windows updates or how NinjaOne can help? Our experts are here to assist you. Schedule a demo today to learn more.
How to disable Windows update in Windows 11
Option 1: Using Windows services (services.msc)
If you want to permanently stop Windows updates from running in the background, disabling the Windows Update service is one of the most effective methods.
- Press the Windows key + R, type services.msc, and press Enter.
- Scroll down and locate Windows Update in the list.
- Double-click on Windows Update to open its properties.
- Under Startup type, select Disabled from the dropdown menu.
- Click Stop if the service is currently running.
- Click Apply and then Ok to save the changes.
Option 2: Using Group Policy Editor (for Windows 11 Pro & Enterprise)
This method is useful for users with Windows 11 Pro or Enterprise editions. The Group Policy Editor allows you to disable automatic updates through system policies.
- Press the Windows key + R, type gpedit.msc, and press Enter.
- Navigate to
sql
Computer Configuration → Administrative Tempates → Windows Components → Windows Update
- Double-click Configure Automatic Updates on the right panel.
- Select Disabled, then click Apply and Ok.
- Restart your computer for changes to take effect.
Option 3: Using Registry Editor (for all editions)
For Windows 11 Home users, disabling updates via the Registry Editor is an alternative since the Group Policy Editor isn’t available. A word of caution, though: Incorrect registry changes can cause system issues.
⚠️ Take note: Editing the registry is risky. Make sure to backup your registry before proceeding.
- Press the Windows key + R, type regedit, and press Enter.
- Navigate to:
HKEY_LOCAL_MACHINE\SOFTWARE\Policies\Microsoft\Windows\WindowsUpdate\AU
- If the WindowsUpdate and AU keys don’t exist, create them.
- Inside AU, right-click and choose New → DWORD (32-bit) Value.
- Name it NoAutoUpdate and set its value to 1.
- Close Registry Editor and restart your PC.
Option 4: Using metered connection (prevents auto updates)
If you don’t want to fully disable updates but want to limit automatic downloads, setting your network as metered will prevent Windows from downloading updates automatically.
- Open Settings (Win + I)
- Go to Network & Internet.
- Select Wi-Fi or Ethernet, depending on your connection type.
- Click on your connected network.
- Toggle Metered connection to On.
Additional option: Using Windows Update pause feature (temporary solutions)
If you just need to delay updates for a few weeks, Windows 11 has a built-in pause feature that temporarily stops updates.
- Open Settings (Win + I).
- Go to Windows Update.
- Click Pause updates and select a duration.
Why disable Windows updates?
Windows updates are important for security and performance—and having them automated provides a lot of convenience. While keeping your Windows updates on is generally recommended, there are valid reasons why you may want to disable them. For example:
- Higher stability: If you rely on specific applications or devices that aren’t fully compatible with the latest Windows updates, you may run into instability or functionality problems. Disabling Windows updates can help your system run smoothly and without disruption.
- Greater convenience: Windows updates often require system restarts, which can interrupt your workflow and lead to productivity losses—especially if you’re working on a critical project or in a time-sensitive environment. By disabling Windows updates, at least temporarily, you can have more control over when and how your system installs new upgrades.
- Avoid unexpected restarts: Windows may restart your PC at inconvenient times after an update. If an update is installed in the background, Windows may schedule an automatic restart without warning, forcing your system to reboot even if you’re in the middle of a task. This can be particularly disruptive for professionals who rely on uninterrupted access to their devices.
- Prevent compatibility issues: Some updates can break compatibility with older software or hardware. If your business relies on legacy applications, certain updates may lead to software unusable, requiring workarounds or even rollbacks. By disabling updates, you ensure your setup remains stable and fully operational without unexpected compatibility problems.
- Save data on limited internet plans: Automatic updates can consume a lot of bandwidth. Large updates, which can exceed several gigabytes, can quickly eat up your monthly data allowances, leading to additional costs or reduced internet speeds due to throttling.
- Prevent buggy updates: Some updates may introduce new bugs or system instability. To clarify: Windows updates are designed to improve functionality, but not all updates are thoroughly tested for every hardware configuration. This may lead to issues, such as system crashes or even the dreaded blue screen of death.
- Full control: Some users have specific reasons for not wanting to install updates automatically, such as concerns about data usage or privacy. In these cases, disabling Windows updates provides the freedom to choose which updates to install manually, giving users greater control over system maintenance.
Should I permanently disable Windows updates?
Permanently disabling Windows updates is generally not recommended. Windows updates are crucial for maintaining your device’s security and stability. Permanently disabling updates exposes your system to potential security vulnerabilities, and your system misses out on important bug fixes and performance improvements.
This means you’ll need to balance controlling system updates and ensuring your computer’s security. Consider reenabling updates during non-working hours or using tools with more granular control over the update process.
In most cases, reenabling Windows updates is as simple as disabling them in the first place. For example, when changing the Group Policy Editor settings, you should select the “Enabled” option rather than “Disabled.” You can adapt the instructions above depending on your preferred method to turn on Windows updates.
Some other downsides to permanently disabling Windows updates include:
- Security risks: Disabling updates exposes your system to potential security vulnerabilities, as you miss out on crucial security patches and bug fixes. Without regular updates, your computer becomes an easy target for malware, ransomware, and other malicious attacks.
- Performance slowdowns: Windows updates often include performance improvements that can enhance the overall functionality and speed of your computer. Failing to install the latest upgrades will mean that your system won’t be getting a boost.
- Compatibility issues: Compatibility can be a problem for systems running software that is too new and too old. Outdated systems may face compatibility issues with newer software or hardware that require updated Windows versions.
Temporarily switching off Windows updates can help you deal with issues like program incompatibility and productivity concerns. For most users, however, there is little to no benefit from permanently disabling Windows updates. Instead, these users will likely want to turn off Windows updates temporarily by following one of the four methods in the next section.
🔔 Not sure how a new update will impact your systems? Check out our KB Catalog for hundreds of KB articles, each with public sentiment analysis, so you can make informed decisions before updates roll out.
Manage Windows updates efficiently with NinjaOne
Rather than permanently disabling Windows updates, consider utilizing tools like NinjaOne to manage your updates effectively. NinjaOne provides Windows patch management software that offers a robust suite of features, including automated remote patch management, a patch status dashboard, and compliance reporting. Watch a demo or sign up for a free trial.
Download Article
An in-depth guide to stop your Windows 10 computer or laptop from updating automatically
Download Article
- Disabling the Update Service
- Using a Metered Connection
- Using Group Policy Editor
- Disabling App Updates
- Video
- Q&A
- Tips
- Warnings
|
|
|
|
|
|
|
Do you want to turn off auto updates on your Windows 10 computer? While there is no way to permanently disable automatic updates, you can delay them indefinitely by using the Services program or by setting your Wi-Fi as a metered connection. You can also disable automatic updates for the apps and drivers on your computer. Be advised that stopping Windows updates will make your system more vulnerable to viruses and malware. This wikiHow will show you how to turn off automatic updates on your Windows 10 computer.
Things You Should Know
- Open «Start» and enter «Services». Click «Services» → «Windows Services» → «Manual» → select «Disabled» → «Apply» → «OK».
- Open «Settings» → «Network & Internet» → «Wi-Fi» → click your network → toggle on «Set as metered connection».
- Disabling Windows 10 updates will increase your risk for viruses and malware.
-

This opens the Start menu and activates the search bar.
- Understand the limitations of this method. While disabling the automatic update service will temporarily halt any Windows 10 cumulative updates, the service will re-enable itself after a certain amount of time.
-
Doing so will open the Services window.[1]
- You can also press the Windows key + R to open the Run window. Type services.msc and press Enter.
Advertisement
-

Doing so opens the Windows Update Properties window.[2]
-
It’s in the middle of the window. Selecting Disabled will prevent the Windows Update service from automatically starting itself for the time being.[3]
- If you don’t see this option, first make sure that you’re on the right tab by clicking General at the top of the Properties window.
-
You’ll find this option near the bottom of the window. Clicking it prompts the Windows Update service to stop running.[4]
-
Both options are at the bottom of the window. Doing so will apply your settings and close the Properties window. The Windows Update service should now be disabled.
-
Any time you restart your computer or go more than two days without shutting down, open Services and check the «Windows Update» status to ensure that it’s still disabled. While the Windows Update service shouldn’t turn itself back on often, it will occasionally do so.
- If you see «Disabled» to the right of the «Windows Update» heading, Windows Update is still disabled.
- If you see anything other than «Disabled» to the right of the «Windows Update» heading, disable the Windows Update again.


Advertisement
-
You’ll find this gear icon in the Start menu, which is typically at the bottom-left corner of the screen. Click the gear in the lower-left side of the Start menu opens your Settings.
- This method won’t work for Ethernet connections. You can only disable automatic updates by using this method on a Wi-Fi connection.
-
It’s in the Settings window.[5]
-
You’ll find this option in the upper-left side of the window.
-
It’s near the top of the page. Doing so will open the Wi-Fi connection’s settings page.
-
This sets your connection to metered, which will prevent Windows from downloading updates over your currently connected network.[6]
- If this switch is colored and has «On» next to it, your Wi-Fi is already set up as a metered connection.


Advertisement
-
You’ll need a pre-Anniversary edition of Windows 10 Pro or an equivalent. You can’t use this method if you’re using Windows 10 Home edition.
- The Windows 10 Education and Enterprise editions also include the Group Policy Editor.
- You can check your version of Windows by typing system into Start, clicking System Information near the top of the menu, and looking for «Microsoft Windows 10 Professional» to the right of the «OS Name» heading.
- The Windows Anniversary update removed the option to turn off automatic updates from the Group Policy Editor, so this method will not work if you’ve been keeping Windows 10 up to date.
-
Pressing these two keys at the same time opens the Run dialog window. You can also get here by typing run into the Search bar.
-
The Group Policy Editor window will open.[7]
-
In the sidebar on the left side of the Group Policy Editor window, do the following:
-
It’s an item in the main Group Policy Editor window. Doing so selects this item.
-
Right-click the selected Configure Automatic Updates item, then click Edit in the resulting drop-down menu.[8]
-
It’s in the upper-left side of the window.
-

This option is on the left side of the window.
-
It’s in the drop-down menu. This option ensures that you’ll be asked before updates are installed, allowing you to decline the updates.
-
Doing so saves your changes.
-
To do so:
- Open Start
- Open Settings
- Click Update & Security
- Click Windows Update
- Click Check for updates
- Wait for Windows to identify available updates (Windows will not install these updates).
- When finished, restart your computer. Once your computer finishes restarting, your update preferences will be saved.
- You’ll still be able to manually allow updates as they become available.


Advertisement
-

Click the Windows logo in the bottom-left corner of the screen. The Start menu will pop up.
-
You should usually see this option on the right side of the Start menu.
- If you don’t see the Store icon in the Start menu, type store into the search bar at the bottom of the menu and then click Store when it appears at the top of the menu.
-

It’s in the top-right corner of the window. This will prompt a drop-down menu.
- On older versions of Windows 10, you’ll click your profile picture in the upper-left corner of the Windows Store.
-
This is in the drop-down menu.
-
Doing so will turn off the switch

.
- If this switch is off, updates for Windows apps are already disabled.


Advertisement
Add New Question
-
Question
What do I do if the Windows Update Service keeps turning itself back on when I disable it?
When you are disabling the Microsoft Update Service, on tabs you’ll see «recovery» is set to «one» in «one minute» and «at restart.» change that to «9999,» «day» and no restart. This will prevent it from restarting the service automatically, unless you restart it manually.
-
Question
If updates are disabled, will my PC still boot?
Yes. Updates simply keep the system more up-to-date and secure.
-
Question
Why does Windows need updates?
There are different types of updates. Security updates help fix any vulnerabilities in Windows so that malware cannot infect your system. Feature updates add new features and interface changes, and are usually delivered a few times a year. Bug fixes fix any software errors and glitches that make it work improperly. These updates can either be delivered alone or bundled with each other in a Windows update.
See more answers
Ask a Question
200 characters left
Include your email address to get a message when this question is answered.
Submit
Advertisement
Video
-
Automatic updates often improve the use and security of Windows, though these updates can eventually slow down an older computer.
Thanks for submitting a tip for review!
Advertisement
-
Disabling Windows Updates makes your system vulnerable to malware. It is strongly recommended that you do not disable updates in Windows.
Advertisement
References
About This Article
Article SummaryX
1. Type «services» into the Windows search bar.
2. Click Services.
3. Double-click Windows Update.
4. Select Disabled from the «Startup type» menu.
5. Click Stop.
6. Click Ok.
7. Click Ok.
Did this summary help you?
Thanks to all authors for creating a page that has been read 445,837 times.
Is this article up to date?
Want to turn off or disable Windows Update in Windows 10? Here are thee ways to stop Windows 10 from automatically downloading updates or completely disable Windows Update in Windows 10.
It’s no secret that Microsoft has changed the expected location of many tools and components in Windows 10. Many of the settings have been moved from the classic Control Panel to the new Settings app, and during the process, some of the options have been completely left out.
In Windows 10, Windows Update settings have been moved from the classic Control Panel to the new Settings app. While the traditional Control Panel is still present in Windows 10 and we need to navigate to the classic Control Panel to access many of the settings, some of the familiar Windows Update settings have been completely removed.

In previous Windows versions, we could choose what updates are downloaded and installed. In Windows 10, users have very little control over updates.
If, for whatever reason, you want to turn off or disable Windows Update in Windows 10, follow the given below workarounds.
Method 1 of 7
Pause updates for up to 35 days
Windows 10 lets you pause updates for up to 35 days. That is, you can temporarily pause updates with ease. However, once the 35-day limit is crossed, Windows 10 will have to install available updates before you pause updates again. Nevertheless, this is a good option if you want to stop updates for up to 35 days.
Step 1: Go Settings > Update & Security > Windows Update.
Step 2: On the right side, click Advanced options.

Step 3: In the Pause updates section, select a date until which you would like to pause updates.

Method 2 of 7
Pause feature updates for up to 365 days
Features updates are the major updates Windows 10 receives twice a year. Around April and October, Microsoft releases major updates (feature updates) to Windows 10. Here is how to stop them for a year:
Step 1: Open the Settings app. Go to Updates & Security > Windows Update.
Step 2: On the right side, click on Advanced options.
Step 3: In the Choose when updates are installed section, you will see “A feature update includes new capabilities and improvements. It can be deferred for these many days” option. Select a number from the drop-down box. The maximum supported is 365 days.

Method 3 of 7
Use Group Policy to disable Windows Update
In this method, we are going to use the Local Group Policy Editor. Since Group Policy Editor is not present in Windows 10 Home edition, this method is not applicable to Windows 10 Home.
Step 1: Open Local Group Policy Editor. To do so, type Edit Group Policy in Start or taskbar search box and then press Enter key. Alternatively, open Run command box, type Gpedit.msc, and then press Enter key to open the same.

Step 2: Navigate to the following policy:
Computer Configuration > Administrative Templates > Windows Components > Windows Update.

Step 3: On the right-side, double-click on the policy labeled Configure Automatic Updates to open its properties.
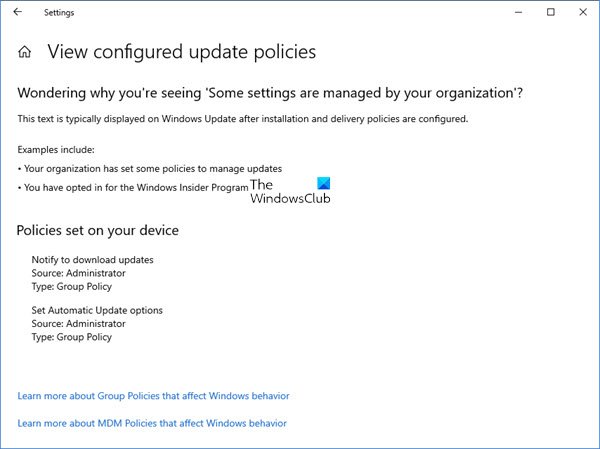
Step 4: Select the Enabled option. Under Configure automatic updating, select the second option labeled Notify for download and notify for install. Don’t touch the rest of the settings.

Click the Apply button. As mentioned before, this method will not turn off Windows Update, but you will be notified when updates are available to download. You can ignore the alert to avoid downloading and installing updates.

When this policy is enabled, you’ll see Some settings are managed by your organization message under Advanced options of Windows Update.
Method 4 of 7
Disable updates via Registry
If you are on Windows 10 Home, you can disable the automatic update by making modifications to the Registry. Here is how to do that.
Step 1: Open the Registry Editor by typing Regedit.exe in the Start/taskbar search field and then hitting the Enter key.
Step 2: Navigate to the following key:
Computer\HKEY_LOCAL_MACHINE\SOFTWARE\Policies\Microsoft\Windows
Step 3: Right-click on the Windows key, click New and then click Key. Name it as WindowsUpdate.

Step 4: Now that you have created WindowsUpdate key, right-click on it, click New, and then name it as AU.

Step 5: Now, right-click on the AU key, click New and then click DWORD (32-bit) Value. Name it as NoAutoUpdate.

Step 6: Double-click on NoAutoUpdate and then change its value data from 0 to 1 to disable automatic updates.


Note that this disables automatic updates only. You can manually check for updates by clicking the Check for updates button in Settings > Update & Security > Windows Update page.
Method 5 of 7
Disable Windows Update service permanently
This is the best method to completely disable Windows Update in Windows 10. In this method, we will disable the service responsible for checking, downloading, and installing updates for Windows and other programs including Windows Defender.
Step 1: Type Services in Start menu or taskbar search box and then press Enter key. Alternatively, you can type Services.msc in Run command box and then press Enter key to open Services.

Step 2: Here, look for the service named Windows Updates. Right-click on it and click Properties to open Windows Update Properties dialog.

Step 3: Here, change the Startup type to Disabled. Click the Apply button and then reboot your computer. That’s it!

From here on, Windows 10 will not be able to check for updates. Good luck!
Method 6 of 7
Use Windows Update Disabler
Over the past few years, a bunch of applications has been released to help Windows 10 users block updates. One of them and probably the best of the lot is Windows Update Disabler. With Windows Update Disabler, you can disable the updates in Windows 10 with a click.

Download Windows Update Blocker
Method 7 of 7
Change your network type to Metered
This solution is no longer effective as Windows 10 now download priority or critical updates when on a metered connection.
By default, Windows 10 doesn’t download all updates when you’re on a metered connection. It downloads only priority updates when on a metered connection. You can make use of this by setting Metered connection property to your network connection.
To set a network as metered, do this:
Step 1: Navigate to Settings app > Network & Internet > Wi-Fi.
Step 2: On the right side, you can see the Wi-Fi network name (SSID) that your PC is connected to. Click on it.

Step 3: In the Metered connection section, turn on the Set as the metered connection option.

For ethernet connection, refer to our how to set an Ethernet connection as a metered network in Windows 10 guide for step-by-step instructions.