
При попытке удалить, изменить, переименовать или переместить какой-либо файл или папку в Windows 11/10 или предыдущей версии ОС вы можете получить сообщение об отказе в доступе: «Вам необходимо разрешение на выполнение этой операции. Запросите разрешение от TrustedInstaller на изменение этой папки (этого файла)».
В инструкции подробно о том, почему так происходит, как удалить, переименовать или выполнить другие действия с такой папкой или файлом и дополнительная информация, которая может оказаться полезной.
Как «запросить разрешение от TrustedInstaller» и удалить или изменить файл или папку

Прежде чем приступить, несколько важных моментов, касающихся TrustedInstaller и того, почему пользователю, несмотря на наличие прав администратора, не позволяется выполнить действия с какими-то элементами:
- TrustedInstaller — встроенная системная учётная запись Windows с максимальными правами.
- Эта учётная запись является владельцем для всех защищенных системных файлов ОС.
- У обычных администраторов по умолчанию нет прав на изменение таких файлов, так как это может привести к неработоспособности Windows.
- Важно: не выполняйте действия с файлами и папками, которые сообщают о необходимости запросить разрешение от TrustedInstaller, если вы не уверены в том, что делаете и не готовы к возможным последствиям. Это небезопасно.
- Настоятельно рекомендую создать точку восстановления системы (а ещё лучше — полную резервную копию), прежде чем выполнять какие-либо действия с такими файлами и папками, если вы всё-таки решились.
Фактически, запрашивать разрешения не нужно: вместо этого необходимо стать владельцем файла или папки, после чего предоставить себе необходимые права. Сделать это можно несколькими способами.
Первый вариант — командная строка:
- Запустите командную строку от имени администратора (как это сделать).
- Для файла — по порядку введите команды:
takeown /f "путь_к_файлу"
icacls "путь_к_файлу" /grant Администраторы:F
В случае англоязычной версии Windows, используйте Administrators вместо «Администраторы».

- Для папки и вложенных файлов и папок:
takeown /f "путь_к_папке" /r /d y
icacls "путь_к_папке" /grant Администраторы:F /t

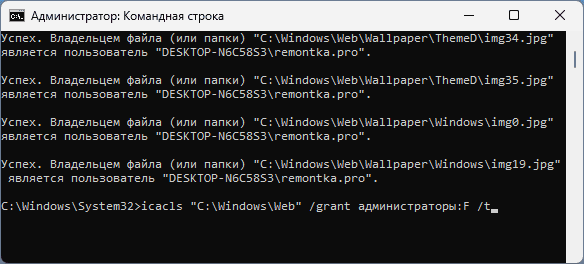
Готово. В результате вы (при условии, что являетесь администратором на компьютере), сможете выполнить необходимые действия с файлом или папкой. Также можно использовать «Все» (Everyone) вместо «Администраторы» (Administrators), но я этого делать не рекомендую.
Второй метод — графический интерфейс:
- Нажмите правой кнопкой мыши по файлу или папке, откройте «Свойства», перейдите на вкладку «Безопасность» и нажмите кнопку «Дополнительно».
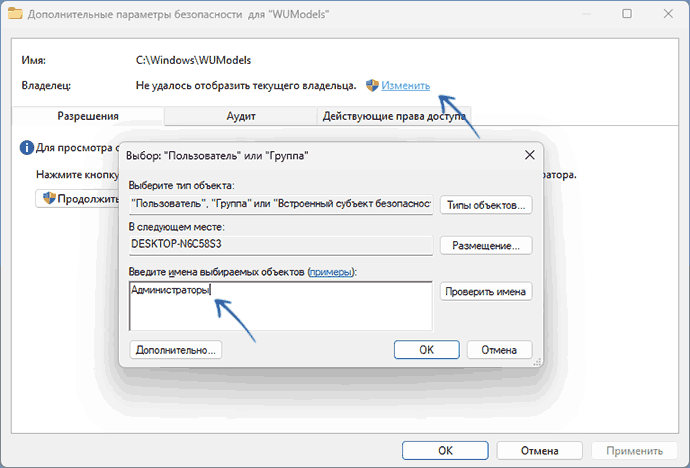
- В поле «Владелец» нажмите «Изменить».
- В поле «Введите имена выбираемых объектов» введите «Администраторы» (или Administrators в изначально англоязычной версии Windows) и нажмите «Ок».

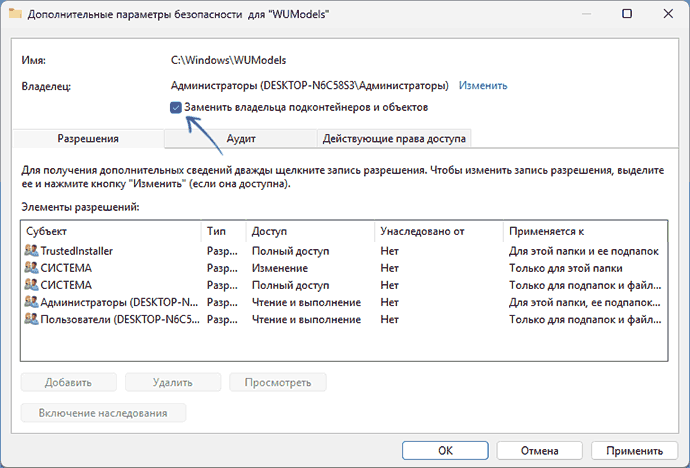
- В случае, если изменения производятся для папки, отметьте пункт «Заменить владельца подконтейнеров и объектов».
- Нажмите «Ок» для применения настроек.
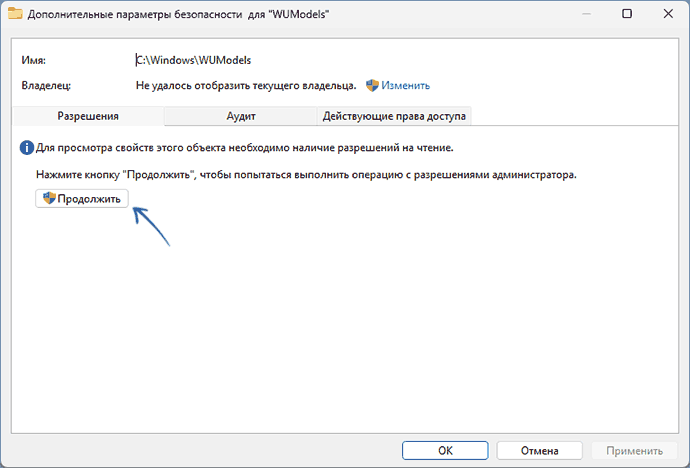
- Вы вернётесь на вкладку «Безопасность» в свойствах объекта, снова нажмите по кнопке «Дополнительно», а затем — по кнопке «Продолжить» в дополнительных параметрах безопасности.
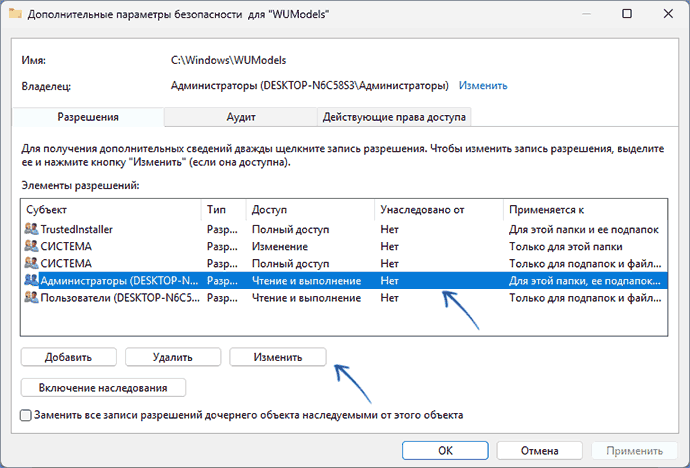
- В списке элементов разрешений выберите пункт «Администраторы» (при отсутствии используйте кнопку «Добавить») и нажмите кнопку «Изменить».
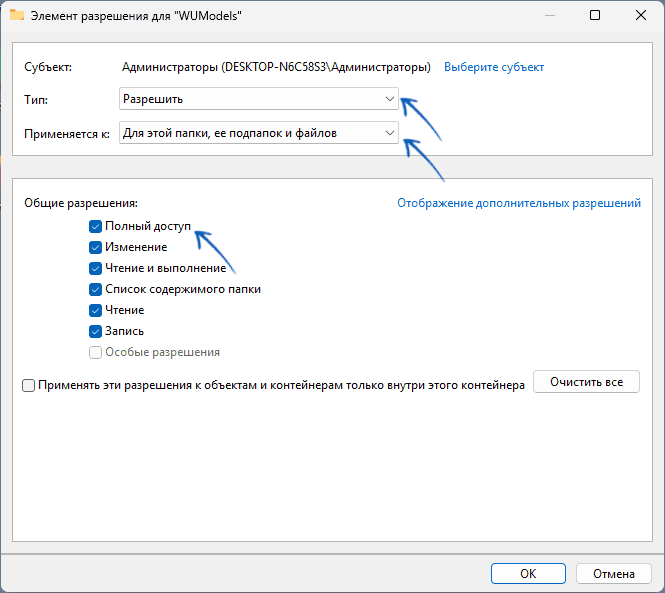
- Предоставьте «Полный доступ» для группы «Администраторы», нажмите «Ок».

- Для папки — отметьте пункт «Заменить все записи разрешений дочернего объекта наследуемыми от этого объекта» внизу окна.
- Нажмите «Ок», подтвердите выполнение и дождитесь завершения применения настроек, нажмите «Ок» в окне свойств папки или файла.
Готово, теперь, опять же при наличии прав Администратора, вы сможете изменять элемент, для которого были выполнены описанные настройки. Как и в предыдущем случае, можно установить разрешения «полный доступ» для группы «Все» или «Пользователи», но это будет ещё менее безопасно, чем в случае с «Администраторы».
Дополнительная информация
Некоторые дополнительные нюансы в контексте рассмотренной темы:
- Есть сторонние программы, которые автоматизируют то, что было описано выше. Подробно о них — в отдельной статье.
- Некоторые системные файлы и папки могут быть защищены дополнительными функциями безопасности или использоваться в системе, что может помешать изменить как права доступа, так и выполнить действия с ними. Я бы не рекомендовал «связываться» с такими элементами, но если требуется — можно сделать это с WinPE или из среды восстановления Windows в командной строке.
- Если в результате действий вы что-то сломали, могут помочь точки восстановления системы и восстановление системных файлов в командной строке.
Надеюсь, материал был полезен, но, повторюсь, я не рекомендую каким-либо образом менять файлы, для которых сообщается «Запросите разрешение от TrustedInstaller на изменение».
Все способы:
- Способ 1: Самостоятельное изменение владельца элементов
- Способ 2: Создание и установка REG-файла
- Способ 3: Использование программы TakeOwnershipEx
- Вопросы и ответы: 0
Обратите внимание на то, что учетную запись TrustedInstaller из Windows 10 удалить нельзя, поскольку она является системной и от нее зависит выполнение многих стандартных операций. Единственное, что вы можете сделать при взаимодействии с этим аккаунтом, — удалить его права из конкретной папки или файла, назначив владельцем себя. В большинстве случаев такого результата и хотят добиться пользователи, сталкивающиеся с проблемами, когда на экране появляется уведомление о том, что TrustedInstaller заблокировал выполнение, изменение или удаление какого-либо файла.
Способ 1: Самостоятельное изменение владельца элементов
Если вы не желаете использовать файлы редактирования реестра или специальные программы, избавиться от TrustedInstaller в Windows 10 для конкретной директории или файла можно путем настроек параметров безопасности элемента. Необходимо указать свою учетную запись в качестве владельца и присвоить полный доступ, после чего любые связи с TrustedInstaller исчезнут и эта учетная запись не сможет заблокировать действия с переназначенными файлами.
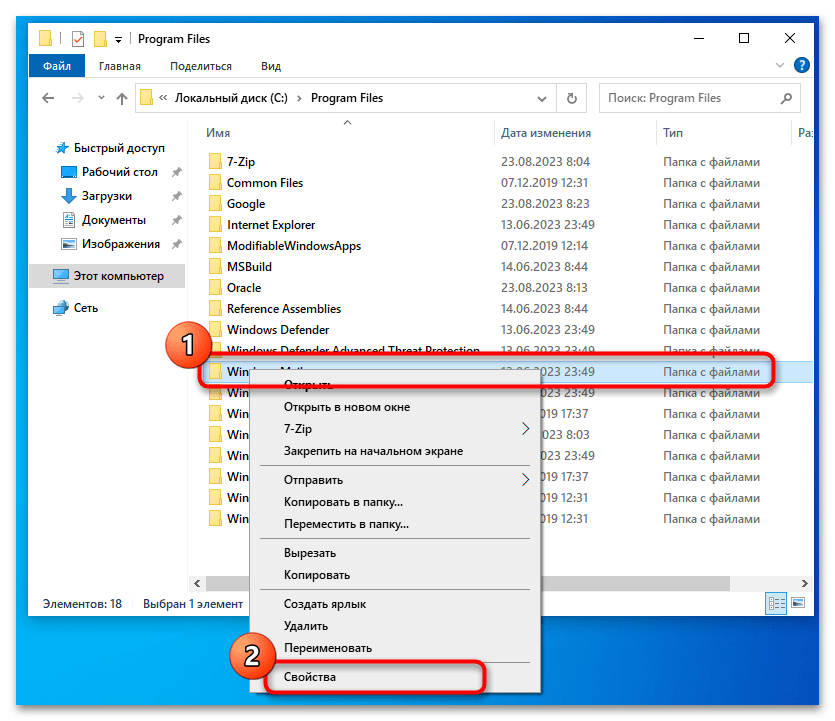
- Найдите каталог или файл через «Проводник», нажмите по нему правой кнопкой мыши для вызова контекстного меню и из него выберите пункт «Свойства».
- Перейдите на вкладку «Безопасность» и нажмите по «Дополнительно» для открытия расширенных параметров безопасности.
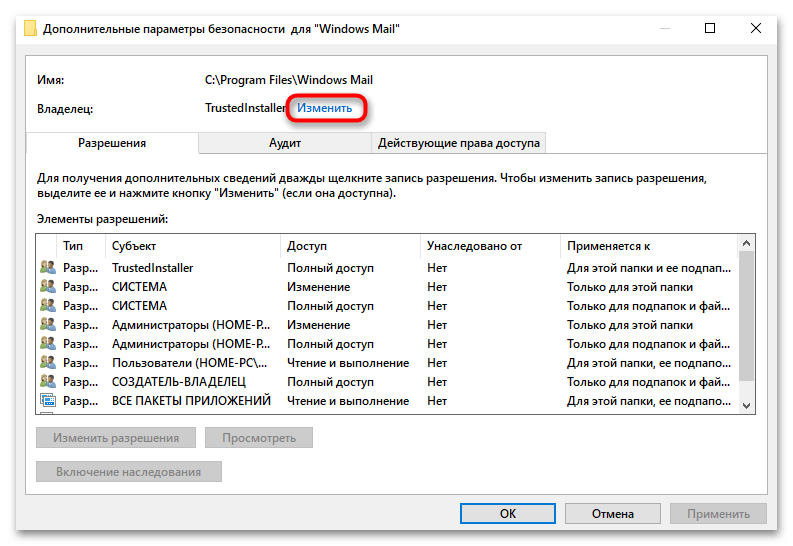
- Напротив строки «Владелец» вы увидите, что им сейчас является как раз TrustedInstaller. Эту ситуацию необходимо исправить, поэтому нажмите по кнопке «Изменить».
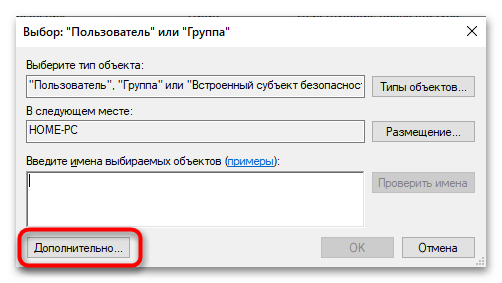
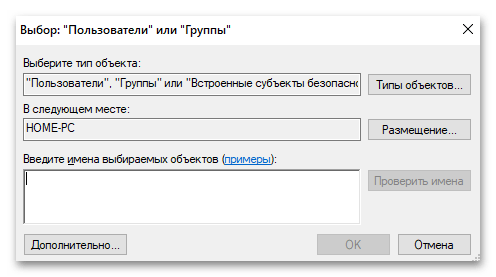
- В следующем окне вы можете ввести расположение и полное имя своей учетной записи в форме, но это не всегда удобно и можно допустить ошибку. Поэтому рекомендуем нажать «Дополнительно» для открытия нового окна поиска учетных записей.
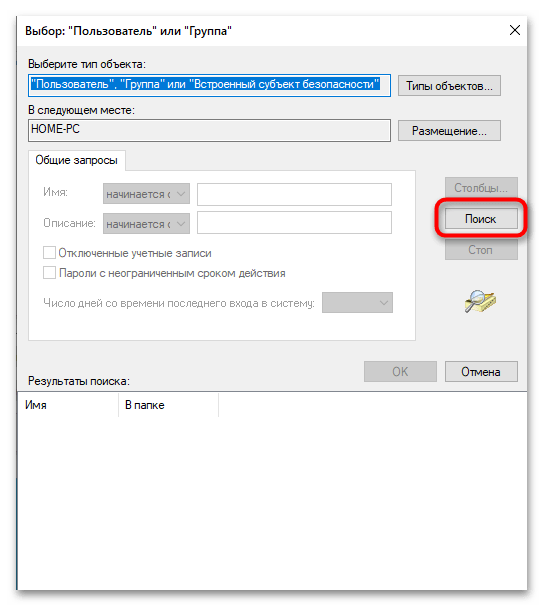
- В нем запустите процесс поиска, кликнув по кнопке с соответствующим названием.
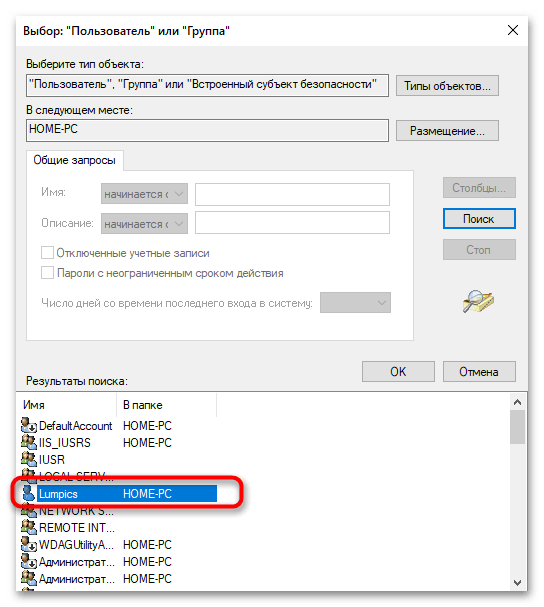
- Из списка обнаруженных профилей выберите свой, нажмите по нему дважды, подтверждая установку его как владельца для каталога или конкретного файла.
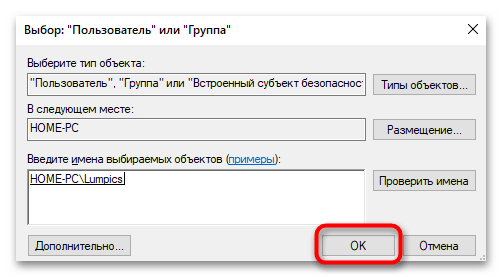
- Вы будете возвращены в предыдущее меню, где просто подтвердите внесенные только что изменения.
- В «Дополнительные параметры безопасности для» обязательно поставьте галочку возле пункта «Заменить владельца подконтейнеров и объектов», после чего обязательно щелкните по «Применить», чтобы изменения вступили в силу.
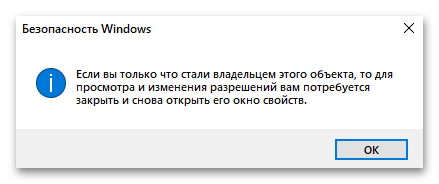
- Вы получите уведомление о том, что теперь ваша учетная запись является владельцем объекта. Закройте все окна, чтобы применились все изменения и обновились свойства.
- Далее на той же вкладке «Безопасность» необходимо проверить права доступа, чтобы не было никаких других конфликтов при взаимодействии с файлами. Для этого здесь отведена кнопка «Изменить».
- После нажатия по ней в следующем окне нажмите «Добавить».
- Точно так же выполните поиск своей учетной записи в аналогичном окне.
- Выберите ее из списка групп и пользователей, затем поставьте галочку возле пункта «Полный доступ» и примените изменения.

Способ 2: Создание и установка REG-файла
Если вы собираетесь регулярно избавляться от TrustedInstaller для системных файлов и папок, переназначая владельца на себя и внося необходимые изменения, можно значительно упростить данный процесс. Заключается он в ручном добавлении функции переназначения владельца на себя через контекстное меню файла или папки. При вызове сценария все изменения будут внесены автоматически, а вам останется только дождаться выполнения всех команд.
- Для работы с будущим REG-файлом через поиск в «Пуске» найдите приложение «Блокнот» и запустите его.
- Вставьте оставленное ниже содержимое, которое и является основной для внедрения необходимых функций.
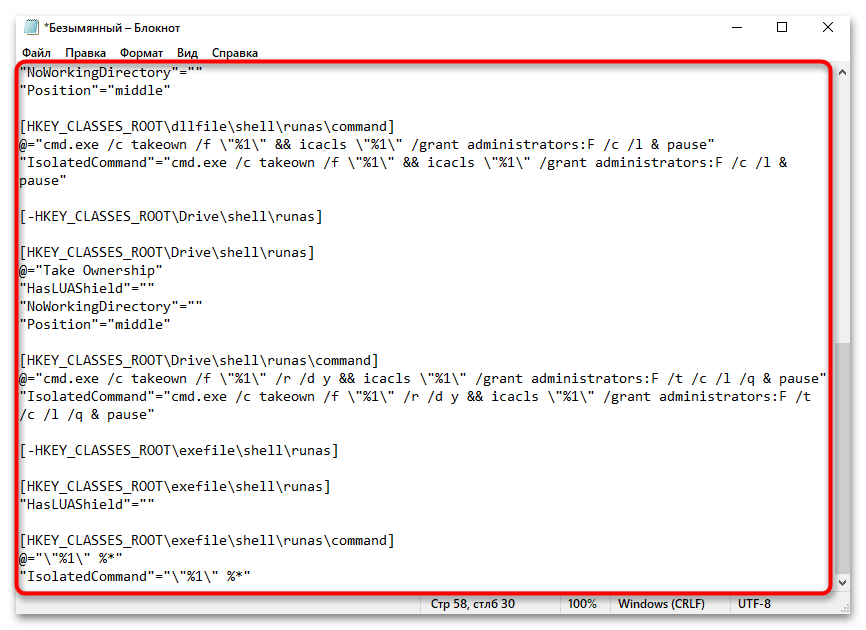
Windows Registry Editor Version 5.00
[-HKEY_CLASSES_ROOT\*\shell\runas]
[HKEY_CLASSES_ROOT\*\shell\runas]

@="Take Ownership"

"HasLUAShield"=""

"NoWorkingDirectory"=""

"Position"="middle"
[HKEY_CLASSES_ROOT\*\shell\runas\command]

@="cmd.exe /c takeown /f \"%1\" && icacls \"%1\" /grant administrators:F /c /l & pause"

"IsolatedCommand"="cmd.exe /c takeown /f \"%1\" && icacls \"%1\" /grant administrators:F /c /l & pause"
[-HKEY_CLASSES_ROOT\Directory\shell\runas]
[HKEY_CLASSES_ROOT\Directory\shell\runas]

@="Take Ownership"

"HasLUAShield"=""

"NoWorkingDirectory"=""

"Position"="middle"
[HKEY_CLASSES_ROOT\Directory\shell\runas\command]

@="cmd.exe /c takeown /f \"%1\" /r /d y && icacls \"%1\" /grant administrators:F /t /c /l /q & pause"

"IsolatedCommand"="cmd.exe /c takeown /f \"%1\" /r /d y && icacls \"%1\" /grant administrators:F /t /c /l /q & pause"
[-HKEY_CLASSES_ROOT\dllfile\shell\runas]
[HKEY_CLASSES_ROOT\dllfile\shell\runas]

@="Take Ownership"

"HasLUAShield"=""

"NoWorkingDirectory"=""

"Position"="middle"
[HKEY_CLASSES_ROOT\dllfile\shell\runas\command]

@="cmd.exe /c takeown /f \"%1\" && icacls \"%1\" /grant administrators:F /c /l & pause"

"IsolatedCommand"="cmd.exe /c takeown /f \"%1\" && icacls \"%1\" /grant administrators:F /c /l & pause"
[-HKEY_CLASSES_ROOT\Drive\shell\runas]
[HKEY_CLASSES_ROOT\Drive\shell\runas]

@="Take Ownership"

"HasLUAShield"=""

"NoWorkingDirectory"=""

"Position"="middle"
[HKEY_CLASSES_ROOT\Drive\shell\runas\command]

@="cmd.exe /c takeown /f \"%1\" /r /d y && icacls \"%1\" /grant administrators:F /t /c /l /q & pause"

"IsolatedCommand"="cmd.exe /c takeown /f \"%1\" /r /d y && icacls \"%1\" /grant administrators:F /t /c /l /q & pause"
[-HKEY_CLASSES_ROOT\exefile\shell\runas]
[HKEY_CLASSES_ROOT\exefile\shell\runas]

"HasLUAShield"=""
[HKEY_CLASSES_ROOT\exefile\shell\runas\command]
@="\"%1\" %*"
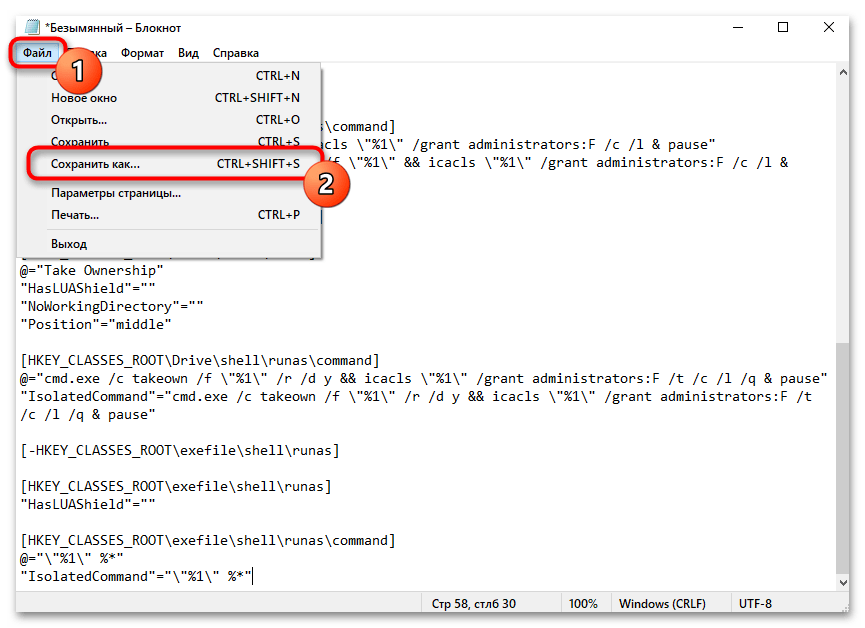
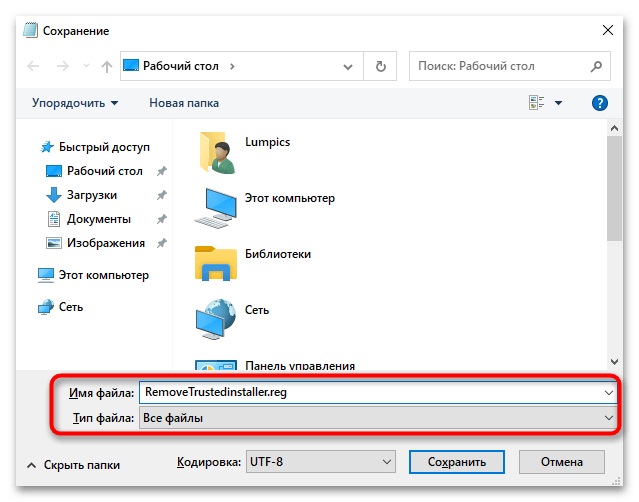
"IsolatedCommand"="\"%1\" %*" - После этого итоговый файл необходимо сохранить, для чего вызовите меню «Файл» и выберите вариант «Сохранить как».
- Задайте для него любое название, но обязательно установите формат как «.reg», а также тип файла отметьте как «Все файлы».
- Поместите этот объект на рабочий стол или в любое удобное место на компьютере. Как будете готовы, дважды щелкните по нему для запуска.
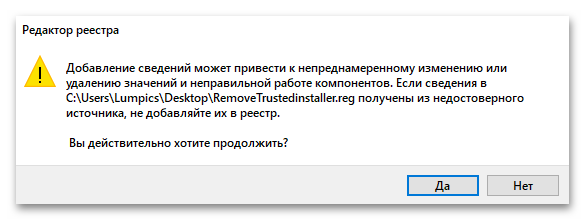
- Появится предупреждение о том, что будут внесены изменения в реестр. Подтвердите его, кликнув по «Да».
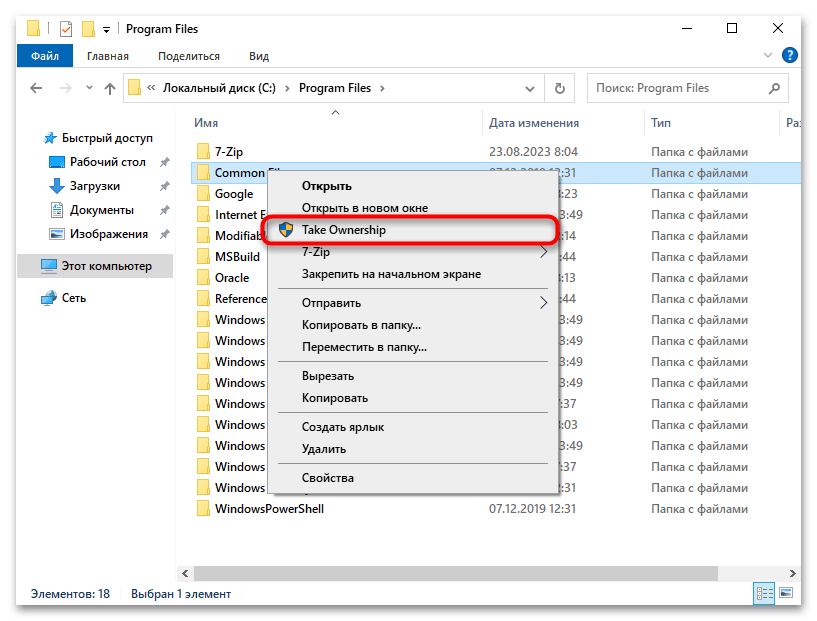
- Теперь вы можете нажать правой кнопкой мыши по любому каталогу или файлу и в контекстном меню найти пункт «Take Owership», который и отвечает за переназначение владельца на текущий профиль.
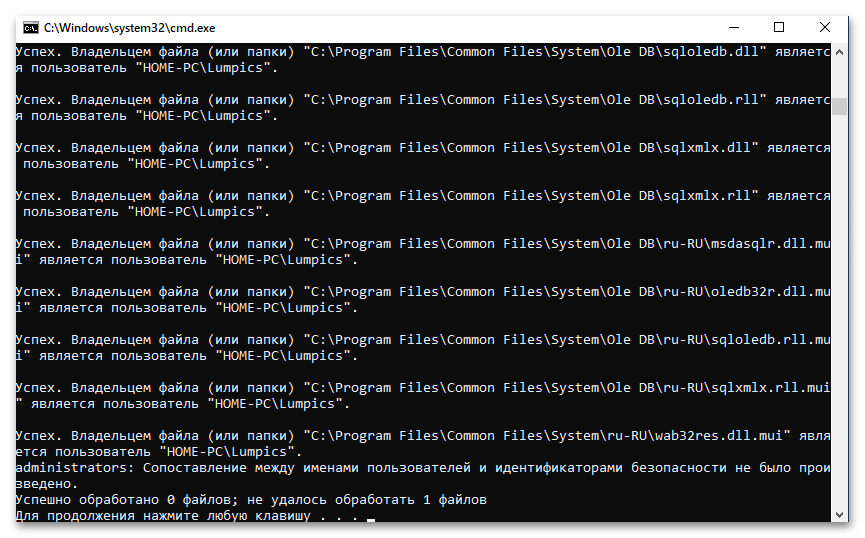
- При выполнении откроется «Командная строка» и все операции будут выполнены автоматически. Вам нужно только дождаться появления строки «Для продолжения нажмите любую клавишу» и нажать по этой самой любой клавише, чтобы консоль была закрыта.
Во время выполнения операции вы можете увидеть сообщение о том, что некоторые файлы не были обработаны, однако появляющиеся выше сообщения «Успех» свидетельствуют о том, что изменения вносятся успешно. По завершении вам просто достаточно проверить владельца папки или файлов, чтобы убедиться в корректности работы REG-файла.

В будущем, если вы захотите убрать этот пункт из контекстного меню «Проводника», все изменения можно будет откатить. Для этого запустите «Блокнот» так, как это было показано выше, однако на этот раз вставьте другой код.
Windows Registry Editor Version 5.00
[-HKEY_CLASSES_ROOT\*\shell\runas]

[-HKEY_CLASSES_ROOT\Directory\shell\runas]

[-HKEY_CLASSES_ROOT\dllfile\shell\runas]

[-HKEY_CLASSES_ROOT\Drive\shell\runas]

[-HKEY_CLASSES_ROOT\exefile\shell\runas]

[HKEY_CLASSES_ROOT\exefile\shell\runas]

"HasLUAShield"=""
[HKEY_CLASSES_ROOT\exefile\shell\runas\command]

@="\"%1\" %*"

"IsolatedCommand"="\"%1\" %*"
Точно также сохраните его в формате REG, запустите и подтвердите внесение изменений. Если пункт в контекстном меню все еще присутствует, просто перезагрузите компьютер и проверьте еще раз.
Способ 3: Использование программы TakeOwnershipEx
Программа TakeOwnershipEx от известного разработчика разных твикеров для операционных систем Windows как раз предназначена для того, чтобы добавить в контекстное меню «Проводника» примерно такой же пункт, который мы создавали вручную выше, но она делает это автоматически, без необходимости самостоятельно вмешиваться в реестр. При удалении программы и пункт из контекстного меню тоже исчезнет.
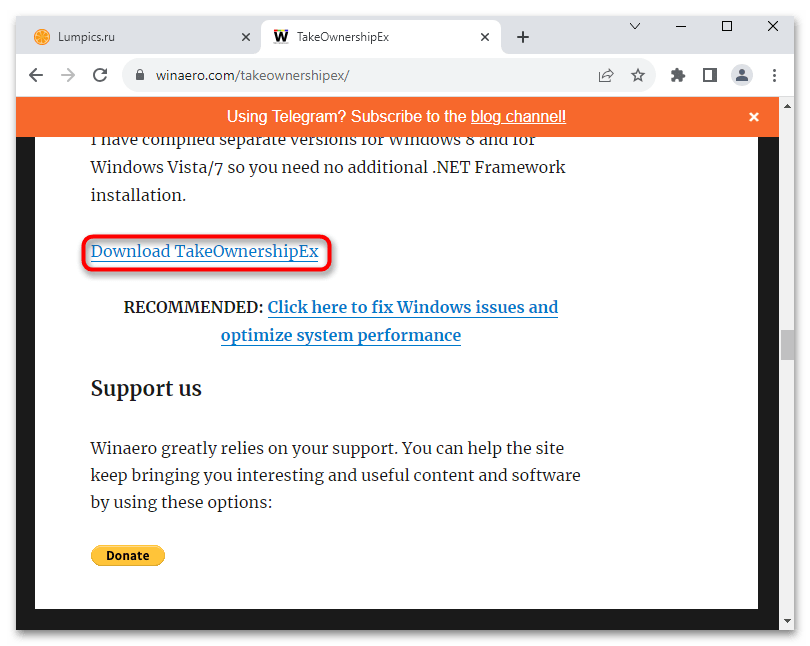
Скачать TakeOwnershipEx с официального сайта
- Перейдя на официальный сайт по ссылке выше, вы найдете ссылку «Download TakeOwnershipEx», по которой и нужно нажать для скачивания программы.
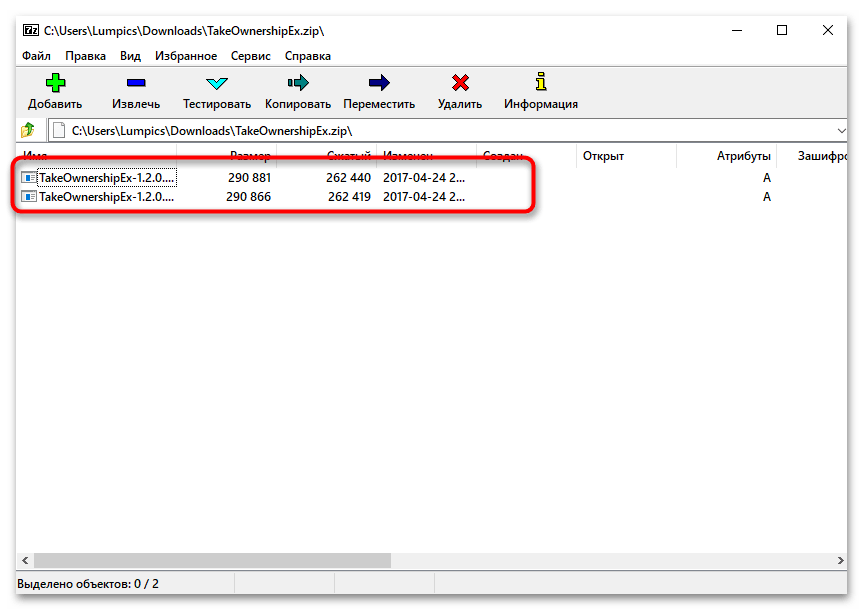
- Полученный архив откройте через любую удобную для вас программу и запустите оттуда исполняемый файл установщика, соответствующий разрядности установленной операционной системы.
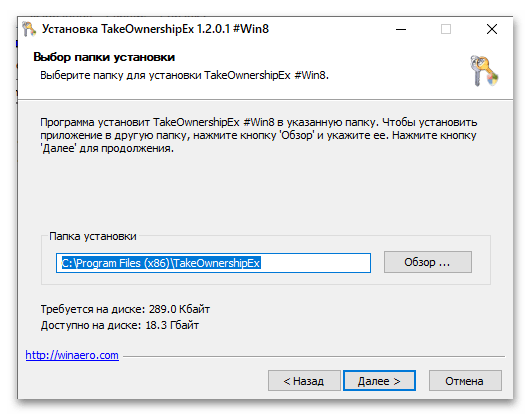
- Процесс установки стандартный, единственное — мы не рекомендуем менять путь, его лучше оставить стандартным.
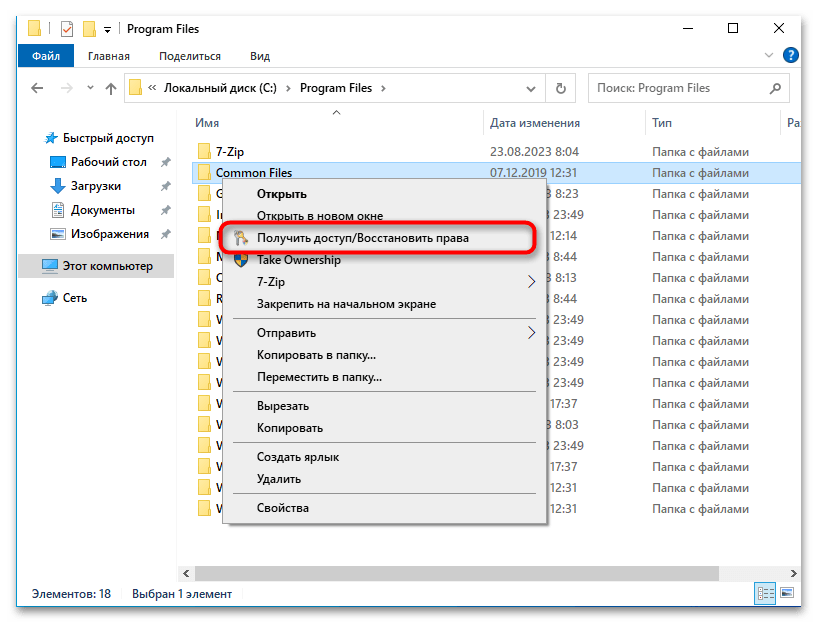
- После установки нажмите по любому каталогу или файлу правой кнопкой мыши. Вы увидите пункт «Получить доступ/Восстановить права». Эта функция как раз и поможет избавиться от TrustedInstaller, став владельцем элемента и получив полные права на его управление.
Наша группа в TelegramПолезные советы и помощь
How to Delete Files Protected by TrustedInstaller in Windows 10: TrustedInstaller is a process of Windows Modules Installer which owns lots of system files, folders, and other programs. Yes, TrustedInstaller is the user account used by Windows Modules Installer service to own control to these protected system files and folders. And yes even if you’re administrator they are not owned by you and you can’t modify these files in any way.

If you try to rename, delete, edit these files or folders which are owned by TrustedInstaller you will end up getting an error message saying “You do not have permission to perform this action” and “You need permission from TrustedInstaller to make changes to this file or folder”.
Well, don’t worry in order to delete files protected by TrustedInstaller in Windows 10 you have to first take the ownership of the file or folder which you’re trying to delete. Once you have the ownership then you can grant full control or permission to your user account.
Table of Contents
Can I delete the TrustedInstaller user account from file ownership?
In short, yes you can and it’s important that you don’t because TrustedInstaller user account is created to protect system files and folders, for example, if virus or malware attack on your PC then they won’t be able to modify system files or folders because these files & folders are protected by TrustedInstaller. And if you still try to delete the TrustedInstaller user account from file ownership, you will get an error message saying:
You can’t remove TrustedInstaller because this object is inheriting permissions from its parent. To remove the TrustedInstaller, you must prevent this object from inheriting permissions. Turn off the option for inheriting permissions, and then try again.
As easy may it sound but the process to take ownership of a file is a little longer but don’t worry that’s why we are here. In this article, I will walk you through the step by step guide on How to Delete Files Protected by TrustedInstaller in Windows 10 by taking the ownership of the file or folder back from TrustedInstaller.
Make sure to create a restore point just in case something goes wrong.
Method 1: Manually Take Ownership of Files or Folders in Windows 10
1.Open the file or folder for which you want to take the ownership back from TrustedInstaller.
2.Right-click on the particular file or folder and select Properties.
3.Switch to the Security tab then click on the Advanced button.
4.This will open the Advanced Security Settings window where you can see that the TrustedInstaller has the Full Control on this particular file or folder.

5.Now next to Owner name (which is TrustedInstaller) click on Change.
6.This will open the Select User or Group window, from where again click on the Advanced button at the bottom.

7.A new window will open, click on the “Find Now” button.
8.You will see all the user account listed in the “Search results:” section, select the user account from this list to make the new owner of file or folder and click OK.

9.Again click OK on the Select User or Group window.

10.Now you will be on Advanced Security Settings window, here checkmark “Replace owner on subcontainers and object” if you need to delete more than one file in a folder.

11.Click Apply followed by OK.
12.From the folder or file properties window, again click on the Advanced button under the Security tab.
13.No click on Add button to open the Permissions Entry window, then click on “Select a principal” link.

14.Again click Advanced button then click on Find Now.
15.Select the user account you selected in step 8 and click OK.
16.You will be again taken to the Permissions Entry window, from where you need to checkmark all the boxes under “Basic permissions“.

17.Also, checkmark “Only apply these permissions to objects and/or containers within this container” and click OK.
18.You will get a security warning, click Yes to continue.
19.Click Apply followed by OK, and again click OK on the file/folder properties window.
20.You have successfully changed the ownership of the file or folder, now you can modify, edit, rename or delete that file or folder easily.
Now you can easily delete files protected by TrustedInstaller in Windows 10 using the above method, but if you don’t like to go through this lengthy process then you could also use the below method to add “Take Ownership” option to the right-click context menu and easily take ownership of any file or folder in Windows 10.
Method 2: Take Ownership of Files/Folders in Windows 10 using Registry
1.Open Notepad file then copy and paste the following code into the notepad file:
Windows Registry Editor Version 5.00

[-HKEY_CLASSES_ROOT\*\shell\runas]

[HKEY_CLASSES_ROOT\*\shell\runas]
@="Take Ownership"
"HasLUAShield"=""
"NoWorkingDirectory"=""
"Position"="middle"

[HKEY_CLASSES_ROOT\*\shell\runas\command]
@="cmd.exe /c takeown /f \"%1\" && icacls \"%1\" /grant administrators:F /c /l & pause"
"IsolatedCommand"="cmd.exe /c takeown /f \"%1\" && icacls \"%1\" /grant administrators:F /c /l & pause"

[-HKEY_CLASSES_ROOT\Directory\shell\runas]

[HKEY_CLASSES_ROOT\Directory\shell\runas]
@="Take Ownership"
"HasLUAShield"=""
"NoWorkingDirectory"=""
"Position"="middle"

[HKEY_CLASSES_ROOT\Directory\shell\runas\command]
@="cmd.exe /c takeown /f \"%1\" /r /d y && icacls \"%1\" /grant administrators:F /t /c /l /q & pause"
"IsolatedCommand"="cmd.exe /c takeown /f \"%1\" /r /d y && icacls \"%1\" /grant administrators:F /t /c /l /q & pause"

[-HKEY_CLASSES_ROOT\dllfile\shell\runas]

[HKEY_CLASSES_ROOT\dllfile\shell\runas]
@="Take Ownership"
"HasLUAShield"=""
"NoWorkingDirectory"=""
"Position"="middle"

[HKEY_CLASSES_ROOT\dllfile\shell\runas\command]
@="cmd.exe /c takeown /f \"%1\" && icacls \"%1\" /grant administrators:F /c /l & pause"
"IsolatedCommand"="cmd.exe /c takeown /f \"%1\" && icacls \"%1\" /grant administrators:F /c /l & pause"

[-HKEY_CLASSES_ROOT\Drive\shell\runas]

[HKEY_CLASSES_ROOT\Drive\shell\runas]
@="Take Ownership"
"HasLUAShield"=""
"NoWorkingDirectory"=""
"Position"="middle"

[HKEY_CLASSES_ROOT\Drive\shell\runas\command]
@="cmd.exe /c takeown /f \"%1\" /r /d y && icacls \"%1\" /grant administrators:F /t /c /l /q & pause"
"IsolatedCommand"="cmd.exe /c takeown /f \"%1\" /r /d y && icacls \"%1\" /grant administrators:F /t /c /l /q & pause"

[-HKEY_CLASSES_ROOT\exefile\shell\runas]

[HKEY_CLASSES_ROOT\exefile\shell\runas]
"HasLUAShield"=""

[HKEY_CLASSES_ROOT\exefile\shell\runas\command]
@="\"%1\" %*"
"IsolatedCommand"="\"%1\" %*"
2.From Notepad menu click on File then select Save As.
3.From the Save as type drop-down select “All Files (*.*)” and then type the name of the file which can be anything you want but make sure to add .reg at the end of it (e.g. takeownership.reg) because this extension is very important.

4.Navigate to where you want to save the file preferably the desktop and click on the Save button.
5.Now right-click on the above file (Registry_Fix.reg) and select Install from the context menu.
Note: You will need an administrator account to install the script to Windows registry files.
6.Click Yes to add the above code to Windows Registry.
7.Once the above script is successfully installed, you can easily take the Ownership of any file or folder you want by simply right-clicking on it and then select “Take Ownership” from the context menu.

8.However, you can uninstall the above script any time you want by again following the steps from 1 to 4 but this time, use the following code:
Windows Registry Editor Version 5.00

[-HKEY_CLASSES_ROOT\*\shell\runas]
[-HKEY_CLASSES_ROOT\Directory\shell\runas]
[-HKEY_CLASSES_ROOT\dllfile\shell\runas]
[-HKEY_CLASSES_ROOT\Drive\shell\runas]
[-HKEY_CLASSES_ROOT\exefile\shell\runas]
[HKEY_CLASSES_ROOT\exefile\shell\runas]
"HasLUAShield"=""

[HKEY_CLASSES_ROOT\exefile\shell\runas\command]
@="\"%1\" %*"
"IsolatedCommand"="\"%1\" %*"
9.And save the file with the name Uninstallownership.reg.
10.If you want to remove the “Take Ownership” option from the context menu, then double-click on the Uninstallownership.reg file and click on Yes to continue.
Method 3: Use 3rd Party Application to Change Ownership of A File or Folder
With the help of the Take Ownership application, you would be easily able to take ownership of any file or folder you want and then delete files protected by TrustedInstaller. The application works the same as the above method but you only need to install the software with or without admin rights instead of manually making the script yourself.
Just install the Take Ownership application and it will add the “Take Ownership” option in the right-click context menu of Windows 10.
Recommended:
- Fix Application has been blocked from accessing Graphics hardware
- Fix You Need Permission To Perform This Action Error
- How to Create Windows 10 Account Using Gmail
- Fix Microsoft Edge Not Working in Windows 10
I hope the above steps were able to help you Delete Files Protected by TrustedInstaller in Windows 10 but if you still have any questions regarding this guide or TrustedInstaller service then feel free to ask them in the comment’s section.
Did you know that a lot of files in Windows are not owned by you, even if you are the Administrator? They are instead owned by an entity called the “Trusted Installer”. Such a wonderful sounding name eh!
So that’s not a problem most of the time, unless you need to delete certain system files and folders. You’ll end up getting a message like:
You do not have permission to perform this action.
or something like:
You need authorization from TrustedInstaller in order to perform this action.

Thanks Windows! So in order to delete a file or folder that is owned by TrustedInstaller, you have to first take ownership of the files or folders and then grant yourself full control permissions and rights!
You have to do all of that just to be able to rename, delete, or edit these files and folders. In this article, I’ll walk you through the steps in order to do this. Note that you really shouldn’t use this method to try and delete basic Windows features like Windows Defender or IE. It won’t work and it’ll mess up your computer. Only use this trick for deleting malware or virus files that may have inserted themselves into protected Windows directories.
Take Ownership of Files
First, go to the folder or set of files that you need to change permissions for, right-click on them and choose Properties.

Next click on the Security tab and then click on the Advanced button at the bottom:
Next click on the Owner tab and you’ll now see that the current owner is TrustedInstaller.
Now click on the Edit (in Windows 10, it’s the Change button) button and choose who you would like to change the owner to, either your account or the Administrators group. If your account is an Administrator account, I would suggest just picking Administrators.
You can also check off Replace owner on subcontainers and objects if you need to delete more than one file in a folder. Go ahead and click OK. Now you will see that the Current owner is the account you picked.
Note that if you are trying to delete an entire folder that has sub-folders, etc., you’ll also need to click on the Permissions tab, then Change Permissions, select Administrators or the account you want to use, and then check the Replace all child object permissions with inheritable permissions from this object.

It’s worth noting that you won’t be able to change permissions until you first change the owner for the folder and all subfolders and files as shown above.
Click OK until you have closed all properties windows and are back to the Windows Explorer screen. Then right-click on the folder or file again and choose Properties again.
Now click on the Security tab again, but instead of clicking on Advanced, you need to click the Edit button.
Now click on the user name in the list that you want to change the permissions for, which should be the same as who you changed the current owner too. If the user name is not in the list, click Add, type in the name and click OK.
Since I had changed the current owner to Administrators, I clicked on Administrators here and then clicked on the check box next to Full Control. When you do that, all the other boxes get checked too.
Click OK once and then click OK one more time to get back to Windows Explorer. Now you can delete those files without any UAC messages telling you that you can’t! It’s quite a few steps, but it does work. Enjoy!
Related Posts
- How to Use Event Viewer to Troubleshoot Windows Problems
- How to Boot into Safe Mode in All Versions of Windows
- How to Reset Your Computer Password If You Lock Yourself Out
- 14 Command Prompt (CMD) Commands Windows Users Should Know
- Change from Public to Private Network in Windows
Last updated on April 27th, 2024
There are a lot of files in Windows based operating systems which come with restrictions. The TrustedInstaller.exe is a Windows Module Installer service in Windows OS which performs the function of installing, modifying and removing system components and Windows updates. Sometimes, you might require deleting a file or folder managed by TrustedInstaller. In such a case you might not have access to the file or folder. In this tutorial we will show you how to delete files protected by TrustedInstaller in Windows.
To delete a file or folder protected by TrustedInstaller in Windows, right-click and go to Properties.
Now, click on the Security tab and head over to Advanced.
Click Change to proceed further.
Enter the name of the username you wish to grant Trustedinstaller permissions to and click Check Names. Once the username is shown, click Ok.
Check Replace owner on subcontainers or objects and click Apply, followed by Ok.
In the next step, select the account from Group or user names that you wish to grant access to and click Edit, followed by Full Control (as shown below). This will grant complete access to your selected username. Click Ok to close the dialogue boxes (as needed).
Now that you have ownership of the file or folder, you can delete it like any other document.
Delete Files Protected by TrustedInstaller – Video Tutorial
In some situations you require permission from TrustedInstaller to perform some actions. The above mentioned process is also explained in the video given below. The video gives you a step-by-step walkthrough of the process for taking ownership from TrustedInstaller so that you have the necessary control to delete files using a standard user account.
It is worth mentioning here that deleting protected files and folders can have undesired effects, so make sure you don’t delete anything that can cause system instability. Always backup your data before deleting files and folders which you might suspect can cause operating system issues.