
Procedure to Run Program Compatibility Troubleshooter on Windows 10 After Creators Update with steps. – Multiple programs that are designed for the previous edition of Windows works perfectly even on Windows 10. But you might be having certain applications that fail to run in this latest operating system. So, if you also encounter issues with older programs running on Windows 10, then modify their compatibility mode. You can verify your computer state pursuing the guide – Check Whether your PC is Compatible with Windows 10.
Hence, in this guide, we present you with the directions to Run Program Compatibility Troubleshooter on Windows 10. Program Compatibility Troubleshooter was previously located deep inside Control Panel. But now, with the arrival of Creators Update, you will find this built-in tool in the Settings application only.
Program Compatibility Troubleshooter will scan for all the programs on your PC and moreover, will ask you to pick the defective one. After selecting the problematic program, the troubleshooter will settle the compatibility settings of it.
To know more about troubleshooting, read Use Common Windows Update Troubleshooter on Windows 10, 8.1, 7.
Ways to Run Program Compatibility Troubleshooter on Windows 10 After Creators Update
Step 1 – Start the process by launching Settings app and to do so, press the key combinations Win&I. As an alternative, you can open Start Menu and select the tiny gear Settings icon also.
Step 2 – Once the Settings app appears on the PC screen with few categories, find and click Update & security.
Step 3 – On the Update & security page, various segments are present on the left sidebar of the page. So, go through the list and select Troubleshooter.
Step 4 – Moving ahead, shift to its right panel and search for Program Compatibility Troubleshooter. You will find this troubleshooter underneath the title Find and fix other problems. Once the Program Compatibility Troubleshooter is visible on the list, select it.
Step 5 – Now, Run the troubleshooter button will appear, click on it.
Step 6 – The Wizard will start detecting the issues. Next, the wizard will list down all the applications that are currently installed on your Windows 10.
Step 7 – So, browse through the list of applications and select the application you are having a problem with and click Next.
Note – In case, you don’t see your program, click Not listed option on the wizard and browse the problematic program file manually.
Step 8 – Now, the wizard will provide you two troubleshooting options. The first one is Try recommended settings and the second one is Troubleshoot program.
Try recommended settings – This first option will experiment and run the program by implementing recommended compatibility settings.
Troubleshoot program – It lets you pick up compatibility settings based on problems you notice.
Step 9 – Follow the directions on the wizard and successfully Run Program Compatibility Troubleshooter in Windows 10. After the troubleshooting is over, the wizard will apply the fix and settle the compatibility issues of the selected program.
Conclusion
Completing the above guidelines will pretty much easily run Run Program Compatibility Troubleshooter in Windows 10 whenever there are issues with programs not running properly. This specific troubleshooter is very helpful, especially for the older programs. If you know more about this troubleshooter, please do write about it on the comments form.
For more information about troubleshooting, see keep your device running smoothly with recommended troubleshooting.
What does the troubleshooter do?
This troubleshooter helps determine if your device might be impacted by known issues from the next Windows 10 Feature Update.
When does the troubleshooter run?
This troubleshooter runs automatically on devices that meet certain criteria. It cannot be run manually.
How will I know if this troubleshooter has run on my device?
You can check troubleshooting history to see if this troubleshooter has been run on your device by going to Start > Settings > Update & Security > Troubleshoot > View history and looking for the following:
Windows Feature Update Compatibility Assessment Troubleshooter
Perform additional compatibility checks to determine Feature Update eligibility for your device.
For more information on known issues:
Version 20H2: Windows 10, version 20H2 and Windows Server, version 20H2 | Microsoft Docs
Version 2004: Windows 10, version 2004 and Windows Server, version 2004 | Microsoft Docs
Version 1909: Windows 10, version 1909 and Windows Server, version 1909 | Microsoft Docs
Need more help?
Want more options?
Explore subscription benefits, browse training courses, learn how to secure your device, and more.
Download Windows Speedup Tool to fix errors and make PC run faster
On your computer running Windows 10 or Windows 11 or newer version, some older games or apps created for earlier versions of Windows might run poorly or even not run at all. PC users can try running the games/apps in Compatibility Mode or run the Program Compatibility Troubleshooter to detect and fix common compatibility problems on their devices. In this post, we walk you through the steps on how to Add or Remove Troubleshoot Compatibility on the Context Menu in Windows 11/10.

By default, in Windows 11/10, when you right-click (or for touchscreen devices, you can press and hold to perform a right-click action) on an application or game executable (.exe) file or an application shortcut, you can click/tap on the Troubleshoot compatibility item on the context menu to run the Program Compatibility Troubleshooter wizard on the program. If you want, you can remove or add this item (especially in cases where it’s missing, perhaps due to system corruption or some other reason) on the context menu by tweaking the registry as we will describe below.
You must be logged in as an administrator on the system to perform this task. And since this is a registry operation, it is recommended that you back up the registry or create a system restore point as necessary precautionary measures. Once done, you can proceed as follows:
- Press the Windows key + R to invoke the Run dialog.
- In the Run dialog box, type notepad and hit Enter to open Notepad.
- Copy and paste the code below into the text editor.
Add Troubleshoot Compatibility on Context Menu

Windows Registry Editor Version 5.00

; BAT files
[HKEY_CLASSES_ROOT\batfile\shellEx\ContextMenuHandlers\Compatibility]
@="{1d27f844-3a1f-4410-85ac-14651078412d}"

; CMD files
[HKEY_CLASSES_ROOT\cmdfile\shellEx\ContextMenuHandlers\Compatibility]
@="{1d27f844-3a1f-4410-85ac-14651078412d}"

; EXE files
[HKEY_CLASSES_ROOT\exefile\shellex\ContextMenuHandlers\Compatibility]
@="{1d27f844-3a1f-4410-85ac-14651078412d}"

; MSI files
[HKEY_CLASSES_ROOT\Msi.Package\shellex\ContextMenuHandlers\Compatibility]
@="{1d27f844-3a1f-4410-85ac-14651078412d}"

[HKEY_CLASSES_ROOT\MSILink\shellex\ContextMenuHandlers]
@="{1d27f844-3a1f-4410-85ac-14651078412d}"

[HKEY_CLASSES_ROOT\MSILink\shellex\ContextMenuHandlers\{1d27f844-3a1f-4410-85ac-14651078412d}]
@="Compatibility Context Menu"

; Clear block
[HKEY_LOCAL_MACHINE\SOFTWARE\Microsoft\Windows\CurrentVersion\Shell Extensions\Blocked]
"{1d27f844-3a1f-4410-85ac-14651078412d}"=-
- Now, click the File option from the menu and select the Save As button.
- Choose a location (preferably the desktop) where you want to save the file.
- Enter a descriptive name with a .reg extension (eg; AddTC-to-CM.reg).
- Choose All Files from the Save as type drop-down list.
- Double-click the saved .reg file to merge it.
- If prompted, click on Run > Yes (UAC) > Yes > OK to approve the merge.
- You can now delete the .reg file if you like.
- Finally, restart the Explorer process, log off/sign out and then login/sign in or restart the computer to apply.
Remove Troubleshoot Compatibility on Context Menu
- Open Notepad.
- Copy and paste the code below into the text editor.
Windows Registry Editor Version 5.00

[HKEY_LOCAL_MACHINE\SOFTWARE\Microsoft\Windows\CurrentVersion\Shell Extensions\Blocked]
"{1d27f844-3a1f-4410-85ac-14651078412d}"=""
- Repeat all the same steps as above, but this time, you can save the reg file with the .reg extension (eg; RemoveTC-on-CM.reg).
That’s it on how to add or remove Troubleshoot Compatibility on the Context Menu in Windows 11/10!
Now read: How to add or remove Compatibility Tab from File Properties
Does Windows 11 have compatibility issues?
There are known Windows 11 problems and issues. Including incompatibility issues with specific versions of drivers for Intel Smart Sound Technology (Intel SST) on Intel 11th Gen Core processors and Windows 11. Windows 11 devices with the affected Intel SST driver might receive an error with a blue screen. That said, the Compatibility tab in Windows 11/10 displays a list of settings that can be selected and applied to an app to resolve the most common issues affecting legacy applications.
Read: Program Compatibility Troubleshooter not working
What is the Compatibility problem?
PC users are likely to encounter compatibility issues if using the same type of software for a task, such as word processors, that cannot communicate with each other. This could be due to a difference in their versions or because different companies make them. Software applications released should be compatible with all software, hardware, OS, platforms, etc., by running compatibility testing which helps in detecting errors before the product is delivered to the end user.
Read: This app can’t run on this device – Program Compatibility Assistant.
Obinna has completed B.Tech in Information & Communication Technology. He has worked as a System Support Engineer, primarily on User Endpoint Administration, as well as a Technical Analyst, primarily on Server/System Administration. He also has experience as a Network and Communications Officer. He has been a Windows Insider MVP (2020) and currently owns and runs a Computer Clinic.
4 Ways to Run the Program Compatibility Troubleshooter on Windows 10 and 11
When it comes to operating systems, compatibility is a critical aspect that can define the user experience. Incompatible software can lead to performance issues, glitches, and crashes, significantly hindering productivity. Thankfully, Windows 10 and Windows 11 come equipped with a built-in tool called the Program Compatibility Troubleshooter. This tool can resolve many of the common issues arising from incompatibility by automatically adjusting settings for older programs to run smoothly. Below, we will explore four different methods to run the Program Compatibility Troubleshooter on both Windows 10 and Windows 11.
Method 1: Using the Properties Menu of the Program
A straightforward method for accessing the Program Compatibility Troubleshooter is through the properties menu of the application you want to troubleshoot. This method is particularly useful if you already know which program you are having trouble with.
-
Locate the Program:
Start by finding the program that is experiencing issues. You can do this by searching for it in the Start menu or by navigating to its installation folder via File Explorer. -
Access the Properties Menu:
Once you’ve located the executable file (an .exe file), right-click on it. From the context menu that appears, select “Properties.” This will open the Properties window for that specific application. -
Compatibility Tab:
In the Properties window, click on the “Compatibility” tab at the top. You will find several options related to compatibility settings. -
Run the Troubleshooter:
Look for the button titled “Run compatibility troubleshooter.” Click on it, and Windows will begin diagnosing your software for compatibility issues. If any problems are detected, it will provide you with recommended settings. -
Choose Settings:
Follow the prompts that appear. Windows may suggest running the program in compatibility mode for an older version of Windows. You can choose to implement these changes immediately or test them before confirming.
By using this method, you can resolve most compatibility concerns without going through extensive troubleshooting processes.
Method 2: Using the Settings App
Windows 10 and Windows 11 offer an alternative way to access the Program Compatibility Troubleshooter through the Settings app. This method can be beneficial for users who prefer a more guided interface.
-
Open Settings:
Click on the Start menu and select the “Settings” icon (the gear symbol). Alternatively, you can use the shortcutWindows Key + Ito open the Settings app quickly. -
Navigate to Apps:
Inside the Settings window, locate and click on “Apps.” This section lists all installed applications on your system. -
Find the Problematic App:
Scroll through the list to find the application that you want to troubleshoot. Click on the application name, and you will see several options related to it. -
Advanced Options:
Once you’ve selected the app, look for the “Advanced options” link. This will direct you to a new set of options concerning that specific application. -
Compatibility Troubleshooter:
In the advanced options, scroll until you find the “Compatibility” section. Click on “Run the compatibility troubleshooter.” Windows will analyze the program settings and suggest adjustments as needed. -
Apply Changes:
Review the recommended changes and apply them if necessary. You can test the program to see if those settings resolve your compatibility issue.
This method serves as another convenient pathway for running the Program Compatibility Troubleshooter, tailored more towards users who are comfortable navigating through the Settings app rather than dealing with file properties directly.
Method 3: Using the Control Panel
For those who prefer more traditional tools, the Control Panel provides access to many system functions, including compatibility troubleshooting. Here’s how to run the Program Compatibility Troubleshooter using the Control Panel.
-
Open Control Panel:
Type “Control Panel” into the Start menu search bar and press Enter, or navigate through the Start menu to find it. If you’re using Windows 11, you might need to search for Control Panel as it is somewhat hidden in the Settings. -
Select Troubleshooting:
In the Control Panel window, look for the “Troubleshooting” option and click on it. If you don’t see “Troubleshooting” right away, make sure to set the “View by” option to «Large icons» or «Small icons.» -
Access Programs:
Within the Troubleshooting window, look for the “Programs” heading. Under this section, click on “Run programs made for previous versions of Windows.” -
Start the Troubleshooter:
A new window will pop up, guiding you through the process. Click on “Next” to start the troubleshooter. Windows will automatically seek out issues related to the programs installed on your computer. -
Follow the Prompts:
You may be asked to select a problematic program from a list. If your program is not listed, you can select “Not listed” and manually browse for the file. Once selected, Windows will run compatibility diagnostics and suggest necessary changes. -
Finish and Apply Changes:
After completing the assessment, you can review and apply any changes that are recommended. This walkthrough offers a broad approach to troubleshoot various applications.
The Control Panel method may appeal to users who appreciate more legacy interfaces that Windows has long provided.
Method 4: Using the Command Prompt
For tech-savvy users or those who enjoy working with commands, using the Command Prompt can be an effective way to launch the Program Compatibility Troubleshooter. This method might not be the most common, but it’s a fantastic tool for users who want to integrate troubleshooting into their script workflows.
-
Open Command Prompt:
Type “cmd” into the Start menu search bar, right-click the “Command Prompt” result, and select “Run as administrator.” This ensures you have the necessary permissions to run administrative tasks. -
Run the Troubleshooter via Command:
In the Command Prompt window, type the following command and press Enter:msdt.exe /id PCW2018This command directly launches the Program Compatibility Troubleshooter.
-
Follow the On-Screen Instructions:
Once the troubleshooter window opens, follow the prompts as described in the previous methods. Windows will analyze installed applications for compatibility issues. -
Apply Suggestions:
After the troubleshooting process completes, apply any recommended changes to improve the compatibility performance of your application.
This method demonstrates the flexibility of the Program Compatibility Troubleshooter, emphasizing how various platforms within Windows can provide access to the same tools.
Conclusion
Running the Program Compatibility Troubleshooter on Windows 10 and Windows 11 can significantly improve the performance of older applications or those that malfunction. Whether using the properties menu, the Settings app, the Control Panel, or Command Prompt, several straightforward methods allow users to remedy compatibility issues efficiently.
As technology evolves, staying abreast of software compatibility issues is paramount. Knowing these methods not only aids in troubleshooting software problems but also enhances your overall experience with Windows 10 and Windows 11. Regular updates to both the operating system and applications can also help maintain compatibility, making it less likely that users will encounter issues in the first place.
In the event compatibility issues persist beyond these troubleshooting steps, consider reaching out to software developers for updated versions or support that can enhance compatibility with newer operating systems. Meanwhile, leveraging the Program Compatibility Troubleshooter can help bridge the gap between older software and modern operating systems, ensuring users continue to benefit from legacy applications seamlessly.
Consistency in applying these troubleshooting steps can preserve the productivity you depend on while using Windows. Troubleshooting software experiences isn’t merely reactionary; it can become part of an ongoing strategy to help keep your workflow smooth and uninterrupted.
Just because developers built an app for an older version of Windows, it doesn’t mean you can’t run it on a newer version of the OS. Through compatibility mode, you can easily run old programs without any issues a majority of the time.
If you run into compatibility issues, however, don’t fret. Windows has a built-in tool that allows you to diagnose and fix them with ease. It’s called the Program Compatibility Troubleshooter, and we’re going to show you all the different ways that you can fire it up.
The easiest way to run the Program Compatibility Troubleshooter on Windows 10 is to simply right-click an app and select Troubleshoot compatibility. If you’re on Windows 11, you’ll have to click Show more options first after you right-click the app to bring back the classic context menu, and then select Troubleshoot compatibility.
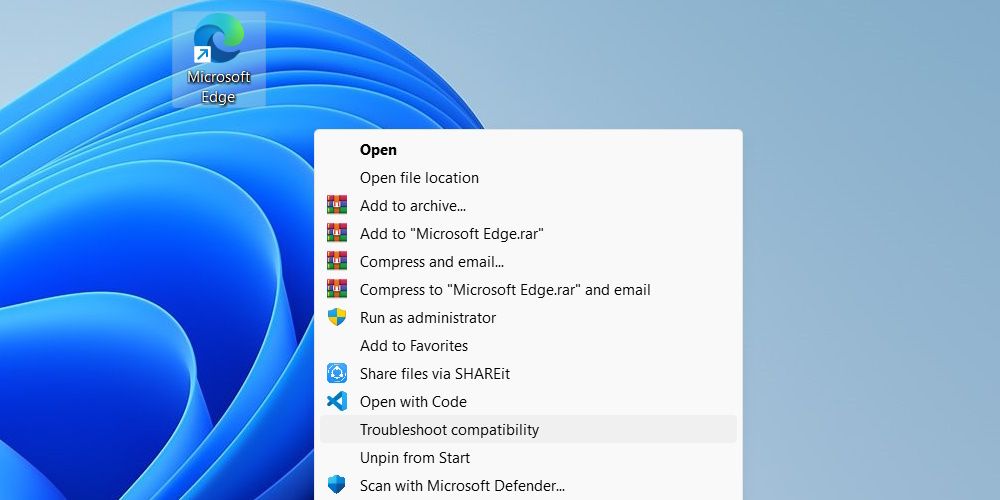
This will instantly launch the tool, and it will help you troubleshoot any compatibility issues you’re experiencing with the selected app.
2. Run the Program Compatibility Troubleshooter on the Troubleshoot Page
Both Windows 10 and 11 have a Troubleshooting page in the Settings app where you can launch the Program Compatibility Troubleshooter from. If you can’t get to the Troubleshoot page because the Settings app isn’t working, please read our guide on how to fix Windows Settings when it won’t open.
On Windows 11
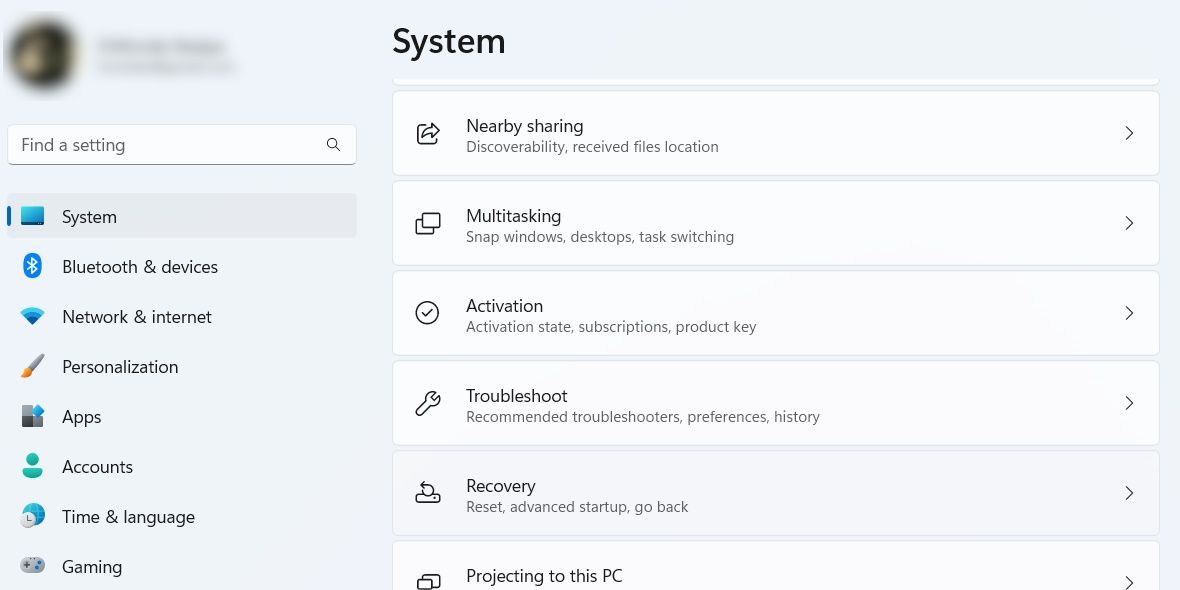
To run the Program Compatibility Troubleshooter from the settings on Windows 11, start by pressing Win + I to open the Settings app. Next, click System on the left side menu, and then click on Troubleshoot on the right.
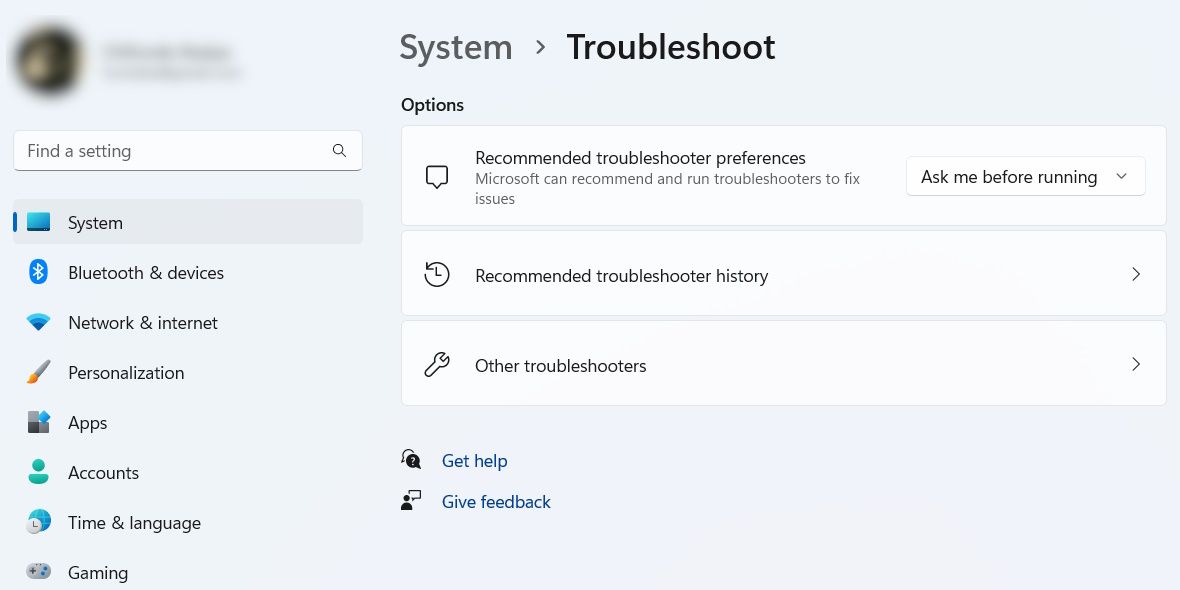
On the Troubleshoot page, scroll down and click on Other troubleshooters.
Scroll down to the Other section, find Program Compatibility Troubleshooter from the list of troubleshooters, and then click the Run button next to it.
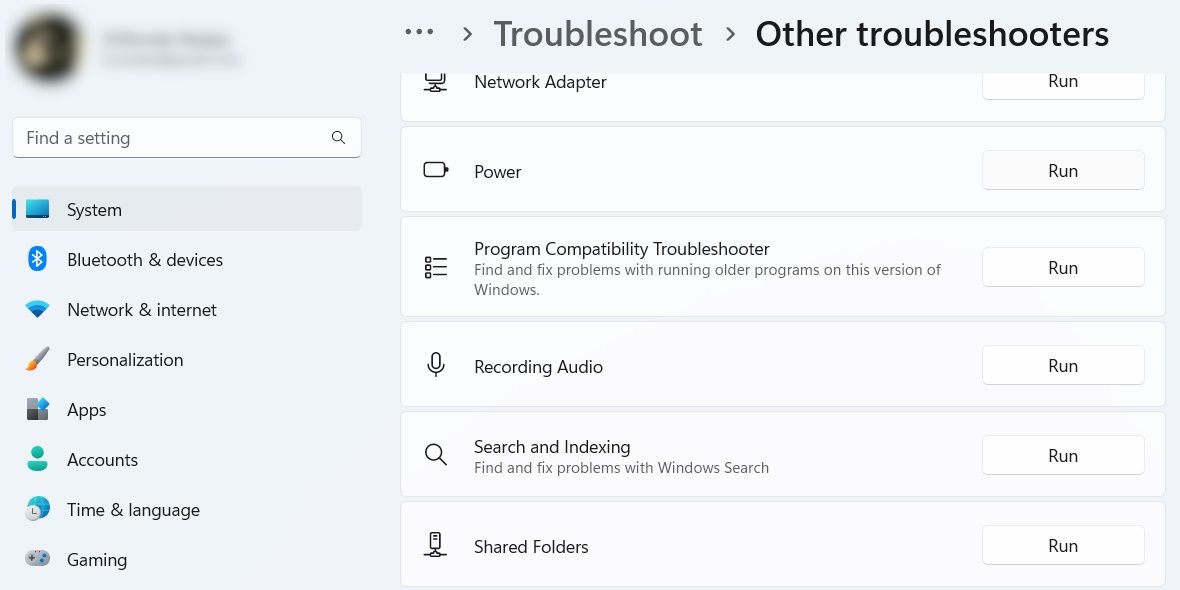
This will get the Program Compatibility Troubleshooter started.
On Windows 10
If you’re on Windows 10, press Win + I to open the Settings app, and then click on Update & Security. Next, click on Troubleshoot on the left side menu, and then click on Additional troubleshooters on the right.
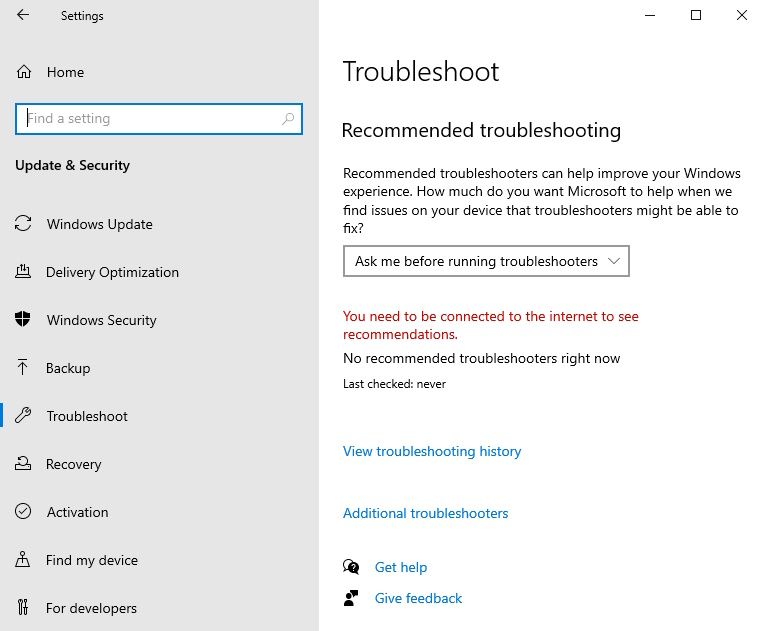
Find and click on Program Compatibility Troubleshooter to expand it. Then, click on the Run this troubleshooter button.
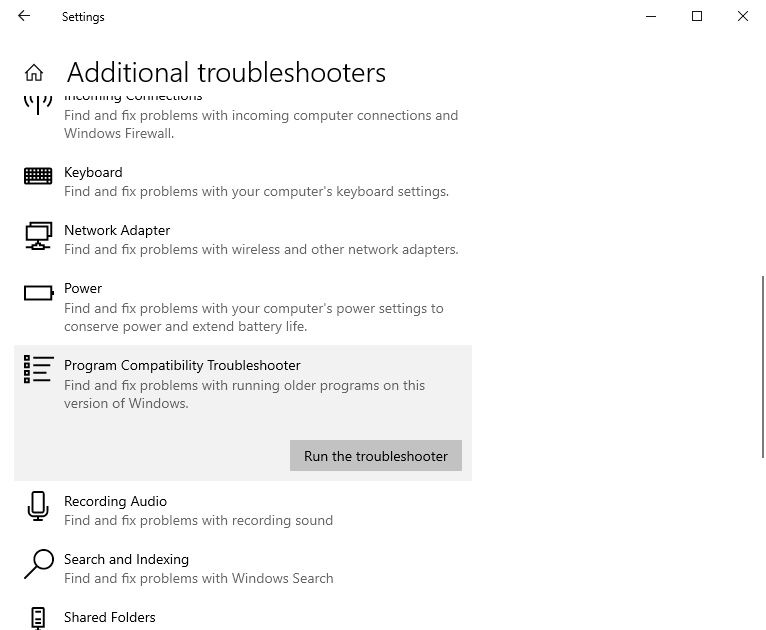
Now, you can use the tool to fix compatibility issues on Windows 10.
3. Run the Program Compatibility Troubleshooter Using the Control Panel
Another way to launch the Program Compatibility Troubleshooter is through the Control Panel. To do that, start by pressing Win + S to bring up Windows Search, enter control panel in the search box, and then click on Control Panel in the search results.
In the Control Panel, select Programs, and then click on the Run programs made for previous versions of Windows link.
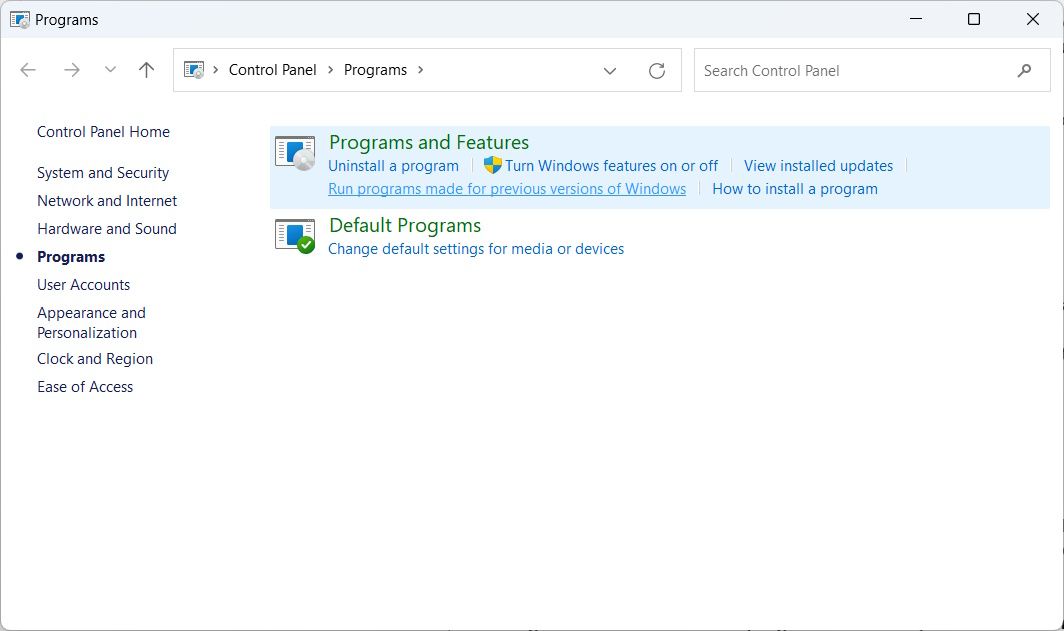
This will launch the Program Compatibility Troubleshooter.
4. Run Program Compatibility Troubleshooter Using a Desktop Shortcut
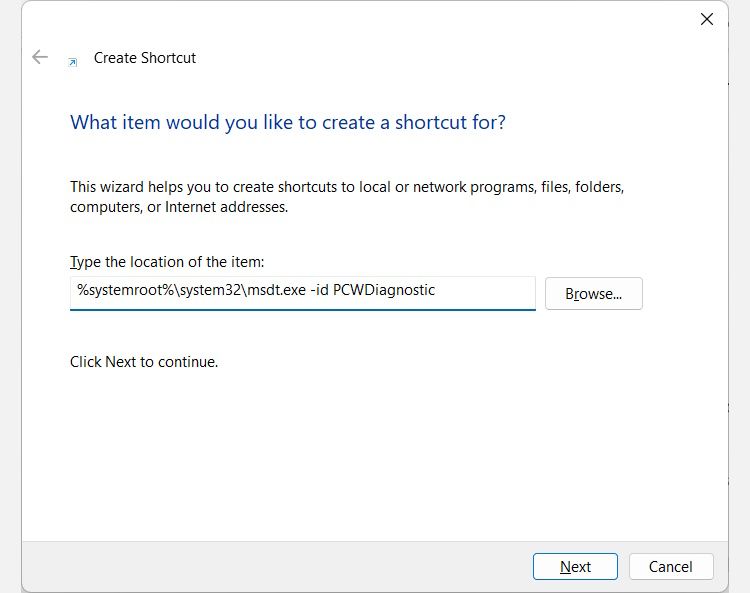
If you use the Program Compatibility Troubleshooter a lot, adding it to the Desktop is a good way to keep it within reach. To do that, right-click an empty space on the Desktop, and then click New > Shortcut to launch the Create Shortcut wizard.
Copy the below text:
%systemroot%\system32\msdt.exe -id PCWDiagnostic
Next, paste the text you just copied into the text box of the Create Shortcut wizard, and then click Next.
Name the shortcut Program Compatibility Troubleshooter, and then click Finish to add the shortcut to your Desktop.
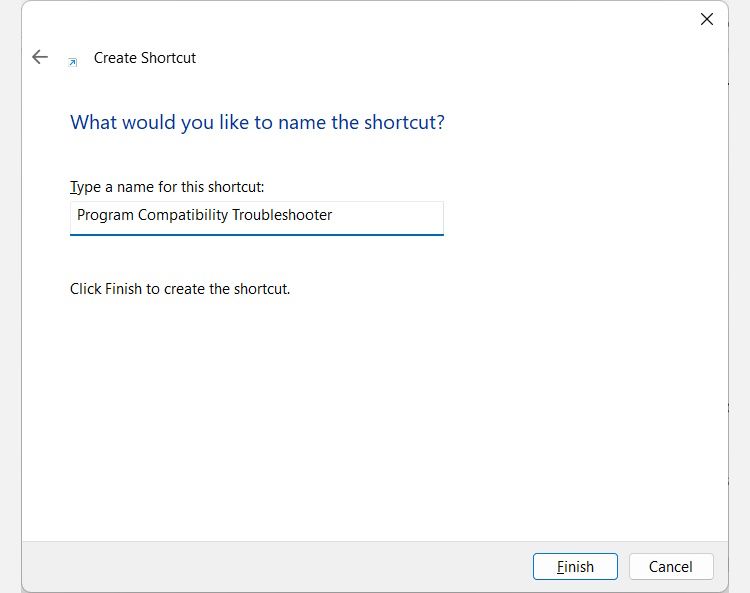
Now when you double-click the shortcut you just created, you will launch the Program Compatibility Troubleshooter.
Now You Can Run the Program Compatibility Troubleshooter in Different Ways
The Program Compatibility Troubleshooter is sometimes the last resort to get older apps running on your current version of Windows. There are various ways to fire up this handy tool, and we have just shown you all the ways in case one of them doesn’t work for you.