
Если вы видите это сообщение, значит, произошла проблема с загрузкой файлов в стилей (CSS) нашего сайта. Попробуйте сбросить кэш браузера (Ctrl+F5).
Если это не поможет, а вы находитесь в регионе, где возможны ограничения интернет-трафика с российских серверов — воспользуйтесь VPN.
|
Системный трей — это самая нижняя панелька на мониторе. Там находятся часы Windows, настройки драйверов звуковой и видео карт, значек антивирусной программы, а так же еще несколько других программ, в частности те что находятся в автозагрузке (запускаются сразу после старта (загрузки) операционной системы Windows). автор вопроса выбрал этот ответ лучшим ЧипИД 5 лет назад В пользовательском интерфейсе Windows есть область, предназначенная для выдачи сообщений операционной системы, отображения иконок системных программ и приложений, работающих в фоновом режиме. Называется эта область «Системный трей» (другие названия «Область состояния» или «Область уведомления»). Найти эту область на рабочем столе Windows довольно просто. В самом низу экрана расположена полоска, которая называется «Панель задач». Системный трей является частью панели задач и в стандартной конфигурации расположен в правой её части. Вы легко найдете системный трей, если запомните, что в нем обычно отображаются часы и иконки регулятора громкости, сетевых подключений, состояния аккумулятора, центра поддержки. Также там расположена кнопочка в виде маленького треугольника для доступа к скрытым значкам. 
Системный трей или как многие говорят просто трей — это нижняя полосочка под рабочим столом, на которой обычно написано «Пуск» в русифицированных Windows и «Start» в Windows на английском языке. В трее отображаются запущенные программы. Слева кнопка «Пуск», нажав которую, можно выбрать и запустить какую-нибудь программу. Затем идут иконки работающих программ, имеющих окна, то есть позволяющих работать с этими программами. Правее можно увидеть маленькие иконки. Это иконки программ, работающих в фоновом режиме или режиме ожидания. Фоновый режим — это значит программы просто что-то делают или проверяют время от времени. Режим ожидания — это когда программа ждёт, когда вы кликнете по этому значку. Когда кликните, откроется небольшое контекстное меню и из него можно уже запустить программу в нормальном окне, либо осуществить какие-нибудь настройки этой программы. Ещё правее, в самом конце, находятся часы Windows, называемые CMOS часами. Если по ним кликнуть, откроется календарь, который можно посмотреть либо настроить на нужную дату и время. Работа трея, также как и наличие рабочего стола Windows осуществляется за счёт процесса Explorer.exe, поэтому если не хотите, чтобы рабочий стол и трей исчезли, не снимайте данный процесс в диспетчере задач. Хотя из него (диспетчера задач) можно его же снова и запустить. 
Эл Лепсо 5 лет назад Для некоторых пользователей ПК остается загадкой, что такое «системный трей» и где его искать. А само назначение этого элемента можно определить и как «область уведомлений»: именно там появляются какие-то системные сообщения, предупреждения, «висят» значки запущенных и работающих в фоновом режиме программ, а также отображается действующая раскладка клавиатуры и текущая дата и время. В общем, много чего там можно найти. До какого-то времени, системный трей всегда находился в строго определенном месте экрана монитора — в правом нижнем углу. Но с некоторых пор появилась возможность перемещать панель задач и вместе с ней системный трей, «прикрепляя» его к любой из сторон монитора — хоть сверху, хоть слева, хоть справа (как на рисунке ниже): Системный трей — это область уведомлений на панели задач, выглядит как группа ярлычков программ в правом нижнем углу экрана, возле часов. Обычно там находятся программы из автозагрузки, а так же программы, которые выполняют свои задачи в фоновом режиме. владс 5 лет назад Находится этот третий системный в нижней части экрана монитора и представлен в виде не большой и довольно узкой полоски внизу экрана. В нем как правило отображается тот спектр программ, который должен работать в фоновом режиме. Валер 4 года назад Доброго времени суток! Как правильно написано выше, системный трей — это область уведомлений системы. Он предназначен для того, чтобы не захламлять рабочее пространство. В трее, как правило, находятся программы работающие в фоновом режиме. Находится системный трей в правом нижнем углу около системных часов и обозначается стрелочкой. Сансе 5 лет назад В самом низу экрана монитора находится полоска с кнопкой «Пуск», часами, значком интернета — это системный трей. Сюда можно вынести также браузеры, чистящие программы, сайты и прочие значки (ярлыки), чтобы они не загромождали рабочий стол и не перегружали работу процессора. Красн 5 лет назад Это нижняя часть экрана монитора, не большая и довольно узкая полоска внизу экрана, это и есть системный трей. Чтобы не грузить процессор я все значки с рабочего стола перенёс в тот самый системный трей, это удобно. И значки у меня не только в нижнем правом углу. SVFE4 8 лет назад Системный трей находится в нижнем правом углу экрана, он обычно ограничен языковой панелью и временем с датой. Там отображаются программы, которые работаю в фоновом режиме а также некоторая информация о системе. Знаете ответ? |
Смотрите также: Как в сист\трее Win 10 сменить иконку значка на другую, без сторонних прог? Трей Янг, какова его: биография, карьера, социальные сети и личная жизнь? Как outlook свернуть в трей? Что значит свернуть в трей? Что значит закрыть программу через трей? Как уменьшить трей? Трей Валлетт, какая биография, личная жизнь, возраст, фото, Инстаграм? Во сколько обходиться городу шведский «Тре крунур» на «Алых парусах? Как убрать из трея значок Microsoft Office Upload Center? Как вернуть трей в низ рабочего стола? Исчезает иконка из трея, как исправить? |
-
Home
-
News
- What Is System Tray Windows 10 | How to Hide and Unhide Icons
By Stella | Follow |
Last Updated
Do you know what Windows 10 system tray is and do you know how to customize system tray on Windows 10 according to your requirements? MiniTool Software writes this post to introduce system tray on Windows 10 and show you how to hide and unhide icons in Windows 10 system tray.
What Is System Tray on Windows 10?
The Windows 10 system tray, which is also known as the Notification area, is located at the right side of the taskbar. It has been there for over 20 years and it keeps improving all the time.
It provides a quick access to your system functions, notifications, and applications. At present, it is very easy to customize the icons in it. For example, you can decide which system and apps icons to be shown in system tray on Windows 10.
In this post, we will show you how to customize system tray on Windows 10, including hiding and unhiding icons on Windows 10 system tray.
How to Hide and Unhide Icons on Windows 10 System Tray?
By default, Windows hides many icons on the system tray, aiming to free up space for the taskbar. If you want to see all icons in the notification area, you can click the up arrow that on the left side. You can click on one of the icons to open it.
But the icons you can see in it may not meet your requirements. In this case, you can customize system tray on Windows 10. For example, you may want to change the position of the icon in the Windows 10 system tray by dragging it to your desired area.
Here you may ask another question: how do I add an icon to my notification area? It is not a difficult job. We will show you two guides.
If you want to hide or unhide the icons of programs on the taskbar, you can follow this guide:
1. Click Start.
2. Go to Settings > Taskbar.
3. Find the Notification area section and click the Select which icons appear on the taskbar link.
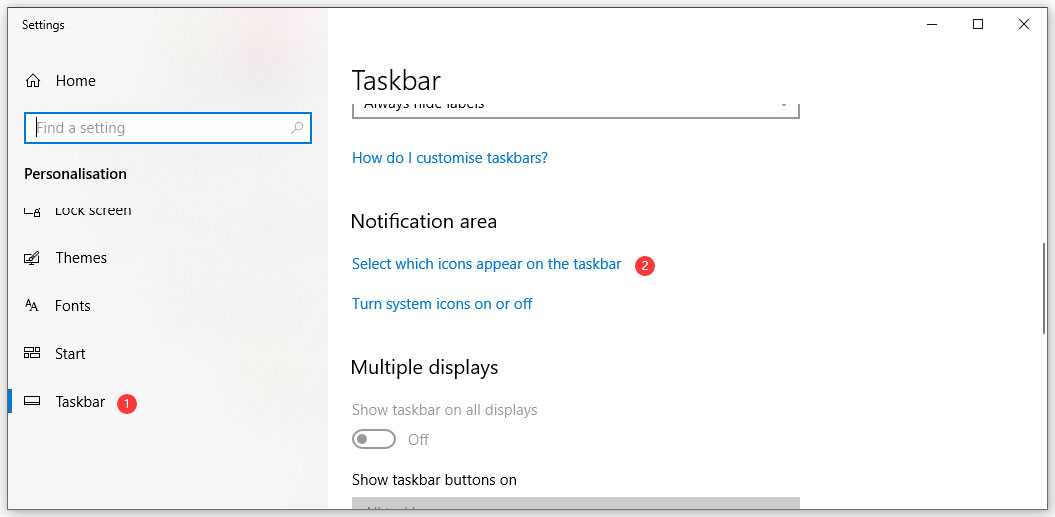
4. You will see the Select which icons appear on the taskbar Here you can turn on the button for program that needs to be displayed on the taskbar. If you want to show all the icons in the notification area, you can turn on the button that below Always show all icons in the notification area.

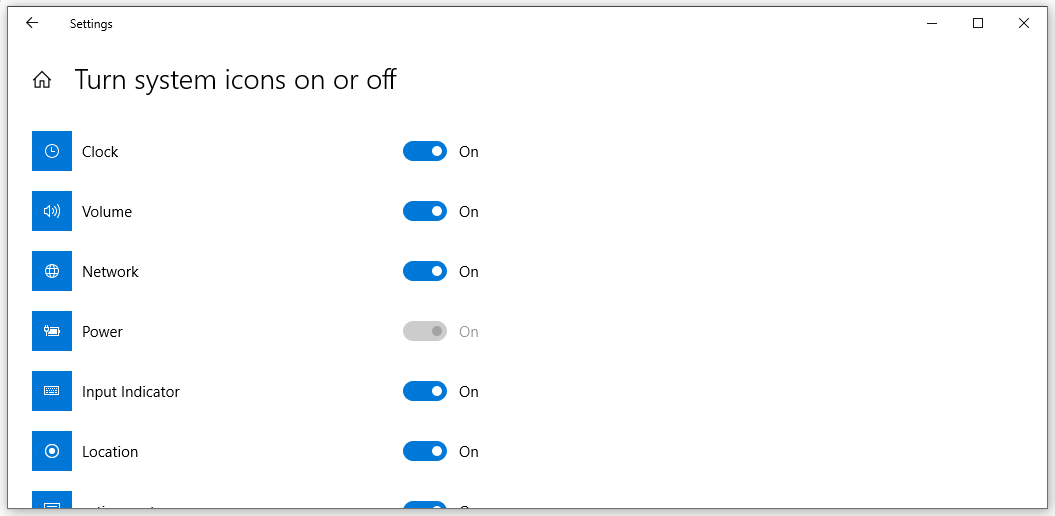
The system icons like Clock, Volume, Network, Power, Input Indicator, Location, and more are not included in the Select which icons appear on the taskbar section. If you want to customize the system icons on the taskbar, you can follow this guide:
1. Click Start.
2. Go to Settings > Taskbar.
3. Find the Notification area section and click the Turn system icons on or off link.
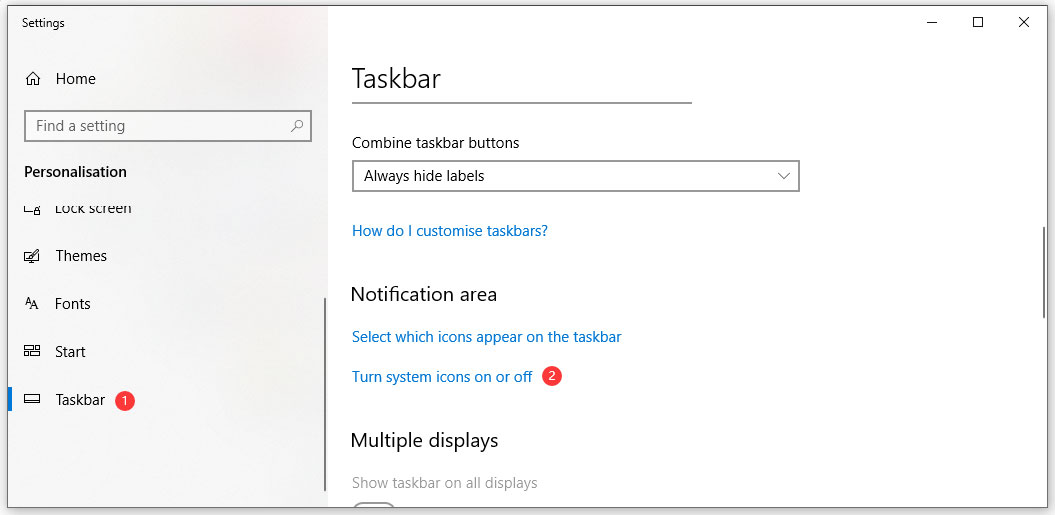
4. On the Turn system icons on or off interface, you can see all the system icons. Then, you can turn on the button for the system icon you want Windows to show on the taskbar.
Now, you know what system tray on Windows 10 is and how to customize the icons in it. If you encounter some related issues, you can let us know in the comment.
About The Author
Position: Columnist
Stella has been working in MiniTool Software as an English Editor for more than 8 years. Her articles mainly cover the fields of data recovery including storage media data recovery, phone data recovery, and photo recovery, videos download, partition management, and video & audio format conversions.
What is the System Tray?
The system tray, also known as the notification area, is a feature found on the taskbar of various operating systems, including Windows and Mac. It is typically located in the bottom-right corner of the screen and contains a collection of icons representing different system and application processes. The system tray provides users with quick access to important functions, notifications, and status updates.
One of the primary purposes of the system tray is to display system information and provide users with a way to manage various aspects of their computer. Common system icons found in the system tray include the clock, volume control, network connection, battery status, and sound notifications. These icons allow users to easily monitor and control essential system functions without the need to navigate through multiple menus or windows.
In addition to system-related icons, the system tray also displays icons for running applications and utilities. This allows users to quickly switch between open programs, access frequently used tools, or receive alerts and notifications from different applications. For example, a messaging application may display an icon in the system tray to indicate new messages, while an antivirus software might use the system tray to notify users of potential threats or update status.
Customization options for the system tray vary depending on the operating system. Users can often choose to show or hide specific icons, rearrange the order of icons, or adjust the behavior and visibility of notifications. This level of customization allows users to personalize the system tray according to their preferences and reduce clutter or distraction caused by unnecessary icons.
Overall, the system tray serves as an essential component of the user interface, providing quick access to important system and application functions while keeping users informed about critical events and notifications. Understanding how to navigate and customize the system tray allows users to enhance their productivity, manage system resources effectively, and stay updated on the status of their computer.
How to Find the System Tray on Windows 10
The system tray on Windows 10 is a convenient tool for accessing essential functions and monitoring system status. Here’s how to find it:
- Start by locating the taskbar, which is typically positioned at the bottom of the screen.
- Look for the small section on the far-right side of the taskbar. This is the system tray.
- If the icons in the system tray are hidden, you may need to click on the small arrow icon to expand it.
- Once expanded, you’ll see various icons representing different system and application processes.
To interact with the icons in the system tray, simply click on them. This will open a menu or perform the associated action. For example, clicking on the volume icon allows you to adjust the system’s sound settings, while clicking on the network icon displays network connection options.
Note that some icons in the system tray may be hidden by default. To customize the visibility of these icons, right-click on an empty space on the taskbar and select “Taskbar settings” from the context menu.
In the taskbar settings, scroll down to the “Notification area” section and click on “Turn system icons on or off.” From here, you can choose which icons to show or hide in the system tray.
Additionally, you can customize the behavior of notifications by going to the settings app and selecting “System,” then “Notifications & actions.” From here, you can adjust the notification settings for specific applications and control how they appear in the system tray.
That’s it! You now know how to find the system tray on Windows 10 and how to customize its appearance and behavior to suit your preferences. Utilize this handy tool to stay informed about your computer’s status and easily access important functions.
How to Find the System Tray on Windows 8
The system tray in Windows 8 serves as a hub for accessing important system functions and receiving notifications. Here’s how to locate it:
- Begin by moving your cursor to the bottom-right or top-right corner of the screen to reveal the Charms bar.
- In the Charms bar, click on the “Settings” option.
- A sidebar will appear on the right side of the screen. Look for the “Notifications” icon, which resembles a speech bubble.
- Click on the “Notifications” icon, and the system tray will open, displaying various icons representing different system and application processes.
If the system tray icons are hidden, you may need to click on the small arrow icon at the left end of the system tray to expand it.
To interact with the icons in the system tray, simply click on them. This will open a menu or perform the associated action. For example, clicking on the volume icon allows you to adjust the system’s sound settings, while clicking on the network icon displays network connection options.
Customizing the visibility of icons in the system tray can be done by accessing the taskbar settings. Right-click on an empty space on the taskbar, and select “Properties” from the context menu. In the Taskbar and Navigation Properties window that appears, navigate to the “Taskbar” tab. Under the Notification area section, click on the “Customize” button to choose which icons to show or hide in the system tray.
That’s it! You’ve successfully located the system tray on Windows 8 and learned how to customize its appearance. Take advantage of this convenient feature to access essential functions and stay updated with important notifications.
How to Find the System Tray on Windows 7
The system tray in Windows 7 is a useful tool for accessing important system functions and monitoring notifications. Here’s how to locate it:
- Begin by locating the taskbar, which is usually located at the bottom of the screen.
- Look for the rightmost section of the taskbar. This section is called the system tray.
- If you see a small arrow icon pointing upward, click on it to expand the system tray. This is necessary if some of the icons are hidden.
- Once expanded, you will see various icons representing different system and application processes.
To interact with the icons in the system tray, simply click on them. This will open a menu or perform the associated action. For instance, clicking on the volume icon allows you to control the system’s sound settings, while clicking on the network icon displays network connection options.
If you want to customize the behavior of the icons or the system tray, right-click on an empty space on the taskbar, and select “Properties” from the menu that appears.
In the Taskbar and Start Menu Properties window that opens, go to the “Taskbar” tab. Under the Notification area section, click on the “Customize” button to choose which icons should be shown or hidden in the system tray.
You can also choose to customize the appearance of the system tray by selecting the “Taskbar” tab and exploring the options available.
That’s it! You’ve successfully located the system tray on Windows 7 and learned how to customize its visibility and appearance. Take advantage of this handy feature to easily access important functions and stay informed about notifications and system status.
How to Find the System Tray on Mac
While Mac computers do not have a system tray similar to Windows, they do have a menu bar that serves a similar purpose. Here’s how to find it:
- Look at the top of your Mac’s screen. You’ll see a bar called the menu bar.
- In the menu bar, you’ll find various icons representing different system functions and applications.
- For system-related functions like Wi-Fi, battery status, and sound controls, check the top-right corner of the menu bar. These icons provide quick access to important system settings and notifications.
- Application-specific icons will appear towards the top-left corner of the menu bar, next to the Apple menu.
- When an application is active or running, you may also see additional icons or menu options related to that specific app.
To interact with the icons in the menu bar, simply click on them. This will open a dropdown menu or perform the associated action. For example, clicking on the Wi-Fi icon allows you to connect to different networks or check your connection status.
To further customize the appearance of the menu bar and the icons shown, go to “System Preferences” from the Apple menu.
In the System Preferences window, click on the “Dock & Menu Bar” option. From there, you can adjust the visibility of different icons, rearrange their order, and customize other menu bar preferences.
That’s it! Although Mac computers don’t have a traditional system tray like Windows, the menu bar serves a similar function. Use this feature to quickly access important system functions and application controls while using your Mac.
How to Customize the System Tray on Windows 10
The system tray in Windows 10 provides a range of customization options, allowing you to personalize its appearance and behavior according to your preferences. Here’s how to do it:
- Right-click on an empty space on the taskbar at the bottom of the screen. This will bring up a context menu.
- From the context menu, select “Taskbar settings.” This will open the Taskbar settings window.
- In the Taskbar settings, scroll down to the “Notification area” section.
- Click on the “Turn system icons on or off” option.
- Here, you can choose which system icons you want to show or hide in the system tray. Toggle the switches according to your preference.
- To further customize the system tray, click on the “Select which icons appear on the taskbar” option.
- In this section, you can enable or disable specific app icons in the system tray. You can also rearrange the order of the icons by dragging and dropping them.
- If you want more precise control over the behavior of notifications in the system tray, go to the settings app and select “System,” then “Notifications & actions.”
- From here, you can adjust the notification settings for individual apps and choose how they appear in the system tray.
- Additionally, you can customize the taskbar and other related settings by exploring the options in the Taskbar settings window.
By following these steps, you can customize the system tray on Windows 10 to suit your preferences. Take advantage of these customization options to declutter the system tray, prioritize important system icons, and fine-tune the behavior of notifications.
How to Customize the System Tray on Windows 8
The system tray on Windows 8 can be customized to suit your preferences, allowing you to personalize its appearance and optimize its functionality. Here’s how to do it:
- Right-click on an empty space on the taskbar, which is typically located at the bottom of the screen. This will open a context menu.
- From the context menu, select “Properties” to open the Taskbar and Navigation Properties window.
- In the Taskbar and Navigation Properties window, navigate to the “Taskbar” tab.
- Under the “Notification area” section, click on the “Customize…” button.
- A new window will appear, displaying a list of available system icons and their corresponding behaviors.
- To change the visibility of an icon, locate it in the list, and select the corresponding drop-down menu under the “Behavior” column. Choose the desired option, such as “Show icon and notifications” or “Hide icon and notifications”.
- To change the order of icons in the system tray, click on the icon you want to move and use the up or down arrow button to adjust its position.
- To customize the settings of a specific application’s icon, click on the icon in the list, then choose the desired option from the drop-down menu under the “Behavior” column.
Additionally, you can access more system tray customization options by right-clicking on any individual system tray icon. This will bring up a context menu with additional options specific to that icon.
Once you have made the desired changes to the system tray customization, click “OK” to save the settings.
By following these steps, you can customize the system tray on Windows 8 according to your preferences. Take advantage of these customization options to streamline your system tray, prioritize important icons, and manage notifications effectively.
How to Customize the System Tray on Windows 7
The system tray on Windows 7 can be customized to meet your preferences, allowing you to personalize its appearance and optimize its functionality. Here’s how you can do it:
- Right-click on an empty space on the taskbar, typically located at the bottom of the screen. This will open a context menu.
- From the context menu, select “Properties” to open the Taskbar and Start Menu Properties window.
- In the Taskbar and Start Menu Properties window, navigate to the “Taskbar” tab.
- Under the “Notification area” section, click on the “Customize…” button.
- A new window will appear, displaying a list of available system icons and their corresponding behaviors.
- To change the visibility of an icon, locate it in the list, and select the corresponding drop-down menu under the “Behavior” column. Choose the desired option, such as “Show icon and notifications” or “Hide icon and notifications”.
- To change the order of icons in the system tray, click on the icon you want to move and use the up or down arrow button to adjust its position.
- To customize the behavior of a specific application’s icon, click on the icon in the list, then choose the desired option from the drop-down menu under the “Behavior” column.
Furthermore, you can access additional customization options by clicking on the “Customize” button located at the bottom-right corner of the “Customize Notifications” window. This will allow you to control how notifications are displayed and managed.
Once you have made the desired changes to the system tray customization, click “OK” to save the settings.
By following these steps, you can easily customize the system tray on Windows 7 to match your preferences. Utilize these customization options to streamline your system tray, prioritize important icons, and effectively manage notifications.
How to Customize the System Tray on Mac
While Mac computers do not have a traditional system tray like Windows, there are ways to customize the menu bar, which functions similarly to the system tray. Here’s how you can customize it on your Mac:
- Click on the Apple menu in the top-left corner of the screen and select “System Preferences.”
- In the System Preferences window, click on “Dock & Menu Bar.”
- On the left side of the window, you will find various categories such as “Displays,” “Sound,” “Keyboard,” and more.
- Click on each category to reveal the available customization options for that particular area.
- Under the “Menu Bar” section, you can customize the icons that appear in the menu bar.
- To remove an icon from the menu bar, uncheck the corresponding box next to the icon name.
- To add an icon to the menu bar, check the box next to the desired icon name.
- To rearrange the icons, simply click and drag them to the desired position in the menu bar.
- Some icons may offer additional customization options, such as adjusting the volume or brightness level.
- Explore the different categories and customize the settings according to your preferences.
By customizing the menu bar, you can tailor it to display the icons that are most important and relevant to you. This allows for quick access to frequently used functions and keeps your menu bar clutter-free.
Keep in mind that not all applications or features may have customization options available in the menu bar. In such cases, you may need to explore the settings within the corresponding application to adjust its behavior or appearance.
Take advantage of the menu bar customization options to create a personalized workspace on your Mac and make accessing important functions a breeze.
How to Troubleshoot Issues with the System Tray on Windows 10
While the system tray on Windows 10 is designed to function smoothly, occasional issues may arise. Here are some troubleshooting steps you can take to address common problems related to the system tray:
- Restart Explorer: The system tray is part of the Windows Explorer process. To restart it, open the Task Manager by right-clicking on the taskbar and selecting “Task Manager.” Under the “Processes” tab, locate “Windows Explorer,” right-click on it, and select “Restart.”
- Reboot the System: Sometimes, a simple system restart can resolve system tray issues. Close any open applications and click on the “Start” menu, then select “Restart” or “Shut down” and power on your computer again.
- Update Windows: Ensure that your Windows 10 operating system is up to date. Go to “Settings” from the Start menu, select “Update & Security,” and click on “Windows Update.” If updates are available, click on “Check for updates” and follow the instructions to install them.
- Check for Driver Updates: System tray issues may be caused by outdated or incompatible device drivers. Visit the website of your computer manufacturer or the respective hardware component manufacturers to download the latest drivers for your system.
- Scan for Malware: Malware infections can cause various system issues, including problems with the system tray. Run a full scan with a reliable antivirus software to detect and remove any malware from your computer.
- Reset Notification Area Icons: If some icons are missing or not displaying properly in the system tray, you can try resetting the notification area icons. Open the Taskbar settings by right-clicking on an empty space on the taskbar and selecting “Taskbar settings.” Scroll down to the “Notification area” section and click on “Select which icons appear on the taskbar.” Then, click on “Restore default icon behaviors.”
- Create a New User Profile: Sometimes, issues with the system tray can be caused by a corrupted user profile. Creating a new user profile can help resolve this. Go to “Settings,” select “Accounts,” and click on “Family & other users.” Under “Other users,” click on “Add someone else to this PC” and follow the instructions to create a new user profile.
- Perform System Restore: If the above steps don’t resolve the system tray issues, you can try using the System Restore feature to revert your computer back to a previous working state. Open the Start menu, type “System Restore,” and open the System Restore tool. Follow the instructions to choose a restore point and restore your system.
If the system tray issues persist after trying these troubleshooting steps, it may be helpful to seek further assistance from technical support or a knowledgeable professional to diagnose and resolve the specific problem.
How to Troubleshoot Issues with the System Tray on Windows 8
While the system tray on Windows 8 is designed to function seamlessly, there may be occasions when it encounters issues. Here are some troubleshooting steps to help you address common problems related to the system tray:
- Restart the Windows Explorer: The system tray is a part of the Windows Explorer process. To restart it, right-click on the taskbar and select “Task Manager.” Under the “Processes” tab, locate “Windows Explorer,” right-click on it, and choose “Restart.”
- Reboot your Computer: Sometimes, a simple system restart can fix system tray issues. Close any open applications, click on the Start button, and select “Restart” or “Shut down.” After the computer powers off, turn it back on again.
- Check for Windows Updates: Make sure your Windows 8 operating system is up to date. Open the Charms bar by moving your cursor to the top-right or bottom-right corner of the screen, click on “Settings,” and select “Change PC settings.” In the PC settings menu, select “Update and recovery” and click on “Check now” under “Windows Update.” Install any available updates.
- Scan for Malware: Malware infections can cause various system issues, including problems with the system tray. Run a full scan using a reputable antivirus software to detect and remove any malware from your computer.
- Reset Notification Area Icons: If some icons are missing or not displaying correctly in the system tray, you can reset the notification area icons. Right-click on an empty area of the taskbar and select “Properties.” In the Taskbar and Navigation Properties window, click on the “Customize” button under “Notification area.” Then, click on “Restore default icon behaviors.”
- Create a New User Profile: System tray issues can sometimes be caused by a corrupted user profile. Creating a new user profile can help resolve the problem. Open the Charms bar, click on “Settings,” select “Change PC settings,” and choose “Accounts.” Under “Other accounts,” click on “Add an account” and follow the instructions to create a new user profile.
- Perform a System Refresh: If the system tray issues persist, you can try a system refresh. Open the Charms bar, click on “Settings,” select “Change PC settings,” and choose “Update and recovery.” Under “Recovery,” click on “Get started” under “Refresh your PC without affecting your files.” Follow the on-screen instructions to refresh your system.
- Seek Professional Assistance: If the above steps do not resolve the system tray issues, it may be necessary to seek assistance from technical support or a professional who can diagnose and fix the specific problem.
By following these troubleshooting steps, you can address common system tray issues on Windows 8 and restore the functionality of this key feature.
How to Troubleshoot Issues with the System Tray on Windows 7
The system tray on Windows 7 usually functions smoothly, but there may be instances where issues arise. Here are some troubleshooting steps to help you address common problems related to the system tray:
- Restart the Windows Explorer: The system tray is part of the Windows Explorer process. To restart it, right-click on the taskbar and select “Task Manager.” Under the “Processes” tab, locate “explorer.exe,” right-click on it, and choose “End Task.” While still in the Task Manager, go to “File” and select “New Task (Run…).” Type “explorer.exe” and hit Enter or click “OK” to restart Windows Explorer.
- Reboot your Computer: Sometimes, a simple system restart can resolve system tray issues. Close any open applications, click on the Start button, and select “Restart” or “Shut down.” After the computer powers off, turn it back on again.
- Check for Windows Updates: Make sure your Windows 7 operating system is up to date. Click on the Start button, go to “Control Panel,” and click on “System and Security.” Under the “Windows Update” section, click on “Check for updates.” Install any available updates.
- Scan for Malware: Malware infections can cause various system issues, including problems with the system tray. Run a full scan using a reputable antivirus software to detect and remove any malware from your computer.
- Reset Notification Area Icons: If some icons are missing or not displaying properly in the system tray, you can try resetting the notification area icons. Right-click on an empty area of the taskbar and select “Properties.” In the Taskbar and Start Menu Properties window, click on the “Customize” button under “Notification area.” Then, click on “Restore default icon behaviors.”
- Create a New User Profile: System tray issues can sometimes be caused by a corrupted user profile. Creating a new user profile can help resolve the problem. Click on the Start button, go to “Control Panel,” and click on “User Accounts and Family Safety.” Under “User Accounts,” click on “Manage another account” and follow the instructions to create a new user profile.
- Perform a System Restore: If the system tray issues persist, you can try using the System Restore feature to revert your computer back to a previous working state. Click on the Start button, go to “Control Panel,” and click on “System and Security.” Under the “System” section, select “System.” In the System window, click on “System Protection” in the left-hand sidebar and follow the instructions to restore your system to an earlier date.
- Seek Professional Assistance: If the above steps do not resolve the system tray issues, it may be necessary to seek assistance from technical support or a professional who can diagnose and fix the specific problem.
By following these troubleshooting steps, you can effectively address common system tray issues on Windows 7 and restore the functionality of this important component.
How to Troubleshoot Issues with the System Tray on Mac
While the system tray equivalent on Mac, known as the menu bar, is known for its reliability, there may be times when issues occur. Here are some troubleshooting steps to help you address common problems with the system tray on Mac:
- Restart the Mac: A simple system restart can often resolve minor system tray issues. Click on the Apple menu in the top-left corner of the screen and select “Restart.”
- Reset the Menu Bar: If icons in the menu bar are misplaced or behaving unexpectedly, you can reset the menu bar to its default settings. Hold down the Command key and drag an icon out of the menu bar until it disappears. Repeat this process for each icon you want to remove. Then, restart your Mac and re-add the icons by going to “System Preferences” > “Users & Groups” > “Login Items.”
- Remove Third-Party Menu Bar Apps: Some third-party apps might cause conflicts with the menu bar. Try removing any recently installed or suspicious-looking apps by dragging them from the menu bar to the Trash. Restart your Mac to see if the issue is resolved.
- Check for Software Updates: Keeping your Mac up to date with the latest software updates can often resolve system tray issues. Click on the Apple menu, select “System Preferences,” and click on “Software Update.” Install any available updates and restart your Mac if needed.
- Restart SystemUIServer: SystemUIServer is the system process responsible for the menu bar. If the menu bar becomes unresponsive or acts strangely, restarting SystemUIServer may help. Open the Terminal app (found in the Utilities folder within the Applications folder) and type “killall SystemUIServer” (without quotes) and press Enter.
- Create a New User Account: If the system tray issues persist, create a new user account to determine if the problem is specific to your user account. Open “System Preferences” and go to “Users & Groups.” Click on the lock icon at the bottom-left corner, enter your password, and click on the “+” button to create a new user account. Log in to the new account and check if the system tray works correctly.
- Perform a macOS Reinstallation: If all else fails, you may need to reinstall macOS. This process should be approached with caution, as it will erase your data. Before proceeding, make sure to back up your important files. Restart your Mac while holding down Command + R to enter Recovery Mode. From there, follow the on-screen instructions to reinstall macOS.
- Seek Professional Assistance: If the above steps do not resolve the system tray issues, it may be necessary to seek assistance from technical support or an authorized Apple service provider for further diagnosis and troubleshooting.
By following these troubleshooting steps, you can effectively address common system tray issues on Mac and restore the smooth functioning of the menu bar.
Main elements on the Windows taskbar
The taskbar is a central hub for accessing various system features and shortcuts. It includes key elements designed to enhance productivity and ease of use. Users can quickly access the start menu, search bar, and pinned applications.
Start
The Start button is the first element on the taskbar, located on the left side. It gives you access to apps, settings, and files. To open the Start menu:
-
Press the Windows logo key or look for the Windows icon on the taskbar. If using a screen reader, you’ll hear the “start button» to access the menu.
-
Once open, you can type the name of any app, setting, or document you want in the search box. Use the Down or Up arrow key to navigate through the suggestions and press Enter to select.
-
Alternatively, use the arrow keys to navigate the Pinned apps and Recommended items.
-
For detailed information, go to Use a screen reader to explore and navigate the Start menu in Windows.
Search
The Search icon, located to the right of the Start button, helps you quickly find files, apps, and settings. With a screen reader, you’ll hear the “search button off.” Follow these steps to use Search:
-
Press the Windows logo key+S or look for the Search icon on the taskbar to type your query in the search box. Then, press Tab to navigate to search categories and results.
For more details, go to Search for anything, anywhere.
Task view
Task view lets you organize your workspace by creating multiple desktops, helping you focus on applications or tasks on a specific desktop. You can switch between them using the Task view button.
-
Press the Windows logo key+Tab. If using a screen reader, you’ll hear «task view button off, number of desktops.»
-
Use the Tab key to navigate the options and arrow keys to explore the desktops. Press Enter to switch.
For more information, go to Multiple desktops in Windows and Keyboard shortcuts in Windows.
System tray
The System tray is at the right end of the taskbar and displays system notifications and app icons. You’ll find OneDrive, Internet access, Audio output device and volume, Battery status, Clock, and Notifications in the System tray. To navigate, follow these steps:
-
Press the Windows logo key+B to access the Show hidden icons or Windows logo key+N to open the Notification center.
-
Use the Left or Right arrow key to navigate through the elements in the System tray such as Internet access, Audio output device and volume, Battery power, and System clock. Press Enter to expand the menu.
-
-
Use the arrow keys to move between icons or notifications, and press Enter to interact with them.
-
To rearrange the icons in the quick settings window, tap and hold the icon and drag to the desired location.
Note: The quick settings pane now includes a Live captions button. Press the Tab key until you hear “Live captions” then press Enter to open it.
-
To learn how to customize the system tray, go to Customize the taskbar notification area.
Manage Wi-Fi connections
To Refresh the network list, follow these steps:
-
Press the Windows logo key+A to open the Quick settings window.
-
Navigate to select the Manage Wi-Fi connections button, and press Enter.
-
Select the Refresh network list icon, and press Enter to find the available Wi-Fi networks.
Remove a hardware device
This feature ensures that all read and write operations are complete before the device is disconnected. It helps prevent data corruption and physical media damage.
-
Press the Windows logo key+B to access the Show hidden icons and then press Enter.
-
Use the Right arrow key to select “Safely remove hardware and eject media button,” and then press Enter to open the connected devices list.
-
Use the Down arrow key to navigate through the list, once selected press Enter to remove the device.
Accessibility flyout
The Accessibility flyout provides quick access to settings such as Magnifier, Color filters, Narrator, Mono audio, Live captions, and Sticky keys. It is part of the Quick settings menu on the right side of the taskbar. To access these settings:
-
Press the Windows logo key+A to open quick settings.
-
Use the arrow keys to navigate the Accessibility button and press Enter or Spacebar to select. This will open the Accessibility flyout menu.
-
To adjust settings, navigate to the More Accessibility settings button and press Enter.
For detailed information, go to Use a screen reader and keyboard to navigate and use the Windows Accessibility flyout and Find your notifications and quick settings / actions.
On-Screen Keyboard
The On-Screen Keyboard (OSK) offers an alternative way to type without a physical keyboard. It displays a visual keyboard with standard keys, allowing you to use your mouse or another pointing device to select keys.
-
To open the On-Screen Keyboard, press the Windows logo key+Ctrl+O.
For more information, go to Use the On-Screen Keyboard (OSK) to type.
See also
Use live captions to better understand the audio
Make your mouse keyboard and other input devices easier to use
How to use the taskbar in Windows
Discover Windows accessibility features
Technical support for customers with disabilities
Microsoft wants to provide the best possible experience for all our customers. If you have a disability or questions related to accessibility, please contact the Microsoft Disability Answer Desk for technical assistance. The Disability Answer Desk support team is trained in using many popular assistive technologies and can offer assistance in English, Spanish, French, and American Sign Language. Please go to the Microsoft Disability Answer Desk site to find out the contact details for your region.
If you are a government, commercial, or enterprise user, please contact the enterprise Disability Answer Desk.