Одной из очень распространенных ошибок, с которой может столкнуться каждый пользователь Windows, является синий экран с текстом «UNMOUNTABLE BOOT VOLUME». Синие экраны «смерти», как их называют в народе, никогда не приводят к чему-то хорошему. Если перевести именно эту ошибку, то система сообщает пользователю о том, что она не смогла смонтировать загрузочный том для дальнейшей обработки операционной системы. При возникновении такой ошибки на постоянной основе, можно прибегнуть к самостоятельным попыткам решить проблему.
Что значит ошибка UNMOUNTABLE BOOT VOLUME в Windows?
Каждый раз, когда пользователь нажимает кнопку питания и включает компьютер или ноутбук, система создает загрузочный том, который и является основой запуска ОС. Это означает, что предзагрузочная система BIOS инициирует формирование определенной файловой системы, которая уже является причиной дальнейшего запуска операционной системы и ее работы. Если монтаж загрузочной раздела не происходит, то и Windows работать не будет. Как правило, причиной ошибки UNMOUNTABLE BOOT VOLUME в Windows является повреждение файловой системы или загрузчика Windows. Но также проблема может быть с разделами самого жесткого диска, его физической неисправности или она заключается в повреждении некоторых системных файлов.
Как исправить UNMOUNTABLE BOOT VOLUME?
С данной проблемой можно обращаться к профессионалам и производить ремонтные процедуры через сервисный центр. Но можно попытаться все решить самостоятельно, есть несколько способов исправить эту проблему без специалистов. Все они требуют определенных навыков в работе с файловыми системами компьютера, но используя наши инструкции во всем может разобраться даже новичок.
Способ 1: сканирование жесткого диска и системы на ошибки
Так как загрузить операционную систему пользователь не может, то ему необходимо идти другим путем. В Windows есть специальная область для восстановления исходных параметров, через нее можно войти в командную строку, а там уже инициировать запуск проверки жесткого диска и системы на предмет ошибок. Для этого нужно выполнить следующие действия:
- Подключить к компьютеру загрузочную флешку Windows.
- На экране установки ОС зажать сочетание клавиш Shift+F10 чтобы открыть командную строку.
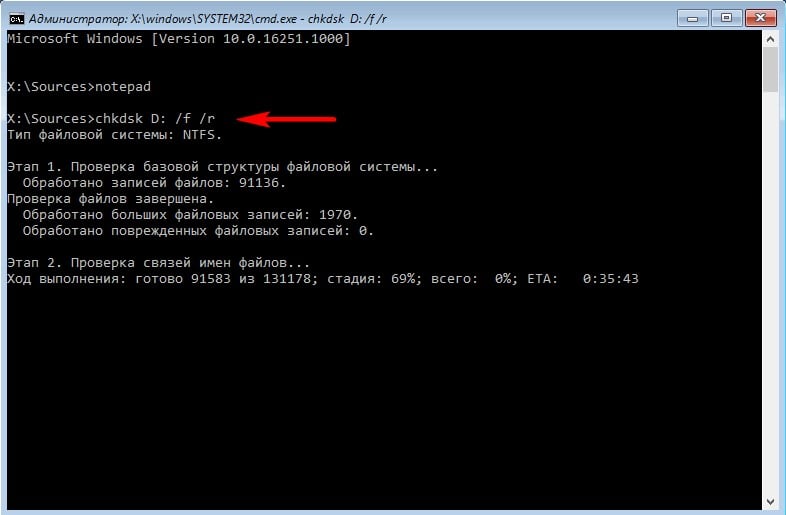
- В строке нужно ввести команду diskpart, а после этого команду list volume, чтобы отобразить все системные диски. Необходимо выбрать тот диск, который является системным, как правило, это диск С:, но буква может быть другой.
- Далее вводим команду chkdsk C: /F /R и нажимаем Enter, чтобы начать проверку диски на ошибки и исправить их автоматически.
- Необходимо дождаться полной проверки жесткого диска и файловой системы, это может потребовать немного времени.
После того как проверка будет закончена, можно перезагружать компьютер стандартным образом и вынимать загрузочную флешку. Если система загрузилась без синего экрана, то проблема была именно в ошибках файловой системы. Если сбой продолжает появляться, необходимо переходить к следующему способу решения проблемы.
Способ 2: восстановление загрузчика
Загрузчик Windows имеет отдельный раздел на жестком диске, где хранятся скрытые от пользователя файлы. Именно из них формируется загрузочный том и именно из-за них система может стартовать. В случае повреждения загрузчика система не будет запущена, а пользователь увидит на экране ту самую ошибку на синем фоне. Чтобы решить эту проблему, необходимо восстановить загрузочную область. Для этого следует проделать такие процедуры:
- Подключить к компьютеру загрузочную флешку Windows.
- На экране установки ОС нажмите «Восстановление системы».
- Выберите пункт «Поиск и устранение неисправностей».
- Выберите пункт «Восстановление при загрузке».
- Дождитесь автоматического восстановления загрузчика.
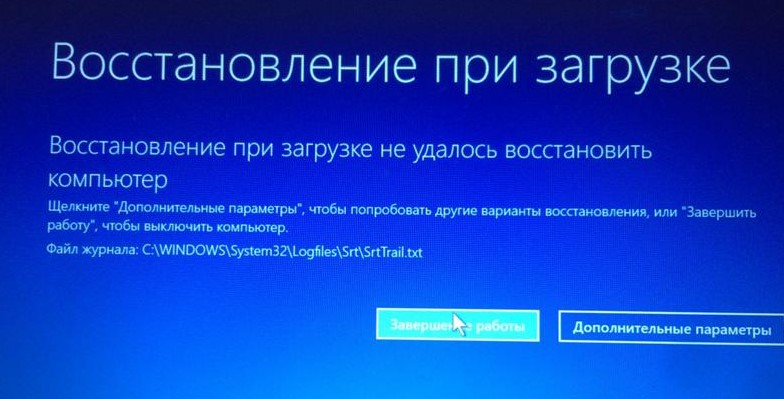
Если все прошло успешно, и вы увидели сообщение о том, что восстановление удачное, можно перезагружать систему в стандартном режиме. В случае, когда Windows запустилась, можно сделать вывод, что проблема была именно в загрузчике. В противном случае, необходимо переходить к следующему способу решения проблемы.
Способ 3: проверка оперативной памяти
Проблемы с оперативной памятью являются очень частой причиной возникновения данной ошибки, поэтому резонно проверить ее состояние. Это можно сделать штатными средствами операционной системы. Так как в саму Windows пользователь зайти не может, необходимо использовать все тот же загрузочный диск или флешку. Чтобы проверить оперативную память, выполните следующие действия:
- Подключить к компьютеру загрузочную флешку Windows.
- На экране установки ОС зажать сочетание клавиш Shift+F10 чтобы открыть командную строку.
- В командной строке введите команду mdsched и выберите «Выполнить проверку и перезагрузиться».
- Перед перезагрузкой вытяните загрузочный диск или флешку, чтобы загрузка произошла с системного носителя.
- Дождитесь окончания проверки.

Если проверка прошла и в отчете пользователь видит наличие ошибок, то ОЗУ придется менять. Если же проверка прошла и на экране есть сообщение о том, что проблем не обнаружено, то следует переходить к следующему способу решения проблемы.
Способ 4: откат обновления Windows
Одной из распространенных причин появления данной проблемы является неудачное обновление операционной системы Windows. Возможно, оно прошло неудачно, пропал интернет или электричество. В результате были повреждены некоторые системные файлы, а это уже и стало причиной того, что загрузочный том не может сформироваться. В этом случае необходимо откатить обновления Windows. Чтобы сделать это, выполните следующие действия:
- Подключить к компьютеру загрузочную флешку Windows.
- На экране установки ОС зажать сочетание клавиш Shift+F10 чтобы открыть командную строку.
- Ввести команду wmic qfe list brief /format:table чтобы отобразить все обновления, которые есть в системе.
- Удалите выбранное обновление командой wusa /uninstall /kb:4578846, где в конце будет номер последнего обновления.
- Перезагрузите компьютер.
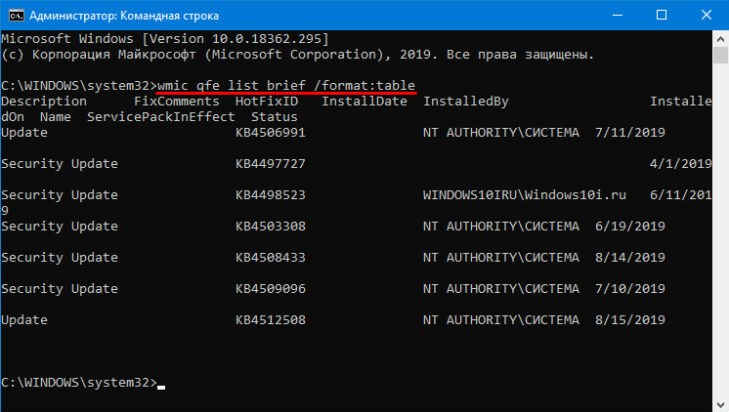
Если причина была именно в обновлении, то синий экран при загрузке больше не будет появляться. Если ошибка осталась, то необходимо переходить к более серьезным решениям.
Способ 5: переустановка Windows
Это довольно банальный способ решения проблемы, но он может оказаться самым эффективным. Переустановка Windows производится с загрузочной флешки, где необходимо дать согласие на формирование новой операционной системы. В этом случае будут перезаписаны все разделы диска, начиная от системного тома и заканчивая загрузочной областью. Чтобы выполнить чистую переустановку системы, необходимо изначально загрузиться в Windows через виртуальный диск и сохранить все данные с основного системного диска, ведь в ходе установки он может быть отформатирован.
Способ 6: проверка работоспособности диска и памяти
Для того, чтобы проверить физическую работоспособность диска и оперативной памяти, можно использовать сторонние программы. Тем не менее, есть и штатные средства для проверки этих носителей. Чтобы проверить оперативную память, необходимо зайти в командную строку и ввести команду mdsched, это инициирует проверку ОЗУ и выдаст результат на экран. Чтобы проверить жесткий диск, необходимо при загрузке компьютера нажимать клавишу F8, Esc или F12, чтобы зайти в Bios. В системных настройках необходимо найти пункт «Primary Hard Disk Self Test», это и есть штатная проверка жесткого диска. Изначально запускается быстрая проверка, потом более медленная и детализированная. В конце процедуры можно будет просмотреть отчет и понять, в каком состоянии находится носитель.
Все эти действия можно выполнить самостоятельно, необходимо только подготовить заранее загрузочную флешку или взять ту, с которой проводилась установка операционной системы ранее. Все эти действия направлены на то, чтобы восстановить нормальную загрузку Windows и избавиться от ошибки UNMOUNTABLE BOOT VOLUME на синем фоне.
Если вы компьютерный пользователь со стажем, то хотя бы раз видели синий экран смерти (BSoD). О возможных причинах его появления и способах устранения я рассказывал в видеоуроке «Синий экран смерти: причины и устранение» и «Анализ синего экрана смерти в не загружающейся Windows». Но, буквально на днях я впервые столкнулся с такой причиной появления экрана как UNMOUNTABLE_BOOT_VOLUME.
Первым делом появились мысли о переустановке Windows, но на самом деле решение проблемы оказалось куда проще, чем я предполагал. Поэтому, давайте рассмотрим еще один способ борьбы с проблемой появления синего экрана смерти. Возможно, данный метод поможет и в других ситуациях!
Что означает сообщение со строкой UNMOUNTABLE_BOOT_VOLUME? Начнем, пожалуй, с определения природы сбоя. Такой сбой свидетельствует о том, что система не распознает загрузочный том, а если дословно – не способна его смонтировать. Как следствие – невозможность старта «операционки» из того раздела, где она изначально была инсталлирована. Как же с этим бороться?
Исправление сбоя UNMOUNTABLE_BOOT_VOLUME Windows XP
На самом деле тут все просто. В этой ситуации пользователю понадобится установочный образ, диск (флешка) с операционной системой Windows XP и загрузиться с него. Далее нужно дождаться начала инсталляции и в первом окне перейти к консоли восстановления. Для этого потребуется нажать клавишу R.
Теперь для устранения проблемы следует вызвать командную строку (cmd) и прописать в ней следующее: chkdsk c: /r (это вариант, если системным разделом является именно диск C). После этого нажимаем клавишу ввода и ждем окончания процесса проверки.
По времени он может занять минут 30, а то и больше (смотря какой размер системного тома). В процессе детектирования ошибок, что очень интересно, будет произведено преобразование поврежденных кластеров в файлы (об этом свидетельствует литера r, указанная в команде проверки). И это же позволяет избежать потери пользовательской информации.
Когда проверка будет успешно завершена, можно просто выйти из консоли или прописать команду exit. После перезагрузки экран со строкой UNMOUNTABLE_BOOT_VOLUME больше не появится.
Исправление ошибки в Windows 7 и выше
Сбой UNMOUNTABLE_BOOT_VOLUME Windows 7 устраняется практически тем же способом. Отличие состоит только в том, что для быстрого вызова командной строки при переходе в меню восстановления системы можно использовать комбинацию Shift + F10.
Далее все делается точно так же, как было описано в первом случае.
Information about the cause and possible resolutions of boot-related Blue Screen of Death (BSOD) with error “UNMOUNTABLE_BOOT_VOLUME” and stop code STOP: 0x000000ED.
This error is sometimes misspelled as UNMOUNTABLE_BOOT_DRIVE, but is functionally the same.
About “UNMOUNTABLE BOOT VOLUME”
The following information on this error has been compiled by NeoSmart Technologies, based on the information gathered and reported by our global network of engineers, developers, and technicians or partner organizations.
Description and Symptoms
The error messages, alerts, warnings, and symptoms below are tied to this error.
Symptom 1: BSOD with error UNMOUNTABLE_BOOT_VOLUME
Upon starting a PC running Windows XP, Windows Vista, or Windows 7, a blue screen of death (BSOD) may be encountered with the error message “UNMOUNTABLE_BOOT_VOLUME” and usually with a stop code of STOP: 0x000000ED, similar to the screen shown below:
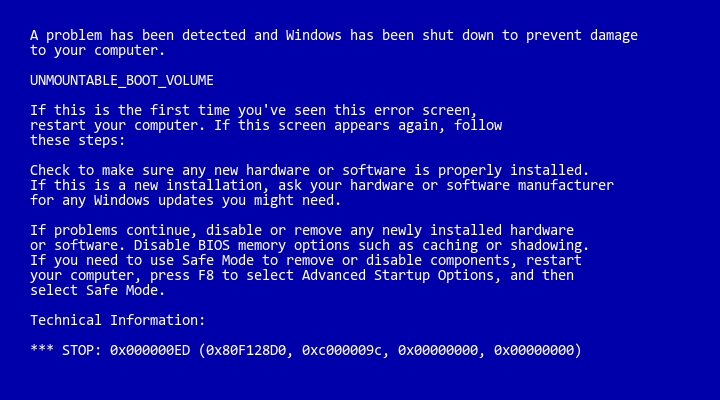
The full text of this error is written below:
A problem has been detected and Windows has been shut down to prevent damage
to your computer.

UNMOUNTABLE_BOOT_VOLUME

If this is the first time you've seen this error screen,
restart your computer. If this screen appears again, follow
these steps:

Check to make sure any new hardware or software is properly installed.
If this is a new installation, ask your hardware or software manufacturer
for any Windows updates you might need.

If problems continue, disable or remove any newly installed hardware
or software. Disable BIOS memory options such as caching or shadowing.
If you need to use Safe Mode to remove or disable components, restart
your computer, press F8 to select Advanced Startup Options, and then
select Safe Mode.

Technical Information:

*** STOP: 0x000000ED (0x80F128D0, 0xc000009c, 0x00000000, 0x00000000)
Symptom 2: BSOD with error UNMOUNTABLE_BOOT_VOLUME
A variation of symptom 1, with this possible alternate text is this:
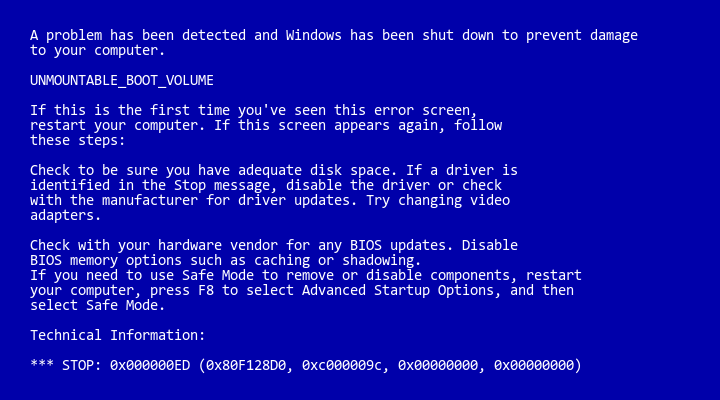
The text of this error:
A problem has been detected and Windows has been shut down to prevent damage
to your computer.

UNMOUNTABLE_BOOT_VOLUME

If this is the first time you've seen this error screen,
restart your computer. If this screen appears again, follow
these steps:

Check to be sure you have adequate disk space. If a driver is
identified in the Stop message, disable the driver or check
with the manufacturer for driver updates. Try changing video
adapters.

Check with your hardware vendor for any BIOS updates. Disable
BIOS memory options such as caching or shadowing.
If you need to use Safe Mode to remove or disable components, restart
your computer, press F8 to select Advanced Startup Options, and then
select Safe Mode.

Technical Information:

*** STOP: 0x000000ED (0x80F128D0, 0xc000009c, 0x00000000, 0x00000000)
Causes of this Error
A blue screen of death with the UNMOUNTABLE BOOT VOLUME error is an indication that Windows was unable to mount the boot filesystem1 to read/load required dependencies from it.
While Windows, being based off a largely microkernel-esque architecture, can load dependencies and components dynamically, there is a basic subset of dependencies that absolutely must be brought online during the boot procedure or else Windows will fail to boot, even if the kernel has been invoked.
With the latest versions of Windows, and especially after the kernel and driver restructuring that took place during the development of Windows Vista, this list of components has steadily dwindled and now comprises only the most basic (and largely universal) input/output drivers2 in addition to the controllers for the hard disk driver.
If Windows is unable to identify and interface with the hard disk controller (whether integrated into the motherboard or as a drop-in PCI-E card) or if hard disk controller is brought online successfully but Windows cannot read the volume it is being booted from for a variety of reasons, a BSOD featuring the UNMOUNTABLE BOOT VOLUME error may present.
This error has been known to occur as a result of one or more of the following:
Cause 1: Failed/Incompatible disk controller drivers
As explained above, if Windows is unable to identify and interface with the hard disk controller responsible for the drive the system partition resides on, the Windows kernel won’t be able to read and load the basic dependencies from disk and this blue screen will be encountered.
A common cause that’s often responsible for this scenario is an uninstall or failed update/upgrade of the hard disk controller drivers.
For instance, if the Intel or LSI disk management drivers are removed, corrupted, uninstalled, or incorrectly upgraded and Windows does not already have “native,” basic support for the particular hard disk controller in use, it will be unable to communicate with the disk adapter to read the required data resulting in the UNMOUNTABLE BOOT VOLUME blue screen of death.
Cause 2: Attempt to load Windows from wrong partition
Another scenario where Windows will be unable to load its core drivers and other basic dependencies would be in a situation where Windows has the required drivers to interface with the hard disk controller, but is instructed to load itself from the wrong partition (i.e. not the partition it is actually installed to). When the bootloader (either NTLDR in the case of Windows XP or BOOTMGR in the case of Windows Vista and Windows 7) begins to load an operating system based on the configuration file3 it passes along to the kernel (in the environment block) information about where it should load the operating system from.
If the configuration store (BOOT.INI/BCD) is incorrectly set or no longer points to the correct partition, the ntoskrnl will be unable to load Windows from the indicated partition and an UNMOUNTABLE BOOT VOLUME BSoD may occur.
Cause 3: Windows partition resized or moved
In a similar vein to the situation with an incorrectly-configured BCD or BOOT.INI that directs the Windows kernel to load the operating system from the wrong partition, the UNMOUNTABLE BOOT VOLUME error may also occur if the identifier for the Windows partition is changed but the boot configuration file retains the outdated information.
NTLDR and BOOTMGR both have multiple methods of uniquely identifying (or trying to) a partition, some of which are based off a combination of the disk number and the partition offset (how far from the start of the disk) or partition number (how many partitions precede it either physically in the sequential disk layout or in the partition table in the MBR).
If the Windows partition is moved, a partition is added or removed before the Windows partition on disk, or the order of the disks changes, the BCD or BOOT.INI references to the Windows partition may no longer be correct and the kernel will throw the UNMOUNTABLE BOOT VOLUME blue screen when it attempts to load Windows from the wrong partition.
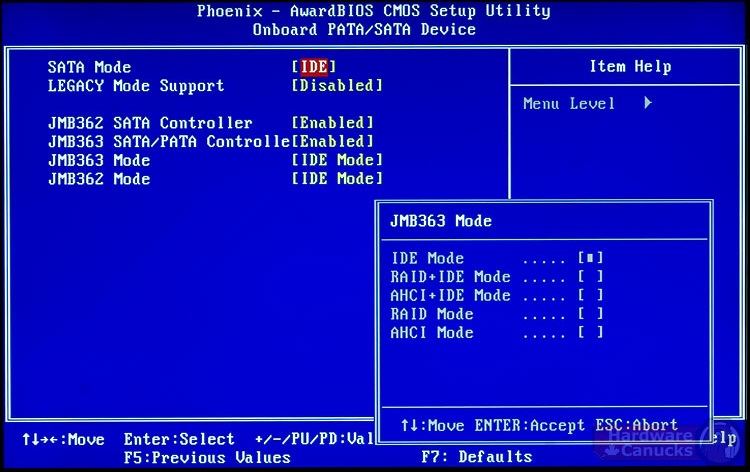
Cause 4: Changed or reconfigured SATA AHCI/IDE/RAID mode
Similar to the first situation discussed above wherein the necessary device drivers for communicating with the Windows partition have been uninstalled or incorrectly replaced, it is possible for the drivers that Windows has been configured to load and use at the very start of the boot procedure are no longer correct — even though the underlying hardware has not changed. Most SATA controllers (the onboard Intel ICH ACH controllers, Marvell, JMicron, nVidia, and others) expose an option in the BIOS for the disk controller to be configured in any one of three modes: IDE, AHCI, or RAID.
- IDE is the most-basic mode and treats the SATA controller in the same way legacy IDE controllers treated ATA drives: the controller itself contains almost no read/write-related logic and simply serves as the most ascetic of bridges, simply proxying data to and from the drives.
- AHCI was a new standard for communication that first saw use in home PCs for disks connected to SATA controllers on newer operating systems, wherein the hard disk controller contains substantial logic pertaining to the read and write procedure.Instead of having the Windows device driver dictate each move of the read/write heads and disk seeks, controllers in AHCI mode will act as “scribes” of sorts for Windows, taking higher-level (more-abstract) read and write orders, and then using its own logic to process the commands as efficiently as possible (to allow for hardware-level caching, read/write order optimization (known as NCQ) to minimize disk seeks and decrease latency, and other optimizations.
- Newer SATA controllers feature a RAID mode where a mostly-software implementation of RAID is used for setting up disks in RAID 0 (“stripe”) for performance, RAID 1 (“mirror”) for data redundancy, or RAID 5/6/1+0 for a combination thereof.Traditionally a separate, fully hardware-based RAID controller would be required for such a configuration, but modern SATA drive controllers split the RAID process between device drivers and on-board microcontrollers for a cost-effective solution.
As can be seen, the three different operation modes above differ quite-greatly in terms of features and implementation. Each of the above three requires a completely different driver to be used by Windows, even though the hardware itself (both the physical disk controller and the drive) has not changed.
Most computers allow for the IDE/AHCI/RAID mode to be set from the BIOS and changed “on-the-fly” without requiring a wipe of the drives. If Windows was installed and booted using one mode, but a different mode was configured (due to changes in the BIOS configuration, a BIOS upgrade, a reset of BIOS settings, etc.) the existing driver will no longer suffice.
Fix: Using EasyRE to correct incorrect boot configuration
For cases where UNMOUNTABLE BOOT VOLUME is caused by incorrect or outdated information regarding the Windows partition in the boot configuration files (BOOT.INI or the BCD) for NTLDR or BOOTMGR, Easy Recovery Essentials’ automatic one-click Windows repair can normally recreate the boot configuration with the correct settings and parameters to allow for Windows to boot correctly.
Easy Recovery Essentials can fix many errors such as this automatically using its built-in Automated Repair option. EasyRE is currently available for Windows XP, Vista, 7, 8, Windows 10, and Windows 11 and can be downloaded and created on any PC.
- Download Easy Recovery Essentials. Make sure to note your Windows version (XP, Vista, 7, 8, 10, or Windows 11) before you download EasyRE. This guide can help you identify what version of Windows you have installed.
- Burn the image. Follow these instructions on how to burn the bootable ISO image very carefully, as making a bootable CD can be tricky! Alternatively, these instructions explain how to create a bootable EasyRE recovery USB stick/drive.
- Boot up your PC from the Easy Recovery Essentials CD or USB you created.
- Once EasyRE is running, choose the “Automated Repair” option and click Continue.

Choose “Automated Repair” in Easy Recovery Essentials
- After EasyRE scans your computer’s drives, identify and select the drive letter for your Windows installation from the list, and then click on the Automated Repair button to begin.
Choose the drive associated with the Windows installation you’re trying to repair.
- Easy Recovery Essentials will start analyzing the selected drive for problems. EasyRE will test for and attempt to automatically correct errors with the disk, partition, bootsector, filesystem, bootloader, and registry. No intervention is required, as EasyRE’s repair is fully automated:
Easy Recovery Essentials searches for errors and makes corrections to the selected Windows installation.
- Once the process is complete, EasyRE will report its findings. Click on the Restart button to reboot your PC and test the changes.
- The “UNMOUNTABLE_BOOT_VOLUME” error should now be fixed as your PC begins to load:


You can download Easy Recovery Essentials from here.
Fixing “UNMOUNTABLE BOOT VOLUME BSOD” on Windows
Windows Setup CD/DVD Required!
Some of the solutions below require the use of the Microsoft Windows setup CD or DVD. If your PC did not come with a Windows installation disc or if you no longer have your Windows setup media, you can use Easy Recovery Essentials for Windows instead. EasyRE will automatically find and fix many problems, and can also be used to solve this problem with the directions below.
Fix #1: Roll back disk controller drivers with System Restore
Most driver-related causes of this error can be corrected by rolling back to an earlier system configuration with System Restore.
Windows normally makes an explicit System Restore point each time certain drivers are installed, upgraded, or removed — meaning that in 9 cases out of every 10, if the UNMOUNTABLE_BOOT_VOLUME error was caused by a change in device drivers, a System Restore point should be available to reverse the damage.
System Restore, available from the Startup Repair/Recovery Console that ships on the Windows Vista, Windows 7, and Windows 8 setup DVDs, can be used to show a list of “snapshots” of your PC taken at various points in time in the recent past, and attempt to rollback your PC to the chosen restore point. System Restore is “non-destructive,” in that it only affects Windows and programs, but not your personal files and folders.
Unable to boot into the Windows setup CD?
See our guide on setting up a PC to boot from the CD or DVD for troubleshooting and more detailed instructions.
- Insert your Windows installation DVD into your PC’s CD-ROM drive,
- Fully power down your PC, and make sure it has fully shut off,
- Power up your PC,
- Press any key when you see “Press any key to boot from CD or DVD..”
- Click the link titled “Repair your computer” in the bottom-lefthand corner, after first selecting your language and keyboard options.
- Wait for Startup Repair to scan your PC for Windows installations, then select your install from the list it shows:
- Choose “System Restore” from the list of available recovery options to begin:
- The System Restore utility will start, giving you the option of choosing a pre-selected System Restore point it has picked out for you, or giving you the option of manually making your choice, choose an option and then press Next to continue.
- Depending on your choice, you may be presented with a list of valid System Restore points and their respective dates, plus a brief description of the reason (if any) they were taken. Make your choice here and then choose Next again to continue.
- System Restore will ask you to confirm your selection and then begin the restoration procedure. You will be prompted to exit and restart your computer for the restore to complete.
Once your PC has rebooted, if System Restore completed its restoration successfully your PC will be repaired and System Restore will inform you of the changes it has made to your PC once you’ve logged back in to Windows. If the System Restore procedure failed or if the System Restore procedure completed successfully but your problem wasn’t resolved, you can repeat the steps above — choosing a different restore point this time — as you experiment and see what works for your PC.
Fix #2: Change IDE/RAID/AHCI mode in the BIOS
If the UNMOUNTABLE_BOOT_DEVICE error is being caused by a change of the SATA disk controller’s mode in the BIOS or firmware, the fix can be as simple as entering the BIOS and toggling the SATA controller’s “mode” setting. The exact instructions differ from one manufacturer to the other, but the options will resemble what is shown in the screenshots below.
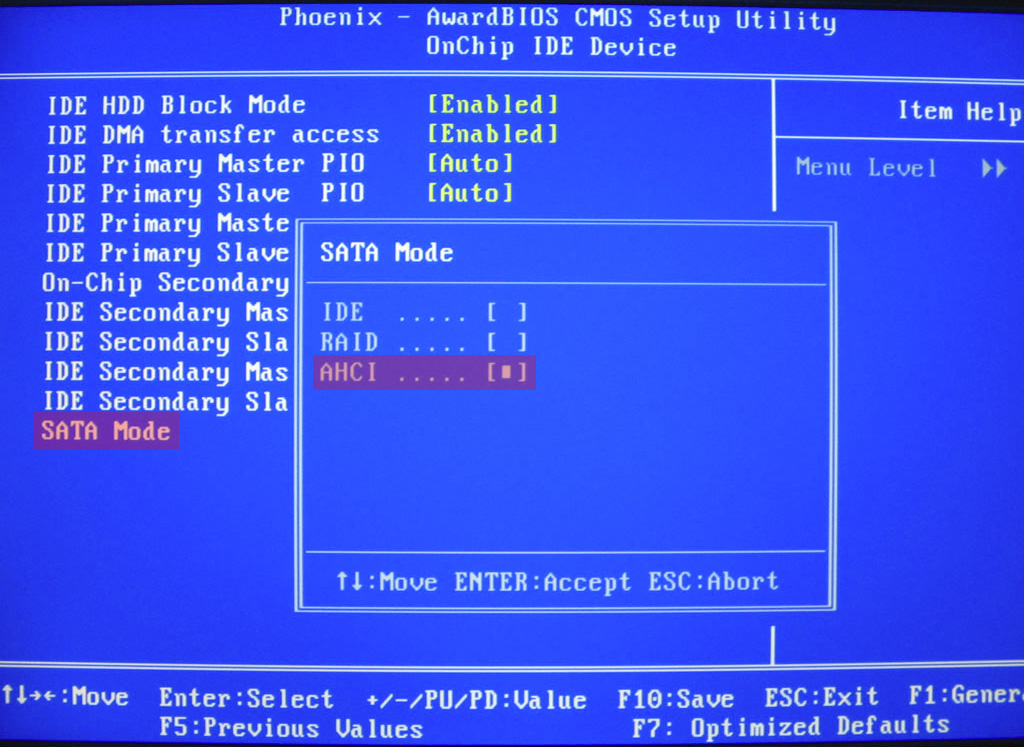

SATA Mode American Megatrends BIOS
Attempt to toggle between all three (or more) modes until a combination that results in Windows booting successfully once more is found.
More Information
Support Links
- Easy Recovery Essentials for Windows – our repair and recovery disk.
It’s an easy-to-use and automated diagnostics disk. It’s available for Windows 8, Windows 7 and Windows Vista. It’s also available for Windows XP and Windows Server.
Read more at Windows Recovery Disks.
- The NeoSmart Support Forums, member-to-member technical support and troubleshooting.
- Get a discounted price on replacement setup and installation discs: Windows XP, Windows Vista, Windows 7.
Applicable Systems
This Windows-related knowledgebase article applies to the following operating systems:
- Windows XP (all editions)
- Windows Vista (all editions)
- Windows 7 (all editions)
- Windows Server 2003 (all editions)
- Windows Server 2008 (all editions)
Propose an edit
-
In this context — as in a few other places in Windows — “boot” actually means the system partition and not the actual boot partition (active partition on startup disk 0), per-se. ↩
-
The basic input/output drivers are, in general, device-agnostic as much of the hardware they interface with has been designed and built around “standards” — even if not everyone sticks to the RFCs and other formal standards as closely as they should! ↩
-
Configuration is stored in the plaintext file BOOT.ini in the case of NTLDR and the binary (registry hive) \BOOT\BCD in the case of BOOTMGR. ↩
Applies ToMicrosoft Windows XP Home Edition Microsoft Windows XP Professional
Author:
Soumitra Sengupta MVP
COMMUNITY SOLUTIONS CONTENT DISCLAIMER
MICROSOFT CORPORATION AND/OR ITS RESPECTIVE SUPPLIERS MAKE NO REPRESENTATIONS ABOUT THE SUITABILITY, RELIABILITY, OR ACCURACY OF THE INFORMATION AND RELATED GRAPHICS CONTAINED HEREIN. ALL SUCH INFORMATION AND RELATED GRAPHICS ARE PROVIDED «AS IS» WITHOUT WARRANTY OF ANY KIND. MICROSOFT AND/OR ITS RESPECTIVE SUPPLIERS HEREBY DISCLAIM ALL WARRANTIES AND CONDITIONS WITH REGARD TO THIS INFORMATION AND RELATED GRAPHICS, INCLUDING ALL IMPLIED WARRANTIES AND CONDITIONS OF MERCHANTABILITY, FITNESS FOR A PARTICULAR PURPOSE, WORKMANLIKE EFFORT, TITLE AND NON-INFRINGEMENT. YOU SPECIFICALLY AGREE THAT IN NO EVENT SHALL MICROSOFT AND/OR ITS SUPPLIERS BE LIABLE FOR ANY DIRECT, INDIRECT, PUNITIVE, INCIDENTAL, SPECIAL, CONSEQUENTIAL DAMAGES OR ANY DAMAGES WHATSOEVER INCLUDING, WITHOUT LIMITATION, DAMAGES FOR LOSS OF USE, DATA OR PROFITS, ARISING OUT OF OR IN ANY WAY CONNECTED WITH THE USE OF OR INABILITY TO USE THE INFORMATION AND RELATED GRAPHICS CONTAINED HEREIN, WHETHER BASED ON CONTRACT, TORT, NEGLIGENCE, STRICT LIABILITY OR OTHERWISE, EVEN IF MICROSOFT OR ANY OF ITS SUPPLIERS HAS BEEN ADVISED OF THE POSSIBILITY OF DAMAGES.
SYMPTOMS
When booting up to Win XP you may get a error that reads «Unmountable Boot Volume».
CAUSE
1.The file system is damaged and cannot be mounted. 2.You use a standard 40-wire connector cable to connect the UDMA drive to the controller instead of the required 80-wire, 40-pin cable. 3.The basic input/output system (BIOS) settings are configured to force the faster UDMA modes.
RESOLUTION
If it be the connector cable problem then replace the 40-wire cable with an 80-wire UDMA cable.If it’s a BIOS settings problem then load the ‘Fail-Safe’ default settings, and then reactivate the most frequently used options such as USB Support.
If it’s a damaged file system case then:-1.Insert the Windows XP CD-ROM into the CD-ROM drive, and then restart the computer.
Click to select any options that are required to start the computer from the CD-ROM drive if you are prompted.
2.When the «Welcome to Setup» screen appears, press R to start the Recovery Console.
3.If you have a dual-boot or multiple-boot computer, select the installation that you must access from the Recovery Console.
4.When you are prompted, type the Administrator password. If the administrator password is blank, just press ENTER.
5.At the command prompt, type chkdsk /r , and then press ENTER.
6.At the command prompt, type exit , and then press ENTER to restart your computer.
This takes a bit longer, but the system should boot back into Windows.
MORE INFORMATION
«STOP 0x000000ED UNMOUNTABLE_BOOT_VOLUME» Error Message When You Restart Your Computer or Upgrade to Windows XP
Description of the Windows XP Recovery Console
If the above process fails to restore the system then in the number#5 step use fixboot command instead of the chkdsk /r command.
Need more help?
Want more options?
Explore subscription benefits, browse training courses, learn how to secure your device, and more.
«Hello, can’t boot to Windows 8. Error is unmountable boot volume.»
Is there a solution for this error and will I be able to recover my file if the hard drive is corrupt?»
Have you ever met the dreaded «Unmountable Boot Volume» error? Many people feel they are forced to format the drive and start from scratch in this situation. However, you don’t have to. Here in this passage, we are going to introduce more details and causes of this error and how to solve this error with a smart Windows boot tool.
- Part 1: The Cause of the Unmountable Boot Volume Error
- Part 2: How to Fix the Unmountable Boot Volume Error in Windows (2 Solutions)
Part 1: What are the Causes of the «Unmountable Boot Volume»
Frequently, the «Unmountable boot volume» error is a devastating experience, following a computer crash and Blue screen of death. When you receive this message, it indicates that your Windows operating system fails to boot from your hard drive.
There are mainly 4 possible reasons of this error:
- Failed/Incompatible disk controller drivers
- Attempt to load Windows from wrong partition
- Windows partition resized or moved
- Changed or reconfigured SATA AHCI/IDE/RAID mode
Part 2: 2 Solutions to Fix the Dread «Unmountable Boot Volume»
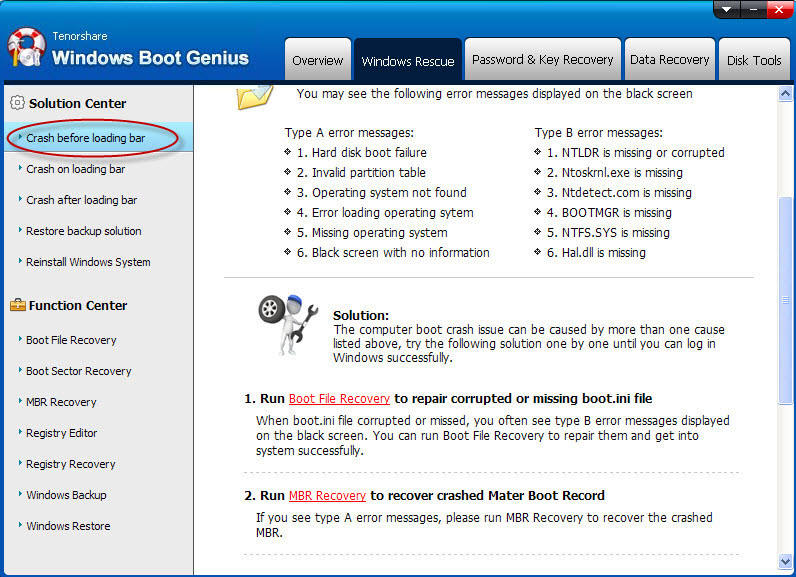
Here is a fast solution to fix BSOD by using Windows Boot Genius.
1. Fix «Unmountable Boot Volume» Error with Windows Boot Tool
It is never easy to fix this error. Fortunately, Windows Boot Genius, a professional Windows boot repair tool, offers automatic one-click Windows repair to correct this error and get your computer back to normal. It is able to fix the unmounted boot volume in Windows 10, 8, 7, XP, Vista.More wonderfully, it can helpfully stop 0x00000ed unmountable boot volume. Before you start, download the program and install it on another bootable PC.
Buy Now
- 1). Insert a blank CD/DVD/USB to the bootable computer and run Windows Boot Genius.
- 2). Select CD/DVD/USB and click «Burn» to create a bootable disk.
- 3). Insert the bootable disk into the unbootable computer and reboot it from the burned CD/DVD/USB.
- 4). After seeing the main interface, get into Windows Rescue tab to backup your Windows at first and then select «Crash before loading bar». In the right section, it offers the issues, causes and solutions. Try the solutions one by one.
These are all for repairing «Unmountable Boot Volume» Error. Easy, isn’t?
2. Fix «Unmountable Boot Volume» by Changing IDE/RAID/AHCI Mode in the BIOS
As mentioned above, this «Unmountable Boot Volume» error may be caused by a change of the SATA disk controller’s mode in BIOS setting or firmware. In this situation, you can simply go to BIOS settings and change it. Depending on different manufacturers, the exact operation may be different. Attempt to switch between all three modes until a combination that results a successful boot.