
If you’ve ever faced slow internet speeds, difficulty accessing websites, or issues with your network connection, you might have heard about the tracert/traceroute command. It’s a powerful diagnostic tool that helps you trace the route packets take across the internet or your local network, helping identify where problems may be occurring. Whether you’re a network admin, IT professional, or just a curious user, knowing how to use the tracert command in Windows 10 or Windows 11 can significantly improve your troubleshooting skills.
In this guide, we’ll understand the process of running the tracert command in both Windows 10 and Windows 11.
What is Tracert
Tracert (short for «Trace Route«) is a command-line utility used to trace the route that data packets take to reach a specific destination across an IP network, such as the Internet. It provides a detailed map of the path taken by the packets from the source device to the destination, showing each intermediate router or «hop» along the way.
Example: Imagine you’re unable to load a website, and you wonder if the problem lies with your internet service provider, the website’s server, or somewhere in between. Running tracert allows you to pinpoint where the connection fails, so you can narrow down the cause of the issue. It’s also incredibly helpful in diagnosing latency issues and understanding the health of your network.
Running Tracert/Traceroute: Step-by-Step Guide
Follow the below steps to Run a traceroute (tracert) command using Mircosoft Windows 10/11:
Step 1: Open the Command Prompt
- Simply type ‘cmd’ in the search bar and hit Enter. The Command Prompt window will open.
- Alternatively, Press
Win + R, typecmd, and hit Enter.
Step 2: Run the Tracert Command
To trace the route to a specific website, type ‘tracert’ followed by the domain or IP address i.e. tracert [hostname or IP address]
Traceroute Command with Example:
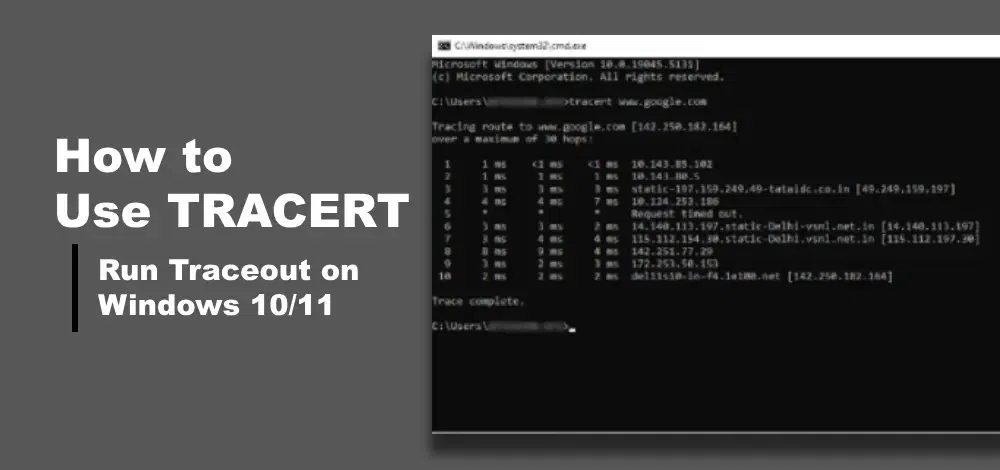
Here we want to Trace the route of www.google.com, In the Command Prompt or Terminal, type the following command:
tracert www.google.com
Step 3: Reading a Traceroute
The output will display the following for each hop:
- The hop number.
- The router’s IP address or domain name.
- The round-trip time (RTT) for the packet to reach that hop and return.
Explanation of the above example:
- The packet first hits the 10.143.85.102 router.
- Then it moves to 10.143.80.5, followed by static and so on, until it reaches 142.250.182.164, which is the IP address of
google.com. - The round-trip time (RTT) for each hop is also shown.
Tracert Command List with Parameters
Here’s a complete table of the Tracert (Trace Route) command along with its common parameters, their descriptions, and how they are used. These parameters allow to customize the behavior of Tracert, making it more flexible for troubleshooting network issues.
| Command | Description | Example |
|---|---|---|
tracert <destination> |
Basic syntax to run Tracert to a specified destination (IP address or domain name). | tracert www.google.com |
tracert -d <destination> |
Disables the domain name resolution; shows only IP addresses instead of hostnames. | tracert -d www.google.com |
tracert -h <max_hops> |
Sets the maximum number of hops to trace before terminating. | tracert -h 20 www.google.com |
tracert -w <timeout> |
Specifies the timeout in milliseconds to wait for each reply. Default is 4000 ms. | tracert -w 1000 www.google.com |
tracert -4 <destination> |
Forces Tracert to use IPv4 for the trace. | tracert -4 www.google.com |
tracert -6 <destination> |
Forces Tracert to use IPv6 for the trace. | tracert -6 www.google.com |
tracert -l <packet_size> |
Specifies the number of bytes in the ICMP packet sent. Default is 32 bytes. | tracert -l 1500 www.google.com |
tracert -p <port> |
Sends the trace to the specified port number (useful in some network troubleshooting). | tracert -p 80 www.google.com |
tracert -R <route_option> |
This option routes each hop in reverse, from destination back to the source. | tracert -R www.google.com |
tracert -T |
Specifies the use of a TCP-based probe instead of the default ICMP packets. | tracert -T www.google.com |
tracert -f <TTL> |
Sets the initial Time-to-Live (TTL) value for the first hop (useful for debugging routing). | tracert -f 64 www.google.com |
tracert -R <destination> |
Routes each hop using a reverse path to the source. | tracert -R www.google.com |
Common Error Messages in Tracert
While using Tracert, you may encounter various error messages that can help diagnose network problems. These messages typically indicate issues with connectivity, routing, or firewalls. Below are some of the most common error messages you might see when running a Tracert command, along with explanations and troubleshooting steps.
1. * * * Request Timed Out
This is one of the most common error messages in Tracert. It means that the Tracert command did not receive a response within the specified timeout period from one of the hops along the route.
Possible Causes:
- The router or server may be configured to ignore ICMP requests (ping requests) for security reasons.
- The router or server may be temporarily down or overloaded.
- Firewalls or security policies may block ICMP traffic.
Troubleshooting:
- This message doesn’t always indicate a serious issue. It is normal for certain routers or firewalls to block ICMP traffic (which is used by Tracert).
- If the timeout occurs only on a particular hop and the rest of the route is fine, the network may be functioning correctly.
- Try running Tracert to different destinations or check if other users are experiencing the same issue.
2. Destination Net Unreachable
This error appears when Tracert cannot find a route to the destination network, meaning the path to the target is completely blocked or the destination network is unreachable.
Possible Causes:
- There may be a routing issue, either within your local network or on the internet.
- A misconfigured router or gateway might be preventing the route.
- The destination might be temporarily down or disconnected from the network.
Troubleshooting:
- Check the local network for misconfigurations, such as incorrect IP settings or faulty network equipment.
- Contact your Internet Service Provider (ISP) if the issue persists beyond your network.
- You can also verify if the destination is reachable via other network tools like
pingortelnet.
3. Request Timed Out - All Hops
When every hop returns the Request Timed Out message, it generally suggests that no ICMP traffic is allowed past the first router in the path. This typically indicates a configuration issue.
Possible Causes:
- A firewall or router along the path is blocking ICMP packets (the type of packet used by Tracert).
- Network-level security policies prevent the Tracert tool from working.
Troubleshooting:
- Check if a firewall on your local machine, router, or ISP is blocking ICMP requests.
- If you are troubleshooting from behind a corporate network, it’s likely that network policies prevent the use of Tracert for security reasons.
- Test using alternative tools like
pingorPathPing.
4. General Failure
This error occurs when Tracert encounters a general issue that prevents it from performing the trace. It typically happens when there is a problem with the local machine’s networking or configuration.
Possible Causes:
- Issues with the network interface on your local machine (e.g., Wi-Fi or Ethernet).
- A misconfigured IP address or DNS settings.
- A software conflict or firewall blocking Tracert.
Troubleshooting:
- Restart your computer and check your network connection.
- Verify that your computer’s IP address and DNS settings are correct.
- Temporarily disable any third-party firewalls or security software and test again.
5. Unable to Resolve Target System Name
This error happens when Tracert is unable to resolve the domain name you provided into an IP address. This suggests a DNS (Domain Name System) resolution issue.
Possible Causes:
- The DNS server is not functioning or configured incorrectly.
- The domain name may be misspelled or the destination website may not exist.
Troubleshooting:
- Check if the domain name is correct and try to visit it in a web browser to ensure it’s active.
- Test your DNS configuration by running
nslookuporpingon the domain name to confirm that it resolves to an IP address. - Try using a different DNS server, such as Google’s public DNS (8.8.8.8), to see if the issue resolves.
6. Time To Live Exceeded
The Time To Live Exceeded error indicates that the packet has traversed more hops than the set TTL (Time To Live) value, which means the packet is stuck in a routing loop or has failed to reach the destination within the set hop limit.
Possible Causes:
- A network routing loop where the packet continuously circulates between two or more routers without reaching the destination.
- A misconfigured router or network device could be creating circular routing paths.
Troubleshooting:
- This error is typically a sign of a problem within the network itself, such as a misconfigured router or a routing loop.
- If the loop is within your network, check the routing tables and configuration on your routers or gateways.
- Contact your ISP if the issue appears to be outside your local network.
7. Network Unreachable
This error occurs when Tracert is unable to find a valid path to the destination network. It suggests a significant connectivity issue between your machine and the target destination.
Possible Causes:
- The destination network may be completely disconnected or misconfigured.
- A major network routing issue exists between your device and the destination.
Troubleshooting:
- Verify that your local network is connected and functional (e.g., check cables or Wi-Fi settings).
- If possible, try accessing a different website or service to verify that the issue is specific to the target destination.
- Contact your ISP or the administrator of the destination network to investigate potential connectivity issues.
How Does Tracert Work?
When you run a Tracert command, it sends a series of Internet Control Message Protocol (ICMP) Echo Request messages (like ping requests) to the target IP address. However, unlike a typical ping, Tracert uses TTL (Time To Live) values to track each hop along the route.
- Initial Packet: Tracert sends the first packet with a TTL of 1. The first router it encounters will decrement the TTL value by 1. Once the TTL reaches 0, the router sends back a «TTL Expired» message (ICMP Time Exceeded message).
- Increasing TTL: Tracert then sends another packet, but this time with a TTL of 2. The first router decrements the TTL to 1, and the second router decrements it to 0. The second router then responds with the «TTL Expired» message. This process continues, incrementing the TTL by one each time until the destination is reached.
- Destination: When the packet reaches the final destination, the destination device responds with an ICMP Echo Reply message, and Tracert stops.
Note: Each router along the path sends an ICMP «Time Exceeded» message to the origin, and Tracert records the round-trip time for each hop. The round-trip time is measured in milliseconds (ms), and the information is displayed for each hop in the output.
Conclusion
Tracert is an valuable tool for network administrators and IT professionals to troubleshoot network issues, analyze network performance, and verify connectivity. It helps pinpoint areas of congestion, identify bottlenecks, and provide a clear map of how data flows across the network. Whether you’re troubleshooting latency issues, ensuring proper routing, or optimizing network paths, Tracert is an essential tool for diagnosing and understanding network behavior.
By using Tracert in combination with other network diagnostic tools like Ping or PathPing, you can quickly identify and resolve network issues, improving overall network performance and reliability.
Also Read
- Most Useful CMD Commands in Windows
- Command Prompt Hacks for Windows
- Linux vs Windows Commands
- Networking Commands For Troubleshooting Windows

Когда мы заходим на интернет-портал, компьютер отправляет запрос к серверу. По пути он проходит через маршрутизаторы. Если все в порядке — ресурс отображается у нас в браузере.
Если сайт не работает, запрос компьютера не дошел к серверу — потерялся на одном из промежуточных узлов связи или причина в чем-то другом (не работает сам сайт). Чтобы разобраться, где именно проблема, проведем трассировку маршрута.
При обращении в службу технической поддержки ресурса, обычно это первое, что просят сделать, если сайт не работает. Это связано с тем, что сайт может не работать из-за перебоев связи на отдельном узле, но в целом сайт работает и с ним все в порядке.
Как сделать трассировку маршрута до сервера, сайта в OC Windows

Запускаем командную строку через меню «Пуск – Все программы – Стандартные». Или нажимаем сочетание клавиш «Win + R», появляется окно системной утилиты «Запуск программы», вводим: «cmd» и нажимаем «ок».
В командной строке вводим: «tracert» и адрес ресурса, который нужно проверить. Нажимаем «ввод». В результате трассировки мы узнаем, какие промежуточные узлы проходит пакет и время отклика. На основе этой информации можно понять, где проблема: у Вас, у интернет-провайдера, на одном из промежуточных узлов или на сервере сайта. Звездочки означают, что один из маршрутизаторов не хочет отвечать.
Звездочки не всегда означают проблему — на сервере может стоять файрволл, который блокирует «лишние» пакеты, а «реальные» пропускает и в браузере страница корректно открывается.
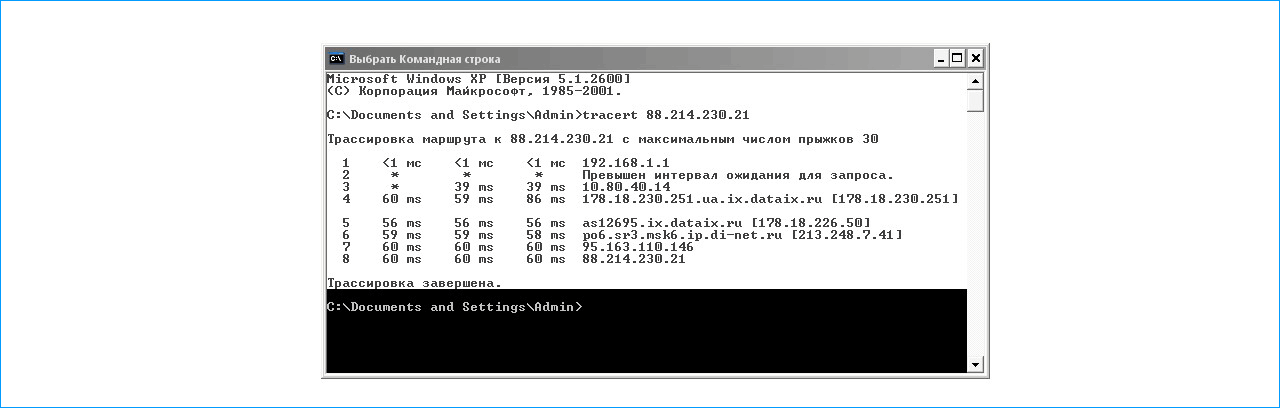
В командной строке узнаем IP адрес для трассировки
Если по доменному имени трассировка не проходит, сделаем это по IP адресу. Узнаем его через команду «ping». Этот запрос показывает время, которое нужно пакету, чтобы дойти до сервера и вернуться обратно. Цифры в квадратных скобках, которые идут после домена в строке «Обмен пакетами с…», это и есть искомый IP. На скриншоте: 88.214.230.21.
CMS хостинг — подберите тарифный план, подходящий для системы управления Вашим сайтом!
Как скопировать результаты пинга и трассировки из командной строки?
Даже если трассировка по домену прошла успешно, стоит «пропинговать» сервер, чтобы увидеть, не теряются ли пакеты. Да и техподдержка может попросить статистику обмена данных вместе с отчетом о трассировке.
Вводим: tracert и IP адрес, нажимаем «ввод» и получаем отчет. Если данные нужны не лично вам, а для тех. поддержки, выделяем мышкой нужные строки и нажимаем «enter». Информация попадает в буфер обмена. Создаем текстовый файл и вставляем комбинацией клавиш Ctrl + V. Сохраняем и отправляем в техподдержку.
iPipe – надёжный хостинг-провайдер с опытом работы более 15 лет.
Мы предлагаем:
- Виртуальные серверы с NVMe SSD дисками от 299 руб/мес
- Безлимитный хостинг на SSD дисках от 142 руб/мес
- Выделенные серверы в наличии и под заказ
- Регистрацию доменов в более 350 зонах
What to Know
- The tracert command details the path a packet takes from your computer to the destination you specify.
- For example, enter tracert google.com into Command Prompt. IP addresses work, too: tracert 192.168.1.1.
This article details how to use the Windows tracert command. It includes all the switches that work with tracert and some examples that show how to write it. You might sometimes see this command referred to as trace route or traceroute; it’s all the same command.
Tracert Command Syntax
If you know how to read command syntax, the syntax for tracert is pretty straightforward:
tracert [-d] [-h MaxHops] [-w TimeOut] [-4] [-6] target [/?]
The availability of certain tracert command switches and other tracert command syntax may differ from operating system to operating system. Tracert, as it’s explained below, applies to Windows only, but the command is also available for Linux.
| Tracert Command Options | |
|---|---|
| Option | Explanation |
| -d | This option prevents tracert from resolving IP addresses to hostnames, often resulting in much faster results. |
| -h MaxHops | This tracert option specifies the maximum number of hops in the search for the target. If you do not specify MaxHops, and a target has not been found by 30 hops, tracert will stop looking. |
| -w TimeOut | You can specify the time, in milliseconds, to allow each reply before timeout using this tracert option. |
| -4 | This option forces tracert to use IPv4 only. |
| -6 | This option forces tracert to use IPv6 only. |
| target | This is the destination, either an IP address or hostname. |
| /? | Use the help switch with the tracert command to show detailed help about the command’s several options. |
Other less commonly used options for the tracert command also exist, including [-j HostList], [-R], and [-S SourceAddress]. Use the help switch with the Windows tracert command for more information on these options.
Tracert Command Examples
Here are some examples of the various ways you might use this command:
Tracert to a Router
tracert 192.168.1.1
In the above example, the tracert command is used to show the path from the networked computer on which the tracert command is being executed by a network device, in this case, a router on a local network, that’s assigned the 192.168.1.1 IP address.
The result displayed on the screen will look something like this:
Tracing route to 192.168.1.1 over a maximum of 30 hops1 <1 ms <1 ms <1 ms 192.168.1.2542 <1 ms <1 ms <1 ms 192.168.1.1Trace complete.
In this example, you can see that tracert found a network device using the IP address of 192.168.1.254, let’s say a network switch, followed by the destination, 192.168.1.1, the router.
Tracert to a Website
tracert www.google.com
With the tracert command shown above, we’re asking tracert to show us the path from the local computer all the way to the network device with the hostname www.google.com.
Tracing route to www.l.google.com [209.85.225.104]over a maximum of 30 hops:1 <1 ms <1 ms <1 ms 10.1.0.12 35 ms 19 ms 29 ms 98.245.140.13 11 ms 27 ms 9 ms te-0-3.dnv.comcast.net [68.85.105.201]...13 81 ms 76 ms 75 ms 209.85.241.3714 84 ms 91 ms 87 ms 209.85.248.10215 76 ms 112 ms 76 ms iy-f104.1e100.net [209.85.225.104]Trace complete.
In this example, we can see that tracert identified fifteen network devices including our router at 10.1.0.1 and all the way through to the target of www.google.com, which we now know uses the public IP address of 209.85.225.104, one of Google’s many IP addresses.
Hops 4 through 12 were excluded above just to keep the example simple. If you were executing a real tracert, those results would all show up on screen.
Tracert Without Resolving Hostnames
tracert -d www.yahoo.com
With this tracert command example, we’re again requesting the path to a website, this time www.yahoo.com, but now we’re preventing tracert from resolving hostnames by using the -d option.
Tracing route to any-fp.wa1.b.yahoo.com [209.191.122.70]over a maximum of 30 hops:1 <1 ms <1 ms <1 ms 10.1.0.12 29 ms 23 ms 20 ms 98.245.140.13 9 ms 16 ms 14 ms 68.85.105.201...13 98 ms 77 ms 79 ms 209.191.78.13114 80 ms 88 ms 89 ms 68.142.193.1115 77 ms 79 ms 78 ms 209.191.122.70Trace complete.
We can see that tracert again identified fifteen network devices including our router at 10.1.0.1 and through to the target of www.yahoo.com, which we can assume uses the public IP address of 209.191.122.70.
As you can see, tracert didn’t resolve any hostnames this time, which significantly sped up the process.
Save Tracert Results to a File
tracert -h 3 lifewire.com > z:\tracertresults.txt
In this last example of the tracert command in Windows, we’re using -h to limit the hop count to 3, but instead of displaying the results in Command Prompt, we’ll use the > redirection operator to send it all to a TXT file located on Z:, an external hard drive.
Here are some example results of this last command:
Tracing route to lifewire.com [151.101.66.114]over a maximum of 3 hops:1 <1 ms <1 ms <1 ms testwifi.here [192.168.86.1]2 1 ms 1 ms <1 ms 192.168.1.13 17 ms 16 ms 17 ms giantwls-64-71-222-1.giantcomm.net [64.71.222.1]Trace complete.
Tracert Command Availability
The tracert command is available from within the Command Prompt in all Windows operating systems including Windows 11, Windows 10, Windows 8, Windows 7, Windows Vista, Windows XP, and older versions of Windows as well.
Tracert Related Commands
The tracert command is often used with other networking-related Command Prompt commands like ping, ipconfig, netstat, nslookup, and others. The pathping command is similar to tracert but also shows network latency and loss information.
Thanks for letting us know!
Get the Latest Tech News Delivered Every Day
Subscribe
Как сделать трассировку?
Для OS Windows
-
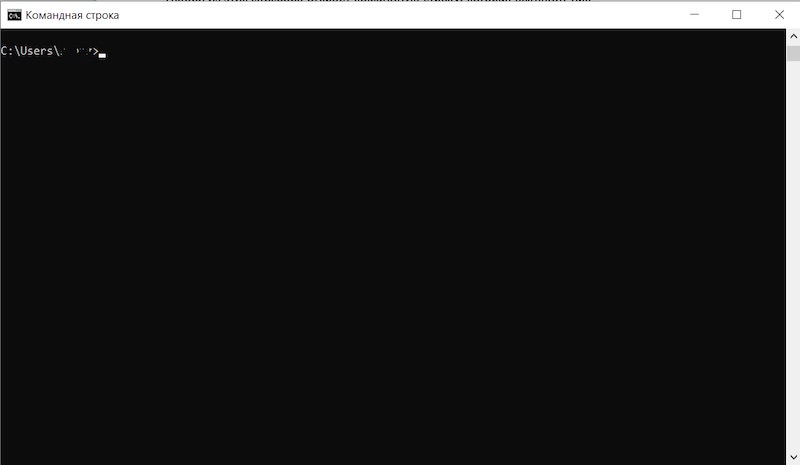
Нажмите сочетание кнопок win+R. Клавиша win — это клавиша с флажком правее клавиши ctrl. Откроется окно:
Наберите cmd и нажмите Enter.
-
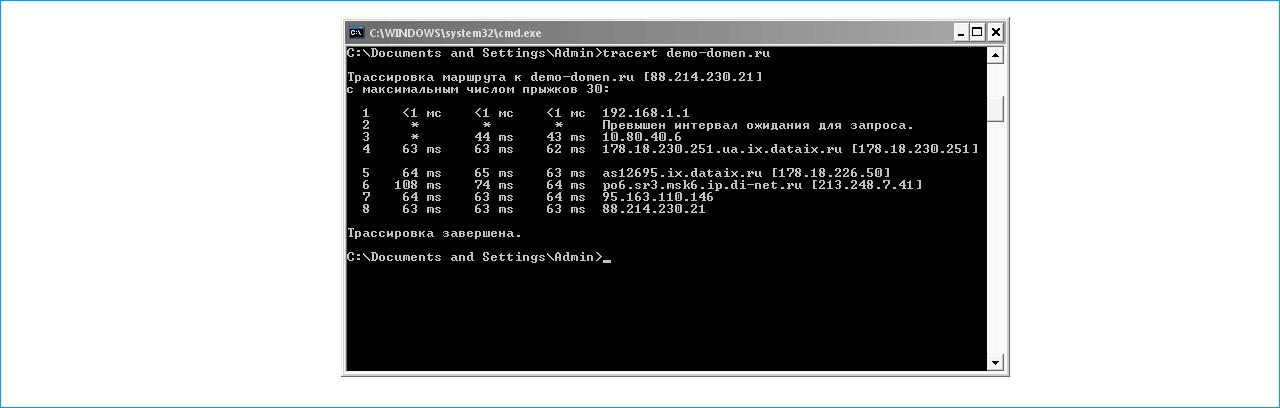
Откроется черное окно консоли. В этом окне нужно набрать tracert имя_вашего_сайта, нажать Enter и дождаться надписи Трассировка завершена.
Имя сайта надо набирать строчными буквами, без www и http://. На картинке приведен пример для домена hostland.ru:
-
Теперь необходимо скопировать трассировку. Правой кнопкой мыши нажмите на окно консоли и выберете Выделить все.
После этого окно будет выглядеть как на рисунке:
- Нажмите кнопку Enter. Теперь трассирвока скопировалась в буфер обмена и ее можно отправить нам.
Для OS Linux, Mac OS, FreeBSD и прочие Unix подобные системы:
инструкции аналогичны, но вместо команды tracert имя_вашего_сайта нужно использовать команду traceroute -I имя_вашего_сайта для использования ICMP ECHO вместо UDP датаграмм.
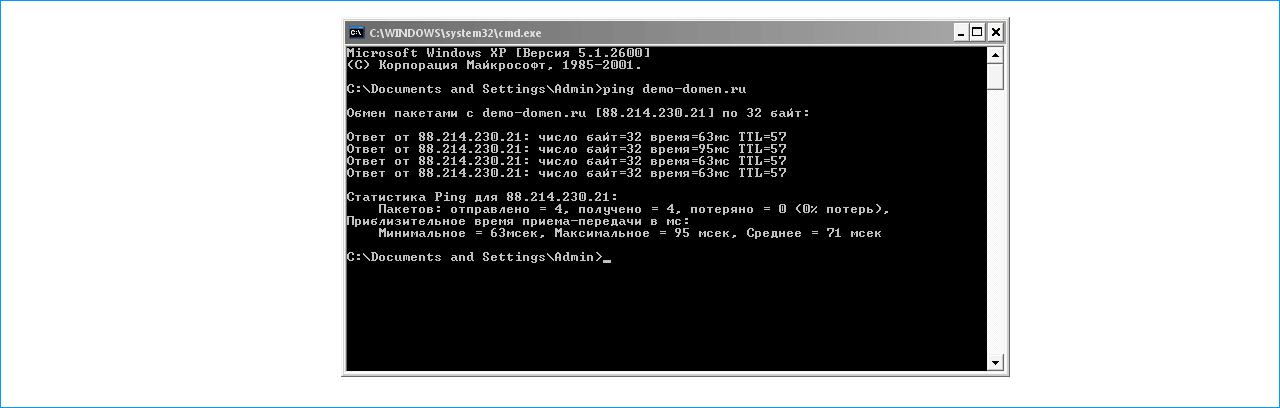
Для начала, определимся с тем, что такое PING. Пинг — специальная утилита, способная проверить целостность соединения. Она основывается на TCP и IP узлах. Протоколы определяют подключение компьютера или сервера к общей сети. Команды, с помощью которых можно проверить IP-адрес и сделать трассировку маршрута, помогают узнать доступность сервера, а также его состояние в момент подключения.
Само понятие трассировки разнится. Кто-то утверждает, что это полученные данные, в то время, как traceroute – это программа, помогающая определить следование (маршрутизацию) данных в сетях IP/TCP.
Проще говоря, мы будем делать с вами трассу и пинговать сервер из оболочки WIndows.
CMD Windows – ищем и проверяем
Необходимо выполнить следующие действия, независимо от вашей версии ПО:
- Пуск — Все программы — Стандартные — Командная строка;
- В окне поиска — вводите тоже самое;
- Открываете панель управления — выполнить — и вводим команду cmd.
Любой из этих способов откроет черное окно, которое выглядит так:
После того, как вы узнали свой IP (достаточно в строке ввести ipconfig), также вам доступна команда PING.
Делаем всё, как на скриншотах.
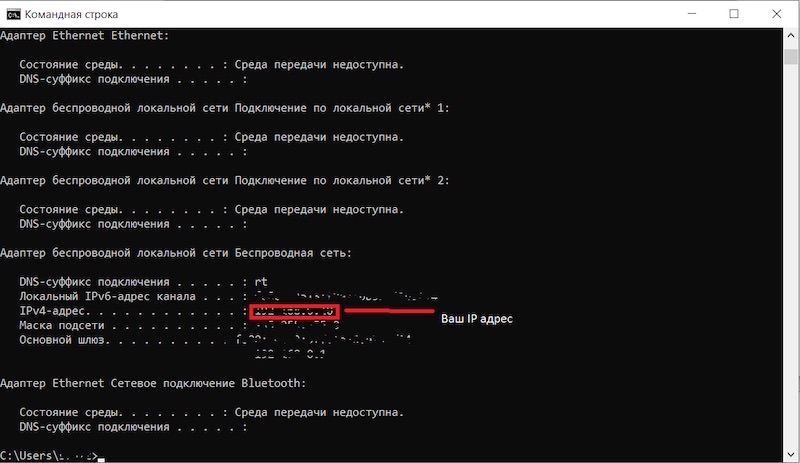
После введенной IPCONFIG – не обязательно заглавными — вы получаете свой IP-адрес в графе IPv4. Его можно скопировать для удобства или запомнить, что более трудно. Многие просто переписывают на листок.
Командная строка всегда выдает по 4 пакета. Мы видим, что каждый пакет передает информацию в 32 бита за 3 миллисекунды каждый.
Все указано на скриншоте ниже.

Вы можете самостоятельно изменить количество отправляемых пакетов, если перед «PING» добавите «-N». Тогда ваша команда будет выглядеть так:
ping -n (число пакетов) IP-адрес
Также вы можете изменить количество бит, и тогда ваша команда будет выглядеть так:
ping -l (количество байт) 22.11.33.444 (к примеру)
В отличие от Windows, на Linux ручная проверка айпи не прекращается до тех пор, пока вы сами не остановите этот процесс. В Виндовс такую операцию сделать также можно с помощью команды добавочной команды «-T», и выглядит это так:
ping -t какой-нибудь IP (к примеру)
Останавливается проверка с помощью нажатия Ctrl + C.
Вы узнали ваш IP-адрес. Теперь вам доступна информация о скорости соединения вашего компьютера с общей сетью.
Проверяем трассу tracert
Трассировка показывает нам скорость прохождения наших пакетов между маршрутизаторами, которые базируются в сети компьютера, который отправляет запросы к итоговому (конечному серверу).
Трасса часто помогает обнаружить проблему в серверной части. Большинство опытных специалистов при каждом изменении кода СУБД ежеминутно проверяют трассировку для определения проблемы и скорости прохождения данных.
Функция tracert – показывает полный сетевой маршрут до указанного места. Выглядит это так (в качестве примера был взял wikipedia.org):
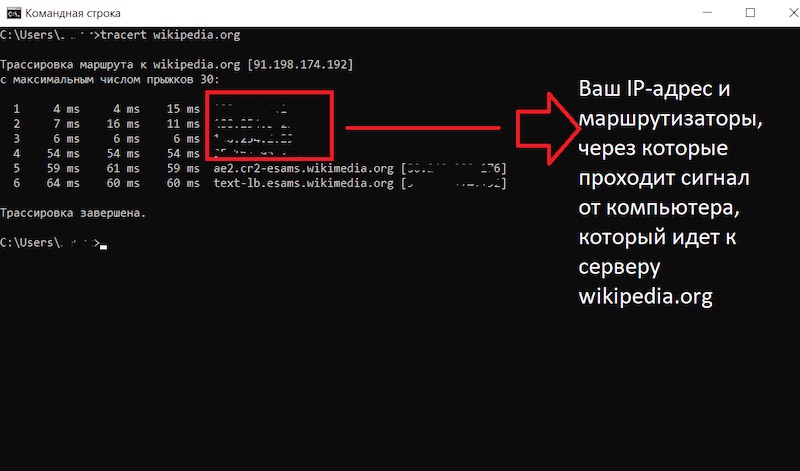
Как мы видим, команда «tracert» — помогает нам увидеть количество промежуточных маршрутизаторов, а также конечное время, которое нам приходится выжидать.