
Приведение к внешнему дисплею с компьютера с Windows
Вы можете подключить компьютер по беспроводной сети к телевизору, проектору или другому внешнему дисплею с поддержкой Miracast.
-
Включите телевизор, проектор или другой дисплей. Если вы используете ключ или адаптер Miracast, убедитесь, что он подключен к дисплею.
-
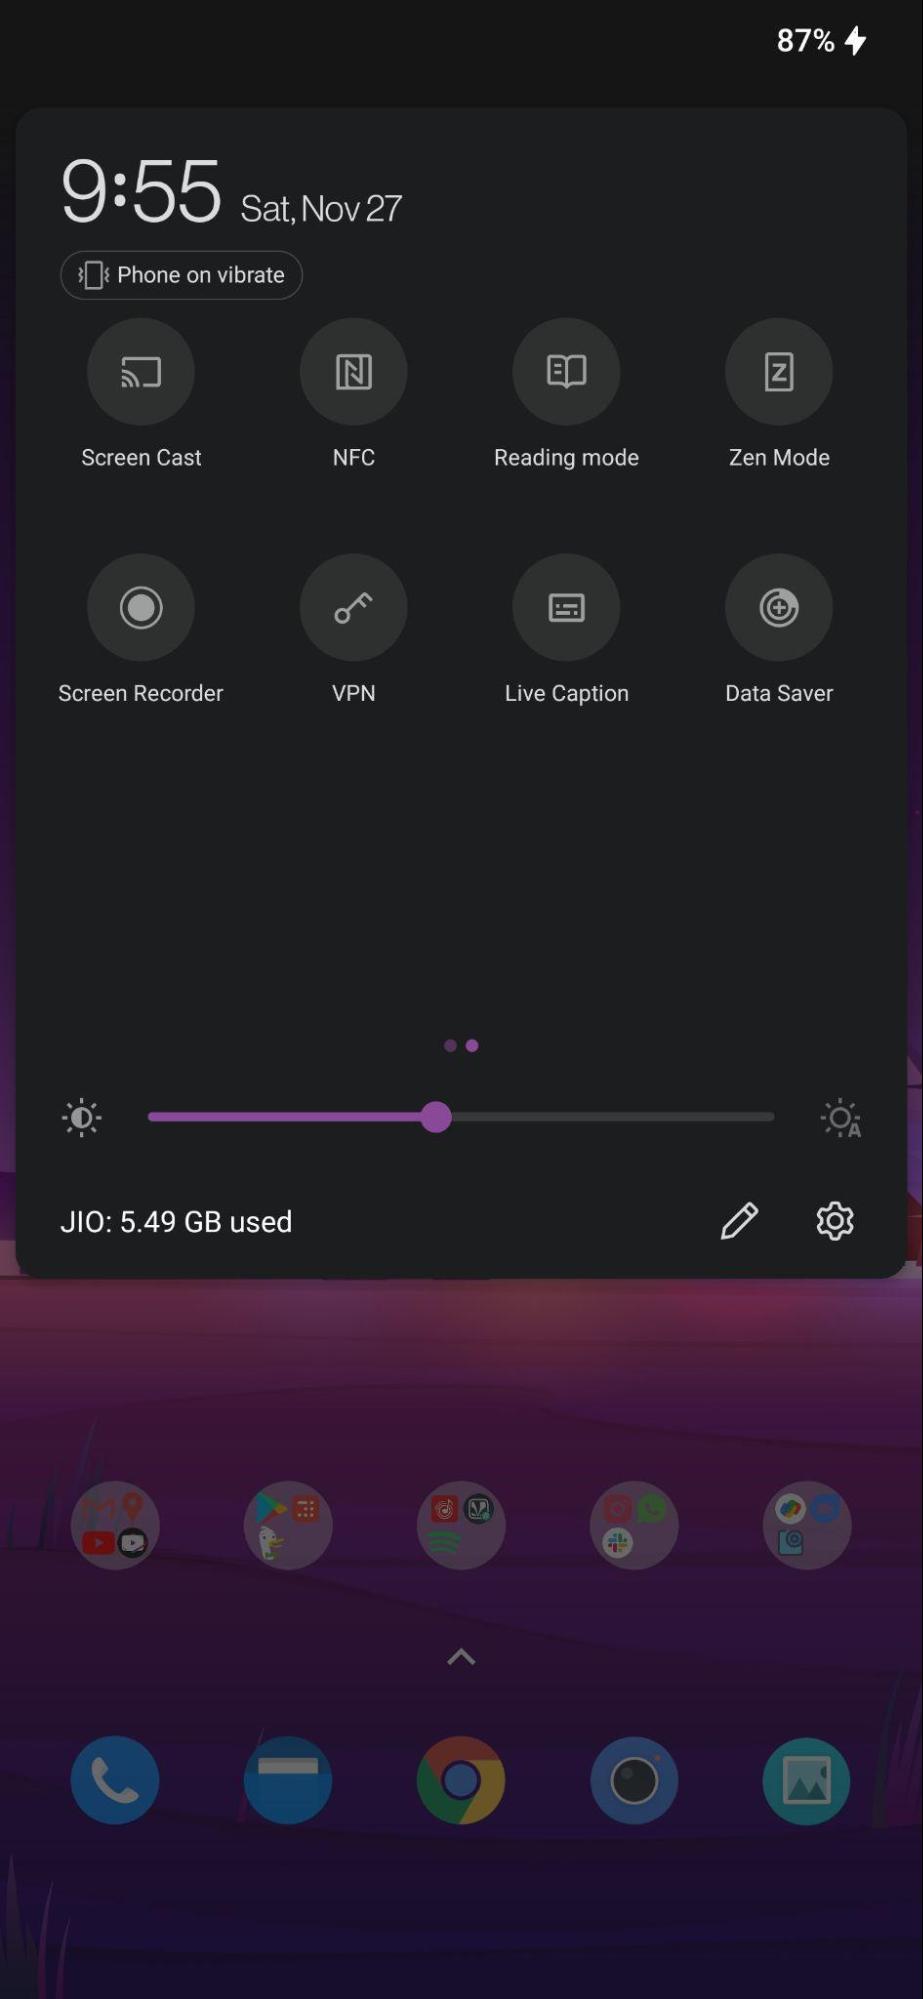
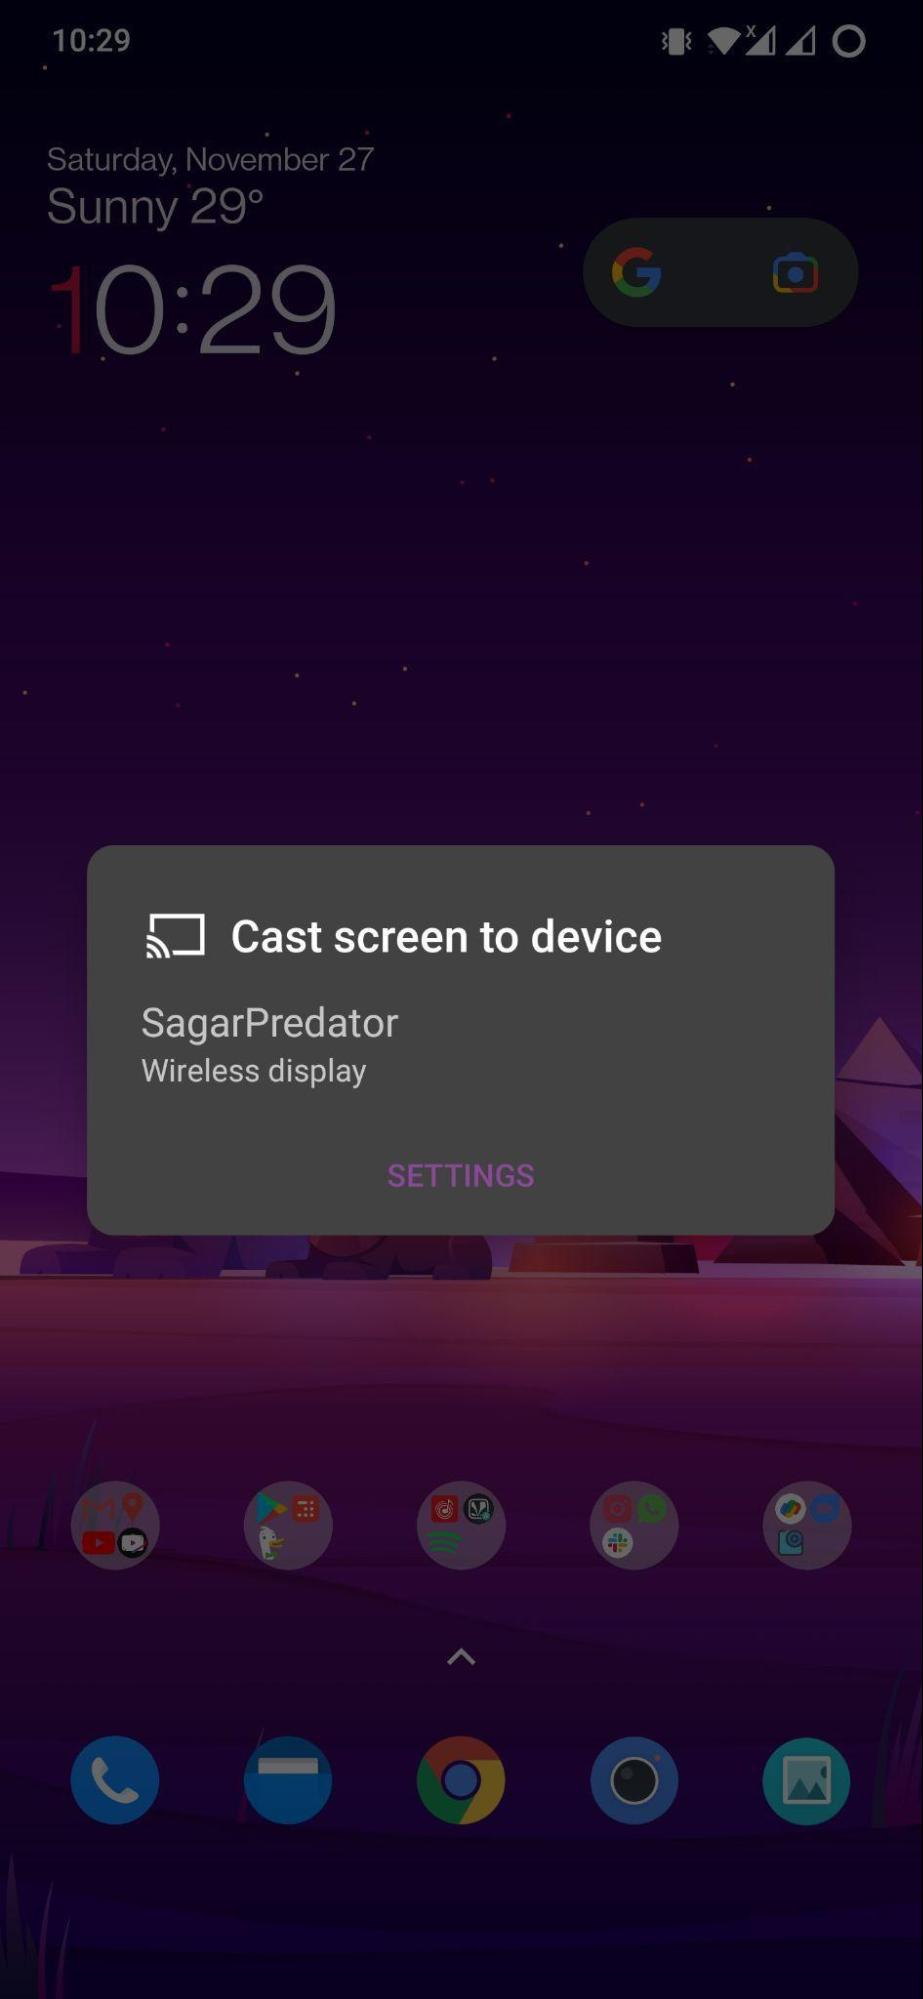
Нажмите клавишу с логотипом Windows + K, а затем выберите в списке доступных устройств дисплей, к который вы хотите привести.
-
Следуйте всем дополнительным инструкциям на экране. В противном случае, все готово.
Приведение к другому компьютеру с Windows с компьютера с Windows
-
На компьютере, на который вы хотите проецировать:
-
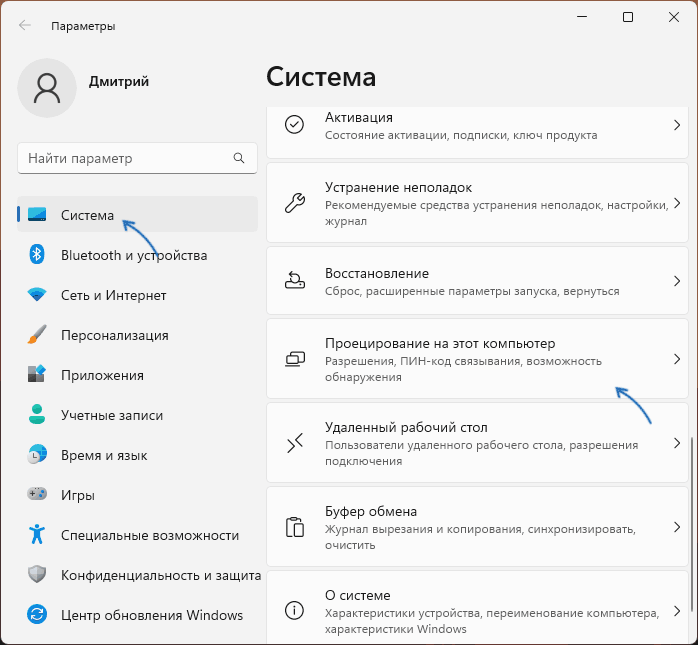
Нажмите кнопку Пуск > Настройки > Система > Проецирование на этот компьютер .
-
В разделе Добавление необязательной функции «Беспроводной дисплей» для проецирования на этот компьютер, выберите Необязательные функции.
-
Рядом с пунктом Добавление необязательной функции выберите Просмотр функций и введите «беспроводной дисплей».
-
Установите флажок рядом с пунктом Беспроводной дисплей в списке результатов, выберите Далее, затем нажмите Установить.
-
После установки беспроводного дисплея выберите Назад , чтобы управлять параметрами проекции на странице Проецирование на этот компьютер в разделе Параметры.
-
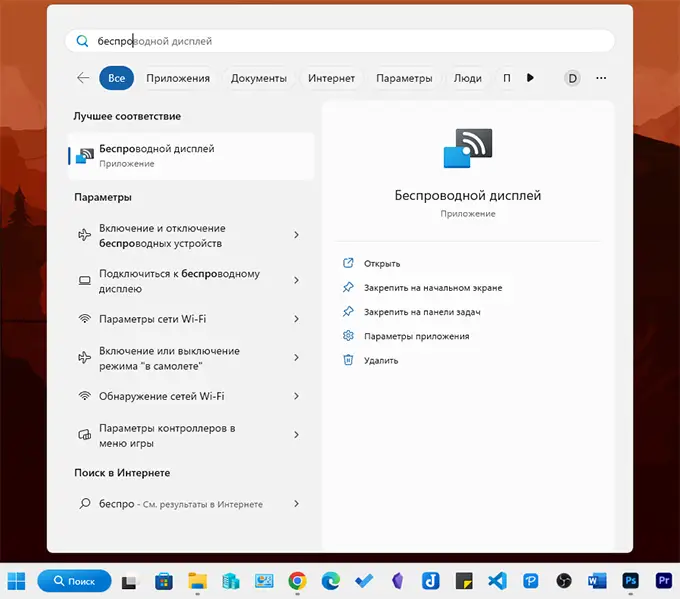
Запустите приложение Wireless Display, введя «беспроводной дисплей» в поле поиска на панели задач и выберите Беспроводной дисплей в списке результатов.
Примечание: Приложение Wireless Display доступно на устройствах под управлением Windows 11 версии 22H2 и более поздних версий. Если вы используете более раннюю версию Windows, запустите приложение Connect, введя connect в поле поиска на панели задач и выбрав Подключить в списке результатов.
Чтобы узнать, какую версию Windows вы используете, см. статью Какая версия операционной системы Windows используется?
-
-
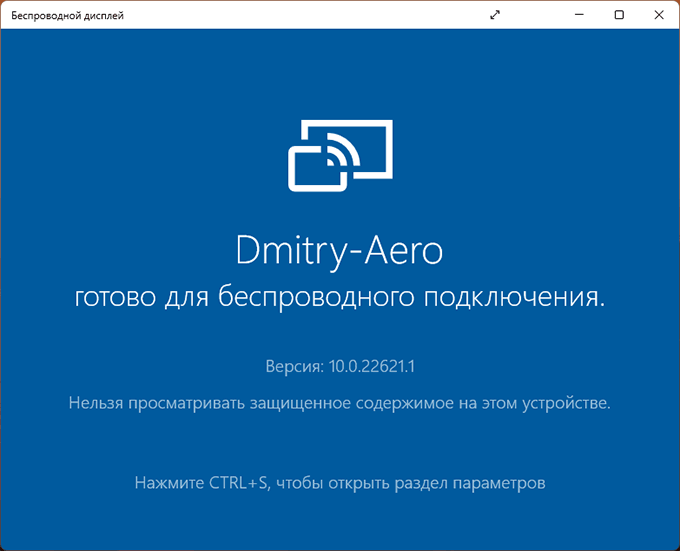
На компьютере, с который вы проецироваться, выберите клавиши с логотипом Windows + K и выберите компьютер, к которому вы хотите подключиться.Вы также можете выполнить поиск по запросу Приведение на панели поиска Windows, а затем выбрать Подключиться к беспроводному дисплею. На странице Параметры отображения в разделе Несколько дисплеев выберите Подключиться к беспроводному дисплею, а затем выберите Подключиться.
Примечание: Если не удается найти компьютер, на который нужно проецироваться, убедитесь, что на нем Wi-Fi включен и установлено и запущено приложение для беспроводного отображения.
Подключение к внешнему дисплею с помощью док-станции WiGig
Беспроводное подключение компьютера к монитору, проектору или другому внешнему дисплею, подключенном к док-станции WiGig .
-
Включите телевизор или проектор.
-
Включите свою док-станцию WiGig и убедитесь, что она подключена к дисплею.
-
Убедитесь, что компьютер поддерживает WiGig и что он включен. Если ваш компьютер поддерживает WiGig, вы увидите элемент управления WiGig в разделе Параметры > сеть & Интернет > режиме в самолете.
-
Нажмите клавишу с логотипом Windows + K, а затем выберите свою док-станцию.
-
Следуйте всем дополнительным инструкциям на экране. В противном случае, все готово.
Проверьте, поддерживает ли ваш компьютер WiGig
Выбор варианта отображения
Чтобы изменить то, что отображается на ваших дисплеях, нажмите клавишу Windows + P. Вот параметры, которые можно выбрать.
|
Если необходимо: |
Выберите |
|
Просматривать элементы только на одном мониторе. |
Только экран компьютера |
|
Просматривать одинаковые элементы на всех мониторах. |
Повторяющийся |
|
Просматривать рабочий стол на нескольких экранах. При расширении мониторов вы можете перемещать элементы между двумя экранами. |
Расширить |
|
Просматривать все только на втором мониторе. |
Только второй экран |
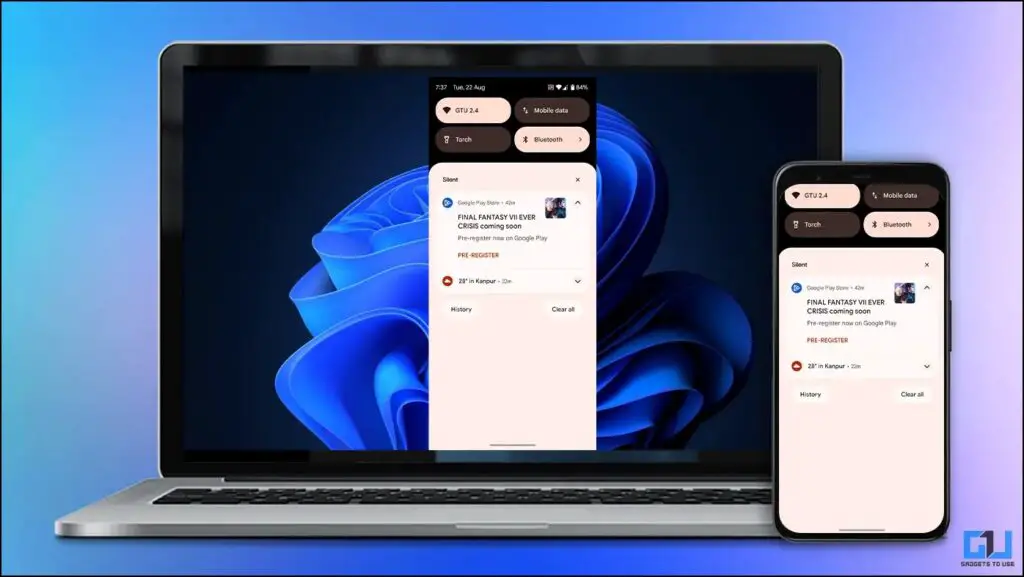
В Windows 11 присутствует встроенная функция приема беспроводной трансляции изображения с экрана смартфона или другого компьютера по Wi-Fi (Miracast) — «Проецирование на этот компьютер», реализуемая с помощью встроенного приложения «Беспроводный дисплей».
В этой инструкции о том, как передать изображение на экран ноутбука или ПК с другого устройства с помощью этой функции и дополнительная информация на тему, которая может быть полезной. Так же вы можете транслировать изображение с компьютера на ТВ или другой беспроводный дисплей.
Беспроводная передача изображения на экран компьютера встроенными средствами системы
Включить возможность передачи изображения на компьютер с Windows 11 можно двумя способами:
- Настроить функцию «Проецирование на этот компьютер» — это оптимальный вариант, если пользоваться возможностью вам требуется регулярно.
- Запустить встроенное приложение «Беспроводный дисплей».
Для настройки «Проецирование на этот компьютер», потребуется выполнить следующие шаги:
- Зайдите в Параметры — Система и откройте пункт «Проецирование на этот компьютер».

- В настройках проецирования вы можете настроить доступность устройства для проецирования: недоступно, только в защищенных сетях или в любых сетях (если при опции «Доступно везде в защищенных сетях» устройства не видят компьютер, попробуйте вариант «Доступно везде»), появление запроса на компьютере при подключении для его разрешения, настройка требования ПИН-кода и доступности устройства при питании от батареи (функция может расходовать заряд).


Когда функция включена, ваш компьютер будет всегда «ожидать» подключения устройств для дублирования экрана.
Вторая возможность, не требующая предварительной настройки «Проецирования на этот компьютер» и работающая, даже если проецирование находится в состоянии «Всегда отключено» — приложение «Беспроводный дисплей»:
- Используйте меню «Пуск» или поиск в Панели задач для запуска приложения «Беспроводный дисплей».

- Приложение будет запущено и начнет ожидать подключения.

Подключение для проецирования на компьютер с Android и Windows
Процесс подключения для беспроводного дублирования экрана производится следующим образом:
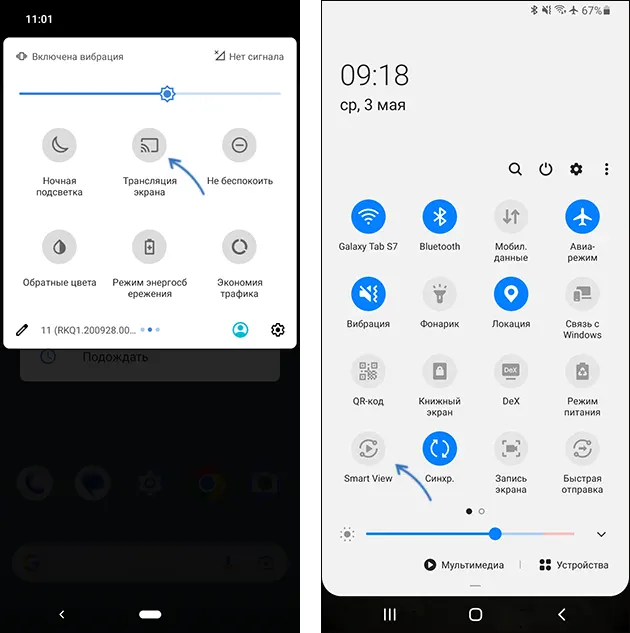
- На смартфоне Android используйте функцию «Трансляция экрана» или «Smart View» (на смартфонах Samsung). Все действия аналогичны таковым при выводе изображения со смартфона на ТВ.

- После включения опции будет найден беспроводный дисплей с именем вашего компьютера, а после его выбора — начнется трансляция изображения с экрана смартфона на экран компьютера.
- Если требуется передать изображение с одного компьютера Windows на другой, используйте сочетание клавиш Win+K в Windows 11 или Win+P и выбор опции «Подключиться к беспроводному дисплею» в Windows 10.
- В результате экран вашего устройства отобразится на экране Windows 11, в некоторых случаях — с возможностью управления (но с ним обычно бывают проблемы, например, в моем тесте смартфон Android реагировал на управление с клавиатуры, но не воспринимал мышь).


При использовании варианта настройки с помощью «Проецирование на этот компьютер» изображение по умолчанию будет отображаться в полноэкранном режиме, а при запуске приложения «Беспроводный дисплей» вручную — в окне.
Решение возможных проблем при дублировании экрана
Функция не всегда работает гладко, а некоторые детали её реализации изначально сделаны не самым удобным образом. Отмечу некоторые замеченные особенности работы, которые могут пригодиться:
- Если вы не можете включить проецирование на ПК, либо запустить приложение «Беспроводный дисплей», убедитесь, что этот компонент установлен. Установка компонента (и просмотр уже установленных) выполняется в Параметры — Приложения — Дополнительные компоненты. Используя поиск по установленным компонентам проверьте, установлен ли беспроводный дисплей, а при его отсутствии — выполните установку с помощью кнопки «Просмотреть компоненты» в разделе «Добавление дополнительного компонента».

- Если в параметрах проецирования вы видите сообщение о том, что «Это устройство не поддерживает получение сигнала Miracast, поэтому беспроводное проецирование на него невозможно», это говорит либо об отсутствии Wi-Fi адаптера, либо его несовместимости с функцией, либо об отсутствии подходящих драйверов беспроводного адаптера (в идеале — скачать их с официального сайта производителя ноутбука именно для вашей модели).

- Изначально странно работает перехват ввода (не со всеми устройствами это в принципе возможно): при использовании настроенного проецирования, перехват для управления на проецируемом экране осуществляется автоматически, но не ясно, каким образом, не прерывая трансляцию из него выйти (все возможные комбинации клавиш опробованы). При использовании «Беспроводный дисплей» появляется уведомление о возможности включить ввод на проецируемом устройстве, но самой возможности включить его нет, причем проблема подтверждается на форумах поддержки Microsoft, а в Windows 10 в этой части всё работало исправно.


В Windows 11 присутствуют и дополнительные возможности принимать изображение с экрана мобильного устройства. Для Android можно использовать встроенное приложение «Связь с телефоном» (на самом телефоне потребуется установить «Связь с Windows», а на Samsung функция предустановлена), на вкладке «Приложения» вы сможете нажать «Открыть экран телефона» и взаимодействовать с ним.

Если требуется передача изображения с iPhone на компьютер с Windows, реализовать это можно с помощью сторонних приложений, многие из которых работают и для Android. Используйте способы из инструкции Как передать изображение с iPhone на ПК или ноутбук с Windows и MacOS.

Сторонних приложений для реализации передачи изображения с Android и iPhone на ПК или ноутбук как по Wi-Fi, так и через другие типы подключений достаточно много и некоторые из них уже рассматривались на сайте. Из примеров универсальных приложений с возможностью бесплатной работы — ApowerMirror и LetsView.
Last Updated :
09 Sep, 2024
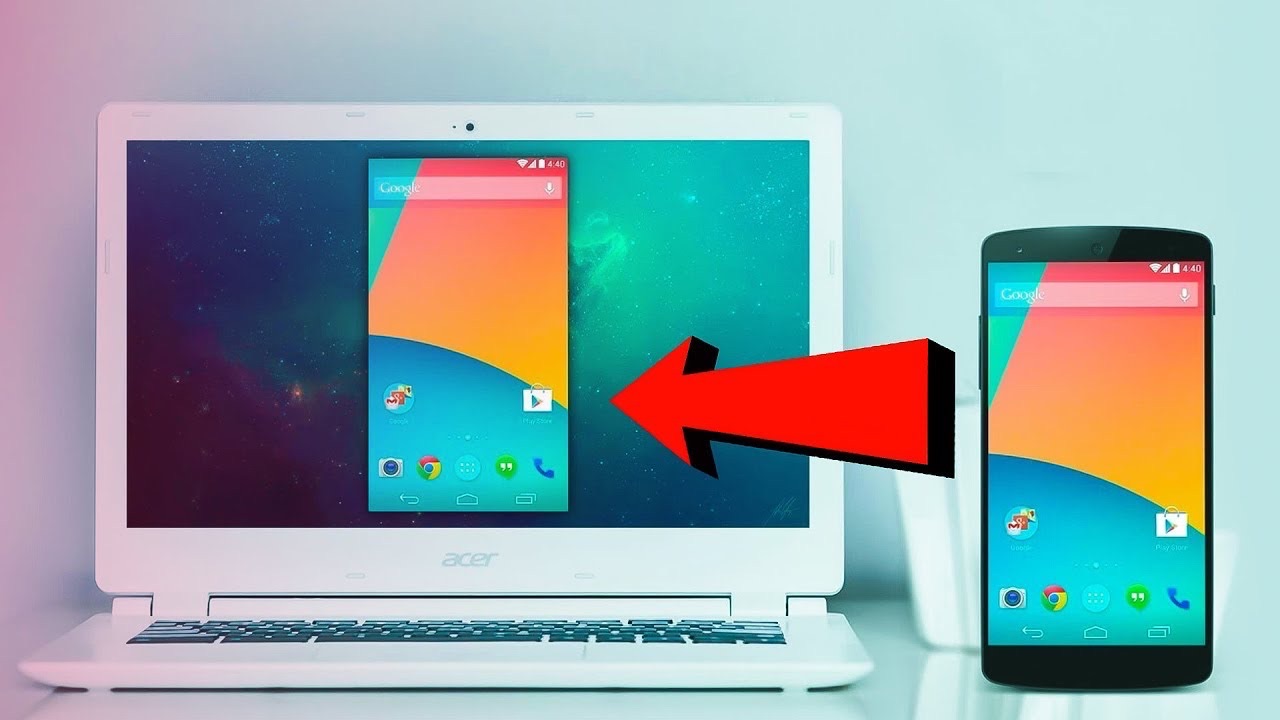
Screen mirroring your Android device to a Windows 11 PC can be incredibly useful for presentations, gaming, or sharing media. Whether you need a larger display or simply want to control your phone from your computer, Windows 11 offers built-in features and third-party apps that make it easy to mirror your Android screen. In this guide, we’ll walk you through how to mirror your Android screen to Windows 11, covering both wireless and cable-based methods for a seamless connection.
How to Mirror Android Screen to Windows 11?
In this article, we will discuss how you can perform screen mirroring in Windows 11 using your mobile. But before you connect these two devices, you need to configure some things. They include:
Enabling Wireless Display
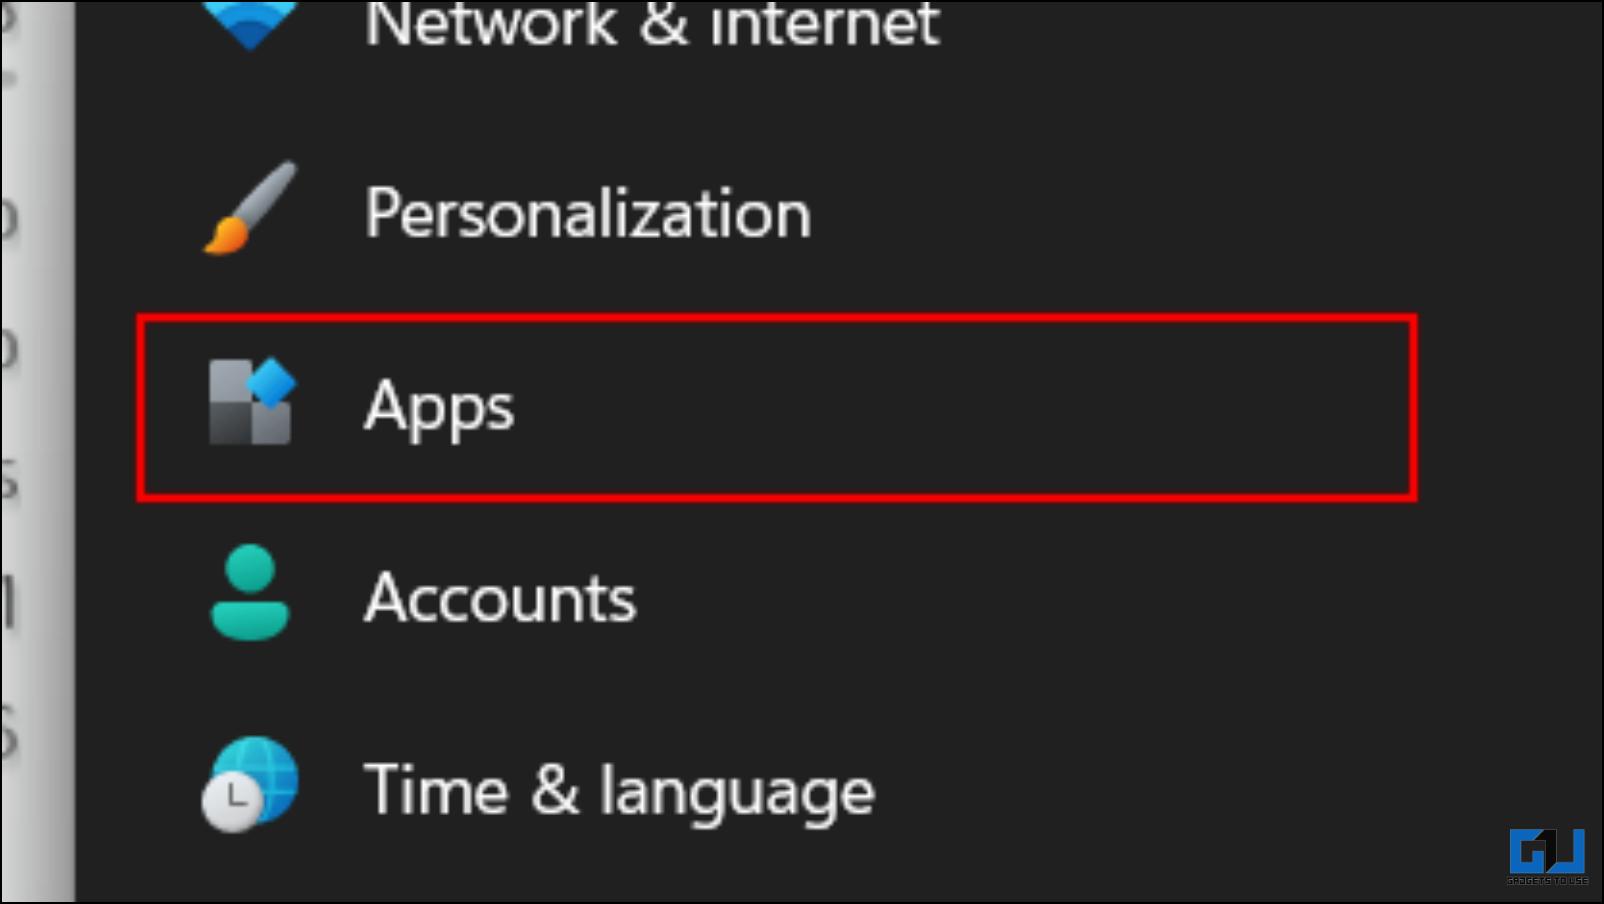
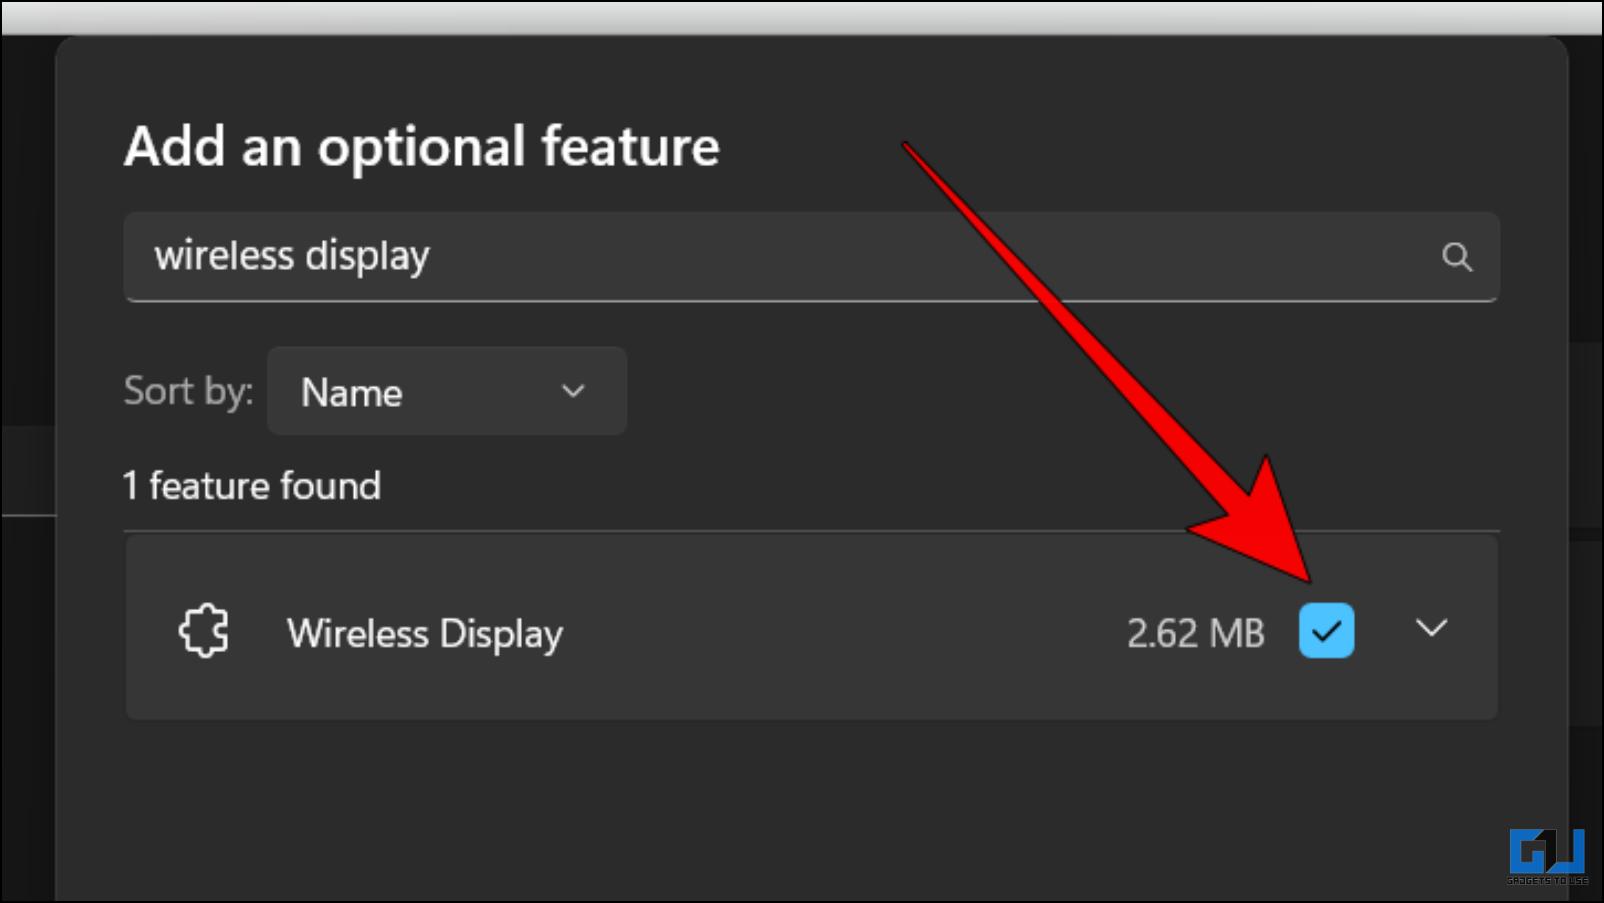
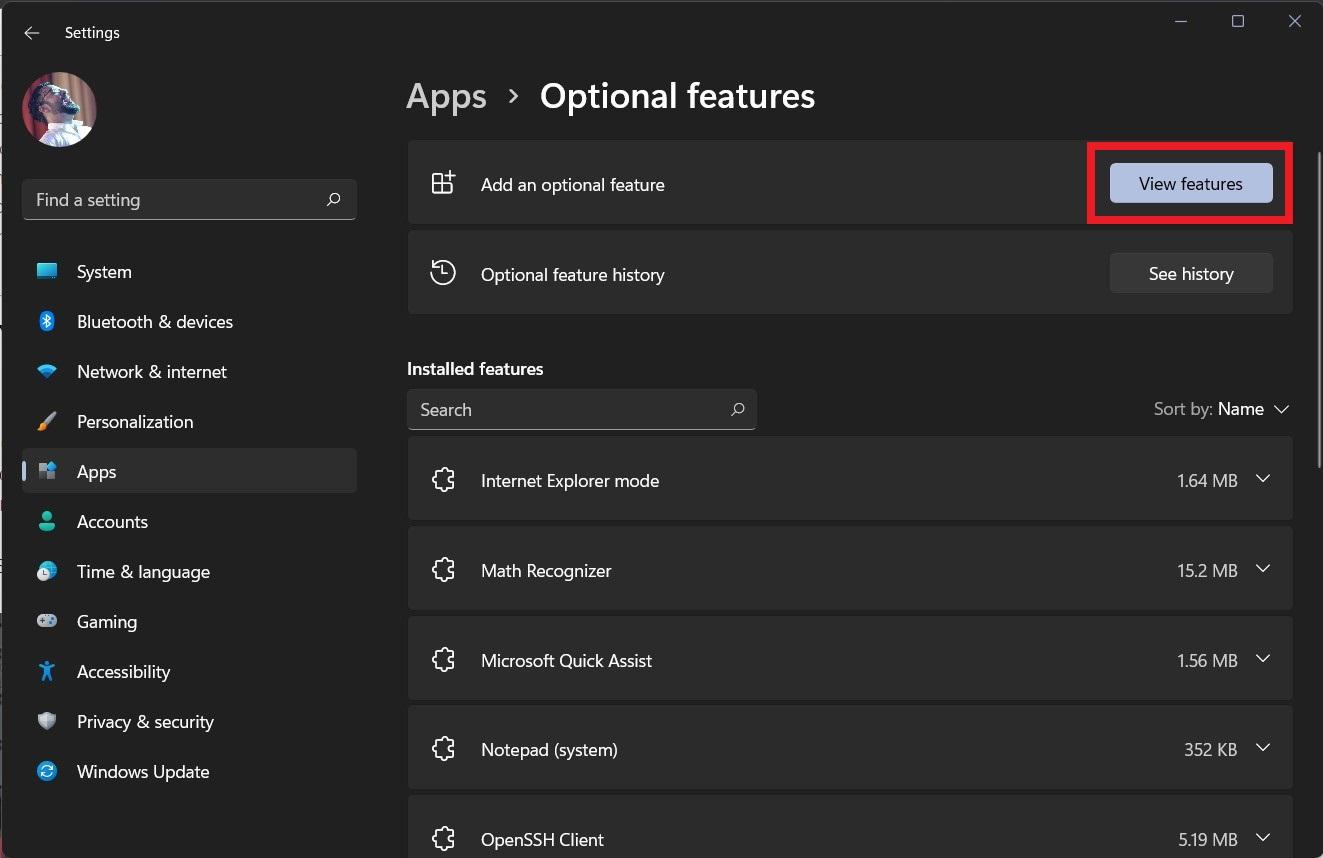
Step 1: Navigate to Settings > Apps. You will see a section named Optional Features. Click on it to proceed.
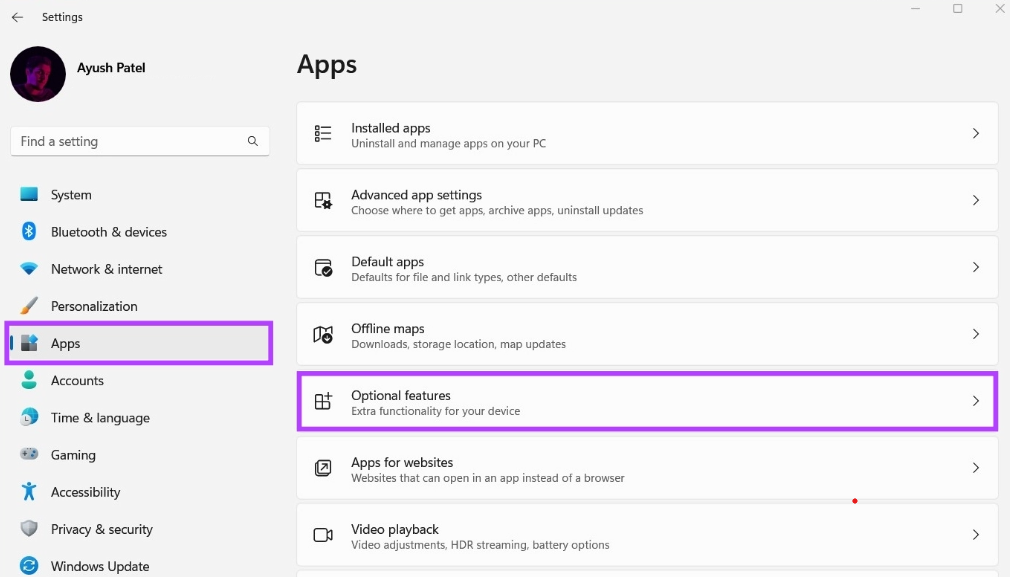
Step 2: Notice a section named Add an optional feature. Click on the View Features button to initiate the installation process.
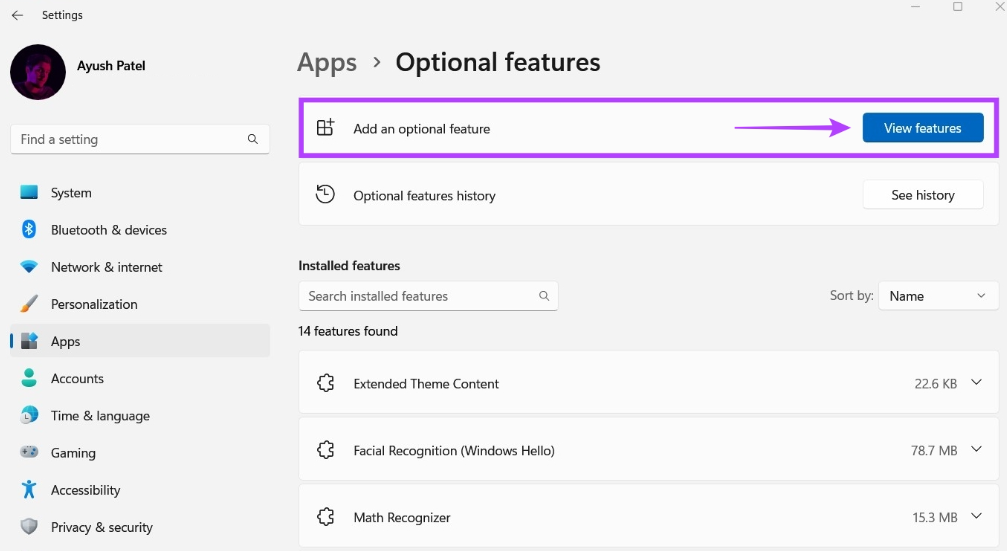
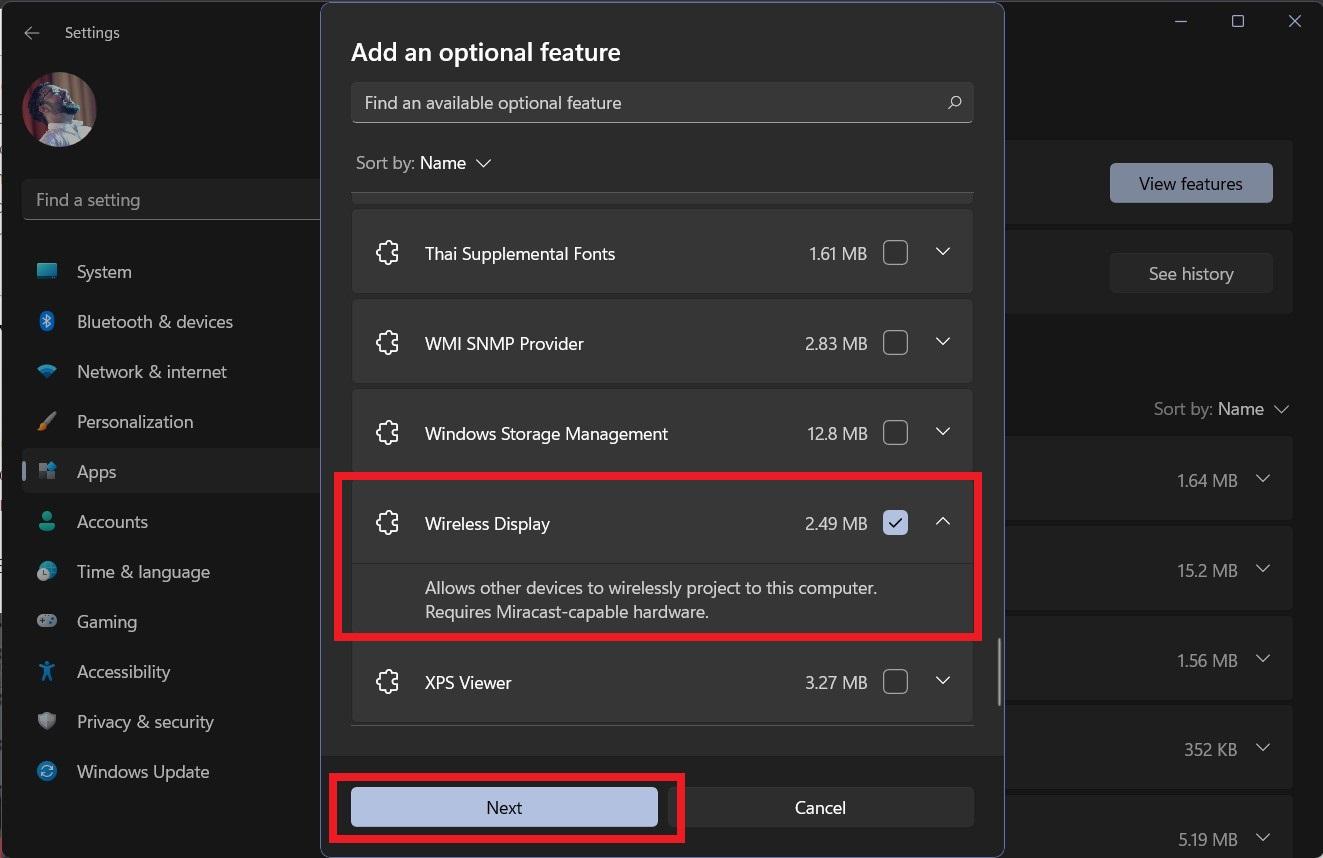
Step 3: The below list will appear. Find the Wireless Display feature in it and check the box you see at the end of the row. Then, click on Next.
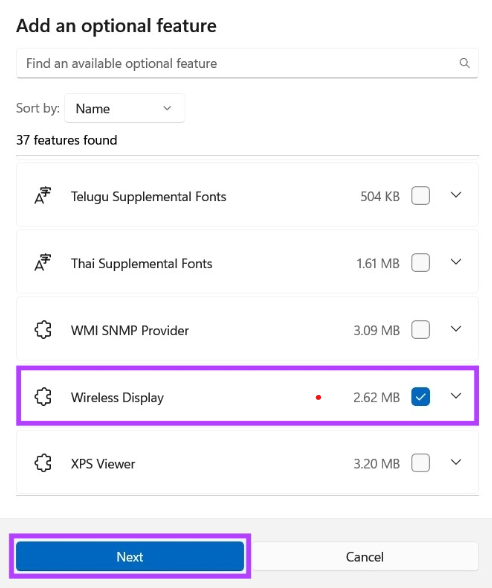
Step 4: Click on Install.
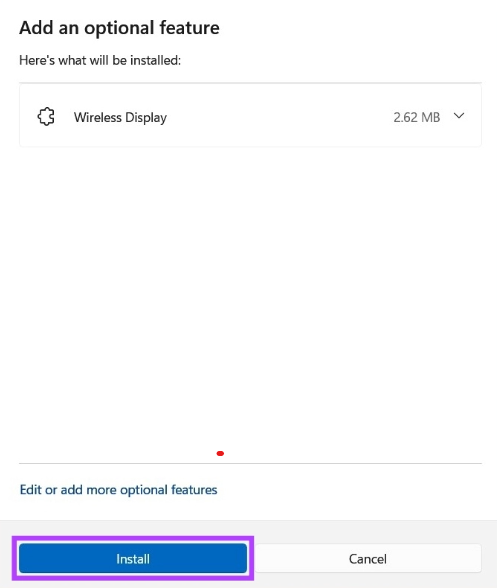
Now, the Wireless Display feature will be installed and enabled automatically.
Configuring Windows 11
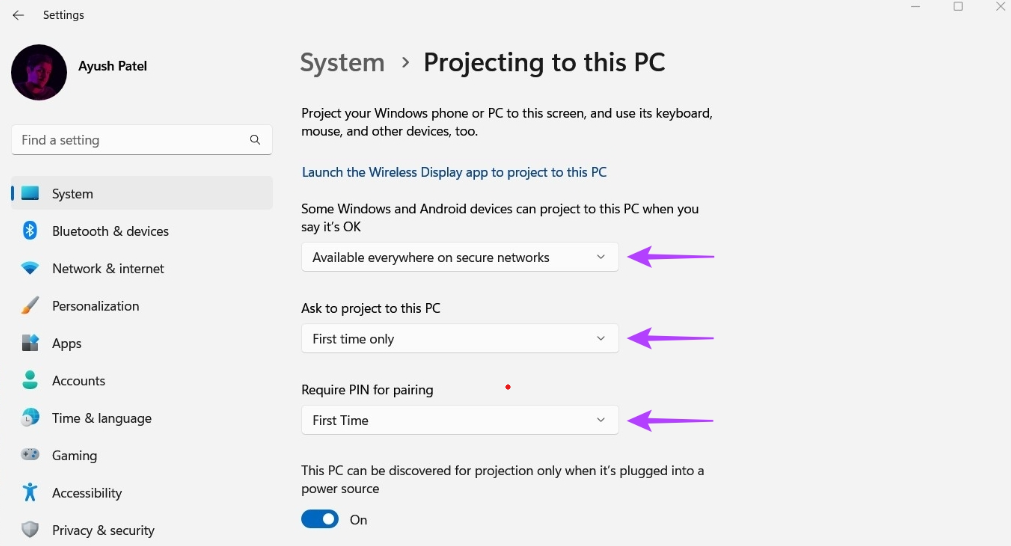
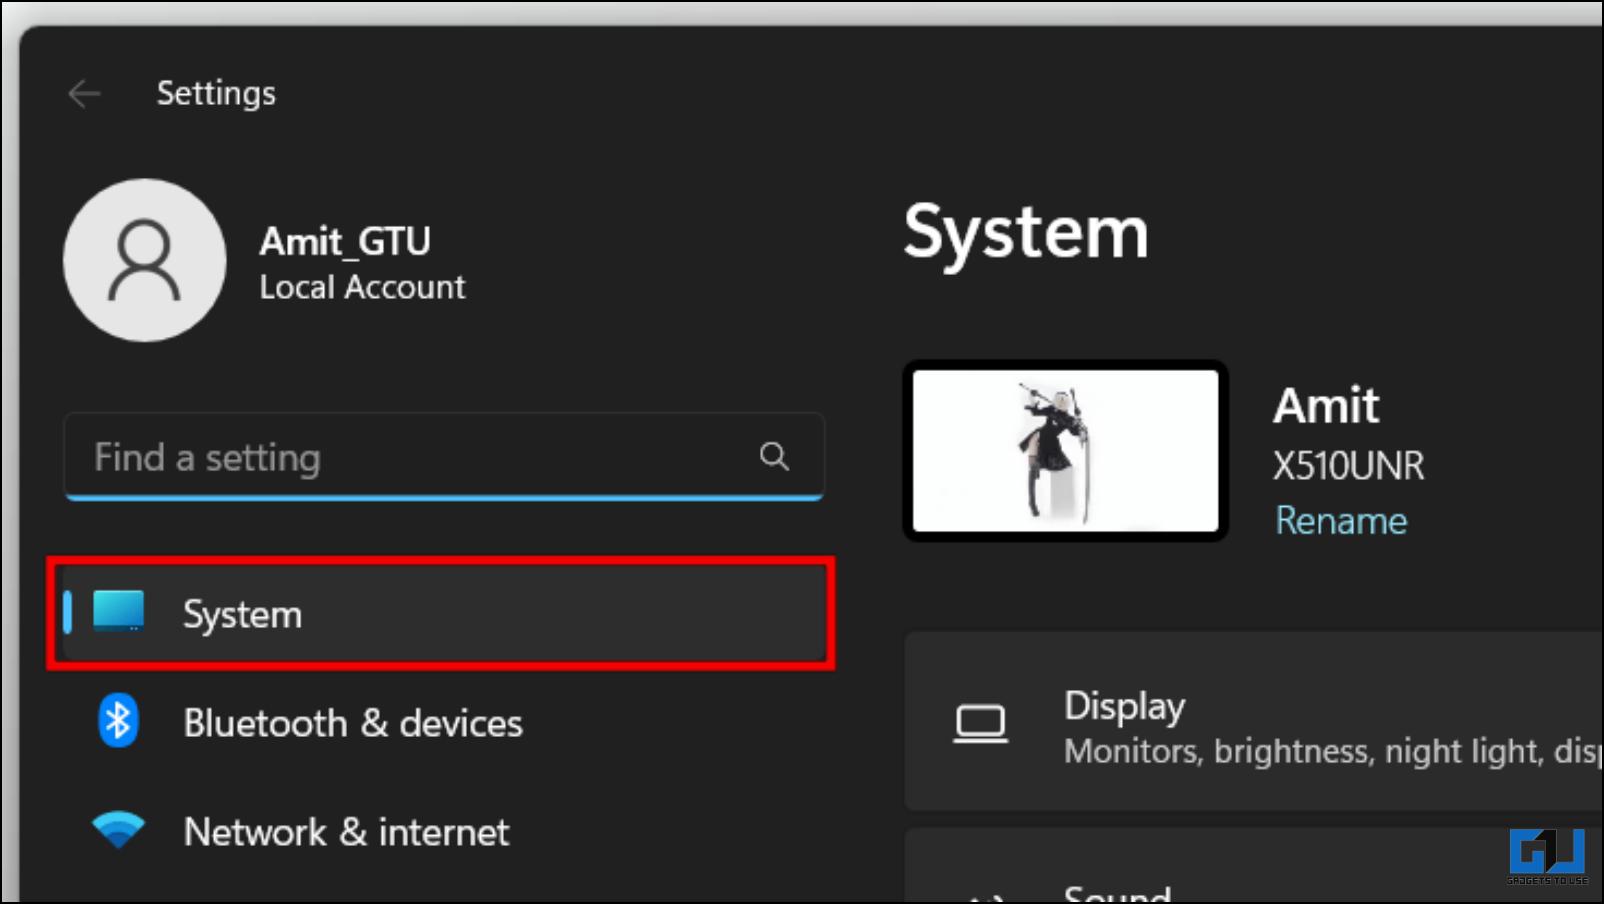
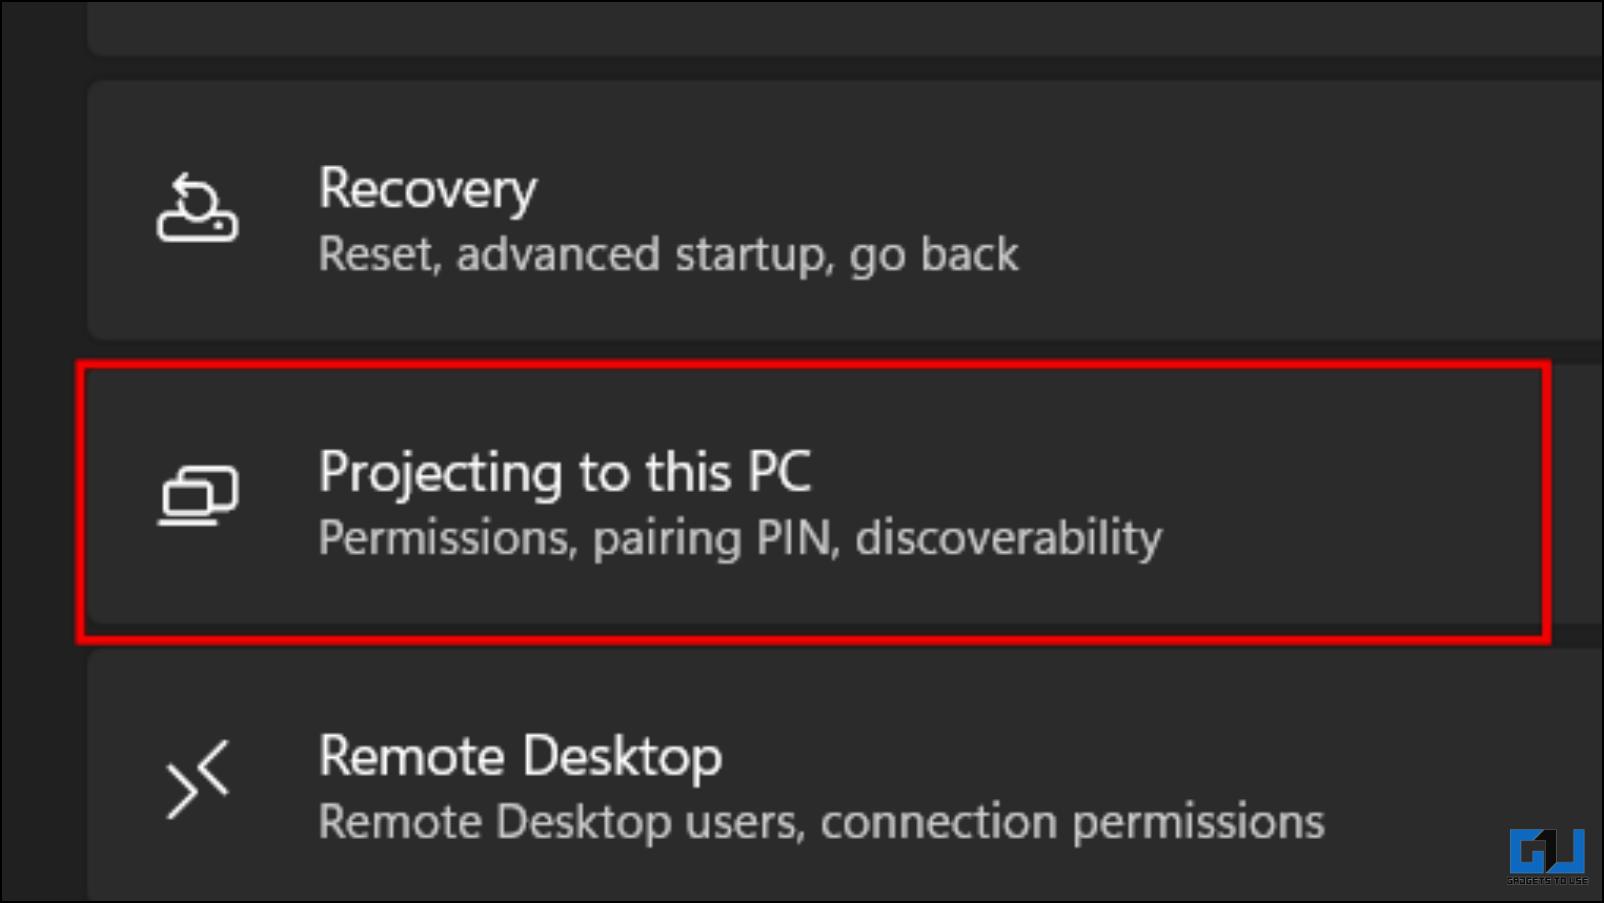
Step 1: Navigate to Settings > System. You will see a section named Projecting to this PC. Click on it to proceed.

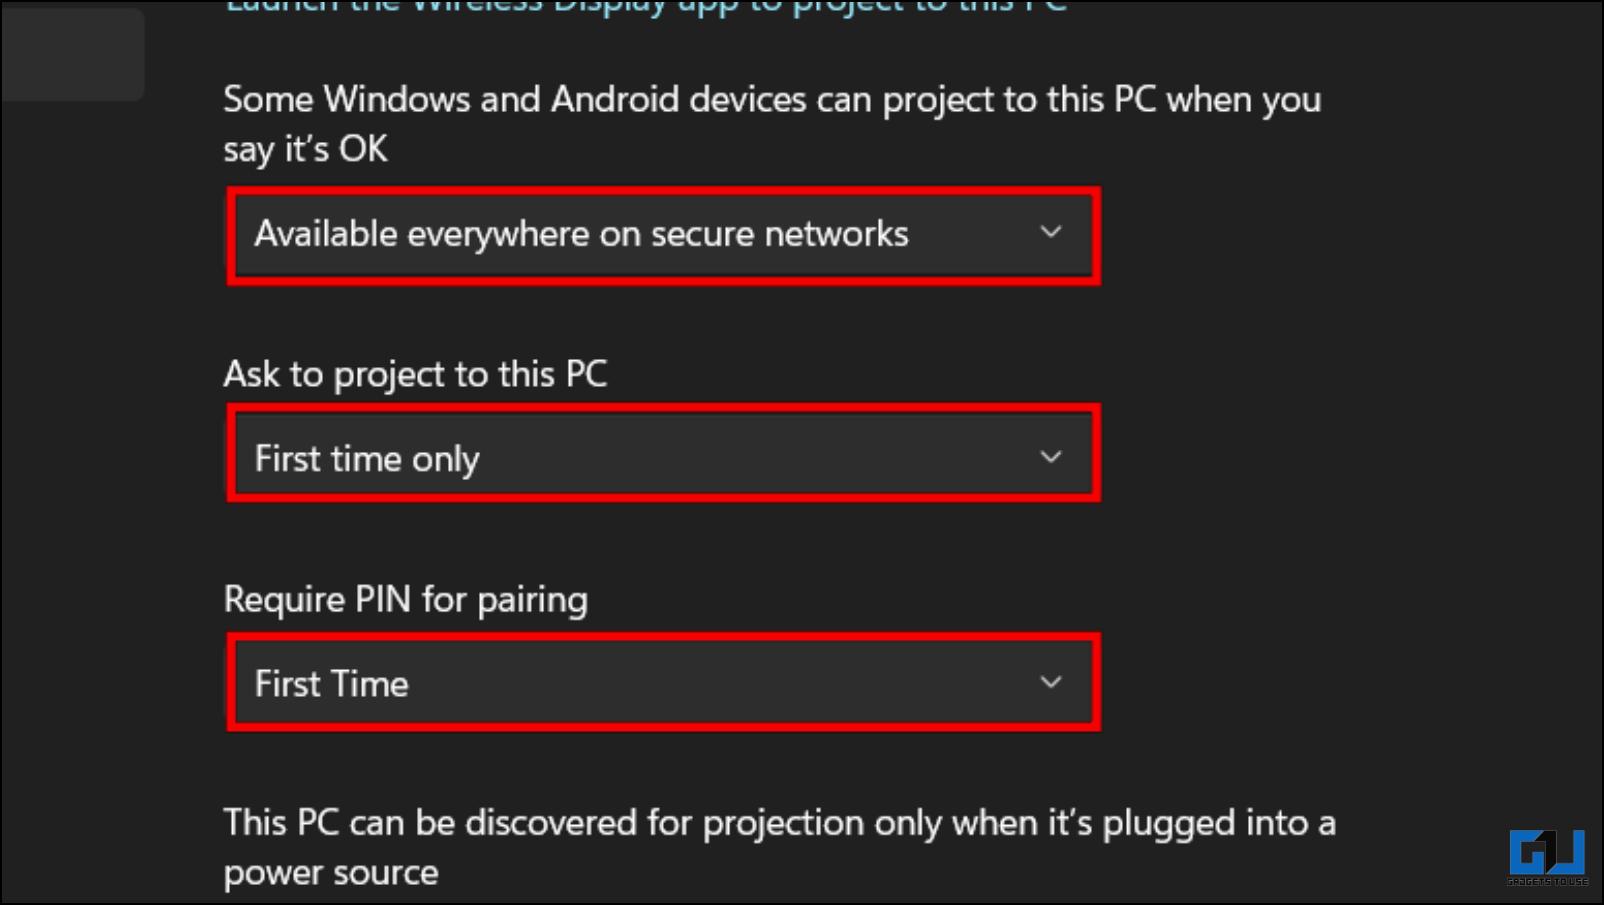
The below page will appear. You will see three dropdown menus. Follow the steps below to configure these options:
Step 2.1: In the first dropdown menu, choose Available Everywhere on secure networks.
Step 2.2: In the second dropdown menu, choose First time only.
Step 2.3: In the first dropdown menu, choose the First Time.
Configuring the Android Device
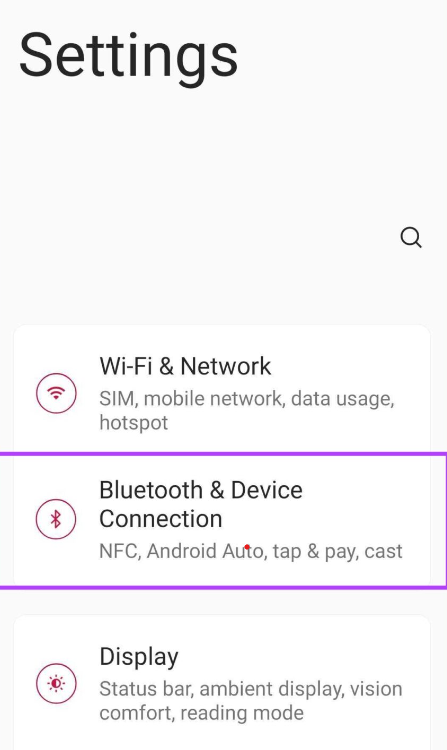
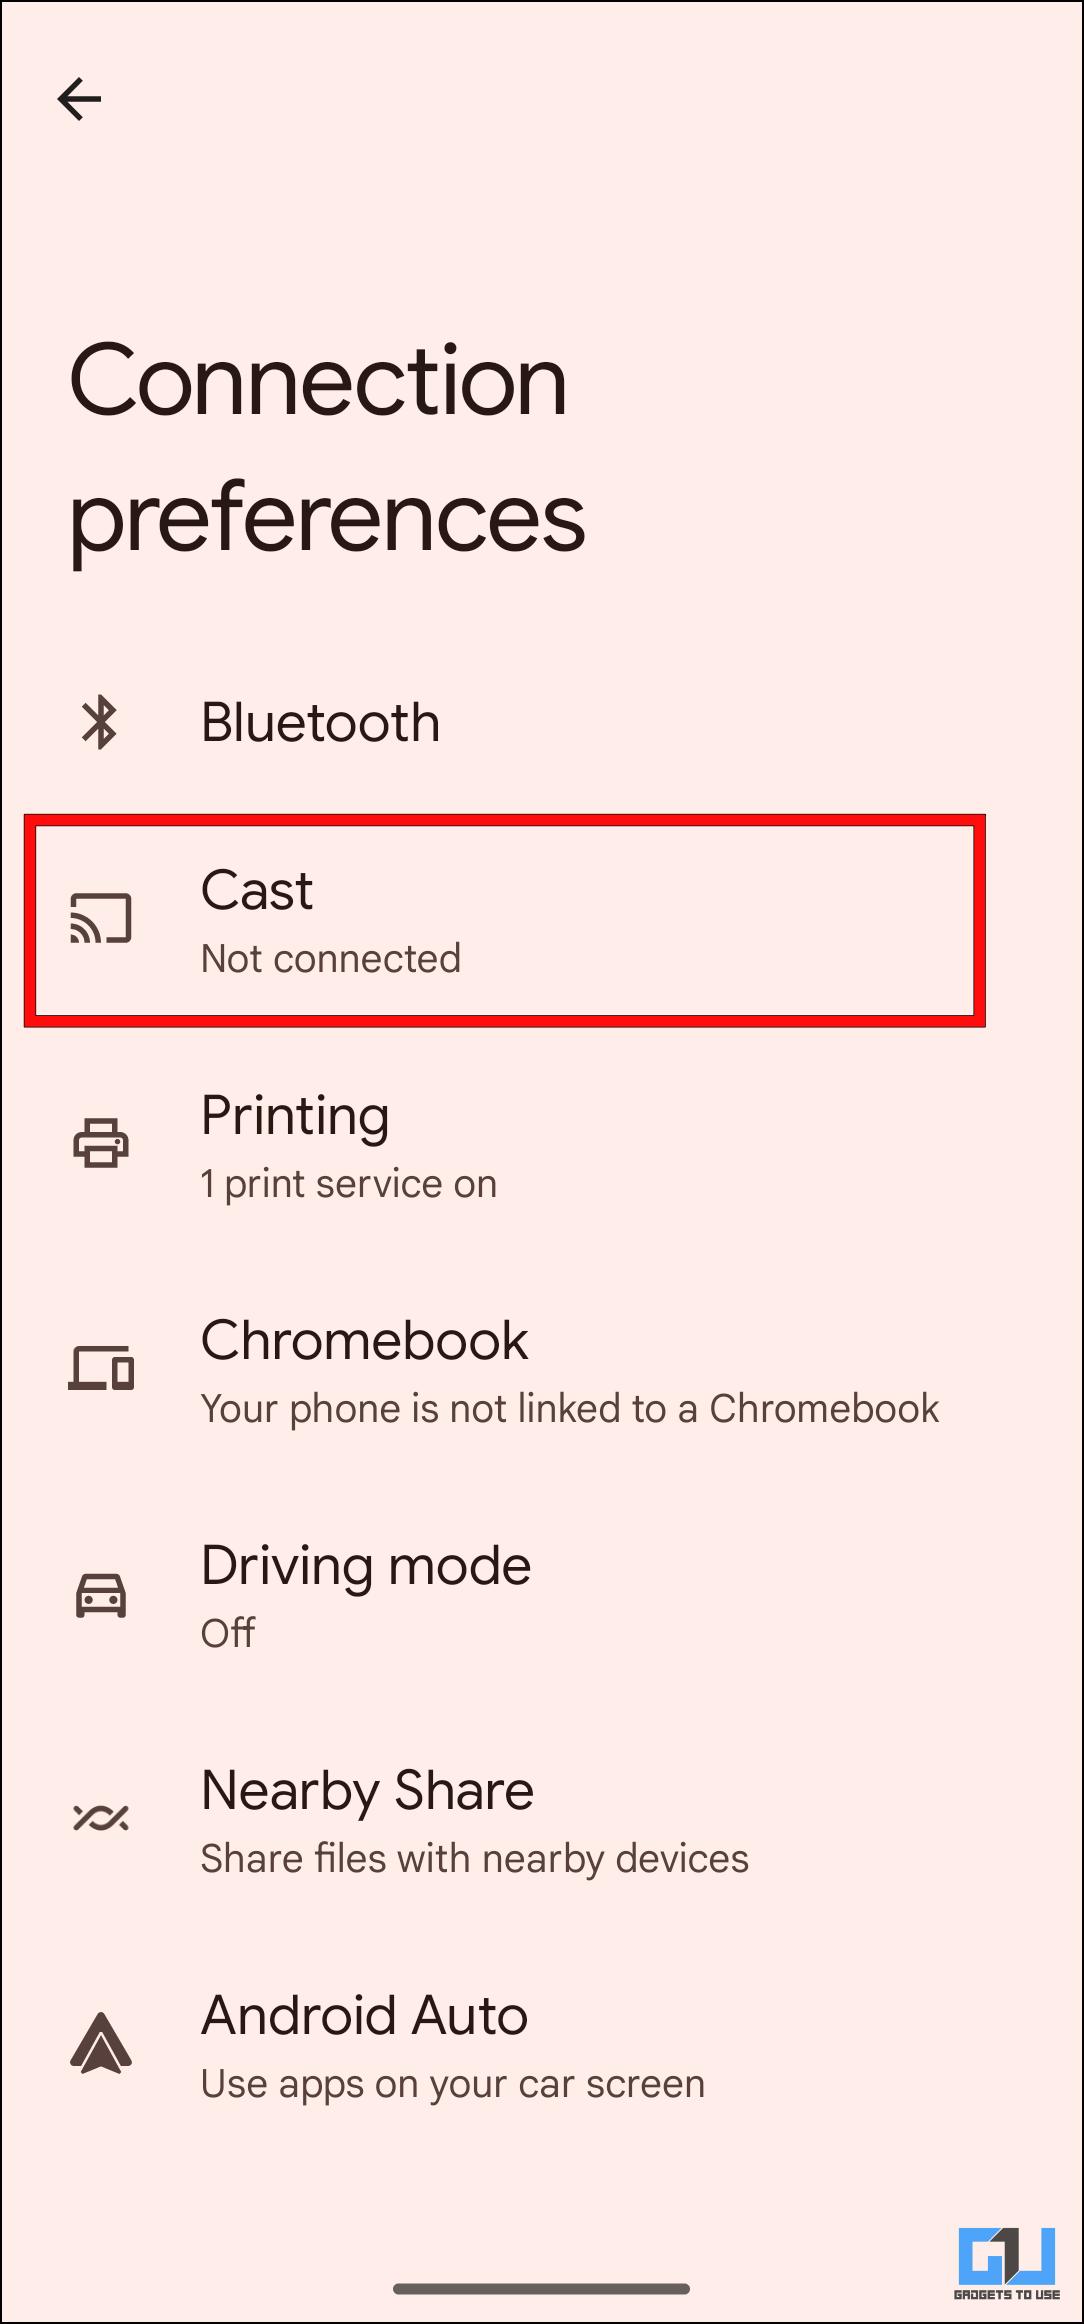
Step 1: Navigate to Settings.
Step 2: Click on Bluetooth & Device Connection.
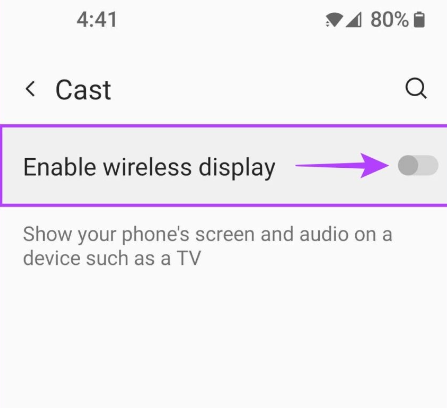
Step 3: Click on Cast.
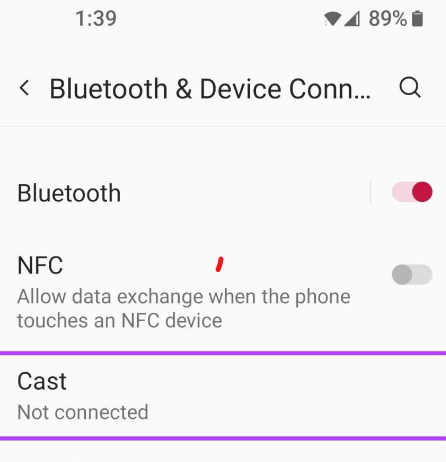
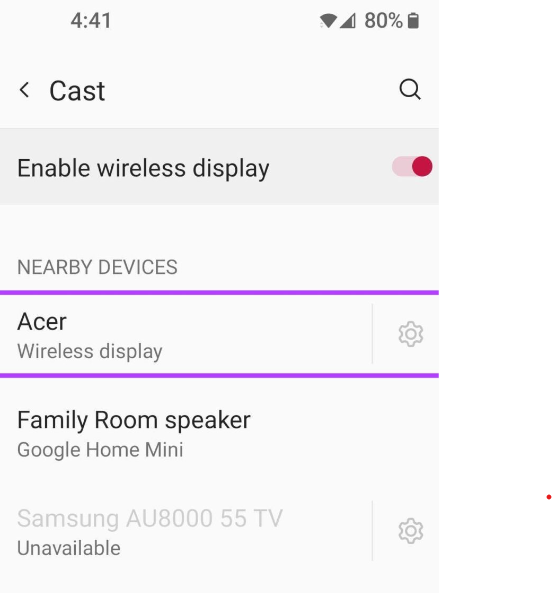
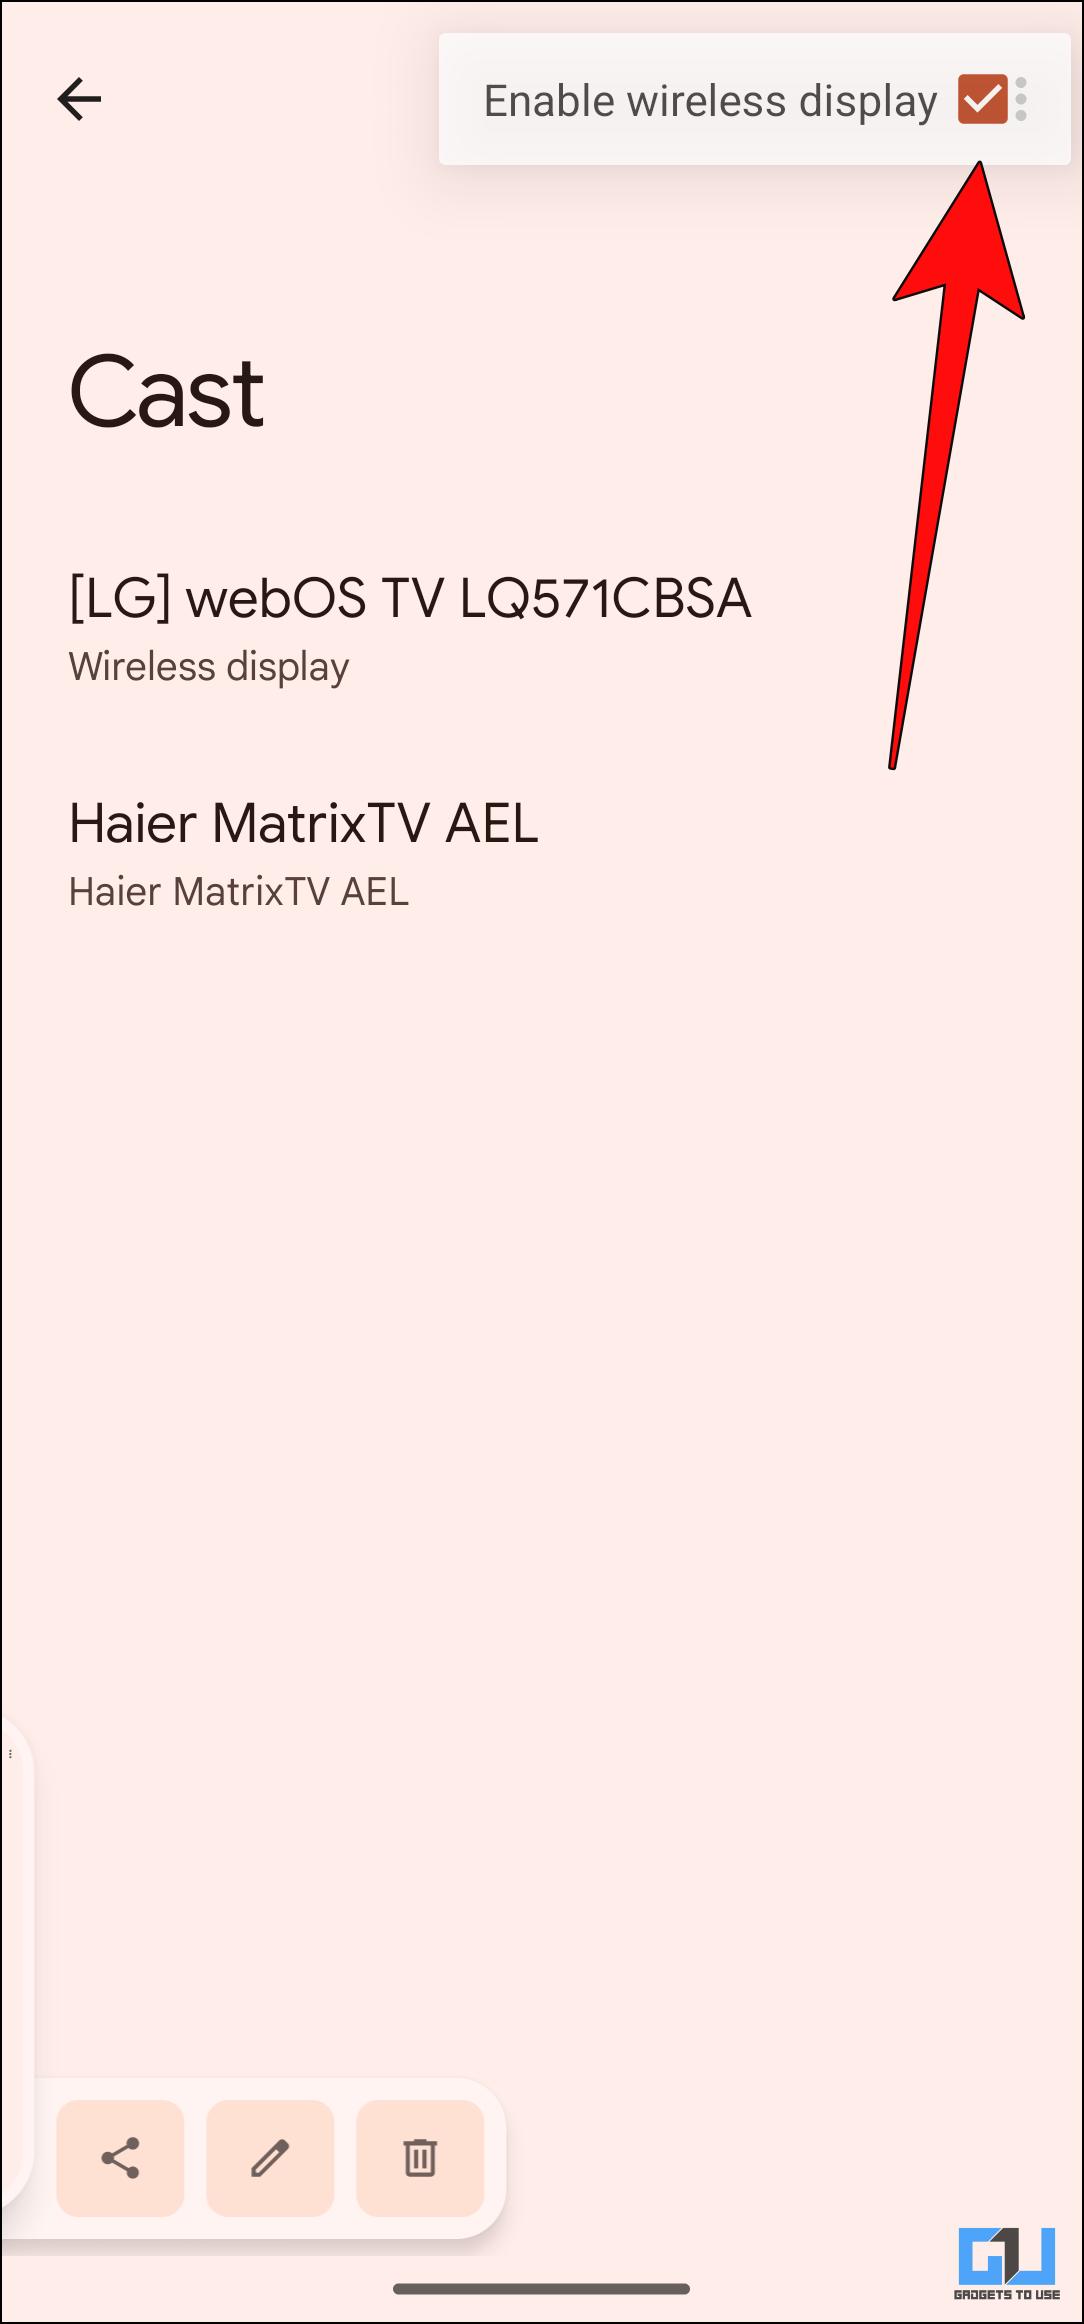
Step 4: Turn on the toggle button that says Enable wireless display.
Connecting Windows 11 to Android
Step 1: On your Android device, you will notice that there is a new device added to the Nearby Devices list, which is essentially your Windows device. Click on it to proceed.
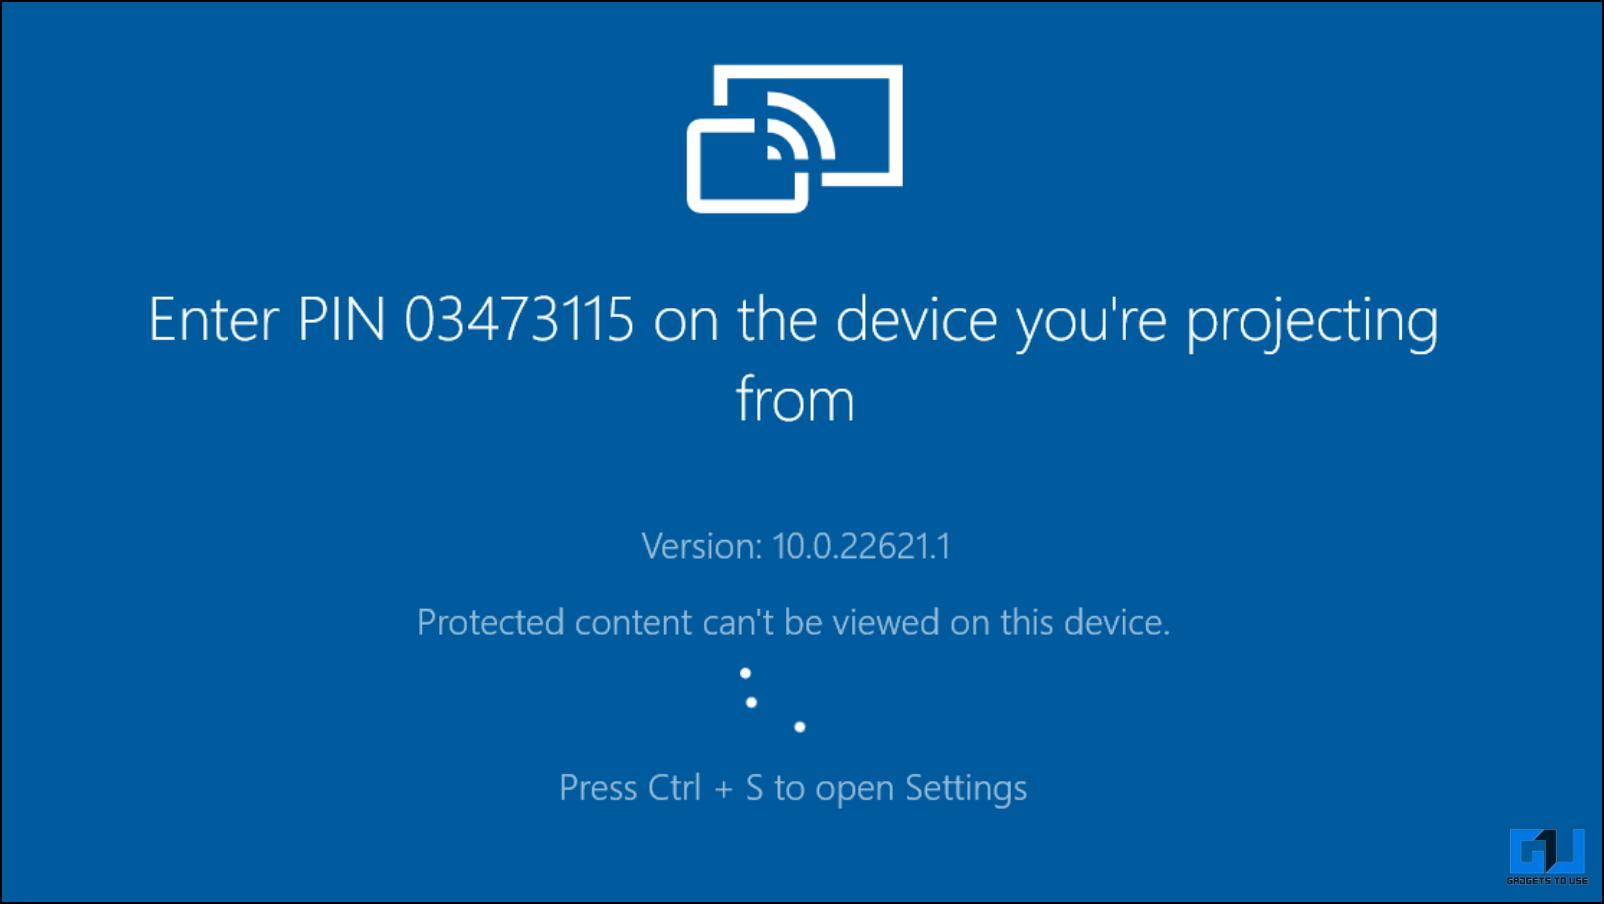
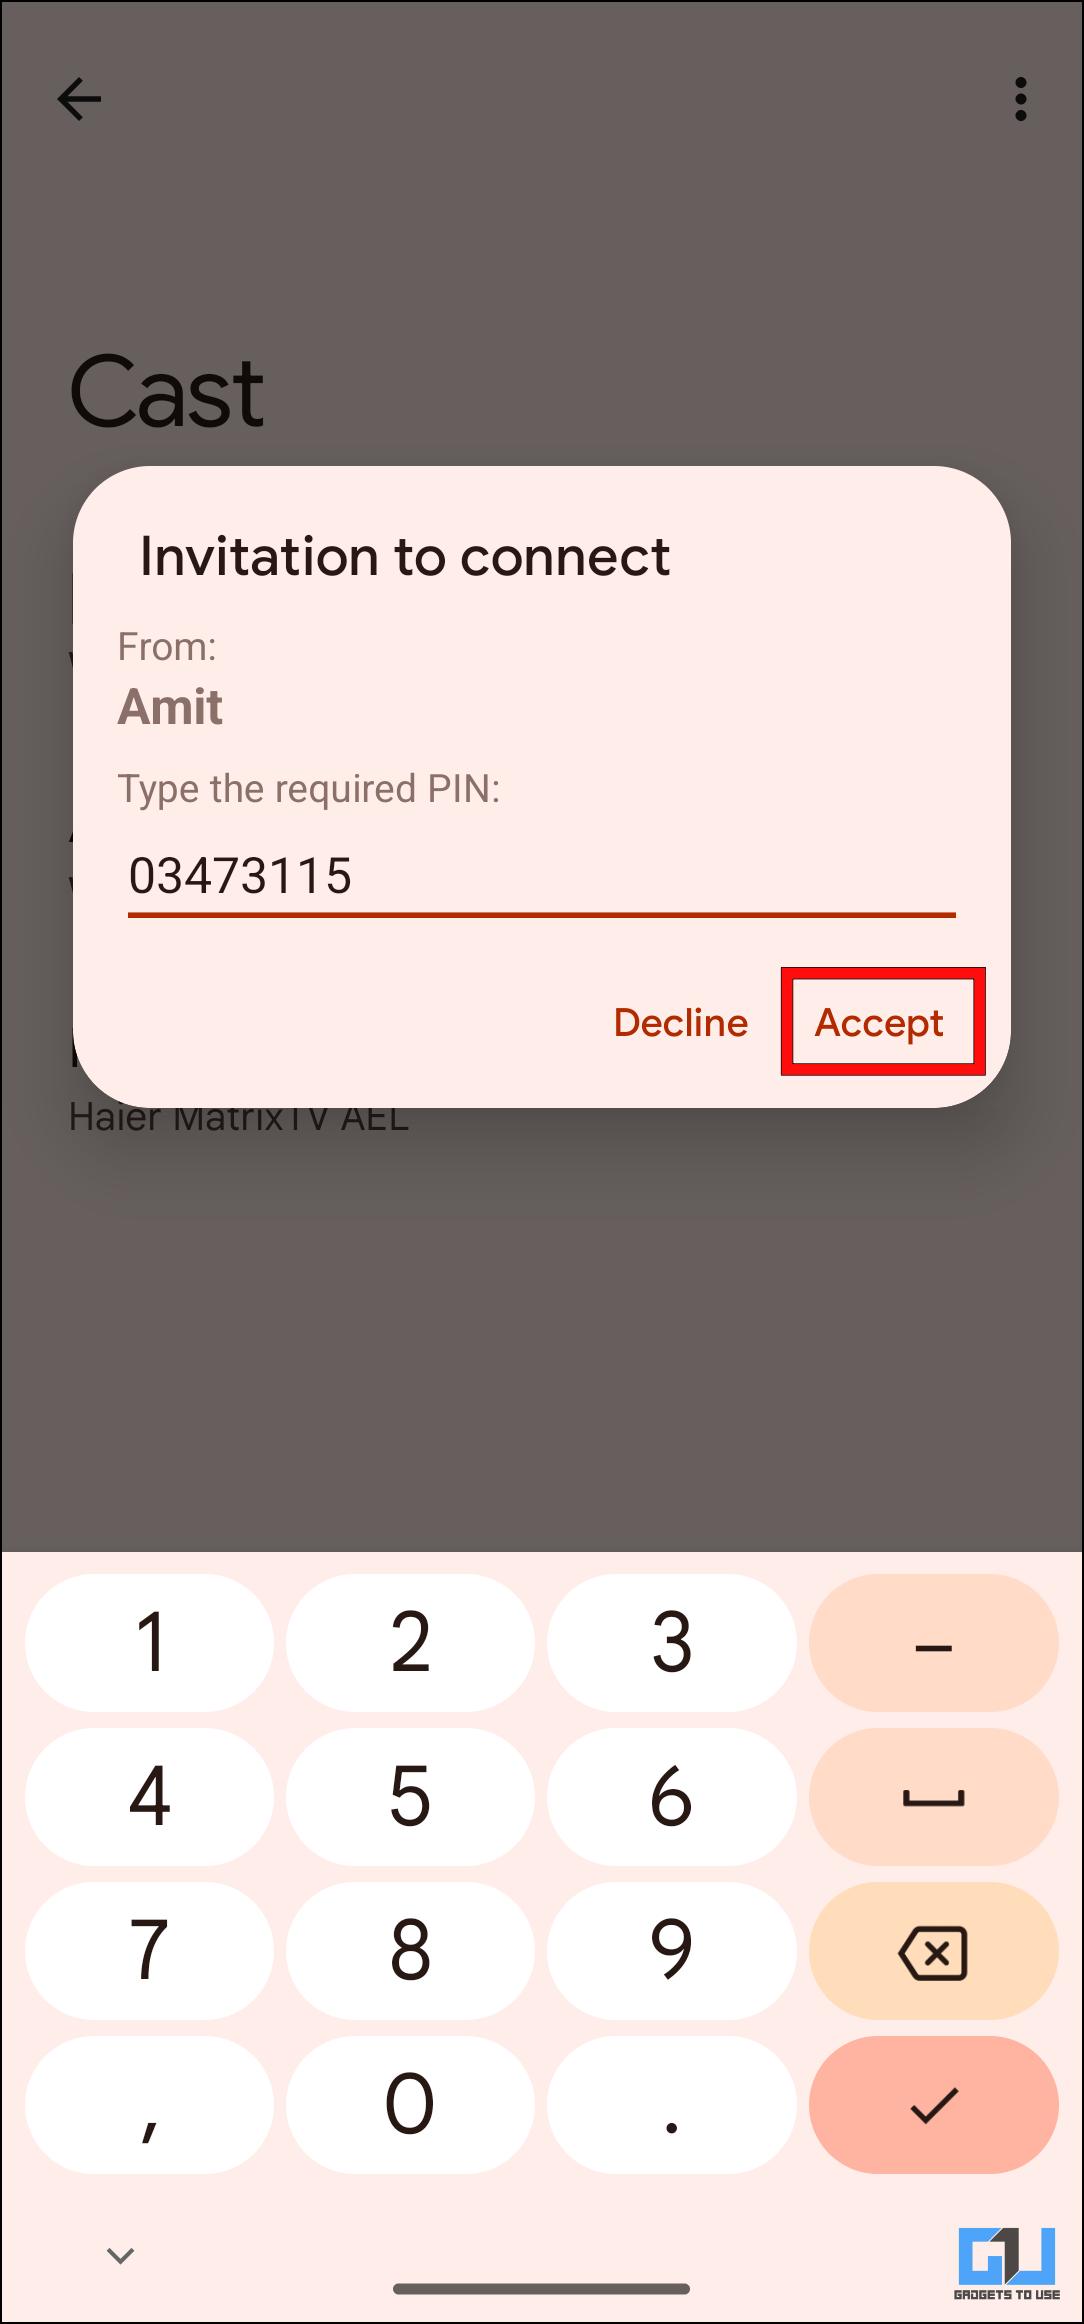
Step 2: Upon clicking, the Wireless Display application will open up on your Windows device. Notice that there is a PIN on your screen. In our case, the PIN is 86489362.
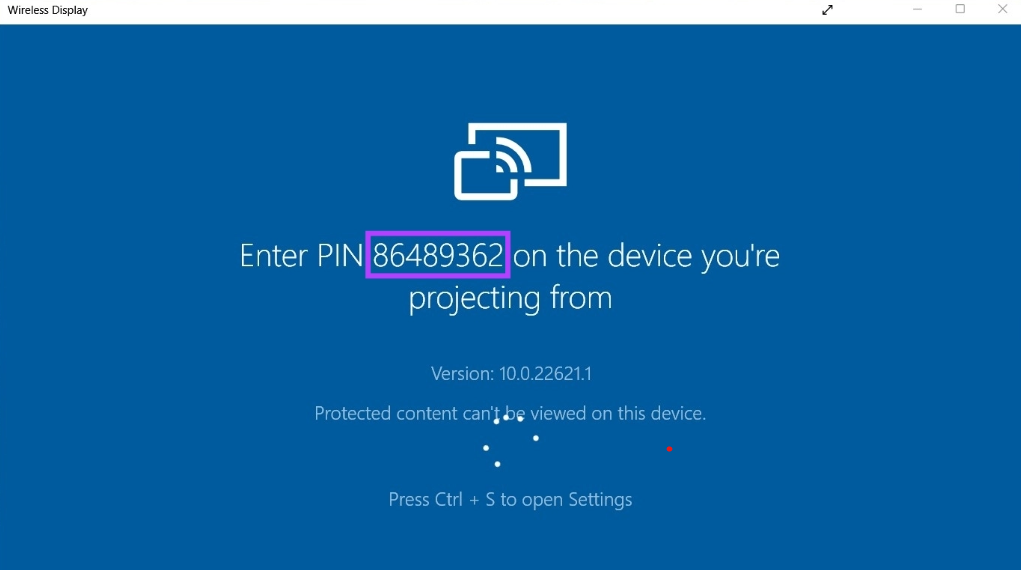
Step 3: Simultaneously, a box will pop up on your Android device. Type the PIN you got from your Windows device in the text field that says Type the required PIN. Then, click on Accept.
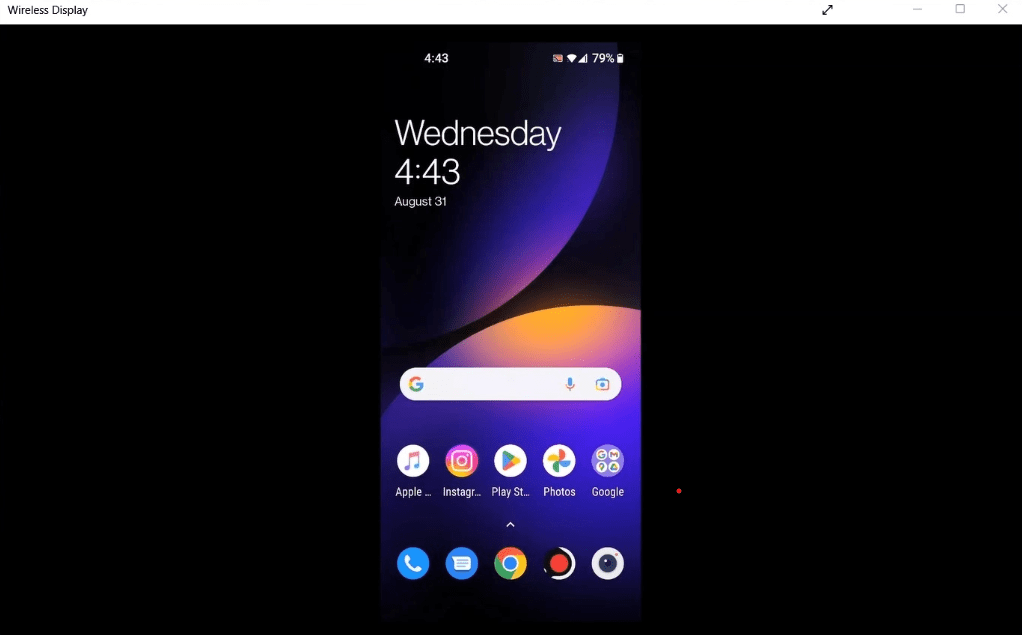
Upon clicking, you will be able to see your mobile screen on your Windows device as these two devices are successfully sharing the screen. Now, anything you do on your mobile will be displayed on your Windows device.
Conclusion
Mirroring your Android screen to Windows 11 is a simple process with multiple methods to suit your needs. Whether you’re using built-in Windows tools or third-party apps, you can quickly and efficiently cast your Android screen to your PC. By following the steps outlined in this guide, you’ll be able to enjoy content from your phone on a larger screen and even control your Android device directly from your computer. Explore these methods and pick the one that works best for you!
Quick Answer
- Sharing the display of your Android smartphone to your Windows PC can come in quite helpful, especially to view your nostalgic photos and videos or present a document stored on your phone.
- Given it is a wireless connection, there is a bit of a delay while performing specific actions.
- Scrcpy is a free app that allows screen mirroring from Android to Windows or Mac over a wired connection.
Sharing the display of your Android smartphone to your Windows PC can come in quite helpful, especially to view your nostalgic photos and videos or present a document stored on your phone. Given the options to mirror your phone’s screen with or without an app, we discussed both ways in this article. Let us look at how you can mirror your Android phone’s display on Windows 10/11. Meanwhile, you can also learn to mirror your phone to LG WebOS TV.
How to Mirror Android Phone Display on Windows 10/11?
There are several ways to mirror your Android phone’s screen on your Windows PC’s monitor. However, for this article, we will keep it simple and discuss three ways to do the same. This includes wired and wireless methods that might or might not require using a third-party app.
Method 1 – Cast Android Phone Display to Windows
The older Windows version did not support Miracast, missing out on wireless mirroring. But that changed with the release of Windows 8, as it came with Miracast support. So, that means you can easily share the screen from your phone to your desktop computer without requiring any third-party app. The process is relatively seamless and does not require any wires.
Step 1: Configure Window for Wireless Display
Before we look at the steps to cast, we must install the Wireless Display plugin in our system. This allows us to cast or mirror other devices to the Windows PC. Here are the steps to install Wireless Display on Windows 10/11.
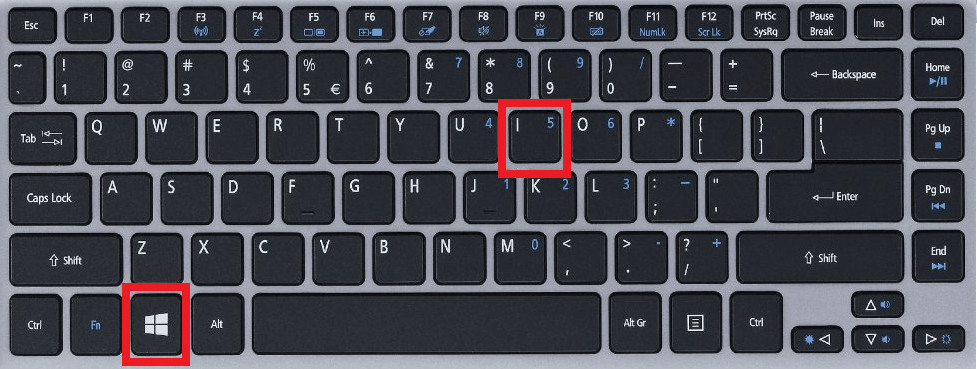
1. Open Windows Settings using the Windows key + I keyboard shortcut.
2. Go to the Apps section using the sidebar menu.
3. Click on the Optional Features.

4. Here, click on View Features next to Add an optional feature.
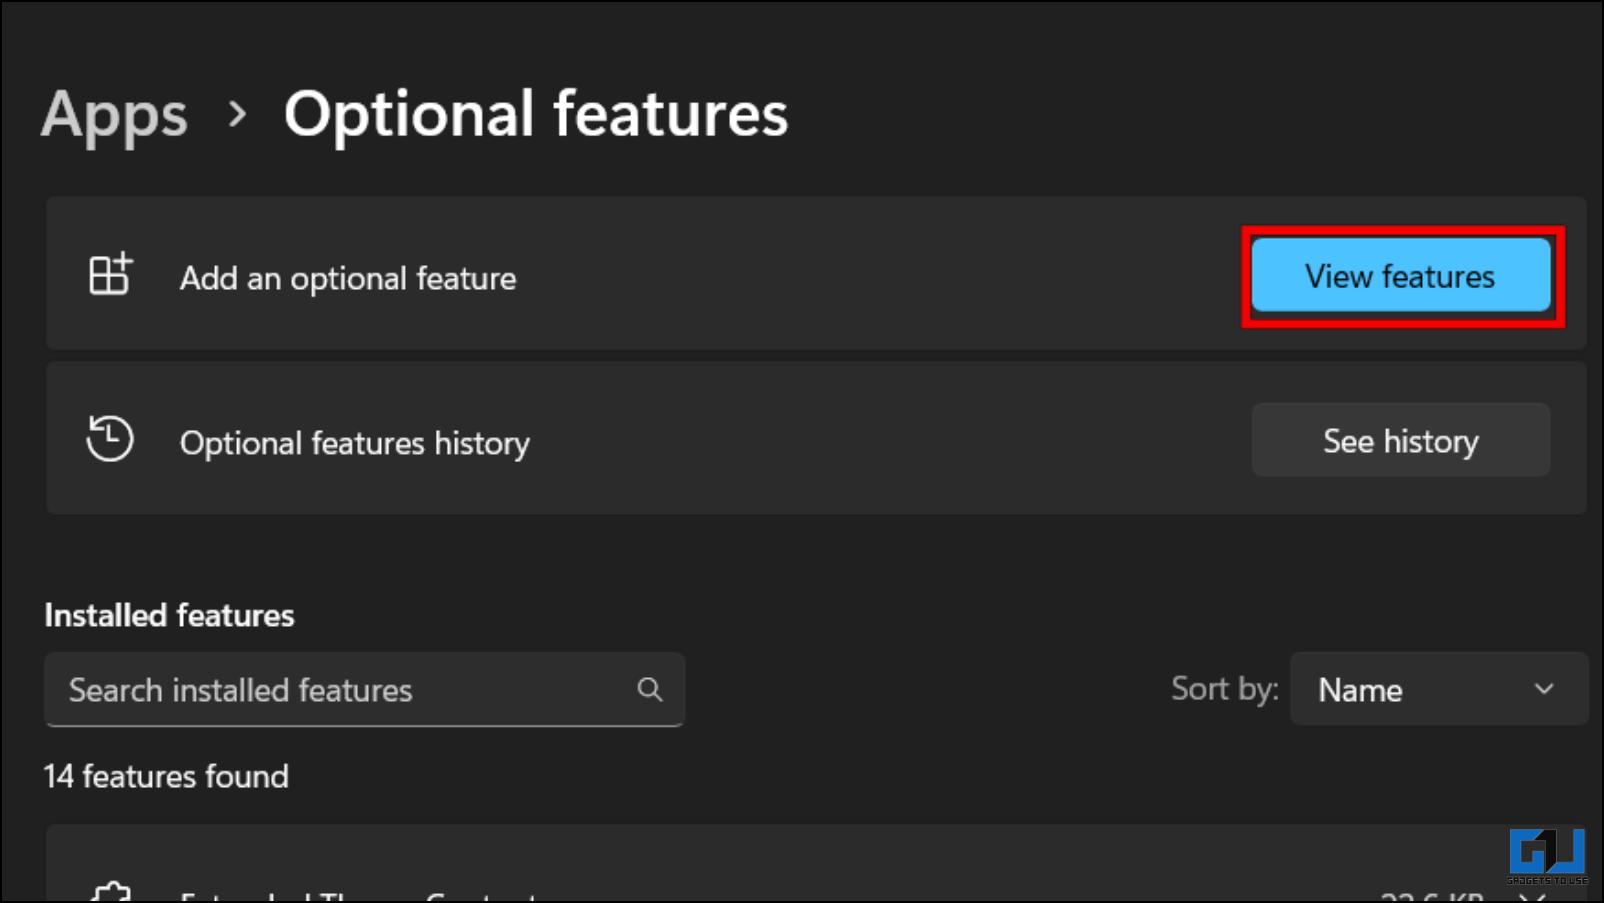
5. Using the search bar above, look for Wireless Display.
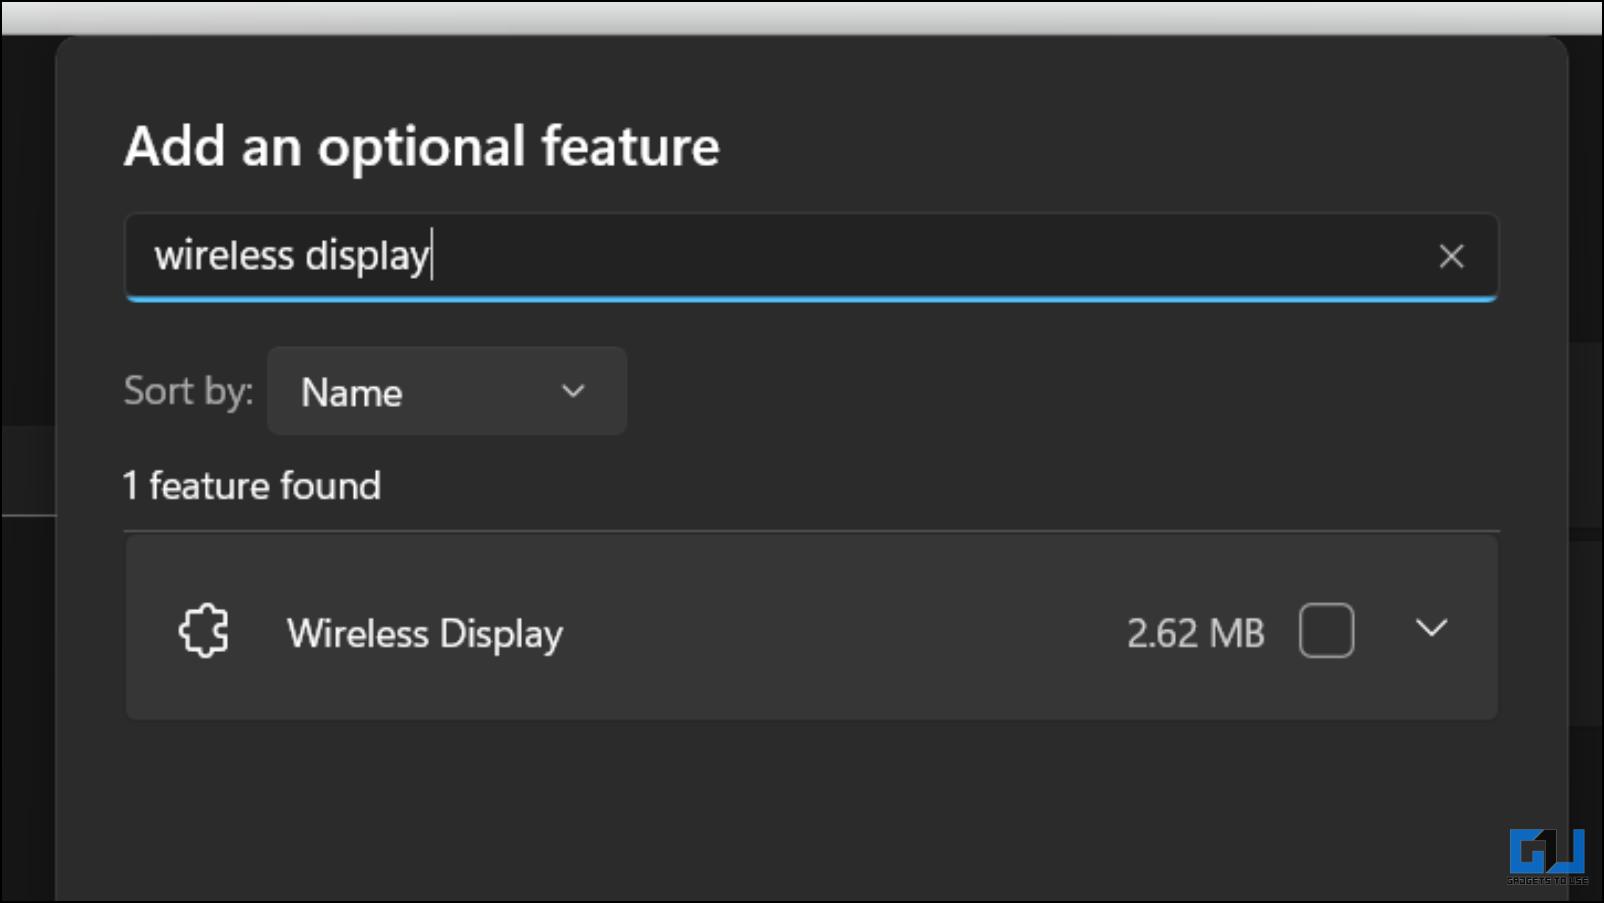
7. Tick the box next to the Wireless Display option, followed by Next.
This will start installing the plugin on your system. Once installed, restart your computer.
Step 2: Enable Project This PC on Windows
After installing Wireless Display, let’s move on to the next step, i.e., enabling the Project on this PC. We need to make some minor adjustments mentioned below before we start mirroring.
1. On Windows Settings, go to the System section.
2. Scroll down and click on Projecting this PC.
3. Here, change the following settings as shown below.
4. Next, click on Launch the Wireless Display app to project to this PC.
You should now see a blue screen stating your device is ready for wireless connection. Now, we can move on to connecting the Android smartphone.
Step 3: Setup and Connect Your Android Smartphone
We must set up our Android devices for the next step to ensure they connect with the Windows system properly. Here are the steps to do so.
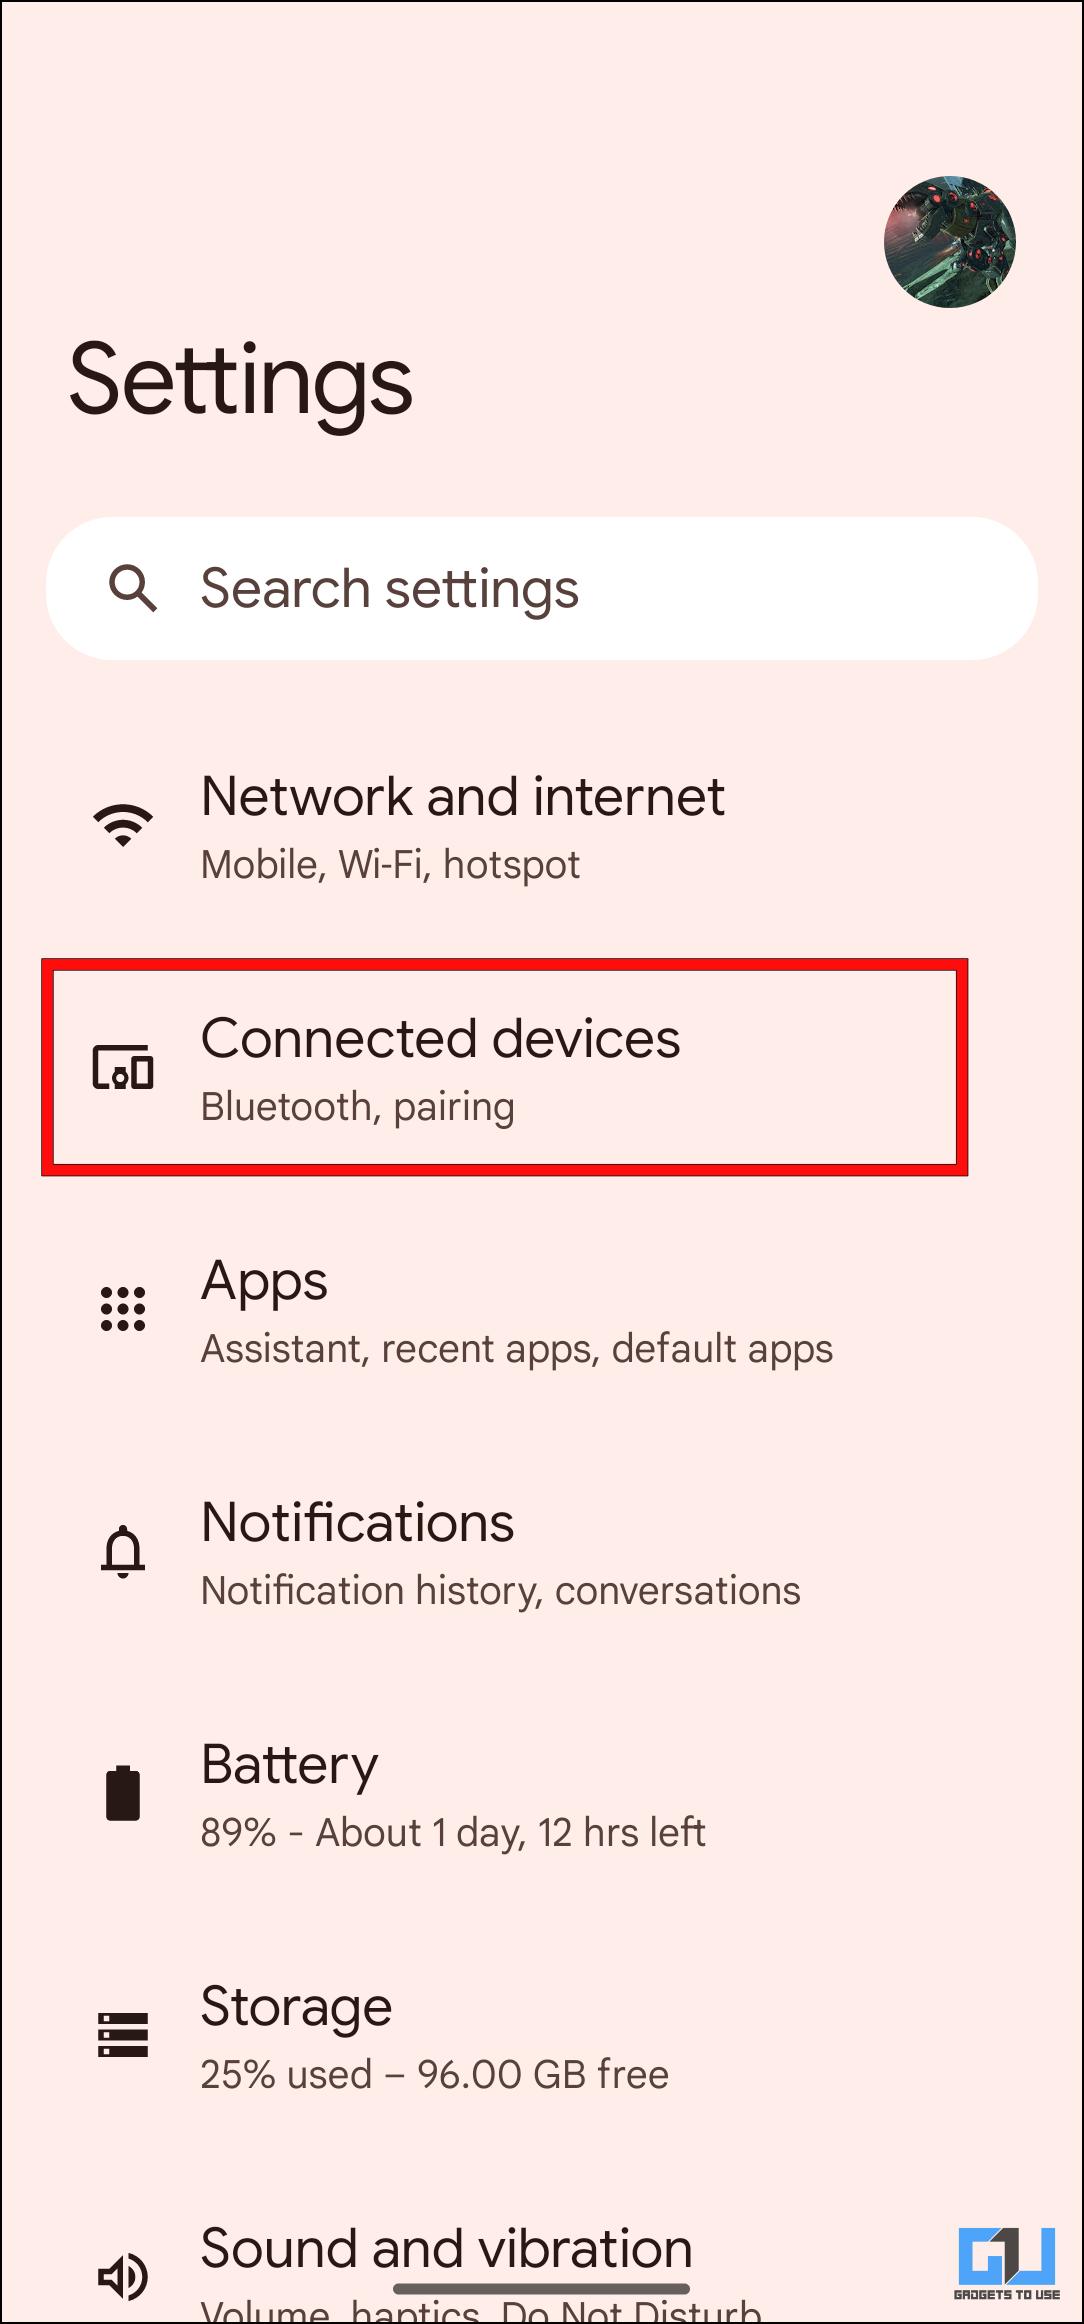
1. Go to the Settings app on your phone.
2. Tap on Connected Devices.
3. Then click on Connection preferences.
4. Click on the Cast option.
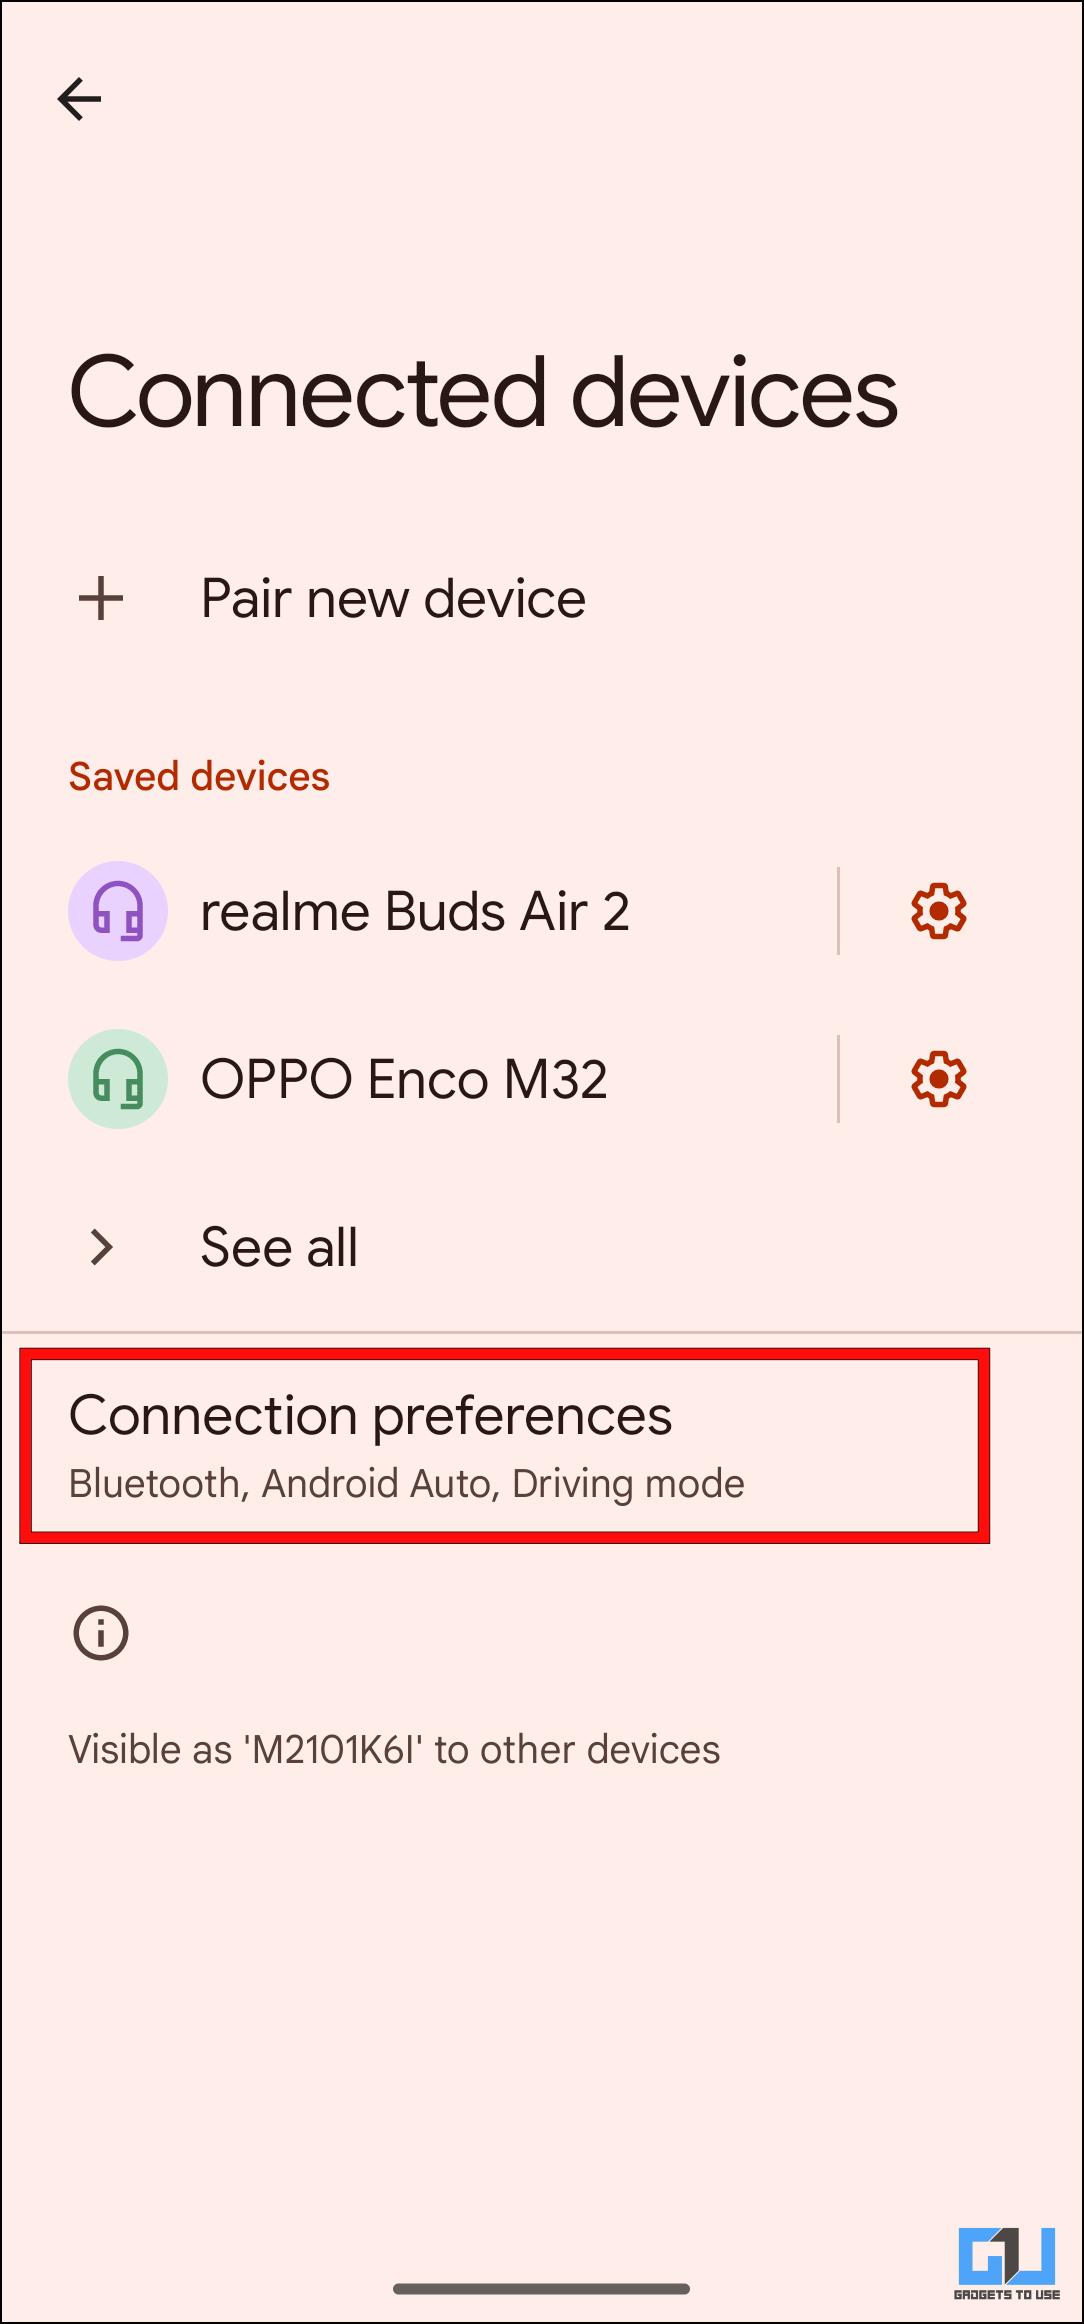
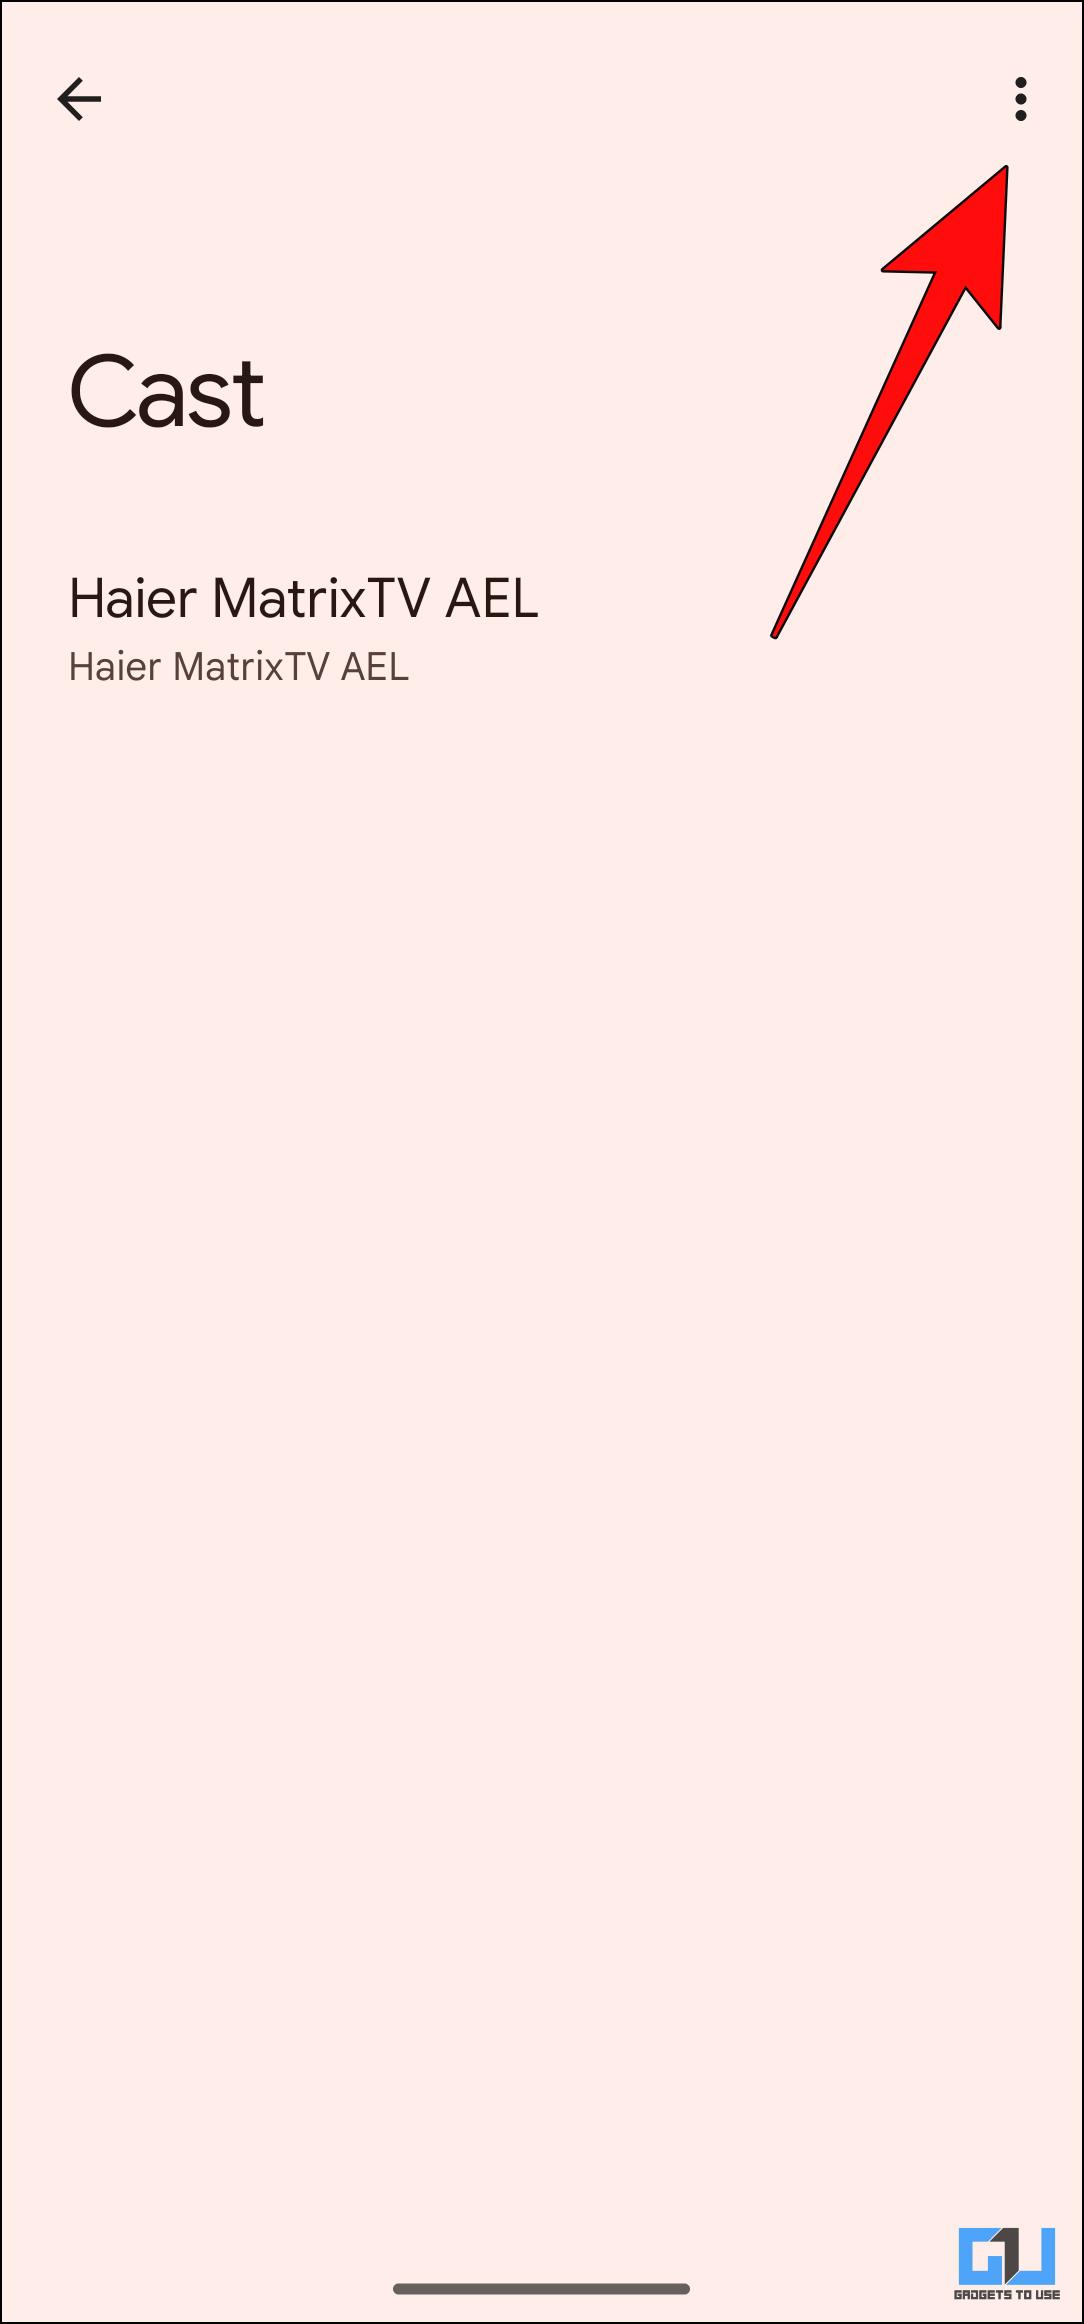
5. Tap on the three-dot menu in the top right corner.
6. Tick the box next to Enable wireless display. Your device should now display available devices to cast.
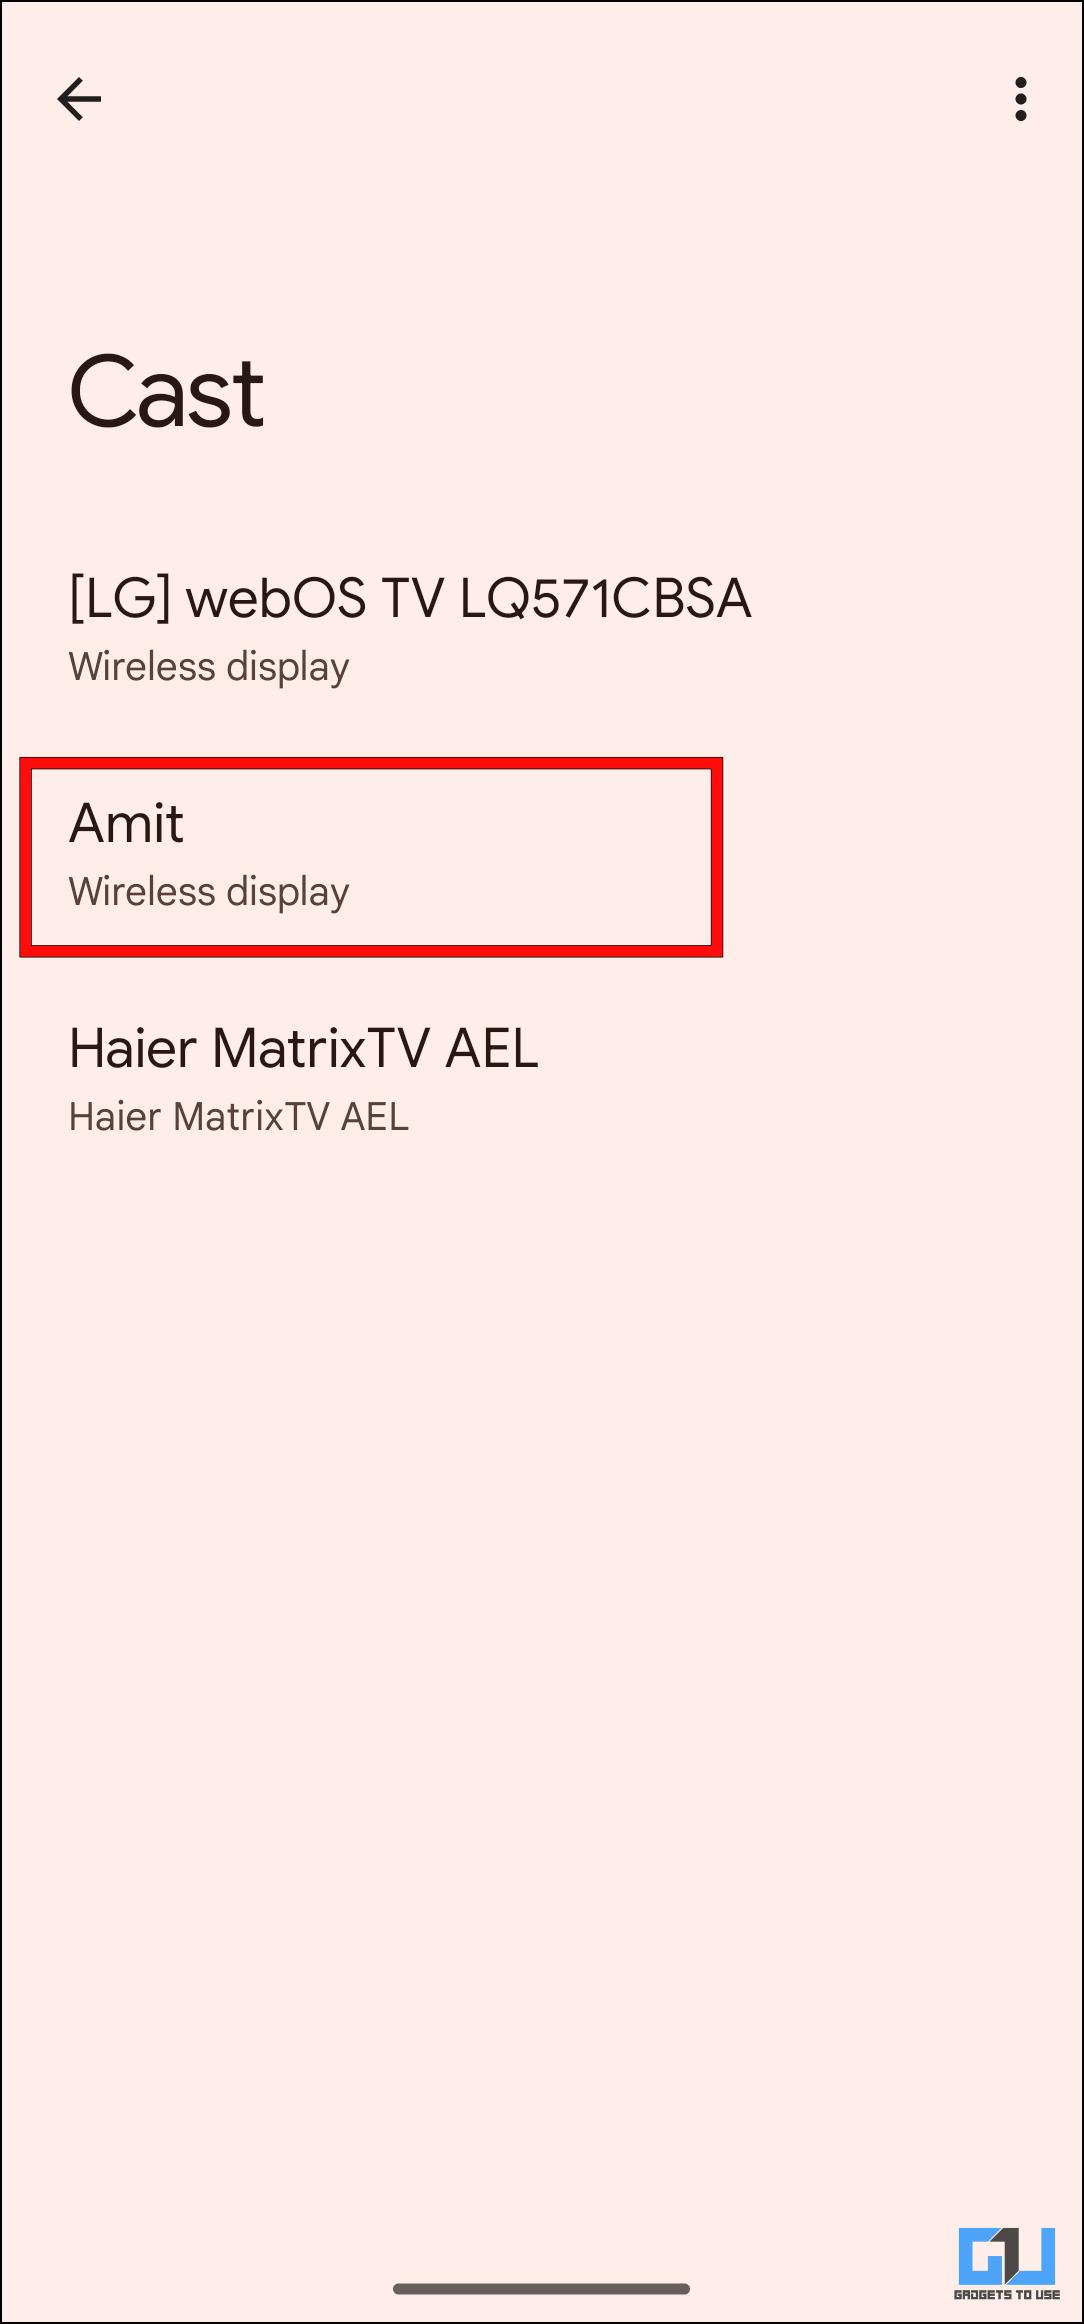
7. Select your Windows PC from the list.
Your smartphone will now ask for an eight-digit PIN.
8. Enter the code displayed on your Windows computer and click on Accept.
Your phone’s display should be mirrored on your computer’s large display. Given it is a wireless connection, there is a bit of a delay while performing specific actions. But it is a good official way to mirror the display of your Android smartphone.
Method 2 – Download Scrcpy to Mirror Android on Windows (Wired)
Scrcpy is a free app that allows screen mirroring from Android to Windows or Mac over a wired connection. It works by utilizing a TCP/IP protocol over a USB connection. The best part about this method is that there is less latency than the wireless option. Though this method is a bit involved, we have broken it down into simple steps to help you.
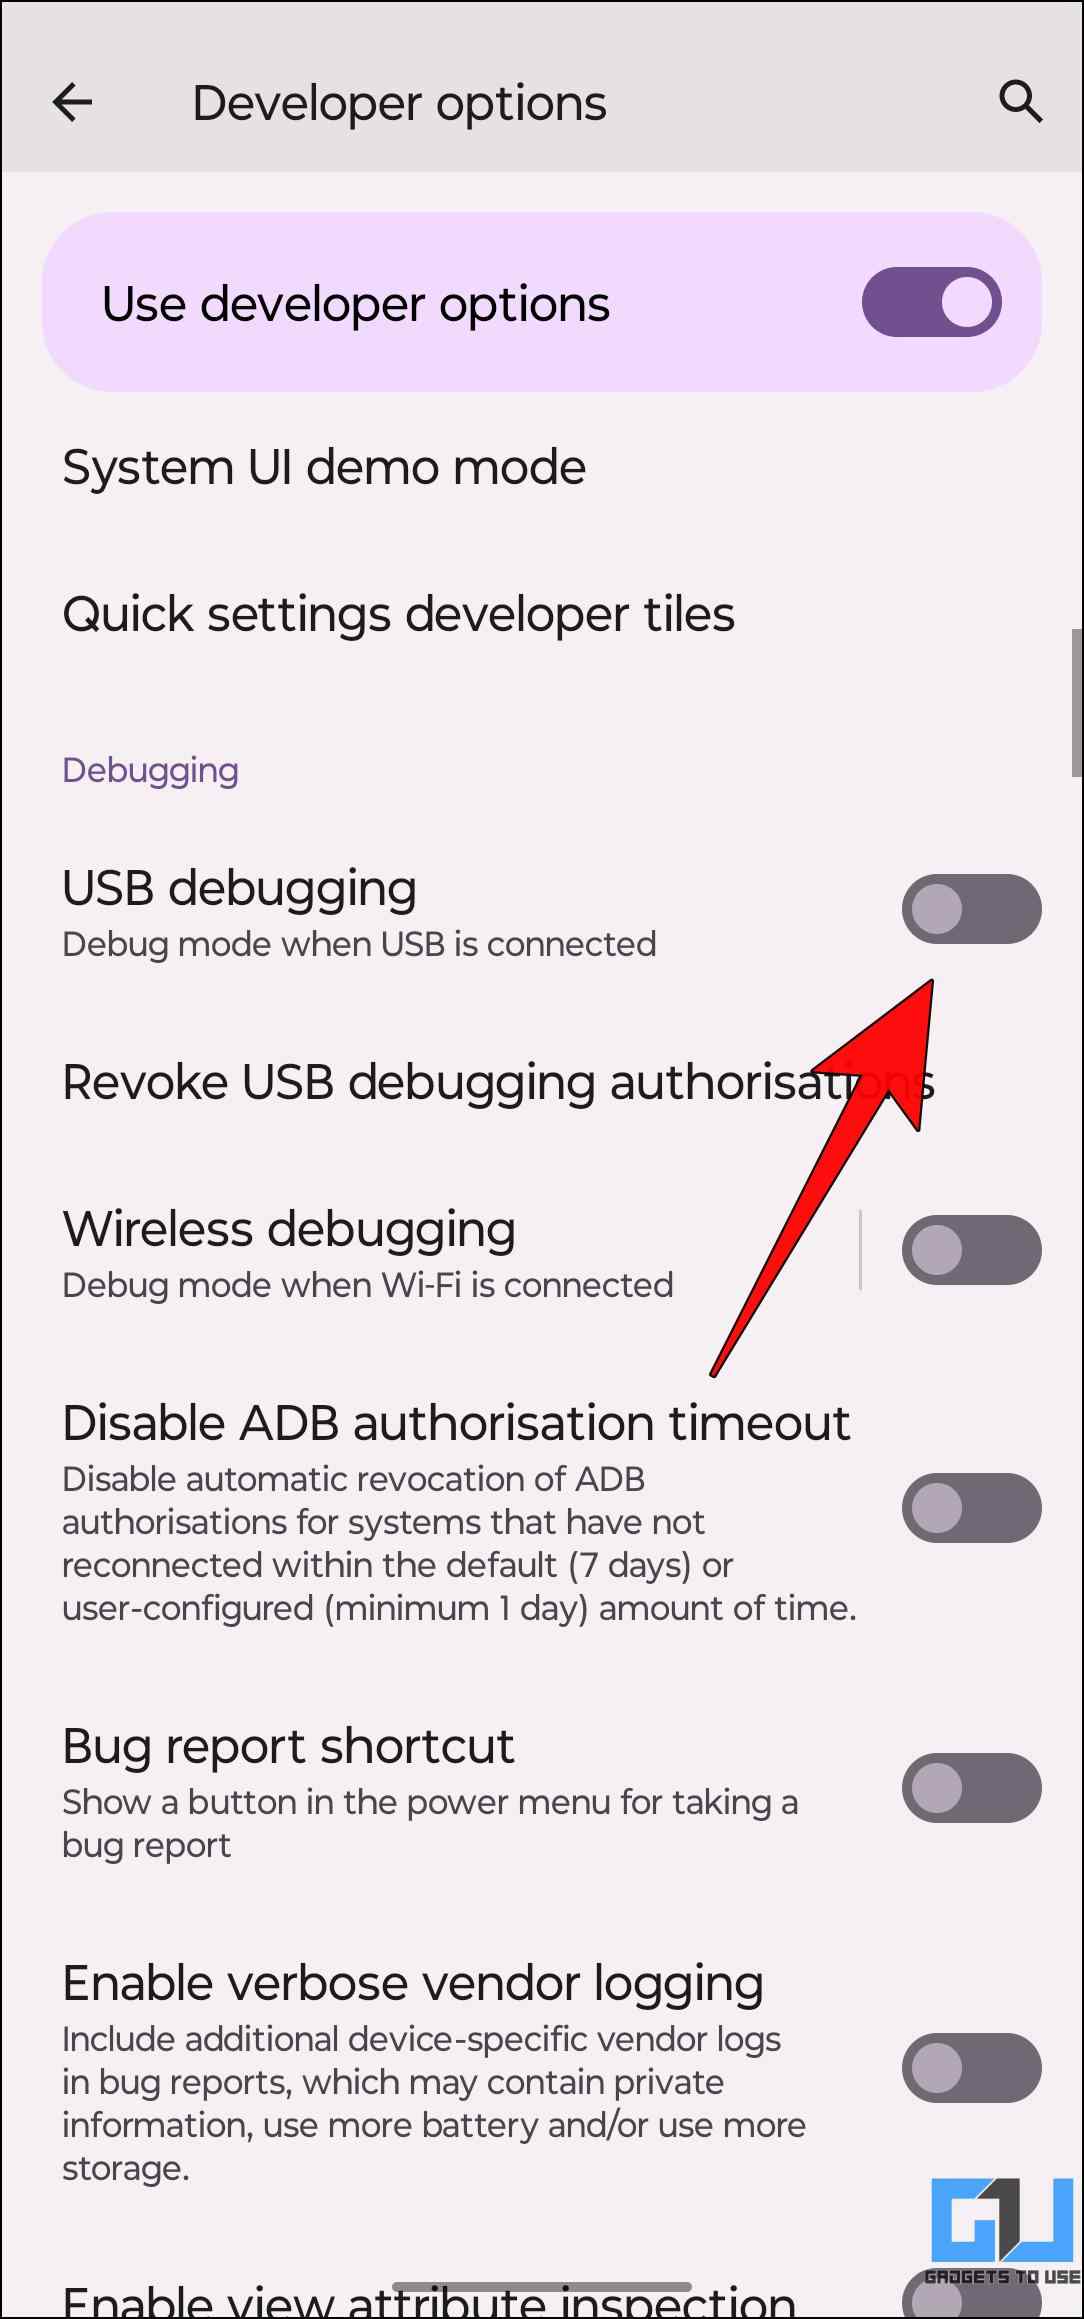
Step 1: Enable USB Debugging on Android
To use Scrcpy, you must first enable USB debugging on your Android smartphone. To do this, follow these steps.
1. Open Settings and scroll down to About phone.
2. Here, tap on the Build number seven times.

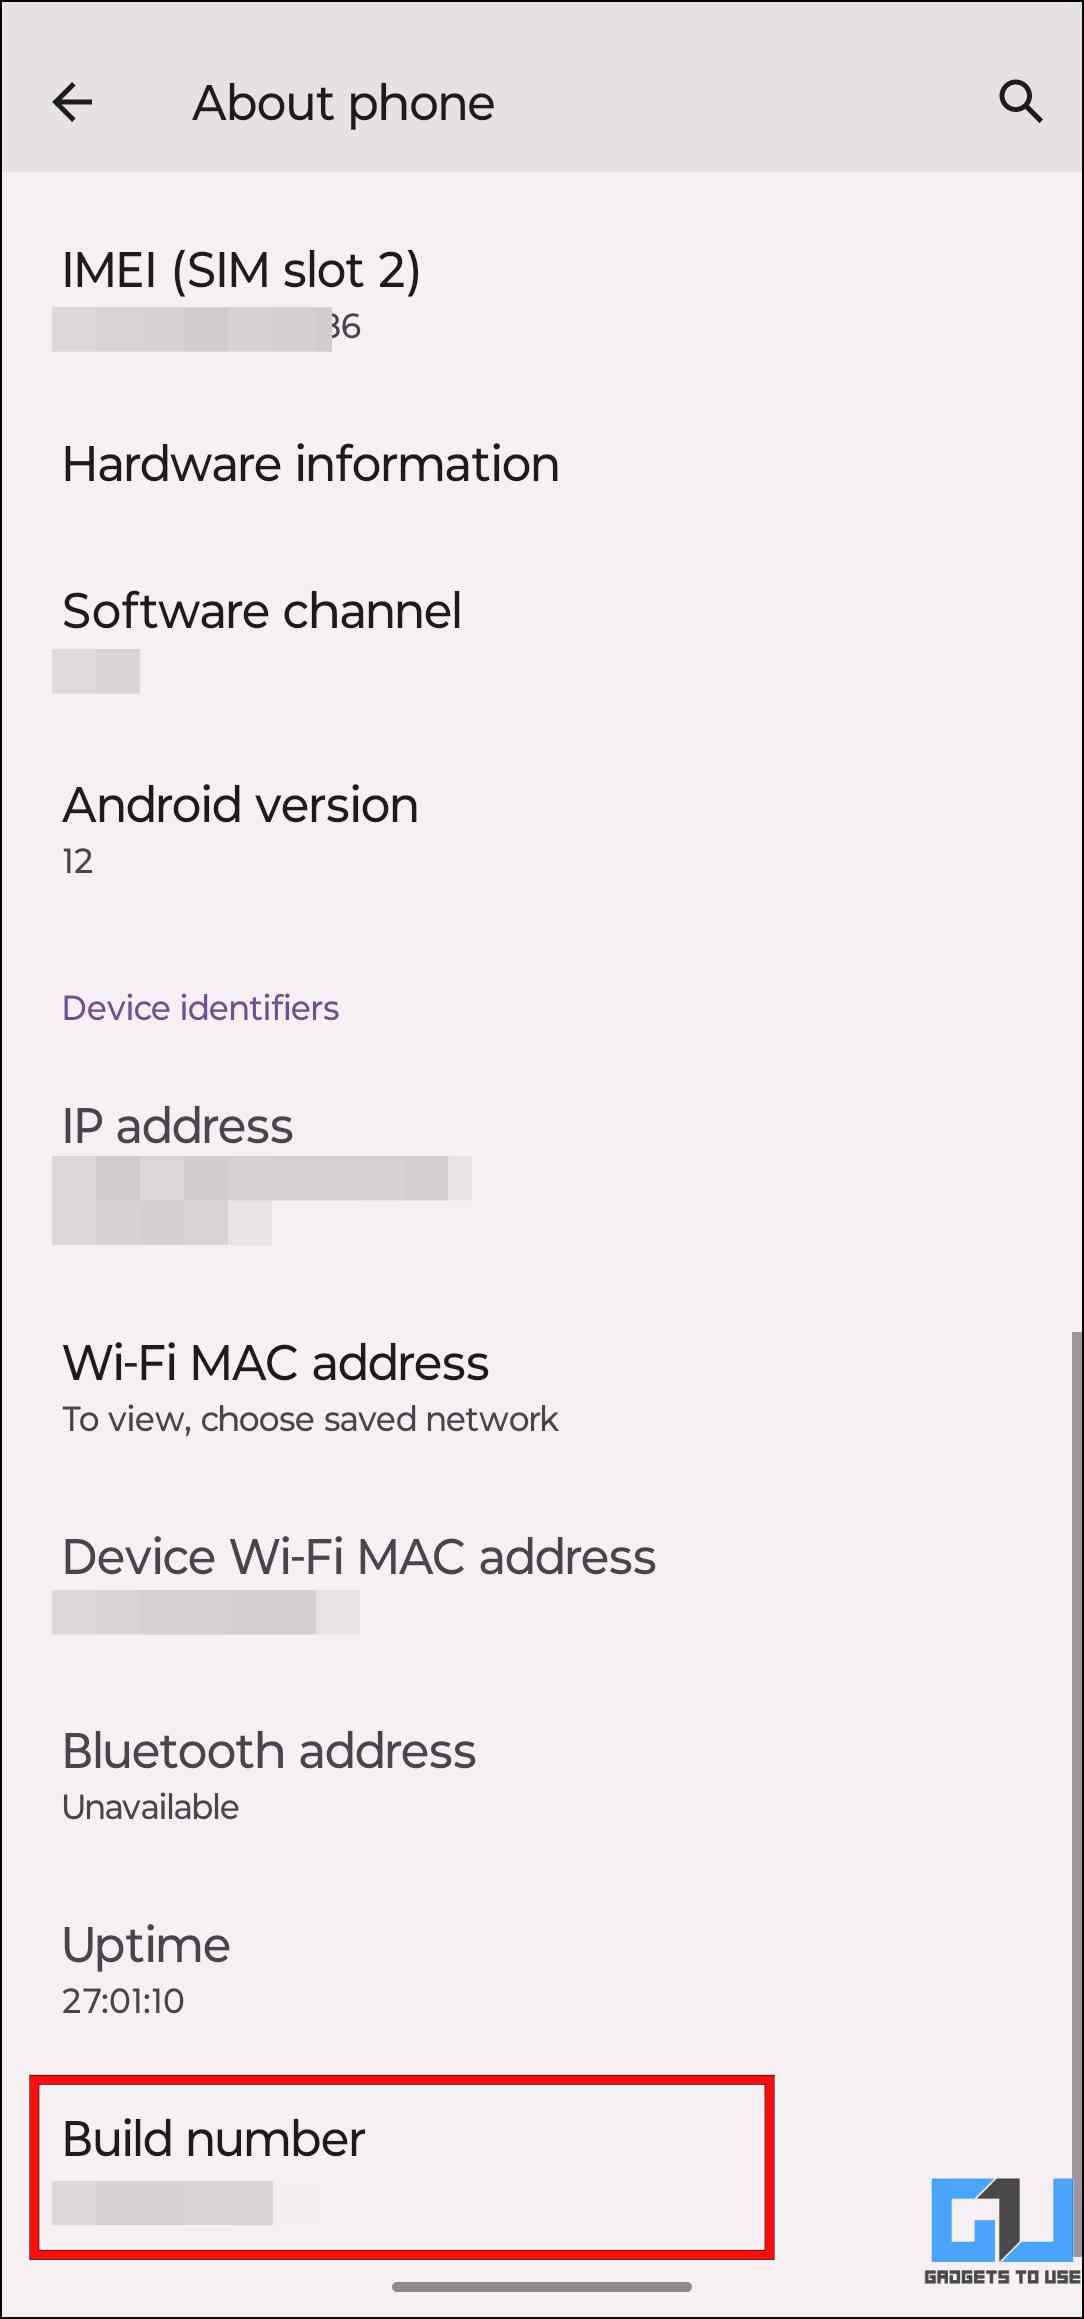
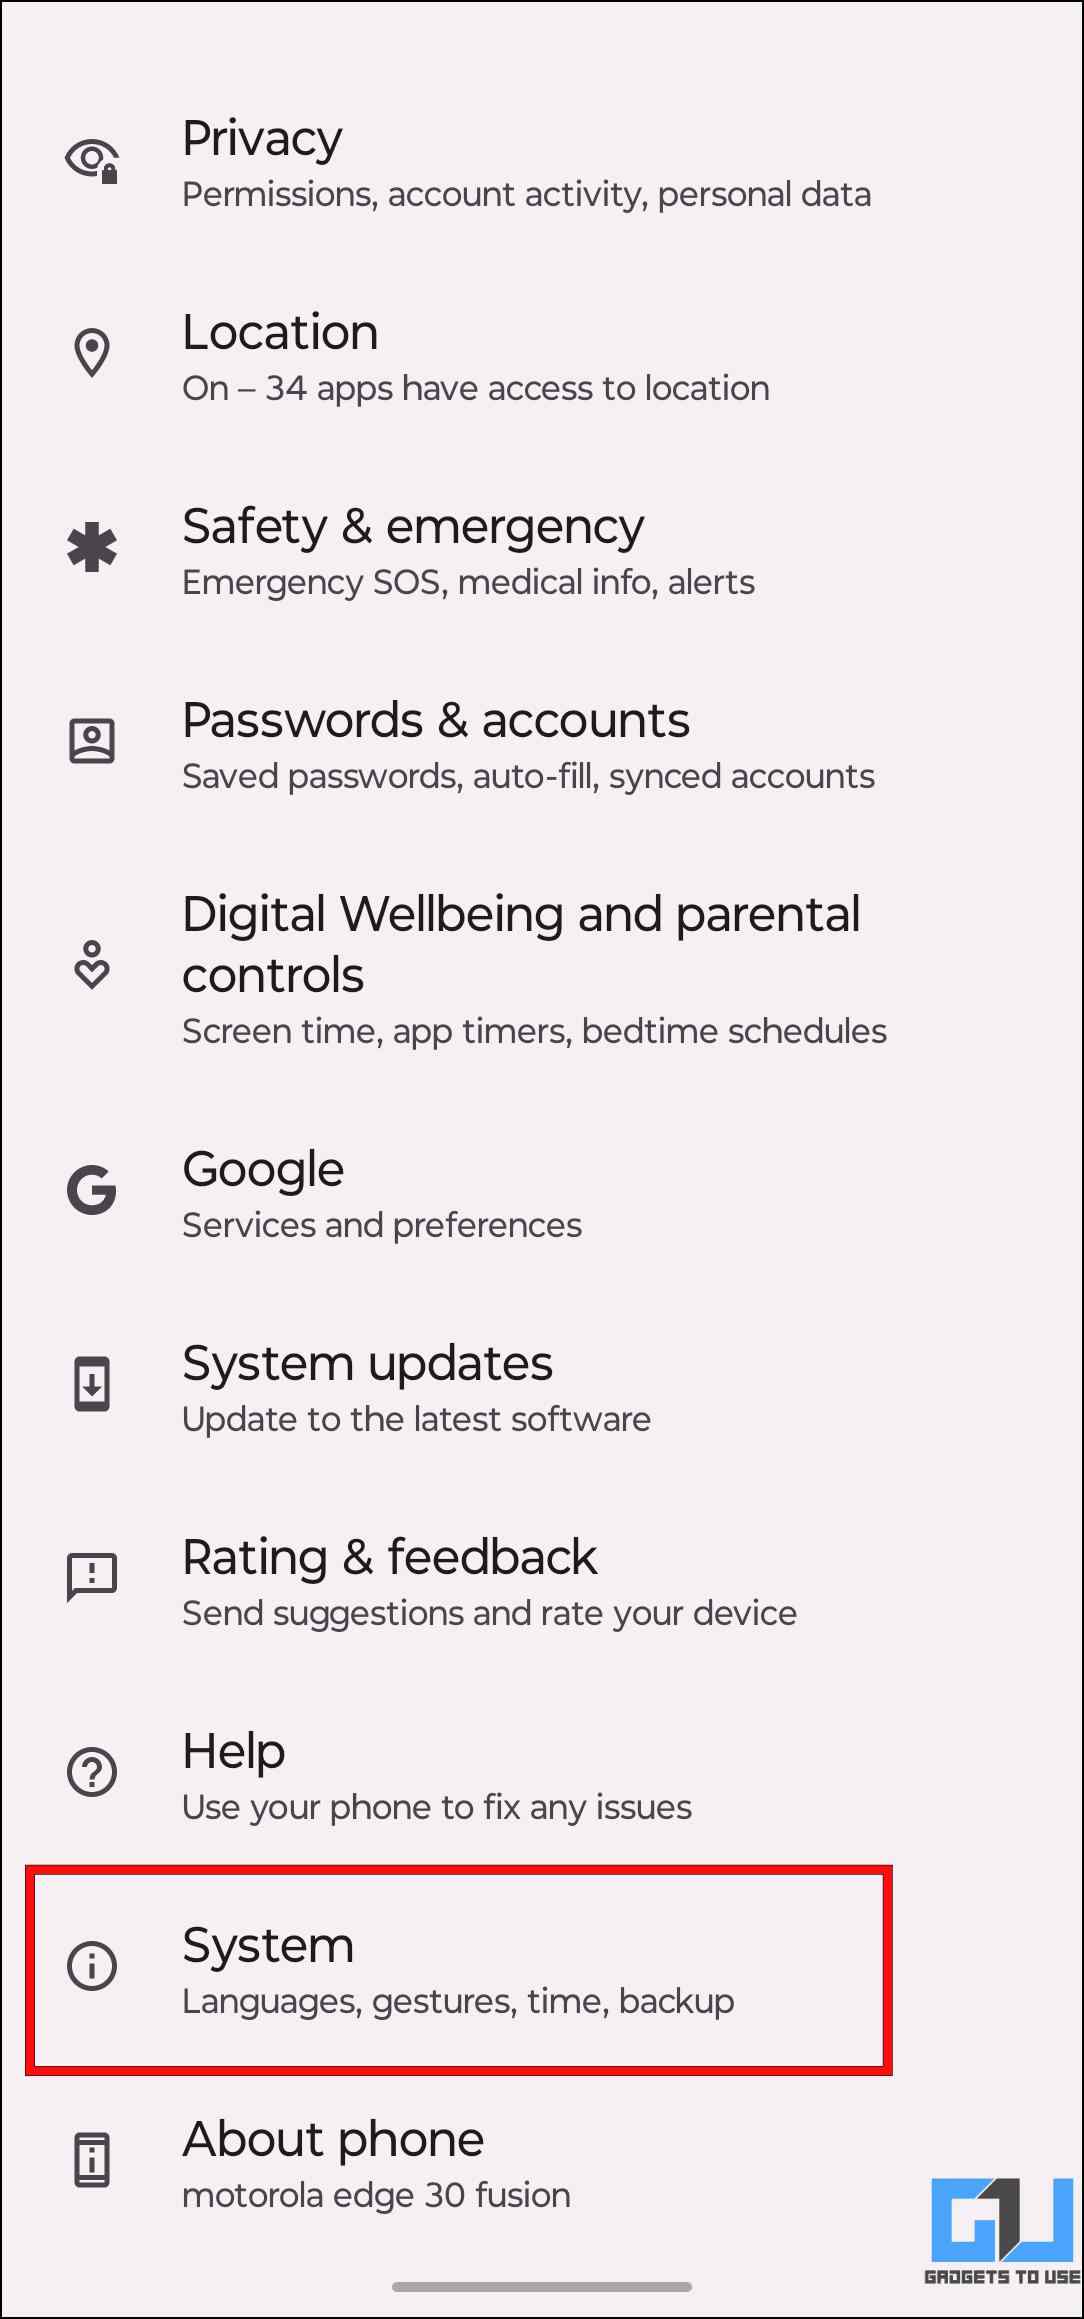
3. Now head back to Settings and go to System.
4. Tap on the Developer options.
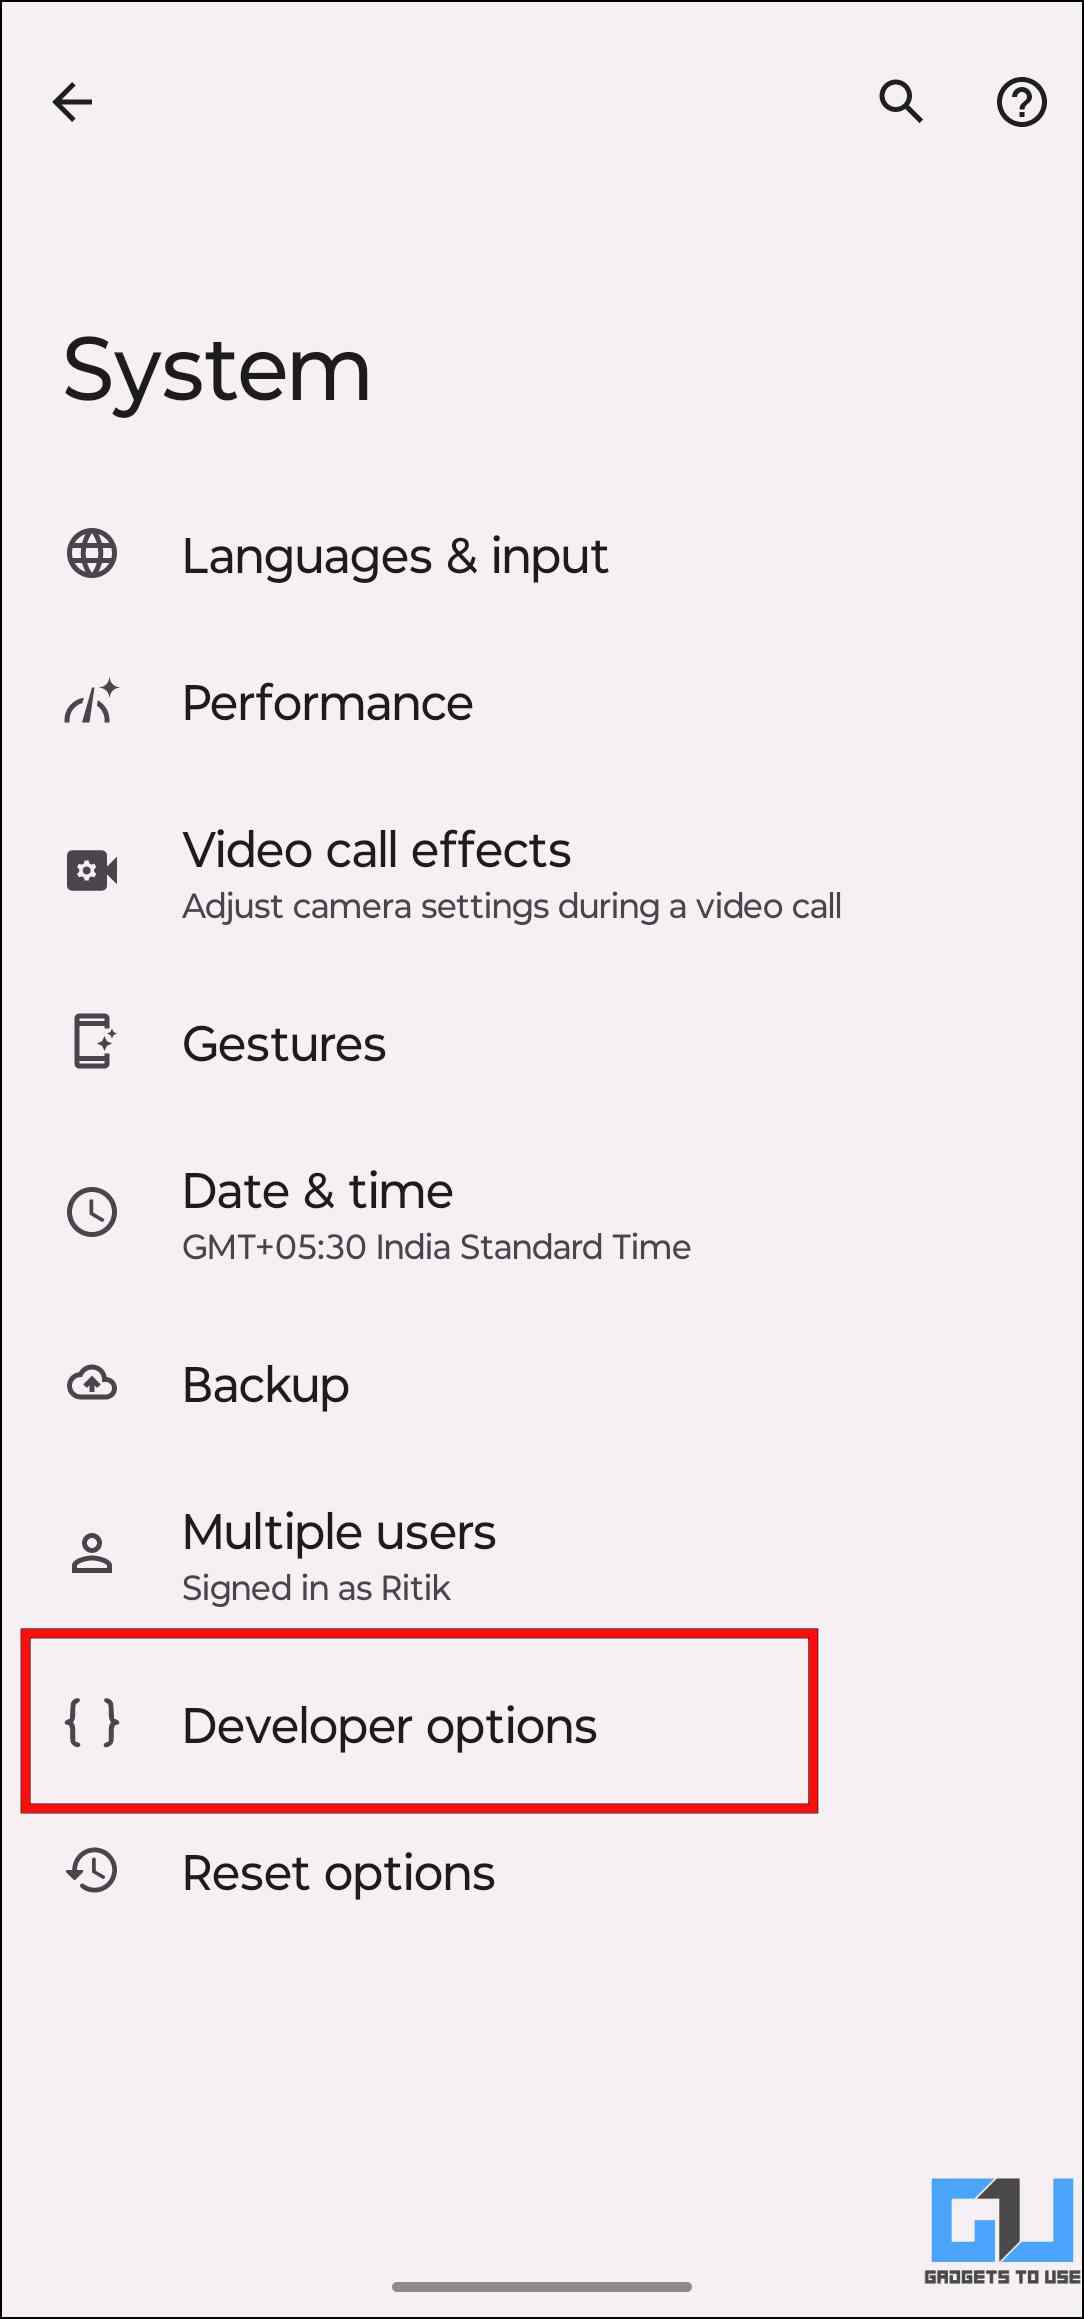
5. Under the Developer options, turn on the toggle for USB debugging.
6. Tap OK on the confirmation prompt to enable USB debugging on your Android phone.
Step 2: Configure Scrcpy on Windows PC
We now have to set up the Scrcpy service on our Windows desktop. Let us look at the steps to install Scrcpy on Windows.
1. Head over to the Scrcpy GitHub page.
2. Click on Windows under the option, Get the App.
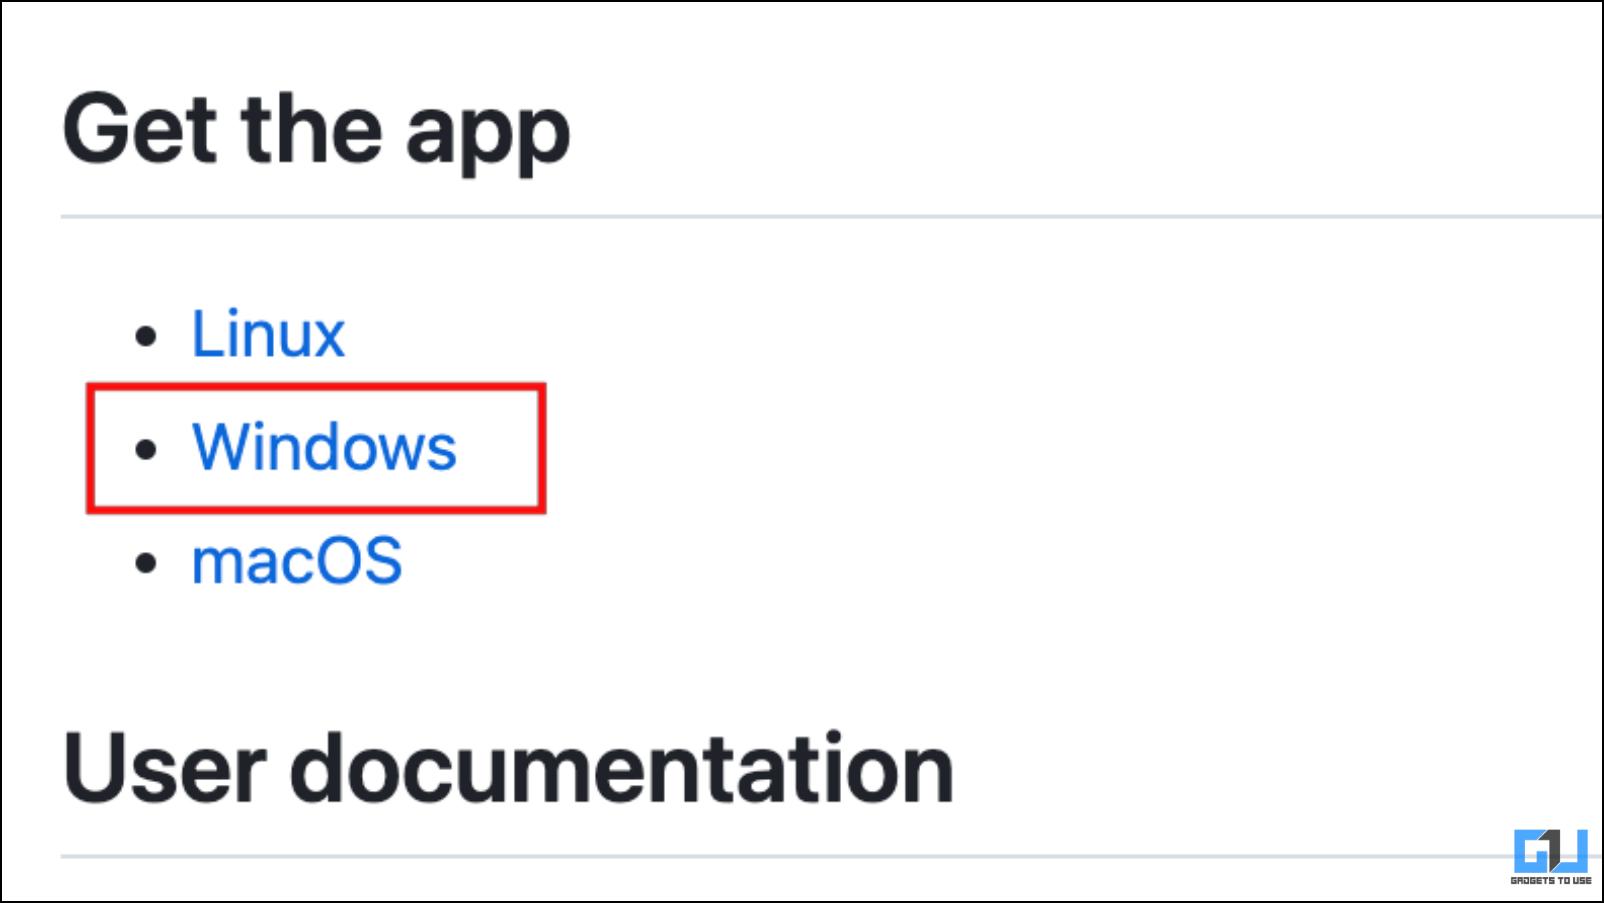
3. Here, select the latest version for your PC and click on it to begin the download.
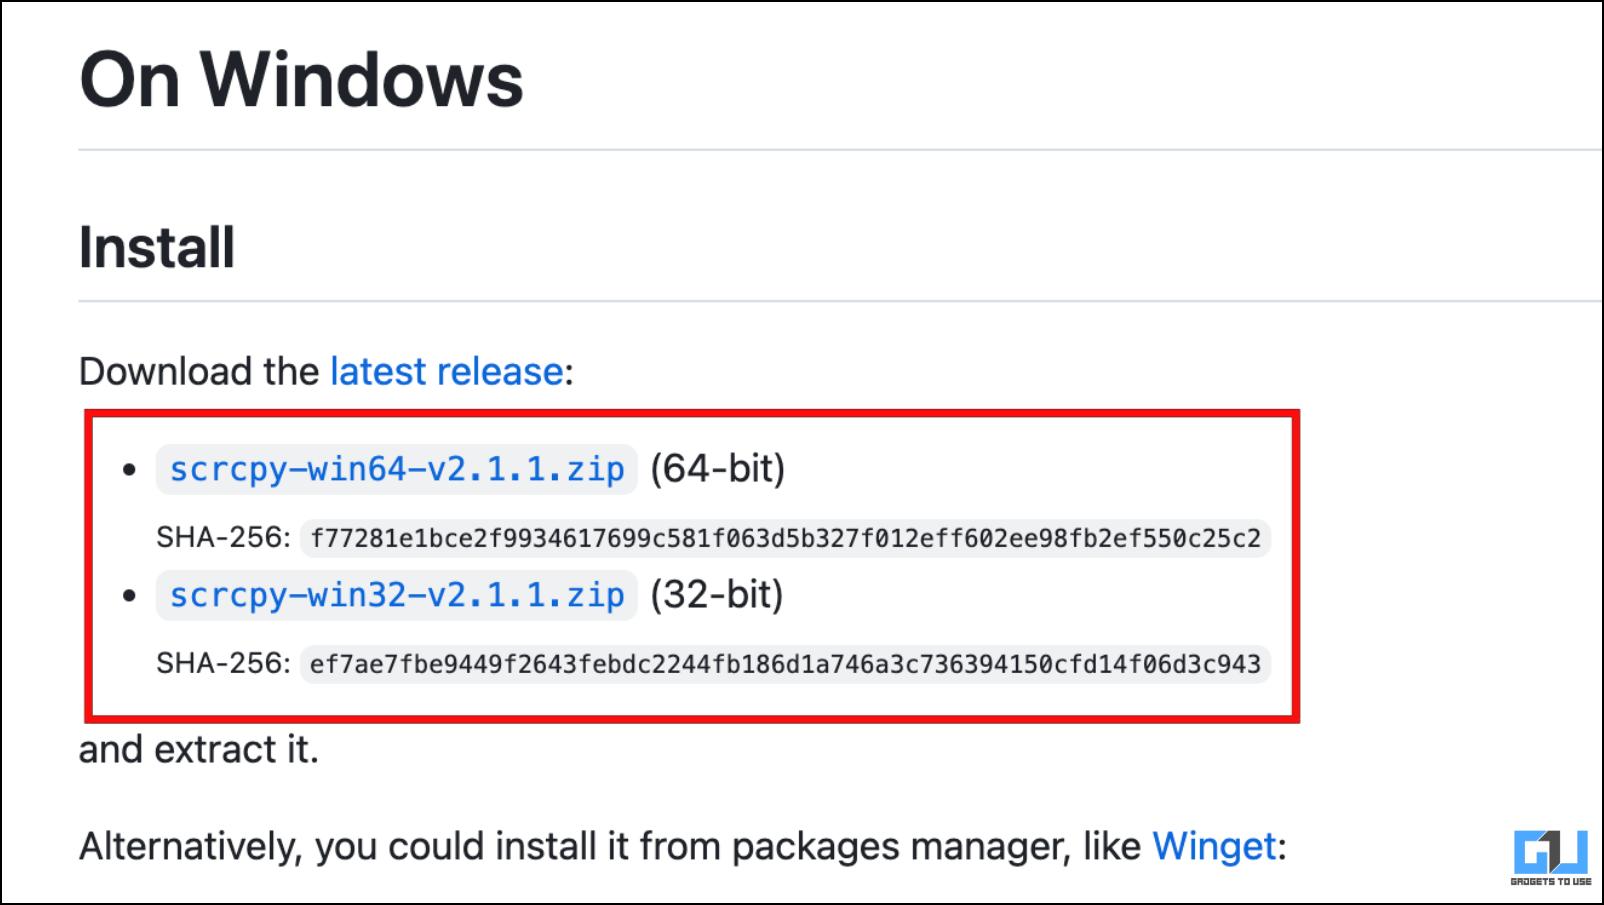
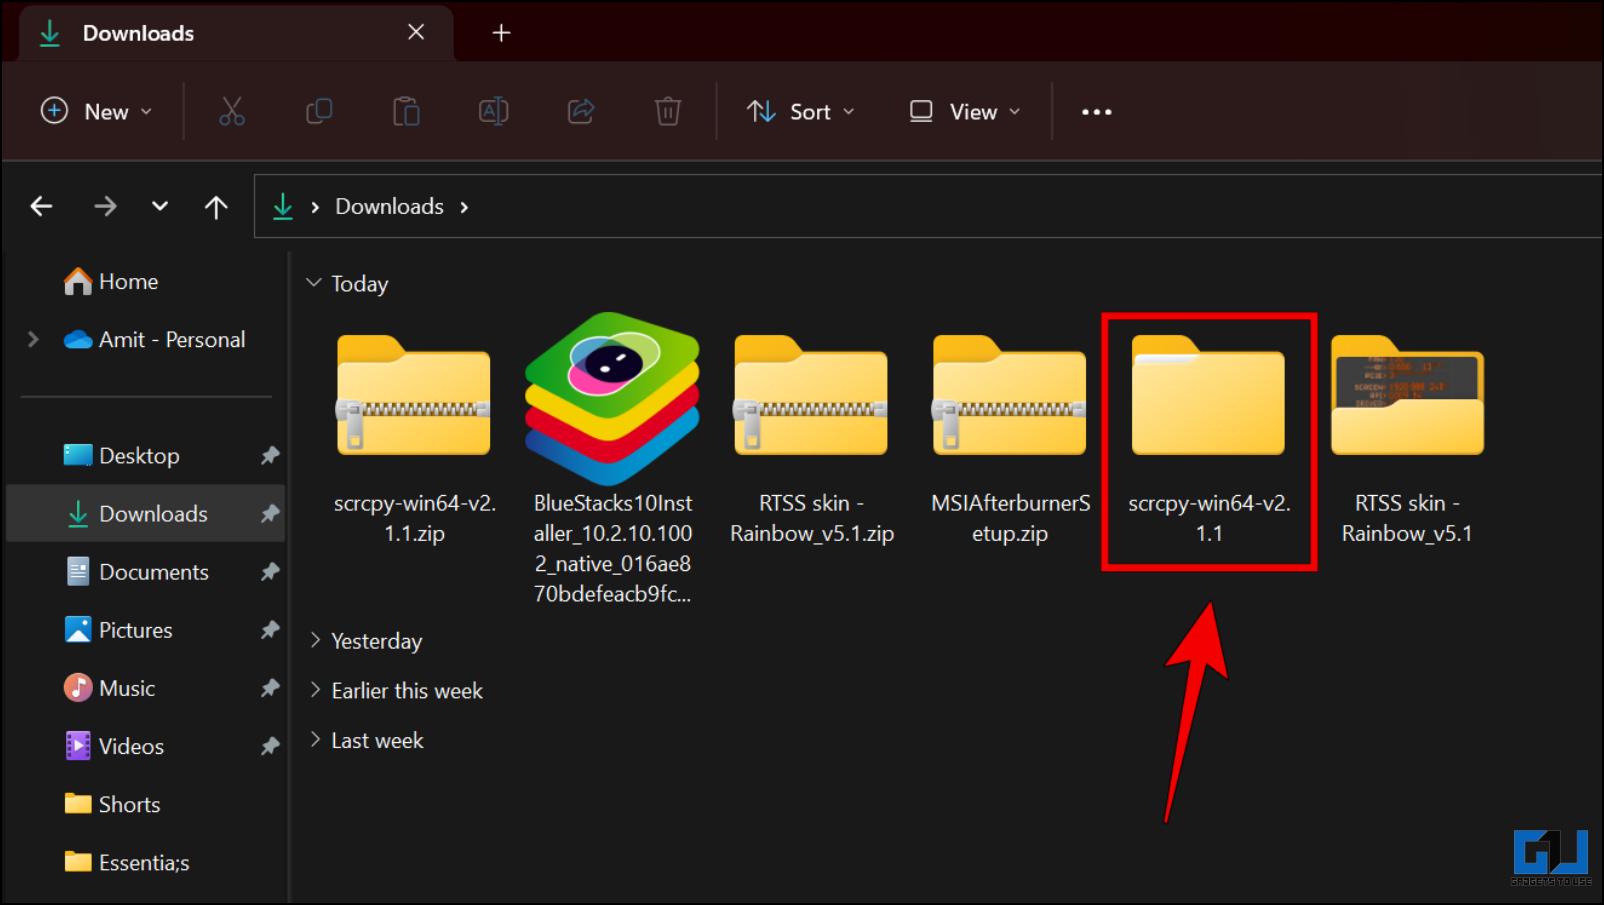
The downloaded file will be available under the Downloads folder in Windows File Manager.
4. Extract the contents of the downloaded .zip file.
5. Go to the extracted file and double-click on open_terminal_window-here.bat.
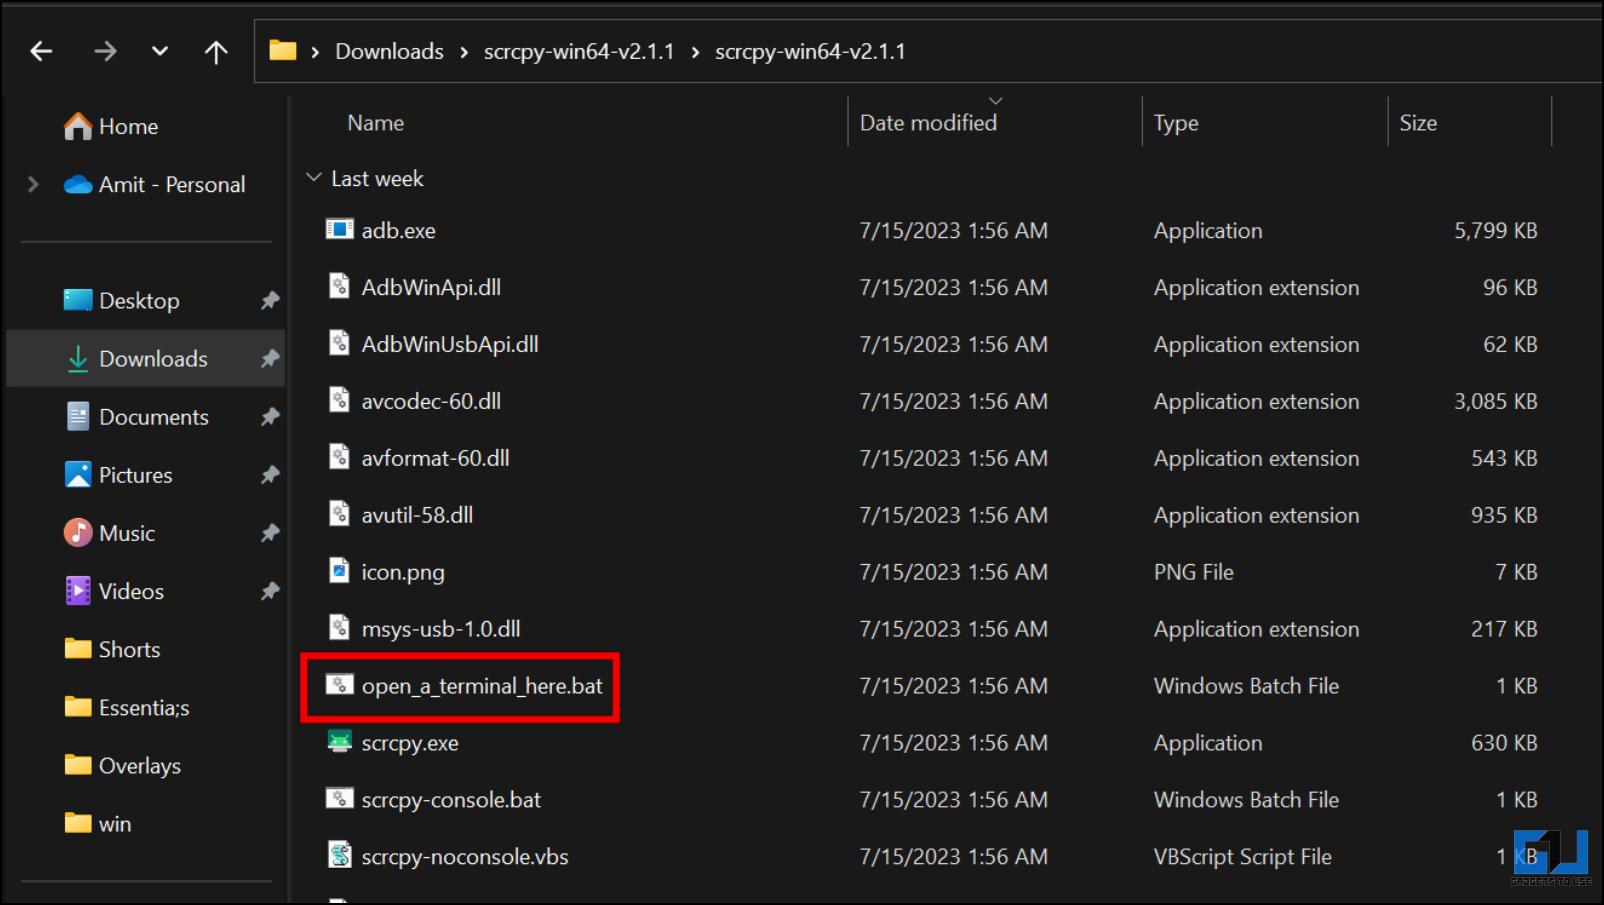
This will open a Terminal window within this folder. Keep it running, as we will require it later.
Step 3: Connect Android Phone with Windows
Finally, connect both devices over a USB to mirror the phone’s contents to the Windows PC.
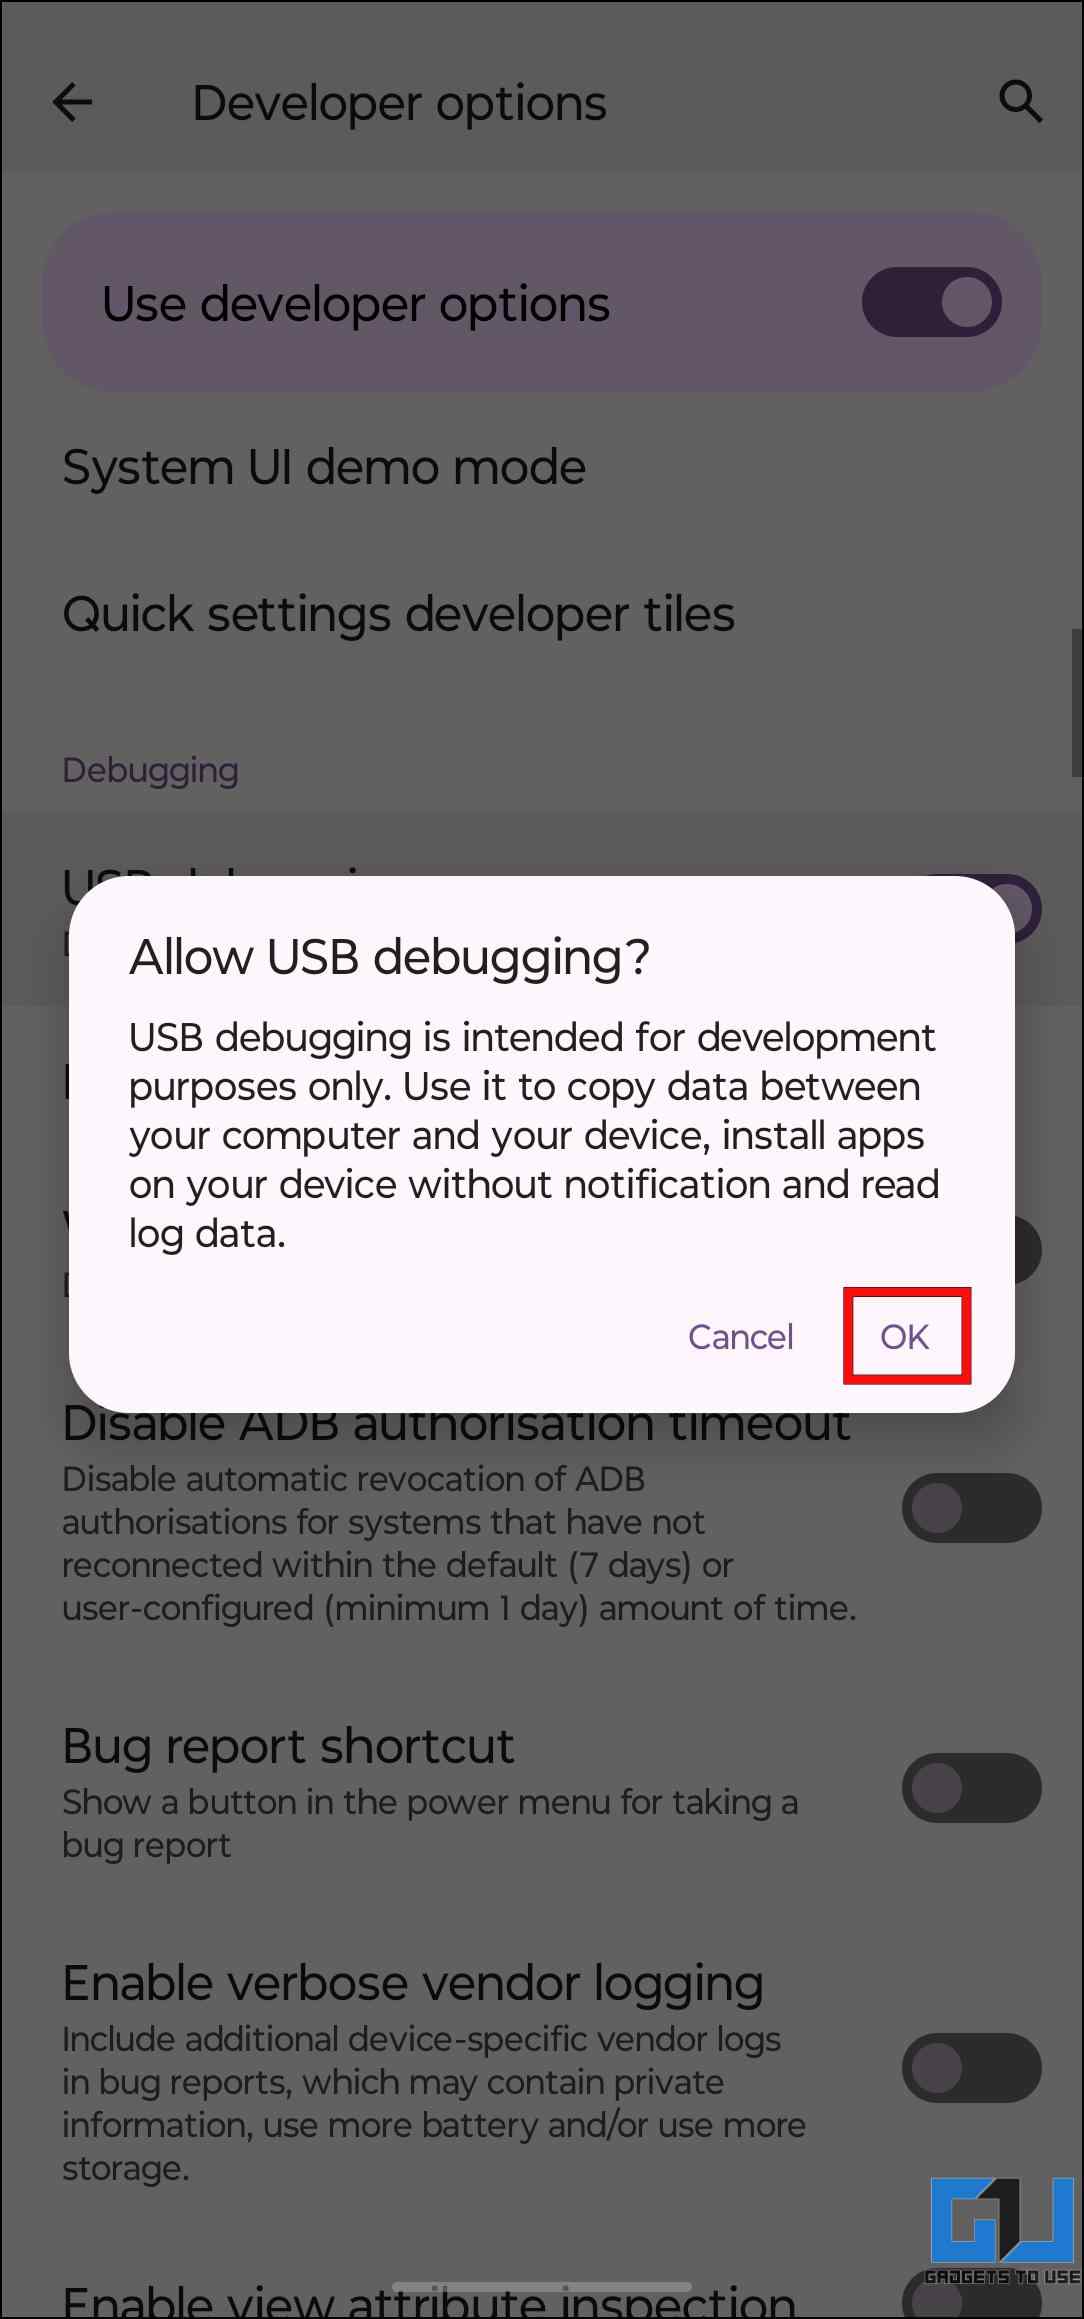
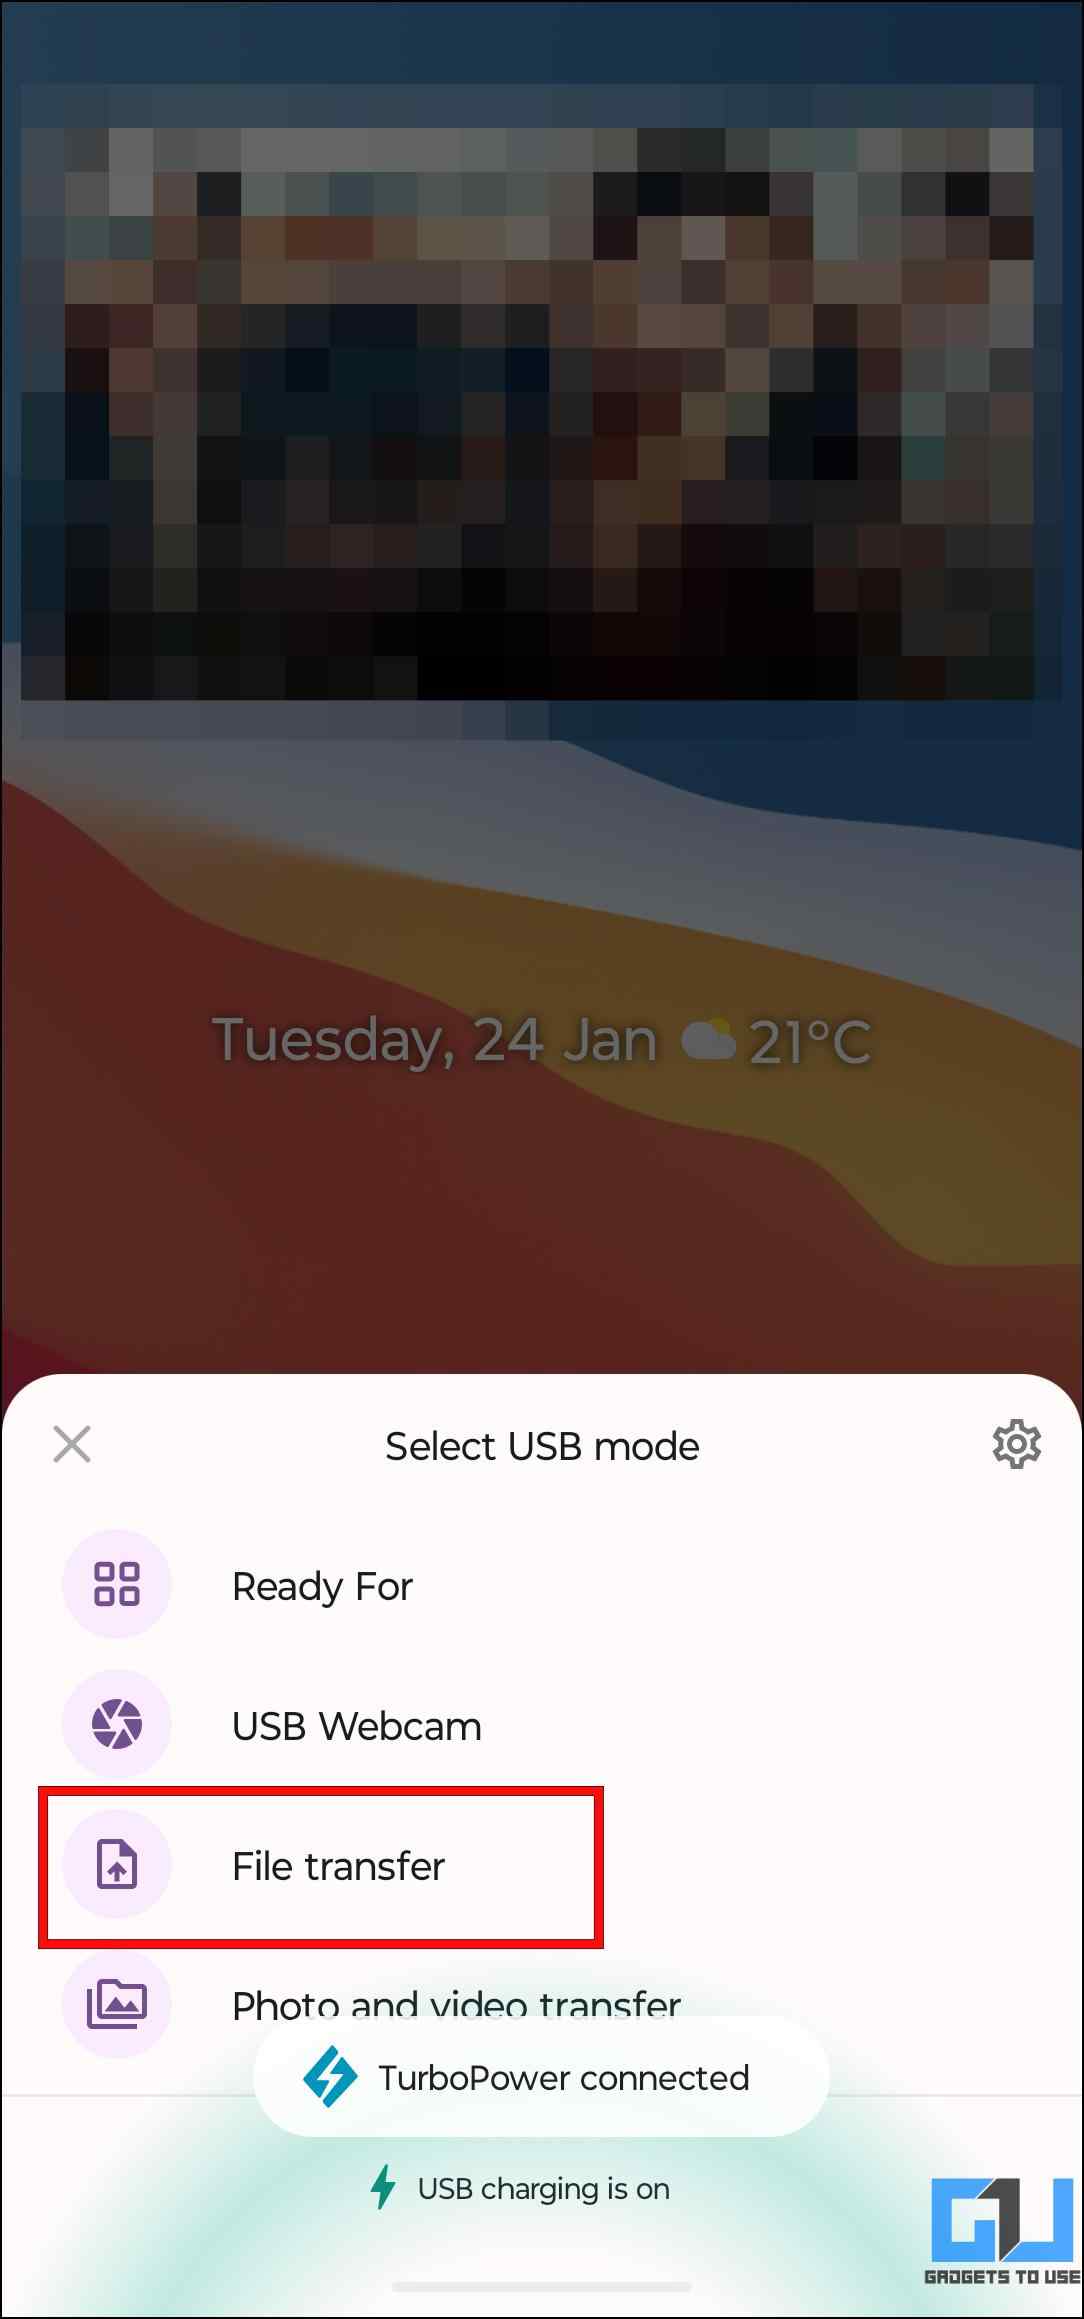
1. Plug your Android smartphone into your PC with a USB cable.
2. Change the connection mode to File Transfer whenever prompted.
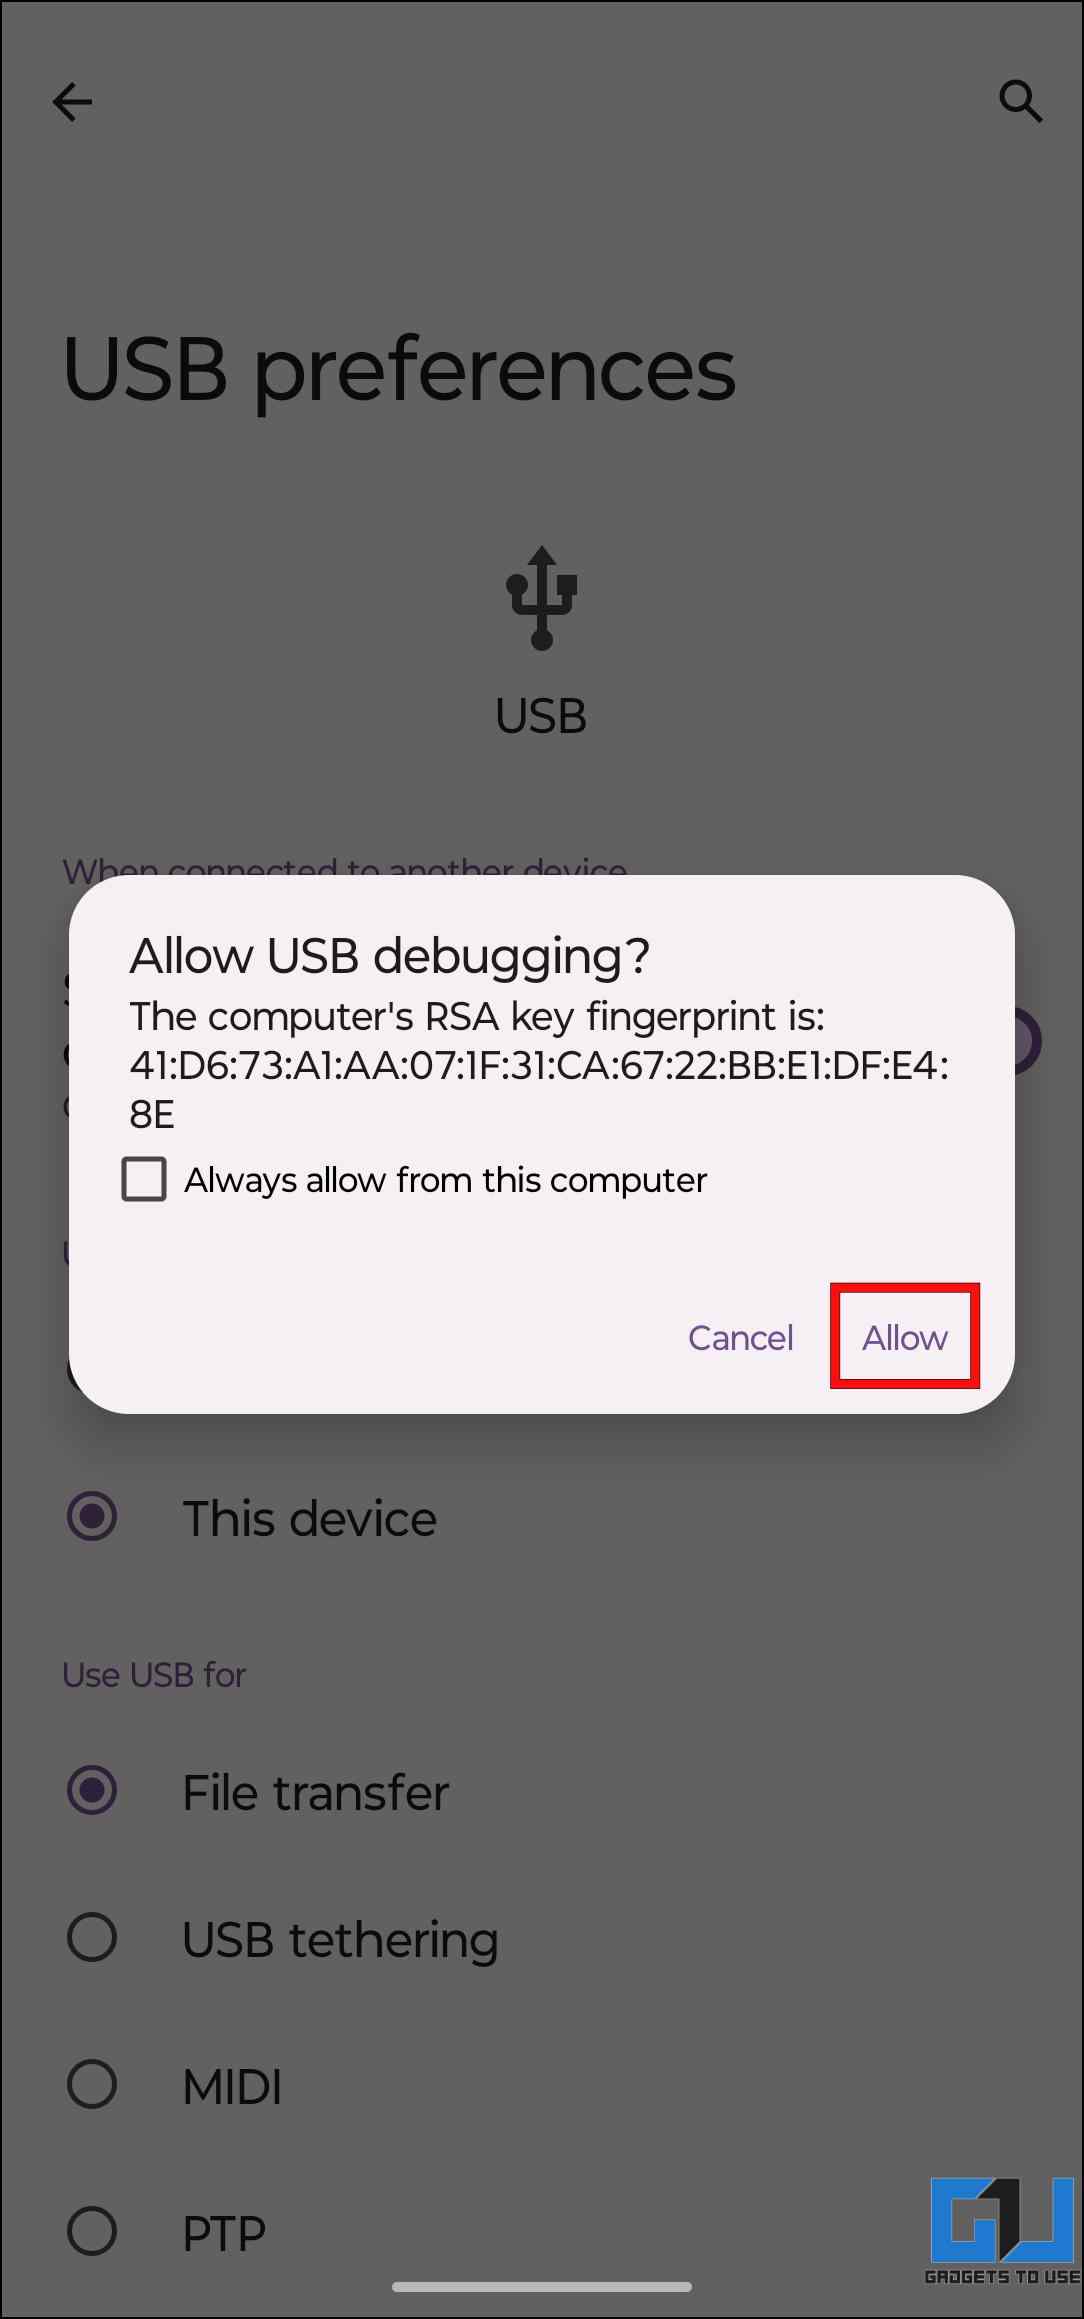
3. Select Allow USB Debugging on the next prompt once plugged in.
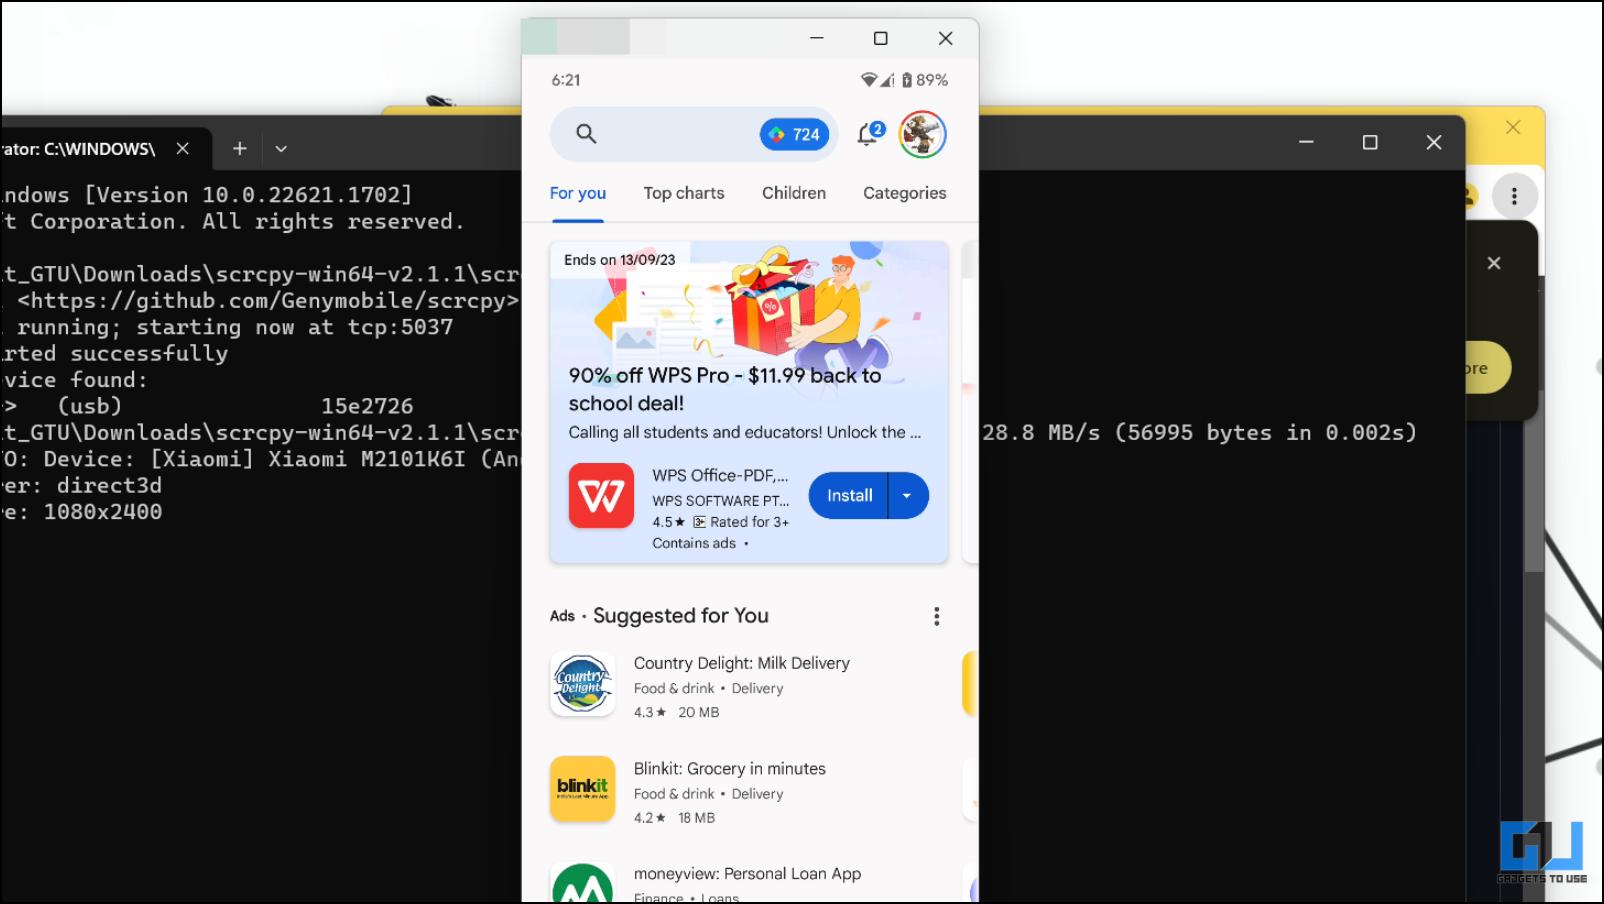
4. Return to the Terminal window opened earlier within the Scrcpy folder. In this window, type the following command.
type: scrcpy and press Enter
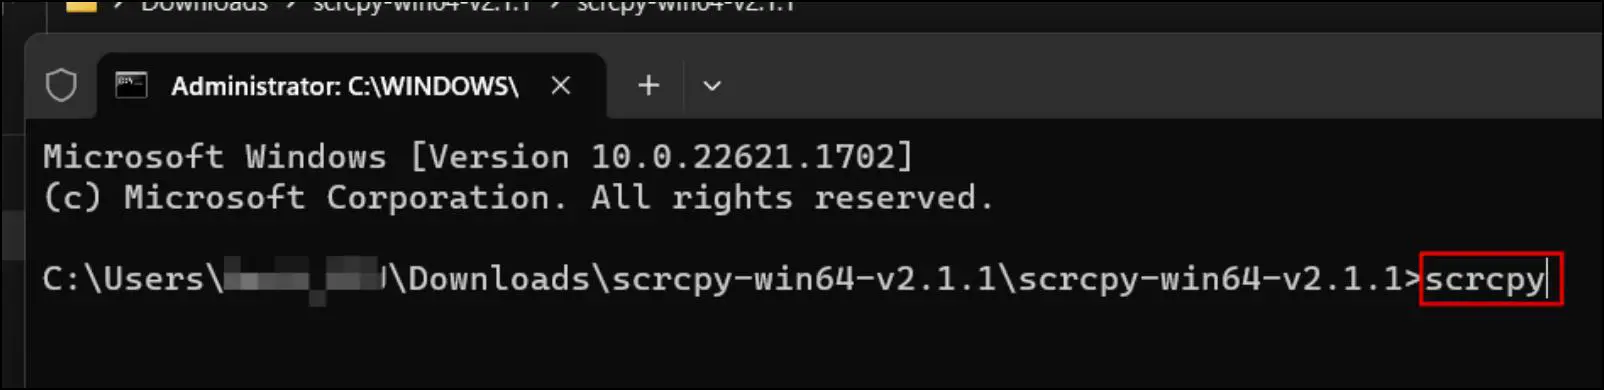
Running this command should start mirroring your phone’s current display to your computer.
Method 3 – Use the Link to Windows on Samsung Smartphones
Windows and Samsung have partnered to allow Samsung user to seamlessly cast their screens on a Windows 10 or 11 system. This is possible with the Link to Windows app pre-installed on every Samsung phone. So, let us look at how you can mirror the screen of your Samsung Android smartphone on your computer.
Step 1: Configure Phone Link App On Windows
You must first configure the Phone Link app to mirror your phone on your Windows desktop. Here’s how it can be done.
1. Open the Phone Link app using the Start menu.
If it is not installed on your system, you can download it from the Microsoft Store.
2. Select Android under the “Use your mobile device from your PC” option.
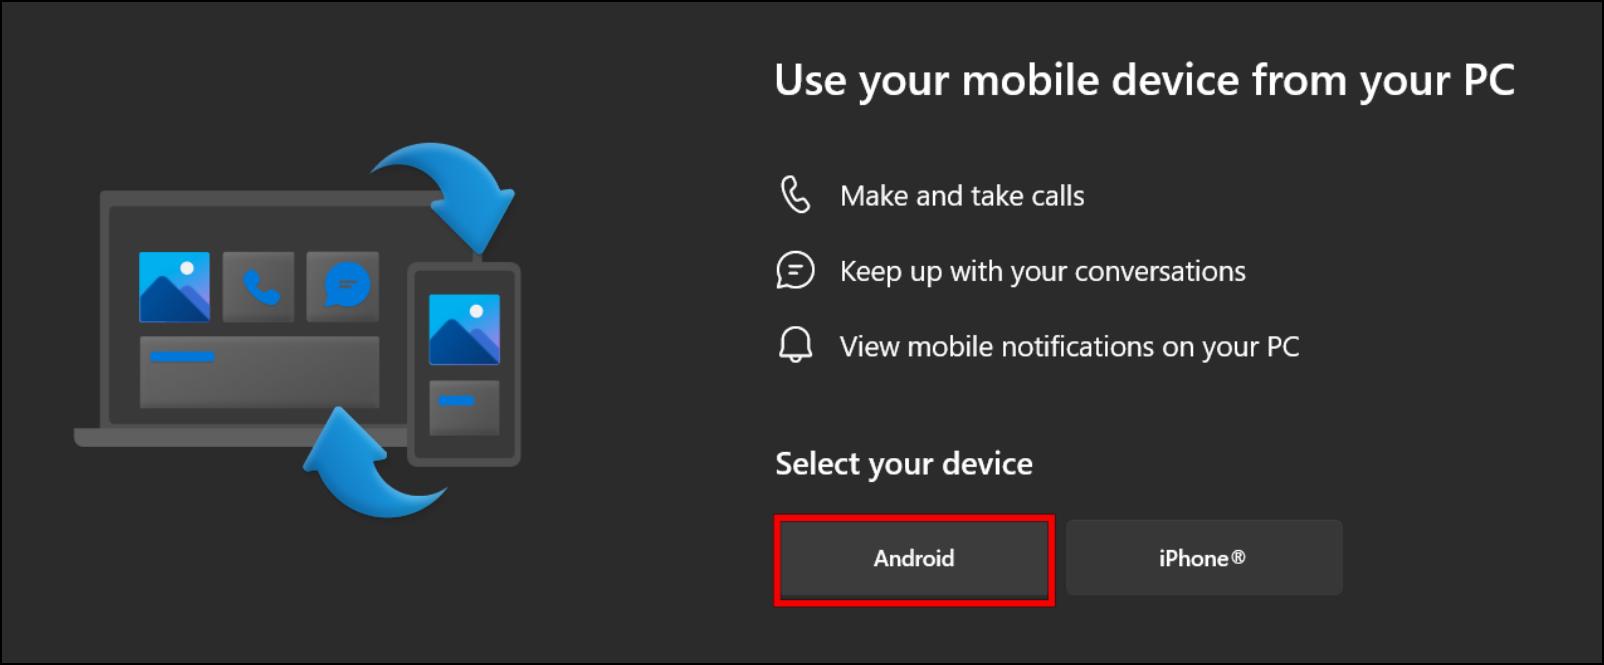
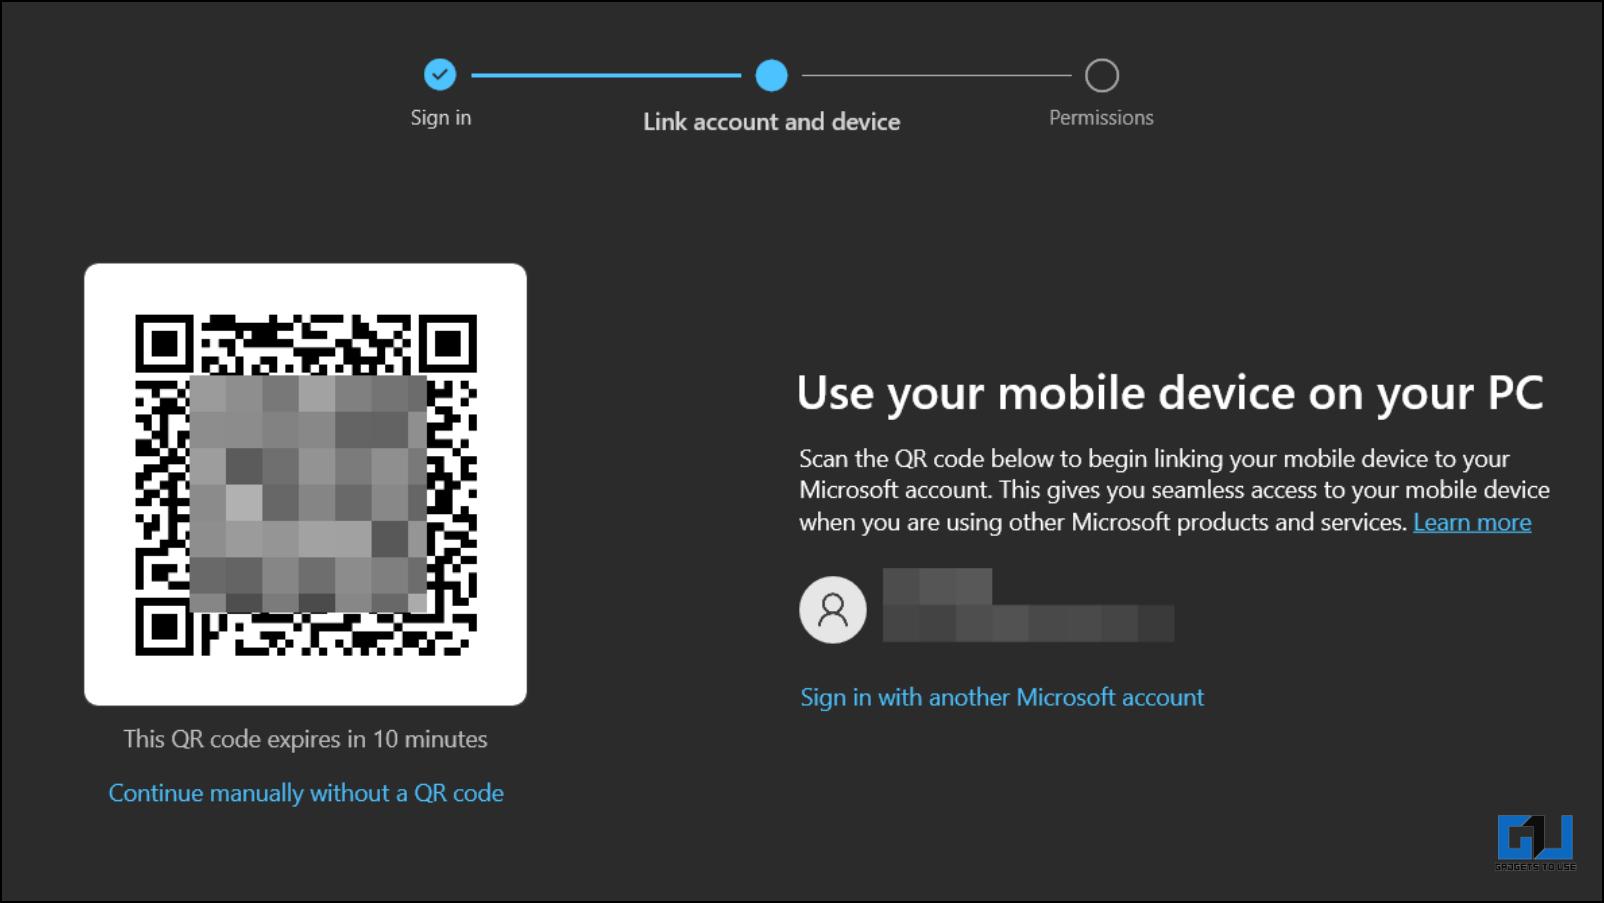
3. Next, sign in with your Microsoft account.

4. Once you are signed in. Scan the QR code displayed on the app to proceed further.
Step 2: Setup Link to Windows on Samsung Android Phone
For the next step, you must set up the Link to Windows on your Samsung smartphone. You can find the service within settings.
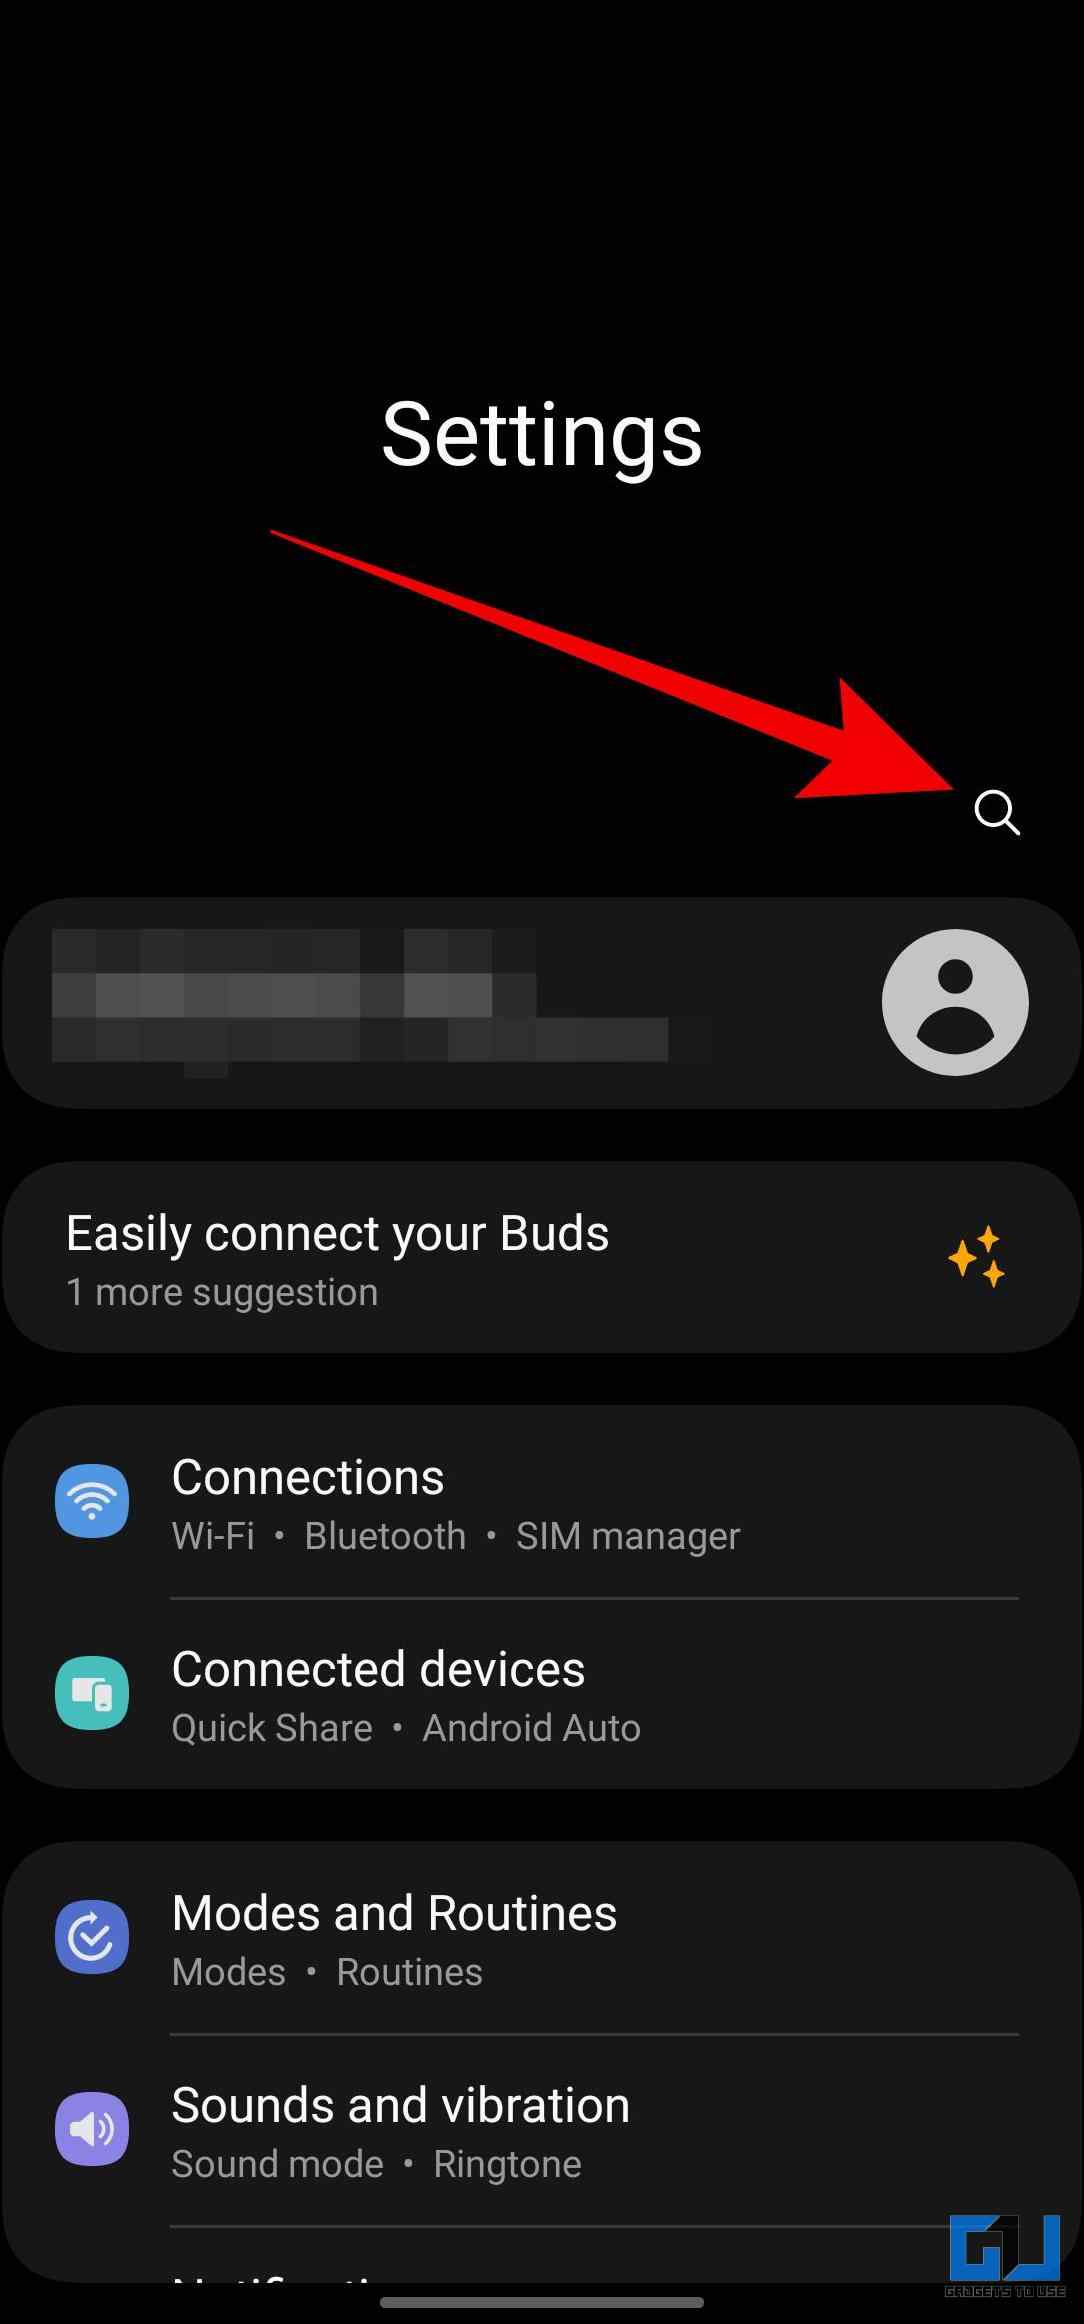
1. Open your phone’s Settings app, then tap the search icon.
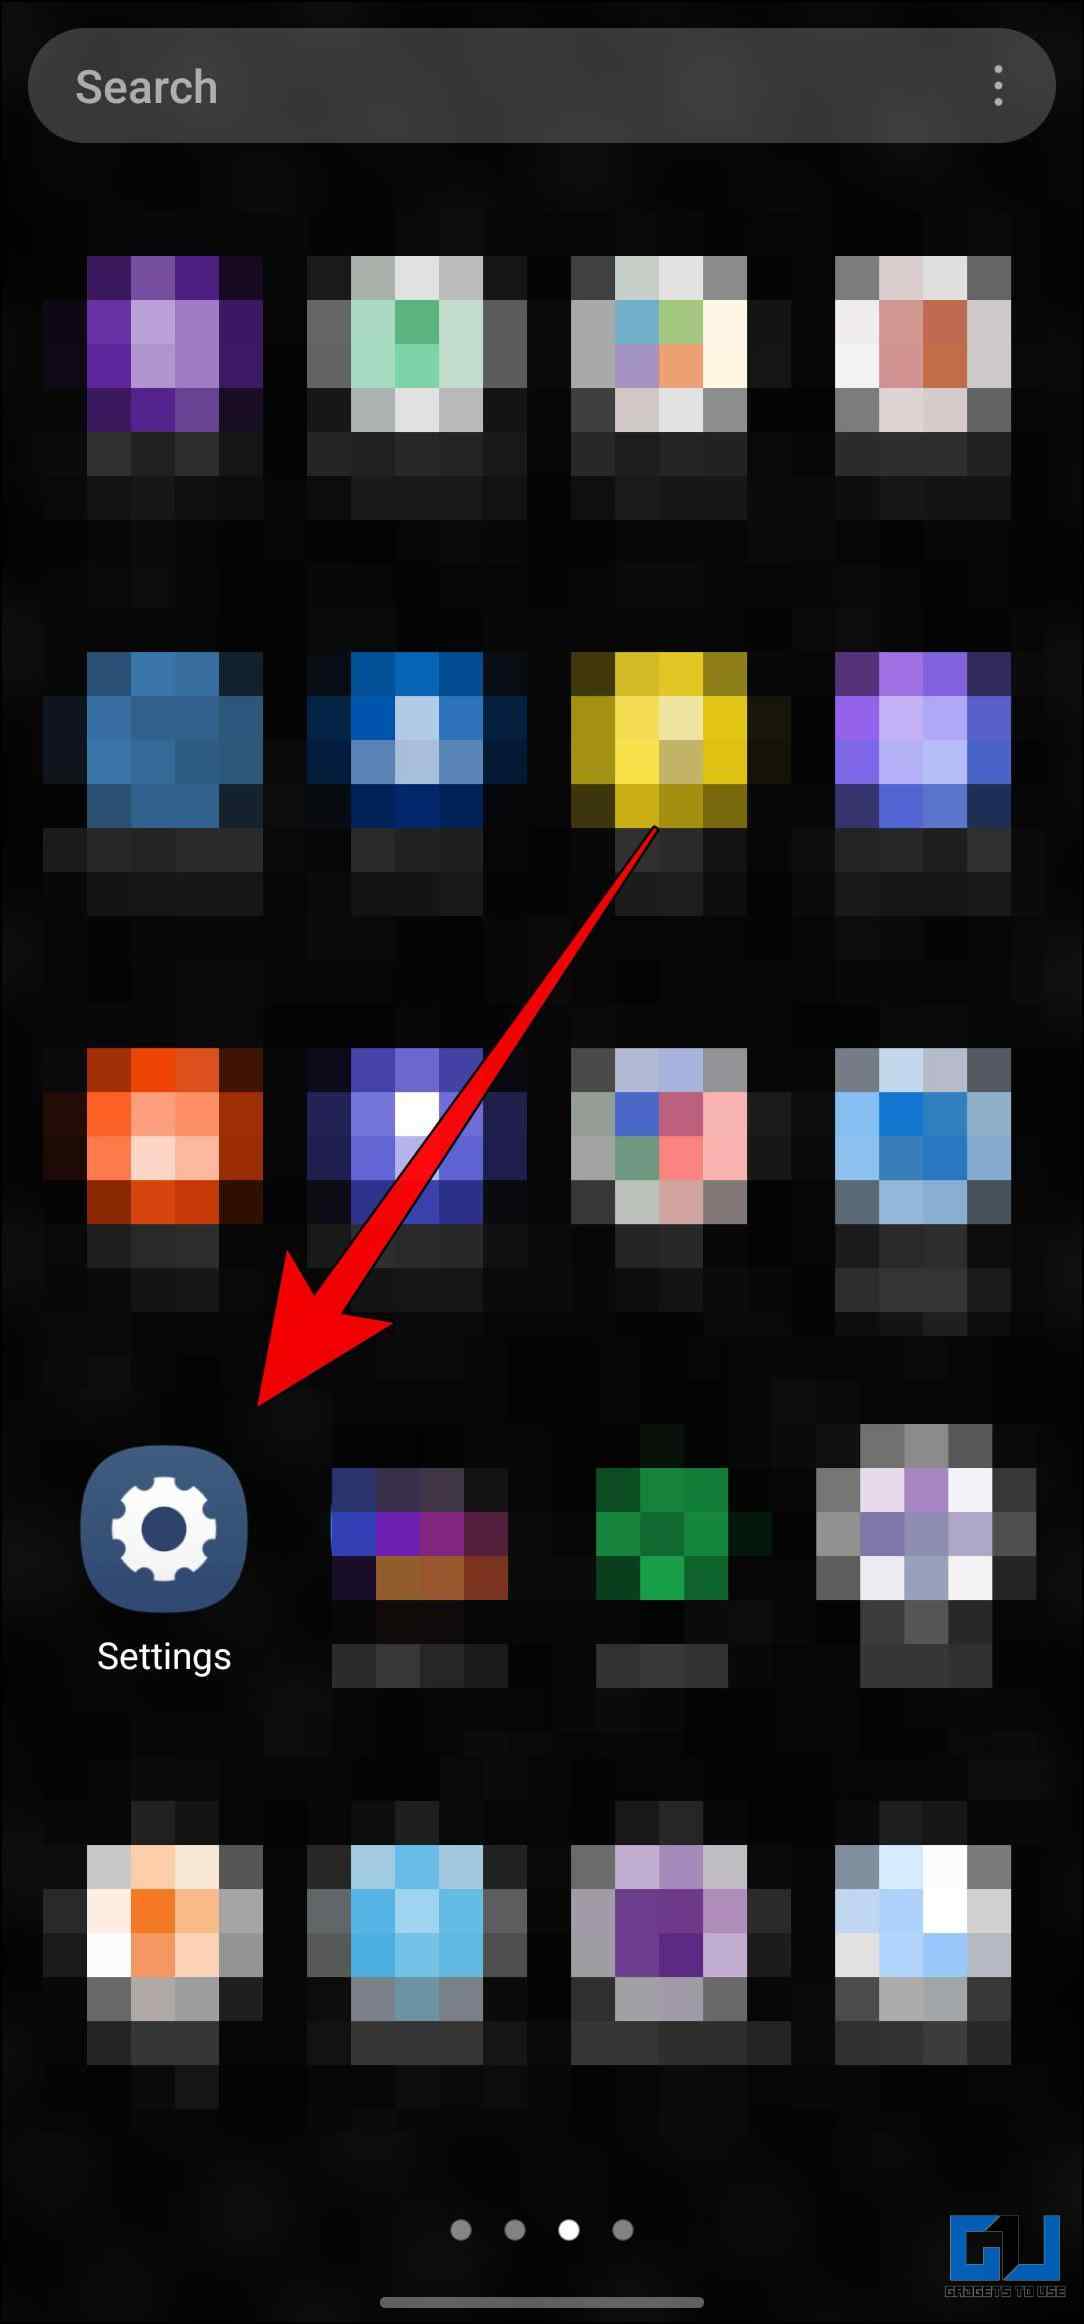
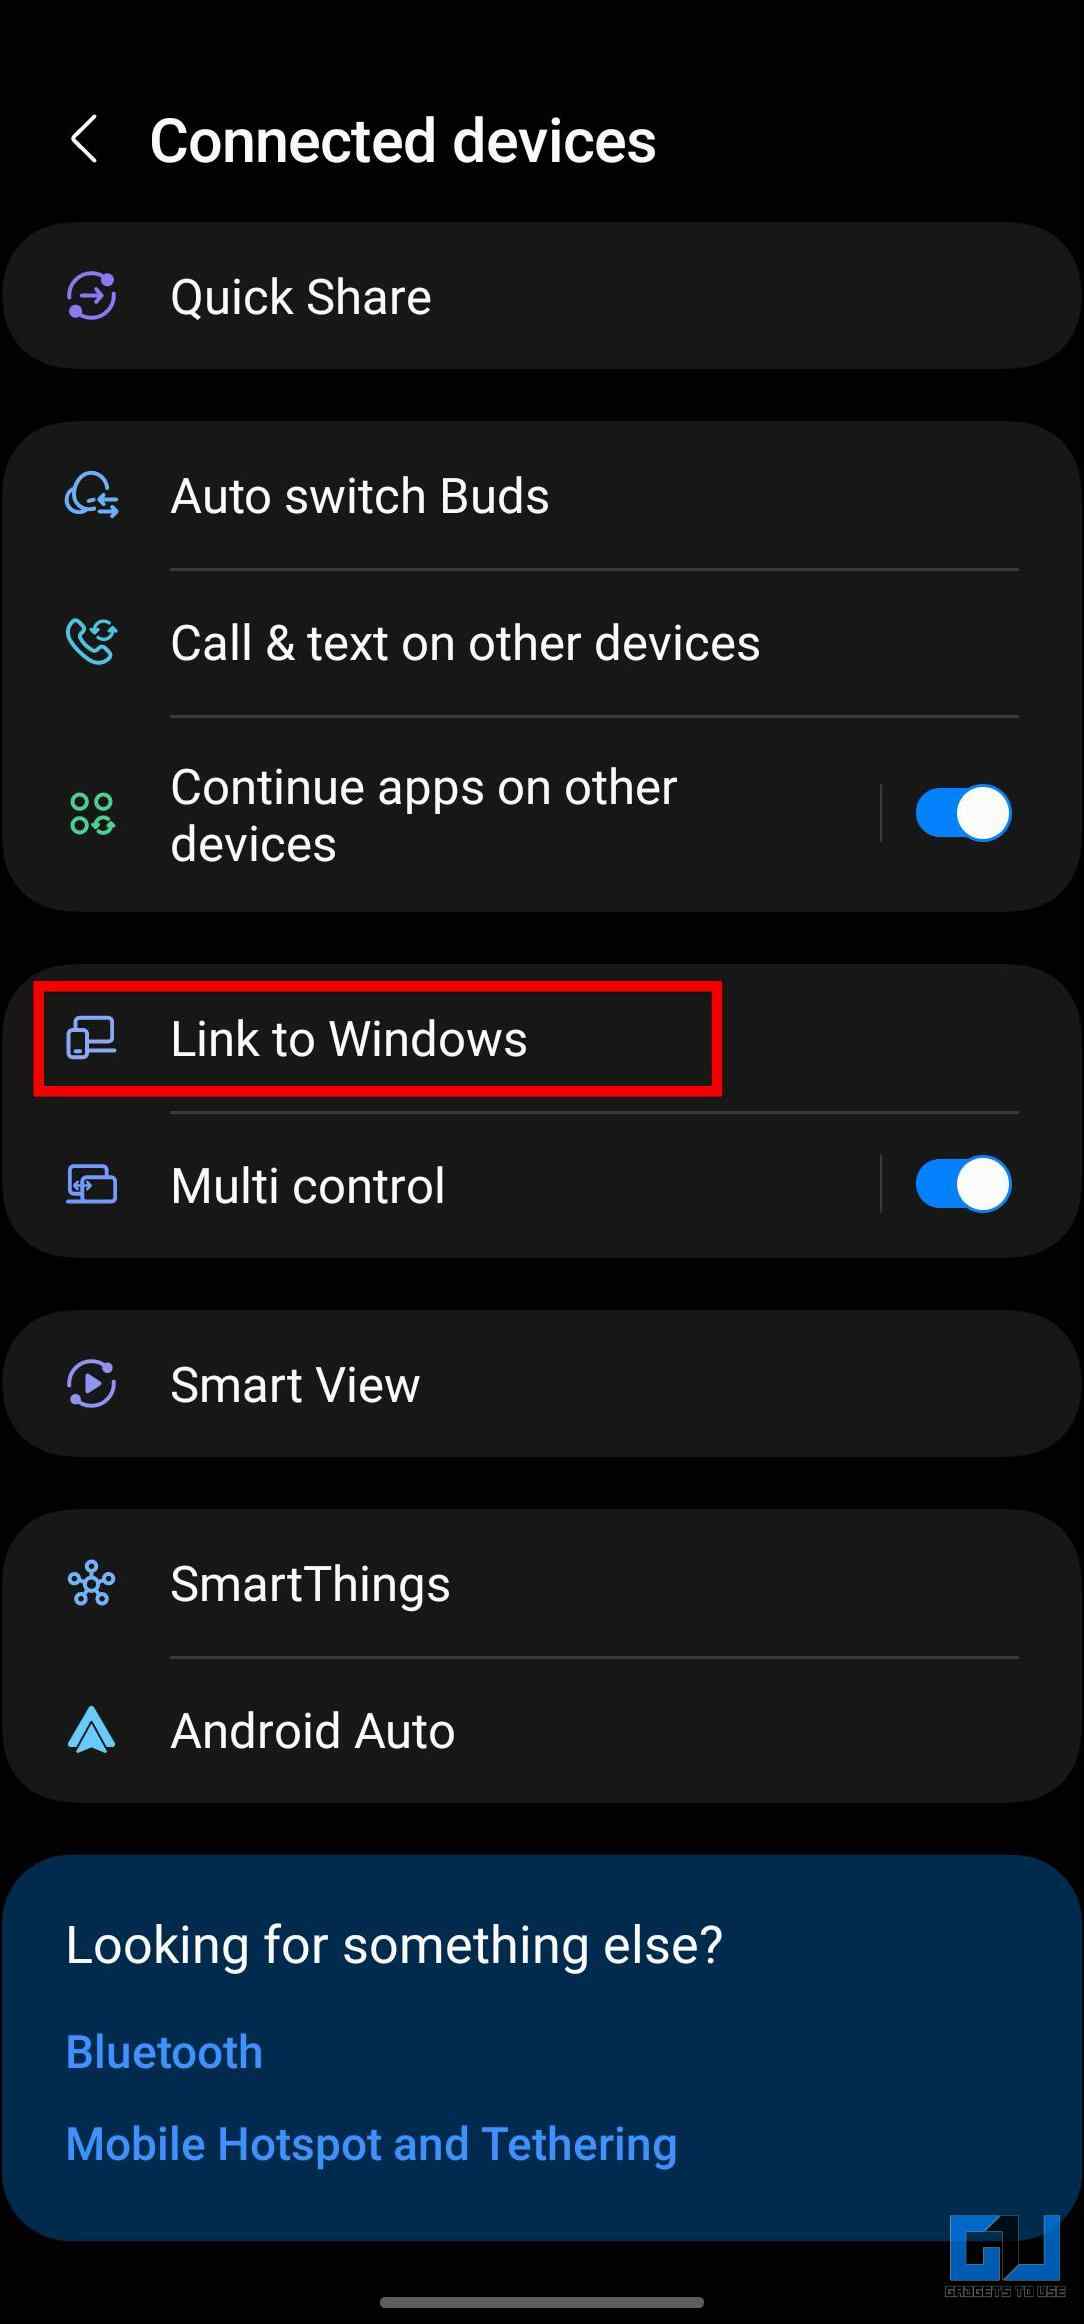
2. Search for the Link to Windows and tap on the first result.
3. Under Connected Devices, tap on Link to Windows.

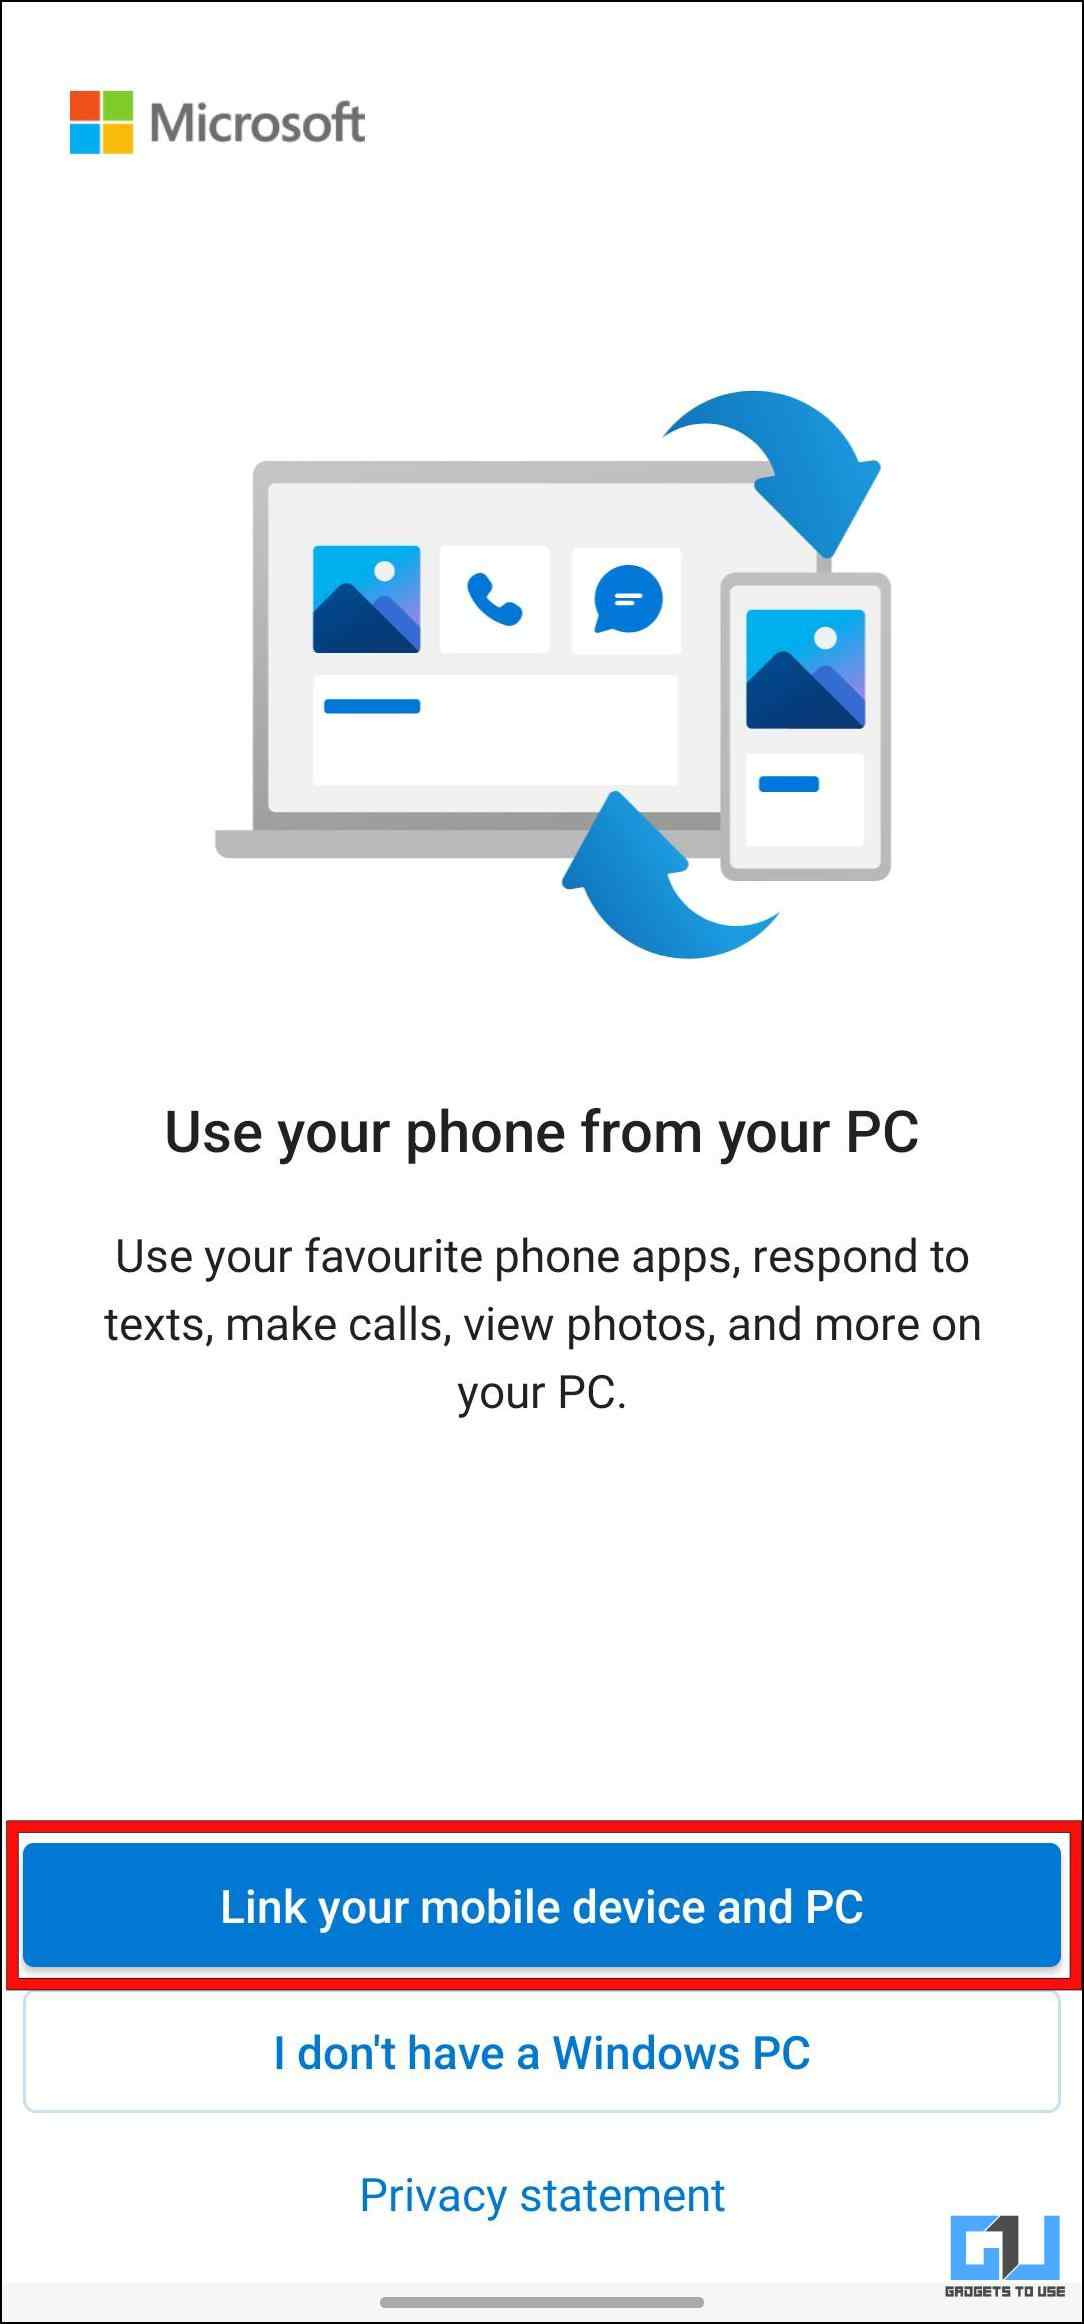
4. Tap the “Link your mobile device and PC” option to use this service.
5. Tap Continue on the next screen.
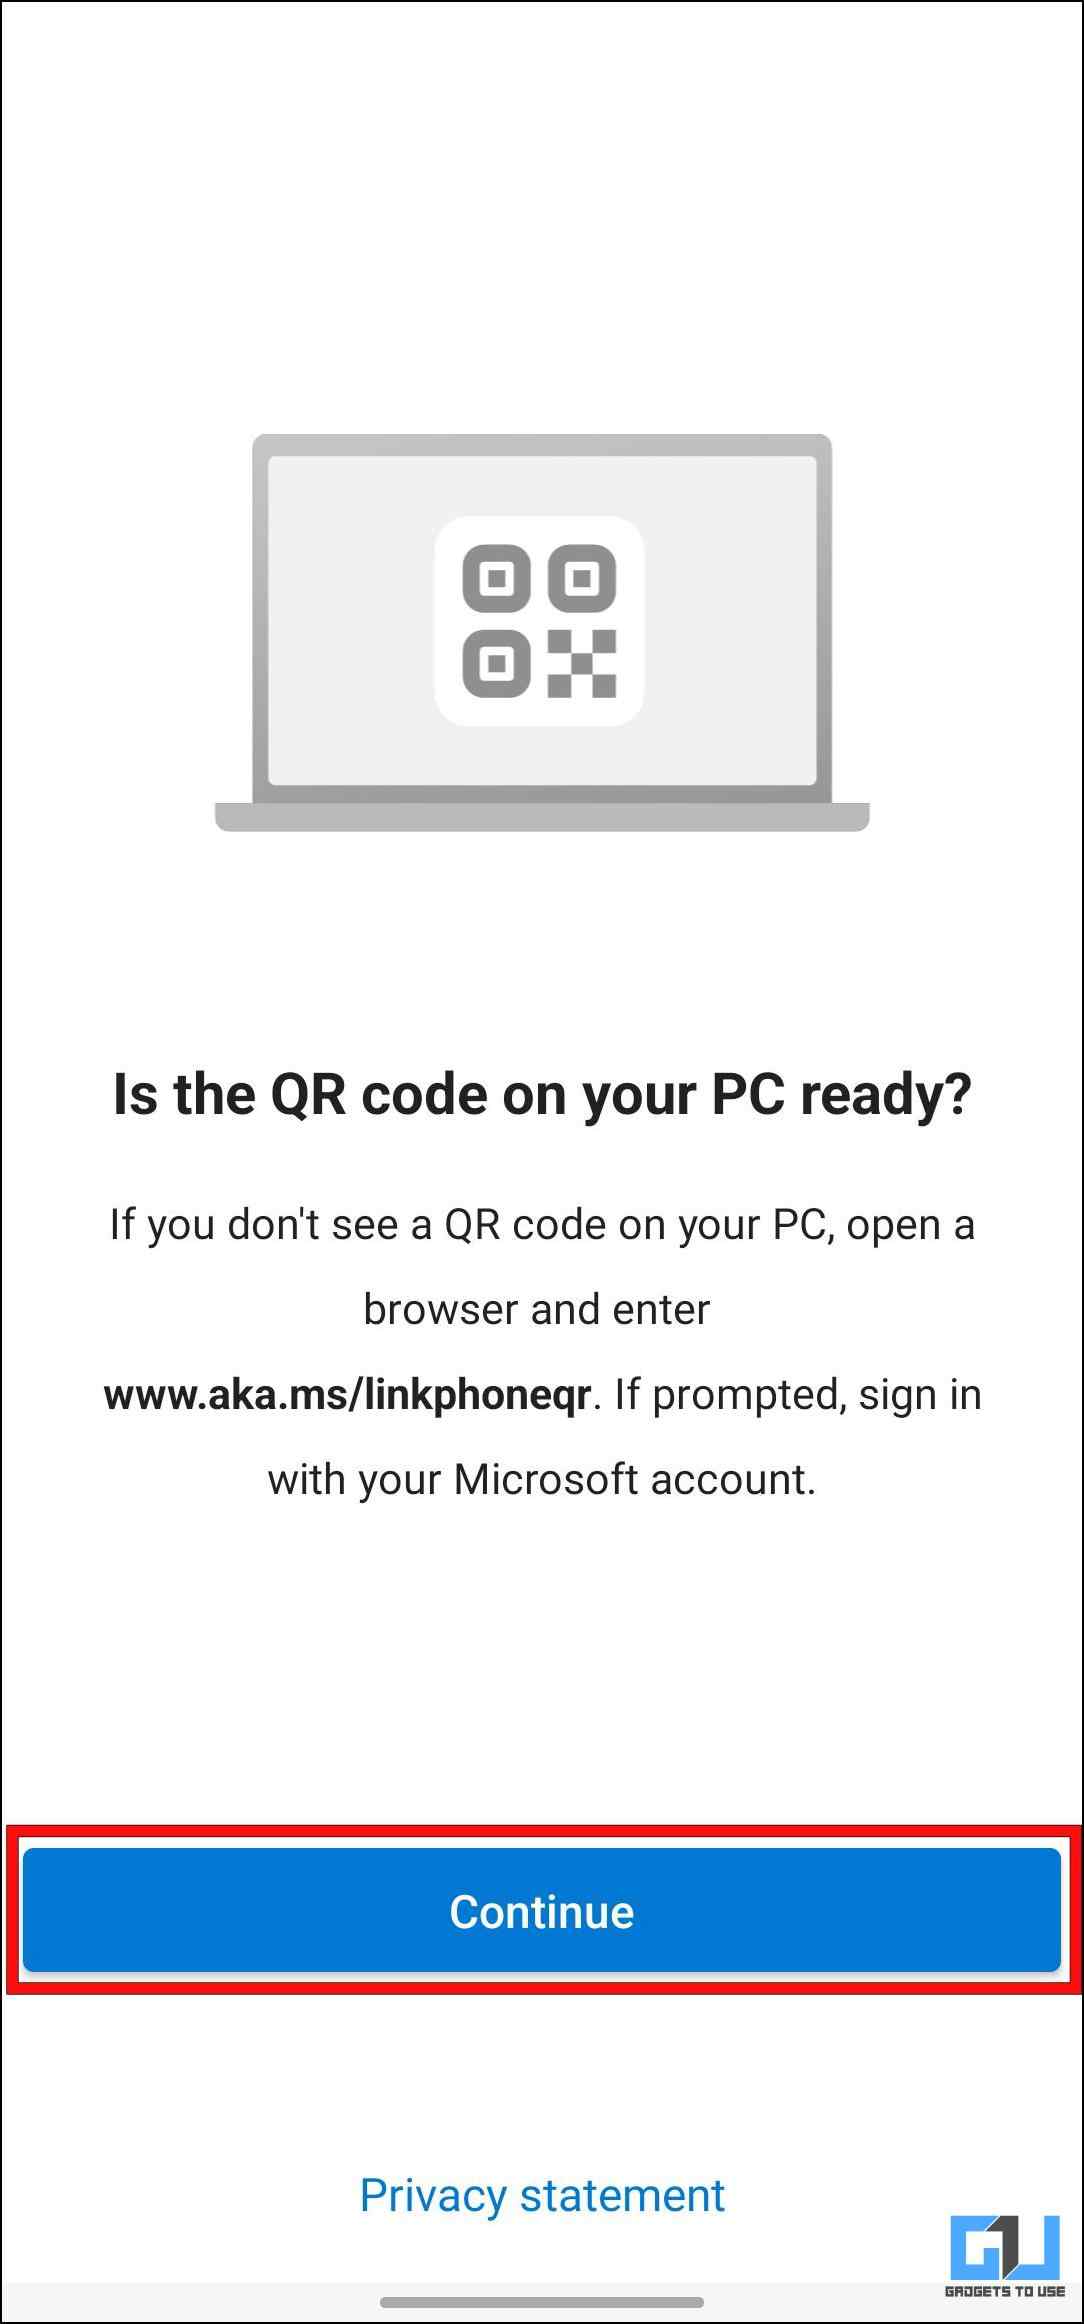
Allow necessary Camera permissions when prompted.
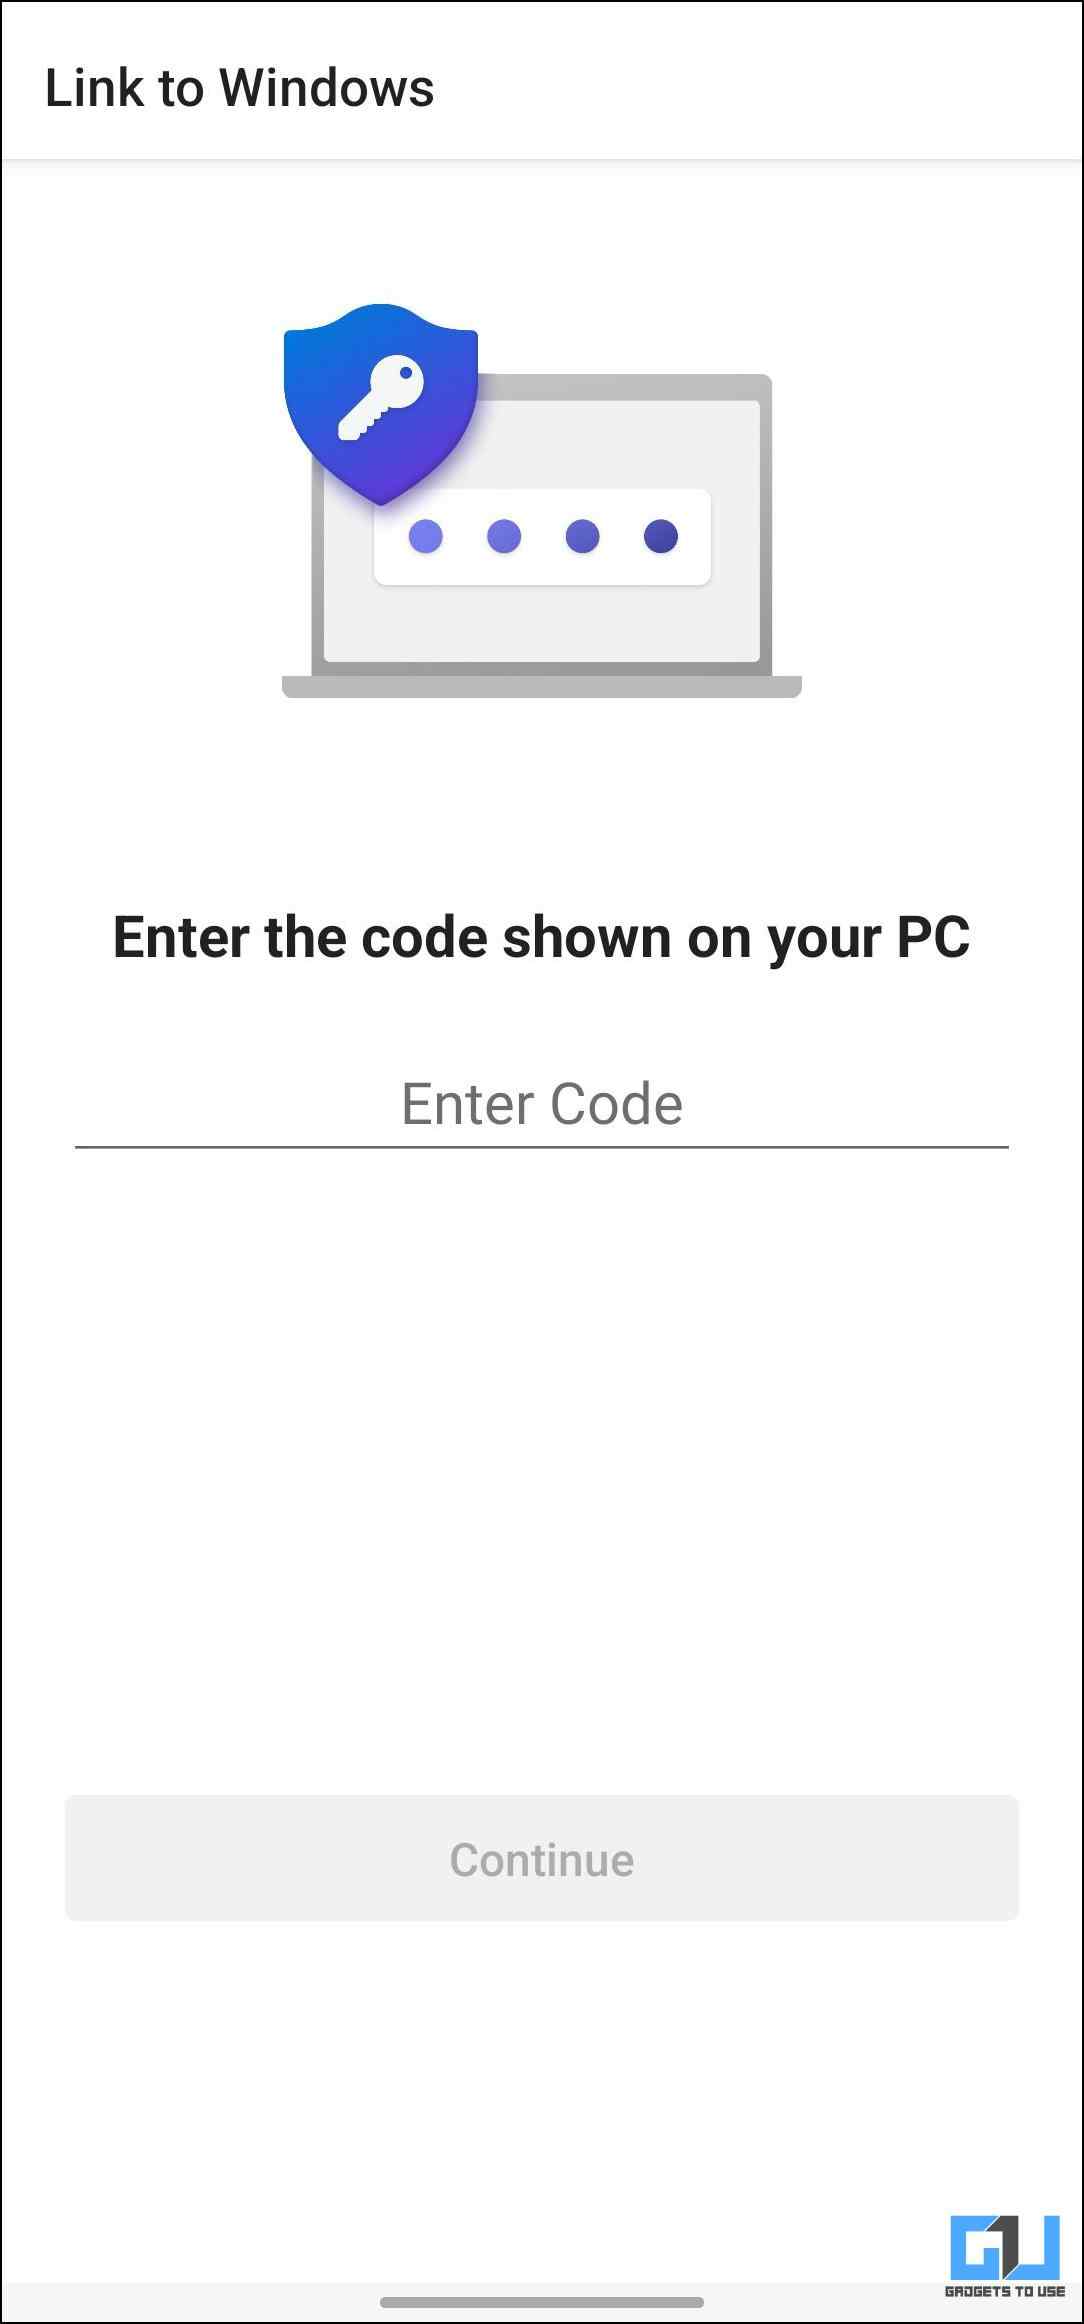
6. Now scan the QR code displayed on your computer.
7. Enter the six-digit code shown on the PC on your smartphone, then tap on Continue.
8. The app will redirect you to sign in to your Microsoft account.
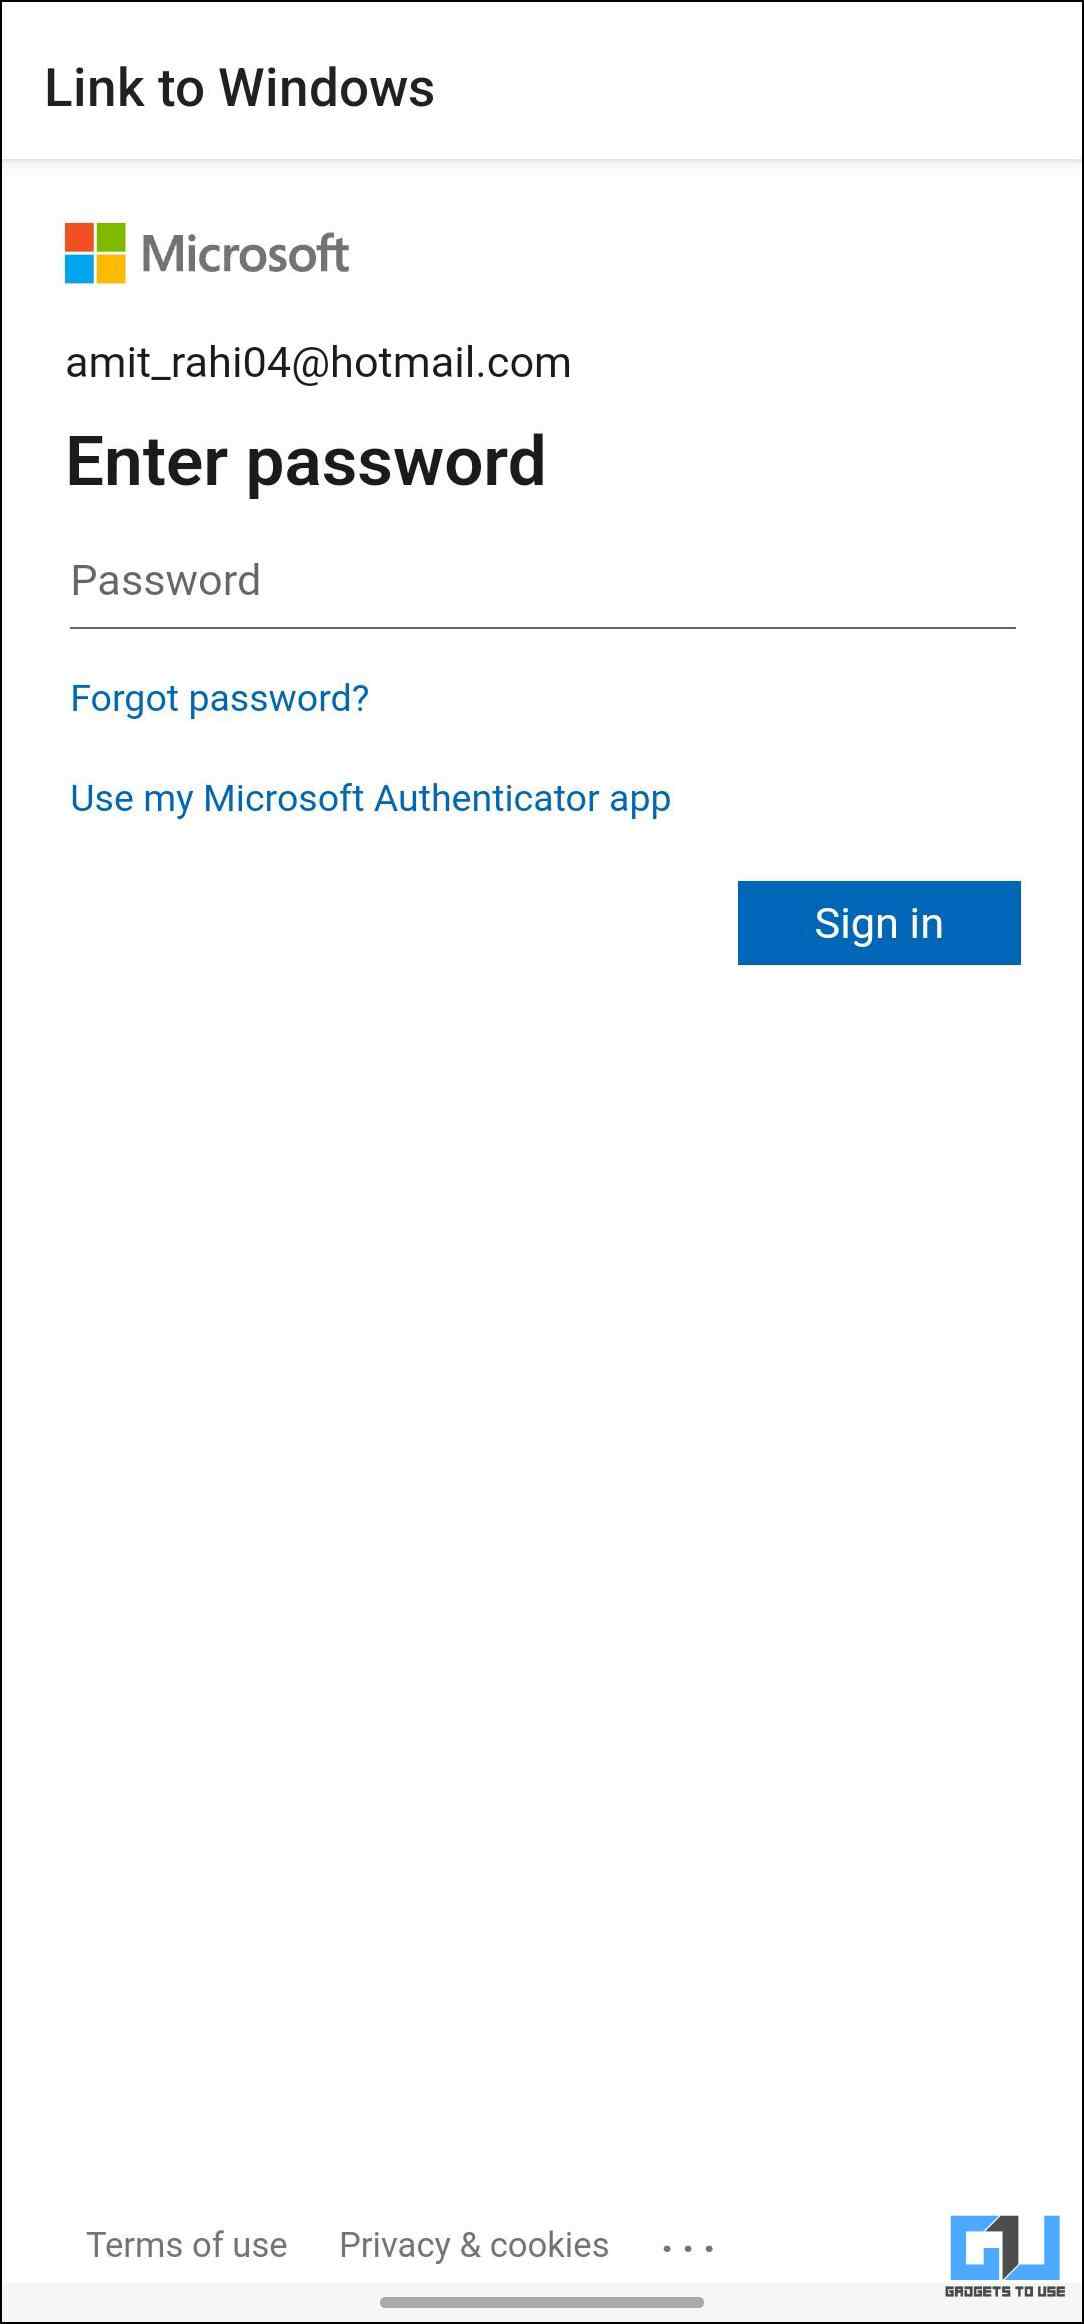
Use the same account that you used to sign in to Phone Link.
Allow the few permissions asked on your phone, including access to photos, videos, messages, and notifications, to use the service.
9. Tap on Done to finish setup for Link to Windows on your smartphone.
Step 3: Mirroring Screen With Phone Link
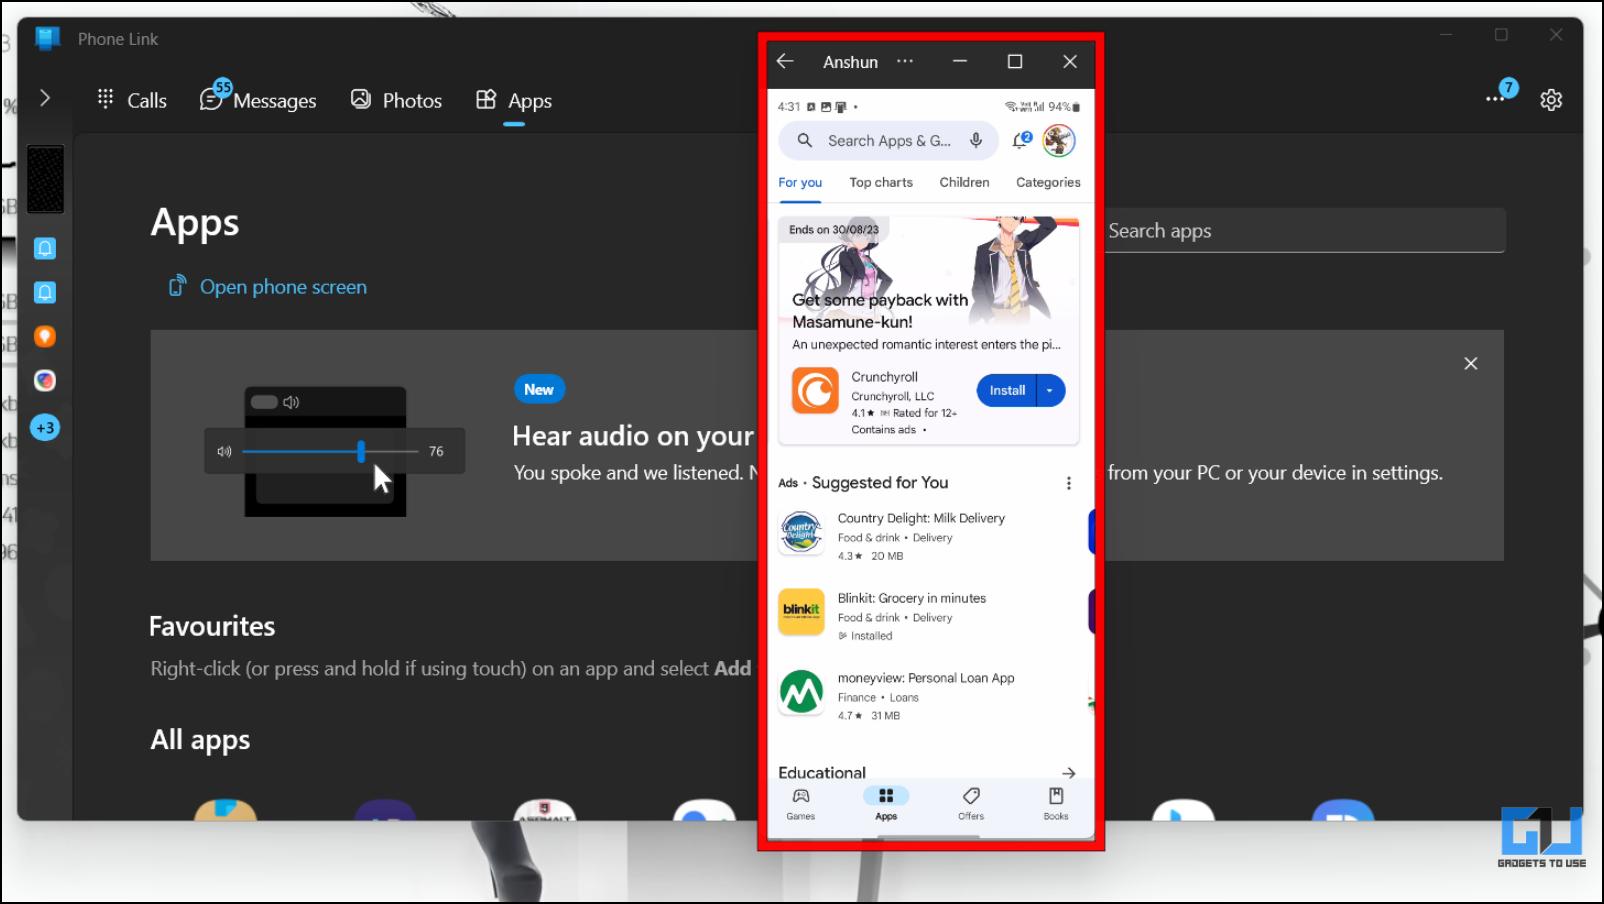
With the setup for both PC and phone completed, let’s discuss how to mirror your Samsung phone screen on the PC.
1. Open the Phone Link app on your Windows PC once paired.
2. Go to the Apps section.
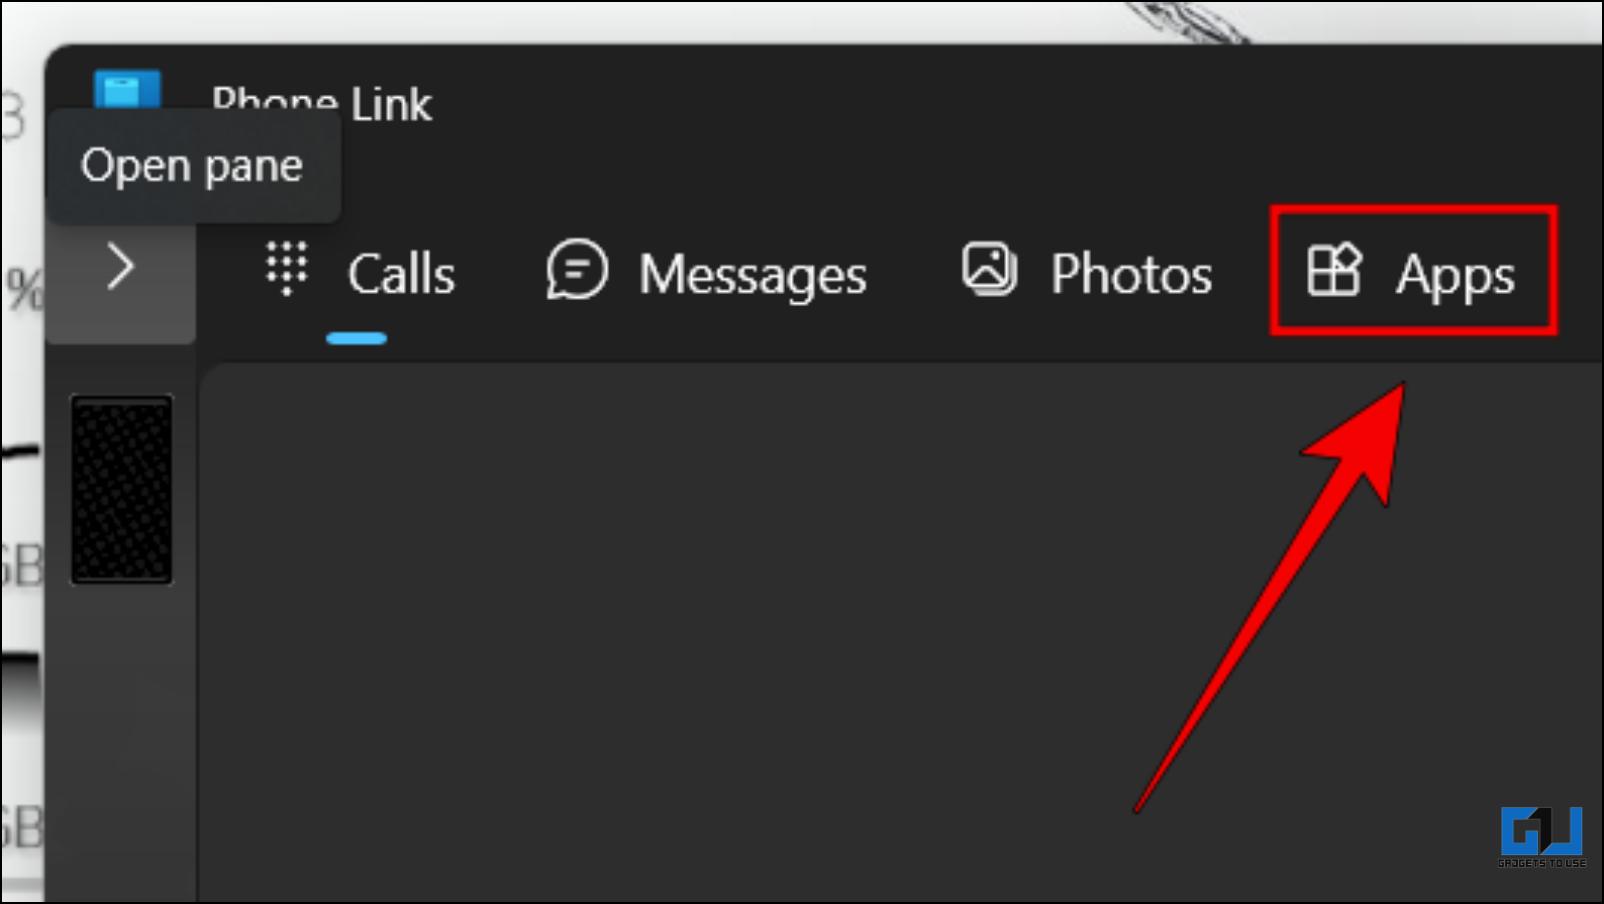
3. Here, click on Open phone screen.

4. It will request your phone to “Start recording or casting with Link to Windows.” Tap on Start now.
Your phone’s display should now be visible on the desktop.
The best part about this method is that it appears as a floating window, which can be dragged across the screen. You can also open apps installed on your phone individually.
Wrapping Up
Though rare for many, there can be instances where you want to use your smartphone on the big screen. This is why it is good that both ecosystem, for the most part, provide their way to cast or mirror your Android phone to Windows 10 or 11 displays. Since I own a Samsung smartphone, I prefer the Link to Windows option. But you can go with any other if you prefer. Stay tuned on GadgetsToUse for more such articles, reviews, and How-Tos.
You might be interested in the following:
- Windows Phone Link vs Intel Unison: Which is Better?
- How to Connect Your iPhone to Windows Phone Link
- Top 5 Ways to Cast or Mirror Content on Android TV From Your Phone
- 6 Ways to Fix Android TV Appearing Twice in the Cast Option
You can also follow us for instant tech news at Google News or for tips and tricks, smartphones & gadgets reviews, join GadgetsToUse Telegram Group or for the latest review videos subscribe GadgetsToUse YouTube Channel.
Was this article helpful?
YesNo
Looking to Screen Mirror your Android Display to Windows 11 PC. Here is Simple Guiide to Cast Android to Windows 11 Computer.
Windows 11 brings a lot of aesthetic changes to the Windows operating system. For instance, the color scheming has been tweaked to provide a more modern appeal, then there is a centered Start menu on the taskbar. Windows 11 will soon support Android apps; there is now widget support, better virtual desktop support, and much more. Multi-tasking has also been improved.
And speaking about multi-tasking, you can make use of the Wireless Display feature to mirror your Android phone’s screen on Windows 11 and multi-task effortlessly. Fiddling back and forth between your Android phone and PC can be a tiring task. This is where this guide comes in handy.
This guide will show you how you can set up your Windows 11 PC as a Miracast Wireless Receiver and cast your Android phone’s screen onto it. Notably, this would also allow you to project your phone’s files to a bigger screen of your PC. Having said that, let us jump right into it.
Does Windows 11 Have Screen Mirroring?
It is possible to connect your Windows 11 computer’s screen to various peripherals in several ways. In contrast, Miracast allows you to stream content from your computer to a smart television wirelessly. With Windows 11, the technology is integrated into the operating system and cannot be downloaded or installed manually. Wirelessly projecting your screen is neither time-consuming nor risky using mobile devices that support screen casting.
Enable Wireless Display on Windows 11
Well, the first thing that you need to do if you want to cast an Android phone’s screen onto your Windows 11 display is to enable the Wireless Display feature on your PC. While for some, this feature may come pre-installed with Windows 11 (like for me, it was pre-installed), but for some, you may need to manually install it. Whatever the case may be, let us look at the steps on which you can install Wireless Display optional feature on your Windows 11 PC.
- Press the Windows key + I button on your keyboard to open the Windows Settings menu. Alternatively, you can right-click on the Start menu button on the taskbar and select Settings from the list of options that appear.

- From the left pane, select Apps. Now, from the right side, click on Optional features.

- You need to click on the View features button situated next to Add an optional feature right at the top.
- You can either search for Wireless Display or scroll down and select the Wireless Display feature. Check the box next to it and click Next. Then, click on Install on the next page and let the feature get installed on your PC.
- That’s it!

Use Wireless Display on Windows 11
The optional Wireless Display that you have installed allows other devices to wireless cast their screens to your PC. As mentioned, this feature can be convenient for those who have to rock back and forth between their PCs and mobile phones. You can make use of this feature and simply cast your phone’s screen onto your Windows 11 PC.
Now that we have enabled the Wireless Display feature on Windows 11, let us take a look at the steps that you need to follow in order to use it.
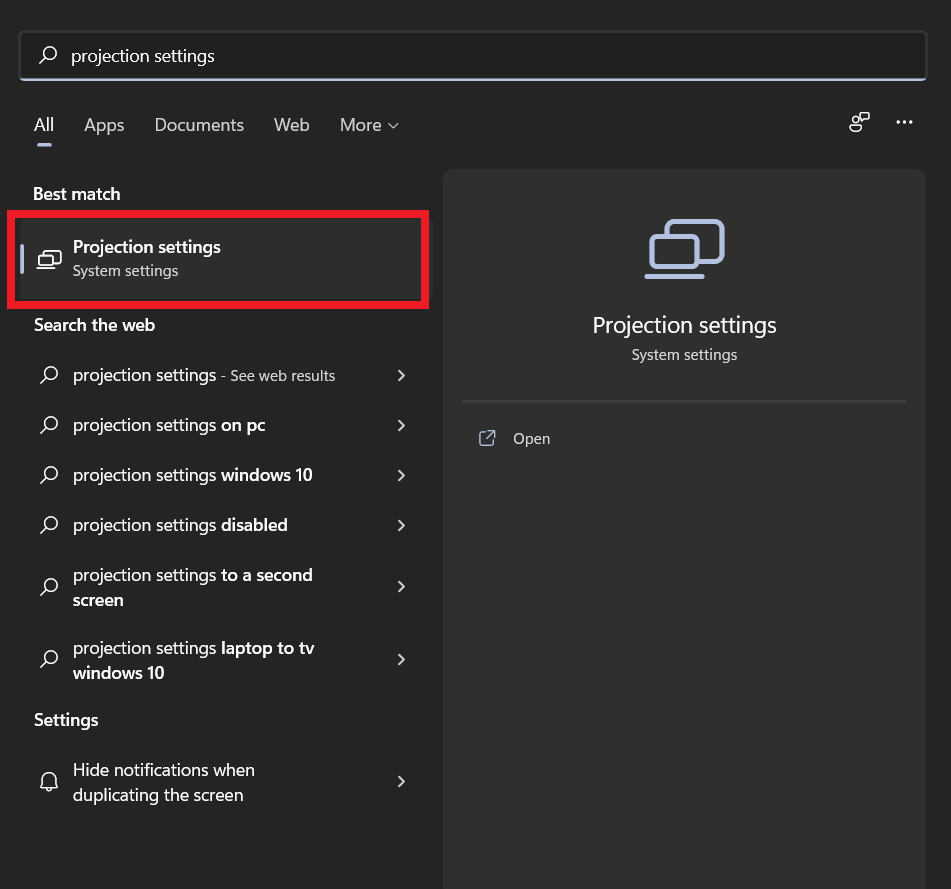
- Click on the Start menu button and search for Projection settings. Open it.

- A new Projecting to this PC window will open, where you have to select a couple of options to make your PC ready for casting.
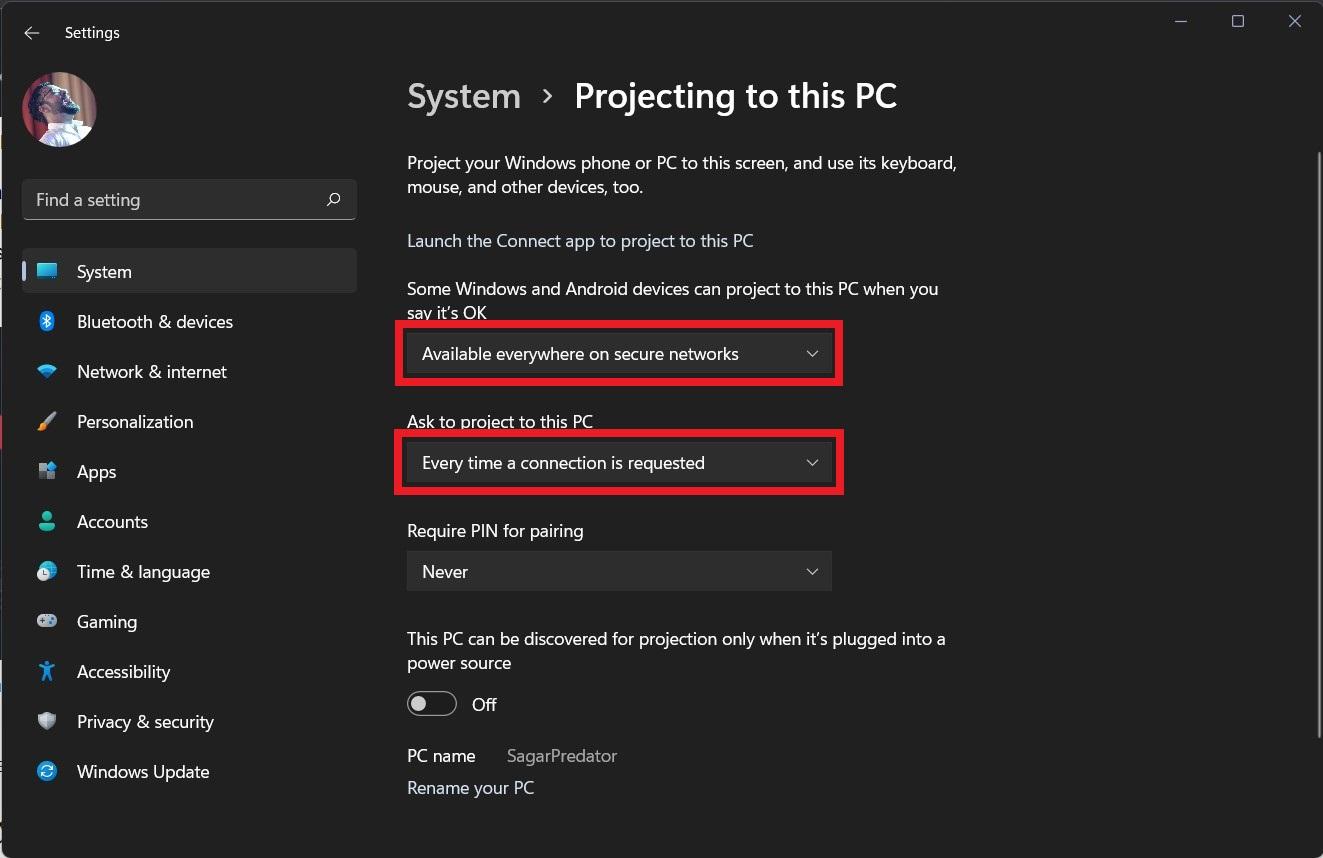
First, you need to select Available everywhere on secure networks under the option Some Windows and Android devices can project to this PC when you say it’s OK drop-down menu.
Second, in the next drop-down menu that says Ask to project this PC, select the First time only option.
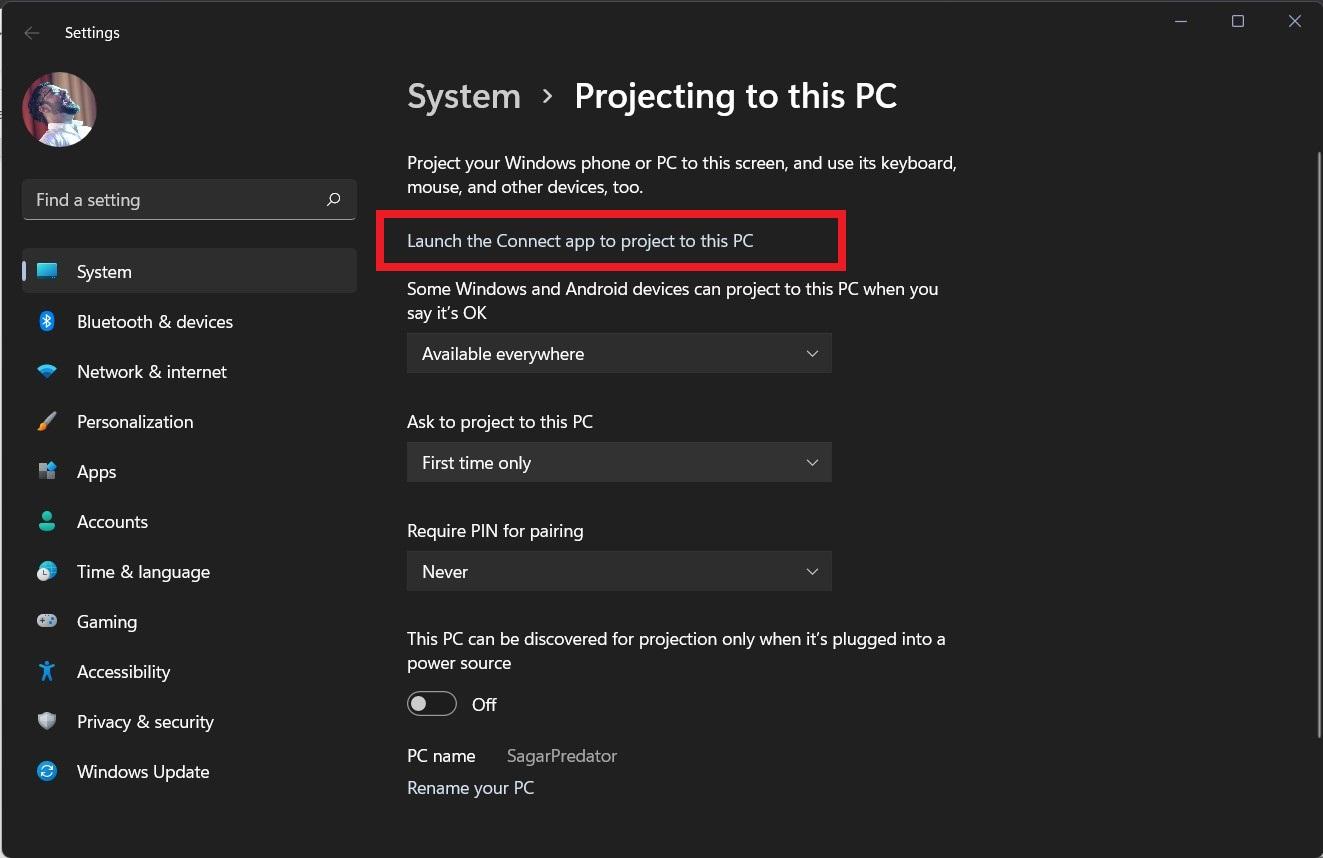
- After everything is selected, click on the Launch the Connect app to project this PC link button on top.
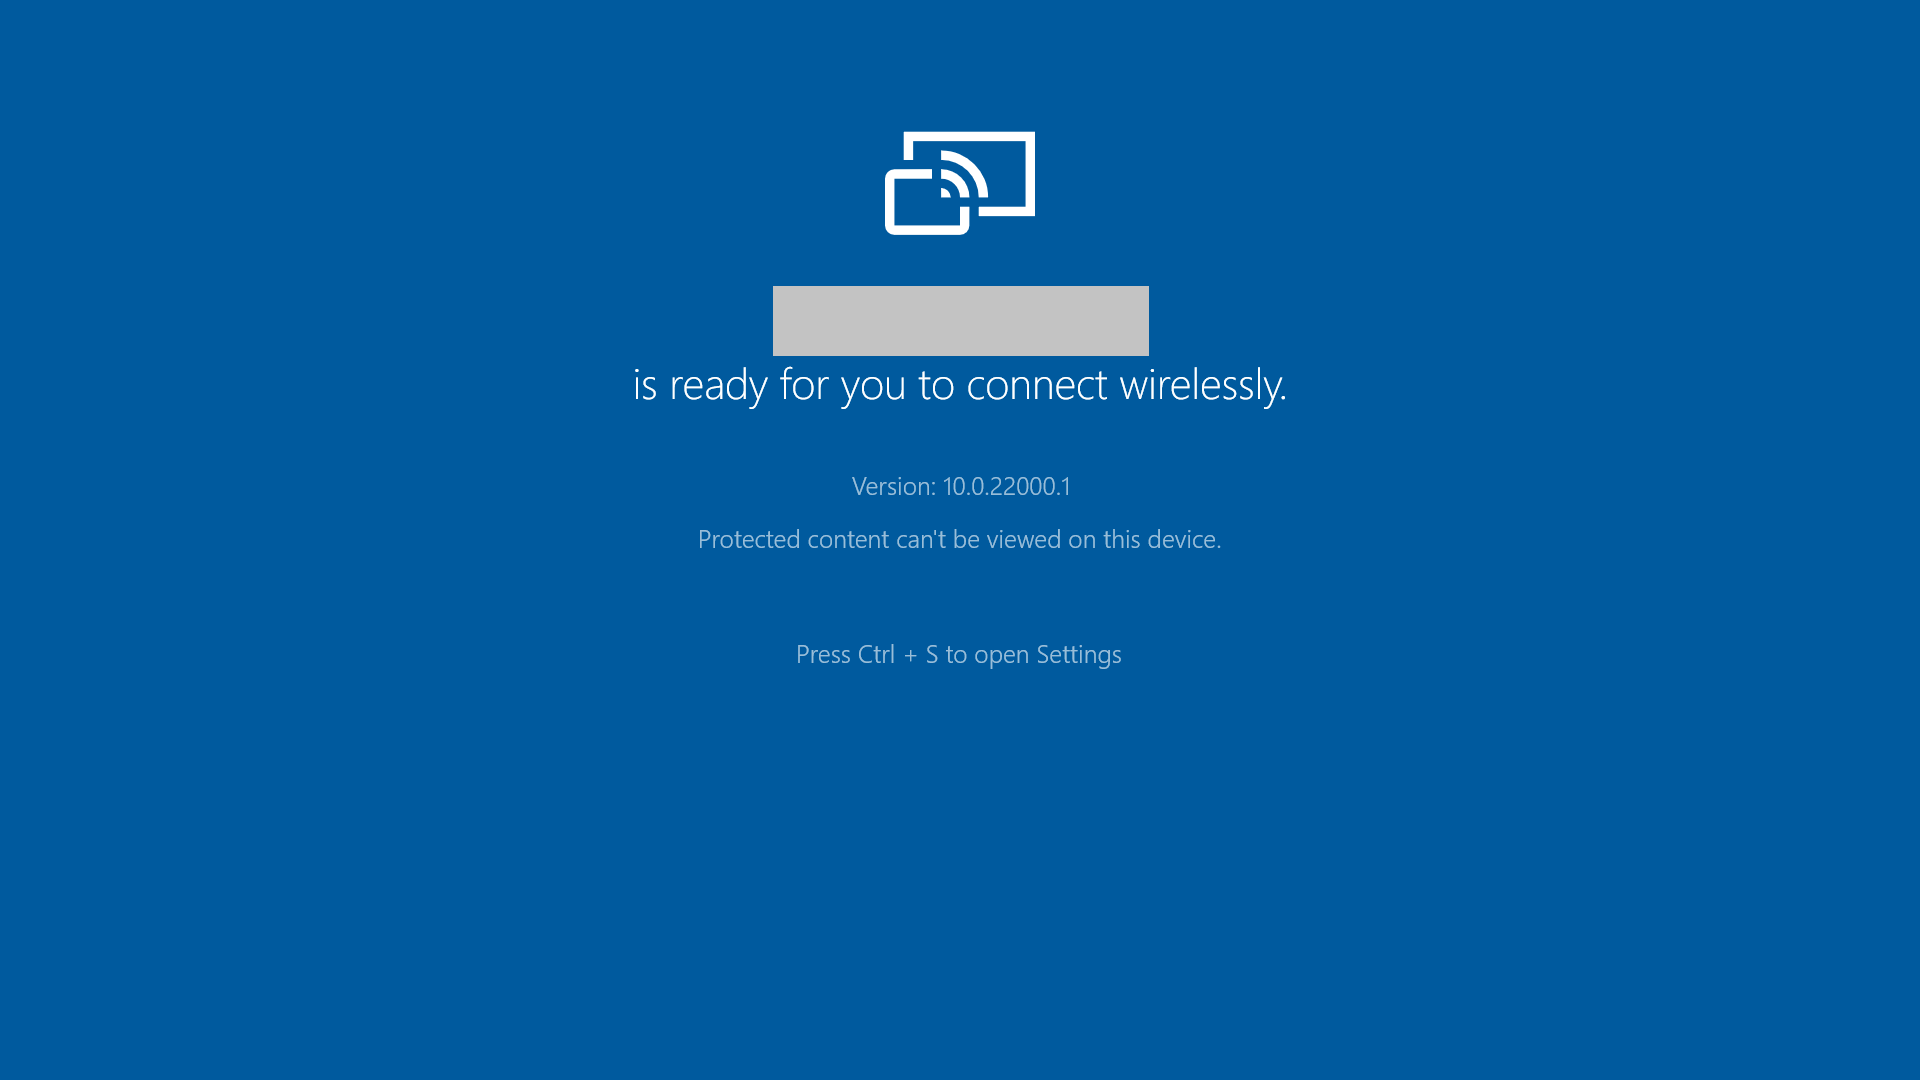
- A blue screen will show up the full screen, which indicates that your Windows 11 PC is ready for casting.

- Now, you can head over to your smartphone and swipe down on your phone’s home screen to open the Quick Settings menu.
- From the Quick Settings menu, select the Screen Cast option. If not available, go to the Android setting and look for Cast/Mirror options.

- Note that your Windows 11 PC and Android phone should be connected to the same wireless network in order for casting to work.
- Select your PC from the list of wireless casting options available, and that’s it!. You will see your phone’s screen mirrored onto your Windows 11 PC display.
- Your Android Display will be Mirrored to Windows 11 Laptop or PC.

You can now easily project any Android phone’s screen to your Windows 11 PC display following the above-mentioned steps. If you are interested, then we have a dedicated guide on how you can cast your Windows 11 display to your Android TV. This would allow you to view your favorite media content or browser internet right on your big screen Android TV. You can check out the guide here.
If you’ve any thoughts on How to Mirror Android Screen to Windows 11?, then feel free to drop in below comment box. Also, please subscribe to our DigitBin YouTube channel for videos tutorials. Cheers!