

Содержание
Если вы решили сменить свой надежный ПК с Windows на Apple Mac или просто являетесь энтузиастом технологий, которому нравится иметь оба варианта, то в какой-то момент вам, скорее всего, понадобится перенести файлы с одного устройства на другое. Это довольно распространенный сценарий, но поскольку устройства Windows и Apple существуют в разных экосистемах и используют разную терминологию для своих функций, все может довольно быстро запутаться. К счастью, мы здесь, чтобы помочь.
Чтобы упростить задачу, мы подготовили руководство, которое поможет вам с легкостью перенести файлы с Windows на Mac.
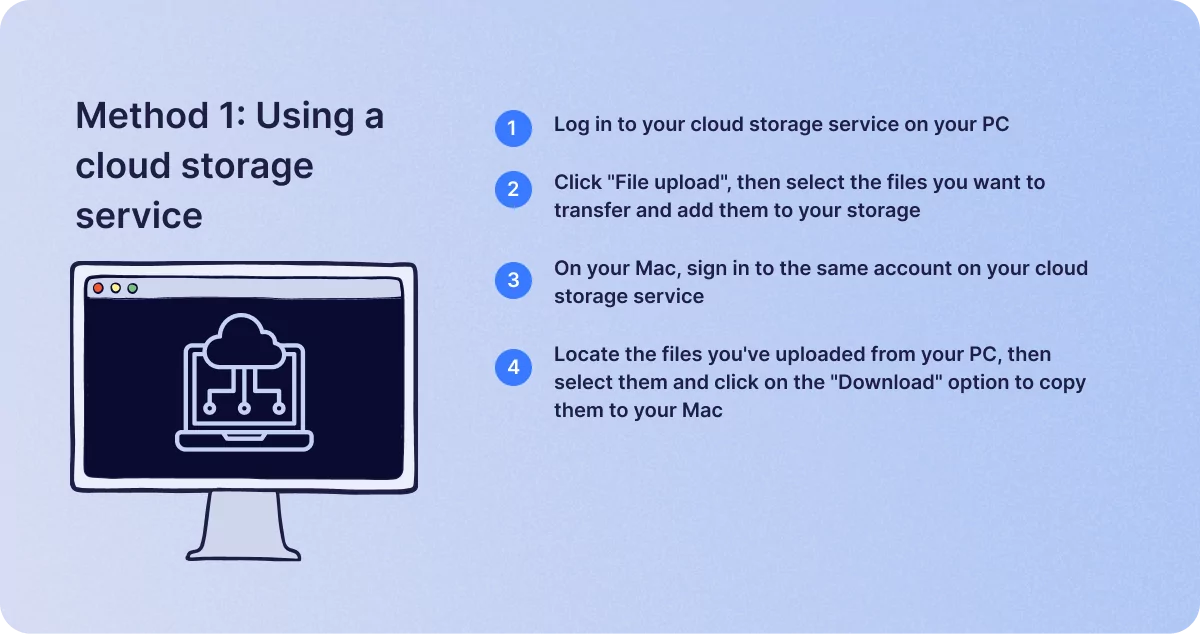
Способ 1: Использование облачного хранилища
Если у вас хорошее интернет-соединение и есть аккаунт в облачном хранилище, например Google Drive или Dropbox, то это самый простой способ перенести файлы. Для этого вы можете выполнить следующие шаги:
- Войдите в облачное хранилище на своем ПК.
- Нажмите «Загрузить файлы», затем выберите файлы, которые вы хотите передать, и добавьте их в свое хранилище.
- На компьютере Mac войдите в ту же учетную запись в облачном хранилище.
- Найдите файлы, которые вы загрузили со своего ПК, затем выберите их и нажмите кнопку «Загрузить», чтобы скопировать их на свой Mac.
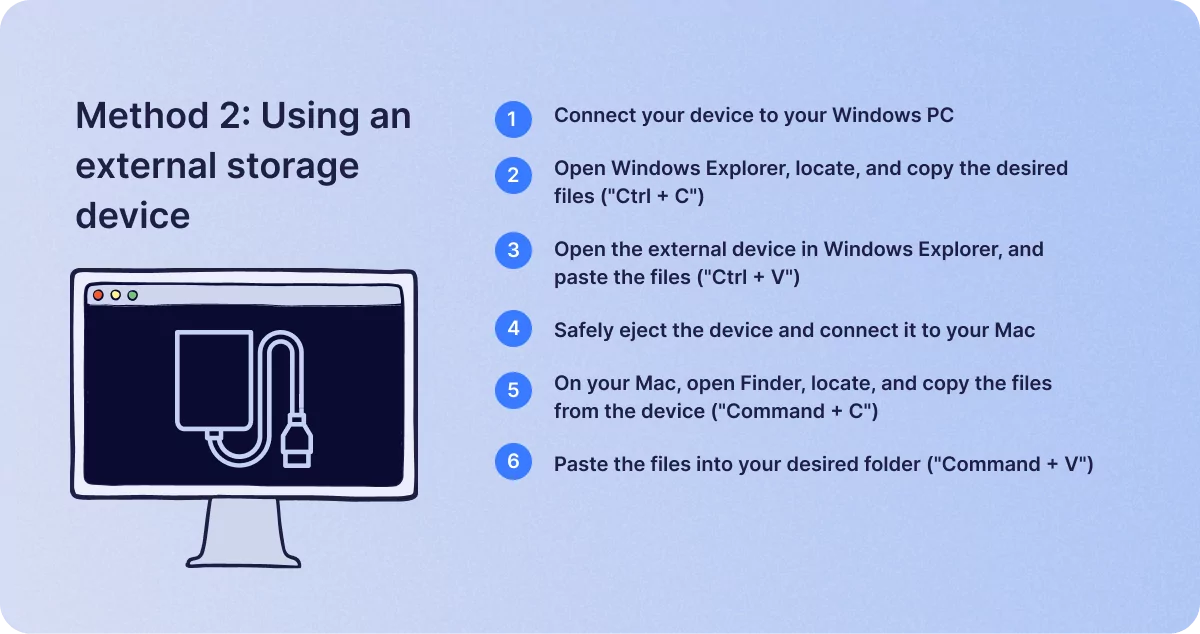
Метод 2: Использование внешнего запоминающего устройства
Если ваше интернет-соединение недостаточно быстрое для использования облака или вы предпочитаете передавать файлы локально из-за беспокойства о онлайн-безопасности, то вы также можете использовать внешнее запоминающее устройство для этого. Это может быть USB-флеш-накопитель, внешний жесткий диск или SD-карта, если на вашем устройстве есть необходимые порты и слоты.
Эти шаги заключаются в следующем:
- Подключите внешнее устройство к ПК с ОС Windows через соответствующий порт или слот.
- Откройте проводник Windows и перейдите к файлам, которые вы хотите перенести.
- Выделите нужные файлы, затем нажмите «Ctrl + C», чтобы скопировать их.
- Снова откройте проводник Windows, перейдите в раздел «Этот компьютер» и откройте оттуда внешнее запоминающее устройство.
- В окне устройства щелкните правой кнопкой мыши и нажмите «Ctrl + V», чтобы перенести файлы на устройство.
- Щелкните правой кнопкой мыши на устройстве хранения в окне «Этот компьютер» и нажмите «Извлечь», чтобы безопасно отключить его. Затем подключите устройство к вашему Mac.
- На Mac откройте Finder и найдите устройство хранения данных в разделе «Устройства».
- Откройте окно внешнего запоминающего устройства, выделите файлы и нажмите «Command + C», чтобы скопировать их.
- Перейдите в нужную папку, затем нажмите «Command + V», чтобы вставить туда файлы.
Метод 3: Использование помощника по миграции Apple
Apple также предоставляет инструмент под названием Migration Assistant, разработанный для помощи пользователям в переносе данных с Windows на Mac. Чтобы перенести файлы с помощью этого метода, выполните следующие действия:
- Убедитесь, что оба устройства находятся в одной сети.
- Загрузите и установите на свой ПК Migration Assistant с веб-сайта Apple.
- Запустите Migration Assistant из папки приложений на вашем Mac, затем выберите «С ПК с Windows» и нажмите «Продолжить».
- Приложение на вашем Mac выполнит поиск вашего ПК в сети. Когда оно появится, выберите устройство и нажмите «Продолжить».
- Откройте Помощник по миграции на ПК с ОС Windows и следуйте инструкциям.
- Выберите файлы, которые вы хотите перенести, затем нажмите «Продолжить», чтобы начать процесс передачи.
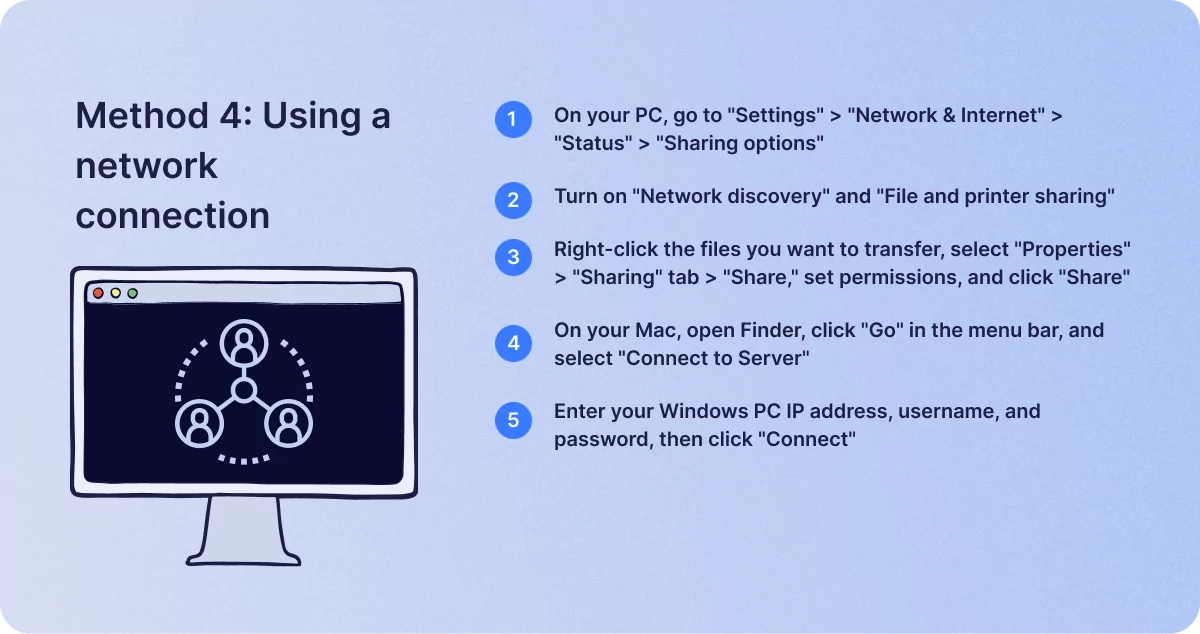
Метод 4: Использование сетевого подключения
Если ваш ПК с Windows и Mac находятся в одной сети, вы также можете передавать файлы напрямую таким образом. Для этого выполните следующие действия:
- На ПК перейдите в «Настройки», затем «Сеть и Интернет» и «Состояние». Нажмите «Параметры общего доступа».
- В разделе «Сетевое обнаружение» нажмите «Включить сетевое обнаружение», а затем выберите «Включить общий доступ к файлам и принтерам».
- Перейдите к файлам, которые вы хотите перенести, затем выделите их, щелкните правой кнопкой мыши и выберите «Свойства».
- На вкладке «Общий доступ» нажмите «Поделиться», затем добавьте свои разрешения и снова нажмите «Поделиться».
- На Mac откройте Finder, затем нажмите «Перейти» в строке меню и выберите «Подключиться к серверу».
- Введите ваш ПК с Windows IP-адрес, имя пользователя и пароль, затем нажмите «Подключиться».
Подведение итогов
Учитывая разные интерфейсы на устройствах Windows и Mac, перенос файлов с одного устройства на другое может показаться немного сложным поначалу, но процесс на самом деле довольно прост, как только вы узнаете, как это сделать. Следуя инструкциям, которые мы здесь привели, вы сможете перенести файлы, чтобы начать работу с вашим Mac за считанные минуты.
Подобные сообщений
Содержание
Can you transfer data from Windows to Mac? Of course! EaseUS offers you a comprehensive and optimal solution to transfer data across systems. With the help of different migration assistants and migration methods, you can easily transfer all your data, including contacts, calendars, email accounts, etc., from your Windows PC to the right place on your Mac. Read on for 5 proven methods provided by EaseUS.
Preparations Before Transferring Data from Windows to Mac
Before we start to migrate data, we need to make preparations on both MacBook and Windows PCs for smooth migration:
1️⃣Download the cross-platform migration tool — EaseUS Todo PCTrans, which provides a straightforward solution to save time and effort.
2️⃣Know the password and name of the administrator account on the PC and ensure the Windows system is up-to-date. The Migration Assistant for transferring data from PC to Mac only works with Windows 7 and higher.
3️⃣Connect your Mac and PC to the same network (such as home Wi-Fi). Or use an Ethernet cable to connect your Mac and PC ports and have an Ethernet adapter on hand.
4️⃣If you are using Microsoft OneDrive, uninstall it first. Also, uninstall antivirus, firewall, or VPN software if you have it installed.
5️⃣Check the hard drive health and ensure there are no problems with your Windows hard drive: open a run window and type cmd to open a command prompt; use chkdsk drive: /F to see any problems.
Once you have done the above preparations, read on. Whether you need to migrate files, documents, or media, these methods will ensure a smooth transfer to your new Mac system. Don’t forget to share this article with others if you found it helpful in transferring your Windows data to Mac.
Follow the five proven efficient ways to transfer data from Windows to Mac:
- Method 1. Use Cross-System Transfer Tool — EaseUS Todo PCTrans
- Method 2. Use Migration Assistant
- Method 3. Use File Sharing
- Method 4. Use Cloud Storage Service
- Method 5. Use an External Storage Device
Method 1. Use Cross-System Transfer Tool — EaseUS Todo PCTrans
Apply to: Users who don’t want to use complicated programs and steps.
EaseUS Todo PCTrans, a professional third-party software for transferring files from PC to PC, provides advanced features and flexibility to transfer data between Windows and Mac. Simply install the tool on both systems, and you can easily solve the problem.
Without expertise or other tool requirements, you can transfer all your data and settings to Mac and enjoy a seamless transition to your new Mac system.
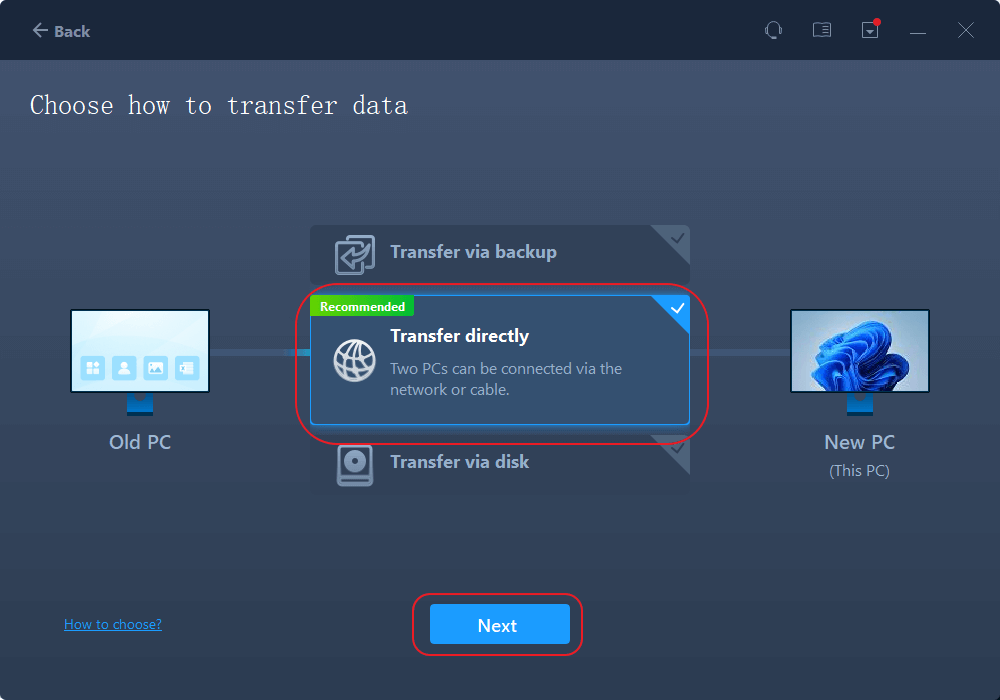
Step 1. Set Up the Old PC
- First, install and launch EaseUS Todo PCTrans and select Data Transfer on the left panel of the main interface.
- Select «Transfer Directly» and click «Next» to continue.
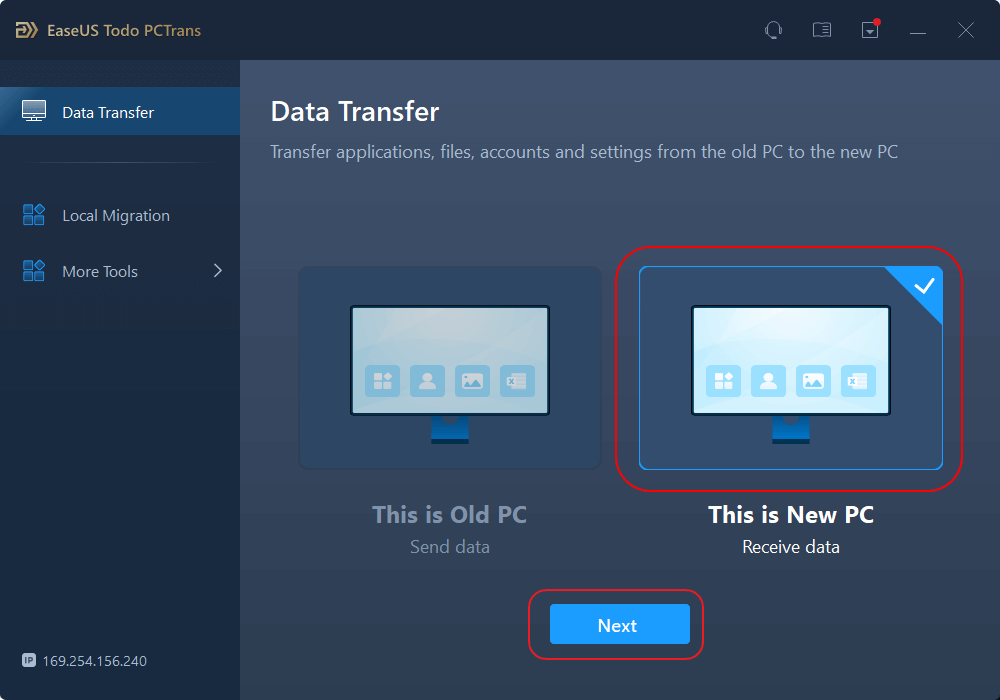
Step 2. Set Up the New PC
- Download and launch EaseUS Todo PCTrans on the new computer; select «This is New PC» and click «Next».
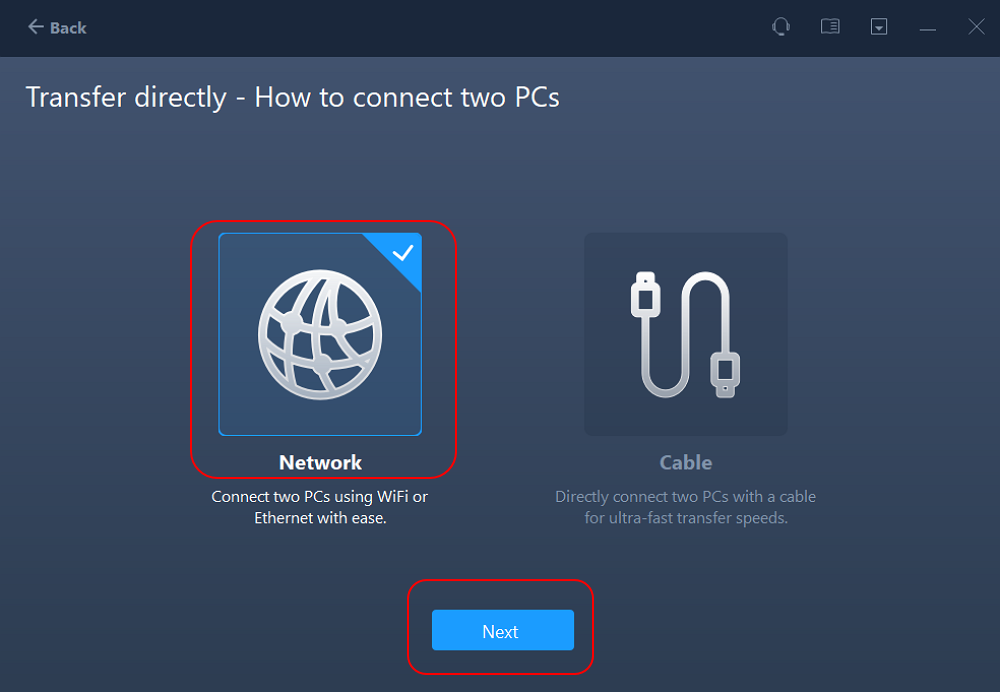
- Select «Transfer directly» and click «Next» to continue.
- Select «Network» and click Next to continue. This will automatically scan the old PC. (Make sure the two PCs are connected to the same LAN.)
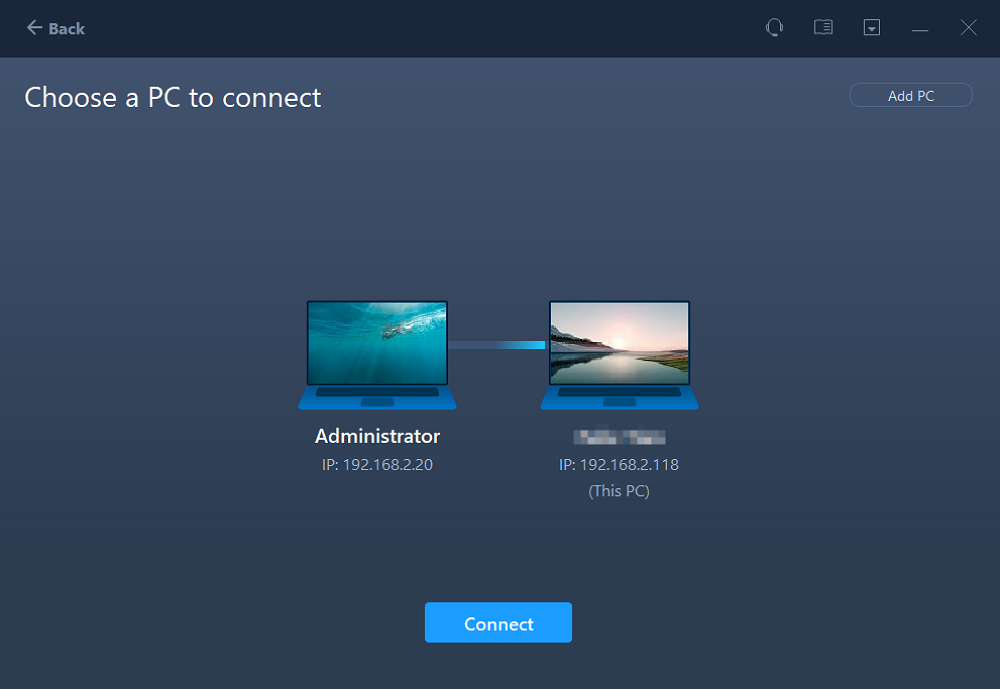
- Select the target PC and click Connect. Then, it will take some time to scan and analyze the data in old PC.
Step 3. Select the Files to Transfer
- Finally, on the new PC, select the Files tab, select the files you need to transfer. Then, click «Transfer» to start.

Method 2. Use Migration Assistant
Apply to: Experienced users familiar with Mac’s built-in tools and want to transfer files to Mac via Wi-Fi.
Migration Assistant is a built-in application provided by Mac. To know Migration Assistant Windows to Mac, refer to this section. Migration Assistant will copy but not delete files from your computer, so please feel free to use this tool:
Before you start, please get on your WindowsPC and install the appropriate Migration Assistant for Windows according to the macOS version on your Mac:
- For macOS Sonoma, macOS Ventura, or macOS Monterey: Windows Migration Assistant (current version)
- For macOS Big Sur: Windows Migration Assistant 2.3.1.0
- For macOS Catalina or macOS Mojave: Windows Migration Assistant 2.2.0.1
- For macOS High Sierra or macOS Sierra: Windows Migration Assistant 2.1.2.0
- For OS X El Capitan or earlier: Windows Migration Assistant 1.0.5.7
Steps to use Migration Assistant on Mac and PC:
On Mac:
Step 1. Open Finder and open Migration Assistant from Applications > Utilities folder.
Step 2. Click on the Transfer from Windows PC option and select Continue.

Step 3. Connect your Mac to your PC via Ethernet or local Wi-Fi network.
On Windows PC
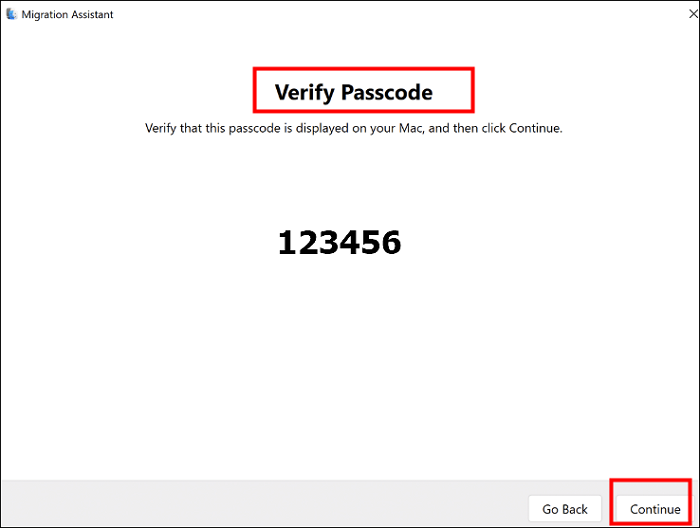
Step 1. Execute the Migration Assistant download.
Step 2. Enter the security code displayed on your Mac into your Windows computer, and make sure your PC and Mac display the same password.
On a Mac
Step 1. The Migration Assistant catalogs the data on Windows. Then, select the data you want to transfer, such as user accounts, applications, files, and settings.
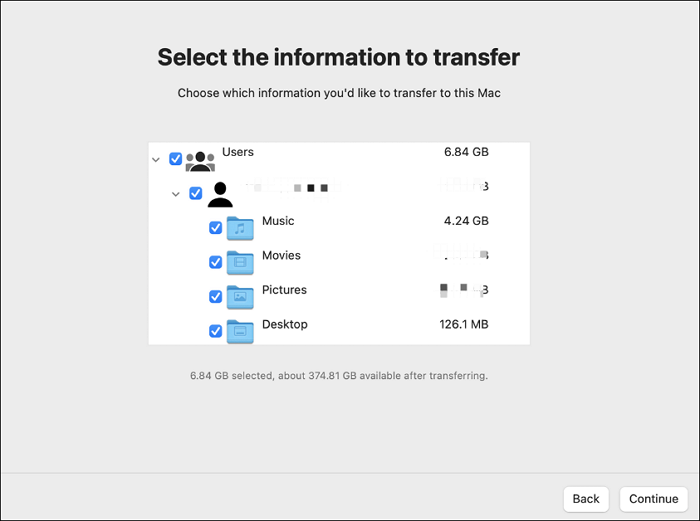
Step 2. Click Continue to start the data transfer process. Large transfers can take several hours to complete.
After the Migration Assistant has completed its work, log out of it on both machines and access the transferred account’s data on your Mac by logging in. The password and account name is the same as those on your PC.
Method 3. Use File Sharing
Apply to: users who are familiar with Windows and Mac operations
Are you wondering how to move data from PC to Mac without using Migration Assistant? Windows also provides inbuilt methods for file sharing. You can connect Windows computers and Macs to the same local network and enable wireless data transfer.
Stage 1. Setting up File Sharing on Windows
Step 1. Open Windows Settings > Network and Internet > Status.
Step 2. Under Change Network Settings, select the Sharing option.
Step 3. After expanding the Private or Public Network menu, open Network Discovery and tick the checkbox next to File and Printer Sharing.
To share a folder, right-click the folder name and go to Properties > Sharing > Network File and Folder Sharing > » Sharing».
Stage 2. Accessing Windows files on a Mac
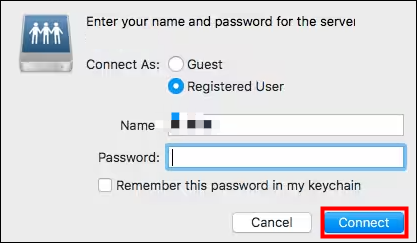
Step 1. Go to the Finder application, link to the server, type smb://[IP address], and press Enter.
Step 2. At the prompt, enter your Windows username and password and click Connect.
Step 3. All shared content or files will be visible on the system when the connection is complete. And drag and drop the required files and data.
Method 4. Use Cloud Storage Service
Apply to: Users transferring small amounts of data or files
Cloud storage services usually provide multiple platforms to be used together. For example, OneDrive, Google Drive, or Dropbox. Through these cloud storage, you can easily transfer data between different devices. However, there is a limit to the size of data that can be transferred through them, and this method is suitable for users who transfer less data or files.
Step 1. Sign up for an account that allows you to sign in on both Mac and PC, such as OneDrive or Google Drive.
Step 2. Sign in to the account within Windows and upload data to a folder in the cloud storage service.
Step 3. Sign in to the same cloud storage account on Mac and sync or download the data uploaded by Windows.
Method 5. Use an External Storage Device
Apply to: novice users, and those who have an external device.
USB flash drives or external hard drives provide the most traditional and simple data transfer method. You can easily transfer files from PC to Mac via USB.
Step 1. Copy the files you wish to move to the external storage device and connect it to your Windows PC.
Step 2. Eject the USB to a Windows PC.
Step 3. Connect the external device to the Mac and locate it.
Step 4. Copy files and folders from the external storage device to the desired location on your Mac.
Conclusion
Transferring data from Windows to Mac involves moving files, folders, and settings from one operating system to another. Fortunately, this article provides five different methods to help you transfer data from Windows to Mac. Depending on the size and complexity of the data, you should choose different methods:
- For small data — try cloud services and USB drives.
- For big data — choose EaseUS Todo PCTrans and Migration Assistant.
FAQs About Transfer Data from Windows to Mac
This section also provides additional questions about transferring data between Windows and Mac. Continue reading.
1. Can you transfer data from Windows to Mac after setup?
Of course, you can transfer data from Windows to Mac after setup, and Apple offers a tool called Migration Assistant. Apple offers a tool called Migration Assistant, which you can run the first time you set up your new Mac or after you’ve finished. Besides, we also provide additional methods in this article, such as external storage devices, local network transfer, cloud storage services, etc., which can help you migrate data from Windows to Mac.
2. How can I transfer files from PC to Mac on the same network?
To transfer files from PC to Mac on the same network, please open a file share on Windows first and then access the shared Windows files on Mac:
- Click Go > Connect to Server from the menu bar.
- Click Connect after entering your Windows computer’s IP address in the Server Address area.
- After entering your password and Windows username, hit Return.
3. How do you transfer files from PC to Mac without Migration Assistant?
You can choose a migration assistant PC to Mac — EaseUS Todo PCTrans, for one-click migration. You can also use file sharing:
Stage 1: Open network share and set up a shared folder on Windows
Stage 2: Access Windows files on Mac and drag and drop them to the Mac drive.
This guide provides detailed solutions, so please read it carefully!
Transferring data from a Windows PC to a Mac can be a daunting task, especially for those who are not tech-savvy. However, with the right tools and guidance, the transition can be smooth and efficient. This guide will walk you through the various methods to migrate your data, ensuring that you don’t lose anything important in the process.
Understanding the Basics
Before diving into the methods of transferring your data, it’s essential to understand the primary differences between Windows and Mac operating systems. While they both serve the same fundamental purpose of managing hardware and software, they do so in unique ways. This difference can sometimes complicate direct data transfers.
Macs use the HFS+ or APFS file systems, whereas Windows primarily uses NTFS or FAT32. This means that external drives formatted for Windows may not be compatible with macOS unless reformatted. Familiarizing yourself with these differences will help you avoid issues during the migration.
Preparing for the Transfer
1. Audit Your Data
Before you begin the transfer, conduct a thorough audit of your data on your Windows PC. Identify what you need to transfer—documents, photos, videos, email data, and application files. This will help you sort through your information and prioritize what is essential.
2. Backup Your Data
Always make sure to back up your data before a significant transfer. Use an external hard drive or cloud storage solutions such as Google Drive, Dropbox, or OneDrive to ensure that all your important files are safe. In some cases, this step may save you from disastrous data losses during the transfer.
Methods for Data Transfer
There are multiple methods available for transferring data from Windows to Mac. Each of these methods has its pros and cons, depending on your specific needs and comfort level with technology.
Method 1: Using Migration Assistant
Apple’s Migration Assistant is a powerful tool designed to move data from a Windows PC to a Mac. Here’s how to use it:
-
Prepare Your Windows PC:
- Download the Windows Migration Assistant from the Apple website.
- Follow the instructions to install the software on your Windows PC.
-
Connect Both Computers:
- Connect your Windows PC and Mac to the same Wi-Fi network. For faster data transfer, consider using a direct Ethernet connection.
-
Launch Migration Assistant:
- On your Mac, open «Migration Assistant» (found in Utilities).
- Select «From a Windows PC» when prompted.
-
Follow the Instructions:
- Ensure the Windows PC is turned on and Migration Assistant is running. Follow the prompts to select the data you wish to transfer, including user accounts, documents, and more.
-
Complete the Process:
- Once the migration is done, restart your Mac. Your data will be organized in the appropriate locations.
Method 2: Using External Hard Drive
If you prefer a manual approach, using an external hard drive can be an excellent option for transferring files:
-
Format the Hard Drive:
- Ensure your external hard drive is formatted in a way that both Windows and Mac can read. Typically, exFAT is an excellent option, but you can also format it to NTFS if you don’t need to write to it from the Mac.
-
Copy Files from Windows:
- Plug the external hard drive into your Windows PC and copy the documents, photos, videos, and other files you need.
-
Connect to Mac:
- Safely eject the hard drive from your Windows machine and connect it to your Mac.
-
Transfer Files:
- Open Finder on your Mac, find the external hard drive, and drag the files to your desired locations on your Mac.
Method 3: Cloud Storage Solutions
Cloud services are excellent for transferring files without the need for physical storage. Here’s how to do it:
-
Select a Cloud Service:
- Choose a cloud service that both your Windows PC and Mac can access, such as Google Drive, Dropbox, or OneDrive.
-
Upload Your Files:
- On your Windows PC, upload the files you want to transfer to your chosen cloud service account.
-
Access on Mac:
- On your Mac, log into the same cloud service account and download the files to your computer.
Transferring Specific Types of Data
Different types of data may require specific methods for seamless transfer. Below is a closer look at how to handle files related to email, programs, and settings.
Email Data
If you use Microsoft Outlook or another email client, consider the following:
-
Export Your Emails:
- On your Windows machine, open your email client and look for an option to export emails. Save the file in a format compatible with your new email provider.
-
Import on Mac:
- On your Mac, open the corresponding email client and import the exported files.
For most web-based email services like Gmail, simply signing into your account from your new Mac will sync all your emails automatically.
Transferring Applications
Moving applications from a Windows PC to a Mac is not as straightforward due to compatibility issues. Here’s what to do:
-
Check Mac Version:
- Ensure that the applications you use on Windows have Mac versions available. Visit the official websites to download them.
-
Installation:
- Install the applications on your Mac and reinstall any necessary plugins or add-ons.
Transferring Settings and Preferences
Settings like system preferences and browser bookmarks often require manual transfer:
-
Browser Bookmarks:
- Export bookmarks from your Windows browser (Chrome, Firefox, etc.) and then import them into the corresponding browser on your Mac.
-
System Preferences:
- Most system preferences will need to be set manually on your Mac, as they don’t transfer over.
Post-Transfer Clean Up
Once your data transfer is complete, there are several steps to ensure everything is in order:
1. Verify Data Integrity
Go through the transferred files on your Mac and check if everything is in its place and accessible. Open documents and photos to confirm that they transferred correctly.
2. Organize Your Files
Take this opportunity to tidy up your files. Create folders and categorize your documents, music, photos, and videos. A well-organized system will help you find things quickly in the future.
3. Install Necessary Software
Make sure to install any necessary software on your Mac that you regularly use on Windows. Don’t forget to check for updates once installed.
4. Data Security
Install security software to protect your new Mac. Consider setting up a backup solution, like Time Machine, to keep your data secure going forward.
Troubleshooting Common Issues
During the transfer process, you may encounter some common issues. Here’s how to address them:
-
Incompatibility Problems:
- If files don’t open, they might be using software not compatible with macOS. Research alternative programs for Mac that can open these files.
-
Network Issues:
- If you face difficulties connecting both computers on the same network, ensure both devices are connected to the same Wi-Fi network or check your firewall settings.
-
Missing Files:
- Double-check your audit list. Sometimes files may not have been copied due to external drive space limits or accidental omissions.
Conclusion
Transferring data from Windows to Mac doesn’t have to be overwhelming. Whether you choose to use Migration Assistant, external drives, or cloud solutions, having a structured plan will ensure you move your essential files and settings smoothly. With proper organization after the transfer, your new Mac can become a productive tool that seamlessly supports your needs.
Remember, the key to a successful migration is preparedness. By following the steps outlined in this guide, you can minimize the stress and enjoy the unique features and benefits that come with using a Mac. Happy transferring!
Can you transfer data from Windows to Mac? Absolutely!
The tool provides a comprehensive and optimized solution for
transferring data across systems. With various migration assistants and
methods, you can easily move all your data, including contacts, calendars,
email accounts, and more, from your Windows PC to the right places on your
Mac. Read on to learn about five verified methods offered by the tool.
#
Preparing to Transfer Data from Windows to Mac
Before we start transferring data, we need to do some preparation on both the
MacBook and the Windows computer to ensure a smooth migration.
1️⃣Download a Cross-Platform Migration Tool — Use the
Todo PCTrans tool, which
offers an easy way to save time and effort.
2️⃣ Know the username and password for an administrator account on the PC, and
make sure that Windows is up to date. The Migration Assistant for transferring
data from a PC to a Mac only works with Windows 7 and later.
3️⃣ Connect your Mac and PC to the same network, such as a
home Wi-Fi. Alternatively, use an Ethernet cable to connect the ports on your
Mac and PC, and have an Ethernet adapter ready.
If you are using Microsoft OneDrive, please uninstall it first. Additionally, if antivirus, firewall, or VPN software is installed, please uninstall it as well.
5️⃣
Check hard drive health
to ensure there’s no issue with the Windows disk: Open the Run window, type
cmd to launch Command Prompt; use
chkdsk drive: /F to look for any problems.
With the preparations out of the way, proceed with the read. These methods
will ensure that your files, documents, or media move over to the new Mac
system without a hitch. If you found this article helpful in transferring
Windows data to a Mac, don’t forget to share it with others.
The Chinese translation for «&nbps;» is «无» or «空白». In web pages or
documents, it is often used to fill or reserve space.
# Five Ways to Transfer Data from Windows to Mac When switching from the
Windows operating system to a Mac, you might need to migrate essential data
like files, applications, and settings to your new platform. Here are some
effective methods to achieve this: 1. **Using Cloud Services**: — Upload your
files to cloud storage services like Google Drive, Dropbox, or OneDrive, then
download them on your Mac. This works well for smaller files and documents. —
For larger datasets, ensure you have enough cloud storage and consider
uploading in batches to save time. 2. **External Hard Drive or USB Drive**: —
Copy all important files onto an external hard drive or USB drive, then import
them to your Mac. This is suitable for transferring large files and entire
folders. 3. **Using Dedicated Migration Tools**: — Apple’s Migration Assistant
can help transfer data from your old computer (running either Windows or
macOS) via Wi-Fi or Ethernet. Follow the on-screen instructions. — Third-party
software like CrossOver or Parallels can also assist in migrating some
applications and settings. 4. **Email or Instant Messaging**: — For individual
files, send them to yourself via email and then retrieve and save them on your
Mac. — Smaller files can also be transferred using instant messaging apps like
WhatsApp, WeChat, or iMessage. 5. **Manual Reinstallation and Downloading**: —
Applications will likely require reinstallation from the Mac App Store or
developer websites. Make sure to back up license keys or account information.
— Settings cannot be directly migrated, but you can manually configure email,
browser bookmarks, system preferences, etc. Choose the method best suited to
your needs and remember to back up important data during the transfer process
to avoid any accidental loss.
Follow five proven methods to transfer data from Windows to Mac:
- Method 1. Using a Cross-System Transfer Tool — Todo PCTrans
- Method 2. Using a Migration Assistant
- Method 3. Using File Sharing
- Method 4. Using Cloud Storage Services
- Method 5. Using External Storage Devices
Method 1: Using a Cross-System Transfer Tool — Todo PCTrans
Intended for: Users who do not want to deal with complex programs and steps.
Todo PCTrans is a professional third-party tool designed for transferring
files from one
PC to another, offering advanced features and flexibility for data migration between
Windows and Mac. Simply install the tool on both systems, and you can easily
tackle this issue.
It transfers all your data and settings to your new Mac without any special
expertise or additional tools, making the transition seamless.
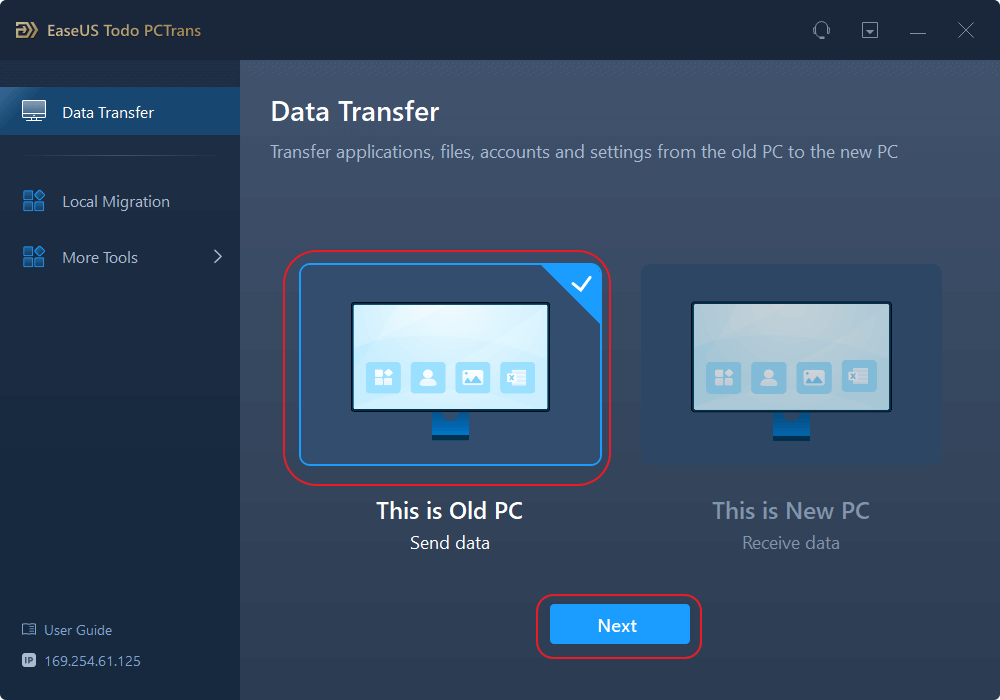
Step 1. Launch Todo PCTrans on both computers. Choose «PC to
PC» to proceed.
Step 2: Make sure you have selected the correct transfer direction.
«Transfer from old» — Move data from your old computer to your current new
one.
«Old» — Migrate data from your current old computer to a new one remotely.
Transfer files from PC to PC — Step 1

Step 3: Enter the password or authentication code of the target computer to
connect the two computers via the network. Make sure you have selected the
correct transfer direction, then click «Connect» to proceed.
The verification code is located in the upper-right corner of the main
“PC-to-PC” screen on the controller computer.

Step 4: Next, tap on «Files» to select the files you want to
transfer. Choose specific ones if needed. You can also customize the storage
path for transferred data by tapping the Edit icon.

5. Click “Transfer” to start transferring files from your computer to the
other. The length of time this takes will depend on the size of the files
you’re sending, so be patient.
Transfer Files from PC to PC — Step 5

Method 2: Using a Migration Assistant
Who this is for: Experienced users familiar with Mac’s
built-in tools who want to transfer files to a Mac over Wi-Fi.
«Migration Assistant» is an app that comes built-in with your Mac. If you’re
migrating from Windows, skip ahead to that section. Migration Assistant will
copy your files over but won’t delete them from your PC, so feel free to use
this tool.
Before you start, make sure you have the correct version of Migration
Assistant for Windows installed on your PC for the version of macOS on your
Mac:
-
For macOS Sonoma, macOS Ventura, or macOS Monterey:
Migration Assistant for Windows (latest version) -
For macOS Big Sur:
Migration Assistant for Windows 2.3.1.0 -
For macOS Catalina or macOS Mojave:
Migration Assistant for Windows 2.2.0.1 -
For macOS High Sierra or macOS Sierra:
Migration Assistant for Windows 2.1.2.0 -
For OS X El Capitan or earlier:
Migration Assistant for Windows 1.0.5.7
The steps to use Migration Assistant on a Mac or PC are:
On a Mac:
Step 1: Open the Finder and launch Migration Assistant from the Utilities
folder within Applications.
Step 2: Tap on Transfer from Windows PC, then tap Continue.

Step 3: Connect your Mac to the PC via an Ethernet cable or over your local
Wi-Fi network.
On a Windows PC
Step 1: Download the Migration Assistant.
Step 2: Enter the security code from your Mac on your Windows
PC, and make sure that the codes match on both devices.

On a Mac
Step 1: The Migration Assistant catalogs your content from
Windows. Then choose the user accounts, apps, files, and settings you want to
transfer.

Step 2: Click Continue to start the data
transfer, which can take hours if you have a large amount of data.
When it’s done, quit Migration Assistant on both machines, and then log in to
the transferred account on the Mac using the same password and account name as
on the PC.
Method 3: Use File Sharing
Applies to: Users familiar with Windows and Mac
Are you wondering how to transfer data from PC to Mac without using Migration
Assistant? Windows also offers a built-in file-sharing method that lets you
connect your Windows computer and Mac to the same local network for wireless
data transmission.
Phase 1: Set Up File Sharing on Windows
Step 1: Open Settings > Network & Internet > Status.
Step 2: Under Change adapter options, select Sharing.
Step 3. Expand the Private or Public network menu, and turn
on Network Discovery. Check the box next to File and Printer Sharing.
To share a folder, right-click the folder name, then go to Properties >
Sharing > Network File and Folder Sharing > Share.
Part 2: Accessing Windows Files on Your Mac
Step 1: Open the Finder, connect to the server by entering
smb://[IP address], and then press Return.
At the prompt, type your Windows user name and password, and then click
Connect.

Step 3: Once connected, all shared content or files will
appear in the system. You can then drag and drop the desired files and data.
Method 4: Use a Cloud Storage Service
Intended for: Users transmitting small amounts of data or files
Cloud storage services like OneDrive, Google Drive, or Dropbox typically offer
cross-platform collaboration. With these, you can easily transfer data between
different devices. However, there are limitations on the amount of data that
can be transferred through them, making it suitable for users transmitting
small amounts of data or files.
Step one: Sign up for an account with a service that lets you log in on both a
Mac and a PC, such as OneDrive or Google Drive.
2. Log in to the account on Windows and upload the data to a folder in the
cloud storage service.
Step 3: Sign in to the same cloud storage account on your Mac
and sync or download the data that you uploaded from Windows.
Method 5: Using an External Storage Device
Intended for: Beginners and users with external devices.
A USB flash drive or external hard drive offers the most traditional and
straightforward way to transfer data. You can easily transfer files from your
PC to your Mac via USB.
Step 1. Copy the files you want to move to an external storage device, and
then connect it to your Windows PC.
Step 2: Move the USB to your Windows PC.
Step 3: Connect the device to your Mac, and then locate it.
Step 4: Copy the files and folders from your external drive
to their designated places on your Mac.
Conclusions
Transferring data from Windows to Mac involves moving files, folders, and
settings from one operating system to another. Luckily, this article offers
five different methods to help you make the transition. Depending on the size
and complexity of your data, you should choose a different method:
- For small amounts of data — Try using cloud services or USB drives.
-
For large amounts of data — Opt for tools like Todo PCTrans and Migration
Assistant.
Common Issues When Transferring Data from Windows to Mac
This section also has other questions about transferring data between Windows
and the Mac. Read on.
1. Can I transfer data from Windows to Mac after installation?
Of course, you can transfer your data from Windows to a Mac after setting it
up, and Apple provides a tool called «Migration Assistant» for this purpose.
You can run this tool, called «Migration Assistant,» either when you first set
up your new Mac or after completing the setup. Additionally, this article
outlines other methods, such as using external storage devices, transferring
over a local network, or utilizing cloud storage services, that can assist you
in moving your data from Windows to a Mac.
**How can I transfer files from a PC to a Mac on the same network?** To
transfer files from a PC to a Mac on the same network, you can use one of the
following methods: 1. **Use AirDrop** (for Mac only): — Open Finder on your
Mac. — Click on «AirDrop» in the sidebar. — On the right, select «Allow me to
be discovered by Everyone.» — On the PC, open «Control Panel» or «Settings,»
then search for «Sharing.» Enable «HomeGroup» and add the Mac’s username. —
Back on the Mac, your PC should appear in Finder. Click it, then drag and drop
the files you want to transfer. 2. **Use shared folders**: — On the Mac,
create a folder and right-click, choose «Share» > «File Sharing.» — Add the
PC’s username, ensuring «Read & Write» permissions are selected. — On the
PC, open «Network,» and you should see the shared folder from the Mac.
Double-click to enter, then copy and paste the files. 3. **Use a cloud storage
service** (like Google Drive, Dropbox, etc.): — Upload the files to the web
version or desktop app of the cloud storage service. — Download the files on
the Mac using the same account’s cloud storage service app. 4. **Use an
FTP/SFTP client**: — Install an FTP or SFTP client (like FileZilla) on the PC.
— Set up an FTP or SFTP server on the Mac (you may need third-party software
like Transmit). — Connect to the Mac’s server with the client and transfer the
files. 5. **Use a USB flash drive**: — Insert the USB flash drive into the PC,
copy the files. — Plug the USB drive into the Mac, and paste the files into
the desired location. Choose the method that best suits your needs and device
configuration.
To transfer files from a PC to a Mac over the same network, first turn on file
sharing on Windows, then access the shared Windows files on your Mac.
-
From the menu bar, click “Go” > “Connect to Server.” In the “Server
Address” field, enter your Windows computer’s IP address, then click
“Connect.” Enter your password and Windows username, then hit Enter.
3. How to transfer files from PC to Mac without Migration
Assistant?
You can choose a
PC to Mac migration assistant
tool like Todo PCTrans to transfer everything in one go. You can also use file
sharing:
Phase 1: Enable network sharing and set up a shared folder on Windows
Step 2: Access your Windows files on the Mac, then drag them
onto a Mac disk.
This guide provides detailed solutions, please read carefully!
Once you switch from a PC to a MAC, you will likely want to transfer the files from one to the other. The easiest method to transfer these files is over WiFi. There is no need for additional cables or hardware required to transfer larger files between Mac and Windows as long as both computers are on the same network or have access to the internet.
This article describes the methods for transfer large files between Mac and Windows over WiFi using free Cloud Services, a WiFi network, and a Flash drive or Hard Disk.
Transfer Files between Windows and Mac with Cloud Drives
The best and free solution to transfer files as is to use a Cloud service. If you are not tech-savvy, rather than going through the network setup, these cloud apps are easy to use. Most of the cloud services like Dropbox, Google Drive, SkyDrive, etc., are available for both the MAC and PC. These Cloud Drive transfer is the most reliable method and does not require additional hardware.
When using the cloud services to transfer files, you can install the Windows and MAC applications in your system and copy files from your hard disk (Windows System hard disk) to the cloud drive. Once you drag or copy and paste the files onto the cloud drive, these files will then sync with your second system. In the second system (MAC), you can copy synced files from cloud drive to your system hard disk to make sure a local copy on your system hard disk.
Related: 6 Easy Methods to transfer files between Android and Windows
Dropbox is one of the best drive solutions available with multip platform support both for PCs and Smartphones. Dropbox is offering 2GB free space and most of the time you can delete the files after transferring to free up space on the cloud drive. You can earn up to 18GB by referral and available on almost all platforms, that can download from DropBox website.
Google Drive, direct from Google also supports and sync files between Windows PC and Mac. Google Drive store files up to 10GB size and offers 15GB free space. You need only a valid Gmail account, and you can install the applications on your PC and MAC system to share files. You can download the Google Drive Application from Google Drive website.
SkyDrive is a cloud service from Microsoft that offers the software for MAC and Windows to install and share files. You can share photos, documents, and other important files between MAC and PC using SkyDrive. This drive offers a 7GB free space and downloads from SkyDrive website.
Transfer Files between Windows and Mac through Network
The next solution as long as you have a home network is to transfer files between Windows and Mac through the network. Before you start, make sure both systems are on the same network. You can’t transfer files remotely from one machine to another one. Both machines should be on the same network to transfer files with each other.
The example below demonstrates Windows PC as the host and the first step is to Enable File Sharing on Windows. This process may be slightly different based on the Windows operating system you are using.
- Windows 10: Control Panel > Network and Internet > Network and Sharing Center > Advanced Sharing Settings > File and Printer Sharing > Turn on File and Printer Sharing.
- Windows 7: Control Panel > Network and Sharing Center > Choose Homegroup and Sharing options > Change Advanced Sharing Settings > click “Turn on File and Printer Sharing.”
- Windows Vista: Control Panel > Network and Sharing Center > Expand the File Sharing drop-down > click on “Turn on File and Printer Sharing.”
- Windows XP: Control Panel > double-click Network Setup Wizard and run it.
Once your Windows PC is ready for file sharing, then the next step is to connect Mac to Windows. Before you start, make sure that followed all the setting on Windows PC as we specified above. Also, please make sure both machines are connected to the same network.
Now open the Finder window on MAC, on the left pane under the “Shared” you can see shared machines. Select the name of the windows machine and click to open up the folder. You can drag and drop files into this folder to share between MAC and Windows.
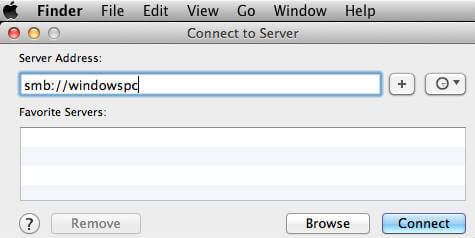
If you are unable to see the Windows machine on MAC finder, then Click on Finder > Go > Connect to Server (Command+K). Type in the prefix smb:// followed by the IP address or hostname of the windows machine. (like smb://192.168.1.101 or smb://windowspc ).
Related: How to Transfer Photos Without Losing Quality-A Complete Guide
USB Flash Drives to Transfer Files between Mac and Windows
Since USB drives are an easy and portable solution, we can start with the USB drives to transfer files. Flash drives are available in the range of 16GB to 256GB for a very low price. Please see the fast transfer USB 3 USB SanDisk flash drive from Amazon that supports to transfer up to 5 times faster (90MB/s) than standard USB 2.0 drives.
USB drives, by default formatted into FAT32, which is compatible with both Mac and Windows. Two drawbacks on this format are that FAT32 supports maximum file size into 4GB and FAT 32 format is more susceptible to disk errors and offers no security. We strongly recommend this method for a temporary purpose file transfer.
Use Portable Hard Disks to Transfer Files
Even though the hard drives are a one-time investment, you can rely upon these drives to transfer large files between PC and Mac. You can have portable Hard disks with a USB port to transfer files between Mac and Windows.
The portable drives are coming in different storage capacity in Terabytes as regular hard disk and also Solid State Drives. SSDs are fast compared to regular hard drives and we already listed a couple of best external SSDs. When you use a portable Hard Drive, please make sure to format hard disk FAT32 to get access for both Mac and Windows OS system.
The hard drives are readily available in the market that offers compatibility with both OS with some additional software. You can get a Seagate Slim USB 3 2TB hard drive from Amazon for $69.99.
NAS Enabled Hard Drives to Transfer Files
Now you can connect your external Hard Disk as a part of your Home Network. The Hard Disk price is coming down, and the storage capacity is growing in terabytes in the market. There are two smart solutions to use the hard disk to transfer filer. The first one is to depend on NAS (Network Attached Storage) devices that are a little bit expensive, but very reliable solution.
There is one WD 4TB My Cloud Personal Network Attached Storage from Amazon with 4TB size and can buy from Amazon for $167.00. Hard drives are coming with a built-in network card and directly connect to a home network and transfer files between all devices on the same network.
The second low-cost solution is to buy a WiFi router with USB Port (Asus Dual-Band Router with USB from Amazon for $69.00). This router USB port can be used to connect the external hard disk to the home network. You can use this guide to Connect External Hard Disk to Home Network over WiFi.
Transfer Files between Mac and Windows by Email
Email file transfer doesn’t need any additional setup or knowledge. However, we recommend this as the least solution to transfer files. You can send the email attachment from one machine and open the email in the second machine and download the attached file.
Emails are capable of attaching large files size in GBs. However, emails are still not offering large file transferring like cloud dives or SMTP transfer. Please refer to our solution to email LARGE file attachment for those who want to transfer large file attachments.
Smartphones as Flash Drives to Transfer Files
Even you can use your iPhone as a portable drive to transfer the files in between MAC and PC. Please see the post here iPhone as a portable hard disk for your Mac and for the PC please see iPhone as a portable hard disk for your Windows.
Transfer Files between Windows and MAC over WiFi
There are plenty of methods to transfer files between Mac and Windows. If you are not tech-savvy and don’t have large files, then the best choice is Cloud Drives or USB Flash Drives.
Use a Portable Hard Drive or USB drive to transfer your files, if you are ready to spend money on external discs. Transfer files via your network, if you have large size files to transfer. The alternative choice is to use NAS based drives and use as local cloud storage for the entire home network.
Disclosure: Mashtips is supported by its audience. As an Amazon Associate I earn from qualifying purchases.