
The Internet today is full of surprises and hidden things that users may not be aware of. Having a traffic monitor to monitor your network speed from time to time can be crucial to let you know if there is anything that is using the internet bandwidth without your knowledge. It is also a great way to know how much internet speed an app is using when it is downloading or uploading something.
Back in Windows 10 and older versions of Windows, there was a simple and popular third-party app called “NetSpeedMonitor” that can display the real-time network or internet speed directly on the taskbar. Sadly, this app is not supported in Windows 11.
Also see: How to Know Which App is Using The Internet in Windows 11
How to add a network speed monitor in Windows 11
Fortunately, there are a few other apps that are able to do the same thing as NetSpeedMonitor to display a real-time network speed monitor on the taskbar in Windows 11. This guide will show you how to add a net speed monitor to the Windows 11 taskbar.
Traffic Monitor for Windows 11
Traffic Monitor is a free and open-source app that lets users display the live network speed on either the taskbar or as a floating gadget on the desktop in Windows. Most importantly, it works perfectly fine on Windows 11.
One huge feature that makes the app stands out among other similar network speed monitor apps is that Traffic Monitor can also display the CPU and Memory usage alongside the Network traffic usage.
Follow the steps below to install Traffic Monitor and add its net speed monitor to the Windows 11 taskbar or desktop.
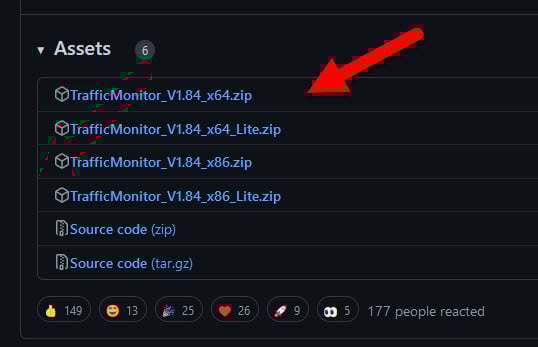
- Go to https://github.com/zhongyang219/TrafficMonitor/releases to download Traffic Monitor. Check the latest release and select the x64.zip under “Assets” to download it. You can download the Lite version but it has much lesser features.

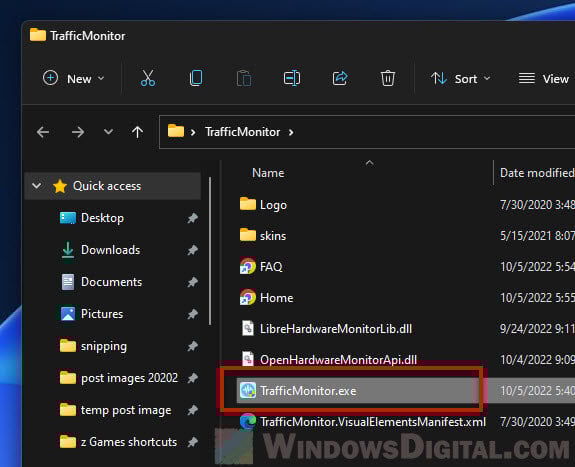
- Once downloaded, unzip the file and open the TrafficMonitor.exe from the extracted folder.

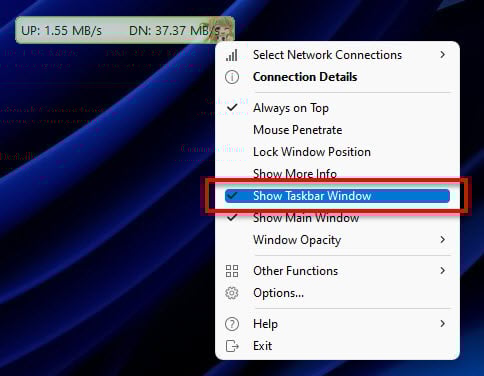
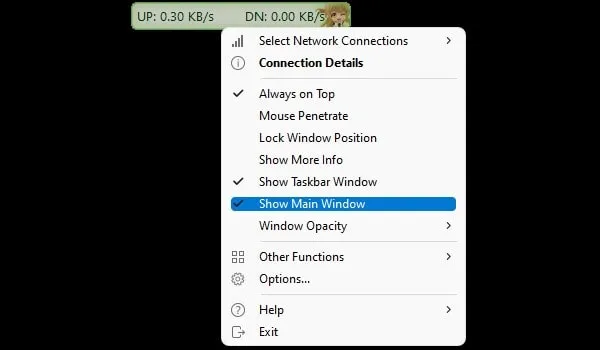
- The app will start off with a floating network speed monitor gadget on the desktop which you can move around easily. To enable it to show on the taskbar instead, right-click the floating network meter and select “Show Taskbar Window“.

- The net speed monitor will now be displayed on the Windows 11 taskbar.

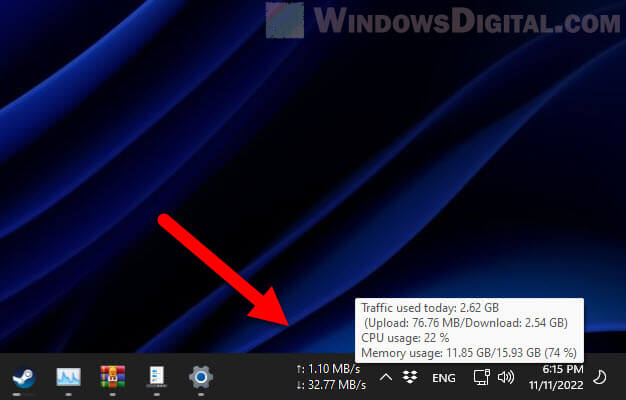
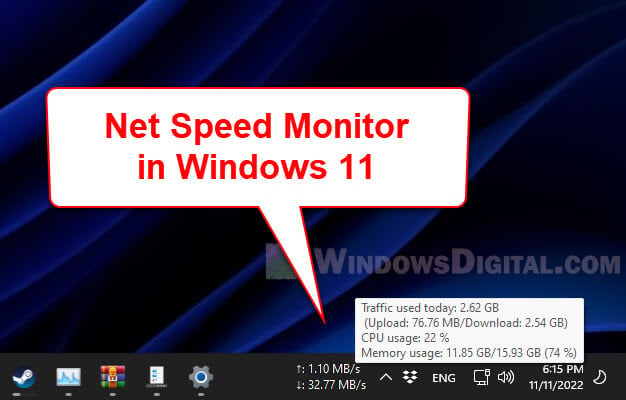
When you hover your mouse cursor over the speed meter, it will display more details such as the total traffic used today (upload and download), as well as the CPU and Memory usage in percentage.
If you don’t want the floating network meter to display on the desktop, right-click on the gadget and uncheck “Show Main Window”. This option will disable traffic monitor from showing on the desktop.

Read next: How to Change Ethernet Network Speed from 100 Mbps to 1 Gbps
Configure Traffic Monitor to auto start on Windows startup
As Traffic Monitor needs to be running in Windows 11 in order for the net speed monitor to continue displaying on the taskbar, to save you the hassles from having to run the app every time you startup your computer, you can set the app to automatically run when Windows starts.
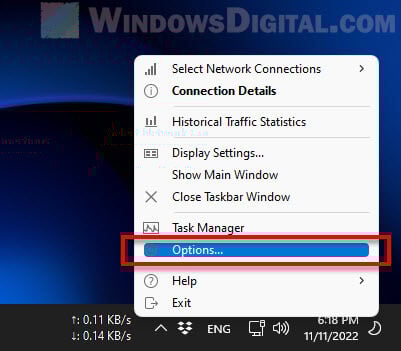
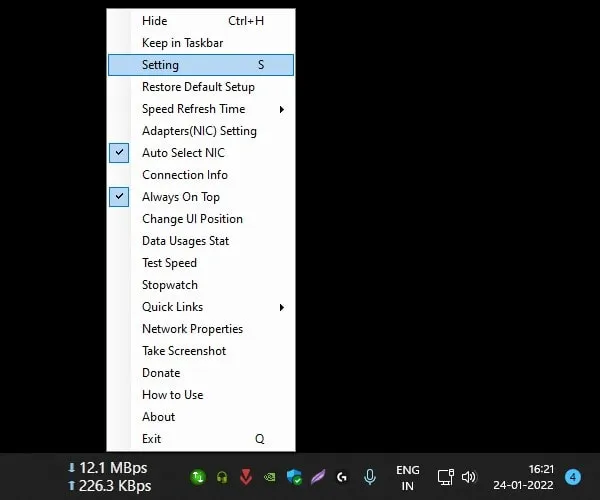
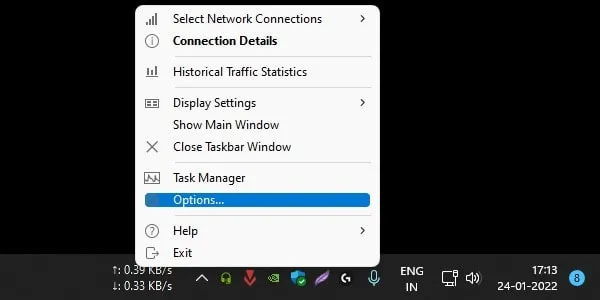
To do so, right-click the net speed monitor on the taskbar and select Options.
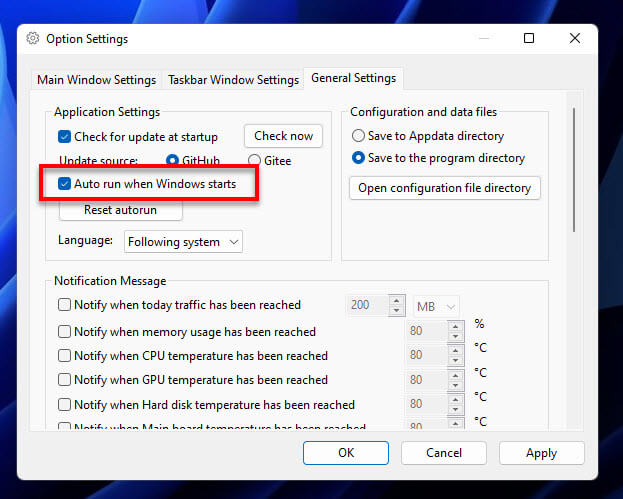
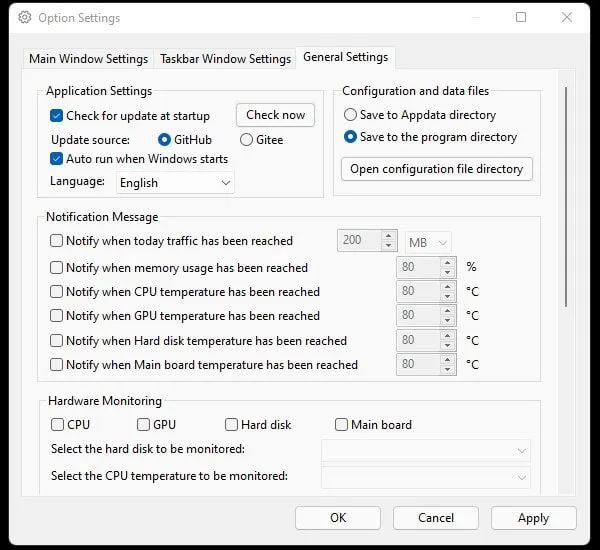
Next, go to the “General Settings” tab and enable the checkbox for “Auto run when Windows Starts” under Application Settings.
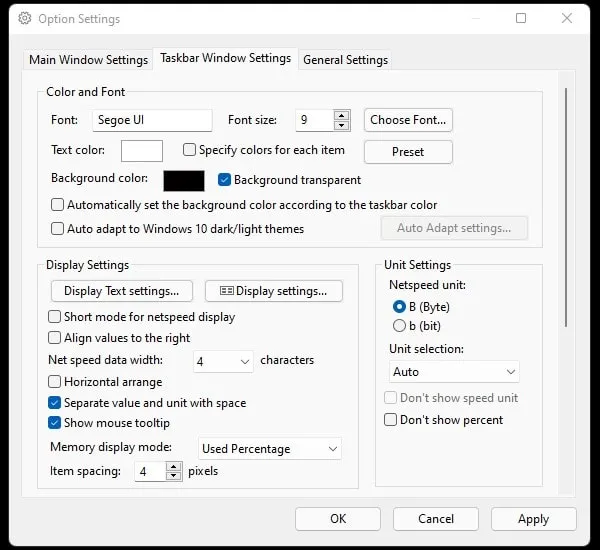
In the mean time, you can also configure other settings from the “Taskbar Window Settings” tab for the net speed monitor on the taskbar or the “Main Window Settings” tab for the floating meter.
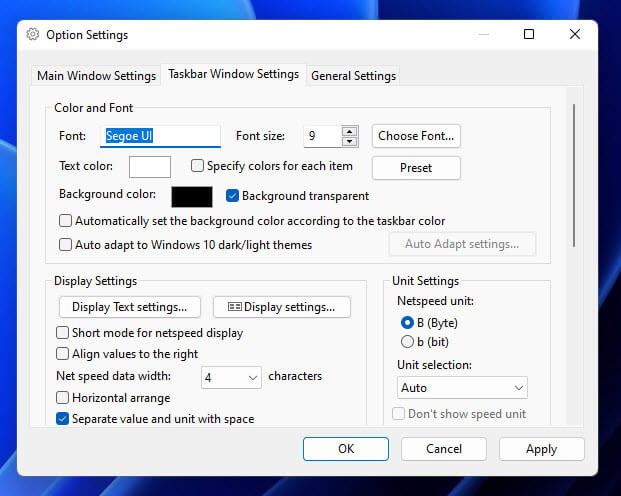
You can change settings such as the color and font of the speed meter, netspeed unit used (Byte or bit), and other display settings.
Related issue: Ethernet Internet Speed Capped at 100 Mbps (Fix)
Internet speed monitor app from Microsoft Store
Alternatively, you can look for a network or internet speed monitor app from the Microsoft Store.
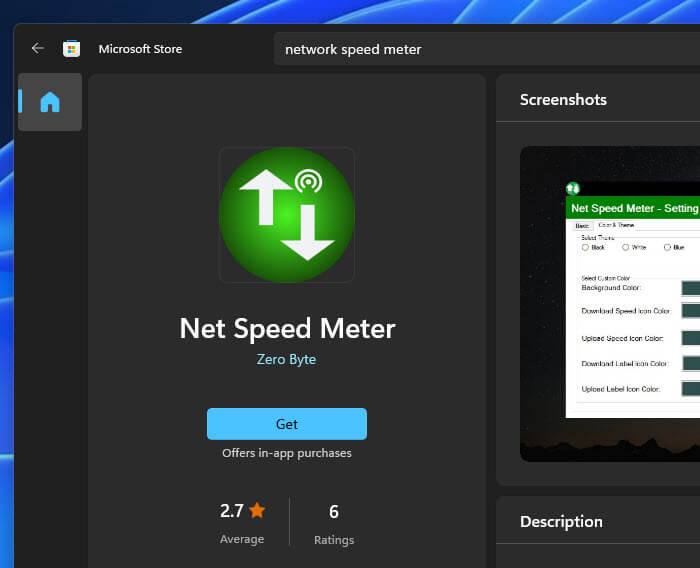
- First, open Microsoft Store via Start menu.
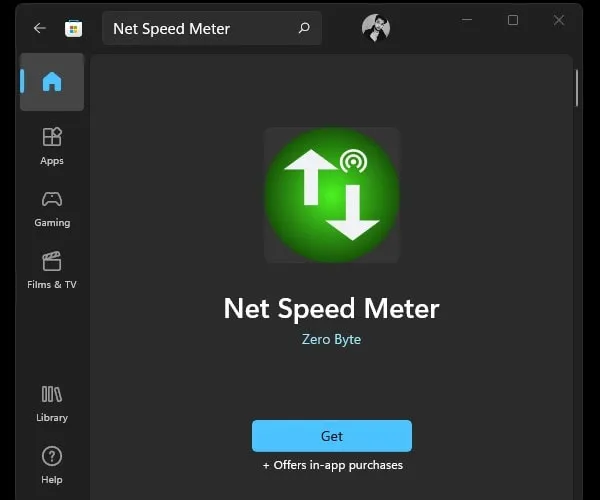
- Search for “Net Speed Meter” using the search bar in the Microsoft Store’s window.
- Select Net Speed Meter and click Get to install the app.

- Once the installation is completed, click Open to launch the app.
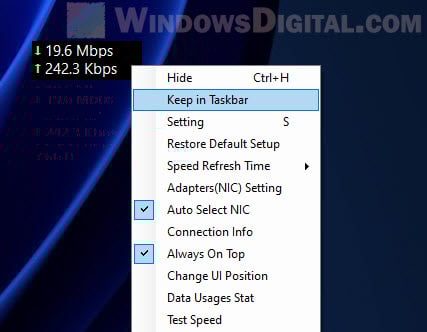
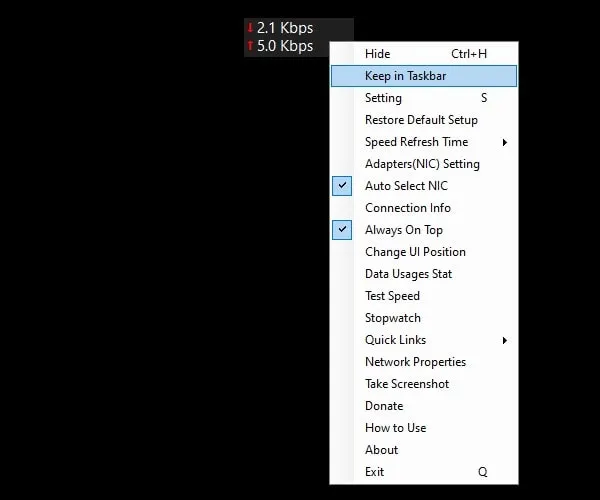
- The app will start out as a floating network meter on the desktop. To move it to the taskbar instead, right-click the floating meter and select “Keep in Taskbar“.

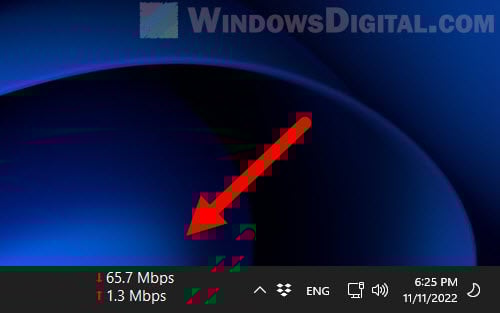
- The net speed monitor will then display on the taskbar in Windows 11.

Task Manager’s Performance tab or Resource Monitor
If you only want to monitor your network or internet speed without installing any third-party app, you can quickly view the network usage via the Task Manager Performance tab or the Resource Monitor in Windows 11. This method does not add any meter to the taskbar or on the desktop.
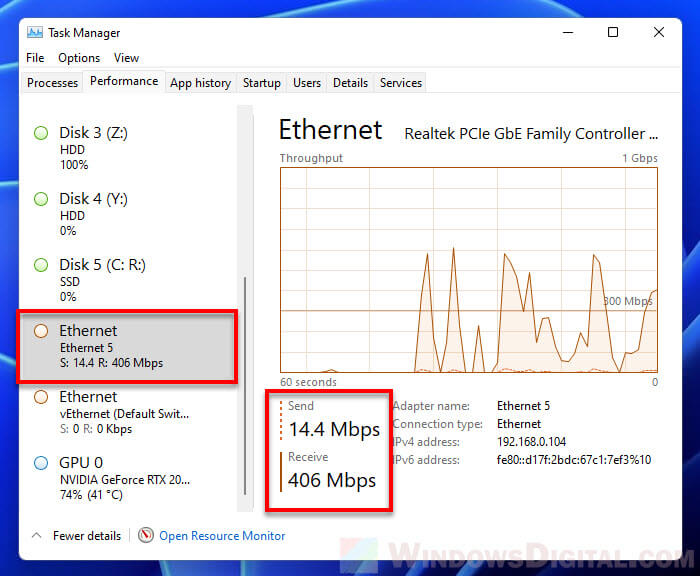
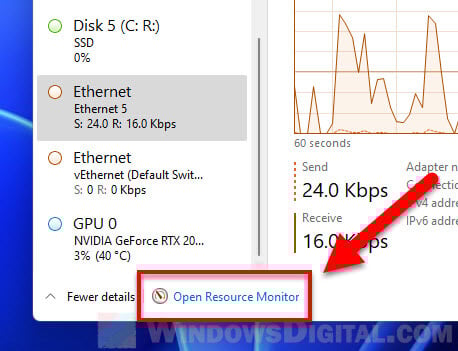
To check the internet speed via Task Manager, first press Ctrl + Shift + Esc to open Task Manager in Windows 11. If it isn’t already in full details mode, click “More details“.
Next, click the “Performance” tab and select your Ethernet or WiFi adapter from the left pane. The network speed usage will shown on the right – the “Send” and “Receive” speed.
Alternatively, to view more details about which app or process is using the network bandwidth, you can use the Resource Monitor instead. To do so, click Open Resource Monitor at the bottom of the Task Manager window.
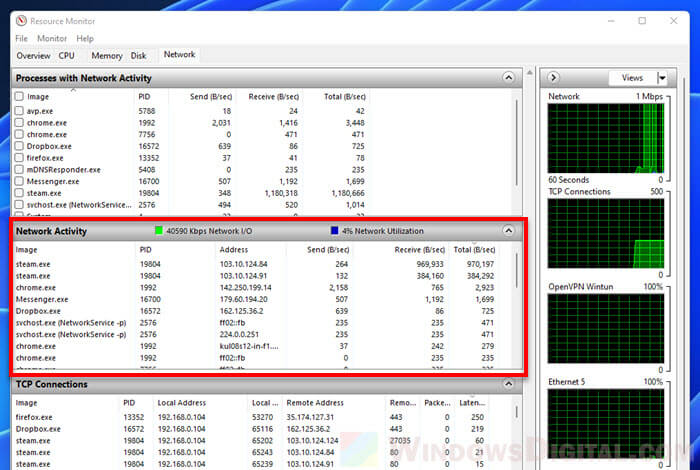
Then, select the Network tab and expand Network Activity. From there, you can view the network transfer speeds (Send, Receive and Total) of all running processes. You can sort the list by transfer speed by clicking the header of the relevant column you want to sort.
In Windows 11, Microsoft has introduced so many new features like widgets, Android Apps support, Snap Layouts, Virtual desktops, and many more. Even, so many taskbar customization options have been introduced. But still, the network speed monitor on Windows 11 missing. In Android, you can enable network speed indicators easily from the settings app. But, in Windows, such an option is missing and much needed. Yes, undoubtedly, the task manager shows the download/upload speed of an active internet connection in send/receive data form. But, you cannot pin it to the taskbar. Like, you can add performance stats to the Windows 11 taskbar.
Well no worries, there are some free third-party apps and tools available. Which shows your Internet connection’s download and upload speed in real time. This means you can constantly track active internet usage on your Windows PC/Laptop. Which will help you to track down connection issues in your network. Also, these net speed monitor apps will work on both Ethernet and WiFI connections. There are so many Internet Speed Monitor Apps available for Windows 11 to use. So, feel free to choose an app that adds a network monitor to the taskbar, and, comes with numerous customization settings.
Add network speed monitor to the Windows 11 Taskbar
Net Speed Meter.
If you don’t want to download an App from a third-party source, then Net Speed Meter is the best app for you. It is available for free on the Microsoft Store. Net Speed Meter app shows the real-time download and upload speed of your internet connection. And, runs in the system tray. The best part is you can drag and drop the network monitor anywhere on the desktop, so no restrictions. App also comes with so many customization options. Like, you can change the speed unit from bits per second to bytes per second. Moreover, you can change the font and text size. Even, you can change the color & theme as well.
By default, the Net speed meter is set as a startup app. So, it gets automatically started when you start Windows 11, no need to run it manually every time. The app does refresh the network speed every 500ms. Which you can change if you want. Test Speed option is also available to perform an Internet Speed Test.
- Click on the start button and after that, click on Microsoft Store App from the pinned apps section.
- Microsoft Store will get open, and search for Net Speed Monitor. Or, you can use the following link to directly open the App page.
- Once you find the Net Speed Monitor app, click on Get to install it in your Windows 11.
- The app will now get downloaded and installed, click on Open to launch it.
- You will now immediately see a Network Speed Monitor in the upper right corner of your desktop.
- Do right-click on it, and a menu will appear. Click on “Keep in Taskbar”.
You can also drag and drop the network speed meter wherever you want.
- Once you set it to the desired position, right-click again on it and click on settings.
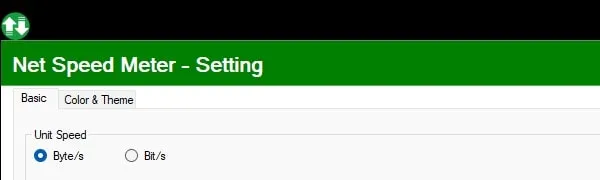
- Select Byte/s in unit speed so that you will get an accurate result. You can also change font and size if you want.
- After that, click on Color & theme and now select the transparent theme. So that it can blend with your Windows 11 theme.

Also, you can change the speed refresh time to fast. By default, it might be set to normal. Okay, so that’s how you can add Network Speed Monitor to the Windows 11 Taskbar.
Windows 11 Traffic Monitor
Traffic Monitor is another free and open-source Windows 11 app to display Windows 11 real-time network speed. Apart from Internet Speed, this app also can display CPU and Memory usage in the taskbar. The traffic Monitor app also can display “historical traffic statistics”, which are locked in the net speed meter app. So definitely, this app is better than that.
The traffic Monitor app comes with two network monitor windows – Main Window and Taskbar Window. The Main Window offers you a graphical interface, which you can drag and drop anywhere on the desktop and lock. But, you cannot drag the main window to the taskbar. So, if you want to add a Network Speed Monitor to the taskbar on Windows 11, then the taskbar window will help you with it. Traffic Monitor also comes with many customization options.
You can customize where you want to show the network monitor in the taskbar. Also, you can choose the background color, text, and theme. Even, you can change the net speed unit as well. Skin replacement function is also available for the main Window. Personally, I find it better than the Microsoft Store.
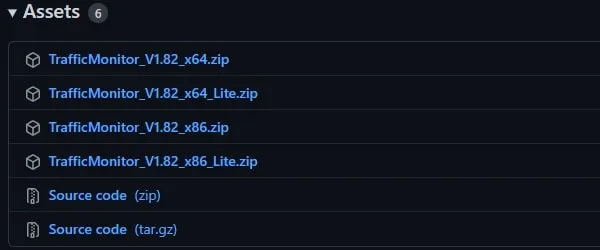
- First, do download the zip file of TrafficMonitor from GitHub.
It is available for 64-bit and 32-bit Windows OS. Also, there is a lite version also available, but better to download the main version.
Note: I am using Windows 11 64-bit version, so I have downloaded the “TrafficMonitor_V1.82_x64.zip” file.
- Once the zip file gets downloaded. Do right-click on it and then click on Extract All > Extract.
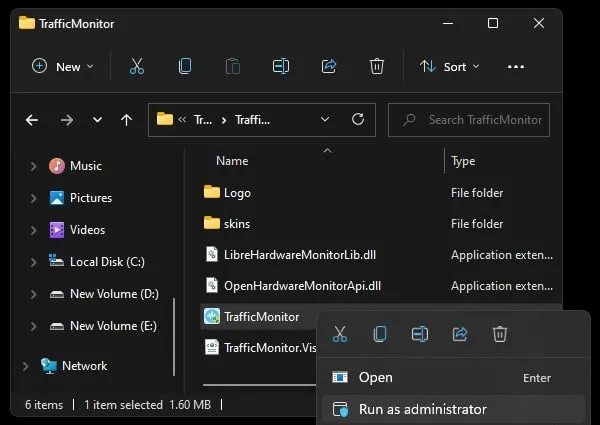
- Open the extracted TrafficMonitor folder and then right-click on the “TrafficMonitor” file and click on “Run as administrator”.
Windows Protection window might appear. Click on More Info > Run anyway. You will now see a shield icon in the Windows taskbar. Click on it and after that click on Yes in the UAC window.
- That’s it, the main window of TrafficMonitor will now appear. Right-click on it, and then click on “Show Taskbar Window”.

Internet Speed Monitor will now appear in the taskbar.
- Now to disable the main window, right-click again on it. And, after that, click on “Show main Window” to uncheck it.
- Okay, now right-click on TrafficMonitor visible in the taskbar. And, click on options to open settings.
- You can now customize the taskbar window. Also, you can change the net speed unit if you want.
- Click on the General Settings tab. And, do enable the “Autorun when Windows starts” option. Also, select English as the language and click on Apply > OK.
That’s it, so that was the easiest way to add real-time download and upload speed to the Windows 11 taskbar.
Для работы проектов iXBT.com нужны файлы cookie и сервисы аналитики.
Продолжая посещать сайты проектов вы соглашаетесь с нашей
Политикой в отношении файлов cookie
Нужно следить за использованием данных на вашем компьютере, независимо от того, подключены ли вы через Wi-Fi или Ethernet. Windows 11 предоставляет встроенную функцию для мониторинга интернет-трафика. Инструмент управления данными в этой операционной системе позволяет определить, какие приложения потребляют интернет-данные. Это позволяет контролировать и уменьшать их использование.
В статье рассмотренно как просмотреть использование данных в Windows 11, выполнив несколько простых шагов согласно инструкции:
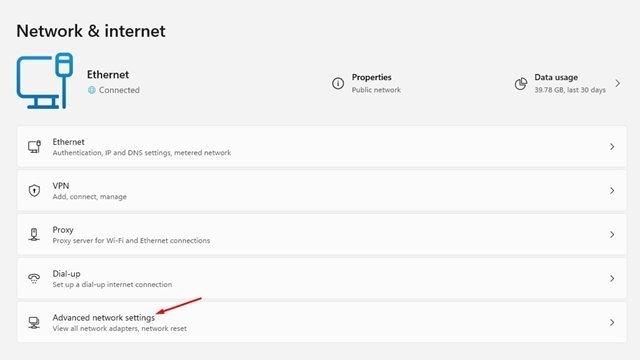
1.Нажмите сочетание клавиш Windows + I на клавиатуре, чтобы открыть настройки Windows 11.

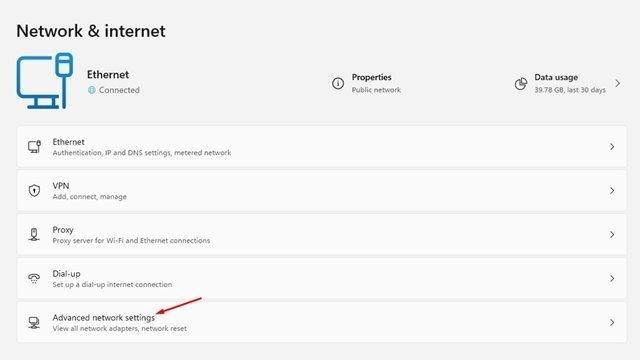
2.В настройках нажмите на опцию «Сеть и Интернет».
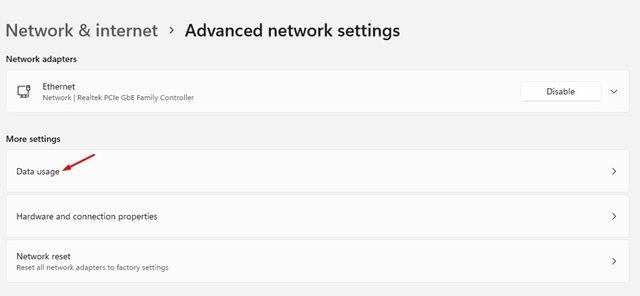
3.На правой панели щелкните на параметр «Расширенные настройки сети».
4.На следующей странице выберите параметр «Использование данных».
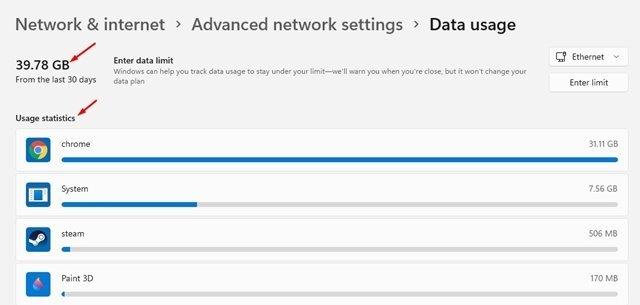
5.Теперь вы увидите ваше общее использование интернета. Статистика использования покажет вам, какие приложения используют ваш интернет.
Вот и все! Так вы можете просматривать использование интернет-данных в Windows 11.
Если вы хотите начать заново и сбросить данные об использовании интернета в Windows 11, выполните следующие простые шаги:
1. Откройте настройки вашего ПК, нажав клавиши Windows + I, затем выберите раздел «Сеть и Интернет».
2. В правой панели выберите «Дополнительные параметры сети».

3. На следующем экране нажмите на опцию «Использование данных».
4. Прокрутите вниз и найдите опцию «Сбросить статистику использования». Нажмите на кнопку «Сброс настроек» для сброса данных использования.

5. Подтвердите действие, нажав кнопку «Перезагрузить» при появлении запроса.
В Windows 11 вы можете легко отслеживать и контролировать использование данных на вашем ПК. Следуя описанным выше шагам, вы сможете просмотреть и сбросить данные об использовании интернета и определить, какие приложения потребляют трафик. Это поможет вам эффективно управлять использованием данных и избежать чрезмерных затрат на интернет.
Want to enable NetSpeedMonitor for Windows 11? Here is the quickest and best way to do it. You can use this method or other methods are given to perform the same work without using any third-party application. We will tell you later about it…
Table of Contents
What is NetSpeedMonitor?
In Windows 10, NetSpeedMonitor was introduced by Microsoft as a built-in application. It is used to display real-time network and internet speed. As well as find all about your internet connection over bandwidth or Wi-Fi.
The application is quite handy, as you can make a floating gadget of NetSpeedMonitor on your screen. This way, you don’t need to open the app each time just to see the stats.
And to put the cherry on top, you can also use the built-in option to show it on the taskbar too. You can easily watch all about your internet connection on the taskbar.
NetSpeedMonitor in Windows 11
While the application was present on Windows 10, Microsoft removed it in Windows 11. You can’t find it inside Windows 11 at all. Instead, we are going to use these methods to download NetSpeedMonitor on Windows 11. Once downloaded then you will enable NetSpeedMontior on Windows 11.
Related Topic: How To Turn OFF Windows Defender on Windows 11?

While you will find the exact application, using the first method. Still, you are recommended to check other methods too. As you can find other alternative options there.
Download Traffic Monitor
Traffic monitor is an open-source application that is exactly like NetSpeedMonitor. Since the application is open source, you will find it free and safe to use.
It has great compatibility with Windows 11 and all other earlier versions. Like NetSpeedMonitor, you will find the gadget on the screen, taskbar, and all other features.
Traffic Monitor can check and give info about real-time network and internet speed. Not only internet usage but info about CPU, Memory, and other sections about your PC is also shown.
Click here “https://github.com/zhongyang219/TrafficMonitor/releases” and download the app.
Now you will click on one of the files given accordingly. Download the file and open it.
Inside you will find the “TrafficMonitor.exe” file, double-click on it. Do the installation on your Windows 11. After the installation, you will use the application.
NOTE: if you are experiencing any sort of error while installing or after the installation. Head to the end of this article to fix the issue.

TIP: Right-click on the floating gadget and select the Show Taskbar Window option. This will enable the application to show about internet connection on Taskbar.
Download from Microsoft Store
You can also find alternatives to this on Microsoft Store. Open Microsoft Store on Windows 11 and search for “Net Speed Meter”.

Click on Get to begin downloading the installation of the app. Once installed, you will see the Open option; click on it to run.
Go to the desktop and here you will find the Net Speed Meter gadget. Right-click on it and select the Keep in Taskbar option.
Use the built-in application in Windows 11
Another way is to use the taskbar application. Within the taskbar, you will find exact same feature. There is no need for any third-party application.
Open the Taskbar by using the CTRL+SHIFT+ESC buttons.
Normally, you will find your Taskbar with full details. However; some might experience the taskbar minimized.
So, click on More details, if your taskbar is minimized.
Now you will find the Performance tab, click on it and find Ethernet or Wi-Fi adapter.
Select the Ethernet or Wi-Fi adapter and click on the Open Resource Monitor option. You can find the option right at the bottom of your taskbar window.
Here you will select the Network tab; expand Network Activity. All the information about your bandwidth or Wi-Fi connection is given here.
Enable NetSpeedMonitor as a Startup app
NetSpeedMonitor is a great way to check about internet connection. However; it can be a drag to start the application manually on each restart. Instead, you can also select the built-in options inside.

To make NetSpeedMonitor a startup application, you are going to right-click on the Taskbar. Now select Options then General Settings. Don’t forget to check the Autorun when the Windows Starts options.
This way, NetSpeedMonitor will start on each Windows startup.
Can’t open NetSpeedMonitor on Windows 11

NetSpeedMonitor is not a built-in application and needs to be downloaded manually. After the installation, users experienced an error which is “Operating System Not Supported (Windows XP, Windows Server 2003, Windows Vista, or Windows 7”.
Here you can’t run the application at all. To fix the issue, here is what you are going to do.
Find the application installed and select the “.exe” file. Right-click on it and select Properties.
In Properties, you will find the Change compatibility option.
Select Run this program in compatibility mode for: and select the version. Once the version is selected then you will click on OK.
Now launch again NetSpeedMonitor and you have fixed the issue.
Again, NetSpeedMonitor is not a built-in application. So, you can’t just enable NetSpeedMontior on Windows 11, instead, you are going to download then install it. after the installation, compatibility of the application might be a problem that can be solved easily.
功能更新:
- 任务栏窗口增加Direct2D的渲染方式,解决有时字体边缘有锯齿的问题 #1156
- 显卡监控功能增加对英特尔显卡的支持
- 右击插件项目时的右键菜单中增加插件菜单
- 插件管理界面增加插件图标的显示,右键菜单中增加插件命令
- 监控时间间隔的最大值调整为30s
- 任务栏窗口设置中增加“窗口顶部边距”和“垂直边距”的选项
- 主窗口增加对png格式透明背景图片的支持
- 新增根据Windows深浅色模式自动切换皮肤的功能 #1013
- 新增在任务栏的插件项目中显示资源占用图的功能,并更新对应的插件接口 #1077
- 主窗口和任务栏窗口中新增今日总流量的显示 #1174
- 任务栏窗口设置中新增“使用彩色emoji”的选项(仅Direct2D渲染方式)
- 常规设置中的温度通知上限调整为120度 #1814
- 新增Arm64EC的支持 #1703
- 新增Lite版显示CPU频率的功能
- 任务栏设置-预设方案中的方案2和方案3增加默认的文本颜色
问题修正:
- LibreHardwareMonitorLib.dll更新到0.9.4版本,解决部分设备硬件监控信息无法正常显示的问题
- 修正Windows 11 build 22621版本后触屏设备任务栏窗口位置不正确的问题
- 修正Windows 11下小组件不存在时,任务栏窗口的位置不正确的问题的问题 #1582
- 修正Windows 11下,当任务栏窗口显示在右侧时,会和系统小组件重叠的问题
- 修正选项设置对话框中使用触摸板手势时滚动过快的问题
- 修正主窗口鼠标提示中CPU频率显示不正确的问题
- 修正皮肤文件中插件项目的显示文本无效的问题 #1813
- 修正如果隐藏了通知区图标,弹出通知后通知区图标再次出现的问题 #1814 #1812 #1811
此版本目前存在以下问题:
在Windows11系统中,如果任务栏上没有任何一个图标,任务栏窗口的位置会偏下:

这个问题是之前解决Windows11触屏设备中任务栏窗口会偏上的问题导致的。
暂时的解决方法是至少在任务栏上固定一个图标。
在Windows11系统中,任务栏窗口右侧有一个空白:

这个问题是由于我为了解决Windows11下的小工具会和任务栏窗口重叠导致的问题。我原本以为开启了Windows11“小工具”之后,它一定会出现在任务栏的右侧,所以我让TrafficMonitor为小工具留出了一定的空间,以避免和小工具重叠,直到现在我才知道,开启了”小工具“之后它不一定会出现在右侧。
暂时的解决方法时关闭Windows11”小工具“。
Current version has the following issues:
In Windows 11, if there is no icons on the taskbar, the position of the taskbar windows will be lower:
This issue was caused by a previous solution to an issue where the position of taskbar window would be upper in Windows 11 touchscreen devices.
The temporary solution is to fix at least one icon on the taskbar.
In Windows 11, there is a space on the right side of the taskbar window»
This problem was caused by fixing a problem with Windows 11 where the Widgets would overlap with the taskbar window.
I originally thought that when Windows 11 “Widgets” turned on, it would appear on the right side of the taskbar, so I had TrafficMonitor leave some space for the Widgets to avoid overlapping with it. I didn’t realize until now that with “Widgets” turned on, it doesn’t always appear on the right side of the taskbar.
A temporary solution is to turn off Windows 11 “Widgets”.