
Пользователи Windows 11/10 могут столкнуться со следующей ситуацией: время от времени при обращении к диску SSD он «зависает», а если в этот момент наблюдать нагрузку на диск в диспетчере задач, она подскакивает до 100%, что не совсем типично для твердотельных накопителей.
В этой инструкции о том, чем может быть вызвана проблема и способах исправить ситуацию.
Драйверы, прошивка и состояние диска
Прежде чем приступать к способам решения, предполагающим изменение параметров Windows 11/10, рекомендую озаботиться установкой оригинальных драйверов, особенно если проблема появилась после свежей установки ОС (Windows устанавливает совместимые драйверы, но не всегда самые подходящие) а при наличии — обновлением прошивки диска:
- С официального сайта производителя материнской платы ПК или вашего ноутбука скачайте все драйверы из раздела «Чипсет» (Chipset) и установите их. Драйверы обычно находятся в разделе поддержки соответствующего продукта.
- Используйте утилиту от производителя вашего SSD для проверки наличия новой прошивки (Firmware), при наличии, выполните его установку. Эта же утилита покажет, если что-то не так с состоянием самого диска (в этом случае, вероятнее всего, дальнейшие действия могут не привести к эффекту), проверку состояния можно выполнить и в сторонних программах для SSD.
- В редких случаях SSD может требовать какого-то специфичного драйвера для своей правильной работы, в этом случае вы можете найти его на странице поддержки вашей модели накопителя.
Может сработать и обновление БИОС/UEFI вашей материнской платы или ноутбука: если вы прибегнете к этому методу, внимательно следуйте указаниям производителя, так как обновление не всегда может проходить гладко, а при наличии проблем с оборудованием риски возрастают.
Отключение прерываний Message-Signaled в реестре
Этот способ срабатывает в большинстве случаев при появлении проблемы со 100% нагрузки на диск в диспетчере задач, при этом работает не только для SSD (перед использованием способа рекомендую создать точку восстановления системы):
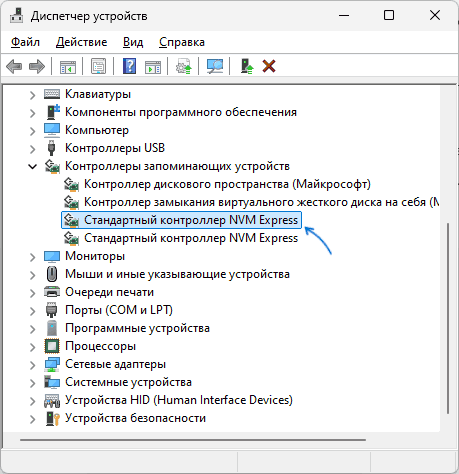
- Откройте диспетчер устройств, для этого можно нажать правой кнопкой мыши по кнопке «Пуск» и выбрать соответствующий пункт контекстного меню.
- Перейдите в раздел «Контроллеры запоминающих устройств» («Контроллеры IDE ATA / ATAPI), дважды нажмите по «Стандартный контроллер SATA AHCI», «Стандартный контроллер NVM Express» или иному, к которому подключен диск.

- На вкладке «Сведения» выберите значение «Путь к экземпляру устройства» и скопируйте его в буфер обмена, нажав по значению правой кнопкой мыши и выбрав соответствующий пункт контекстного меню.

- Запустите редактор реестра (Win+R — regedit) и перейдите к разделу
HKEY_LOCAL_MACHINE\System\CurrentControlSet\Enum
- В адресной строке редактора реестра добавьте «\» справа от Enum, затем вставьте путь, скопированный на 3-м шаге.

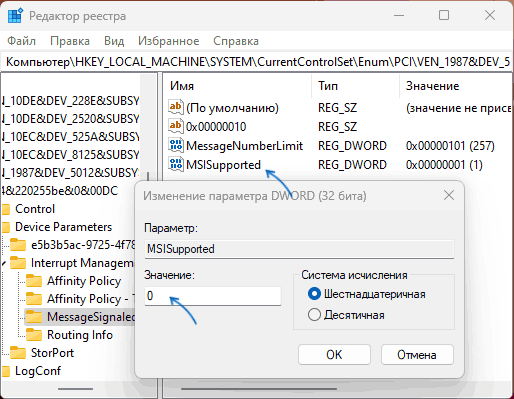
- Перейдите в подраздел
Device Parameters\InterruptManagement\MessageSignaledInterruptProperties
- Дважды нажмите по параметру с именем MSISupported и измените его значение на 0, примените настройки и закройте редактор реестра.

- Перезагрузите компьютер.


После этого останется лишь наблюдать, появится ли проблема в дальнейшем.
Параметры управления электропитанием диска SSD (LPM)
По умолчанию для SSD дисков включены функции управления питанием LPM (Link Power Management), обычно — в режиме HIPM (Host Initiated Link Power Management), отключающие диск при отсутствии запросов ввода-вывода, относится это и к SSD.
В случаях, когда проблема с зависанием SSD не вызвана проблемами с самим диском, можно попробовать сделать так, чтобы диск не отключался — это может решить проблему.
Шаги будут следующими (важная деталь — в случае ноутбука это негативно повлияет на время автономной работы, учитывайте этот момент):
- Запустите редактор реестра, для этого можно нажать правой кнопкой мыши по кнопке «Пуск», выбрать пункт «Выполнить», ввести regedit и нажать Enter.
- Перейдите к разделу реестра
HKEY_LOCAL_MACHINE\SYSTEM\CurrentControlSet\Control\Power\PowerSettings\0012ee47-9041-4b5d-9b77-535fba8b1442\0b2d69d7-a2a1-449c-9680-f91c70521c60
дважды нажмите по параметру с именем Attributes и измените его значение с 1 на 2 — это добавит новый пункт в дополнительные параметры электропитания.

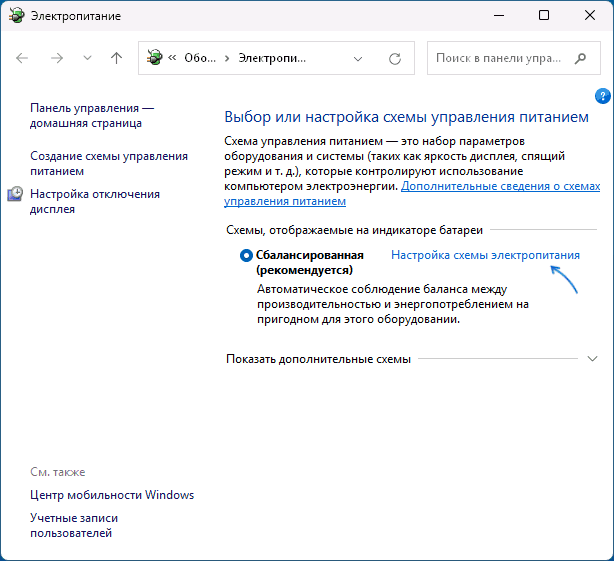
- Нажмите клавиши Win+R на клавиатуре, либо нажмите правой кнопкой мыши по кнопке «Пуск», введите powercfg.cpl и нажмите Enter
- В открывшемся окне нажмите по пункту «Настройка схемы электропитания» справа от текущей схемы.

- Нажмите «Изменить дополнительные параметры питания».
- В разделе «Жесткий диск» — «AHCI Link Power Management – HIPM/DIPM» установите значение «Active».

- При наличии параметра «AHCI Link Power Management – Adaptive», измените значения на 0.
- Примените настройки и закройте параметры электропитания.


После этого можно наблюдать, была ли исправлена проблема. Если это помогло, можно также поэкспериментировать с другими значениями — DIPM или HIPM+DIPM, иногда они также помогают, при этом обеспечивают значительно лучшую экономию энергии.
Некоторые дополнительные нюансы и подходы к решению, на которые следует обратить внимание, если вы столкнулись с зависаниями вашего SSD:
- Некоторые пользователи устанавливают систему на SSD на одном компьютере, после чего подключают этот же диск на другом ПК или ноутбуке. Обычно всё проходит успешно, но не всегда, особенно при значительных отличиях в оборудовании. Настоятельно рекомендую выполнять установку ОС на том же оборудовании, где планируется её использование.
- Одна из особенностей работы SSD — чувствительность к свободному месту на диске. Если на накопителе остаются единицы Гб свободного пространства, именно это может вызвать его неадекватную работу. Решение — позаботиться о наличии свободного места: желательно не менее 10% от общего пространства диска.
- Если речь идёт о SATA SSD, проверьте подключение кабелей как со стороны самого диска, так и со стороны материнской платы. Ещё лучше — заменить SATA-кабели на новые.
- При наличии нескольких физических дисков в системе возможен следующий сценарий: один из дисков имеет аппаратные проблемы, а тот для которого решается проблема — полностью исправен, но при обращении к нему происходят зависания. Простой способ проверки: оставить подключенным только тот диск, проблему с которым мы хотим решить и проверить, решило ли это проблему. Для SATA накопителей и наличии нескольких SATA-контроллеров на материнской плате может помочь подключение дисков к отдельным контроллерам.
- Перегрев контроллера SSD (особенно для моделей с высоким энергопотреблением) может приводить к рассматриваемым эффектам. Решение — использование радиаторов, термопрокладок.
- На ПК причиной проблемы могут оказаться износ или неполадки блока питания, а на ноутбуке — работа от батареи (особенно в случае её износа) и высокая общая нагрузка при этом, чаще — при наличии SSD с высоким энергопотреблением (например, Pro-серий Samsung).
- Работа некоторых вирусов и майнеров может приводить к похожим проблемам, может иметь смысл выполнить проверку компьютера на их наличие.
- Если проблема появляется только после завершения работы с последующим включением, но исчезает после перезагрузки компьютера или ноутбука, попробуйте отключить быстрый запуск Windows.
- Редко: к похожему поведению могут приводить проблемы со стабильностью работы оперативной памяти сами по себе или в сочетании с включенными в фирменном ПО SSD функциями ускорения за счет использования оперативной памяти.
Возможно, ваш сценарий зависания SSD и скачков нагрузки на него до 100% отличается от предложенных в инструкции — в этом случае вы можете поделиться предысторией, наблюдаемыми закономерностями и любыми другими деталями в комментариях ниже, не исключено, что решение найдётся.
Операционная система Windows самостоятельно определит SSD и выберет для него оптимальные настройки. В большинстве случаев никаких дополнительных действий от пользователя не требуется. Многочисленные советы по оптимизации или продлению жизни твердотельного накопителя, как правило, не несут в себе пользы, а в худшем случае даже вредят. Какие-то из них изначально неудачные, а какие-то просто устарели. В этой статье мы разберем некоторые моменты по оптимизации и продлению ресурса SSD.

Как определить ресурс накопителя
Ресурс SSD можно понять по гарантированному объему записи (TBW), указанному в характеристиках накопителя. Так, для Samsung 850 EVO на 256 гигабайт — 75 TBW, для HP S700 Pro на 512 гигабайт — 340 TBW. Обратите внимание, что у более емких накопителей ресурс тоже больше. Если вы ориентируетесь на этот параметр при выборе SSD, сравнивайте версии одного объема.

Утилита CrystalDiskInfo покажет, сколько данных уже было записано на диск. Смотрите параметр «Всего хост-записей». В нашем примере — 26 065 гигабайт. То есть примерно 26 терабайт из 75.
Кроме того, можно посчитать среднее количество записываемых данных в месяц, если вы помните, когда покупали и начали пользоваться диском. В нашем случае диск находится в системе 4 года и 1 месяц: 26 065 / 49 = 532 гигабайта в месяц. Несложно подсчитать, что при таком расходе диска хватит еще более чем на 6 лет. Диск работал без какой-либо оптимизации со стороны пользователя.

Важно также проверить максимальное количество циклов перезаписи (P/E Cycles). Нужно открыть параметры S.M.A.R.T. (есть в CrystalDiskInfo) и найти строку Wear Leveling Count. В нашем случае диск изношен на 6%, а число циклов перезаписи составляет 127. Делим количество циклов (127) на процент износа (6) и умножаем на 100. Получается 2117, но это приблизительное число.
Беспокоиться о ресурсе стоит, если у вас ежедневно большой объем записываемых данных. Разумеется, у каждого пользователя это понятие отличается, поэтому прежде чем делать какие-то выводы, нужно сделать замеры.
Обновление прошивки
Никогда нельзя исключать ошибки микропрограммы, которые могут привести к некорректной работе накопителя, повышенному расходу ресурса и т. п. Чтобы оборудование работало наилучшим образом, необходимо обновляться на свежие версии прошивки. Как правило, производитель таким образом исправляет ошибки, проводит оптимизацию и внедряет улучшения. Твердотельные накопители также нуждаются в обновлениях.

Если производитель предоставляет фирменное программное обеспечение для работы с накопителем, то обновление прошивки идет через него. Если софта нет, нужно обращаться к инструкциям на официальном сайте.
Оптимизация и перенос программ на HDD
Если на вашем SSD ежедневно наблюдаются большие объемы записи, возможно, в этом виноваты некоторые программы, в том числе работающие в фоновом режиме. Так, программы резервного копирования могут создавать бэкапы, мессенджеры и браузеры — кэшировать данные, занимающие на диске десятки гигабайт.
Впрочем, переносить кэш браузера на жесткий диск не стоит — вы лишь замедлите работу программы. Задумываться об оптимизации стоит, если у вас очень большие ежедневные объемы записи данных.
Многочисленные советы из интернета о переносе программ на другой диск тоже сомнительные. Но если у вас диск малого объема, например, 128 Гб, то смысл есть. Программы, которыми вы редко пользуетесь или которые не требуют быстрого накопителя, позволят сэкономить место.
Функция TRIM
Команда TRIM удаляет данные с неиспользуемых ячеек памяти, чтобы при последующей записи не тратить время на их очистку. Грубо говоря, система подготавливает блоки для повторного использования.
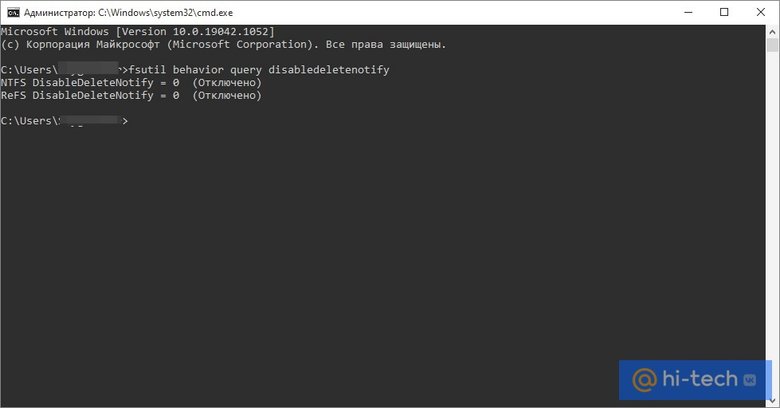
В Windows 10, 8 и 7 функция включена по умолчанию (для XP и Vista нужен специальный софт), но лучше проверить ее работу. Откройте командную строку от имени администратора и введите fsutil behavior query disabledeletenotify. Если в двух строках стоит значение 0, то функция TRIM включена.
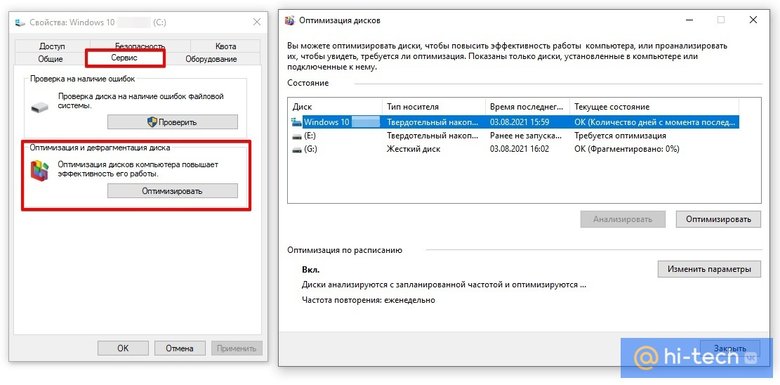
Также нелишним будет проверить, верно ли определяется SSD в вашей системе. Зайдите в свойства накопителя через правый клик в проводнике. Выберите вкладку «Сервис» и нажмите на «Оптимизировать». В открывшемся окне будет список накопителей с указанием их типа. Если диск SSD определяется как жесткий диск, это нужно исправить. Выполните команду winsat diskformal в командной строке. Также может помочь переустановка драйвера.
Включить TRIM вручную можно командами:
- fsutil behavior set disabledeletenotify NTFS 0
- fsutil behavior set disabledeletenotify ReFS 0
Дефрагментация
Твердотельные накопители не нуждаются в дефрагментации. Однако и отключать ее, следуя советам из сети, не нужно. Дело в том, что Windows и так знает, что в системе установлен SSD, поэтому не будет его дефрагментировать. Таким образом, отключая оптимизацию (именно так этот пункт и называется в Windows 10) по расписанию, вы ничего не добьетесь.
Файл подкачки
Идея перенести файл подкачки на HDD или вовсе его отключить не лишена здравого смысла. Впрочем, вопрос все равно довольно спорный. С одной стороны, отсутствие pagefile.sys может заметно сэкономить свободное место на SSD и уменьшить его износ. С другой — сколько бы ни было оперативной памяти, в определенный момент ее может не хватить. Проблемы возникают даже при наличии 64 гигабайт оперативки, так как аппетиты программ не всегда предсказуемы.
Если же оперативной памяти мало и файл подкачки будет находиться на медленном жестком диске, то система будет работать медленнее, чем могла бы. В таком случае и смысла от SSD нет. Тем не менее, все зависит от самого ПК и сценариев использования. Так, можно попробовать перенести файл на жесткий диск и посмотреть на скорость работы в повседневном использовании.
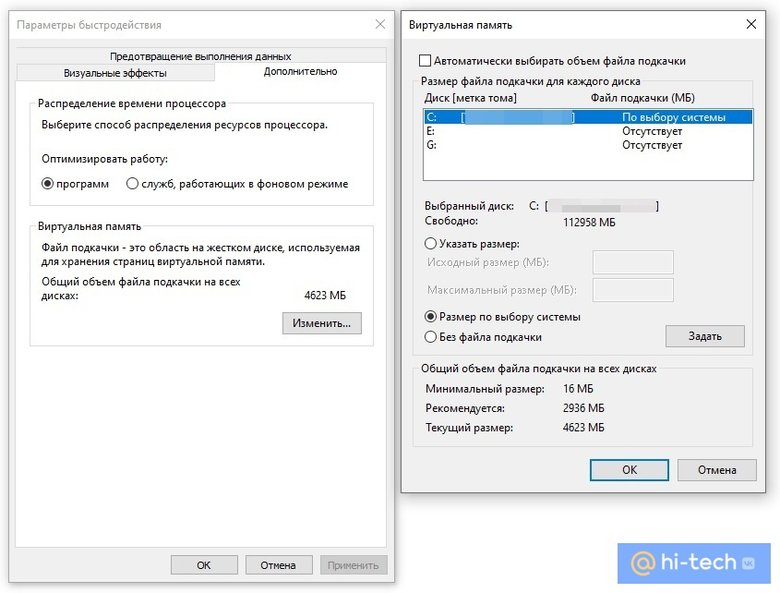
Отключить файл подкачки, перенести его на другой диск и изменить размер можно следующим способом. Наберите в поиске Windows «Настройка представлений и производительности системы». Перейдите на вкладку «Дополнительно» и далее пункт «Виртуальная память» и «Изменить».
Режим гибернации
Отключение режима гибернации может быть целесообразно, если у вас стационарный ПК или ноутбук, который редко бывает вдалеке от розетки. В режиме гибернации на диск записывается содержимое оперативной памяти, чтобы можно было быстро возобновить работу. При большом количестве оперативной памяти (уже никого не удивить 32 гигабайтами) и постоянной работе с тяжелыми программами объем записи может быть существенным.

Защита системы
Функция «Защита системы» создает точки восстановления системы, к которым можно вернуться в случае сбоя. Точки восстановления занимают определенное место на диске. В нашем случае — 6,36 ГБ. Если хотите сэкономить место на накопителе, отключите восстановление системы. Но вы лишитесь возможности восстановить систему в случае сбоя.
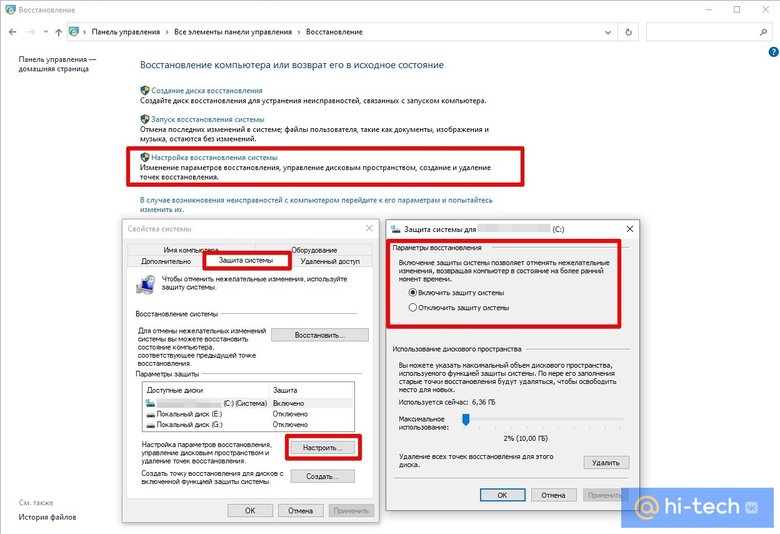
Наберите в поиске «Восстановление» и в открывшемся окне кликните на ссылку «Настройка восстановления системы». Далее нажмите на кнопку «Настроить» и отключите защиту системы.
Свободный объем и Over Provisioning
В связи с особенностями работы SSD рекомендуется оставлять на нем 10−15% свободного пространства. Следить за этим можно вручную или с помощью фирменной утилиты (если она есть).

Так, в Samsung Magician доступна функция Over Provisioning, которая позволяет зарезервировать место в автоматическом режиме. Можно выбрать объем вручную, но лучше предоставить право выбора системе.
Режим AHCI
На всякий случай стоит проверить, работает ли режим AHCI для накопителей. В режиме IDE некоторые функции системы для улучшения производительности и продления срока службы SSD могут не работать.

Зайдите в «Диспетчер устройств» и найдите строку «Контроллеры IDE ATA/ATAPI». Если в выпадающем списке значится AHCI, то все в порядке.
A Solid State Drive (SSD) can greatly slow down due to multiple reasons, as is evident with every mechanical device. However, sometimes the SSD doesn’t really slow down on its own but an issue related to an external factor is causing this to happen. Let’s take a look at the reasons and their solutions that lead to a visible slowdown in the SSD’s performance in Windows 10.
Recommended Act
ST Cleaner is one of the best system optimizer and system cleaner in town. It helps:
- Optimize as well as clean up the System Cache
- Clean up tons of Junk Data
- Clean up Internet junk to optimize its speed
- Sweep clean Software junks to optimize their performance
Get ST Cleaner NOW!
This software adheres to Clean Software Association Guidelines
Solution 1: Disable Onboard VGA
Many users have reported that the painfully slow performance of the SSD simply vanished once they disabled the onboard VGA feature of their computer. This resulted in a decrease of the system boot-up time upto 15 seconds. Here is what you need to do.
- Reboot your computer and open BIOS.
- Navigate to the Advanced BIOS section.
- Search for Onboard VGA.
- Now select the Disable option.
Note: The exact titles for the options and the procedure to navigate as well as disable them will vary from one motherboard to another. However, with a little bit of intelligent exploration, you can easily make your way through and do the trick. Don’t worry nothing wrong will happen so long as you don’t change a value that is critical. And even if you suspect that you’ve made a change which you shouldn’t have, there is always an option to restore BIOS to its default values to bail you out on such occasions.
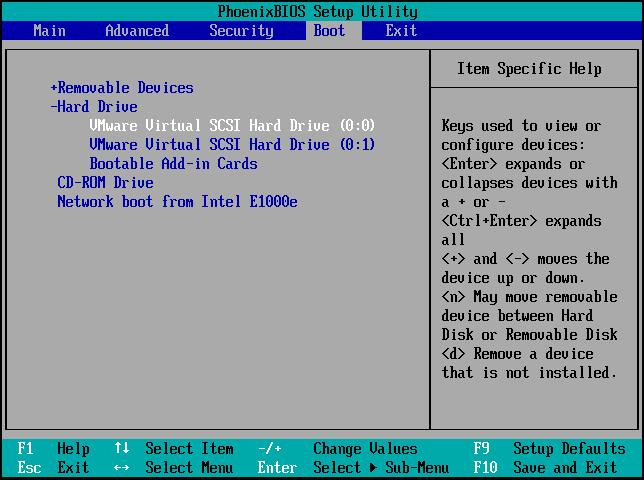
Solution 2: Configure Boot Sequence
Another reason the SSD drive is slow is that the bootup sequence is incorrectly configured as a hard drive on top priority means it will take a lot longer for it to fetch and loads the operating system.
- Restart your computer and boot into BIOS.
- Change the boot sequence of HDD and SSD. (First priority should be given to SSD).
Solution 3: Update BIOS
Another more common reason for the poor performance of a SSD in Windows is due to an outdated BIOS. To fix this issue, simply update BIOS. You can download the latest version of BIOS from the website of your computer’s manufacturer. The updated BIOS will include compatibility for new hardware, improved cache functions and other user-friendly hardware tweaks as well.
Solution 4: Check the SATA Port
Most motherboards these days have SATA 3Gbps/ SATA 6Gbps ports. The speed of the port bears heavily on the SSD’s performance. It isn’t that simple to identify the SATA Port, hence you should refer to the motherboard’s manual in order to correctly determine it. Usually, motherboards built on Intel chipsets contain an Intel SATA controller. This controller specifically has the highest speed. So the boot device should be connected to this one. Also note that the first SATA port has the highest speed, as claimed by most technical blogs.
Solution 5: Check the SATA Cable
Another reason the SSD performance is not meeting your expectations is that the SATA cable is either defective or of a poor quality make. Therefore, be sure to always purchase a SATA cable from a well-known manufacturer.
Solution 6: AHCI Mode is Disabled
The AHCI Mode helps bring the best out of the SSD. If this mode is disabled, the computer can encounter crashes or even see the notorious blue screen of death.
To fix it, simply go to BIOS Settings, look for the OnChip SATA Type and set it to AHCI.
Solution 7: Update Firmware of the SSD
Just like any other piece of software that acts as the eyes and the minds of the hardware, the firmware of the SSD is surely not an exception. That’s why manufacturers release patches and updates on a periodic basis. Remember to keep checking for a firmware update, or else you could be toying with an eventuality as extreme as complete performance disaster.
Solution 8: TRIM Command Doesn’t Exist or is Disabled
The TRIM command is absolute for stable performance of SSD. Make sure the SSD supports TRIM and it is enabled on your Windows 10 computer.
- Open Command Prompt as an administrator.
- Type in fsutil behavior query DisableDeleteNotify and press Enter.
- If you get 0 as a result, it means TRIM is already enabled, but if you get a 1 it isn’t.
- Enable TRIM in by executing the following command:
fsutil behavior set DisableDeleteNotify 0
Solution 9: SSD Needs Optimization
The SSD accumulates junk just like the rest of the computer. You need to optimize it from time to time to restore it to its original spick and span shape. Windows 10 enables you to do so very easily.
- Search for Disk Cleanup in the Start menu.
- Perform the Disk Cleanup process for the SSD to rid if of all the junk.
- Now search for defrag and open Defragment and Optimize Drives.
- Perform defragmentation for the SSD drive by selecting it and clicking the Optimize button.
Solution 10: The SSD Is Almost Full
As a rule of thumb, the SSD needs to be at least 20 percent empty so as to perform at optimal speeds. Unfortunately, most users do not know about this fact and they keep on piling their personal data (in addition to the OS) on the same SSD, which literally bogs it down big time. So be sure to always create a separate partition for the OS and don’t save anything else on it come what may.
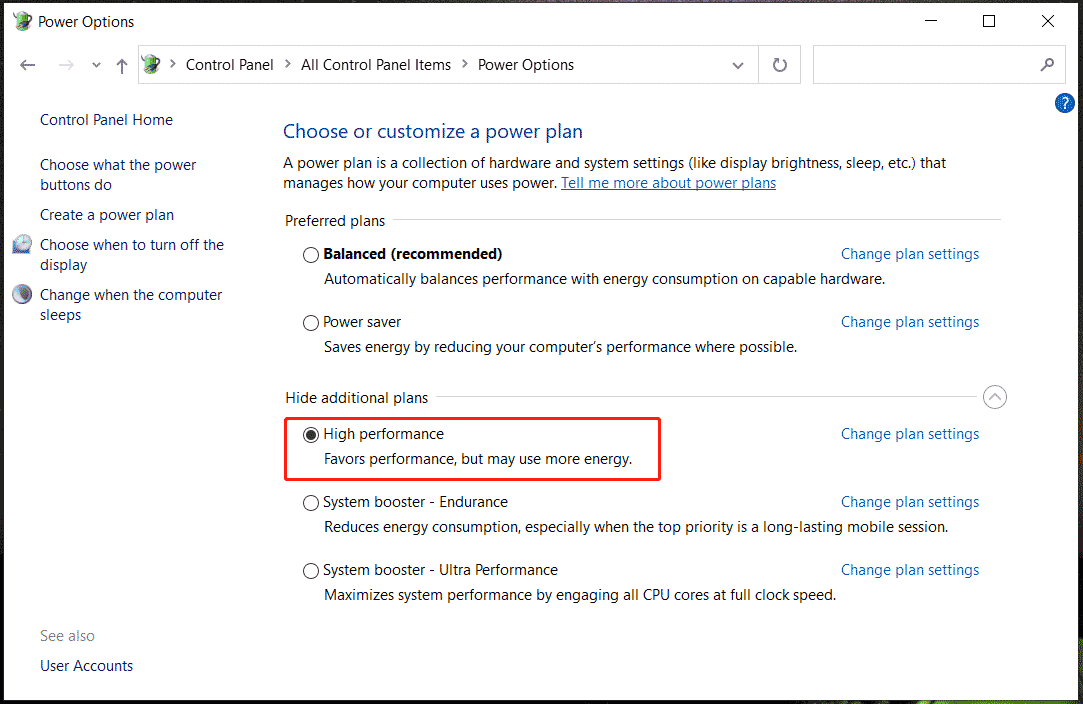
Solution 11: Go For the High Power Plan
Most of us keep our computer/ laptop at Balanced Power. The setting is easy to change and can be adjusted by typing in Power in the Search area of Windows 10 taskbar. Though the SSD doesn’t actually run fast due to the High Power plan, it is strongly suggested to select this plan if there are other devices sharing power such as the GPUs.
Solution 12: Format the SSD
If you’re using a pre-used SSD for installing the OS, it will perform a lot slower than what you’d expect from it. In such a case, format the SSD before you begin the installation.
Right-click the Solid State Drive (SSD) and select Format, or type in format /q in Command Prompt and execute this command.
Solution 13: RAM is Low
Quite possibly, it’s the RAM rather than the SSD which is causing the trouble. The RAM might have ‘fallen’ to a very low level which would have led to a decrease in the cache size and adversely impacted the SSD’s performance.
Remember to add a minimum of 4GB of RAM for decent performance of the system if you plan to use Windows 10. And if you will be using heavy duty software programs, then 8GB is a must have!
Solution 14: Erase the SSD Contents
After excessive usage of the SSD, it will get slow no matter what you try. Therefore secure erase everything saved on it from time to time by backing up your data to another disk. If you do not have ‘secure erase’ feature enabled on the disk then use a third-party software to achieve the same results.
We hope these solutions helped you out with your quest for getting the most out of your SSD. Have a good day!
Raza Ali Kazmi
Raza Ali Kazmi works as an editor and technology content writer at Sorcim Technologies (Pvt) Ltd. He loves to pen down articles on a wide array of technology related topics and has also been diligently testing software solutions on Windows & Mac platforms. If you have any question about the content, you can message me or the company’s support team.
Why is my SSD so slow? How do I fix a slow SSD? If you ask these two questions, you come to the right place. In this post, we will introduce some possible reasons for SSD running slow and how to speed up solid-state drives in Windows 11/10.
SSD Slowing Down
Compared to an HDD, an SSD brings conspicuous performance. Since it doesn’t have moving parts, its write speed and read speed are fast.
Related post: SSD VS HDD: What’s Difference? Which One Should You Use in PC
However, your SSD can slow down over time – you may take longer than usual to open apps, copy files, or boot up the system. Even sometimes your PC freezes, making the machine unavailable. What is responsible for SSD running slow on Windows 11/10?
- Low disk space
- Low RAM
- Disabled AHCI mode
- Outdated BIOS/firmware
- TRIM command is disabled or does not exist
- The SATA port or cable goes wrong
No matter what causes the SSD to run slowly, you should take some measures to improve its performance and speed up the Windows’s speed. Now, let’s look at how to make SSD faster from the part below.
Optimize SSD to Speed up It
When your SSD is almost full, the write speed and read speed could turn very slow. To solve the poor SSD performance, you can try to clear up some disk space by deleting some junk files & unnecessary files and uninstalling some apps. Besides, you can choose to defragment your SSD since file fragments on the drive can accumulate over time, leading to a slow SSD.
To optimize your SSD to solve SSD running slow, MiniTool System Booster can be a great assistant since it allows deleting Internet junk files, Windows junk files, broken registry items, etc., realigning and defragmenting your drive to increase the drive efficiency, uninstalling unnecessary apps, disabling startup items, and more.
Now, free download MiniTool System Booster via the button below to have a trial.
MiniTool System Booster TrialClick to Download100%Clean & Safe
See how to speed up SSDs:
Step 1: Launch MiniTool System Booster in Windows 11/10.
Step 2: Go to Performance and choose Deepclean from the Performance Home menu.
Step 3: After tapping START CLEAN, this PC cleaner starts 7 cleanup tasks. We recommend running these four tasks – Internet Cleanup, Windows Cleanup, Registry Cleanup, and Program Accelerator. They respectively help delete Internet files, Windows junk files, and registry items and defrag your SSD to speed up the drive.

Step 4: Besides, you can choose to uninstall some unused apps by going to Toolbox > Advanced Uninstaller to free up some disk space.
Tips:
In addition to using MiniTool System Booster to clean up unnecessary files, you can try other ways. Let’s see this post — How to Clean Junk Files on PC in Windows 11/10? 5 Tips.
Check the TRIM Command
Windows 11/10 SSD running slow can happen due to the disabled or non-existing TRIM command. So, go to check this command and make sure it is running in Windows.
Related post: What Is SSD Trim and How to Check it?
Step 1: Input cmd to the search box and click Run as administrator > Yes.
Step 2: Execute this command – fsutil behavior query DisableDeleteNotify.
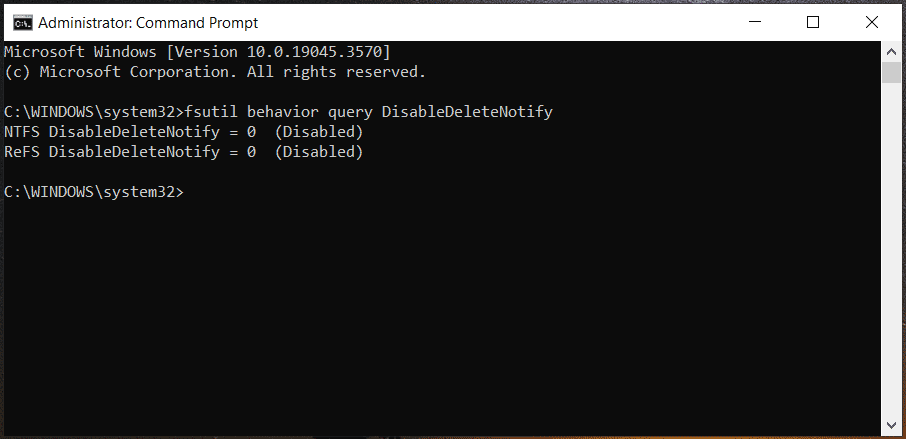
Step 3: If you get 0, it means TRIM is already enabled. If you get 1, TRIM is disabled and you need to execute this command – fsutil behavior set DisableDeleteNotify 0.
Enable AHCI Mode
AHCI, short for Advanced Host Controller Interface, plays an important role in maintaining the high performance of your SSD. Compared to IDE (Integrated Drive Electronics) mode, it allows an SSD to run faster. If you run into the issue of SSD write speed slow, go to enable AHCI mode.
Related tutorial: AHCI vs IDE: What’s the Difference Between AHCI and IDE
You can do this thing via Command Prompt and Registry Editor and this guide – 2 Ways to Enable AHCI in Windows 10/11 can help you a lot.
Update SSD Driver
A driver update sometimes helps to solve some issues that cause the slow SSD write/read speed. So, try to update the SSD driver via these steps:
Step 1: Choose Device Manager from the Win + X menu.
Step 2: Expand Disk drives, right-click on your SSD, and choose Update driver.
Step 3: Let Windows automatically search for your PC for the best available driver and install it by tapping on the first option.
Disable Onboard VGA
According to users, disabling Onboard VGA can help to solve the issue of SSD running slow. If you also suffer from this frustrating problem, try this way to speed up SSDs.
Step 1: Restart your PC to boot to BIOS.
Step 2: Go to the Advance BIOS section and find Onboard VGA.
Step 3: Disable this feature.
Choose High-Performance Mode
When using the Balanced power plan, the SSD won’t receive the full power it needs to run at its best capacity. To solve SSD slowing down in Windows 11/10, you can use the high-performance mode.
Step 1: Open Control Panel and view all the items by Large icons.
Step 2: Click Power Options and check the option of High performance.
Check Your SATA Port
Currently, most motherboards offer SATA 3Gbps/SATA 6Gbps ports and the port speed greatly impacts the SSD performance. But it is hard to find the SATA port and you had better seek help from the motherboard’s manual. From this post – SATA 2 vs SATA 3: Is There Any Practical Difference, you can find some that you need.
Check SATA Cable
The write and read speed of an SSD can be impacted by the SATA cable’s condition, whether it is tearing or has poor quality. So, check your SATA cable and see if it is in good condition.
Verdict
How to make SSD faster when you suffer from SSD running slow in Windows 11/10? From this post, you learn multiple methods to speed up solid-state drives. Take action!
You’ve come to the right place if you have SSD slow write speed issues and other random errors with your SSD. In the following guide, you will learn more about the causes of SSD slowdowns and some easy and quick solutions.
First, let’s figure out why our SSDs get slowly gradually.
It’s time to replace an old SSD with a faster and better-performance SSD.
Why SSD Gets Slow
Many users report getting speed issues, such as the «Samsung SSD slow write speed» issue. Solid-state drives, or SSDs, have become very popular recently thanks to advancements in integrated circuit technology and the performance changes they can make to your computer. However, SSD slow write speeds are a huge issue affecting old or 100% filled drives.
Running SSD performance tests regularly can help us find the errors in time. The following are potential reasons why Windows 10/11 or other operating systems may have slow SSD performance:
- Low RAM
- AHCI mode is disabled
- PC settings are incorrect
- SSD space runs out entirely
- A virus has infected your files in the SSD
- The boot sequence is incorrectly configured
- The TRIM command is missing or disabled
- The BIOS/firmware of your device or drive is outdated
Now that you know the leading causes of SDD slow write speeds, you can refer to the article’s next section to learn how to test SSD write speed and fix the slowdowns.
See Also:
How to Test SSD Write Speed
You can verify your suspicions using Command Prompt if you believe that your computer is running slowly as a result of SSD slow write speeds. However, you will need to type a few lines of commands, which can be challenging if you’re a beginner.
Using a third-party app for speed testing is much easier if you are unfamiliar with the commands. EaseUS Partition Master is one of many programs that worked the best in my experience.
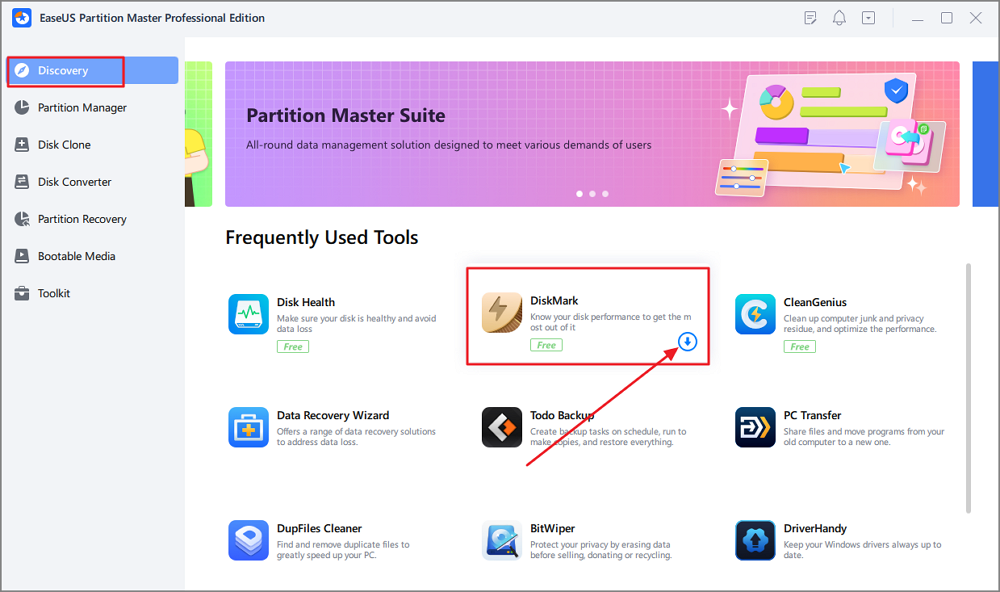
The «Disk Mark» feature of EaseUS Partition Master makes it easy to check SSD write speeds. Even if you are a beginner, you can navigate and effectively use it to manage your drives with its user-friendly interface.
Follow the steps below to learn how to check SSD write speed:
Step 1. Launch EaseUS Partition Master. And click the download button to activate the «DiskMark» feature under the «Discovery» section.
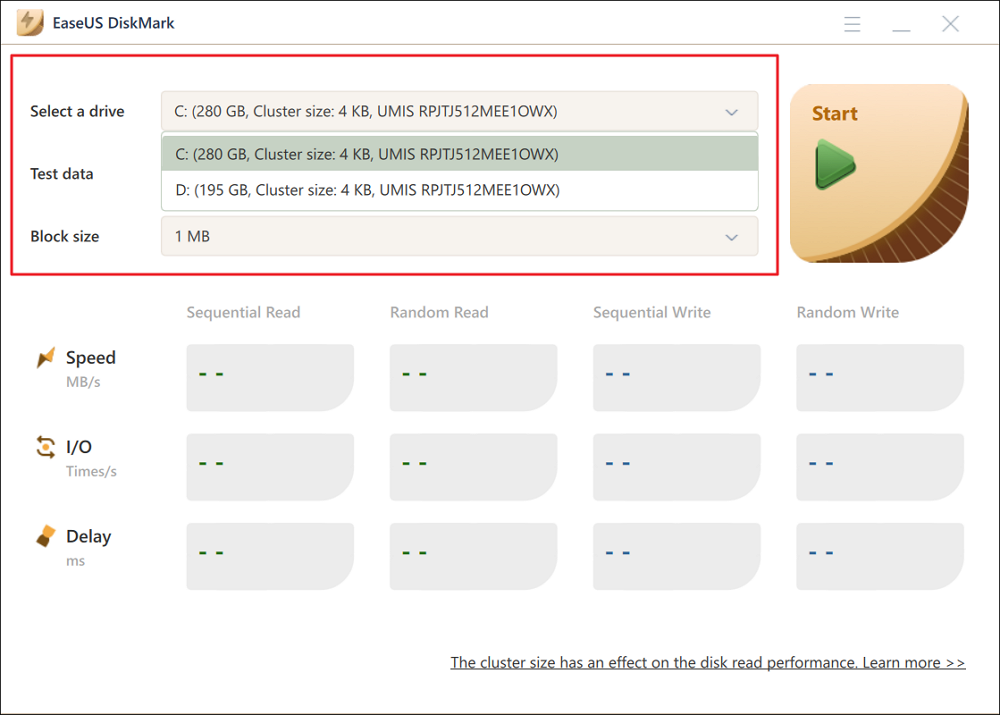
Step 2. Click on the drop-down box to choose the target drive, test data, and block size.
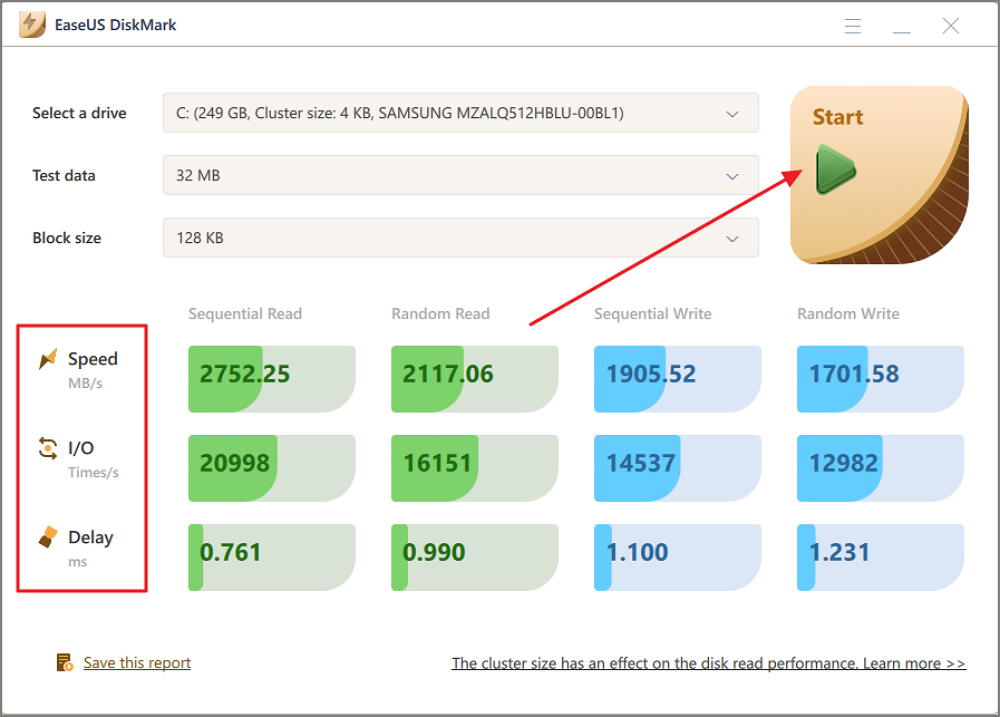
Step 3. Once everything is configured, click «Start» to begin the disk test. Then, you can see the Sequential or Random read/write speed, I/O, and Delay data.
The software is excellent at identifying and fixing SSD speed problems with a few easy clicks. In addition, the quick partition feature enables you to speed up computer performance if you have partitions or low disk space issues.
It’s time to replace an old SSD with a faster and better-performance SSD.
EaseUS Partition Master is your one-stop solution to identify any drive issues and find a solution. The app also lets you immediately check for file system errors and bad sectors, then correct them to get your problematic device back to working properly.
So, what are you waiting for? Download it and use it now.
How to Fix SSD Slow Write Speed on Windows 10/11 — Ten Fixes
It’s time to look into how to address the problems you found with your SSD speeds. The 10 fixes are listed below:
- Fix 1. 4K Align the Slow SSD
- Fix 2. Make Sure the TRIM Command Is Running
- Fix 3. Enable AHCI Mode
- Fix 4. Disable Onboard VGA
- Fix 5. Choose a High-Performance Mode
- Fix 6. Update the Firmware of the SSD
- Fix 7. Configure Correct Boot Order
- Fix 8. Free Up Hard Drive Space
- Fix 9. Check Your SATA Port
- Fix 10. Check Your SATA Cable
Note: If you know the precise issue affecting your SSD write speed, you can skip to that fix and see how to proceed. If not, try going through each individually to see if it works.
Fix 1. 4K Align the Slow SSD
Too many fragments on your SSD will slow it down, so the first way to fix the SSD slow issue is to 4K Align your SSD to improve its performance. EaseUS Partition Master allows you to speed up your SSD with the 4K Alignment feature.
Here is how to:
Step 1. Go to «Toolkit» and choose «4K Alignment».
Step 2. Select the disk you want to align. Click the «Start» button.
And this solution is also suitable to fix Windows 10 slow after clone. If you are interested in this topic, click the link:
To efficiently fix your slow SSD, try EaseUS Partition Master now. And this tool can also help to improve SSD read and write speed.
Fix 2. Make Sure the TRIM Command Is Running
If the TRIM command is not running in your system, your SSD has a high chance of having slow write speeds. Check below for the steps for running the TRIM command on your system.
Step 1. Open the «Command Prompt» as an administrator.
Step 2. Now type the «fsutil behavior query DisableDeleteNotify» command and press «Enter.» 0, as a result, means the TRIM is running, and 1 means it is disabled.
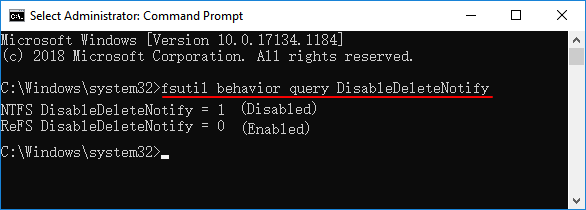
Step 3. If you get «1» as a result, type «fsutil behavior set DisableDeleteNotify 0» and hit «Enter.»
You have successfully enabled the TRIM command on your device.
Fix 3. Enable AHCI Mode
The primary advantage of AHCI, or Advanced Host Controller Interface, is that it allows SSDs to operate faster than those operating in Integrated Drive Electronics (IDE) mode. So, you need to enable it for higher SDD write speeds.
Here’s how you can do it using the Command Prompt:
Step 1. Run «Command Prompt» as an administrator.
Step 2. Type «bcdedit /set {current} safeboot minimal» and press «Enter.»
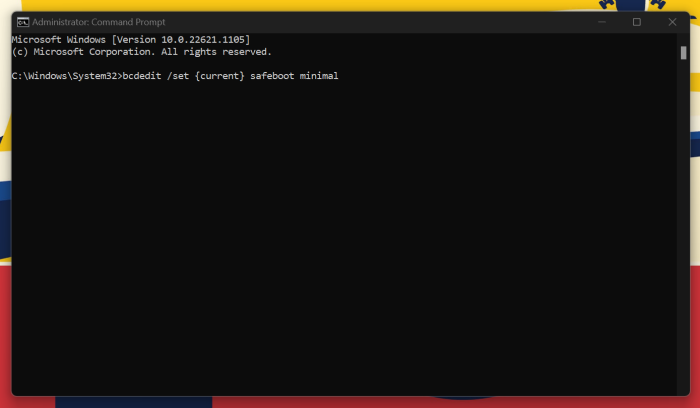
Step 3. In BIOS, enable the «AHCI» mode.
Step 4. Now exit the BIOS after saving the changes you have made.
Step 5. Now enter the «bcdedit /deletevalue {current} safeboot» command in the safe mode of the Command Prompt terminal.
Step 6. Restart your system for automatic AHCI installation.
You may also like:
Fix 4. Disable Onboard VGA
Another potential reason your SSD write speed is slow is that your onboard VGA is enabled. So, to resolve this problem, adhere to the instructions below.
Step 1. Open the «BIOS» on your computer after restarting it.
Step 2. Go to the «Advance BIOS» section and search for «Onboard VGA.»
Step 3. Choose «Disable.»
Fix 5. Choose a High-Performance Mode
Your SSD may not work properly if it is not getting sufficient power. So, you must choose a high-performance mode to run the SSD at its best capacity.
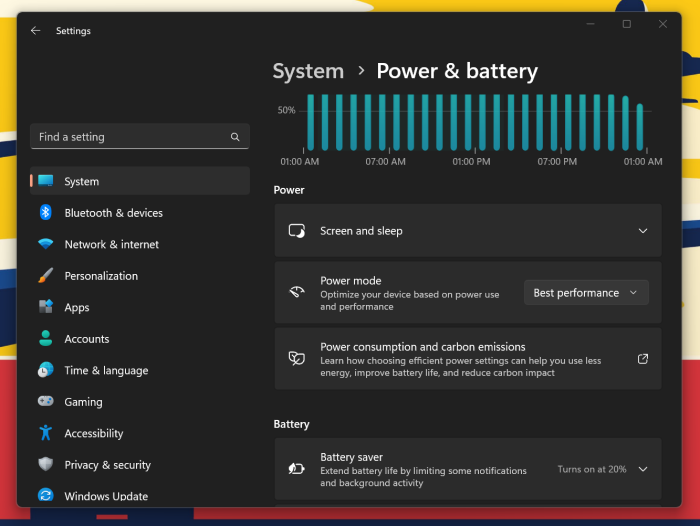
Step 1. In the «Start» menu and search «power.»
Step 2. Choose the «Power and Sleep» option.
Step 3. Now choose the «Additional power Settings» option.
Step 4. Choose the «Power mode» option and select «Best Performance.»
Fix 6. Update the Firmware of the SSD
Is your SSD’s firmware up-to-date? As new bugs and issues can be found and fixed, updating the firmware on your SSD is essential.
The firmware can be updated to enhance SSD performance. To do this, you must first determine the exact SSD’s firmware version and then go to the manufacturer’s website to download the updated firmware.
Fix 7. Configure Correct Boot Order
An incorrectly configured boot sequence may also cause a slow SSD drive. The computer will operate slowly if the hard drive receives priority over the SSD. Follow the steps given below to configure the correct boot order.
Step 1. Restart and open the «BIOS» on your device.
Step 2. Select «System Configuration» and then «Boot Options.»
Step 3. Now you can make desired changes to the boot order.
Fix 8. Free Up Space on SSD
Clutter on your drive will undoubtedly slow down the SSD write speed. Be at ease, though! It is very simple to make it work with the EaseUS Partition Master tool.
You can follow the link below to learn how to free up hard drive space.
How to Free Up Hard Drive Space in Windows 10/11 [Step-by-Step Guide]
If you don’t have room on your computer for new applications or games, or if the clutter on your hard drive is driving you crazy, you’re not alone.
Fix 9. Check Your SATA Port
Nowadays, SATA 3Gbps/SATA 6Gbps ports are on most motherboards. The port’s speed heavily influences the performance of your SSD. Because it can be challenging to recognize the SATA Port, you should consult the motherboard’s manual to do so.
An Intel SATA controller is typically found on motherboards built with Intel chipsets. The fastest should be labeled and always use it for the best speeds.
- Notice:
- M.2 SSDs are also becoming a thing, offering the best performance with the NVME standard. So, make sure your motherboard supports it.
Fix 10. Check Your SATA Cable
The SATA cable’s condition, whether torn or of poor quality, will impact the SSD’s write speed. Check to see if the cable is in good condition, and only buy a SATA cable from a reputable manufacturer.
Also, ensure the cable is slotted correctly and you don’t have a loose connection. You can also re-seat the cable to get the best fit.
Hopefully, the ten solutions provided above have solved your problem.
Conclusion
An SSD’s slow writing speed can be very annoying when using your computer to play games or complete essential tasks. Additionally, if you do not resolve this problem quickly, your SSD may become irreparably corrupted, meaning you would lose all of your data.
Therefore, be sure to check the status of your SSD regularly. You can use EaseUS Partition Master to easily check the SSD’s speed and even speed up slow SSDs by downloading it. Except for Samsung and Sandisk, this tool is compatible with other brands’ SSDs, such as fixing Toshiba SSD slow write speed. If you want to fix your SDD’s slow write speeds, you can use the solutions provided in this article. The following video shows you how to check SSD speed.

SSD Slow Write Speed FAQs
With the ten fantastic solutions offered in the article, fixing the SSD’s slow write speed has become simpler and easier.
Hopefully, you can get your SSD functioning properly using the solutions offered. Check the FAQs below if you still have questions about the SSD’s slow write speed.
1. What is a good SSD write speed?
How quickly a file can be written to the drive is measured as write speed. A standard SDD could read and write at 200 — 500 MB/s; some can even get up to thousands of MB/s. So, anything above 300 MB/s is a great speed to be at.
2. Why is my disk writing so slow?
Your disk writing may be slow for several reasons, including low RAM, outdated BIOS firmware, low disk space, a virus-infected disk, and disabled TRIM command. Using a third-party tool like EaseUS Partition Master, you can quickly identify and resolve the SSD writing speed issue.
3. How do I fix slow write speed on SSD?
Check whether the SSD has enough space before fixing the slow write speed issue. Then see if your computer has the TRIM command enabled or not. You can also check the SATA connection or cable and download the latest firmware or drivers for your PC and SSD.