
These are the installation instructions for installing Tor on Windows without the need to have the Tor Browser Bundle (TBB) running all the time as well.
Running Tor as a service on Windows separately from the Tor Browser Bundle is only usefull for users who want to keep Tor running all the time, without having to have the Tor Browser running as well.
This lets you use Tor for other services, such as instant messaging, email, or remotely accessing other computers through the Tor network. It can be especially usefull for you if you want to host onion services (Hidden Services/.onion Sites) on your Windows computer or relay traffic for other Tor users.
The Tor Browser Bundle installer for Windows, provided by the Tor Project, does not include an option during installation to configure Tor to run as a Windows service. But, by using the Windows command line interface (CLI) you can easily instruct tor.exe to install a Windows Service without any additional downloads or advanced configuration.
For most users the installation of the Tor Browser Bundle is all they need to browse the web anonymously or to let another app connect to the internet over Tor. You can find here further information about the Tor Browser and direct download links for iOS, macOS, Windows and Linux/Unix.
How to install Tor on Windows without the need to have the Tor Browser Bundle running- Tutorial — Installing Tor as a Windows Service:
First, download and install the Tor Browser Bundle for Windows:
- Tor Browser Windows Download
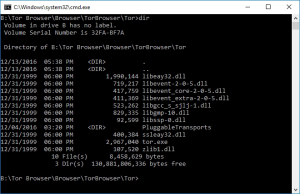
Open the Windows File Explorer and navigate to the directory in which you installed the Tor Browser (i.e. C:\Tor Browser\)
- Go into the Browser\TorBrowser\ directory
- You should see a «Tor» folder in this directory
- While holding down the «Shift» key, right click the «Tor» folder
- Select «Open command window here»

This will open the Windows CLI already in the context of the C:\Tor Browser\Browser\TorBrowser\Tor\ directory (or wherever you have installed the Tor Browser).
Now enter the following command to instruct tor.exe to install a Windows Service:
c:\Tor Browser\Browser\TorBrowser\Tor> tor.exe –service install
That’s it — now you are running Tor as a service on Windows.
You can check if the service was installed by opening the Windows Services snap-in by holding down the Windows Key while pressing R and typing services.msc:
Click «OK»

Check for «Tor Win32 Service» in the list and view its status, as well as stop, start, or restart the service.
It can also be easily configured to not automatically start on Windows boot (if desired).
Now you can configure other software to use the Tor service (tunnel traffic through the Tor network) for anonymous internet connections.
Настройка Tor как службы Windows
Чтобы запустить Tor как службу, да еще и с указанием адреса нужно выполнить следующую команду:
tor —service install -options -SOCKSListenAddress <ip-address>[:port]
По-умолчанию Tor слушает только по 127.0.0.1. Для такого конфига подойдет команда:
tor —service install
Информация целиком и полностью взята из официальной факи.
Популярные сообщения из этого блога
До неприличия просто! В wincmd.ini в секцию [ Configuration ] добавляем строку: HideRemovableNoMedia=1 . И все, тотал начинает отображать только активные диске (в т.ч. среди съемных).
Довелось мне с целью парсинга сайта использовать библиотеку BeautifulSoup . При вызове метода prettify() возникла ошибка ‘charmap’ codec can’t encode character … in position …: character maps to <undefined> . Кому интересно, что с этим делать — под кат.
После обновления прошивки на своем RedMi 3S столкнулся с тем, что смс-ки и история звонков ни в какую не хотели синхронизироваться. Решение проблемы было найдено на официальном форуме. Оставлю здесь на будущее, да и тем, кто с английским не дружит.
- on Июл 02, 2021
-
in
Без рубрики
Для начала нам понадобится сам Torbundle его можно взять тут
https://www.torproject.org/ru/download/tor/Нам нужен именно Windows Expert Bundle
ну или прямая ссылка на актуальную на момент написания версию.
https://www.torproject.org/dist/torbrowser/10.0.18/tor-win32-0.4.5.9.zipСкачиваем данный архив переходим в директорию нашего пользователя командой
%USERPROFILE%Создаем папочку TorBundle и распаковываем туда содержимое скаченного архива.
Дальше нужно создать файлик torrc внутри директории Data\Tor со следующим содержимым
DataDirectory C:\Users\%USERPROFILE%\TorBundle\Data\Tor
GeoIPFile C:\Users\%USERPROFILE%\TorBundle\Data\Tor\geoip
GeoIPv6File C:\Users\%USERPROFILE%\TorBundle\Data\Tor\geoip6
AvoidDiskWrites 1
SocksPort 127.0.0.1:9160
%USERPROFILE% только меняем на имя вашего пользователя.
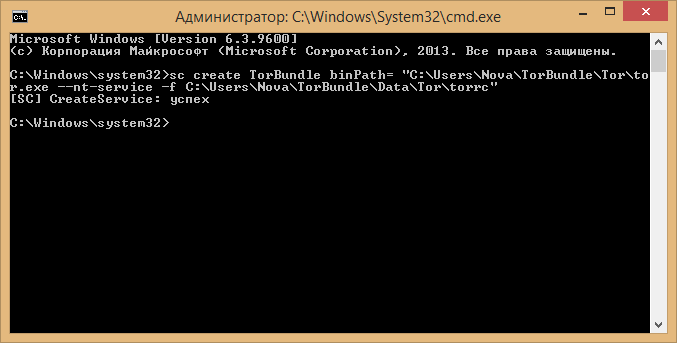
дальше нам нужно запустить CMD от имени Администратора и установить tor в качестве службы.
выполнив данную команду.
sc create TorBundle binPath= "C:\Users\%USERPROFILE%\TorBundle\Tor\tor.exe --nt-service -f C:\Users\%USERPROFILE%\TorBundle\Data\Tor\torrc" %USERPROFILE% меняем на имя вашего пользователя!!!
*ОБРАТИТЕ ВНИМАНИЕ НА ПРОБЕЛ ПОСЛЕ binPath= он должен быть!
пример
После этого идем в службы (Панель управления > Администрирование > Службы) и запускаем наш TorBundle
дополнительно ставим автоматический запуск, что бы служба работала после перезагрузки.

на этом настройка закончена, после всех манипуляций у вас должен быть локально запущен сокс5 на порту 9160.
Для тех кого еб*т все это делать, запилил инсталятор, он автоматически скачивает torbundle распаковывает в директорию вашего профиля в папку TorBundle и устанавливает службу, приложение нужно запускать с правами администратора и в системе должен быть .NET Framework не ниже 4.5
Тестед нах on Windows 7 / 8.1 / 10 | редакции (х64) виз дисаблед УАК 
https://nova.ws/dl/release/torbundle.zipsha256sum exe файла.
0aa936ee30015ca8e56d6170f7433c4f79a27d782b674719b63dc758553f6e4bДля тех кому интересен сурс этого приложения, он доступен тут
If you use a Bitcoin full node over Tor, then usually it will only be able to make outgoing connections. Therefore, you will only get a maximum of 10 total connections. This is fine, and is not something you usually need to worry about, but if your computer is often online and you want to be a big help to the network, you can run a Tor hidden service in order to accept incoming connections over Tor.
Note that there is no need to forward port 8333 when using a Tor hidden service. The hidden service will cause most firewalls and NAT setups to be bypassed. For this reason, running a Tor hidden service is also a good idea if you want incoming connections but are for some reason unable to forward port 8333.
Prerequisites
These instructions are for Linux. It is possible to do on other platforms such as Windows and macOS. The instructions for Windows are presented at the end.
You need Tor (at least version 0.2.7.1). Figure out where your torrc file is (/etc/tor/torrc is one possibility). This guide assumes default Tor settings. This guide assumes that Tor is running under the user and group tor, which will usually be the case if you install Tor using your distro’s package manager. Note that since version 22.0 Bitcoin does not support Tor hidden service version 2 (ie. short onion addresses), only support Tor version 3 hidden services (Tor v3, ie. long onion addresses).
You need Bitcoin Core (or similar). For method 1, you need at least version 0.12.0. Find bitcoin.conf in your data directory.
Linux Method 1 (recommended)
This sets up an automatic hidden service that is initiated by Bitcoin Core. On the first startup of bitcoind after configuring Bitcoin Core to use Tor ControlPort as follows, Bitcoin Core will generate a file called onion_private_key in the data directory. The file onion_private_key contains the private key needed to generate your unique XXXXXXX.onion address. KEEP THIS SAFE. If someone copies this file they can run a server with your .onion address. Also, if you delete this file, the next time bitcoind loads it will generate a new key file and xxxxxxxx.onion address. Note that while a malicious party cannot necessarily associate the server with you as a person, as long as your server has the same xxxx.onion address they will know it is run by the same person. For absolute security delete onion_private_key at each reboot or some frequent interval.
Add these lines to your torrc:
ControlPort 9051
CookieAuthentication 1
CookieAuthFileGroupReadable 1
You need to figure out what user bitcoind or bitcoin-qt is running as. Usually it is the same as the currently logged-in user, but in some setups, it may be different. Run the following command while Bitcoin is running:
ps -eo user,group,comm |egrep 'bitcoind|bitcoin-qt' |awk '{print "Bitcoin user: " $1}'
Write down the reported user.
Run the following command as root, which adds your Bitcoin user to the tor group. Replace BITCOIN_USER with the actual user name found above:
usermod -a -G tor BITCOIN_USER
At this point your node will work over Tor without further configuartion. Bitcoin Core v0.12 and later automatically tries to connect to Tor via the ControlPort if listen=1 is set in bitcoin.conf. By default Bitcoin Core will usually connect over the regular Internet as well as allow connections to and from the Tor hidden service. This will help other users who wish to submit transactions to the bitcoin network securely and obscurely, but transactions you submit could theoretically be traced back to your ip address. If you want Bitcoin Core to only connect via Tor (for anonymity), add these lines to bitcoin.conf:
proxy=127.0.0.1:9050
listen=1
bind=127.0.0.1
Note that port 9051 is the ControlPort. This is the port used to control the Tor service. It is not the port Bitcoin Core uses — port 9050 is the SOCKS proxy for tunneling Bitcoin Core’s traffic via Tor.
If you additionally want Bitcoin Core to only connect out to Tor hidden services, also add this line (not particularly recommended):
onlynet=onion
Doing so will make your specific bitcoind node arguably more secure because it will never have an unencrypted connection to another node, but if everyone used onlynet=onion nobody on the onion bitcoin chain would be able to communicate with the clearnet chain. It is essential that some nodes access both clearnet and Tor. If you need to submit bitcoin transactions to the network with the highest level of obscurity, use onlynet=onion. If you only wish to give access to your node to other Tor users, do not use it.
Now restart Tor, and then Bitcoin Core. At some point during startup in ~/.bitcoin/debug.log you will see
tor: Got service ID XXXXXXXXXXX, advertising service XXXXXXXXXXX.onion:8333
This is the .onion address of your server. You should eventually get incoming connections via the hidden service.
Linux Method 2
This sets up a manual hidden service controlled by the tor daemon. The hidden service address (xxxx.onion). Note that as in method 1, your xxxxx.onion address will stay the same until you delete your key file. Someone tracking you can’t necessarily associate the xxxx.onion with you, but they will know it is run by the same person or entity.
Add these lines to your torrc:
HiddenServiceDir /var/lib/tor/bitcoin-service/
HiddenServicePort 8333 127.0.0.1:8333
Restart Tor. As root, run cat /var/lib/tor/bitcoin-service/hostname. Your onion address will be reported. If it didn’t work, then probably your distro’s version of Tor doesn’t actually use /var/lib/tor for this purpose. You should try to figure out the correct HiddenServiceDir location.
In the following steps, replace ONION_ADDR with the onion address reported above.
If you don’t care about anonymity and are only looking to help the network, add the following lines to bitcoin.conf:
onion=127.0.0.1:9050
listen=1
externalip=ONION_ADDR
discover=1
This will allow you to accept connections both via your onion address and your IP address (if you have port 8333 forwarded), and Tor will only be used for connections to and from Tor hidden services.
If you care about anonymity, instead of the above, add the following lines to bitcoin.conf to use Tor for everything:
proxy=127.0.0.1:9050
listen=1
bind=127.0.0.1
externalip=ONION_ADDR
If you additionally want Bitcoin Core to only connect out to Tor hidden services, also add this line (not particularly recommended):
onlynet=onion
Now restart Bitcoin Core. You should eventually get incoming connections via your hidden service.
Windows
First you need to download Tor, we recommend the Tor Expert Bundle (intended for developers who need to bundle tor with their applications), it contains only the tor and pluggable transports binaries, bridge strings, and geoip data. The latest version for Windows 64bits (x86_64) or Windows 32bits (i686) is located here on torproject.org. The Tor Expert Bundle is also available for macOS, Linux, and Android, and setup on these platforms is similar to the Windows instructions.
Then extract the contents on a folder in a place that your user can access, like %UserProfile%.
On your Windows Explorer go to that folder and create a file called torrc. Open it with Notepad, type the content below and save:
ControlPort 9051
CookieAuthentication 1
Open Windows PowerShell (maybe you will need to Open as Administrator), navigate to the extracted folder (ex.: cd C:\Users\MyUserName\torExpertBundle), and enter the folder Tor (ie.: cd Tor). Type dir you should see some files and tor.exe among them. So type the code below (remember to change the folder accordingly to where you extracted)
tor.exe --service install -options -f "C:\Users\MyUserName\torExpertBundle\Tor\torrc"
If the code succeeds it will say something related to the creation of a new entry on Windows Services. Access Windows Services by pressing the Windows button and typing services then enter. You should see Tor Win32 Service (Provides an anonymous Internet communication system) on the list. Check if the status is Running and initialization type is Automatic. To verify if Tor is really working as a service, open Windows PowerShell then type:
netstat -aon | findstr ":9050"
You should see something like :9050 LISTENING:
TCP 127.0.0.1:9050 0.0.0.0:0 LISTENING 4000
Then type:
netstat -aon | findstr ":9051"
You should see something like :9051 LISTENING:
TCP 127.0.0.1:9051 0.0.0.0:0 LISTENING 4000
If you don’t see any LISTENING output, it means that Tor service is not working properly and this issue may be related to Windows permissions on the folder you extracted. To fix it go to where you extracted the Tor Expert Bundle and check the top folder Properties > Security > Advanced and verify if in the Permissions tab you have SERVICE with Full Control, if not click Add, click on the link Select a Secure Entity and type SERVICE (all letters in UPPERCASE) then hit enter and select Full Control (Try to start the Tor service again in Windows Services, if it doesn’t work, try adding SYSTEM and LOCAL SERVICE with Full Control on folder permissions and repeat the tests above).
See BitcoinCore debug.log file what is happening on the communication with the Tor service, edit your bitcoin.conf file and add this line at the end debug=tor, then restart BitcoinCore. If everything is ok, you should see something like that:
2022-06-13T21:45:32Z Config file arg: debug="tor"
2022-06-13T21:45:44Z torcontrol thread start
2022-06-13T21:45:44Z tor: Reading cached private key from C:\YourBitcoinFolder\onion_v3_private_key
2022-06-13T21:45:44Z tor: Successfully connected!
2022-06-13T21:45:44Z tor: Connected to Tor version 0.4.x.x
2022-06-13T21:45:44Z tor: Supported authentication method: COOKIE
2022-06-13T21:45:44Z tor: Supported authentication method: SAFECOOKIE
2022-06-13T21:45:44Z tor: Using SAFECOOKIE authentication, reading cookie authentication from C:\Windows\ServiceProfiles\LocalService\AppData\Roaming\tor\control_auth_cookie
2022-06-13T21:45:44Z Leaving InitialBlockDownload (latching to false)
2022-06-13T21:45:44Z tor: SAFECOOKIE authentication challenge successful
2022-06-13T21:45:44Z tor: AUTHCHALLENGE ServerHash xxxxx ServerNonce xxxxx
2022-06-13T21:45:44Z tor: Authentication successful
If you get tor: Authentication cookie C:\Windows\ServiceProfiles\LocalService\AppData\Roaming\tor\control_auth_cookie could not be opened (check permissions) on Bitcoin debug.log this means that you need to navigate to the folder C:\Windows\ServiceProfiles\LocalService and enter Properties > Security > Advanced to verify if in the Permissions tab you have SERVICE with Full Control, if not click Add, click on the link Select a Secure Entity and type SERVICE (all letters in UPPERCASE) then hit enter and select Full Control (Try to start BitcoinCore again, if it doesn’t work, try adding SYSTEM and LOCAL SERVICE with Full Control on folder permissions and repeat the tests above… you may need to add All Application Packages, NETWORK SERVICE, USERS, or other security groups, with at least «Read & execute» in order to work).
- KeepItSimpleBitcoin How To Install Tor (Mac OS, Linux, Windows) — text and video instructions including Bitcoin Core config.
- Bitcoin Core Docs Tor — Explanation of the Bitcoin Core configs related to Tor.
В эпоху повсеместного https и защиты персональных данных в пору позаботиться об анономности в сети, используя, так называемую, луковую маршрутизацию. А поможет нам в этом Tor — система прокси-серверов, позволяющая устанавливать анонимное сетевое соединение, защищённое от прослушивания.
Установка Tor Bundle в Ubuntu
Создайте новый файл tor.list в директории /etc/apt/sources.list.d/ со следующим содержимым:
deb http://deb.torproject.org/torproject.org xenial main
deb-src http://deb.torproject.org/torproject.org xenial main
Добавьте gpg-ключи, выполнив последовательно в консоли следующие команды:
gpg -keyserver keys.gnupg.net -recv 886DDD89
gpg -export A3C4F0F979CAA22CDBA8F512EE8CBC9E886DDD89 | sudo apt-key add -
Теперь обновите источники и установите Tor:
sudo apt-get update
sudo apt-get install tor deb.torproject.org-keyring
Настройка Tor Bundle в Ubuntu
Вся первоначальная настройка Tor сводится к копированию моего файла в папку с установленным Tor.
Создайте файл /etc/tor/torrc и впишите туда следующее:
SOCKSPort 9050 CacheDNS UseDNSCache
SOCKSPolicy accept private:*,reject *:*
DataDirectory /var/lib/tor
Log notice file /var/log/tor/notice.log
ExcludeExitNodes {ru},{ua},{by},{kz},{??}
StrictNodes 1
Установка Tor Bundle в Windows в качестве сервиса
Скачайте архив с официального сайта проекта, содержащий Expert Bundle.

Распакуйте содержмое zip-архива в папку tor в корне вашего жесткого диска.
Это важно, так как позволит избежать проблем в будущем, когда в пути встречаются русские символы или пробелы.
Откройте терминал с административными правами. Для чего вызовите меню «Выполнить», нажав на клавиатуре клавиши Win + R.
И вставьте следующую команду в появившемся окне:
runas /noprofile /user:administrator cmd

Administrator — имя пользователя с полными правами. У вас может отличаться.
Добавьте новый сервис TOR:
sc create TOR binPath= "C:torTortor.exe -nt-service -f C:torDataTortorrc"
Настройка Tor Bundle в Windows
Вся первоначальная настройка сводится к копированию моего файла в папку с установленным Tor.
Создайте файл C:torDataTortorrc и впишите туда следующее:
SOCKSPort 9050 CacheDNS UseDNSCache
SOCKSPolicy accept private:*,reject *:*
DataDirectory C:torvar
Log notice file C:torvarnotice.log
HeartbeatPeriod 1 hours
ExitRelay 0
GeoIPFile C:torDataTorgeoip
GeoIPv6File C:torDataTorgeoip6
ExcludeExitNodes {ru},{ua},{by},{kz},{??}
StrictNodes 1
Настройка софта, поддерживающего Socks
Чтобы ваши приложения начали использовать луковую маршрутизацию, впишите в их настройках в качестве прокси socks 4a или 5.0 хост 127.0.0.1 с портом 9050.
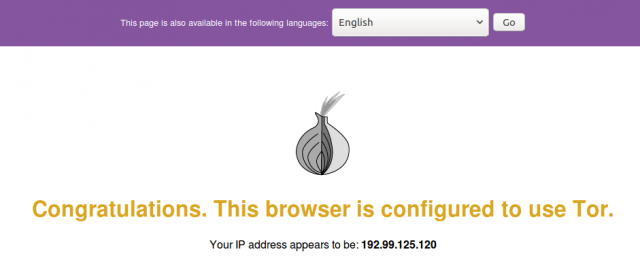
Проверка маршрутизации Tor
Чтобы убедиться, что луковая маршрутизация у вас работает корректно, просто зайдите на тестовую страницу проекта.
Если вас встретила жёлтая надпись «Congratulations. This browser is configured to use Tor», то всё впорядке, иначе проверьте, запущена ли служба Tor, соединился ли клиент с сетью (в логе «Bootstrapped 100%»).
Работа с onion-ресурсами
Внутри сети Tor доступны ресурсы в домене .onion. Их неполный список можно увидеть здесь.
Чтобы на них попасть, вы должны быть подключены к сети и ваши браузеры настроены должным образом.
Mozilla Firefox
Заходим в about:config, ищем параметр network.proxy.socks_remote_dns и выставляем его значение в true.
Chromium/Google Chrome
Заходим в Настройки, выбираем «Показать дополнительные настройки» и в разделе «Личные данные» делаем пункт «Предсказывать сетевые действия для ускорения загрузки страниц» неактивным.
Приятного и безопасного вам сёрфинга.
Linux Tor Tor Bundle Ubuntu Windows Yota
Разработчик из России с 20-ти летним стажем. Работаю с PHP, ООП, JavaScript, Git, WordPress, Битрикс, Joomla, Drupal, OpenCart, DLE, Laravel, Moonshine, Symfony, SuiteCRM.
Оптимизирую сайты под Google Page Speed, настраиваю импорты для больших магазинов на WooCommerce + WP All Import. Пишу плагины на заказ. Все мои услуги.
Веду блог о разработке, дайджест в телеграмме и в ВК.
Вы всегда можете нанять меня.