Оперативный доступ к различным программам, функция переключения между программами и получать уведомления — это лишь малая часть возможностей, что предлагает пользователю панель задач. Этот элемент дизайна ОС можно и нужно настраивать под свои нужды. Вы можете закрепить на ней свои любимые приложения, изменить ее размер или скрыть, если вам это удобно. Как это сделать? Рассказываем в нашей статье!
Панель задач Windows — что это? Определение и возможности
Панель задач Windows — часть графической оболочки операционной системы. Традиционно выглядит как небольшая полоска внизу экрана, где отображаются значки программ, запущенных на вашем компьютере. Она является одним из самых важных элементов Windows, предоставляющим удобный доступ к различным программам, которыми пользуется человек, работающий за ноутбуком или ПК.
Основная задача данного элемента интерфейса — обеспечить пользователю работу в режиме многозадачности. Пользователь может запустить несколько программ одновременно и легко переключаться между ними, просто щелкая на соответствующих значках в панели задач. Это особенно полезно, когда вам нужно работать с несколькими приложениями одновременно, например, редактировать документ, просматривать веб-страницы и слушать музыку.
Кроме того, в приложениях на панели задач Windows часто можно увидеть уведомления. Когда у вас есть новое сообщение электронной почты, входящий звонок или какое-либо другое уведомление, соответствующий значок появляется на панели чтобы вы не пропустили важную информацию. В Windows 10 для уведомлений создали отдельную зону справа, однако часть программ до сих пор сообщают об изменениях мигающей иконкой или значком в трее.
Помимо прочего, панель задач предоставляет доступ к системным настройкам. Вы можете легко изменить громкость звука, настроить сетевое подключение, проверить уровень заряда батареи на ноутбуке.
Элементы на панели задач Windows
В панели задач в Windows 10 есть несколько стандартных зон. На изображении ниже они выделены цифрами.

Панель задач и ее элементы
Перечислим последовательно все стандартные элементы на панели задач Windows:
- Меню «Пуск». Нажав эту кнопку, вы открываете меню, где очень просто найти и запустить программы, настроить системные параметры, получить доступ к документам и папкам, а также выполнить другие действия, связанные с использованием операционной системы.
- Кнопка поиска. Частично дублирует современное меню «Пуск», т. к. с ее помощью можно найти нужное приложение на компьютере. Однако, позволяет также искать данные в интернете и сразу открывать в браузере.
- Кнопка «Просмотра задач». Позволяет в несколько кликов переключаться между открытыми приложениями. Когда вы нажимаете эту кнопку, на экране появляется предварительный просмотр доступных пользователю открытых окон и приложений.
- Зона приложений с обычными и закрепленными иконками. Здесь отображаются иконки запущенных приложений и приложений, закрепленных для быстрого доступа. Когда вы открываете приложение, его иконка появляется в зоне приложений. Закрепленные иконки позволяют быстро запускать часто используемые программы, просто щелкнув по ним.
- Системный трей. Находится справа от зоны приложений. В системном трее отображаются различные системные иконки, такие как иконка громкости, сети, часы и другие. Вы можете использовать эти иконки для доступа к функциям и настройкам, связанным с соответствующими системными компонентами.
- Зона уведомлений. Находится справа от системного трея. В этой зоне отображаются уведомления от различных приложений в зависимости от выбранных вами настроек. Например, если вы будете записывать видео с экрана, в зоне уведомлений появится сообщение о том, что ролик сохранен. Также там появляется информация об обновлениях системы и др.
У каждого элемента на панели задач есть свои особенности и часто — свои настройки. В этом материале мы не будем их касаться, а поговорим только об общих характеристиках зоны. Например, разберемся, как сделать панель задач в Windows 10 невидимой или вернуть ее на место.

Использование поиска для подбора отеля в Москве
Настройки — как скрыть и вернуть
Панель задач на экране занимает довольно много места, поэтому многие ее скрывают. Разберемся, как скрыть, вернуть этот элемент — и что делать, если панель задач исчезла, когда вы этого не планировали.
Как скрыть и вернуть панель задач
Если вы хотите разобраться, как вернуть панель задач Windows или скрыть ее, то это несложно. Вопрос решается простым переключением параметра в настройках. Первым шагом найдите пустое место на панели задач, это важно, т. к. при клике на расположенную в зоне иконку вы откроете ее свойства, а не нужное вам меню. Правой кнопкой мыши нажмите на пустое место. Появится контекстное меню.
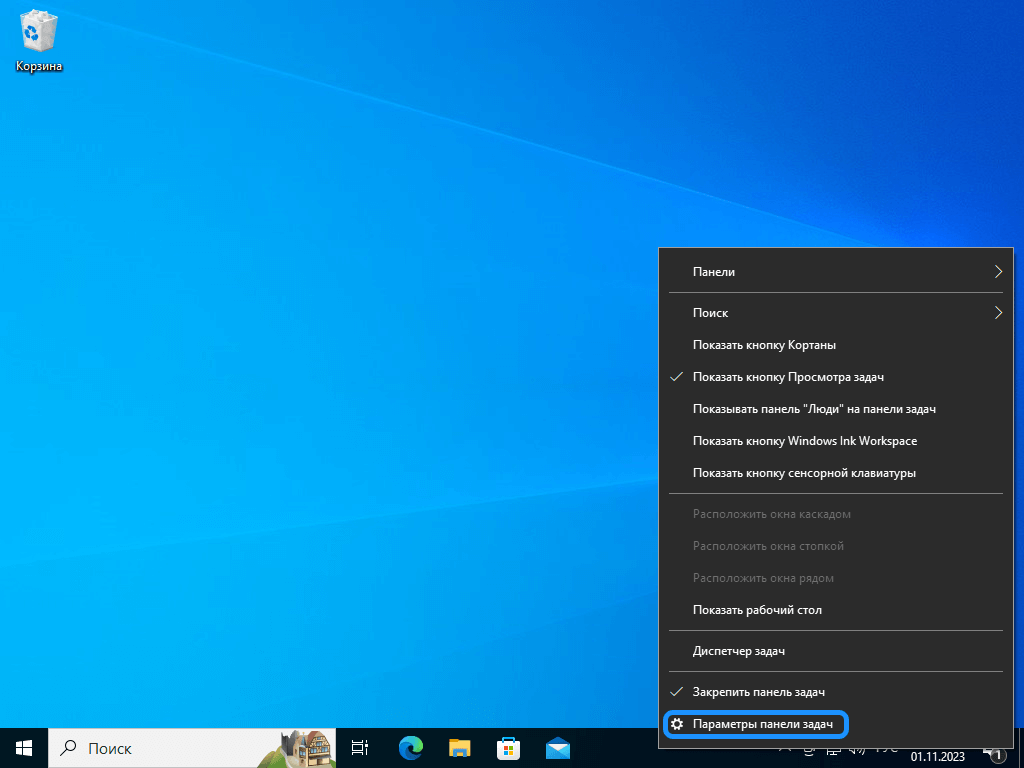
Контекстное меню
В меню найдите опцию «Параметры панели задач». Откроется окно с настройками панели задач. В окне с настройками найдите две опции «Автоматически скрывать панель задач» в режиме рабочего стола и в режиме планшета. Измените положение переключателя рядом с ними.
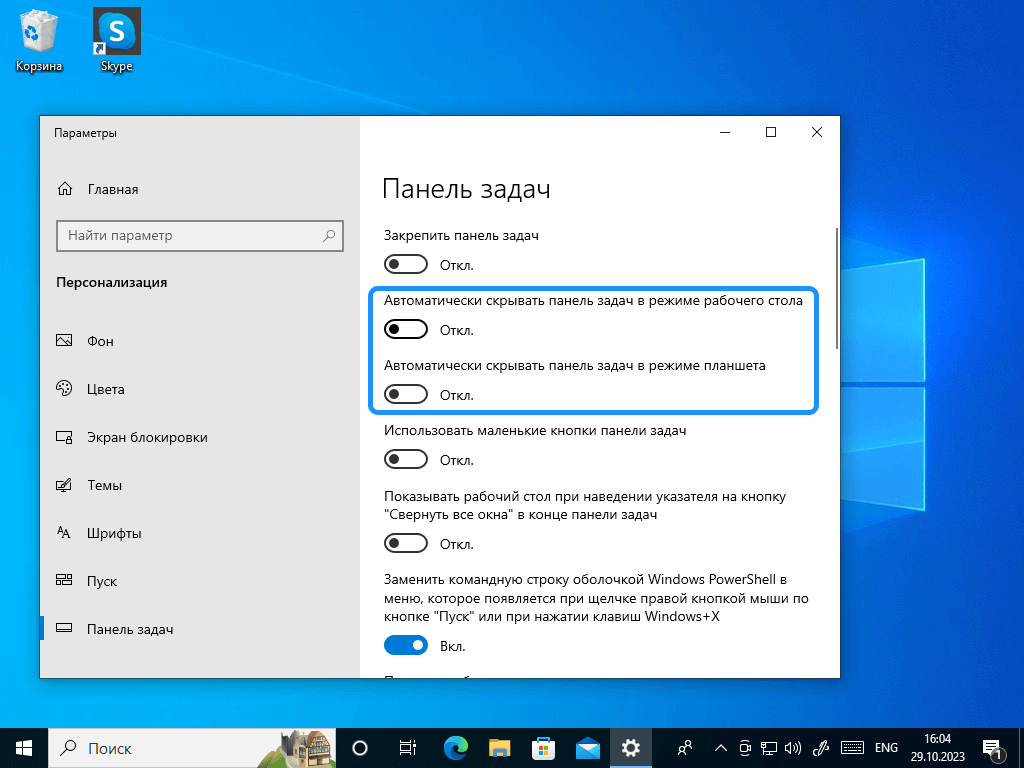
Настройка скрытия панели задач
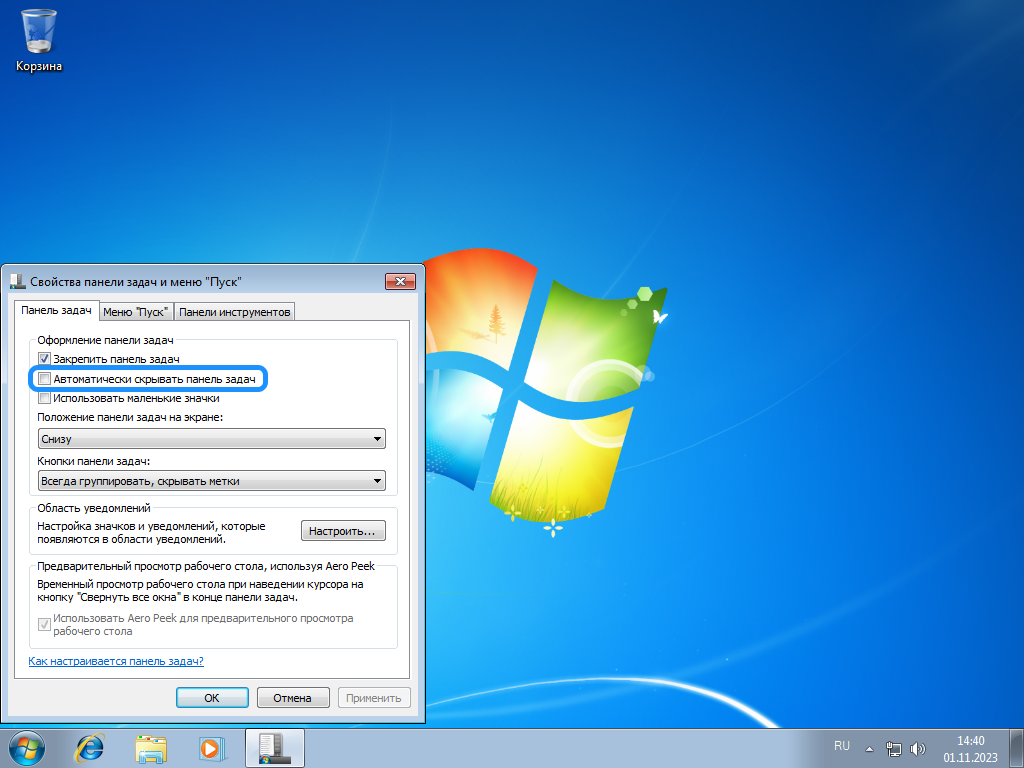
Настройка скрытия панели задач для Windows 7
Если вы поставили переключатель в положение «Вкл» панель задач будет скрыта на вашем компьютере. Чтобы ее снова отобразить, просто проведите курсор мыши к нижней части экрана, и она автоматически появится. Если установить переключатель в положение «Откл», элемент интерфейса будет всегда показываться на экране.
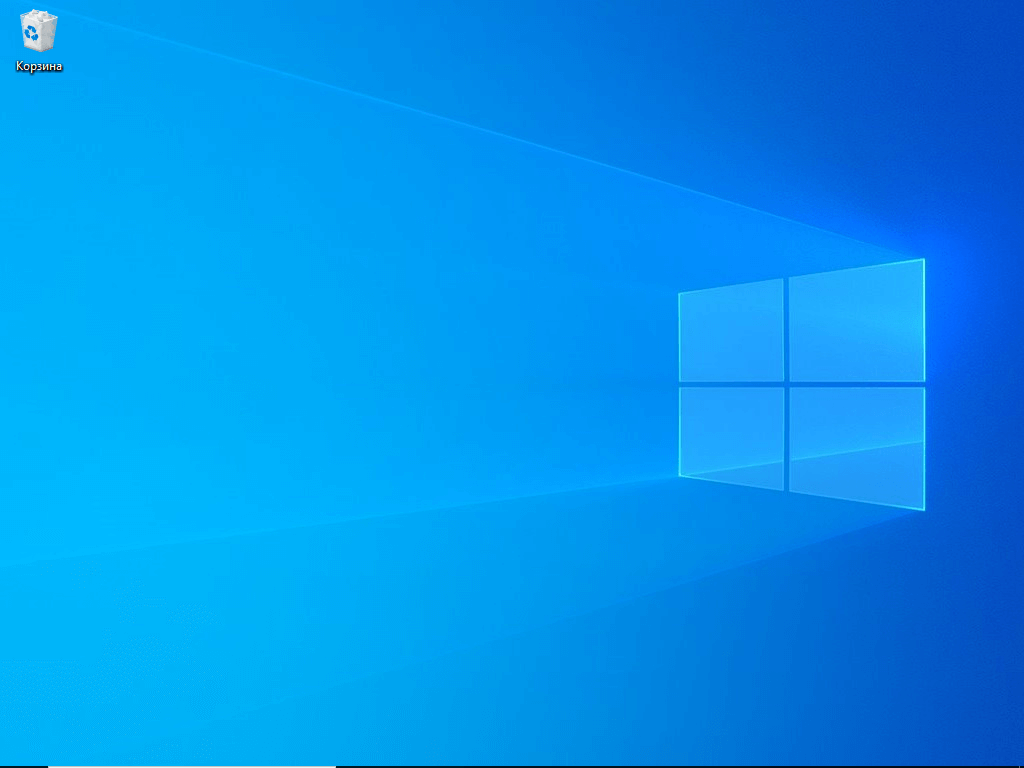
Рабочий стол без панели задач (видна только узкая полоска внизу)
Закрепление панели задач — инструкция и зачем это нужно
Возможно, когда вы изучали контекстное меню, которое упоминалось в разделе выше, то увидели в нем строчку «Закрепить панель задач Windows». Многие новички считают, что именно этот элемент и нужен, чтобы заставить панель оставаться на экране. Но это не так.
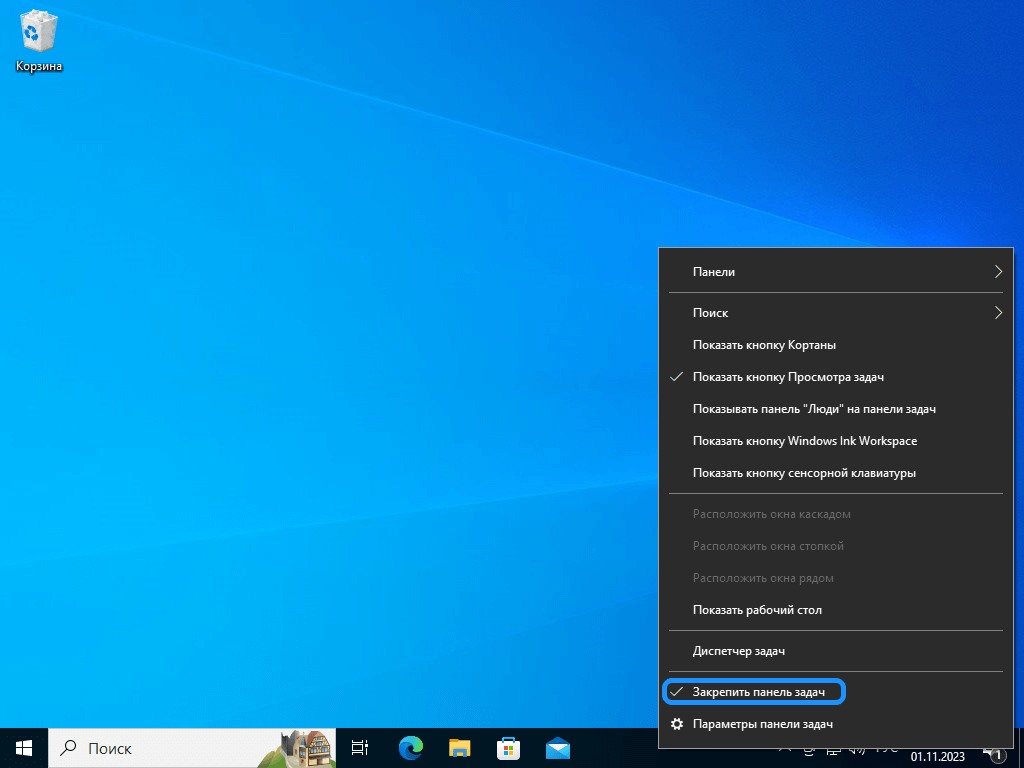
Пункт «Закрепить панель задач» в контекстном меню
Дело в том, что панель задач можно не только скрывать, но и расширять. Чтобы этого добиться, наведите курсор на краешек панели пока курсор не превратится в двойную стрелку, а после зажмите левую кнопку мыши и потяните. Панель изменит свой размер. Чтобы зафиксировать нужный размер панели как раз и используется настройка «Закрепить». Если ее выставить, то курсор перестанет превращаться в двойную стрелку, т. е. вы не измените случайно ширину полосы внизу экрана.
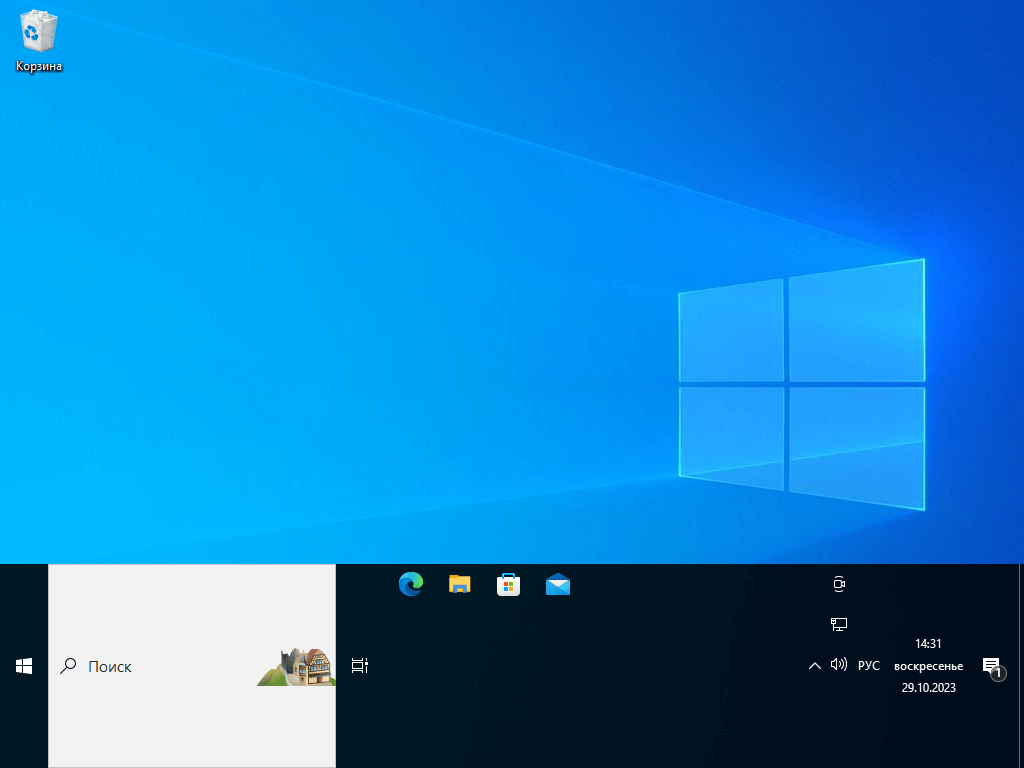
Расширенная панель задач в Windows 10
Что делать, если панель пропала сама по себе?
Иногда случается, что компьютер «подвисает», а после все возвращается в норму, кроме панели задач. Это значит, что у вас закончила работу программа «Проводник», которая управляет окнами. Естественно, возникает вопрос — как вернуть панель задач Windows 10 на место?
Самый простой способ — перезагрузиться. И он предпочтительный. Если у вас закрылся «Проводник», значит, в нем появилась какая-то серьезная ошибка. И неизвестно, какие еще ошибки произошли в системе. Если есть возможность — перезагрузитесь.
Второй способ, как можно вернуть панель задач в Windows 7 или 10, предполагает запуск программы «Проводник». Для этого откройте диспетчер задач (одновременно нажмите и удерживайте клавиши CTRL, Shift и ESC), в нем через меню «Файл» вызовите окошко новой задачи (пункт, в меню их всего два, называется «Запустить новую задачу»), в открывшемся поле напишите «explorer.exe» (без кавычек). Также можно попытаться вызвать поле запуска задачи через сочетание клавиш Win+R.

Перезапуск «Проводника» через «Диспетчер задач»
Работа с панелью задач: размещение закрепление, скрытие значков на панели
Как уже говорилось, на панель задач можно добавить свои иконки. Сделать это очень просто. Вот инструкция о том, как добавить значки на панель задач в Windows 10:
- Найдите приложение, для которого вы хотите добавить значок на панель задач. Это может быть любая программа, которую вы часто используете. Например, пусть это будет Skype.
- Щелкните правой кнопкой мыши на значке приложения (Skype) в меню «Пуск». Появится контекстное меню.
- Выберите пункт «Дополнительно» и в открывшемся меню — «Закрепить на панели задач». Кликните по нему левой кнопкой.
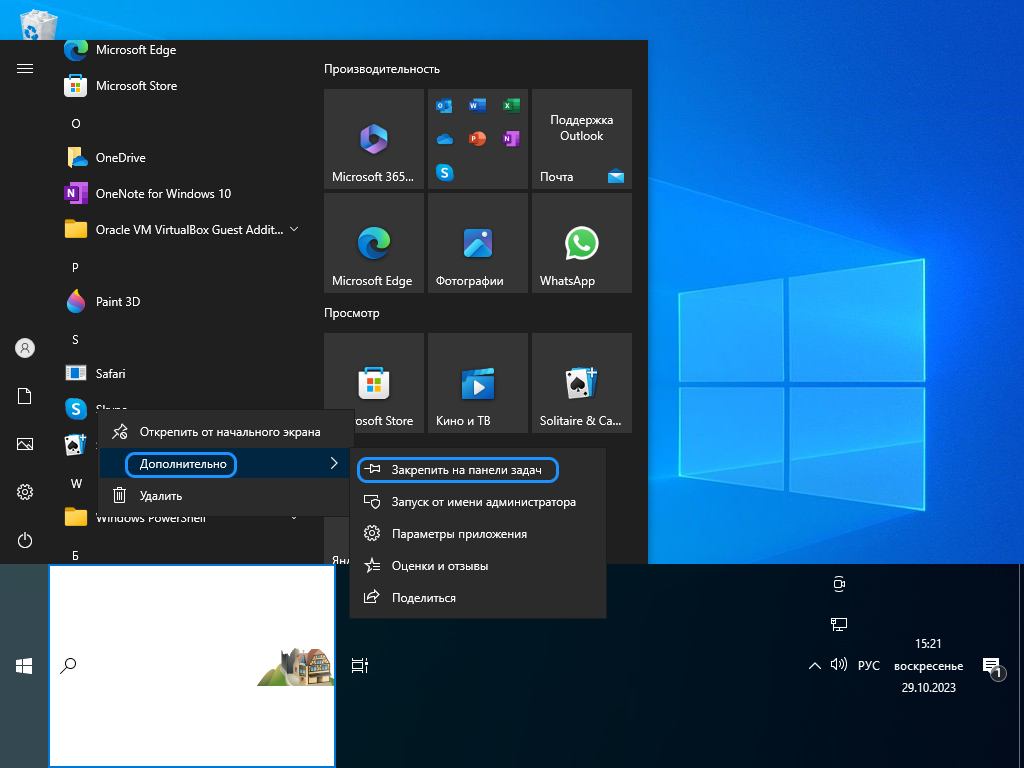
Меню закрепления значка из раздела «Пуск»
Еще один вариант — выполнить нажатие правой кнопкой на значок, что находится на рабочем столе. В этом случае пункт с закреплением будет не в разделе «Дополнительно», а сразу же в первом меню.

Меню закрепления значка с рабочего стола
Есть еще один путь, который позволяет закрепить значок. Вот он:
- Откройте нужную программу любым способом.
- Наведите мышь на ее значок на панели задач и нажмите правую кнопку.
- Вам нужен пункт «Закрепить панель задач».

Меню закрепления значка прямо на панели задач при открытой программе
После описанных действий значок приложения (Skype) появится на панели задач. Вы можете перемещать его по своему усмотрению, чтобы он был удобно расположен. Для этого наведите на него курсор, зажмите левую кнопку мыши и двигайте значок. Повторите этот процесс для всех приложений, которые вы хотите добавить на панель задач.
После того, как вы смогли добавить значок на панель задач Windows 10, его можно оттуда удалить. Используйте один из трех способов:
- ПКМ на значке приложения в меню «Пуск», выберите пункт «Дополнительно» и после «Открепить от панели задач»;
- ПКМ на значке приложения на рабочем столе и выберите пункт «Открепить».
- ПКМ на значке приложения на панели задач и открепите его с помощью соответствующего пункта.
ПКМ в данном случае означает «правой кнопкой мыши». Вам необходимо навести курсор на нужную иконку и сделать клик правой кнопкой.
Также существуют специальные системные кнопки, которые можно включить через меню. Это кнопка «Кортана», «Просмотр задач», панель «Люди», кнопка Windows Ink Workspace, сенсорная клавиатура и «Поиск». Их включение и выключение настраивается через контекстное меню самой панели задач. Открыть его можно, кликнув по свободному месту на панели правой кнопкой, а дальше — выбирайте подходящий пункт и нажимайте на него левой кнопкой. Галочка напротив пункта означает, что кнопка отображается. Если она скрыта, галочки напротив не будет.

Скриншот контекстного меню панели задач, где включены все системные кнопки
Теперь вы знаете, как закрепить панель задач, скрыть ее, вернуть, разместить на ней значки и многое другое. Не забывайте, что все инструкции актуальны только для Windows. В Linux и иных операционных системах есть свои приемы, а кое-где и панели задач в том смысле, о котором мы говорили, нет. Поэтому будьте внимательны при настройке. А тем, кто уже обратился к нам за услугами по обслуживанию компьютеров, не придется разбираться в таких тонкостях: если что-то не работает, напишите нам, мы — поможем!
Provide feedback
Saved searches
Use saved searches to filter your results more quickly
Sign up

Using toolbars to access commands increases your efficiency.
Image Credit:
Siri Stafford/Digital Vision/Getty Images
Toolbars are found in office suites, graphics editors and Web browsers. They serve to increase your efficiency on a computer by representing commonly used commands either with graphic icons, text or both. Toolbars differ from menu bars; menu bars tend to group similar commands that you need to click to access while toolbar commands are always visible.
An application toolbar (appbar) works like the Windows taskbar. Software programs use them extensively. The appbar is anchored to part an edge of the Window, which differentiates it from a palette, often a free-floating or a dialog box that appears with a right click of the mouse. Appbars generally have buttons that give you quick access to other Windows, applications or shortcuts within the program such as «Home,» «View» or «Update.»
Although menus and toolbars were eliminated by Microsoft in Office 2010 in lieu of «ribbons,» the Quick Access Toolbar is notably still present. A customizable toolbar, which you can locate either above or below the Ribbon, is a set of your most frequently used commands. It does not matter on which ribbon the command is found, it always appears for your easy access.
Most search engines, such as Google, Yahoo! and Bing, offer users a toolbar to attach to the top of the browser window. Depending on the preferences that you choose, you can use the toolbar to quickly search or access your favorite search engine features including mail, weather and news. These browser toolbars also provide access to functionality similar to many word processing programs such as «File,» «Edit» and «Save.» Some browser toolbars provide email and instant message access as well as spam controls.
Called favorites in Internet Explorer, and bookmarks in Chrome and Firefox, most browsers include a spot to display frequently accessed bookmarks. When you save a bookmark, you can choose to place it on the bookmark bar or you can move it there at a later date. Save folders, website or feeds to the bar and rearrange them easily. A «Favorites» icon such as a star is often included with the Bookmarks toolbar, providing you with easy access to your favorite websites.
A thumbnail toolbar found exclusively in Windows 7 provides you with instant access to the key commands of a window through an embedded toolbar in the thumbnail. The toolbar has a maximum of seven buttons. It is only available if the application designer has included the toolbar feature; it is not a toolbar that you can choose to display.
Windows 11 has made several significant changes to the user interface compared to its predecessors. With the introduction of a more streamlined design and a focus on productivity, users may find that they need to adapt their workflow to this new environment. One frequently asked question is about adding toolbars in Windows 11, which can help users access their preferred applications and functionalities quickly.
This comprehensive article will delve into what toolbars are, why they are useful, and provide an in-depth guide on how to add toolbars in Windows 11. This guide aims to keep things simple, informative, and actionable, ensuring that every user, whether a novice or more advanced, can navigate the process with ease.
What are Toolbars?
Toolbars are usually a row of icons or buttons located at the top or sides of a graphical user interface (GUI) that provide quick access to various functionalities. Toolbars can minimize the time required to perform tasks by providing shortcuts to frequently-used applications, files, or settings. In Windows, toolbars were traditionally incorporated into the taskbar, which allows users to access them effortlessly.
In Windows 11, the concept of toolbars has evolved, but they still serve the same vital functions — enabling faster workflow and organization.
Why Use Toolbars in Windows 11?
Using toolbars in Windows 11 can enhance productivity significantly. Here are a few reasons why toolbars are beneficial:
-
Quick Access: With a toolbar, you can access applications and files without navigating through various menus or folders.
-
Customization: Toolbars allow for personalization according to your preferences. You can add, remove, or rearrange items in a toolbar, creating a workspace that suits your workflow.
-
Organization: By categorizing applications and files into toolbars, you can keep your taskbar and desktop less cluttered and more organized.
-
Efficiency: Spending less time searching for applications and information means more time focused on getting work done.
With these benefits in mind, let’s dive into how you can add a toolbar in Windows 11.
Steps to Add a Toolbar in Windows 11
Step 1: Access the Taskbar Settings
The first thing you need to do is access the Taskbar settings, as this is where you will manage most of your toolbars.
- Right-click on the taskbar (the bar at the bottom of your screen) to open a context menu.
- Select “Taskbar settings.” This action will direct you to the settings page dedicated to the taskbar features.
Step 2: Enable Toolbars
While Windows 11 restricts certain features visible in previous versions, the functionality of adding toolbars remains intact, albeit with a slightly different approach.
- In the Taskbar settings window, scroll down to the section titled “Toolbars.”
- You will typically see options to enable toolbars like the “Address” toolbar and “Links” toolbar.
- Toggle them on by clicking the switch next to the desired toolbar.
Step 3: Adding a New Toolbar
To create a new toolbar, you’ll need to utilize the desktop instead. Unlike in previous versions where the functionality could be fully managed from the taskbar settings, Windows 11 offers you a different approach.
-
Create a Folder: You can create a folder on your desktop or in File Explorer where you can add shortcuts for the applications or files you want to include in your toolbar. (Right-click on the desktop, select “New,” and then “Folder.”)
-
Add Shortcuts: Drag and drop shortcuts of the applications, documents, or folders you want quick access to into this new folder.
Step 4: Add the Folder as a Toolbar
With your shortcuts in place, you can now turn that folder into a toolbar.
-
Right-Click on the Taskbar: Once again, right-click on the taskbar.
-
Select Toolbars: Hover over or select the option to add a toolbar.
-
New Toolbar: You will see an option for “New toolbar…” Click on it.
-
Select Your Folder: A dialog box titled «New Toolbar» will pop up. Navigate to your desktop or wherever you created the shortcut folder and select that folder.
-
Click Select Folder: After selecting the folder, click the “Select Folder” button. Your folder will be incorporated as a new toolbar on your taskbar.
Step 5: Use Your New Toolbar
Your new toolbar is now visible alongside other taskbar items. You can either click on the arrow next to the toolbar name or hover over it to display the shortcuts you added inside. Clicking on an icon will directly open the corresponding application or file.
Step 6: Customize Your Toolbar
One significant advantage of toolbars is customizability. Here are some tips for customization:
-
Resizing the Toolbar: If you want to change the size of your toolbar, right-click on the taskbar and click on “Taskbar settings.” Here, you can adjust the size of your icons, thereby affecting the toolbar’s appearance.
-
Rearranging Toolbars: You can rearrange toolbars by clicking and dragging them. For instance, you might want your new toolbar to be on the left or right side of the taskbar rather than the default position. Simply click and hold the name of the toolbar and drag it to your desired location.
-
Remove a Toolbar: If you find that you no longer need a particular toolbar, right-click on the taskbar again, hover over “Toolbars,” and you can uncheck the toolbar you wish to remove.
Step 7: Adding Functionality with Third-Party Applications
While Windows 11’s built-in tools are beneficial, consider augmenting your capabilities using third-party applications that provide enhanced toolbar functionalities. Some popular options include:
-
Classic Shell: This software allows users to bring back the Start menu and customize toolbars even further.
-
7+ Taskbar Tweaker: This app provides a slew of customization options, including toolbar management.
Before downloading third-party applications, ensure they are from reliable sources and check their compatibility with Windows 11.
Understanding the Limitations
While adding toolbars can significantly enhance usability, it is essential to be aware of certain limitations within Windows 11’s current framework:
-
Lack of Traditional Toolbars: Unlike older versions of Windows, in Windows 11, you do not get traditional menu bar toolbars you could once find directly on File Explorer windows.
-
Limited Third-Party Support: The evolution of Windows has shifted a lot of focus towards modern apps, and some third-party toolbars may not integrate seamlessly or may lack support.
-
User Interface Changes: As Microsoft continues to evolve Windows 11, users should keep abreast of potential changes that can affect functionality.
Conclusion
Adding toolbars in Windows 11 can be a powerful way to streamline your workflow, granting faster access to applications and files that you frequently use. By following the steps above, you’ll be capable of customizing your toolbar to fit your preferences seamlessly.
Remember that toolbars are just one of numerous functionalities within Windows that can enhance your productivity. Whether you’re managing important documents, requiring rapid application access, or structuring your desktop more efficiently, toolbars can serve as a valuable component of your workspace.
Always ensure to stay updated with any changes Microsoft implements to the operating system, as new features and enhancements can continuously improve user experience and functionality.
In today’s digital age, we rely on a multitude of software applications for everything from writing documents to editing photos to browsing the web. These tools have become indispensable in our daily lives, both personally and professionally. As I reflect on my journey with computers, I remember the days of DOS commands and text-based interfaces. The transition to graphical user interfaces (GUIs) was a game-changer, and toolbars were at the forefront of this revolution.
A toolbar is a graphical user interface (GUI) element that contains icons, buttons, menus, or other input or output tools. These tools provide quick access to various functions and commands within software applications. Think of it as a physical toolbox, but instead of wrenches and screwdrivers, you have digital shortcuts to frequently used functions. Whether you’re a seasoned professional or a casual user, toolbars play a crucial role in enhancing productivity and user experience.
According to Statista, the number of mobile app downloads worldwide reached 218 billion in 2020, and is projected to grow to 299.5 billion by 2025. This highlights the increasing reliance on digital tools, many of which utilize toolbars to provide easy access to features.
This article aims to explore the essential features of toolbars, their evolution, and their significance in modern computing. We’ll delve into the different types of toolbars, their advantages, common issues, and even a glimpse into their future.
Section 1: The Evolution of Toolbars
Historical Background
The origins of toolbars can be traced back to the early graphical user interfaces (GUIs) of the 1980s and 1990s. Before GUIs, users interacted with computers through command-line interfaces, typing in commands to perform tasks. This was efficient for experts, but daunting for beginners. The introduction of GUIs, pioneered by Xerox PARC and later popularized by Apple and Microsoft, marked a significant shift.
Key milestones in toolbar development include the introduction of the Windows operating system and the rise of web browsers. Windows 3.0, released in 1990, brought a more user-friendly interface to a wider audience, incorporating toolbars into various applications. The advent of the World Wide Web in the early 1990s and the subsequent rise of web browsers like Netscape Navigator and Internet Explorer further cemented the importance of toolbars.
Transition from Text-Based Interfaces to Graphical Toolbars
The shift from command-line interfaces to graphical user interfaces paved the way for the integration of toolbars. Text-based interfaces required users to memorize commands, whereas GUIs allowed users to interact with computers using visual elements such as icons and buttons. Toolbars became a natural extension of this visual approach, providing a convenient way to access frequently used commands without having to navigate through menus.
Imagine having to type “format C:” every time you wanted to format a floppy disk versus clicking a single icon in a toolbar. The latter is much more intuitive and user-friendly. This transition made computers more accessible to a broader audience, driving the adoption of personal computing in homes and offices.
Key Innovations
Over the years, toolbar design has seen several significant innovations. One of the earliest was the introduction of customizable toolbars. This allowed users to rearrange, add, or remove buttons according to their preferences, tailoring the interface to their specific needs.
Another important innovation was the development of context-sensitive toolbars. These toolbars change based on user behavior or the selected object within an application. For example, in a word processor, the toolbar might display formatting options when text is selected but switch to image editing tools when an image is clicked.
More recently, adaptive toolbars have emerged, leveraging machine learning to predict which tools a user is most likely to need based on their past behavior. This represents a significant step towards personalized user interfaces that anticipate user needs and streamline workflows.
Section 2: Types of Toolbars
Application Toolbars
Application toolbars are specific to software applications and provide quick access to commonly used functions within those applications. These toolbars are designed to enhance productivity by placing essential commands within easy reach.
Examples of commonly used application toolbars include:
- Microsoft Word: The toolbar in Microsoft Word typically includes options for formatting text, inserting objects, and managing documents. Features like bolding, italicizing, and changing font sizes are readily accessible.
- Adobe Photoshop: In Adobe Photoshop, the toolbar provides access to a wide range of tools for image editing, such as selection tools, brushes, and filters. The toolbar is highly customizable, allowing users to tailor it to their specific workflow.
- Web Browsers: Web browsers like Chrome, Firefox and Safari also have toolbars. These include navigation buttons, address bar, extensions, and other tools that enhance the browsing experience.
Web Browser Toolbars
Web browser toolbars play a crucial role in enhancing the browsing experience. They typically include navigation buttons (back, forward, refresh), an address bar for entering URLs, and bookmarks for saving favorite websites. Over time, browser toolbars have evolved to include features such as ad-blocking, password managers, and privacy tools.
Browser extensions often add additional toolbars or buttons to the browser interface, providing access to specialized functionality. For example, a grammar-checking extension might add a button to the toolbar that allows users to check their writing for errors.
However, it’s worth noting that browser toolbars have also been a source of controversy. In the past, some toolbars were installed without the user’s consent and contained malware or spyware. Modern browsers have taken steps to address this issue by providing better control over extensions and toolbars.
Operating System Toolbars
Operating system toolbars are part of the operating system itself and provide access to system-level functions and settings. Examples include the Windows taskbar and the macOS menu bar.
The Windows taskbar is located at the bottom of the screen (by default) and provides access to running applications, system tray icons, and the Start menu. It also includes features such as pinned applications and quick access to frequently used files and folders.
The macOS menu bar is located at the top of the screen and provides access to application menus, system settings, and status icons. It also includes the Apple menu, which provides access to system-wide settings and utilities.
Operating system toolbars differ from application-specific toolbars in that they provide access to system-level functions rather than application-specific commands. They are also typically more persistent, remaining visible regardless of which application is currently in use.
Section 3: Essential Features of Toolbars
Iconography and Usability
The design of icons in toolbars plays a crucial role in user experience. Recognizable and intuitive icons contribute to ease of use, allowing users to quickly identify and access the functions they need.
Good icon design involves several key principles:
- Clarity: Icons should be clear and easy to understand, even at small sizes.
- Consistency: Icons should be consistent in style and design, creating a cohesive visual language.
- Relevance: Icons should accurately represent the function they represent.
- Uniqueness: Icons should be distinct from one another to avoid confusion.
When icons are poorly designed, users may struggle to find the functions they need, leading to frustration and reduced productivity. On the other hand, well-designed icons can make toolbars more intuitive and efficient to use.
Customization Options
Customization is a key feature of many toolbars, allowing users to rearrange, add, or remove buttons and menus according to their preferences. This enhances user efficiency and productivity by tailoring the interface to their specific needs.
Customization options may include:
- Rearranging buttons: Users can drag and drop buttons to change their order on the toolbar.
- Adding buttons: Users can add new buttons to the toolbar, either from a predefined list or by creating their own custom buttons.
- Removing buttons: Users can remove buttons from the toolbar that they don’t use frequently.
- Creating custom toolbars: Some applications allow users to create entirely new toolbars with their own set of buttons and menus.
By customizing their toolbars, users can create a personalized interface that streamlines their workflow and makes them more productive.
Contextual Features
Contextual toolbars are a powerful feature that can greatly enhance user efficiency. These toolbars appear based on user actions or selected objects within applications, providing access to relevant commands and functions.
For example, in a word processor, a contextual toolbar might appear when a user selects an image, providing options for resizing, cropping, and adjusting the image. Similarly, in a spreadsheet application, a contextual toolbar might appear when a user selects a chart, providing options for changing the chart type, adding data labels, and formatting the chart.
Contextual toolbars streamline workflow by eliminating the need to search through menus for the commands they need. They put the right tools at the user’s fingertips, making it easier and faster to complete tasks.
Integration with Other Tools
Toolbars can integrate with other software tools and applications, providing a seamless user experience. This integration can take many forms, such as plugins, extensions, and APIs.
Plugins are software components that add specific features to an existing application. For example, a web browser plugin might add the ability to play Flash videos or view PDF documents.
Extensions are similar to plugins but are typically more lightweight and focused on enhancing the user interface. For example, a web browser extension might add a button to the toolbar that allows users to save web pages to a cloud storage service.
APIs (Application Programming Interfaces) allow toolbars to communicate with other applications and services, enabling them to exchange data and functionality. For example, a toolbar might use an API to retrieve data from a database or send commands to another application.
By integrating with other tools, toolbars can provide a more comprehensive and seamless user experience, allowing users to accomplish more without having to switch between applications.
Section 4: Advantages of Using Toolbars
Increased Productivity
Toolbars provide quick access to frequently used functions, leading to improved workflow and efficiency. Instead of navigating through menus or typing commands, users can simply click a button on the toolbar to perform a task.
This can save a significant amount of time, especially for tasks that are performed frequently. For example, a graphic designer who frequently uses the “crop” tool can save time by adding a button to the toolbar instead of having to select it from a menu each time.
In my experience, customizing toolbars to fit my specific workflow has significantly increased my productivity. By placing the tools I use most often within easy reach, I can focus on the task at hand without being distracted by the need to search for commands.
User Accessibility
Toolbars enhance accessibility for different user groups, including beginners and advanced users, by providing intuitive navigation options.
For beginners, toolbars provide a visual way to explore the features of an application. By clicking on different buttons, they can discover what each function does and learn how to use the application more effectively.
For advanced users, toolbars provide a way to customize the interface to fit their specific needs. By adding or removing buttons, they can create a personalized interface that streamlines their workflow.
Toolbars also enhance accessibility for users with disabilities. For example, users with motor impairments can use toolbars to perform tasks that would be difficult or impossible using a mouse or keyboard.
Consistency Across Applications
Consistent toolbar designs across different applications help users transition between software with ease. When toolbars are designed in a similar way, users can quickly learn how to use new applications without having to relearn the basics.
For example, many applications use similar icons for common functions such as “save,” “open,” and “print.” This makes it easier for users to find these functions, regardless of which application they are using.
However, it’s important to note that consistency should not come at the expense of functionality. Toolbars should be designed to provide access to the specific functions that are most relevant to each application.
Section 5: Common Issues and Troubleshooting Toolbars
Toolbar Disappearances
One of the most common problems users face is when toolbars disappear or become unresponsive. This can be caused by a variety of factors, such as software glitches, accidental clicks, or corrupted settings.
Here are some basic troubleshooting steps to resolve these issues:
- Check if the toolbar is hidden: Many applications allow users to hide or show toolbars. Look for a menu option such as “View” or “Toolbars” and make sure the toolbar is checked.
- Reset the toolbar to default settings: Most applications have an option to reset the toolbar to its default settings. This can often resolve issues caused by corrupted settings.
- Restart the application: Sometimes, simply restarting the application can fix the problem.
- Update the application: Make sure you are using the latest version of the application. Software updates often include bug fixes that can resolve toolbar issues.
Customization Gone Wrong
Users may accidentally customize their toolbars in ways that hinder usability. For example, they might accidentally remove a button that they use frequently or rearrange the buttons in a way that makes it difficult to find the functions they need.
To fix this, users can reset the toolbar to its default settings. This will restore the toolbar to its original configuration, making it easier to use.
I once accidentally removed the “save” button from my word processor toolbar. It took me a while to figure out how to get it back, and I learned a valuable lesson about being careful when customizing toolbars.
Compatibility Issues
Compatibility issues may arise with software updates or installations of new applications affecting toolbar functionality. This can happen when a new version of an application is incompatible with an existing toolbar or when a new application conflicts with an existing toolbar.
To resolve compatibility issues, users can try the following:
- Update the toolbar: Check for updates to the toolbar. The developer may have released a new version that is compatible with the latest software.
- Disable the toolbar: If the toolbar is not essential, you can try disabling it to see if that resolves the issue.
- Contact the developer: If you are unable to resolve the issue yourself, contact the developer of the toolbar for assistance.
Section 6: The Future of Toolbars
Trends in User Interface Design
Emerging trends in user interface design may influence the future of toolbars. These trends include:
- Minimalism: Minimalist interfaces focus on simplicity and clarity, reducing clutter and making it easier for users to find the functions they need.
- Voice commands: Voice commands allow users to interact with applications using their voice, eliminating the need for toolbars altogether.
- AI-driven interfaces: AI-driven interfaces use machine learning to predict user needs and adapt the interface accordingly.
These trends suggest that toolbars may evolve into more streamlined, personalized, and intuitive interfaces.
Adaptive and Smart Toolbars
The potential for smart toolbars that learn user behavior and adapt their functionality over time is exciting. These toolbars would use machine learning to predict which tools a user is most likely to need based on their past behavior.
For example, a smart toolbar might automatically display the tools that a user typically uses when editing a particular type of document. Or it might suggest tools that the user has not used before but that might be relevant to the task at hand.
This would greatly enhance user efficiency and productivity by putting the right tools at the user’s fingertips at the right time.
Integration with Mobile and Touch Interfaces
The role of toolbars in mobile applications and how touch interfaces are shaping toolbar designs is also important. Mobile applications typically have smaller screens than desktop applications, so toolbars must be designed to be compact and easy to use with touch.
Touch interfaces also require different design considerations than traditional mouse-based interfaces. For example, buttons must be large enough to be easily tapped with a finger, and toolbars must be designed to be easily accessible from any part of the screen.
As mobile devices become more powerful and touch interfaces become more prevalent, toolbars will continue to evolve to meet the needs of mobile users.
Conclusion
Recap of Key Points
In this article, we have explored the essential features of toolbars, their evolution, and their significance in modern computing. We have seen how toolbars have evolved from simple lists of commands to sophisticated interfaces that enhance productivity, accessibility, and user experience.
We have also discussed the different types of toolbars, their advantages, common issues, and future trends. From application toolbars to web browser toolbars to operating system toolbars, we have seen how toolbars play a crucial role in shaping the way we interact with computers.
Final Thoughts
As technology continues to evolve, toolbars will undoubtedly continue to adapt and change. However, their fundamental purpose—to provide quick and easy access to the functions we need—will remain the same.
I believe that toolbars will continue to be an important part of the computing landscape for many years to come. Whether they take the form of traditional toolbars, smart toolbars, or voice-activated interfaces, they will continue to shape our experiences in an increasingly digital world.
