
|
|
|
31 / 31 / 22 Регистрация: 22.06.2015 Сообщений: 102 |
|
|
23.09.2015, 16:46. Показов 49939. Ответов 18 Всем Привет. diskpart не видит том для загрузки. На скрине 1, посмотрите, в проводнике он присутствует — Boot (X: ) На скрине 2, начало загрузки компьютера (BIOS) Извините за качество скринов и вопросы от новичка. Может подкините материальчик, как восстановить загрузчик ?
0 |
|
31 / 31 / 22 Регистрация: 22.06.2015 Сообщений: 102 |
|
|
23.09.2015, 16:53 [ТС] |
|
|
0 |
|
15903 / 7926 / 755 Регистрация: 03.01.2012 Сообщений: 32,863 |
|
|
23.09.2015, 17:35 |
|
|
SherHun, Брр! А если в дискпарте — сначала list disk, а потом выбрать жёсткий диск (select disk <id>) и его уже detail disk
1 |
|
31 / 31 / 22 Регистрация: 22.06.2015 Сообщений: 102 |
|
|
23.09.2015, 18:15 [ТС] |
|
|
Сообщение от gecata select disk <id>) Так уже делал, повторил сейчас. Миниатюры
0 |
|
3374 / 784 / 150 Регистрация: 12.04.2015 Сообщений: 1,977 |
|
|
23.09.2015, 19:07 |
|
|
Сообщение от SherHun На скрине 1, посмотрите, в проводнике он присутствует — Boot (X: ) Это разве не рам диск флешки? Что-то не совсем понятно, что требуется сделать. У вас на 1 Тб винчестере с MBR разметкой видно два тома 99 Гб и 100 Гб, на С скорее всего система установлена. Копируйте файлы загрузки на диск С командой bcdboot c:\windows /L ru-ru /s c: /f bios, отключайте в биосе UEFI и загружайтесь в вашу систему. Или что-то другое требуется сделать?
1 |
|
31 / 31 / 22 Регистрация: 22.06.2015 Сообщений: 102 |
|
|
23.09.2015, 19:35 [ТС] |
|
|
Сообщение от olen6 Что-то не совсем понятно, что требуется сделать. В общем не грузится Виндоус. В консоли с командой bootrec/ScanOs получил: Тогда скачал с оф. сайта образ. Подробнее не помню . Сейчас буду вспоминать что делал,
0 |
|
31 / 31 / 22 Регистрация: 22.06.2015 Сообщений: 102 |
|
|
23.09.2015, 20:14 [ТС] |
|
|
Сообщение от olen6 Копируйте файлы загрузки на диск С командой bcdboot c:\windows /L ru-ru /s c: /f bios, отключайте в биосе UEFI и загружайтесь в вашу систему. Не помогло . В консоли: Отключился в биосе UEFI. Загрузка, получаю синий экран. Восстановление Сообщение от olen6 после выбора диска в дискпарте дайте команду list partition и покажите. Миниатюры
0 |
|
olen6 3374 / 784 / 150 Регистрация: 12.04.2015 Сообщений: 1,977 |
||||
|
23.09.2015, 21:55 |
||||
|
Сообщение от Андрей1224 Вместо скрина из Проводника, покажите скрин с разделами диска. Покажите вы скрин с разделами. Систему пробуете запустить с тем же режимом (ahci, ide, raid), что и устанавливалась система? Раздел с ОС это точно диск С? Просто я предположил, что система на С и команду под это давал. Посмотрите через проводник файлы на разделе С, папку Windows и т.п. Ещё, как вариант, а раздел С активный? Если нет, то в дискпарте дайте ему активность. Кликните здесь для просмотра всего текста
Последний вариант с активностью раздела очень вероятен, т.к. на вашем скрине, где detail disk видно, что
1 |
|
Андрей1224 8584 / 3083 / 523 Регистрация: 14.04.2011 Сообщений: 7,732 |
||||
|
23.09.2015, 22:04 |
||||
|
Судя по последнему скрину из diskpart, у раздела 1, смещение 351 МБ. Возможно перед этим разделом был загрузочный раздел 350 МБ. Тогда кроме активности раздела 1 и записаных на его файлов загрузки, возможно потребуется сделать
1 |
|
31 / 31 / 22 Регистрация: 22.06.2015 Сообщений: 102 |
|
|
23.09.2015, 22:31 [ТС] |
|
|
Сообщение от olen6 Систему пробуете запустить с тем же режимом (ahci, ide, raid), что и устанавливалась система? Не знаю как устанавливалась. Пытался все режимы, результат одинаковый. raid — такого нет. Сообщение от olen6 Раздел с ОС это точно диск С, просто я предположил, что система на С и команду под это давал? Bootrec.exe /ScanOs Bootrec.exe /RebuildBcd Сообщение от olen6 Если нет, то в дискпарте дайте ему активность Делал Сообщение от olen6 Покажите вы скрин с разделами. . Миниатюры
0 |
|
3374 / 784 / 150 Регистрация: 12.04.2015 Сообщений: 1,977 |
|
|
24.09.2015, 07:03 |
|
|
На последнем фото корня диска С у вас включено отображение скрытых файлов? Просто не видно необходимых для загрузки папки boot и файла bootmgr. Кликните здесь для просмотра всего текста
Ну дааайте скрин из управления дисками посмотреть. Выполнить diskmgmt.msc
1 |
|
8584 / 3083 / 523 Регистрация: 14.04.2011 Сообщений: 7,732 |
|
|
24.09.2015, 09:12 |
|
|
SherHun,
1 |
|
31 / 31 / 22 Регистрация: 22.06.2015 Сообщений: 102 |
|
|
24.09.2015, 10:23 [ТС] |
|
|
Фото делаю так: Ось же не грузится? На фото C:\Windows\Boot и C:\Windows\Boot\PCAT (там нашел bootmgr) Миниатюры
0 |
|
31 / 31 / 22 Регистрация: 22.06.2015 Сообщений: 102 |
|
|
24.09.2015, 10:44 [ТС] |
|
|
Сообщение от Андрей1224 Кроме того, о чём спросил olen6, вы Linux не устанавливали? На новый чистый компьютер была установлена Windows 8.1. Добавлено через 5 минут Пишет: Добавлено через 9 минут Сообщение от Андрей1224 . Такое ощущение, что мы всё время бежим за уходящим поездом. Хотелось бы восстановить систему.
0 |
|
15903 / 7926 / 755 Регистрация: 03.01.2012 Сообщений: 32,863 |
|
|
24.09.2015, 11:40 |
|
|
Сообщение от SherHun diskmgmt.msc указал полный путь. А если заглянуть с ERDCommander?
0 |
|
8584 / 3083 / 523 Регистрация: 14.04.2011 Сообщений: 7,732 |
|
|
24.09.2015, 12:17 |
|
|
SherHun,
0 |
|
31 / 31 / 22 Регистрация: 22.06.2015 Сообщений: 102 |
|
|
24.09.2015, 18:19 [ТС] |
|
|
Спасибо. как будет возможность, попробую, отпишусь.
0 |
|
31 / 31 / 22 Регистрация: 22.06.2015 Сообщений: 102 |
|
|
07.10.2015, 12:49 [ТС] |
|
|
Проблема была решена. Извините правда по теме ничего не могу сказать.
1 |
|
raxper Эксперт 30234 / 6612 / 1498 Регистрация: 28.12.2010 Сообщений: 21,154 Блог |
07.10.2015, 12:49 |
|
Помогаю со студенческими работами здесь Восстановление загрузчика windows после установки windows server 2008 в раздел с windows 7 не… Восстановление загрузчика для винды Восстановление после DiskPart восстановление загрузчика Восстановление загрузчика Искать еще темы с ответами Или воспользуйтесь поиском по форуму: 19 |
|
Новые блоги и статьи
Все статьи Все блоги / |
||||
|
POCO, ACE, Loki и другие продвинутые C++ библиотеки
NullReferenced 13.05.2025 В C++ разработки существует такое обилие библиотек, что порой кажется, будто ты заблудился в дремучем лесу. И среди этого многообразия POCO (Portable Components) – как маяк для тех, кто ищет. . . |
Паттерны проектирования GoF на C#
UnmanagedCoder 13.05.2025 Вы наверняка сталкивались с ситуациями, когда код разрастается до неприличных размеров, а его поддержка становится настоящим испытанием. Именно в такие моменты на помощь приходят паттерны Gang of. . . |
Создаем CLI приложение на Python с Prompt Toolkit
py-thonny 13.05.2025 Современные командные интерфейсы давно перестали быть черно-белыми текстовыми программами, которые многие помнят по старым операционным системам. CLI сегодня – это мощные, интуитивные и даже. . . |
Конвейеры ETL с Apache Airflow и Python
AI_Generated 13.05.2025 ETL-конвейеры – это набор процессов, отвечающих за извлечение данных из различных источников (Extract), их преобразование в нужный формат (Transform) и загрузку в целевое хранилище (Load). . . . |
Выполнение асинхронных задач в Python с asyncio
py-thonny 12.05.2025 Современный мир программирования похож на оживлённый мегаполис – тысячи процессов одновременно требуют внимания, ресурсов и времени. В этих джунглях операций возникают ситуации, когда программа. . . |
|
Работа с gRPC сервисами на C#
UnmanagedCoder 12.05.2025 gRPC (Google Remote Procedure Call) — открытый высокопроизводительный RPC-фреймворк, изначально разработанный компанией Google. Он отличается от традиционых REST-сервисов как минимум тем, что. . . |
CQRS (Command Query Responsibility Segregation) на Java
Javaican 12.05.2025 CQRS — Command Query Responsibility Segregation, или разделение ответственности команд и запросов. Суть этого архитектурного паттерна проста: операции чтения данных (запросы) отделяются от операций. . . |
Шаблоны и приёмы реализации DDD на C#
stackOverflow 12.05.2025 Когда я впервые погрузился в мир Domain-Driven Design, мне показалось, что это очередная модная методология, которая скоро канет в лету. Однако годы практики убедили меня в обратном. DDD — не просто. . . |
Исследование рантаймов контейнеров Docker, containerd и rkt
Mr. Docker 11.05.2025 Когда мы говорим о контейнерных рантаймах, мы обсуждаем программные компоненты, отвечающие за исполнение контейнеризованных приложений. Это тот слой, который берет образ контейнера и превращает его в. . . |
Micronaut и GraalVM — будущее микросервисов на Java?
Javaican 11.05.2025 Облачные вычисления безжалостно обнажили ахиллесову пяту Java — прожорливость к ресурсам и медлительный старт приложений. Традиционные фреймворки, годами радовавшие корпоративных разработчиков своей. . . |
Наверх
Вопрос
“”Я пытаюсь перезагрузить свой компьютер, так как я произвел замену жесткого диска на SSD, но когда я делаю
это с помощью USB-накопителя или DVD-диска, я неоднократно получаю сообщение об ошибке: Не удается
перезагрузить компьютер. Необходимый раздел диска отсутствует.””-Вопрос от Reddit
Если вы находитесь в той же лодке, что и вышеупомянутый заявитель, и ищете ответы, то вы обратились по адресу.
Ошибка раздела при перезагрузке вашего компьютера является досадным сбоем и может быстро уничтожить ваш
компьютер. Но пусть этот факт вас не пугает, потому что в этом руководстве вы найдете всю необходимую
информацию, чтобы исправить эту досадную ошибку и восстановить работоспособность вашего компьютера. Мы
позаботились обо всем, что вам нужно знать об этой ошибке, начиная с причин и заканчивая исправлениями и многим
другим. Так что читайте дальше, чтобы больше никогда не сталкиваться с такой ошибкой на вашем компьютере.
- Часть 1: Обзор Отсутствует необходимый раздел диска
- Часть 2: Как восстановить данные из отсутствующего раздела?HOT
-
Часть 3: Как исправить невозможность перезагрузки вашего компьютера из-за отсутствия
необходимого раздела диска?- Исправление 1: Запустите автоматическое восстановление при запуске
- Исправление 2. Запустите команду Bootrec для восстановления BCD
- Исправление 3. Восстановите поврежденный MBR
- Исправление 4. Запустите SFC
- Исправление 5. Установите системный раздел как активный
- Исправление 6. Запустите CHKDSK
- Исправление 7. Используйте командную строку
- Исправление 8. Выполните восстановление системы
- Исправление 9: Переустановите Windows
-
Часть 4: Часто задаваемые вопросы по разделам
- 1. Как мне сбросить раздел диска?
- 2. Как мне разблокировать раздел в Windows 10?
Часть 1: Обзор Отсутствует необходимый раздел диска
Что это значит, когда отсутствует раздел диска?
Ошибка «Отсутствует необходимый раздел диска» указывает на то, что Windows не может обнаружить раздел,
необходимый для выполнения определенной функции. Эта ошибка обычно возникает, когда вы пытаетесь установить
новую версию Windows или выполняете сброс настроек Windows.
Причины отсутствия необходимого раздела диска в Windows 10
Как и в случае любой проблемы, связанной с диском, причина ошибки отсутствия раздела в Windows 8 многогранна.
Наиболее известные из них включают:
- Повреждена основная загрузочная запись (MBR) или конфигурация загрузки (BCD).
- Ваши жесткие диски были повреждены или скомпрометированы.
- Системные файлы отсутствуют или повреждены
- Ошибка с вашим системным диском.
Часть 2: Как восстановить данные из отсутствующего раздела?
Устранение ошибок типа «Не удается перезагрузить компьютер, отсутствует необходимый раздел диска» может привести
к большому риску потери данных. Но что, если мы скажем вам, что можем полностью исключить этот риск? Все верно,
с помощью мощного программного обеспечения для восстановления данных Tenorshare 4DDiG никакие данные никогда
не теряются. Он включает в себя современные алгоритмы, которые обеспечивают более высокие показатели успеха и
более быстрое время восстановления. Это также облегчает жизнь вам и вашему компьютеру благодаря удобному
интерфейсу и отсутствию вирусов, вредоносных программ или рекламного ПО. Но это еще не все, 4DDiG позволяет вам
восстанавливать данные с множества опций, таких как локальные и внешние диски, потерянные разделы, диски с
шифрованием Bitlocker, корзина, вышедшие из строя ПК и т.д. Итак, давайте посмотрим, как вы можете максимально
использовать это приложение.
- Откройте приложение и выберите потерянный раздел из списка дисков, отображаемых на экране, для сканирования.
Перед сканированием вы также можете выбрать целевые типы файлов. - Теперь приложение сотворит свое волшебство и выполнит поиск потерянных данных в разделе и выведет их список.
Вы можете остановить это сканирование в любое удобное для вас время, как только найдете нужный файл. Вы
также можете выбрать глубокое сканирование, если при обычном сканировании ваш файл не отображается в списке. - Просмотрите восстановленные данные и сохраните их на своем устройстве, нажав на кнопку “Восстановить’.
Часть 3: Как исправить невозможность перезагрузки вашего компьютера из-за отсутствия необходимого
раздела диска?
Исправление 1: Запустите Startup Repair
Startup repair – это фантастическая идея для запуска процесса исправления таких ошибок, как невозможность
перезагрузки вашего пк, отсутствие необходимого раздела диска asus. Перед выполнением этого исправления вам
нужно будет создать загрузочный диск, содержащий установочные файлы Windows.
Шаг 1: Загрузите ваш компьютер в BIOS и создайте загрузочный диск, который вы создали первым в порядке
загрузки. Сохраните и выйдите из BIOS, а также перезагрузите компьютер.
Шаг 2: Запустите установку Windows и установите язык, дату и время. В следующем окне выберите опцию
‘Восстановить ваш компьютер’ в левом нижнем углу экрана.
Шаг 3: Теперь выберите опцию устранения неполадок. В окне устранения неполадок выберите ‘Дополнительные
параметры’. После этого в разделе “Дополнительные параметры” выберите “Восстановление при запуске”.
Завершите восстановление при запуске, а затем перезагрузите компьютер. Посмотрите, устранена ли ошибка, если
нет, переходите к следующему шагу.
Исправление 2: Запустите команду Bootrec для восстановления BCD
Проблема с конфигурацией загрузки (BCD) часто является предвестником таких ошибок, как отсутствие требуемого
раздела диска в Windows 10. Так что перестройка BCD – неплохая идея. Вот как вы можете сделать это на своем
компьютере.
Сначала выполните действия, описанные в ИСПРАВЛЕНИИ 1, вплоть до “Дополнительных параметров”, оказавшись там,
выберите “Командная строка”.
Оказавшись в командной строке, введите следующие команды:
- Bootrec /fixmbr
- Bootrec /fixboot
- Attrib C:\Boot\BCD -h -r -s ren
- C:\Boot\BCD C:\Boot\BCD.bak
- Bootrec /rebuildbcd
Примечание: Нажимайте enter после каждой команды.
Исправление 3. Восстановите поврежденный MBR
Поврежденный MBR также может быть исправлен таким же образом, как и BCD. Выполните действия, описанные в
исправлении 1, и откройте командную строку в разделе ‘Дополнительные параметры’. Как только вы запустили его
введите следующее:
- Bootrec /scanos
После этого введите следующие три команды и нажимайте enter после каждой из них:
- Bootrec /fixmbr
- Bootrec /fixboot
- Bootrec /rebuildbcd
Теперь перезагрузите ваш компьютер, и, надеюсь, ваша неспособность перезагрузить компьютер из-за отсутствия
необходимого раздела будет исправлена.
Исправление 4. Запустите SFC
Средство проверки системных файлов – это удобный инструмент для исправления этой ошибки, если ошибка связана с
проблемой с системными файлами. Чтобы сделать это, откройте командную строку, как мы делали в исправлениях 2 и
3, и введите следующую команду:
- Sfc /scannow
Нажмите enter и позвольте SFC работать своим чередом.
Исправление 5. Установите системный раздел как активный
Потенциальной причиной этой ошибки может быть неактивный системный раздел. Простым решением этой проблемы
является активация системного раздела. Вот как вы можете это сделать с помощью утилиты Windows под названием
DISKPART.
Шаг 1: Откройте командную строку при установке Windows, как описано в исправлениях 2 и 3.
Шаг 2: Сначала введите следующие команды:
- Diskpart
- List Disk
Теперь будет показан список дисков на вашем устройстве. Теперь вам нужно выбрать раздел, из-за которого у вас
возникла проблема, набрав:
- Выберите диск 0
- Раздел списка
- Выберите раздел 0
- Активный
Теперь соответствующий раздел станет активным.
Исправление 6. Запустите CHKDSK
CHKDSK – это мощная утилита, специально разработанная для устранения таких ошибок, как невозможность
перезагрузки вашего пк. Необходимый раздел отсутствует. Чтобы запустить его, выполните действия, описанные в
исправлении 1, и откройте “Командную строку”, когда дойдете до дополнительных параметров.
Теперь введите следующую команду:
- CHKDSK x: /f /r
Здесь x относится к потерянному разделу.
Исправление 7. Используйте командную строку
Командная строка – один из ваших самых полезных союзников, и эта ошибка ничем не отличается. В этом исправлении
вам нужно будет открыть командную строку, как указано в исправлениях 2 и 3, и ввести приведенные ниже команды:
- BOOTREC /SCANOS
- BOOTREC /FIXMBR
- BOOTREC /FIXBOOT
- BOOTREC /REBUILDBCD
Перезагрузите компьютер.
Исправление 8: Выполните восстановление системы
Восстановление системы направлено на устранение несоответствий, присутствующих в вашей системе Windows, чтобы
избавиться от ошибки раздела. Чтобы выполнить восстановление системы, вам просто нужно выбрать опцию
“Восстановление системы” в меню “Дополнительные параметры”, а затем следовать инструкциям.
Исправление 9: Переустановите Windows
Если ни одно из вышеперечисленных исправлений не работает, лучше всего стиснуть зубы и переустановить Windows.
Создайте резервную копию всего, прежде чем делать это, и переустановите Windows с созданного вами загрузочного
диска.
Часть 4: Часто задаваемые вопросы по разделам
1.Как мне сбросить раздел диска?
Вы можете сбросить раздел диска, отформатировав его с помощью диспетчера устройств в вашей Windows.
2. Как мне разблокировать раздел в Windows 10?
Вы можете разблокировать раздел в вашей Windows следующими способами:
- Проверка диска с помощью CHKDSK
- Проверка системных файлов
- Восстановление при запуске
- Восстановление системы
- Обновление ПК
Резюме
Ошибка жесткого диска никогда не бывает хорошей, она угрожает вашей операционной системе, данным и, самое
главное, вашему душевному спокойствию. Но если вы будете старательно следовать рекомендациям, приведенным в этом
руководстве, вы выберетесь из этой ямы в кратчайшие сроки. Не только это, но мы также позаботились о
потенциальных проблемах с потерей данных, которые могут возникнуть при исправлении этой ошибки, внедрив
программное обеспечение для восстановления данных Tenorshare 4DDiG Так что перестаньте
беспокоиться и начинайте исправлять!
Tenorshare 4DDiG Data Recovery
4DDiG — это ваш непревзойденный выбор для восстановления всех потерянных данных на компьютере Windows / Mac после различных сценариев потери, таких как удаление, форматирование, RAW и т.д. с более высокой вероятностью успеха.
Скачать Бесплатно
Скачать Бесплатно
Купить Сейчас
Купить Сейчас
Many users often face the issue of «there is no partition selected in Diskpart» when they format a hard disk, USB drive, and CD. Mike has a similar issue up his sleeves. Here’s his situation:
Mike needed his USB drive sufficient to utilize Diskpart on his Windows 7. So he tried formatting the drive using the command executed list disk > select disk two> list partition > delete partition; however, he got the prompt «There are no partitions selected, select a prompt and try again.» Then he typed in select partition 1, only to receive yet another error message saying ‘There is no partition selected.»
If you are like Mike, you may be left frustrated, wondering what the problem is and why Windows could not select your drive. You may also experience other error prompts such as «There is no disk select» and «There are no partitions on this disk to select to list partition» when you type select disk and after you select the list partition command, respectively.
This guide will help you identify why you receive these prompts and provide possible ways to rectify these issues in the future.
There are a few reasons why the prompt «There is no partition selected» may be displayed after you type a command on Diskpart. Following this, here are the basic reasons why you get the no partition selected error:
- Diskpart already selected a partition: Sometimes, when you get the «There is no partition selected» error, it probably means that Diskpart has already selected the partition.
- Windows only recognizes the first partition on a USB: The first primary partition on any output or removable devices, such as a memory card, USB flash drive, and SD card, is usually recognized by Windows OS as a standard modus operandi.
- The partition or volume lacks a drive letter: Windows usually apply driver letters for all drives on a computer. However, when a driver loses its driver letter, it becomes impossible for you to access the documents saved directly.
The next heading will depict various means you can use to rectify this issue. Read on!
How to Fix There Is No Partition Selected in Diskpart
You employ four basic methods to resolve the ‘there is no partition selected» error in Diskpart. Any method can guarantee the desired result; however, they are subject to the specific cause of the error. The methods involved include:
- Method 1. Check the Selected Partition
- Method 2. Assign a Drive Letter to the Partition
- Method 3. Use Diskpart Alternative Tool to Delete Partition
- Method 4. Use the «Clean» Command in Diskpart
Let’s closely examine each method.
Method 1. Check the Selected Partition
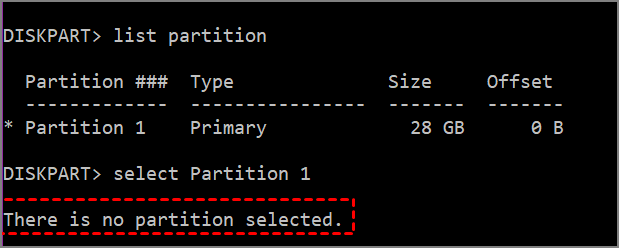
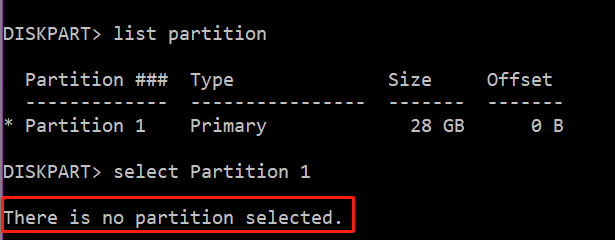
As stated earlier, before Diskpart can be used, the item on the partition or disk must first be selected to give it focus. When an item has the given focus, it automatically reacts to any Diskpart you type. It’s worth noting that whenever you use a list command, there will be an asterisk next to the item with focus.

Endeavor to check if there’s an asterisk (*) in front of the partitioned item you want to select. You will always get the ‘There is no partition selected» error if the volume or partition is already Diskpart selected. Ultimately, an asterisk (*) in front of the partition signifies that the partition is being focused on at the moment. And solve the problem according two the following two cases:
Case 1. If an asterisk precedes the partition you listed, this partition is already selected. Go ahead and enter the command:
list partition
select partition x
delete partition
Case 2. If you do not find an asterisk, rewrite the selection, or assign a drive letter to the drive. And refer to method 2.
Method 2. Assign a Drive Letter to the Partition
It is convenient to assign a drive letter using EaseUS Partition Master — a comprehensive disk partition tool. It can assign to each drive efficiently. And it’s easy to use. Even if you are new to computers, you can know how to assign drive letter.
Follow the steps below to assign a drive letter to the partition with the aid of EaseUS Partition Master:
Step 1. Run EaseUS Partition Master, right-click the target partition, and choose «Change Drive Letter».
Step 2. In the new window, click the down arrow and choose a drive letter for the partition from the drop-down menu, then click «OK».
Step 3. Click the «Execute 1 Task(s)» button in the top-left corner, check the changes, and click «Apply» to change the drive letter of the selected partition.
Except for this tool, you can assign a drive letter to the partition using the Disk Management and Diskpart that comes with Windows. But you should be careful when using Diskpart to avoid the wrong parameters.
Method 3. Use Diskpart Alternative Tool to Delete Partition
Deleting a partition is the easiest way to generate unallocated space on your disk or USB, which can be added to another partition. You can do this using third-party partition software, such as the EaseUS Partition Master — a powerful tool related to disk partition.
The EaseUS Partition Master helps to effortlessly delete a partition or all partitions from an internal or external hard drive and a USB drive in Windows. Here are the steps to take if you’re using the EaseUS Partition Manager:
Step 1. Launch EaseUS Partition Master, and click «Partition Manager».
Make sure that you’ve backed up the important data before deleting any partition on your disk.
Step 2. Select to delete partition or delete all partitions on hard drive.
- Delete single partition: right-click on a partition that you want to delete and choose «Delete«.
- Delete all partitions: right-click a hard drive that you want to delete all partitions, and select «Delete All«.
Step 3. Click «Yes» to confirm the deletion.
Step 4. Click «Execute xx Task» and then click «Apply» to save the change.
0:00 — 0:26 Delete single volumes; 0:27 — 0:53 Delete all partitions.
EaseUS Partition Master is a reliable tool for deleting partitions. You can delete different format of partitions, such as delete NTFS partition. And then, you can use and allocate the unallocated disk space.
Method 4. Use the «Clean» Command in Diskpart
When you’ve got a whole disk to clean, the Diskpart clean command can convert all stored data to unallocated space. This operation deletes all disk data by writing zeros on each disk sector, and Diskpart also deletes all partition and volume data from the selected drive.
Follow the given steps to clean a disk using the Diskpart command.
Step 1: Press «Windows + R» to open the run.
Step 2: Type «cmd» in the run box and click «OK» to open Command Prompt.
Step 3: Type «diskpart» in the command prompt and then type «select disk 0«.
Step 4: Type «clean» and hit Enter.
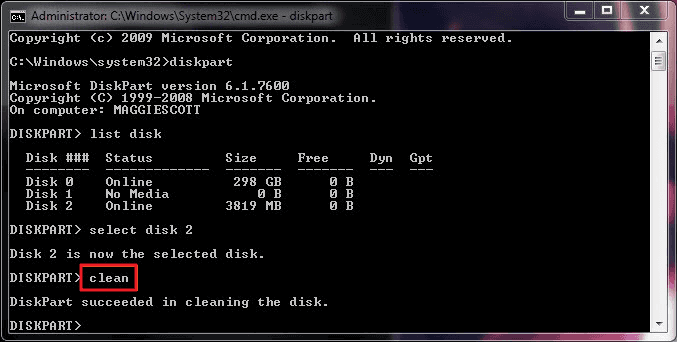
Step 5: Lastly, type «exit» to close Diskpart.
It would be more complicated when using Diskpart. You should be more careful when using the command. If Diskpart clean not working, you can use EaseUS Partition Master to replace it to delete partitions more efficiently.
Conclusion
You may encounter other issues when operating on Diskpart; however, when it boils down to the «There is no partition selected» error, the solution is already in the palm of your hand. If you’re unfamiliar with the workings of Diskpart, we recommend you utilize the EaseUS Partition Master to operate on your disk. The tool works marvelously and will save you from typing the wrong commands on Diskpart.
FAQ of There Is No Partition Selected in Diskpart
Fixing the error «There is no partition selected in Diskpart» can be done in a few easy steps. Peradventure, if you have further questions about «There is no partition selected,» you will find additional answers in the following FAQ.
1. How do I select a partition?
Select a partition through the following steps:
Step 1. To select a partition, select a disk with the «Select Disk» command.
Step 2. The target partition in the selected disk is displayed if there’s no specific partition number.
Step 3. The partition will be automatically selected when the volume is selected with a corresponding partition.
2. What does the asterisk mean in diskpart?
The asterisk in diskpart shows the properties and volume of the particular disk. It also shows the listed partition in the current disk partition table.
3. Does diskpart clean remove partitions?
All partition and volume information on a selected drive can be removed using Diskpart. Diskpart deletes all data on the disk with this operation by writing zeros on each disk sector.
-
Home
-
News
- DiskPart There Is No Partition Selected? Try These Fixes
DiskPart There Is No Partition Selected? Try These Fixes
By Ariel | Follow |
Last Updated
A lot of users encounter the “There is no partition selected” error when listing partitions in DiskPart. What causes the “DiskPart no partition selected” error? How to fix it? Now, let’s explore the answers together with MiniTool Partition Wizard.
DiskPart is a widely used Windows partition and disk management tool that can be used to format/clean/create/wipe/extend partitions, convert disk, repair disk errors, etc. Sometimes, however, this utility runs into various errors, such as “failed to extend the volume DiskPart”, “Clean is not allowed on the disk Virtual Disk Service error”, and the one discussed here.
select partition 1 gives «No partition selected». I’m trying to fix a USB flash drive to format to the full capacity. When I use diskpart, I cannot delete the primary partition. I try to select the partition, but it gives the error “DiskPart there is no partition selected”.https://superuser.com/questions/852467/select-partition-1-gives-no-partition-selected
Why You Can’t Select Partition in DiskPart
Why there is no partition selected DiskPart? According to user reports, the DiskPart no partition selected error mainly occurs when they want to select a partition for formatting or deleting. Sometimes the error appears even when DiskPart already selected the partition. If the partition has no drive letters, you may encounter the error too.
How to fix it if you can’t select partition in DiskPart Windows 10/11? Here we summarize 3 simple methods to fix the “there are no partitions selected” error. Let’s start trying.
# 1. Use an Alternative to DiskPart
The first and simplest solution to the “there is no partition selected DiskPart” error is to use an alternative. MiniTool Partition Wizard is a better choice. It’s a comprehensive and free partition manager that can create/format/delete/wipe partitions, convert FAT32 to NTFS without data loss, extend/resize/copy partitions, change cluster size, and more.
If there is no partition selected in DiskPart when formatting or deleting a partition, use MiniTool Partition Wizard now.
MiniTool Partition Wizard FreeClick to Download100%Clean & Safe
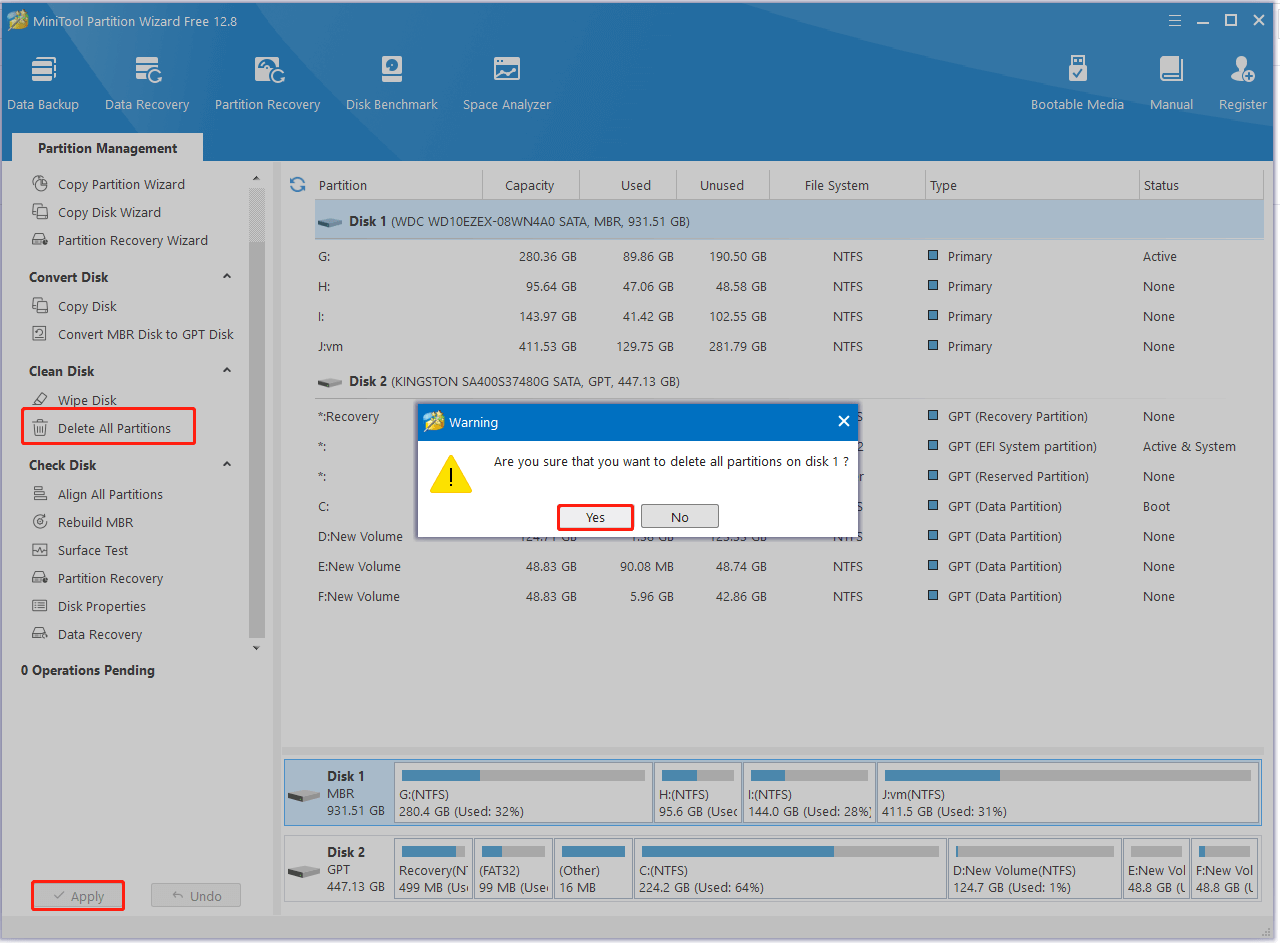
Step 1. Run the MiniTool program to enter its main interface, and then select the partition that you want to format and click on Format Partition from the left actional panel. Alternatively, you can right-click the drive and select Format from the context menu.
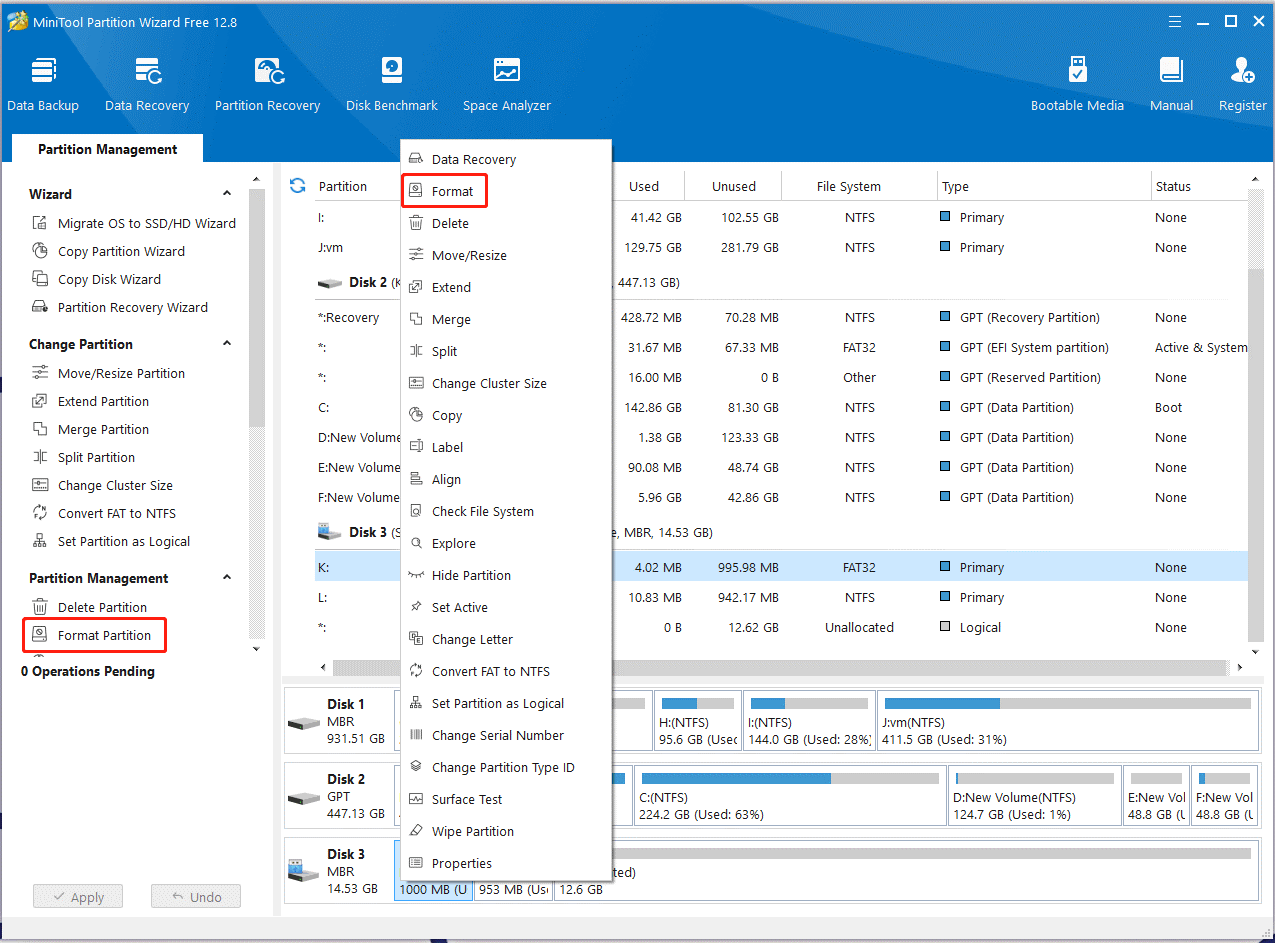
Step 2. In the pop-up window, select File System from the drop-down menu and click on OK to confirm the option. You can also change Cluster Size and set Partition Label according to your needs.
Step 3. Click on Apply to execute the formatting process.

Step 4. If you just want to delete it, select the partition from the disk map and click on Delete Partition from the left panel, then click on Apply. If you want to clean up the disk, you can select the disk and click on Delete All Partitions > Yes > Apply.
# 2. Assign a Drive Letter to the Partition
Some users reported that the “DiskPart there are no partitions selected” error can occur if the partition lacks a drive letter. Here you can follow the steps below to change the drive letter for the partition.
Step 1. Press the Win + R keys to open the Run dialog box, and then type diskmgmt.msc and press Enter to open Disk Management.
Step 2. In the pop-up window, right-click the affected partition and select Change drive letter and paths from the context menu.
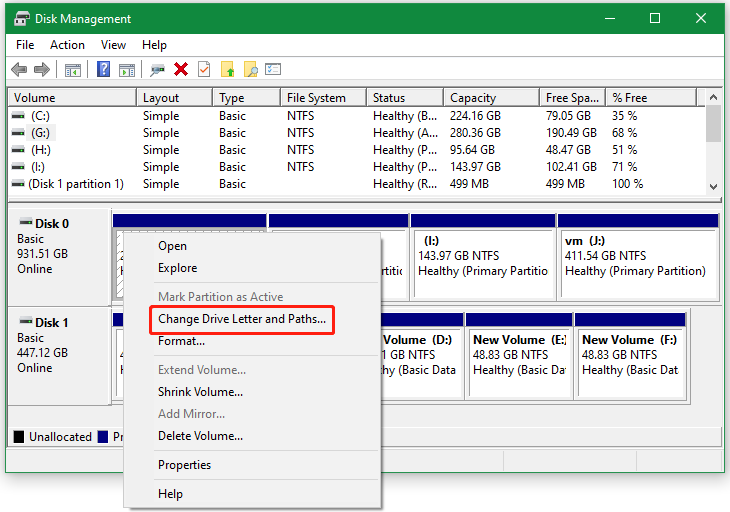
Step 3. Click on Add and select a drive letter from the drop-down menu, and click on OK > Yes to save the change. After that, you can run the list partition command again and see if the “DiskPart there is no partition selected” error disappears.
# 3. Use the “Clean” Command
As discussed above, the “there is no partition selected DiskPart” error mainly appears when running the “list partition” command. If you just want to delete partitions or clean up the hard disk using DiskPart, you can use the “clean” command instead.
Step 1. Press the Win + R keys to open the Run dialog box, and then type diskpart in the box and press Enter. Then click on Yes in the UAC window to confirm it.
Step 2. In the pop-up window, type the following commands in order and press Enter after each one to delete all partitions on the disk. Once done, you can create partitions on the hard disk again.

How to fix it if there is no partition selected in DiskPart? MiniTool Partition Wizard is a good alternative to DiskPart. If you have any other solutions to this problem, please leave them in the following comment area.
About The Author
Position: Columnist
Ariel has been working as a highly professional computer-relevant technology editor at MiniTool for many years. She has a strong passion for researching all knowledge related to the computer’s disk, partition, and Windows OS. Up till now, she has finished thousands of articles covering a broad range of topics and helped lots of users fix various problems. She focuses on the fields of disk management, OS backup, and PDF editing and provides her readers with insightful and informative content.
Solution for There are No Partitions on This Disk to Show – Windows Error
Approved By Ashwani Tiwari
Published On
April 2nd, 2024
Reading Time 7 Minutes Reading
Most of the users are looking for a solution to know how to fix the fact that there are no partitions on this disk to show. So, with the help of this article, we are going to let you know the best free solutions to resolve the issue, i.e., there is no partition on this disk to show Windows 11, 10. Simply go through the complete write-up to learn more.
Diverse Techniques Under Several Circumstances
When this issue occurs, like disk not showing in diskpart by Windows 10,. There are so many reasons for the occurrence of this problem. So, here in this section, we are going to explain different resolution techniques according to their issues. Have a look.
- Unhide the Hidden Partition in Windows 10
- Assign Drive Letter to a Hidden Partition
- Reformat Partition to Fix No Partitions on Disk to Show
- Check Partition in Disk Management
- Update Device Drivers Using Device Manager
Case #1: Unhide The Hidden Partition in Windows 10
In this case, if you mistakenly or intentionally hide the disk partition,. So, it will not appear in File Explorer. Here are the steps to recover data from deleted partition in Windows. Also, to resolve the issue, there is no partition on this disk to show in Windows 11, 10, 8, and 7. The method is discussed in an appropriate manner. Simply follow all the steps to execute the procedure to show a hidden partition in Windows 10. It is the solution to your query about what to do in case there are no partitions on this disk to show an error:
- First of all, type cmd into the Windows search box to open the Command Prompt wizard
- Now, type diskpart in the given field.
- After that, type the list disks command to list out all the hard drives in your local machine
- Here, type select disk n; the alphabet n is the hard disk number.
- Subsequently, type list partition to view all the partitions on the opted MBR and GPT hard drives.
- Then, type assign; after this, the computer assigns a drive letter automatically.
- Lastly, after completion of the above-stated process, you can view the disk partitions in Windows 10 easily.
Note: How to Recover data from GPT Protective Partition in HDD?
Case #2: Assign Drive Letter to a Hidden Partition
If the hard disk partition is without a drive letter, you’ll be unable to view the partition in Windows File Explorer. So, in this section, we mentioned the best solution to resolve the issue, such as a hard drive partition not showing Windows File Explorer. Simply follow the below-stated steps. All the measures are discussed in a descriptive manner.
- Firstly, you have to press Windows + R keys altogether to open a Run box
- Here, type diskmgmt.msc and then, press Enter key to access Disk Management appropriately
- Now, Management, go to the partition without a drive letter and select Change drive letter and path option
- At last, hit Add to assign an efficient drive letter to the partition.
After implementing the steps appropriately, I hope all the missing disk partitions will display in File Explorer perfectly.
Also read: Check if partition is MBR or GPT in Windows
Case #3: Reformat Partition to Fix No Partitions on Disk to Show
To reformat a hard disk partition, you can follow the below-explained steps. Those will help in removing partitions from the existing hard disk instantly. Let’s have a look and resolve disk with disk not showing in diskpart the issue:
- Primarily, start computer management by pressing the Start button.
- Then, choose Control Panel>>System and Security>>Administrative Tools, and after that, double-click on Computer Management.
- Now, in the left panel, choose Disk Management under Storage
- Here, right-click on the volume that you need to format. Then, choose Format to begin the procedure.
- Ultimately, format the volume with the default settings. You have to choose OK in the Format dialog box, and after that, click OK again.
Warning Note: This free solution to formatting an existing disk will destroy complete data on the partition. So, ensure that you have updated the backup of important data before you begin the procedure. If don’t have a backup and have formatted the disk,. Then get the guide here and recover files from formatted hard disk.
Case #4: Check Partition in Disk Management
Initially, check your hard disk partitions in disk management. If any partition is unallocated, it won’t show up in File Explorer. At this time, you need to make the disappearing hard drive online and create the partition by following the steps listed below. All the steps are stated in an effective manner. Simply follow all of them to get the desired outcome. It is the simplest way to resolve the diskpart list partition; there are no partitions on this disk to show the issue.
- The foremost step is to access disk management; the existing hard disk partition is marked as unallocated. Simply right-click on it and select Initialize Disk
- Then, it will prompt you to select the MBR or GPT partition style for your disk. So, you have to hit OK
- Now, you will go back to the main interface for disk management.
- Here, you can see that the hard disk is marked as unallocated. You have to right-click the unallocated space and select New Simple Volume.
- In the end, follow the new Simple Volume window to generate a partition on the hard disk. After completing this, you can view the hard disk partition in Windows 10 properly.
Important Note: This method to initialize the hard disk may lead to data loss issues so it is advised that if you have crucial data, do not opt for this solution. Moreover, there are high chances that you will be unable to initialize the hard disk and may encounter an error such as the device not being ready.
Case #5: Update Device Drivers Using Device Manager
When your hard disk is not showing up in Disk Management,. So, it is common that the hard disk partitions are certainly not showing up in Windows 10. In such situations, you can try to update drivers using the device manager utility to fix this problem. So, in this section, we are going to discuss the detailed steps for the same and fix it if there are no partitions on this disk to show a diskpart error.
- Initially, start the Run box and type devmgmt.msc in it. Afterward, hit the Enter key to open the Device Manager utility.
- Now, click on the disk drivers and navigate to the external hard disk that is now showing up in Disk Management.
- Additionally, right-click on it and select Update Driver
- Finally, select Search automatically for updated driver software to end the process.
After executing the above-listed steps, you have to check whether the hard disk partitions show up in Disk Management or not.
Time to Sum Up
In this write-up, we emphasize the free techniques to fix the fact that there are no partitions on this disk to show Windows 10 problem. We explained all the resolutions in an efficient manner. You can follow any one of them according to your requirements. But keep one thing in mind, i.e., the free solutions have some limitations. Mainly, it may lead to a data loss issue. So, you may lose your crucial data. I hope you have the solution that there is no partition on this disk to show the issue.
Questions asked by users
Q1: Can’t find my hard drive in the disk management?
If you want to fix this issue, then read this informative blog post. Here, you will learn about all possible solutions.
Q2: My computer is not showing the E drive. What to do?
It is because either your E drive was hidden or the E partition was deleted. Read this blog in the above section and learn the working solution.