
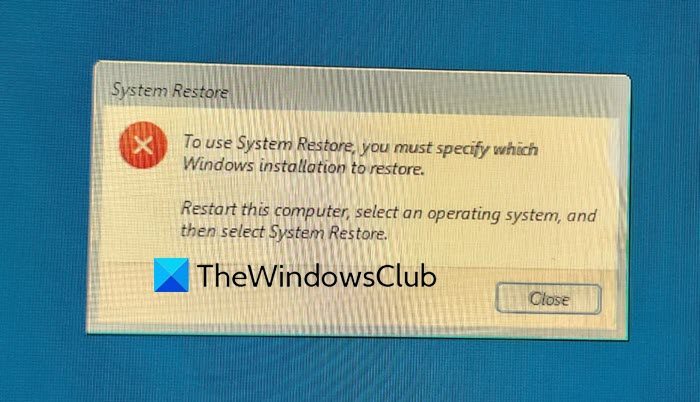
There are situations where you need to perform the System Restore operation. But at times you may face an error – To use System Restore, you must specify which Windows installation to restore. This error is caused due to corrupted files in the system. Because of this error, you are not able to perform the system restore and this can be a hurdle to proceed further.
There are scenarios where you cannot boot up once you encounter this error. This article provides solutions to solve this error. So, first, let us see what causes “To use System Restore you must specify which Windows installation to restore” error-
- Any of your previous actions might have corrupted System files and may cause this error.
- As BCD (Boot Configuration Data) is used to stores all data – it could be BCD Corruption
If you see an error message To use System Restore, you must specify which Windows installation to restore, here are the solutions you can try to fix this error-
- Run System File Checker Offline
- Run DISM to repair a potentially corrupted system image
- Repair BCD corruption
- Run Automatic Startup Repair
- Use the Windows Recovery Environment
- Try performing System Restore using Command Prompt.
1] Run System File Checker Offline
As I mentioned at the beginning of the article, system files corruption we would need to run System File Checker Offline. Here is the way to do it-
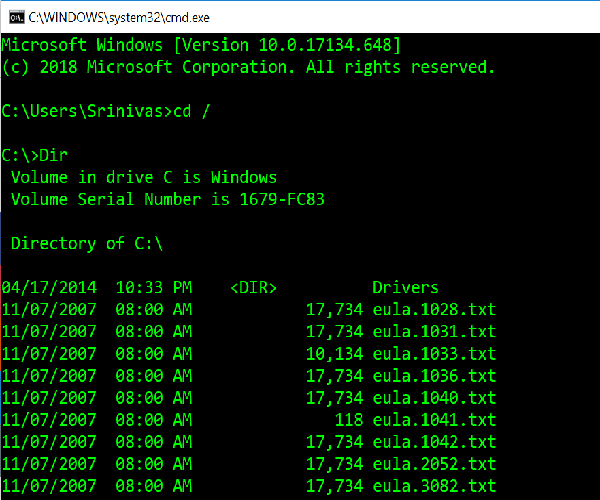
Type the following commands one by one, to know your system’s drive.
Cd /

Dir
If the “Users” folder is seen, then this is your system’s drive. If not, you can change the drive by giving the alphabet of your volume as “D:”.
Then, execute this in the command prompt (Here “C” is your system drive):
sfc /scannow /offbootdir=C:\ /offwindir=C:\Windows
Repeat steps sequentially, as mentioned above.
2] Run DISM to repair a potentially corrupted system image
Here, we need to check the health of the system i.e, we need to check the integrity of the system files and service Windows. This is done using the Deployment Image Servicing and Management tool. To run DISM, open the command prompt and give the following command
DISM /Image:C:\Windows /Cleanup-Image /RestoreHealth /Source:C:\Windows\WinSxS
Here, “C:” is system volume.
If it throws an error, insert Windows USB od DVD and give the following command-
DISM /Image:C:\Windows /Cleanup-Image /RestoreHealth /Source:esd:E:\Sources\Install.esd:1 /limitaccess
Here “E:” is your USB or DVD drive and replace it if it is showing another alphabet.
In rare cases, install.esd would be install.wim.
In such cases, you need to modify and give the following command,
DISM /Image:C:\Windows /Cleanup-Image /RestoreHealth /Source:wim:E:\Sources\Install.wim /limitaccess
Run the steps sequentially as mentioned above and check if this can solve your error.
3] Repair BCD corruption
Bootrec.exe is a built-in command-line tool for troubleshooting problems related to booting up and Windows Startup. We would use this tool to scan the system to solve boot-up issues.
Make sure a bootable USB or DVD is inserted into your system before running the following commands. To repair the BCD, open the command prompt and give the following commands one by one-
Bootrec /Fixmbr

Bootrec /FixBoot
Each of the above commands should output “The operation completed successfully”. If not, try again.
Next, to rebuild the BCD, give the following command,
Bootrec /RebuildBCD
This should help.
4] Run Automatic Startup Repair
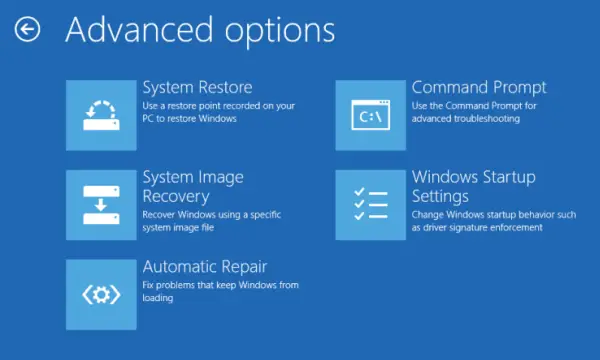
Run Automatic Repair from Advanced Startup Options screen and see if that helps.
5] Use the Windows Recovery Environment
If you have tried the abovementioned methods, this is the last way to fix the error. You must run Windows Repair using a Windows bootable USB or DVD.
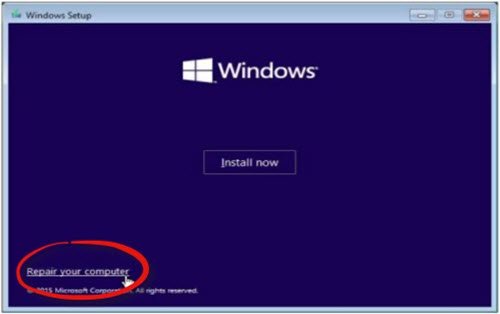
Insert the bootable USB or DVD and boot into it and select “Repair your computer”.
If you are facing any problems, try doing these steps:
- Insert DVD drive and hard reset the computer.
- Once the manufacturer logo appears, press the key to enter into Windows Recovery Environment (eg. Press F2 for Dell users).
- Under UEFI firmware settings, change the Boot sequence to DVD Drive and Restart.
- Once the PC restarts, select the boot order and make changes accordingly, as shown on the BIOS screen.
6] Try performing System Restore using Command Prompt
Open Command Prompt and give the following command
rstrui.exe /OFFLINE:C:\Windows
Replace “C” with the drive where Windows Installation is located.
Please follow all these steps carefully.
Hopefully, one of the solutions mentioned here will help you.
How to select an operating system and select System Restore?
To select an operating system and use System Restore, go to Control Panel and search for Recovery. Select Recovery, then Open System Restore. Choose the appropriate restore point tied to the issue, click Next, and Finish to complete the process.
What is the difference between Windows System Restore and System Recovery?
The primary difference between Windows System Restore and System Recovery is that System Restore only affects system files and settings. System Recovery involves restoring your entire hard drive, including the operating system, applications, settings, and all files. This makes System Recovery more comprehensive.
Windows 10/11 System Restore sometimes gets stuck on restoring files or hung up on initializing while trying to revert a computer to a previous state or restore point. Here we will discuss the solutions to this issue, and the best alternative to the Windows System Restore tool — MiniTool ShadowMaker.
2 Cases: Windows 10 System Restore Stuck
System Restore is a Windows features used to revert the computer’s state (system files, Windows Registry, settings, installed applications) to a previous point in situations of malfunctions or other problems.
Various problems can be encountered during the system restore process; one of the more common ones is the task being frozen even when you try to interrupt it.
How long does System Restore take on Windows 10/11/7/8? Usually, the operation would complete within 20-45 minutes based on the system size but certainly not a few hours.
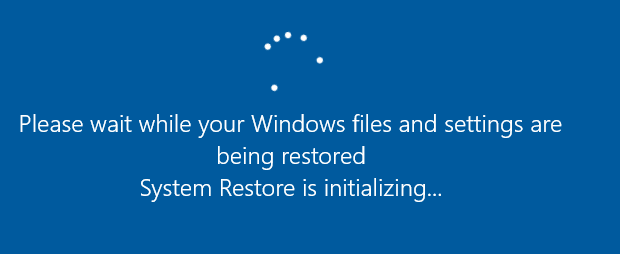
If you run Windows 10/11 and start System Restore in System Protection, you might get stuck on the following screen, saying:
“Please wait while your Windows files and settings are being restored
System Restore is initializing“.
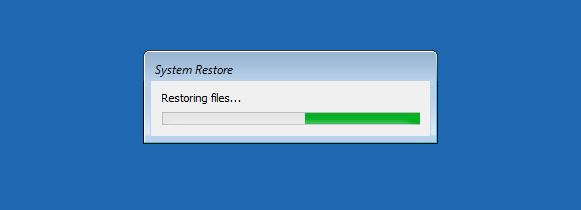
In another situation, you might try to perform a restoration in WinRE. Again, Windows System Restore is stuck on restoring files.
So what to do when a system restore in Windows 10/11 gets stuck?
The following sections are some possible methods for fixing the issue of System Restore taking forever to complete.
Tip: In addition to system restore stuck issue, you may encounter a system restore error Windows 10/11, for example, system restore failed 0x80070057, 0x80042302, etc., Windows cannot find a system image on this computer.
How to Fix Windows 11/Windows 10 System Restore Stuck
Since there are a lot of discussions on this topic on the internet, we have compiled a list of useful solutions for you to try one by one.
① Perform System Restore in Safe Mode
If your system is stuck on the initializing screen or file restoring, the first thing to do is still to wait for a while especially if the restore point contains a lot of data.
However, if Windows 10 System Restore freezes for more than an hour, try forcing a shutdown, restarting your computer and checking for the status.
If Windows still returns to the same screen, try fixing it in Safe Mode using the following steps.
Step 1: Prepare an installation USB drive or disc. Go to the Microsoft website on another working computer, download Windows 10/11 tool and create an installation USB drive or disc. In addition, you can also create a repair disc or repair drive.
Step 2: Insert the created media into your computer and change the boot order to boot the computer from the media.
Step 3: Select Repair your computer on the Install Windows screen to enter WinRE (Windows Recovery Environment).
Tip: If this screen does not appear, your PC might not be set up to boot from a drive. Check your PC manufacturer’s website for information on how to boot from media, and then try again.
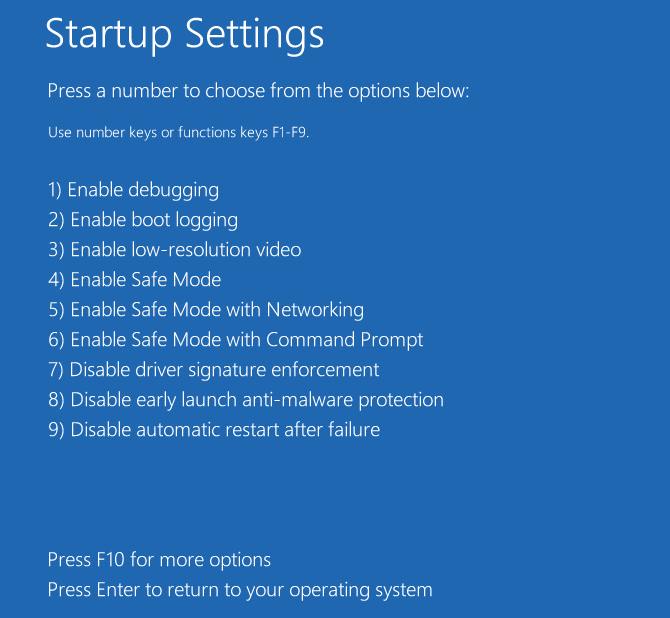
Step 4: Go to Choose an option > Troubleshoot > Advanced Options > Startup Settings > Restart.
Step 5: Press F6 to select Enable Safe Mode with Command Prompt to run System Restore.
Step 6: Choose an account and enter the password.
Step 7: Type rstrui.exe in the pop-up Command Prompt window and press Enter.
Step 8: Now you can start System Restore in Safe Mode.

This should effectively fix the issue of Window1 11/Windows 10 System Restore stuck. However, if System Restore still freezes upon initializing or restoring files, try the next solution.
② Run Startup Repair
Can I stop system restore Windows 10/11?
You can force a shutdown to stop the system restoration process in order for your computer to run normally again upon reboot. Nevertheless, the issue of System Restore hung up on initializing still appears when you run it.
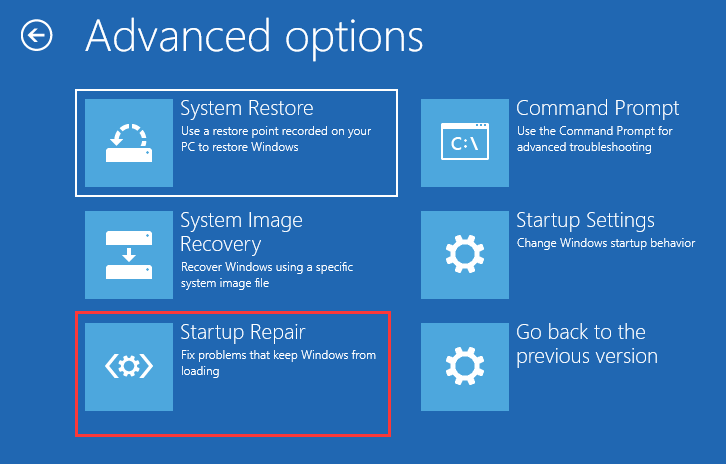
One of the possible reasons is that the boot manager is corrupted. In this case, you can simply fix it by through Startup Repair.
To do this, enter WinRE. Then, go to Choose an option > Troubleshoot > Advanced Options > Startup Repair.
Try the next solution if this doesn’t work with the issue Windows 10 System Restore stuck.
③ Run SFC
System File Check (SFC.exe) is a Windows utility that helps you scan for corruptions in Windows system files. It will try restoring any corrupted files found.
If the System Restore taking forever Windows 10/11 issue happens, it is likely that certain files are damaged.
Here, run System File Check to scan Windows and check if it helps.
- Enter WinRE by using an installation disc, just like the first method.
- Navigate to Choose an option > Troubleshoot > Advanced Options > Command Prompt.
- Choose an account and enter the password.
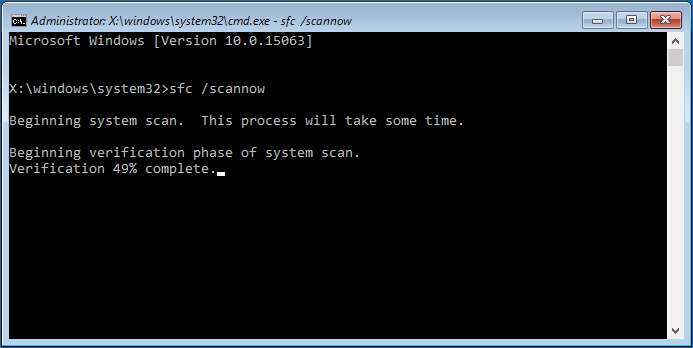
- Type sfc /scannow in the pop-out window and press Enter to troubleshoot missing or corrupted system files on Windows 10/11.
Please wait patiently until the verification reaches 100%.
After the verification is done, run a System Restore again to see whether it is still stuck on restoring files or initializing.
In addition to these three solutions, some users suggest performing a full system virus scan using Windows Defender to ensure that the PC is free from virus, or running the disk cleanup and then try performing a system restore. These solutions might also fix the issue of Windows 11/Windows 10 System Restore taking a long time.
“Windows 10 System Restore stuck on restoring files? System Restore hung up on initializing? These methods are helpful. Try these solutions and share them with everyone.”Click to Tweet
Tip: In Windows 10/11, you might be in a loop of Windows being stuck at reset or restoring to a previous Windows version. Read these related articles for solutions:
How Can You Fix “Restoring Your Previous Version of Windows”?
Here Are Three Ways to Fix Windows 10 Reset Stuck Issue!
Important:
It is easy for System Restore to get stuck on initializing or restoring files in Windows. When something goes wrong, it becomes impossible to restore your computer to a restore point. This is really annoying, but if you have an available backup, things will be easy.
Computer backup has been an issue of critical concern for many people. In case of system corruption or data loss, the backup can be used to quickly restore your system or data.
Compared to System Restore in Windows, backup is recommended since it is all-sided; Windows files, individual files, settings, applications, etc. can all be included in an image file.
As an advice, the following section will show you how to protect your computer via backup.
To protect your computer well, we highly recommend the free backup software, MiniTool ShadowMaker.
As the best free Windows System Restore alternative software, it easily finishes file, system, partition and disk backup in Windows 11/10/8/7.
It provides a flexible way to back up your PC with automatic backup, incremental backup and differential backup.
Most importantly, this free backup software is capable of creating bootable media with its Media Builder; it can be used to boot your crashed computer and perform a quick disaster recovery without taking hours like System Restore.
Universal Restore could be helpful for restoring the image to another computer with different hardware.
Download the Free MiniTool ShadowMaker 30-Day Trial Edition now to avoid Winodws 11/Windows 10 System Restore stuck.
MiniTool ShadowMaker TrialClick to Download100%Clean & Safe
Backup Windows 10/11
See how to create a Windows backup:
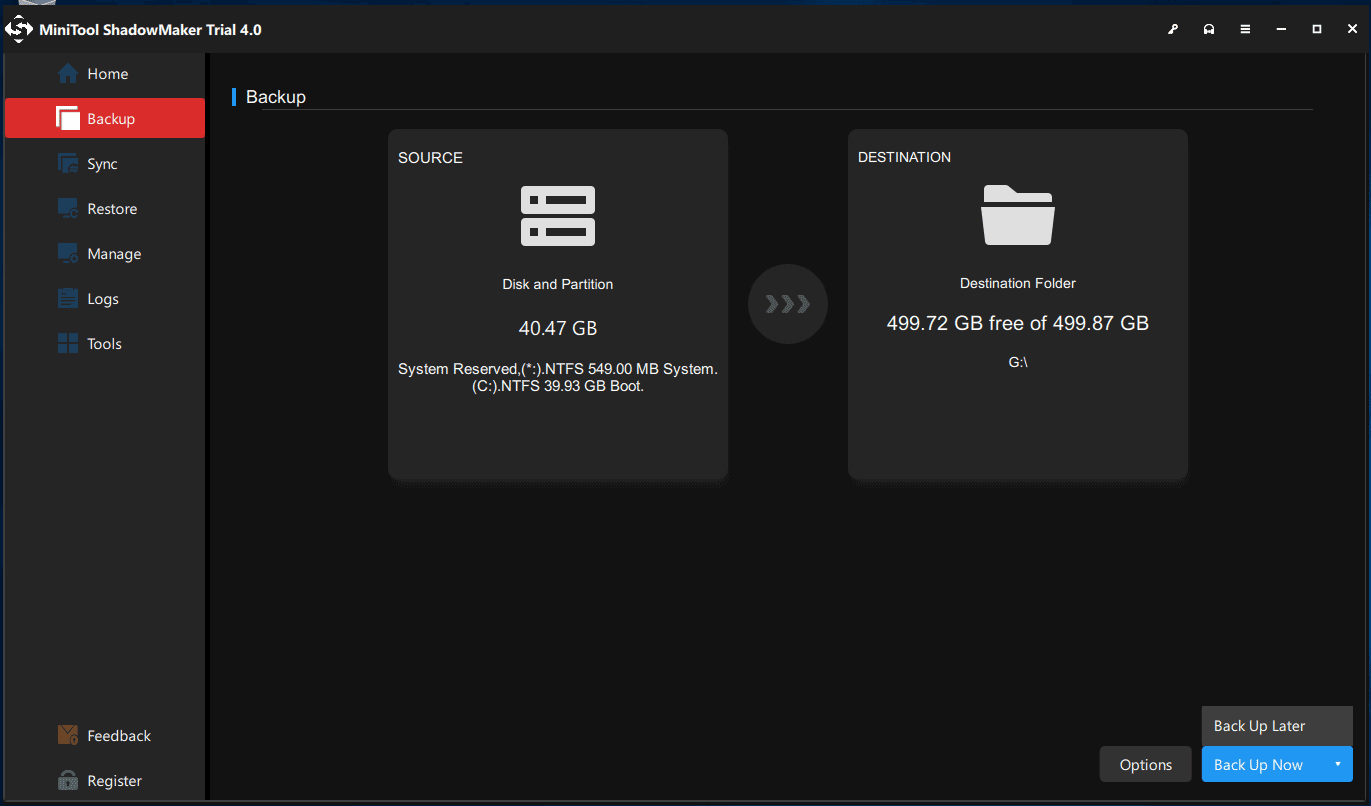
Step 1: Run MiniTool ShadowMaker in Windows 10/11 to its main interface.
Step 2: In the Backup interface, specify the backup source and storage location.
By default, the system partitions are chosen in the Source section. To back up the entire system disk, use this section to choose all system disk partitions.
Usually, it is recommended to back up a computer to an external hard drive.
Step 3: Click Back Up Now. The backup operation can be monitored in the Manage interface.
Tip: We suggest creating automatic disk backups using Schedule feature or differential/incremental backups using Scheme feature. Just click Options to find the corresponding feature.
Windows 10/11 System Image Recovery
How to restore Windows image from an external hard drive after the occurrence of accidents? See the guide.
Step 1: Create a bootable USB drive or CD/DVD with the Media Builder of MiniTool ShadowMaker. Change the boot order of your PC to boot from the media.

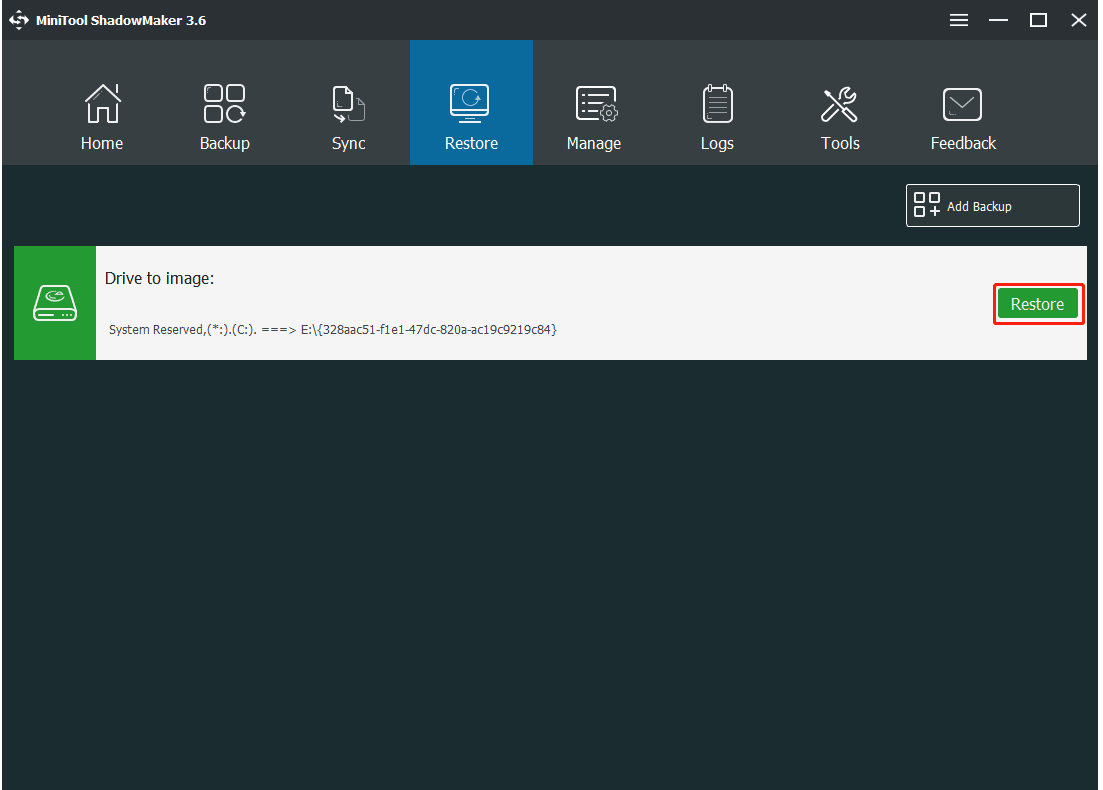
Step 2: MiniTool ShadowMaker will start running in WinPE. Go to the Restore page, and choose the system image or system disk image to start restoring.
Tip: If you can’t see the backup you want in the list, use Add Backup to find and add one.
Step 3: Next, choose one backup version.
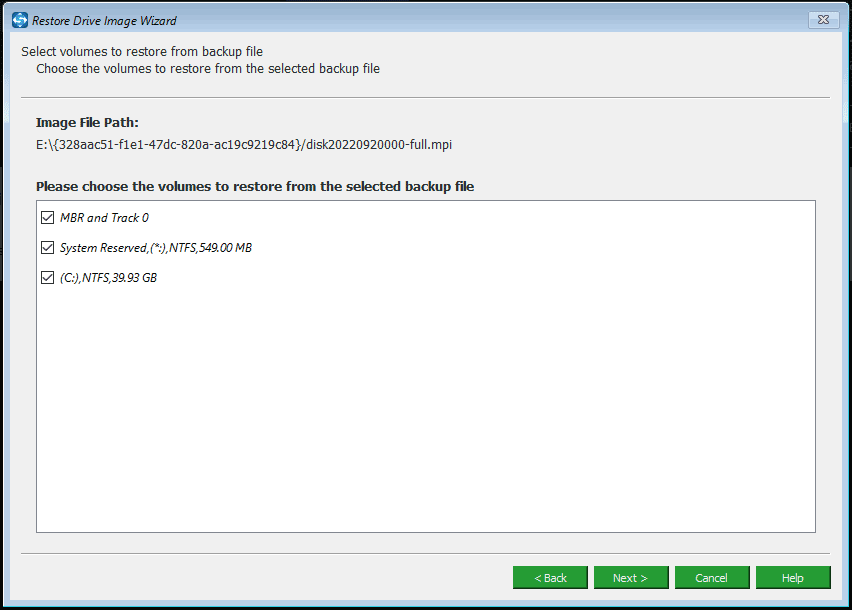
Step 4: Select volumes to restore from the backup file.
Note: All system related partitions need to be chosen, as well as MBR and Track 0; otherwise Windows 10/11 will be unbootable.
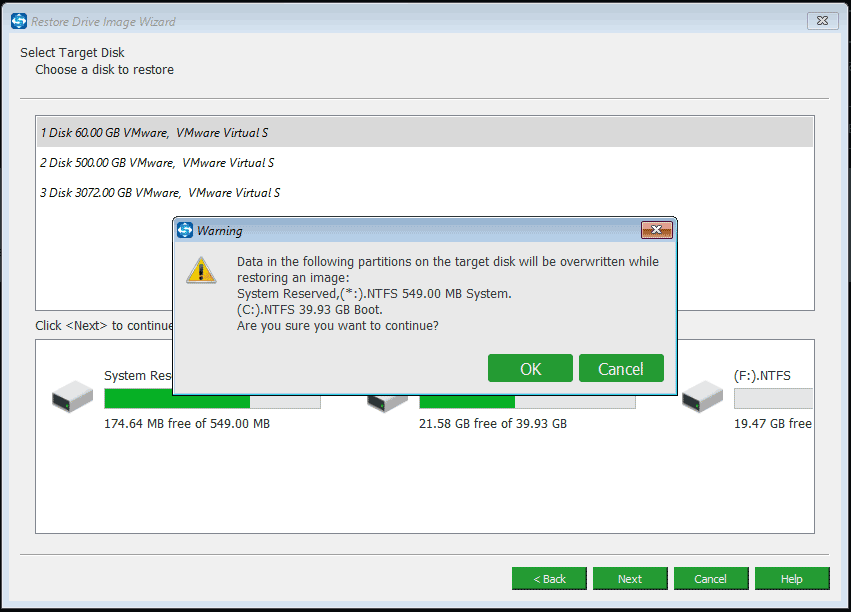
Step 5: Select the disk you want to restore the Windows image to. The original system disk is usually recommended. Note that the selected partitions will be overwritten during the recovery process.
Step 6: Wait for a few minutes for MiniTool ShadowMaker to perform the recovery operation.
In conclusion, MiniTool ShadowMaker safeguards your computer by making it easy for system backups and recovery. No more Windows 10 System Restore stuck on restoring files or initializing!
Don’t want to experience System Restore taking forever Windows 10/11 issue? Get the best free backup software – MiniTool ShadowMaker NOW to keep your computer safe.
MiniTool ShadowMaker TrialClick to Download100%Clean & Safe
Further Reading: System Restore Point VS Windows Image Backup
In this article, we mentioned two concepts: System Restore Point and Windows image backup.
Although both of them can be used to restore the computer to a previous state, they are actually two very different things. So what are the differences?
Restore Point
A restore point is essentially a snapshot of the Windows registry, critical system files and driver files. It does not include users’ personal files, pictures, audio, video files, and other files.
Consequently, without affecting any user data, a system restore reverts registry, system files and driver files back to where it was at an earlier date.
By default, the restore points are saved in the system partition.
Tip: It is very possible to lose some files after a System Restore. Read this post to learn how to get them back: Quick Recover Files after System Restore Windows 10/8/7 – MiniTool.
Window Backup Image
A backup image is a copy of the essentials – it could be everything on your drive or a selected portion like documents, pictures, music, etc. The 3 different types of backups are automatic, differential and incremental backups.
A recovery will recover the entire contents on the image file, which could be stored in an external hard drive like USB drive, NAS, etc.
To wrap it up, an image backup is a more all-around and flexible method compared to a restore point. Now, start creating a backup for your Windows 10 with the backup software, MiniTool ShadowMaker.
MiniTool ShadowMaker TrialClick to Download100%Clean & Safe
Final Words
Have you tried our solutions to fix the issue of Windows 11/Windows 10 System Restore stuck on restoring files or hung up on initializing? We will be glad to see your thoughts in the following comments area.
If you have any questions while using MiniTool ShadowMaker, please write an email to [email protected].
Windows 10 System Restore Stuck FAQ
How long should System Restore take Windows 10?
Usually, it takes 20-45 minutes not a few hours to run a system restore.
How do I fix a stuck Windows 10 factory reset?
- Perform a system restore or system image recovery
- Run Startup Repair by Windows repair disc
- Reinstall Windows 10
What happens if I interrupt System Restore Windows 10?
If you have waited a long time and you need to stop the system restore operation, you can force reboot the system but this may cause an unbootable system. If it doesn’t boot, interrupt the boot process three times and then Windows 10 will start automatic repair.
What if System Restore takes too long?
If System Restore takes too long and gets stuck on restoring files or hung up on initializing, the restore process may have gone corrupt or something has failed severely.
When performing system restore, you may encounter the issue of to use system restore you must specify which Windows installation to restore. However, this post from MiniTool will show you how to solve it.
You may encounter the error of to use system restore, you must specify which Windows installation to restore. This system restore error may be caused by the corrupted files in the system or the corrupted BCD files.
When encountering this error, you can’t perform system restore successfully. And in the following section, we will show how to solve the issue of to use system restore you must specify which Windows installation to restore.
Solution 1. Run Chkdsk
In the first, we will show you the first way to fix the error of rstrui exe you must specify which Windows installation to restore. In this way, you can check disk first.
Now, here is the tutorial.
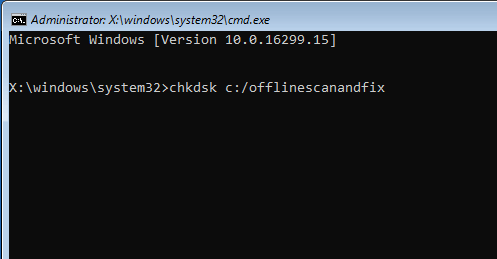
Step 1: Boot your computer from the Windows installation media, then click Repair your computer to continue. After entering Windows Recovery Environment, click Troubleshoot > Advanced Options > Command Prompt to continue.
Tip: If you don’t have the Windows installation media, read the post A Complete Guide to Windows 10 Media Creation Tool: How to Use to create a one.
Step 2: Then input the command chkdsk C: /offlinescanandfix and hit Enter to continue. (The C represents the drive letter.)
When all steps are finished, reboot your computer and check whether the issue of to use system restore you must specify which Windows installation to restore is solved.
If this solution is not effective, try the following solutions.
Solution 2. Run System File Checker
The second solution to fix the issue of rstrui exe you must specify which Windows installation to restore is to run System File Checker. In this way, you can scan and fix the corrupted system files.
Now, here is the tutorial.
Step 1: Boot from the bootable media and open Command Prompt as the way mentioned in the above part.
Step 2: Then type the commands to know your system’s drive.
cd /
Dir
If you see ‘User’s’ folder in the list, this means it is your system drive. If not, change your drive by giving the alphabet of your volume.
Step 3: Then input the following command and hit Enter to continue.
sfc /scannow /offbootdir=C:\ /offwindir=C:\Windows
When it is finished, you can reboot your computer and check whether the issue of to use system restore you must specify which Windows installation to restore is solved.
Related article: Quickly Fix – SFC Scannow Not Working (Focus on 2 Cases)
The third solution to fix the issue of to use system restore you must specify which Windows installation to restore you must always restore the drive that contains Windows is to run DISM tool.
Now, here is the tutorial.
Step 1: Boot your computer from the Windows installation media, then open Command Prompt as the way mentioned in the above part.
Step 2: In the Command Prompt window, type the command DISM /Image:C:\Windows /Cleanup-Image /RestoreHealth /Source:esd:E:\Sources\Install.esd:1 /limitaccess and hit Enter to continue. Here E is the drive letter of USB drive. You can change it if there is a need.
Tip: In some cases, the install.esd may be install.wim. In such an event, you have to enter the command as follows: DISM /Image:C:\Windows /Cleanup-Image /RestoreHealth /Source:wim:E:\Sources\Install.wim /limitaccess
When it is finished, reboot your computer and check whether the issue of to use system restore you must specify which Windows installation to restore is solved.
Solution 4. Repair BCD Corruption
As we have mentioned in the above section, this system restore error may be caused by the corrupted BCD files. So, in order to solve it, you can repair BCD corruption.
Now, here is the tutorial.
Step 1: Boot your computer from the installation media, then open Command Prompt as the way mentioned in the above section.
Step 2: In the pop-up window, type the following command:
Bootrec /Fixmbr
Bootrec /FixBoot
Bootrec /RebuildBCD
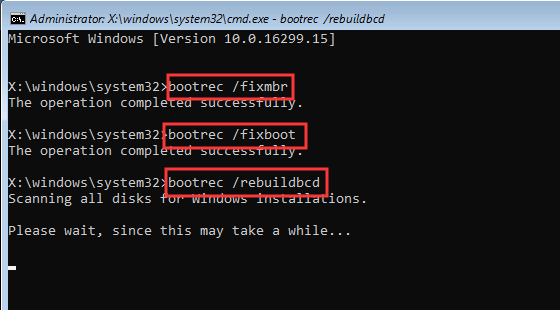
When it is finished, reboot your computer and check whether the issue of to use system restore you must specify which Windows installation to restore is solved.
Related article: Step-by-Step Guide to Repair and Fix MBR Windows 7/8/8.1/10
Solution 5. Run Automatic Repair
If the above solution is not effective, you can try running automatic repair.
Now, here is the tutorial.
Step 1: Boot your computer from the installation media, click Repair your computer, then go to the Windows Recovery Environment.
Step 2: Then choose Troubleshoot > Advanced Options > Startup Repair to continue.
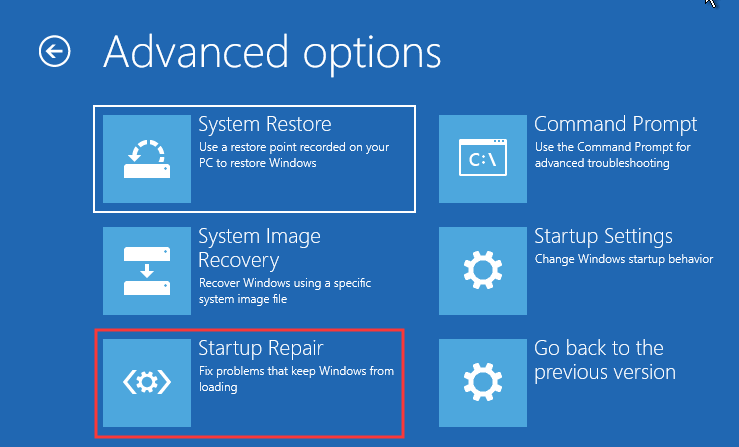
Then it will fix problems. When it is finished, reboot your computer and check whether the issue of rstrui exe you must specify which Windows installation to restore is solved.
As a matter of fact, besides the system restore point, you can also create a system image to keep your PC safe. What’s more, you can use the system image to restore your computer to a previous state when there is a need. And you will not encounter this issue of to use system restore you must specify which Windows installation to restore or other system restore errors.
Final Words
To sum up, this post has introduced what may cause the issue of to use system restore you must specify which Windows installation to restore and how to fix it. If you encounter the same issue, try these solutions.
If you are facing performance issues with your PC or laptop and thinking about fixing them, then reinstalling your operating system is the best solution to fix any lagging and performance issues. But the question is, did you lose your data while performing the reinstallation of your Windows?
Well, the answer is no! You will reinstall your Windows 10 without losing a bit of data. And through this guide, you will learn various built-in methods to reinstall Windows 10 without losing data.
Table of Content
- How to Reinstall Windows 10 Without Losing Data — 3 Methods
- 1. Repair and Reinstall Windows 10 without losing Data
- 2. Reinstall Windows 10 without Losing Data
- 3. Clean & Reinstall Windows 10 without Losing Files
- Common Issues and Troubleshooting Tips During Windows Reinstallation
How to Reinstall Windows 10 Without Losing Data — 3 Methods
After applying multiple techniques to fix the system’s internal difficulties, and none of them have truly worked, it could be time to completely reinstall Windows 10 to resolve all the internal issues without losing the required data. Here, we’ll see 3 easy methods to reinstall Windows 10 without losing any internal data or files.
1. Repair and Reinstall Windows 10 without losing Data
Users can reinstall Windows 10 without losing internal data or programs if the system can boot up and they think everything that is installed is working. Now we’ll see some easy steps to repair and install Windows 10 without losing internal data.
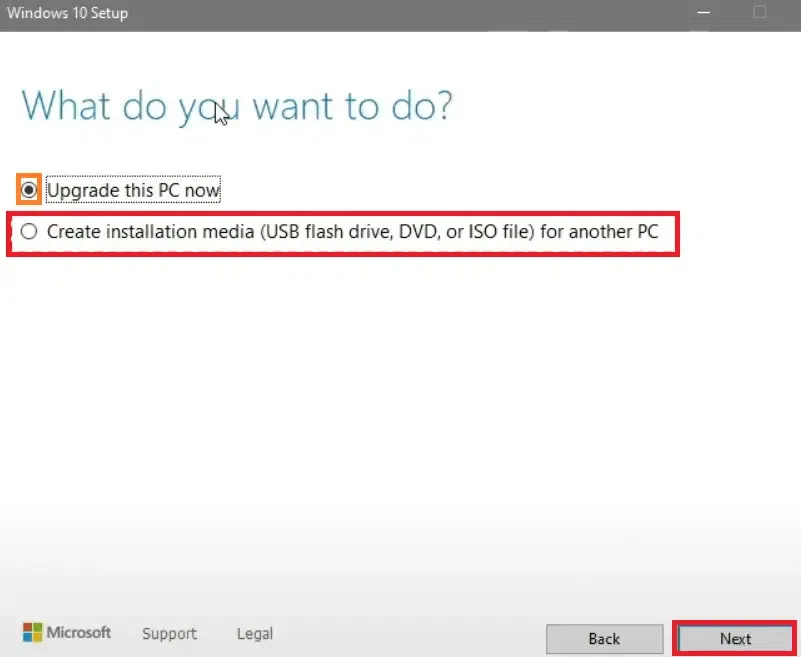
Step 1: Initiate the Windows 10 Setup
Download the Windows Media Creation tool > Create an Installation ISO file.
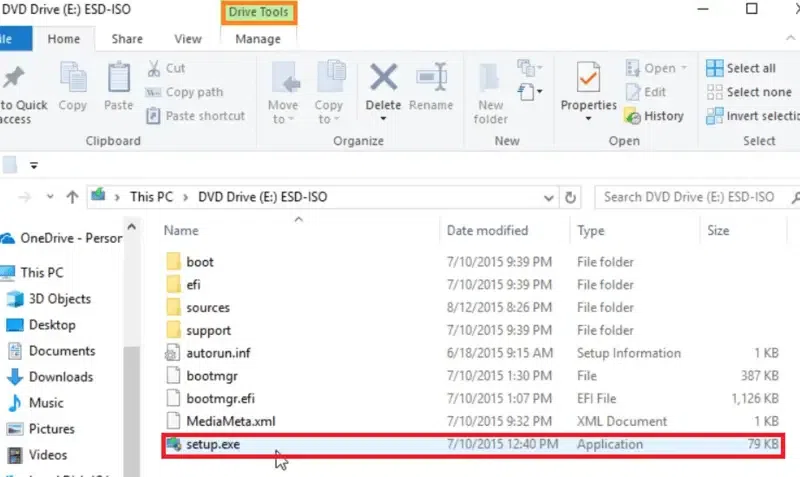
Step 2: Run the EXE file
Double-click on mount the ISO File > Double-click on run the Setup.exe file.
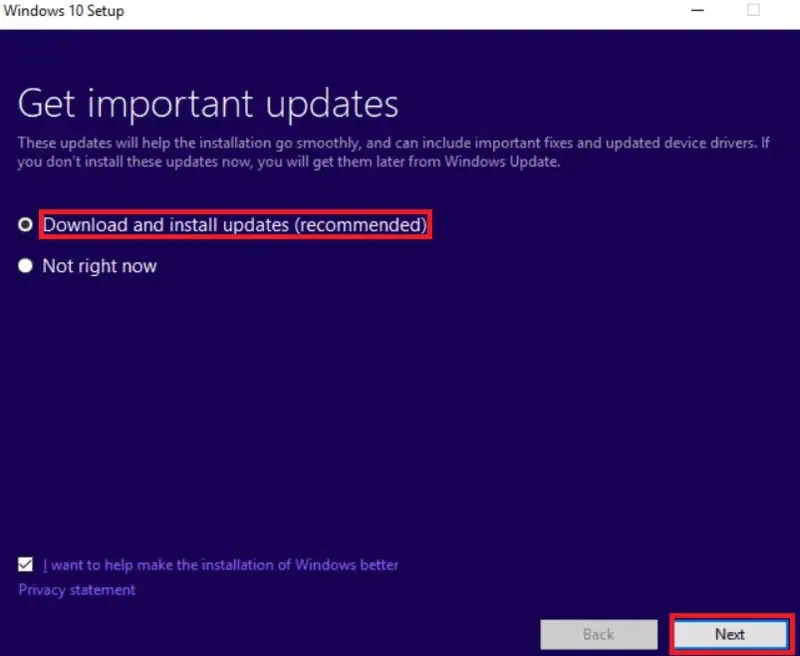
Step 3: Check for Updates
Windows 10 setup is ready > Download Updates.
Step 4: Confirm to Setup
Click on Change what to keep option and select an option as per your preference, which shows «Keep personal files, apps, and Windows settings«, «Keep personal files only«, or «Nothing«. Confirm the selected option > Click on Refresh.

2. Reinstall Windows 10 without Losing Data
With Windows 10, users may use the «Reset this PC» tool to help fix system issues by returning the internal system to its original configuration and properties. Now, we’ll see the required steps to install Windows 10 without losing personal files or data.
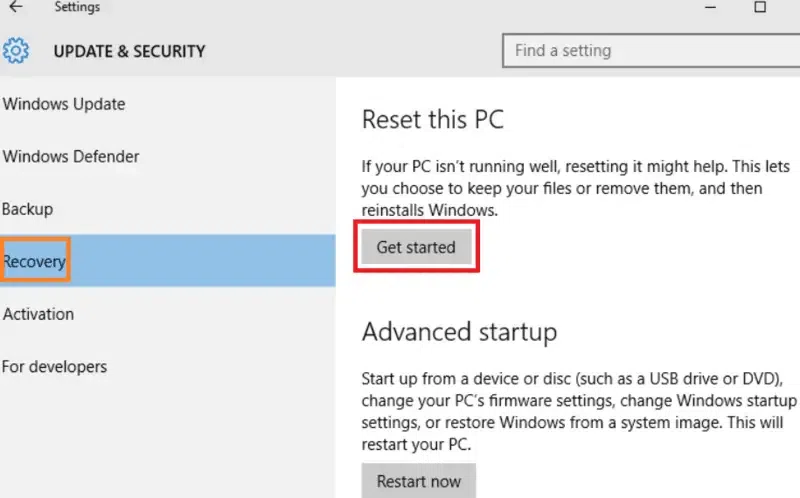
Step 1: Go to Settings > Reset this PC
Go to Settings > Update & Security > Recovery > Reset your PC > Get Started.
Step 2: Enter the Troubleshoot Mode
Another way, Create a Recovery Drive > Choose Keyboard Layout> Select Troubleshoot > Reset your PC.
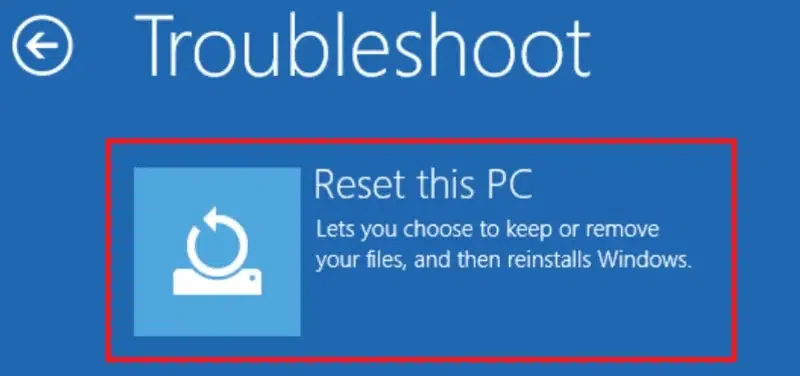
Step 3: Choose to «Keep» or «Remove» files
When users select the Reset PC option, they can see two options «Keep my Files» and «Remove Everything» > Select the «Keep my Files» option and click to «Reset».

3. Clean & Reinstall Windows 10 without Losing Files
This method can be used to upgrade Windows 10 if users would rather not lose internal games or other important data from USB drives or installation disk management. Now we’ll see some easy steps to clean and install Windows 10 without losing personal files.
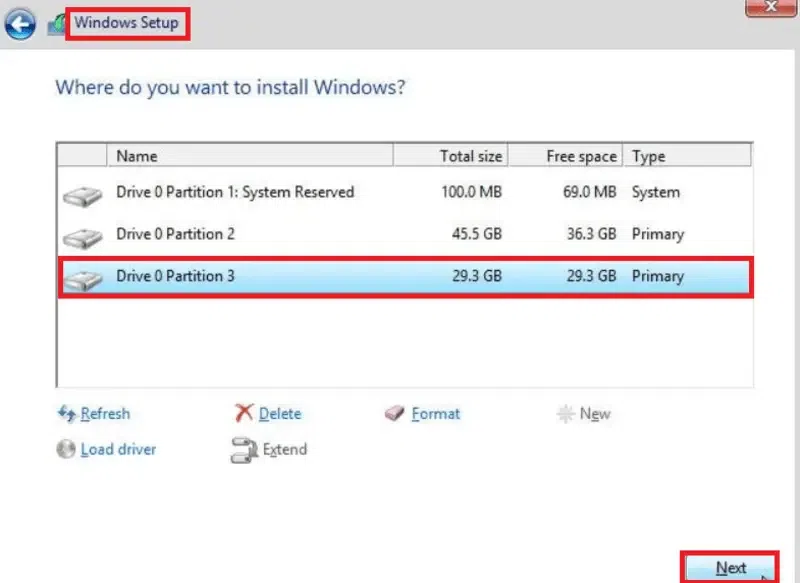
Step 1: Go to Windows Setup to start
Insert Installation disc > Boot from it (If not present, user can install Windows media creation tool)
Step 2: Select Language & Proceed to Install
Select Language & Keyboard > Click on Next. Now, Click on «Install Now» > Type user Product Key (or skip it).
Step 3: Select the Dedicated Drive
Select the installation type as «Custom» > Select the C: proceed Drive > Click Next to proceed.
Common Issues and Troubleshooting Tips During Windows Reinstallation
While reinstalling Windows 10 without a CD or USB is generally straightforward, users may encounter some issues during the process. Below are some of the most common problems and troubleshooting tips to help you resolve them:
1. Windows 10 Reset or Reinstall Fails to Start
When attempting to reset or reinstall Windows 10 via the «Reset this PC» option, you may see an error message or the process may fail to start.
Possible Causes:
- Corrupted system files
- Issues with the recovery partition
- Lack of disk space or insufficient system resources
Troubleshooting Tips:
- Run Automatic Repair: If you cannot reset the PC normally, try booting into the Windows Recovery Environment (WinRE) and select Startup Repair.
- Check Disk Space: Make sure your system partition has enough free space to complete the reinstallation. You can use a disk cleanup tool or external storage to free up space.
- Use the Command Prompt: In WinRE, open Command Prompt and run the following command to repair the system files:
sfc /scannowThis will check for any corrupted files and attempt to fix them.
2. Error: «There was a problem resetting your PC»
During the reset process, you might encounter the error message, «There was a problem resetting your PC,» preventing the reinstallation.
Possible Causes:
- Corrupted or missing system files
- A damaged recovery partition
- Conflicting software or settings
Troubleshooting Tips:
- Check the Recovery Partition: Ensure that the recovery partition is intact. If it’s missing or corrupted, you may not be able to use the reset function. In such cases, using the Cloud Download method might be a viable solution.
- Perform a System Restore: If the reset option doesn’t work, try performing a system restore to a previous point where Windows was functioning properly.
- Use DISM Tool: Open the Command Prompt in WinRE and run the following command to fix corrupted system files:
DISM /Online /Cleanup-Image /RestoreHealth
3. Reinstallation Process is Stuck or Frozen
The reinstallation process may get stuck or freeze during certain stages, such as «Preparing» or «Installing.»
Possible Causes:
- Slow or unstable internet connection (for cloud-based reinstallations)
- Insufficient hardware resources (RAM or CPU)
- Corrupted Windows installation files
Troubleshooting Tips:
- Check Your Internet Connection: If you’re using Cloud Download, ensure that your internet connection is stable and fast enough to download the necessary installation files. A slow connection could cause the process to freeze or fail.
- Restart the Installation: If the process seems stuck, try restarting your computer and reattempting the reinstallation. If you’re using a recovery partition, ensure it hasn’t been altered or corrupted.
- Use Safe Mode: If the system is stuck at a certain point, boot into Safe Mode (press F8 or Shift + F8 during startup) and attempt the reset from there.
4. Error Message: «Windows Cannot be Installed»
While trying to reinstall Windows 10, you may see an error message that says, «Windows cannot be installed» or «The installation cannot proceed.»
Possible Causes:
- Hard drive partitioning issues
- Compatibility problems with your system hardware
- A damaged or full hard drive
Troubleshooting Tips:
- Check Hard Drive Health: Use tools like CHKDSK or CrystalDiskInfo to check the health of your hard drive. If there are any issues, consider replacing the hard drive before proceeding with the installation.
- Fix Partition Issues: If the problem is related to partitioning, boot into Command Prompt and use diskpart to clean the drive and create a new partition:
diskpart
list disk
select disk 0
clean
exit
After cleaning the disk, try the reinstallation again.
5. Missing Drivers After Reinstallation
After reinstalling Windows 10, some drivers (like for graphics, Wi-Fi, or sound) may be missing or not functioning properly.
Possible Causes:
- Windows did not automatically install the correct drivers
- Drivers were not included in the recovery partition or cloud installation
Troubleshooting Tips:
- Install Drivers Manually: Visit the official manufacturer’s website for your PC or device and download the latest drivers. Install them manually to ensure full compatibility.
- Use Windows Update: After reinstalling, check for updates by going to Settings > Update & Security and selecting Check for Updates. Sometimes, Windows Update will automatically detect and install missing drivers.
- Driver Update Software: You can also use third-party software like Driver Booster or DriverPack Solution to find and install missing or outdated drivers.
6. PC is Unable to Boot After Reinstallation
After reinstalling Windows 10, your PC might fail to boot up properly or enter into a boot loop.
Possible Causes:
- Corrupted bootloader
- Incorrect boot settings in BIOS
- Issues with the hard drive or SSD
Troubleshooting Tips:
- Repair the Bootloader: Boot into WinRE, open Command Prompt, and run the following commands to fix the bootloader:
bootrec /fixmbr bootrec /fixboot bootrec /rebuildbcd - Check Boot Order in BIOS: Ensure that your hard drive or SSD is set as the primary boot device in your BIOS settings.
- Perform System Repair: Use the Startup Repair option in WinRE to automatically detect and fix boot problems.
Conclusion
Reinstalling Windows 10 without losing your data is not only possible but also straightforward when you follow the correct procedures. By using the three methods explained above can help user also, you can address system issues, improve performance, and ensure a clean installation while keeping your files and applications safe. Regularly backing up your data and staying up to date about the latest Windows 10 features can further enhance your experience and prevent future bugs or problems.
Also Read
- How to Reinstall Windows 10 without CD?
- How to Reinstall Windows 10 without CD/USB Easily?
- How to Switch from Windows to Linux without Losing Data?
A time comes when you want to perform the System Restore operation. But at times you might face an error – To use System Restore you must specify which Windows installation to restore. However, the error occurs because of corrupted files in the system which caused this error. Due to this error, you are unable to perform the system restore and this can be difficult to move further.
There are cases where you are unable to boot up when you face this error. This guide provides fixes to fix this error. So, initially, let us check what are the causes of error: “To use System Restore you must specify which Windows installation to restore”
- Maybe your earlier actions might have corrupted System files and might cause this error.
- BCD is used to save all data – it can be BCD Corruption
Also See: How to Fix Service Host Diagnostic Policy Error
Contents
- 1 Steps To Fix Error: ‘To use System Restore you must specify which Windows installation to restore’
- 1.1 Run SFC Offline
- 1.2 Run DISM tool to repair corrupted system image
- 1.3 Repair BCD corruption
- 1.4 Run Automatic Startup Repair
- 1.5 Use WRE (Windows Recovery Environment)
- 1.6 Try To Perform System Restore In Advanced Startup Options
- 1.6.1 Further;
- 1.7 Conclusion:
Steps To Fix Error: ‘To use System Restore you must specify which Windows installation to restore’

If you view an error message ‘To Use System Restore, You Must Specify Which Windows Installation To Restore’ then don’t fret here are the fixes you must try to resolve this error:
- Run SFC Offline
- Run DISM tool to repair corrupted system image
- Repair BCD corruption
- Run Automatic Startup Repair
- Use the Windows Recovery Environment
- Try performing System Restore through Command Prompt in advanced startup options
Run SFC Offline
As I mentioned earlier, for system file corruption we try to run System File Checker Offline. Here is the method to do it:
Input the following commands one by one, to know your PC drive.
Cd /

Dir
When you view the “Users” folder, then this is your system’s drive. If not, you can simply modify the drive after specifying the alphabet of your volume as “D:”.
Then, specify the below command in the command prompt (Here “C” is your system drive),
sfc /scannow /offbootdir=C:\ /offwindir=C:\Windows
Repeat the steps one-by-one as mentioned earlier. Want more ways to fix the ‘To Use System Restore, You Must Specify Which Windows Installation To Restore’ error? Scroll down below!
Also See: How To Fix Windows Error time.windows.com
Run DISM tool to repair corrupted system image
Here, we would like to check the system health i.e, we would like to check the system files and service Windows integrity. You can do this through the Deployment Image Servicing and Management tool. To execute DISM, head over to the command prompt and specify the following command
DISM /Image:C:\Windows /Cleanup-Image /RestoreHealth /Source:C:\Windows\WinSxS
Here, “C:” is system volume.
If an error occurs, add Windows USB od DVD and specify the following command:
DISM /Image:C:\Windows /Cleanup-Image /RestoreHealth /Source:esd:E:\Sources\Install.esd:1 /limitaccess
Here “E:” is your DVD or USB drive and you can simply replace it if it is displaying another alphabet.
In some cases, install.esd would be install.wim. But in many cases, you should change and specify the following command:
DISM /Image:C:\Windows /Cleanup-Image /RestoreHealth /Source:wim:E:\Sources\Install.wim /limitaccess
Sequentially run the steps as mentioned earlier and check if this can fix your error.
Repair BCD corruption
Bootrec.exe is a built-in command-line tool. You can use it to fix issues related to boot up and Windows Startup. We would use this tool to scan the PC to fix boot-up problems.
Make sure a bootable DVD or USB is added to your PC before executing the following commands. If you want to repair the BCD, head over to the command prompt and specify the following commands one by one-
Bootrec /Fixmbr

Bootrec /FixBoot
The above commands should output “The operation completed successfully”. If not try again.
then, to rebuild the BCD specify the following command,
Bootrec /RebuildBCD
Want more ways to fix the ‘To Use System Restore, You Must Specify Which Windows Installation To Restore’ error? Scroll down below!
Run Automatic Startup Repair
If the above fix is not reliable, you can try to execute the automatic repair.
- Boot your PC from the installation media, tap Repair your PC, then head over to the Windows Recovery Environment.
- Then select Troubleshoot > Advanced Options > Startup Repair to continue.
Then it will resolve the issues problems. When it is completed, reboot your PC and check whether the issue fixed or not. If not, then move to the other method.
Also See: How Do I Troubleshoot VPN Error 720 – Tutorial
Use WRE (Windows Recovery Environment)
If you have tried all the methods given above, then this is the last method to resolve the error. Simply execute Windows Repair and using a Windows bootable USB or DVD.
Add the bootable DVD or USB and boot into it and choose “Repair your computer”.
If you are facing issues then follow the steps given below:
- Input DVD drive and hard reset the PC.
- When the manufacturer logo appears, hit the key to input into Windows Recovery Environment (eg. hit F2 for Dell users).
- Now under the UEFI firmware settings, modify the Boot sequence to DVD Drive and Restart.
- When the computer restarts, choose the boot order and make modifications accordingly.
Try To Perform System Restore In Advanced Startup Options
As you can’t boot into your Windows 10 PC, then try to execute System Restore again in the Advanced Startup Options.
- Boot your PC into the Advanced Startup Options screen.
- From there, you will then view some options to troubleshoot when you can’t log in to Windows in an efficient way.
- Now choose Troubleshoot > Advanced Options > Command Prompt.
- After that, input “exe /OFFLINE:C:Windows” and press Enter to run the command which will start the System Restore process.
Note: You want to replace “C” using the drive where Windows Installation is located.
The given solutions above should resolve the “To use System Restore you must specify which Windows installation to restore” error when executing System Restore. Alternatively, if you have many other system-related problems that need some solutions on your Windows 10 PC. However, there is a one-tap fix known as Restoro you can try to resolve. This program is an essential tool that can repair corrupted registries and optimize your system’s overall performance. Rather than that, it can clean out your PC for any junk or corrupted files that help you remove any unwanted files from your PC.
Further;
Perform a full system scan via Restoro. To do so, follow the steps below.
- Power on your PC. If it’s already on, then reboot it.
- After that, the BIOS screen will be shown, but when the Windows pops up instead, reboot your PC and then try again. When you’re on the BIOS screen, try to repeat hitting F8, after doing so the Advanced Option display up.
- To navigate the Advanced Option simply use the arrow keys and choose Safe Mode with Networking then press enter.
- Now Windows loads the Safe Mode with Networking.
- Hit and hold both the R key and Windows key.
- If it is done correctly, the Windows Run Box will display up.
- Input the URL address in the Run dialog box and then click Enter or tap OK.
- Then it’ll successfully download the program. Wait until the download finish and then open the launcher to successfully install the program.
- When the installation process is successfully completed, run Restoro to perform a full system scan.
- When the scan is completed tap the “Fix, Clean & Optimize Now” button.
Conclusion:
To conclude, this article has introduced what might cause the problem to use system restore you must specify which Windows installation to restore and how to resolve it. If you face the same issue, try these methods to fix it. If you find it helpful then share it with your friends. Also, waiting for your valuable feedback!
Also Read:
- How To Fix ‘Windows Can’t Format This Drive’ In Windows 10