Table of contents
- What Causes the “This PC Can’t Run Windows 11?” Issue?
- What Are the System Requirements for Running Windows 11?
- Secure Boot and TPM: What Are They?
- Is My Device Capable of Tpm 2.0 and Secure Boot?
- How to Fix the “This PC Doesn’t Meet the Minimum Requirements for Windows 11” Issue
- Before You Start
- Speak to Your Manufacturer
- Back Up Your Files
- Follow the Instructions Carefully
- Turning On TPM and Secure Boot
- Opening the BIOS Environment
- Turning On TPM
- How to Turn On Secure Boot
- Bypass TPM 2.0 and Secure Boot Requirement Using Registry Editor
- Conclusion
- FAQ
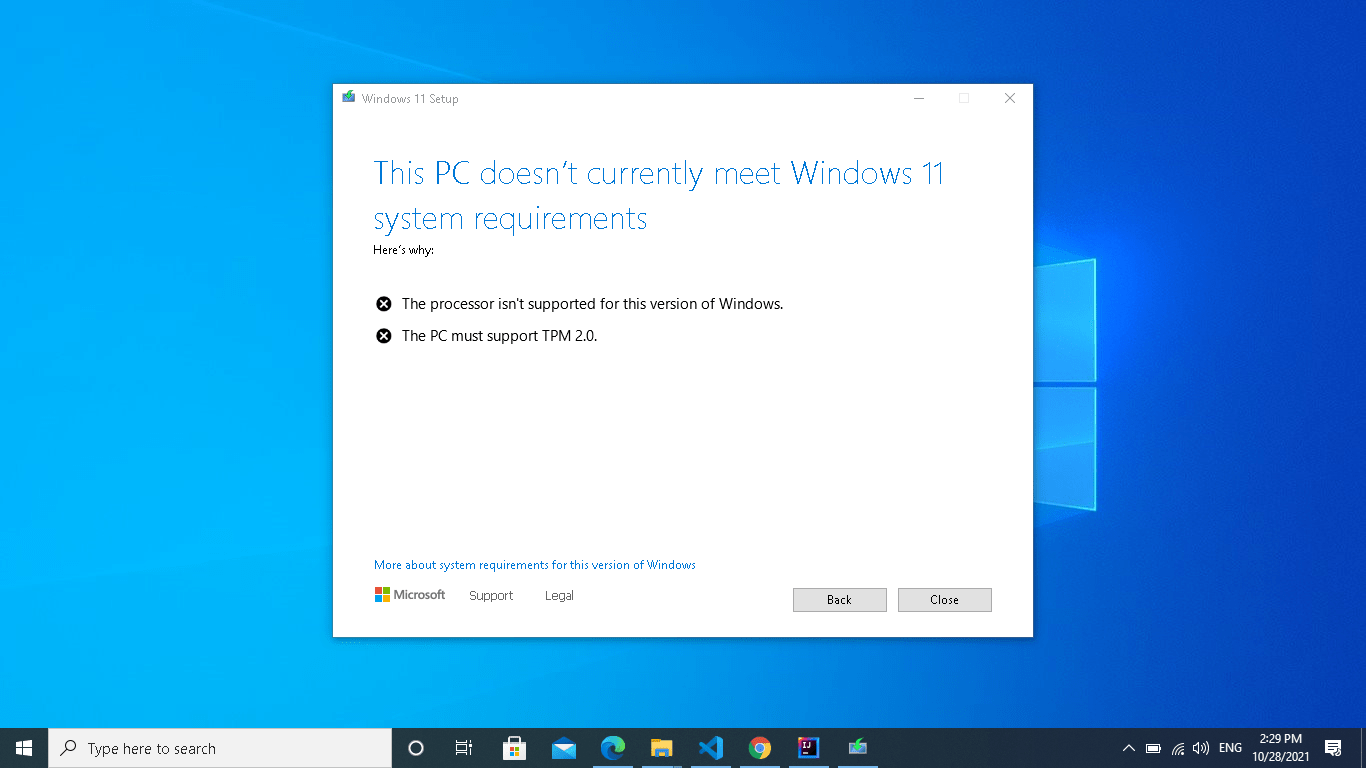
Many PC owners are already enjoying Windows 11’s shiny interface and other bells and whistles. But others are not so happy as they see something scary whenever they try to upgrade. It’s the dreaded “ This PC can’t run Windows 11 ” message that shows up on machines that fail to meet some basic requirements.
Nowadays, the message reads:
“This PC doesn’t currently meet the minimum system requirements to run Windows 11.”
It now appears on the Windows Update screen in the Settings application and typically shows the missing requirements. If you’re one of the users asking, “ Why can’t my PC run Windows 11? ” you’ve found the right webpage. This article will cover the meaning of the message, why you’re seeing it, and ways to resolve the issue.
Also Read: Patch Tuesday in March 2023: Issues to Note Before Updating Your Windows 11
Understanding the Error
The error is a way of saying, “ This PC doesn’t support Windows 11. ”
Whether you believe the message is correct or erroneous, it indicates that the Windows 11 setup can’t find what it needs to continue the installation. It may mean that some hardware components are unavailable or some features are turned off.
What Causes the “This PC Can’t Run Windows 11?” Issue?
The message appears when Windows determines that a computer falls short of its minimum system requirements. This assertion doesn’t mean that the computer lacks everything to run the OS. However, lacking just one component can trigger the message and halt the Windows 11 installation process.
That said, TPM and secure boot are the leading reasons why many Windows users see the error. They are security features that you can easily turn on through Windows or your BIOS (UEFI). But your CPU or motherboard needs to support TPM before you can enable it.
Also Read: [FIXED] ‘The PC Must Support TPM 2.0’ Error While Upgrading to Windows 11
It’s also important to note that lacking the required free storage space (at least 64GB), RAM size (at least 4 GB), and processor type (at least 1 GHz) can also cause the problem .
What Are the System Requirements for Running Windows 11?
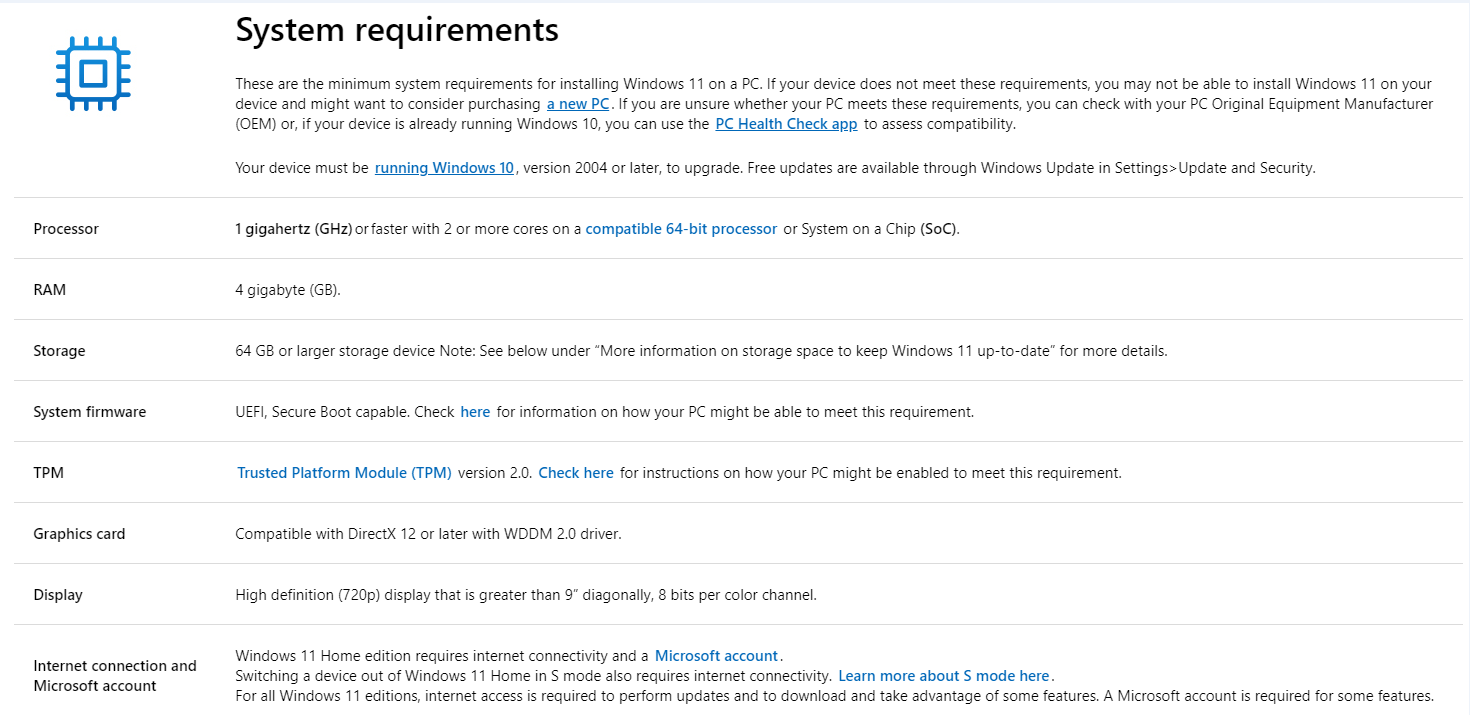
Windows 11 comes with strict security requirements. A PC must have the following hardware and software specifications and security features turned on:
- Processor:
- 1 gigahertz (GHz) or faster
- Minimum of 2 cores
- Compatible 64-bit processor or System on a Chip (SoC) – You can check the list of supported processors
- Memory:
- Storage:
- 64 GB or more (You need more storage space for Windows Updates and virtual memory)
- System Firmware:
- UEFI
- Secure Boot capability
- TPM (Trusted Platform Module) Version 2.0
- Graphics:
- DirectX 12 or newer
- WDDM 2.0 Driver
- Display:
- High definition (720p) or better
- Larger than 9 inches diagonally
- 8 bits per color channel (color depth)
Some Windows 11 system requirements are easier to meet than others, even if your computer currently falls short.
For example, you can upgrade your RAM, update your BIOS, turn on secure boot, free up storage space, and upgrade your hard drive. On the other hand, you can’t easily replace your CPU, especially if you’re using a laptop.
If you do not have a CPU or motherboard that supports TPM, you are left with the choice of replacing your computer or bypassing the TPM requirement (we’ll show you how to do that later).
Download Auslogics BoostSpeed
Your one-stop PC maintenance and optimization tool, this program will clean, speed up, repair and tweak your system to ensure maximum speed and efficiency.
Also Read: How to Find Out the Motherboard Model I Have on My PC
Secure Boot and TPM: What Are They?
TPMs (Trusted Platform Modules) are microchips built into computer motherboards. Some are standalone, while others use CPU resources. They act as security checkpoints during the bootup process to double-check for unauthorized changes.
The TPM check prevents the computer from starting if it detects a security breach. Features in Windows 10, such as Windows Hello and BitLocker, depend on TPM, and Microsoft requires version 2.0 of the module for Windows 11.
Also Read: File Security: BitLocker Encryption Guide
Secure Boot is another PC security feature that stops unauthorized operating systems from loading. While it is competent in guarding against ransomware and malware, it can limit system flexibility. Turning on the feature can block dual-booting, like running Linux alongside Windows. It also stops bootable drives created by apps like Rufus.
You can turn on these security features through your computer’s BIOS/UEFI.
Is My Device Capable of Tpm 2.0 and Secure Boot?
Knowing whether your computer supports TPM 2.0 and Secure Boot could help you answer the question, “Why can’t I install Windows 11?”
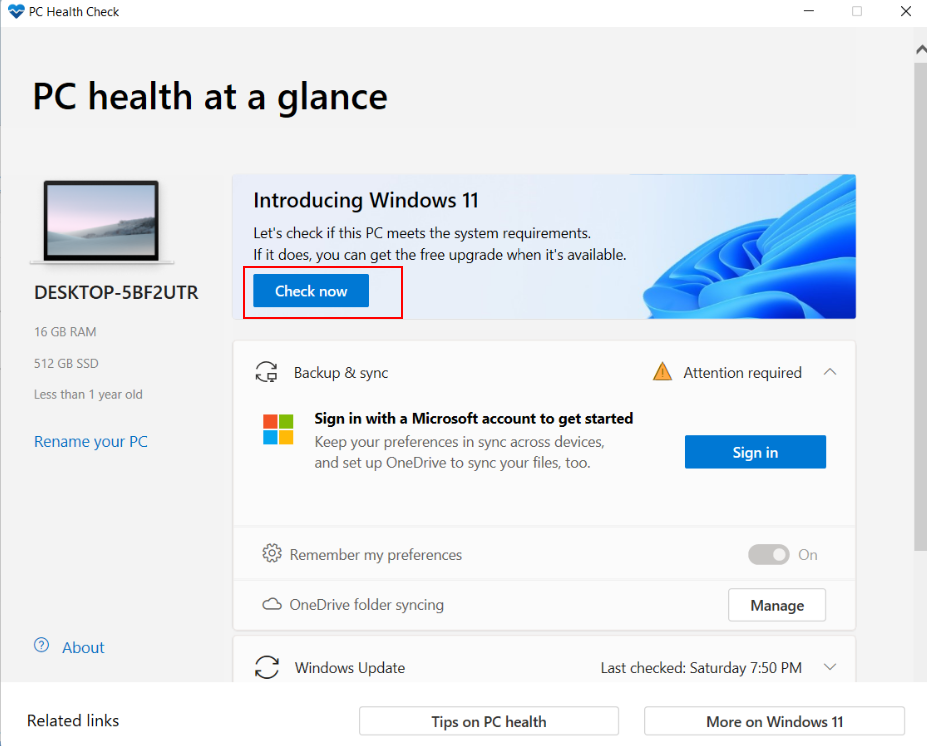
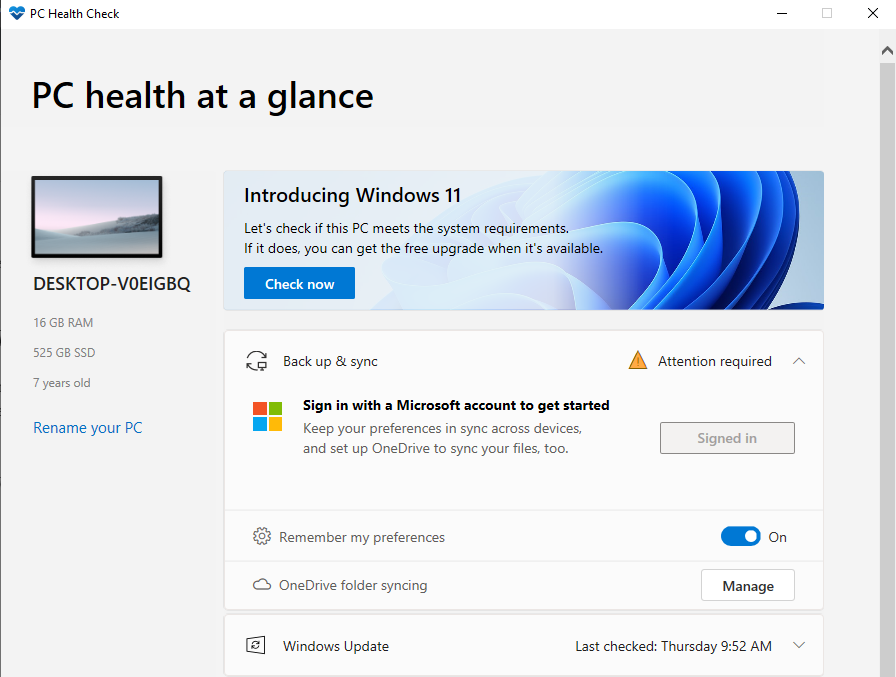
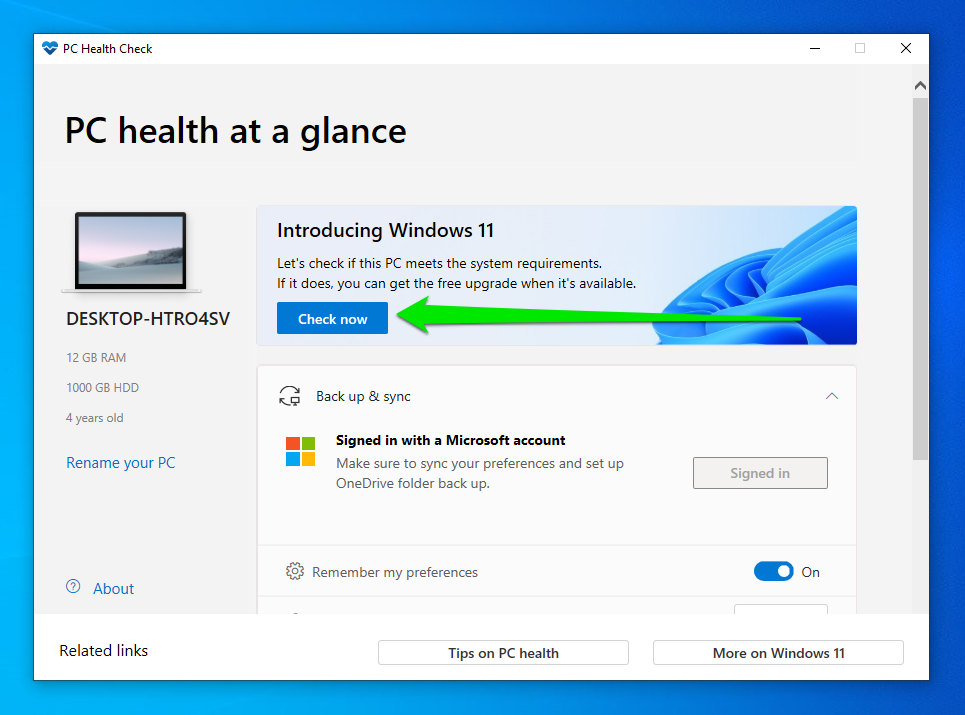
The easy way to check whether your computer has these security features is by running the PC Health Check app from Microsoft. Running the application tells if Windows detects TPM and Secure Boot. It also checks for other system requirements and whether your computer meets them.
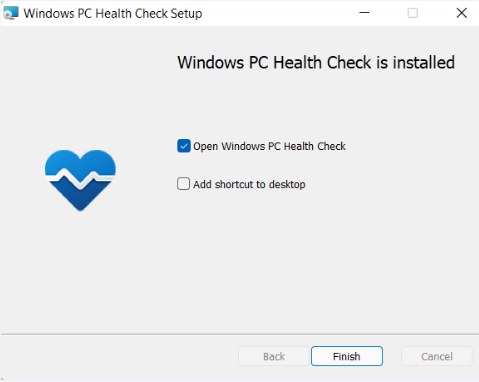
Using the program is as easy as downloading and installing it and clicking the Check now button under “Introducing Windows 11.”
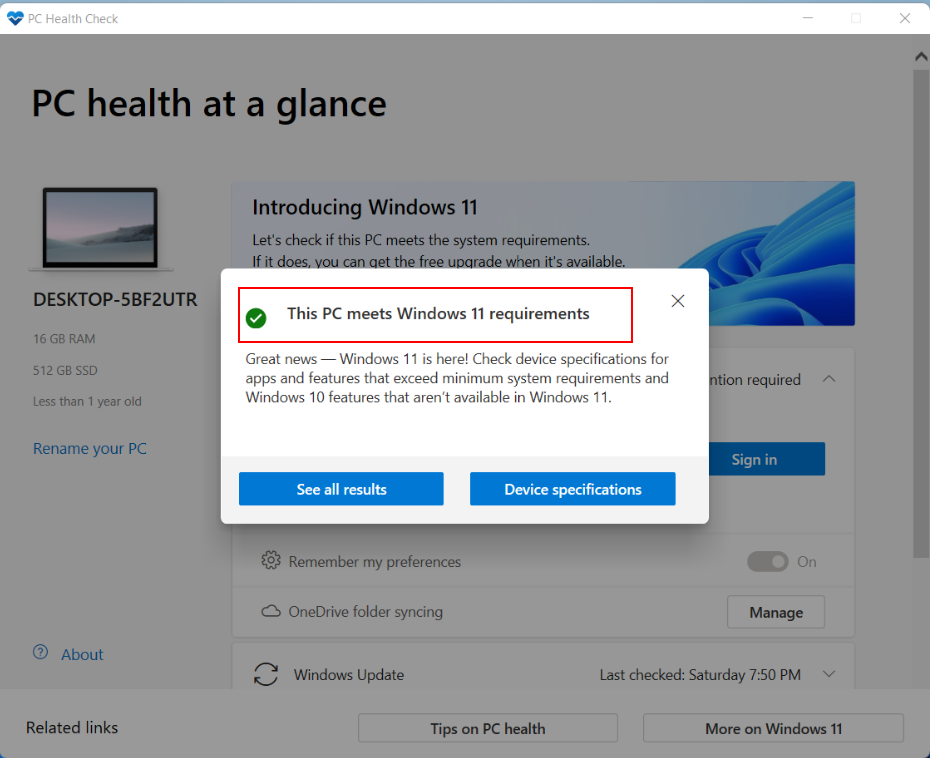
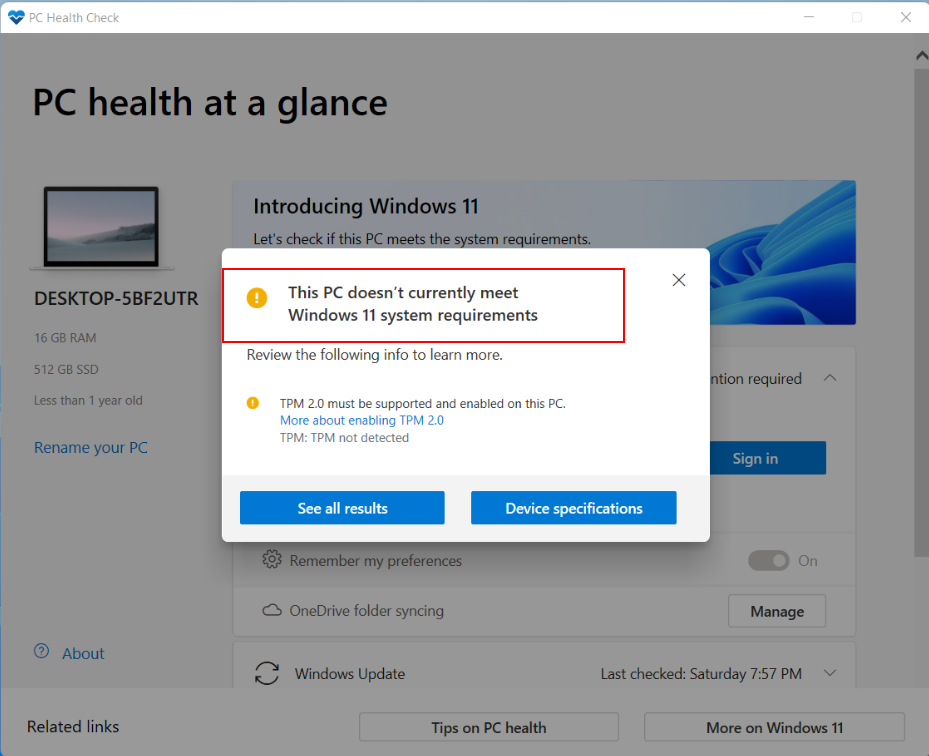
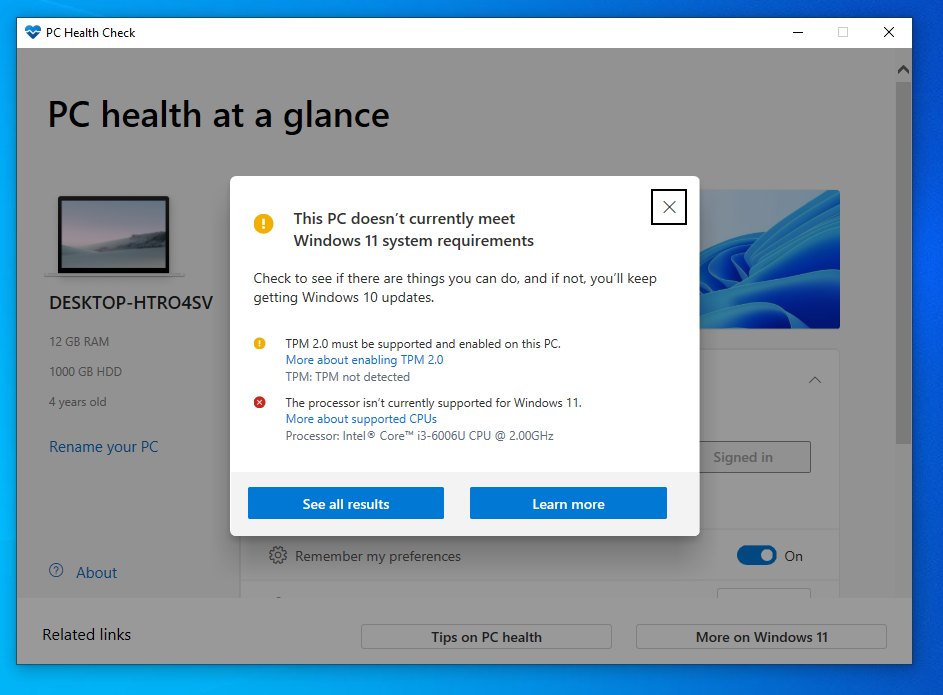
The tool will then show why your computer does not meet the requirements.
You can also check manually to confirm that TPM 2.0 and Secure Boot are supported.
You can go through Windows Security or the Trusted Platform Module (TPM) Management on a Local Computer window.
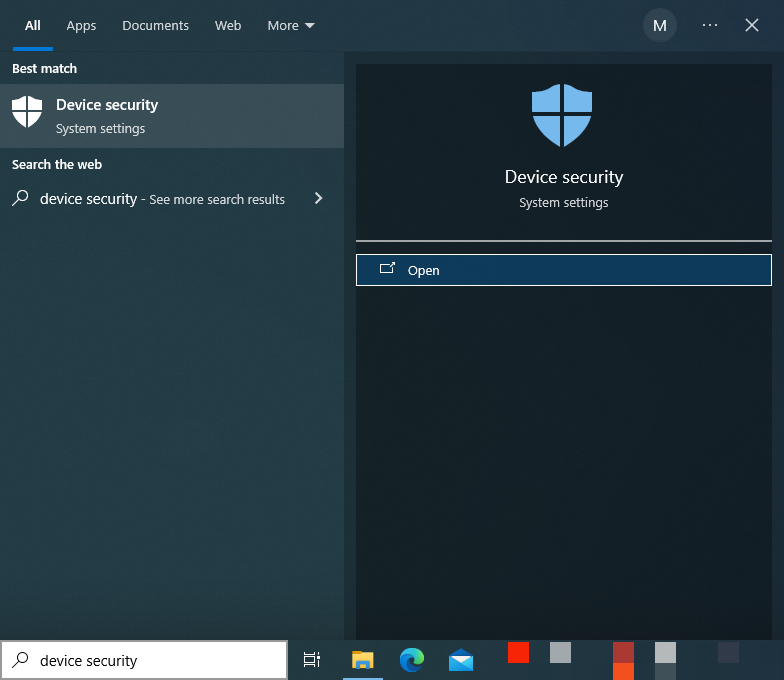
Follow these instructions for Windows Security:
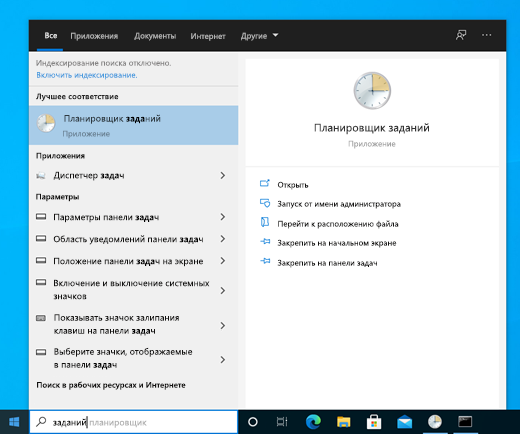
- Open the Start menu and type
device security.
- Click Device security on the search result page.
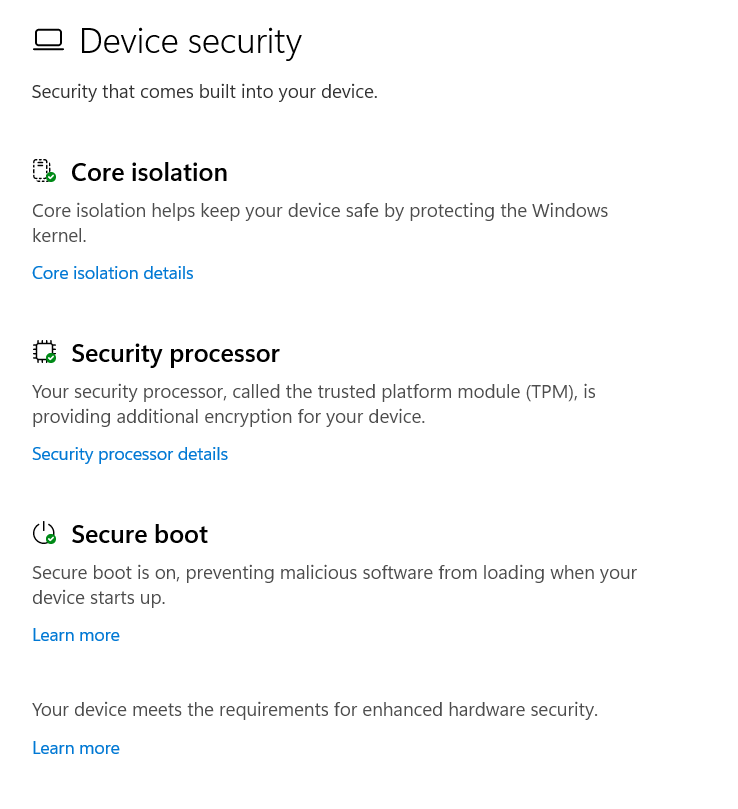
Once the Device security interface within Windows Security opens, you’ll see sections such as Security processor and Secure boot. Security processor confirms the presence of TPM and shows you its details, and the Secure boot section tells you whether the feature is turned on.
- You’ll see a message saying, “Standard hardware security not supported” if your PC doesn’t have TPM installed.
Here is how to go through the TPM management window:
- Go to your keyboard and tap the
Windows logo and R keyboard buttons simultaneously.
- After the Run dialog window appears, go to the text field, type
tpm.msc, and hit the Enter keyboard button.
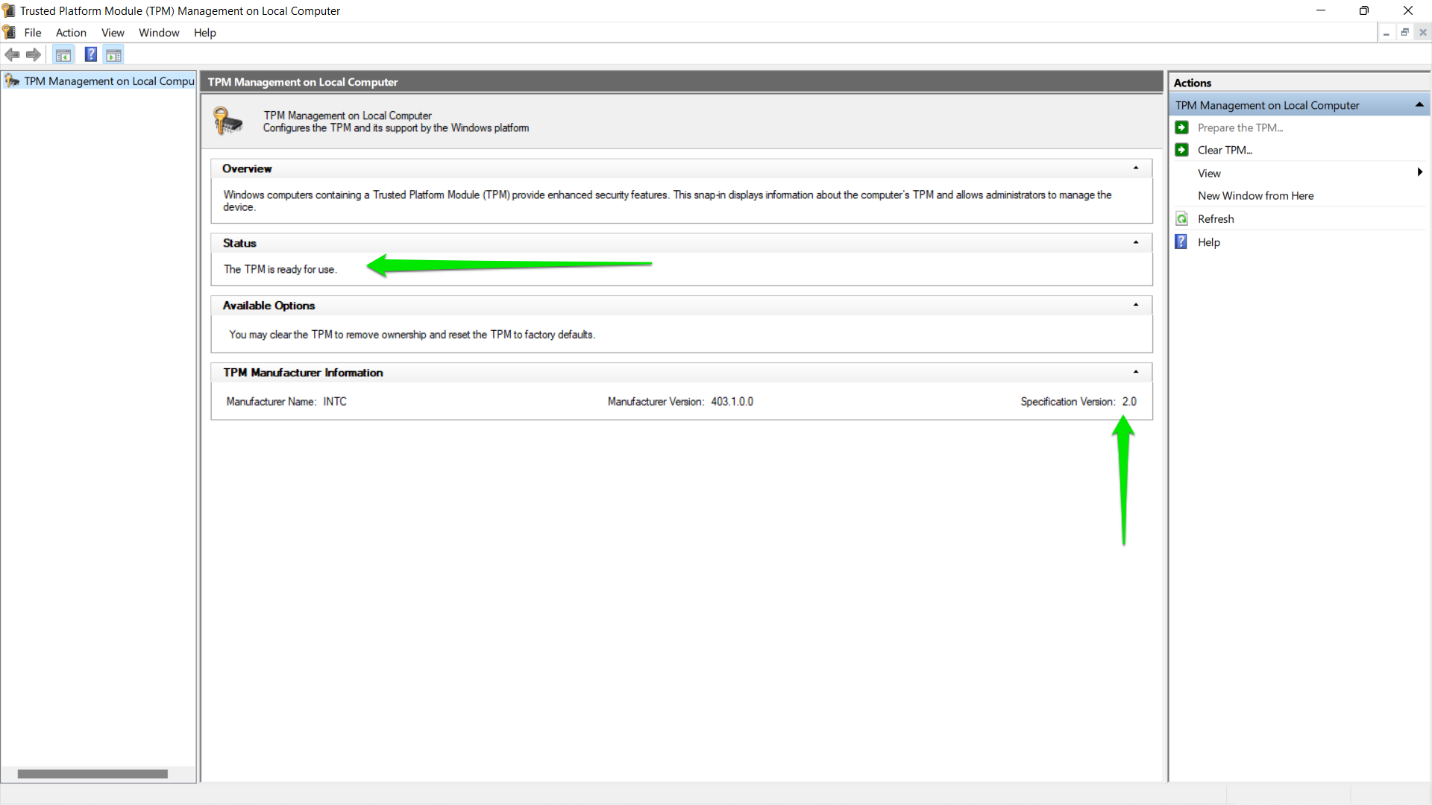
- The Trusted Platform Module (TPM) Management on Local Computer window will now appear.
- If your computer has the security module installed, the window will display the following sections:
- Overview
- Status
- Available Options
- TPM Manufacturer Information
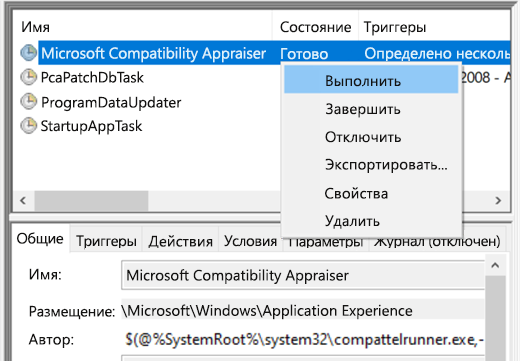
- Now, expand the Status section to check whether TPM is ready for use.
Follow these steps to check if Secure Boot is turned on or off:
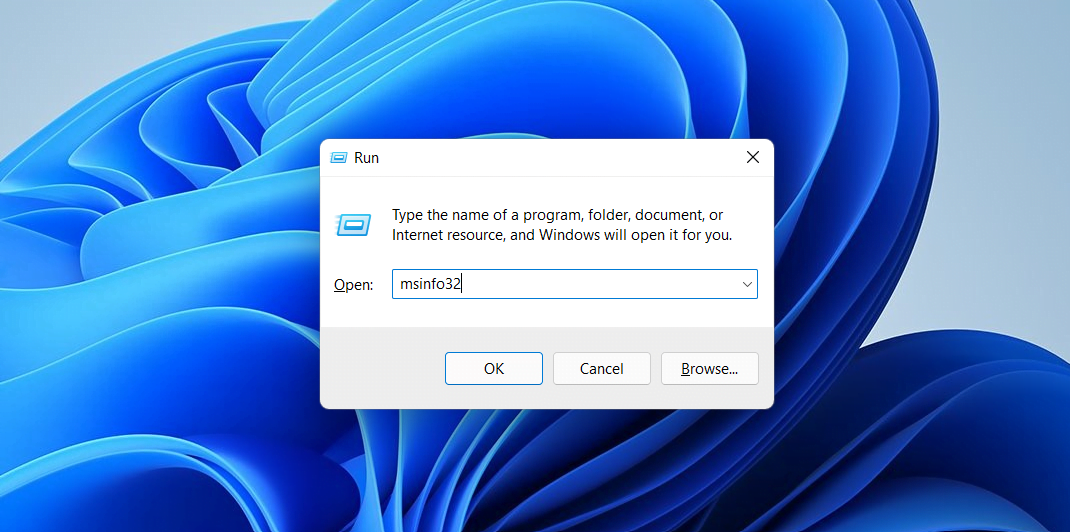
- Open Run, type
msinfo32, and hit the Enter keyboard button.
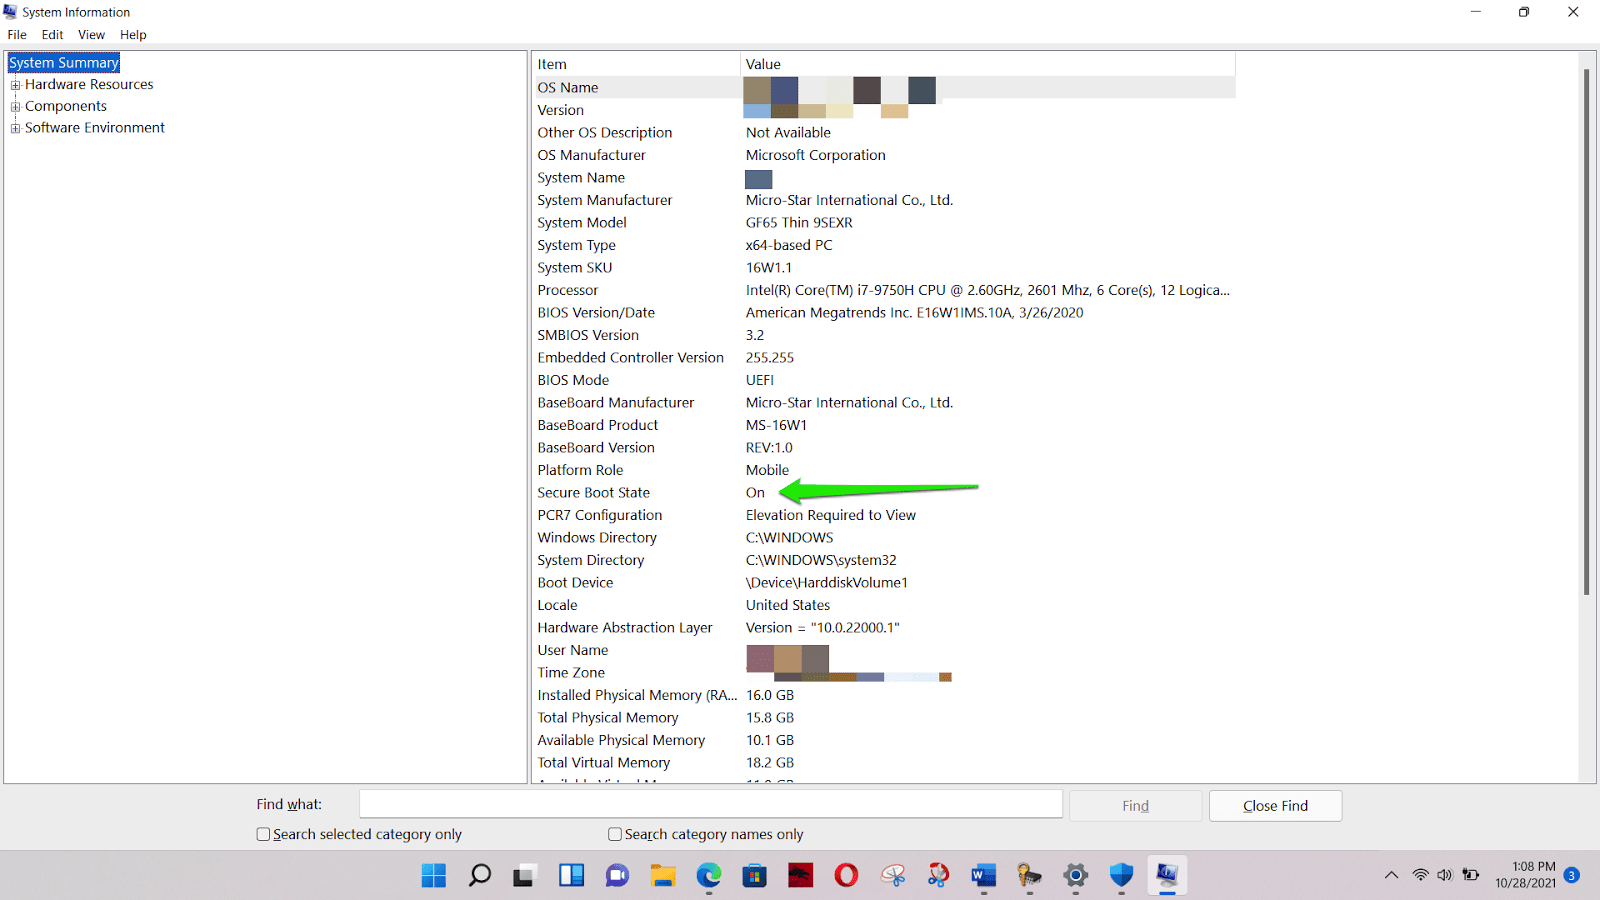
- Once you see the System Information window, look for the Secure Boot State entry. You’ll find out if it’s On or Off.
How to Fix the “This PC Doesn’t Meet the Minimum Requirements for Windows 11” Issue
You have to turn on the features that the PC Health Check app is reporting to be turned off. We’ll show you how to turn on TPM and Secure Boot if your computer supports the security features. We’ll also show you how to bypass the requirement if your PC lacks the hardware.
Before You Start
You’re likely eager to head over to the UEFI environment, turn on TPM, and hop on Windows 11. But before you jump in, there are a few things you should do and remember:
Speak to Your Manufacturer
If you have TPM installed, consider checking your manufacturer’s policy before making changes to your BIOS. That way, you’ll avoid voiding your warranty. You can also follow the instructions on their site on enabling TPM.
Back Up Your Files
It always makes sense to back up important files whenever you want to apply impactful modifications – more so when trying to install a new OS – even if you’re not using the “Delete everything” option.
Also Read: Windows 10 Backup Guide: Backing Up to an External Hard Drive
Follow the Instructions Carefully
The instructions here will walk you through opening the BIOS or UEFI on your computer and turning on the security features in question. Please ensure you follow the instructions carefully, as making mistakes may cause problems .
Turning On TPM and Secure Boot
TPM 2.0 could be active, and Secure Boot could be turned off on some computers. This is the case with some Windows 10 machines running applications that don’t work correctly with Secure Boot.
For example, if you’ve ever recovered or reinstalled your OS using a bootable USB drive created with Rufus, Secure Boot is likely turned off.
So, if the TPM Management console reported that “TPM is ready to use,” you can skip the TPM guide and head over to the Secure Boot process.
Opening the BIOS Environment
There are two main ways to get to the UEFI or BIOS interface. They include going through the Advanced Startup environment or pressing key combinations during startup.
Also Read: Best BIOS Settings for Better Performance and Gaming
Let’s start with the first method:
- Launch the Start menu and click the Power icon.
- Hold down the
Shift key and select Restart.
- You’ll be redirected to the Advanced Startup environment when your system boots up.
Here’s how to go through Settings if the Restart + Shift combination doesn’t work:
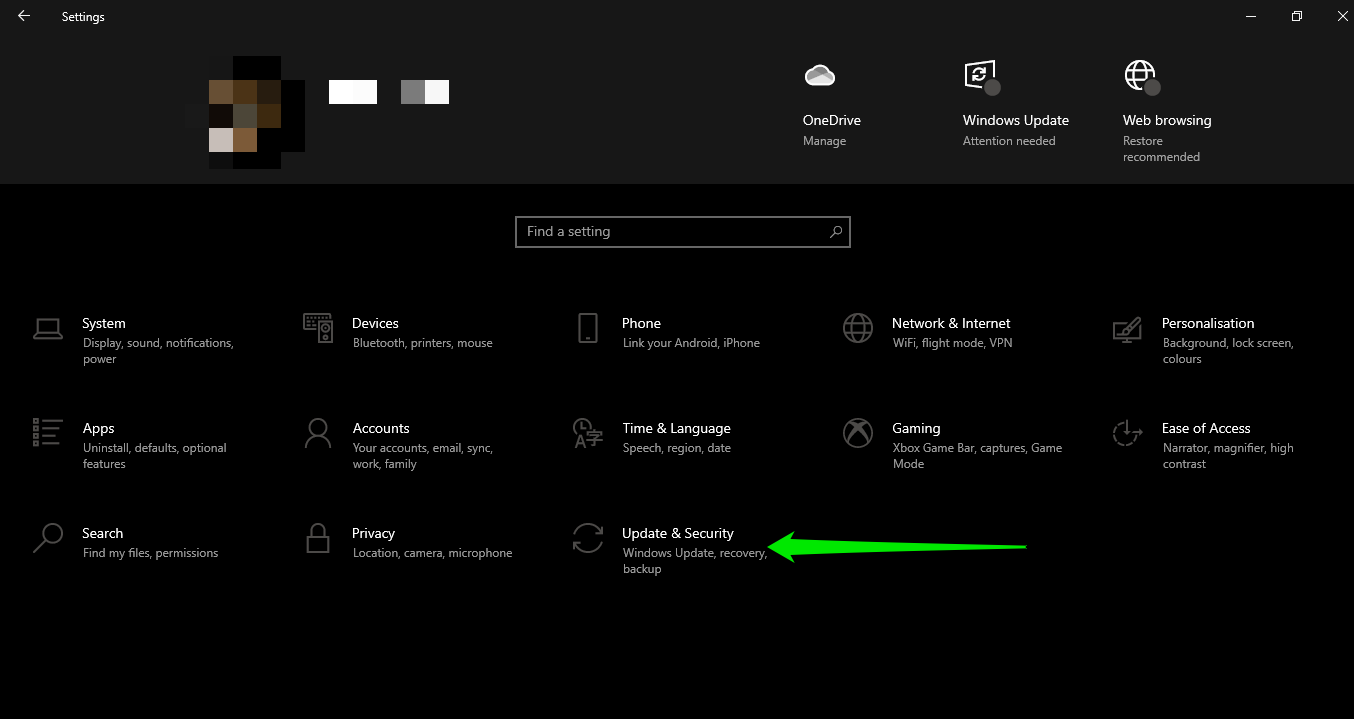
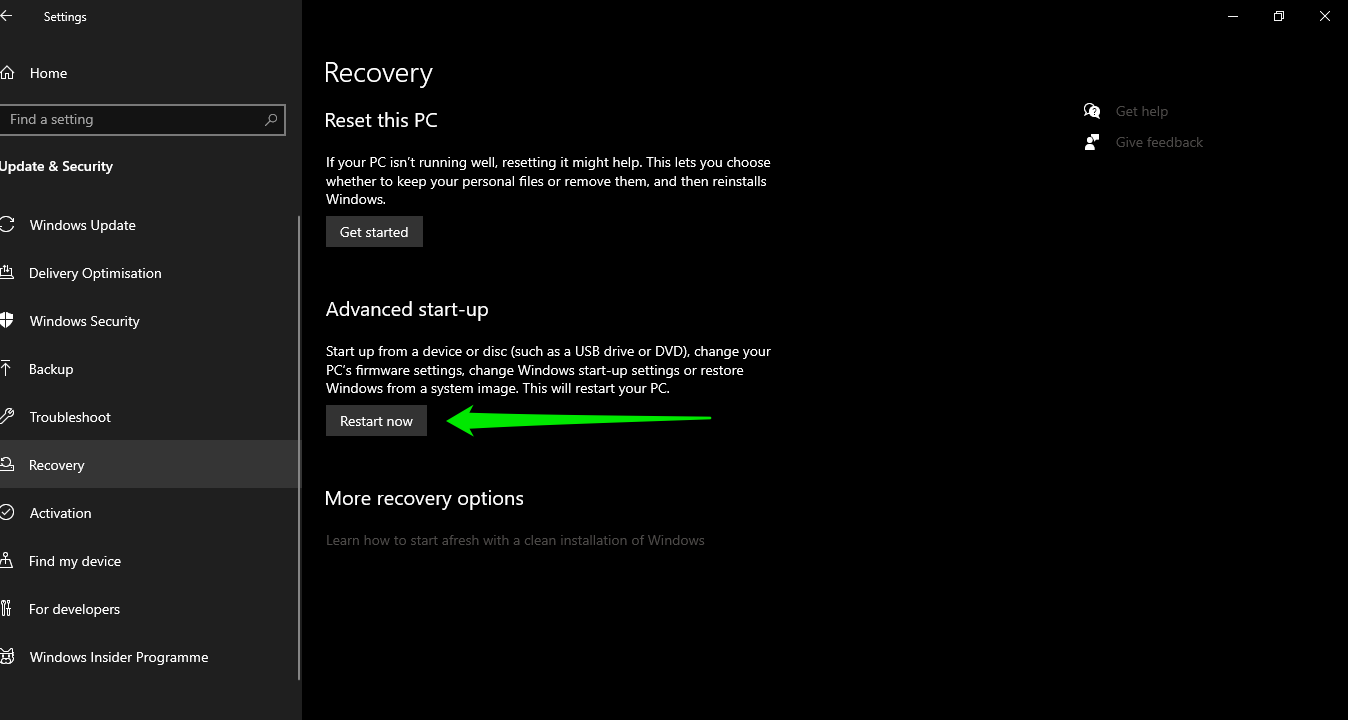
- Launch the Start menu and click the Settings icon.
- After the window jumps out, go to the bottom and select Update & Security.
- Now, on the following interface, go to the right pane and click on Recovery.
- Head to the Advanced start-up section and select Restart now.
- That’s it. You’ll now be taken to the blue interface that asks you to choose an option.
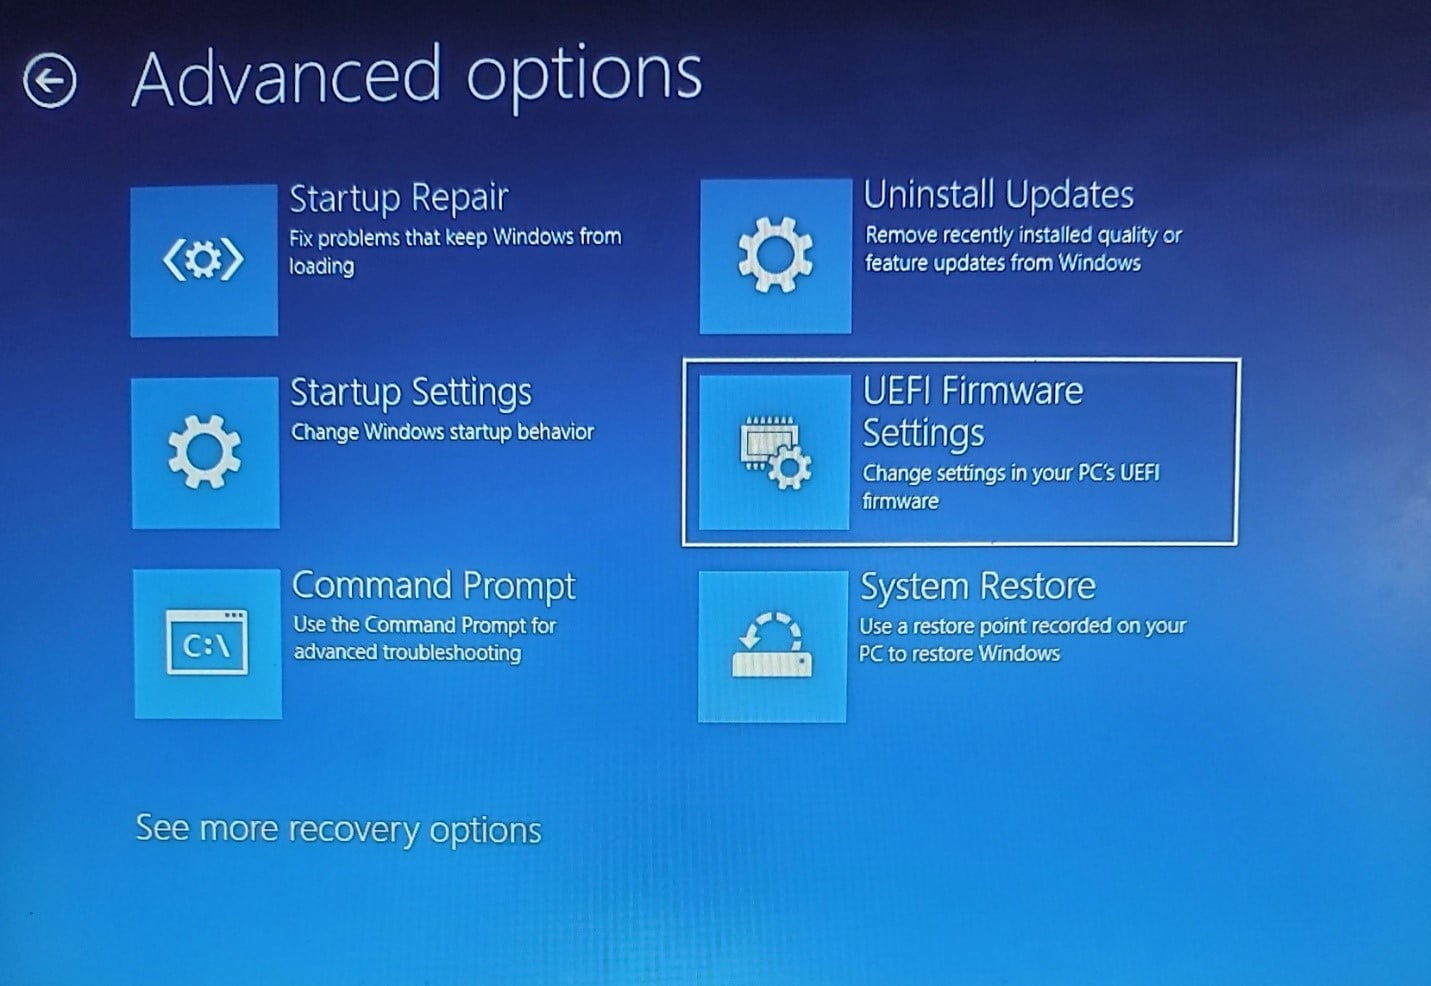
- After the Advanced Startup environment opens, select Troubleshoot under Choose an option, then click Advanced options.
- Select UEFI Firmware Settings.
- This will reboot your computer again. However, this time, you’ll be redirected to your BIOS or UEFI environment.
As mentioned, the second method involves pressing key combinations before your system goes too far in the boot process.
Follow these steps:
- Restart your PC.
- Pay attention to the first thing you see on the screen. In most cases, you’ll see a message on a page with the manufacturer’s logo telling you to tap a key to enter your BIOS or UEFI. Of course, the message will vary depending on your system.
The keys you have to tap will also vary. For some computers, you’ll be told to tap F2, F8, F11, or F10. For others, it’ll be a combo, like Ctrl + Alt + Del.
In some cases, though, there won’t be an instruction. So, you’ll have to hit the correct button when you see the manufacturer’s logo and before your PC loads up the operating system. You can check online for your system’s BIOS key.
- After tapping the key, the setup interface, which will be nothing like your fancy Windows GUI, will pop up.
Turning On TPM
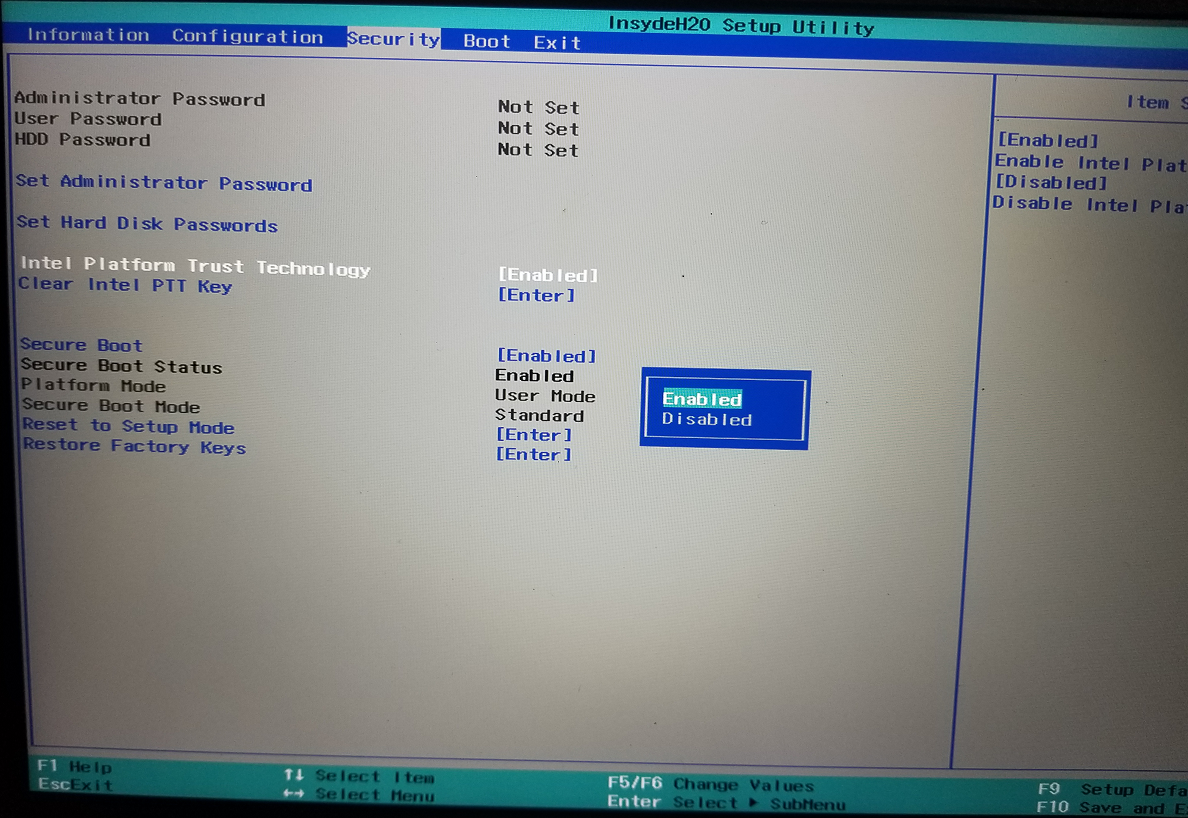
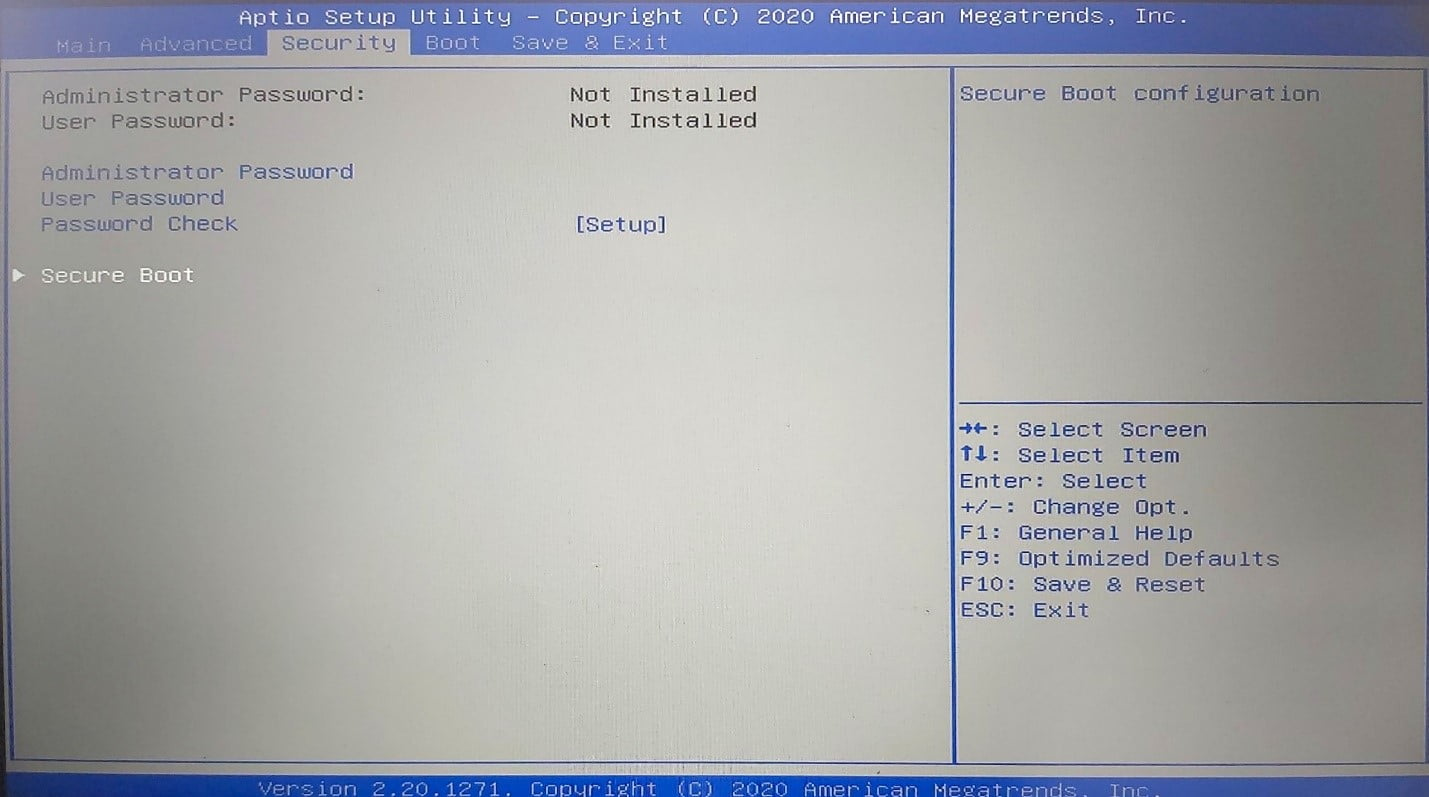
You should see the Security tab in the UEFI or BIOS menu. The menu could be on the left side of your screen or at the top. Switch to the Security tab using the arrow keys on your keyboard. Some UEFI and BIOS interfaces allow you to use your mouse, though. However, you might need to expand the submenu using the + key on some systems.
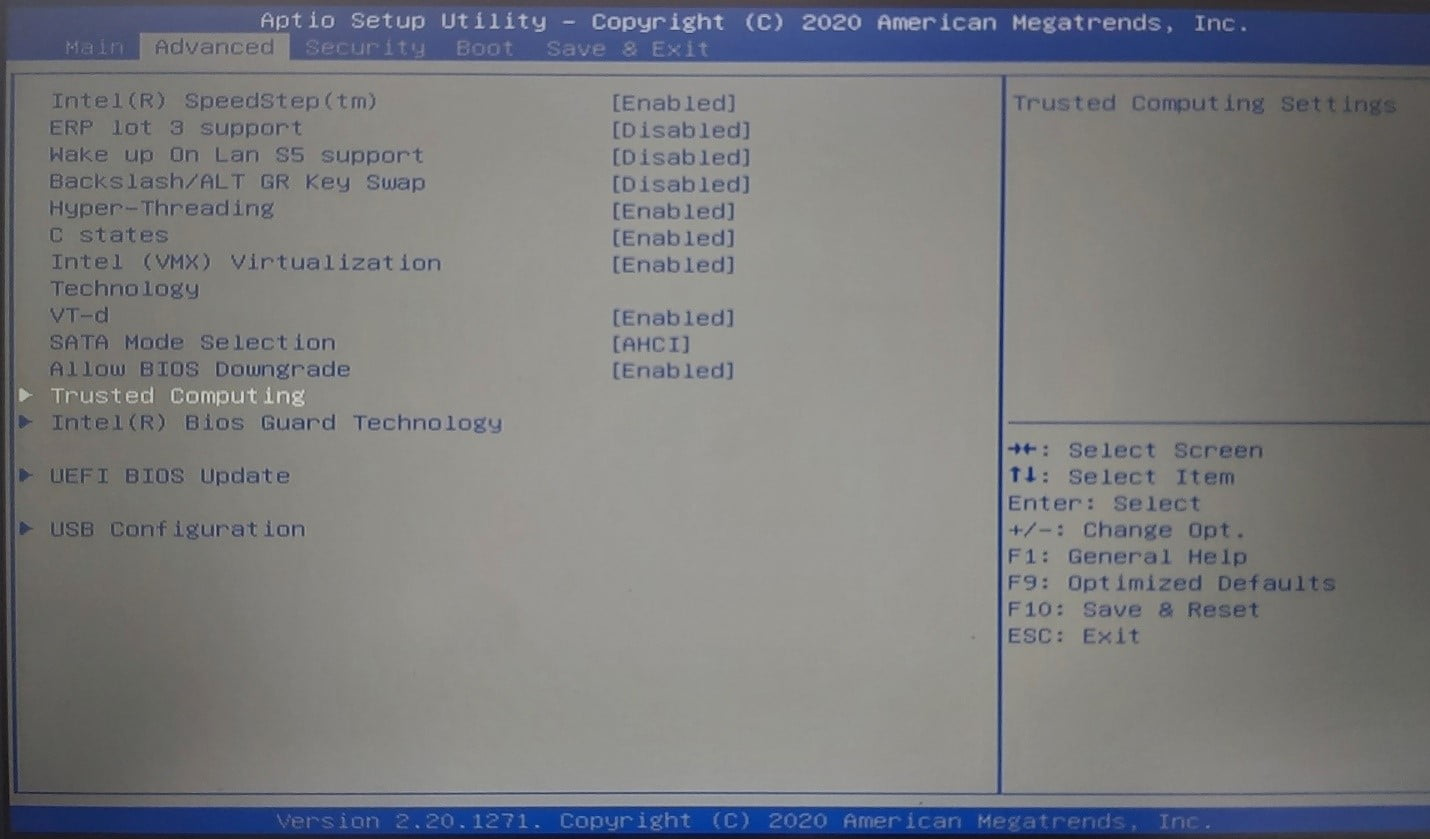
The next thing to do is look for the TPM setting under the Security tab.
You should note that there are different variations of the TPM setting. For starters, the setting you’re looking for might not be explicitly labeled TPM. You should look for PTT, Intel Trusted Platform Technology, or Trusted Computing on Intel computers. Other variations include AMD CPU fTPM and AMD fTPM.
If you can’t find the TPM setting under the Security tab, it should be under Advanced.
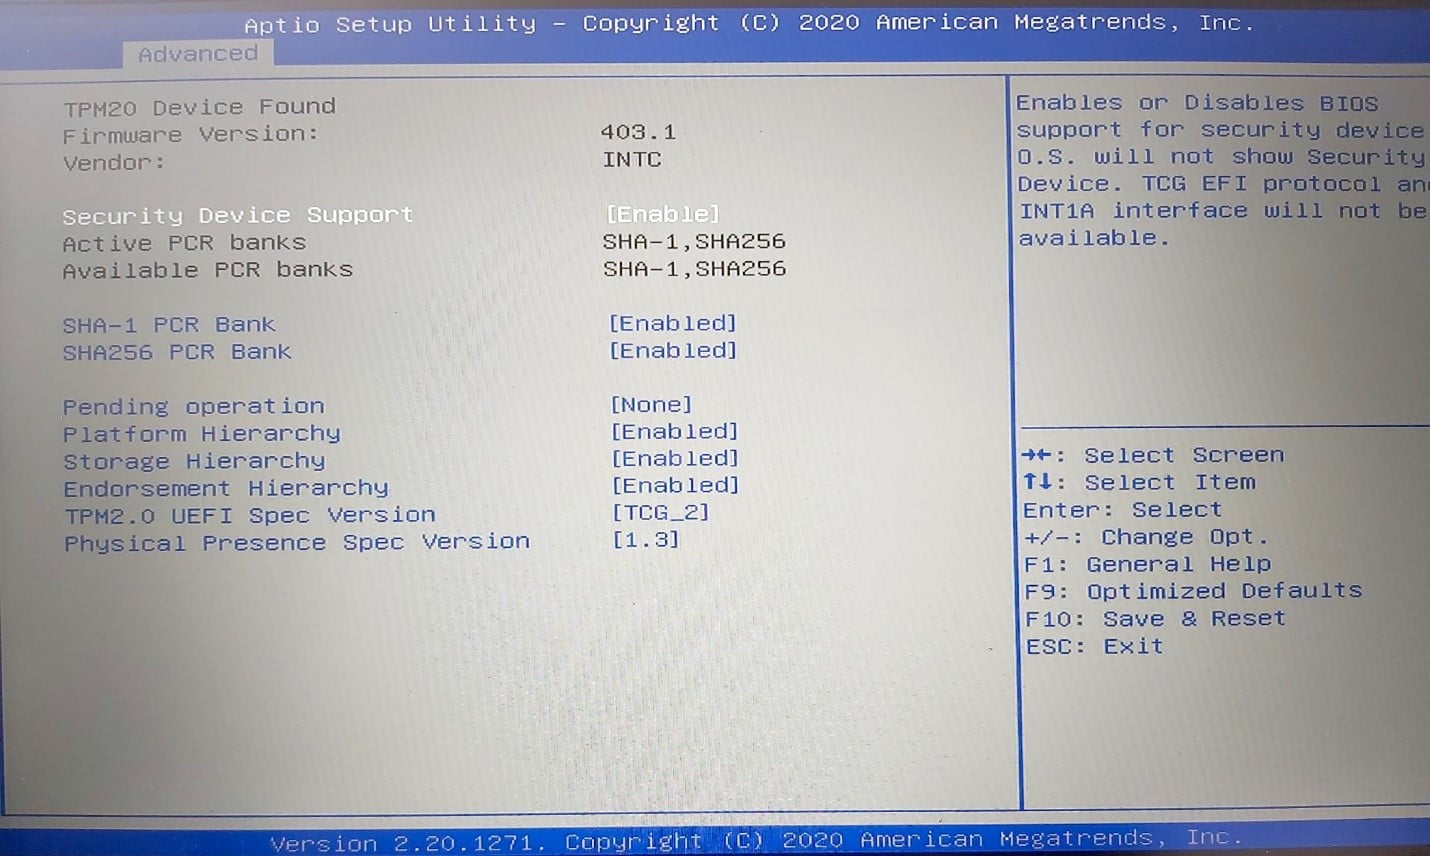
Now, for some PCs, the TPM switch should be right beside the security feature’s name. However, in some cases, it opens a new interface where you’ll have to turn on options like Security Device Support or simply TPM.
After selecting your option, press Enter or the related button indicated in the BIOS to exit. A pop-up will show up. Choose the option that saves your changes. Some BIOS and UEFI interfaces allow you to tap a button such as F9 or F5 to save and apply your changes before exiting.
Also Read: CPU Cores Explained: Does the Number of Cores Affect CPU Performance
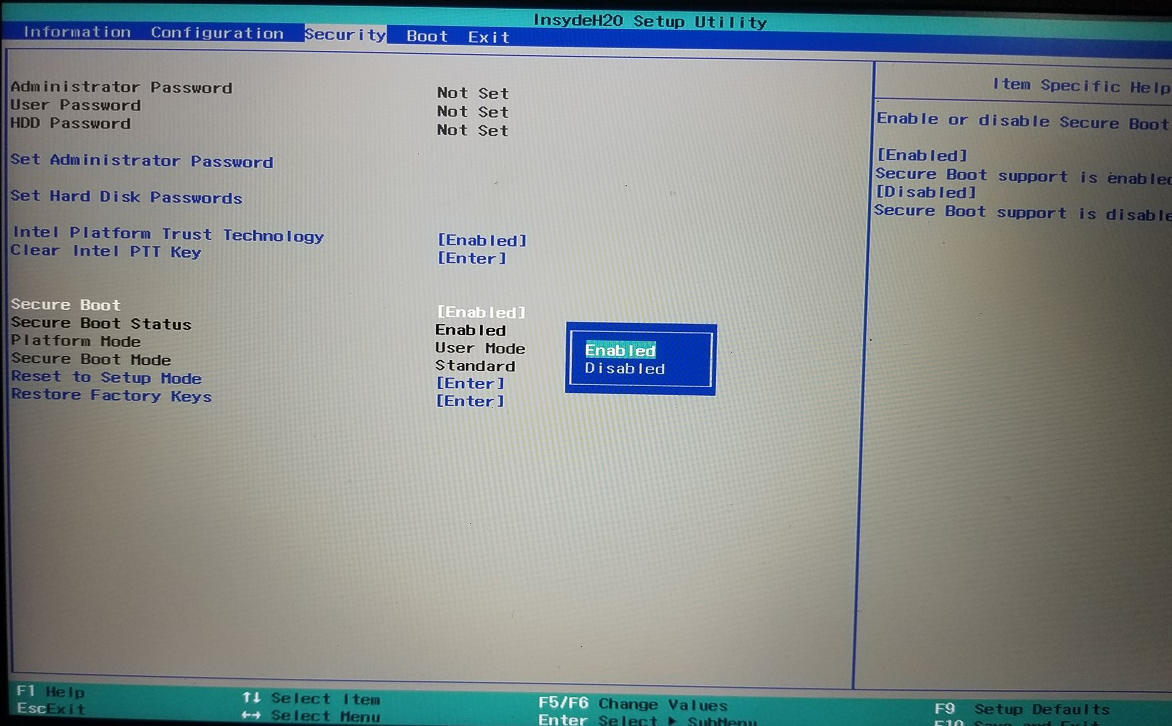
How to Turn On Secure Boot
Open the BIOS using any of the methods above. Once you’re in the Setup window, look for the Secure Boot setting and turn it on. It could be under the Security, Boot, or Authentication tab. Use the navigation buttons indicated in your BIOS environment to move around and select your options.
After turning on Secure Boot, exit the BIOS and save your changes.
Restart your computer and check if the “ Windows 11 won’t install on new PC ” issue persists.
Bypass TPM 2.0 and Secure Boot Requirement Using Registry Editor
If your computer does not have the supported hardware, you must buy a new one or bypass the TPM and Secure Boot check before upgrading to Windows 11.
However, note that bypassing the checks means you may be installing an unsupported version of Windows 11 and may miss out on advanced device security enabled by TPM.
Also Read: TOP-10 Cyber Security Threats: All You Need to Know
Also, bypassing TPM means using the Windows 11 ISO file to install the upgrade instead of going through Windows Update.
Also Read: How to Reset Windows Update: Fixing Update Problems
It’s important to remember that editing your registry can be risky. That is because the Windows registry contains critical low-level settings that may cause issues when altered. So, back up your registry or create a restore point before you continue with this method. That way, you can undo any erroneous adjustment.
Also Read: Ultimate Guide: Why and How to Defrag Windows Registry?
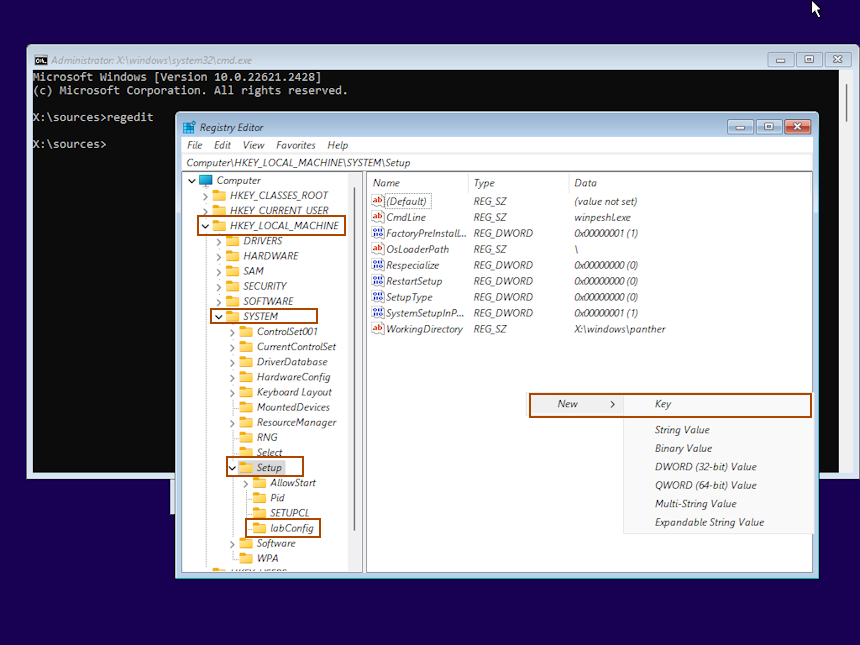
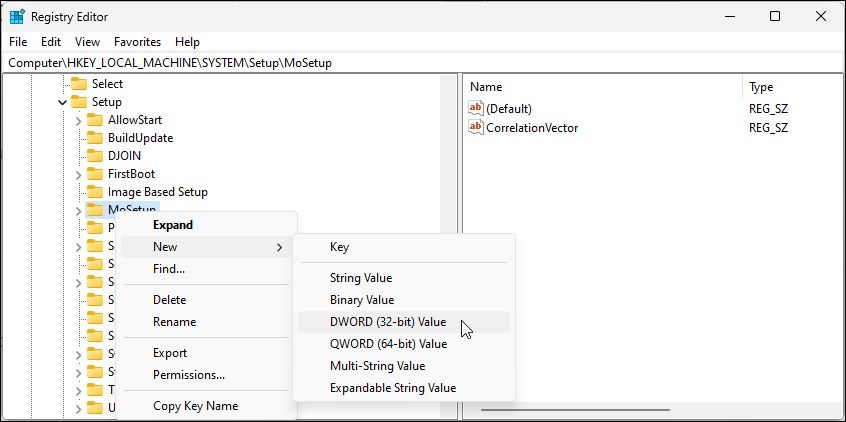
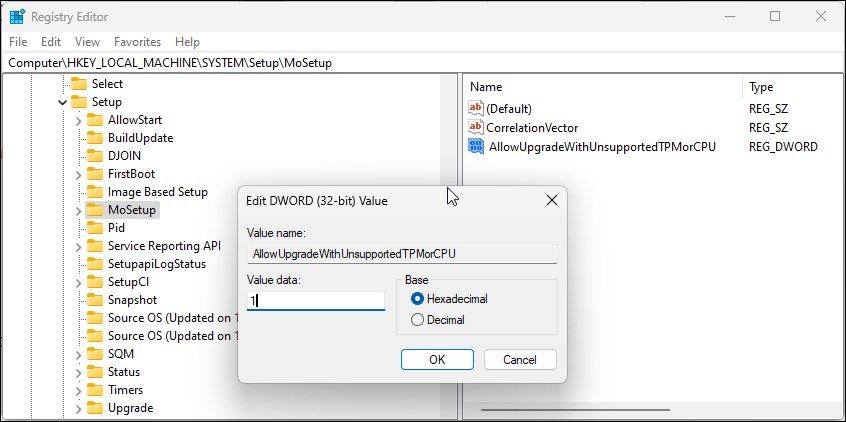
Follow these steps to bypass TPM and Secure Boot using the Registry Editor:
- Open the Start menu.
- Type
regedit and click Registry Editor.
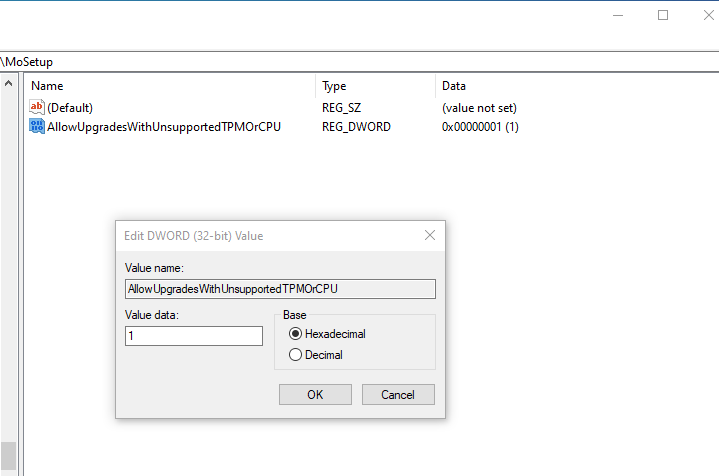
- After the Registry Editor opens, go to the left pane and navigate to the following key:
HKEY_LOCAL_MACHINE\SYSTEM\Setup\MoSetup