
Многие пользователи Windows 10 сталкиваются с тем, что процесс TiWorker.exe или Windows Modules Installer Worker грузит процессор, диск или оперативную память. Причем нагрузка на процессор бывает такой, что какие-либо другие действия в системе становятся затруднены.
В этой инструкции подробно о том, что такое TiWorker.exe, почему он может нагружать компьютер или ноутбук и что можно сделать в этой ситуации, чтобы исправить проблему, а также о том, как отключить этот процесс.
Что за процесс Windows Modules Installer Worker (TiWorker.exe)

Прежде всего о том, что такое TiWorker.exe — это процесс, запускаемый службой TrustedInstaller (установщик модулей Windows) при поиске и установке обновлений Windows 10, при автоматическом обслуживании системы, а также при включении и отключении компонентов Windows (в Панель управления — Программы и компоненты — Включение и отключение компонентов).
Удалить этот файл нельзя: он необходим для правильной работы системы. Даже если вы каким-то образом удалите этот файл, с большой вероятностью это приведёт к необходимости восстановления операционной системы.
Существует возможность отключить запускающую его службу, о чем тоже поговорим, но обычно, для того, чтобы исправить описываемую в текущем руководстве проблему и снизить нагрузку на процессор компьютера или ноутбука, этого не требуется.
Штатная работа TiWorker.exe может вызывать высокую нагрузку на процессор
В большинстве случаев то, что TiWorker.exe грузит процессор — это штатная работа Windows Modules Installer. Как правило, это происходит при автоматическом или ручном поиске обновлений Windows 10 или их установке. Иногда — при проведении обслуживания компьютера или ноутбука.
При этом обычно достаточно просто подождать, когда установщик модулей завершит свою работу, что на медленных ноутбуках с медленными жесткими дисками, а также в тех случаях, когда обновления давно не проверялись и не скачивались, может занять продолжительное время (вплоть до часов).
Если ждать нет желания, а также нет уверенности, что дело в вышеописанном, начать следует со следующих шагов:
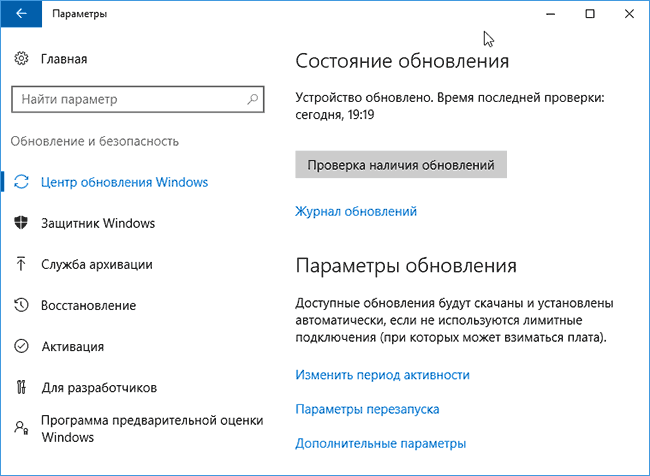
- Зайдите в Параметры (клавиши Win+I) — Обновление и восстановление — Центр обновления Windows.
- Проверьте наличие обновлений и дождитесь их загрузки и установки.

- Перезагрузите компьютер для окончания установки обновлений.
И ещё один вариант, вероятно, нормальной работы TiWorker.exe, с которым несколько раз пришлось столкнуться: после очередного включения или перезагрузки компьютера вы видите черный экран (но не так как в статье Черный экран Windows 10), по Ctrl+Alt+Del можно открыть диспетчер задач и там виден процесс Windows Modules Installer Worker, который сильно грузит компьютер. В этом случае может показаться, что с компьютером что-то не так: но по факту, через 10-20 минут всё приходит в норму, загружается рабочий стол (и больше не повторяется). Судя по всему, такое происходит, когда загрузка и установка обновлений была прервана перезагрузкой компьютера.
Проблемы в работе Центра обновления Windows 10
Следующая по распространенности причина странного поведения процесса TiWorker.exe в диспетчере задач Windows 10 — неправильная работа Центра обновлений.
Здесь следует попробовать следующие способы исправления проблемы.
Автоматическое исправление ошибок
Возможно, помочь решить проблему смогут встроенные средства поиска и устранения неполадок, для использования которых выполните следующие шаги:
- Зайдите в Панель управления — Устранение неполадок и слева выберите «Просмотр всех категорий».
- Поочередно запустите следующие исправления: «Обслуживание системы», «Фоновая интеллектуальная служба передачи», «Центр обновления Windows».


После завершения выполнения, попробуйте выполнить поиск и установку обновлений в параметрах Windows 10, а после установки и перезагрузки компьютера посмотреть, была ли исправлена проблема с Windows Modules Installer Worker.
Ручное исправление проблем Центра обновлений
Если предыдущие шаги не решили проблему с TiWorker, попробуйте следующие:
- Способ с ручной очисткой кэша обновлений (папки SoftwareDistribution) из статьи Не скачиваются обновления Windows 10.
- Если проблема появилась после установки какого-либо антивируса или фаервола, а также, возможно, программы для отключения «шпионских» функций Windows 10, это также могло повлиять на возможность загрузки и установки обновлений. Попробуйте временно их отключить.
- Выполните проверку и восстановление целостности системных файлов, запустив командную строку от имени Администратора через меню правого клика мыши по кнопке «Пуск» и введя команду dism /online /cleanup-image /restorehealth (подробнее: Проверка целостности системных файлов Windows 10).
- Выполните чистую загрузку Windows 10 (с отключенными сторонними службами и программами) и проверьте, будет ли работать поиск и установка обновлений в параметрах ОС.
Если с вашей системой всё в целом в порядке, то один из способов к этому моменту уже должен был бы помочь. Однако, если этого не произошло, можно попробовать альтернативные варианты.
Как отключить TiWorker.exe
Последнее, что я могу предложить в плане решения проблемы — это отключить TiWorker.exe в Windows 10. Для этого проделайте следующие шаги:
- В диспетчере задач снимите задачу с Windows Modules Installer Worker
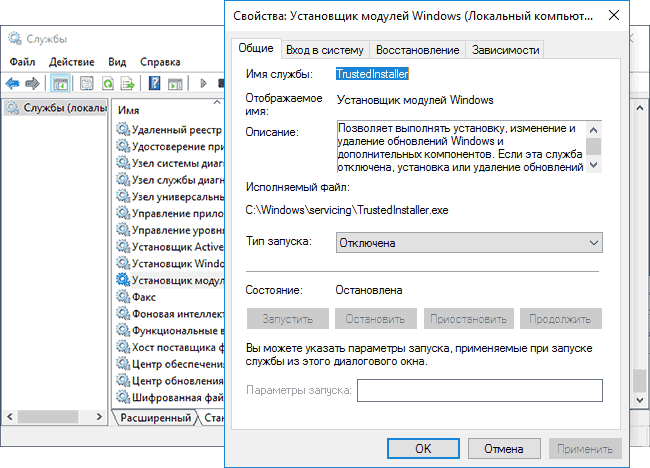
- Нажмите клавиши Win+R на клавиатуре и введите services.msc
- В списке служб найдите «Установщик модулей Windows» и дважды кликните по ней.
- Остановите службу, а в тип запуска установите «Отключена».

После этого процесс запускаться не будет. Еще один вариант этого же способа — отключение службы «Центр обновления Windows», но в данном случае исчезнет возможность устанавливать обновления вручную (как это описывается в упоминавшейся статье про не скачивающиеся обновления Windows 10).
Дополнительная информация
И еще несколько пунктов, касающихся высокой нагрузки, создаваемой TiWorker.exe:
- Иногда это может быть вызвано несовместимыми устройствами или их фирменным ПО в автозагрузке, в частности встречалось для HP Support Assistant и служб старых принтеров других марок, после удаления — нагрузка пропадала.
- Если процесс вызывает мешающую работать нагрузку в Windows 10, но это не является результатом проблем (т.е. проходит само через некоторое время), вы можете установить низкий приоритет для процесса в диспетчере задач: при этом, ему придется дольше выполнять свою работу, но TiWorker.exe будет в меньшей степени влиять на то, что вы делаете за компьютером.


Надеюсь, какие-то из предложенных вариантов помогут исправить ситуацию. Если же нет, попробуйте описать в комментариях, после чего появилась проблема и что уже предпринималось: возможно, у меня получится помочь.
Содержание статьи:
- Что это за процесс
- Что делать, если TiWorker.exe нагружает ЦП
- Способ 1: Ручное обновление ОС
- Способ 2: Смена приоритета для процесса
- Способ 3: Встроенное средство устранения неполадок
- Способ 4: Комплексная проверка на наличие неполадок
- Способ 5: Очистка кэша обновлений
- Способ 6: Чистая загрузка ОС
- Способ 7: Отключение службы
- Способ 8: Проверка на вирусы
- Вопросы и ответы: 0
Что это за процесс
Прежде, чем останавливать или удалять процесс, связанный с исполняемым файлом TiWorker.exe, следует выяснить, что это такое и для чего он нужен. Зачастую пользователи сталкиваются с тем, что именно он нагружает центральный процессор, что затрудняет работу системы и понижает производительность в целом, поскольку ЦП может быть занят им на 70-80%, что можно узнать из данных, предоставляемых «Диспетчером задач».
TiWorker.exe – это системный файл, предназначенный для обеспечения автоматического поиска и установки обновлений. Кроме того, он отвечает за запуск и отключение некоторых важных программных компонентов операционной системы. Большая нагрузка на центральный процессор при работе данного процесса – нормальное явление, особенно в тех случаях, когда компьютер не слишком мощный или тогда, когда система давно не обновлялась либо пакет обновлений довольно объемный.
Если процесс начал грузить ЦП только сейчас, а ранее подобной проблемы замечено не было, либо она возникала редко, лучше дождаться, пока соответствующая служба и файл закончат проверку и установку апдейтов для операционной системы, хотя нередко это может занимать довольно много времени. После того, как все будет сделано, просто перезагрузите компьютер и процесс не должен вас беспокоить до следующего крупного обновления.
Что делать, если TiWorker.exe нагружает ЦП
Случается, что такая активная работа процесса TiWorker.exe – это системный сбой. Если нагрузка продолжительная, вероятно, случилась ошибка в «Центре обновления Windows» или в работе самой службы. Не исключена и вирусная деятельность на компьютере. Именно для таких ситуаций ниже мы привели несколько эффективных решений, которые смогут помочь снизить нагрузку на процессор либо устранить неполадку, которая вызвала это.
Способ 1: Ручное обновление ОС
Иногда из-за сбоя в работе «Центра обновления Windows» проверка наличия апдейтов запускается автоматически раз за разом, при этом не происходит скачивания, а нагрузка на центральный процессор не уходит. В этом случае можно попробовать ускорить процесс обновления вручную, запустив проверку и установку самостоятельно:
- Нажмите на кнопку «Пуск» и запустите штатное приложение «Параметры».
- Перейдите в раздел «Обновления и безопасность» в Windows 10, или переключитесь на вкладку «Центр обновления Windows» в Windows 11.
- Нажмите на кнопку «Проверить наличие обновлений».


Дождитесь окончания проверки. Если апдейты будут найдены, отобразится соответствующее уведомление. Вручную запустите установку обновлений, а по завершению перезагрузите компьютер.
Таким образом вы ускорите процесс работы с обновлениями, если в автоматическом режиме с ним по каким-то причинам у системы возникли проблемы. Есть вероятность, что после инсталляции апдейтов нагрузка центрального процессора при последующих проверках будет нормальная и происходить именно в тот момент, когда начинается загрузка или установка больших обновлений.
Способ 2: Смена приоритета для процесса
Если же процесс, который нагружает систему, в данный момент активен, а в другое время не сильно беспокоит, но при этом требуется снизить нагрузку на ЦП сейчас и освободить ресурсы для каких-то задач, можете настроить приоритет для TiWorker.exe, самостоятельно выбрав для него нужный уровень.
- Запустите «Диспетчер задач» любым удобным способом. Например, сочетанием клавиш «Ctrl + Alt + Esc» или кликнув правой кнопкой мыши по рабочей панели и выбрав нужный пункт.
- Переключитесь на вкладку «Подробности» (Windows 10) или «Сведения» (Windows 11), затем отыщите проблемный процесс в списке задач. Кликните по нему правой кнопкой мыши, наведите курсор на пункт «Задать приоритет» и выберите «Ниже среднего» или «Низкий». Это зависит от того, насколько нужно снизить потребление ресурсов данным процессом.

Когда приоритет для обновления снижен, понаблюдайте, как ведет себя система и меняется ли нагрузка на центральный процессор.
Способ 3: Встроенное средство устранения неполадок
Если же проблема довольно частая на вашем устройстве и даже после установки обновлений и перезагрузки компьютера ситуация не меняется, есть вероятность, что с работой «Центра обновлений Windows» случился довольно серьезный сбой. Проверить, так ли это, и при необходимости исправить ситуацию поможет предустановленное средство устранения неполадок.
- С помощью строки системного поиска найдите раздел «Параметров» «Устранение неполадок». Этот способ быстрого перехода к средству подойдет как для «десятки», так и для 11 версии ОС. Введите запрос
Устранение общих проблемилиПараметры устранения неполадок. - Выберите строку «Другие средства устранения неполадок», если у вас Windows 11.
- В списке найдите «Центр обновления Windows» и запустите встроенное средство, нажав на соответствующую кнопку.
- Начнется автоматическая проверка выбранного компонента на наличие неисправностей или ошибок. Дождитесь окончания сканирования. Как правило, обнаруженные ошибки исправляются автоматически.


Выявленные неполадки отобразятся в окне результата проверки, также можно увидеть, исправлена ли ошибка.
Способ 4: Комплексная проверка на наличие неполадок
Если нужно, можно прибегнуть к комплексной проверке состояния системы и ее компонентов, которые отвечают за обновления операционки. Для этого подойдет встроенное средство, а сам метод актуален для более ранних версий ОС (Windows 10, Windows 8 или Windows 7):
- Запустите классическую «Панель управления», отыскав апплет в главном меню или с помощью системного поиска.
- В меню «Просмотр» выберите отображение разделов в виде значков и кликните по строке «Устранение неполадок».
- В открывшемся окне кликните по строке «Просмотр всех категорий» на панели слева, после чего система начнет искать диагностические пакеты.
- Отобразится список компонентов. Для начала кликните правой кнопкой мыши по пункту «Обслуживание системы» и выберите «Запуск от имени администратора».
- В появившемся окне нажмите на кнопку «Далее».
- Начнется процесс обнаружения проблем, которые связаны с выбранным компонентом. Если ошибок не будет выявлено, просто закройте средство. В случае, когда неполадка найдена, примените автоматические исправления.


Проделайте то же самое с такими компонентами, как «Фоновая интеллектуальная служба передачи» и заодно «Центр обновления Windows».
После исправления ошибок перезагрузите компьютер, затем попробуйте вручную установить обновления с помощью штатных средств. Для этого вернитесь к Способу 1.
Способ 5: Очистка кэша обновлений
Иногда причиной нагрузки на центральный процессор является поврежденный кэш обновлений. В таких случаях даже встроенное средство устранения неполадок может оказаться бесполезным, поэтому очистить временные данные лучше вручную:
- Предварительно рекомендуется отключиться от интернета, поскольку, если процесс работает и грузит систему, значит, может идти подгрузка файлов обновления. В случае с подключением по Wi-Fi, достаточно разорвать соединение через панель уведомлений Windows.

Если же у вас проводное соединение с сетью, перейдите к списку сетевых адаптеров. Для этого выполните запрос
ncpa.cplв диалоговом окне «Выполнить» (сочетание клавиш «Win + R»).
В открывшемся окне кликните правой кнопкой мыши по активному подключению и выберите пункт «Отключить» в контекстном меню.
- Теперь запустите консоль с расширенными правами. Можете воспользоваться поиском системы, введя запрос
cmd, после чего выберите пункт «Запуск от имени администратора». - В окне «Командной строки» сначала введите команду
net stop wuauservи нажмите на клавишу «Enter». Таким образом, вы деактивируете «Центр обновления Windows», который может препятствовать удалению кэша. - Теперь отключите службу «Фоновая интеллектуальная служба передачи (BITS)» по той же причине. Выполните команду
net stop bits. - Запустите штатный «Проводник», перейдите в системный локальной диск и откройте папку «Windows».
- Далее нужно перейти в папку, где непосредственно хранятся временные данные обновлений. Дважды кликните по каталогу с названием «SoftwareDistribution».
- Удалите все содержимое любым удобным способом.
- Останется снова запустить «Центр обновления Windows» и связанную с ним службу. Вернитесь к «Командной строке» и по очереди выполните запросы
net start bitsиnet start wuauserv.


После запуска средств подключитесь к интернету и попробуйте вручную выполнить поиск и установку обновлений для операционки.
Способ 6: Чистая загрузка ОС
Иногда сторонние процессы и службы препятствуют корректной работе «Центра обновления Windows», поэтому есть смысл выполнить чистую загрузку операционной системы, затем в таком режиме попробовать обновить систему.
- Одновременно нажмите на клавиши «Win + R», затем в окне «Выполнить» введите запрос
msconfigи нажмите на кнопку «ОК». - На вкладке «Общие» окна «Конфигурация системы» отметьте пункт «Выборочный запуск», отключите опцию «Загружать элементы автозагрузки» и примените настройки.
- Теперь перейдите на вкладку «Службы» и поставьте галочку в чекбоксе «Не отображать службы Майкрософт».
- Отключите оставшиеся в списке службы, поскольку они являются сторонними, потом снова примените и сохраните новые параметры запуска.
- Перейдите на вкладку «Автозагрузка» и кликните по ссылке «Открыть диспетчер задач».
- Откроется окно «Диспетчера задач» на вкладке «Автозагрузка». Нужно вручную отключить все процессы, которые запускаются вместе со стартом системы. Для этого по очереди кликайте правой кнопкой мыши по каждому процессу и в контекстном меню выбирайте пункт «Отключить».


Перезагрузите компьютер, после чего он должен запуститься без сторонних процессов и лишних служб. Вернитесь к Способу 1 и попытайтесь вручную обновить операционную систему.
Способ 7: Отключение службы
Есть способ, позволяющий отключить процесс TiWorker.exe и связанную с ним службу, что позволит самостоятельно контролировать обновления операционки, а средство перестанет работать в автоматическом режиме и, соответственно, нагружать процессор:
- Откройте «Диспетчер задач». Для этого достаточно кликнуть правой кнопкой мыши по рабочей панели и выбрать запуск средства. На вкладке «Процессы» найдите работу исполняемого файла TiWorker.exe. Часто он называется «Windows Modules Installer Worker». Выделите его нажатием левой кнопкой мыши и щелкните по кнопке «Завершить процесс»/«Снять задачу».
- Теперь следует запустить встроенную оснастку «Службы». Вызовите диалоговое окно «Выполнить» (сочетание «Win + R») и выполните запрос
services.msc. - В отобразившемся списке найдите «Установщик модулей Windows» и остановите службу через контекстное меню.
- Можете открыть свойства службы, дважды кликнув по ней левой кнопкой мыши, после чего в меню «Тип запуска» выберите «Вручную» или «Отключена». Сохраните настройки.
- Те же самые действия выполните для службы «Центр обновления Windows».


Эти действия позволят запретить автоматический поиск и установку обновления для операционной системы, переведя эту операцию в ручной режим. Рекомендуется периодически проверять наличие апдейтов в таком случае.
Способ 8: Проверка на вирусы
Нельзя полностью исключать наличие вирусной активности, когда процесс TiWorker.exe начинается чрезвычайно грузить систему и процессор. Случается, что вредоносный код инфицирует исполняемый файл, отчего и появляется рассматриваемая проблема. Либо же он маскируется под этот процесс, что затрудняет его поиск вручную. Используйте сторонние антивирусы для проверки компьютера на наличие потенциально опасных утилит, и в этом вам поможет наш отдельный материал на сайте на эту тему.
Подробнее: Как почистить компьютер от вирусов и «рекламы» (проверка системы + лечение)

Contents:
- Windows Modules Installer Worker High CPU Usage Overview
- What is Windows Modules Installer Worker on Windows 10?
- Why Tiworker.exe Uses So High CPU on Windows 10?
- How Do I Fix Windows Modules Installer Worker High CPU?
Windows Modules Installer Worker High CPU Usage Overview:
Windows Modules Installer Worker high CPU often comes to you after you checked Windows 10 updates, or installed some drivers and programs on Windows 10.
Sometimes, upon your computer runs slowly or keeps loading in games, you tend to check what CPU usage in task manager, but what you find is a process named Tiworker.exe or Windows Modules Installer Worker taking up so much CPU resource, 50% or even 100%. To worsen the tiworker.exe high CPU error, Windows Modules Installer Worker high disk or memory usage followed up on Windows 10.
In this article, you are able to find powerful ways to fix this high CPU by the Tiworker.exe process.
What is Windows Modules Installer Worker on Windows 10?
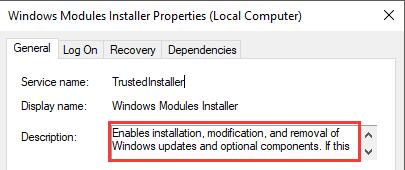
According to its service description, the Windows Modules Installer Worker is the process used to enable installation, modification, and removal of Windows updates and optional components.
Thus you can see that the Tiworker.exe service is closely related to Windows update or application installation. Normally, Windows 10 updates itself automatically, meanwhile, Windows 10 Modules Installer Worker try to fix the updating errors or bugs left behind.
If you have any actions about Windows update, install a new one, uninstall the update, etc. This process would always work in the background and lead to Windows Module Installer error in some cases.
Why Tiworker.exe Uses So High CPU on Windows 10?
If there are any updates for Windows 10, considerable Windows Modules Installer Worker would come up to check for updates. In this way, though these Tiworker.exe services are running in the background, CPU will also go high.
Under this circumstance, you would better try some methods to solve this Tiworker.exe high CPU error for Windows 10.
How Do I Fix Windows Modules Installer Worker High CPU?
On Windows 10, you can manage to utilize various ways to stop the Tiworker.exe process from using so much CPU, for instance, disable Windows Update service from automatically running on Windows 10.
Solutions:
1: Change Windows Modules Installer to Manual
2: End Tiworker.exe Process
3: Disable Automatic Windows Update
4: Run Windows Update Troubleshooter
5: Delete SoftwareDistribution Folder
6: Update Drivers
7: Run System File Checker and DISM
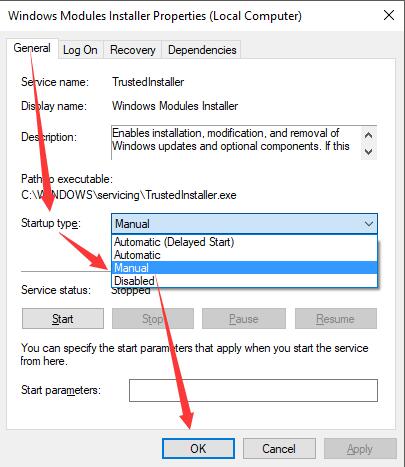
Solution 1: Change Windows Modules Installer Service to Manual
Generally speaking, for the sake of convenience, you would be suggested to set the Tiworker.exe service to automatically serve for Windows update. But now concerning Windows 10 Modules Installer CPU issue, you may try to make it manually. In this way, Windows Modules Installer won’t run automatically.
1. Press Windows + R to activate the Run box.
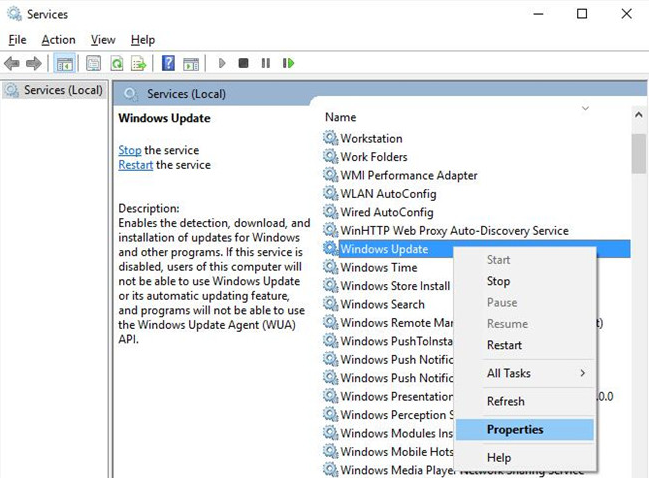
2. Type in services.msc in the box and hit OK to open Services window.
3. In Services, scroll down to locate Windows Modules Installer and right click it to navigate to its Properties.
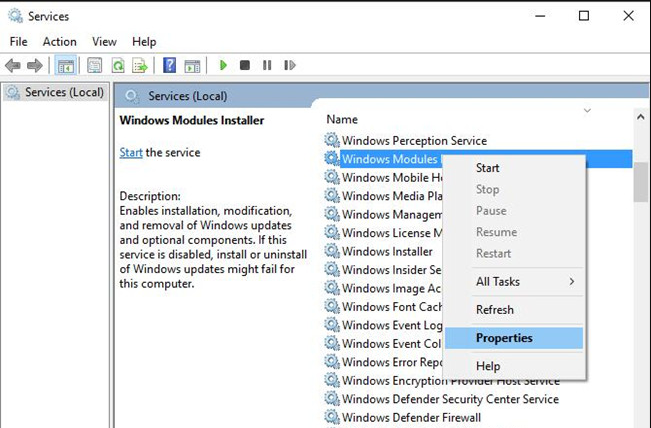
4. In General tab, find out Startup type and choose to set it as Manual. Then click OK to save the change.
Once you made this change, check the CPU usage in Windows 10 task manager. Maybe the Tiworkker.exe process would not eat up CPU for this moment. To some degree, Tiworker.exe high disk can also be fixed.
Solution 2: End Windows Modules Installer Worker Process
On the other hand, it is also feasible to stop Tiworker.exe process in hope that windows modules installer worker high CPU can be fixed on Windows 10.
1. Press Ctrl + Alt + Delete combination key to elevate task manager.
2. In task manager, scroll down to find exe (Windows Modules Installer Worker) process and then right click it to End task.
3. Reboot Windows 10 to take effect.
If disabling Tiworker.exe can help resolve high CPU usage by Windows Modules Installer Worker in Windows 10, now you can see the 100 CPU usage or disk is nowhere to be seen on your PC.
Solution 3: Disable Automatic Windows Update
If you have known for sure what the Windows Modules Installer Worker do on Windows 10, you can get why you are advised to turn off the option to update Windows automatically.
Like what you do in Solution 1 to set the Windows Modules Installer startup type as manual, to disable the automatic Windows update, do the same thing in Services.
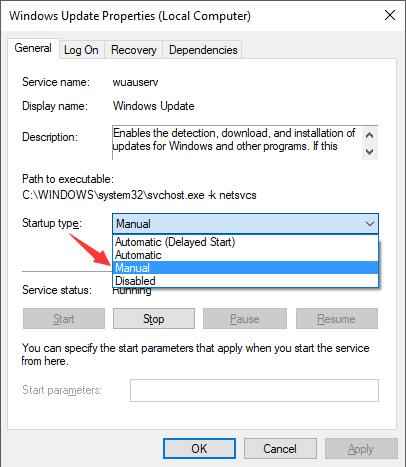
1. In Services, pinpoint Windows update and open its Properties.
2. Make Windows update Startup type as Manual and then hit OK to take effect.
In this way, you are enabled to decide the time you are to update Windows rather than by itself automatically. But it is wise for you to check for updates in Update & Security to make sure you can receive the new features offered by Microsoft.
Thus, the CPU usage by Windows Modules Installer worker will be reduced greatly on Windows 10.
Solution 4: Run Windows Update Troubleshooter
Though Microsoft has released online Windows update troubleshooter, you may know that there is an inbuilt tool for you to troubleshoot Windows update errors, among which Tiworker.exe high CPU is what you are meeting with on Windows 10.
Hence, utilize this Microsoft Windows update troubleshooter to figure out and then fix the Tiworker high CPU problem.
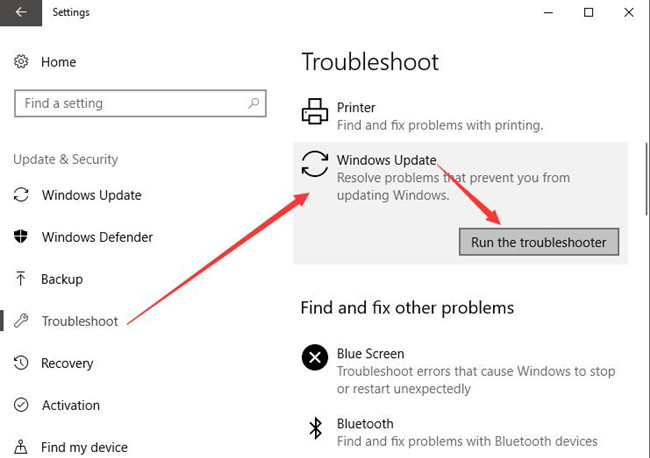
1. Go to Start > Settings > Update & Security.
2. Under Troubleshoot, find out Windows Update and click Run the troubleshooter.
If there are any updating issues on your PC, this troubleshooter would let you know and fix them for you if possible. Or you can also download the online troubleshooter to solve the high CPU usage by Windows Modules Installer.
Solution 5: Delete SoftwareDistribution Folder
There is a folder saving the temporary files left by Windows 10 update, driver or program installation. As per what discussed above, Windows Modules Installer Worker high CPU on Windows 10 can be caused by the corrupted Windows updates, you might as well manage to remove this SoftwareDistribution folder for Windows 10.
1. Open the File Explorer from the search box.
2. In File Explorer, find out C:\Windows\Softwaredistribution and then right click this folder to Delete.
you can open task manager to check if the Tiworker.exe process keeps hogging much CPU or disk.
Solution 6: Update All Drivers
Driver incompatibility can cause Windows Modules Installer Worker high CPU on Windows 10 in some way. On the other hand, now that you have upgraded Windows 10, it is necessary to make sure the drivers on your PC are the most up-to-date.
It may seem extremely troublesome to download all the device drivers on corresponding official site, such as AMD, NVIDIA, Intel site. Therefore, it is strongly recommended for you to update the graphics card, video or sound card drivers or network drivers automatically by Driver Booster.
Driver Booster is professional and reliable in downloading and updating drivers for Windows 10. You may as well take advantage of it to tackle the Tiworker.exe high CPU trouble.
1. Download, install and run Driver Booster on Windows 10.
2. Click Scan.

Driver Booster will begin to find the missing, corrupted, and faulty drivers on your PC.
3. Allow Driver Booster to Update Now to get all drivers updated.
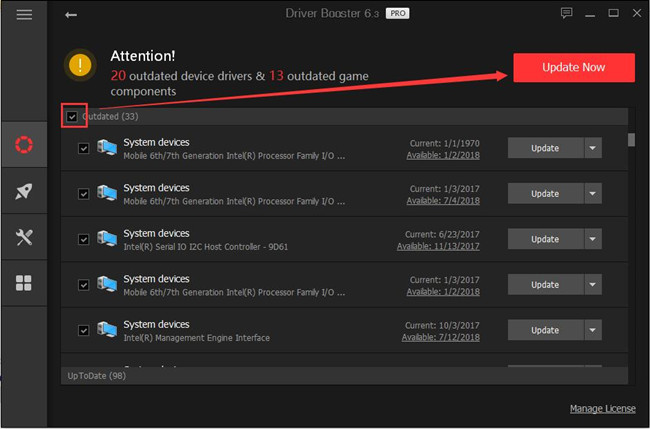
After Driver Booster downloaded the latest chipset or display card drivers for your computer, you may as well restart your computer to take effect. In some sense, these newest drivers can be helpful in solving high CPU by Windows Modules Installer Worker on Windows 10.
And this is also the method feasible to address any high CPU usage problems, such as WMI Provider Host high CPU usage and Ntoskrnl.exe high CPU usage on Windows 10.
Solution 7: Run System File Checker and DISM
To exclude the possibilities that it is the system files causing high CPU by Tiworker.exe, you can use SFC tool to scan for your computer on Windows 10. Especially when you updated Windows 10, there may some incompatible or corrupted files, you need to correct them.
1. Search Command Prompt in the search box and right click the result to Run as administrator.
Then stroke Enter to get to Command Prompt.
2. Input sfc/scannow in the Command Prompt and press Enter to use SFC.
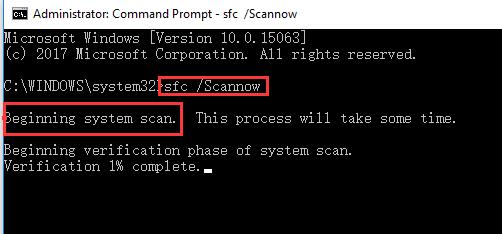
You can see that the System File Checker begins system scanning.
This is to repair corrupted system file that may lead to Windows Modules Installer Worker high CPU usage on Windows 10.
Run DISM
Alternatively, if you find there is something wrong with the system image on your computer, it is accessible to scan for the image issues with the Deployment Image Servicing and Management(DISM).
To use DISM to fix the Tiworker.exe high CPU issue, follow the steps below:
1. In Command Prompt (as administrator), type in the command: DISM /Online /Cleanup-Image /RestoreHealth
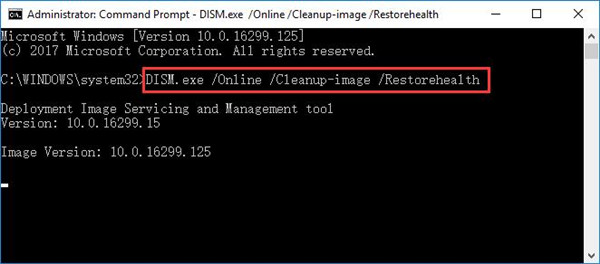
2. Then Stroke Enter to execute it.
Then DISM tool would automatically scan for the problematic system images and fix them for you.
Granted that there are no corrupted system files or image errors on Windows 10, the high CPU by Windows Modules Installer Worker can also disappear.
More Articles:
Solved: Windows Image Acquisition High CPU Usage on Windows 10
Top 5 Ways to Fix Google Chrome High CPU Usage
6 Ways to Fix Desktop Window Manager DWM.exe High CPU Usage
TiWorker.exe is an essential file for Windows 10 that is used to download the latest updates from Microsoft Server. The main task for TiWorker.exe is to download the available updates on Windows 10. And that’s why you may see Tiworker.exe is using a high CPU, which is normal.
Quick Overivew
File Size and Location
When a Windows 10 is installed on a Pc or Laptop, by default it is installed under the C driver. That means TiWorker.exe will always be located under C:\Windows\WinSxS\ folder. And the average file size could be approx 230 KB.
Quick Overview
| Filename: | TiWorker.exe |
| File description: | Windows Modules Installer Worker |
| File version: | 10.0.19041.740 |
| Product name: | Microsoft® Windows® Operating System |
| File type: | Executable Application |
| Copyright: | Microsoft Corporation |
| Digital Signature: | Microsoft Windows | sha256 (digest algorithm) |
| Language: | English |
A genuine TiWorker.exe process looks like this:

What are the uses of TiWorker.exe?
As explained above, TiWorker.exe is an essential process for Windows 10 and the main task of this file is to keep your system up to date by downloading the updates from time to time. But this requires an interest connection, without that, the TiWorker.exe won’t be able to download it.
Why Multiple Copies of TiWorker.exe is showing on Windows PC?
You may see multiple TiWorker.exe on Windows 10, sometimes it could of 6 files and all will be located under C:\Windows\WinSxS\ directory which is normal. All these TiWorker.exe are used to update Windows 10, thus it should not be removed.
Is this a Virus or Safe?
Typically, TiWorker.exe is a safe file and it should not be removed or disabled. There is a very rare chance that TiWorker.exe could be malware or a virus. The best way to figure out whether TiWorker.exe is a virus is to check the file location. If the process is running on the Task Manager then follow the below steps to verify it:
1) Press Ctrl+Shfit+Esc button together
2) Click on Details Tab
3) Now locate TiWorker.exe, right-click and choose Open file location
4) If it opens the C:\Windows\WinSxS\ folder then it’s a safe file
5) But if it opens any another folder then it is a virus
Why TiWorker.exe is using High CPU & Disk Space?
Many users have complained that the occasionally TiWorker.exe is using high CPU and sometimes high DISK usage. Many users also complain that TiWorker.exe is using nearly 25% of the RQAM and slowing down the system speed.
Now, let me tell you that this is very common and this usually happens when the TiWorkere.xe run in the system background to download the updates. That means you may notice that TiWorke.exe is using high memory or Disk space when your Windows 10 is downloading the updated in the background.
This is completely normal and high disk space or memory or CPU will be normal functioning as soon the download process will be finished.
Can I Disable TiWorker.exe?
It is not recommended to disable or remove TiWorker.exe from the Operating System as it may affect your system to work properly. However, if TiWorker.exe is consuming high CPU or Memory space regularly then you may follow the below-mentioned methods to fix this issue.
How to Fix high Disk / Memory usage by TiWorker.exe?
Method 1) Check the Windows update manually and install it
This is one of the best options to fix the high memory usage of TiWorker.exe. All you have to is to check for the available Windows update manually and then install it. Here is how you can do it in Windows 8, 8.1 version.
- Press Windos+R, type wuapp.exe in the dialog box, and press the Enter button.
- You will get the “check for update’’ option in the left panel of the Windows Update section.
- If any update exists, install it immediately.
- After the installation, restart your computer simply to get your problem fixed.
For Windows 10, here are the steps to download the available updates manually.
1) Press the Windows logo on your keyboard
2) Type Check for updates and click on it
3) Now click on Check for updates b utton
4) Depending on your net speed, you will have to wait for several minutes to download the update.
5) Once done then restart the system and TiWorker.exe won’t be running anymore on the system background.
Make sure you are connected to the internet while following the above steps then only you will be able to download the updates manually.
2. Fix the problem by running the Windows Update Troubleshooter
Windows Update Troubleshooter is a very useful tool that allows fixing the problem in case if you are not able to connect to the Windows server to download the updates. This process may help you to resolve the TiWorker.exe high CPU usage problem, according to Microsoft experts.
B. With Windows System Maintenance Troubleshooter
- You have to open “Troubleshooting’’ from the Control Panel to use System Maintenance Troubleshooter.
- Select the System Maintenance option from the list and click the Next button to proceed. After that, you should follow the onscreen instructions to access the System Maintenance Troubleshooter on your PC.
- If any dispute exists in your System, these onscreen instructions will guide your device to diagnose and resolve them automatically.
- It would be best to reboot your PC after both troubleshoot gets completed.
3. Run Sfc commandline
The problem of high resource usage occurs due to the presence of corrupted files sometimes. It would be better to use the SFC command in the Command Prompt section to diagnose and delete corrupted files from your PC.
1) Open the Command Prompt with Admin Access
2) Type sfc/scannow and hit the enter button

3) Now wait for few minutes to finish the process.
The entire SFC scanning process can take few times to get completed. We recommend you not to shut down your PC or run TiWorker.exe during the SFC scanning process.
After that reboot, your device and check if TiWorker.exe is using massive resources still or not.
Read next:
- How to fix w3wp.exe High CPU usage?
- Why Nessusd.exe is using high CPU
- What is Vsmon.exe
tiworker.exe / Windows Modules Installer Worker is basically a process whose main job is to scan for new updates and to eventually install them on your computer. So, during the updates, this specific process puts a load on the PC which highly increases the disk or CPU usage. Read our other guide to Check Which Process Is Using More CPU in Windows 10.
If you are facing tiworker.exe / Windows Modules Installer Worker on Windows 10 high usage then this guide includes a few sureshot solutions to get rid of. You may see our other article Fix AMD Installer Not Responding in Windows 10. Well, let us go to the solutions and explore steps and details to low down the high usage of CPU and disk.
tiworker.exe / Windows Modules Installer Worker Windows 10 Solutions
Solution 1 – Check Windows Update
While your Windows Update is running, it is likely to end up in high disk usage. So, if the update is taking place, wait for some time and the disk usage by Windows Modules Installer Worker will low down once the update is over. In case, update is not happening, quickly scan for new ones and install them.
Step 1 – Launch Setting app by right-clicking Start icon and selecting Settings. Instead, you can also open Settings application by jointly pressing the keys Windows&I on the keyboard.
Step 2 – Click Update & security on the main interface of Settings application.
Step 3 – On the right pane of Windows Update page, see if any updates are taking place. If yes, wait for it to complete it and then you will notice the reduction in the disk or CPU usage by tiworker.exe process. If no updates are happening, click Check for updates as new updates may resolve this issue.
Solution 2 – Run an Antivirus Scan
A presence of malicious programs or malware or threat attacks on your PC can also lead to the high CPU or disk usage by tiworker.exe. So, you must first run an Antivirus Scan and dig out and remove the culprits.
Get Best Free online Antivirus to Scan Windows Computer gets Infected.
Solution 3 – Troubleshoot System Maintenance and Windows Update
Another workaround using which you can sort out Windows modules installer worker issues is by troubleshooting two important categories – System Maintenance and Windows Update.
Step 1 – Type cp in the Cortana search and select Control Panel that Cortana displays as the Best match.
Step 2 – Make the items of Control Panel in small icons view and moving ahead, click Troubleshooting. Select View all on the left sidebar of Troubleshooting window.
Step 3 – Locate and double-click System Maintenance and let the troubleshooter detects the areas that is creating high CPU usage by tiworker.exe.
Step 4 – Once you troubleshoot System Maintenance successfully, search and double-click Windows Update category from the list. Follow the guidelines that appear on Troubleshooter dialog and repair all the troubles related to Windows Update.
Solution 4 – Kill Windows modules installer worker in Task Manager
You may also try killing Windows modules installer worker in the Task Manager to see whether this stops the problem from persisting again and again.
Step 1 – Make a right-click on Taskbar and from the menu that pops up select Task Manager.
Get more ways to Open Task Manager in Windows 10.
Step 2 – In the Processes tab, search for a process namely Windows modules installer worker. When you find the process, conduct a right-click on it and select End task.
Well, in most cases, ending the task fails to resolve things as restarting the process reoccurs the issue.
Solution 5 – Remove SoftwareDistribution Folder
SoftwareDistribution is a folder in your local hard drive that stores all the important files related to Windows Update. When this folder holds corrupted files, you are likely to encounter problems in updating Windows. Hence, follow the below given steps and try to settle the high usage trouble originated by tiworker.exe.
Step 1 – Type Services in the Cortana search and select the same when Cortana displays it as the result.
Step 2 – Find and right-click on the service namely Windows Update. From the options that show up, click Stop. This will immediately stop the service from functioning and now you have to move ahead to delete the folder.
Step 3 – Navigate to C:\Windows and henceforth delete the folder SoftwareDistribution.
Step 4 – Finally, restart the PC and upon rebooting, Windows Update will start functioning all by itself. This action will automatically regenerate a new SoftwareDistribution folder.
If tiworker.exe issue continues to occur on your Windows 10 PC, give a shot to the next solution.
Read our full guide to Remove Items From C:\Windows\SoftwareDistribution\Download Windows 10.
Solution 6 – Run System File Checker and DISM Tool
Your Windows 10 PC may have some corrupted files which result in tiworker.exe problems. So, running these built-in tools will help you to repair and replace the corrupt files on your machine.
Pursue SFC /Scannow, DISM.Exe, CHKDSK Windows 10 guide in detail.
Conclusion
Hence, following these workarounds will settle your Windows Modules Installer Worker / tiworker.exe in Windows 10 pretty much easily. Well, different solutions may work for different users, depending on the status of their computer. So, give a shot to the above mentioned solutions and write to us if Windows Modules Installer Worker / tiworker.exe is sorted out using any other method.