
В Windows 10 есть функция Timeline — временная шкала или шкала активности пользователя, которая отслеживает и сохраняет историю ваших действий. Если вы не хотите использовать эту функцию, то ее можно деактивировать. Как это сделать, расскажем в этой статье.
Что такое временная шкала в Windows 10?
Временная шкала в Windows 10 отображает все ваши действия за последние дни, недели и месяцы, что позволяет быстро возобновить работу или открыть посещенные сайты. По умолчанию вы можете вызвать эту функцию, используя комбинацию клавиш Win + Tab.
Если вы не хотите, чтобы Windows собирала такую информацию о вас или получала к ней доступ, то временную шкалу можно отключить несколькими способами.
Отключаем временную шкалу в настройках Windows
- Откройте настройки Windows через меню «Пуск» или нажав комбинацию клавиш Win + I.
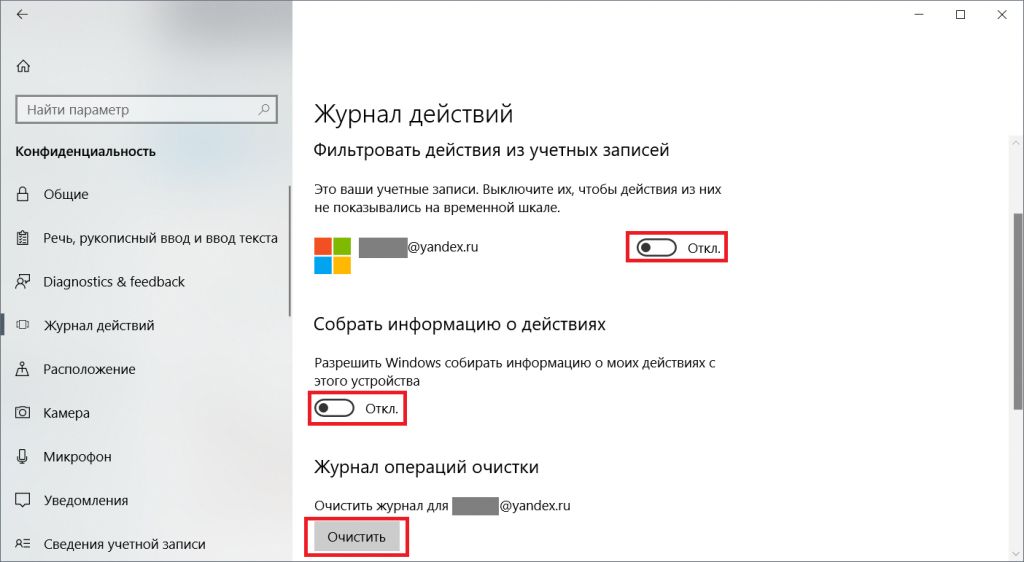
- Нажмите Конфиденциальность, а затем Журнал действий слева.
- В разделе Фильтровать действия из учетных записей установите переключатель на «Выкл.».
- В разделе Собирать информацию о действиях в пункте Разрешить Windows собирать информацию о моих действиях с этого устройства также установите переключатель в положение на «Выкл.».
- Если вы хотите удалить уже собранную историю активности, нажмите на кнопку Очистить в Журнале операций очистки.
Windows 10: как отключить шкалу активности в реестре
В качестве альтернативы Вы можете деактивировать временную шкалу через реестр Windows:
- Нажмите Win + R и введите regedit. Подтвердите действие нажатием на ОК.
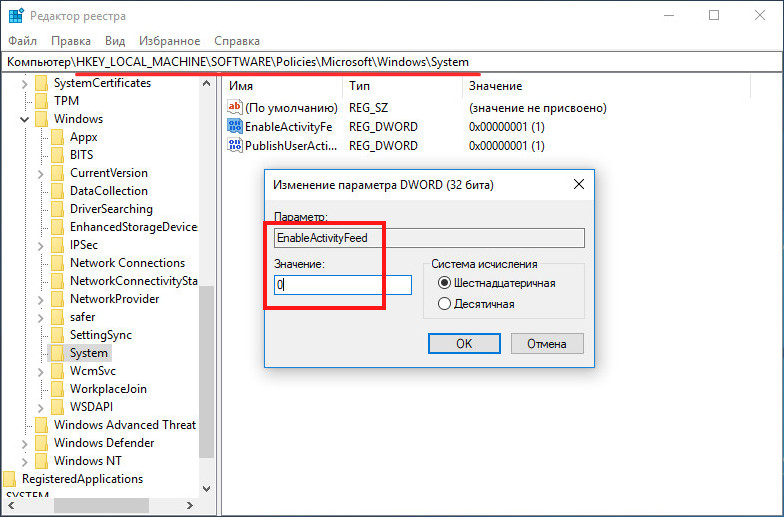
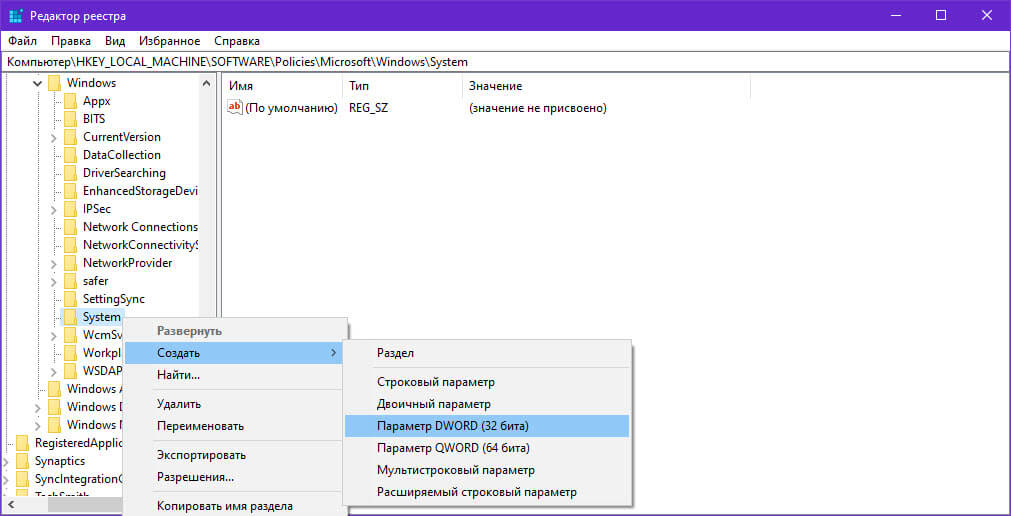
- В отобразившемся окне перейдите в раздел Computer\HKEY_LOCAL_MACHINE\SOFTWARE\Policies\Microsoft\Windows\System.
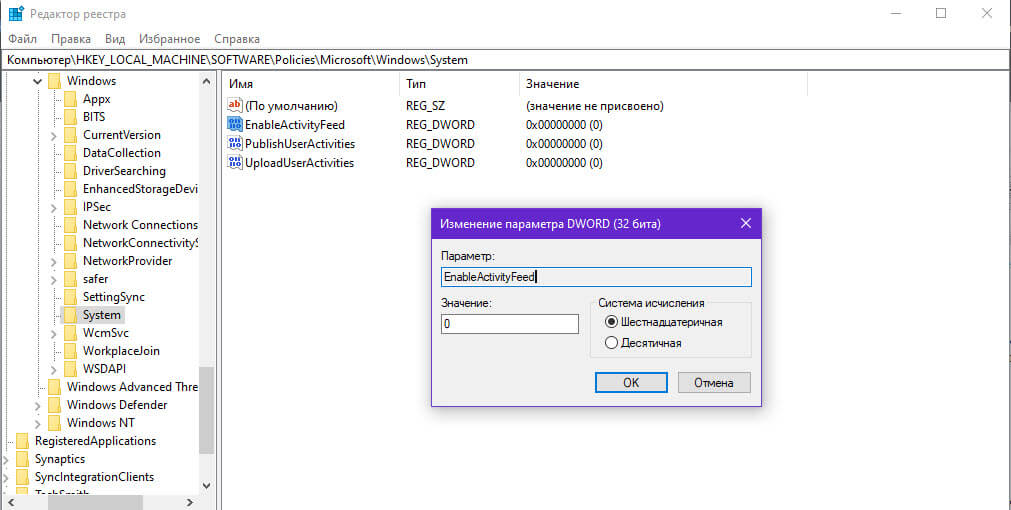
- В правой части окна дважды щелкните запись EnableActivityFeed и введите значение «0».
- Если запись не существует, придется сначала ее создать. Для этого щелкните правой кнопкой мыши по пустому пространству и выберите Создать, а затем Параметр DWORD (32-бит) или Параметр DWORD (64-бит) в зависимости от типа вашей Windows (32-bit или 64-bit). Назовите его «EnableActivityFeed» и задайте значение «0».
- Перезагрузите Windows. Временная шкала будет полностью удалена.
Как отключить временную шкалу при помощи групповой политики Windows
Если вы используете Windows 10 Pro с правами администратора, то можете отключить временную шкалу с помощью групповой политики
- Нажмите Win + R и введите gpedit.msc. Подтвердите ввод.
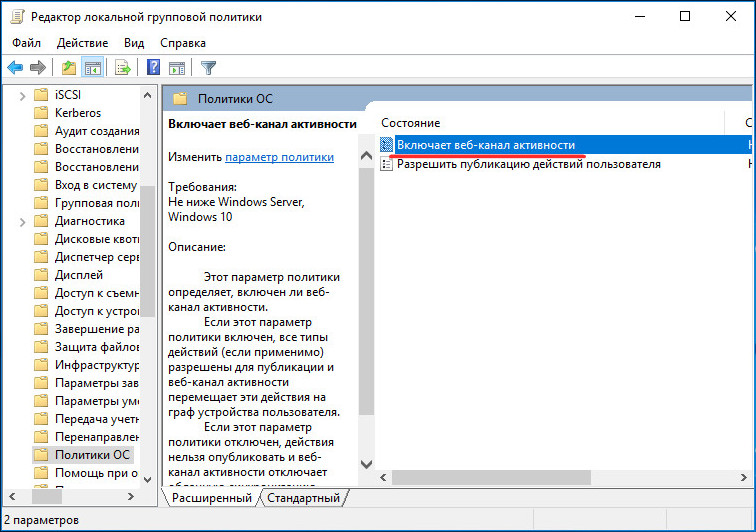
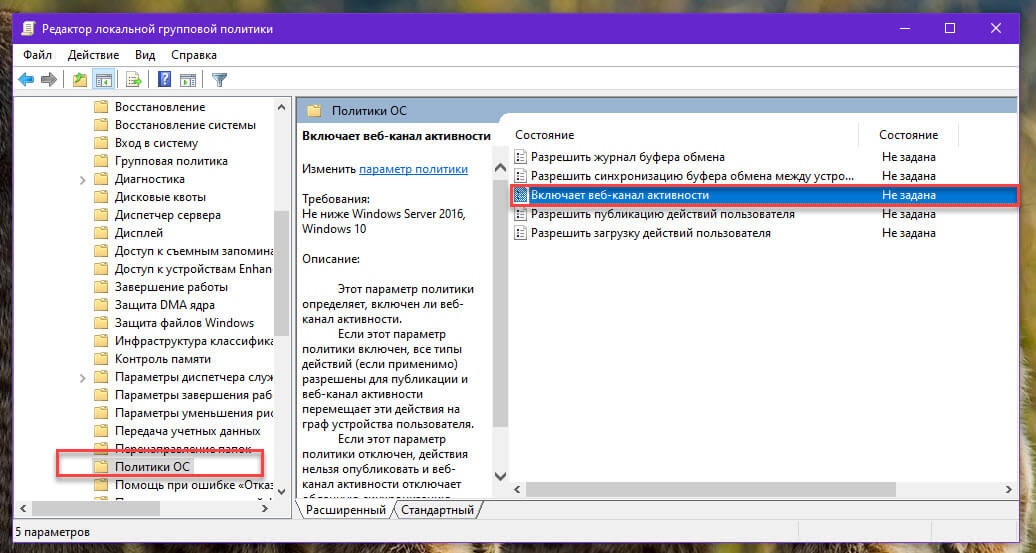
- Нажмите Конфигурация компьютера > Административные шаблоны > Система > Политики операционной системы.
- Затем дважды щелкните по записи Включает веб-канал активности.
- В новом окне выберите «Отключено» и подтвердите выбор нажатием на кнопку OK.
- Перезапустите Windows, чтобы применить изменения.
Читайте также:
- Windows 10 шпионит за вами: пошаговое руководство, как это отключить
- Как настроить синхронизацию папок и файлов в Windows 10
- Как настроить меню «Пуск» в Windows 10
Фото: авторские, pxhere.com
Временная шкала Windows 10 помогает вам перейти к действиям, над которыми вы работали в прошлом, если эта функция не интересна для вас, ее можно отключить.
Временная шкала в Windows 10 — это функция, которая использует Microsoft Graph и позволяет вам вернуться к действиям (например, приложению, документу, веб-сайту), над которыми вы работали в прошлом. Эти действия могут быть запущены на том же компьютере или других устройствах, таких как ноутбук, планшет и даже ваш телефон, которые подключены к вашей учетной записи Microsoft.
Единственное предостережение, для возобновления задач на разных устройствах Windows 10 должна отслеживать активность вашего ПК, что для многих пользователей не представляет особой проблемы, но для других это может быть проблемой, связанной с конфиденциальностью или безопасностью.
Если Временная шкала вам не нравится или вы просто не хотите, чтобы Windows 10 хранила ваши прошлые действия, можно отключить эту функцию всего несколькими кликами мыши с помощью приложения «Параметры».
В этом руководстве вы узнаете, как отключить Журнал действий, который также отключает временную шкалу в Windows 10.
- Как отключить временную шкалу Windows 10 с помощью Параметров
- Как отключить временную шкалу Windows 10 с помощью групповой политики
- Как отключить временную шкалу Windows 10 с помощью реестра
Как отключить временную шкалу Windows 10 с помощью приложения «Параметры».
Используйте эти шаги, чтобы отключить историю активности в Windows 10:
Шаг 1: Откройте приложение «Параметры», самый быстрый способ нажать две клавиши Win + I.
Шаг 2: Перейдите в группу настроек «Конфиденциальность».
Шаг 3: Перейдите в раздел «Журнал действий».
Шаг 4: Снимите флажок «Сохранить мой журнал активности на этом устройстве».
Шаг 5: Снимите флажок «Отправить мой журнал активности в Microsoft».
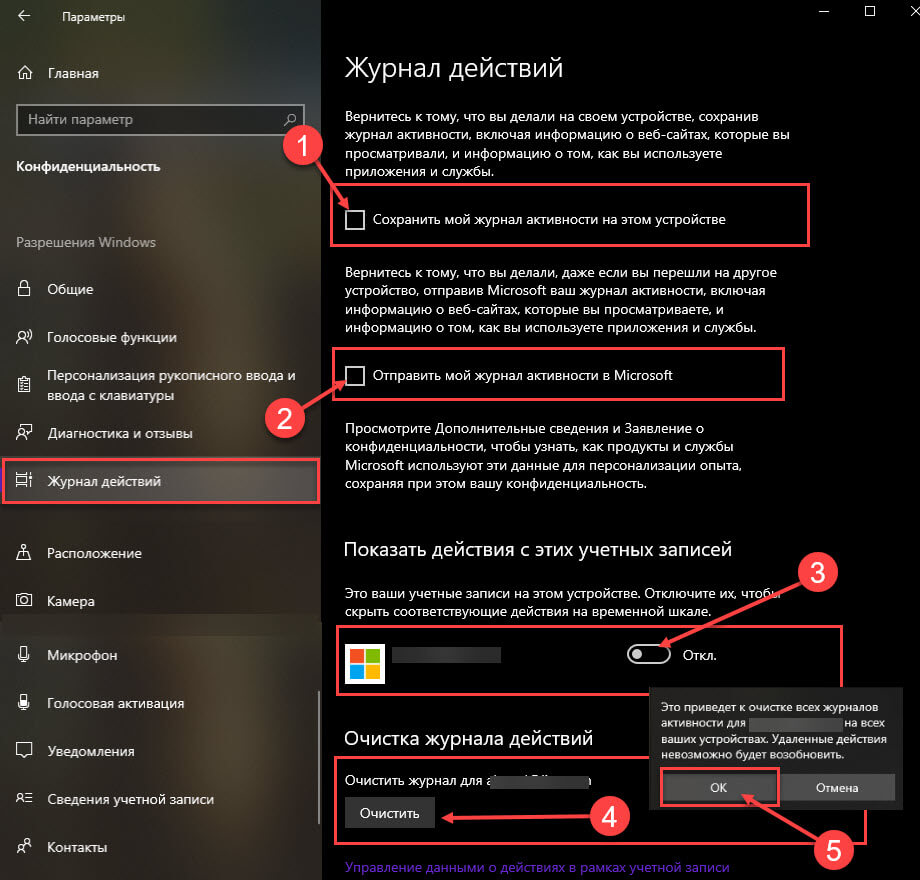
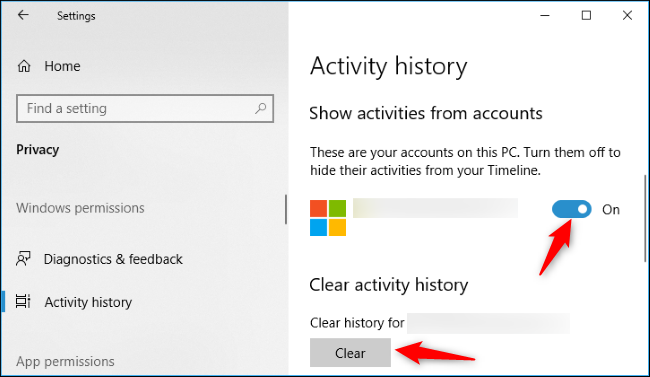
Шаг 6: В разделе «Показать действия с этих учетных записей» передвиньте переключатель в положение «Откл.».
Шаг 7: Перейдите на другую любую страницу параметров, а затем снова вернитесь на страницу «Журнал действий», чтобы обновить страницу и сделать доступной возможность удаления своей истории.
Шаг 8: В разделе «Очистка журнала действий» нажмите кнопку «Очистить».
Шаг 9: Нажмите кнопку «ОК», чтобы подтвердить намерения.
После того, как вы выполните эти шаги, Windows 10 больше не сможет собирать вашу историю на устройстве, и вы не сможете возобновить задачи на других устройствах с помощью временной шкалы.
Как отключить временную шкалу Windows 10 с помощью групповой политики
Используйте эти шаги для отключения временной шкалы с помощью групповой политики в Windows 10 Pro, Enterprise или Education:
Шаг 1: Откройте редактор групповой политики (см. как).
Шаг 2: Перейдите по следующему пути: Конфигурация компьютера \ Административные шаблоны \ Система \ Политики ОС
Шаг 3: С правой стороны дважды кликните политику «Включает веб-канал активности» и отключите его выбрав опцию «Отключено».

Шаг 4: Нажмите кнопки «Применить» и «ОК».
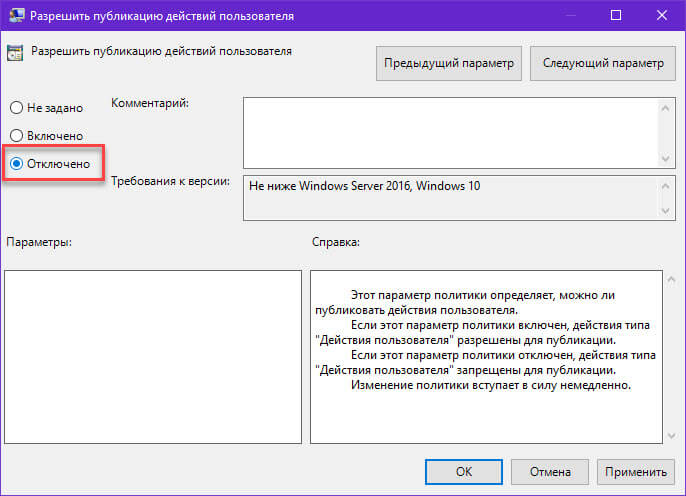
Шаг 5: Дважды кликните «Разрешить публикацию действий пользователя».
Шаг 6: Выберите опцию «Отключено» и нажмите кнопки «Применить» и «ОК».
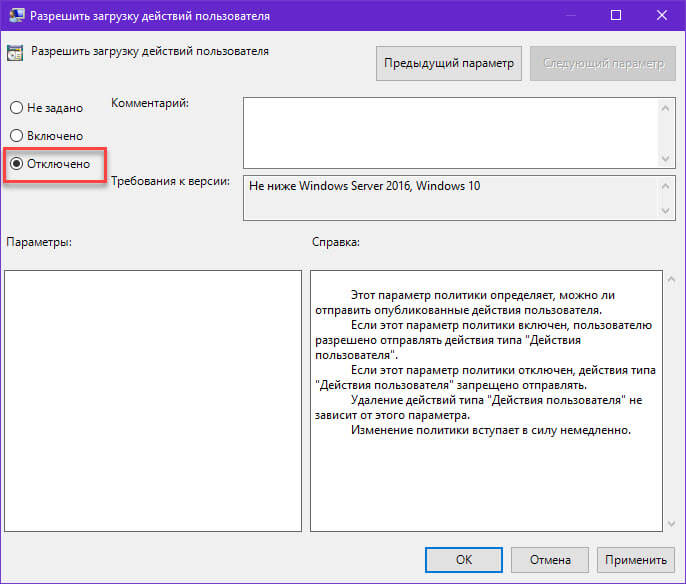
Шаг 7: Дважды кликните «Разрешить загрузку действий пользователя»
Шаг 8: Выберите опцию «Отключено» и нажмите кнопки «Применить» и «ОК».
Шаг 9: Перезагрузите компьютер.
После выполнения этих шагов «Временная шкала» (Timeline) больше не будет работать на вашем устройстве под управлением Windows 10.
Как отключить временную шкалу Windows 10 с помощью реестра
Кроме того, вы можете навсегда отключить временную шкалу в Windows 10, изменив реестр:
Предупреждение. Очень важно отметить, что изменение реестра Windows может привести к серьезным проблемам. Предполагается, что вы знаете, что делаете, и что вы создали полную резервную копию своей системы, прежде чем продолжить.
Шаг 1: Откройте редактор реестра, (см. как)
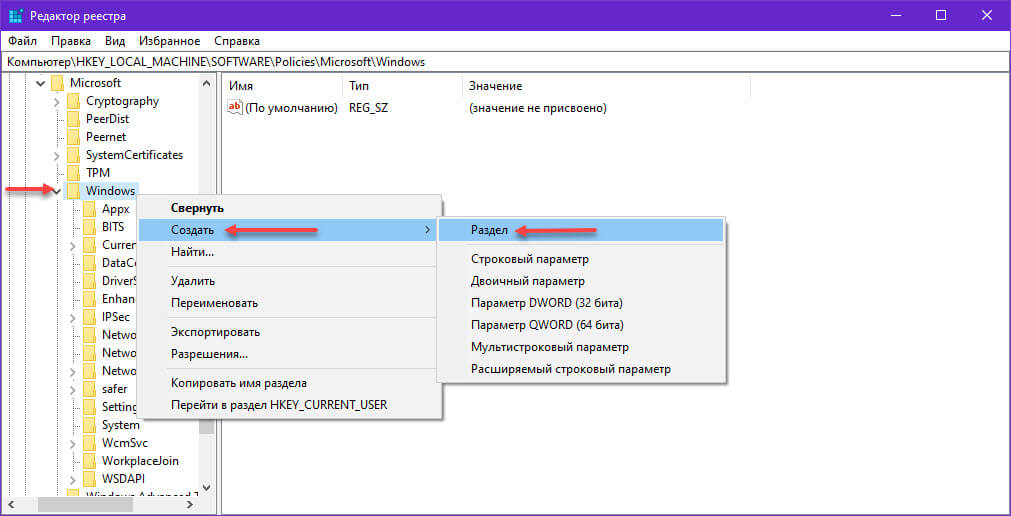
Шаг 2: Перейдите по следующему пути:
HKEY_LOCAL_MACHINE\SOFTWARE\Policies\Microsoft\Windows
Шаг 3: Кликните правой кнопкой мыши на раздел «Windows» (папка), выберите «Создать» → «Раздел» и назовите его «System».
Шаг 4: Кликните правой кнопкой мыши на созданном разделе «System», выберите «Создать» → «Параметр DWORD (32-бита)».
Шаг 5: Назовите его «EnableActivityFeed» и нажмите Enter
Шаг 6: Дважды кликните «EnableActivityFeed» и убедитесь, что его значение равно 0.
Шаг 7: Кликните правой кнопкой мыши на разделе «System», выберите, «Создать» → «Параметр DWORD (32-бита)».
Шаг 8: Назовите его «PublishUserActivities» и нажмите Enter
Шаг 9: Дважды щелкните вновь созданный параметр и убедитесь, что его значение равно 0.
Шаг 10: Кликните правой кнопкой мыши на разделе «System», выберите, «Создать» → «Параметр DWORD (32-бита)».
Шаг 11: Назовите его «UploadUserActivities» и нажмите Enter
Шаг 12: Дважды щелкните вновь созданный параметр и убедитесь, что его значение равно 0.
После выполнения этих шагов перезагрузите компьютер, и временная шкала будет полностью отключена.
В любой момент вы можете снова включить Временную шкалу, выполнив те же действия, которые указаны выше, но вам нужно будет Удалить созданные параметры EnableActivityFeed, PublishUserActivities и UploadUserActivities , а затем перезагрузите устройство.
Посмотрите видео данного процесса:
Если вы не видите настройки «Журнала действий», это потому, что вы используете не последнюю версию Windows 10. Данные настройки доступны начиная с Windows 10 build 17040 и выше.
Статьи по теме:
- Как включить и использовать Временную шкалу (Timeline) в Windows 10.
- Как добавить Представление задач / Временную шкалу в контекстное меню Windows 10.
- Как исправить не работающую Временную шкалу в Windows 10.
- Официальное расширение — Временная шкала Windows 10 для Google Chrome
The Timeline feature is the highlight of the new Windows 10 April update, also known as the v1803 update. It can be accessed by clicking on the Task View button on the taskbar or by simply pressing Win + Tab.
Timeline shows you all your past activities in Windows 10 and syncs them across your devices. It allows you to return to any point in your past activities from the timeline and get back to the documents, webpages, or apps you were working on.
In order for Timeline to work, Microsoft has to gather information about what you do on your computer all the time. While it may sound great to some, it can be a privacy nightmare for others.
If you don’t want to allow Microsoft to collect this information from you, you can disable Timeline in Windows 10 by following the guide below.
How to disable Timeline in Windows 10
There is no obvious button to disable Timeline at once. What you can do is stop Windows from collecting information about your activities on your PC. This will also stop Timeline from showing anything because no data can be collected from you anymore. Here’s how to do it:
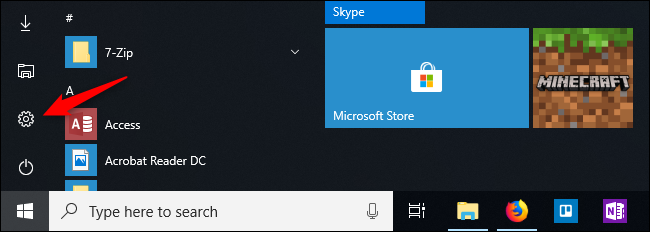
- Go to Start Menu, then click on Settings (gear icon).
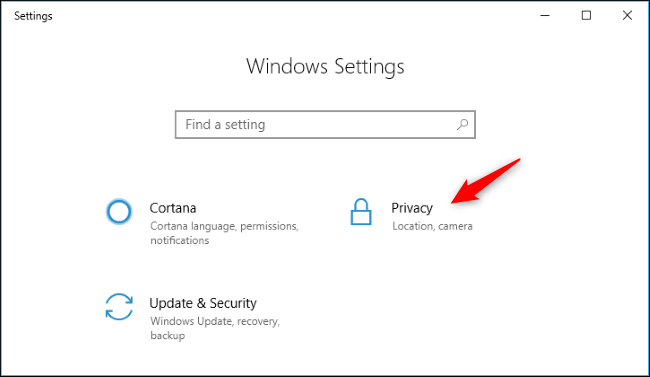
- Select Privacy from Windows settings.

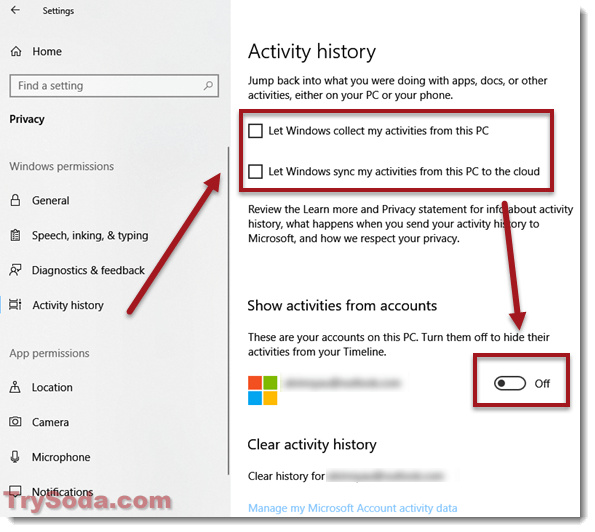
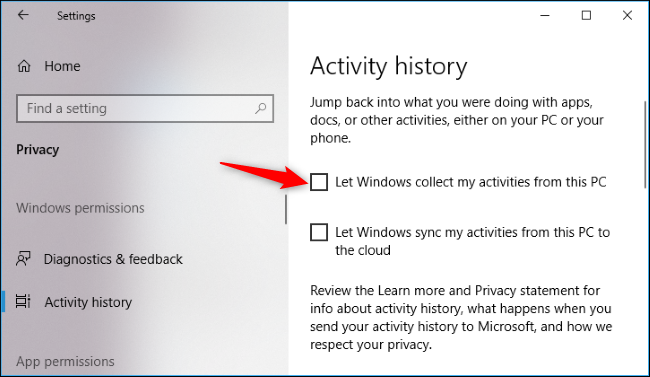
- From the left pane, under Windows permissions, click on Activity history.
- Uncheck the checkbox that reads Let Windows collect my activities from this PC.
- Alternatively, you can also disable Let Windows sync my activities from this PC to the cloud to stop Windows from syncing info to the cloud.
- Under Show activities from accounts, switch the toggle to off beside your outlook account. This will stop Windows from syncing your activities on the computer to your Microsoft’s account.

- If Windows has collected any info from you, there will be a Clear button in this window. Click on the Clear button to remove all activity history Windows has collected so far.
If you also want to clear all your activity history that Microsoft has collected from your Microsoft account so far, in the same window under “Clear activity history,” click on “Manage my Microsoft Account activity data.”
You will then be taken to your browser and prompted to log in to your Microsoft account. Log in to your account. From the privacy settings page, you can view and clear your browsing history, search history, location activity, voice activity, Cortana data, and your health activity.
If you go to Task View now, you should only be able to see your current activity (currently opened windows or apps). There will be nothing when you scroll back to the past in the Timeline.
Other tips for protecting your privacy on Windows 10
Here are some extra steps you can take to keep your private stuff private when using Windows 10:
- Check out your privacy settings. Windows 10 lets you tweak your privacy settings so you can decide how much info you share with Microsoft. Just go to Settings > Privacy to make your changes.
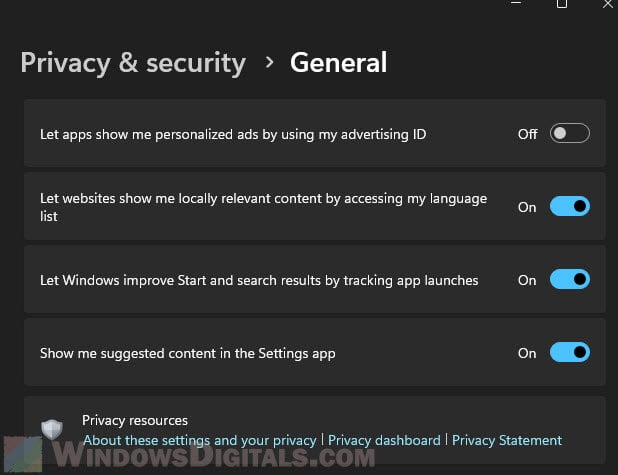
- Say no to personalized ads. Microsoft can show you ads based on what you do on your computer. If you’re not into that, you can turn it off. Head to Settings > Privacy > General and switch off the “Let apps use advertising ID” setting.

- Stop location tracking. Not keen on Windows 10 knowing where you are? You can turn off location tracking. Just go to Settings > Privacy > Location and turn off the “Location for this device” option.
- Try a browser that cares about privacy. Microsoft Edge comes with Windows 10, but you can try other browsers like Mozilla Firefox, Brave, or Tor Browser if you want something that’s more focused on keeping your stuff private.
- Think about using a VPN. A VPN can make your internet activity more private by encrypting your traffic and hiding your IP address. There are plenty of VPN options out there, both free and paid.
Timeline on Windows 10 is a feature that leverages the Microsoft Graph and allows you to get back to activities (for example, app, document, website) you were working in the past. These activities could have been started on the same computer or other devices, such as a laptop, tablet, and even your phone that are connected with the same Microsoft account.
The only caveat is that in order to resume tasks across devices, Windows 10 has to track your PC activities, which for many users isn’t a big deal, but for others it can be a privacy or security concern.
If Timeline isn’t for you, or you simply don’t want Windows 10 collecting your activities, it’s possible to disable the feature with just a few clicks using the Settings app.
In this guide, you’ll learn the steps to disable activity history which also disables Timeline on Windows 10.
- How to disable Windows 10’s Timeline using Settings
- How to disable Windows 10’s Timeline using Group Policy
- How to disable Windows 10’s Timeline using Registry
How to disable Windows 10’s Timeline using Settings
Use these steps to turn off activity history on Windows 10:
-
Open Settings.
-
Click on Privacy.
-
Click on Activity history.
-
Clear the Store my activity history on this device option.
-
Clear the Send my activity history to Microsoft option.

Activity history settings to disable TImeline on Windows 10 -
Under “Show activities from accounts,” turn off the toggle switch for all your accounts.
-
Jump to another settings page, and then come back to the “Activity history” page to refresh the page and make the option to delete your history available.
-
Under “Clear activity history,” click the Clear button.
-
Click the OK button to confirm.

Once you complete the steps, Windows 10 will no longer be able to collect activities on your device nor you’ll be able to resume tasks on other devices using Timeline.
It’s worth noting that this feature doesn’t clear of the data Microsoft collects about you, “Activity history” only deletes “pick up where you left off” related items.
How to disable Windows 10’s Timeline using Group Policy
Use these steps to disable Timeline using Group Policy on Windows 10 Pro, Enterprise, or Education:
-
Open Start.
-
Search regedit and click the top result to open the Registry.
-
Search for gpedit and click the top result to open the Group Policy Editor.
-
Browse the following path: Computer Configuration\Administrative Templates\System\OS Policies
-
On the right side, double-click the Enables Activity Feed policy.

Group Policy OS Policies -
Check the Disabled option.

Enables Activity Feed policy -
Click the Apply button.
-
Click the OK button.
-
Double-click the Allow publishing of User Activities policy.
Allow publishing of User Activities policy -
Check the Disabled option.
-
Click the Apply button.
-
Click the OK button.
-
Double-click the Allow upload of User Activities policy.
Allow upload of User Activities policy -
Check the Disabled option.
-
Click the Apply button.
-
Click the OK button.
-
Restart your computer.


After you complete the steps, Timeline will no longer work on your device running Windows 10.
How to disable Windows 10’s Timeline using Registry
Alternatively, you can permanently disable Timeline on Windows 10 modifying the Registry with these steps:
Warning: It’s very important to note that modifying the Windows Registry can cause serious problems if not used properly. It’s assumed you know what you’re doing and that you have created a full backup of your system before proceeding.
-
Open Start.
-
Search regedit, and click the top result to open the Registry.
-
Browse the following path:
HKEY_LOCAL_MACHINE\SOFTWARE\Policies\Microsoft\Windows
-
Right-click the Windows (folder) key, select New, and click on the Key option.
-
Name the key System and press Enter.
-
Right-click the System (folder) key, select New, and click on DWORD (32-bit) Value.

Disable Timeline using Registry -
Name the key EnableActivityFeed and press Enter.
-
Double-click the newly created key and make sure its value is to 0.
-
Right-click the System (folder) key, select New, and click on DWORD (32-bit) Value.
-
Name the key PublishUserActivities and press Enter.
-
Double-click the newly created key and make sure its value is to 0.
-
Right-click the System (folder) key, select New, and click on DWORD (32-bit) Value.
-
Name the key UploadUserActivities and press Enter.
-
Double-click the newly created key and make sure its value is to 0.

After you complete the steps, restart your computer, and Timeline should now be disabled.
At any time, you can enable Timeline again by using the same steps mentioned above, but on step No. 4, make sure to right-select Delete for the EnableActivityFeed, PublishUserActivities, and UploadUserActivities keys, and then reboot your device.
Watch the video on how to turn off Timeline on Windows 10:
Timeline is a feature expected to arrive on Windows 10 version 1803 (April 2018 Update) on April 30, 2018. If you don’t see the “Activity history” settings, it’s because you’re not running the latest version of Windows 10. These settings are available starting Windows 10 build 17040 and later.
Update July 23, 2019: This guide was originally published in December 2017, and it’s been updated to reflect the changes on Windows 10.
Windows 10 collects a history of activities you’ve performed, including files you’ve opened and web pages you’ve viewed in Edge. You can disable this Timeline feature and remove the activities from Task View.
Timeline was added in Windows 10’s April 2018 Update. It can synchronize your activities between your PCs, but you have to enable the synchronization feature. By default, Windows keeps your history of activities on your own PC.
This option is located in the Settings app. Click the Start button, and then click the Settings icon (or press Windows+I on your keyboard) to open it.
Click the «Privacy» category in the Settings window.
Click the «Activity History» option under Windows permissions in the sidebar and then uncheck the «Let Windows collect my activities from this PC» checkbox. Windows will no longer collect any new activities for the Timeline.
Even after you disable collection of activities, Windows still shows activities it has previously collected in your Timeline. If you have Timeline enabled and syncing to your other PCs, it also shows activities from those other PCs in your Timeline.
To prevent activities from syncing to your PC, toggle any Microsoft account that appears under «Show activities from accounts» to the «Off» setting.
To remove all the existing activities from your Timeline, click the «Clear» button under «Clear activity history.»
The Timeline vanishes from the Task View interface after you perform the above steps.
If you have an empty desktop and look at Task View, you’ll see a «Use your PC to see more activities here» message, but no activities will appear until you re-enable this feature.