
Introduction
Update 4/24/12: Added login user/password tip
Update 11/15/11: Corrected error in original appliance

Recently I came across a SmallNetBuilder reader on the forums who was planning to build a Windows-based home server. As a Macbook Pro user, one of his needs was to have his server act as a target for Time Machine backups. Not an unreasonable request, but apparently more difficult than you might think. I suggested using Linux instead, but he was keen to stick with what he knew.
Apple, of course, sells the Time Capsule, so backing up over the network is possible. Requirements for backing up over the network include the use of AFP (Apple Filing Protocol) 3.2 or above.
Other people have used the TMShowUnsupportedNetworkVolumes hack in MacOS X to use a Windows file share as a Time Machine. But this has since shown to result in data loss once you start to fill up your disk. So this option is not recommended!
Regular readers of SmallNetBuilder will be aware that many NASes now come with TimeMachine support built in. This is courtesy of Netatalk – the open source implementation of AFP.
But back to Windows. Netatalk is open source, so probably also works on Windows, right? Apparently not, although why this is so remains a mystery to me. Microsoft itself used to include AFP compatibility in Windows Server, but they have pulled it as of Server 2008. Besides, it was only version AFP 2.2, so of no use for Time Machine.
As far as commercial products go, GroupLogic’s ExtremeZ IP supports Time Machine on Windows. But as this is SmallNetBuilder and not LargeCorporateNetBuilder, the $795 for 3 licenses pricetag is probably out of reach for most readers!
So what does that leave us with? Not a lot, unfortunately. So it got me thinking. There must be plenty of users out there who have a Windows-based server but have a few MacOS X users who would like to use said server to do their Time Machine backups over the network. What can SmallNetBuilder do to help them?
The solution I came up with was to use a virtual machine on Windows to host Linux running Netatalk. The idea would be to keep it as ‘appliance-like’ as possible, so that it could easily be downloaded installed and would be unlikely to go astray.
Now before the nay-sayers start, I agree this isn’t the most elegant solution. But it provides an alternative that is infinitely better than the current TMShowUnsupportedNetworkVolumes hack!
This article will first walk you through installing a virtualization solution on a Windows system. You’ll then have the option of installing a preconfigured «appliance» to handle Time Machine backups. Or you can go through the gory details and create your own appliance for installation.
This Part 1 will give you the easy way to get up and running by first installing a virtualization solution on a Windows system and then a preconfigured virtual appliance. For those who want to understand the whole process so that they can create their own version, you’ll get that all in Part 2.
Note that the result is not going to be a high performance solution. But that’s ok, since Time Machine backups are relatively low bandwidth once the initial backup is done. If you’re looking for an enterprise-grade solution for handling an office full of Macs running Time Machine backups, you’d be better off using a full blown (non-virtualized) Linux server or talk to GroupLogic (and get your checkbook ready). So with the introduction out of the way, let’s begin.
Virtualization
As previously mentioned, we are going to be running virtualized Linux. So we must choose a free virtualization solution. Three candidates were considered for the article and, to be honest, there isn’t a lot to choose from. But there is no reason why the techniques I use here won’t work in another version. So my choices were VMware Server, Oracle’s Virtualbox and Microsoft’s Virtual PC. All three run on an existing Windows installation (i.e. they don’t require a ‘bare metal’ install).
VMware Server is a great, mature product, but a bit of a beast (a 500 MB download!) and probably overkill for this project. I don’t have too much experience with MS Virtual PC, but it seems as good as any free VM solution.
This leaves VirtualBox, my preferred choice because I have used it the most. It is also (partially at least) available as open source (which we like). The download is only 1/6th of the size of VMware, too. The downside is that as a desktop package, it is not so easy to run the VM as an always-on service, but we’ll fix that later.
As I said, all products will work so use the one that you are most comfortable with.
The Easy Way
For those of you who just want to cut to the chase, there are two steps.
1) Go download and install Virtualbox from http:/www.virtualbox.org. I used version 4.1.2-7350 and run it on a Lenovo T420 laptop with Windows 7 Enterprise 64-bit with 8 GB RAM. Note that if you’re installing on Windows XP, you may get a number of errors and warnings. Just click on through them to finish the install.
2) Download the Time Machine appliance file from here. Double-click to install it.
Update 11/15/11 Note: There was an error in the original appliance that will throw a disk permissions error when you try to connect to the Time Machine appliance. If you downloaded the appliance before 11/15/2011, you need to download the updated version and install it.
Or you can use the original appliance, log into the VM with root/tmroot and type in
chmod 777 /mnt/MyTimeCapsuleData
That’s pretty much it. Your virtual MyTimeCapsule device should be visible to your Macs and you should be able to use it to store Time Machine backups.
You will probably want to create a service for the virtual machine so that it starts when Windows starts and cleanly shuts down when Windows does. We are going to be using a free Windows application called VBoxVmService. Download it and then extract the vms folder to your C drive root directory (c:\). Easy to follow documentation can be found in c:\vms\doc\Howto.txt.
First, navigate to the vms folder and open up VBoxVmService.ini in notepad.
You need to modify the second line to add your user name. Mine became:
VBOX_USER_HOME=C:\Users\kevin.herring\.VirtualBox
Edit the section called [Vm0] and change it so that it looks like:
VmName=MyTimeCapsule Autostart=yes
Then save and close the file.
Now you just follow the steps in the Howto.txt document:
Step 1. (for WINXP / SERVER2003) Launch CMD (Command Prompt) from your start menu.
Step 1. (for VISTA / SERVER2008 / WIN7) Right-click on CMD (Command Prompt) and choose “Run as Administrator” from the context menu.
Step 2. Install the service. Within the terminal window type:
cd C:\vms [ENTER]
VmServiceControl.exe -i [ENTER]
Step 3. Reboot your system.
That’s it! Just restart your Windows system and make sure that the virtual MyTimeCapsule device appears.
Update 4/24/12 note: If you are asked for a login details at any time you will need to log in with tmuser as both username and password.
Virtual Machine Creation
For the brave souls who want to craft their own appliance, you’ll first need to choose a Linux distro. Debian was my first exposure to Linux all the way back in 2005, when I wrote the Xbox NAS article. Ever since then, it has been what I have used for all my Linux server installations. I love it, so I’m going to be using it here. It has easy package management, a relatively small footprint (if properly configured) and installing Netatalk is a walk in the park.
I did investigate some other distros with the aim of reducing the installation size: Damn Small Linux (small but not so easy to install Netatalk); Gentoo; Linux From Scratch (too much effort for a relatively small return); and CentOS (no real benefit from Debian).
So Debian it is.
Usually, I would use Debian Testing (currently called Wheezy). But while installing it for this article, there were bugs with the installation process. So I gave up and went with Stable, version 6.0.2.1, currently called Squeeze. But the current release has changed and will continue to do so in the future.
So pick up the latest version here. Using 6.0.2.1 does mean we will need to pick up the Testing version of Netatalk later though. The i386 version is used because it has a small installed size. Since we are using only 128 MB RAM, a 64 bit version is not required.
Let’s fire up VirtualBox and create our machine.
Click New to launch the New Virtual Machine Wizard. On the VM Name and OS Type screen, I entered MyTimeCapsule for a name, Linux for operating system and Debian for OS version (Figure 1).

Creating the Virtual Machine
On the Memory screen, use the slider or text entry box to choose 128 MB of memory.

Setting VM Memory size
On the Virtual Hard Disk screen, check the Start-up Disk box and click the Create new hard disk radio button

Create hard disk
On the next screen, select the VDI (VirtualBox Disk Image) button.

Hard disk type
And on the following Virtual disk storage details screen (not shown) select Dynamically allocated for Storage details.
On the Virtual disk file location and size screen, accept the default Location shown in the screenshot below and enter a 1.0 GB size.

Hard disk location and size
After you click Next, you’ll get a Summary screen reporting your settings (not shown). If everything is OK, click Create. Otherwise click Back to make whatever changes you need.
After your VM is created, you’ll see the screen below.

VM created
VM Configuration
We next need to tweak some settings on the Virtual machine we’ve just set up. So select your new VM and click Settings. Select System and uncheck Enable absolute pointing device as shown below.

System settings
Now move to Display, select the Remote Display tab, check Enable Server and enter a port other than the 3389 default. I chose 33891 as shown below.

Remote Display
Move to Storage, which will show IDE and SATA controllers as shown below. Select the IDE Controller and delete it by clicking the icon shown.

Storage before changes
This will delete the virtual IDE CD/DVD device, so we need to add a SATA one. Click the left icon (Add CD/DVD Device) of the two that are to the right of the SATA controller (mousing over each one will reveal the correct one). Then click the Choose Disk button in the window that pops up and select the Debian ISO you downloaded. When you’re done, the Storage settings should look similar to those below.

Storage after changes
On the Audio settings, uncheck Enable Audio.

Audio settings
Moving to Network, change from NAT to Bridged Adapter. Then expand Advanced and change Adapter Type to Paravirtualized Network (virtio-net) as shown below.

Network settings
Finally, for USB, just uncheck Enable USB Controller.
Now click OK to close the Settings window.
We will also create another virtual hard disk to store your Time Machine data on. I suspect we will take a bit of a performance hit storing it in a virtual disk. But hopefully it won’t be noticeable and it will make the configuration easier. I am going to create disk that will expand up to 100 GB, but initially will be empty. Feel free to create one of a size that suits you.
Select your virtual machine and click Settings.
Click Storage then select the SATA Controller. Now click the Add Hard Disk icon (right hand one) and then the Create new disk button in the window that opens, which will launch the wizard. You’ve seen these screens before, so just enter these settings on the approprirate screens:
- First screen: VDI
- Details: Dynamically allocated
- Location/Name: MyTimeCapsuleData
- Size: 100 GB
- Click Create and you are done
That’s it for this time. In Part 2, we’ll install and configure Debian and Netatalk and show you how to create your own virtual appliance for it all.
Discuss this in the Forums
На предприятии с большим количеством компьютеров на базе ОС Apple macOS может возникнуть необходимость развёртывания централизованного сервера для хранения резервных копий на базе пакета Time Machine с интеграцией в механизмы доменной авторизации на базе каталога Active Directory (AD). В данной заметке мы рассмотрим три варианта организации сетевого ресурса (SMB) под задачу резервного копирования компьютеров macOS, а также поговорим о разных вариантах настройки клиентов macOS для подключения к такому ресурсу.
Сразу стоит отметить, что по причине появления Apple File System (APFS) протокол Apple Filling Protocol (AFP) стал считаться устаревшим, поэтому рассматривать AFP в контексте данной заметки мы не будем.
Организация сетевого ресурса для Time Machine на macOS
С тех пор, как Apple отказались развивать «серверные» продукты в пакете Server.app оставив только Profile manager, многие стали задаваться вопросом, а как же сейчас организовывать Time Machine Server?
На мой взгляд, Apple сделали лучше, чем было ранее, потому что перенесли возможность организации сетевого хранения резервных копий macOS в базовые настройки ОС, и поэтому теперь не требуется ничего устанавливать дополнительно.
Рассмотрим пример создания сетевого каталога для Time Machine на macOS Mojave.
1. Откроем настройки и перейдём в общий доступ;
2. Добавим каталог, который будет использоваться для Time Machine;
3. Вызываем контекстное меню на каталоге и откроем «дополнительные параметры…»
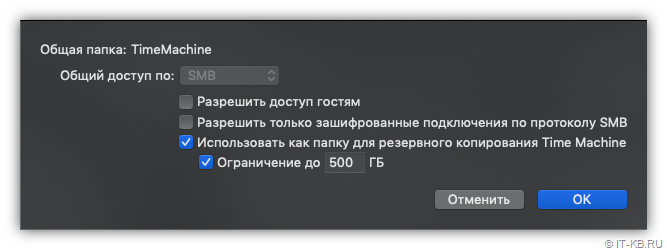
Разрешим использовать каталог для резервного копирования Time Machine.
Если macOS введён в домен, то на каталог можно применить необходимую группу безопасности AD для ограничения доступа к резервным копиям.
Общие ресурсы для Time Machine не поддерживаются на разделах APFS.
Организация сетевого ресурса для Time Machine на Linux Debian 10
Поддержка Apple Time Machine появилась в Samba 4.8, но в репозитории Debian 9 имеется только версия 4.5, поэтому необходимо либо собирать Samba в ручную, либо установить пред-релизную сборку Debian 10 Buster, в репозитория которого Samba 4.9.5.
В нашем примере на базе хоста виртуализации с Windows Server 2012 R2 разворачивается виртуальная машина Hyper-V Gen2 c гостевой ОС Debian 10 Buster. Описанная далее процедура базовой настройки Debian 10 не имеет прямого отношения к нашей задаче резервного копирования и добавлена для полноты описания. Поэтому знатоки Debian могут переместиться в конец этого раздела, где идёт речь о создании сетевого ресурса на базе Samba.
Итак, выполним вход под супер-пользователем и начнём настраивать систему.
Первым делом необходимо настроить сеть:
# nano /etc/network/interfaces
# The primary network interface
allow-hotplug eth0
iface eth0 inet static
address 10.28.35.20/24
gateway 10.28.35.1
# dns-* options are implemented by the resolvconf package, if installed
dns-nameservers 10.10.0.2 10.20.0.2
dns-search holding.com
Если в сети не используется IPv6, то отключим его:
# nano /etc/sysctl.conf
...
# Turn off IPv6
#
net.ipv6.conf.all.disable_ipv6 = 1
net.ipv6.conf.default.disable_ipv6 = 1
net.ipv6.conf.lo.disable_ipv6 = 1
net.ipv6.conf.eth0.disable_ipv6 = 1
Применим изменения:
# sysctl -p
Если для доступа в Интернет используется прокси-сервер, настроим его, чтобы была возможность устанавливать и обновлять пакеты:
# nano /etc/profile
...
#Set proxy
#
export ALL_PROXY=http://s-Update-User:P2ssw0rd@KOM-PROXY.holding.com:3128
export http_proxy=$ALL_PROXY
export https_proxy=$ALL_PROXY
export ftp_proxy=$ALL_PROXY
Применяем изменения:
# source /etc/profile
Настоим репозитории Debian 10:
# nano /etc/apt/sources.list
...
#
deb http://deb.debian.org/debian buster main contrib non-free
deb-src http://deb.debian.org/debian buster main contrib non-free
#
deb http://deb.debian.org/debian buster-updates main contrib non-free
deb-src http://deb.debian.org/debian buster-updates main contrib non-free
#
deb http://security.debian.org/ buster/updates main contrib non-free
deb-src http://security.debian.org/ buster/updates main contrib non-free
Установим обновления пакетов:
# apt-get update
# apt-get upgrade
Установим пакеты, необходимые в рамках нашей задачи:
# apt-get install hyperv-daemons ntp sssd krb5-user policykit-1 packagekit samba sudo net-tools
Настроим sudo, разрешив всем пользователям повышающим привилегии, использовать ранее заданные переменные с настройками прокси:
# visudo
Defaults env_keep = "http_proxy https_proxy ftp_proxy"
Разрешим пользователю user1 выполнять повышение привилегий. Добавим пользователя user1 в группу sudo
# usermod -aG sudo user1
Теперь можно завершить сеанс пользователя root и в дальнейшем пользоваться учётной записью user1.
Так как система будет добавлена в домен, необходимо, чтобы на нашем сервере с Debian 10 было правильное время. Настроим NTP-клиент на получение времени с контроллеров домена:
$ sudo nano /etc/ntp.conf
Добавляем в файл записи о NTP-серверах:
...
server dc01.holding.com
server dc02.holding.com
...
Перезапускаем службу
$ sudo systemctl restart ntp
Настраиваем поддержку Kerberos под свой домен AD:
$ sudo mv /etc/krb5.conf /etc/krb5.conf.org
$ sudo nano /etc/krb5.conf
[libdefaults]
dns_lookup_kdc = no
dns_lookup_realm = no
ticket_lifetime = 24h
renew_lifetime = 7d
forwardable = true
rdns = false
default_realm = HOLDING.COM

# for Windows 2008 with AES
default_tgs_enctypes = aes256-cts-hmac-sha1-96 rc4-hmac des-cbc-crc des-cbc-md5
default_tkt_enctypes = aes256-cts-hmac-sha1-96 rc4-hmac des-cbc-crc des-cbc-md5
permitted_enctypes = aes256-cts-hmac-sha1-96 rc4-hmac des-cbc-crc des-cbc-md5

[realms]
HOLDING.COM = {
kdc = dc01.holding.com
kdc = dc02.holding.com
admin_server = dc01.holding.com
default_domain = holding.com
}

[domain_realm]
.holding.com = HOLDING.COM
holding.com = HOLDING.COM
Настраиваем конфигурацию SSSD под свой домен AD:
$ sudo nano /etc/sssd/sssd.conf
[sssd]
domains = holding.com
config_file_version = 2
services = nss, pam
default_domain_suffix = holding.com
[domain/holding.com]
ad_server = dc01.holding.com, dc02.holding.com
ad_backup_server = dc03.holding.com, dc04.holding.com
ad_domain = holding.com
ad_gpo_access_control = disabled
krb5_realm = HOLDING.COM
cache_credentials = True
id_provider = ad
krb5_store_password_if_offline = True
default_shell = /bin/bash
ldap_id_mapping = True
ldap_idmap_default_domain_sid = S-1-5-21-3456789012-5678989012-6654389012
ldap_idmap_range_size = 2000000
ldap_use_tokengroups = False
use_fully_qualified_names = True
fallback_homedir = /home/%d/%u
access_provider = ad
subdomains_provider = none
default_shell = /bin/bash
Установим права на конфигурационный файл
$ sudo chmod 600 /etc/sssd/sssd.conf
Система ещё не в домене, поэтому работа службы sssd невозможна, отключим и остановим её, а так же выполним очистку кэша:
$ sudo systemctl disable sssd
$ sudo systemctl stop sssd
$ (sudo rm -f /var/lib/sss/db/* ) && (sudo rm -f /var/lib/sss/mc/* )
Отключаем и останавливаем nmbd:
$ sudo systemctl disable nmbd
$ sudo systemctl stop nmbd
Выполняем настройку Samba:
$ sudo mv /etc/samba/smb.conf /etc/samba/smb.conf.orig
$ sudo nano /etc/samba/smb.conf
[global]
# Basic Samba configuration
#
workgroup = HOLDING
realm = HOLDING.COM
netbios name = TM-Server
security = ads
kerberos method = secrets and keytab
client signing = yes
client use spnego = yes
server min protocol = SMB3_02
idmap config *:backend = tdb
idmap config *:range = 3000-7999
idmap config HOLDING.COM:backend = rid
idmap config HOLDING.COM:range = 10000-999999

# Turn off printing to avoid log spam
#
load printers = no
printing = bsd
printcap name = /dev/null
disable spoolss = yes

# Special configuration for Apple's Time Machine
#
fruit:model = MacPro
fruit:advertise_fullsync = true
fruit:aapl = yes

# Logging
#
log file = /var/log/samba/%m.log
#log level = 10
max log size = 1000

[TimeMachine]
root preexec = /etc/samba/mkhomedir.sh %U
path = /mnt/timemachine/%U
fruit:time machine = yes
spotlight = yes
valid users = @TimeMachine-Users@holding.com
read only = no
vfs objects = catia fruit streams_xattr
ea support = yes
inherit permissions = yes
Проверяем корректность настроек
$ testparm
Система выдаст предупреждение о лимите открытых файлов который в Linux и Windows отличается
rlimit_max: increasing rlimit_max (1024) to minimum Windows limit (16384)
Исправляем:
$ ulimit -n 16384
Для того, чтобы изменения применялись после каждой загрузки сервера, необходимо отредактировать конфигурацию системы, добавив строки:
$ sudo nano /etc/security/limits.conf
* - nofile 16384
root - nofile 16384
Выполним настройку автоматического создания каталога пользователя:
$ sudo nano /etc/samba/mkhomedir.sh
#!/bin/bash
if [ ! -e /mnt/timemachine/$1 ]; then
mkdir -m 700 /mnt/timemachine/$1
chown $1 /mnt/timemachine/$1
fi
exit 0
Разрешим выполнение скрипта:
$ sudo chmod +x /etc/samba/mkhomedir.sh
Попробуем получить билет Kerberos пользователя, учётные данные которого будут использоваться для ввода сервера в домен:
$ sudo kinit AdminUser
Проверим билет Kerberos:
$ sudo klist
Присоединим сервер к домену, используя ранее полученный билет Kerberos :
$ sudo net ads join -k osName='Debian GNU/Linux' osVer='10.0 (Buster)'
Получим и проверим билет Kerberos для учётной записи сервера:
$ sudo kinit -k TM-Server$
$ sudo klist
Если ввод в домен осуществлялся не с правами учётной записи администратора домена, то для учётной записи сервера необходимо отдельно зарегистрировать запись SPN, которая требуется для работы протокола Kerberos. Сделать это можно на любой Windows-системе, присоединённой к домену следующей командой:
setspn -A HOST/TM-Server.holding.com TM-Server
Включаем и запускаем SSSD:
$ sudo systemctl enable sssd
$ sudo systemctl start sssd
Теперь настроим Linux для работы с доменными пользователями, чтобы в дальнейшем использовать свои административные учётные записи Active Directory для администрирования сервера.
Автоматическое создание домашнего каталога для доменных пользователей:
$ sudo nano /etc/pam.d/common-session
session required pam_mkhomedir.so umask=0022 skel=/etc/skel
Настройка PAM для ограниченного входа в систему группам пользователей:
$ sudo nano /etc/access-groups-to-system
sudo
root
Linux-Admins@holding.com
Установим права на файл:
$ sudo chown root:root /etc/access-groups-to-system
$ sudo chmod 600 /etc/access-groups-to-system
Опишем в PAM использование нашего файла с перечнем разрешённых логинов/групп:
$ sudo nano /etc/pam.d/login
...
# Restricted access to service from local and domain groups
account required pam_listfile.so onerr=fail item=group sense=allow file=/etc/access-groups-to-system
...
Настройка sudo для группы доменных пользователей:
$ sudo nano /etc/sudoers.d/linux-admins
%Linux-Admins@holding.com ALL=(ALL) ALL
$ sudo chmod 0440 /etc/sudoers.d/linux-admins
Настройка PAM для SSH-подключений:
$ sudo nano /etc/pam.d/sshd
...
# Restricted access to service from local and domain groups
account required pam_listfile.so onerr=fail item=group sense=allow file=/etc/access-groups-to-system
...
Настроим конфигурацию SSH-сервера:
$ sudo nano /etc/ssh/sshd_config
Изменим следующие строки:
Port 22
ListenAddress 10.28.35.20

# GSSAPI options
GSSAPIAuthentication yes
GSSAPICleanupCredentials yes
Перезапустим службу SSH-сервера:
$ sudo systemctl restart sshd
Напоследок подключим диск, на котором будут хранится резервные копии.
Посмотрим, какой диск виртуальной машины доступен
$ sudo fdisk --list
В нашем примере будет использоваться диск /dev/sdb. Выполним на этом диске разметку:
$ sudo fdisk /dev/sdb
n — создаём новый раздел
p — проверяем результат
w — записываем изменения
Форматируем созданный раздел в файловую систему ext4:
$ sudo mkfs.ext4 /dev/sdb1
Создаём точку монтирования:
$ sudo mkdir /mnt/timemachine
Узнаём необходимый для монтированная идентификатор UUID диска:
$ sudo blkid /dev/sdb1
Настраиваем авто-монтирование диска при каждой загрузке сервера:
$ sudo nano /etc/fstab
...
# Time Machine disk
#
UUID=7d7932b8-ea6f-4507-99b4-613322765d21 /mnt/timemachine ext4 defaults 0 0
Применяем изменения в fstab
$ sudo mount -a
Установим доменную группу на каталог резервных копий:
$ sudo chgrp "TimeMachine-Users@holding.com" /mnt/timemachine
Перезапустим службу Samba:
$ sudo systemctl restart smbd
Организация сетевого ресурса для Time Machine на Windows Server
По умолчанию, Time Machine не поддерживает SMB ресурсы организованные на Windows Server, так как Windows Server не имеет расширения F_FULLSYNC. Поэтому мы вручную создадим, так называемый (в терминологии локализованной версии macOS), «рассеянный» (sparsebundle) пакетный образ диска и разместим его на этом сетевом ресурсе.
Подключим сетевой ресурс и создадим на нём рассеянный пакетный образ диска с помощью Disk Utility.app
- Имя файла: имя хоста
- Имя раздела: Резервные копии Time Machine
- Размер устанавливаем в зависимости от потребностей
- Файловая система: Mac OS Extended (Чувствительный к регистру символов, журналируемый)
- Шифрование: устанавливаем если мы хотим иметь зашифрованную резервную копию
- Раздел: Одиночный раздел — Схема разделов GUID
- Формат: Рассеянный пакетный образ диска

Создать образ sparsebundle можно и с помощью Terminal.app:
hdiutil create -encryption AES-256 -size 150g -type SPARSEBUNDLE -imagekey sparse-band-size=1024000 -fs "Case-sensitive Journaled HFS+" -volname "Резервные копии TimeMachine" /Volumes/backups-macos\$/$(hostname -s).sparsebundle
Отдельное внимание можно уделить ключу «-imagekey sparse-band-size=«, который по умолчанию имеет значение 16384. С помощью него можно регулировать размер части диска, с учётом 512 байт на сектор. То есть по умолчанию размер части равен 8 Мб, а в примере 512 Мб.
После создания образа дисковой утилитой, он автоматически подключится в систему. Теперь необходимо включить на этом образе параметр enableOwnership, для того, чтобы Time Machine мог управлять разрешениями.
Откроем Terminal.app и узнаем каким устройством подключен образ:
$ diskutil list
Включим управление владением
$ sudo diskutil enableOwnership /dev/disk3s2
Проверить состояние параметра можно как в терминале, так и в дисковой утилите
$ diskutil info disk3s2 | grep Owner
В Disk Utility.app информация об этом параметре «Владельцы включены» обновится только после переподключения образа. Однако, необходимо иметь ввиду, что данный параметр хранится на той системе, где он был включен и находится в файле /var/db/volinfo.database. Это можно проверить, но сперва узнаем идентификатор тома:
$ diskutil info /dev/disk3s2 | grep "Volume UUID"

Volume UUID: 07550ADF-1BC3-397B-95E9-B3DC77F94C54
Затем прочтём файл
$ sudo cat /var/db/volinfo.database | grep 07550ADF

07550ADF-1BC3-397B-95E9-B3DC77F94C54: 00000001
Для того, чтобы метод работал, необходимо заранее монтировать образ в систему при входе пользователя, создадим приложение на Apple Script:
tell application "Finder"
  try
    mount volume "smb://File-Cluster.holding.com/backups-macos$"
  end try
end tell
try
  do shell script "hdiutil attach /Volumes/backups-macos$/$(hostname -s).sparsebundle"
end try
Экспортируем его как «Программа», затем добавляем в автозагрузку при входе пользователя.
Для подобного метода резервного копирования на sparsebundle-диск можно использовать и другие и другие сетевые ресурсы, например NFS.
Подключение сетевого ресурса к Time Machine
При относительно небольшом количестве клиентов подключения можно выполнить вручную, используя утилиту терминала tmutil.
Если подключаемся к сетевому расположению, то пример команды будет выглядеть так:
$ sudo tmutil setdestination smb://$USER:password@TM-Server.holding.com/timemachine
Несмотря на то, что клиентская машина с macOS в домене и у нас имеется сквозная аутентификация, здесь необходимо будет явным образом указать имя пользователя и пароль.
Если подключаемся к смонтированному HOSTNAME.sparsebundle на сетевом ресурсе:
$ sudo tmutil setdestination /Volumes/Резервные\ копии\ Time\ Machine/
Посмотреть информацию о существующих расположениях Time Machine:
$ tmutil destinationinfo
Если в компании много компьютеров на базе macOS, то настраивать каждый из них вручную будет не совсем интересно. В таком случае для массовой настройки можно воспользоваться Profile Manager.
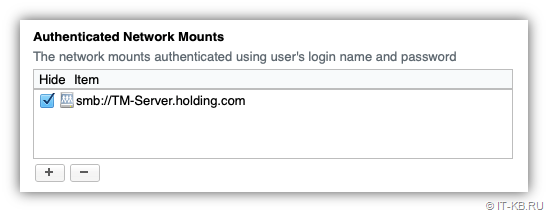
В группе macOS, секции Login Items, настроим аутентификацию пользователя на сетевом ресурсе.
В секции Time Machine укажем путь до сетевого каталога и параметры резервного копирования.
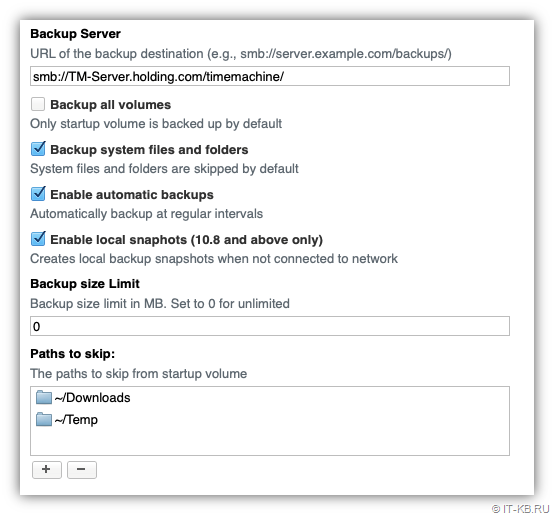
Для вступления параметров в силу необходим релогин. После применения параметров, пользователь сможет управлять только исключениями каталогов из резервного копирования.
Проверка восстановления из резервной копии
После того, как создана хотя бы одна резервная копия, мы можем проверить восстановление файлов.
Перейдём в каталог, в котором хотим выполнить восстановление, вызовем spotlight сочетанием клавиш ⌘+пробел и откроем Time Machine. Остаётся выбрать файлы или каталоги, которые необходимо восстановить.
Подобным образом можно восстанавливать удалённые письма в приложении Mail.app.
Для восстановления операционной системы после критических сбоев, замены HDD/SSD или переноса конфигурации на новый Mac, необходимо воспользоваться macOS Recovery. После загрузки macOS Recovery переходим в Time Machine, выполняем подключение к «Другой сервер», прописываем сетевой путь до каталога с резервными копиями:

При необходимости, система запросит учетные данные для подключения к сетевому ресурсу и ключ для зашифрованной резервной копии.
Introduction
Setting up a Time Machine server for multiple MacBooks can be a complex task, especially when using a Windows server as the backup destination. While there are many resources available for setting up Time Machine on a Mac or a Linux server, the process can be more challenging when using a Windows server. In this article, we will guide you through the process of setting up Time Machine for multiple MacBooks on a Windows server, using a Dell PowerEdge R730xd and a Dell PowerVault M1200 as an example.
Understanding Time Machine and SMB
Time Machine is a built-in backup feature on Macs that allows users to back up their data to an external drive or a network-attached storage (NAS) device. SMB (Server Message Block) is a protocol that allows Windows servers to share files and folders with Macs. To set up Time Machine on a Windows server, we need to configure the server to share files and folders using SMB, and then configure the MacBooks to use Time Machine to back up to the Windows server.
Hardware Requirements
To set up Time Machine on a Windows server, you will need the following hardware:
- A Windows server (in this case, a Dell PowerEdge R730xd)
- A NAS device or a storage array (in this case, a Dell PowerVault M1200)
- A network switch or router to connect the MacBooks to the Windows server
- Multiple MacBooks to back up to the Windows server
Software Requirements
To set up Time Machine on a Windows server, you will need the following software:
- Windows Server 2019 or later (in this case, Windows Server 2019)
- SMB protocol enabled on the Windows server
- A backup software (in this case, Windows Server Backup)
- Multiple MacBooks with Time Machine enabled
Configuring the Windows Server
To configure the Windows server to share files and folders using SMB, follow these steps:
Step 1: Enable SMB on the Windows Server
- Open the Server Manager on the Windows server.
- Click on «Add Roles and Features» and select «File and Storage Services».
- Click on «SMB Shares» and select «Next».
- Select «Create a new SMB share» and select «Next».
- Select the storage location for the SMB share and select «Next».
- Enter a name and description for the SMB share and select «Next».
- Select the permissions for the SMB share and select «Next».
- Click on «Install» to install the SMB share.
Step 2: Configure the SMB Share
- Open the File Explorer on the Windows server.
- Navigate to the SMB share and right-click on it.
- Select «Properties» and select the «Security» tab.
- Click on «Edit» and select the «Add» button.
- Enter the username and password for the MacBooks to use to access the SMB share.
- Select the permissions for the MacBooks to use to access the SMB share.
- Click on «OK» to save the changes.
Step 3: Configure the Backup Software1. Open the Windows Server Backup on the Windows server.
- Click on «Backup» and select «Next».
- Select the storage location for the backup and select «Next».
- Select the backup options and select «Next».
- Click on «Backup» to start the backup process.
Configuring the MacBooks
To configure the MacBooks to use Time Machine to back up to the Windows server, follow these steps:
Step 1: Enable Time Machine on the MacBook
- Open the System Preferences on the MacBook.
- Click on «Time Machine» and select «Select Backup Disk».
- Select the SMB share on the Windows server as the backup disk.
- Enter the username and password for the MacBook to use to access the SMB share.
- Click on «Select» to select the SMB share as the backup disk.
Step 2: Configure the Time Machine Settings
- Open the Time Machine preferences on the MacBook.
- Click on «Options» and select «Select Backup Disk».
- Select the SMB share on the Windows server as the backup disk.
- Enter the username and password for the MacBook to use to access the SMB share.
- Click on «Select» to select the SMB share as the backup disk.
Step 3: Start the Backup Process
- Open the Time Machine preferences on the MacBook.
- Click on «Backup Now» to start the backup process.
Troubleshooting
If you encounter any issues while setting up Time Machine on a Windows server, follow these troubleshooting steps:
- Check the SMB share configuration on the Windows server.
- Check the Time Machine settings on the MacBook.
- Check the network connection between the MacBook and the Windows server.
- Check the backup software configuration on the Windows server.
Conclusion
Setting up Time Machine on a Windows server can be a complex task, but with the right hardware and software requirements, it is possible to configure a Windows server to share files and folders using SMB and configure the MacBooks to use Time Machine to back up to the Windows server. By following the steps outlined in this article, you can set up a Time Machine server for multiple MacBooks on a Windows server and ensure that your data is safely backed up.
Additional Resources
For more information on setting up Time Machine on a Windows server, refer to the following resources:
- Microsoft documentation on SMB shares
- Apple documentation on Time Machine
- Dell documentation on PowerEdge R730xd and PowerVault M1200
Frequently Asked Questions
Q: What is the minimum hardware requirement for setting up Time Machine on a Windows server?
A: The minimum hardware requirement is a Windows server with a storage array or NAS device.
Q: What is the minimum software requirement for setting up Time Machine on a Windows server?
A: The minimum software requirement is Windows Server 2019 or later.
Q: How do I configure the SMB share on the Windows server?
A: To configure the SMB share on the Windows server, follow the steps outlined in the «Configuring the Windows Server» section of this article.
Q: How do I configure the Time Machine settings on the MacBook?
A: To configure the Time settings on the MacBook, follow the steps outlined in the «Configuring the MacBooks» section of this article.
Q: What is the minimum hardware requirement for setting up Time Machine on a Windows server?
A: The minimum hardware requirement is a Windows server with a storage array or NAS device. The storage array or NAS device should have enough storage capacity to hold the backups of all the MacBooks that will be using Time Machine.
Q: What is the minimum software requirement for setting up Time Machine on a Windows server?
A: The minimum software requirement is Windows Server 2019 or later. You will also need to install the SMB protocol on the Windows server and configure it to share files and folders with the MacBooks.
Q: How do I configure the SMB share on the Windows server?
A: To configure the SMB share on the Windows server, follow these steps:
- Open the Server Manager on the Windows server.
- Click on «Add Roles and Features» and select «File and Storage Services».
- Click on «SMB Shares» and select «Next».
- Select «Create a new SMB share» and select «Next».
- Select the storage location for the SMB share and select «Next».
- Enter a name and description for the SMB share and select «Next».
- Select the permissions for the SMB share and select «Next».
- Click on «Install» to install the SMB share.
Q: How do I configure the Time Machine settings on the MacBook?
A: To configure the Time Machine settings on the MacBook, follow these steps:
- Open the System Preferences on the MacBook.
- Click on «Time Machine» and select «Select Backup Disk».
- Select the SMB share on the Windows server as the backup disk.
- Enter the username and password for the MacBook to use to access the SMB share.
- Click on «Select» to select the SMB share as the backup disk.
Q: What are the troubleshooting steps for setting up Time Machine on a Windows server?
A: The troubleshooting steps for setting up Time Machine on a Windows server are as follows:
- Check the SMB share configuration on the Windows server.
- Check the Time Machine settings on the MacBook.
- Check the network connection between the MacBook and the Windows server.
- Check the backup software configuration on the Windows server.
Q: Can I use a third-party backup software with Time Machine on a Windows server?
A: Yes, you can use a third-party backup software with Time Machine on a Windows server. However, you will need to configure the third-party backup software to work with the SMB share on the Windows server.
Q: How do I secure the SMB share on the Windows server?
A: To secure the SMB share on the Windows server, follow these steps:
- Open the File Explorer on the Windows server.
- Navigate to the SMB share and right-click on it.
- Select «Properties» and select the «Security» tab.
- Click on «Edit» and select the «Add» button.
- Enter the username and password for the MacBooks to use to access the SMB share.
- Select the permissions for the MacBooks to use to access the SMB share.
- Click on «OK» to save the changes.
Q: Can I use a Windows server with a different operating system than Windows Server 2019?
A: Yes, you can use a Windows server with a different operating system than Windows Server 2019. However, you will need to ensure that the operating system is compatible with the SMB protocol and the backup software you plan to use.
Q: How do I monitor the backup process on the Windows server?
A: To monitor the backup process on the Windows server, follow these steps:
- Open the Windows Server Backup on the Windows server.
- Click on «Backup» and select «View Backup History».
- Select the backup job you want to monitor and click on «View Details».
- You can also use the Event Viewer to monitor the backup process.
Q: Can I use a third-party backup software to monitor the backup process on the Windows server?
A: Yes, you can use a third-party backup software to monitor the backup process on the Windows server. However, you will need to configure the third-party backup software to work with the SMB share on the Windows server.
Q: How do I troubleshoot issues with the backup process on the Windows server?
A: To troubleshoot issues with the backup process on the Windows server, follow these steps:
- Check the SMB share configuration on the Windows server.
- Check the Time Machine settings on the MacBook.
- Check the network connection between the MacBook and the Windows server.
- Check the backup software configuration on the Windows server.
- Check the Event Viewer for any error messages related to the backup process.
Q: Can I use a Windows server with a different storage array or NAS device than the Dell PowerVault M1200?
A: Yes, you can use a Windows server with a different storage array or NAS device than the Dell PowerVault M1200. However, you will need to ensure that the storage array or NAS device is compatible with the SMB protocol and the backup software you plan to use.
Q: How do I configure the storage array or NAS device on the Windows server?
A: To configure the storage array or NAS device on the Windows server, follow these steps:
- Open the Server Manager on the Windows server.
- Click on «Add Roles and Features» and select «File and Storage Services».
- Click on «Storage Pools» and select «Next».
- Select the storage array or NAS device and select «Next».
- Configure the storage pool settings and select «Next».
- Click on «Install» to install the storage pool.
Q: Can I use a Windows server with a different network configuration than the one described in this article?
A: Yes, you can use a Windows server with a different network configuration than the one described in this article. However, you will need to ensure that the network configuration is compatible with the SMB protocol and the backup software you plan to use.
Q: How do I configure the network configuration on the Windows server?
A: To configure the network configuration on the Windows server, follow these steps:
- Open the Server Manager on the Windows server.
- Click on «Add Roles and Features» and select «File and Storage Services».
- Click on «Network Configuration» and select «Next».
- Configure the network settings and select «Next».
- Click on «Install» to install the network configuration.
Q: Can I use a Windows server with a different operating system than Windows Server 2019?
A: Yes, you can use a Windows server with a different operating system than Windows Server 2019. However, you will need to ensure that the operating system is compatible with the SMB protocol and the backup software you plan to use.
Q: How do I configure the operating system on the Windows server?
A: To configure the operating system on the Windows server, follow these steps:
- Open the Server Manager on the Windows server.
- Click on «Add Roles and Features» and select «File and Storage Services».
- Click on «Operating System» and select «Next».
- Configure the operating system settings and select «Next».
- Click on «Install» to install the operating system.
Q: Can I use a Windows server with a different storage configuration than the one described in this article?
A: Yes, you can use a Windows server with a different storage configuration than the one described in this article. However, you will need to ensure that the storage configuration is compatible with the SMB protocol and the backup software you plan to use.
Q: How do I configure the storage configuration on the Windows server?
A: To configure the storage configuration on the Windows server, follow these steps:
- Open the Server Manager on the Windows server.
- Click on «Add Roles and Features» and select «File and Storage Services».
- Click on «Storage Configuration» and select «Next».
- Configure the storage settings and select «Next».
- Click on «Install» to install the storage configuration.
- Introduction
- Selecting WSL version
- Install WSL and pick default version:
- Install Ubuntu and configure
netatalk - Service startup script
- WSL 2
- WSL 1
- Scheduling service startup
- Connecting from macOS and configuring Time Machine
- History
Introduction
Time Machine on macOS does not like windows hosts as targets, likely due to noncompliance to Time Machine over SMB Specification.
In this article, we’ll document the steps to create a compatible Time Machine target via AFP using netatalk running under Ubuntu in WSL 2 or WSL 1
Selecting WSL version
While WSL 2 offers better compatibility by running a full Linux kernel in the virtual machine (see https://docs.microsoft.com/en-us/windows/wsl/compare-versions), there are some issues that may make WSL 1 a better choice for our purposes, at least for now:
- WSL 2 consumes massive amounts of RAM and doesn’t return it. As a workaround, the amount of memory available to the VM can be limited, as described in the Advanced Configuration
- WSL 1 has better performance across file systems, which our use case might benefit from
Install WSL and pick default version:
In the new cmd session:
Reboot when prompted, relaunch the cmd and set the chosen WSL version as default:
wsl --set-default-version 2
or
wsl --set-default-version 1
For details and best practices, please refer to the documentation https://docs.microsoft.com/en-us/windows/wsl/install
Install Ubuntu and configure netatalk
- Install the desired distribution (from https://aka.ms/wslstore or directly in the CMD):
wsl --list --online wsl --install -d ubuntu-20.04 - Unless the shell into the newly installed distribution has launched in a separate window—launch it by name. In this case,
ubuntu2004(note, remove punctuation). You can also run the default simply by runningwsl: -
After a while, a prompt to set up the username and password will appear. These credentials will be used to connect to AFP share from the Mac later. Proceed with configuring them and wait for the shell prompt to appear.
-
Optional. At this point, I would get rid of all non-essential packages as described here https://askubuntu.com/questions/79665/keep-only-essential-packages. There is no reason to keep all the bloatware, including
snapdand graphics drivers for our purposes. - Start logging service (will be helpful for troubleshooting if anything goes wrong):
sudo service rsyslog startLogs can be viewed by tailing
/var/log/syslog - Update repositories and install
netatalk:sudo apt update sudo apt -y upgrade sudo apt -y install netatalk - Edit
/etc/netatalk/afp.confto configure paths to the folders to be shared. Windows disks are mounted under/mnt/. For example, to share general purpose folder nameStorageand another one dedicated to Time Machine namedTime Machinelocated in the root of windows driveR:add the following:[Storage] path = /mnt/r/Storage [Time Machine] path = '/mnt/r/Time Machine' time machine = yesNote, if you later want to make changes to the file, restart
netatalkwithsudo service netatalk restart. - Allow starting the
netatalk(and optionally logging) service without prompts. Editsudoersfile viasudo visudoand add the following lines:%sudo ALL=(ALL) NOPASSWD: /usr/sbin/service netatalk start %sudo ALL=(ALL) NOPASSWD: /usr/sbin/service rsyslog start - Start the service
sudo service netatalk start - If Windows firewall prompted for access – click
Allow access. Otherwise, add the rule manually:netsh advfirewall firewall add rule name="Allow AFP connections" dir=in action=allow protocol=TCP localport=548
Service startup script
WSL 2
WSL 2 runs in a separate internal network connected to an internal Hyper-V virtual switch named WSL. Unfortunately, it is not feasible to make it external without breaking everything around it, so we’ll instead create a port mapping. Consequently, mDNS/Bonjour won’t work to advertise AFP shares and Time Machine services, but that’s not a big deal: Windows host supports mDNS, so we can connect to it directly in the finder via Command+K, afp://windows-host-name.local.
To configure firewall to access the WSL instance, we will build on the excellent script shared here: https://github.com/microsoft/WSL/issues/4150#issuecomment-504209723
Additionally, it may be helpful to start the logging service as well, just to be able to troubleshoot any possible runtime issues with the netatalk in the future.
Create the script somewhere accessible, like c:\Scripts\wsl_startup.ps1, with the following content:
$remoteport = bash.exe -c "hostname -I"
$found = $remoteport -match '\d{1,3}\.\d{1,3}\.\d{1,3}\.\d{1,3}';

if( $found ){
  $remoteport = $matches[0];
} else{
  echo "The Script Exited, the ip address of WSL 2 cannot be found";
  exit;
}

iex "netsh interface portproxy add v4tov4 listenport=548 listenaddress=0.0.0.0 connectport=548 connectaddress=$remoteport";

wsl sudo service rsyslog start
wsl sudo service netatalk start
WSL 1
There is no need to configure port forwarding. Remove any existing forwards you might have created when playing with WSL 2 above:
netsh interface portproxy show v4tov4
netsh interface portproxy delete v4tov4 listenport=548 listenaddress=0.0.0.0
Create the script somewhere accessible, like c:\Scripts\wsl_startup.ps1, with the following content:
wsl sudo service rsyslog start
wsl sudo service netatalk start
If logging is not needed and therefore the contents of the script condense to a single line it can be directly scheduled in the Task Scheduler (program name wsl, arguments sudo service netatalk start).
Scheduling service startup
Using Task Scheduler, create a new task to launch the script on each Windows start:
- search for
Task Schedulerand launch it Action→Create TaskGeneral:Name: Pick something, e.g.AFP StartupSecurity Options: SelectRun whether user is logged on or notSecurity Options: CheckRun with highest privilegesConfigure for:Windows 10
Triggers→New...Begin the task:At startupDelay the task:15 seconds(just in case)- Press OK
Actions→New...Action:Start a programProgram/script:powershell.exeAdd arguments:-ExecutionPolicy Unrestricted -File c:\Scripts\wsl_startup.ps1
- Press OK. Enter the administrator account credentials as requested.
To test the whole thing, including the scheduler item, restart windows host. Then on macOS, try to connect to it:
Connecting from macOS and configuring Time Machine
- Press
Command+Kin Finder, typeafp://windows-host-name.local, press Enter. - Pick the Time Machine share and press OK.
- Now that is it mounted, go to
Time Machinesettings inSystem Preferences, and clickSelect Disk. Pick the available share from the list (named as configured inafpd.confabove).
That’s pretty much it. The Time Machine from there on will be auto-mounting the share to perform the backup.
History
| Dec 12, 2021 | initial publication |
| Dec 14, 20201 | added WSL 1 specifics and simplified scripts |
There are tons of network backup solutions available for Windows and Linux. However, as Apple likes to make their own wheel so much, Time Machine is officially supported only by Apple’s own hardware and a few commercial NAS providers.
In order to make Time Machine work with Windows Server, one can follow this guide to create a sparse bundle image and share it over the network. However, it is quite unreliable as most of the time, macOS cannot recognize and mount this drive appropriately upon start-up or wake-up. A more elegant solution has been provided on Linux with the help of the netatalk package. Here I will describe all the steps needed to create an Ubuntu Server with Hyper-V hosted on your Windows Server and use a virtual disk (VHDX) file dedicated as a Time Machine backup location.
Create VM
First, install Ubuntu Server into Hyper-V. With modern Ubuntu releases, Gen 2 VM is absolutely going to work and is recommended. As this server is dedicated only to make Time Machine work, we can assign a small hard drive space (20 GB) and RAM size (1 GB). Dynamic RAM will be a very useful function to use here. After all the configurations, the assigned RAM is typically ~800 MB.
Create and config a dedicated virtual disk space
Then, we create a virtual disk (VHDX) as a dedicated backup space for Time Machine. You can use either the Hyper-V Manager or Disk Management to do so.
In Hyper-V Manager, go to the Settings of the Ubuntu VM, add a hard drive under the SCSI Controller, and point it to the virtual disk that you just created.
Now start your Ubuntu VM and connect to it with your favorite tool, e.g., ssh.
We will prepare the connected virtual disk for use.
First, check the device name of the virtual disk:
The virtual disk is usually ‘/dev/sdb’:
Disk /dev/sdb: 250 GiB, 268435456000 bytes, 524288000 sectors
Disk model: Virtual Disk
Units: sectors of 1 * 512 = 512 bytes
Sector size (logical/physical): 512 bytes / 4096 bytes
I/O size (minimum/optimal): 4096 bytes / 4096 bytes
Disklabel type: dos
Disk identifier: 0xed899760
Then, use the graphic cfdisk tool to create a partition that covers the entire drive:
In this tool, create a new partition (which should be \dev\sdb1 that covers all the space in this drive, Write the results, and Quit the tool.
Format this partition with ext4, and assign a volume label (optional) at your convenience:
sudo mkfs.ext4 /dev/sdb1
sudo e2label /dev/sdb1 timemachine
sudo reboot now
After the reboot (required), we need to tell the server to mount this volume automatically and give access. We first create a folder for the time machine storage. This can be anything but here i will use /media/timemachine.
sudo mkdir /media/timemachine
Now we will look for the UUID of the volume we created (virtual disk):
Look for the UUID of the volume that was created (in this case, dev/sdb1 with a volume label timemachine. Copy it and then edit this file:
Of course, I prefer nano which is much more user-friendly than vi.
Append the following line to this file:
UUID=XXXXX /media/timemachine ext4 defaults 0 0
where the XXXXX is the UUID you just copied. Ctrl+O to save this file, and Ctrl+X to exit.
Now we can reboot the server again and check if it’s automatically mounted. Otherwise, we can mount it now:
sudo mount /dev/sdb1 /media/timemachine
Assign permission:
sudo chown -R USER /media/timemachine
Here, USER is the username in your Ubuntu Server that will be used for backup. You will need this account to log in when you point your Time Machine destination in macOS.
Install and config netatalk
Next, we install the following packages:
sudo apt install netatalk avahi-daemon
avahi-daemon is a Bonjour service used for network location discovery on your mac.
Edit the config file of netatalk:
sudo nano /etc/netatalk/afp.conf
In nano, add the following content:
[Time Machine]
  path = /media/timemachine
  time machine = yes
Ctrl+O to save this file, and Ctrl+X to exit.
Restart the netatalk service:
sudo service netatalk restart
Now you should be able to see and select this drive for Time Machine in macOS if it is in the same local network as the server. The login info is the account you use on your Ubuntu Server, not what you use on the mac.
References:
- https://www.grizzly-hills.com/2019/11/02/ubuntu-19-10-setting-up-time-machine/
- https://zhuanlan.zhihu.com/p/129740379
- https://zhuanlan.zhihu.com/p/31088141