
Все способы:
- Способ 1: Регулировка громкости на наушниках
- Способ 2: Проверка физических неисправностей
- Способ 3: Регулировка громкости в ОС
- Способ 4: Проверка дополнительных параметров звука
- Способ 5: Обновление звукового драйвера
- Способ 6: Использование средств улучшения звука
- Вопросы и ответы: 0
Способ 1: Регулировка громкости на наушниках
Одна из частых причин тихой работы наушников — низкий уровень громкости, установленный на самом устройстве. Сейчас практически все современные, как музыкальные, так и игровые девайсы имеют либо колесико на одной из сторон, либо кнопки в этом же месте, либо кнопки на специальной плате, расположенной на кабеле. Внимательно ознакомьтесь со спецификацией своих наушников, попробуйте найти кнопки или колесико, затем выполните регулирование и проверьте, удастся ли таким способом увеличить громкость в Windows 11.
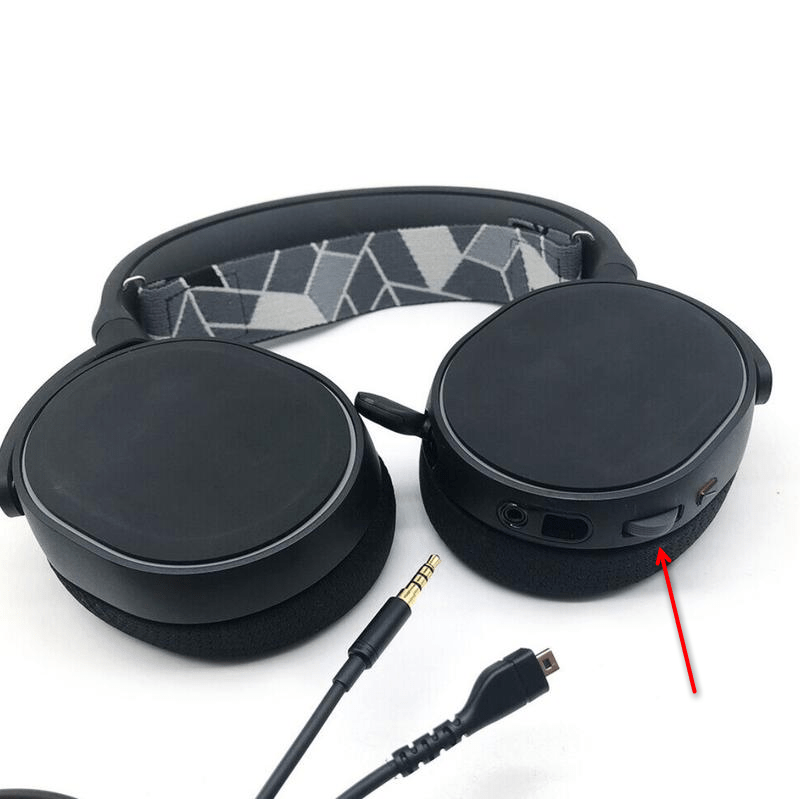
Способ 2: Проверка физических неисправностей
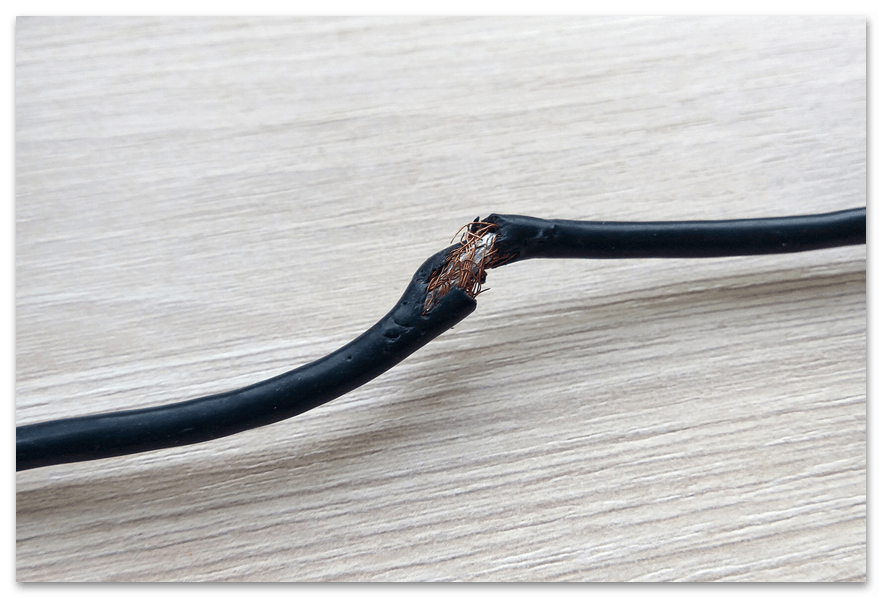
Иногда пользователи даже не замечают, что кабель на наушниках перегнулся в одном месте или начались проблемы с оплеткой. Обычно такие проблемы возникают около штекера или возле соединения с амбушюрами. Приводит такая неисправность к ухудшению звука, его отсутствию в одном из наушников или искажению частот, что тоже отражается на громкости. Мы советуем внимательно посмотреть на всю длину кабеля и узнать, нет ли на нем видимых физических дефектов.
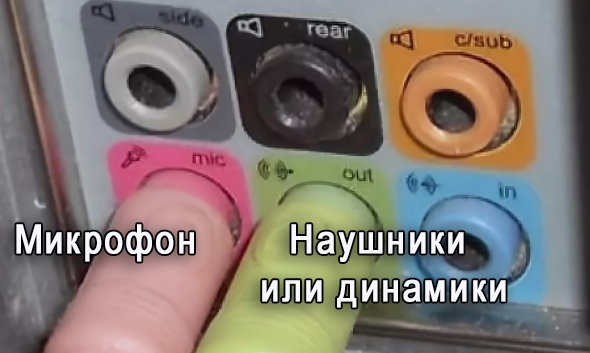
Отдельно стоит отметить, что при наличии нескольких доступных разъемов 3,5 мм вы можете попробовать подключить наушники к другому свободному порту, чтобы исключить проблему с его неисправностью. Это может быть как порт на вашем мониторе, так и материнской плате или передней панели корпуса системного блока.
Способ 3: Регулировка громкости в ОС
Теперь, если предыдущие способы не помогли решить ситуацию, понадобится обратиться непосредственно к операционной системе и проверить, можно ли увеличить громкость в наушниках через ее настройки. Рассмотрим как работу с общим ползунком громкости, так и с дополнительным меню, где есть регуляторы для всех работающих приложений.
- Вы можете нажать по кнопке на панели задач для вызова меню с настройками, среди которых есть и общий регулятор громкости. Передвиньте его немного вправо, если значение еще не максимальное, и проверьте, удалось ли решить проблему.
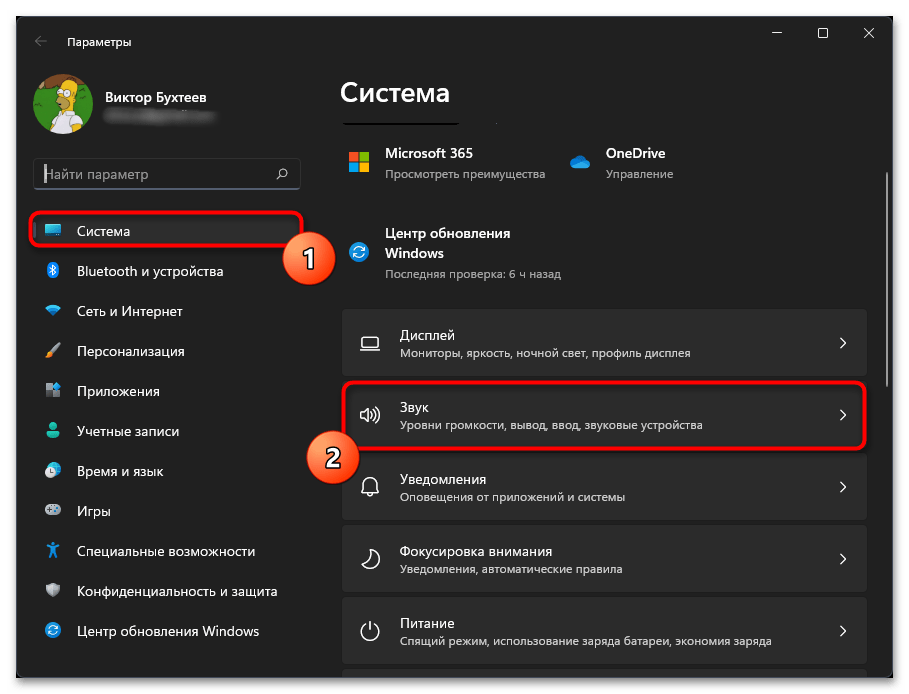
- Еще можно проверить громкость через «Параметры», открыв приложение путем нажатия по его значку в списке закрепленных «Пуска».
- Выберите раздел «Система» и разверните категорию «Звук».
- В ней убедитесь в правильности выбранного устройства воспроизведения, затем отрегулируйте громкость и попробуйте включить «Монозвук», что может оказаться полезным для небольшого усиления звучания.
- Опуститесь по списку и нажмите по «Громкость» для перехода к списку всех работающих приложений.
- Проверьте громкость каждой из программ и отрегулируйте ее, если это будет нужно. Такой метод часто помогает в ситуациях, когда в самой Виндовс 11 и в других приложениях громкость нормальная, а в каком-то конкретном — слишком низкая.


Способ 4: Проверка дополнительных параметров звука
Улучшения или параметры дискретизации, установленные для устройства воспроизведения в Windows 11, могут негативно сказываться на громкости, немного или даже ощутимо занижая ее. Особенно это будет заметно в тех случаях, когда речь идет о наушниках с не самыми хорошими звуковыми характеристиками. Мы советуем ознакомиться с этими дополнительными параметрами и изменить их для проверки настроек громкости.
- В том же меню настроек звука нажмите по ссылке «Дополнительные параметры звука».
- На первой вкладке под названием «Воспроизведение» найдите «Динамики» или «Гарнитуру», с которой сейчас осуществляется вывод звука. Дважды кликните по оборудованию левой кнопкой мыши.
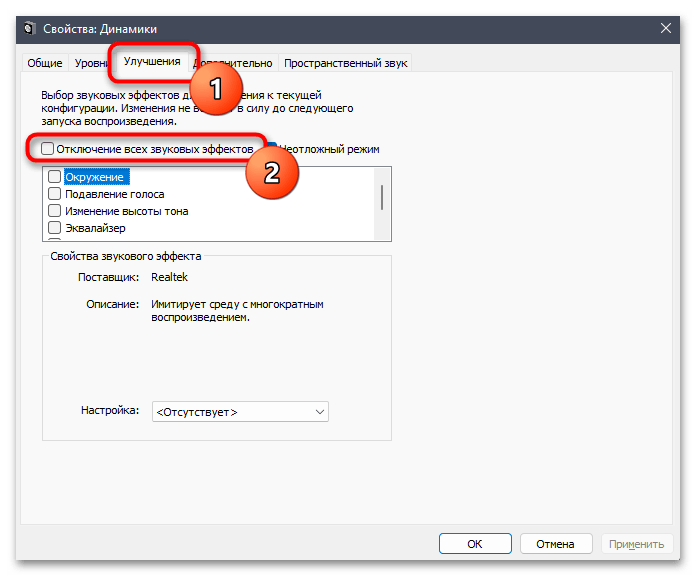
- Перейдите на вкладку «Улучшения», установите галочку возле пункта «Отключение всех звуковых эффектов» и примените изменения. Затем приступите к воспроизведению звуков и проверке громкости.
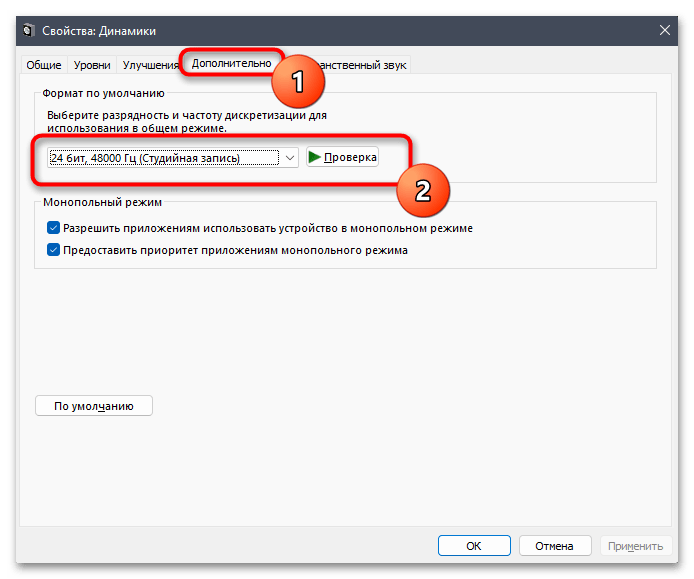
- Еще можно перейти на вкладку «Дополнительно», чтобы изменить формат по умолчанию, выбрав другую разрядность и частоту дискретизации. В некоторых случаях отличные от установленного параметры оказывают положительное влияние на громкость наушников.


Способ 5: Обновление звукового драйвера
Отсутствующий или устаревший звуковой драйвер редко становится причиной тихого звука на наушниках в Windows 11, однако такую причину исключать нельзя. Поэтому мы советуем самостоятельно проверить наличие обновлений и установить их. Использовать можно самые разные методы, начиная от штатного и заканчивая применением специальных программ. Более детально об этом читайте в другой статье по следующей ссылке.
Подробнее: Обновление звукового драйвера в Windows 11

Способ 6: Использование средств улучшения звука
Последний метод является комплексным, поскольку подразумевает использование разных средств для улучшения звука в наушниках. Иногда помогает установка драйвера от Realtek, в других случаях проблема решается после добавления специальных кодеков. Каждая из рекомендаций описана в материале, доступном по следующему заголовку.
Подробнее: Улучшение звука в наушниках на компьютере
К этому же методу можно отнести использование программ для усиления звука. Некоторые предназначены именно для этой цели, а другие являются настраиваемыми эквалайзерами с нужными функциями. Вы можете выбрать любой понравившийся софт и проверить, как он повлияет на звук в ваших наушниках. Обзор на самые действенные решения такого рода вы найдете далее.
Подробнее: Программы для усиления звука на компьютере
Наша группа в TelegramПолезные советы и помощь
Среди прочих проблем с воспроизведением звука одна из самых частых — слишком низкая громкость воспроизведения, иначе говоря, тихий звук: иногда только в отдельных программах, иногда в системе в целом, проблема может наблюдаться и в колонках, и в наушниках.
В этой инструкции о том, чем может быть вызвана проблема тихого звука в Windows 11 и 10 и способах исправить проблему.
Простые способы решения проблемы низкой громкости
Прежде чем приступить к каким-то дополнительным способам исправления, рекомендую проверить следующие вещи, особенно если до недавних пор громкость была нормальной, а проблем с воспроизведением не наблюдалось.
Рекомендую серьёзно отнестись к каждому пункту и перепроверить, даже если вы уверены, что всё в порядке:
- Если тихий звук наблюдается только в отдельной программе, загляните в микшер громкости (правый клик по значку динамика — открыть микшер громкости): возможно, низкая громкость выставлена отдельно для этой программы.

- Проверьте регуляторы громкости на колонках, мониторе (в меню монитора), если такие присутствуют и звук выводится через них.
- Проверьте подключение во всех узлах вашего устройства воспроизведения: коннекторы должны быть плотно подключены к звуковой карте, устройству воспроизведения, если колонки сами по себе модульные и соединяются кабелями, проверьте подключение кабелей между ними: часто проблема оказывается именно в этом, особенно если недавно проводилась уборка, оборудование двигалось.

- Если воспроизведение выполняется в проигрывателе с собственными параметрами громкости, эквалайзером или иными настройками воспроизведения, внимательно изучите их.
- В случае, если вы столкнулись с проблемой на наушниках, которые подключены к передней панели ПК, проверьте, изменится ли ситуация, если подключить их к выходу звуковой карты на задней панели.


Если все указанные подходы не изменили ситуацию, переходим к следующим шагам.
Параметры устройств воспроизведения
Следующий шаг — заглянуть в параметры устройств воспроизведения и поэкспериментировать с настройками:
- Нажмите клавиши Win+R на клавиатуре, либо нажмите правой кнопкой мыши по кнопке «Пуск» и выберите пункт «Выполнить», введите mmsys.cpl и нажмите Enter.
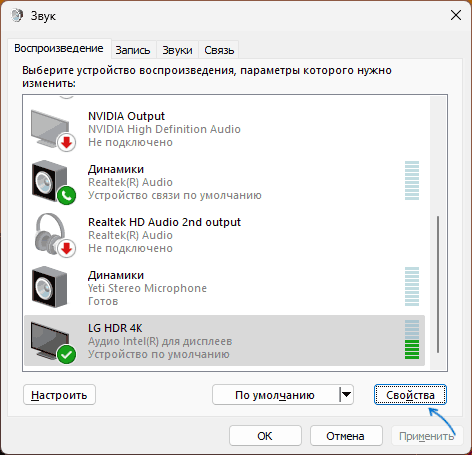
- Перейдите на вкладку «Воспроизведение», выберите ваше устройство воспроизведения и нажмите кнопку «Свойства».

- Попробуйте менять настройки, применяя изменения с помощью кнопки «Применить»: ситуацию может изменить отключение пространственного звука и дополнительных эффектов (вкладка присутствует не для всех звуковых карт), изменение формата по умолчанию на вкладке «Дополнительно».

Возможно, на одном из шагов громкость воспроизведения придёт в норму.
ПО управления звуком
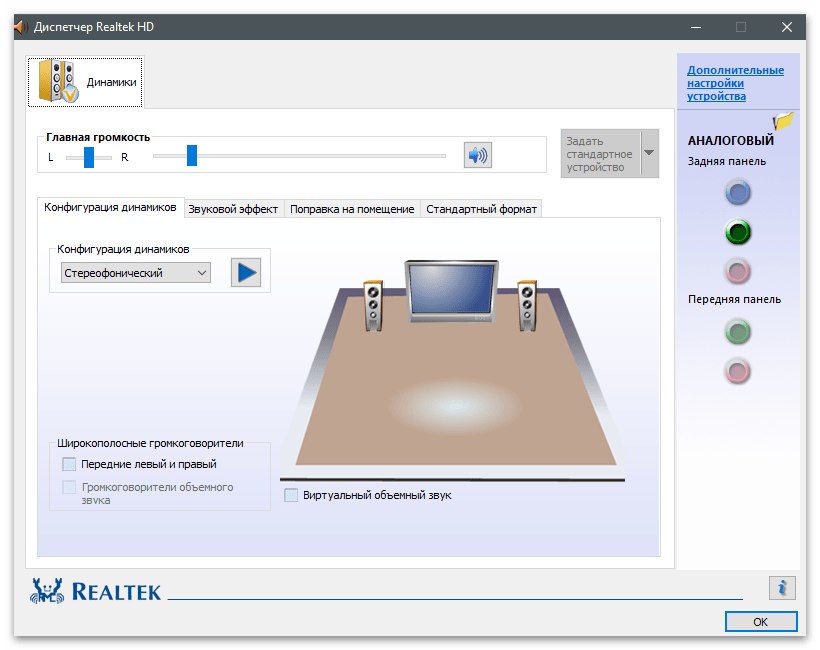
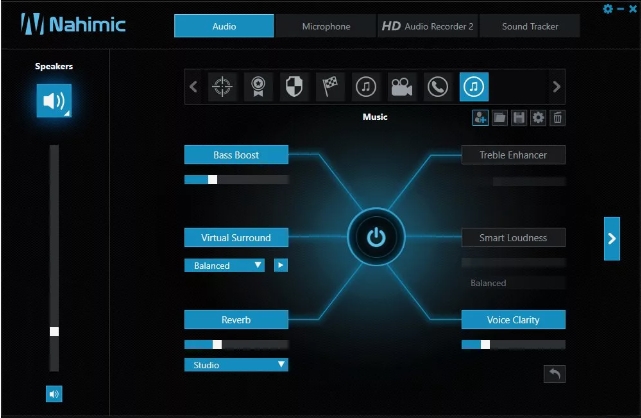
При наличии установленных приложений для управления звуковой картой: Realtek Audio Control, Nahimic и других, откройте их и внимательно изучите все настройки: эквалайзеры, конфигурацию динамиков и другие.
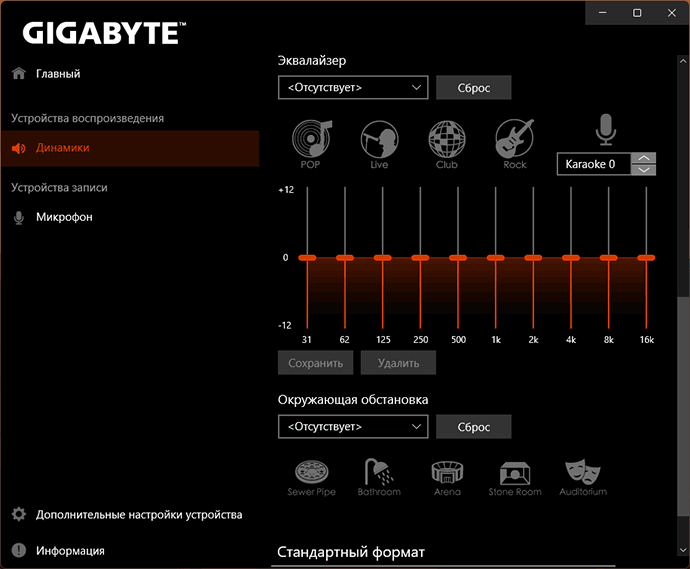
При наличии возможности включения и отключения различных эффектов и «улучшений», попробуйте их отключить и понаблюдать, даст ли это нужный эффект.
Драйверы звуковой карты
Windows 11/10 автоматически устанавливает и обновляет драйверы звука. Обычно, всё работает исправно, но не всегда. Если вы не устанавливали драйверы звуковой карты вручную, рекомендую это сделать:
- Зайдите на страницу поддержки вашей модели материнской платы (для ПК) или ноутбука, найдите раздел «Загрузки» (Downloads).
- Найдите драйвер звука (даже если он не для вашей версии Windows, с большой вероятностью он будет работать), скачайте его и запустите установку.


После установки желательно перезагрузить компьютер, а затем проверить, восстановилась ли громкость.
Некоторые дополнительные нюансы, которые могут влиять на громкость звука при воспроизведении:
- В случае, если тихий звук наблюдается в наушниках, то это может быть результатом загрязнения мембраны, иногда — износа их компонентов, повреждения кабелей. Проверить, в этом ли дело легко: если то же самое наблюдается при подключении наушников к другим устройствам воспроизведения, причина, видимо, именно в них.
- Тихий звук на ноутбуке, особенно если он такой с момента покупки — возможно, не является какой-либо неисправностью или результатом неправильных настроек: акустика на многих ноутбуках оставляет желать лучшего.
- Если проблема наблюдается при воспроизведении какого-то определенного контента (например, конкретного видео или музыкального альбома), возможно, сама запись была произведена с таким уровнем громкости.
- Если до недавнего времени проблем с громкостью не наблюдалось, а система не переустанавливалась, могут помочь точки восстановления системы.
Некоторые дополнительные материалы сайта, связанные с решением проблем со звуком в Windows: Что делать, если пропал звук в браузере, Не работает звук в Windows 11 — решение.
Всем привет! Сегодня будет очередной разбор достаточно популярной проблемы, когда на компьютере или ноутбуке с Windows (10, 11, 7, 8), вдруг внезапно стал очень тихий звук. Или вы только подключили свою гарнитуру и заметили малую громкость звучания. В статье я привел все возможные и невозможные варианты решения. Начнем мы с самого простого и потихоньку будет перебирать все способы. Напомню, что вы всегда можете обратиться за помощью ко мне – просто подробно опишите свой случай в комментариях. Но все же, советую перед этим внимательно почитать статью ниже.
Содержание
- Проверка уровня громкости
- Проверка драйвера
- Проблема с беспроводными наушниками или динамиками
- Проблема с драйвером
- Дополнительное ПО для звуковой карты
- Дополнительные советы
- Задать вопрос автору статьи
Проверка уровня громкости

Итак, у нас есть проблема – по каким-то причинам звук на ноутбуке или компьютере в Windows, очень тихий. Причем неважно какое устройства для вывода звука вы используете – это могут быть наушники, динамики, или встроенная периферия на ноуте. В первую очередь проверяем уровень громкости – нажимаем левой кнопкой мыши (ЛКМ) по динамику и устанавливаем громкость на максимум.
Если поверх динамика вы видите красный крестик – читаем эту инструкцию.
Далее нам нужно открыть микшер громкости для всех запущенных программ и окон. Кликаем правой кнопкой (ПКМ) по динамику и открываем соответствующий пункт.
Смотрите, чтобы уровень громкости был на максимум у всех программ и приложений.

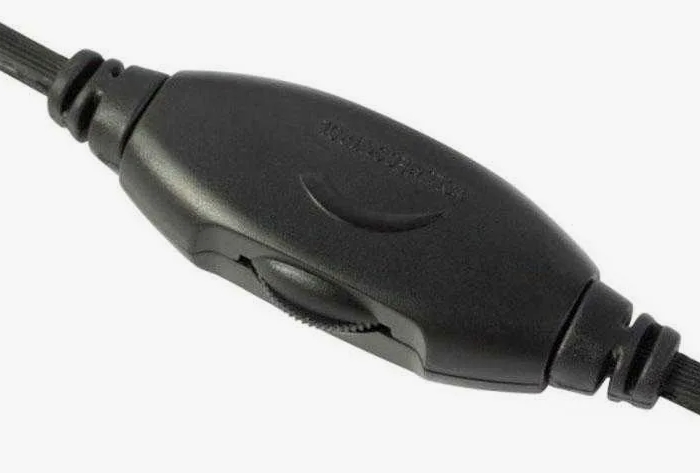
Некоторые наушники имеют на проводе регулятор громкости – его можно нечаянно выкрутить не в ту сторону. Иногда регулятор может находиться на самих ушах. Подобные штуки встречаются и в Bluetooth наушниках, но уже реже. Если у вас есть внешняя звуковая карта с регулятором – попробуйте проверить его там.
Еще одна проблема – неплотно вставлен кабель в порт звуковой карте. Проверьте, а лучше переподключите джек – отключаем, и снова подключаем кабель, плотно вставив его в порт. Если ваши наушники имеют переходник, то проверьте подключение и там.
Попробуйте включить звук и музыку из другого источника – в браузере, в проигрывателе, другой программе. Возможно проблема лежит именно со стороны программного обеспечения (проигрывателя). Если вы слушаете музыку или звук на сайте в интернете, то попробуйте другой альтернативный браузер. Можно попробовать встроенный Microsoft Edge.
Проверка драйвера
Итак, прошлые шаги нам не дали никакого результата, как же нам обратно усилить звук на ноутбуке или компе с Windows. Для этого давайте зайдем в параметры.
- Чтобы быстро попасть в нужный для нас раздел, кликаем ПКМ по динамику и открываем параметры звука.
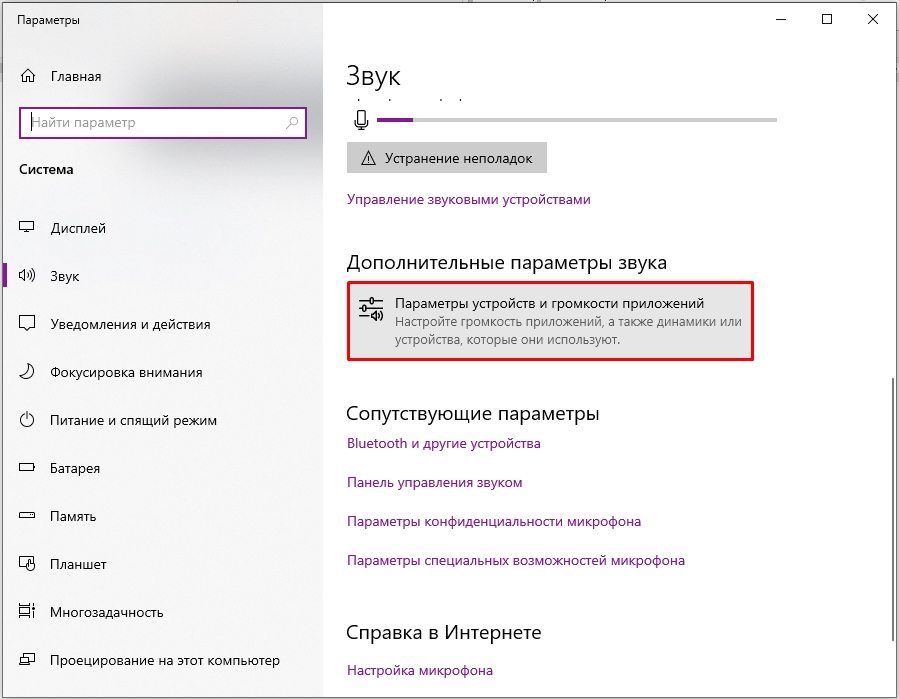
- В правом окошке кликните по кнопке «Устранение неполадок» в разделе «Звук». Далее система попробует провести диагностику – просто действуем согласно инструкциям в окошке.
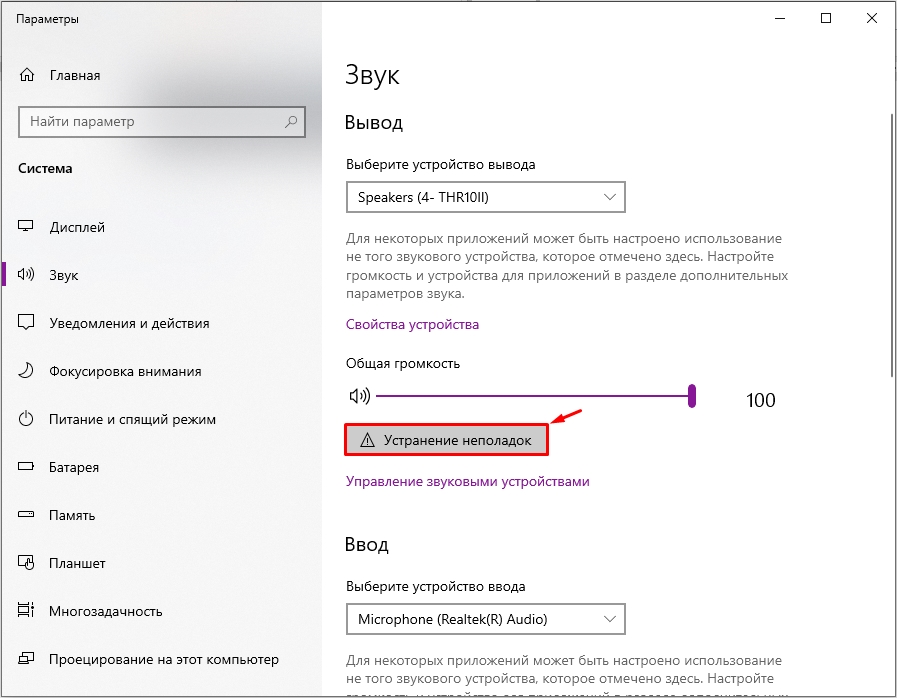
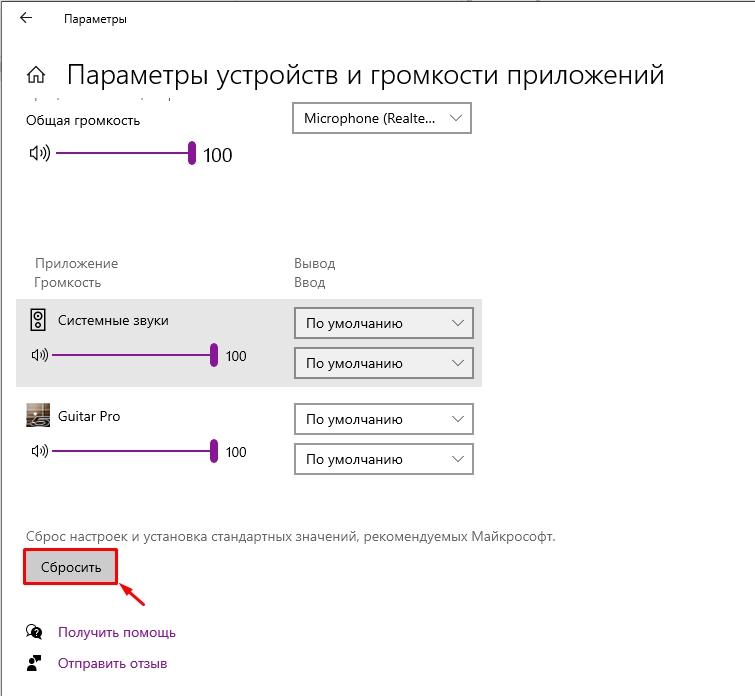
- Если проблема не решилась, листаем немного вниз до подраздела «Дополнительные параметры звука» – кликаем по кнопке ниже.
- Листаем вниз и сбрасываем параметры до значений по умолчанию. После этого проверяем звук.
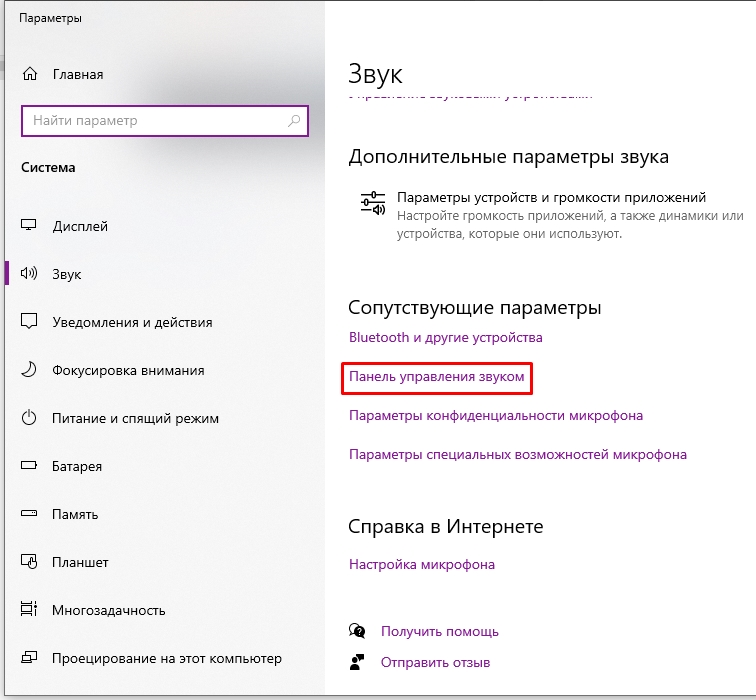
- Ниже в «Сопутствующих параметрах» откройте «Панель управления звуком».
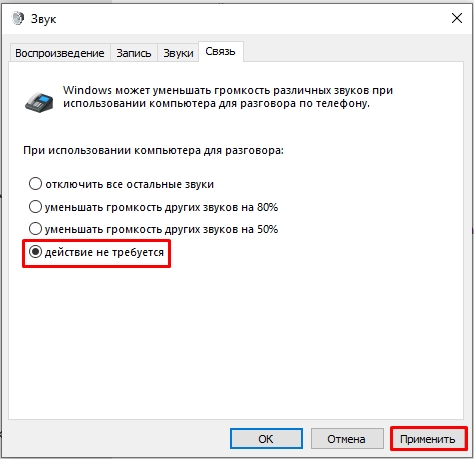
- Смотрите, после каждого из дальнейших шагов – проверяйте звук. Сначала переходим в «Связь», ставим настройку «Действие не требуется» и жмем «Применить».
- Кликаем ПКМ по вашим динамикам или наушникам, через которые идет звук и заходим в «Свойства».
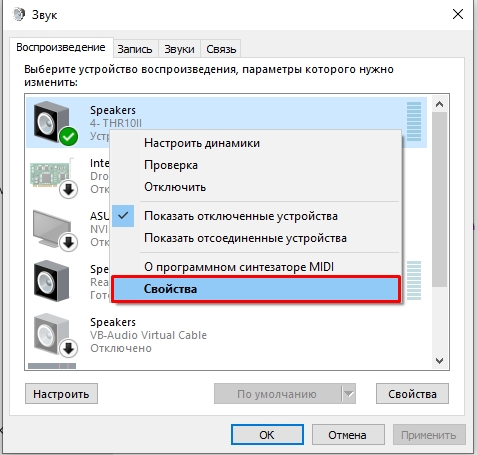
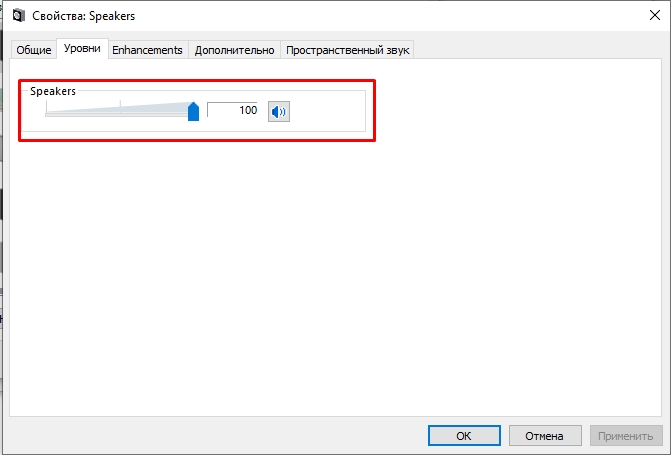
- В разделе «Уровни» смотрим, чтобы уровень громкости был на максимум.
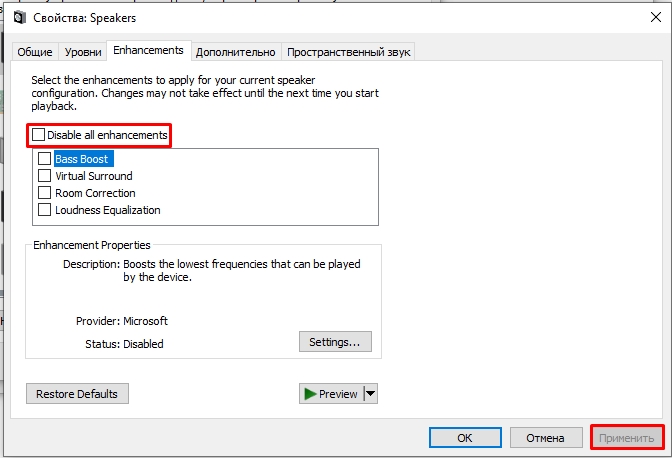
- Если у вас есть дополнительная вкладка «Enhancements» – выключите все галочки.
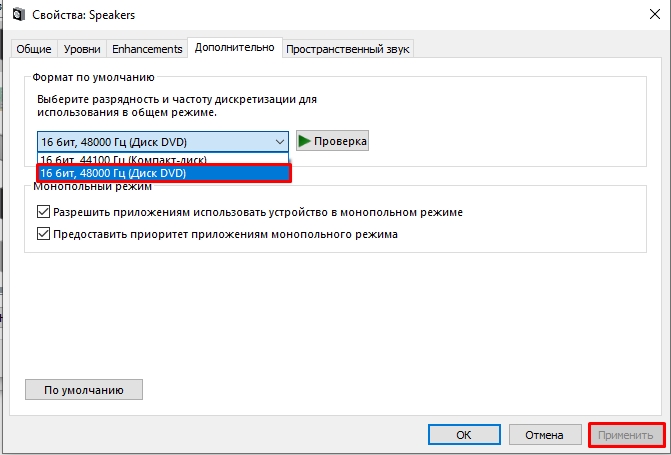
- Во вкладке «Дополнительно» установите максимальную частоту дискретизации и битность.
- Выключаем пространственный звук.
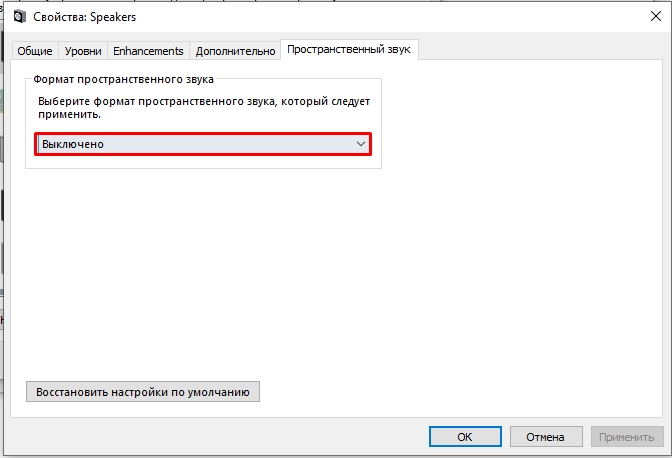
- Применяем настройки и делаем проверку. Если проблема осталась – попробуйте перезагрузить систему и сделать проверку повторно.
Проблема с беспроводными наушниками или динамиками
Если вы используете беспроводные наушники или динамики, подключённые по Bluetooth, вам нужно проверить некоторые моменты. Если вы используете небольшие наушники, то проблема может быть в загрязнении сеточки. В такие случаи их нужно чистить – об этом подробно написано тут. Отнеситесь к этому вопросу серьезно. У меня так была проблема с уровнем звука в моих стареньких наушниках Redmi, после чистки звук стал громче раза в два.
Можно попробовать заново их переподключить – об этом у нас есть подробная инструкция (ссылка). Возможно, при подключении вы сделали что-то не так, поэтому и есть проблема с громкостью и звук стал тише на компьютере. Возможно, сильно упал заряд батареи самих наушников – попробуйте их подзарядить.
Проблема с драйвером
Если звук все также очень тих, что в наушниках, что в динамиках – значит есть вероятность поломки драйверов. Иногда при обновлении Windows неправильно устанавливает программное обеспечение. Можно попробовать воспользоваться старым дедовским способом:
- Заходим в «Диспетчер устройств», нажав ПКМ по кнопке «Пуск».
- Прежде чем мы продолжим, проверьте, что вы подключены к интернету. Откройте «Звуковые, игровые и видеоустройства». Найдите вашу звуковую карту, кликните правой кнопкой и выберите «Удалить устройство». Подтвердите действие.
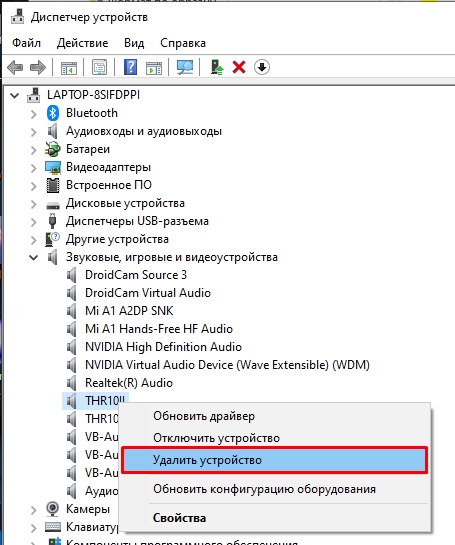
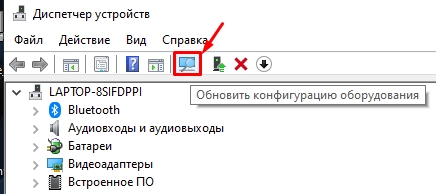
- Далее вы можете просто перезагрузить комп или нажать по кнопке обновления конфигурации оборудования. Драйвера будут скачены с интернета и установлены повторно.
Если это не поможет, нам нужно скачать драйвера вручную с сайта производителя, а потом установить их на компьютере. Если вы используете встроенную звуковую карту, то вам нужно полностью скачать все драйвера для материнской платы. Если вы используете дополнительный звуковой адаптер – то ищем драйвера на официальном сайте. Если вы подключены по Bluetooth, то вам нужно помимо драйвера для звуковой карты, скачать и обновить драйвера для Bluetooth модуля. Вообще, советую скачать полный пак дров для всего железа.
Читаем – как полностью и правильно обновить драйвера для Window.
Дополнительное ПО для звуковой карты
Некоторые звуковые карты работают с дополнительным программным обеспечением (Realtek Audio Control, Nahimic и т.д.). Стоит зайти туда и проверить уровень звука, включенные дополнительные эффекты, есть ли какие-то фильтры. Попробуйте отключить все дополнительные функции, которые могут в теории или улучшить, или ухудшить звук. Также посмотрите эквалайзер – какая схема там стоит? Не выключены ли все бегунки в самое дно? Проверьте всё что там есть.
СОВЕТ! У меня была как-то проблема – Nahimic выдавал шумы и скрежет в наушниках при прослушивании музыки. Мне помогло только удаление этой программы с ПК. Поэтому, если вообще ничего не поможет из статьи, то можно попробовать деинсталлировать это дополнительное ПО. Авось звук станет громче и лучше.
Дополнительные советы
Все возможные варианты с драйвером и настройками мы уже рассмотрели в предыдущих главах. Если звук как был, так и остался – значит есть проблема в ядре операционной системы. Вот ряд советов, которые должны помочь. Дополнительно я буду оставлять ссылки на конкретные инструкции – просто переходим и делаем то что там написано.
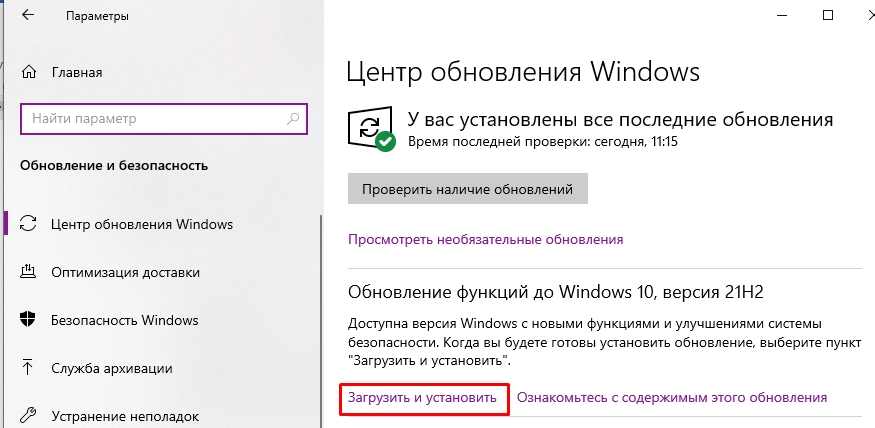
- Если проблема появилась внезапно, возможно, после установки какого-то ПО или драйверов – попробуйте выполнить откат системы до самой ранней точки восстановления.
- Выполните полное обновление ОС – «Пуск» – «Параметры» – «Обновление и безопасность» – устанавливаем все пакеты, которые вам доступны, даже самые мелкие.
- Проделываем чистку системы от всего лишнего. Дополнительно уберите все лишнее из автозапуска.
- Попробуйте заново подключить и настроить звук. Не пропускайте этот шаг – в 90% случаев именно переподключение помогает с проблемой тихого звука.
- В первую очередь попробуйте подключить наушники, динамики к другому устройству. Возможно, проблема связана в физической поломке внутренних динамиков. В таком случае поможет только ремонт.
- Не выкидываем из головы, что тихий звук может быть браком оборудования. Особенно если вы только купили, собрали ПК, ноутбук или дополнительную звуковую карту. Говорю, как человек, который в свое время уже сдавал ноутбук в магазин, и как раз была проблема со звуком. История закончилась хорошо, так как мне вернули деньги за него.
На этом все, дорогие читатели. Если вы хотите получить персональную помощью от специалистов портала WiFiGiD.RU – подробно опишите свой вопрос в комментариях, в самом низу этой статьи. Всем добра и берегите себя!
Windows 11 has had its fair share of bugs since its release. There have recently been several reports that Windows 11’s audio falls too low, which users did not experience with Windows 10.
Normally, Windows sound-related problems don’t arise as a result of a physical issue with the audio device but because of software-related issues within the system. Following are several troubleshooting methods that have proved effective for other affected users. Choose whichever method is most applicable to you.
1. Check Your Audio Source
Windows 11 allows you to choose an appropriate output device by selecting it from the Action Center. After you select a device, your system routes the audio to it so that you can listen. If you don’t select the right output device, you won’t be able to listen to the audio correctly or even at all.
Here is how you can select the correct audio source on your Windows 11 device:
- Press Win + A simultaneously to launch the Action Center.
-
Click on the arrow associated with the audio bar.

-
Now, choose the audio device you wish to use for playback.

- Once done, play something and check if adjusting the audio source helped fix the issue.

In case the issue persists, move to the next method below.
2. Set Your Audio Device as Default Device
Depending on whether you’re connected to an audio device via USB or HDMI, you might need to specify it as the default audio device.
In several cases, Windows 11 users were facing a low audio problem because their external monitor without any built-in speakers was selected as the default audio device. If this scenario is applicable, setting your preferred audio device as the default device will do the trick for you.
Follow the steps below to determine whether your monitor is set as the default audio device. If it is, change it to your preferred device.
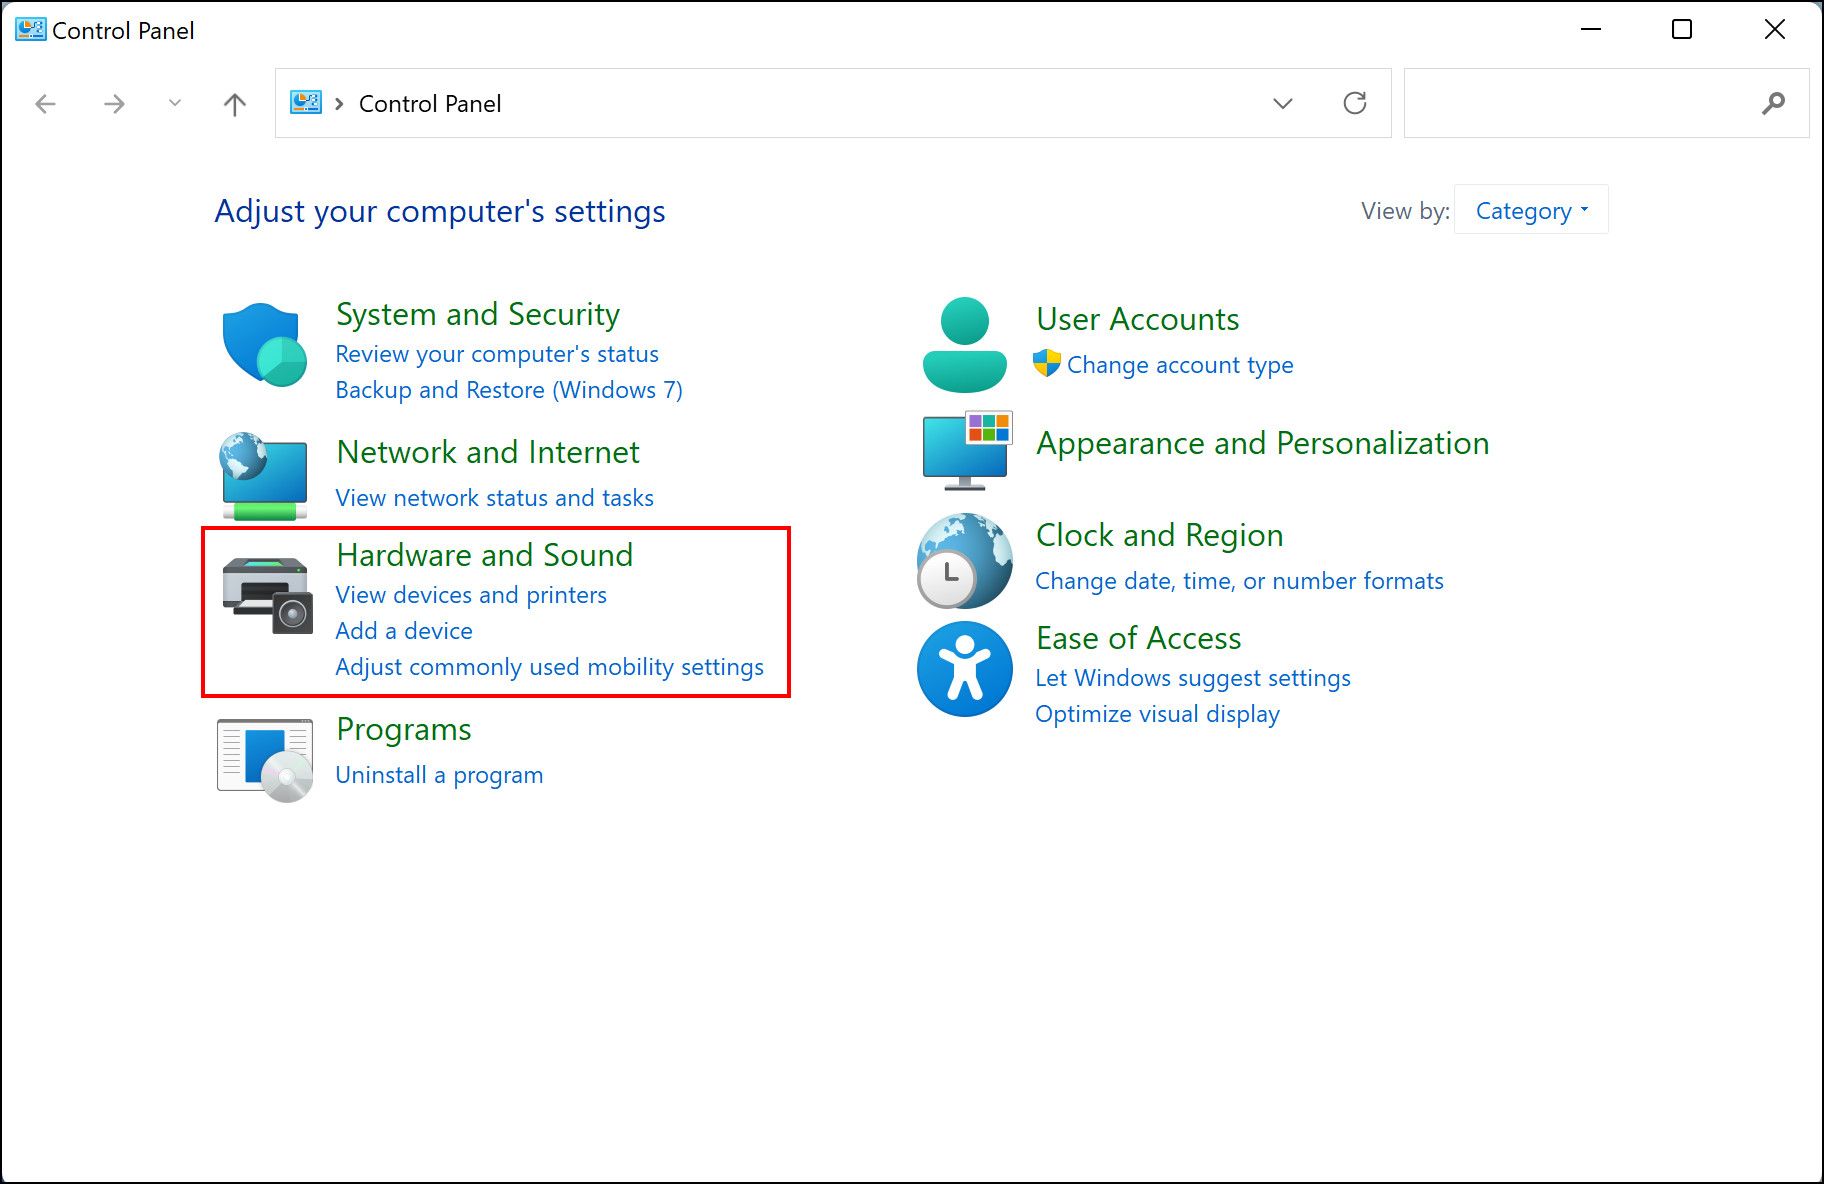
- Type Control Panel in the search area of your taskbar and click Open.
-
Select Hardware and Sound from the list of options available.

-
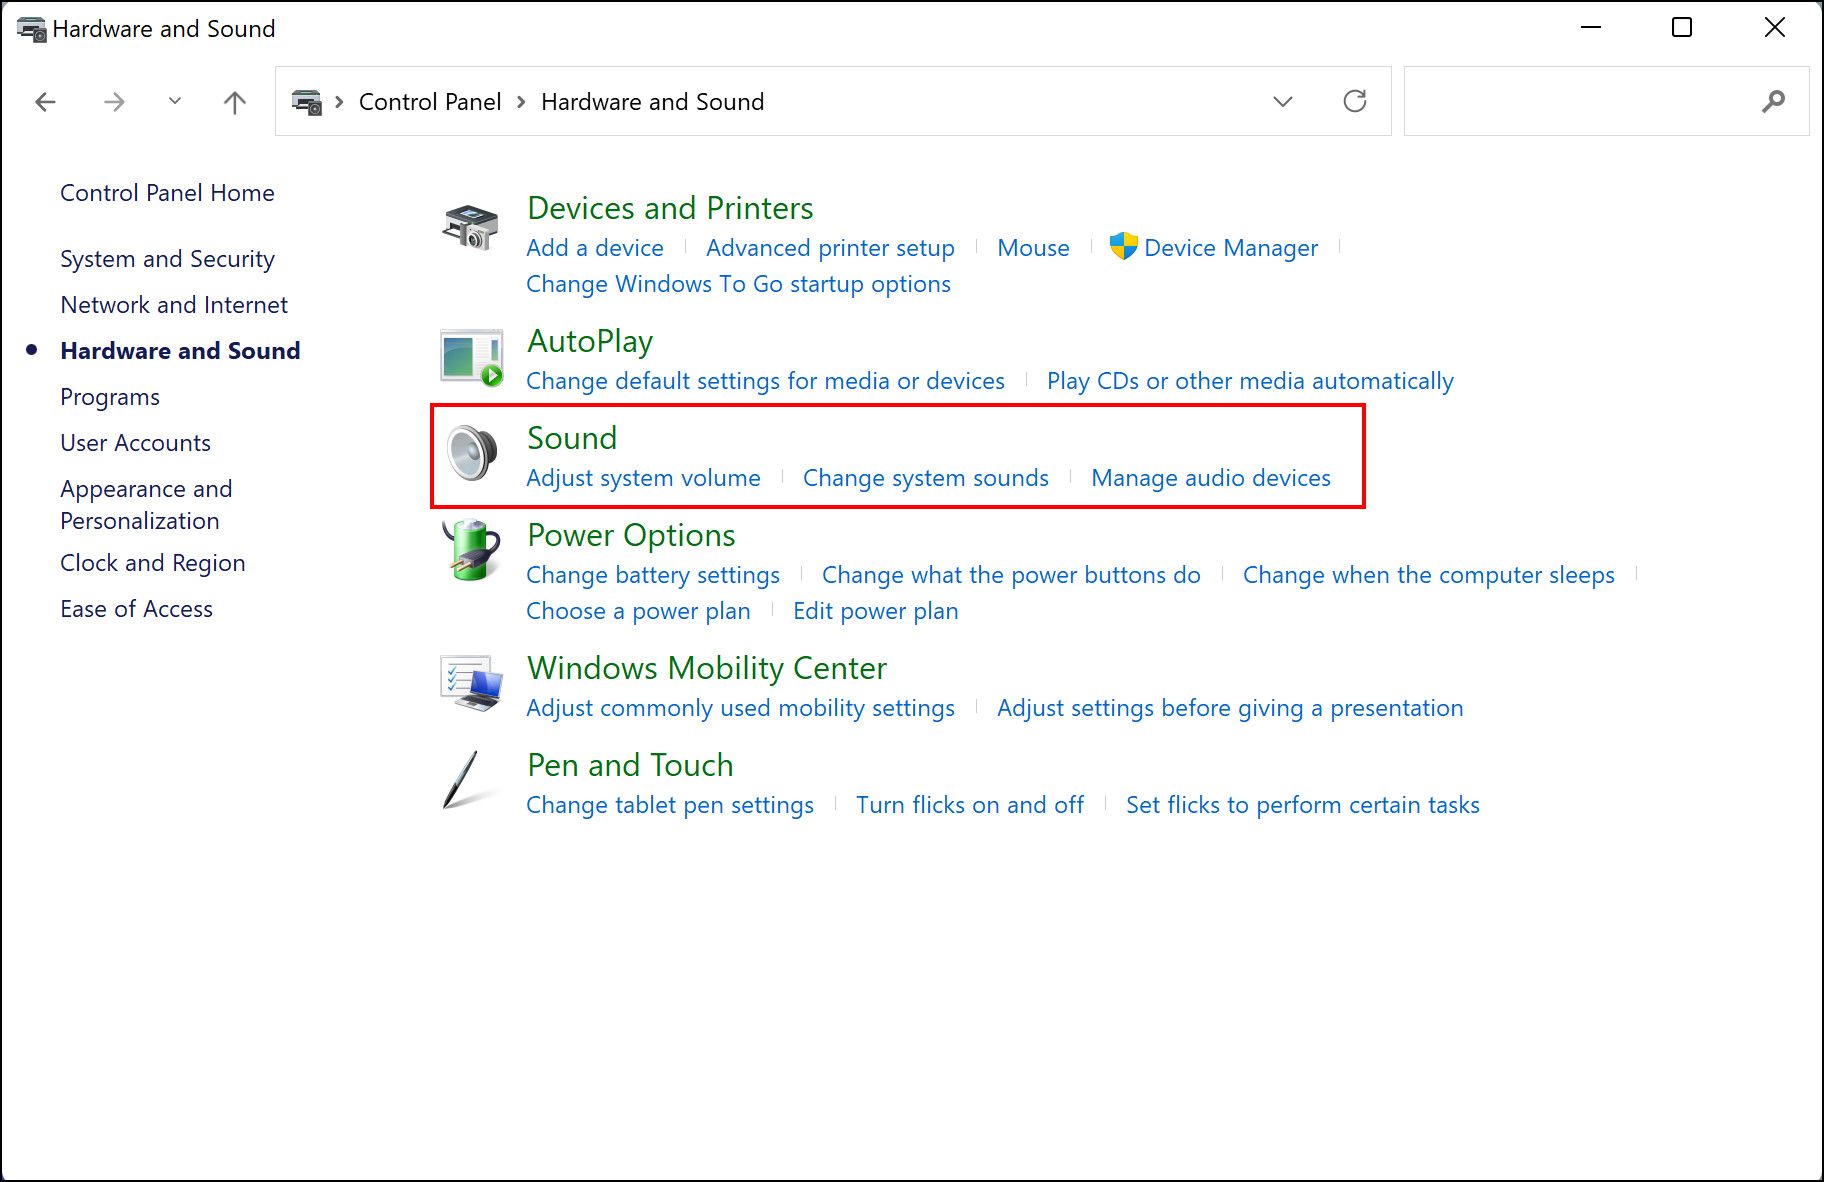
Next, click on Sound.

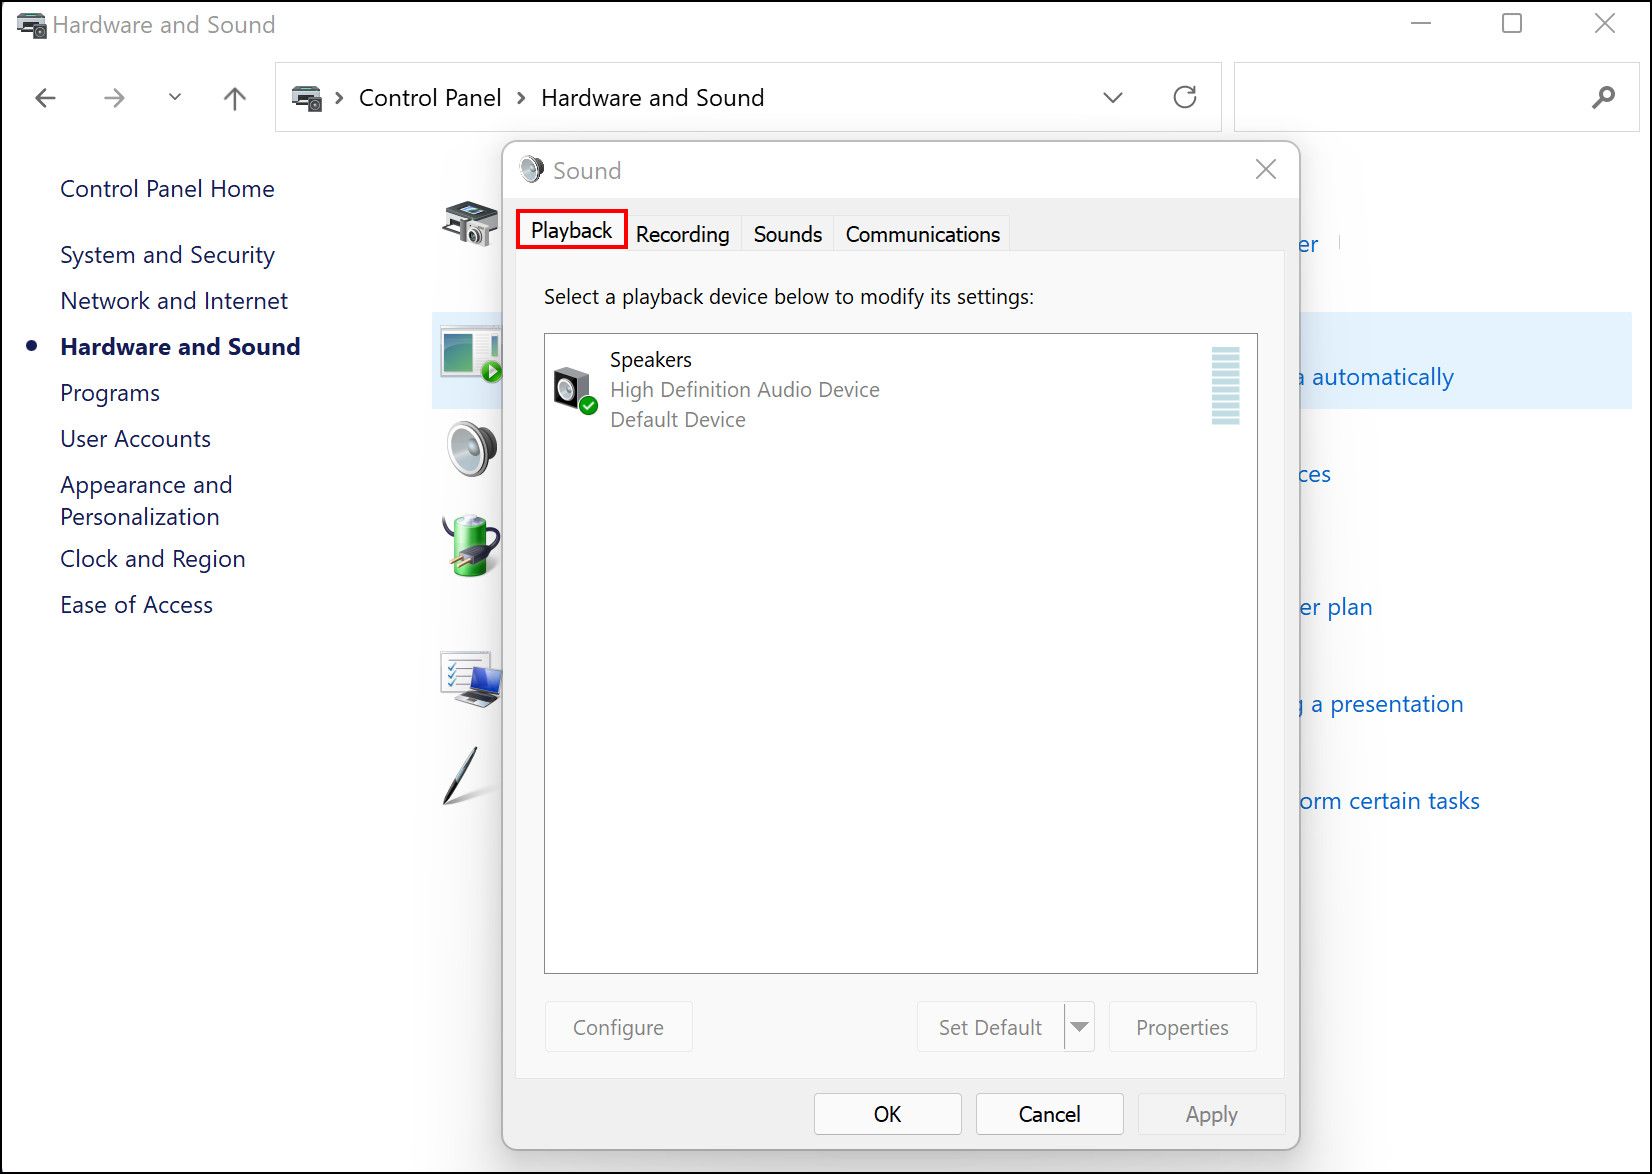
- In the newly launched Sound dialog, head over to the Playback tab and right-click on your preferred audio device.
-
Choose Set as Default Device from the context menu and then hit OK.

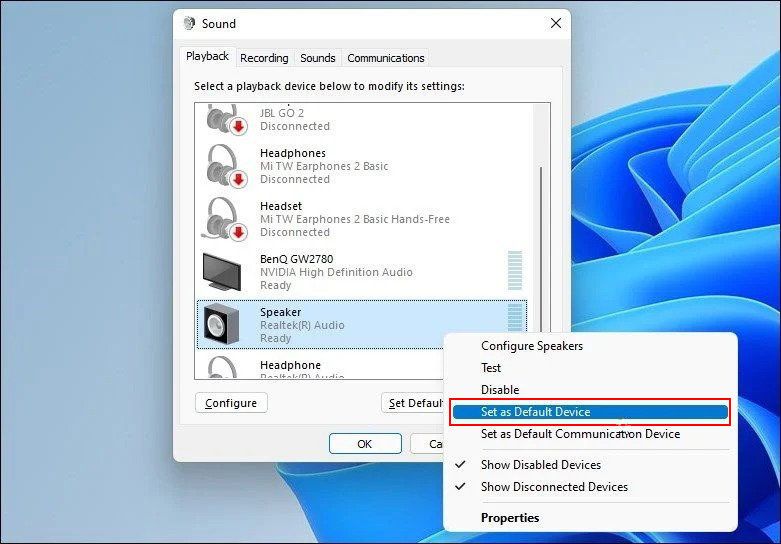
You can now try putting on some music to see if this works.
3. Run the Audio Troubleshooter
Running the Audio Troubleshooter is also an effective way to diagnose audio issues within the Windows operating system.
Like several other troubleshooting utilities, the Audio Troubleshooter is also built into Windows. Running it will launch a scan that will check your operating system for potential sound-related issues and fix the ones that are identified without significant user input.
Moreover, there have been reports that Microsoft is already aware of the low audio problem in Windows 11, and has launched a few automated fixes that will do the trick for you. You can apply these fixes by running the Audio Troubleshooter as described below:
- Press Win + I simultaneously to launch Windows Settings.
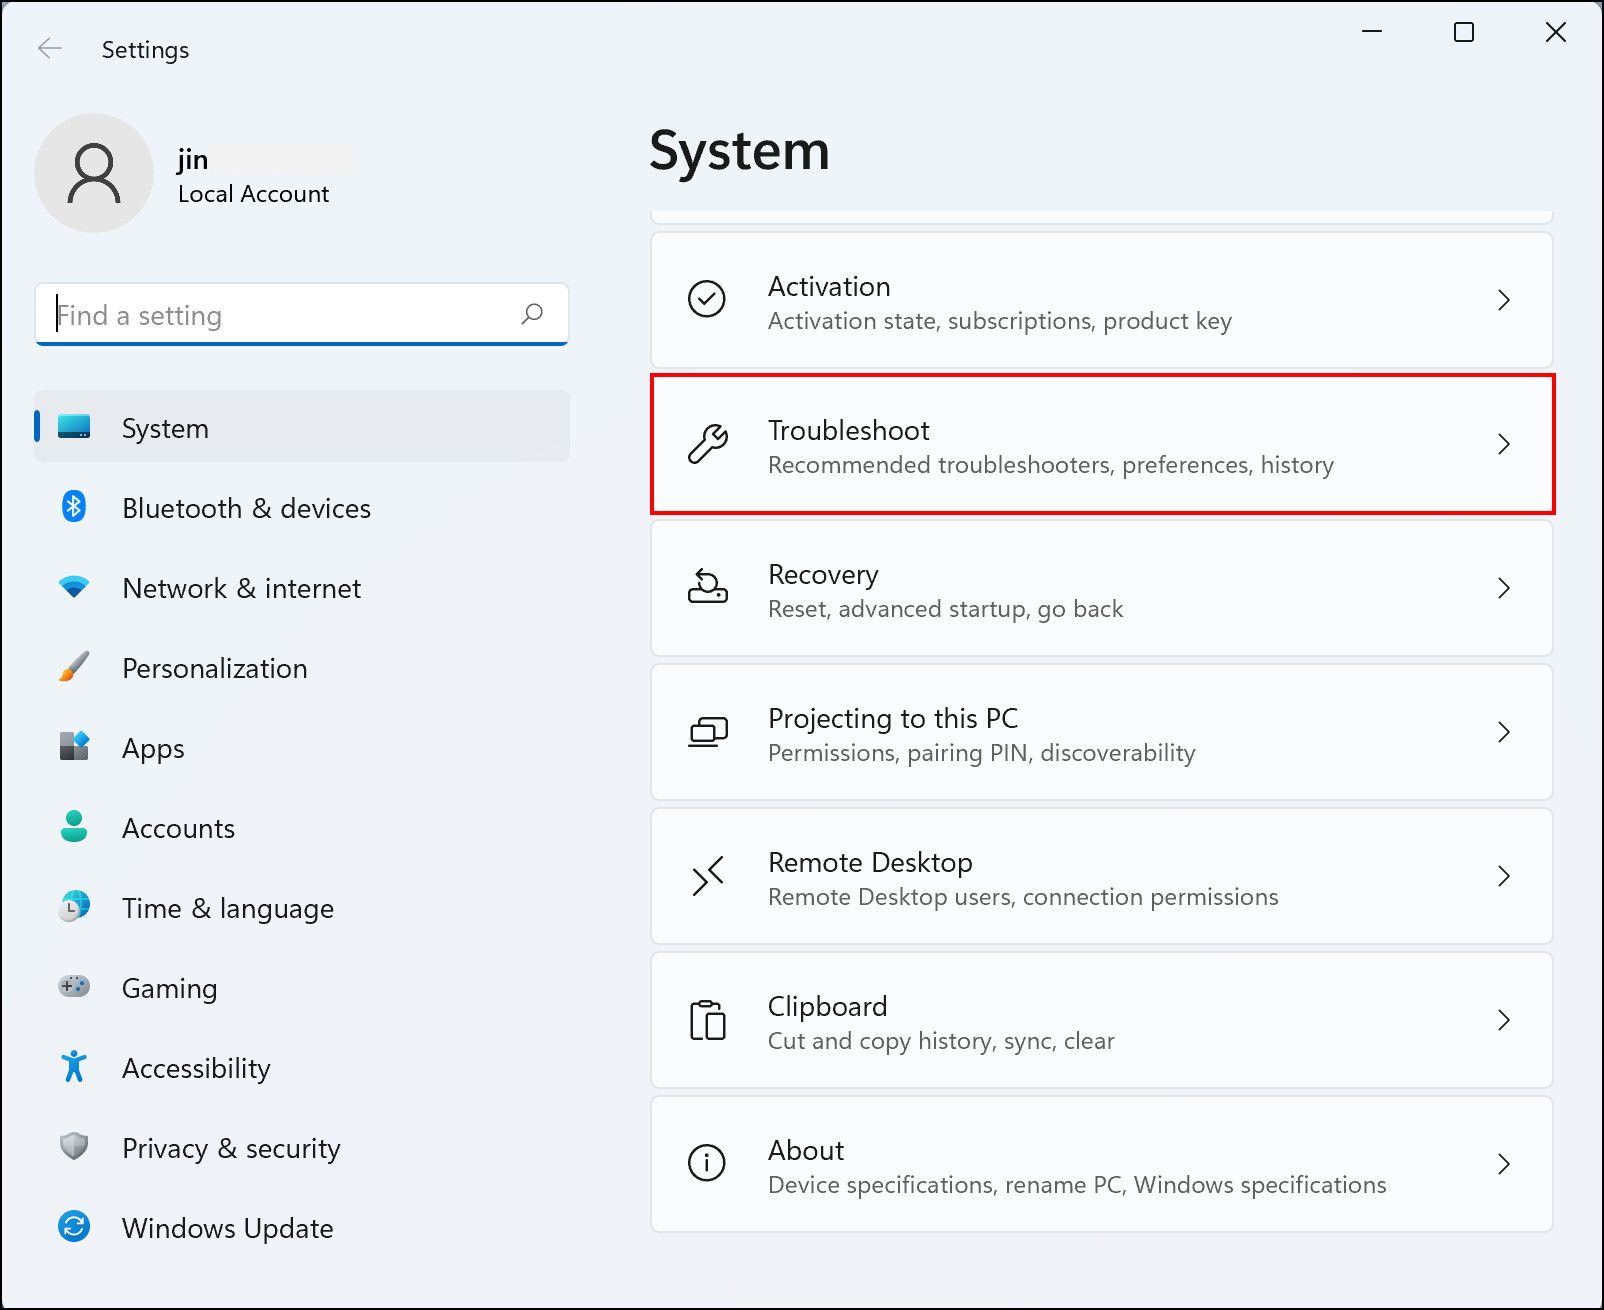
- Choose System from the left pane.
-
Now, click on Troubleshoot on the right-hand side of the window.

-
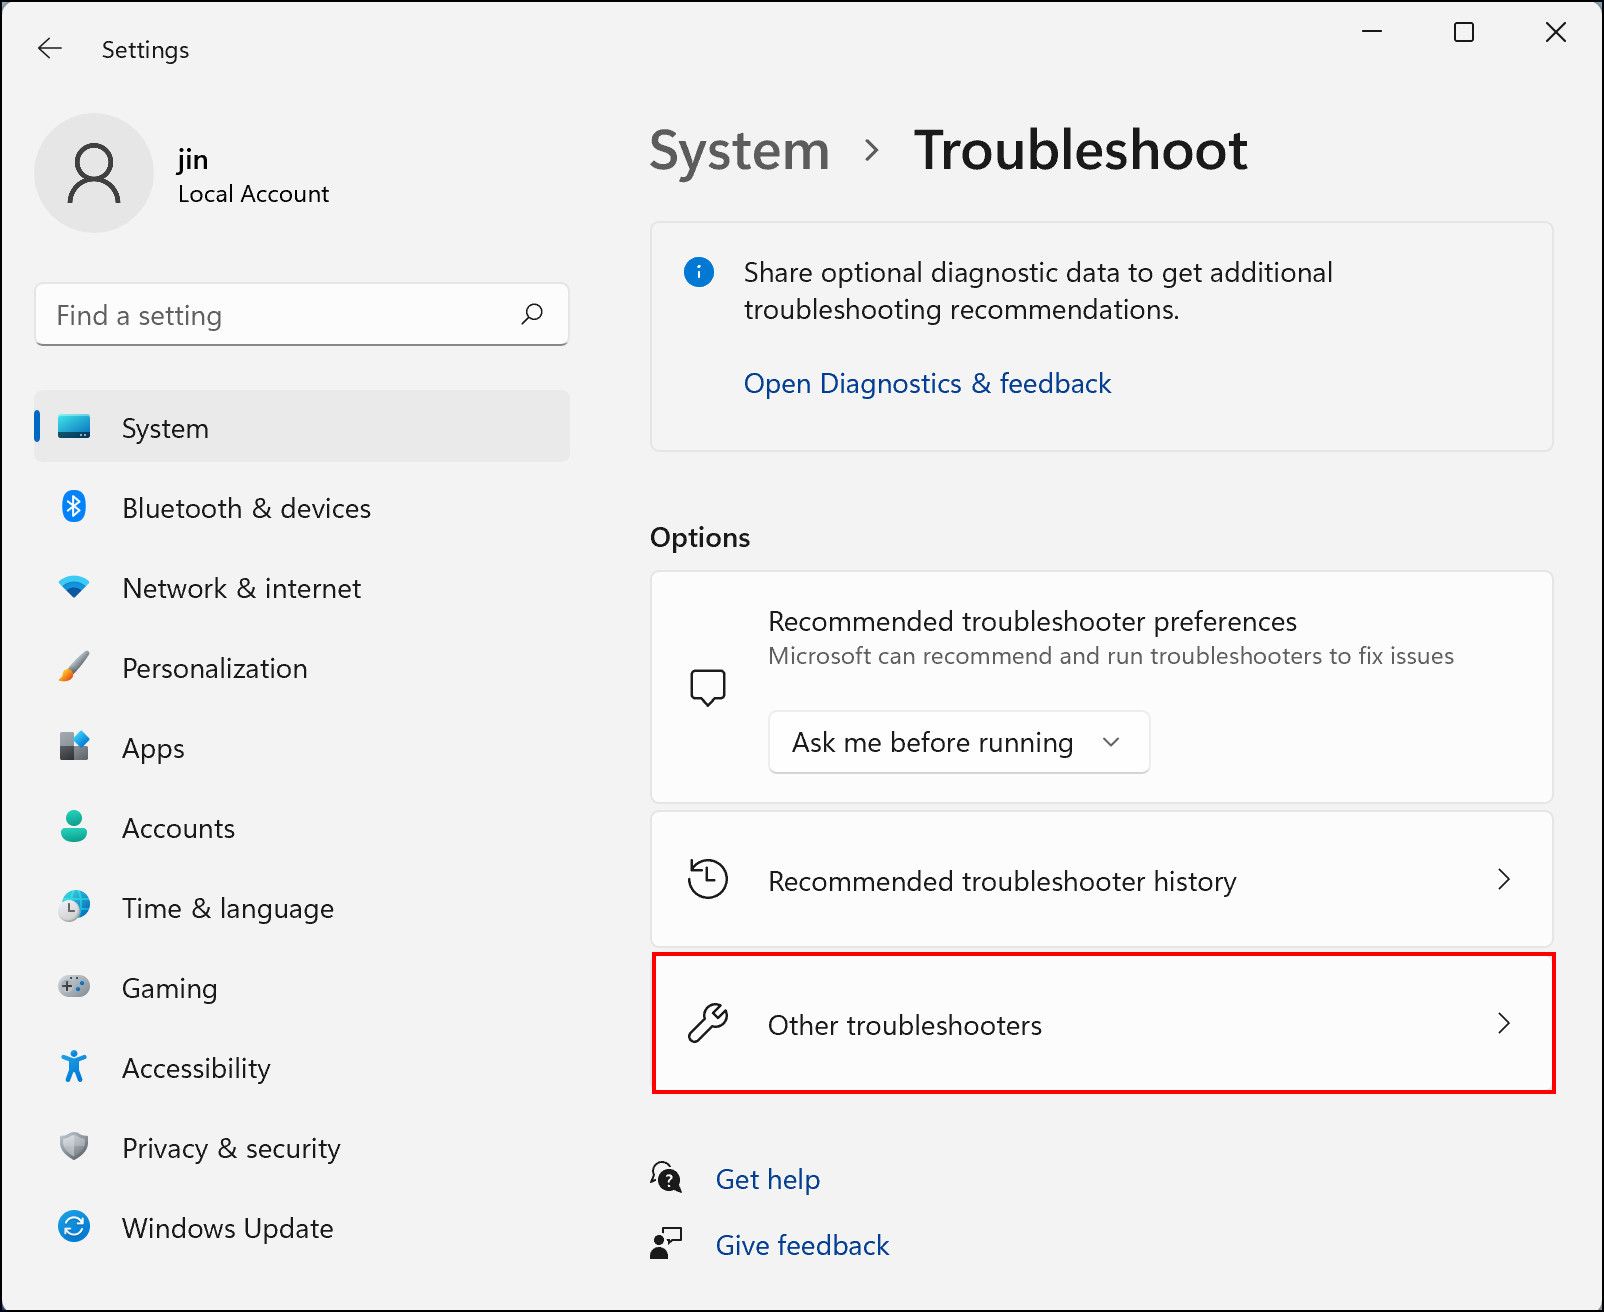
Inside the Troubleshoot window, click on Other troubleshooters under the Options section.

-
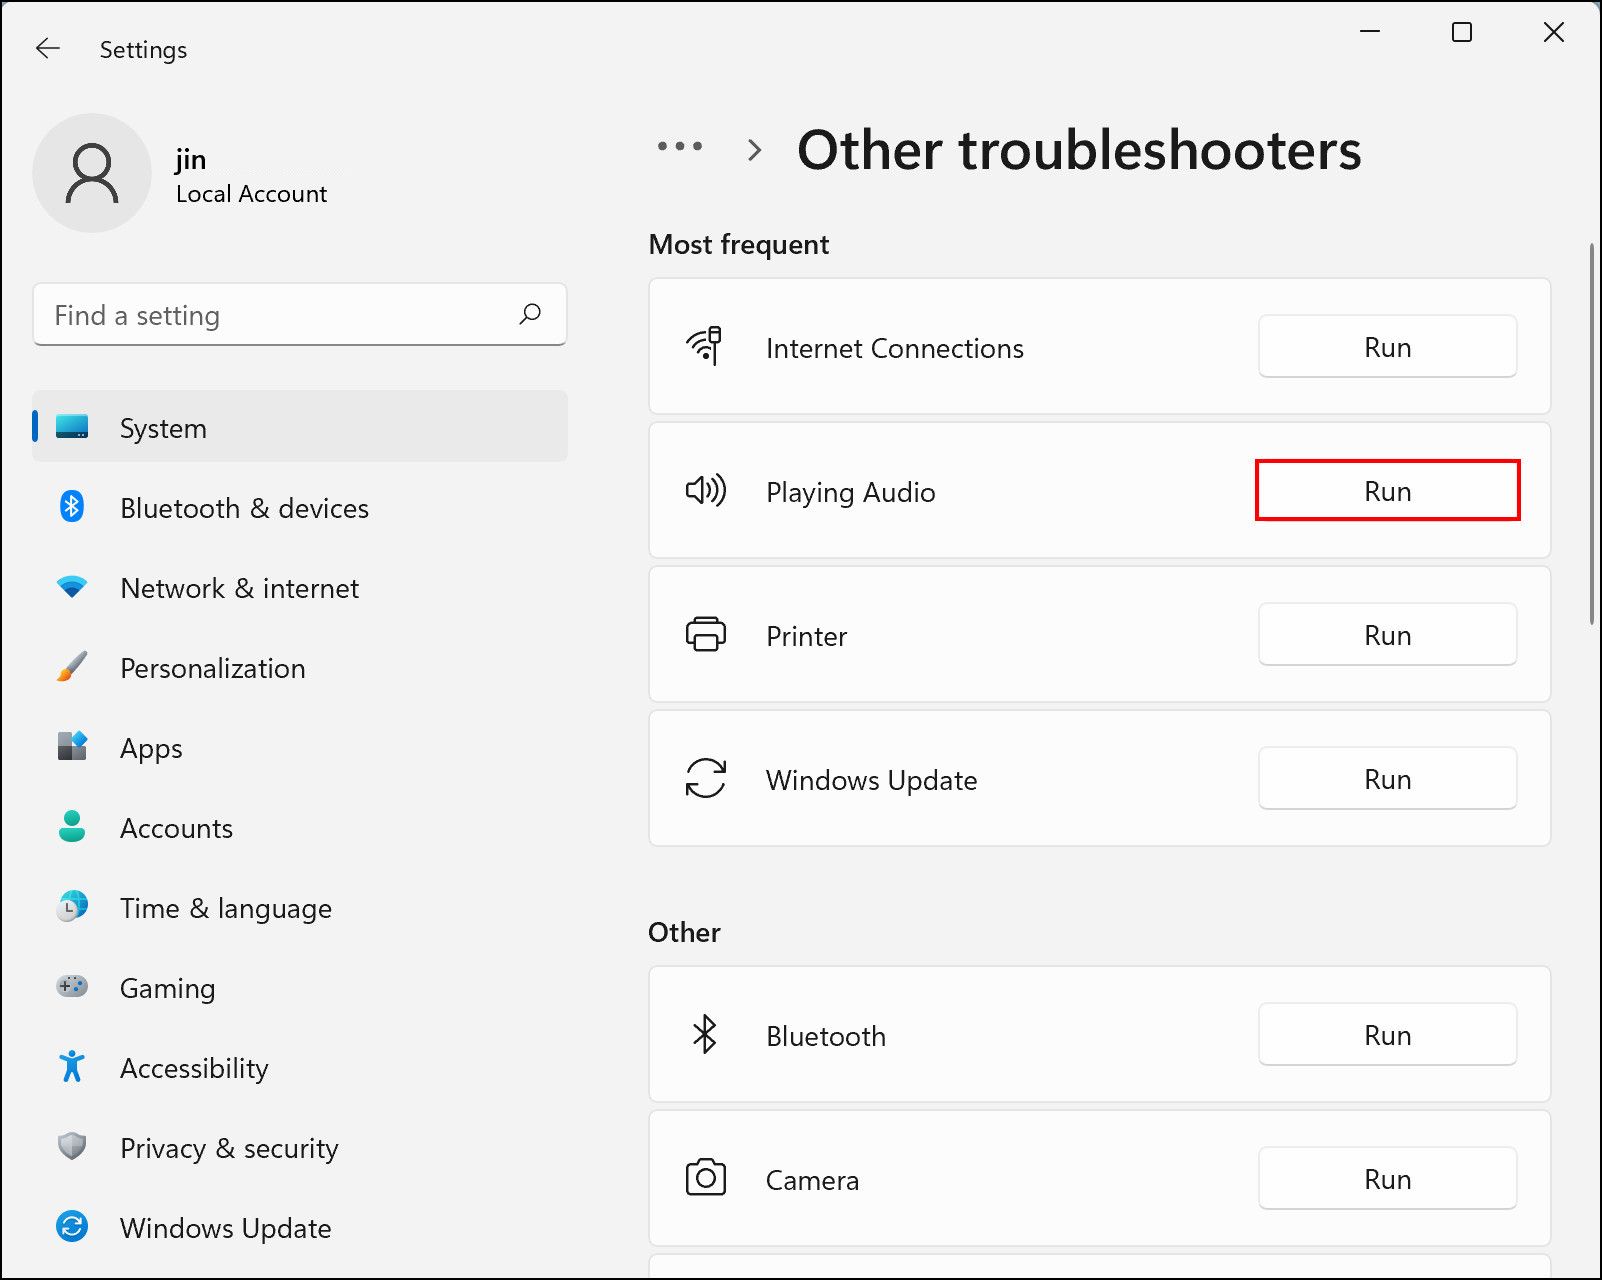
Next, scroll down to the Most frequent section and click on the Run button associated with Playing Audio.

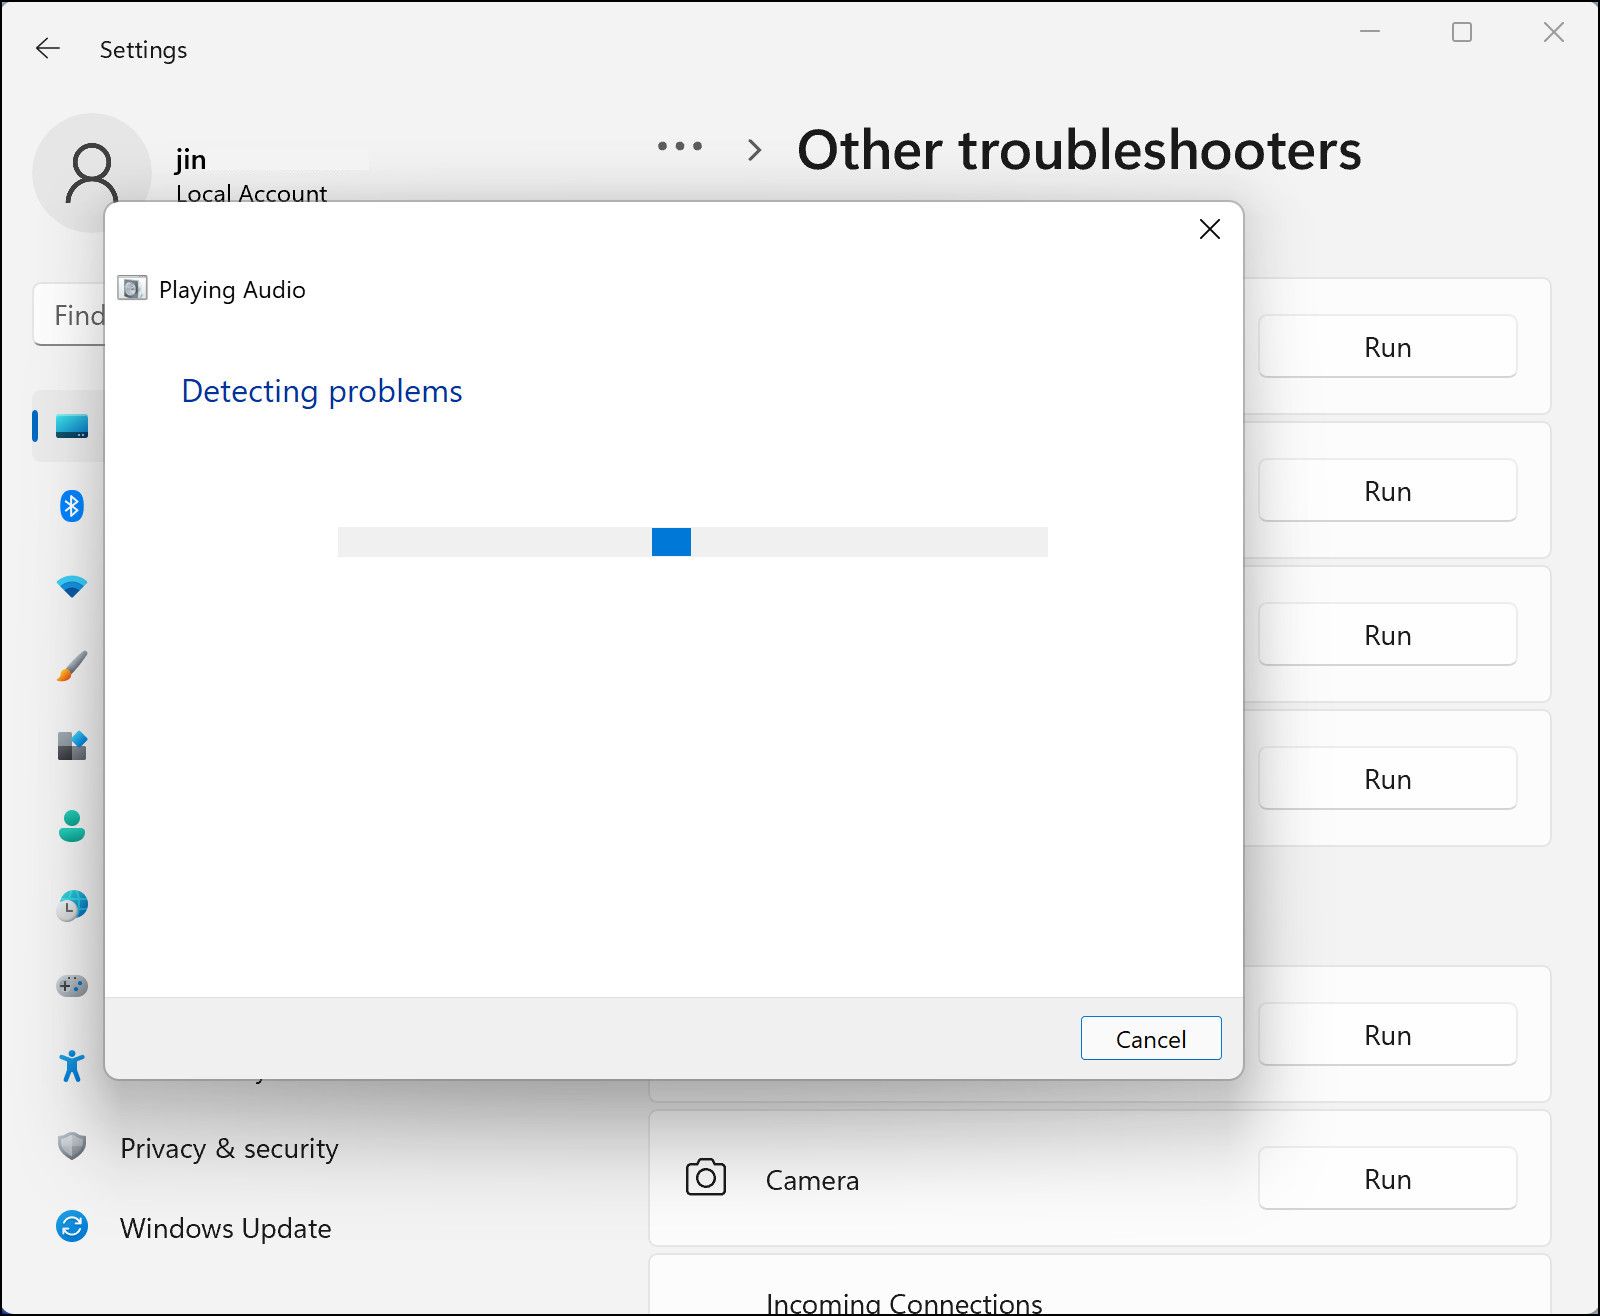
-
This should begin an initial scan. Wait for it to complete.

- Then, choose the device you are having issues with. If you are unsure, choose your default device and hit Next.
- The following scan should identify the potential issues that might be causing the low volume problem. If the troubleshooter finds any issue, click on Apply this fix.
- Finally, restart your PC and check if the problem is resolved.
4. Update Your Audio Driver
In some cases, outdated audio drivers are also responsible for issues like the one under consideration. A driver is a piece of software that communicates with your hardware to make it work with your OS.
The best way to keep your hardware functional with the latest version of your operating system is by updating your audio drivers. However, if updating does not fix the problem for you, you can try rolling back or reinstalling the audio driver.
Here is how you can update your audio driver:
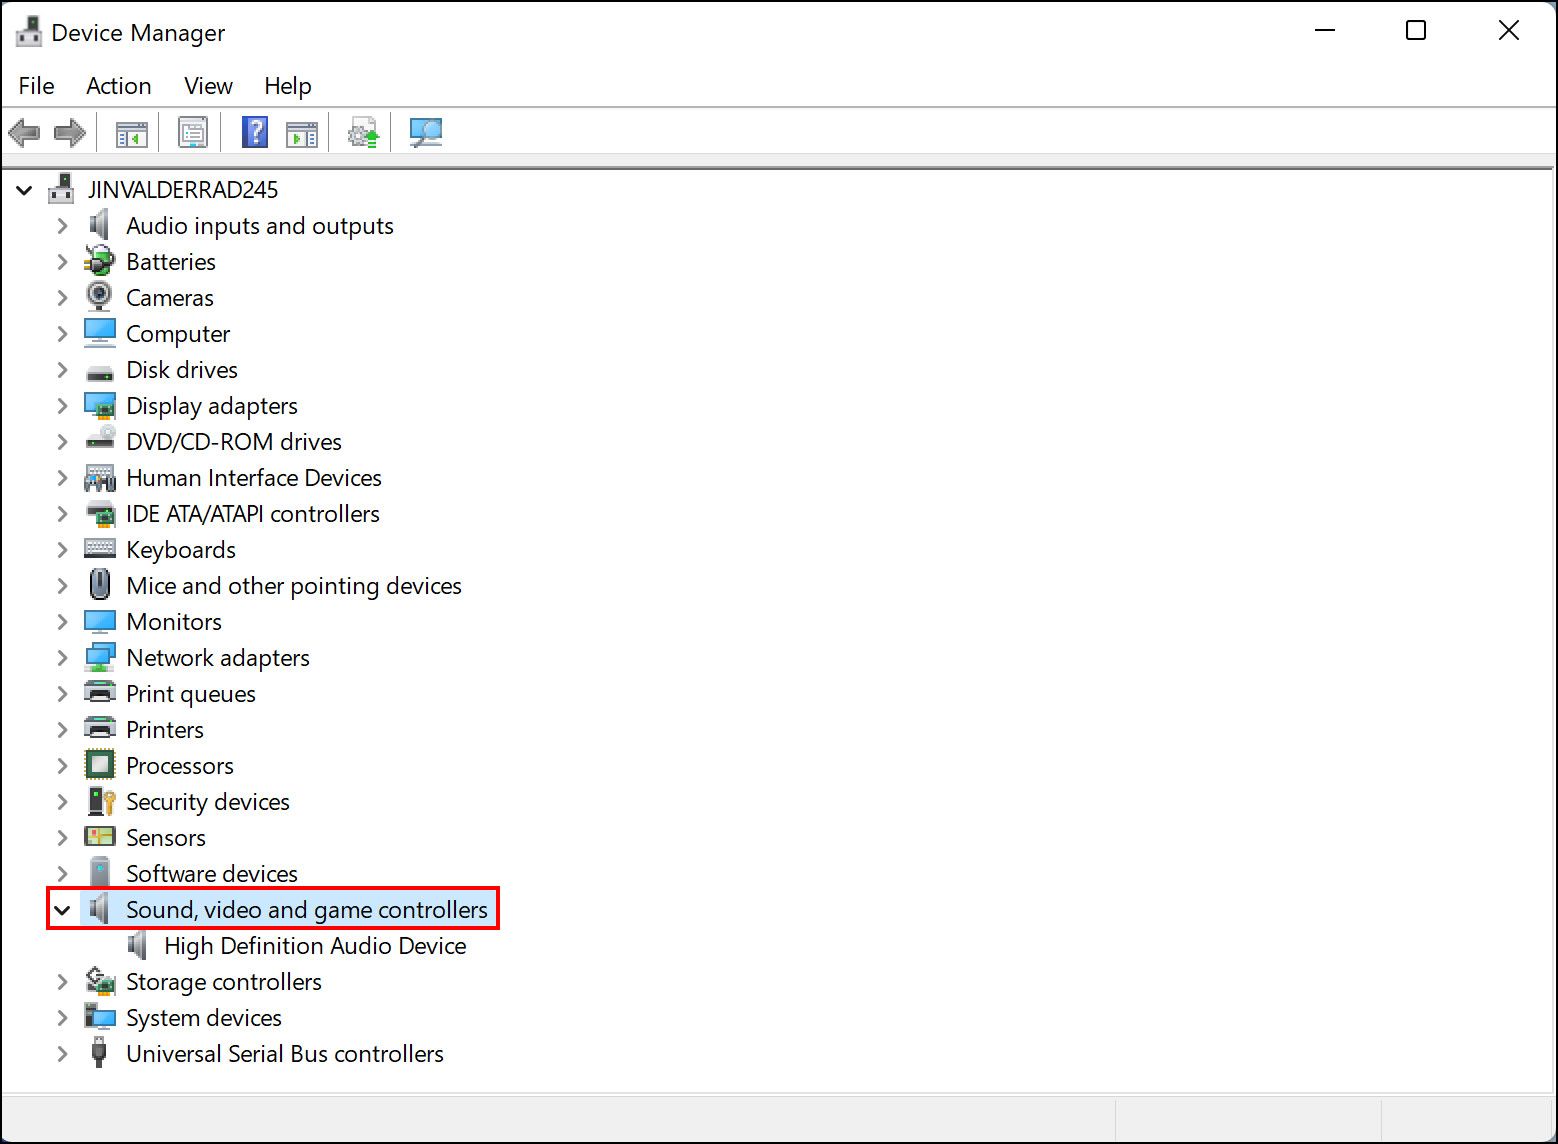
- Type Device Manager in the search area of your taskbar and click Open.
-
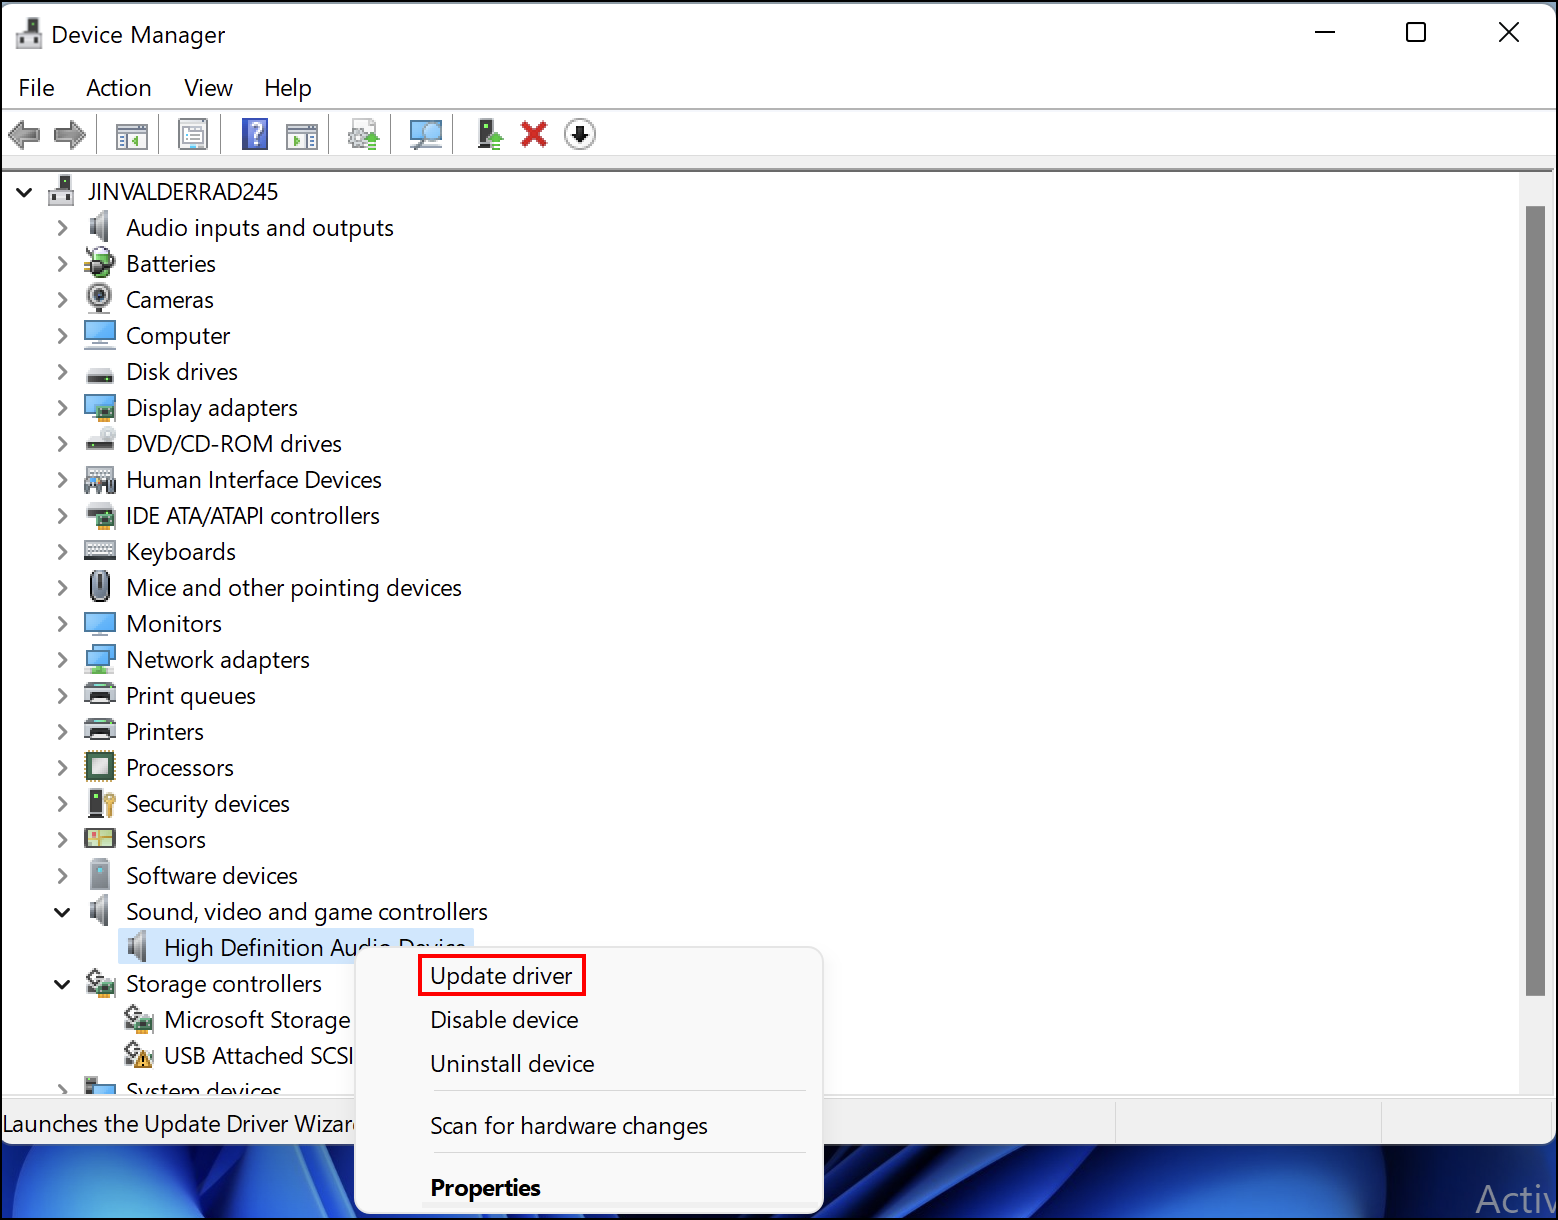
In the Device Manager window, expand the Sound, video, and game controllers menu and right-click on your audio driver.

-
Select Update driver from the context menu.

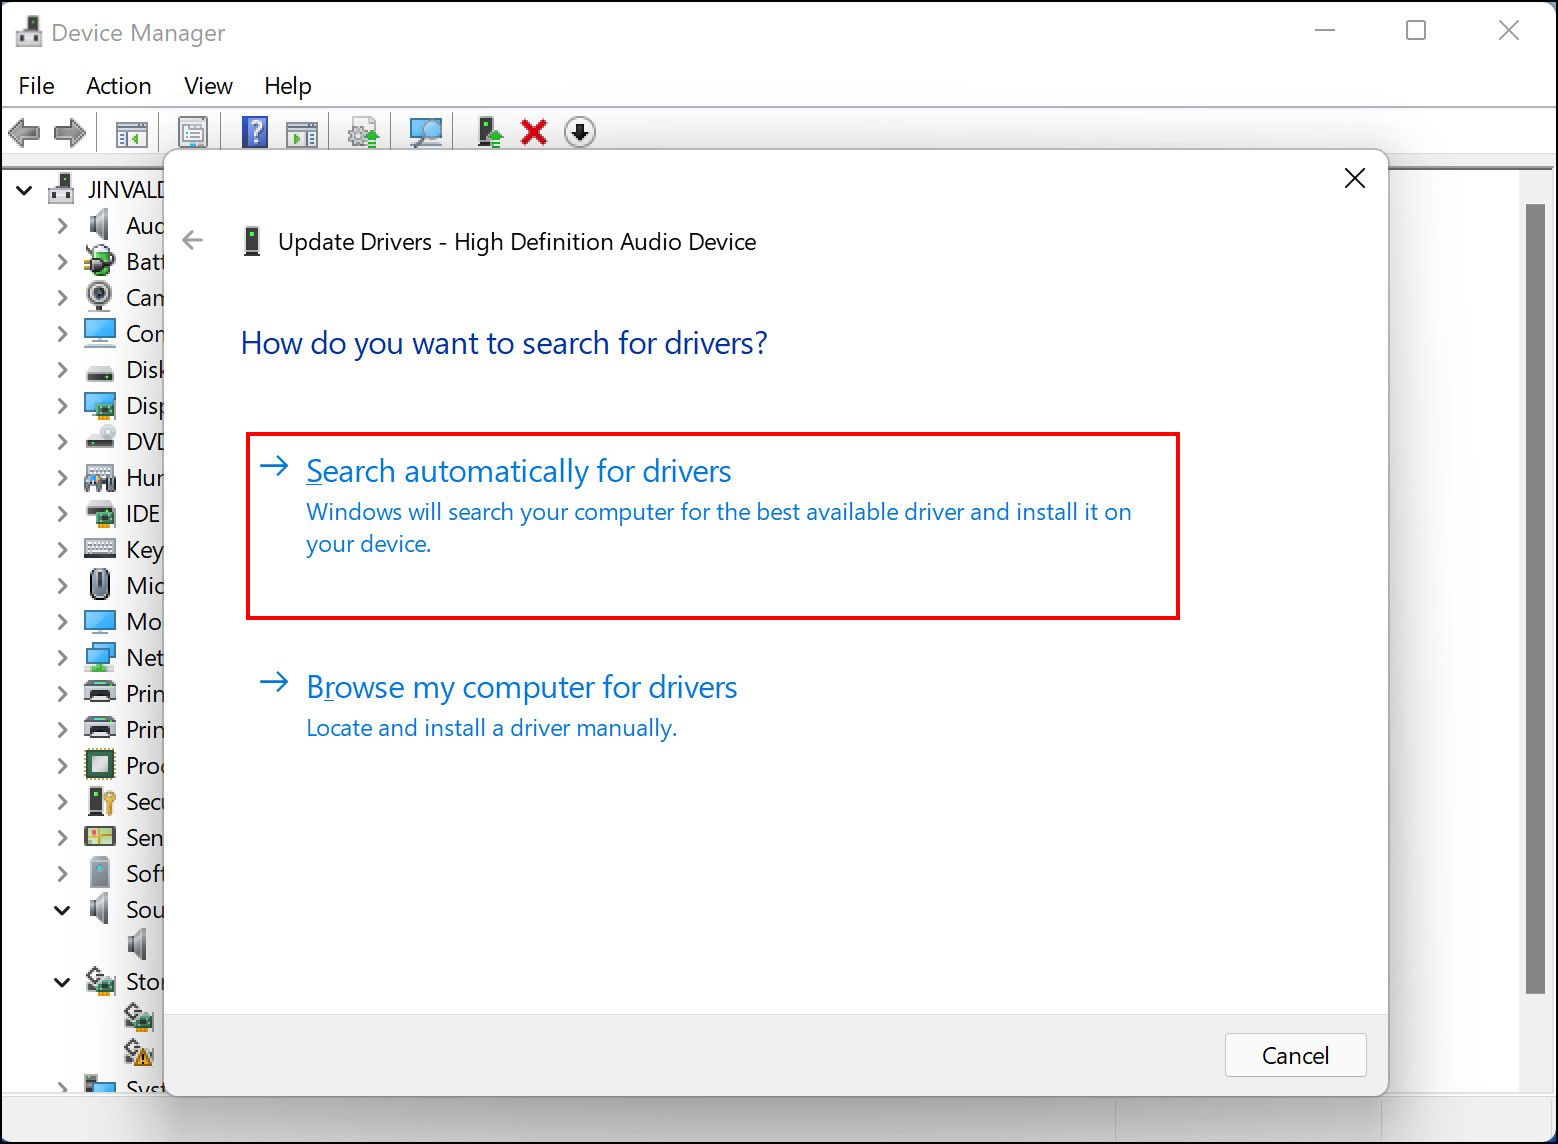
-
In the newly launched dialog, click Search automatically for drivers.
- Wait for the Device Manager to identify an available driver and then follow the on-screen instructions to proceed.
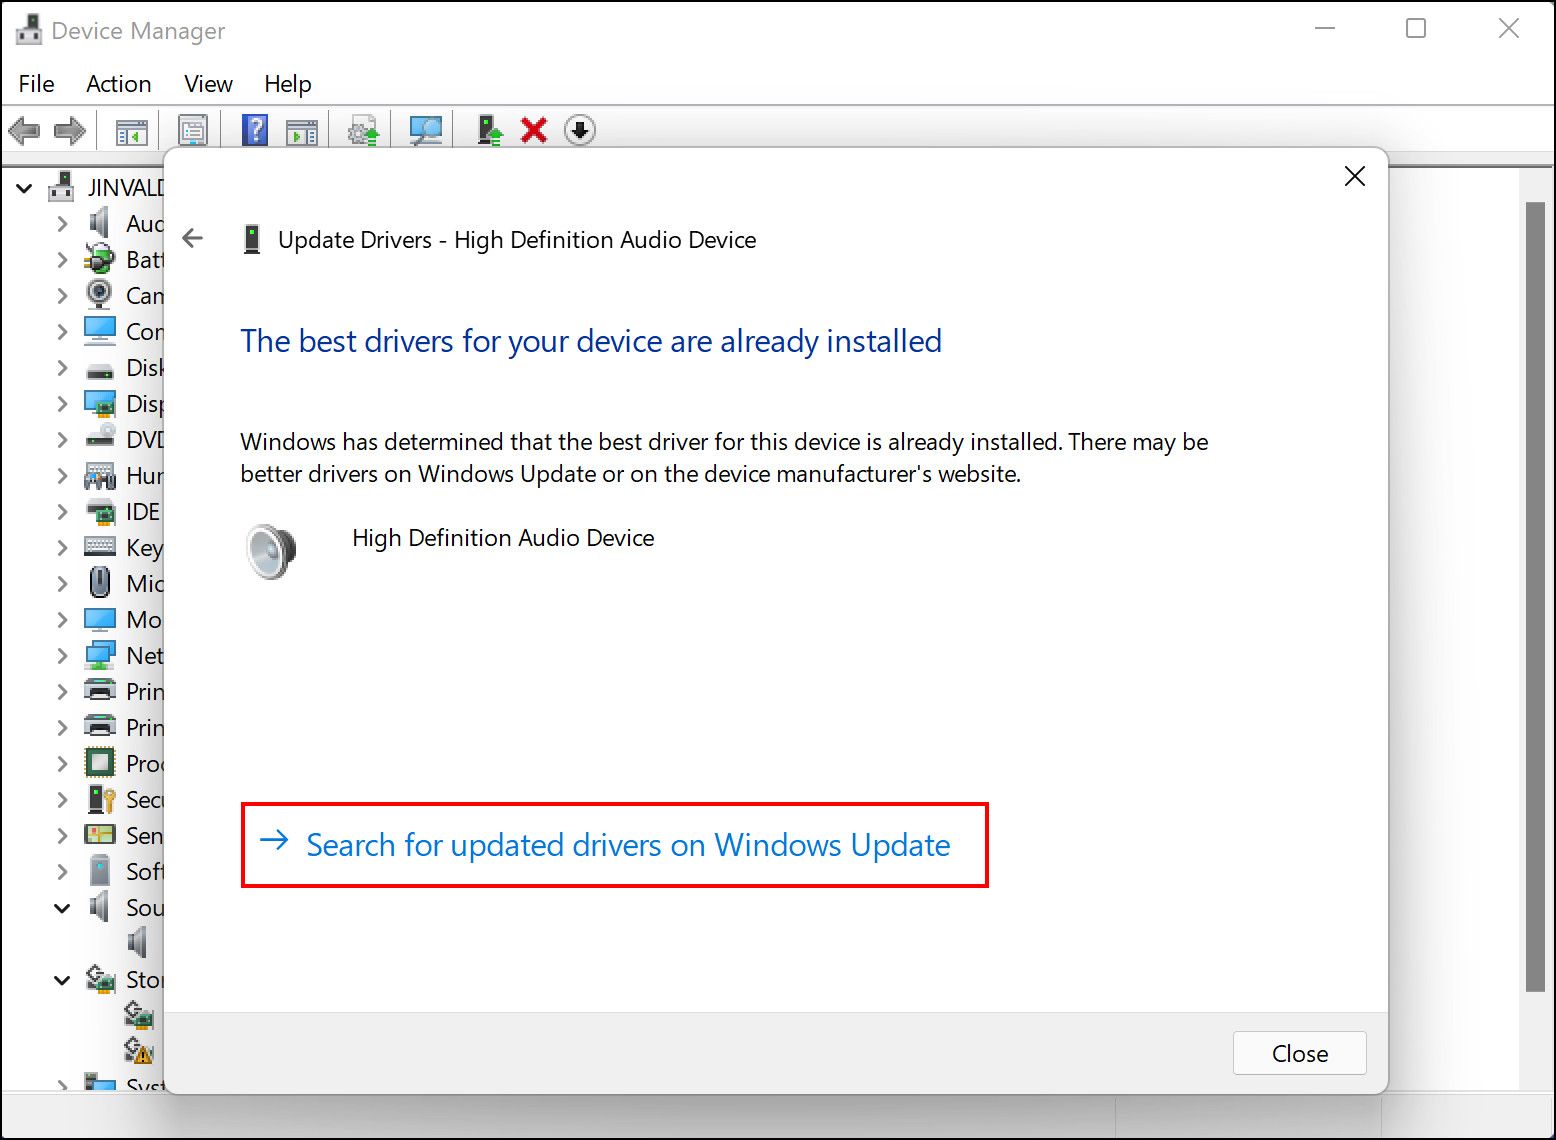
-
In case the Device Manager does not identify any available drivers, click on Search for updated drivers on Windows Update.

- Then, follow the on-screen instructions to install the updated driver.
- Finally, restart your PC and check if you can hear the audio properly now.
5. Disable Windows Audio Enhancements
Audio enhancement packages (whether developed by Microsoft or third-party programs) aim to improve the sound quality and performance of Windows. Nonetheless, they have a well-known reputation for causing problems with audio and sound.
They may also be the main cause of your audio issue in Windows 11, which is why we recommend disabling them and checking if that fixes the problem.
Follow these steps to do so:
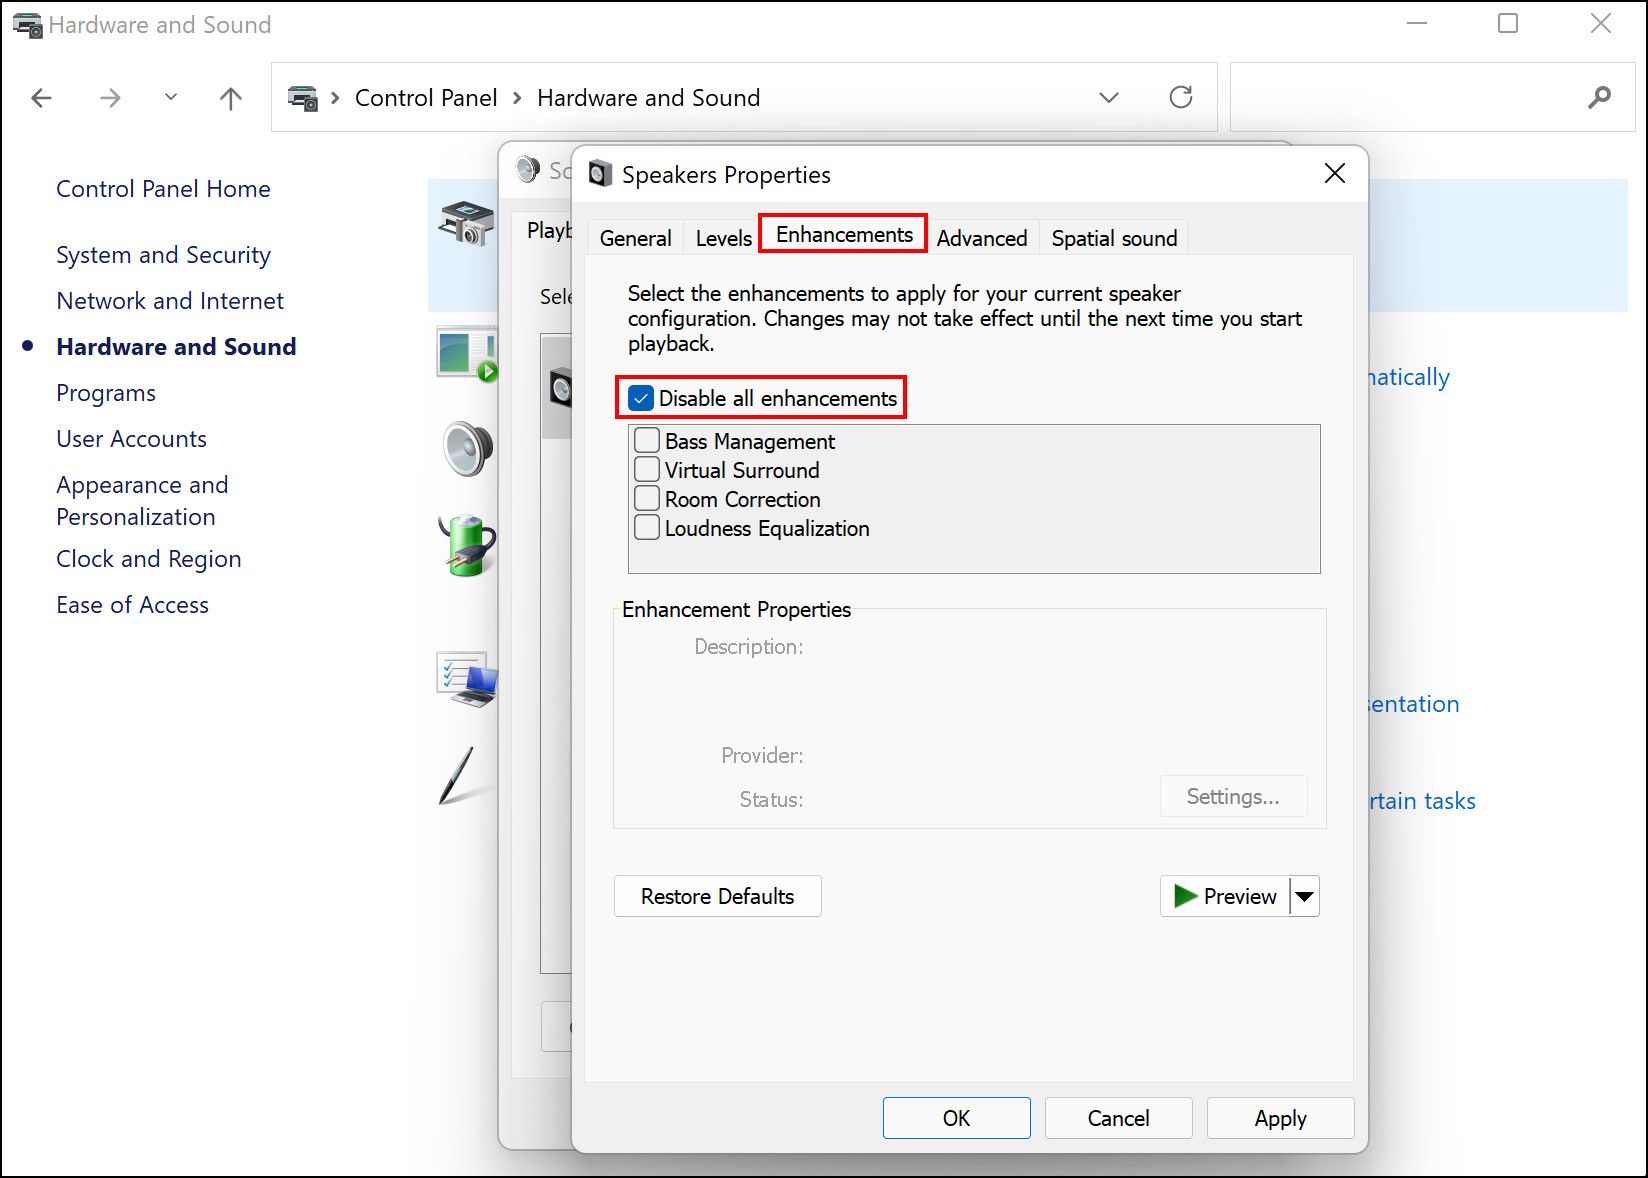
- Launch Control Panel and select Hardware and Sound from the list of options available.
- Next, click on Sound.
-
In the newly launched Sound dialog, head over to the Playback tab and double-click on your audio device.

-
Now, click on the Enhancements tab and checkmark the box associated with Disable all enhancements.

- Click Apply and close the window.
Windows 11’s Low Audio Issue, Fixed
Windows users are prone to run into audio issues now and then, and as we stated earlier, most of them are software-related. Fortunately, fixing these issues is not tough, as checking your audio source, updating audio drivers, and disabling audio enhancements should do the trick for you.
We’ve been noticing an increasing number of reports about Windows 11 issues, particularly users complaining that the overall PC audio volume is unusually low. This affects both system sounds and audio in native and third-party applications.

Upon investigating the issue, we discovered that several potential causes could lead to unusually low volume output on Windows 11:
- Common inconsistency – Often, problems responsible for the low audio issue on Windows 11 are covered by automated fixes available via the Windows Audio troubleshooter. Thus, the ideal starting point for troubleshooting is running the Audio troubleshooter and applying the recommended fixes.
- Outdated audio driver – Not updating your audio driver for an extended period, especially if Windows Update is not configured to update it, can lead to this problem. To resolve this, you can manually update the driver through the Device Manager.
- Generic driver partially incompatible – Using a generic driver updated during the upgrade to Windows 11 can cause low volume. If this is the case, installing the dedicated sound card driver that matches your motherboard could rectify the issue.
- Dedicated audio driver update pending for Windows 11 – If you’re using a dedicated driver without full compatibility updates for Windows 11, the best fix is to uninstall the current driver and opt for a generic driver instead.
- Interfering audio enhancements – Software simulated audio enhancements can also cause low volume outputs on Windows 11, particularly when using speakers. To remedy this, disable all software simulated enhancements via Sound Properties.
- Incompatible BitRate sound format – Setting a high BitRate format as the default for your audio device can result in lower volume when playing sounds of lesser quality. Change the BitRate sound format in your Sound settings to avoid this issue.
- Recent driver or app conflict – Operating systems have numerous components that could interfere with sound output. If the low volume issue began recently, consider using a recent System Restore snapshot to return your PC to a state before the problem started.
- System file corruption – Some users claim to have resolved their audio issues by running SFC and DISM scans in quick succession, suggesting system file corruption as a potential root cause.
- Lack of a compatible audio driver for Windows 11 – If all else fails, you might be dealing with a legacy sound card that lacks compatibility with Windows 11. Unfortunately, in this case, the only solution might be to revert to Windows 10.
With the potential causes outlined, let’s move on to the solutions that have helped other users resolve low volume issues on Windows 11.
1. Run the Audio troubleshooter
Troubleshooting this issue should begin with testing whether Windows 11 can automatically fix the problem.
Microsoft has acknowledged this issue, and their engineers have rolled out automated fixes aimed at resolving the low volume problem on Windows 11.
To utilize these automated fixes, run the Audio troubleshooter and apply the recommended fix. This has been confirmed effective by many users, especially those who upgraded to Windows 11 from Windows 10 instead of performing a clean installation.
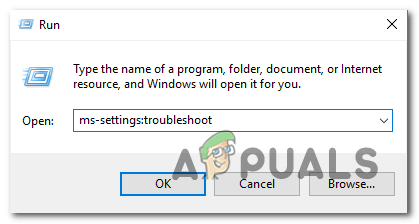
- Press Windows key + R to open a Run dialog box.
- Type “ms-settings:troubleshoot” and press Enter to open the Troubleshooting tab in the Settings app.

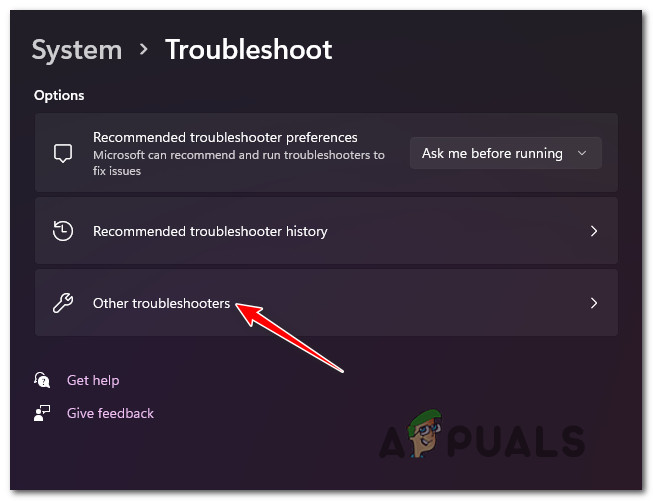
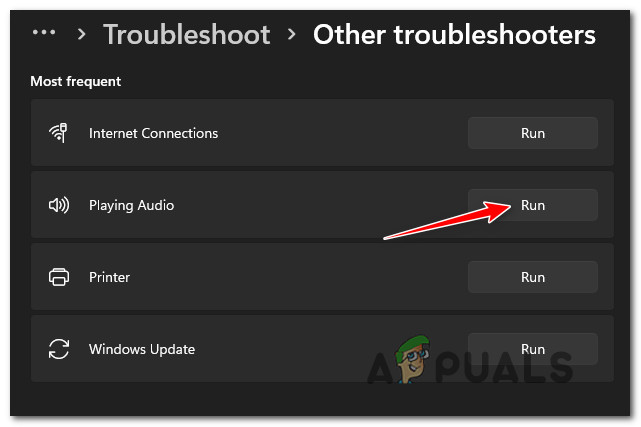
Accessing the Troubleshooting tab - In the Troubleshoot tab, move to the right-hand section and click on Other Troubleshooters (under Options).

Accessing the Other Troubleshooters tab - From the next menu, under Most frequent, click on the Run button associated with Playing Audio.

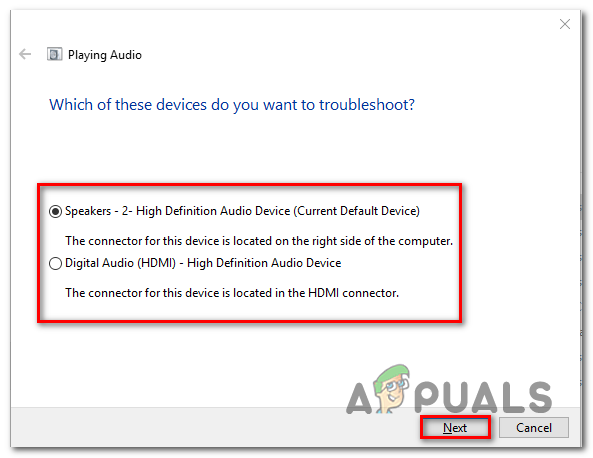
Running the Audio Troubleshooter - Wait patiently until the initial investigation phase is complete.
- Select the device you’re using as the default audio device.

Selecting the default audio device - Wait until the utility analyzes your Audio device for problems.
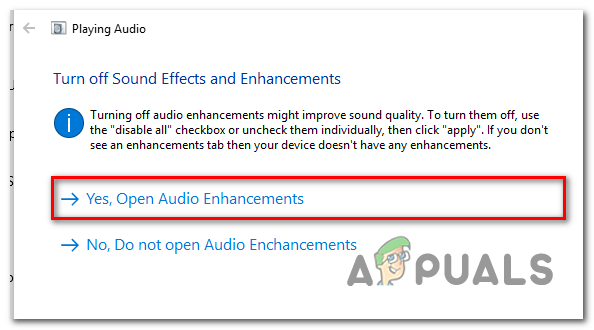
- If a problem is identified, you will be recommended a repair strategy. Follow the on-screen prompts (click ‘Yes, Apply fix‘ or ‘Yes, Open *menu‘) and comply with the recommendations.

Applying the recommended fix - Restart your computer to see if the error has been resolved after the next startup.
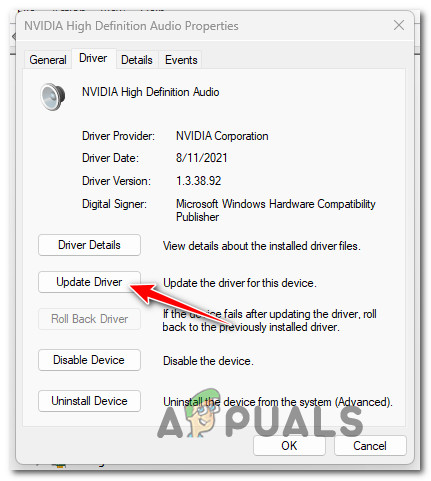
2. Update the Audio driver
Generally, Windows Update should maintain your driver up to date automatically. However, sometimes you might find yourself stuck with an older version not compatible with your operating system.
A number of users who faced this problem reported fixing it by using the Device Manager to force an update of the driver from the Properties screen of the High Definition Audio Device.
- Press Windows key + R to open a Run dialog box. Next, type ‘devmgmt.msc’ and press Enter to open the Device Manager.
Accessing the Device Manager tab - If prompted by the User Account Control prompt, click Yes to grant administrative access.
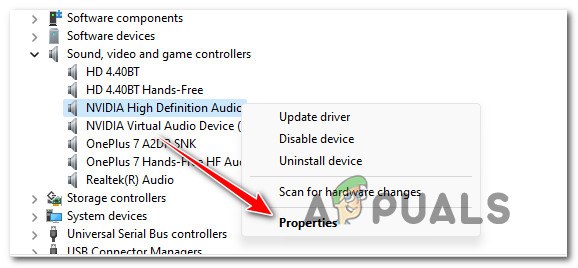
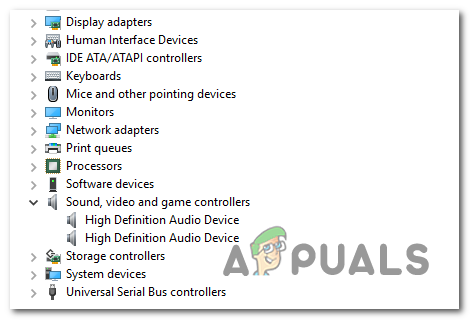
- Within Device Manager, scroll down through the list of devices and expand the drop-down menu for Sound, video, and game controllers.
- Right-click on your high-definition audio driver.
- From the context menu, select Properties.

Accessing the properties menu - On the Properties screen, navigate to the Driver tab at the top, then click Update Driver.

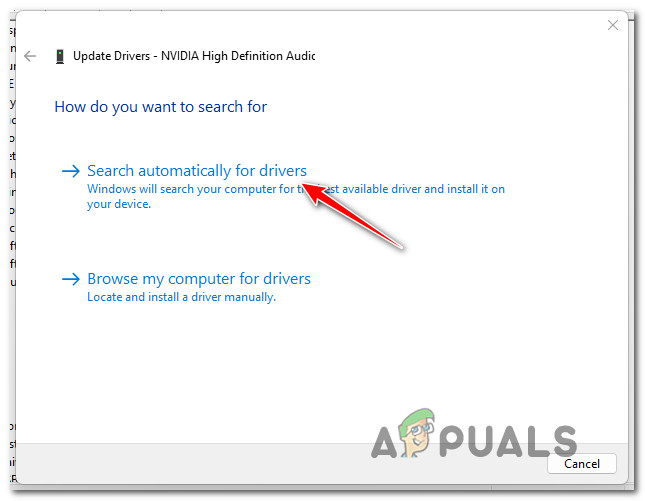
Updating the driver - On the next screen, select Search automatically for drivers.

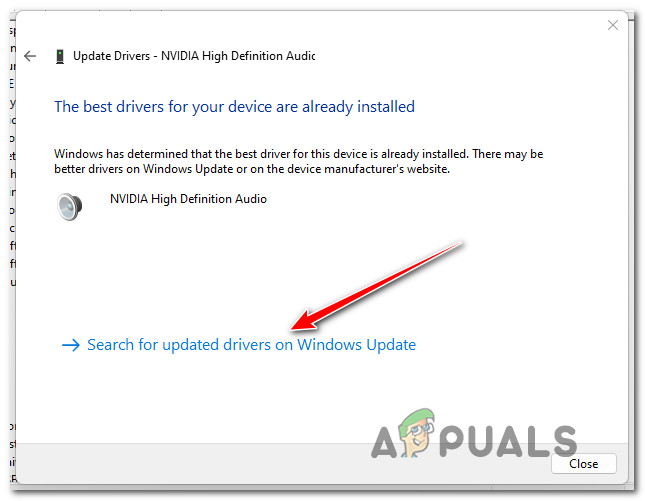
Searching automatically for drivers - Wait to see if a new audio driver version is identified. If found, follow the on-screen instructions to install it.Note: If Device Manager fails to identify a new driver, click on “Search for updated drivers on Windows Update,” as this could yield different results.
Search for updated drivers - Restart your PC to check if the issue has been fixed post-reboot.
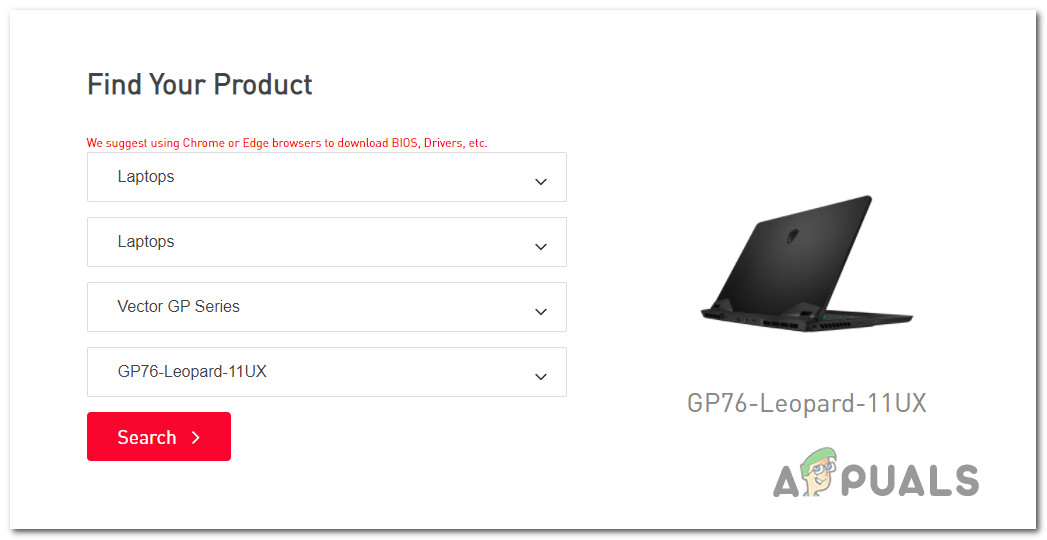
3. Install the dedicated Sound Card driver
If you’re using a generic driver, you should install the dedicated sound card driver from your PC or motherboard’s manufacturer’s website.
This is particularly recommended if you’re using a laptop from brands like MSI or Lenovo, as they often utilize proprietary audio hardware that may not perform optimally with generic drivers.
Note: Avoid generic drivers if you’re using a dedicated sound card.
Be aware that the process of finding and installing the appropriate sound card driver will vary based on the specific manufacturer of your device.
- Open your preferred browser and visit your manufacturer’s driver download page.

Searching for compatible laptop drivers Note: For laptops, head to the manufacturer’s download page and look up your specific model.
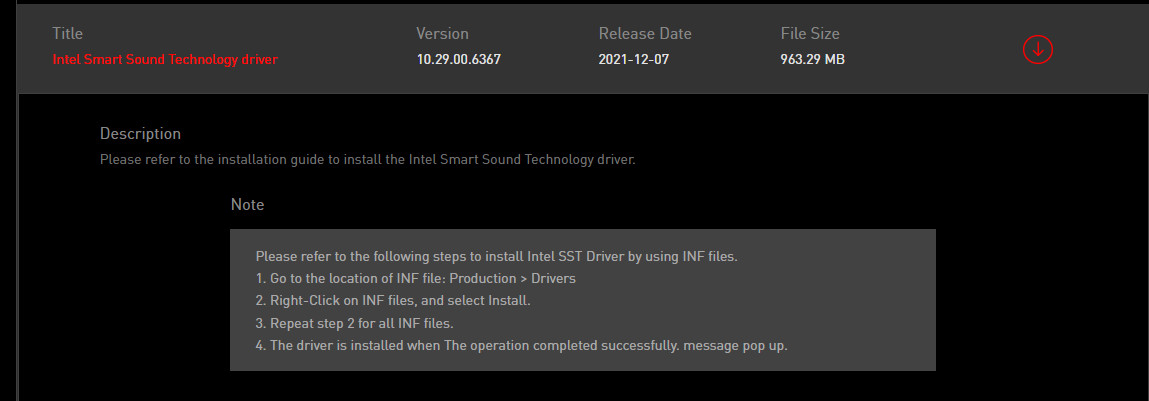
- On the download page for your laptop or motherboard model, head to the Driver section and download the suggested audio driver.

Downloading the smart sound technology driver - Once downloaded, extract the driver and proceed with the installation.Note: The instalation method depends on the file type: right-click and choose Install for INF files or double-click for executable (.exe) files.
- Complete the installation by following on-screen instructions, then reboot your PC and check if the low volume issue has been resolved.
4. Uninstall audio driver (use a generic equivalent)
Another scenario that might cause low audio volume on Windows 11 involves using a dedicated audio driver that was ported from Windows 10 or Windows 8.1 following an OS upgrade.
In such cases, your dedicated driver might not be fully compatible with Windows 11. To solve this, uninstall the current dedicated driver and switch to a generic audio equivalent.
- Press Windows key + R to open a Run dialog box.
- Type ‘devmgmt.msc’ and press Ctrl + Shift + Enter to open Device Manager with administrator privileges.
Accessing the Device Manager tab - At the User Account Control (UAC) prompt, click Yes for admin access.
- In Device Manager, scroll down to Sound, video, and game controllers and expand the menu.

Accessing your Audio adapter Device Manager listing - Right-click on your dedicated audio driver and select Properties from the context menu.
- Navigate to the Driver tab in the Properties menu and click on Uninstall Device.
- At the confirmation prompt, check Attempt to remove the driver for this device and click Uninstall.
Uninstalling the audio driver - Once the driver is uninstalled, reboot your PC. During the subsequent startup, Windows 11 will identify the absence of an active driver, automatically installing a generic equivalent.
- After the reboot, verify if the low audio problem has been rectified.
In case the issue continues, move on to the next suggested fix.
5. Disable all enhancements from Sound Properties
If your problem hasn’t been solved thus far, the next step is to look at the Sound Enhancements you currently have active.
Several Windows 11 users who experienced low audio volume reported that they resolved the issue by disabling all audio enhancements.
Note: If you’re using a dedicated audio card, it likely comes with its own audio enhancement options. In this case, disable them from the dedicated utility, as disabling the Windows settings won’t remedy the issue.
Note 2: Users of SRS Premium Sound or SRS Premium Sound should uncheck the box next to Audio Enhancement within the dedicated application to resolve the issue.
- Press Windows key + R to open a Run dialog box.
- Type “control” in the box and press Enter to open the Control Panel.
- In the Control Panel, use the search function at the top-right to find Sound.
- Click on Sound in the results.
- Within the Sound screen, ensure the Playback tab is active, right-click your problematic playback device, and choose Properties.
- In the device Properties, select the Enhancements tab and check the box next to Disable all enhancements.
- Press Apply to save the changes.
- Restart your PC and see if this has fixed the issue after the boot process.

Continuing to experience low-volume audio despite the deactivation of all virtual enhancements means you should try the next potential fix.
6. Change the BitRate sound format
If you’ve yet to find a successful fix and you’re using a premium sound system or headset, the low-volume audio might be due to inadequate Windows settings related to stream format quality for the active playback device.
You can likely solve the problem by heading to the Sound settings and altering the Default format to use the highest sample rate available (24 bit, 48000 Hz, Studio Quality).
Many users encountering this issue after updating to Windows 11 from Windows 10 reported resolving it as soon as they increased the default stream format to Studio Quality.
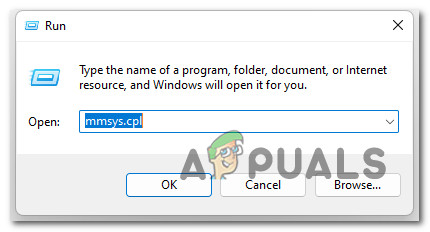
- Press Windows key + R to open a Run dialog box.
- Type ‘mmsys.cpl’ into the text box and press Enter to open the Sound settings.

Accessing the Sound Settings on Windows 11 Note: If confronted by the User Account Control (UAC) prompt, click Yes to grant administrative access.
- Within the Sound settings, ensure the Playback tab is selected.
- Right-click on the audio device you’re currently using and select Properties from the context menu.
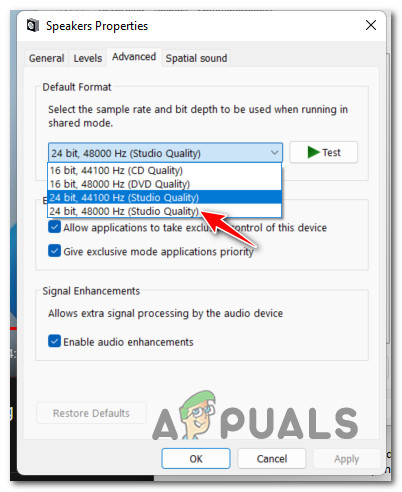
Accessing the Properties menu of your Sound device - In the Speaker Properties menu, navigate to the Advanced tab.
- Under Default format, change the selection in the dropdown menu to 24 bit, 48000 Hz (Studio Quality).
- Click on Apply to save the changes.

Changing the sound quality - After adjusting the sound quality setting, reboot your PC to check if the low-volume sound issues on Windows 11 have been resolved.
If the problem continues despite trying the above instructions, consider the next potential solution.
7. Use a System Restore point
If you suspect the issue is due to a recent change (new driver installation, app update, etc.), using System Restore could revert your computer to a state before the issue began.
Note: System Restore typically stores snapshots at critical system events. Unless you altered the default settings, you should have several to choose from.
For instructions on how to use System Restore, follow this guide on accessing previously saved System Restore points. This process will allow you to turn back the clock to a point when the low volume issue was not present.
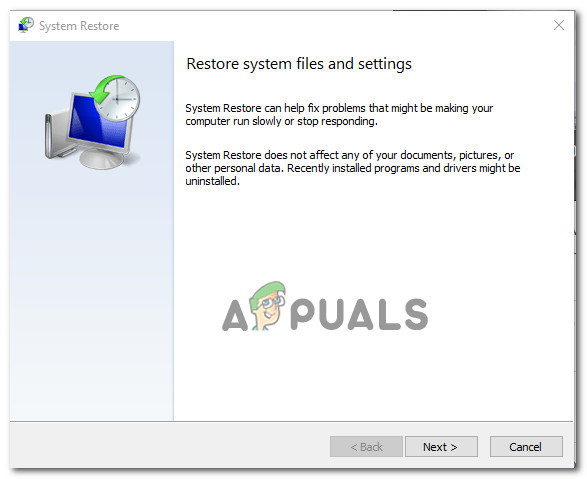
After restoring your PC using the above guide, check if the low volume issue persists on Windows 11.
If the problem is still unresolved, proceed to the next method.
8. Deploy SFC and DISM scans
If all else fails, consider that system file corruption might be affecting your computer’s audio outputs. When faced with such issues, two built-in tools—System File Checker (SFC) and Deployment Image Servicing and Management (DISM)—can often help.
These utilities can fix common corruption issues that potentially interfere with Windows Update’s functionality.
Ideally, start with an SFC scan, which doesn’t require an internet connection.
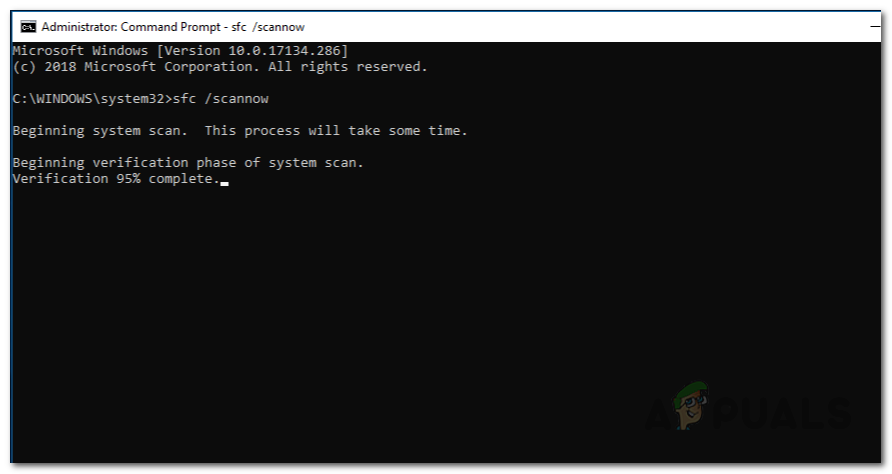
Note: The SFC tool uses a locally stored cache to replace corrupted files with intact ones. Let this process complete fully to avoid additional complications.
SFC scans can take a while, especially on HDDs, so exercise patience during this process.
Important: If the SFC scan seems to freeze, wait for the tracking to resume instead of closing the window.
Once the SFC scan is complete, reboot your PC and check for the low audio issue.
Should the issue persist, proceed with a DISM scan.
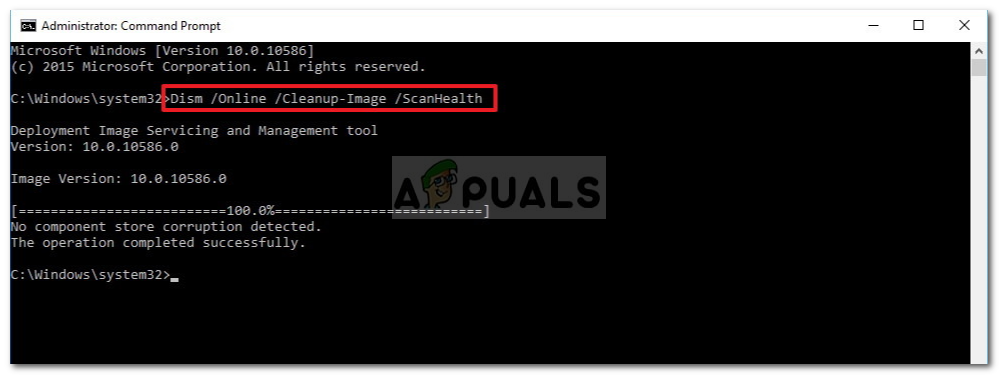
Note: DISM relies on Windows Update to replace damaged files with clean versions. Thus, ensure a stable internet connection before starting this operation.
After completing both the SFC and DISM scans, restart your PC and assess if the audio issues with your Windows 11 computer have been addressed.
9. Revert back to Windows 10
If you’re within the 10-day rollback period, you can easily downgrade to Windows 10 by following this guide: reverting to Windows 10.
If reverting isn’t an option, enhancing audio volume on Windows 11 might be impossible with your current hardware configuration.