
Все способы:
- Способ 1: Проверка системных настроек
- Способ 2: Средство устранения неполадок
- Способ 3: Установка драйверов
- Способ 4: Разблокировка громкости для Bluetooth-устройств
- Способ 5: Восстановление Виндовс 11
- Способ 6: Сторонний софт
- Вопросы и ответы: 0
Способ 1: Проверка системных настроек
Если обычно динамики звучат громко, а сегодня вы включили компьютер и заметили, что звук стал тише, в первую очередь перезагрузите систему. Далее, если это не подействовало, следует убедиться, что причиной проблемы не являются аудионастройки Виндовс 11.
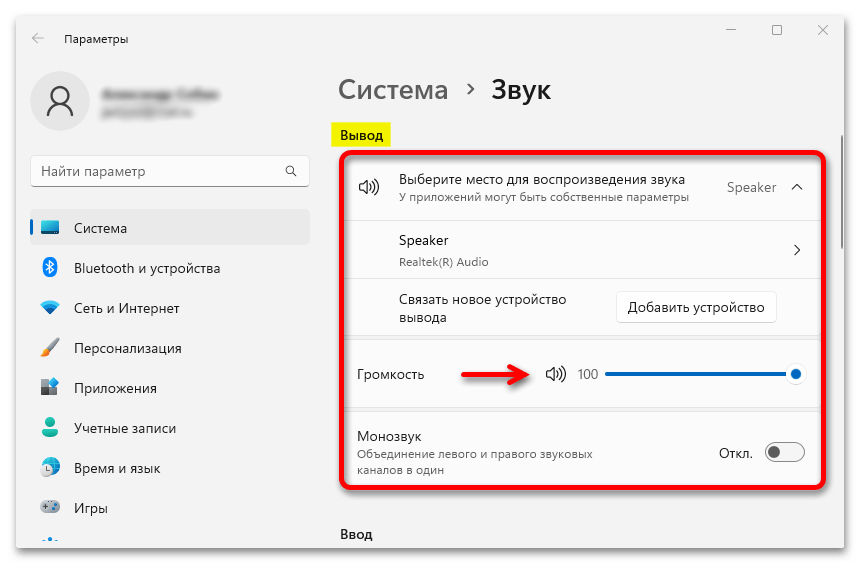
- Справа на панели задач кликаем правой кнопкой мышки иконку в виде динамика и открываем «Параметры звука».
- В блоке «Вывод» устанавливаем громкость на максимальный уровень.

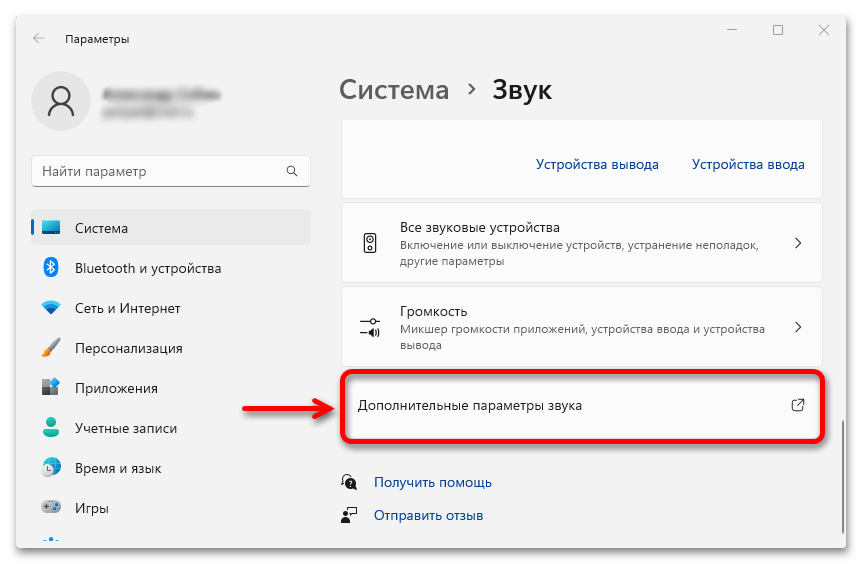
Затем переходим ниже и открываем дополнительные параметры.
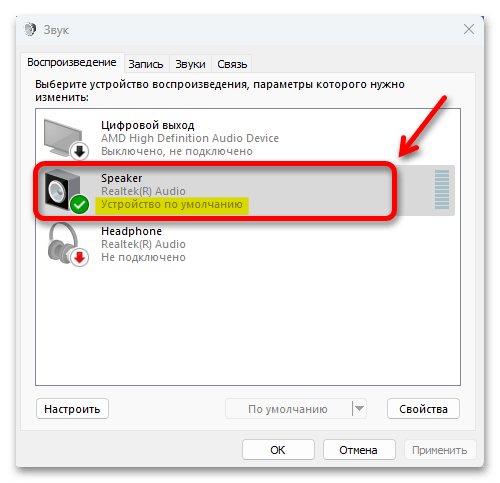
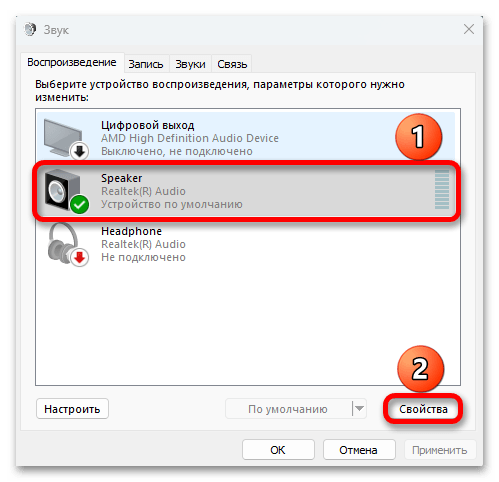
- Во вкладке «Воспроизведение» динамики ноутбука должны быть выбраны в качестве устройства по умолчанию.

Теперь выделяем их и нажимаем «Свойства».
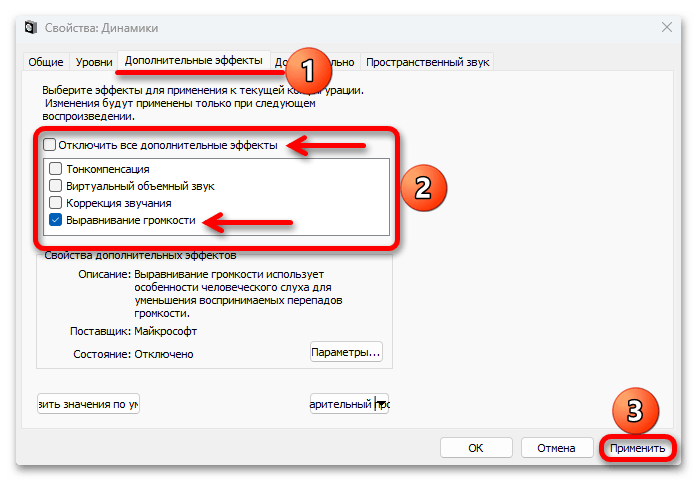
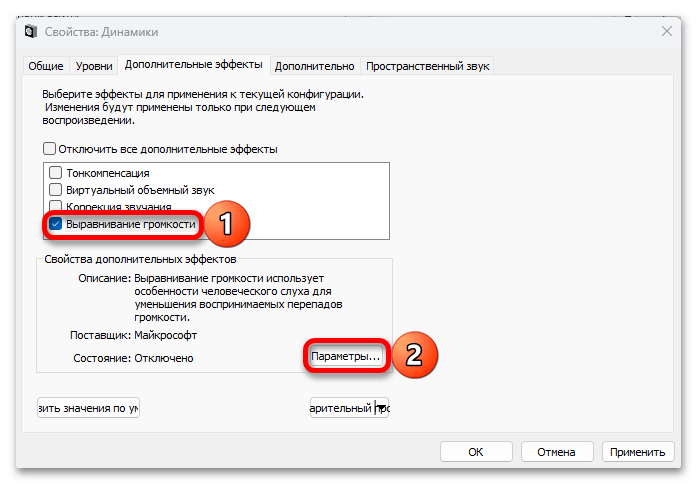
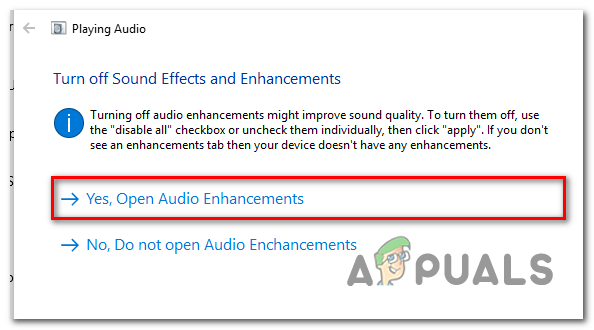
- Если есть вкладка «Дополнительные эффекты» или «Enhancements», открываем ее, затем снимаем блокировку улучшений, включаем «Выравнивание звука» («Loudness Equalization») и нажимаем «Применить».

Это не усиление в прямом смысле слова, но функция позволяет снизить динамический диапазон, т.е. разницу между тихими и громкими звуками в одной аудиодорожке, например диалогами персонажей и спецэффектами в фильме. Правда, она может как увеличить, так и уменьшить уровень громкости, но попробовать все-таки стоит. Если есть изменения в лучшую сторону, можно выполнить дополнительную настройку эффекта. Нажимаем «Параметры»,

и ползунком меняем скорость выравнивания, подбирая таким образом наиболее подходящий вариант.
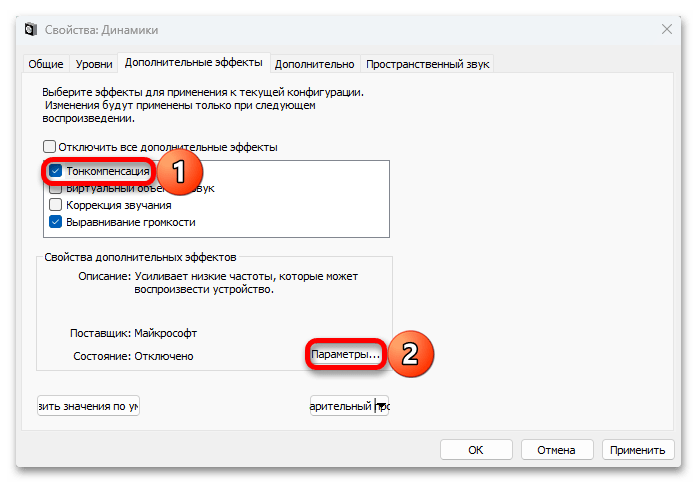
Дополнительно можно включить «Тонкомпенсацию», которая занимается выравниванием частот, и поработать отдельно с настройками этого эффекта.

С другой стороны, если изначально эти улучшения были включены, попробуйте их отключить.
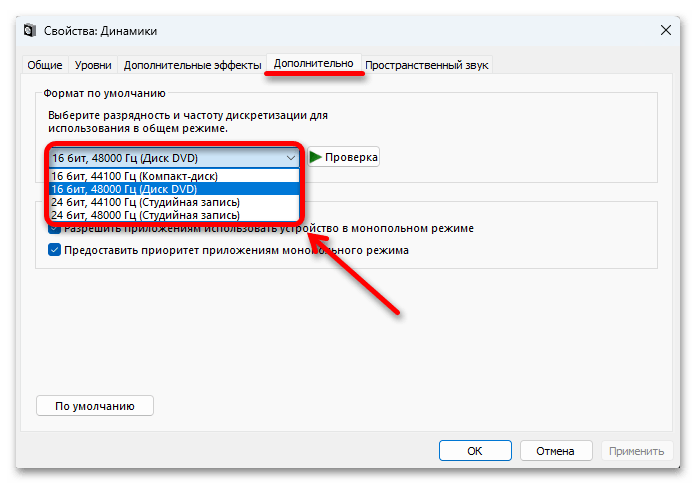
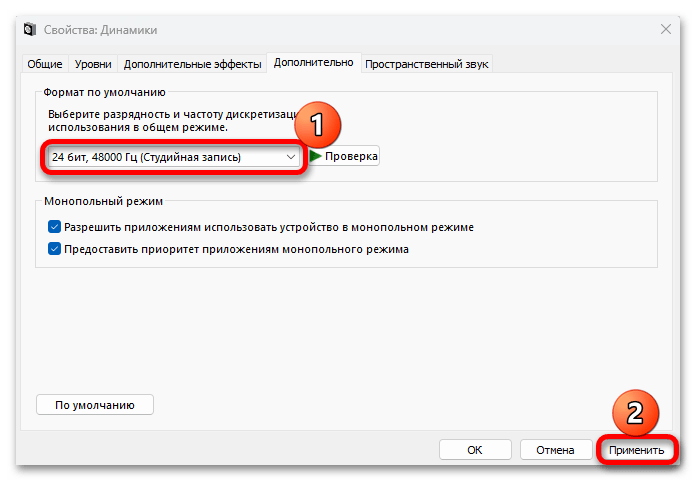
- Во вкладке «Дополнительно» можно изменить формат звука, но эта характеристика также зависит от аудиооборудования ноутбука.

Пробуем по очереди устанавливать разные сочетания разрядности и частоты дискретизации.
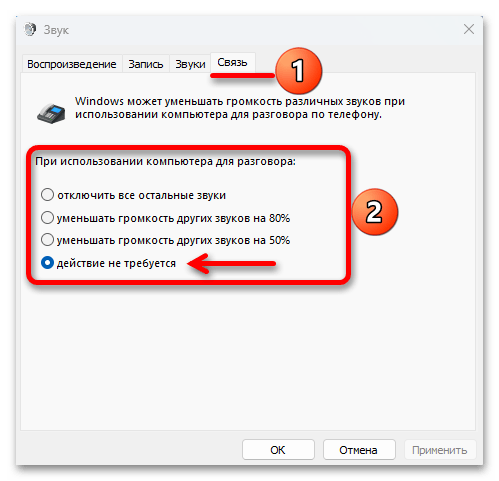
- Закрываем свойства динамиков и переходим во вкладку «Связь». В Виндовс есть функция, позволяющая во время разговора по телефону уменьшать другие звуки компьютера. Даже если в данный момент вы не выполняете никаких вызовов, убедитесь, что установлено значение – «Действие не требуется». Вдруг система почувствовала какие-нибудь коммуникационные операции.
Если вкладки с эффектами нет, значит, либо их не поддерживает звуковая карта, либо текущие аудиодрайверы. Возможно, они появятся после установки новой версии ПО, о чем рассказывается в третьем способе статьи.
Способ 2: Средство устранения неполадок
Если настройки в порядке и описанные выше шаги не принесли положительного результата, возможно, дело в некорректной работе аудиоустройств. Поэтому есть смысл запустить встроенное в систему средство устранения неполадок.
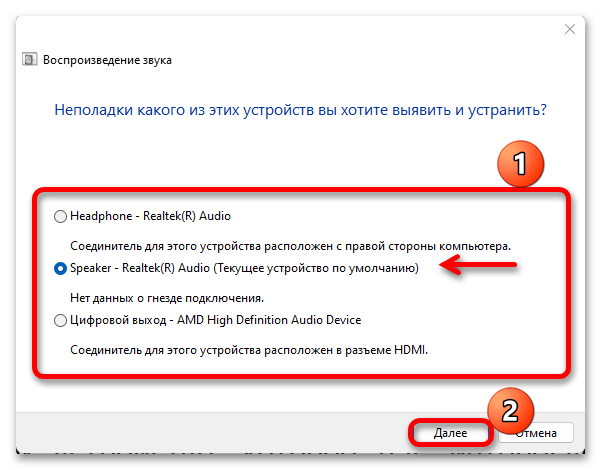
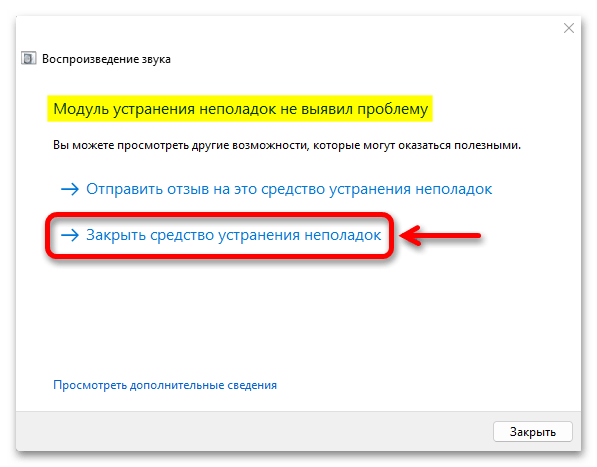
- Снова кликаем ПКМ по динамику в правом нижнем углу экрана и запускаем средство устранения неполадок со звуком.
- Выбираем устройство, которое нас интересует (наушники, динамики и т.д.), и нажимаем «Далее».
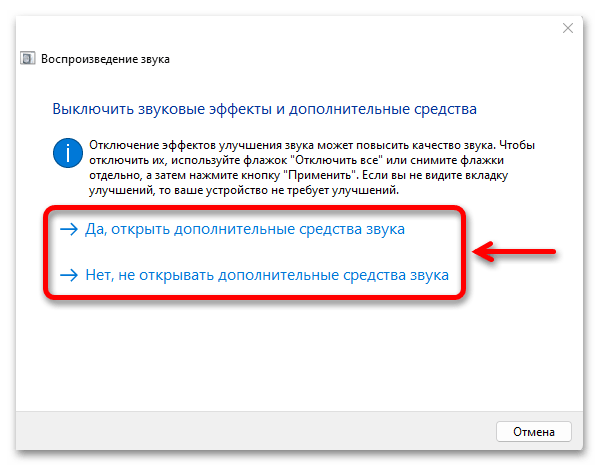
- Здесь нам предложат выбрать один из вариантов – отключить или не отключать средства улучшения качества звука. В предыдущем способе мы о них говорили, и если они хотя бы чуть-чуть прибавили громкость, можно оставить эффекты включенными. А после попробовать запустить инструмент без них.
- В данном случае модуль не выявил неполадок, но если что-то найдет, будет исправлять в автоматическом режиме.
Способ 3: Установка драйверов
Для звуковой карты обязательно должны быть установлены драйверы, а еще лучше, чтобы они были последней версии. Для начала попробуем обновить программное обеспечение в пределах системы.
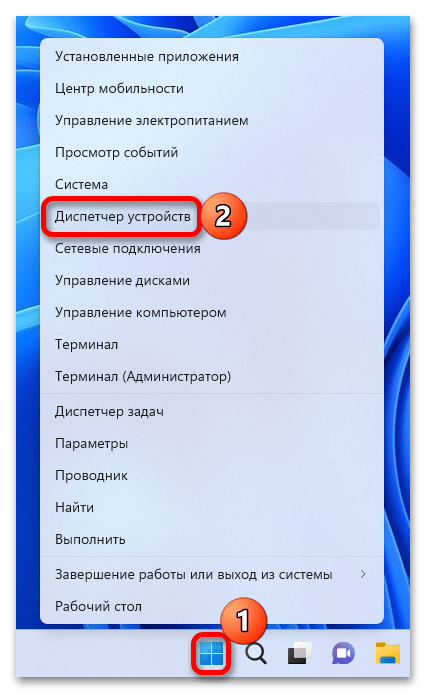
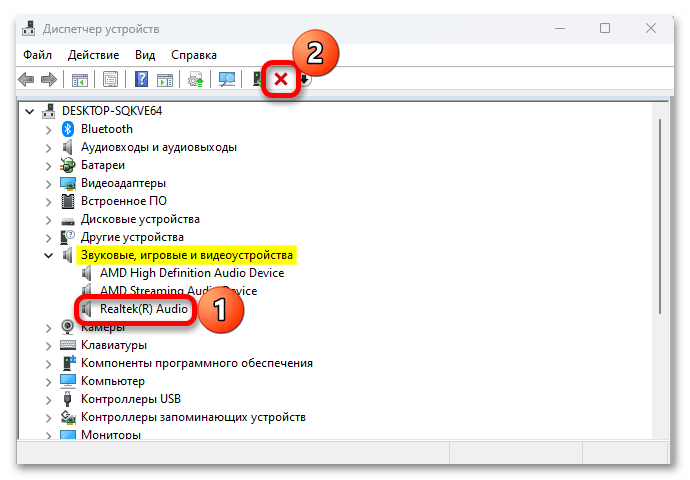
- Кликаем правой кнопкой мышки «Пуск» и открываем «Диспетчер устройств».
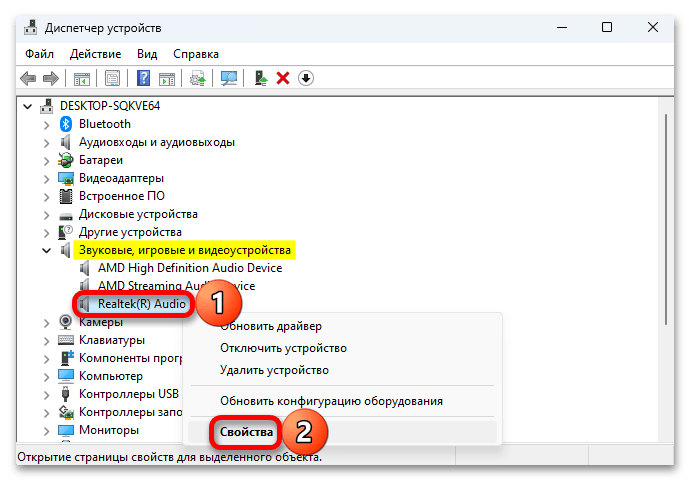
- В разделе «Звуковые, игровые и видеоустройства» щелкаем ПКМ по аудиоустройству, открываем «Свойства»

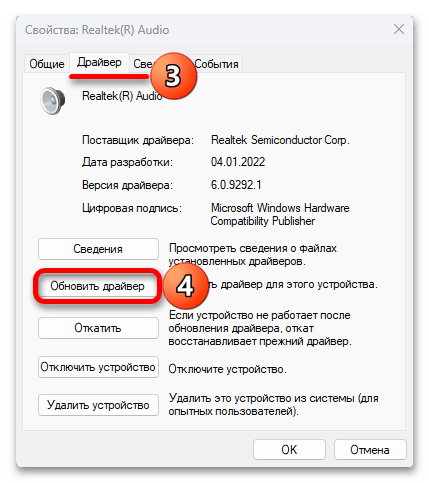
переходим во вкладку «Драйвер», запускаем обновление,

а затем автоматический поиск. Просто дожидаемся, когда завершится операция. Если потребуется, перезагружаем компьютер.
- Другой вариант – удалить текущее устройство. А система после этого установит его заново, что, возможно, устранит проблему со звуком. Для этого выделяем нужное аудиоустройство, нажимаем «Удалить»,

отмечаем пункт, связанный с удалением драйверов, и подтверждаем действие. Перезагружаем компьютер.
Бывает, что драйверы выходят с ошибкой или по какой-то причине неправильно устанавливаются. В этом случае можно попробовать вернуть более старую их версию. А чтобы система потом не смогла ее обновить, необходимо сначала отключить автообновление аудиодрайверов.
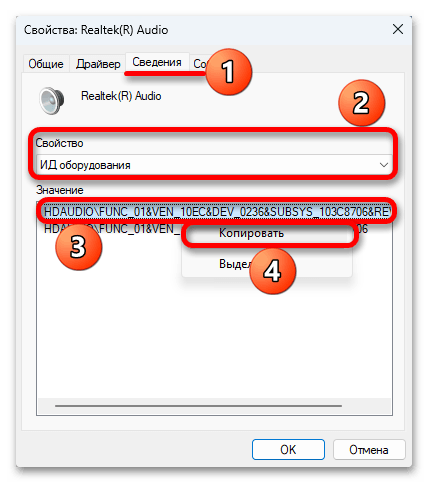
- Снова открываем свойства аудиоустройства, переходим во вкладку «Сведения», в поле «Свойства» выбираем «ИД оборудования», кликаем ПКМ по первому в списке значению и копируем его.
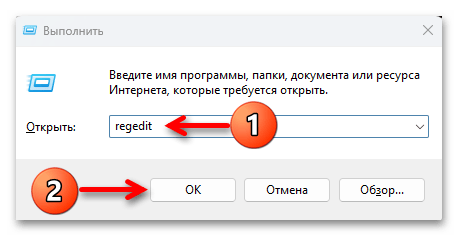
- Вызываем окно «Выполнить» и с помощью команды
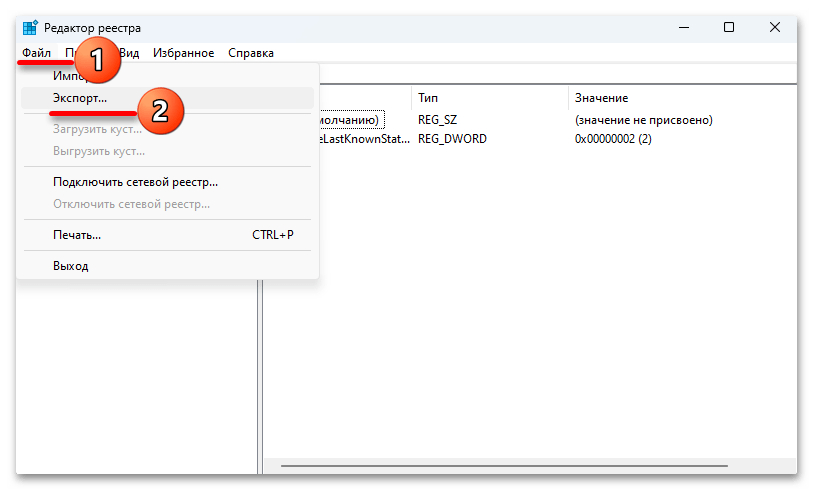
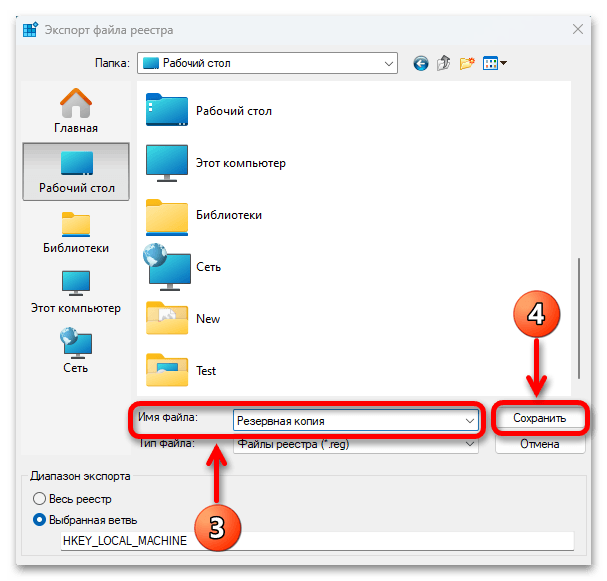
regeditоткрываем реестр. - Реестр – один из самых важных компонентов операционной системы, поэтому изменения нужно вносить аккуратно, а перед этим желательно создавать резервную копию хотя бы той ветки, с которой будете работать. В нашем случае – это «HKEY_LOCAL_MACHINE», так что выделяем ее, во вкладке «Файл» нажимаем «Экспорт»,

присваиваем РК название и сохраняем ее.

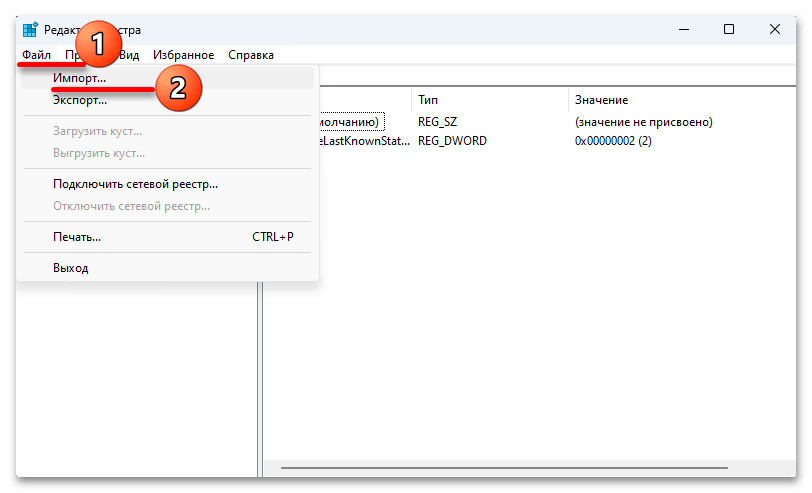
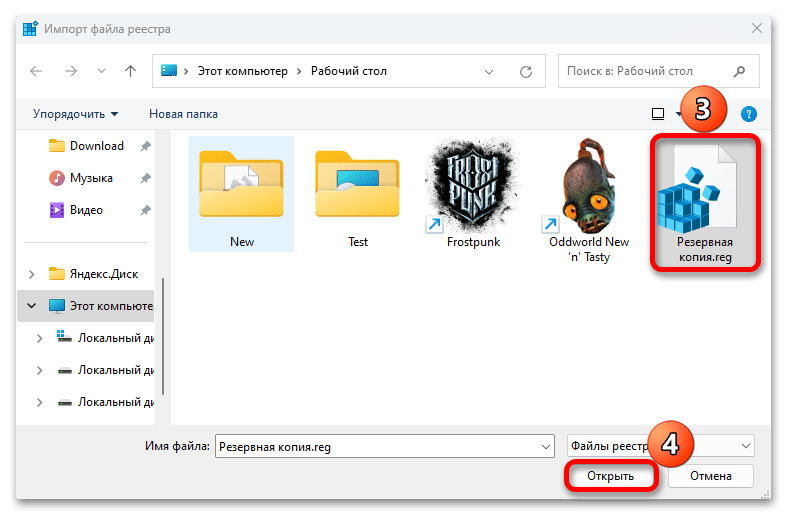
Чтобы в дальнейшем воспользоваться ею, кликаем «Импорт»,

находим файл на компьютере и загружаем.
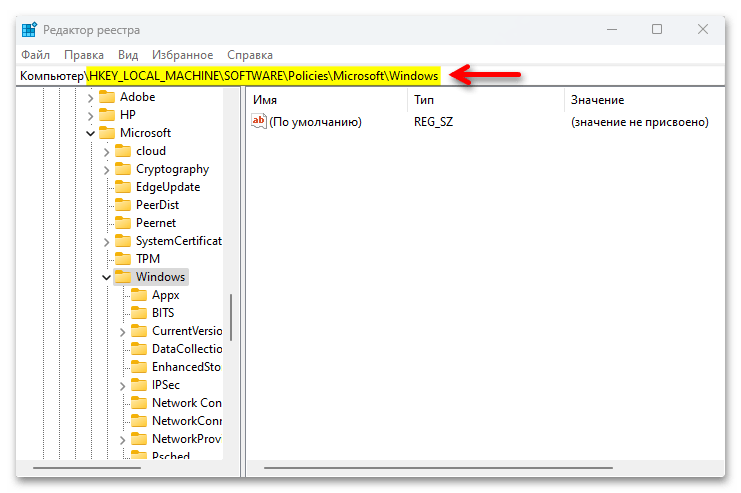
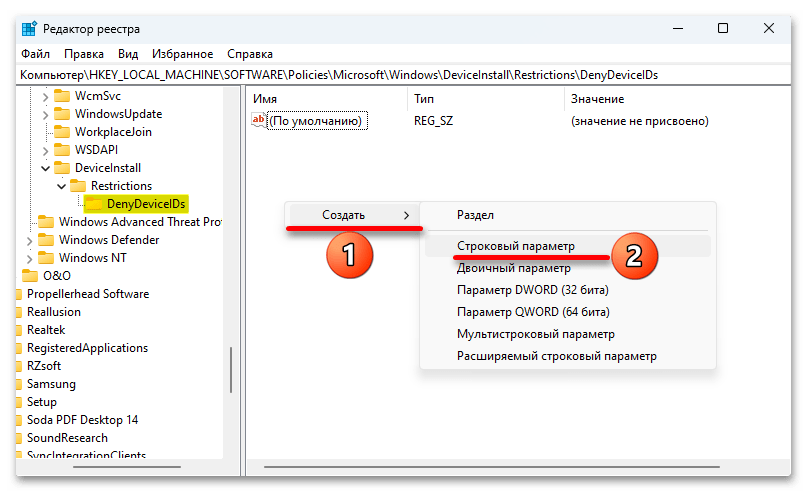
- В реестре идем по пути:
HKEY_LOCAL_MACHINE\SOFTWARE\Policies\Microsoft\Windows
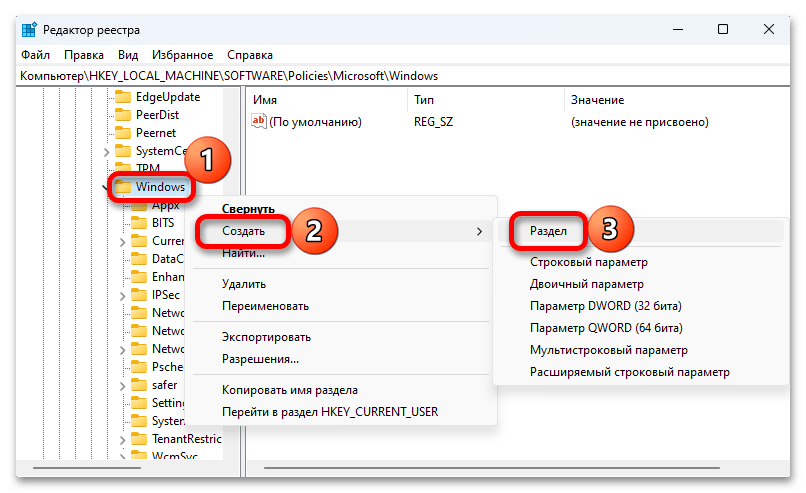
Кликаем ПКМ по папке «Windows», создаем в ней новый раздел

и называем его «DeviceInstall».

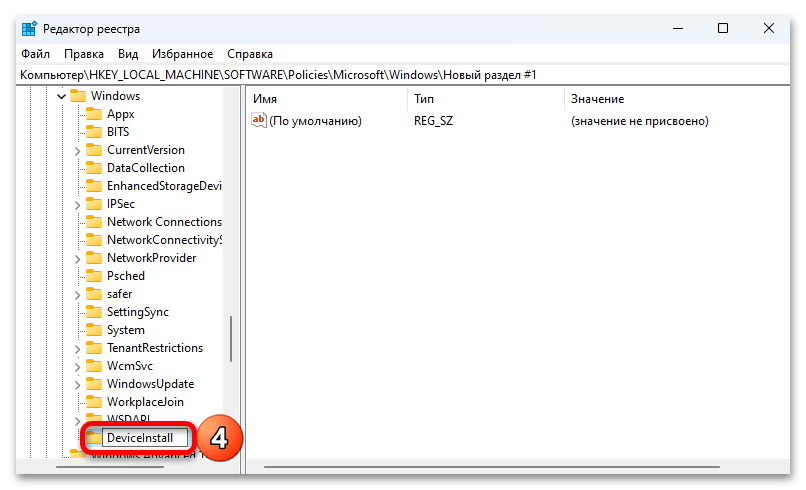
Теперь в нем создаем каталог «Restrictions», а в нем «DenyDeviceIDs».
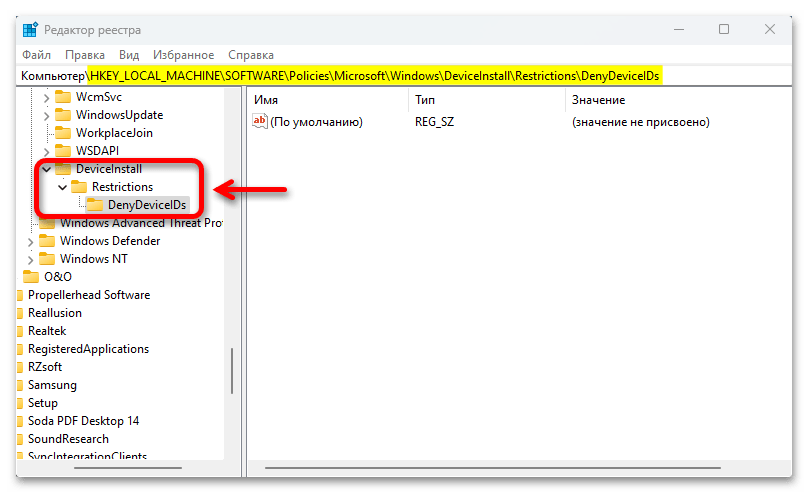
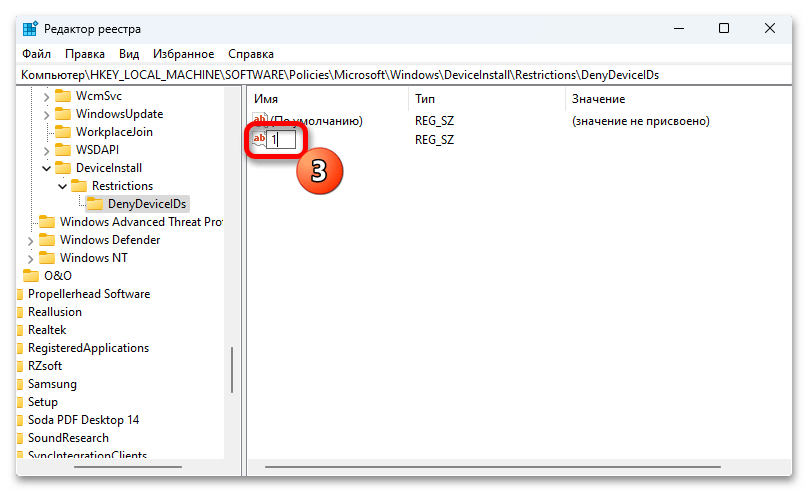
- В последнем каталоге создаем строковый параметр

и присваиваем ему имя «1». Если блокируем обновление нескольких устройств, то даем им названия «1, 2, 3, 4 и т.д.».

Кликаем по параметру дважды и вставляем скопированное в свойствах аудиоустройства значение.

Читайте также: Очистка реестра в Windows 11
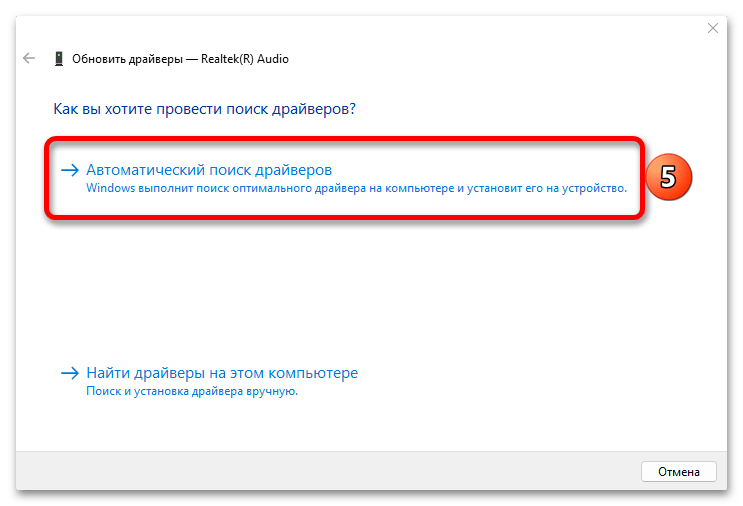
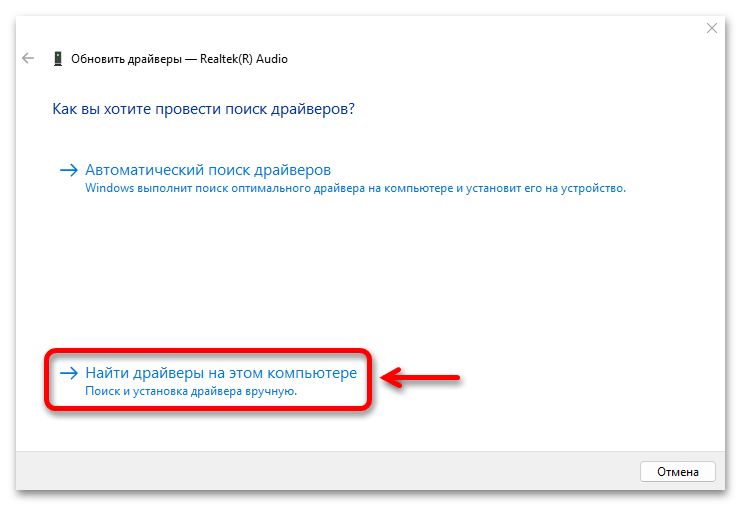
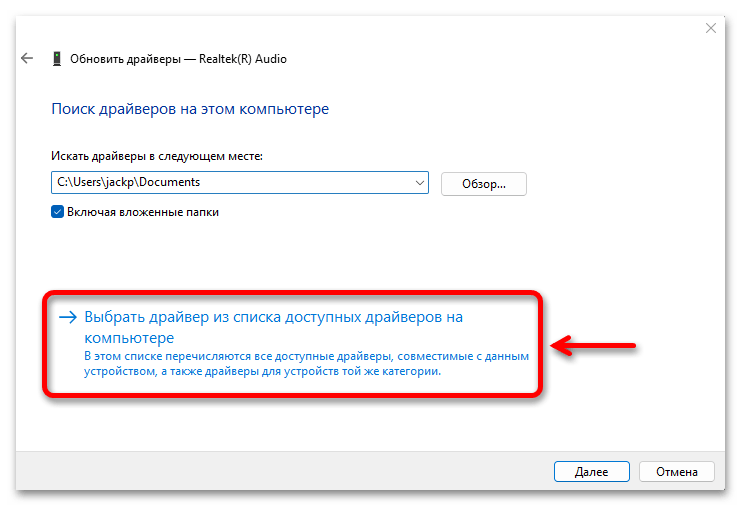
- Снова запускаем обновление драйвера и уже выбираем поиск на этом компьютере.

В следующем окне кликаем «Выбрать драйвер из списка доступных на ПК»,
выделяем более старую версию, например предыдущую, и нажимаем «Далее». После установки перезагружаем компьютер.

Аудиодрайверы теперь перестанут обновляться как автоматически, так и вручную. Причем если удалить само устройство, Windows не сможет его восстановить, пока параметр с ИД будет в реестре.


При обновлении через «Диспетчер устройств» Windows ищет драйверы в Центре обновления, но ведь там могли еще не появиться самые свежие версии, поэтому есть смысл поискать их в интернете. В отдельной статье на нашем сайте подробно описано, как найти и загрузить аудиодрайверы с сайта производителя ноутбука или материнской платы, а также как обновить их с помощью сторонних приложений.
Подробнее:
Как определить необходимые для звуковой карты драйверы
Поиск и инсталляция аудиодрайверов для Windows

Способ 4: Разблокировка громкости для Bluetooth-устройств
Этот способ подойдет только в том случае, если ваше устройство вывода подключено по технологии «Bluetooth». На сегодняшний день многие пользователи столкнулись с тем, что регулятор громкости на панели задач не менял звук, выходящий из беспроводных наушников или колонок.
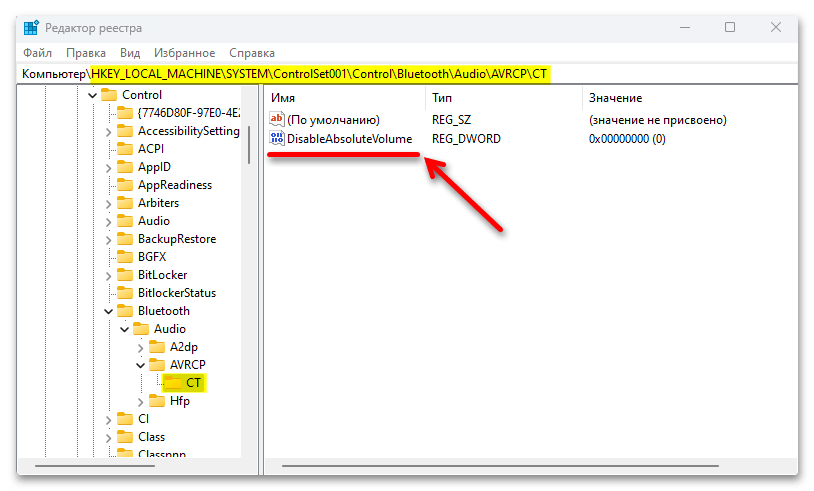
- Вызываем «Редактор реестра» так, как это было сделано в предыдущем способе, и по очереди открываем папки, следуя по указанному ниже пути:
HKEY_LOCAL_MACHINE\SYSTEM\ControlSet001\Control\Bluetooth\Audio\AVRCP\CTЗдесь нас интересует параметр «DisableAbsoluteVolume»
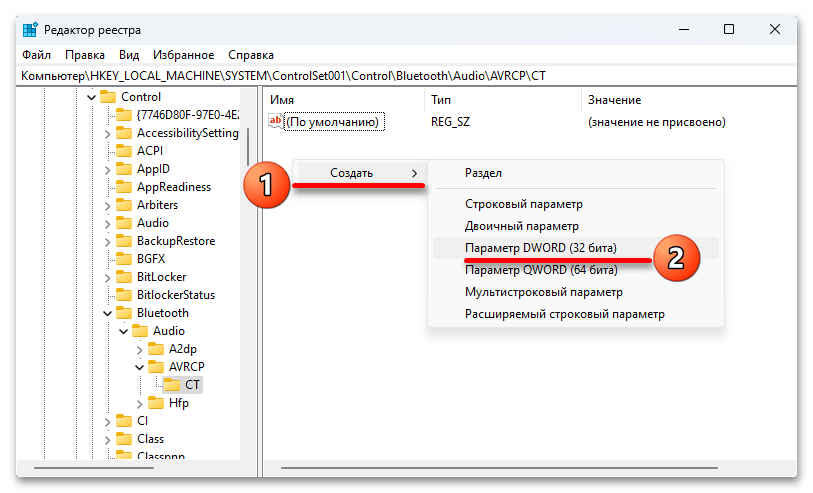
- Если такого нет, кликаем по пустой области правой кнопкой мышки, создаем параметр DWORD

и называем его соответствующим образом.
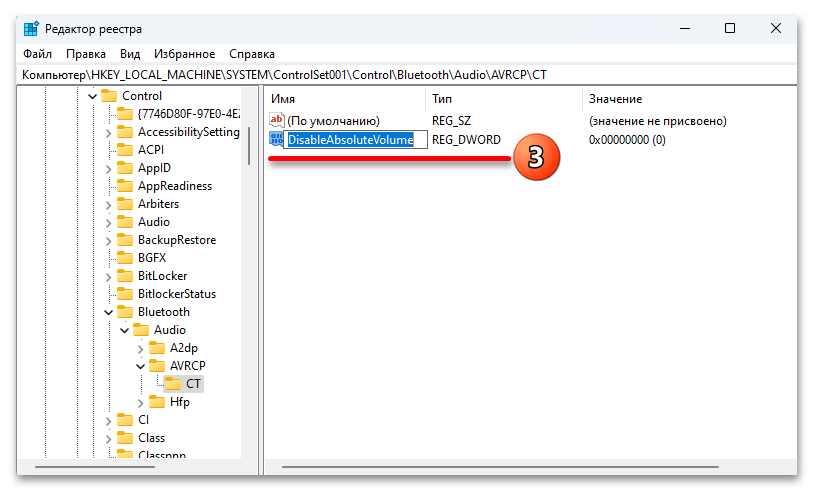
- Теперь дважды кликаем по нему, устанавливаем значение «1», подтверждаем изменения и перезагружаем систему.
Способ 5: Восстановление Виндовс 11
Механизм восстановления Windows позволяет устранять разного рода неполадки путем отката системы к предыдущим состояниям. Точки восстановления могут создаваться как автоматически, например перед установкой обновлений, так и по желанию пользователя. Правда, для этого должна быть включена соответствующая функция, поэтому не факт, что ТВ на вашем ноутбуке создавались, но проверить этот вариант стоит.
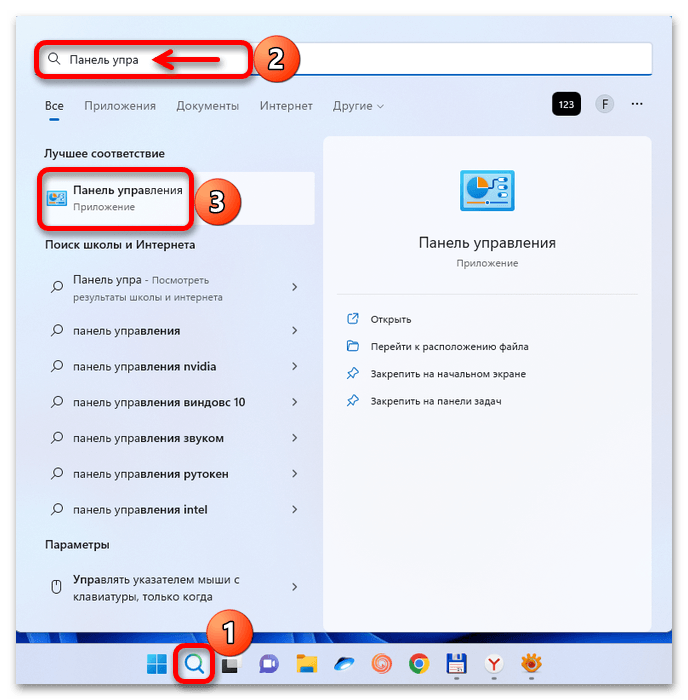
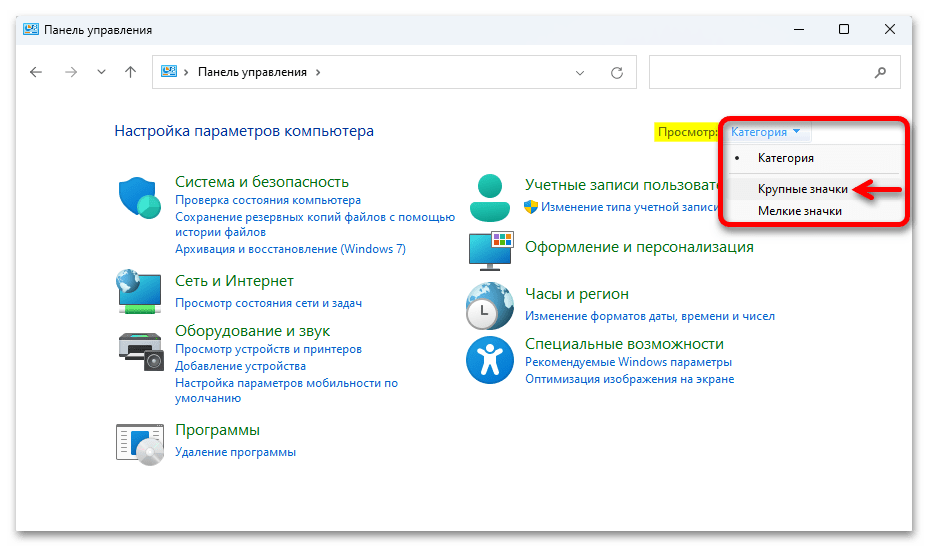
- В область поиска вбиваем «Панель управления» и открываем компонент.
- В поле «Просмотр» выбираем «Крупные значки», чтобы появился нужный нам раздел.
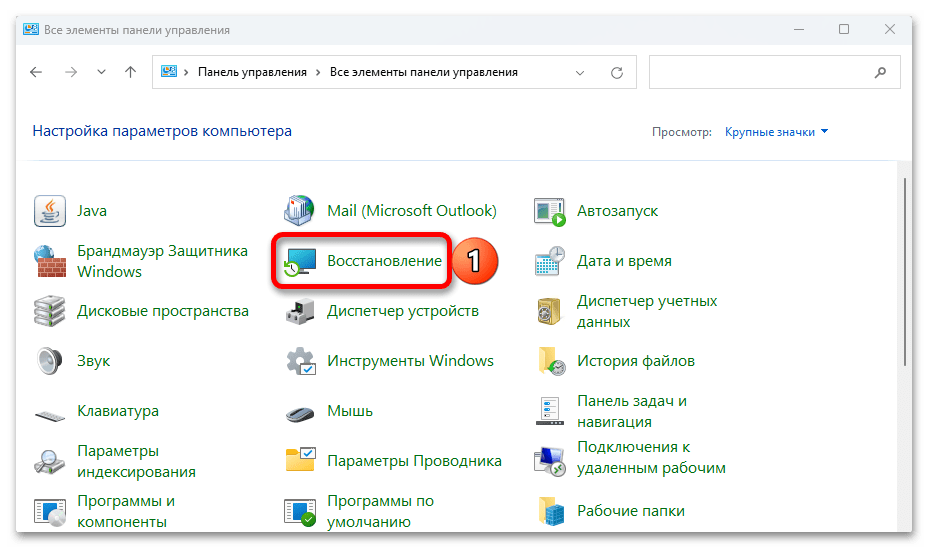
- Кликаем «Восстановление»,

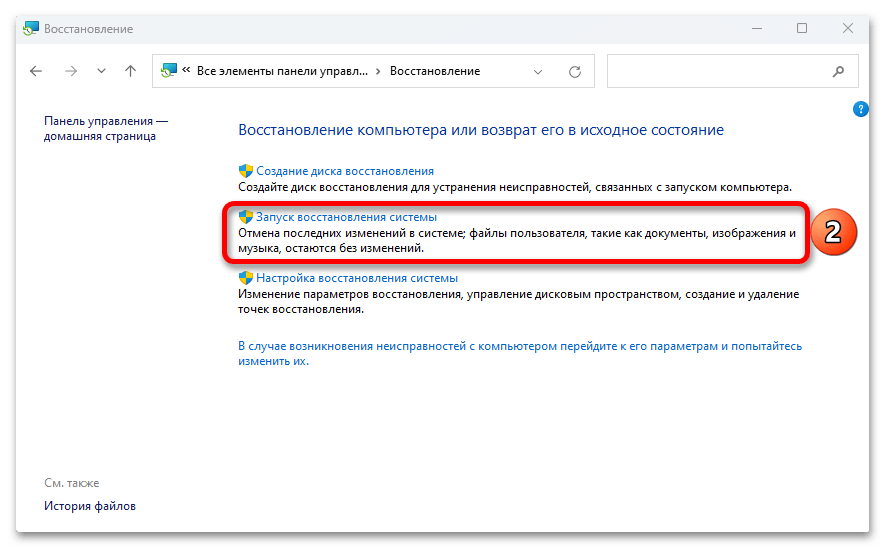
а затем «Запуск восстановления системы».
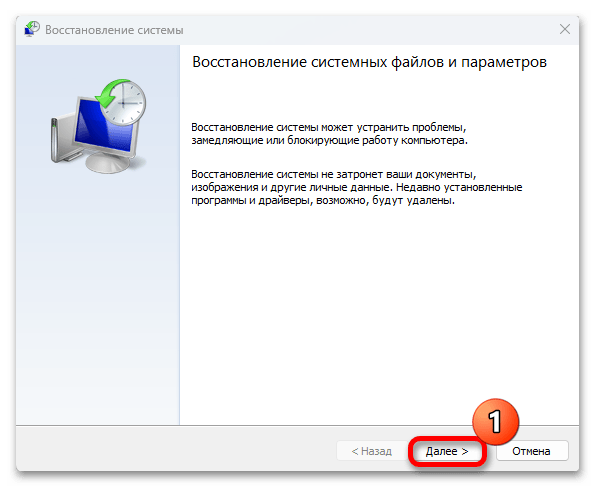
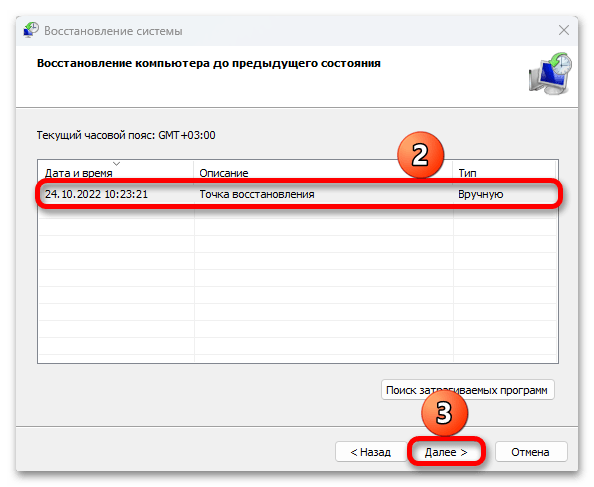
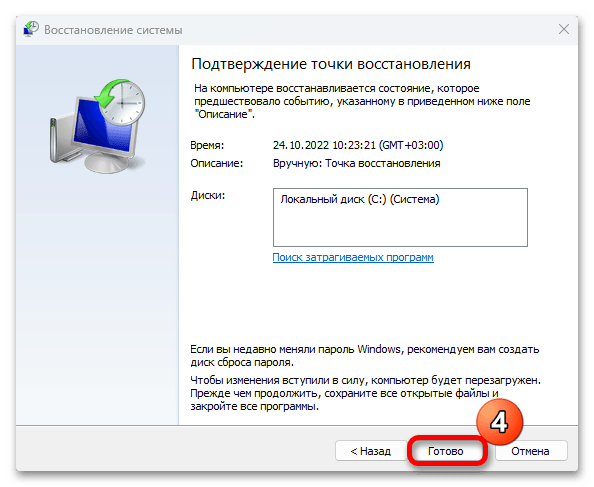
- В появившемся окне нажимаем «Далее»,

в списке выбираем нужную ТВ, если они вообще есть, кликаем «Далее»

и в следующем окне нажимаем «Готово». Дожидаемся завершения операции.
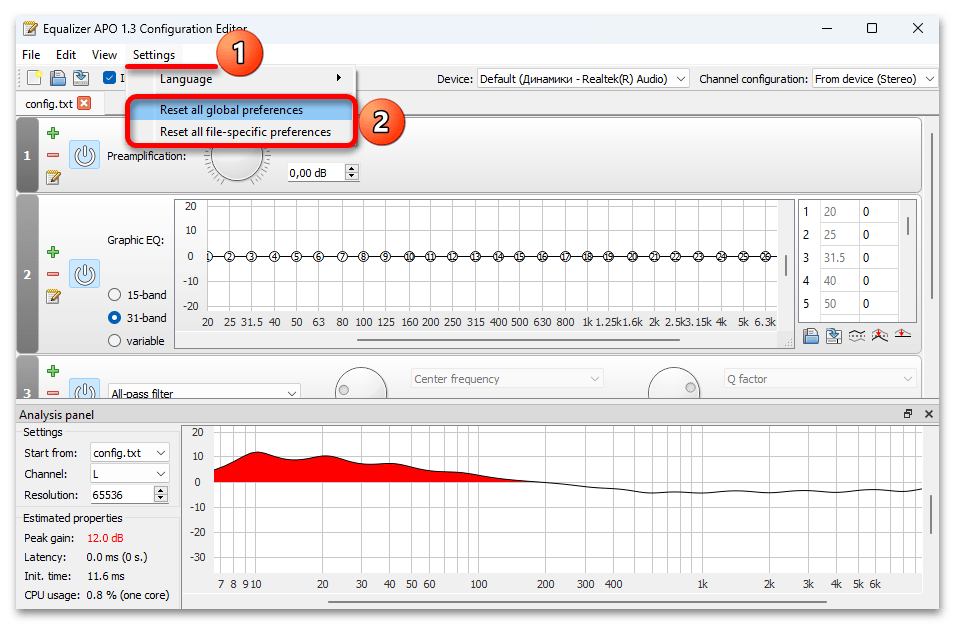
Способ 6: Сторонний софт
Вполне вероятно, что описанные способы так и не помогут вам решить проблему, но даже в этом случае еще есть возможность сделать звук на ноутбуке громче. Для этого существует специальное программное обеспечение от сторонних разработчиков. Например, подойдет APO Equalizer – параметрический эквалайзер, предназначенный для настройки звука из наушников, колонок и других устройств.
Скачать Equalizer APO с официального сайта
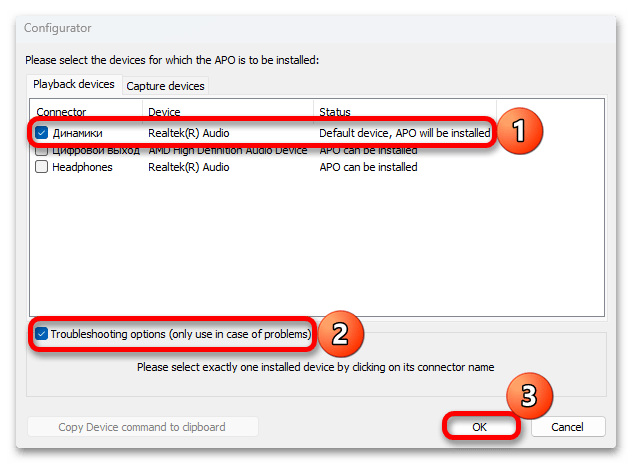
- Загружаем программу по ссылке выше и устанавливаем ее. Сразу после установки нам предложат выбрать устройство вывода, а так как у нас есть проблемы, заодно подключаем опцию устранения неполадок и нажимаем «OK».

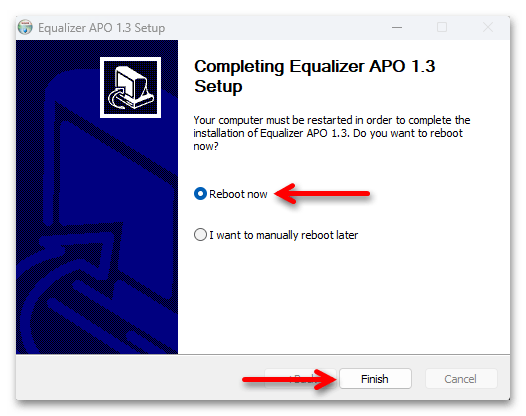
Перезагружаем систему, чтобы APO установил необходимые драйверы.
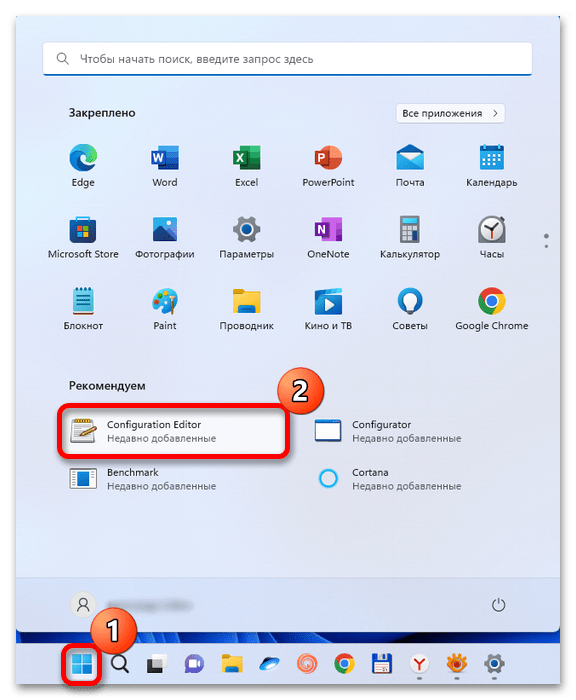
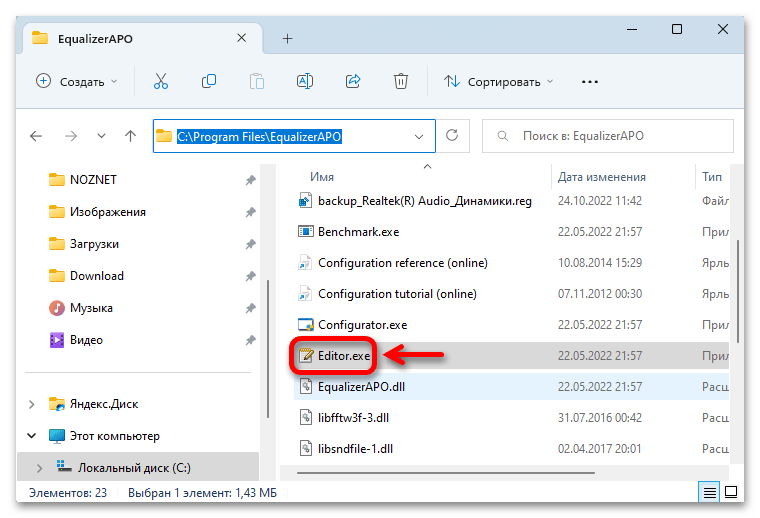
- Программа не создает ярлык на рабочем столе, поэтому открываем «Пуск» и запускаем «Configuration Editor».

Если там иконки запуска нет, открываем папку, в которую было установлено приложение, и запускаем его оттуда.

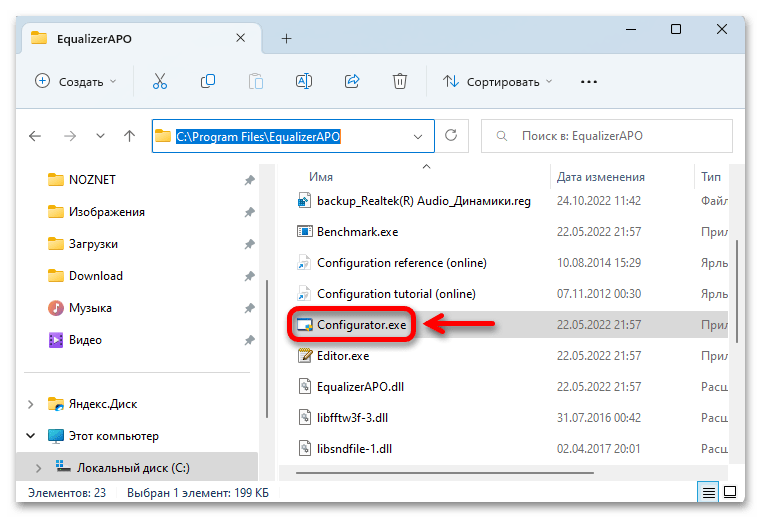
Чтобы потом изменить устройство вывода, например переключиться на наушники, используем файл «Configurator».
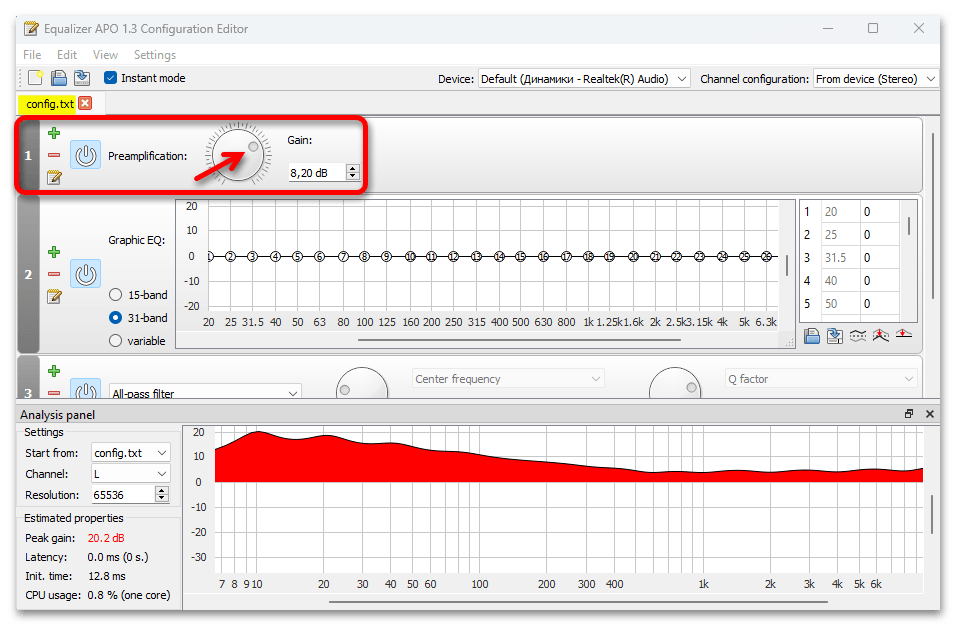
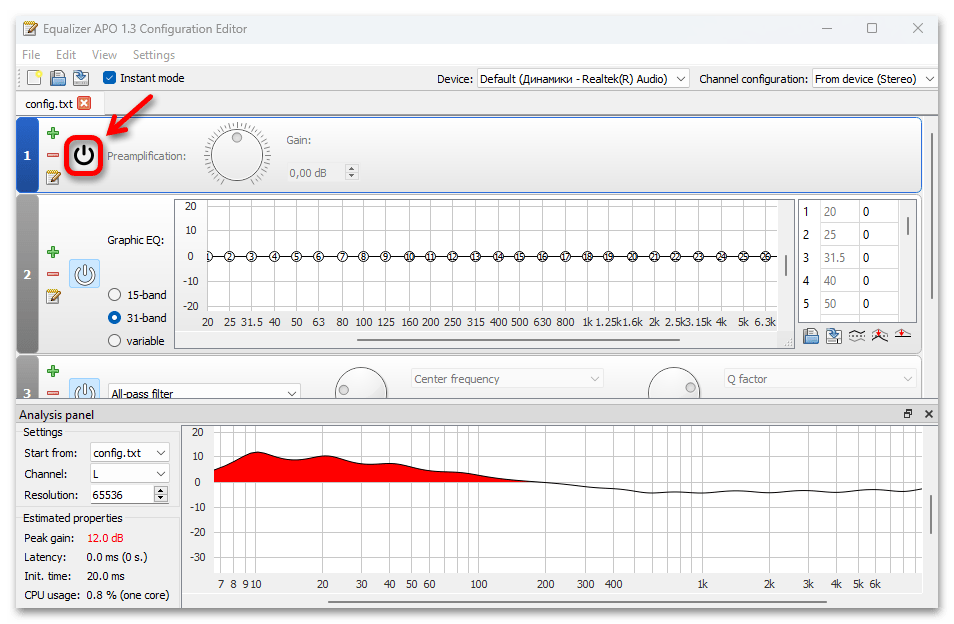
- После запуска мы увидим пресет «config» с набором заранее подключенных фильтров. В первую очередь нас интересует модуль «Preamplification». Для теста включаем на компьютере какой-нибудь звук, например запускаем аудиоплеер, и крутим тумблер в право для усиления громкости.
- Если изменений нет, а такое бывает, особенно если ранее APO устанавливался, открываем вкладку «Settings» и сбрасываем настройки – можно выбрать каждую опцию по очереди. В результате приложение должно перезапуститься и начать работать.

Чтобы отключить лишний фильтр, нажимаем соответствующую кнопку на нем.
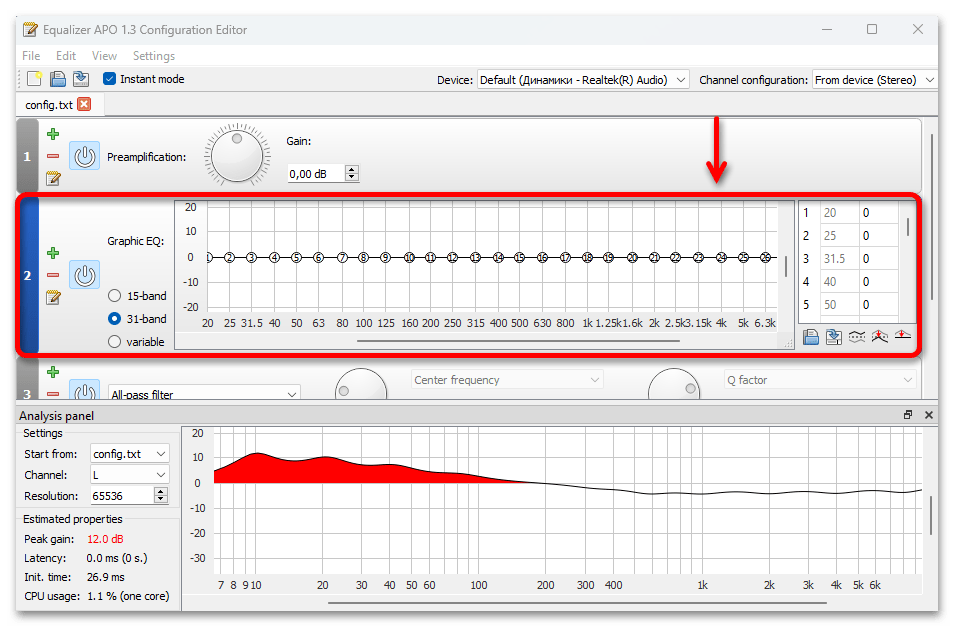
- Дополнительную настройку можно сделать с помощью графического эквалайзера, который уже подключен ниже.
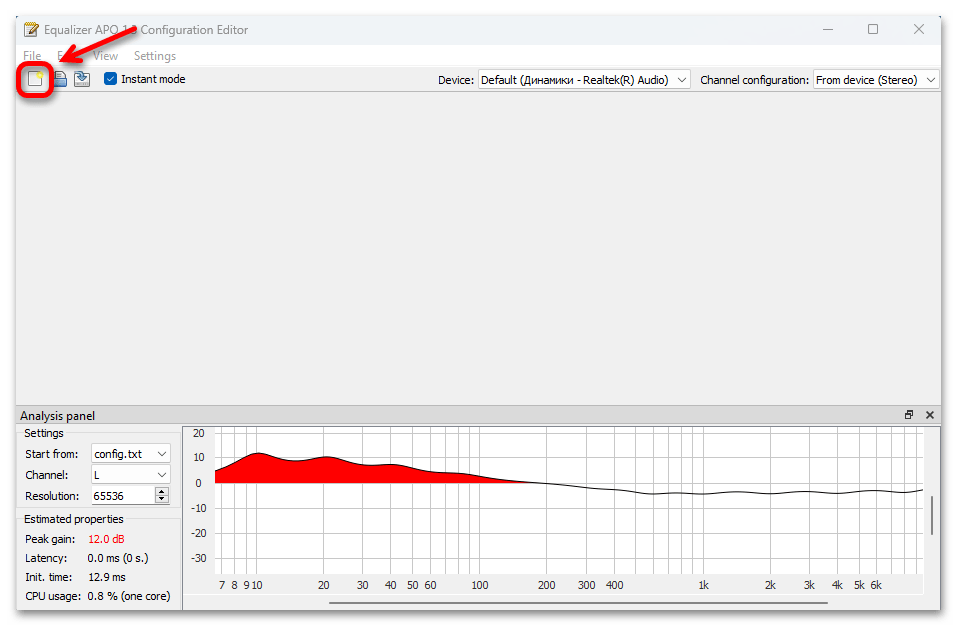
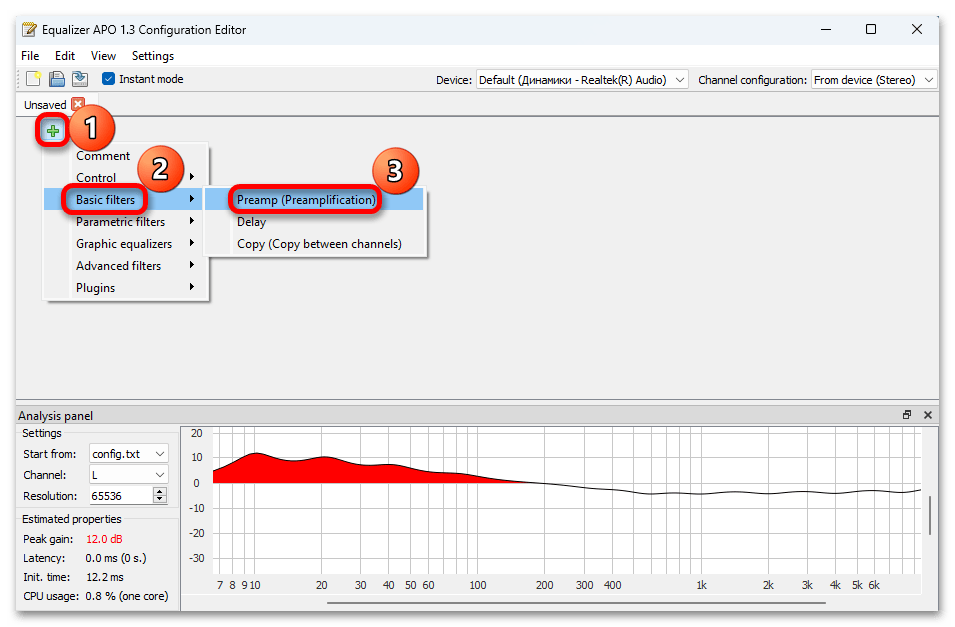
- Если не нужны лишние фильтры, кликаем иконку «New», чтобы создать свой пресет. При этом текущий можно оставить или закрыть.
- Нажимаем плюс, переходим в раздел «Basic filters» и подключаем модуль «Preamplification».
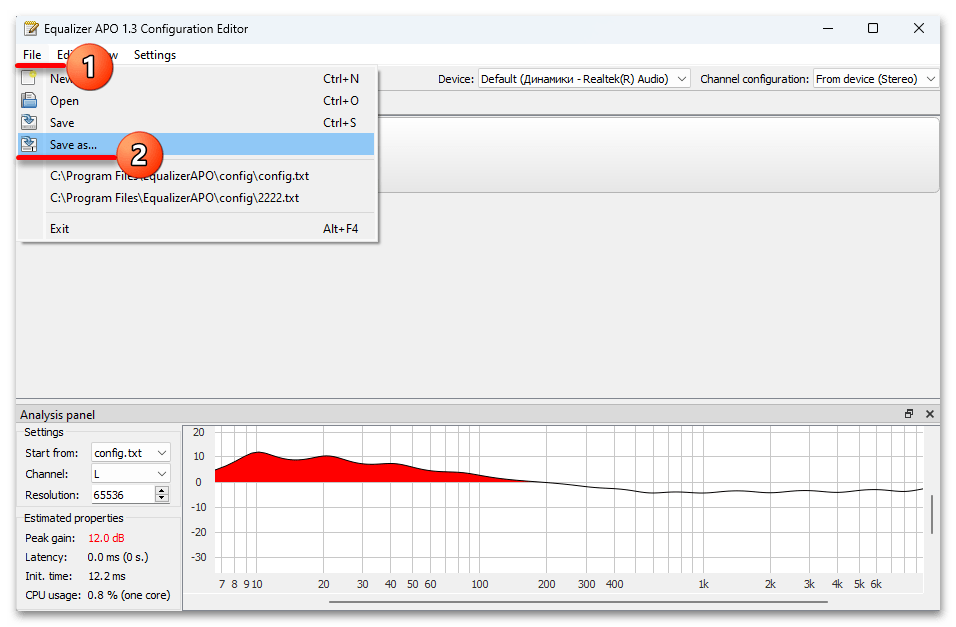
- Правда, работать этот пресет не будет, пока не получит название «config», поэтому открываем вкладку «File», кликаем «Save as»,

находим файл «config.txt» и пересохраняем его.
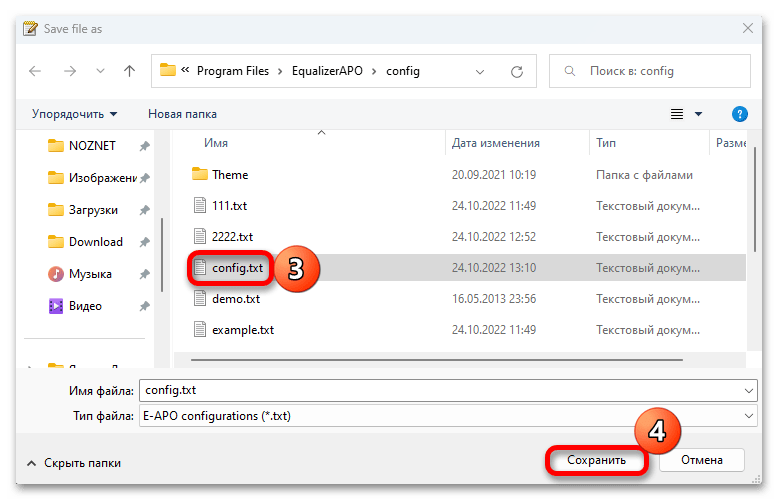
Таким образом, если потом вы захотите создать сразу несколько наборов фильтров, нужно будет просто сохранить их под другими названиями и только при использовании присваивать единственное возможное имя.
Читайте также:
Популярные эквалайзеры для компьютера на Windows
Программы для усиления звука на компьютере
Наша группа в TelegramПолезные советы и помощь
We’ve been noticing an increasing number of reports about Windows 11 issues, particularly users complaining that the overall PC audio volume is unusually low. This affects both system sounds and audio in native and third-party applications.

Upon investigating the issue, we discovered that several potential causes could lead to unusually low volume output on Windows 11:
- Common inconsistency – Often, problems responsible for the low audio issue on Windows 11 are covered by automated fixes available via the Windows Audio troubleshooter. Thus, the ideal starting point for troubleshooting is running the Audio troubleshooter and applying the recommended fixes.
- Outdated audio driver – Not updating your audio driver for an extended period, especially if Windows Update is not configured to update it, can lead to this problem. To resolve this, you can manually update the driver through the Device Manager.
- Generic driver partially incompatible – Using a generic driver updated during the upgrade to Windows 11 can cause low volume. If this is the case, installing the dedicated sound card driver that matches your motherboard could rectify the issue.
- Dedicated audio driver update pending for Windows 11 – If you’re using a dedicated driver without full compatibility updates for Windows 11, the best fix is to uninstall the current driver and opt for a generic driver instead.
- Interfering audio enhancements – Software simulated audio enhancements can also cause low volume outputs on Windows 11, particularly when using speakers. To remedy this, disable all software simulated enhancements via Sound Properties.
- Incompatible BitRate sound format – Setting a high BitRate format as the default for your audio device can result in lower volume when playing sounds of lesser quality. Change the BitRate sound format in your Sound settings to avoid this issue.
- Recent driver or app conflict – Operating systems have numerous components that could interfere with sound output. If the low volume issue began recently, consider using a recent System Restore snapshot to return your PC to a state before the problem started.
- System file corruption – Some users claim to have resolved their audio issues by running SFC and DISM scans in quick succession, suggesting system file corruption as a potential root cause.
- Lack of a compatible audio driver for Windows 11 – If all else fails, you might be dealing with a legacy sound card that lacks compatibility with Windows 11. Unfortunately, in this case, the only solution might be to revert to Windows 10.
With the potential causes outlined, let’s move on to the solutions that have helped other users resolve low volume issues on Windows 11.
1. Run the Audio troubleshooter
Troubleshooting this issue should begin with testing whether Windows 11 can automatically fix the problem.
Microsoft has acknowledged this issue, and their engineers have rolled out automated fixes aimed at resolving the low volume problem on Windows 11.
To utilize these automated fixes, run the Audio troubleshooter and apply the recommended fix. This has been confirmed effective by many users, especially those who upgraded to Windows 11 from Windows 10 instead of performing a clean installation.
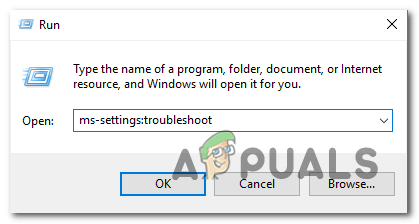
- Press Windows key + R to open a Run dialog box.
- Type “ms-settings:troubleshoot” and press Enter to open the Troubleshooting tab in the Settings app.

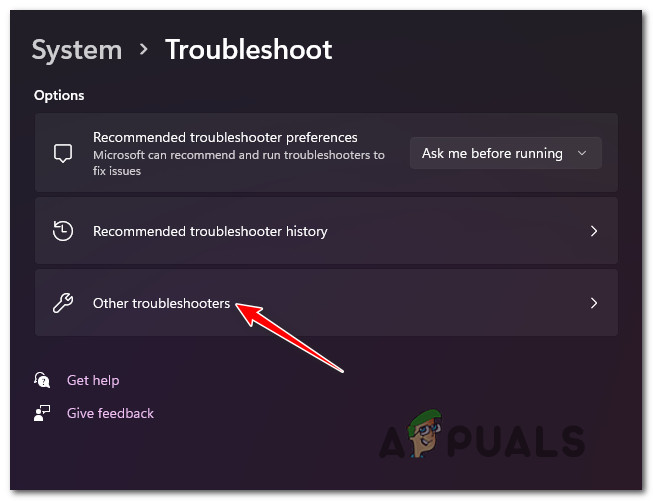
Accessing the Troubleshooting tab - In the Troubleshoot tab, move to the right-hand section and click on Other Troubleshooters (under Options).

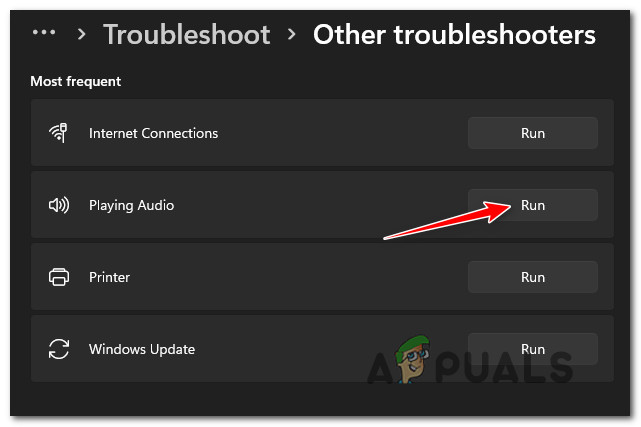
Accessing the Other Troubleshooters tab - From the next menu, under Most frequent, click on the Run button associated with Playing Audio.

Running the Audio Troubleshooter - Wait patiently until the initial investigation phase is complete.
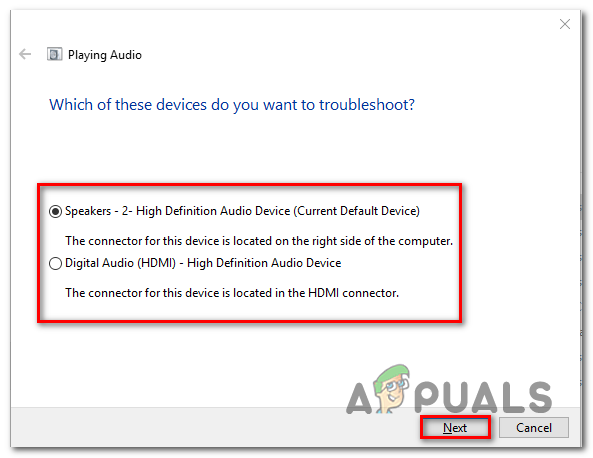
- Select the device you’re using as the default audio device.

Selecting the default audio device - Wait until the utility analyzes your Audio device for problems.
- If a problem is identified, you will be recommended a repair strategy. Follow the on-screen prompts (click ‘Yes, Apply fix‘ or ‘Yes, Open *menu‘) and comply with the recommendations.

Applying the recommended fix - Restart your computer to see if the error has been resolved after the next startup.
2. Update the Audio driver
Generally, Windows Update should maintain your driver up to date automatically. However, sometimes you might find yourself stuck with an older version not compatible with your operating system.
A number of users who faced this problem reported fixing it by using the Device Manager to force an update of the driver from the Properties screen of the High Definition Audio Device.
- Press Windows key + R to open a Run dialog box. Next, type ‘devmgmt.msc’ and press Enter to open the Device Manager.
Accessing the Device Manager tab - If prompted by the User Account Control prompt, click Yes to grant administrative access.
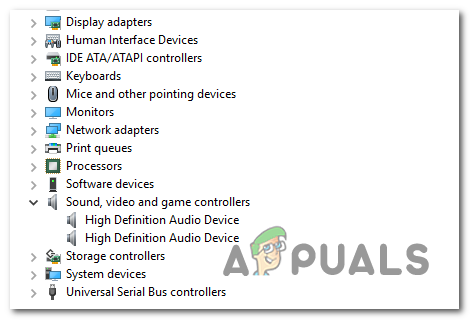
- Within Device Manager, scroll down through the list of devices and expand the drop-down menu for Sound, video, and game controllers.
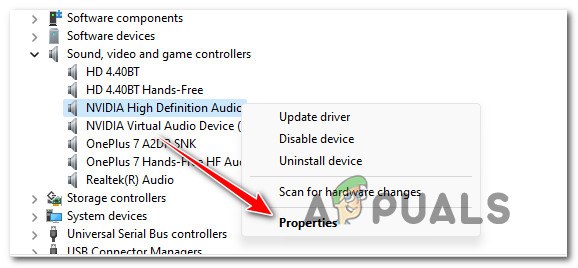
- Right-click on your high-definition audio driver.
- From the context menu, select Properties.

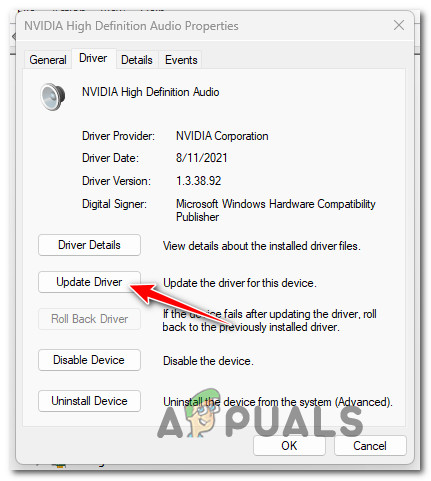
Accessing the properties menu - On the Properties screen, navigate to the Driver tab at the top, then click Update Driver.

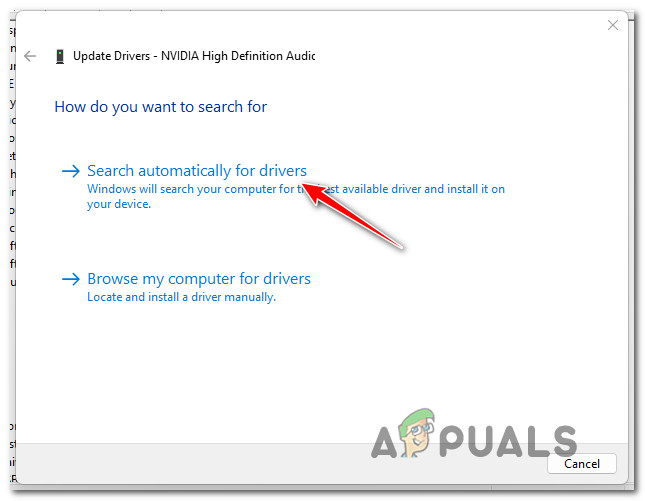
Updating the driver - On the next screen, select Search automatically for drivers.

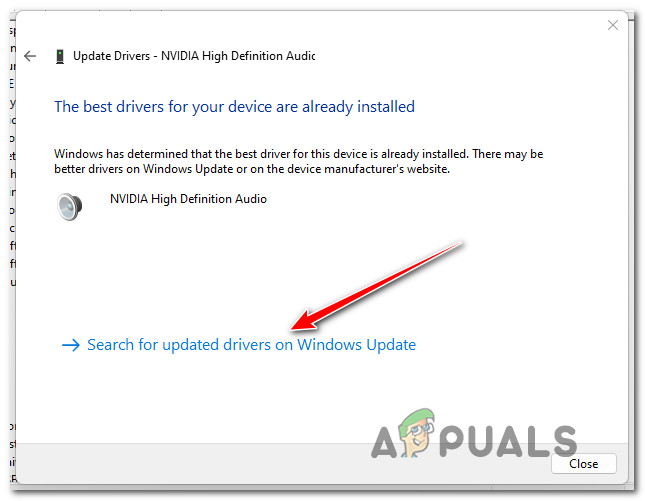
Searching automatically for drivers - Wait to see if a new audio driver version is identified. If found, follow the on-screen instructions to install it.Note: If Device Manager fails to identify a new driver, click on “Search for updated drivers on Windows Update,” as this could yield different results.
Search for updated drivers - Restart your PC to check if the issue has been fixed post-reboot.
3. Install the dedicated Sound Card driver
If you’re using a generic driver, you should install the dedicated sound card driver from your PC or motherboard’s manufacturer’s website.
This is particularly recommended if you’re using a laptop from brands like MSI or Lenovo, as they often utilize proprietary audio hardware that may not perform optimally with generic drivers.
Note: Avoid generic drivers if you’re using a dedicated sound card.
Be aware that the process of finding and installing the appropriate sound card driver will vary based on the specific manufacturer of your device.
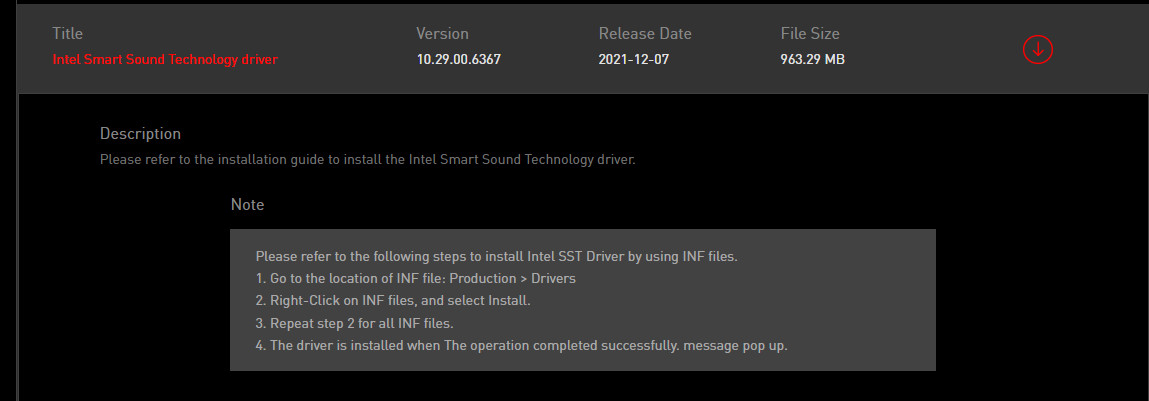
- Open your preferred browser and visit your manufacturer’s driver download page.

Searching for compatible laptop drivers Note: For laptops, head to the manufacturer’s download page and look up your specific model.
- On the download page for your laptop or motherboard model, head to the Driver section and download the suggested audio driver.

Downloading the smart sound technology driver - Once downloaded, extract the driver and proceed with the installation.Note: The instalation method depends on the file type: right-click and choose Install for INF files or double-click for executable (.exe) files.
- Complete the installation by following on-screen instructions, then reboot your PC and check if the low volume issue has been resolved.
4. Uninstall audio driver (use a generic equivalent)
Another scenario that might cause low audio volume on Windows 11 involves using a dedicated audio driver that was ported from Windows 10 or Windows 8.1 following an OS upgrade.
In such cases, your dedicated driver might not be fully compatible with Windows 11. To solve this, uninstall the current dedicated driver and switch to a generic audio equivalent.
- Press Windows key + R to open a Run dialog box.
- Type ‘devmgmt.msc’ and press Ctrl + Shift + Enter to open Device Manager with administrator privileges.
Accessing the Device Manager tab - At the User Account Control (UAC) prompt, click Yes for admin access.
- In Device Manager, scroll down to Sound, video, and game controllers and expand the menu.

Accessing your Audio adapter Device Manager listing - Right-click on your dedicated audio driver and select Properties from the context menu.
- Navigate to the Driver tab in the Properties menu and click on Uninstall Device.
- At the confirmation prompt, check Attempt to remove the driver for this device and click Uninstall.
Uninstalling the audio driver - Once the driver is uninstalled, reboot your PC. During the subsequent startup, Windows 11 will identify the absence of an active driver, automatically installing a generic equivalent.
- After the reboot, verify if the low audio problem has been rectified.
In case the issue continues, move on to the next suggested fix.
5. Disable all enhancements from Sound Properties
If your problem hasn’t been solved thus far, the next step is to look at the Sound Enhancements you currently have active.
Several Windows 11 users who experienced low audio volume reported that they resolved the issue by disabling all audio enhancements.
Note: If you’re using a dedicated audio card, it likely comes with its own audio enhancement options. In this case, disable them from the dedicated utility, as disabling the Windows settings won’t remedy the issue.
Note 2: Users of SRS Premium Sound or SRS Premium Sound should uncheck the box next to Audio Enhancement within the dedicated application to resolve the issue.
- Press Windows key + R to open a Run dialog box.
- Type “control” in the box and press Enter to open the Control Panel.
- In the Control Panel, use the search function at the top-right to find Sound.
- Click on Sound in the results.
- Within the Sound screen, ensure the Playback tab is active, right-click your problematic playback device, and choose Properties.
- In the device Properties, select the Enhancements tab and check the box next to Disable all enhancements.
- Press Apply to save the changes.
- Restart your PC and see if this has fixed the issue after the boot process.

Continuing to experience low-volume audio despite the deactivation of all virtual enhancements means you should try the next potential fix.
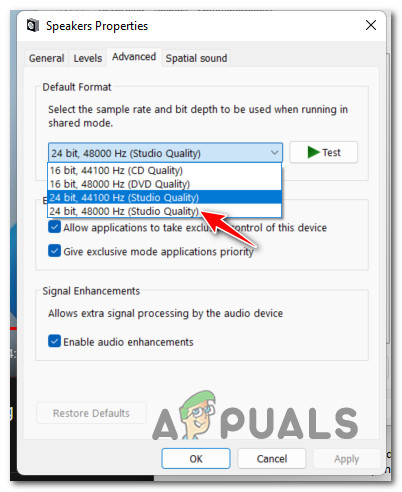
6. Change the BitRate sound format
If you’ve yet to find a successful fix and you’re using a premium sound system or headset, the low-volume audio might be due to inadequate Windows settings related to stream format quality for the active playback device.
You can likely solve the problem by heading to the Sound settings and altering the Default format to use the highest sample rate available (24 bit, 48000 Hz, Studio Quality).
Many users encountering this issue after updating to Windows 11 from Windows 10 reported resolving it as soon as they increased the default stream format to Studio Quality.
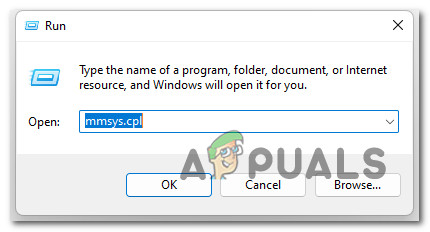
- Press Windows key + R to open a Run dialog box.
- Type ‘mmsys.cpl’ into the text box and press Enter to open the Sound settings.

Accessing the Sound Settings on Windows 11 Note: If confronted by the User Account Control (UAC) prompt, click Yes to grant administrative access.
- Within the Sound settings, ensure the Playback tab is selected.
- Right-click on the audio device you’re currently using and select Properties from the context menu.
Accessing the Properties menu of your Sound device - In the Speaker Properties menu, navigate to the Advanced tab.
- Under Default format, change the selection in the dropdown menu to 24 bit, 48000 Hz (Studio Quality).
- Click on Apply to save the changes.

Changing the sound quality - After adjusting the sound quality setting, reboot your PC to check if the low-volume sound issues on Windows 11 have been resolved.
If the problem continues despite trying the above instructions, consider the next potential solution.
7. Use a System Restore point
If you suspect the issue is due to a recent change (new driver installation, app update, etc.), using System Restore could revert your computer to a state before the issue began.
Note: System Restore typically stores snapshots at critical system events. Unless you altered the default settings, you should have several to choose from.
For instructions on how to use System Restore, follow this guide on accessing previously saved System Restore points. This process will allow you to turn back the clock to a point when the low volume issue was not present.
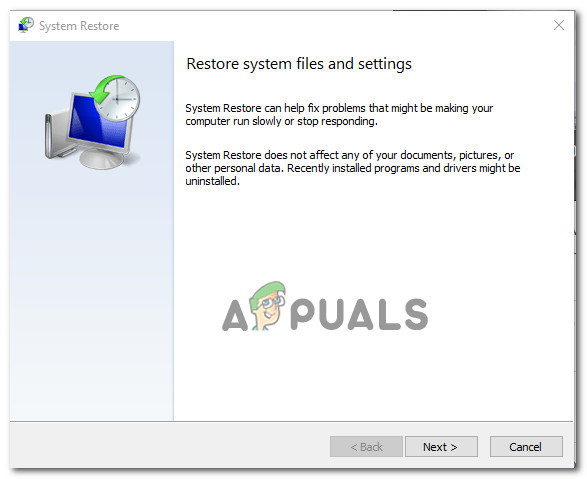
After restoring your PC using the above guide, check if the low volume issue persists on Windows 11.
If the problem is still unresolved, proceed to the next method.
8. Deploy SFC and DISM scans
If all else fails, consider that system file corruption might be affecting your computer’s audio outputs. When faced with such issues, two built-in tools—System File Checker (SFC) and Deployment Image Servicing and Management (DISM)—can often help.
These utilities can fix common corruption issues that potentially interfere with Windows Update’s functionality.
Ideally, start with an SFC scan, which doesn’t require an internet connection.
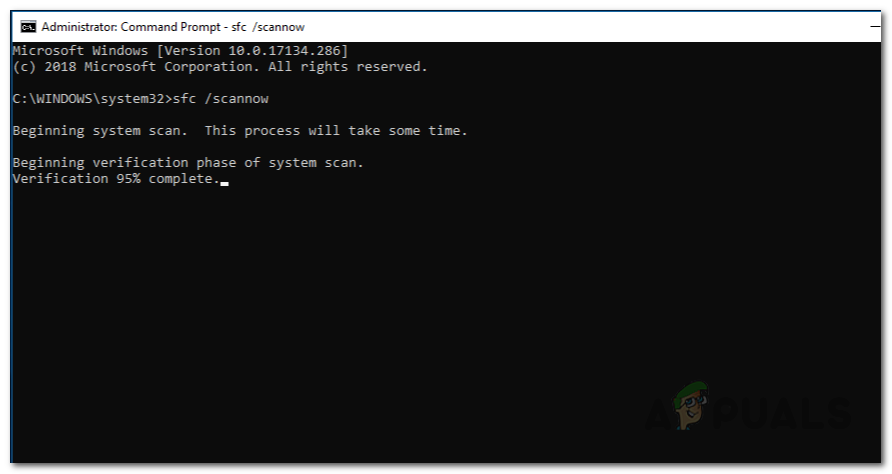
Note: The SFC tool uses a locally stored cache to replace corrupted files with intact ones. Let this process complete fully to avoid additional complications.
SFC scans can take a while, especially on HDDs, so exercise patience during this process.
Important: If the SFC scan seems to freeze, wait for the tracking to resume instead of closing the window.
Once the SFC scan is complete, reboot your PC and check for the low audio issue.
Should the issue persist, proceed with a DISM scan.
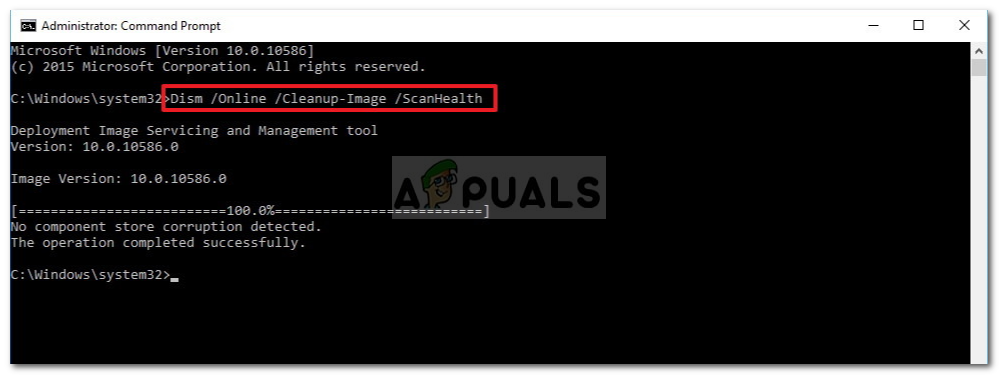
Note: DISM relies on Windows Update to replace damaged files with clean versions. Thus, ensure a stable internet connection before starting this operation.
After completing both the SFC and DISM scans, restart your PC and assess if the audio issues with your Windows 11 computer have been addressed.
9. Revert back to Windows 10
If you’re within the 10-day rollback period, you can easily downgrade to Windows 10 by following this guide: reverting to Windows 10.
If reverting isn’t an option, enhancing audio volume on Windows 11 might be impossible with your current hardware configuration.
Время на прочтение2 мин
Количество просмотров4.5K

Microsoft сообщила, что разработчики компании в курсе проблем со звуком в играх на ПК с Windows 11 24H2. Громкость звука на игровых ПК выставляется на 100% при использовании внешних звуковых адаптеров USB DAC (ЦАП).

В Microsoft объяснили, что проблема возникает в игровых системах с ПК Windows 24H2, где геймеры используют цифровой аудиоконвертер (ЦАП) Creative Sound BlasterX G6 USB или подключают и немедленно отключают внешнюю звуковую систему от системы.
Пользователи также могут столкнуться с проблемой неожиданного увеличения громкости звука в играх до полной громкости после перевода своей игровой системы в спящий режим, а затем вручную вывода её из спящего режима или после регулировки громкости внешней звуковой системы и немедленного её отключения.
«При использовании внешней звуковой системы USB-цифрового аудиоконвертера (ЦАП) уровень звука может увеличиться до 100%. Никаких сообщений об ошибках или других идентифицирующих факторов, кроме внезапного увеличения громкости звука до 100%, нет», — сообщили в Microsoft.
Эта ошибка вызвана тем, что возникает проблема синхронизации в системной службе AudioEndpointBuilder, которая перечисляет, инициализирует и активирует конечные точки звука в системах Windows. В Microsoft в настоящее время изучают проблему и работают над её исправлением. В компании не уточнили, когда будет выпущен патч против этой ошибки.
Ранее Microsoft сообщила, что в курсе проблемы с изменением часового пояса через приложение «Параметры» в Windows 11 24H2.
В начале ноября Microsoft признала, что из-за бага в Windows 11 24H2 показывается чёрный экран на 10 секунд при использовании сочетания клавиш Alt+Tab.
В конце октября Microsoft сообщила, что баг, из-за которого показывается ноль запущенных приложений и фоновых процессов на вкладке «Процессы» в Windows 11 24H2, является некритичной ошибкой.
Quick Tips
- In most cases, restarting the audio-related services or running the built-in audio troubleshooter should fix the problem.
- Consider enabling loudness equalization and disabling sound enhancement features for your audio device.
- You may have to resort to a third-party app like Equalizer APO if nothing else works.
Try Basic Fixes
- Check the volume mixer: Right-click the speaker icon on the taskbar and select the Open volume mixer option. In the Settings window that opens, check the volume level under the System section and increase it to your liking. Windows 11 allows you to set different volume levels for each app, so be sure to review and adjust the levels for every app you intend to use.
- Verify the volume levels of your headphones or speakers: If your headphones or speakers have their own volume controls, make sure you check them as well. If you’ve accidentally muted your audio device, it can make it seem like there’s a problem with your PC. You can also switch to a different audio device to rule out any issues with your headphones or speakers.
Fix 1: Run the Audio Troubleshooter
Windows 11’s audio troubleshooter can automatically detect and resolve common sound-related issues on your computer. You can try running this troubleshooter if the speaker or headphone volume remains too low even after you increase it.
Step 1: Press the Windows key + I to open the Settings app and head to System > Troubleshoot.

Step 2: Go to Other troubleshooters.
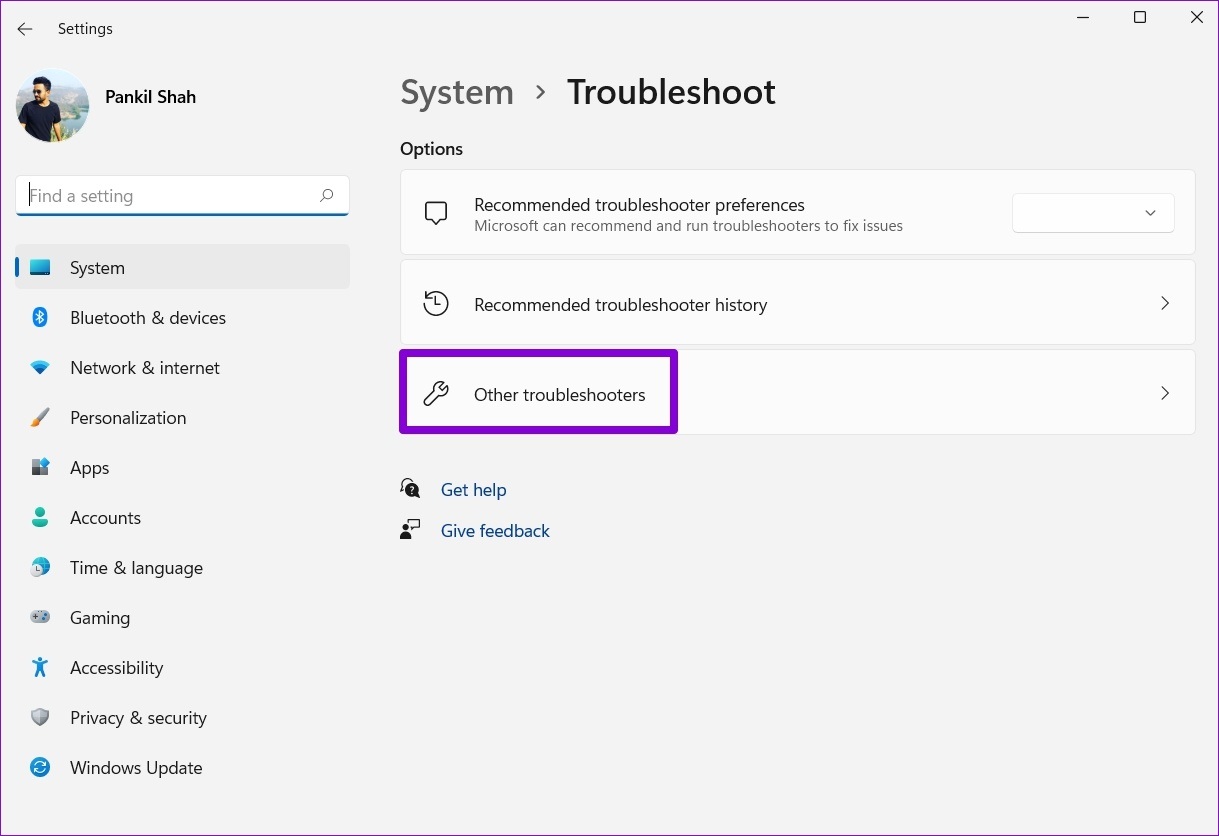
Step 3: Click the Run button next to the Playing Audio troubleshooter.

Follow the on-screen prompts and allow Windows to resolve any issues.
Fix 2: Enable Loudness Equalization
The Loudness Equalization feature on Windows can help boost your PC’s overall volume output. You can try enabling it if running the troubleshooter does not help.
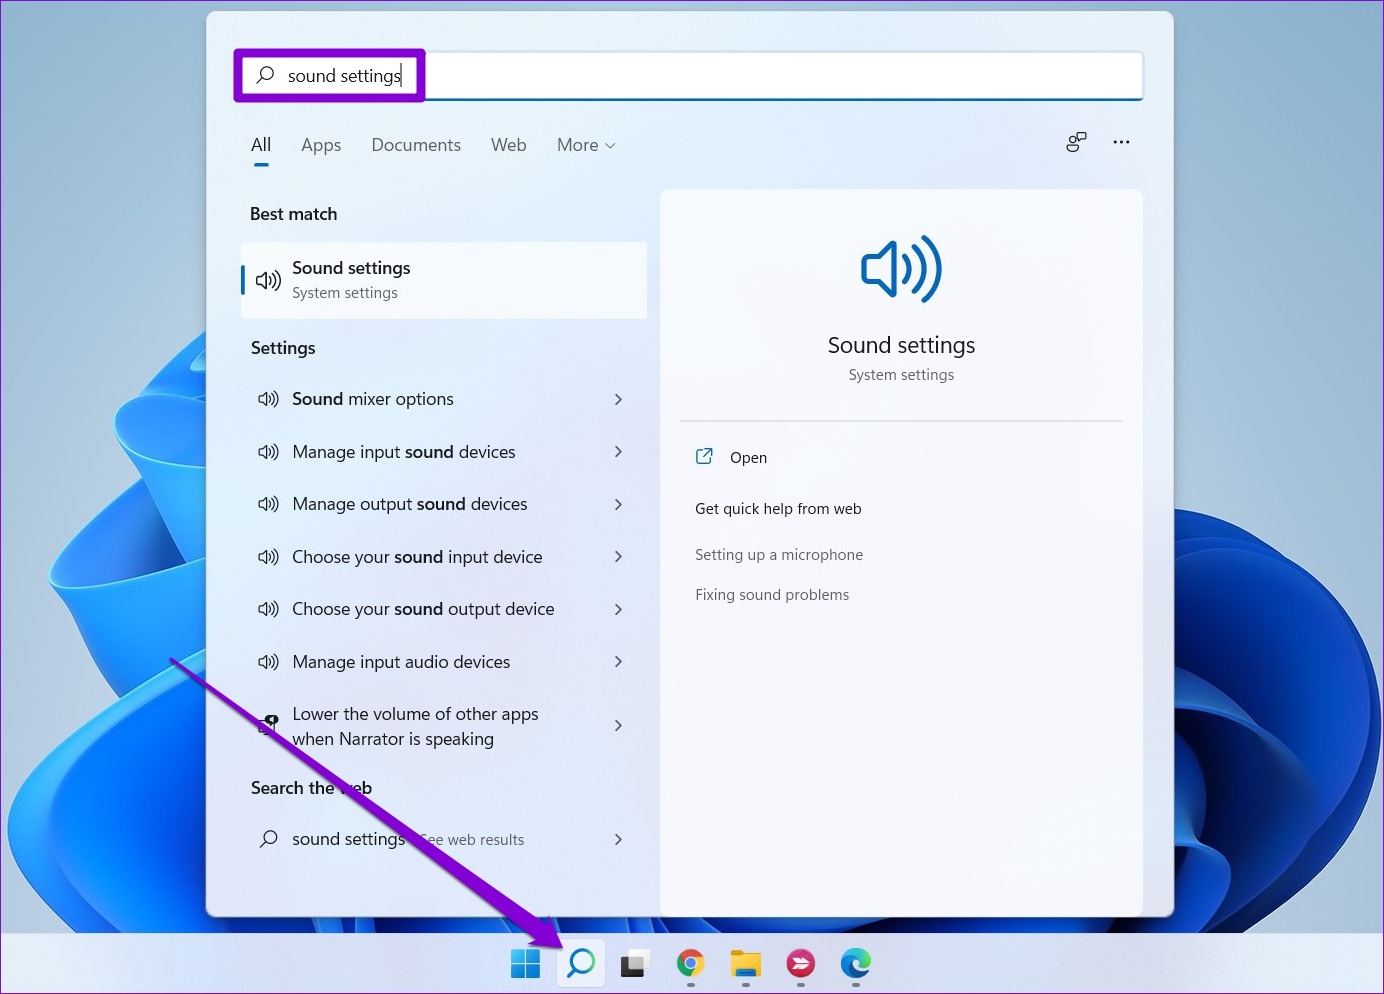
Step 1: Click the search icon on the taskbar, type in sound settings and press Enter.
Step 2: Under Advanced, click on More sound settings.

Step 3: Double-click on your audio device to open its properties.

Step 4: Switch to the Enhancements tab and tick the Loudness Equalization option. Then, hit Apply followed by OK.

Fix 3: Disable Sound Enhancements
While Windows 11’s built-in audio enhancements promise to improve the sound output, they may not work well with all audio devices. So, if the sound output appears to be too low, it’s best to disable these enhancements.
Step 1: Press the Windows key + I to open the Settings app and navigate to Sound.

Step 2: Select your audio device.

Step 3: Use the drop-down menu next to Audio enhancements and select Off.

Fix 4: Modify Sound Properties
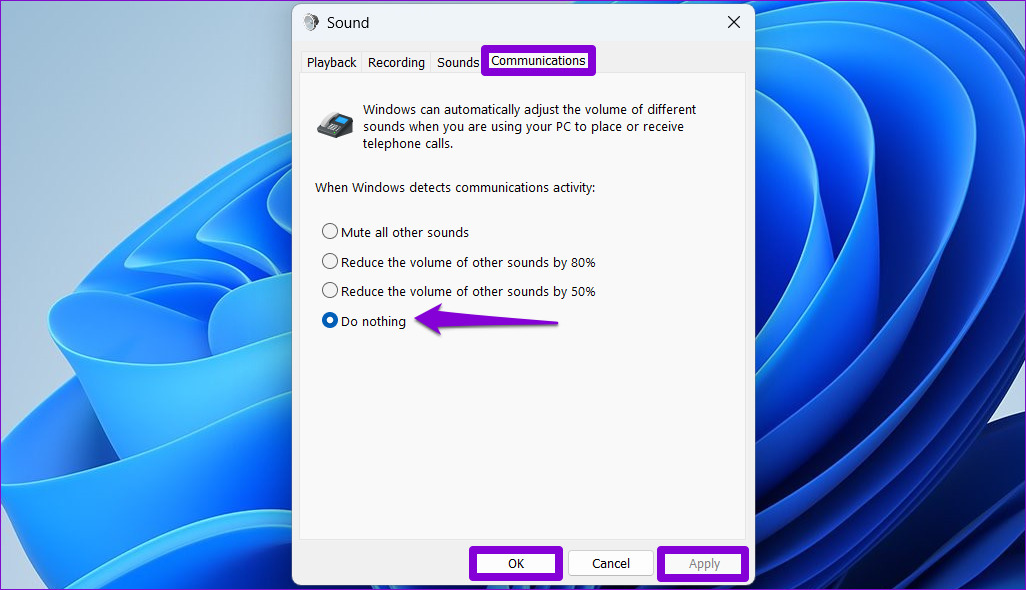
Windows 11 includes a feature that automatically reduces your PC’s volume when it detects communication activity. Since this feature could contribute to the low volume issue on Windows, you should disable it using these steps:
Step 1: Right-click the speaker icon and select Sound settings.

Step 2: Click on More sound settings.
Step 3: Switch to the Communications tab and select the Do nothing option. Then, hit Apply followed by OK.
Fix 5: Update or Reinstall the Audio Driver
If the sound output on your Windows 11 laptop or PC is still low, it could be due to incompatible or outdated audio drivers. In such cases, updating the audio drivers should help fix the issue.
Step 1: Right-click on the Start icon and select Device Manager from the list.

Step 2: Double-click on Sound, video and game controllers to expand it. Right-click on your audio device and select Update driver.

From there, follow the on-screen prompts to finish updating the driver. If the issue remains, uninstall the audio drivers using Device Manager. Then, restart your PC and Windows will install the missing driver whenever it boots next.

Fix 6: Restart Audio Services
On Windows, services are small programs that run in the background every time your PC boots up. If one of the audio-related services is malfunctioning, you could experience low-volume issues. Here’s what you can do to fix that.
Step 1: Press the Windows key + R to open the Run dialog. Type services.msc in the box and press Enter.
Step 2: In the Services window, scroll down to locate the Windows Audio service. Right-click on Windows Audio and select Restart from the list.

Similarly, restart the “Windows Audio Endpoint Builder” service and see if that solves the problem.
Fix 7: Use a Third-Party App Like Equalizer APO
Several users on a Microsoft Community post reported fixing low-volume issues on Windows 11 by using the Equalizer APO app, which utilizes a high-quality audio processing engine. So, if all else fails, you can use Equalizer APO to fine-tune and boost the volume on your Windows 11 PC.

Was this helpful?
Thanks for your feedback!
The article above may contain affiliate links which help support Guiding Tech. The content remains unbiased and authentic and will never affect our editorial integrity.