
Recommended version
DISCLAIMER: TigerVNC dropped official support for the Windows server (WinVNC) in September 2020. However, as of August 2024, version 1.14.0 works reliably.
(Note: WinVNC stores settings in the Windows registry.)
Private network
Before installing TigerVNC server, check you are on a private network at home (not a public network). Then check that your computer knows that you are on a private network (steps below).
- In the task bar (bottom right), right click on the Network icon and choose Open Network & Internet settings
- If it says «Private network» under your connection, skip to «Install and setup TigerVNC server.» If it says «Public Network» continue.
- Choose Change connection properties
- Choose Private
- Close settings.
Install and setup TigerVNC server
- Download and install TigerVNC server using the default settings. Look for the download file with the name «-winvnc-» (e.g. «tigervnc64-winvnc-x.xx.xx.exe»). That file contains the server. Otherwise you just get the viewer.
- Restart your computer.
- In the task bar (bottom right), choose the up arrow to show more task icons, then right click on the TigerVNC icon and choose Options
- Under Authentication choose Configure and type a password. Important: VNC only accepts the first eight characters of the password, so make sure you have a good mix of uppercase, lowercase, numbers, and symbols in those eight characters. No extended characters are permitted.
- Choose OK to close the password window and OK to close the Server Properties window.
Firewall setup
The following instructions are for Windows built-in firewall. Adapt if you are using a 3rd-party firewall.
- From the Start menu type and choose Firewall & network protection
- Choose Allow an app through firewall
- Choose Change settings
- Choose Allow another app
- Choose Browse…
- Browse to
C:\Program Files\TigerVNC Server\winvnc4.exe(older versions saved underC:\Program Files\TigerVNC\winvnc4.exe) - Choose Add
- Choose OK
Connecting
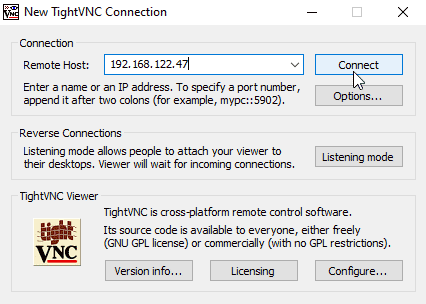
- Open the TigerVNC viewer on another computer (we’ll call this the «remote (client) computer»)
- Type in the name or IP address of the computer you want to connect to, then choose Connect
- Type in the password you setup for the server. Then choose OK
Troubleshooting
If you get a «Can’t establish connection» error. Here are a few steps to try to locate the problem.
- Open TigerVNC’s viewer on the same computer and connect to «localhost». This checks the VNC server is working on your computer. If you get the same error, check the following:
- Review the «Install and setup TigerVNC server» section above.
- If you have VNC software besides TigerVNC running, close or uninstall it.
- Open TigerVNC’s viewer on the same computer and connect to your IP address on the network. This checks the firewall on the server computer is not an issue. If you get the same error on this step, review the «Firewall setup» section above.
- On the remote computer enter the IP address/computer name. Using TigerVNC’s viewer on the remote computer is recommended. If you use another viewer, here’s some setting to check:
- Protocol: VNC (Virtual Network Computing)
- Server: (name/IP address of computer on your local network)
- Username: (leave blank)
- Password: (password you set up on the server, or leave blank if you want it to ask you every time).
Making the connection secure
Next, see Secure your connection.
The Virtual Network Computer (VNC) enables people to access the remote desktop environment. It is a graphical desktop sharing system that uses the Remote Frame Buffer protocol (RFB). This post introduces install and configure TigerVNC server in Debian 12/bookworm and Windows client.
1. Pre-requisites
- A Debian server ( with desktop environment installed.
- Debian version 12/bookworm
- XFce4 desktop environment
- A Windows computer will install VNC client
2. Install and configure TigerVNC server on Debian
TigerVNC is available in the Debian package repository.
$ sudo apt update
$ sudo apt install tigervnc-common tigervnc-standalone-server tigervnc-tools
Next set a VNC password
$ vncpasswd
Password:
Verify:
Would you like to enter a view-only password (y/n)? n
Now we can start the VNC server by:
Output:
New Xtigervnc server 'servername:1 (user)' on port 5901 for display :1.
Use xtigervncviewer -SecurityTypes VncAuth -passwd /tmp/tigervnc.7VAx04/passwd :1 to connect to the VNC server.
The VNC server status Can be checked by:
$ vncserver -list

TigerVNC server sessions:

X DISPLAY #     RFB PORT #      RFB UNIX PATH   PROCESS ID #    SERVER
1               5901                            23736            Xtigervnc
TigerVNC server could be stopped by:
$ vncserver -kill :1
Killing Xtigervnc process ID 23736... success!
Note:
If there were multiple desktop environment available in the server, we can do a bit more»
$ vncserver -xstartup /usr/bin/gnome-session -geometry 1024x768 -localhost no :1It creates a tigervnc server ‘dlp.srv.world:1 (user)’ on port 5901 for display
:1.
3. Download VNC viewer for Windows
There are many free VNC viewer available, e.g.,
- UltraVNC
- RealVNC Viewer
4. Connect to the VNC Desktop Securely
By default, VNC does not use secure protocols when connecting. Here we will use an SSH tunnel to connect to the Debian server.
In the Windows computer, open a Command or PowerShell terminal, and input:
> ssh -L 5901:127.0.0.1:5901 -N -f -l <username> -t <server>
# If remote SSH port were not the default 22, simply append -p option:
> ssh -L 5901:127.0.0.1:5901 -N -f -l <username> -t <server> -p <port>
Here the username is the login username you configured the vncserver above, and the server is the remote Debian server IP address.
Launch the VNC viewer, and connect to the server as:
localhost:5901
or
localhost:1
Then input the vnc password you have set in section 1. Now the remote desctop is ready.
References
- TigerVNC
- Install and Configure TigerVNC VNC Server on Debian 11/10
- Install and Configure VNC Server to connect to Debian Desktop from remote clients
n this tutorial, we are going to install VNC server on Windows 10, which can enable you to connect to your Windows 10 PC from a remote computer. The VNC (Virtual Network Computing) is a great choice if you need a free alternative to the Windows Remote Desktop (RDP).
Installing TightVNC Server On Windows 10
There are several free VNC servers available for Windows 10, we are going to use TightVNC software.
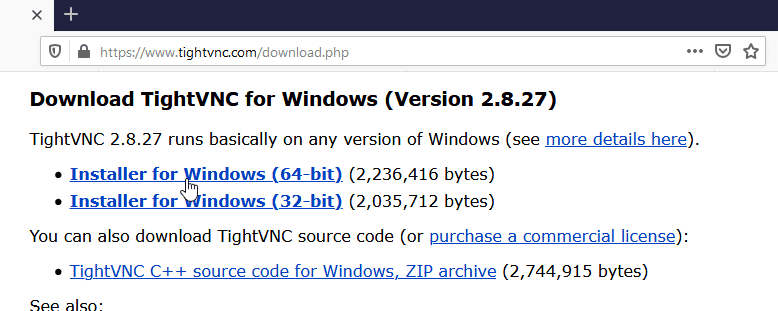
First, Download TightVNC Server from http://tightvnc.com/download.php.
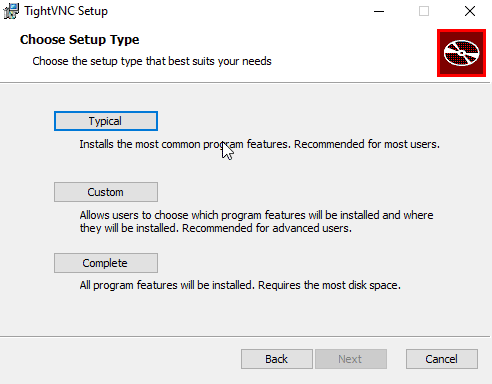
Run the setup file and continue with the Typical install option.
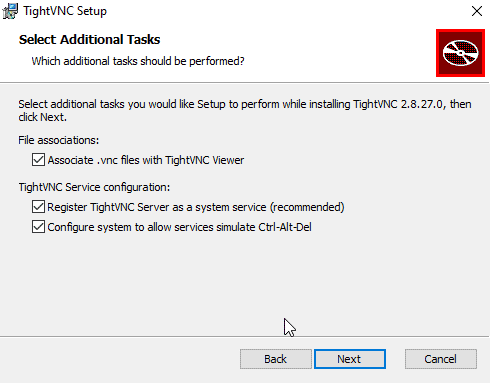
TightVNC should be set to run as a system service.
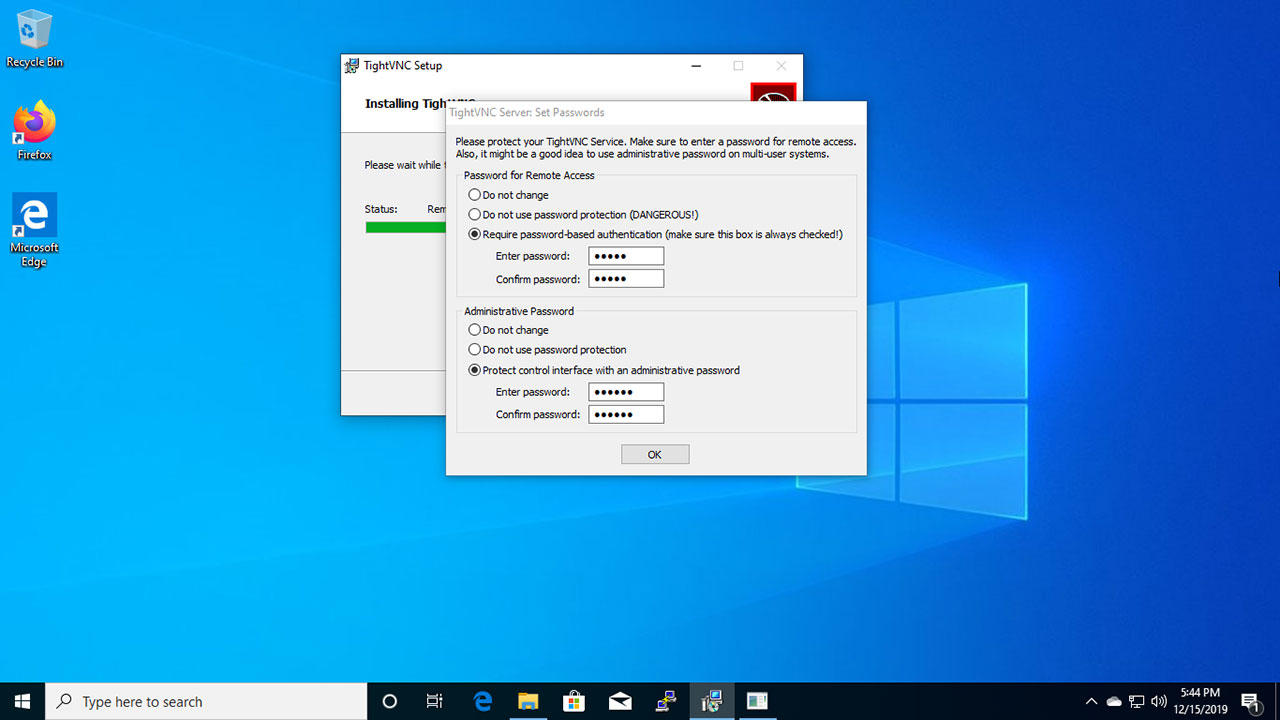
Set Passwords for Remote Access and control interface.
That’s all we need to do. VNC Server on Windows 10 listen on port 5900. The TightVNC server automatically configures Windows Firewall to allow incoming connections, so you don’t need to worry about Windows firewall.
Connecting to the desktop remotely
On the remote computer, a VNC viewer should be installed. There are several VNC viewers available, you can use the TightVNC viewer which is available for Windows, Linux and macOS.
Enter your Windows 10 computer’s IP address to connect.
The user will then be prompted for their remote access password.
We can reset Remote Access password from the Control interface. Double click the VNC Tray icon to open the Control interface.
Starting and Stopping VNC Server
To Stop VNC Server, right click the VNC icon on the Windows tray bar and click «Shutdown TightVNC Server».
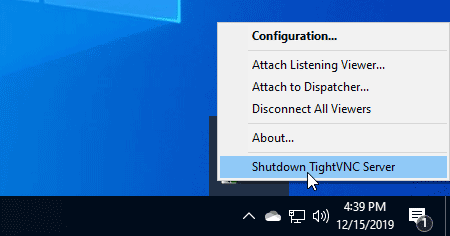
To Start VNC, Go to Start Menu and click «Start TightVNC Service».
Table of Contents
Установка и настройка VNC-сервера на Ubuntu 20.04
Вводная
Появилась задача тестирования приложений Яндекса на различный версиях Ubuntu Desktop.
В облаке развернул несколько ВМ и встала задача получить c Windows машины удаленный доступ к рабочему столу Ubuntu.
Перебрал несколько вариантов.
С разбегу xrdp не заработал, vino не понравился, как-то там было не очень хорошо с заданием разрешения экрана.
В итоге пошел по самому очевидному варианту c наибольшим количеством доки — ставить TigerVNC.
Схема решения:
-
На Ubuntu заводим пользователя, рабочий стол которого будем показывать.
-
На Ubuntu ставим TigerVNC сервер.
-
На Windows ставим ssh и vnc клиента.
-
С Windows коннектимся по ssh.
Через ssh прокидываем локальный порт с Windows на порт Ubuntu на котором работает vnc-сервер. -
На Windows запускаем vnc-клиента и подключаемся к ранее прокнутому локальному порту.
Существующие проблемы:
-
Проблема с “Authentication Error” после блокировки экрана — экран перестает реагировать на клавиатуру.
Описание проблемы тут, тут и тут.
Костыль тут. -
Не работает автоматический запуск vncserver через systemd.
С разбегу не разобрался, в данном решении сервер запускает сам пользователь. -
Для работы нужна полоса 15-20Мбит\с на стандартных, авто-согласованных, настройках.
Установка сервера TigerVNC
Смотрим доступные пакеты.
katya@ubuntu-20-1:~$ sudo apt search tigervnc
Sorting... Done
Full Text Search... Done
tigervnc-common/focal 1.10.1+dfsg-3 amd64
  Virtual network computing; Common software needed by servers

tigervnc-scraping-server/focal 1.10.1+dfsg-3 amd64
  Virtual network computing server performing X screen scraping

tigervnc-standalone-server/focal 1.10.1+dfsg-3 amd64
  Standalone virtual network computing server

tigervnc-viewer/focal 1.10.1+dfsg-3 amd64
  Virtual network computing client for X

tigervnc-xorg-extension/focal 1.10.1+dfsg-3 amd64
  Virtual network computing X server extension
Ставим нужные.
katya@ubuntu-20-1:~$ sudo apt install tigervnc-standalone-server tigervnc-xorg-extension
Настройка сервера TigerVNC
VNC-сервер будет работать для пользователя kayta, соответственно настраивать его будем тоже от katya.
Задаем пароль для подключения к рабочему столу.
katya@ubuntu-20-1:~$ vncpasswd
Password:
Verify:
Would you like to enter a view-only password (y/n)? n

katya@ubuntu-20-1:~$ ll .vnc/
total 12
drwxrwxr-x  2 katya katya 4096 мая  2 12:43 ./
drwxr-xr-x 16 katya katya 4096 мая  2 12:43 ../
-rw-------  1 katya katya    8 мая  2 12:43 passwd
Создаем скрипт запуска рабочего стола ~/.vnc/.
- xstartup
-
#!/bin/sh
# Start Gnome 3 Desktop
[ -x /etc/vnc/xstartup ] && exec /etc/vnc/xstartup
[ -r $HOME/.Xresources ] && xrdb $HOME/.Xresources
vncconfig -iconic &
dbus-launch --exit-with-session gnome-session &
Делаем его исполняемым.
katya@ubuntu-20-1:~$ chmod 700 ~/.vnc/xstartup

katya@ubuntu-20-1:~$ ll ~/.vnc/
total 116
drwxrwxr-x  2 katya katya  4096 мая  3 10:29 ./
drwxr-xr-x 19 katya katya  4096 мая  2 19:10 ../
-rw-------  1 katya katya     8 мая  2 12:43 passwd
-rw-rw-r--  1 katya katya 83594 мая  2 19:31 ubuntu-20-1:1.log
-rw-rw-r--  1 katya katya     5 мая  2 19:10 ubuntu-20-1:1.pid
-rw-rw-r--  1 katya katya  1819 мая  2 18:08 ubuntu-20-1:2.log
-rwxr-xr-x  1 katya katya   204 мая  3 10:29 xstartup*
-rwxr-xr-x  1 katya katya   206 мая  2 16:05 xstartup~*
Для теста запускаем vncserver и смотрим на каком порту он запустился.
katya@ubuntu-20-1:~$ vncserver -geometry 1440x900

New 'ubuntu-20-1:1 (katya)' desktop at :1 on machine ubuntu-20-1

Starting applications specified in /home/katya/.vnc/xstartup
Log file is /home/katya/.vnc/ubuntu-20-1:1.log

Use xtigervncviewer -SecurityTypes VncAuth -passwd /home/katya/.vnc/passwd :1 to connect to the VNC server.

katya@ubuntu-20-1:~$ netstat -nap | grep vnc
(Not all processes could be identified, non-owned process info
 will not be shown, you would have to be root to see it all.)
tcp        0      0 127.0.0.1:5901          0.0.0.0:*               LISTEN      10385/Xtigervnc
tcp6       0      0 ::1:5901                :::*                    LISTEN      10385/Xtigervnc
...

katya@ubuntu-20-1:~$ ps aux | grep vnc
katya      10385  0.4  1.3 726636 55208 pts/1    Sl   12:48   0:00 /usr/bin/Xtigervnc :1 -desktop ubuntu-20-1:1 (katya) -auth /home/katya/.Xauthority -geometry 1440x900 -depth 24 -rfbwait 30000 -rfbauth /home/katya/.vnc/passwd -rfbport 5901 -pn -localhost -SecurityTypes VncAuth
katya      10399  0.0  0.1  10080  4592 pts/1    S    12:48   0:00 vncconfig -iconic
katya      10913  0.0  0.0  17664   732 pts/1    S+   12:49   0:00 grep --color=auto vnc
Cкрипты для управления vnc-сервером
Запуск или перезапуск vnc-сервера.
- 1_start_restart_katya_vnc.sh
-
#!/bin/bash
echo "Start vnc"
vncserver -kill :*
vncserver -geometry 1440x900
vncserver --list
Разблокировать экран.
- 2_fix_after_screen_lock.sh
-
#!/bin/bash

loginctl list-sessions | grep katya | awk 'system("loginctl unlock-session " $1)'
Остановить vnc-сервера.
- 3_stop_katya_vnc.sh
-
#!/bin/bash

echo "Stop vnc"
vncserver -kill :*
vncserver --list
Настройка ssh и vnc клиента на Windows
В TigerVNC нет шифрования, поэтому к Ubuntu будем подключаться по ssh и прокидывать локальный порт.
Скачиваем и ставим ZOC и vncviewer.
ZOC
В ZOC все стандартно, только надо настроить проброс локального порта Windows tcp/5902 на удаленный порт Ubuntu tcp/5901.

Подключаемся к Ubuntu и запускаем скрипт 1_start_restart_katya_vnc.sh.
vncviewer
Запускаем vncviewer и подключаемся по 127.0.0.1:5902
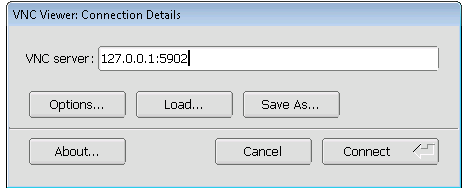
Все, должно работать.
Полезные ссылки
How to Install Tiger VNC on Windows 10
TigerVNC is a high-performance, platform-neutral virtual networking client that allows users to easily connect to and control remote computers. In this tutorial, we will guide you through the process of installing TigerVNC on a Windows 10 computer.
Prerequisites
Before you begin the installation process, you must have the following:
- A Windows 10 computer
- An internet connection
- Administrative privileges on the computer
Installation Steps
Follow the step-by-step guide below to install TigerVNC on your Windows 10 machine:
-
Open your preferred web browser and navigate to the TigerVNC website at http://tigervnc.org/.
-
From the homepage, click on the «Downloads» link at the top of the page.
-
Scroll down to the «TigerVNC Binary Releases» section and select the appropriate version for your operating system (in this case, Windows).
-
The download will begin automatically. Once it is complete, navigate to the location where the file was saved and double-click on it to run the installer.
-
You may be prompted by your operating system to allow the installation to proceed. If so, click on «Yes» or «Allow» to proceed.
-
The installer will launch, and you will be presented with the TigerVNC Setup Wizard. Click «Next» to continue.
-
Read and accept the license agreement, then click «Next» again.
-
Choose the destination folder where you want to install TigerVNC or leave the default folder as it is. Click «Next» to proceed.
-
Choose the components you want to install, then click «Next». For most users, the defaults will be sufficient.
-
Choose the installation options you want, then click «Next». If you are unsure about any of these options, you can leave the defaults as they are.
-
The installer will now begin the installation process. This may take several minutes depending on the speed of your computer.
-
Once the installation is complete, you will be presented with a dialog box. Click «Finish» to complete the installation.
-
You can now launch TigerVNC from the Start menu or from the desktop shortcut that was created during the installation process.
-
Enter the IP address or hostname of the remote computer you wish to connect to, along with the default port number (5900). You can also configure additional options such as the display resolution and color depth.
-
Click «Connect» to establish a connection to the remote computer. You will be prompted for the appropriate credentials if necessary.
-
Once connected, you can control the remote computer just as if you were sitting in front of it.
Congratulations, you have successfully installed TigerVNC on your Windows 10 computer!
If you want to self-host in an easy, hands free way, need an external IP address, or simply want your data in your own hands, give IPv6.rs a try!
Alternatively, for the best virtual desktop, try Shells!