
Вопрос от пользователя
Здравствуйте.
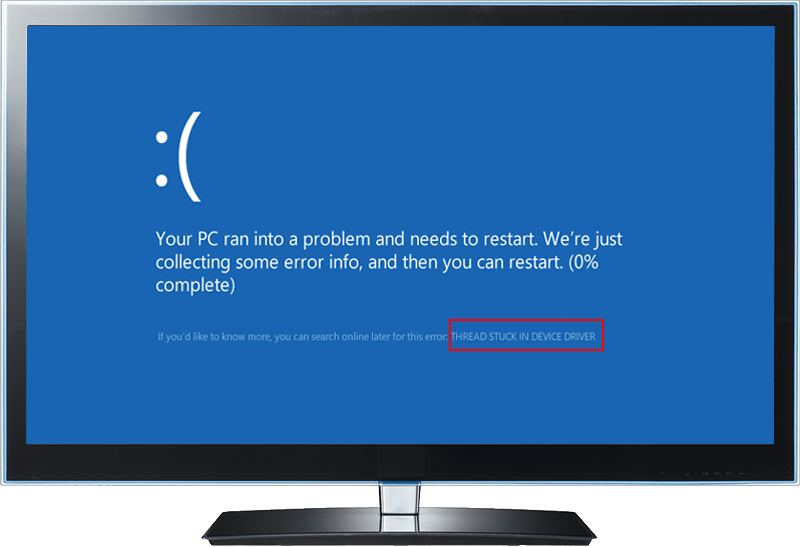
При запуске некоторых игр (часто при смене графических настроек в них) Windows вылетает с синим экраном и ошибкой «THREAD STUCK IN DEVICE DRIVER» (ее фото скинул вам на почту). Сначала подумал, что поймал какой-то вирус или ОС приказала долго жить…
Переустановил полностью Windows, обновил ее, проверил все на вирусы и.. это не помогло. Подскажите что не так, в сервис бы отнес, но сейчас везде карантин. Печалька…
Здравствуйте.
Очень неприятная штука, в большинстве случаев связанна с видеодрайвером (сбойная версия, некорректная установка, конфликт с др. устройствами и пр.).
Ниже приведу несколько рекомендаций для ее устранения.

THREAD STUCK IN DEVICE DRIVER — внешний вид ошибки (если перевести на русский: «драйвера ожидают определенного действия от видеокарты, что вызвало ошибку…».
*
Что можно сделать для устранения «THREAD STUCK…»
👉 ШАГ 1
И так, первое, что порекомендую в этом случае — поменять видеодрайвер (и не всегда самый новый драйвер подойдет). Это тем более актуально, если вы пользуетесь теми драйверами, которая нашла сама ОС Windows 10…
Кратко, что делать:
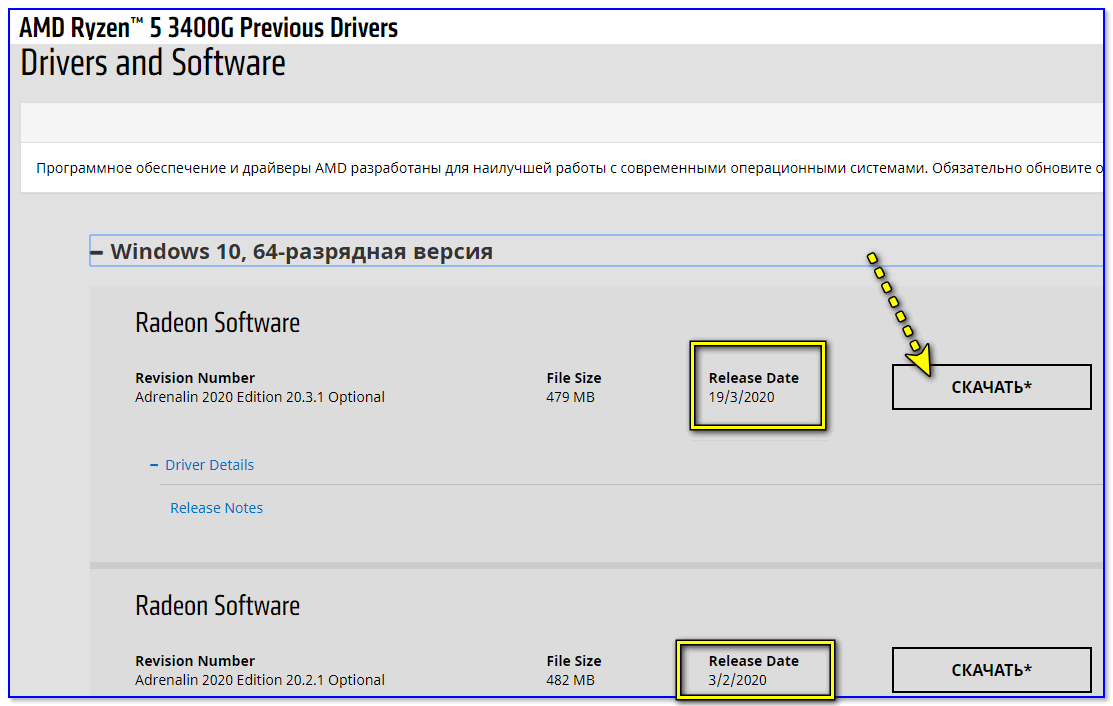
- определить точную 👉 модель своей видеокарты;
- зайти на официальный сайт AMD (nVidia, Intel) и загрузить для нее 2-3 версии полноценных драйверов (которые идут вместе с панелью управления). Несколько версий нужно для поочередного их тестирования;

Скриншот с сайта AMD
- после, устанавливаете одну из загруженных версий драйвера, и перезагружаете ПК;
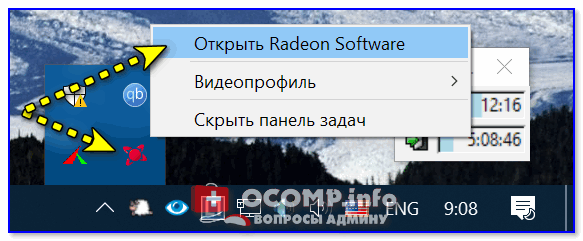
- затем, нужно зайти в панель управления драйвером (значок должен появиться в трее, рядом с часами. Если его нет — см. это);

Открыть настройки Radeon
- в настройках видеодрайвера отключите (это важно!) различные анти-лаги, ограничения, улучшения, коррекции, синхронизации и т.д. (см. пример ниже для AMD);

Отключаем доп. настройки в видеодрайвере
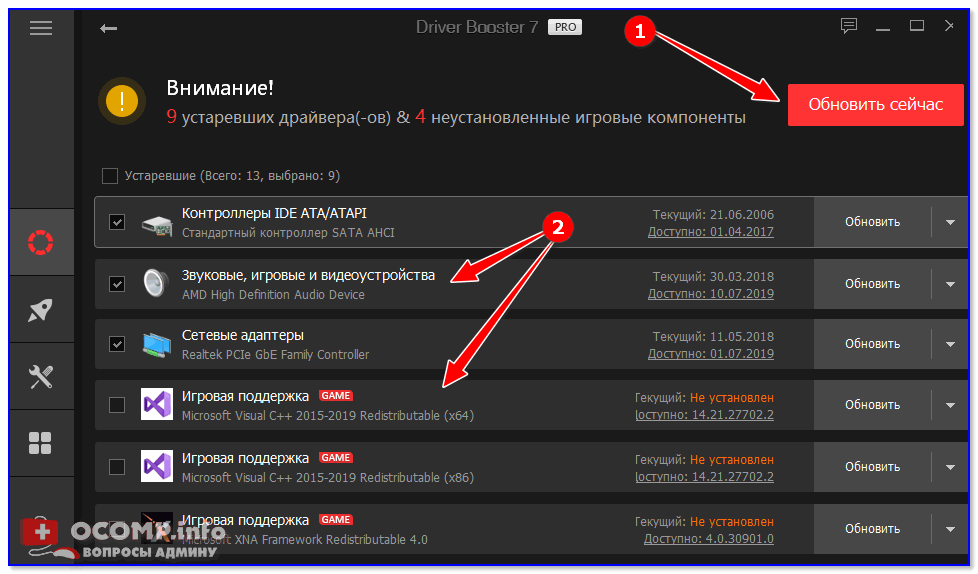
- также порекомендовал бы загрузить утилиту 👉 Driver Booster и просканировать ей свою систему — она подскажет, какие системные библиотеки следовало бы обновить (Visual C++, Net Framework и т.д.). В общем-то, с ее помощью можно также обновить все драйвера в системе (разумеется, за исключением видеокарты!).

Обновить всё — игровые компоненты, звуковые и игровые устройства и пр. / Driver Booster
- после обновления и настройки драйвера — проверьте, не перестала ли вылетать ошибка?..
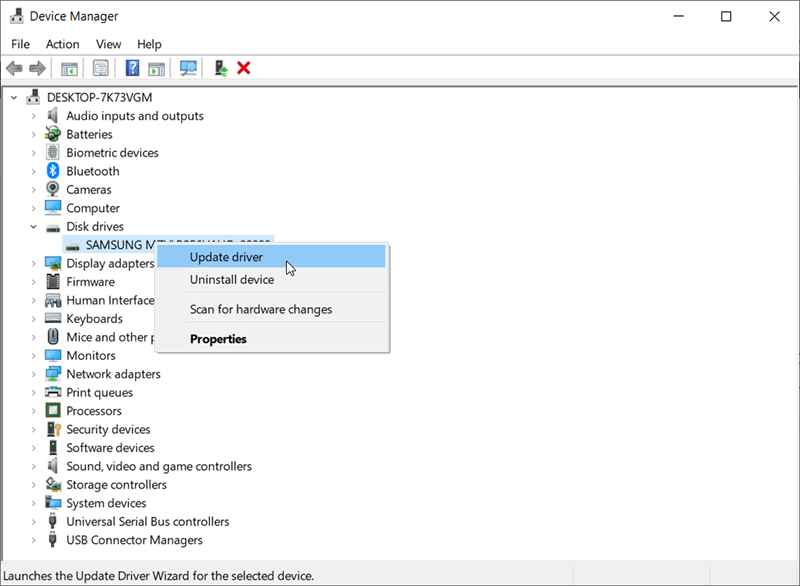
- если ошибка возникнет вновь — рекомендую установить еще одну-две версию драйвера и проверить их также (поочередно). Кстати, для выбора текущей версии драйвера — зайдите в 👉 диспетчер устройств, начните обновление драйвера и выберите его вручную (см. скриншоты в помощь ниже 👇).


Обновить драйвер — выбрать вручную
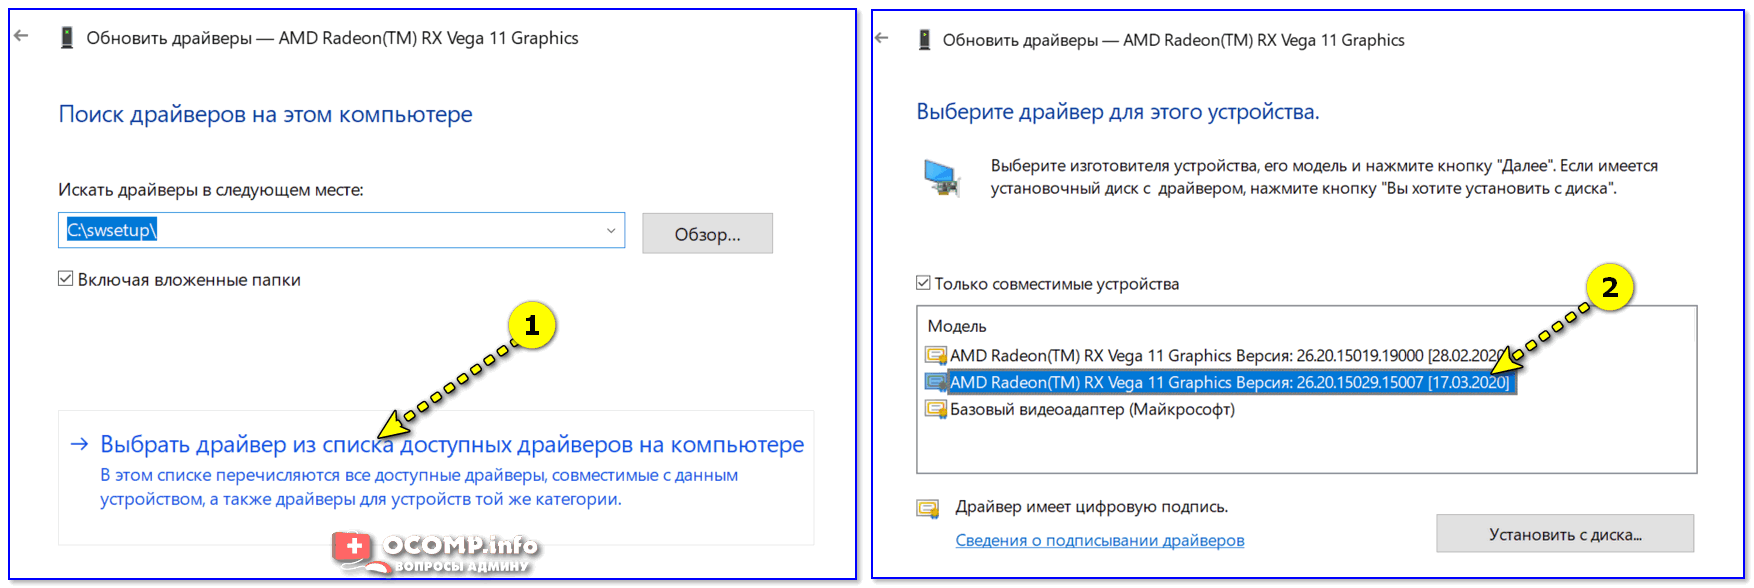
выбор драйвера
*
👉 ШАГ 2
Далее советую зайти в настройки BIOS и загрузить оптимальные настройки, т.е. сбросить текущие на безопасные (либо вручную отключить режим Turbo/Boost для ЦП, и установить «родную» частоту ОЗУ (Memory Clock/DRAM Frequency)). На моем «железе» частота составляет 2933 MHz. 👇
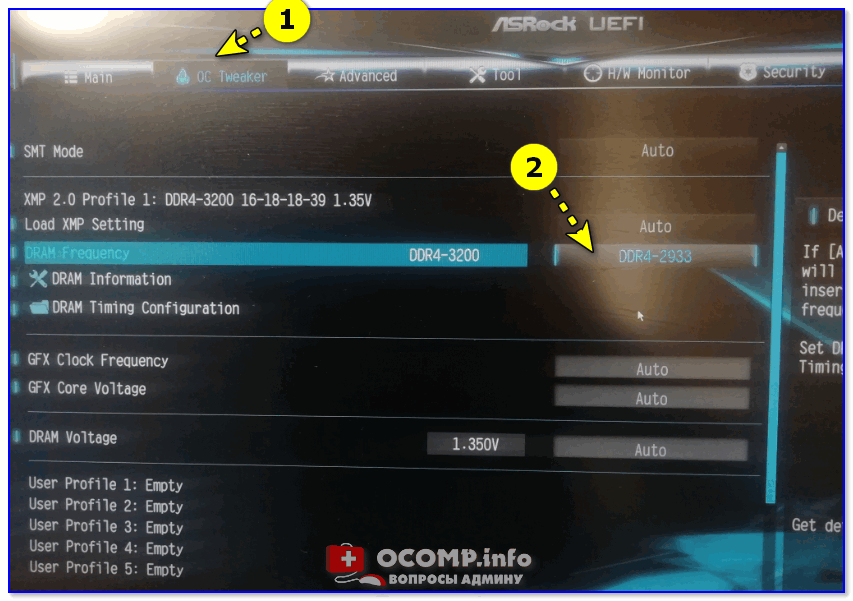
Установка частоты ОЗУ 2933 MHz
Примечание: в особенности это относится ко встроенным видеокартам (AMD Ryzen Vega 8/11, Intel HD), т.к. их производительность сильно зависит от частоты плашек ОЗУ. При выставлении высокой частоты — нередко встроенная карта начинает выдавать подобные «пируэты».
Также проверьте сайт производителя вашей материнской платы. Если есть новая версия BIOS/UEFI для вашей модели — крайне желательно обновиться…
👉 В помощь!
Как обновить UEFI (BIOS) материнской платы (на примере ASRock)
*
👉 ШАГ 3
Еще одной характерной причиной появл. синих экранов может стать высокая температура графического чипа. Перед запуском игр или ресурсоемких приложений — установите себе одну из утилит для мониторинга температуры видеокарты, и проследите: до каких значений она доходит.
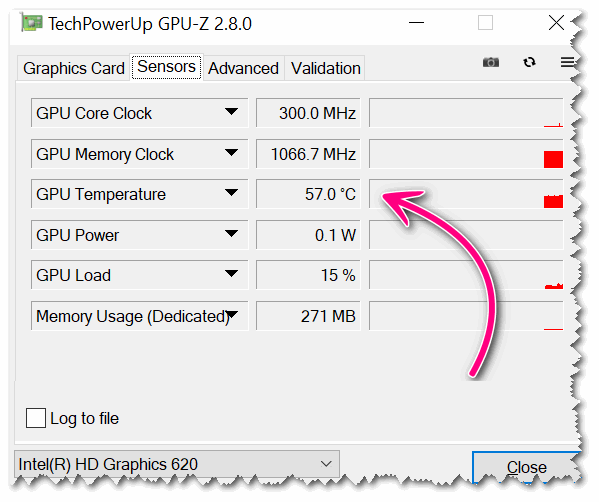
GPU-Z — просмотр температуры
Возможно, стоит почистить ПК от пыли, поменять термопасту, и установить доп. кулеры в системный блок на вдув/выдув. Все эти меры в комплексе могут снизить температуру на десятки градусов!
👉 В помощь!
Температура видеокарты: как ее узнать, допустимые и критические значения t-ры
*
👉 ШАГ 4
Ну и последний вариант (если остальные не увенчались успехом) — проведите диагностику с другой видеокартой (если вы работаете на встроенной карте (APU), установите дискретную видеокарту).
Также желательно проверить и вашу карту (на которой сыпятся ошибки) в другом системном блоке.
В некоторых случаях синий экран с сообщением «THREAD STUCK IN DEVICE DRIVER» может указывать на аппаратные проблемы. * В домашних условиях подобное не устранимо…
* Кстати!
Если у вас б/у видеокарта — возможно, у нее не «родной» BIOS (т.е. ее перепрошил предыдущий хозяин под какую-либо узкую задачу). В этом случае вполне может появиться подобная проблема…
И, если все вышеперечисленное не помогло, я бы посоветовал попробовать самостоятельно прошить BIOS видеокарты заводской («родной») прошивкой.
*
Просьба: если вы решили проблему как-то иначе — дайте знать в комментариях!
На сим пока всё, удачи!
👋
Ошибка THREAD_STUCK_IN_DEVICE_DRIVER показывает нам на то, что драйвера для устройства(почти всегда это драйвера для видеокарты) застряли в ожидании какого-то действия от аппаратной составляющей.
Данная ошибка идет под руку вместе с синим экраном смерти и требует от вас перезагрузить компьютер. Обычно это происходит после очень интенсивного использования мощностей вашей видеокарты. От этой ошибки страдают как пользователи карточек от Nvidia, так и AMD.
Решаем ошибку THREAD_STUCK_IN_DEVICE_DRIVER

Метод №1 Убрать Аппаратное ускорение(Windows 7)
Хоть этот метод и понизит производительность вашей видеокарты, но он сможет решить проблему. Сделайте следующие:
- Нажмите правой кнопкой мыши на «Пуск» и выберите «Панель управления».
- Зайдите в «Экран» -> «Настройки параметров экрана» -> «Дополнительные параметры» -> «Диагностика проблем» -> «Изменить настройки».
- Далее переместите ползунок «Аппаратного ускорения» на позицию отключения этой опции.
- После этого перезагрузите компьютер.
Метод №2 Обновление БИОС
Если на ваш БИОС вышло недавно какое-то обновление, то очень важно установить его. Именно не обновленный БИОС может стать причиной различных ошибок и синих экранов смерти.
- Нажмите комбинацию клавиш Win+R и впишите в пустую строку msinfo32.
- В сведениях о системе вы должны найти строчку «Версия BIOS».
- Сравните версию БИОСа с версией на сайте производителя вашей материнской карты или ноутбука. Если есть новые версии, то скачайте самую последнюю и установите ее.
- После процесса обновления БИОСа перезагрузите свой компьютер.
Порой пользователи забывают за такую обязанность с их стороны. Очень важно содержать свой БИОС в обновленном состоянии постоянно. Проверяйте доступные обновления время от времени и ошибка THREAD_STUCK_IN_DEVICE_DRIVER не будет вас больше беспокоить.
Метод №3 Обновление видеодрайверов
Если предыдущий метод не смог решить проблемы, то дело скорее всего заключается в драйверах видеокарты.
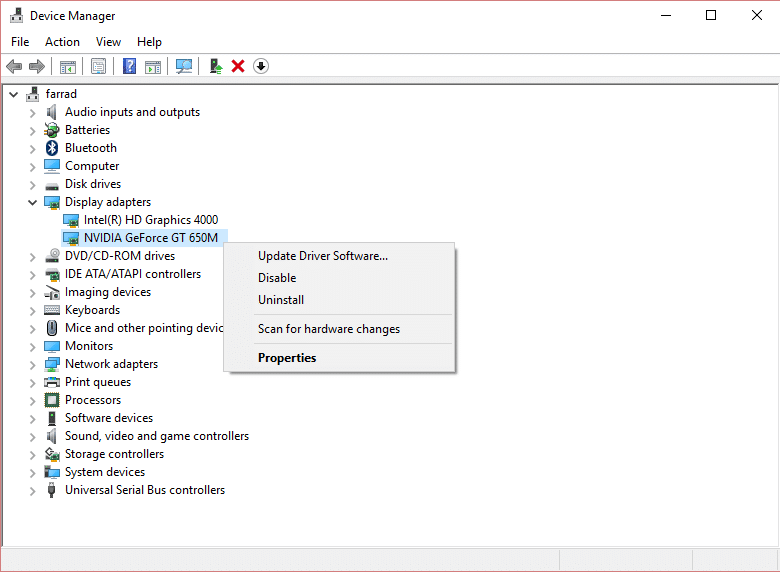
- Нажмите правой кнопкой мыши по «Пуску» и выберите «Диспетчер устройств».
- Найдите в списке вкладку «Видеоадаптеры» и раскройте ее.
- Кликните на свою видеокарту и выберите из контекстного меню «Обновить драйверы…».
- Как альтернатива, можете за место обновления удалить драйвера для видеокарты, а затем скачайте их с сайта производителя и установить.
- Затем перезагрузите компьютер.
Метод №4 Замена видеокарты
Если все вышеописанные методы не помогли вам в решении ошибки THREAD_STUCK_IN_DEVICE_DRIVER, то к большому сожалению вам придется менять свою видеокарту.
Но перед тем как это делать, попробуйте найти или одолжить у кого видеокарту и проверьте ее работу в системе. Если сообщения об ошибке перестали себя проявлять, то можете смело идти покупать новую карточку.
Summary: The Windows 10 thread stuck in device driver error, which is accompanied by the stop code 0x100000ea that often results in Blue Screen of Death no matter on your HP, Lenovo, Dell, or ASUS RX 580 computers. If this error message is kept persisted and you don’t know what to do, this article has comprised 16 practical solutions to help you overcome this issue.
WIN VERSION MAC VERSION
Table of Contents
What Does Thread Stuck in Device Driver Mean?
The Windows 10 thread stuck in device driver error is actually means that some device driver is getting corrupted or a rare hardware issue that caused the computer to an endless loop while it waits for the device to enter the idle state. It’s widely reported that the causes behind this problem could vary from incompatibility between driver software to physical damage to specific devices. For example, users on Reddit reported experiencing problem when updating an AMD graphics card driver or using Photoshop.
Hence, to tackle the problem, we have worked out 16 practical solutions to guide you in steps on how to overcome the error.
Troubleshooting Thread Stuck in Device Driver Error
Troubleshooter 1: Check Power Supply
The deficiency in the power supply is known as a killer to cause the thread stuck in device driver error. In this case, you should check the power supply of your computer physically and make sure the power supply fan is working normally, or there’s no power leakage problem, then decide whether to replace it with an adequate one.
Troubleshooter 2: Keep Computer and Graphics Card Cool
Overheating can be another culprit that is accountable for the thread stuck in device driver error. What you should do is shut down your computer for at least half an hour, or take off the cover of the computer case and then restart the computer to check.
Troubleshooter 3: Change Overclocking Settings
The computer is set to run at a certain maximum speed. If the computer runs at a specific speed with proper cooling, the CPU should work fine without any problems. However, if you’re overclocking the CPU to enhance your system’s performance, many problems could be triggered, and the thread stuck in device driver is one of them. To fix the problem, reset the overclocking settings in BIOS or uninstalling any overclocking software.
Troubleshooter 4: Replace the Graphics Card
If all of the troubleshooting procedures described above fail and the error still exists, you can choose to replace the graphics card. However, if you don’t know which video card you can choose, ask your computer vendor. But we do not recommend you to replace the graphics card immediately, as we have other solutions that you can easily follow up.
How to Fix Thread Stuck in Device Driver Error
Fix 1: Update Drivers
Sometimes, the computer users might install the incompatible hardware driver to the system, or the driver was corrupted or damaged during the installation, then we may encounter the Windows 10 thread stuck in device driver error after rebooting; hence, at the very first beginning, we should update the hardware drivers to the latest version in the Device Manager.
Step 1: Press Win + Q and type Device Manager, and open it.
Step 2: Look for the problematic device and then expand its tree.
Step 3: Right-click on the driver entry and click on Update driver.
Step 4: Repeat the steps to update other wanted drivers.
Note: You can also go to the manufacturers’ official website to download the specific drivers to be installed. But if you were not familiar with the hardware series or versions, then use the Device Manager to perform updates is much easier.
Fix 2: Update BIOS
BIOS stands for basic input/output system, which is the microprocessor embedded in your computer and serves to start the computer system after turning the computer on. It also initializes important devices on your computer, like CPU and GPU, and serves as an interface between the attached hardware and the computer’s operating system.
It’s said that an older version of BIOS that doesn’t support features newly installed in a computer could lead to the thread stuck in device driver error. The problem is not convoluted, but to update BIOS is tricky owing to the variety of BIOS and the enormous damage that a minor change could inflict on the computer.
Hence, if you want to update BIOS, please consult the manufacturer’s website or an expert to learn how to do it.
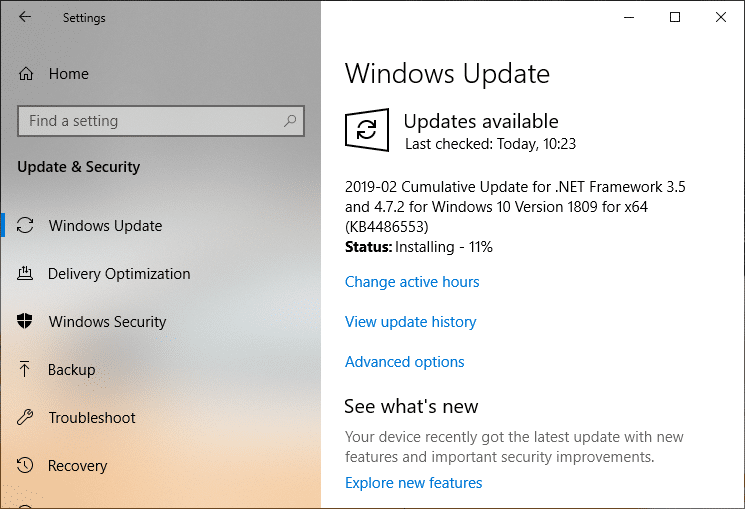
Fix 3: Update Windows
In some cases, the error could result from an operating system that has been updated for a considerable time. Therefore, you can try to update the operating system using the following steps:
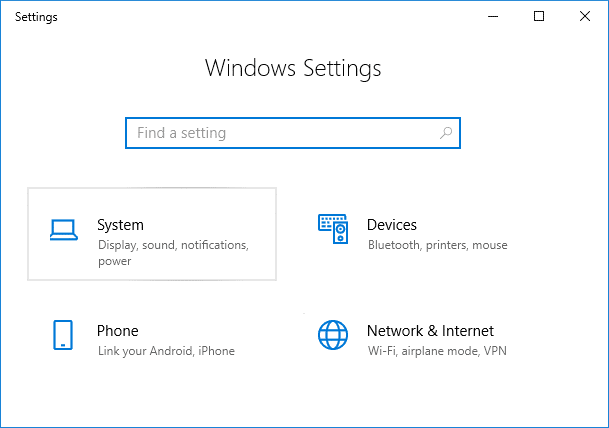
Step 1: Right-click the Start Menu and select Settings.
Step 2: Navigate to Update & Security > Windows Update.
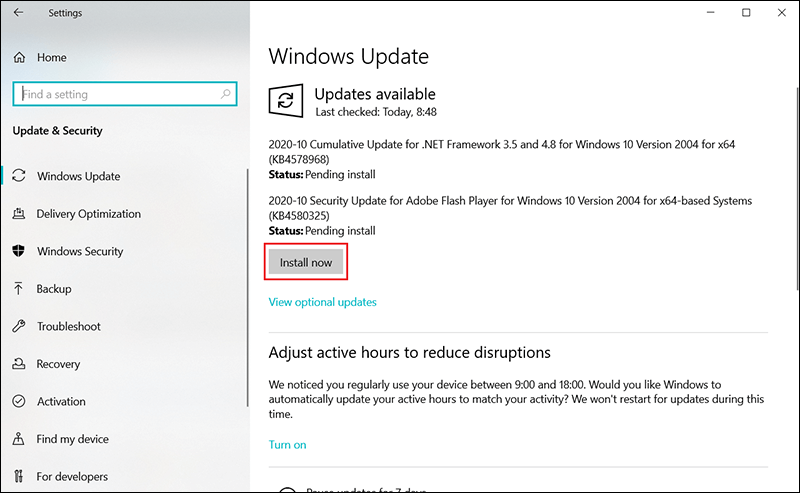
Step 3: On the right page, check out whether there is an update available. If so, download and install it.
Step 4: After the installation, restart your computer to see if the error persists.
Generally, after updating the hardware drivers to the latest versions and keeping the BIOS and Windows version up-to-date, you should fix the thread stuck in device driver error already, restart the computer, and you shouldn’t see the blue screen of death (BSOD) and the stop code thread_stuck_in_device_driver.
However, if you are scared of updating the BIOS, yes, we should say that a tiny mistaken operation may cause the motherboard to completely dead, and you need to send the motherboard back to the manufacturer for a firmware burning or some other physical checking.
Then, try with the below solutions as all of which are executed on Windows 10 and can be easy to follow, but you need to read them carefully and slowly to make sure that each step is correct.
Extra Solutions to Thread Stuck in Device Driver Error
Solution 1: Disable Hardware Acceleration
Although hardware acceleration can enhance the performance of your PC, it sometimes triggers the thread stuck in device driver error. Use the steps to turn it off and check out whether the error persists.
Step 1: Press Win + I to open Settings.
Step 2: Navigate to System > Display.
Step 3: Scroll down the right page and click on the Advanced display settings.
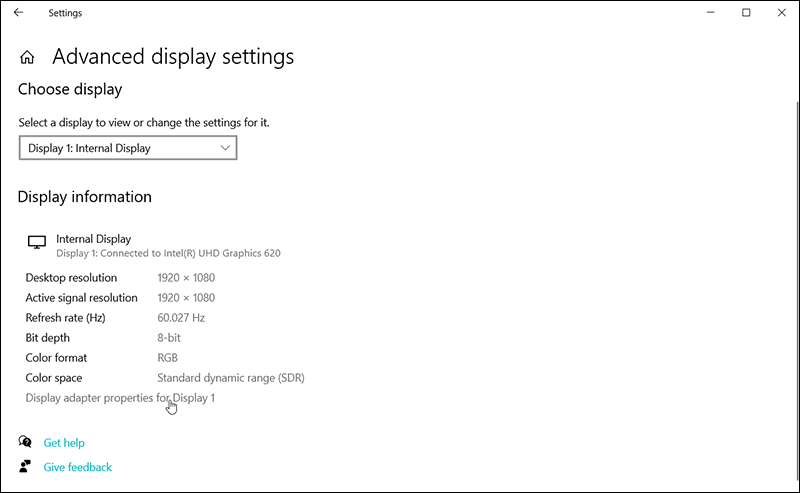
Step 4: Click on Display adapter properties for Display 1 in the new window.
Step 5: In the Properties window that has been brought up, go to the Troubleshoot tab and click on Change Settings.
Step 6: Drag the slider to the left side to set Hardware acceleration to None.
Note: To turn off hardware acceleration will more or less limit your video card’s performance and functionality.
Solution 2: Run the BSOD Troubleshooter
Since BSOD is the accompanying symptom caused by thread stuck in device driver error, using the BSOD troubleshooting tool provided by Windows can help resolve the problem.
Step 1: Right-click on Start Menu and select Settings.
Step 2: Navigate to Update & Security > Troubleshoot
Step 3: On the right page, look for Additional troubleshooters and click on it.
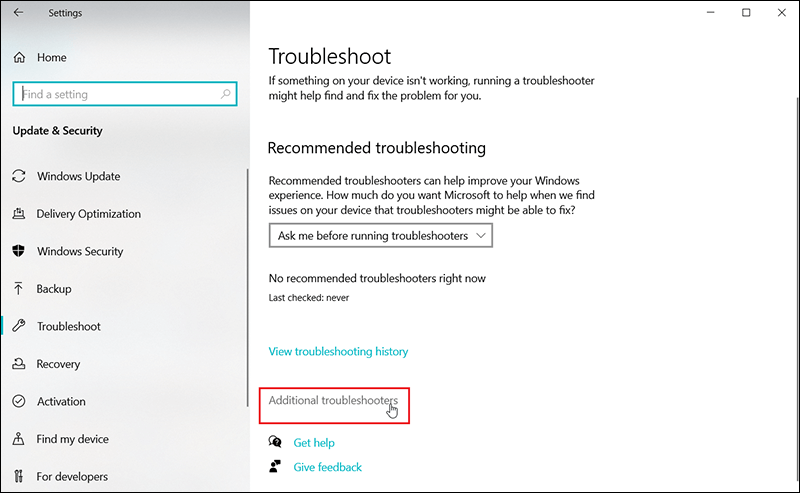
Step 4: Click on the Blue Screen option.
Step 5: Click on Run the troubleshooter.
Step 6: Follow the instructions to run the troubleshooter.
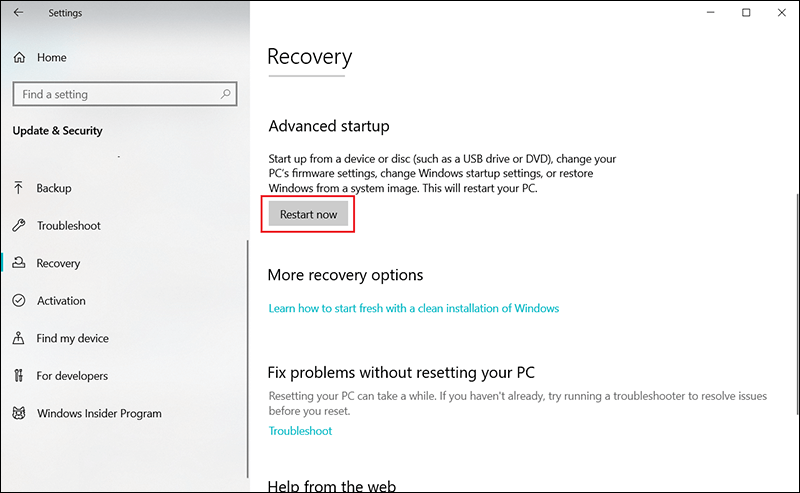
Solution 3: Run Startup Repair
Another way to fix a BSOD problem is to use the Startup repair by accessing Advanced Startup options. After you choose to run Startup repair, it will restart the computer and scan your system to look for problems. If it detects a problem, let it automatically fix it and restart the computer to see if the thread stuck in device driver error persists.
Use the following steps to get to the Advanced startup options menu.
Step 1: Press Win + I to open Settings and click on Update & Security.
Step 2: Click on Recovery on the left part.
Step 3: Click the Restart now button on the right page.
Solution 4: Grant Graphic Card Access to the Application
If the problem repeatedly occurs when you try to launch a specific application, you can try to grant your graphic card access to it.
Step 1: Type in Settings in the Search bar.
Step 2: Navigate to System > Display.
Step 3: Scroll down the right page and click on Graphics Settings.
Step 4: If the application is a built-in one in Windows, choose the Universal app option under the title Choose an app to set preference.
Step 5: Expand the menu below Universal app to select the application.
Step 6: If you can’t find the application, choose the Classic app option on the first menu, and click on Browse to look for it.
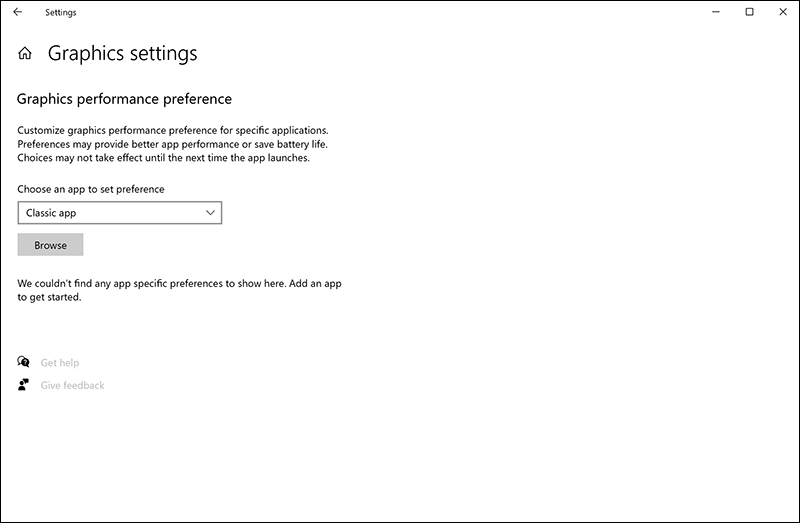
Step 7: After the application is added, select it and then click on Options.
Step 8: Select High performance and then click on Save.
Step 9: Restart your PC to save the change.
Solution 5: Disable Fast Startup
Fast Startup is a feature that Windows 10 offers to expedite the process of startup. While it reduces startup time, many users who turn on the feature on their computers reportedly encounter issues such as Windows stuck at a black screen or different blue screen errors, one of which is thread stuck in device driver. Hence, some of those users have tried disabling Fast Startup and found out that the method works.
Use the following steps to disable it.
Step 1: Press Win + Q, type in Control Panel, and open it.
Step 2: Navigate to Power Options > Choose what the power buttons do.
Step 3: Click on Change settings that are currently unavailable.
Step 4: Uncheck the box beside Turn on fast startup (recommended)
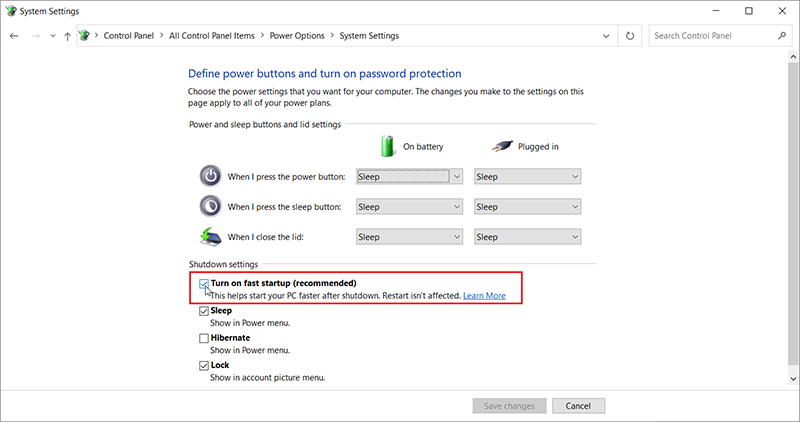
Step 5: Click on Save changes.
Solution 6: Allow Graphics Card Maximum Performance
Since the thread stuck in device driver error is more or less associated with graphics cards, a graphics card working in bad performance could trigger this error. Try allowing the graphics card to have maximum performance using the following steps.
Step 1: Navigate to Settings > System > Power & Sleep.
Step 2: On the right part, scroll down to click on Additional power settings.
Step 3: Click on Change plan settings and then Change advanced power settings.
Step 4: Expand the Graphics Settings tree and then the Graphics Power Plan.
Step 5: Change the two settings to Maximum Performance.
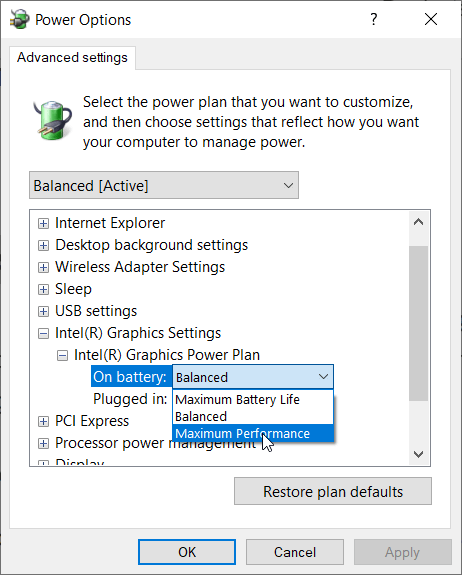
Step 6: Click on Ok and restart your PC.
Solution 7: Run SFC
Sometimes the thread stuck in device driver error could result from damaged or corrupted system files. To fix this problem, you can use a built-in tool called System File Checker (SFC) offered by Windows to scan the PC and perform the fixes.
Step 1: Search CMD in the search bar and choose Run as administrator.
Step 2: Type the command and press Enter: sfc/scannow.
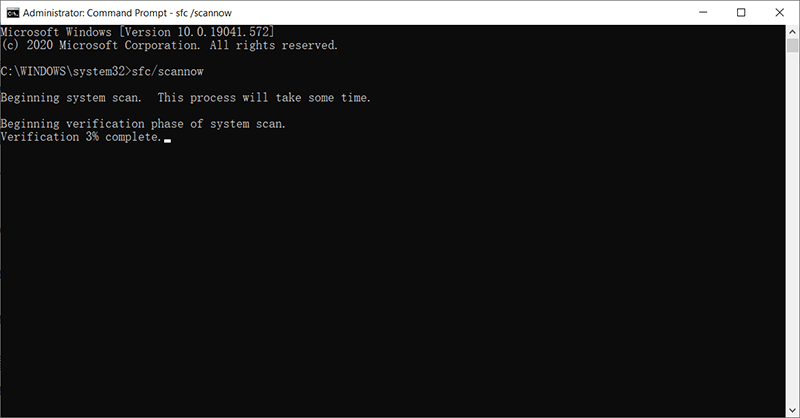
Step 3: Wait for the scanning to finish.
Step 4: After the process is completed, restart your PC to see whether the error persists.
Solution 8: Run DISM
If SFC does find out damaged or corrupted files residing on your computer but fails to fix them, another built-in utility, Deployment Image Servicing and Management (DISM), can lend you a helping hand. The tool is best known to fix issues that SFC can’t.
Step 1: Press Win + Q and then type in Command Prompt, choose Run as administrator.
Step 2: Type in the following command and press Enter:DISM /Online /Cleanup-Image /RestoreHealth.
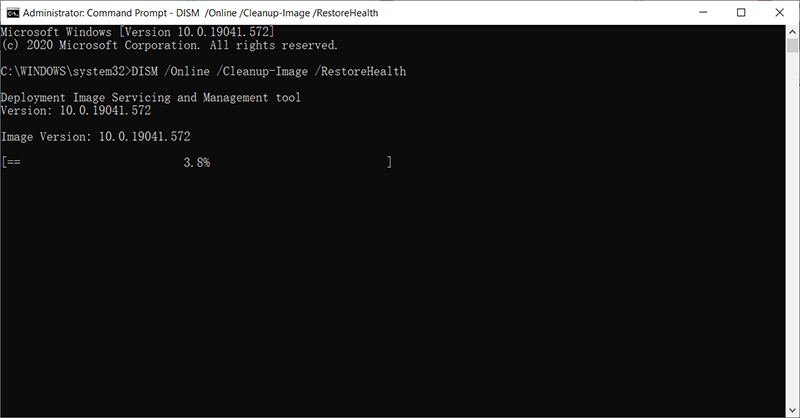
Step 3: Wait until the process is 100 % complete and then restart your PC.
Solution 9: Uninstall Third-Party Software
If you notice that you repeatedly encounter the thread stuck in device driver error after installing a certain program, the problem may lie in the incompatibility between the system and the software, not least when antivirus software is concerned. If that’s the cause of it, temporarily disable the antivirus software or completely uninstall the third-party software should work. To uninstall a program, use the following steps:
Step 1: Press Win + I to open Settings.
Step 2: Navigate to Apps > Apps & features.
Step 3: On the right page, look for the Sort by option under the Apps & features section.
Step 4: Bring up the drop-down menu next to Sort by and select Install Date.
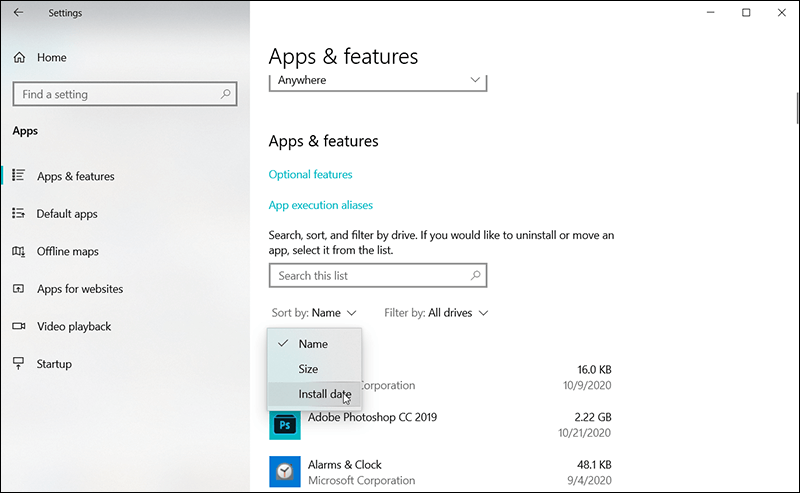
Step 5: Click on the suspicious application and click on Uninstall.
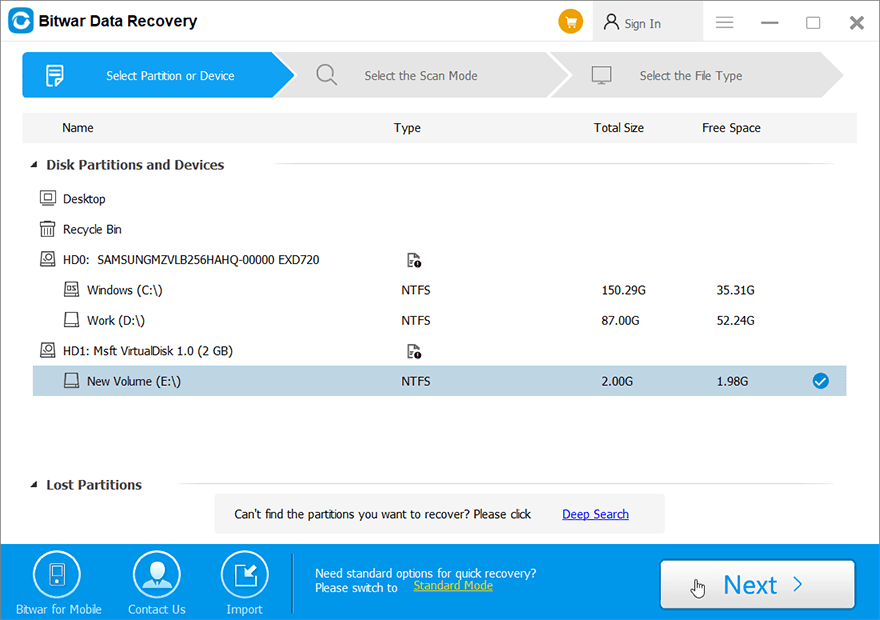
How to Recover Lost Data Using Bitwar Data Recovery
It’s reported that the thread stuck in device driver error not only confounds users but also inflicts damages on their computers, one of which is data loss. If you have encountered this error and a lot of treasured data has subsequently vanished, it’s highly recommended that you use a powerful and user-friendly program, Bitwar Data Recovery, to recover your data. Just use the following five steps, and then you can effortlessly retrieve them.
Step 1: Go to the official website to download Bitwar Data Recovery and install it on your computer.
Step 2: Run the software, choose the disk drive/partition where the lost files had been before vanishing.
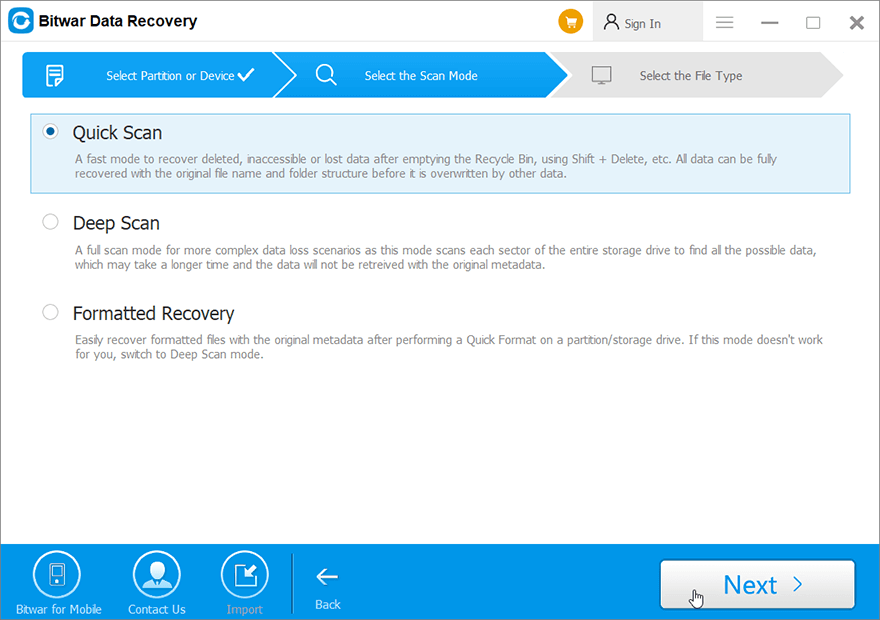
Step 3: In this stage, you should select a scan mode. Quick Scan will serve you better. It only requires a few minutes to scan all the sectors of an ordinary drive. If this scan mode fails to work on the disk, you can try Deep Scan next time.
Step 4: Select file types and then click on Scan.
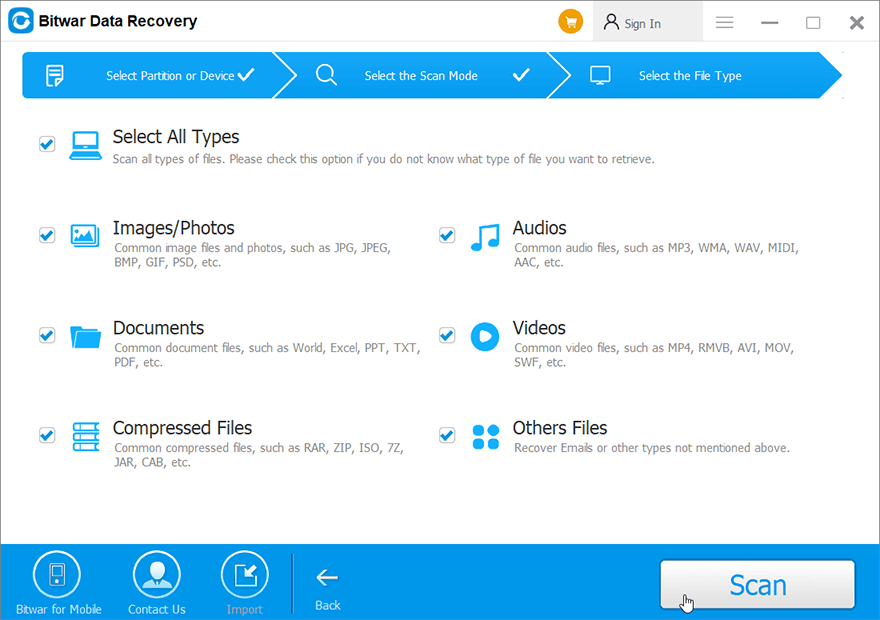
Step 5: Double-click on a file to preview it. Select wanted files and click on Recover to recover them.
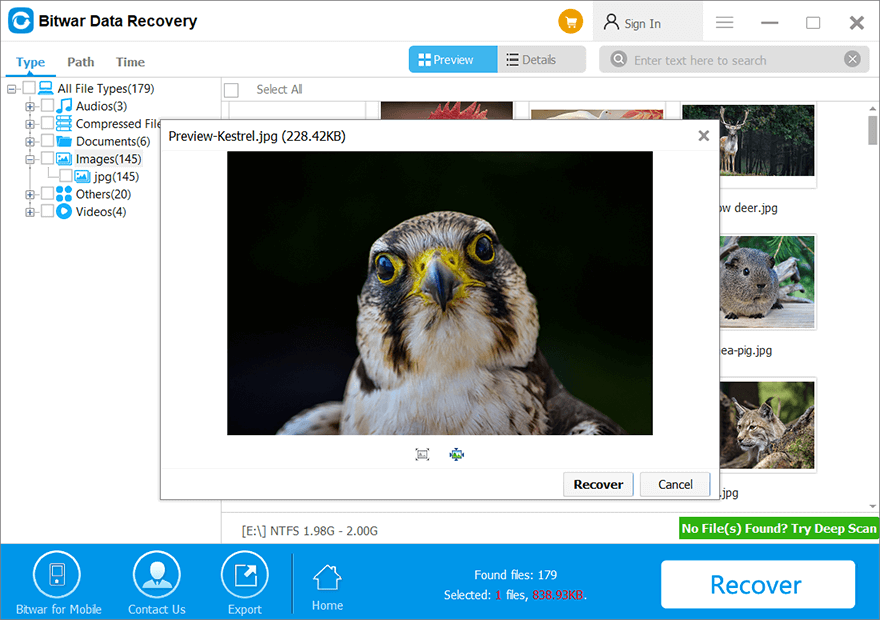
Note: To avoid the risk of overwriting your deleted files, files to be recovered should not be saved to the original disk drive that contained those deleted files.
Conclusion
Although BSOD is one of the most common problems that persistently annoy users on Windows 10, a multitude of possible causes and the respective fixes to them prevent many users from making an effort to fix them. But the later possible risks this error could entail are worrying, such as the recurrence of the thread stuck in device driver error and the loss of valuable data. Hence in this article, we have shown as many solutions as possible to meet your need. On top of the solutions to the error, this article also introduces a reliable program, Bitwar Data Recovery, to help you recover lost data.
Thread Stuck In Device Driver Error in Windows 10 is a BSOD (Blue Screen Of Death) error which is caused by a driver file caught in an endless loop. The stop error code is 0x000000EA and as the error, itself suggests it’s the device driver issue rather than a hardware problem.
![Thread Stuck In Device Driver Error in Windows 10 [SOLVED]](https://techcult.com/wp-content/uploads/2017/02/Thread-Stuck-In-Device-Driver-Error-in-Windows-10-SOLVED.png)
Anyway, the fix for the error is simple, update the drivers or BIOS and the problem is resolved in all most all the cases. If you can’t boot into Windows to perform the below-listed steps then boot your computer into safe mode using the installation media.
Depending on your PC you may receive one of the following errors:
- THREAD_STUCK_IN_DEVICE_DRIVER
- STOP Error 0xEA: THREAD_STUCK_IN_DEVICE_DRIVER
- The THREAD_STUCK_IN_DEVICE_DRIVER bug check has a value of 0x000000EA.
Few of the cause which can lead to Thread Stuck In Device Driver error are:
- Corrupt or old device drivers
- Driver conflict after installing new hardware.
- Error 0xEA blue screen caused by a damaged video card.
- Old BIOS
- Bad Memory
Table of Contents
So without wasting any time let’s see How to Fix Thread Stuck In Device Driver Error in Windows 10 with the help of the below-listed troubleshooting guide.
Method 1: Update Graphic Card Drivers
If you’re facing the Thread Stuck In Device Driver Error in Windows 10 then the most probable cause for this error is corrupted or outdated Graphics card driver. When you update Windows or install a third-party app then it can corrupt the video drivers of your system. If you face issues such as screen flickering, screen turning on/off, display not working correctly, etc you may need to update your graphics card drivers in order to fix the underlying cause. If you face any such issues then you can easily update graphics card drivers with the help of this guide.
Method 2: Disable Hardware Acceleration
1. Press Windows Key + I to open Settings then click on System.
2. From the left-hand side menu, select Display. Now at the bottom of the Display window, click on the Advanced display settings.
3. Now go to the Troubleshoot tab and click Change Settings.

4. Drag the Hardware Acceleration slider to None
5. Click Ok then Apply and restart your PC.
6. If you don’t have the troubleshoot tab then right-click on the desktop and select NVIDIA Control Panel (Every graphic card has their own control panel).

7. From the NVIDIA Control Panel, select “Set PhysX configuration” from the left column.
8. Next, under select, a PhysX processor make sure the CPU is selected.

9. Click Apply to save the changes. This will disable NVIDIA PhysX GPU acceleration.
10. Reboot your PC and see if you’re able to fix thread stuck in device driver error in Windows 10, if not, continue.
Method 3: Run SFC and DISM tool
1. Press Windows Key + X then click on Command Prompt(Admin).
2. Now type the following in the cmd and hit enter:
Sfc /scannow

3. Wait for the above process to finish and once done restart your PC.
4. If you are able to fix Thread Stuck in device driver error in Windows 10 issue then great, if not then continue.
5. Again open cmd and type the following command and hit enter after each one:
Dism /Online /Cleanup-Image /CheckHealth
Dism /Online /Cleanup-Image /ScanHealth
Dism /Online /Cleanup-Image /RestoreHealth

6. Let the DISM command run and wait for it to finish.
7. If the above command doesn’t work then try on the below:
Dism /Image:C:\offline /Cleanup-Image /RestoreHealth /Source:c:\test\mount\windows
Dism /Online /Cleanup-Image /RestoreHealth /Source:c:\test\mount\windows /LimitAccess
Note: Replace the C:\RepairSource\Windows with the location of your repair source (Windows Installation or Recovery Disc).
7. Reboot your PC to save changes.
Method 4: Perform Windows update
Sometimes pending Windows update can cause a problem with the drivers, hence it’s recommended to update Windows.
1. Press Windows Key + I to open Settings then click on Update & Security.
2. From the left-hand side, menu click on Windows Update.
3. Now click on the “Check for updates” button to check for any available updates.

4. If any updates are pending then click on Download & Install updates.
5. Once the updates are downloaded, install them and your Windows will become up-to-date.
6. After the updates are installed reboot your PC to save changes.
Method 5: Run Windows 10 BSOD Troubleshooter
If you are using Windows 10 Creators update or later, you can use Windows inbuilt Troubleshooter to fix Blue Screen of Death Error (BSOD).
1. Press Windows key + I to open Settings then click on ‘Update & Security’.
2. From the left pane, select ‘Troubleshoot’.
3. Scroll down to ‘Find and fix other problems’ sections.
4. Click on ‘Blue Screen’ and click on ‘Run the troubleshooter’.

Method 6: Give Graphics Card Access to the Application
1. Press Windows Key + I to open Settings then click on System.

2. From the left-hand menu select Display then click on Graphics settings link at the bottom.

3. Select the type of app, if you can’t find your app or game in the list then select the Classic app and then use the “Browse” option.

4. Navigate to your application or game, select it, and click Open.
5. Once the app is added to the list, click on it then again click on Options.

6. Select “High performance” and click on Save.

7. Reboot your PC to save changes.
Method 7: Update BIOS (Basic Input/Output System)
Note: Performing BIOS update is a critical task and if something goes wrong it can seriously damage your system, therefore, expert supervision is recommended.
BIOS stands for Basic Input and Output System and it is a piece of software present inside a small memory chip on the PC’s motherboard which initializes all the other devices on your PC, like the CPU, GPU, etc. It acts as an interface between the computer’s hardware and its operating system such as Windows 10. Sometimes, the older BIOS doesn’t support new features and that is why you can face the Thread Stuck in device driver error. In order to fix resolve the underlying issue, you need to update BIOS using this guide.

Method 8: Reset Overclocking Settings
If you’re overclocking your PC then this might explains why you’re facing the Thread Stuck in device driver error, as this overclocking software puts a strain on your PC hardware which is why PC restarts unexpectedly giving the BSOD error. To fix this issue simply reset the overclocking settings or remove any overclocking software.
Method 9: Faulty GPU
Chances are the GPU installed on your system might be faulty, so one way to check this is to remove the dedicated graphic card and leave the system with only integrated one and see if the issue is resolved or not. If the issue is resolved then your GPU is faulty and you need to replace it with a new one but before that, you could try cleaning your graphic card and again place it in the motherboard to see it’s working or not.

Method 10: Check Power Supply
A faulty or failing Power Supply is generally the cause for the Bluescreen of death errors. Because the power consumption of hard disk is not met, it won’t get enough power to run, and subsequently, you may need to restart the PC several times before it can take the adequate power from PSU. In this case, you may need to replace the power supply with a new one or you could borrow a spare power supply to test if this is the case here.

If you have recently installed new hardware such as video card then chances are the PSU is not able to deliver the necessary power needed by the graphic card. Just temporarily remove the hardware and see if this fixes the issue. If the issue is resolved then in order to use the graphic card you may need to purchase a higher voltage Power Supply Unit.
That’s it you have successfully Fix Thread Stuck In Device Driver Error in Windows 10 but if you still have any queries regarding this post then feel free to ask them in the comment’s section.
How to Fix the THREAD STUCK IN DEVICE DRIVER Error on Windows 11/10
THREAD STUCK IN DEVICE DRIVER is a Blue Screen of Death (BSOD) error you can get due to faulty or corrupted device drivers. This article will explore this error in more detail and offer several ways to fix it.

The THREAD STUCK IN DEVICE DRIVER error can occur on any Windows version, including Windows 11/10/8.1/8/7. Furthermore, it commonly occurs on Lenovo, Dell, and HP devices. Still, it can appear on any desktop or laptop device, particularly laptops with AMD-Ryzen processors and built-in graphics.
What Causes This Error?
The THREAD STUCK IN DEVICE DRIVER error occurs when a driver file gets caught in an endless loop while it waits for (or doesn’t allow) the hardware to enter an idle state. Therefore, this error occurs due to a software issue and seldom occurs due to faulty hardware.
If left unchecked, the underlying driver issue will worsen and cause a Blue Screen of Death error with the THREAD STUCK IN DEVICE DRIVER description. On top of that, the BSOD can result in data loss, application malfunctions, and other issues.
Our research has revealed that this error is often caused by faulty or corrupted graphics card drivers, specifically those with AMD-Ryzen processors.
Furthermore, this error can occur due to over-the-top (OTT) (also known as streaming platforms) and data mining activities.
In the worst-case scenario, this error may occur due to a hardware issue, mainly a faulty GPU.
Before trying our advanced fixes, here are a few things you can try:
- Update your Windows operating system.
- Remove CPU/GPU overclock settings.
- Ensure adequate GPU cooling. Some have suggested that this error can occur due to GPU overheating issues that cause the GPU chipset to lock up. Check your GPU’s temperatures under heavy load, check the cooling fan for dust build-up, and consider replacing the thermal paste.
Video Tutorial on How to Fix THREAD STUCK IN DEVICE DRIVER
Table of Contents:
- Introduction
- Method 1. Update the Device Driver Using the Device Manager
- Method 2. Uninstall GPU/Audio Drivers With DDU and Install New Drivers
- Method 3. Run the Deployment Image & Servicing Management (DISM) and System File Checker (SFC) Scans
- Method 4. Perform a System Restore
- Video Tutorial on How to Fix THREAD STUCK IN DEVICE DRIVER
Download Computer Malware Repair Tool
It is recommended to run a free scan with Combo Cleaner — a tool to detect viruses and malware on your device. You will need to purchase the full version to remove infections. Free trial available. Combo Cleaner is owned and operated by Rcs Lt, the parent company of PCRisk.com read more.
Method 1. Update the Device Driver Using the Device Manager
Since the THREAD STUCK IN DEVICE DRIVER error can be caused by faulty or corrupted device drivers, you can try updating them. Look through the device list to find devices with a yellow triangle with an exclamation mark symbol and try to update their drivers. Consider updating the video and audio drivers first, as they often cause the issue.
Note: If your system can’t run long enough to perform the following steps, boot Windows into Safe Mode, which should allow your system to run without crashing.
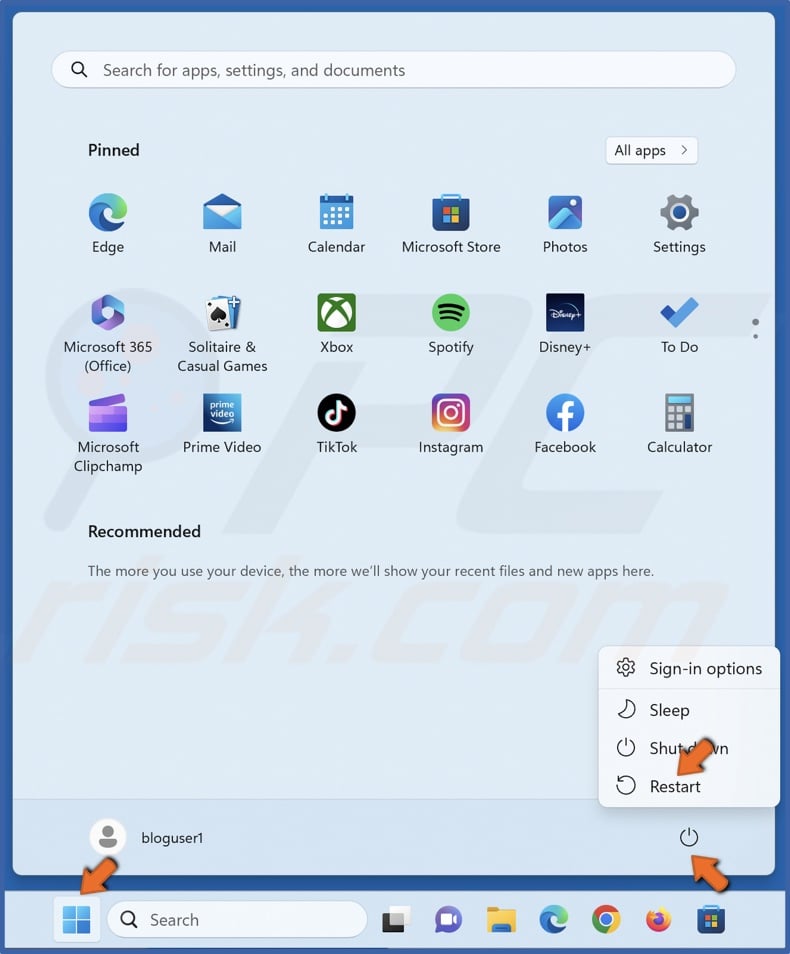
1. Open the Windows Start menu and click the Power button.
2. Hold down the Shift key and click Restart.
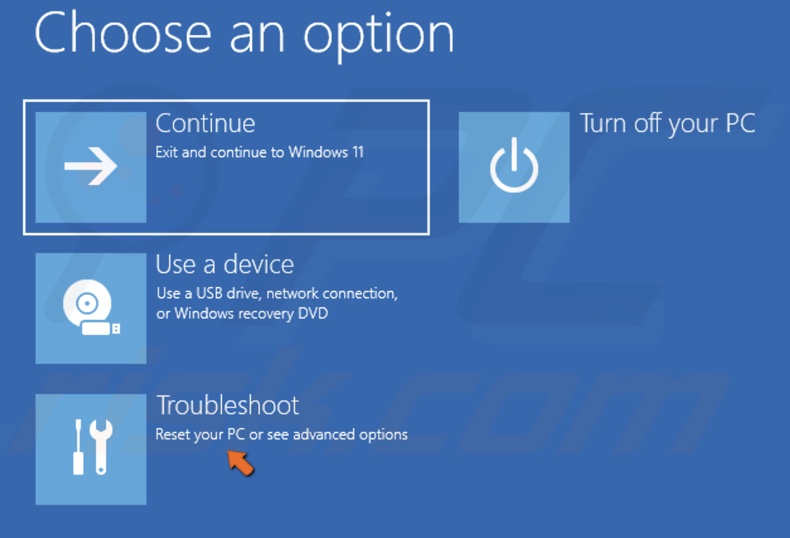
3. Select Troubleshoot.
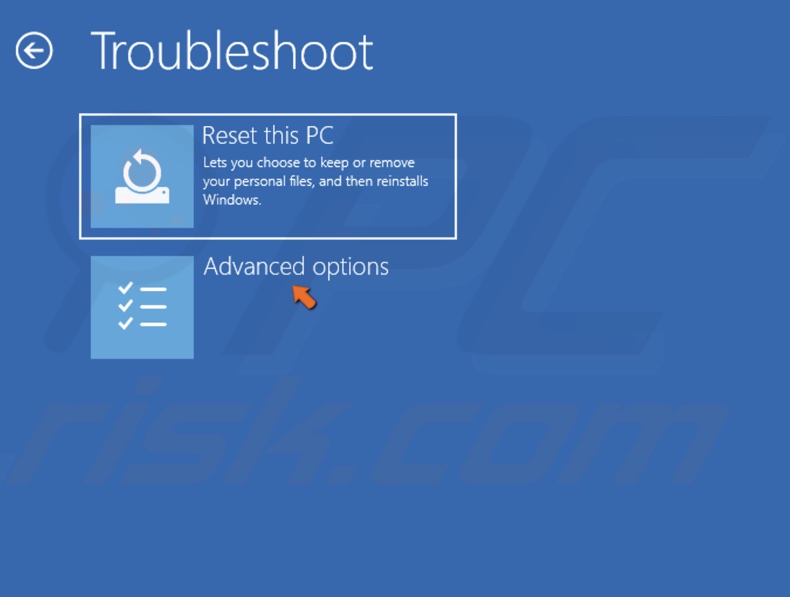
4. Select Advanced options.
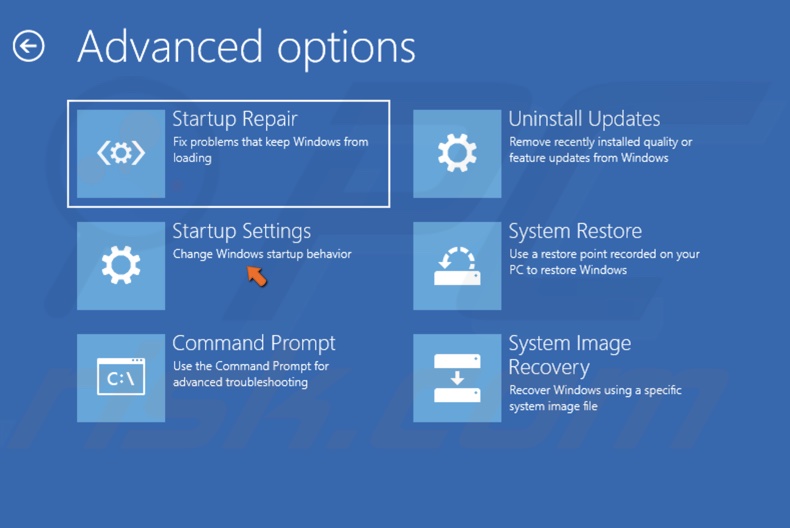
5. Select Startup Settings.
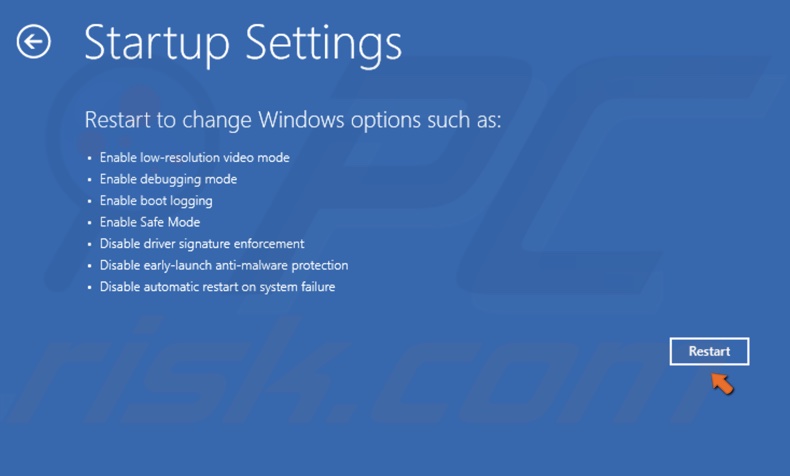
6. Click Restart.
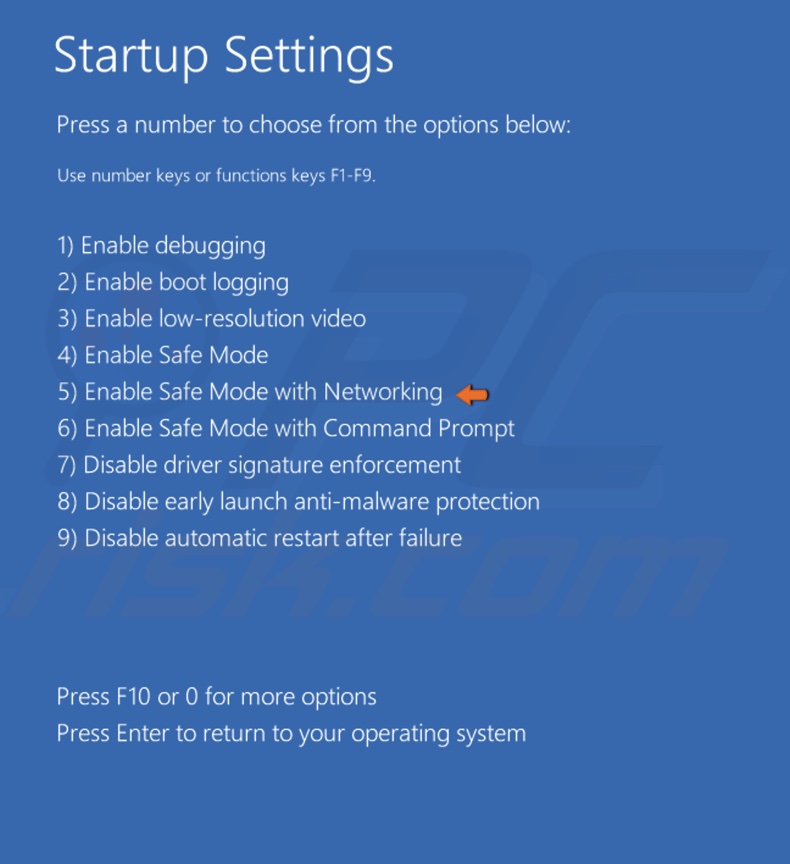
7. Press the 5 or F5 key to boot your PC into Safe Mode with Networking.
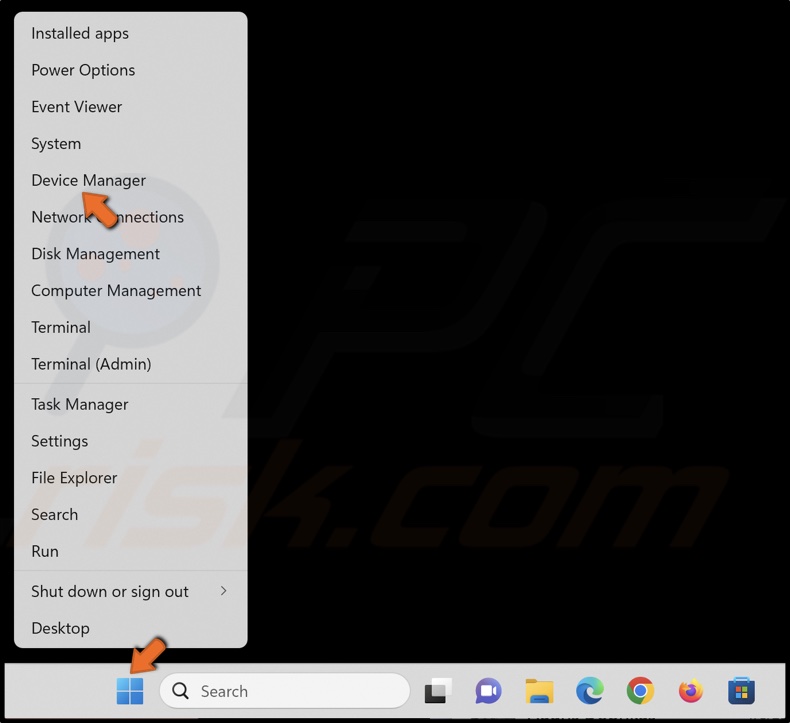
8. Right-click the Windows Start button and click Device Manager.
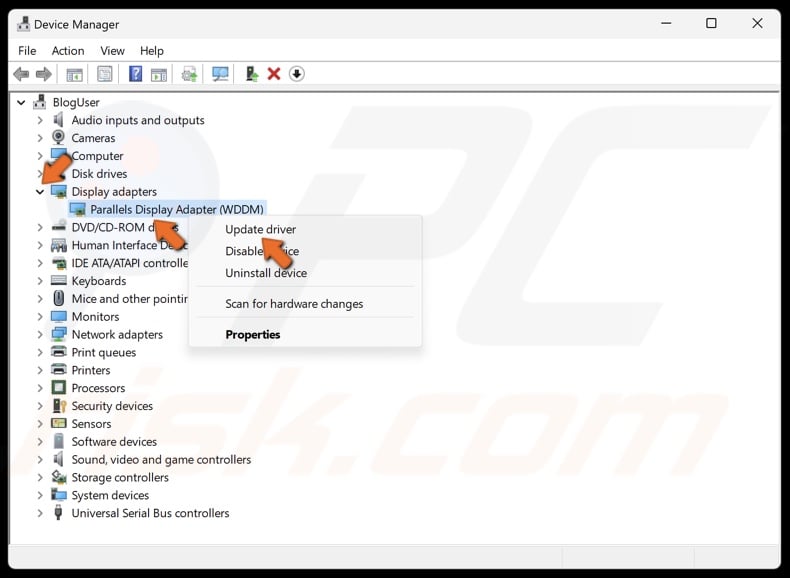
9. Go through the devices list and look for devices that have a yellow triangle with an exclamation mark. This symbol indicates an issue with the device.
10. Right-click the device and click Update driver.
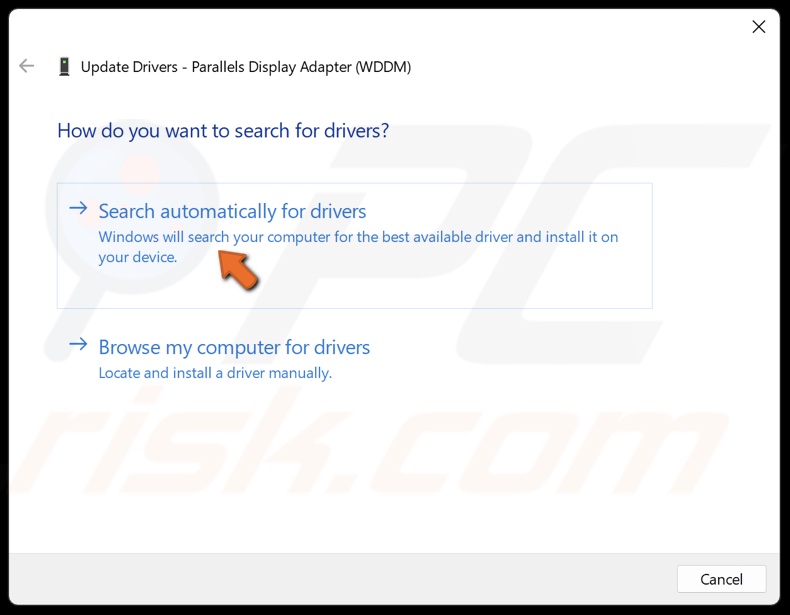
11. Select Search automatically for drivers. Windows will automatically install the best driver available on your computer.

12. Alternatively, select Browse my computer for drivers.
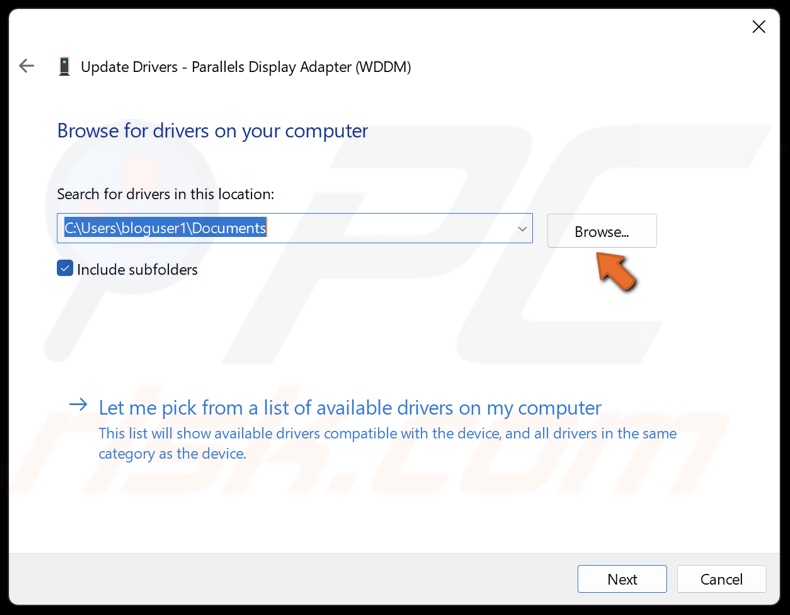
13. Click Browse and select a driver downloaded from the vendor’s website.
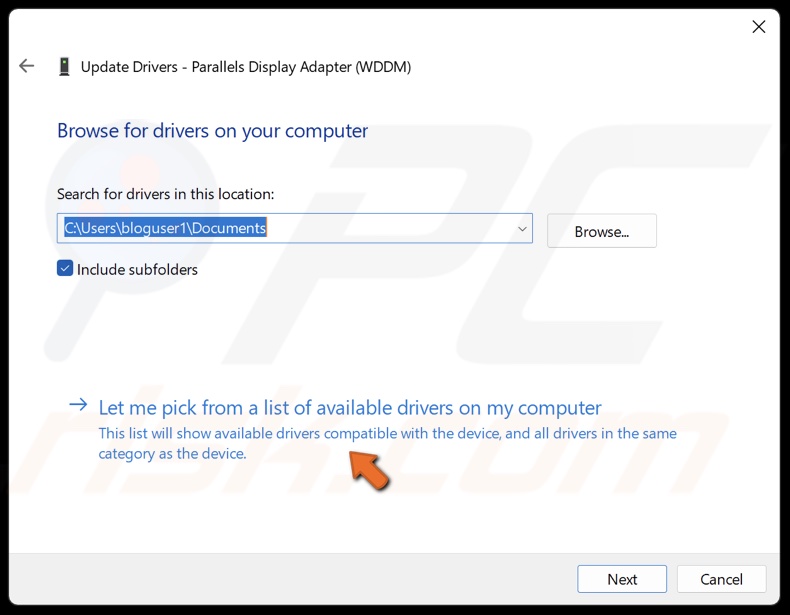
14. Alternatively, select Let me pick from a list of available drivers on my computer.
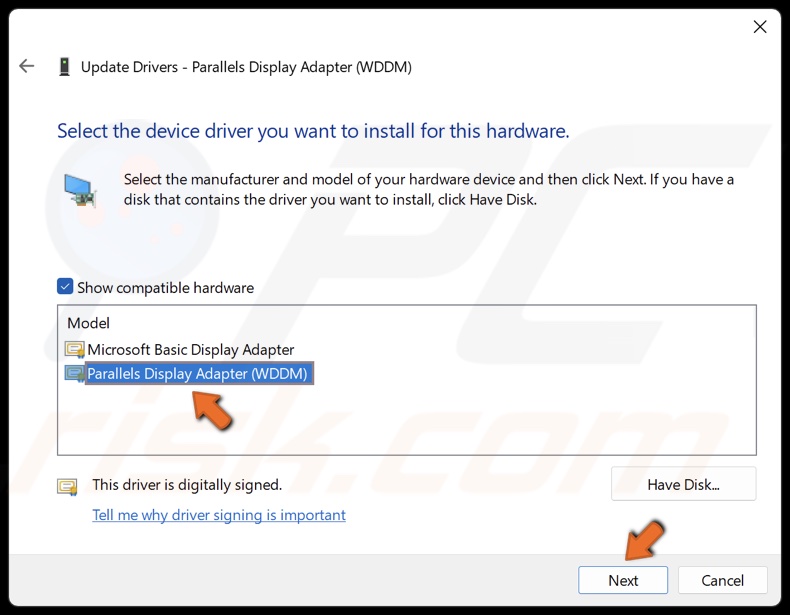
14. Select a compatible driver from the drivers list and click Next.

15. Click Close after installing the driver and restart your PC.
[Back to Table of Contents]
Method 2. Uninstall GPU/Audio Drivers With DDU and Install New Drivers
In many cases, the THREAD STUCK IN DEVICE DRIVER error is caused by corrupted GPU or audio drivers. However, updating the driver doesn’t always work, and you need to completely remove the driver using DDU (Display Driver Uninstaller) and install the latest driver or downgrade to an older version.
Note: If your system can’t run long enough to perform the following steps, boot Windows into Safe Mode, which should allow your system to run without crashing.
1. Open the Windows Start menu and click the Power button.
2. Hold down the Shift key and click Restart.
3. Select Troubleshoot.
4. Select Advanced options.
5. Select Startup Settings.
6. Click Restart.
7. Press the 5 or F5 key to boot your PC into Safe Mode with Networking.
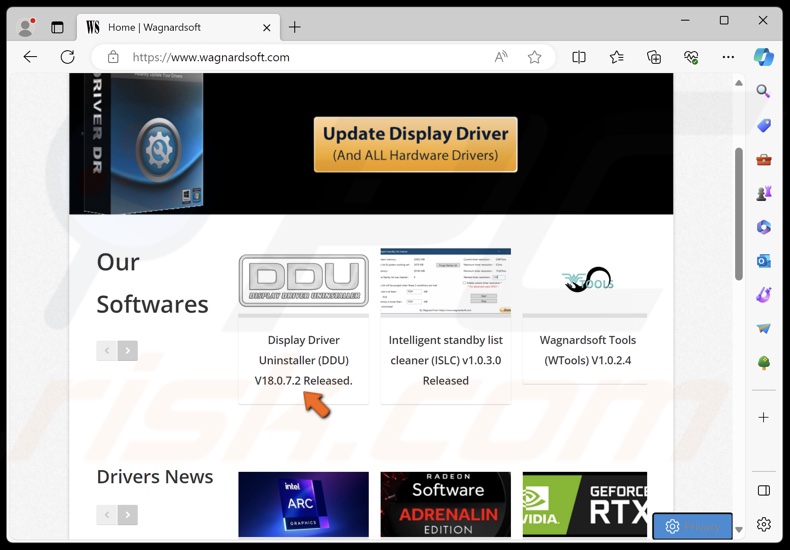
8. Once your PC boots up, open your browser and go to the DDU (Display Driver Uninstaller) website.
9. Click Display Driver Uninstaller (DDU).
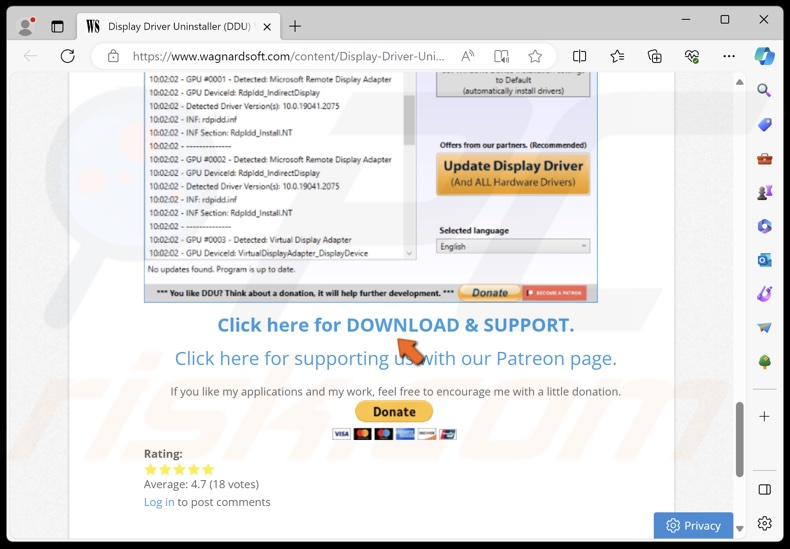
10. Scroll down and click on the Click here for DOWNLOAD & SUPPORT link.
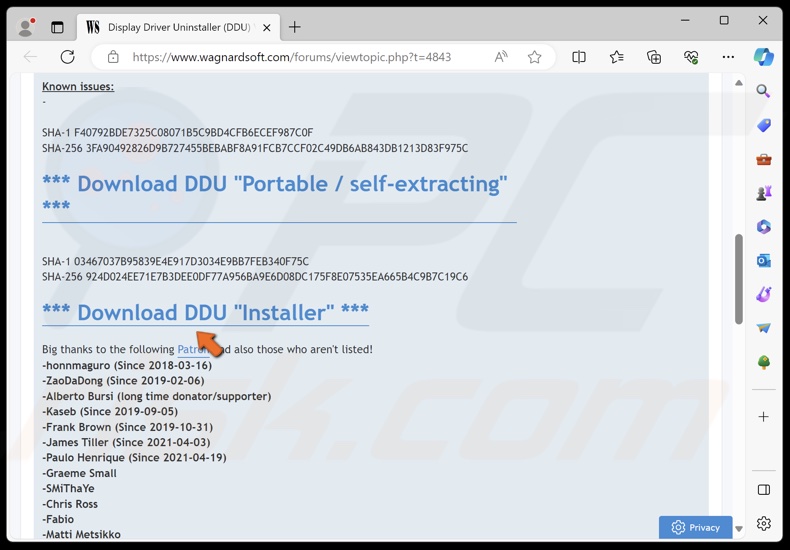
11. Scroll down and click Download DDU “Installer”.

12. Run the installer once it’s downloaded.
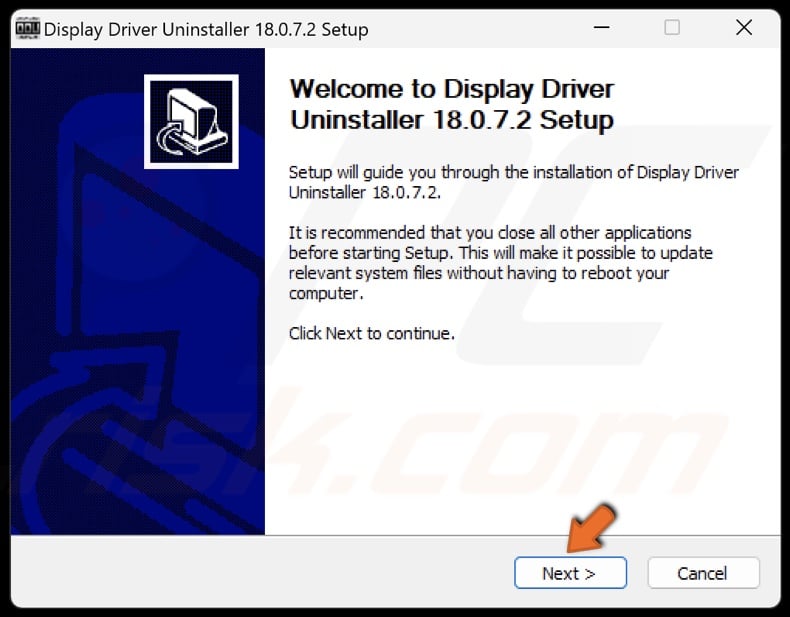
13. Click Next.
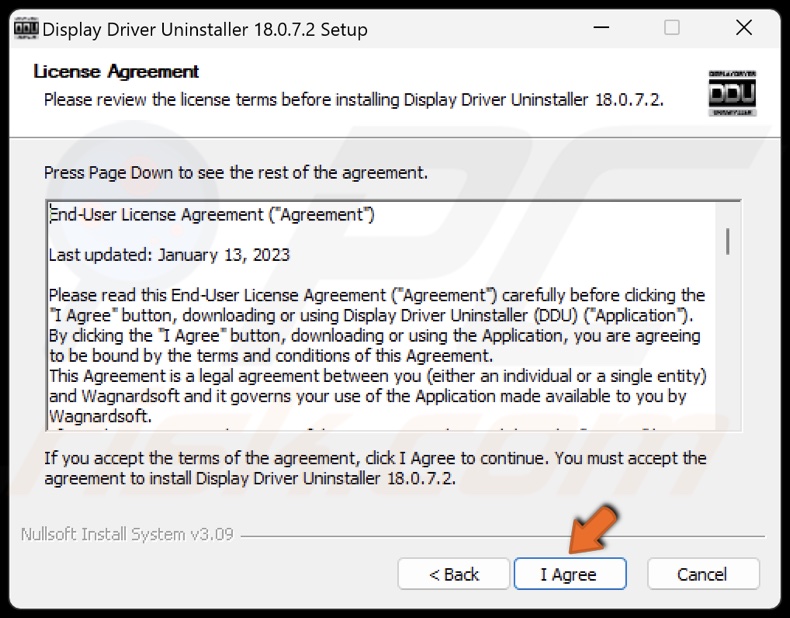
14. Click I Agree.
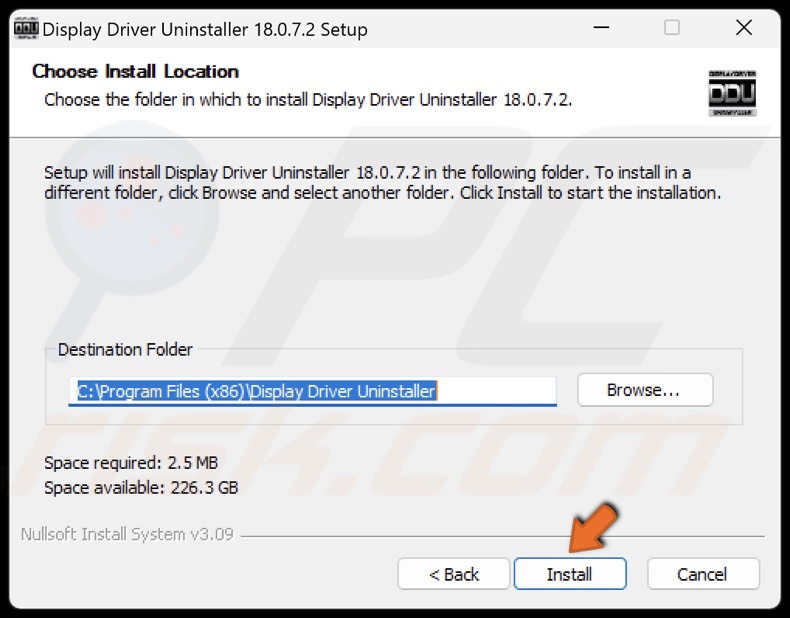
15. Click Install.
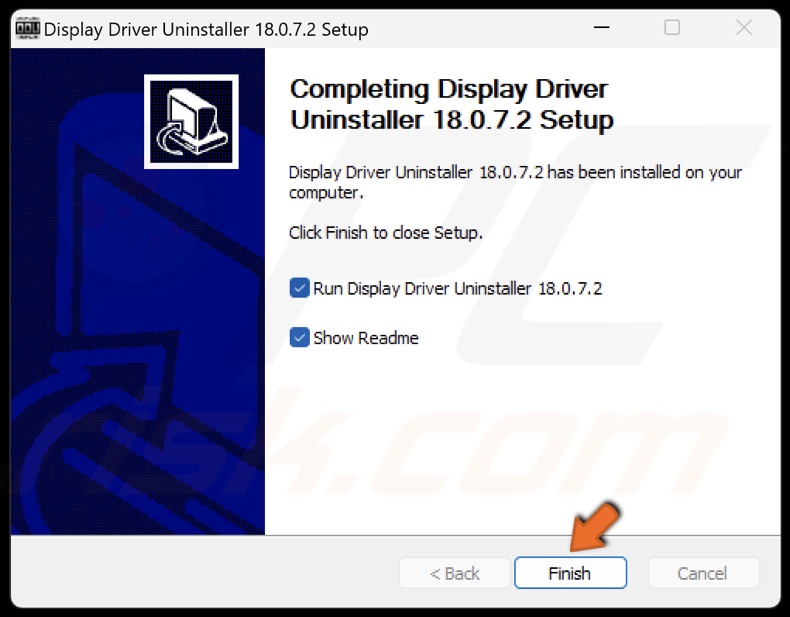
16. Click Finish.
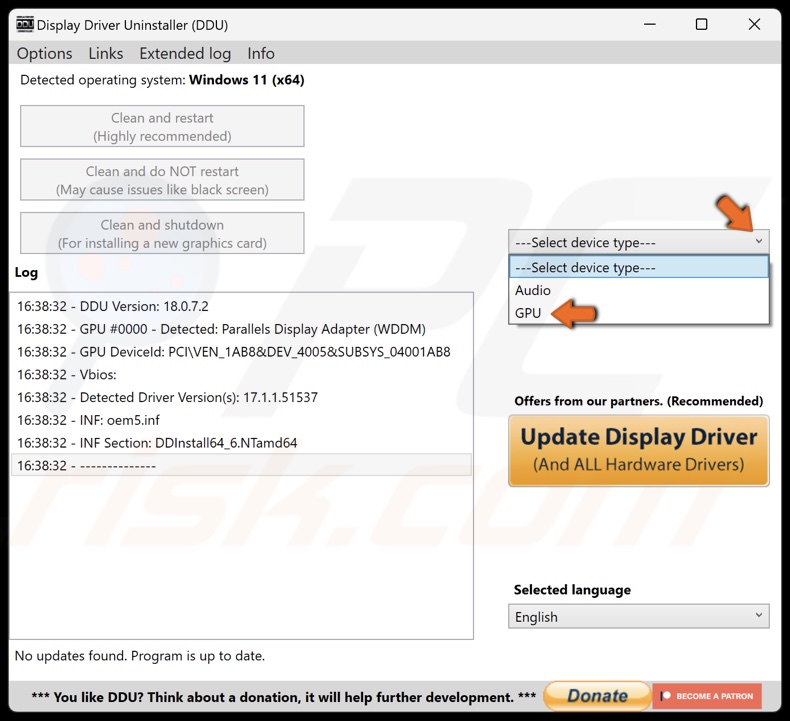
17. Once DDU is installed, open the Select device type menu and select GPU. You can also do the same for your audio drivers.
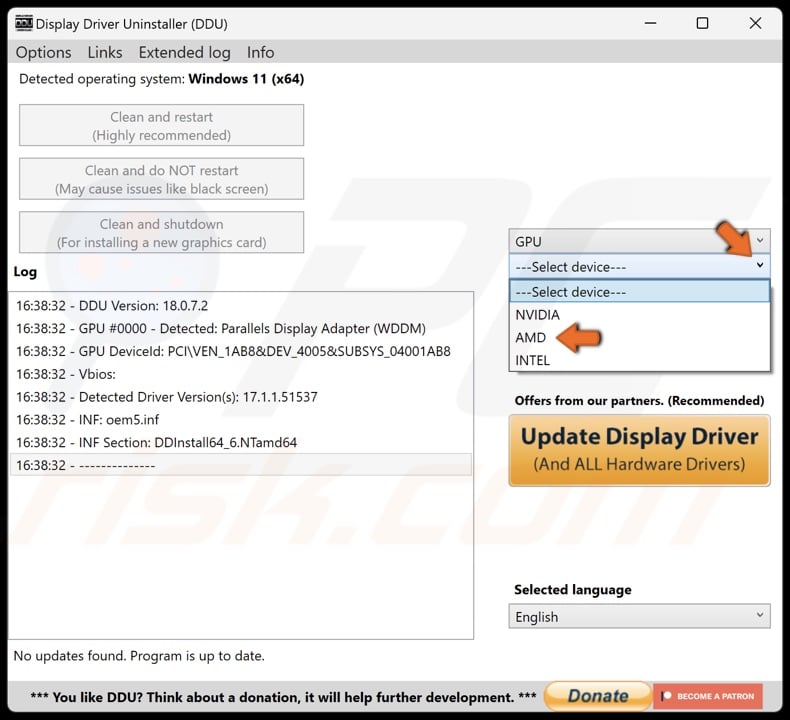
18. Open the Select device menu below and select your chipset manufacturer.
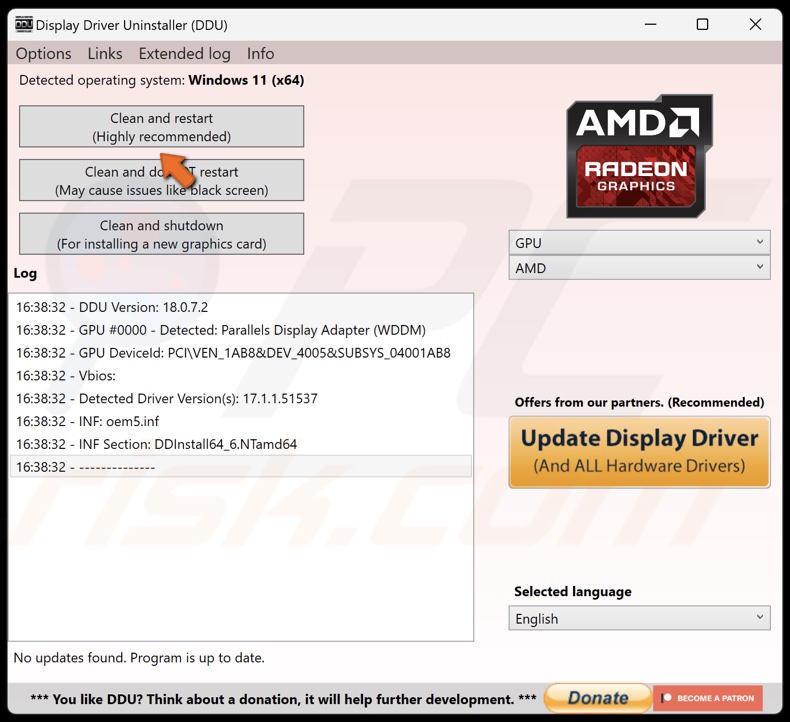
19. Click Clean and restart. Your PC will restart automatically after removing the driver.
20. After the restart, open your browser and go to your GPU chipset manufacturer’s website. You can also download the graphics card drivers for Intel, Nvidia, and AMD manually from their respective websites.
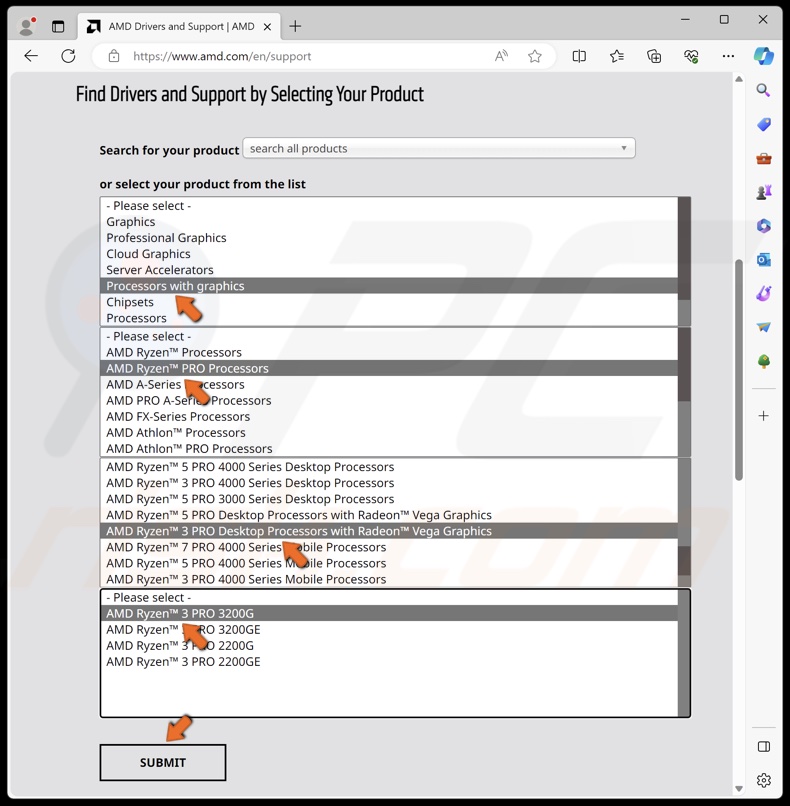
21. Select your GPU series and model.
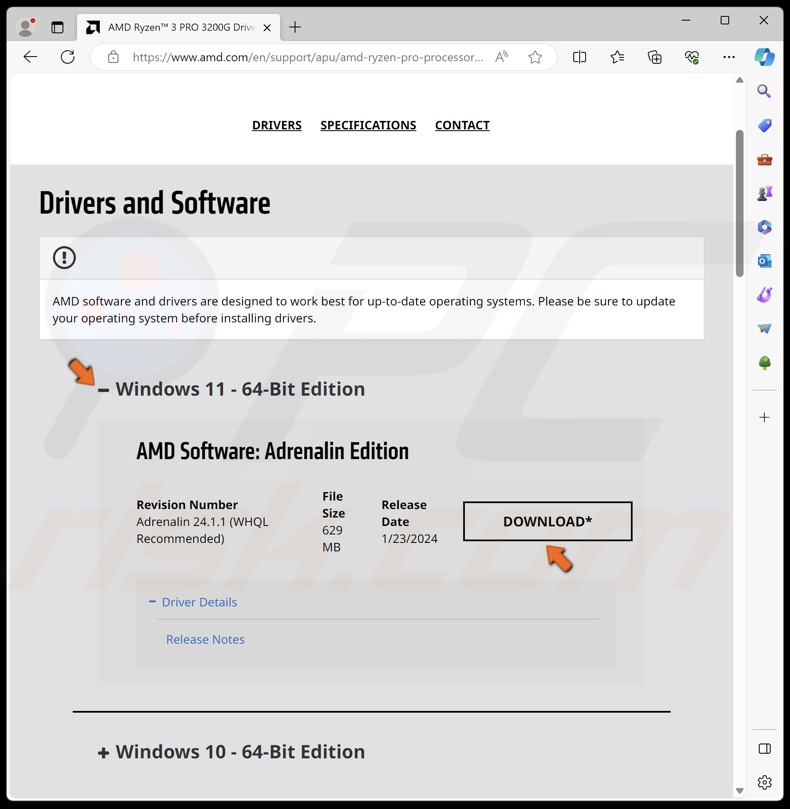
22. Select the driver for your operating system and click Download.

23. Install the driver once it’s downloaded.
[Back to Table of Contents]
Method 3. Run the Deployment Image & Servicing Management (DISM) and System File Checker (SFC) Scans
System File Checker (SFC) is a command-line tool dedicated to fixing corrupted system files. Deployment Image Servicing and Management (DISM) is a tool that redeploys the system image to repair issues with system files and drivers. Therefore, running the aforementioned tools may fix THREAD STUCK IN DEVICE DRIVER.
Note: If your system can’t run long enough to perform the following steps, boot Windows into Safe Mode, which should allow your system to run without crashing.
1. Open the Windows Start menu and click the Power button.
2. Hold down the Shift key and click Restart.
3. Select Troubleshoot.
4. Select Advanced options.
5. Select Startup Settings.
6. Click Restart.
7. Press the 5 or F5 key to boot your PC into Safe Mode with Networking.
8. Hold down Windows+R keys to open Run.
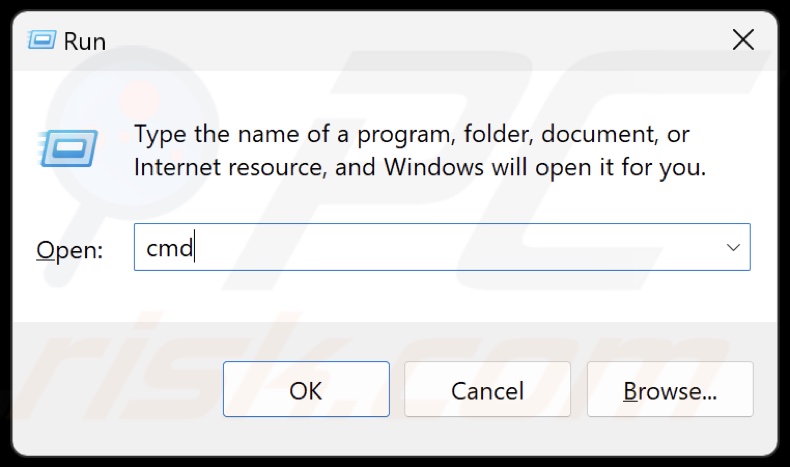
9. Type CMD in Run and hold down Ctrl+Shift+Enter keys to open the elevated Command Prompt.
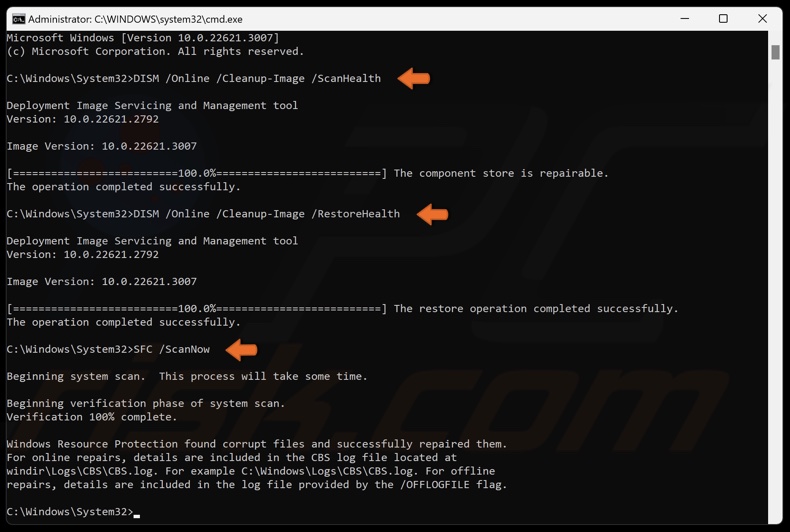
10. In the Command Prompt, type in DISM /Online /Cleanup-Image /ScanHealth and press Enter.
11. Type in DISM /Online /Cleanup-Image /RestoreHealth and press Enter.
12. Then, type in SFC /ScanNow and press Enter.
13. Close the Command Prompt and restart your PC.
[Back to Table of Contents]
Method 4. Perform a System Restore
Reverting your system to an earlier state before you started getting the THREAD STUCK IN DEVICE DRIVER error may resolve the underlying issue.
1. Open the Windows Start menu and click the Power button.
2. Hold down the Shift key and click Restart.
3. Select Troubleshoot.
4. Select Advanced options.
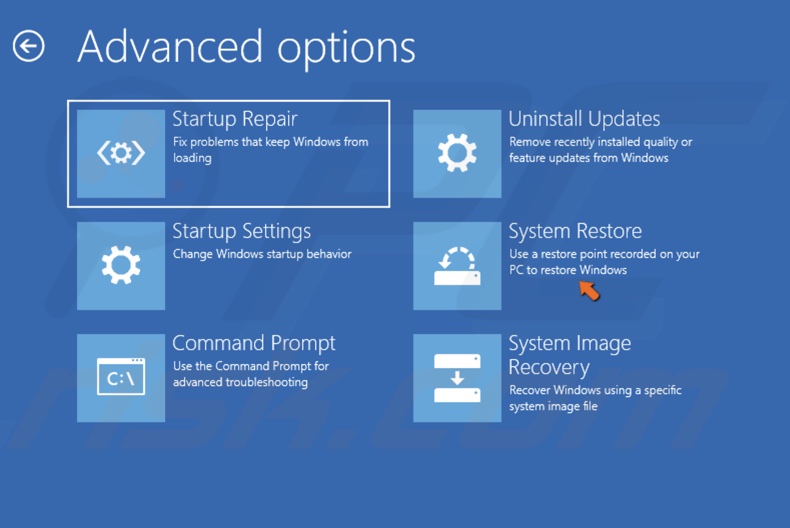
5. Select System Restore.

6. Click Next in the System Restore window.
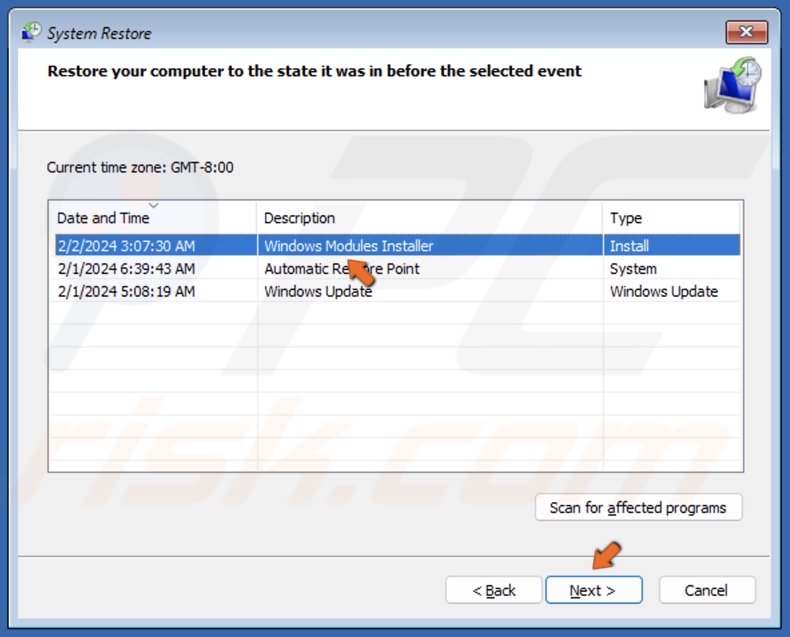
7. Select a restore point before your PC started crashing and getting the error and click Next.
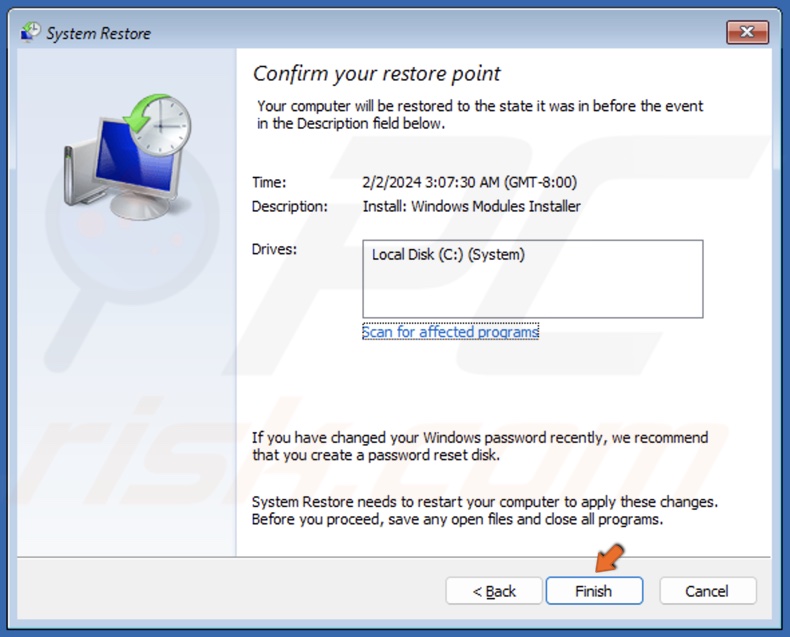
8. Click Finish.
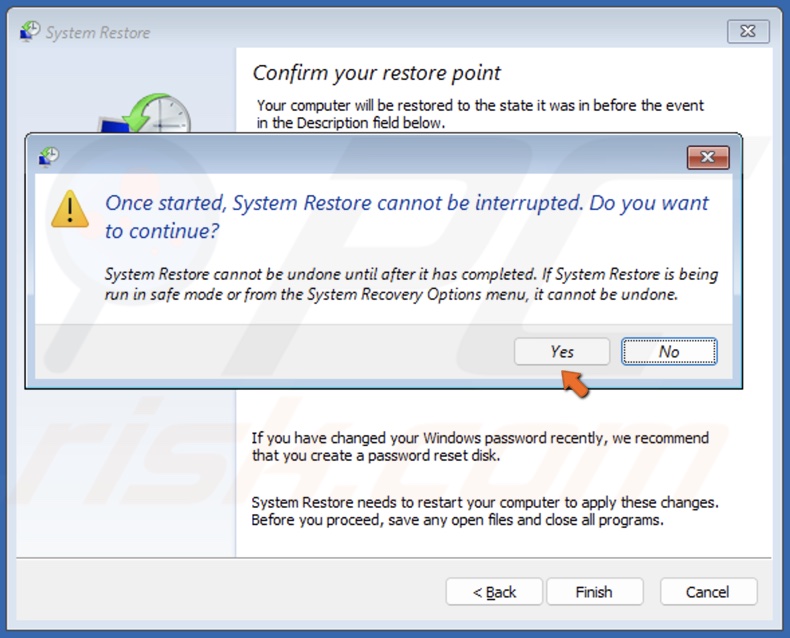
9. Click Yes to confirm.
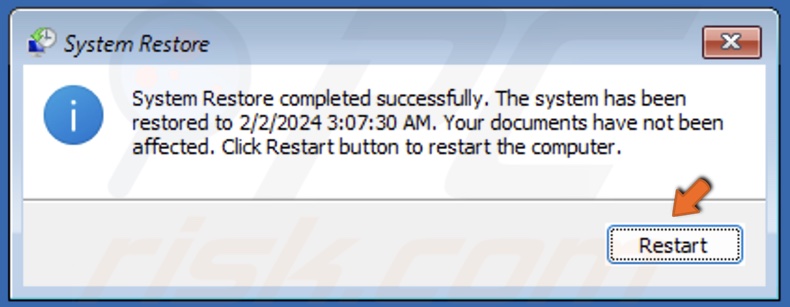
10. Click Restart once the system restore is complete.
If the fixes described above didn’t fix THREAD STUCK IN DEVICE DRIVER, you can try to update your system’s motherboard’s BIOS or the firmware of an add-in board. However, be aware that updating your BIOS has associated risks. Do this only as a last resort and perform in-depth research on how to do it since the process between hardware manufacturers is different.
Did this article help you fix the THREAD STUCK IN DEVICE DRIVER error on your PC? Let us know in the comments below. If you know how to fix this error not mentioned in this article, please share it with others in the comments.
[Back to Top]