
Windows Auto Dark Mode

Switches between the dark and light theme of Windows at scheduled times.
Overview • Features • Download • Release Notes • Wiki • Telegram Group
Overview

Tired of looking at dark content while the sun is shining brightly? But at night everything is suddenly too bright? Auto Dark Mode is the solution for you!
Android, iOS and MacOS already offer the possibility of changing the system design based on the time of the day. We’re bringing this feature to Windows on a larger scale.
Auto Dark Mode helps you to be more productive. Because you shouldn’t care about changing Windows settings several times a day. As soon as the sun goes down, we’ll take care of your eyes.
Because a simple design change would be too boring, Auto Dark Mode is packed with useful functions. For example, we can also change your desktop wallpaper or run custom scripts.
Features

- Compatible with Windows 10* and Windows 11.
- Theme switch based on sunrise and sunset.
- Desktop wallpaper switch.
- Mouse cursor switch.
- Accent color switch.
- Office theme switch.
- Windows .theme file switch.
- Keyboard shortcuts.
- Support for turning on/off accent color on the Taskbar and title bars.
- Auto Dark Mode can enable the grayscale color filter of Windows.
- Suitable for gamers: Doesn’t switch while playing games to avoid stuttering.
- Run custom scripts.
- Postpone or delay the next switch as you like.
- Automatic updates.
- Lightweight with clean uninstall. No admin rights needed.
*Windows 10 versions 21H1 and older are considered legacy, not all features may work
Download
Download from Microsoft Store
Download from GitHub
Click here to download the newest version of Auto Dark Mode!
Even more download options
Click to expand
Via WinGet
Download Auto Dark Mode from WinGet.
winget install --id Armin2208.WindowsAutoNightMode
Via Chocolatey
Download Auto Dark Mode from Chocolatey (unofficial entry).
choco install auto-dark-mode
Via Scoop
Download Auto Dark Mode from Scoop (unofficial entry).
- Via portable
scoop bucket add dorado https://github.com/chawyehsu/dorado
scoop install autodarkmode
- Via non-portable
scoop bucket add nonportable
scoop install auto-dark-mode-np
Installation
Installation is pretty easy, as you only need to run the setup file provided as .exe. If you want to deploy Auto Dark Mode on multiple machines, you can use the argument /allusers /verysilent to skip the installer window.
Sometimes Windows or web browsers will show a security notice while downloading Auto Dark Mode. This is due to our lack of a developer license. You can ignore these messages.
Translations
We use Weblate’s cool free Libre plan that supports open source software projects!
You can find our project here: https://hosted.weblate.org/projects/auto-dark-mode/app/

Alternatively, you can manually edit the translation files in AutoDarkModeLib/Properties/Resources.
More information
You still have open questions? Check out our wiki!
Когда-то в Windows 10 использовалась только одна тема оформления – белая. Но пользователи быстро нашли в дебрях реестра Windows возможность включить черную тему. Для многих пользователей такое оформление предпочтительнее. Смотрится местами красивее, да и глаза не слепит. Поэтому в одном из обновлений Microsoft сделала возможным сменить белую на черную тему (и наоборот) с помощью одного переключателя в Параметрах Windows 10. К сожалению, автоматический смены тем в Windows 10 пока еще нет. Тем не менее, Windows можно заставить автоматически менять оформление в зависимости от различных условий. Эта инструкция рассказывает, как включить автоматическое включение черной темы в Windows 10 и наоборот. Немного подробнее о том, Как скачать и установить темы на Windows 10, вы можете узнать в отдельной статье.
Примечание: для выполнения этой инструкции вам нужна учетная запись с правами Администратора. Если у вас такой нет, придется узнать пароль Администратора.
Предупреждение: инструкция включает в себя изменение параметров реестра операционной системы. Будьте внимательны, поскольку неправильные значения в реестре могут повредить системе на вашем компьютере. Если вы не уверены в своих силах, лучше откажитесь от задуманного. Как вариант, можете создать точку восстановления Windows 10, чтобы вернуть все назад в случае неполадки или ошибки.
Как настроить автоматическое включение черной темы в Windows 10
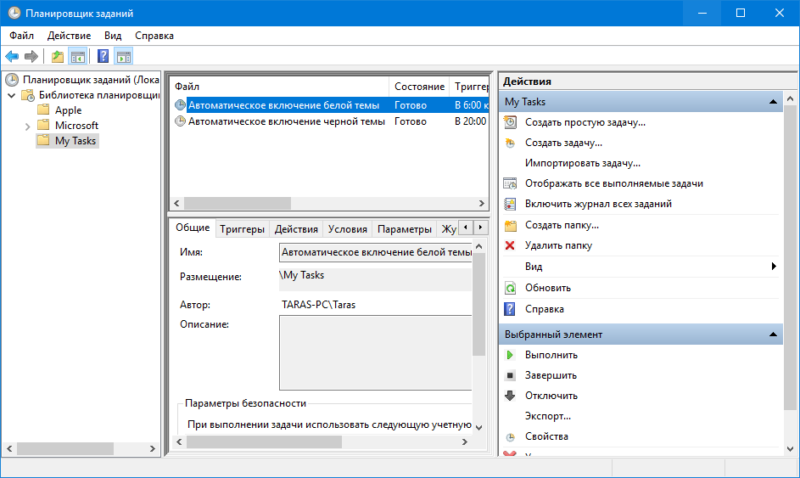
- Нажмите Win + R и введите команду taskschd.msc. Эта команда запускает встроенный в Windows 10 Планировщик заданий. Как вариант, вы можете открыть его с помощью поиска в меню Пуск. Для некоторых пользователей этот способ будет даже быстрее.

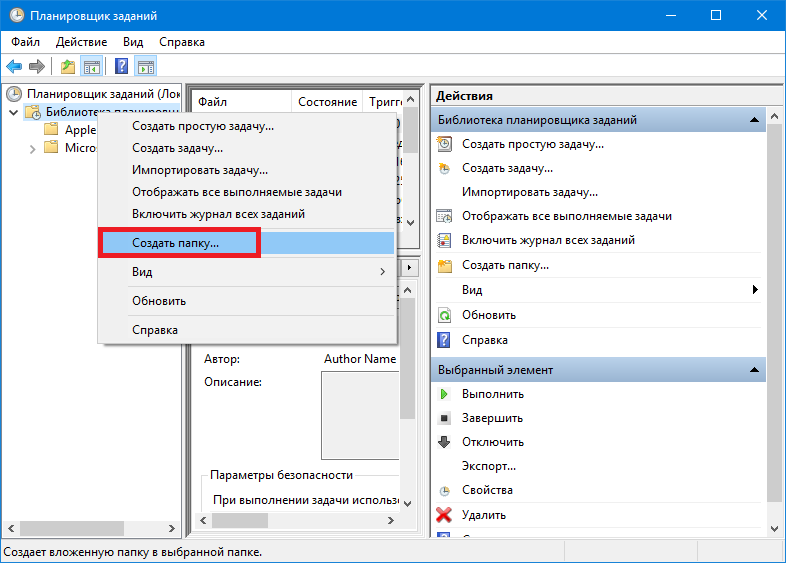
- В левой части окна разверните папку Библиотека планировщика заданий. Затем кликните по ней правой кнопкой мыши и выберите Новая папка. Этот шаг опциональный и не обязателен к выполнению. Он поможет вам потом легче найти созданные задачи. Если не хотите, можете создавать задачу в общей библиотеке.

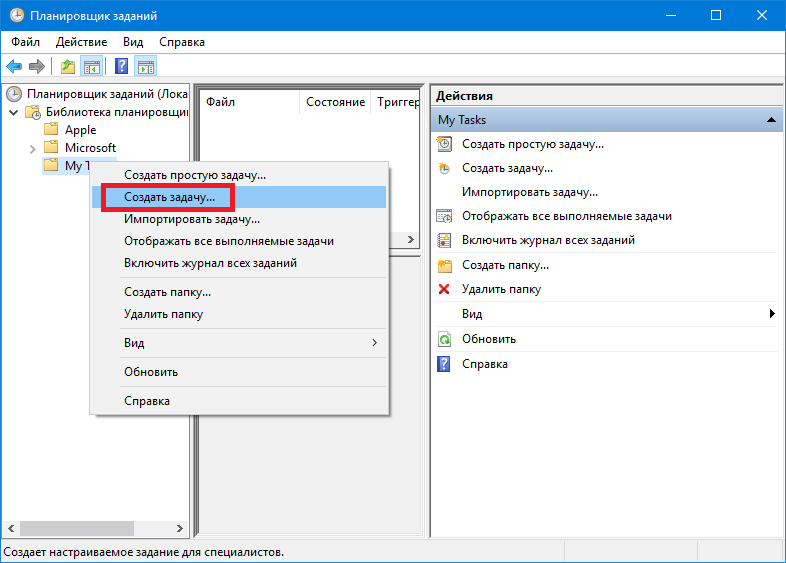
- Нажмите правую кнопку по созданной папке и выберите Создать задачу.
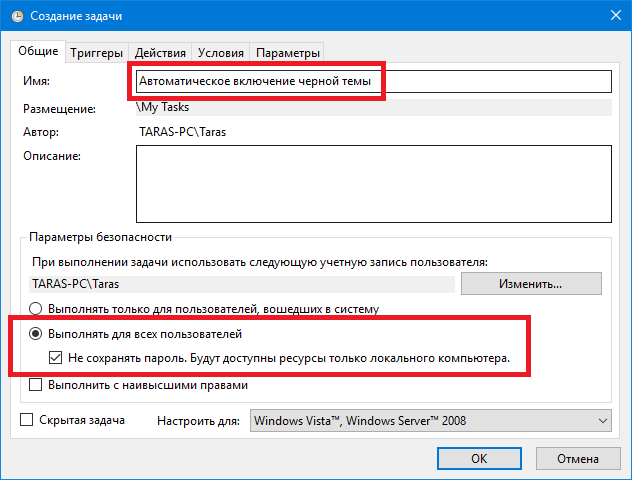
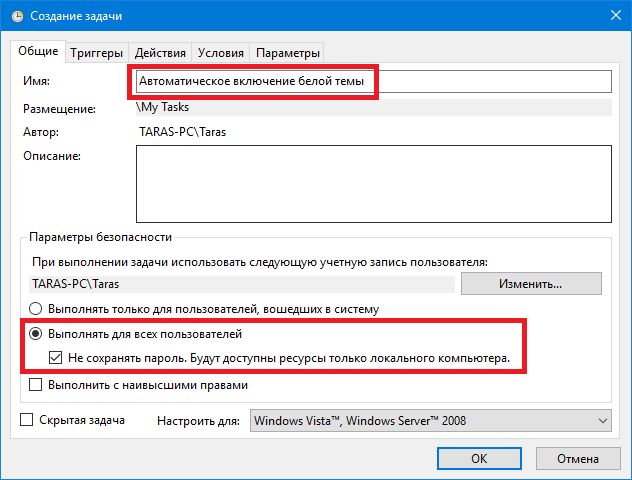
- На новом окне в поле Имя введите имя для вашей задачи. К примеру, «Автоматическое включение черной темы в Windows 10. Активируйте переключатель Выполнять для всех пользователей, а также установите отметку возле Не сохранять пароль.

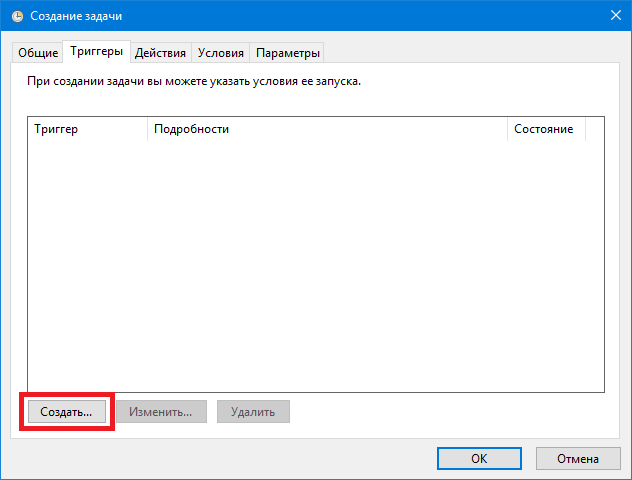
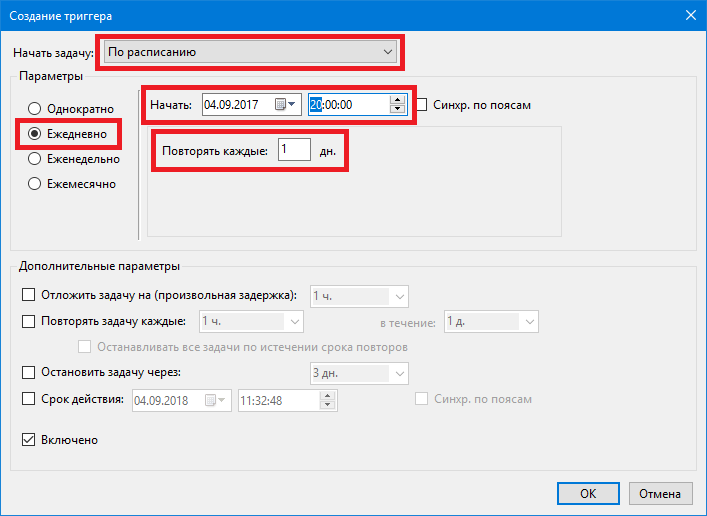
- Перейдите на вкладку Триггеры и нажмите кнопку Создать.
- Из выпадающего списка Начать задачу выберите По расписанию, а затем в секции Параметры включите параметр Ежедневно.
- Задайте время, в которое система активирует черную тему оформления. К примеру, 20:00 вечера. В окошке Повторять каждые поставьте 1. Таким образом система будет выполнять активацию черной темы каждый день без исключений.

- Нажмите Ок.
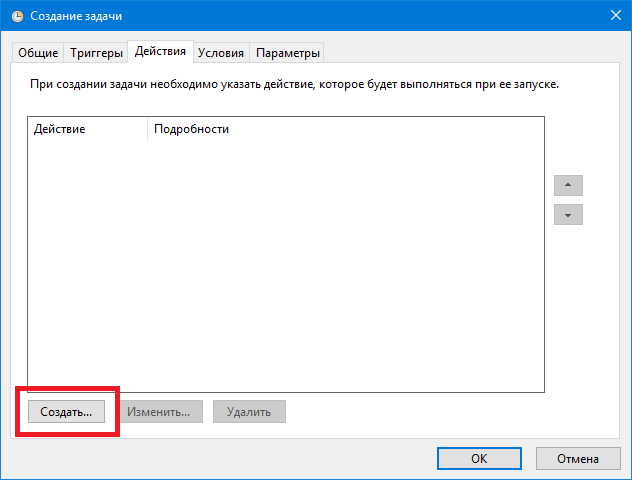
- Теперь переходите на вкладку Действия. Здесь вы будете прописывать саму команду изменения темы. Нажмите на кнопку Создать.
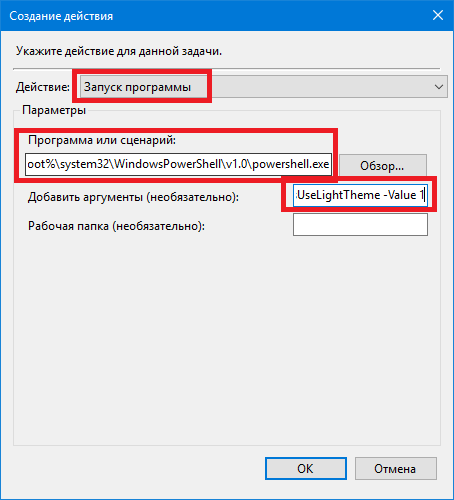
- Из выпадающего списка Действие выберите Запуск программы. Этот пункт будет установлен по умолчанию.
- В поле Программа или сценарий введите %SystemRoot%\system32\WindowsPowerShell\v1.0\powershell.exe. Эта команда запустит традиционное приложение PowerShell.
- Теперь надо указать системе, какую именно команду надо выполнять в PowerShell. Для этого в окно Добавить аргументы введите New-ItemProperty -Path HKCU:\SOFTWARE\Microsoft\Windows\CurrentVersion\Themes\Personalize -Name AppsUseLightTheme -Value 0 -Type Dword -Force. Эта команда будет записывать в реестр системы значение для активации черной темы оформления.

- Нажмите Ок.
- Перейдите на вкладку Параметры.
- Отметьте пункт Немедленно запускать задачу, если пропущен плановый запуск. Это надо сделать для того, чтобы система сразу же выполняла вашу задачу, если, к примеру, компьютер был отключен в назначенное время. Для справки: выполнение пропущенной задачи может занять до 10 минут.
- Также установите отметку возле При сбое выполнения перезапускать через. Можно оставить стандартные значения, либо установить те, которые вы считаете нужными. Если вы оставите стандартные значения (1 минута, 3 раза), Windows 10 будет пытаться выполнить задачу три раза с интервалом в одну минуту, если с первой попытки ее запустить не удалось.
- Нажмите Ок.


Теперь ваш компьютер настроен на автоматическую активацию черной темы в указанное вами время.
Как настроить автоматическое включение светлой темы в Windows 10
Инструкция фактически такая же, только вам надо будет указывать другие значения в командах.
- Вернитесь обратно к Планировщику заданий. Для этого нажмите Win + R и введите taskschd.msc.
- Нажмите на созданную выше папку для ваших заданий и выберите Создать задачу. Если вы не создавали отдельной папки для задач, в правой части окна Планировщика нажмите кнопку Создать задачу.
- Дайте задаче имя, которое потом поможет вам легко ее найти и удалить или изменить. К примеру, «Автоматические включение белой темы».
- Поставьте отметку возле Выполнять для всех пользователей, а также Не сохранять пароль.
- Перейдите на вкладку Триггеры и нажмите Создать.
- В выпадающем списке Начать задачу надо установить По расписанию, а затем, в секции Параметры, отметить пункт Ежедневно.
- В окошке Начать укажите время, в которое система будет включать белую тему оформления. К примеру, в 6:00 утра. В окне Повторять каждые надо прописать 1, тогда Windows 10 будет выполнять смену темы ежедневно.
- Нажмите Ок.
- Откройте вкладку Действия и нажмите кнопку Создать.
- Убедитесь, что параметр Действие установлен в Запуск программы. В поле Программа или сценарий введите %SystemRoot%\system32\WindowsPowerShell\v1.0\powershell.exe.
- В поле Добавить аргументы надо ввести Set-ItemProperty -Path HKCU:\SOFTWARE\Microsoft\Windows\CurrentVersion\Themes\Personalize -Name AppsUseLightTheme -Value 1. Таким образом система будет изменять ключ реестра, отвечающий за активированную тему.
- Нажмите Ок.
- Переходите на вкладку Параметры. Как и в предыдущей части инструкции, отметьте пункты Немедленно запускать задачу, если пропущен плановый запуск, а также При сбое выполнения перезапускать через.
- Нажмите Ок.
Теперь в системе у вас есть две задачи, отвечающие за автоматическое переключение темы оформления в Windows 10. Будет здорово, если разработчики добавят эту опцию в параметры персонализации Windows 10 или ночного режима. Пока это не случилось, используйте инструкцию выше.
Как отключить автоматическое переключение темы в Windows 10
Если необходимость в автоматическом переключении темы в Windows 10 уже исчезла, и вы хотите отключить эту функцию, сделайте следующее:
- Откройте Планировщик заданий. Для этого надо нажать Win + R и ввести taskschd.msc.
- Найдите созданную вами задачу и затем нажмите по ней правой кнопкой мыши. Выберите Удалить.

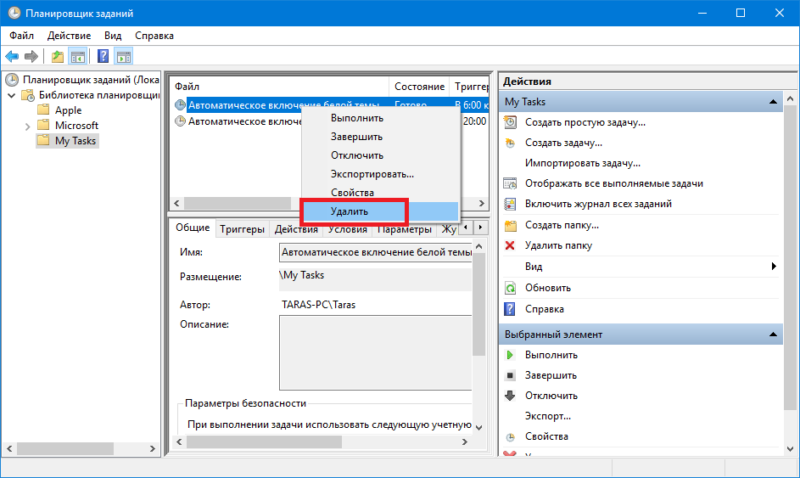
На этом все.
Alongside the slew of personalization settings, Windows 10 ships with two color modes, including the «light» color mode, which applies a lighter color scheme across apps and desktop elements, such as Start menu, taskbar, and action center, and it’s a mode that works well during daytime. Then there’s the «dark» color mode that allows you to set a darker set of colors across the desktop and apps, and it’s more suited for low-light environments.
Whether you like the lighter or darker colors on your device, Windows 10 makes it easy to change modes using the Settings app. However, it doesn’t offer an option to switch between the two color modes depending on the time of day automatically, similar to other OSes, including Xbox One.
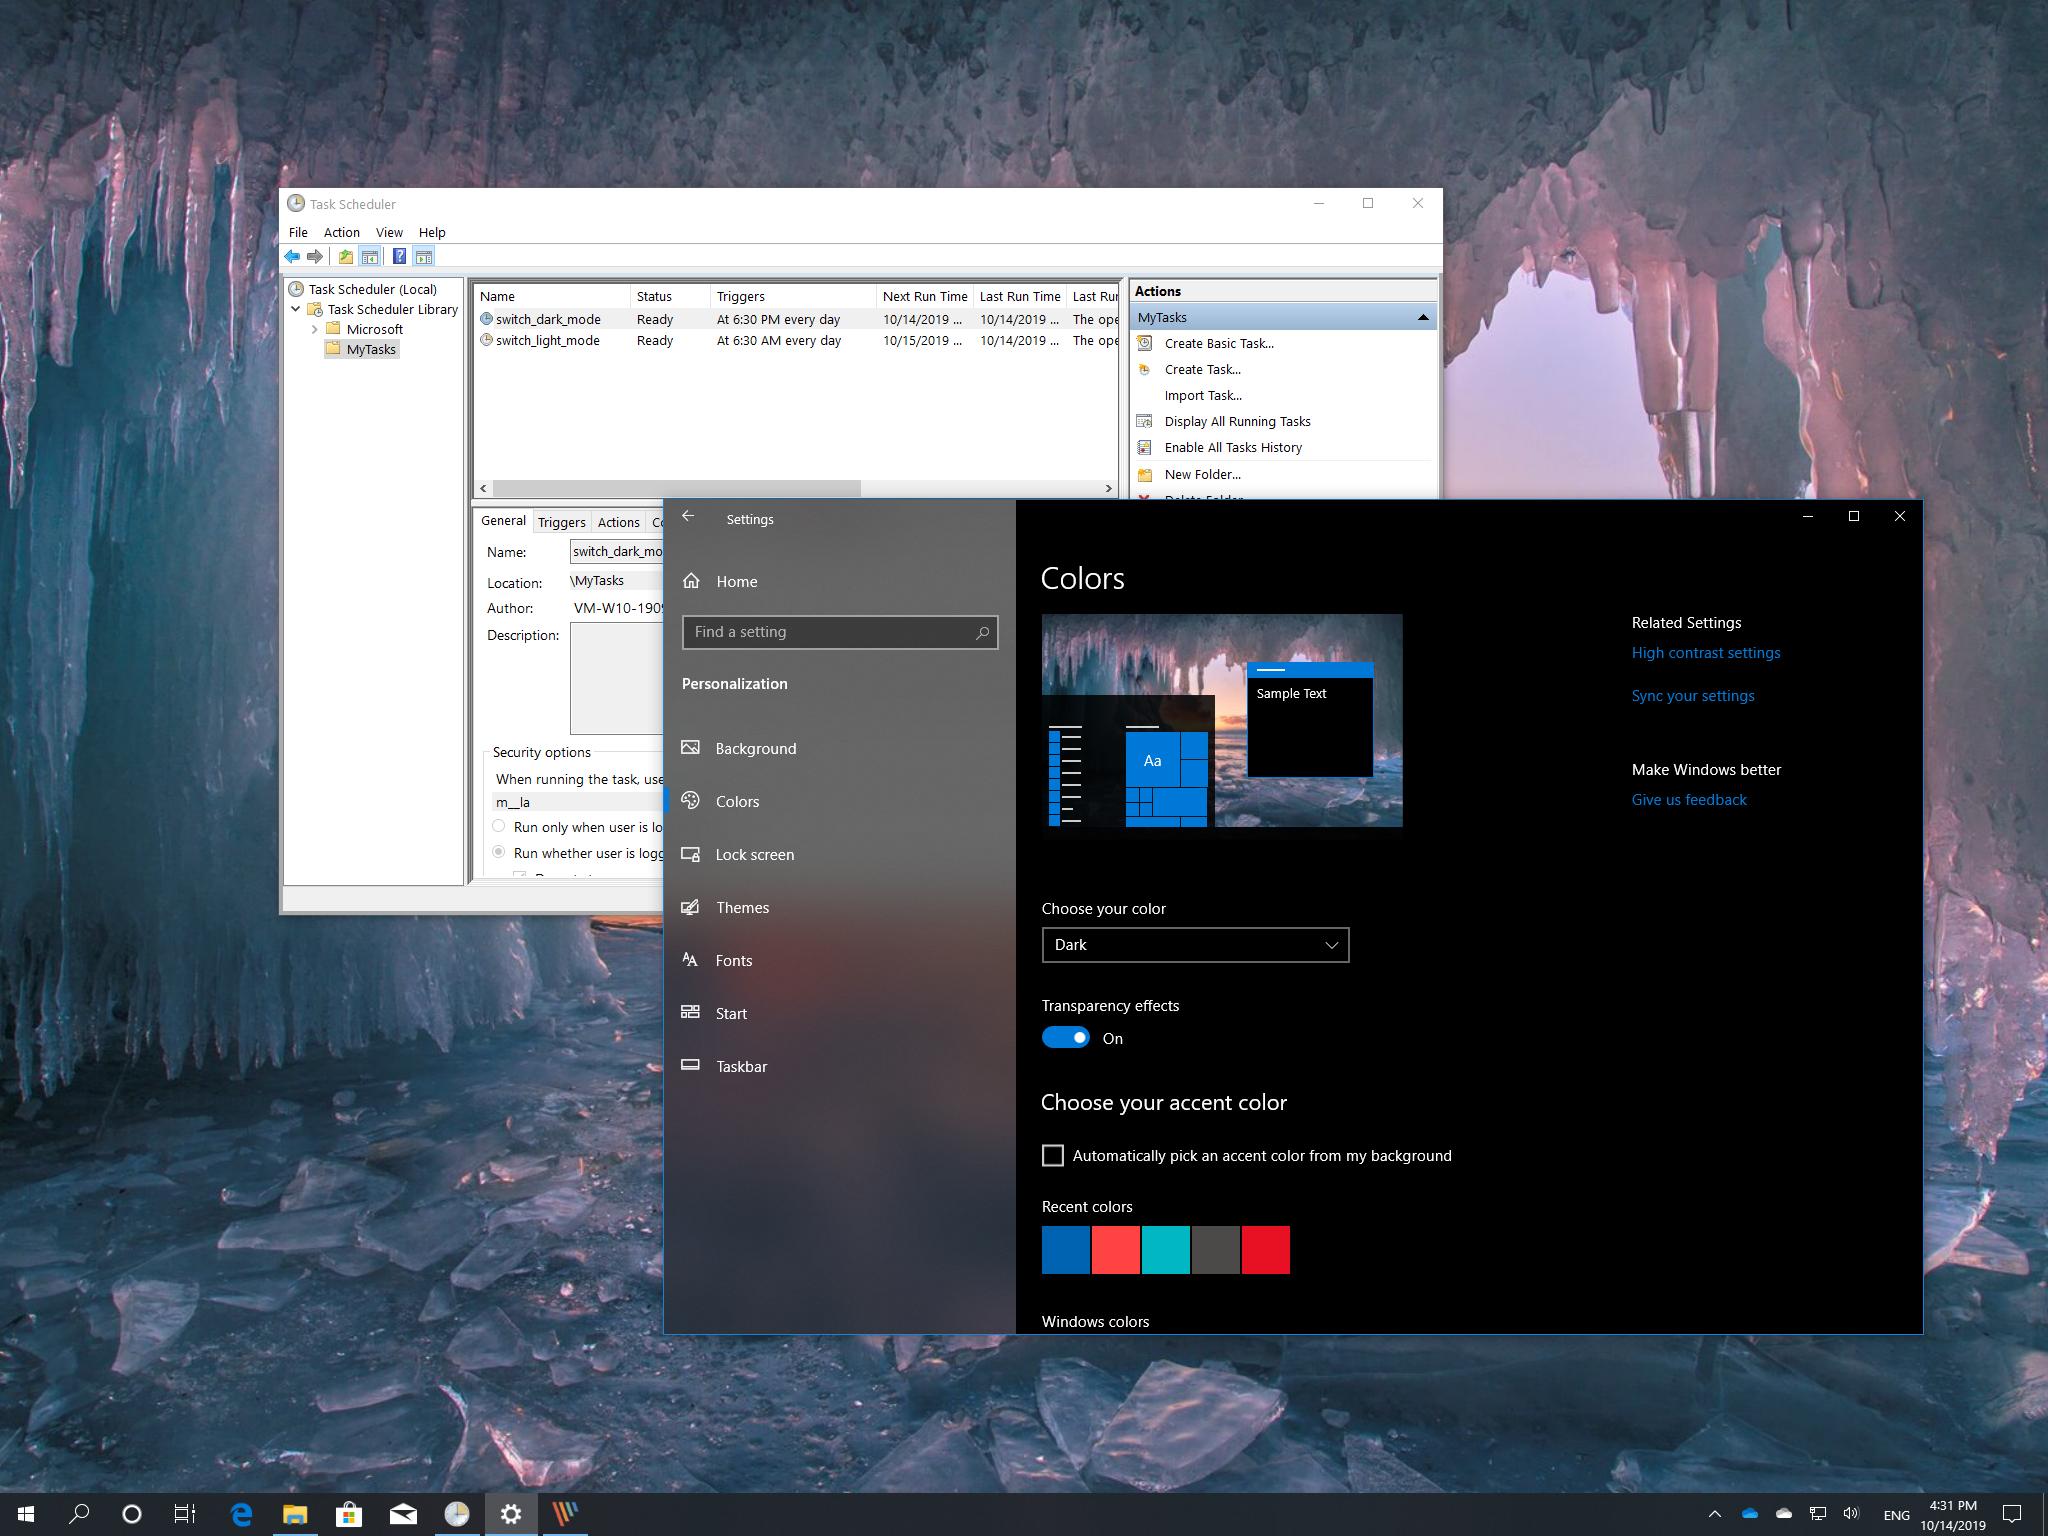
If switching between dark and light (and vice versa) is an option you would like to have on your device, you can create an automated process using the Task Scheduler and a few simple PowerShell commands to modify the Registry to switch to light mode during the day and dark mode at night, automatically.
In this Windows 10 guide, we walk you through the steps to configure your device to switch between the light and dark system modes depending on the time of day, using a few PowerShell commands and Task Scheduler.
- How to switch from dark to light system mode on Windows 10
- How to switch from light to dark system mode on Windows 10
(Warning: This is a friendly reminder that editing the Registry is risky, and it can cause irreversible damage to your installation if you don’t do it correctly. We recommend making a temporary full backup of your PC before proceeding.)
How to switch from dark to light system mode on Windows 10
To switch from the dark to light system mode automatically on Windows 10, use these steps:
- Open Start.
- Search for Task Scheduler and click the top result to open the app.
- Expand the Task Scheduler Library folder.
- Right-click the «Task Scheduler Library,» and select the New Folder option.
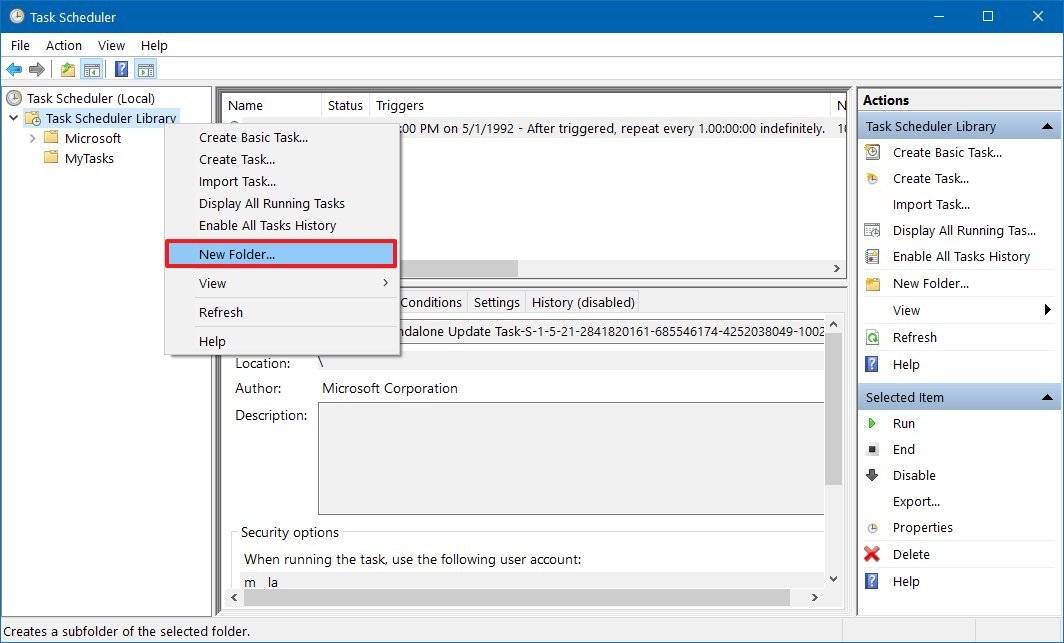
- Type a name for the folder (for example, MyTasks), and click the OK button.(Quick note: We’re creating a new folder to keep your tasks and system tasks separate, which makes it easier to manage tasks.)
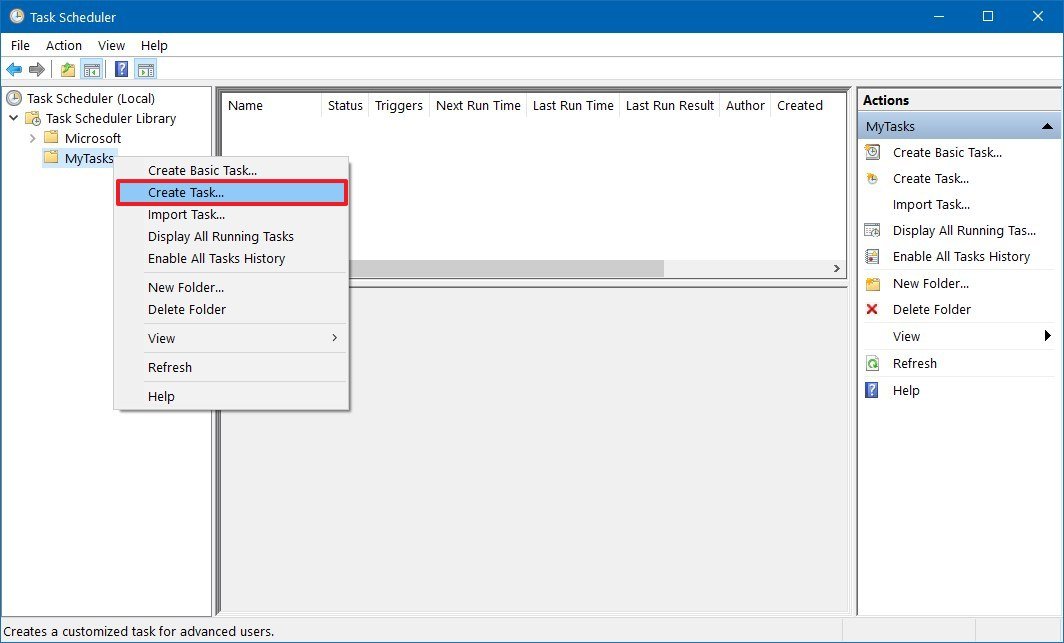
- Right-click the «MyTasks» folder (if applicable), and select the Create Task option.
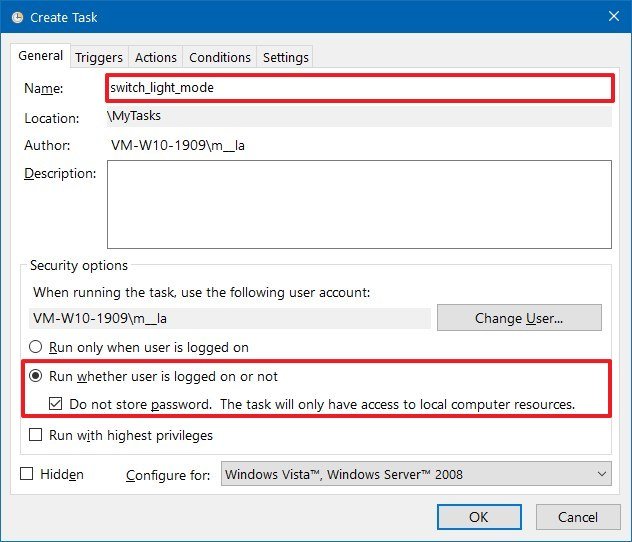
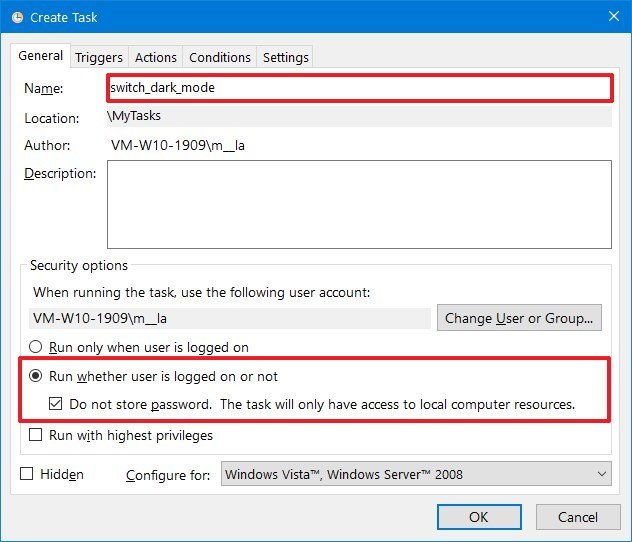
- Click on the «General» tab.
- Under the «Name» field, enter a descriptive name for the task. (For example, switch_light_mode).
- Under the «Security options» section, select the option Run whether user is logged on or not option.
- Check the Do not store password option.
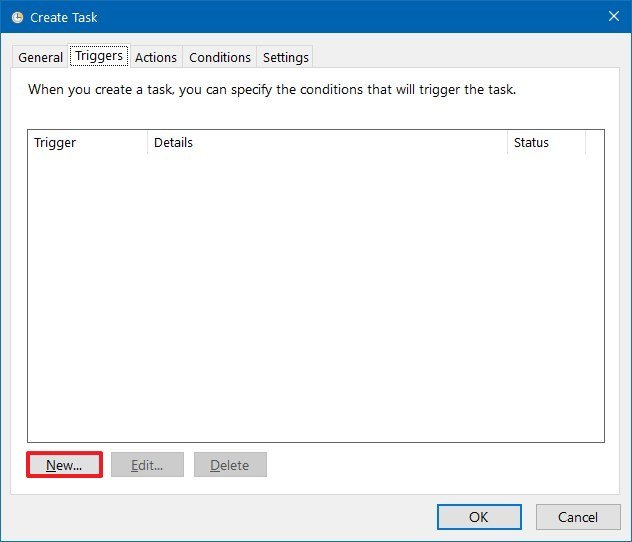
- Click on the Triggers tab.
- Click the New button.
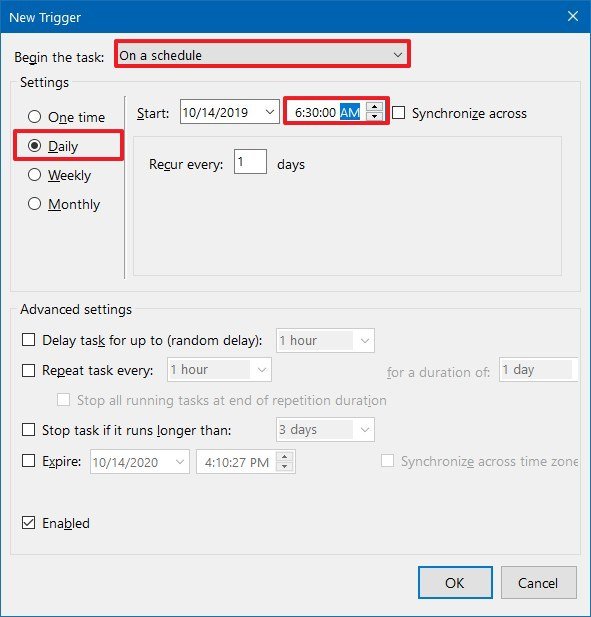
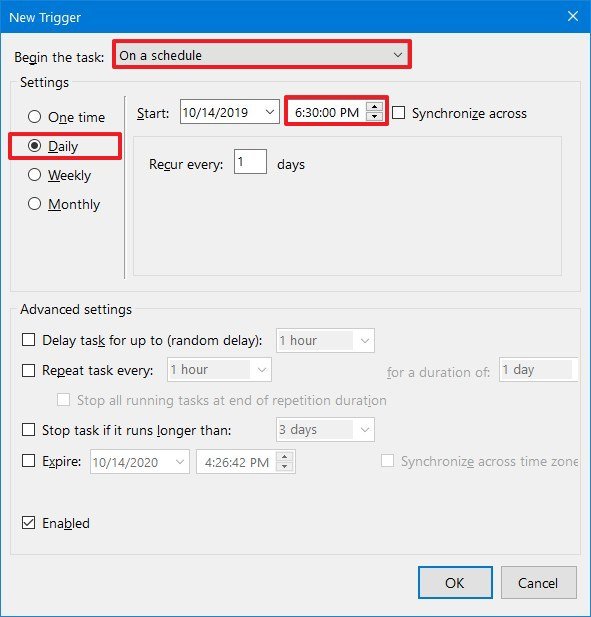
- Under «Begin the task,» select the On a schedule option. (You can configure any trigger you want.)
- Under the «Settings» section, select the Daily option.
- Set the time you want Windows 10 to switch automatically to the light mode. (For example, 6:30 a.m.)
- Click the OK button.
- Click on the Actions tab.
- Click the New button.
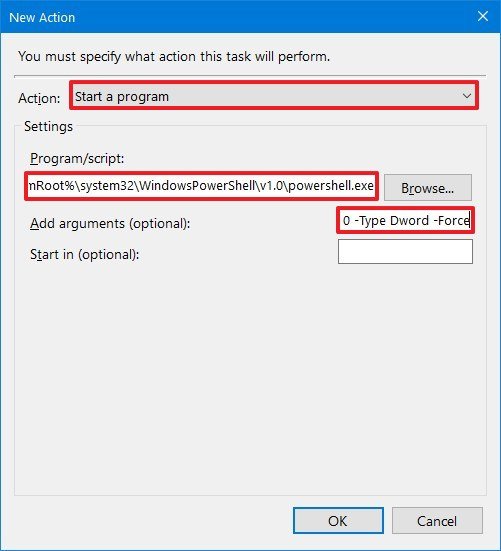
- Using the «Start a program» action, under the «Settings» section, copy and paste the following path:
%SystemRoot%\system32\WindowsPowerShell\v1.0\powershell.exe - Under the «Add arguments (optional)» field, copy and paste the following PowerShell command:
New-ItemProperty -Path HKCU:\SOFTWARE\Microsoft\Windows\CurrentVersion\Themes\Personalize -Name SystemUsesLightTheme -Value 1 -Type Dword -Force; New-ItemProperty -Path HKCU:\SOFTWARE\Microsoft\Windows\CurrentVersion\Themes\Personalize -Name AppsUseLightTheme -Value 1 -Type Dword -ForceThe above command will try to create a SystemUsesLightTheme and AppsUseLightTheme DWORD in the Registry and set their values to 1, which disables the dark and enables the light color mode across apps and desktop.

- Click the OK button.
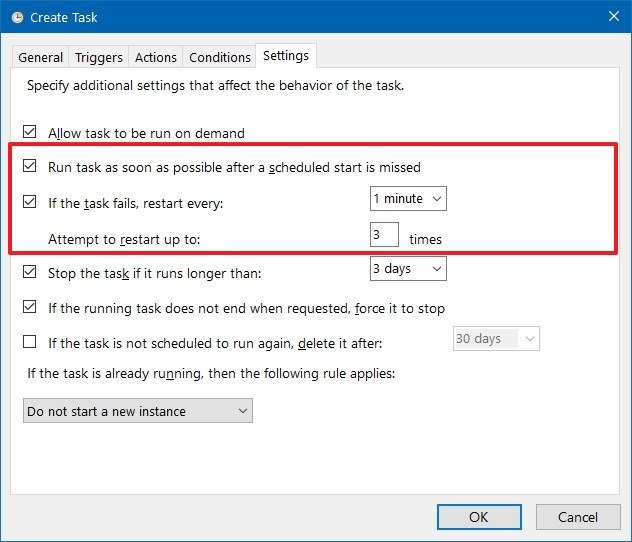
- Click on the Settings tab.
- Check the Run task as soon as possible after a scheduled start is missed option, which should help to run the command if Task Scheduler misses the schedule because your computer was asleep.
- Check the If the task fails, restart every option, and make sure it’s set to 1 minute and only 3 restart attempts.
- Click the OK button.
Once you complete these steps, every day at the time you specified Windows 10 will switch to the light mode for apps and the desktop environment automatically.
All the latest news, reviews, and guides for Windows and Xbox diehards.
How to switch from light to dark system mode on Windows 10
To switch from the light to dark system mode on schedule automatically, use these steps:
- Open Start.
- Search for Task Scheduler, and click the top result to open the app.
- Expand the Task Scheduler Library folder.
- Right-click the «MyTasks» folder (if applicable), and select the Create Task option.
- Click on the General tab.
- Under the «Name» field, enter a descriptive name for the task. (For example, switch_dark_mode.)
- Under the «Security options» section, select the option Run whether user is logged on or not option.
- Check the Do not store password option.
- Click on the Triggers tab.
- Click the New button.
- Under «Begin the task,» select the On a schedule option. (You can configure any trigger you want.)
- Under the «Settings» section, select the Daily option.
- Set the time you want Windows 10 to switch automatically to the dark mode. (For example, 6:30 p.m.)
- Click the OK button.
- Click on the Actions tab.
- Click the New button.
- Using the «Start a program» action, under the «Settings» section, copy and paste the following path:
%SystemRoot%\system32\WindowsPowerShell\v1.0\powershell.exe - Under the «Add arguments (optional)» field, copy and paste the following PowerShell command:
New-ItemProperty -Path HKCU:\SOFTWARE\Microsoft\Windows\CurrentVersion\Themes\Personalize -Name SystemUsesLightTheme -Value 0 -Type Dword -Force; New-ItemProperty -Path HKCU:\SOFTWARE\Microsoft\Windows\CurrentVersion\Themes\Personalize -Name AppsUseLightTheme -Value 0 -Type Dword -ForceThe above command will try to create a SystemUsesLightTheme and AppsUseLightTheme DWORD in the Registry and set their values to 0, which disables the light and enables the dark mode.
- Click the OK button.
- Click on the Settings tab.
- Check the Run task as soon as possible after a scheduled start is missed option, which should help to run the command if Task Scheduler misses the schedule because your computer was asleep.
- Check the If the task fails, restart every option, and make sure it’s set to 1 minute and only 3 restart attempts.
- Click the OK button.
After you completing the steps, every day at the time you specified Windows 10 will switch to the dark mode for apps and the desktop environment automatically.
If you want to make sure the task is working, you can always right-click the tasks, and select the Run option.
When you no longer need this feature, you can open the Task Scheduler folder with the tasks you created, and then right-click and delete each task. Then you can continue to use the Settings app to switch modes from the «Personalization» page.
Mauro Huculak has been a Windows How-To Expert contributor for WindowsCentral.com for nearly a decade and has over 15 years of experience writing comprehensive guides. He also has an IT background and has achieved different professional certifications from Microsoft, Cisco, VMware, and CompTIA. He has been recognized as a Microsoft MVP for many years.
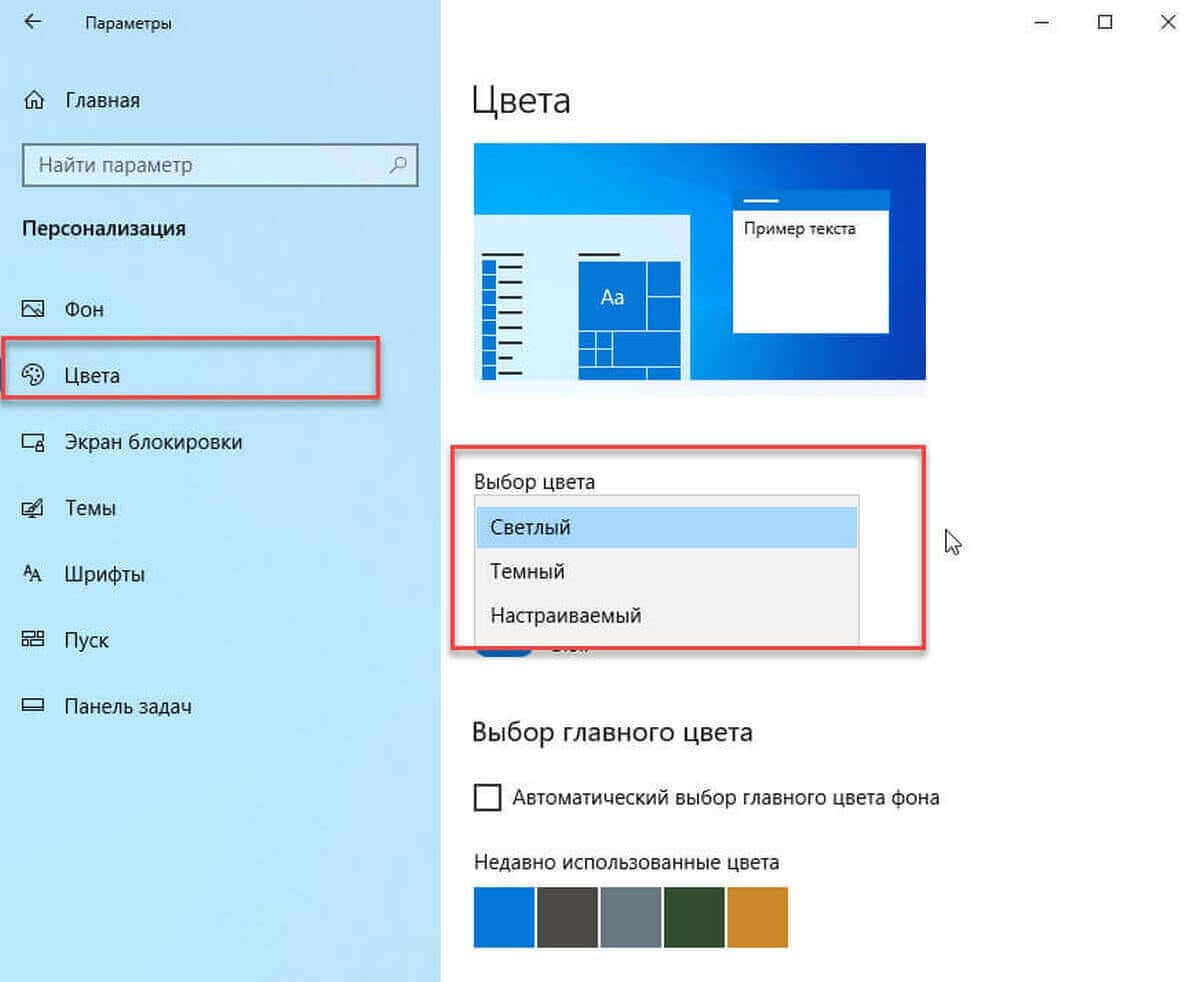
Начиная с Windows 10 версии 1903, операционная система получила новую светлую тему, которая изменяет цвет на белый в меню «Пуск», панели задач и Центра действий с акриловыми эффектами. Выбрав опцию «Настраиваемый» в разделе «Параметры» → «Персонализация» → «Цвета», вы можете применить «Светлую» или «Темную» тему отдельно для системы и отдельно для приложений.

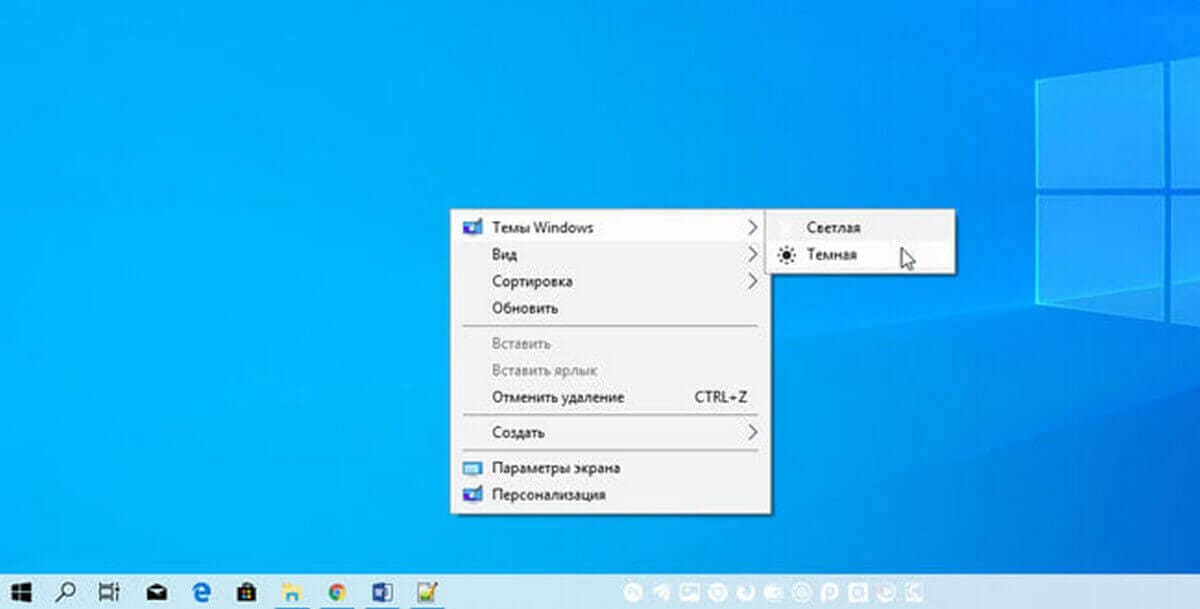
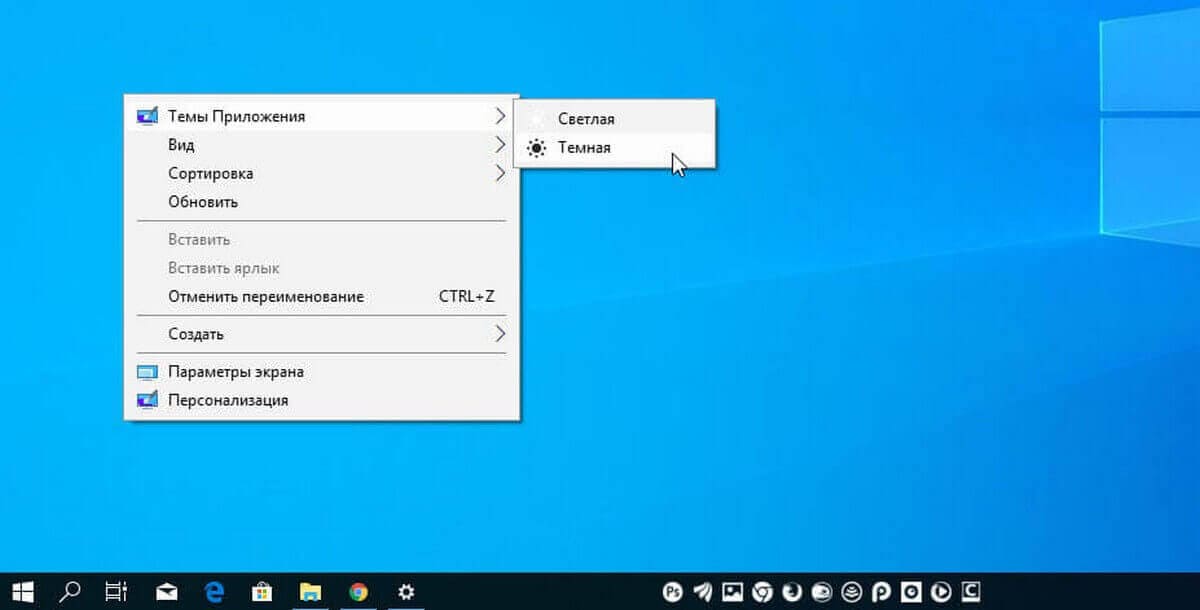
Сегодня рассмотрим, как добавить в контекстное меню рабочего стола две опции которые в один клик позволяют переключатся между темным или светлым режимом операционной системы и приложений.
Чтобы быстро переключатся межу темной и светлой темой Windows, вы можете добавить команду в контекстное меню, которая позволит переключать цветовой режим одним кликом, не открывая приложение «Параметры». Это можно сделать с помощью простой настройки реестра.
Добавить в контекстное меню Windows 10, возможность изменить цветовой режим (тему) для системы.
Шаг 1: Загрузите следующие файлы реестра: Загрузите файлы реестра.
Шаг 2: Распакуйте ZIP-архив, который вы загрузили, в любое место. Вы можете поместить их прямо на Рабочий стол.
Шаг 3: Дважды кликните файл «add-windows-theme-context-menu.reg» и подтвердите операцию слияния.
Чтобы удалить контекстное меню, дважды кликните предоставленный файл «remove-windows-theme-context-menu.reg».
Как это работает.
За переключение между Темной и Светлой темами в Windows, отвечает параметр DWORD (32 бита) с именем SystemUsesLightTheme
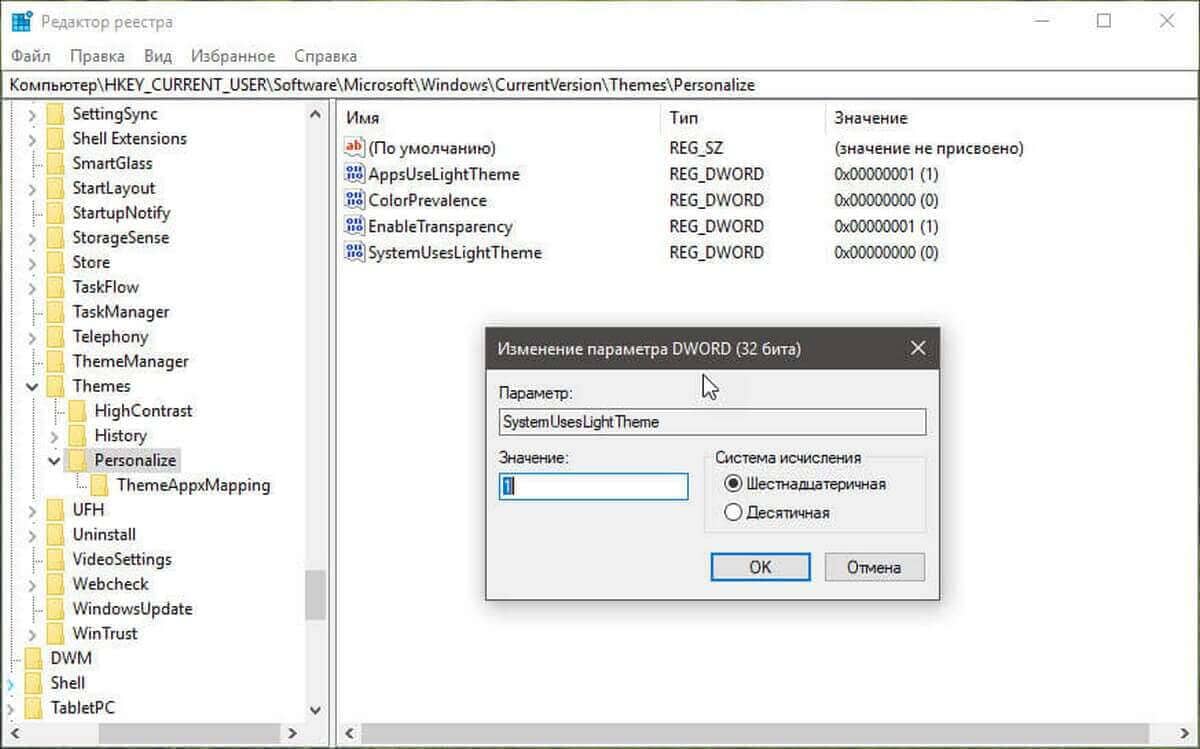
Который находится в разделе реестра:
HKEY_CURRENT_USER\SOFTWARE\Microsoft\Windows\CurrentVersion\Themes\Personalize
Он поддерживает следующие значения:
- 1 — Windows будет использовать тему «Светлая».
- 0 — Windows будет использовать тему «Темная» (по умолчанию).
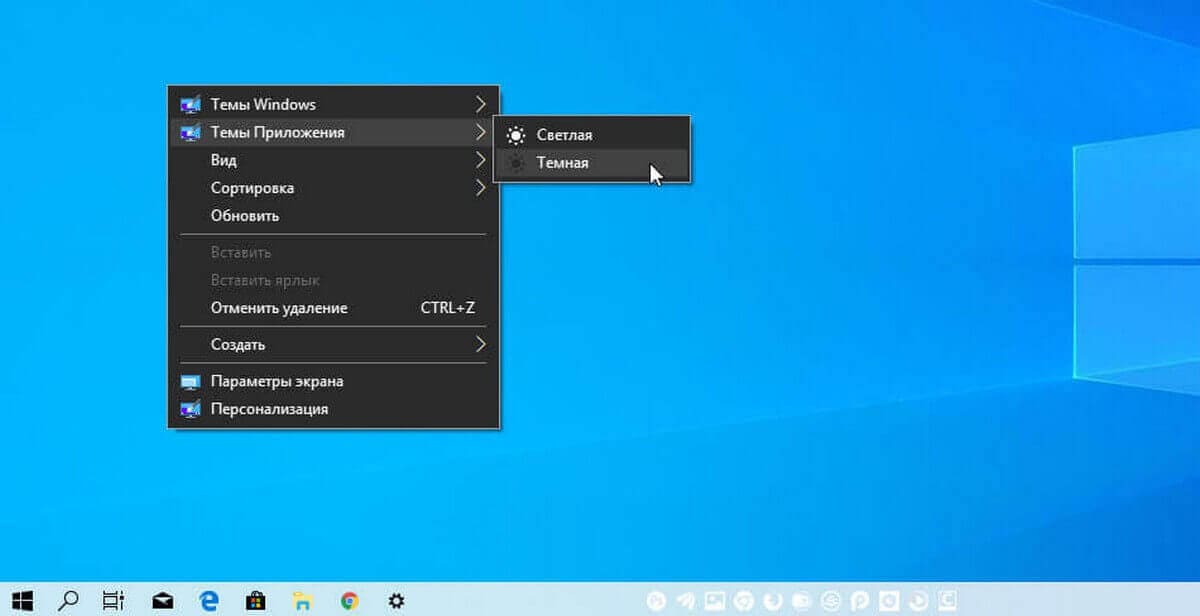
Кроме того, вы можете добавить подобное меню для переключения темного и светлого режима по умолчанию только для приложений.
Чтобы переключать темы для приложений «Темная» или «Светлая» одним кликом мыши выполните следующие действия:
Применить темную тему к вашим приложениям, вы можете использовать «Параметры» → «Персонализация» → «Цвета». См. Следующий снимок экрана:
С помощью простой настройки реестра вы можете добавить в контекстное меню рабочего стола темный и светлый режим приложений и включить нужную тему одним кликом мыши:
Шаг 1: Загрузите следующие файлы реестра: Загрузите файлы реестра.
Шаг 2: Извлеките ZIP-архив, который вы загрузили, в любое место. Вы можете поместить их прямо на Рабочий стол.
Шаг 3: Дважды кликните файл «add-app-theme-context-menu.reg» и подтвердите операцию импорта.
Это добавит на рабочий стол следующее контекстное меню:
Чтобы удалить контекстное меню, дважды щелкните предоставленный файл «remove-app-theme-context-menu.reg».
Если вам интересно посмотреть содержимое твика, вот как он выглядит:
Windows Registry Editor Version 5.00


[HKEY_CLASSES_ROOT\DesktopBackground\Shell\AppMode]

"MUIVerb"="App mode"

"Icon"="themecpl.dll,-1"

"Position"="Top"

"SubCommands"=""


[HKEY_CLASSES_ROOT\DesktopBackground\Shell\AppMode\shell\01Light]

"MUIVerb"="Light"


[HKEY_CLASSES_ROOT\DesktopBackground\Shell\AppMode\shell\01Light\command]

@="reg add HKCU\\SOFTWARE\\Microsoft\\Windows\\CurrentVersion\\Themes\\Personalize /v AppsUseLightTheme /t REG_DWORD /d 1 /f"


[HKEY_CLASSES_ROOT\DesktopBackground\Shell\AppMode\shell\02Dark]

"MUIVerb"="Dark"


[HKEY_CLASSES_ROOT\DesktopBackground\Shell\AppMode\shell\02Dark\command]

@="reg add HKCU\\SOFTWARE\\Microsoft\\Windows\\CurrentVersion\\Themes\\Personalize /v AppsUseLightTheme /t REG_DWORD /d 0 /f"
Вы можете скопировать его в «Блокнот» и изменить в соответствии с вашими предпочтениями. Например, вы можете настроить положение меню. Попробуйте изменить строку «Position» = «Top» на «Middle» или «Bottom». После внесения изменений сохраните файл как * .REG и запустите его двойным кликом.
Чтобы удалить меню вручную, откройте редактор реестра и удалите параметр
HKEY_CLASSES_ROOT\DesktopBackground\Shell\AppMode
Как и в первом способе, где мы добавляем переключение темы только для системы, настройка изменяет 32-параметр DWORD AppsUseLightTheme и изменяет его значение с 0 (режим по умолчанию) на 1, чтобы включить темный режим.
В качестве альтернативы.
Хотя вы можете включить светлый или темный режим непосредственно в «Параметрах» или с помощью контекстного меню, вы заметите что, не можете автоматически включать режимы в зависимости от времени суток.
В этом поможет «Auto Dark Mode» — бесплатная программа с открытым исходным кодом для автоматического переключения между светлым и темным режимами.
Примечание: При загрузке программы вы можете получить предупреждение безопасности Smartscreen.
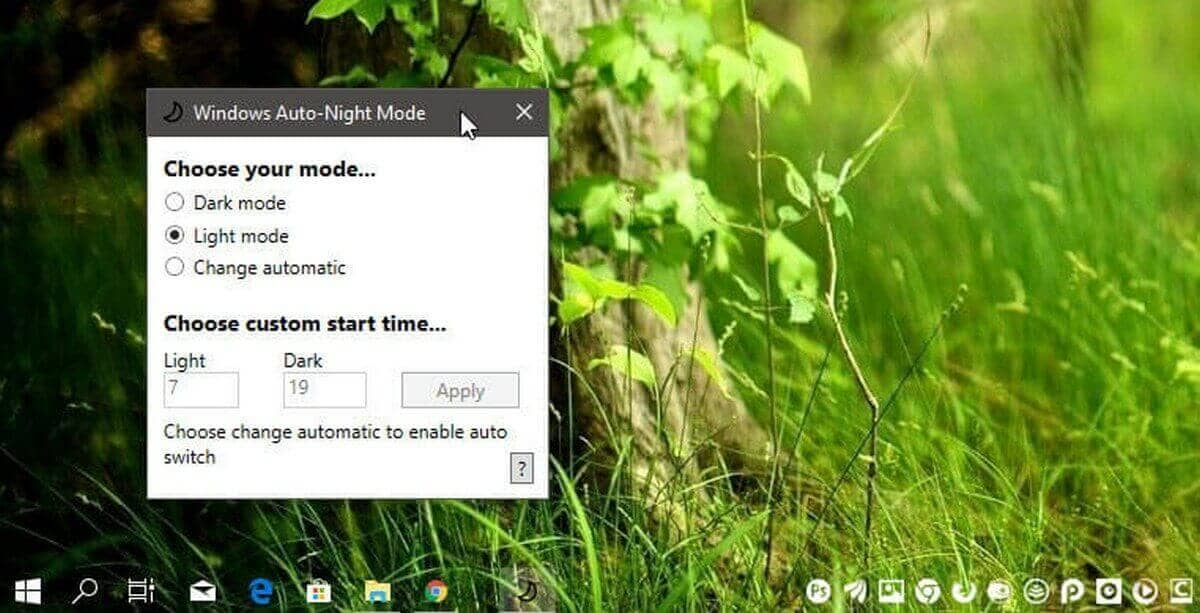
При запуске меню выбора приложения отображает текущий режим, светлый или темный, а также имеет возможность переключения в «Автоматический режим», который позволит переключается между темным и светлым режимами в зависимости от времени суток. Просто установите время начала для светлого и темного режима, например, светлый режим с 7 часов утра и темный с 19 часов. Это создаст новую задачу, которая автоматически изменяет настройки в зависимости от выбранного вами времени.
Кроме того, вы можете быстро переключаться между светлым и темным режимами, кликнув правой кнопкой мыши значок автоматического ночного режима на панели задач и затем выбрать соответствующий параметр.
Получить данное приложение вы можете на странице github.
Все!
Рекомендуем: Как сделать панель задач прозрачной в Windows 10.
Dark Mode is one of the popular modes/themes that are used widely on Windows 11/10 PCs. It is a perfect solution for those who don’t like to see white screens all around, primarily if they work in the dark. Once you activate dark mode, all supported applications also wear a dark theme. However, the most significant disadvantage is that Windows 11 and 10 do not automatically switch between dark and light modes.
This gearupwindows article will guide you on switching between dark and light modes on Windows 11/10. Since there is no built-in way to switch between dark and light themes automatically, we will use a third-party tool for this job.
Why should we switch between Dark and Light Modes?
The dark mode is a boon for PC users. However, not everyone wants to work in the dark mode every time, so people would like to switch the modes according to sunset and sunrise. So if you are working during the day and sufficient lights are coming, people prefer to use the light mode. But after sunset, our choice changes and to make our eyes comfortable we prefer to use dark mode.
Auto Dark Mode X for Windows 11/10
Auto Dark Mode X is a free application built for Windows 11 and Windows 10 that automatically switches between light and dark modes. The program enables you to set your preferred time and configure modes based on your geographical coordinates.
The Auto Dark Mode X is available on GitHub. You need to download and install it as regular software. Once you install this software, it will launch automatically.
Installation is easy, and all you need to do is download the executable file from the official page and install it like any other software. The software, once installed, will launch automatically. The option to schedule is disabled by default.
As said above, there is no direct way on a Windows 11/10 to switch between light and dark modes. So, we will use a free application Auto Dark Mode X, to solve the purpose. This application allows you to set your preferred time or configure it based on your geographical coordinate to switch between themes automatically.
Step 1. First, download the Auto Dark Mode X executable file on your PC.
Step 2. After that, install it on your computer as a regular application by double-clicking on it.
Step 3. Now, Auto Dark Mode X will automatically launch.
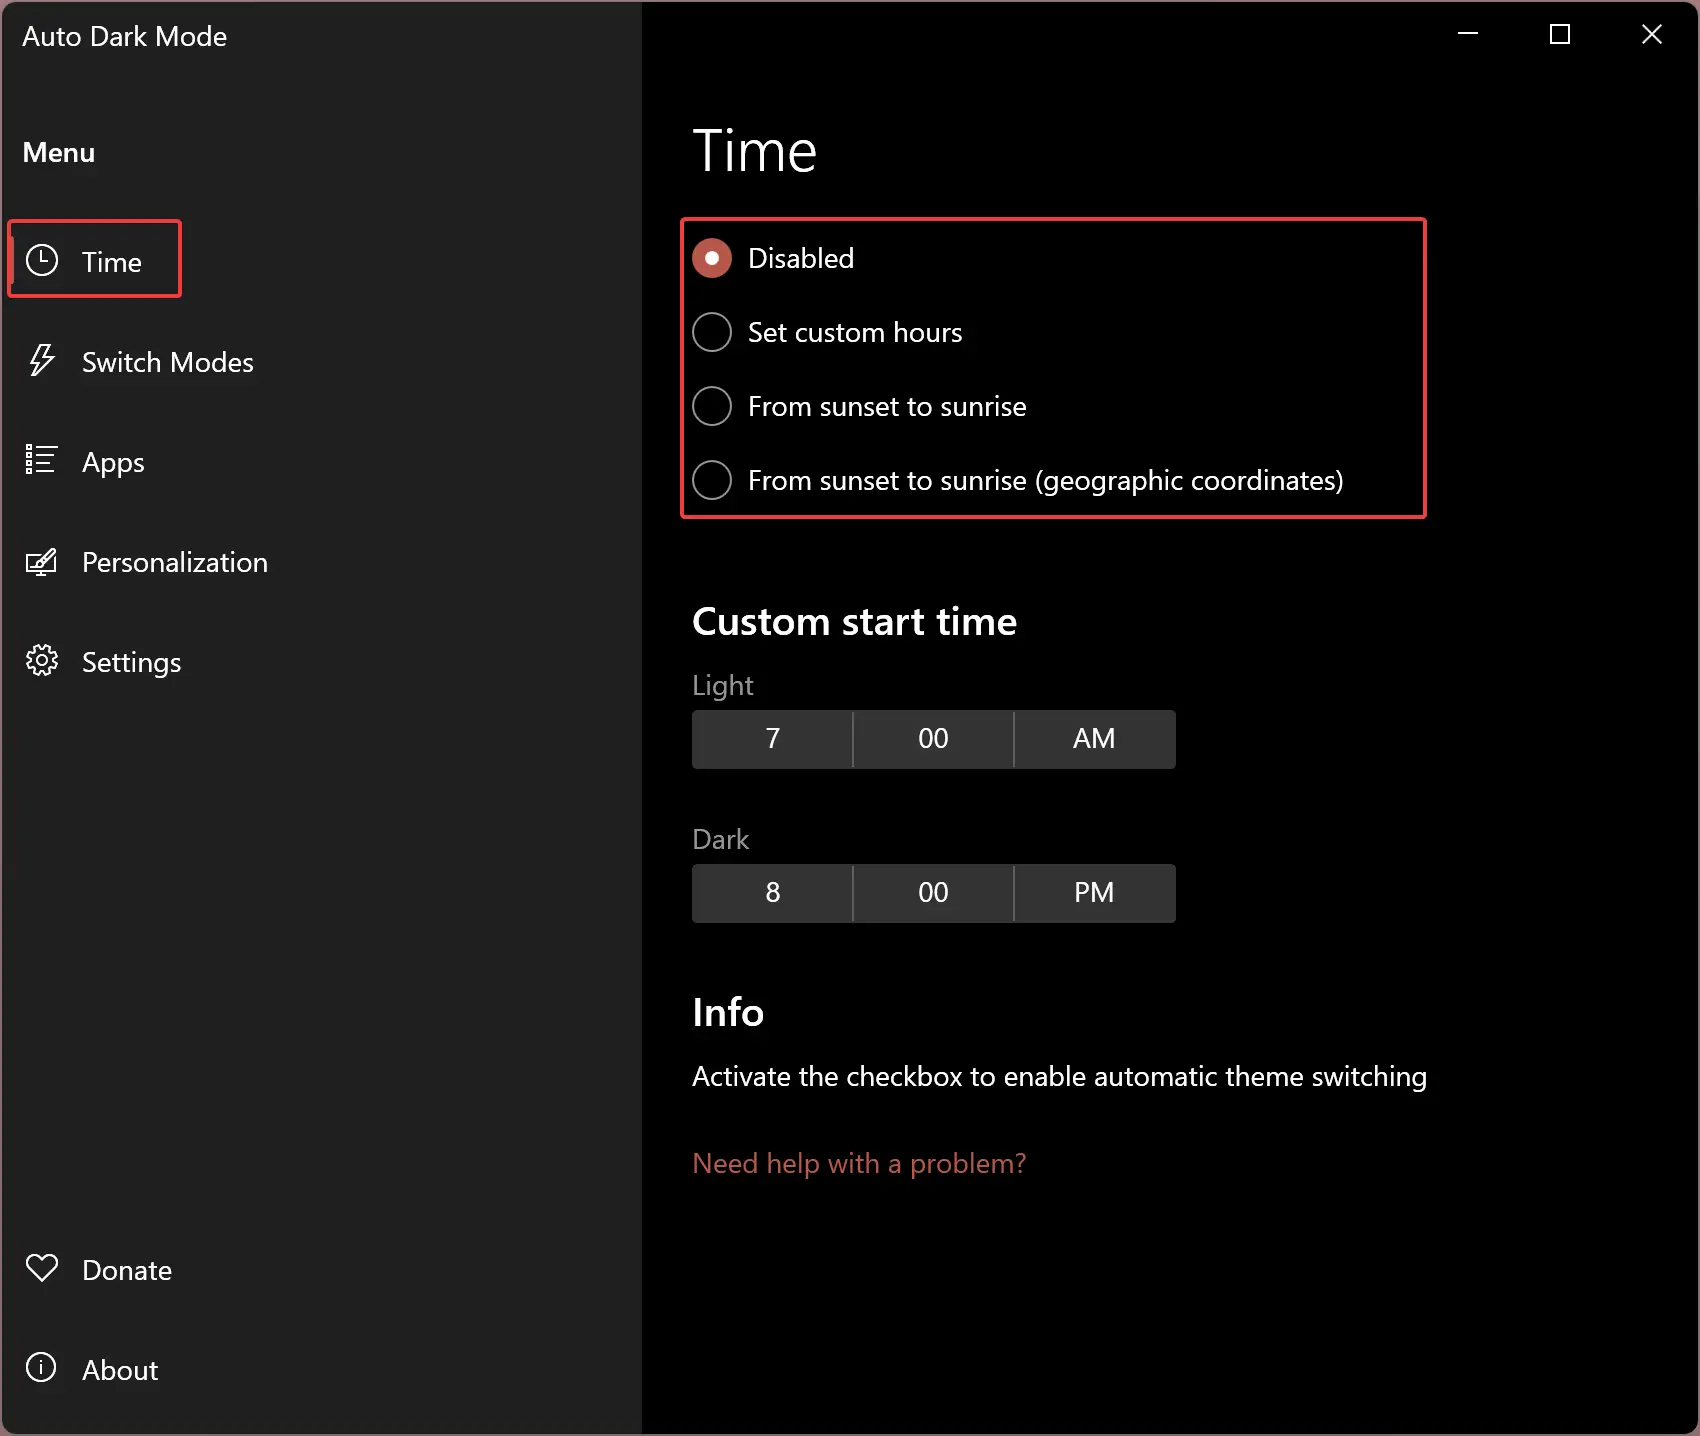
Step 4. When Auto Dark Mode X opens, select the Time section from the left sidebar. On the right sidebar, you will find the following options:-
- Disabled
- Set custom hours
- From sunset to sunrise
- From sunset to sunrise (geographic coordinates)
Select the appropriate option that you would like to use. The settings will be saved automatically.
Apart from that, there are several options available that you might want to customize, for example, “Switch Modes.”
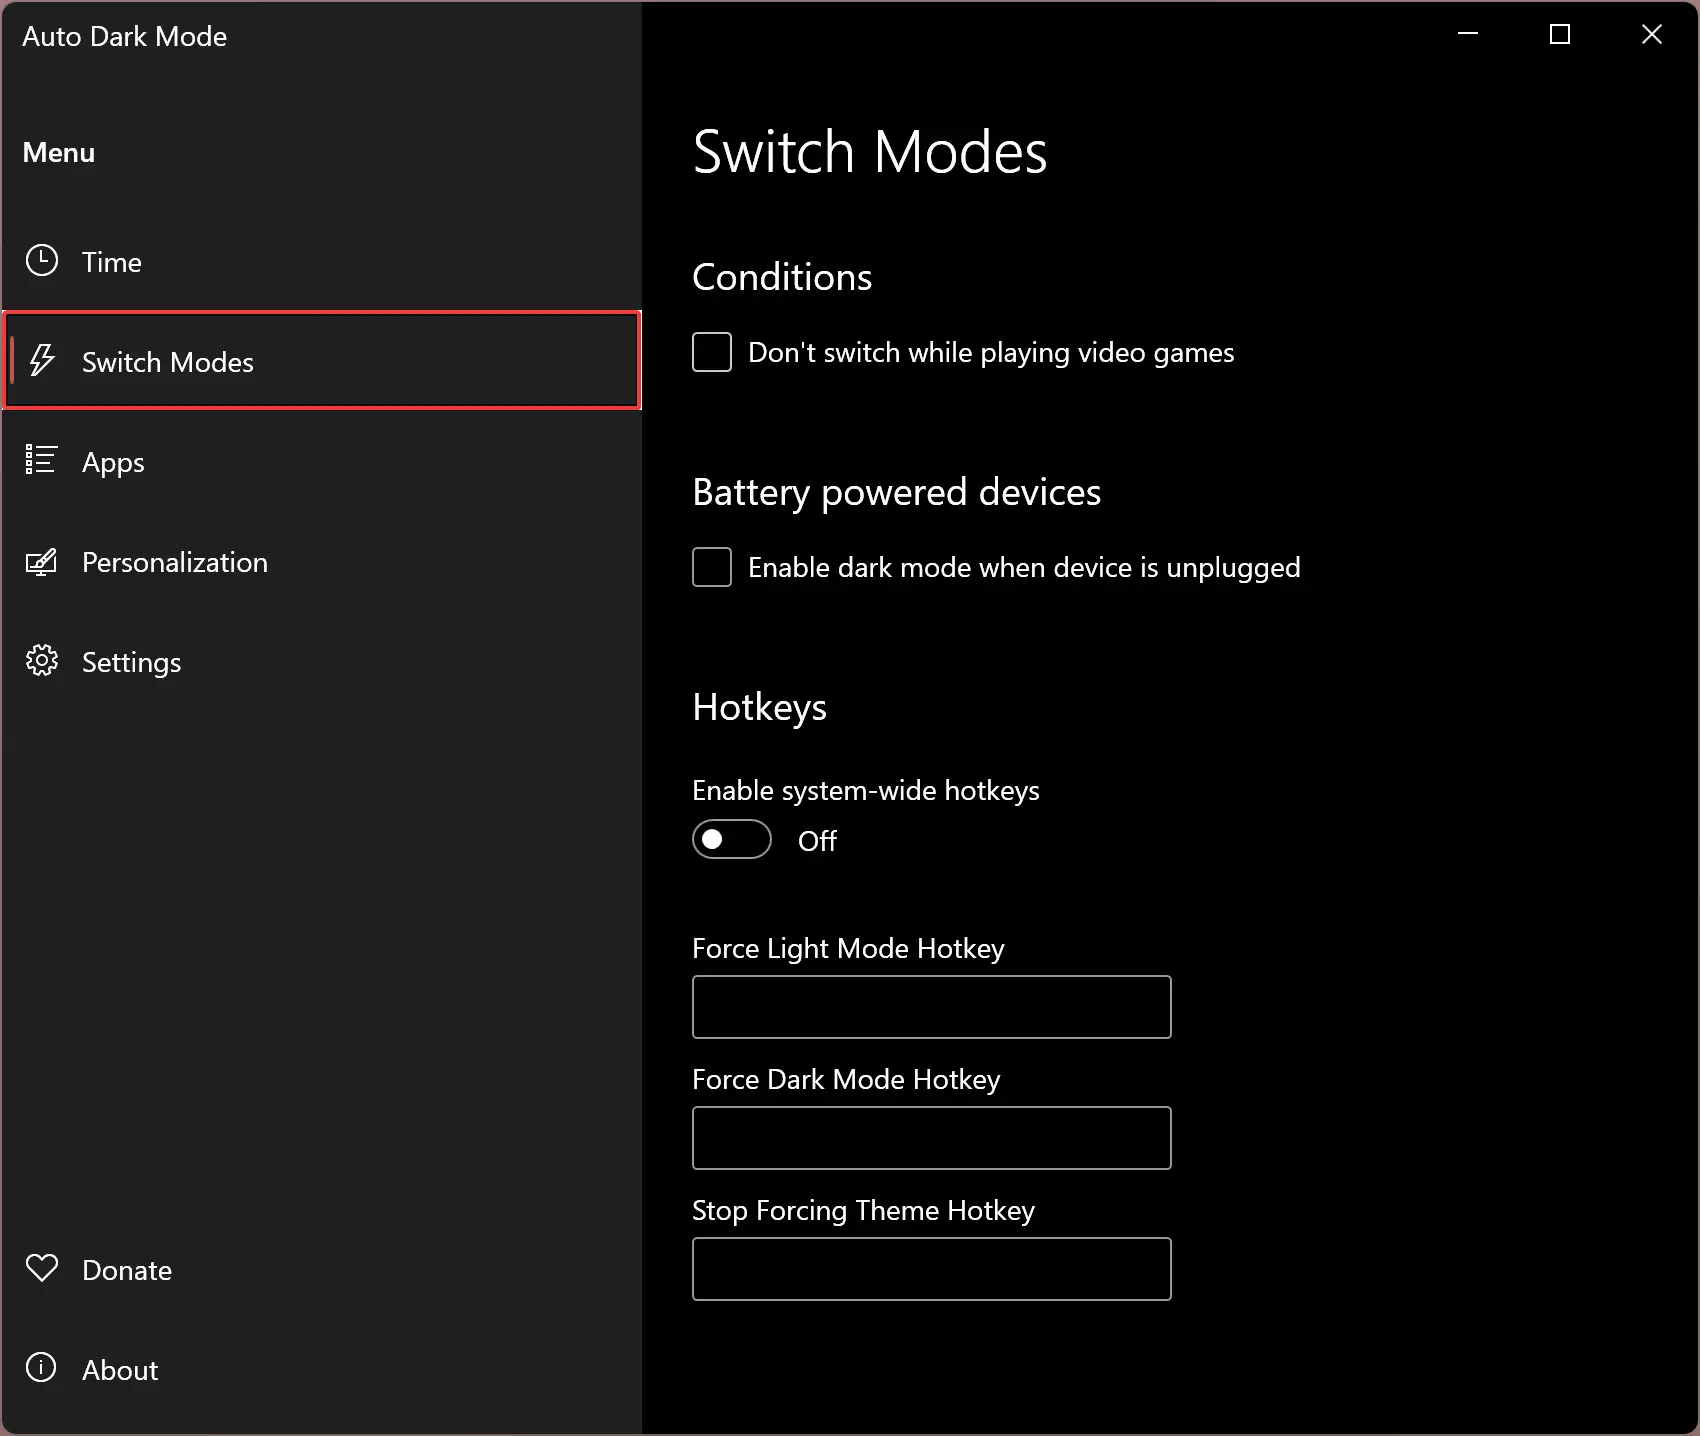
Switch Modes: Here, you can enable or disable the following settings:-
- Don’t switch modes while playing video games.
- Enable/disable dark mode when the device is unplugged.
- Configure Hotkey to switch between light and dark themes.
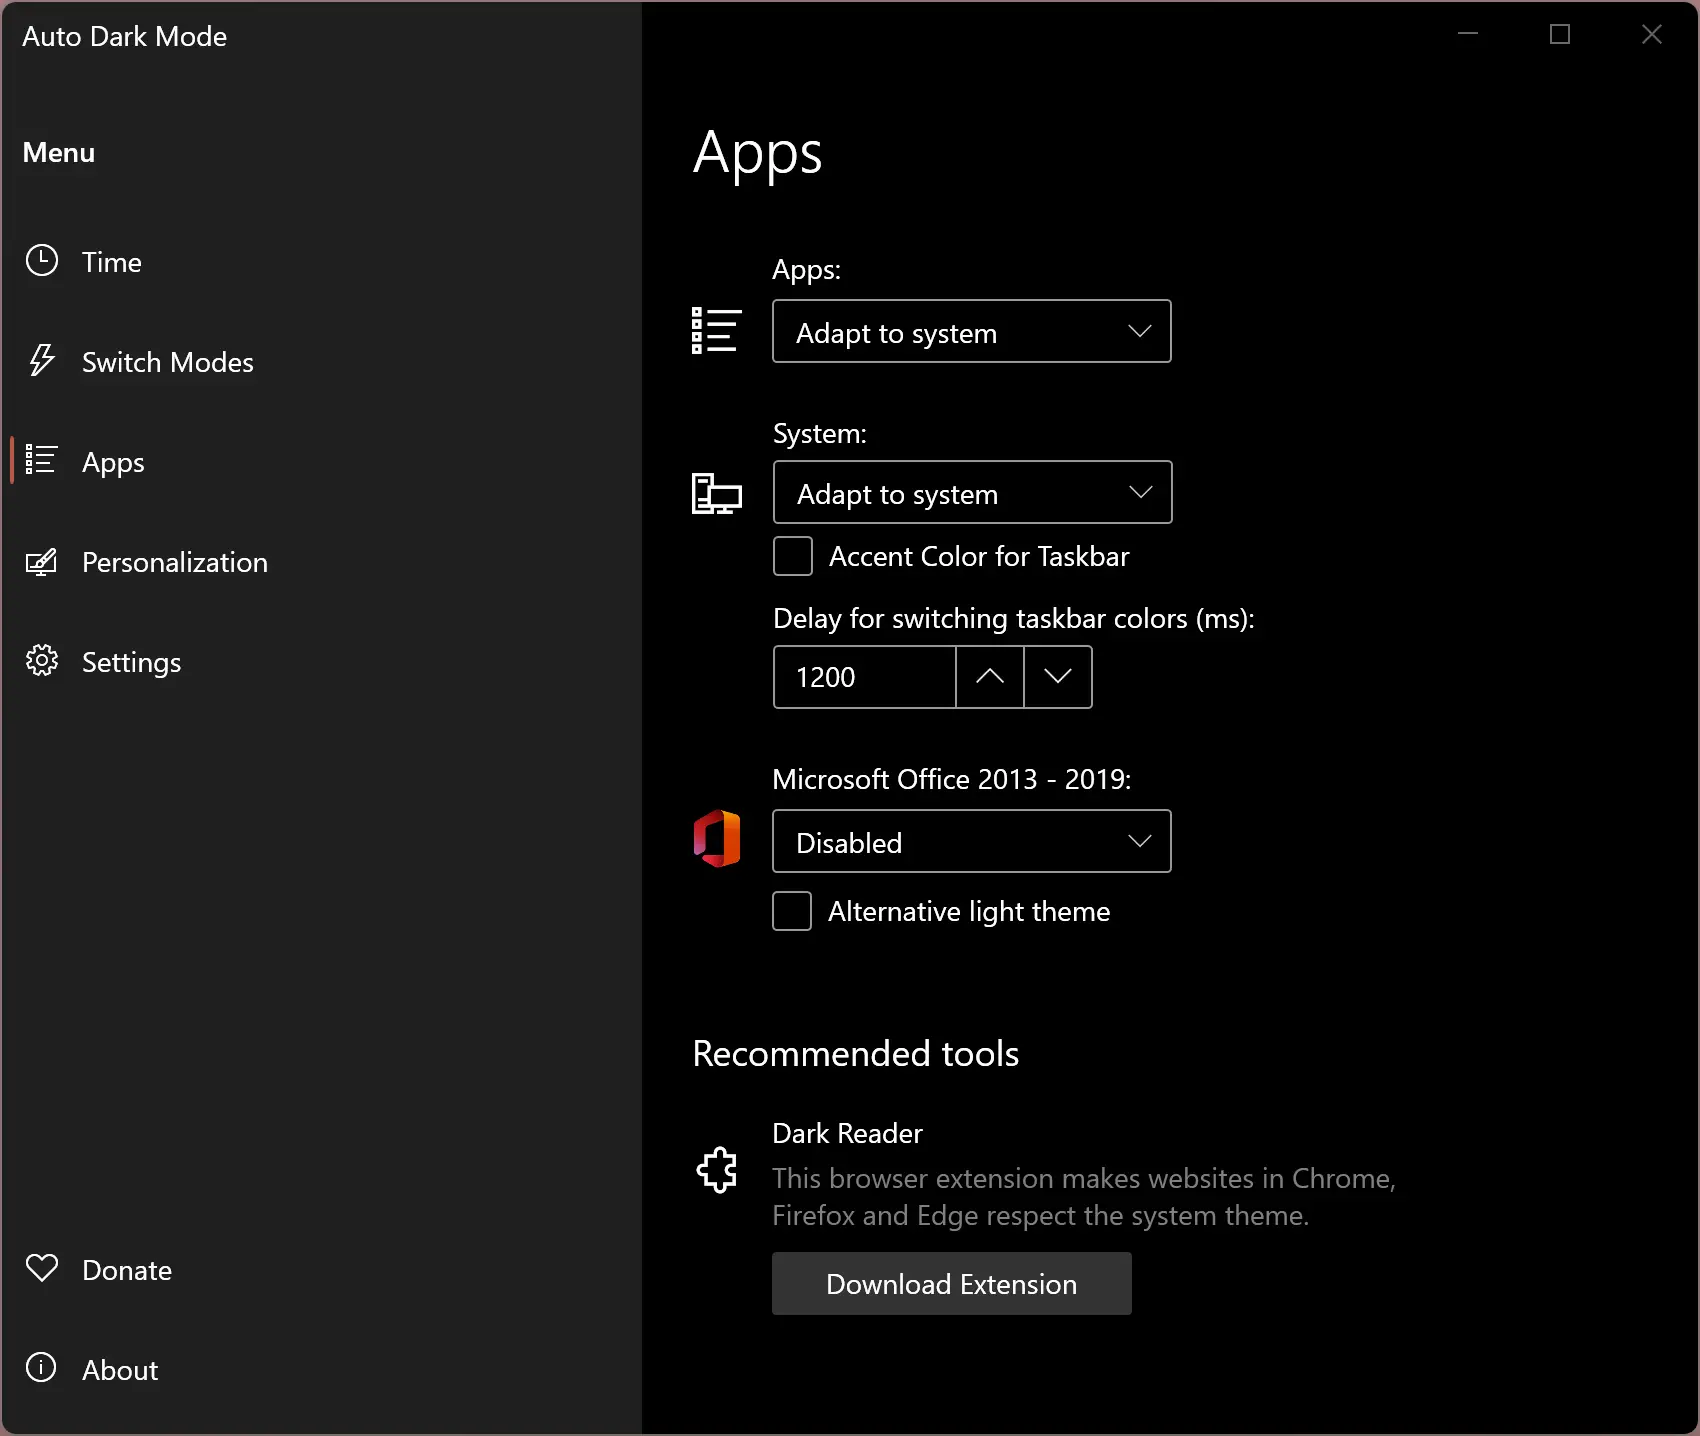
Apps: You can set this app to use the dark or light theme or even adopt system mode. Apart from that, you can install and use the “Dark Reader” extension for browsers that will force Chrome, Edge, and Firefox browsers to use the system theme you apply.
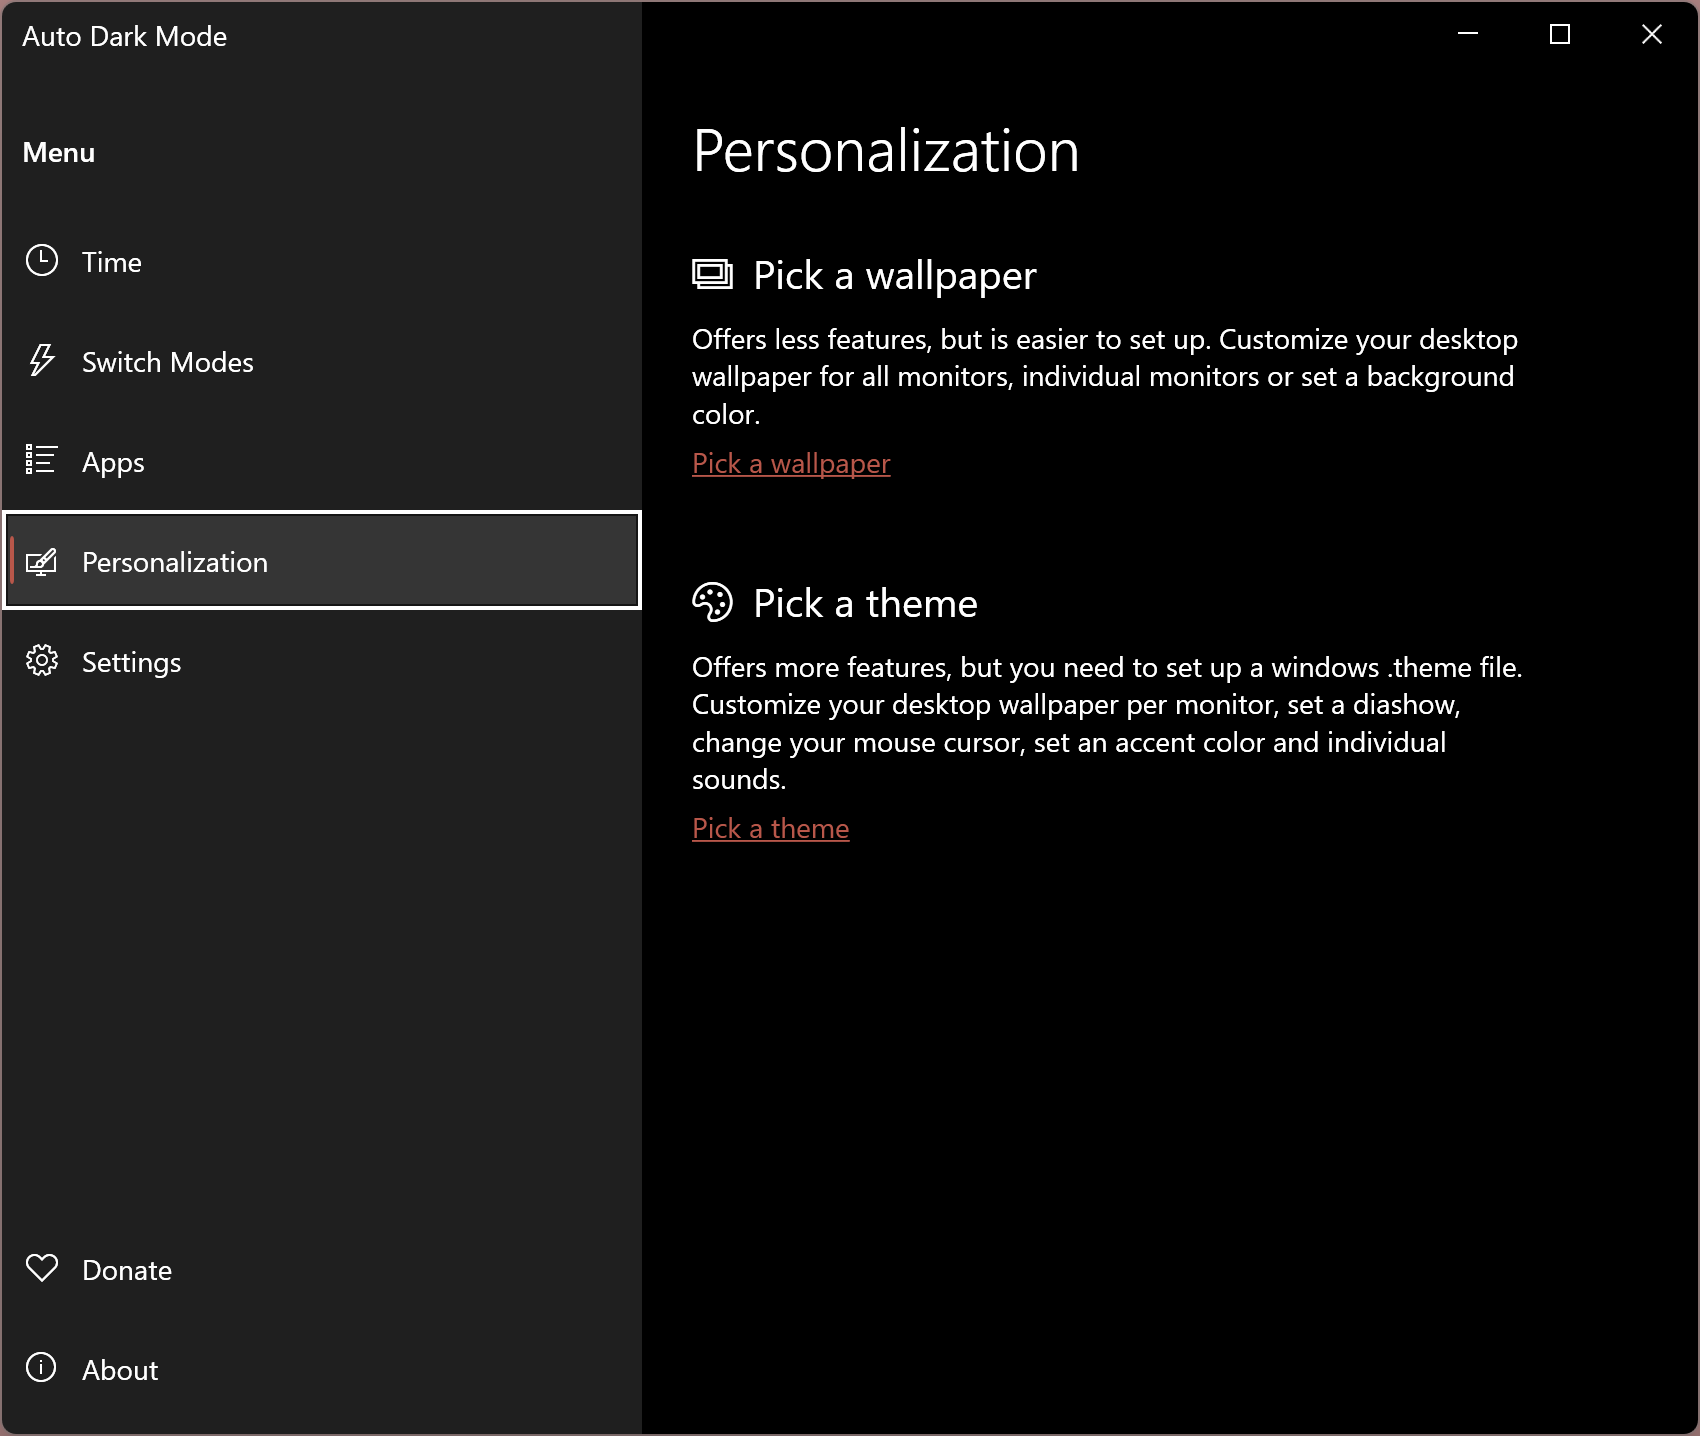
Personalization: It’s an exciting option for theme lovers. This section allows you to enable wallpaper and theme switches. You need to select a theme manually to apply in dark or light mode. Similarly, you can use wallpaper too.
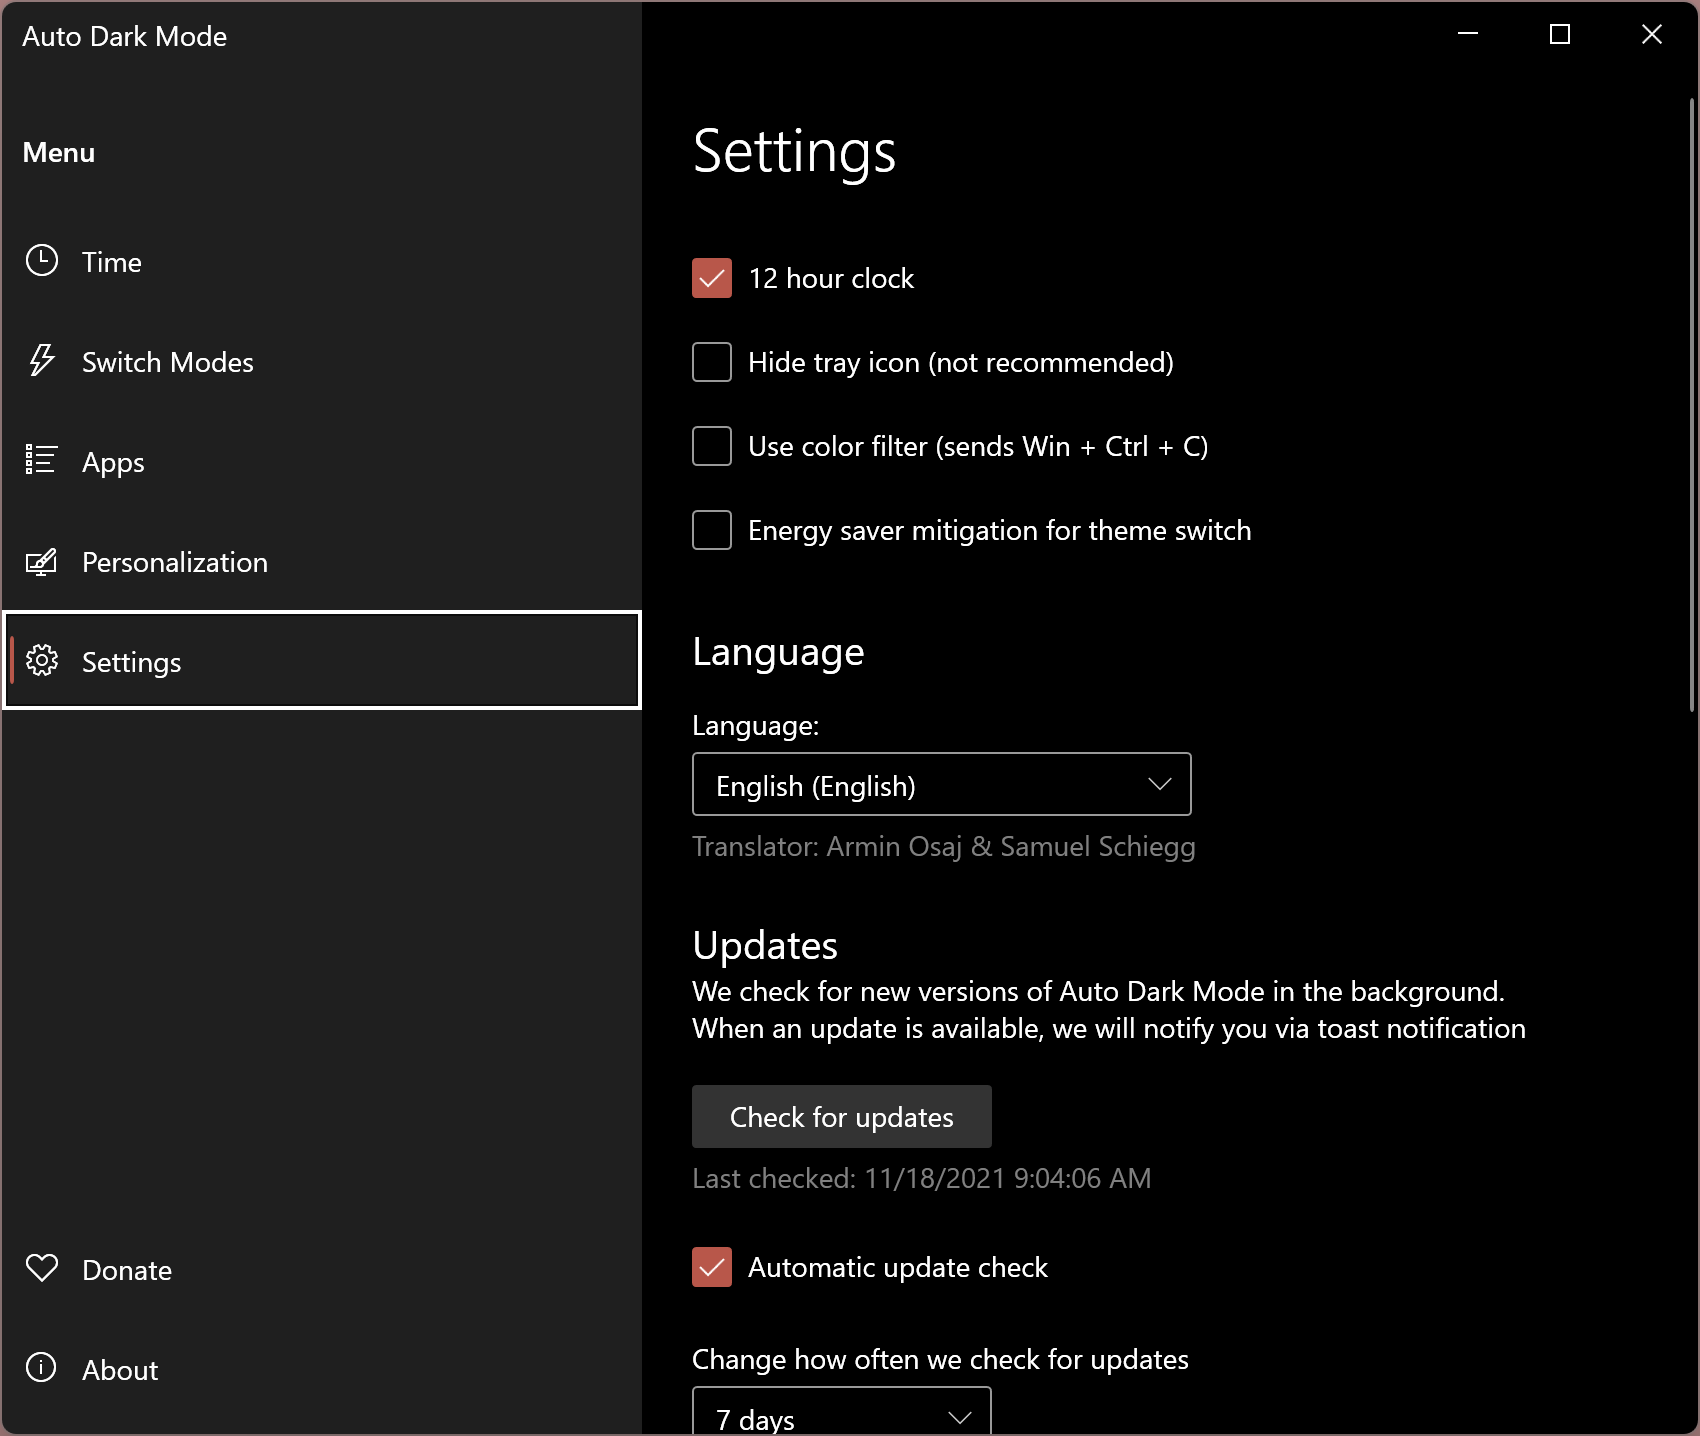
Settings: Under the “Settings” section, many options are available to customize Windows 11/10. For example, 12 hr clock, hide system tray icon, color filters, language change, the auto start of Auto Dark Mode app along with Windows. You can also apply the logon task instead of using it with Startup for a faster switch.
Overall, Auto Dark Mode is an excellent software that can work without disturbing you in the background. In our test, it never failed to switch between dark and light modes in Windows.
Download Auto Dark Mode X
If you would like to use Auto Dark Mode X, you can download the same from GitHub.
Conclusion
In conclusion, dark mode has become increasingly popular among PC users, especially those who work in low-light conditions. However, not everyone wants to use dark mode all the time, so switching between light and dark modes becomes necessary. Unfortunately, Windows 11/10 does not have a built-in feature to switch between the two themes automatically. But, with the help of third-party software like Auto Dark Mode X, it is now possible to switch between the two themes automatically based on your preference. Auto Dark Mode X is a free application that is easy to install and offers several customization options. With this software, users can enjoy the benefits of both light and dark modes without any hassle.