
Windows Update is a critical component of the Microsoft Windows operating system, designed to improve system security and performance through regular updates. However, sometimes, users encounter issues with the Windows Update Service, particularly when attempting to stop or restart the service. A common error message that users face is «Windows Update Service could not be stopped.» This article will explore the possible reasons behind this error, guide you through steps to resolve it, and offer preventive measures for the future.
Understanding the Windows Update Service
Before diving into solutions, let’s take a moment to understand what the Windows Update Service is and why it may be difficult to stop it. The Windows Update Service is a background service run by Windows, responsible for downloading and installing updates. It’s essential for maintaining the operating system’s health, but it can sometimes cause issues when users attempt modifications, such as stopping or disabling it.
Possible Reasons for the Error
Before addressing how to fix the issue, it’s essential to identify potential reasons why the «Windows Update Service could not be stopped» error arises:
-
System Permissions: Insufficient administrative privileges might prevent you from ending the service.
-
System Integrity Issues: Corrupted system files could hinder the service’s functionality.
-
Background Services: Other services may be dependent on the Windows Update service, thus preventing it from being stopped.
-
Third-Party Software Conflicts: Certain security or optimization software can interfere with system processes.
-
Windows Services Configuration: If services related to Windows Update are misconfigured, it might prevent stopping the service.
Having identified the potential reasons, we can now explore how to resolve the issue effectively.
Step-by-Step Solutions
1. Check for Administrative Privileges
Before proceeding to more technical solutions, ensure you’re running the Command Prompt or PowerShell with administrative privileges.
- How to Run as Administrator:
- Press
Windows + Xto bring up the Quick Access Menu. - Select either “Windows PowerShell (Admin)” or “Command Prompt (Admin).”
- If prompted, click “Yes” to allow changes.
- Press
Once you have administrative privileges, try stopping the Windows Update service again:
net stop wuauservIf the service still cannot be stopped, proceed to the next solution.
2. Disable Windows Update Through Services
Sometimes, stopping the service directly from the Services application can bypass the error.
- How to Access Services:
- Press
Windows + Rto open the Run dialog. - Type
services.mscand press Enter. - In the Services window, find “Windows Update.”
- Right-click on it and try selecting «Stop.»
- Press
If you are successful, you can ensure that it is disabled:
- Right-click again on «Windows Update» and select «Properties.»
- Set the “Startup Type” to “Disabled” and click “OK.”
3. Use the Command Prompt to Stop Dependent Services
Often, the Windows Update service won’t stop if other services depend on it. Identify and stop any dependent services first.
- Open the Command Prompt or PowerShell as an administrator.
- Type the following command to see dependencies:
sc qc wuauserv- Look for dependent services (you’ll typically see
DependOnServicelisted).
For each, try stopping them:
net stop [DependentServiceName]Once the dependent services are stopped, attempt to stop the Windows Update service again.
4. Restart in Safe Mode
Booting Windows into Safe Mode helps to stop unnecessary services and allows users to troubleshoot issues without interference from third-party software.
- How to Boot into Safe Mode:
- Click on the Start Menu and select Settings (the gear icon).
- Navigate to «Update & Security» and then «Recovery.»
- Under «Advanced Startup,» click «Restart now.»
- After the computer restarts, select «Troubleshoot,» then «Advanced options», and «Startup Settings.»
- Click «Restart,» and you’ll be presented with several options.
- Press
F4(or4) to start your PC in Safe Mode.
Once in Safe Mode, try stopping the Windows Update service again.
5. Use Windows PowerShell to Stop Windows Update
If Command Prompt commands aren’t effective, you can try using PowerShell commands.
- Open Windows PowerShell as an administrator.
- Use the following command to stop the Windows Update service:
Stop-Service -Name wuauserv -ForceThe -Force flag helps to terminate any processes that may be blocking the service.
6. Repair Corrupted System Files
Corrupted system files can lead to numerous issues, including problems with the Windows Update service. You can use the System File Checker (SFC) and DISM tools to repair these files.
- Using System File Checker:
- Open Command Prompt with administrative privileges.
- Run the following command:
sfc /scannow- Wait for the scan to complete. If issues are found and repaired, restart your computer and try stopping the Windows Update service again.
- Using DISM:
- Open Command Prompt as an administrator.
- Execute the following commands one by one:
DISM /Online /Cleanup-Image /CheckHealth
DISM /Online /Cleanup-Image /ScanHealth
DISM /Online /Cleanup-Image /RestoreHealth- After running these, restart your computer and attempt to stop the Windows Update service again.
7. Disable Third-Party Anti-Virus Software
Third-party anti-virus or firewall software can sometimes interfere with system processes. Try disabling, or even uninstalling, your third-party security software temporarily:
- Look in your system tray for your anti-virus icon.
- Right-click it and look for options to disable or exit.
- After disabling, try to stop the Windows Update service.
8. Clean Boot
Performing a clean boot starts Windows with a minimal set of drivers and startup programs, which can help pinpoint software conflicts.
- How to Perform a Clean Boot:
- Press
Windows + R, typemsconfig, and press Enter. - In the System Configuration window, go to the «Services» tab.
- Check “Hide all Microsoft services” and then click “Disable all.”
- Go to the “Startup” tab and click “Open Task Manager.”
- Disable all startup items and close Task Manager.
- Click “OK” on the System Configuration window and restart your PC.
- Press
Try stopping the Windows Update service post-clean boot.
9. Registry Key Changes
As a last resort, you can modify the registry to manage the Windows Update service. Warning: Be careful when editing the registry. Incorrect changes can lead to further issues.
- Press
Windows + R, typeregedit, and press Enter. - Navigate to:
HKEY_LOCAL_MACHINESYSTEMCurrentControlSetServiceswuauserv- Look for a key named “Start” and double-click it.
- Change its value to
4(this will disable the service). - Click OK and restart your computer.
10. Reinstall Windows Update Components
If all else fails, you can reset Windows Update components. This process involves renaming the SoftwareDistribution and catroot2 folders, which store data related to updates.
- Open Command Prompt as an administrator.
- Execute the following commands one after the other:
net stop wuauserv
net stop cryptSvc
net stop bits
net stop msiserver
ren C:WindowsSoftwareDistribution SoftwareDistribution.old
ren C:WindowsSystem32catroot2 catroot2.old
net start wuauserv
net start cryptSvc
net start bits
net start msiserver
This effectively resets the Windows Update service and can resolve the issues relating to downloading and installing updates.
Preventive Measures for Future Issues
After resolving the error, taking preventive measures can help avoid similar issues in the future. Here are some recommendations:
-
Regularly Update Windows: Ensure your OS remains current by performing manual checks for updates periodically.
-
System Maintenance: Regularly run disk checks and maintenance tasks to help keep your system optimized.
-
Use Trusted Security Software: Ensure that your security software doesn’t interfere with system processes. Consider Windows Defender as a viable option.
-
Backup Data Regularly: Maintain backups of important data to guard against data loss caused by system issues.
-
Restore Points: Ensure that system restore points are enabled, allowing you to revert your system if anything goes awry.
-
Educate Users: If multiple users operate on a single system, educate them about the significance of not altering system processes without an understanding of the consequences.
Conclusion
The error «Windows Update Service could not be stopped» may appear frustrating, but it’s typically resolvable through a sequence of systematic troubleshooting steps. By following the outlined procedures to either stop the service directly or reset its components, you can regain control over the Windows Update process. Furthermore, adopting preventive measures will help maintain system integrity and ensure that Windows can continue to deliver necessary updates for a seamless experience. If you ever find yourself dealing with similar issues, remember that patience and methodical troubleshooting can often lead to a resolution.
Have you ever met the problem “Windows Update service could not be stopped”? This post will introduce you 3 methods to fix this issue and show you a powerful program — MiniTool ShadowMaker. With this program, you can back up your data in advance to keep it safe. Get more information from MiniTool website.
Windows Update Service Could Not Be Stopped
Have you ever met the situation that Windows Update service could not be stopped and do you know what causes this error?

It is often unknown what causes this problem, but there are still some common reasons.
Missing Administrator Privileges
This could prevent Windows Update service from stopping. In order to stop it, you need to use an elevated Command Prompt.
Something is Wrong with Your Computer
This is a more serious problem, so you need to consider upgrading in place or fixing the installation.
Fix “Windows Update Service Could Not Be Stopped”
- Stop WUAUSERV Process
- Clear the Contents of Update Folder
- Perform a Repair Installation
How to Fix “Windows Update Service Could Not Be Stopped” Problem
While automatically downloading and installing updates is great in theory, it’s a problem for most of you in reality. Meanwhile, you may wonder how to stop them.
Automatic updates are usually a good thing, so I recommend not turning them off in general. Therefore, the following methods should primarily be used to prevent automatic reinstallation of a troublesome update or to stop the installation of a potentially troublesome update.
Tip: If you are a Windows 10 Home user, you can’t stop security updates which are not delivered using the Windows Update service. You are not recommended to stop these security updates in any case.
The following part will offer you 3 potential methods to fix “Windows Update service could not be stopped” problem.
Tip: If Windows Update is not working, you can read this post to get methods: Bothered by Windows Update Not Working? Here’s What to Do.
Method 1: Stop WUAUSERV Process
If you can’t stop Windows Update service, you can use Command Prompt with administrative permissions to circumvent this issue. Using the command to end the process which is recognized by its PID. If you want to use the Windows Update functionality in the future, you need to restart the process with the Services tool once you stop it.
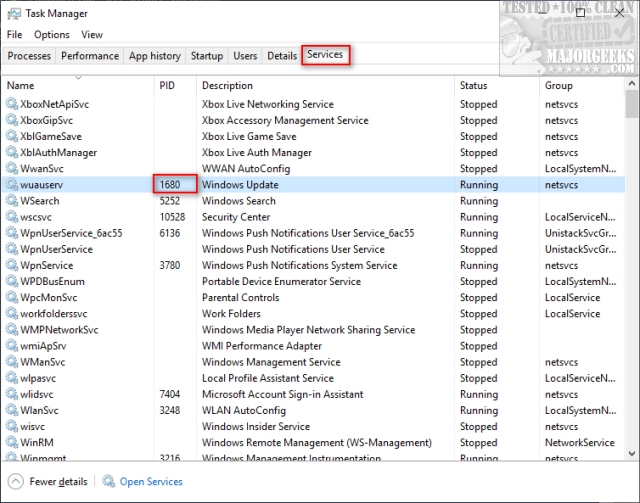
Step 1: Press the Ctrl + Shift + Esc keys at the same time to run the Task Manager utility. Alternatively, you can also press the Ctrl + Alt + Del key at the same time and then choose Task Manager from the pop-up window to open the Task Manager utility.
Step 2: In order to expand Task Manager, click More details. Click the Services tab, and navigate to the wuauserv service under the Name column. Note down the PID number.
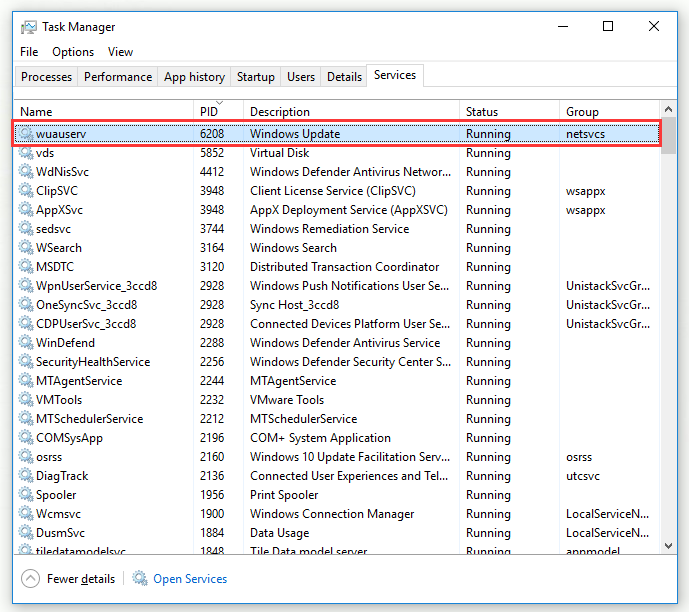
Step 3: Type cmd in the search bar, right-click Command Prompt and then choose Run as administrator.
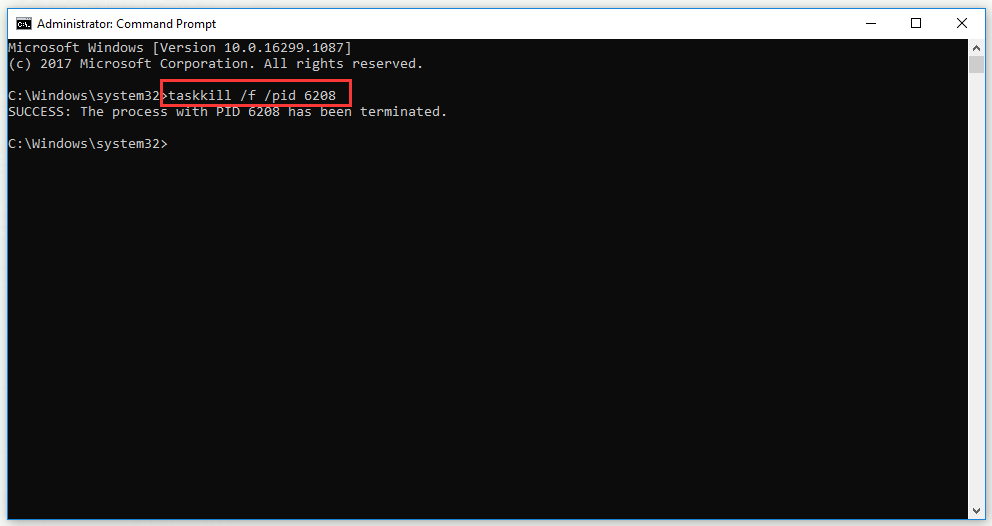
Step 4: Type the command taskkill /f /pid PID and press Enter on your keyboard.
Tip: Make sure you replace PID with the wuauserv service number you noted down before.
If Command Prompt shows that the process with your PID has been terminated, it means you successfully fix “Windows Update service could not be stopped” problem.
Method 2: Clear the Contents of Update Folder
When you are resetting Windows Update components or you are just trying to fix an issue of the automatic updates, you can use this set of commands which will delete the contents of a folder to stop the Windows Update service.
Step 1: Type cmd in the search bar, right-click Command Prompt and then choose Run as administrator.
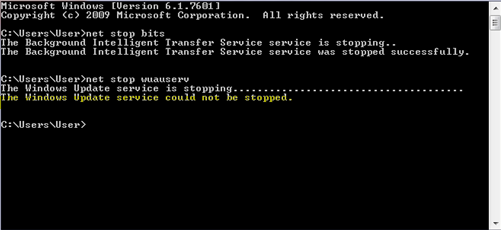
Step 2: Type the command net stop wuauserv and net stop bits and press Enter on your keyboard.
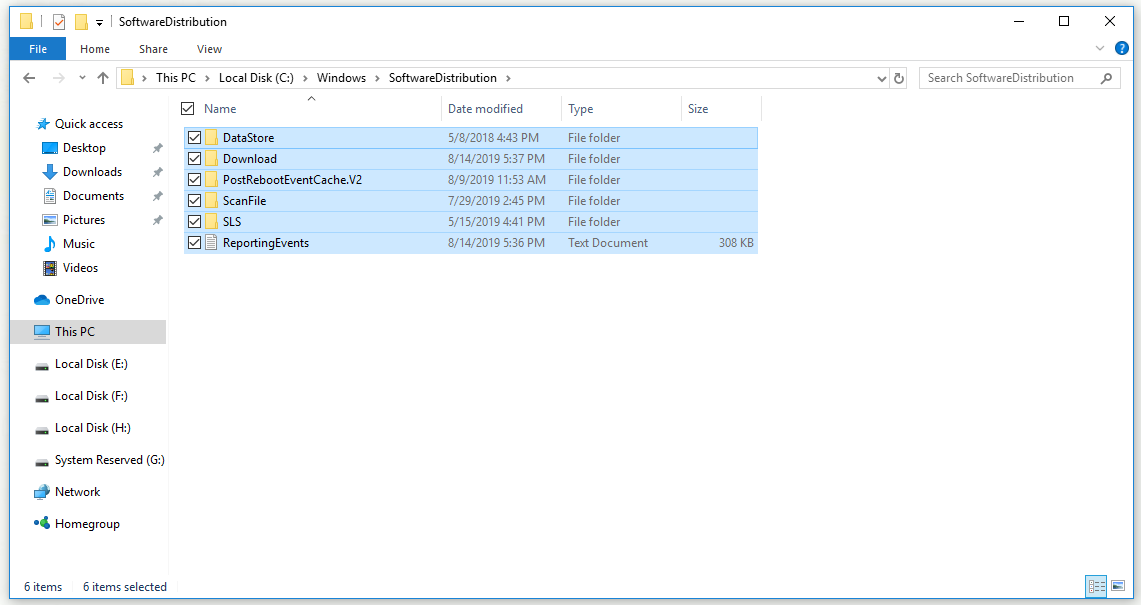
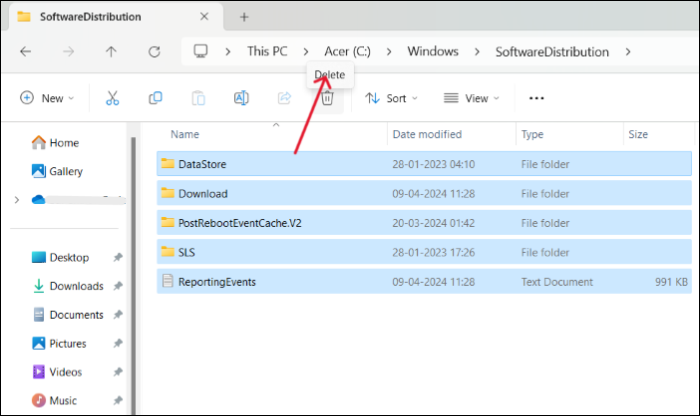
Step 3: Open Windows Explorer, click This PC and navigate to the location C:\Windows\SoftwareDistribution on your computer.
Step 4: Click SoftwareDistribution to open it and press the Ctrl+ A key at the same time to choose all files, right-click on this window and click Delete from the context menu to delete the contents of SoftwareDistribution folder.
Step 5: If you want to restart the Windows Update service and the BITS, type the commands net start wuauserv and net start bits in Command Prompt and press Enter to run them.
After you finish all the steps above, you can stop the Windows Update service successfully.
Method 3: Perform a Repair Installation
This method needs you to create bootable Windows 10 media and then perform a repair installation. You will not lose your personal files with this method. This method will install the latest version of Windows, so if you want Windows Update to work, you should try this one last time.
Create Bootable Windows 10 Media
Step 1: Click Download tool now to download the media creation tool from Microsoft. Open the file you just downloaded, read Applicable notices and license term carefully and click Accept to continue.
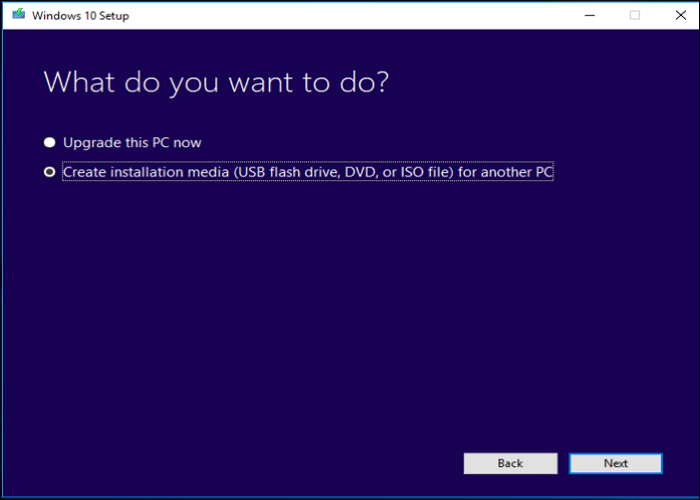
Step 2: Choose Create installation media (USB flash drive, DVD, or ISO file) for another PC and click Next.
Step 3: Select language, architecture, and edition you want to use. Or just check Use the recommended options for this PC. Click Next to continue.
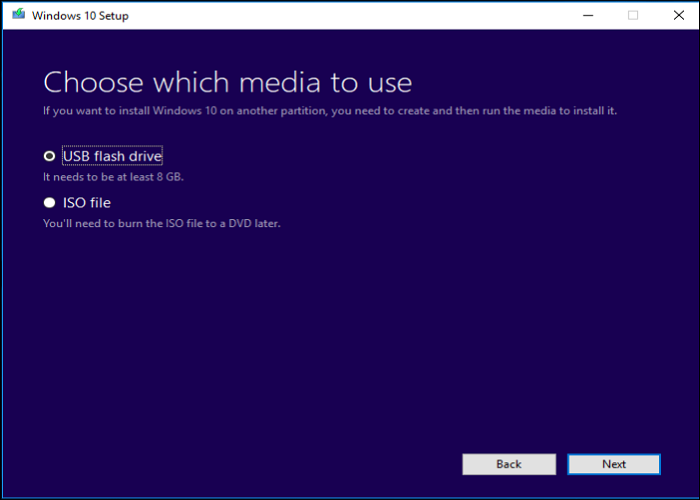
Step 4: Choose which media you want to use. You can choose USB flash drive or ISO file, which depends on the device you want to use to store this image on. Click Next to continue.
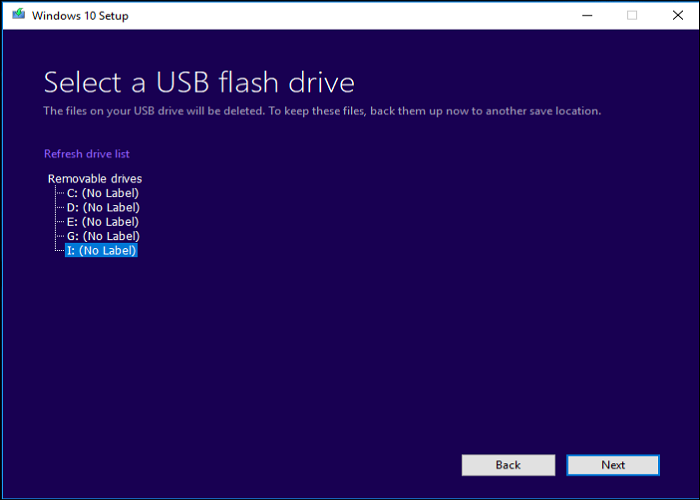
Step 5: The storage media connected to your computer will show up on the list. Select a USB or DVD drive from the list and click Next.
Step 6: The Media Creation Tool will download the necessary files. This process will take you a few time, please wait patiently.
After you complete all the steps above, you will have your recovery media. Now that you can start the recovery drive to solve the booting problem through the steps below.
Perform a Repair Installation
Step 1: Insert the installation drive which you have just created to boot your computer. Depending on the operating system you have installed, the initial screen will be different.
Step 2:Select language to install, time and currency format and keyboard or input method, and then click Next.
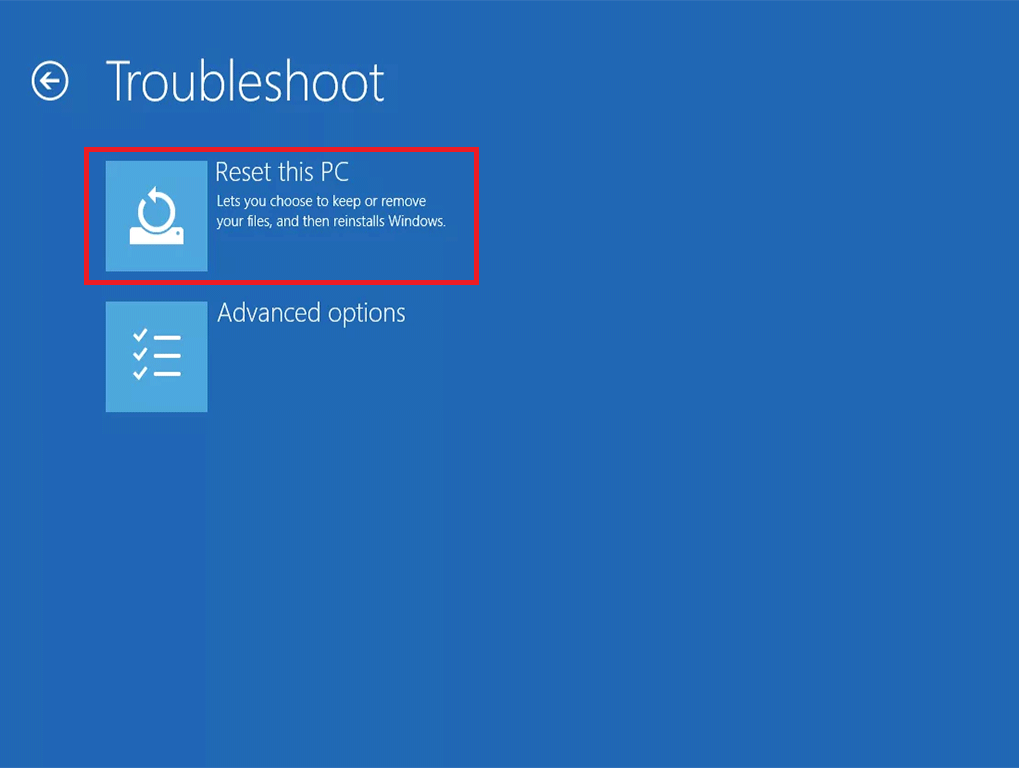
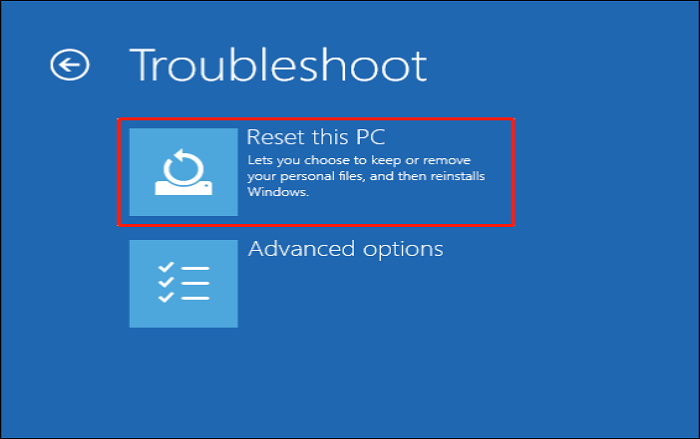
Step 3: Click the Repair your computer option to enter the Windows Recovery Environment.
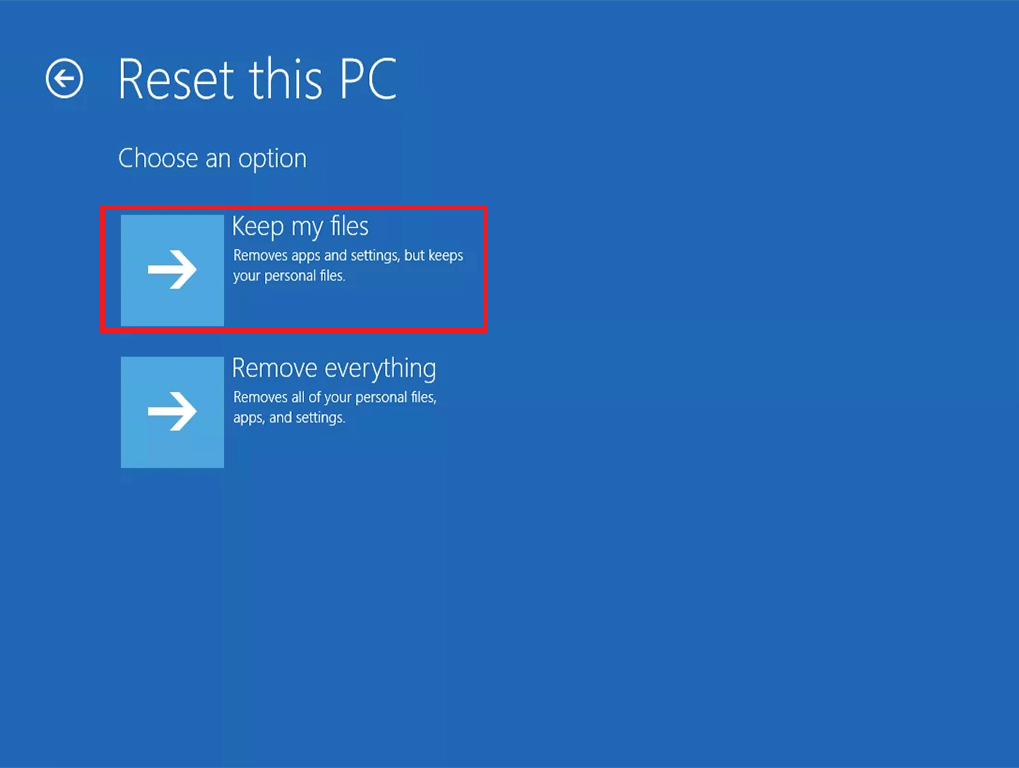
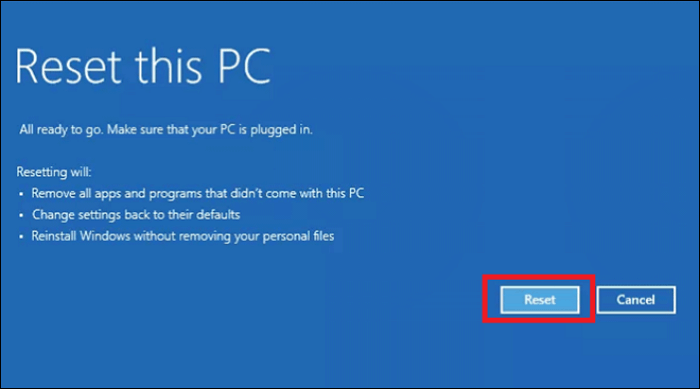
Step 4: Select Troubleshoot firstly and then choose Reset this PC.
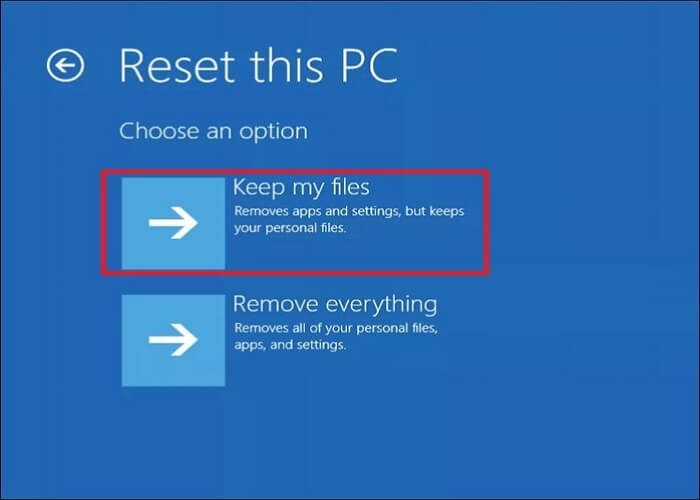
Step 5: Select Keep my files. Wait while the Reset this PC process prepares to start.
Step 6: Once Reset this PC is loaded, enter the password for your account and then click Continue.
Step 7: Click the Reset button once you’re absolutely sure that this is what you want to do.
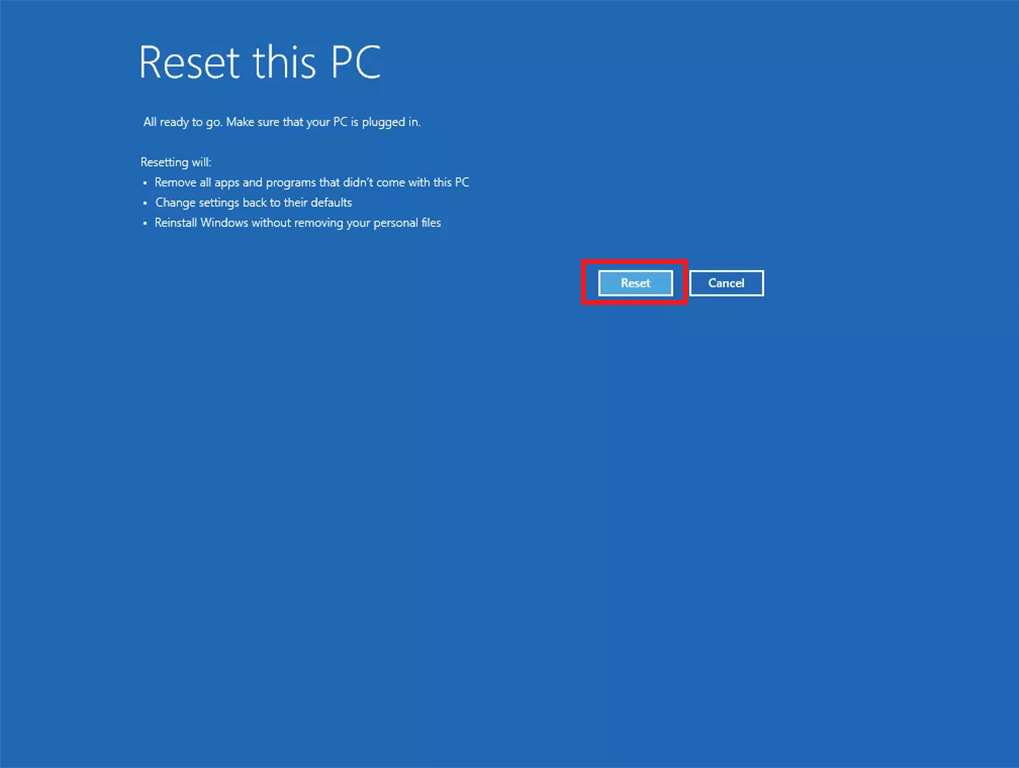
After completing the process of Reset this PC, you should again have working access to your Windows. Right now, you can check to see if the BSODs still appear in a loop.
Make a Backup with MiniTool ShadowMaker to Protect Your Windows
- Choose the Source File
- Choose a Destination Path to Save Backup Files
- Perform Backup Operation
Further Reading: An Useful Method to Protect Your Windows
Sometimes, an automatic Windows update can cause data loss. Thus, in order to keep your data safe, you need to back up your data in advance. You are highly recommended to use great backup software – MiniTool ShadowMaker.
Tip: It’s best to back up your system before Windows updates automatically so that you can restore the operating system to its previous state.
MiniTool ShadowMaker is a data protection and disaster recovery solution for your PC. With it, you can back up files, partitions, OS and even the whole disk and you are allowed to restore data if you encounter system crash, hard drive failure, and more.
Tip: If your hard drive is corrupted all of a sudden, read this post to find the way to recover data: This Tells How To Recover Data After Hard Drive Crash On Windows.
In addition, when your computer fails to boot, you can also restore the system to a normal state with created bootable media. It is also a powerful piece of file sync software that allows you to sync files and folders.
Right now, you can download MiniTool ShadowMaker Trial Edition to back up your data to prevent your data loss.
MiniTool ShadowMaker TrialClick to Download100%Clean & Safe
The following part will show you how to make a file backup with the Backup function of MiniTool ShadowMaker.
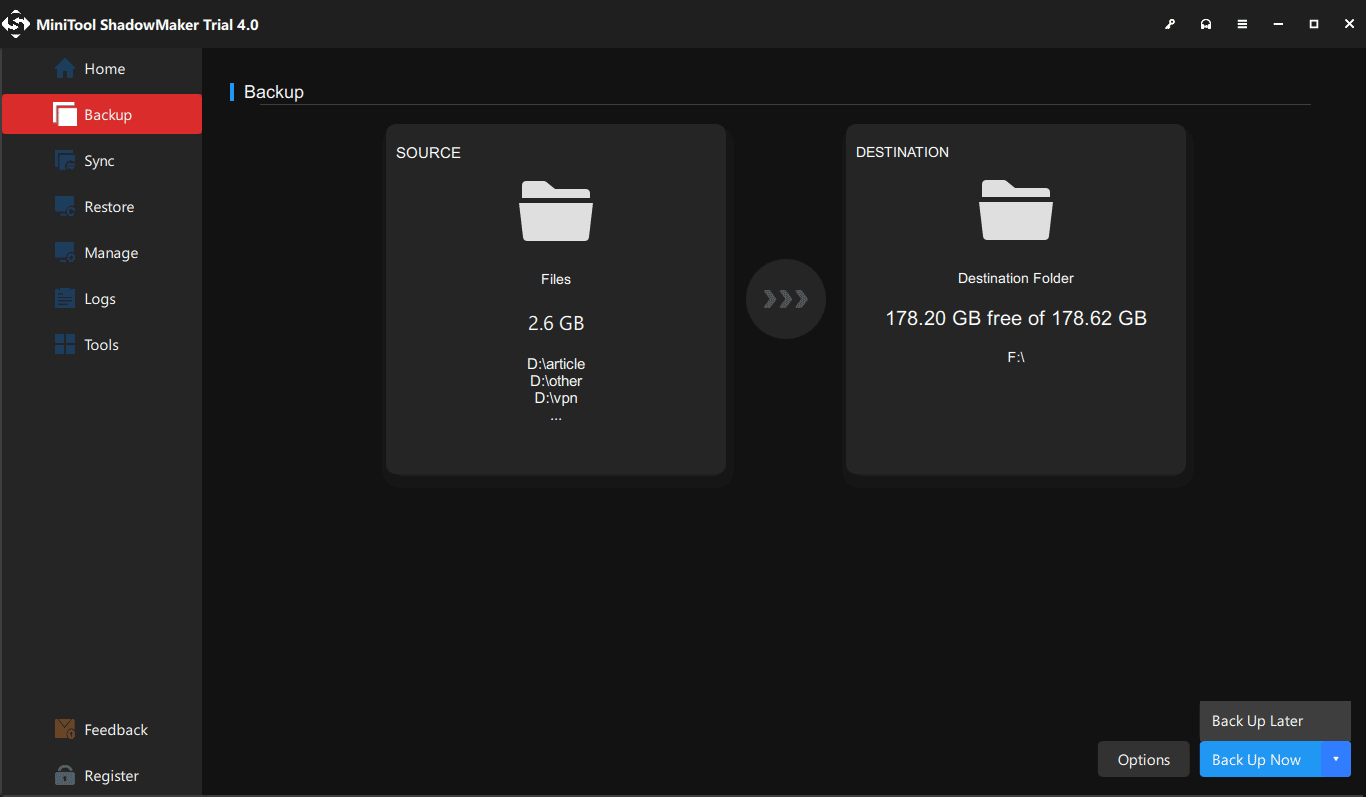
Step 1: Choose the Source File
1.Run MiniTool ShadowMaker to enter its interface.
2.After entering the main interface of MiniTool ShadowMaker, click the Backup tab to continue.
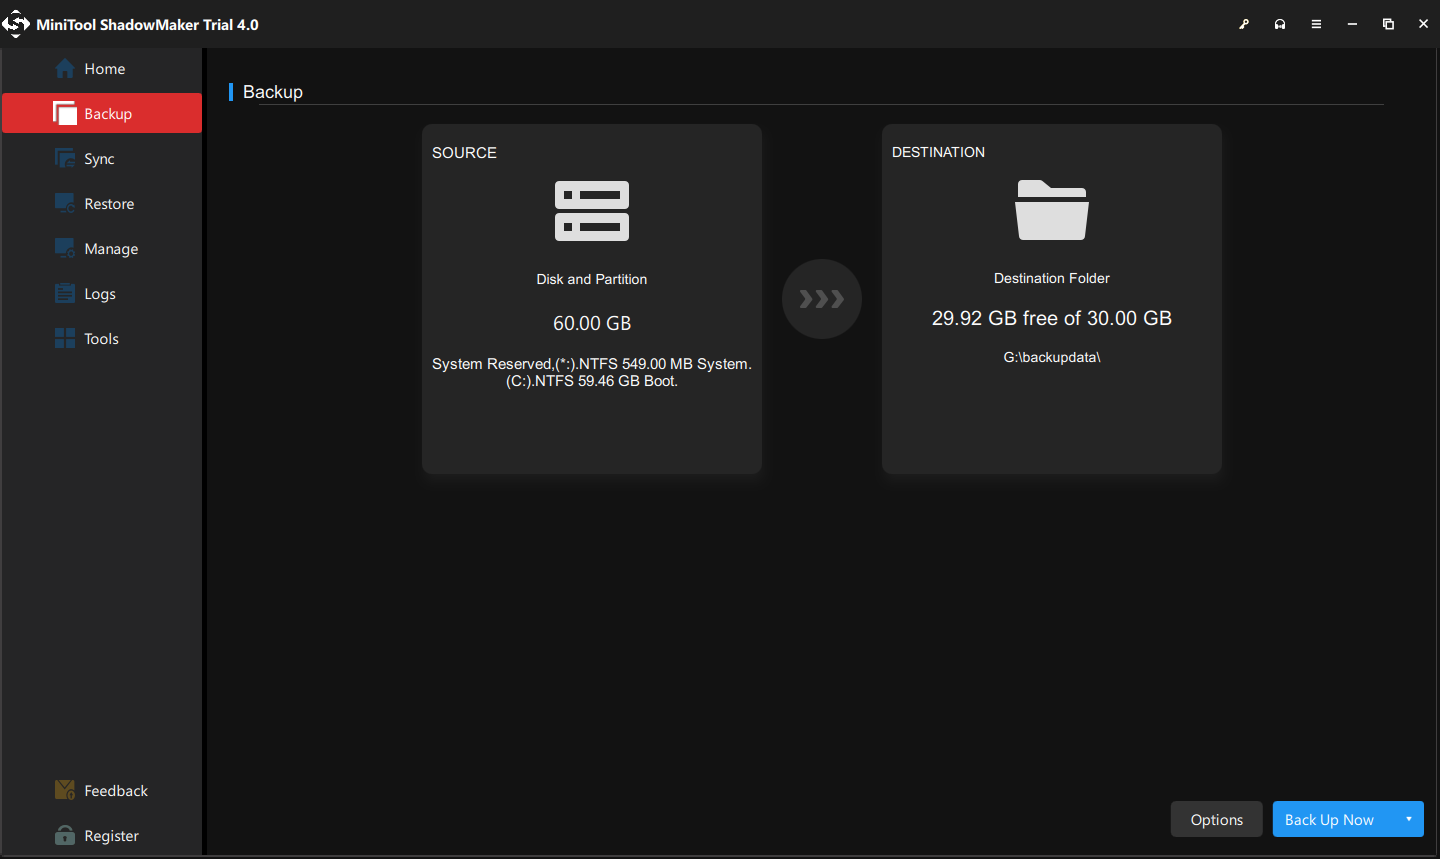
Tip: In general, the system reserved partition and C drive are selected by default. You can choose another backup source – file/folder/disk/partition which you want to back up.
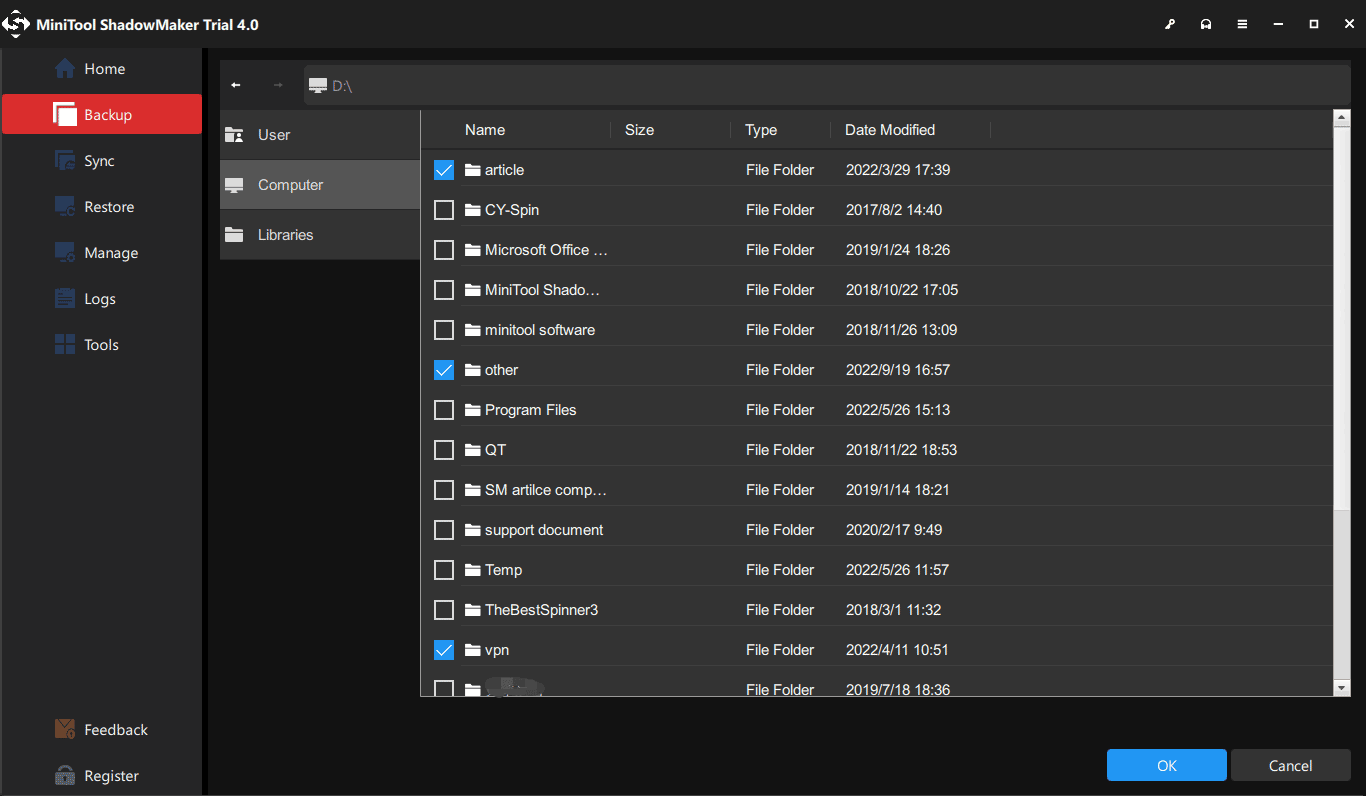
3.Click the SOURCE module firstly and then select the source type you want to back up. Here, you should choose files as backup source to avoid losing data.
Step 2: Choose a Destination Path to Save Backup Files
1.Click the DESTINATION module.
2.Then click a destination where you want to save backup files. There are 5 types of destination paths for you to choose – User, Libraries, Computer, Shared. Click OK to continue.

Step 3: Perform Backup Operation
1.Click Back Up Now to execute the backup operation immediately.
Tip: You can also choose Back Up Later to carry out the operation later, and you need to click Back Up Now in the Manage page to execute the pending operation.
2.Read the confirmation and click OK to continue. You can also check Shut down the computer when all the running backup tasks are finished.

Tip: If you want to make some advanced settings for backup files, you can click Schedule Settings, Backup Options, and Backup Scheme in Options, but you need to change the settings before you click Back up Now. If you are interested in the Scheme function, read this post – 3 Types of Backup: Full, Incremental, Differential – MiniTool
In addition to Backup, Sync is also a powerful tool of MiniTool ShadowMaker to protect your data. With this function, you can sync files and folders. The following part will show you how to sync files with this tool briefly.
Step 1: Run MiniTool ShadowMaker to enter its interface.
Step 2: Select the files you want to sync from the SOURCE tab and then select a destination where you want to save the synced files from the DESTINATION tab.
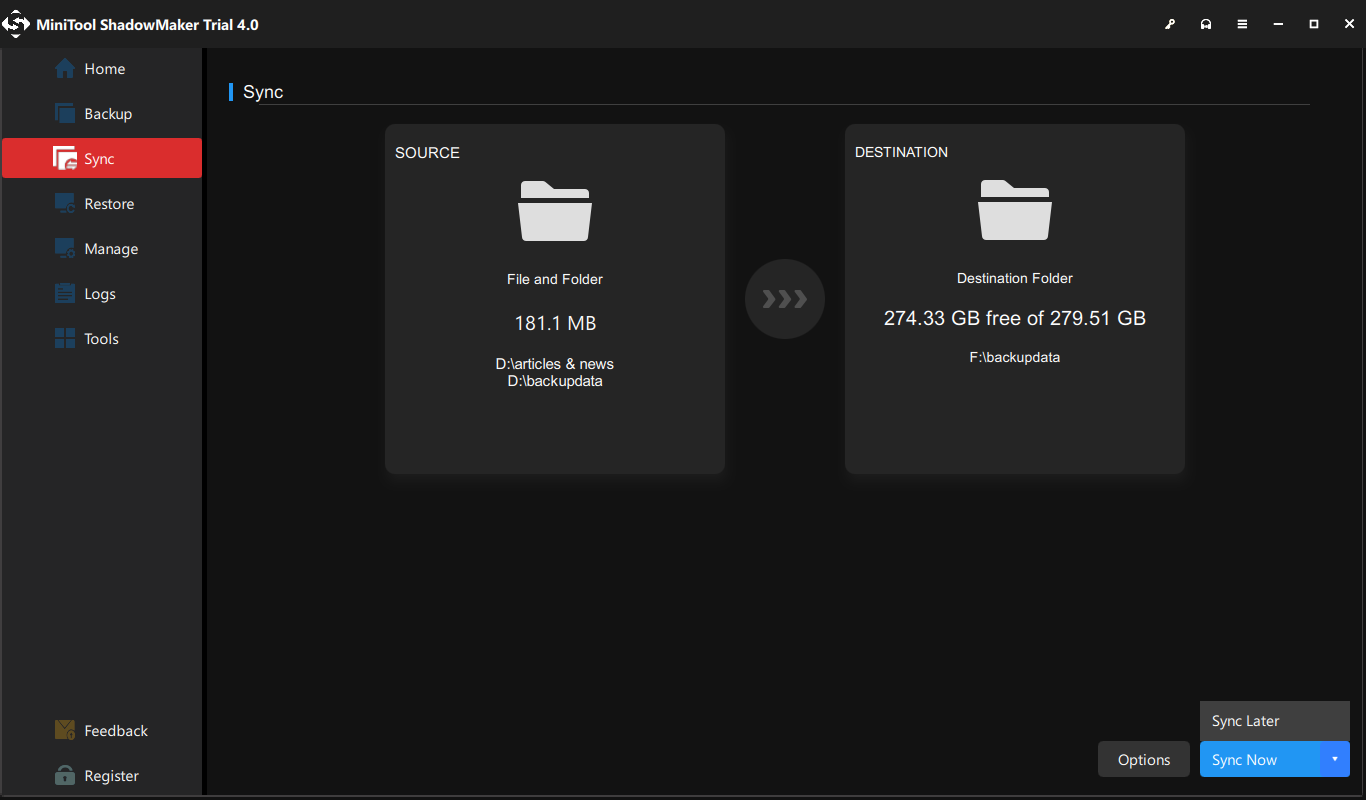
Step 3: Click Sync Now to perform this operation immediately.
Tip: You can also choose Sync Later to carry out the operation later, and you need to click Sync Now in the Manage page to execute the pending operation.
After you complete all the steps above, you can successfully sync files with MiniTool ShadowMaker.
If you want to learn more about sync and get more details of syncing files with MiniTool ShadowMaker, click to read this post – The Best File Synchronization Software – MiniTool ShadowMaker.
After reading this post, I successfully solve “Windows Update service could not be stopped” issue. Meanwhile, with MiniTool ShadowMaker, I create a backup in advance.Click to Tweet
Conclusion
This post has shown you 3 useful methods to solve “Windows Update service could not be stopped” issue. It also introduces you a useful tool to back up your data when you encounter this issue. If you cannot disable Windows Update service either, you can try methods above.
If you have any problems when you are using our program, feel free to contact us with the email [email protected].
Windows Update Service Could Not Be Stopped FAQ
How do I force Windows Update Service to stop?
- Press Win + R to open the Run command. Next, type services.msc and press Enter to open Services.
- From the Services list, find the Windows Update service and open it.
- Under the General tab, change Startup type to Disabled. Click Apply > OK.
- Restart you PC.
How do I manually kill a service in Windows?
- Right-click the Start menu and select Run.
- Look for the service, check the Properties and identify its service name.
- Once found, open a command prompt. Type sc queryex [servicename] and press Enter.
- Identify the PID.
- In the same command prompt type taskkill /pid [pid number] /f and press Enter.
What service is Windows Update?
It is a free service offered by Microsoft. It provides updates such as service packs and patches for the Windows operating system and other Microsoft software. It can also be used to update drivers for popular hardware devices.
What service is Wuauserv?
By default, the Windows update service is set to trigger manually. Recommended setting is Windows 10. One loads automatically at startup. Manually load when the process requires it (which can cause errors for services that require automatic services).
Windows OS automatically updates the OS with Windows Update services. Sometimes, these automatic updates causes may make the system erroneous. To avoid it, you try to stop the updates, only to encounter the «Windows update service could not be stopped» error. EaseUS will get into the details and help you fix the error. Let’s begin!
What Causes Windows Update Service Can’t Be Stopped
Windows Update Services automatically installs the updates on your PC. But, the process is not always feasible and results in errors. Even with the «net stop wuauserv» command, the Updates services are still running. Here are some common reasons for the issue.
- Missing administrator privileges: If you are not running the command prompt with administrator privileges.
- Issues with the computer: The whole update issue could be a problem on your computer.
How to Fix the Can’t Stop Windows Update Service Error
The following part will provide potential methods to fix the»Windows Update service could not be stopped» problem.
Way 1. Reboot your PC
Reboot your PC. This will restart the OS services and update the pending updates. If you have pending updates, you cannot stop the Update components.
Way 2. Stop Windows Update Service Process
If the OS won’t let you stop the Windows Update service, you can use CMD to stop the services. The Windows Update Service, also known as WUAUSERV is recognized by a PID. You can use the PID to stop the service and fix the «Windows update service could not be stopped» issue.
Step 1. Open Task Manager on your PC. Press the Start button and search for it.
Step 2. Expand the Task Manager, and navigate to the Services tab using More Details.
Step 3. Find the WUAUSERV service and note the PID number.

Step 4. Open the command prompt with administrative privileges and enter the below command.
- taskkill /f /pid PID

Note: Replace PID with the PID number you noted by the task manager.
After executing, if the command prompt shows that the process with PID is terminated successfully, you have stopped the Windows update services on your PC.
Share this post on your social media if it helps you solve your problem.
Way 3. Clear Update Folder
The Windows Update folder consists of all the files related to the updates. Be it resetting the Update components or fixing the automatic updates, you can delete these folder contents to stop the Windows update service. Steps to clean the contents of the Update Folder.
Step 1. Launch the command prompt with admin privileges.
Step 2. Type the two commands and press Enter after each entry.
- net stop wuauserv
- net stop bits
Step 3. Open File Explorer on this PC, and navigate to the location below.
- C:\Windows\SoftwareDistribution
Step 4. Open the folder SoftwareDistribution and select all the files in it. Use Ctrl + A to choose, and delete all the content using the context menu.
Step 5. If you want to start the update services again, type net start wuauserv and net start bits and execute them.
Once you finish the steps, the Windows Update services will be stopped successfully.
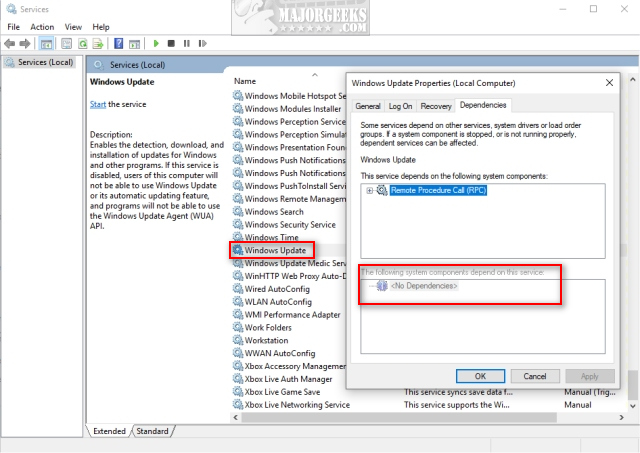
Way 4. Check Service Dependencies
If you are still finding it difficult to stop the Windows update services, it could be due to service dependencies. Some services have dependencies, meaning you cannot stop a service, as the other service running concurrently is dependent on the Update service. So, you have to find the dependent services and stop them.
Step 1. Press Windows + R and enter services.msc.
Step 2. Find the Windows Update wuauserv service, and right-click on it.
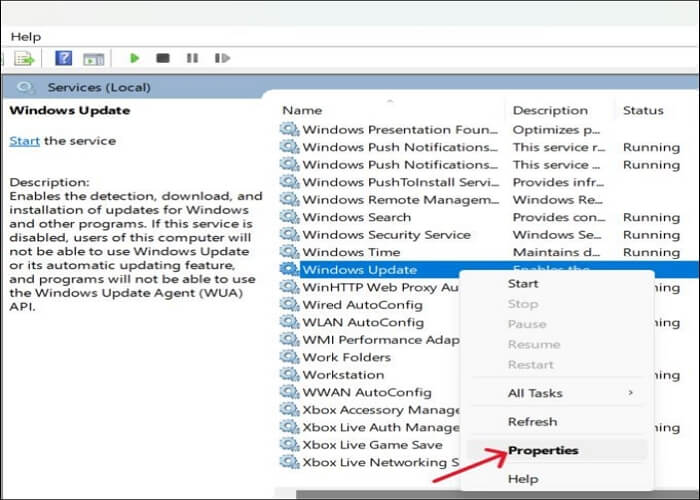
Step 3. Under Properties, click on dependencies.
Step 4. Check under The following system components depend on this service tab, to find the dependant services.
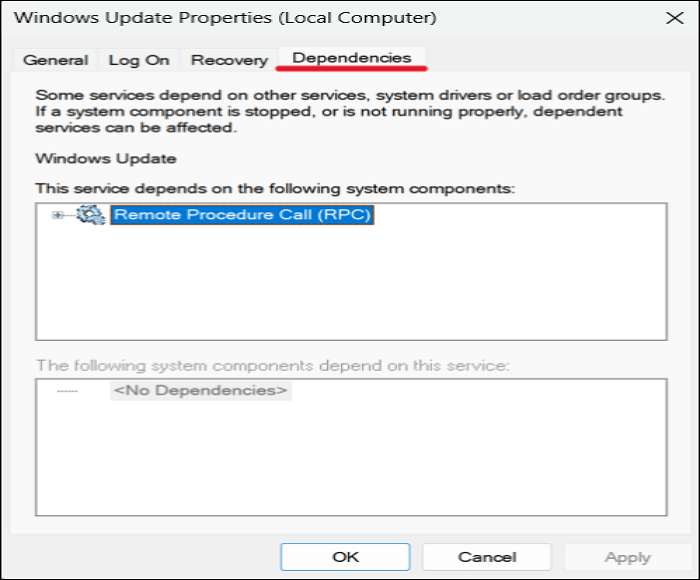
Step 5. Now, stop the dependent services first and try stopping the Windows update services.
Way 5. Perform Repair Installation
To perform a repair installation, you will have to create a bootable Windows 10 media using a USB or CD. This way, you will not lose any personal files and will have the latest version of Windows. Learn how to create a Windows 10 live USB and perform a repair installation.
Part 1. Create Bootable Windows 10 Media
Step 1. Download the Windows Media Creation Tool from Microsoft. Now, accept the terms and conditions and get the software on your PC.
Step 2. From the Windows 10 setup screen, select Create installation media (USB flash drive, DVD, or ISO file) for another PC and click Next.
Step 3. Choose the language, Edition, and Architecture if you want to customize, or just select Use the recommended options for this PC.
Step 4. Now, you need to choose the type of Media. Go with the USB flash drive, and click Next. Make sure you have 8GB of free space on the USB.
Step 5. You can see all the storage devices connected to the computer in the next select, select the USB or CD/DVD, and click Next.
Step 6. The Media Creation Tool will download all the necessary files for a repair installation. Wait till the process is done.
Once you have your recovery drive with installation files, follow the steps below to boot the computer with the recovery drive and solve the Windows Update service could not be stopped error.
Part 2. Perform the Repair Installation
Step 1. Insert the recovery drive you have created to boot the computer. The initial screen may be different based on the OS you have installed.
Step 2. Choose the language, time, currency, and input method, and click Next.
Step 3. Select the Repair your computer option to invoke WinRE.
Step 4. In the Troubleshoot section, select Reset this PC.
Step 5. Choose Keep my files, and wait until the reset process begins.
Step 6. As soon as the Reset this PC process loads, the system prompts you to enter the password for your account.
Step 7. Click the Reset if you are sure that you want to install the new updates with the USB flash drive.
After the process is complete, you will have access to the latest version of your PC.
Share this post on your social media if it helps you solve your problem.
Pro Tip: How to Protect Your Windows in an Easy Way🔥
Windows Update problems can erase your entire data sometimes. Even with the best preventive methods and fixes, your data is under threat. So, to keep your data safe, you need to back it up and recover it in emergencies. EaseUS Todo Backup Free is a reliable and efficient backup software that allows you to create copies of your files.
You can back up files, folders, hard drives, or the entire PC. The seamless recovery only takes a click to get all the files back on your PC. As the best file sync software for Windows, it also lets you sync files between computers and hard drives.
The software offers the cloud backup to store a copy of your data at all times. You can schedule backups and use password-protect features to add more protection. Get your hands on the free version and backup important data on your PC.
Step 1. Launch EaseUS Todo Backup on your computer, and click Create Backup on the home screen and then hit the big question mark to select backup contents.

Step 2. To back up your Windows operating system, click «OS» to begin the backup task.

Step 3. Your Windows operating system information and all system related files and partitions will be automatically selected so you don’t need to do any manual selection at this step. Next, you’ll need to choose a location to save the system image backup by clicking the illustrated area.

Step 4. The backup location can be another local drive on your computer, an external hard drive, network, cloud or NAS. Generally, we recommend you use an external physical drive or cloud to preserve the system backup files.

Step 5. Customiztion settings like enabling an automatic backup schedule in daily, weekly, monthly, or upon an event, and making a differential and incremental backup are available in the Options button if you’re interested. Click «Backup Now«, and the Windows system backup process will begin. The completed backup task will display on the left side in a card style.

To Wrap Things Up
Automatic updates install all the updates without the user’s authorization, resulting in errors. If you tried to stop the update services and were stuck on Windows update service could not be stopped error, find out what you can do to fix it. If you want to protect your data from such emergencies, use EaseUS Todo Backup to make a backup of all your data and recover it whenever you need.
FAQs on Windows Update Service Cannot Be Stopped
Here are some frequently asked questions about Windows Update Services cannot be stopped error.
1. How do I force the Windows Update service to stop?
In the Run dialog box, type services.msc and press Enter. Under the Services tab, find the Windows Update service and force it to stop.
2. How do I permanently stop the Windows 10 update service?
Open the task manager and navigate to the Services section. Check for the Windows update service, right-click on it, and select Stop to disable the services permanently.
3. How to stop the Windows update service using cmd?
Find the PID of the Windows Update Service, and open the command prompt with administrator privileges. Enter the command «taskkill /f /pid ****» and replace the **** with PID to terminate the service.
4. Why is Windows Update always stuck?
The Windows Update is stuck because the OS ran into some issues. A frozen blue screen appears and takes forever to update.
Download Windows Speedup Tool to fix errors and make PC run faster
If you are trying to stop Windows Update service using Command Prompt, but you receive a message The Windows Update service could not be stopped, here is what you can do to stop the Service. This message appears only when you use the Command Prompt to stop the Windows Update service – and if CMD doesn’t have the admin privilege. Many people are trying to disable automatic Windows 10 Update, but you cannot stop the service for some reason, then this article will help you.
The usual command to stop the Windows Update service using CMD is:
net stop wuauserv
But this may at times return the error message. If you cannot stop it even via the Windows Services Manager, then read on.
If Windows Update Service won’t stop then this post will show you how to stop this WUAUSERV service on Windows 11/10:
- Stop Windows Update service using PID
- Check Service dependencies.
1] Stop Windows Update service using PID
Every running process or service has a unique ID or PID. You can find it in the Task Manager and then use it to stop the service.
Open the Task Manager and go to the Services tab. Here you should find a service named wuauserv. You need to get the PID of that running service.

After that, open Command Prompt with administrator privilege and enter this command-
taskkill /f /pid <PID>
Do not forget to replace <PID> with original PID that you copied earlier from the Task Manager – which in our case is 6676.
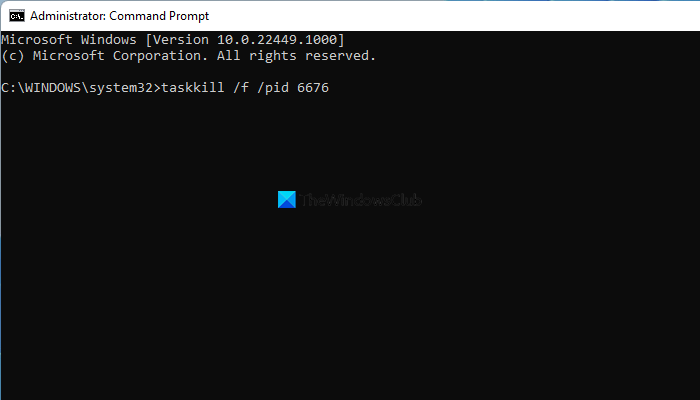
You should be greeted with a message like this-
SUCCESS: The process with PID 6676 has been terminated.
This means you have successfully stopped the Windows Update service.
2] Check Service dependencies
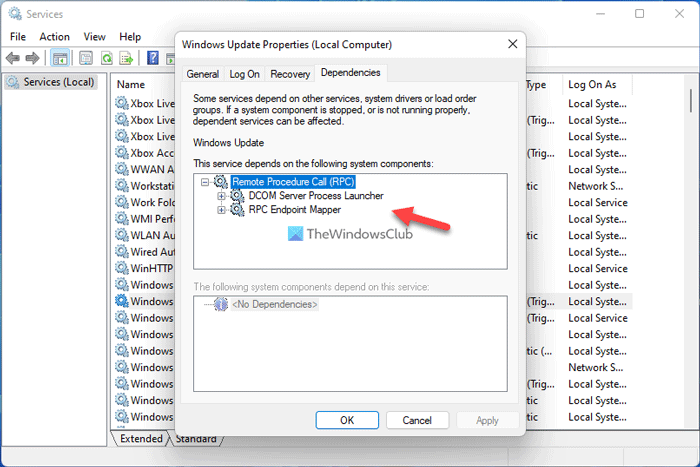
Most Windows services depend on other services. Sometimes those services can cause an issue due to some internal conflict. At such times, you should check the dependencies. In this case, you need to find Dependencies of this Windows Service. If any running service is using the WU service, then you may be required to stop that service first.
Hope this helps!
How do I force Windows Update Service to stop?
You can use Command Prompt to force the Windows Update service to stop in Windows 11/10. For that, you need to take the help of the Task Manager to find the PID, which is assigned with every running task. After that, you can open elevated Command Prompt and enter taskkill /f /pid <PID> command to stop the service from running on your PC.
Why can I not stop Windows Update service?
You must have administrative privilege to stop the Windows Update service. If your account doesn’t belong to the Administrator group, you might not be able to stop this service on your computer. Therefore, log in to your Administrator account and stop the Windows Update service using Services or Command Prompt. On the other hand, it is recommended to check the service dependencies as well.
Anand Khanse is the Admin of TheWindowsClub.com, a 10-year Microsoft MVP (2006-16) & a Windows Insider MVP (2016-2022). Please read the entire post & the comments first, create a System Restore Point before making any changes to your system & be careful about any 3rd-party offers while installing freeware.
Reader Interactions
By Timothy Tibbetts |
Occasionally when using «net stop wuauserv» from the Command Prompt or PowerShell, you might get an error message saying that «The Windows Update service could not be stopped.» Here are the steps you can take to stop the Windows Update Service.
Before we get started, stopping Windows Updates this way is only temporary. The next time Windows needs to check for updates, the Service will be restarted. The same goes for rebooting. If you’d like to stop Windows Updates for a period of time, we suggest reading Configure When and How Windows Updates Are Delivered or How-to Change Rollback Days for Windows 10 Feature Upgrades.
1: Reboot
The first thing to try is a reboot. If there are pending Windows Updates, this could be why the service can’t be stopped. Assuming you already tried restarting, let’s try a couple of other ideas.
2: Stop Windows Update Service by PID
You’ll find that every process has a unique ID or PID. By identifying the PID for wuauserv, we can try to stop it from the Command Prompt.
Press CTRL+ALT+DEL and click on Task Manager. Click on the Services tab. Find wuauserv and make note of the PID.
Now open the Command Prompt or PowerShell as Admin and type in taskkill /f /pid **** where **** is your PID.
If this worked, you’d see a message that says SUCCESS: The process with PID **** has been terminated.

3: Check for Dependencies
Some services will have dependencies, meaning you can’t stop the service because something else is depending on it or vice versa. We need to check for any dependencies and stop them first.
Press the Windows Key + R and type in services.msc.
Scroll down to Windows Update, right-click and click on Properties.
Click on the Dependencies tab.
If you see any services listed under The following system components depend on this service you will need to find the service, right-click on that service and click on Stop. If that service can’t be stopped, find the PID as explained in Step 2 and try to stop the service that way.
Similar:
Configure When and How Windows Updates Are Delivered
How-To Delete Pending Windows Updates
How-to Change Rollback Days for Windows 10 Feature Upgrades
Some Updates Were Canceled When Running Windows Update
comments powered by Disqus