The windows media player network sharing service

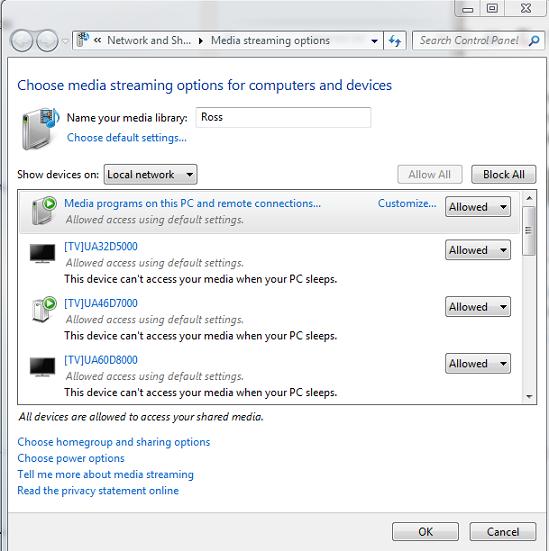
The Windows Media Player Network Sharing Service (WMPNetworkSvc) shares Windows Media Player libraries with other networked players and media devices by using the UPnP architecture.

This service is installed by default in all editions of Windows 7, and its startup type is Automatic on Windows 7 Home Premium and Windows 7 Professional. In all other editions of Windows 7, its startup type is Manual.

When the Windows Media Player Network Sharing Service is started in its default configuration, it logs on by using the Network Service account.

The Windows Media Player Network Sharing Service is dependent on the following system component:

  • HTTP

Related content

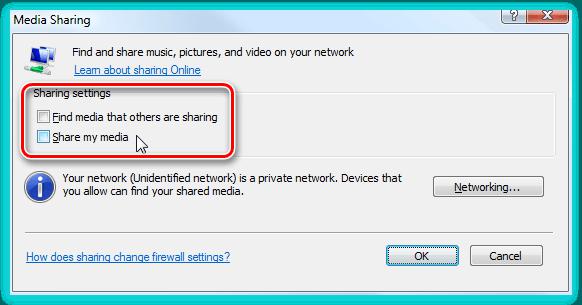
Windows Media Player is the world’s most popular media playing program. It lets users participate in network sharing among other things. However, if it is not required, you can disable the Windows Media Player Network Sharing feature. We will show you how to do so in this article.

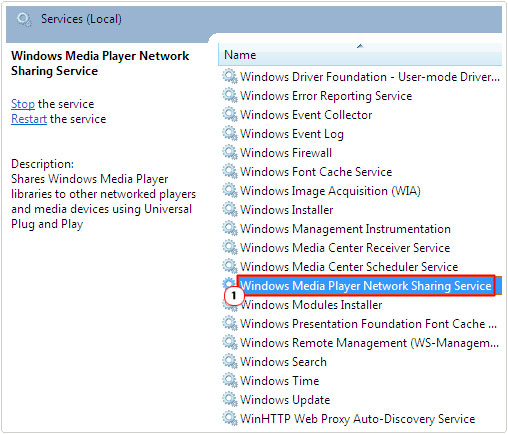
  • Click on Start > type «services.msc» in the search field and press Enter.
  • In the «Services» window, look for the following entry:
  • Windows Media Player Network Sharing Services
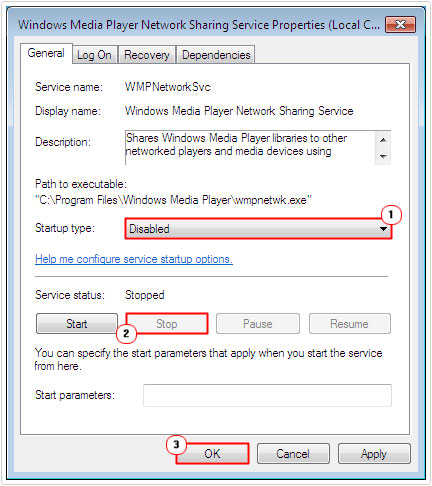
  • Double click and set the «Startup type» as «Disabled«
windows media player

© Copyright free
  • Click on OK to validate.

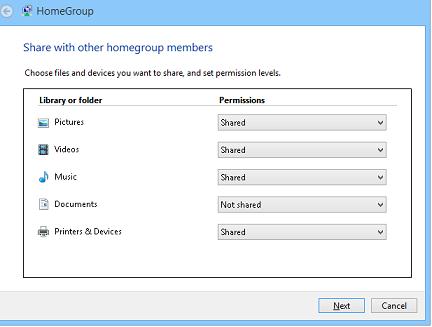
This service is only required for Homegroup sharing and can be safely disabled!

Note: If you don’t have Windows Media Player, you can easily download it here for Windows computers, and here for Mac computers.

Do you need more help with Windows Media Player? Check out our forum!

Shares Windows Media Player libraries to other networked players and media devices using Universal Plug and Play.

This service also exists in Windows 11, 8 and Vista.

Startup Type

Windows 10 version Home Pro Education Enterprise
1507 Manual Manual Manual Manual
1511 Manual Manual Manual Manual
1607 Manual Manual Manual Manual
1703 Manual Manual Manual Manual
1709 Manual Manual Manual Manual
1803 Manual Manual Manual Manual
1809 Manual Manual Manual Manual
1903 Manual Manual Manual Manual
1909 Manual Manual Manual Manual
2004 Manual Manual Manual Manual
20H2 Manual Manual Manual Manual
21H1 Manual Manual Manual Manual
21H2 Manual Manual Manual Manual
22H2 Manual Manual Manual Manual

Default Properties

Display name: Windows Media Player Network Sharing Service
Service name: WMPNetworkSvc
Type: own
Path: %ProgramFiles%\Windows Media Player\wmpnetwk.exe
Error control: normal
Object: NT AUTHORITY\NetworkService
Privileges:
  • SeChangeNotifyPrivilege
  • SeCreateGlobalPrivilege
  • SeImpersonatePrivilege

Default Behavior

The Windows Media Player Network Sharing Service is running as NT AUTHORITY\NetworkService in its own process of wmpnetwk.exe. It doesn’t share its process with other services. If Windows Media Player Network Sharing Service fails to start, the error is logged. Windows 10 startup proceeds, but a message box is displayed informing you that the WMPNetworkSvc service has failed to start.

Dependencies

Windows Media Player Network Sharing Service is unable to start, if at least one of the following services is stopped or disabled:

  • HTTP Service
  • Windows Search

Restore Default Startup Type of Windows Media Player Network Sharing Service

Automated Restore

1. Select your Windows 10 edition and release, and then click on the Download button below.

2. Save the RestoreWindowsMediaPlayerNetworkSharingServiceWindows10.bat file to any folder on your hard drive.

3. Right-click the downloaded batch file and select Run as administrator.

4. Restart the computer to save changes.

Note. Make sure that the wmpnetwk.exe file exists in the %ProgramFiles%\Windows Media Player folder. If this file is missing you can try to restore it from your Windows 10 installation media.

Yea, though I walk through the valley of the shadow of death, I will fear no evil: for thou art with me; thy rod and thy staff they comfort me.

Attention Before you read this post, I highly recommend you check out my resources page for access to the tools and services I use to not only maintain my system but also fix all my computer errors, by clicking here!

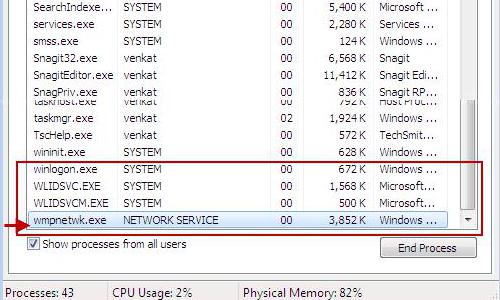
It’s most likely that you noticed the wmpnscfg.exe process while you were browsing through Windows Task Manager. Wmpnscfg.exe is a Windows Media Player (WMP) process, and since, it’s highly unlikely that you actually use WMP; you’d probably want to know why it’s running.

It’s not a process that consumes an awful amount of resources, but it can be rather annoying, when you close it, only for it to restart itself.

What Is Wmpnscfg.exe?

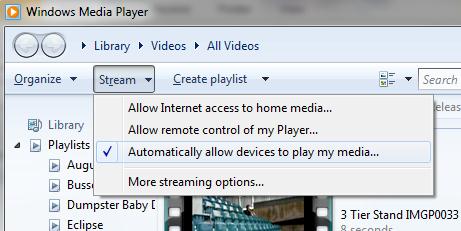
When a new media device becomes available across your network, the wmpnscfg.exe will display a popup notification in your system tray. When you click on the notification window, it will automatically launch WMP where you can share your files.

Wmpnscfg.exe is a Windows Media Player component that allows for media network sharing. This process will notify the user when a new media device has connected to the network. To put it simply, this process allows the end users to share media files across a network, usually between the computer and a third-party device, such as Xbox 360.

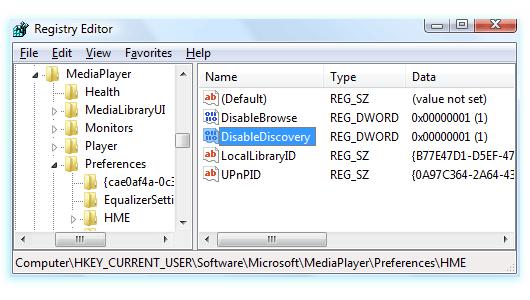
Wmpnscfg.exe is an important though not crucial aspect of Windows Media Player. This file works as a substitute for Windows Media Connect, which has now been integrated into the latest versions of WMP. That said; disabling file sharing in Windows Media Player will usually not be enough to prevent this process from starting back up. However, this process can also be quite handy, when sharing media with another computer, across a network.

Common Wmpnscfg.exe Issues

There are a number of issues associated with this process. However, of these many issues, the ones that tend to occur most often are as follows:

  • When the system first boots up, the operating system loads two instances of the wmpnscfg.exe process. This number slowly increases over time until you have an excessive number of wmpnscfg.exe processes running in the background.
  • When waking your computer out of sleep mode, it’s not uncommon for the user to be confronted with the following error message:

    “Wmpnscfg.exe – Application Error” “The instruction at 0xff42c01 referenced memory at 0x02450d01. The memory could not be written. Click OK to terminate the program.”

    The referenced memory location will vary from error to error, but the error message itself, remains the same.

  • Numerous instances of the wmpnscfg.exe process are loaded into memory, causing other running applications to crash.

Common Causes of Wmpnscfg.exe Issues

The various processes and applications that run on your computer have an enormous effect on its performance, wmpnscfg.exe notwithstanding. If you are yet to experience any real problems with this process, then it’s probably because you do not use it to share media. The general one fits all solution, is to uninstall the application in the event of a problem.

With that said the most common causes for issues with the Wmpnscfg.exe process are as follows:

  • The application associated with the process (which is Windows Media Player) is either outdated or corrupted. Windows Media Player must be working correctly, in order for the network sharing service (wmpnscfg.exe) to work.
  • Certain DLL files required for wmpnscfg.exe to work are either missing or corrupt.
  • The computer has been infected with a virus.
  • The Windows registry has been corrupted, resulting in wmpnscfg.exe errors. The registry is an integral component of the operating system, and so, errors, corruption and faults within this component can cause errors in applications and device drivers.

How to Fix It

There are several things that can be done to fix wmpnscfg.exe based issues. The solution that you do eventually adopt should depend greatly on the extent of the problem(s) on your computer. Typically, performance issues won’t require such drastic measures as error messages.

With that said, I suggest you continue reading for working solutions, to problems associated with wmpnscfg.exe.

Run a Malware Scan

It’s not uncommon for your wmpnscfg.exe issue(s) to be due to a virus infection. If your system is infected with a malicious file, such as spyware, malware or Trojan horse, then the wmpnscfg.exe may have been compromised. In situations like this, a virus will get onto your system and disguise itself as a legitimate process (such as wmpnscfg.exe in this case), giving the hacker backdoor access to your computer.

Symptoms will include wmpnscfg.exe application errors, prohibiting Windows Media Player from working. Thus, as a solution, you should definitely run a full virus scan of your system, using SpyHunter, an antimalware tool which is the very best in the marketplace today.

Anyway, you can acquire SpyHunter from here:

CLICK HERE TO CHECK OUT SPYHUNTER

The solution(s) below are for ADVANCED level computer users. If you are a beginner to intermediate computer user, I highly recommend you use the automated tool(s) above!

Reinstall Application

If you’re having problems with the wmpnscfg.exe process, whether it’s not allowing you to share media files or it’s constantly crashing the WMP, then you should consider reinstalling the application. To do that, simply do the following:

Note: These instructions are for Windows Vista/7/8/8.1/10 based systems.

1. First, boot into your computer with full administrative rights.

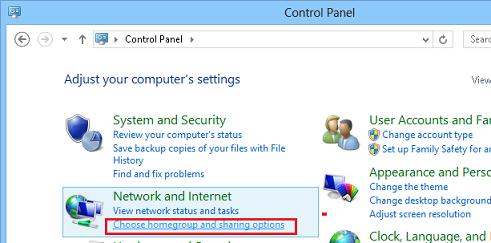
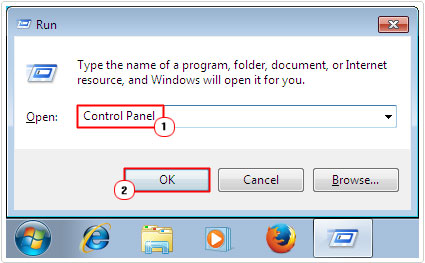
2. Then press + R, type Control Panel and click on OK.

run - data-lazy-src=

3. When Control Panel loads up, click on Programs.

4. This will take you to the Programs option, from here, click on Turn Windows features on or off.

Programs -> Turn Windows features on or off» width=»546″ height=»275″ src=»https://www.compuchenna.co.uk/wp-content/uploads/2016/04/Wmpnscfg-exe-2.jpg?x73977″ srcset=»https://www.compuchenna.co.uk/wp-content/uploads/2016/04/Wmpnscfg-exe-2.jpg 546w, https://www.compuchenna.co.uk/wp-content/uploads/2016/04/Wmpnscfg-exe-2-300×151.jpg 300w»></p>
<div class= Картинка с сайта: www.compuchenna.co.uk

5. A Windows Feature applet should appear (wait for it to finish loading), then click on the + symbol next to Media Features, and un-tick the box next to Windows Media Player and click on OK.

Media features -> un-tick Windows Media Player box» width=»441″ height=»387″ src=»https://www.compuchenna.co.uk/wp-content/uploads/2016/04/Wmpnscfg-exe-3.jpg?x73977″ srcset=»https://www.compuchenna.co.uk/wp-content/uploads/2016/04/Wmpnscfg-exe-3.jpg 441w, https://www.compuchenna.co.uk/wp-content/uploads/2016/04/Wmpnscfg-exe-3-300×263.jpg 300w»></p>
<div class= Картинка с сайта: www.compuchenna.co.uk

Note: You may be required to restart your computer, to finish the uninstallation process.

6. Once you have successfully removed Windows Media Player, repeat steps 1 – 5, to reinstall it.

If you’re having problems with the wmpnscfg.exe process and would like to remove or disable it, the best way to do it is through the WMP options menu, however there are a number of ways of doing it, all of which I have explained below:

Note: You may find it most prudent to utilise all three methods, in the event that you’re unable to achieve your desired result, utilising just one method.

Using WMP Options

1. First, boot into your computer with full administrative rights.

2. Then click on the Windows Media Player icon (in the Taskbar), to load it up.

3. Once Windows Media Player loads up, click on Stream, and then click on More Streaming Options.

stream -> More Streaming Options» width=»470″ height=»254″ src=»https://www.compuchenna.co.uk/wp-content/uploads/2016/04/Wmpnscfg-exe-5.jpg?x73977″ srcset=»https://www.compuchenna.co.uk/wp-content/uploads/2016/04/Wmpnscfg-exe-5.jpg 470w, https://www.compuchenna.co.uk/wp-content/uploads/2016/04/Wmpnscfg-exe-5-300×162.jpg 300w»></p>
<div class= Картинка с сайта: www.compuchenna.co.uk

Note: This is only applicable if you have already enabled Media Sharing.

4. This will take you to the Choose Media streaming options for computers and devices page, from here, click on the Block All button, then click on OK.

media streaming options -> Block All» width=»602″ height=»422″ src=»https://www.compuchenna.co.uk/wp-content/uploads/2016/04/Wmpnscfg-exe-6.jpg?x73977″ srcset=»https://www.compuchenna.co.uk/wp-content/uploads/2016/04/Wmpnscfg-exe-6.jpg 602w, https://www.compuchenna.co.uk/wp-content/uploads/2016/04/Wmpnscfg-exe-6-300×210.jpg 300w»></p>
<div class= Картинка с сайта: www.compuchenna.co.uk

Using Services

1. First, boot into your computer with full administrative rights.

2. Then press + R, type Services.msc and click on OK.

run -> services.msc» width=»425″ height=»264″ src=»https://www.compuchenna.co.uk/wp-content/uploads/2016/02/Error-0x80190194-1.jpg?x73977″></p>
<div class= Картинка с сайта: www.compuchenna.co.uk

3. Once Services loads up, double click on Windows Media Player Network Sharing Service.

Double click on Windows Media Player Network Sharing Service

4. This will load up the Windows Media Player Network Sharing Service Properties applet, from here, set Startup type to Disabled, then click on the Stop button (if the service is currently running), lastly click on OK.

set startup type to disabled for Windows Media Player Network Sharing Service

Using Regedit

WARNING: Improperly editing the registry can render your system inoperable, thus, tread with caution.

1. First, boot into your computer with full administrative rights.

2. Then press + R, type Regedit and click on OK.

open registry editor

3. This will load up Registry Editor, from here, navigate to the following path:

HKEY_CURRENT_USER\Software\Microsoft\MediaPlayer\Preferences\HME

visit registry path HKEY_CURRENT_USER\Software\Microsoft\MediaPlayer\Preferences\HME

4. In the right-hand pane, you should see a DWORD value called DisableDiscovery, double click on it.

access DisableDiscovery registry key

5. This will bring up its Edit DWORD (32-bit) Value applet, from here, change the Value data to 1 and click on OK.

6. Lastly, restart your computer.

Are you looking for a way to repair all the errors on your computer?

If the answer is Yes, then I highly recommend you check out Advanced System Repair Pro.

Which is the leading registry cleaner program online that is able to cure your system from a number of different ailments such as Windows Installer Errors, Runtime Errors, Malicious Software, Spyware, System Freezing, Active Malware, Blue Screen of Death Errors, Rundll Errors, Slow Erratic Computer Performance, ActiveX Errors and much more. Click here to check it out NOW!

Источник

WMPNetworkSVC — что это за служба?

Приветствую. WMPNetworkSVC — служба общих сетевых ресурсов штатного плеера Windows Media. Индексирует медиа-файла для общего доступа в локальной сети.

Как понимаю — связано с расшариванием файлов в плеере. Другим словами — совместное использование библиотеки. Можно отключить — ниже написал два способа.

WMPNetworkSVC предположительно расшифровывается так — Windows Media Player Network Sharing Service, оказалось это название службы:

Работает под процессом WMPNetwk.exe:

Учтите — процесс запущен от NETWORK SERVICE. Если запущен от вашей учетной записи — подозрительно (возможно вирус).

Процесс находится в папке с плеером:

C:\Program Files\Windows Media Player

Как отключить WMPNetworkSVC

Служба не является критически важной, при необходимости можно отключить через командную строку:

  1. Запускаете командную строку — зажимаете Win + R, вводите cmd.exe, нажимаете ОК.
  2. Появится черное окно — пишем команду:

sc config WMPNetworkSvc start= disabled

  • Нажимаем энтер. При успешном выполнении должно выдать — [SC] ChangeServiceConfig: успех. Файл > Запустить новую задачу > Поставить галочку запуск с правами администратора > указать cmd.exe > нажать ОК.
    1. Зажимаем Win + R.
    2. Вставляем команду services.msc, нажимаем ОК.
    3. Откроется окно со списком служб.
    4. Находим Windows Media Player Network Sharing Service > нажимаем два раза > в Тип запуска выбираем Отключена > дальше нажимаем кнопку Остановить.

    Надеюсь информация помогла. Удачи.

    Добавить комментарий Отменить ответ

    Этот сайт использует Akismet для борьбы со спамом. Узнайте как обрабатываются ваши данные комментариев.

    Источник

    Разворачиваем домашний DLNA сервер на Windows 8

    DLNA (Digital Living Network Alliance) — технология, позволяющая в реальном времени транслировать медиа-контент (видео, музыку, фото) через локальную сеть (Ethernet/Wi-Fi) или интернет. В качества источника такого контента могут выступать компьютеры, смартфоны, планшетные устройства (и т.д.), а потребителями телевизоры, ресиверы, плееры, принтеры, игровые приставки (xBox, Playstation) и другие устройства, поддерживающие технологию DLNA. По сути, с помощью DLNA, возможно создать единую цифровую сеть, включающую в себя всю домашнюю электронику. Задача создания такой сети упрощается благодаря тому, что устройства с поддержкой спецификации DLNA могут настраиваться и объединиться в единую сеть в автоматическом режиме.

    Источником DLNA медиа-контента (DLNA сервером) может быть как отдельный «железный девайс», так и программное решение на базе ПК. Для организации DLNA сервера на базе Windows существует достаточно много программ (как бесплатных, так и платных). Но не все знают, что в Windows 8 (как и в Windows 7) уже имеется встроенный DLNA сервер. Этот функционал интегрирован в саму систему и в проигрыватьель Windows Media Player версий 11 и 12. Помимо того, Windows Media Player поддерживает потоковое вещание медиа информации на DLNA (UPnP) устройства (клиенты и плееры). DLNA клиенты видят компьютер с Windows 8 как DLNA сервер с содержимым его библиотек Видео/Музыка/Изображения.

    В этой статье мы разберемся об особенностях настройки и работы DLNA сервера на базе Windows 8.

    Как активировать DLNA в Windows 8

    Откройте панель управления Windows 8 и в разделе Network and Internet выберите пункт Choose home group and sharing options.

    Выберите пункт Choose what you want to share, and view the home group password.

    Выберите библиотеки Windows и устройства, к которым необходимо предоставить общий доступ (нас интересуют библиотеки Picture, Videos, Music) и нажмите Next.

    Далее система сгенерирует и отобразит на экране пароль, который будет использоваться для сетевого доступа к этому компьютеру (его в дальнейшем можно будет изменить).

    Затем нажмите кнопкуAllow all devices on this network such as TVs and game console to play my shared content .

    Укажите имя создаваемого вами DLNA сервера. Windows автоматически построит список всех обнаруженных в сети DLNA клиентов. Чтобы разрешить всем устройствам доступ к нашему DLNA-серверу, нажмите Allow All, либо настройте доступ индивидульно.

    На этом настройка DLNA сервера на Windows 8 окончена. Теперь все домашние устройства могут получать доступ к информации в библиотеках Windows (каталог C:\Users\Public и пользовательским библиотекам Видео/Музыка/Изображения).

    1. В том случае, если на компьютере работает брандмауэр Windows или другой межсетевой экран, необходимо учесть что для работы DLNA сервере нужно открыть порты TCP 50001,50002 и UDP 1900.
    2. Если в системе зарегистрировано несколько пользователей, то DLNA видят такой компьютер не как один DLNA медиа-сервер, а как 4 (!) медиа сервера (по одному на каждую учетку). Чтобы скрыть лишние медиа серверы, нужно под каждой учетной записью, у которой необходимо отключить потоковое аудио\видео, необходимо в параметрах потоковой передачи мультимедиа контента выбрать Deny All (запретить все).

    DLNA сервер на базе Windows Media Player

    В Windows 8 DLNA сервер также может быть организован на базе Windows Media Player. Основная особенность Windows Media Player – возможность трансляции потокового мультимедиа (Media Streaming) и управление воспроизведением. Функционал DLNA сервера в WMP реализуется на базе службы Windows Media Player Network Sharing Service.

    Функция Media Streaming позволяет организовать DLNA сервер с транскодированием видеоформатов, которые в настоящий момент не поддерживаются в качестве DLNA контента (например, MP4 , WMV).

    Чтобы активировать DLNA сервер на базе Windows Media Player, включите опции Automatically allow devices to play my media и Allow remote control of my Player .

    Если нужно добавить в раздаваемый DLNA контент дополнительные каталоги, выберите пункт Manage libraries->Videos.

    И добавить соответствующий каталог

    Что касается неудобных моментов – то в первую очередь бросается в глаза то, что Windows Media Player недостаточно быстро обновляет содержимое библиотек (строит списки файлов для воспроизведения). Т.е. пользователь скачивает в свою библиотеку новый фильм/фото/музыкальный контент, но сразу не видит его на своем DLNA клиенте (например, телевизоре). Чтобы заставить Windows Media Player перестроить списки медиа-контента, выберите в меню Organize пункт Apply media information changes.

    С помощью кнопки Play To из WMP возможно запустить потоковое воспроизведение медиа на конкретном устройстве (естественно, сертифицированном на совместимость со стандартом DLNA). Просто щелкните ПКМ по медиа-файлу и в контекстном меню выберите пункт “Play to” и выберите DLNA устройство, на котором необходимо его воспроизвести.

    Источник

    Как отключить процесс wmpnetwk.exe

    В операционной системе зачастую работают процессы, которые попросту не нужны пользователю, и если закрыть их, никаких серьезных изменений не произойдет, зато повысится производительность компьютера. Одним из таких и является wmpnetwk.exe. В статье будет рассказано не только, что это за процесс, но и как его отключить. Приведено будет три способа.

    Wmpnetwk.exe — что это

    Изначально давайте разберемся, за что отвечает процесс в системе. А предназначение его довольно полезное, хоть и не востребовано большинством пользователей. wmpnetwk.exe — это процесс, который позволяет совместное использование данных с другими компьютерами, которые находятся в одной сети. Работает он смежно с wmplayer.exe (Windows Media). То есть, эта служба позволяет воспроизводить музыку или фильмы с другого компьютера, связанного по локальной сети.

    Файл вирусом быть не может, активируется во время запуска проигрывателя и работает в фоновом режиме, пока пользователь не начнет прослушивание музыки или просмотр видео другого компьютера.

    Как отключить wmpnetwk.exe

    Несмотря на то, что процесс довольно полезный, им мало кто пользуется, ведь не у всех дома есть несколько компьютеров, которые можно связать по локальной сети. В этом случае процесс wmpnetwk.exe грузит процессор просто так, и вы его можете спокойно отключить, ведь никаких серьезных последствий за собой это не повлечет.

    Сейчас будут рассмотрены три способа, как можно выполнить отключение процесса.

    Способ 1: через Windows Media

    Данный способ подразумевает изменение настроек непосредственно в проигрывателе Windows.

    1. Откройте Window Media Player.
    2. Войдите в его настройки на вкладку «Библиотека».
    3. Нажмите по кнопке «Настройка общего доступа».
    4. В появившемся окне будет установлены две галочки. Вам их необходимо снять, после чего нажать «Применить».
    5. Нажмите кнопку «ОК».
    6. В появившемся окне подтвердите свои действия, нажав соответствующую кнопку.

    После этого служба будет отключена, а после перезапуска компьютера автоматически запускаться не будет.

    Способ 2: через «Службы»

    Если вы запутались в хитросплетениях параметров проигрывателя, то куда проще будет выполнить завершение процесса путем остановки соответствующей службы.

    1. Запустите окно «Выполнить».
    2. Впишите в него «services.msc» и нажмите «ОК».
    3. В появившемся списке всех служб Windows отыщите ту, которая называется Windows Media Player Network.
    4. Откройте ее свойства.
    5. Переключите параметр «Тип запуска» на «Отключено».
    6. Примените изменения, кликнув по соответствующей кнопке, и нажмите «ОК».

    После этого останется лишь перезапустить компьютер — процесс будет отключен.

    Способ 3: через системный реестр

    Если предыдущие способы вам не помогли, то вы точно сможете завершить нежелательный процесс, изменив его параметры в системном реестре.

    1. Откройте окно выполнить, нажав Win+R.
    2. Выполните «regedit».
    3. В открывшемся окне системного реестра нажмите Ctrl+F.
    4. В поисковую строку введите «DisableDiscovery» и выполните поиск.
    5. Нажмите по найденному файлу дважды.
    6. В окне, в поле «Значение», введите цифру 1 или 2.
    7. Сохраните изменения.

    После этого перезапустите компьютер, чтобы окончательно сохранить настройки.

    Источник

    Источник

    Понравилась статья? Поделить с друзьями:
    0 0 голоса
    Рейтинг статьи
    Подписаться
    Уведомить о
    guest

    0 комментариев
    Старые
    Новые Популярные
    Межтекстовые Отзывы
    Посмотреть все комментарии
  • Rhino for windows 8
  • Android app player on windows pc
  • Microsoft ggk windows professional 7 sp1 32 bit 64 bit russian legalization dsp oei dvd
  • C windows system32 smss exe
  • Как включить все потоки процессора windows 11