
Если рабочая станция Windows теряет доверительные отношения с доменом Active Directory, компьютер не может установить безопасный канал с контроллером домена, а доменные пользователи не смогут авторизоваться на таком компьютере. В этой статье мы рассмотрим, причины выпадания компьютеров из домена и простой способ восстановить доверительные отношения компьютера с доменом без перезагрузок
Содержание:
- Не удалось установить доверительные отношения между этой рабочей станцией и основным доменом
- Восстановить доверительные отношений компьютера с доменом с помощью PowerShell
- Пароль учетной записи компьютера в домене Active Directory
Не удалось установить доверительные отношения между этой рабочей станцией и основным доменом
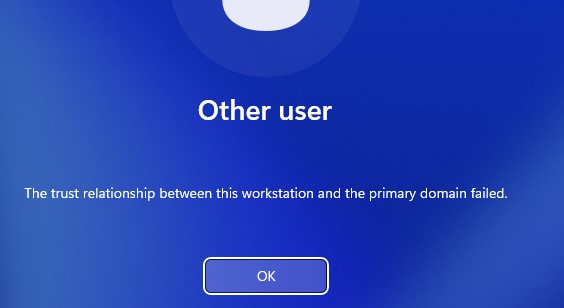
Если компьютер вылетел из домена, при попытке входе на такой компьютер под доменным пользователем появится ошибка:
The trust relationship between this workstation and the primary domain failed.
Не удалось установить доверительные отношения между этой рабочей станцией и основным доменом.
Также ошибка может выглядеть так:
The security database on the server does not have a computer account for this workstation trust relationship.
База данных диспетчера учетных записей на сервере не содержит записи для регистрации компьютера через доверительные отношения с этой рабочей станцией.

Восстановить доверительные отношений компьютера с доменом с помощью PowerShell
Обычно, администраторы в такой ситуации просто выводят компьютер из домена и добавляют его в AD повторно. Это способ рабочий – но требует много времени и нескольких перезагрузок. Гораздо проще восстановить доверительные отношения рабочей станции с домена с помощью PowerShell.
Для восстановления доверительных отношений с доменом, нужно войти на компьютер локально с учетной записью с правами администратора. Это может быть локальный пользователь с правами администратора, или встроенный администратор Windows (можно сбросить пароль локального администратора, если вы его не знаете).
Windows по умолчанию кэширует учетные данные последних десяти пользователей. Поэтому, если отключить от компьютера сетевой кабель в момент входа, можно войти на компьютер с помощью кэшированных учетных данных доменного пользователя (Cached Credentials).
Для входа под локальным пользователем, нужно на экране пользователя указать его имя в формате:
.\localuser
. Точка в начале указывает, что нужно использовать локальную базу учетных записей.
Откройте консоль PowerShell с правами администратора и проверьте наличие доверительных отношений компьютера с доменом AD:
Test-ComputerSecureChannel -Verbose
Если пароли не совпадают и компьютер не может установить доверительные отношения с доменом, команда вернет значение False –
The Secure channel between the local computer and the domain winitpro.ru is broken
.
Для восстановления доверительных отношений компьютера с доменом, выполните команду:
Test-ComputerSecureChannel -Repair -Credential winitpro\administrator -Verbose
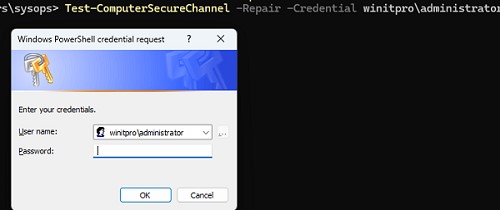
Если компьютер сможет подключиться к DC, установить новый пароль для своей учетной записи и тем самым восстановить доверительные отношения с AD, появится сообщение:
True. The secure channel between the local computer and the domain contoso.com was successfully repaired.
Проверьте, что доверительные отношения были успешно восстановлены. Выполните команду
Test-ComputerSecureChannel
и убедится, что она возвращает True (
The Secure channel between the local computer and the domain winitpro.ru is in good condition
). Завершите сеанс и войдите на компьютер под доменным пользователем (перезагрузка не требуется).
Также для принудительного сброса и синхронизации пароля компьютера можно использовать команду:
Reset-ComputerMachinePassword -Server dc01.corp.winitpro.ru -Credential corp\domain_admin
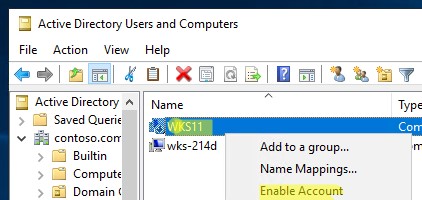
В некоторых случаях команда восстановления доверительных отношений может возвращать ошибку:
The attempt to repair the secure channel between the local computer and the domain contoso.com has failed.
В этом случае нужно проверить, что домен доступен, а учетная запись вашего компьютера в домене существует, не отключена и у вас есть права на нее. Получить имя своего компьютера командой
hostname
, откройте консоль Active Directory Users and Computers (
dsa.msc
) и найдите учетную запись этого компьютера. В нашем примере она отключена. Включите ее.
Пароль учетной записи компьютера в домене Active Directory
Почему могут пропадать доверительные отношения между компьютером и доменом?
Когда компьютер вводится в домен Active Directory, для него создается отдельная учетная запись типа computer. У каждого компьютера в домене есть свой пароль, который необходим для аутентификации компьютера в домене и установления доверенного подключения к контроллеру домена. Этот пароль хранится локально на компьютере (в ветке реестра
HKLM\SECURITY\Policy\Secrets\$machine.ACC
) и в базе AD и по-умолчанию меняется автоматически раз в 30 дней (задается настройками политики Domain member: Maximum machine account password age).
Срок действия пароля компьютера не истекает в отличии от паролей пользователей. Смену пароля инициирует компьютер, а не контроллер домена.
Даже если компьютер был выключен более 30 дней, его можно включить, он нормально аутентифицируется на DC со старым паролем, и только после этого локальная служба Netlogon изменит пароль компьютера в своей локальной базе (и затем в аккаунте компьютера в Active Directory.
Если хэш пароля, который компьютер отправляет контроллеру домена не совпадает с паролем учетной записи компьютера, компьютер не может установить защищённое подключение к DC.
Почему это может произойти?
- Самая частая проблема. Компьютер был восстановлен из старой точки восстановления или снапшота (если это виртуальная машина), созданной раньше, чем был изменен пароль компьютера в AD. Т.е. пароль в снапшоте отличается от пароля компьютера в AD. Перед созданием снапшота рекомендуется принудительно выполнить смену пароля компьютера в домене:
nltest.exe /sc_change_pwd:winitpro.loc - Компьютер был склонирован без выполнения sysprep;
- В AD создан новый компьютер с тем же именем, или кто-то сбросил аккаунт компьютера в домене через консоль ADUC;

- Учетная запись компьютера в домене заблокирована администраторам (например, во время регулярной процедуры отключения неактивных объектов AD);
- Довольно редкий случай, когда сбилось системное время на компьютере или Windows не может синхронизировать время с внешним источником.
Для тестовых ВМ, которые приходится часто восстанавливать из снапшотов с помощью параметра GPO можно отключить регулярную смену паролей (параметр Domain member: Disable machine account password changes в секции Computer Configuration -> Policies -> Windows Settings -> Security Settings -> Local Policies -> Security Options).
Being in a home or business workplace, you can maintain your client and server computers within two simple infrastructures namely, Workgroup (used for small business activities with 10 or fewer computers) and Domain (has thousands of computers connected to a centralized network). For Workgroup infrastructure, you may not need a dedicated server, whereas, for Domain infrastructure, you must need at least one server that has the functionalities of both Active Directory Domain Services and Domain Name Services. Many users complain that the trust relationship between this workstation and the primary domain failed Windows 10 occurs on PC when they try to log in to the domain account. If you are also one among them, we bring a perfect guide to sort the trust relationship between this workstation and the primary domain failed no local admin issue.

Table of Contents
One of the most common issues faced by system administrators is the trust relationship between this workstation and the primary domain failed issue. Following are a few points to know for the said issue.
- If you combine your PC with any Active Directory domain, a new user account and password have to be set.
- When you log in to your PC to an Active Directory Domain, a safe channel is established together with the nearest domain controller. The Domain Controller (DC) checks the user credentials and now, the trust is established between your PC and domain if the credentials meet the security policies pre-defined by the company.
- The password is valid for 30 days (default) and you have to change it after the allotted time.
- Your PC local account and password credentials will not expire in AD. This is because the Domain Password Policies do not apply to the Active Directory Computer Objects.
- The interesting fact is that, even if you have not powered on your computer for several months or a year, the trust relationship between the PC and the domain will still be remaining. So, the next time you log on to your domain-connected workstation, the password will be changed at the first login.
- When this trust relationship breaks for any reason, the trust relationship between this workstation and the primary domain failed no local admin prompt pops up on the screen.
How to Verify Trust Relationship Between Workstation and Primary Domain
To verify the trust relationship between your workstation and primary domain, you have to ensure that the local password of your computer is synced with the domain-controlled computer account password. Follow the below-mentioned instructions to find the same.
1. Log in to your computer with your local admin account and password.
Note: If you face any difficulties in logging into your computer that also uses a domain account, then temporarily disconnect the Ethernet cable. Sometimes, this may allow you to log on to your computer by using cached Active Directory user credentials. Once you have logged in using these cached credentials, reconnect your Ethernet cable.
2. Now, hit the Windows key and type PowerShell, then click on Open.

3. Then, type Test-ComputerSecureChannel command and hit the Enter key.

4. You can also include –verbose switch parameter and hit Enter key.
Test-ComputerSecureChannel -Verbose
VERBOSE: Performing the operation Test-ComputerSecureChannel on target Techcult(Type Company Name).
True
VERBOSE: The secure channel between the local computer and the domain techcult.com is in good condition.

5. You must receive The secure channel between the local computer and the domain (company name).com is in good condition. If so, then the trust relationship between the workstation and the domain is good.
Reasons that Cause Trust Relationship Failed Problem
The domain trust relationship failed problem can arise in your computer due to several reasons.
- When your workstation is no longer trusted by the domain, you will face the trust relationship between this workstation and the primary domain failed problem.
- When the local account password credentials of your PC do not match with the object password of your PC in Active Directory, you will face the same problem.
- If your workstation tries to authenticate the domain with an incorrect password, you will face the discussed problem.
- It also happens after reinstalling Windows.
- When your computer is restored to an old restore point or to a snapshot that has an expired machine account password.
Also Read: Fix Intel RST Service Is Not Running in Windows 10
Here is a list of super seven troubleshooting methods that help you fix the trust relationship between this workstation and the primary domain failed issue. Follow the same to attain the best results.
Note: Make sure you create a System Restore point to restore your Windows 10 computer when something goes wrong.
Method 1: Enable DHCP Server
If you have recently added a new DHCP server or made any changes to the existing DHCP pool, then continue reading this method. You can assign IP addresses to your host computers in a network, but static or dynamic addressing methods.
Few users have reported that the trust relationship between this workstation and the primary domain failed issue arose after adding the DHCP server to the server. This happens when you add the wrong DHCP pool of IP addresses to the host networks. Hence, there is a need to check whether DHCP is working properly as instructed below.
Note: Here, steps to check DHCP configurations for Windows Server 2016 and TP-Link TL-ER6120 working with 192.168.1.0/24 IP address are explained. Follow the steps according to your network setup.
1. Press and hold Windows + R keys together to open the Run dialog box.
2. Now, type dhcpmgmt.msc and hit Enter to launch the DHCP Management tool.

3. Now, expand your server to techcult.com\IPv4\Scope.
4. If you find the DHCP configuration is not configured properly, (192.168.1.0/24 IP address), you have to change the DHCP configuration.
Then, to check the DHCP configuration of your router (e.g. TP-Link TL-ER6120), follow the below-mentioned steps.
1. Make a note of the IP address, Username, and Password of your wireless router.
Note: If you do not know how to find the IP address of your router, refer to our guide How to Find My Router’s IP Address? or you can also find the information in the router manual.

2. Now, launch any browser and type the IP Address of your router in the address bar.

3. Now, type your router credentials and log in.
4. Then, navigate to the Network tab and select LAN from the left pane.
5. Now, switch to the DHCP tab and make sure DHCP Server is enabled. Check the DHCP addresses and click on Save if you made any changes.

Method 2: Rejoin Machine from Domain
Re-joining a machine or workstation from a domain is a potential fix for trust relationship between this workstation and the primary domain failed error. All you need is a Domain Administrator account that has all the rights to add or join any machine from the domain.
Note: In this article, we have demonstrated steps to re-join Windows 10 Pro using a Server 2016 machine. You can also follow these steps with other client and server OS either from a Windows XP or Windows 8 machine using Windows Server 2003 or 2012 R2.
1. Sign in to your Windows local admin account and press Windows + E keys together to open File Explorer.
2. Then, click on This PC from the right of File Explorer and select Properties.
3. Then, search and click on View advanced System Settings and switch to the Computer Name tab.

4. Now, click on the Change… button.

5. Then, in the Computer Name/Domain Changes window, select the Workgroup radio button and type the name whatever you like.
6. Then, click on OK to save the changes.
7. In the next Windows Security prompt, type your Administrator account credentials and click on OK.
8. Confirm the next successive prompts by clicking on OK and exiting the System Properties windows.
9. Reboot your machine and log on to your Windows 10 domain user account.
Check if you have fixed the trust relationship issue between your workstation and domain.
Also Read: Fix The Active Directory Domain Services is Currently Unavailable
Method 3: Use PowerShell to Fix Domain Trust Relationship
This is another potential method that will help you fix the domain trust relationship PowerShell. It helps you establish the trust between the client and workstation. For this, you must need a local administrator account. Follow as instructed to fix the trust relationship between this workstation and the primary domain failed Windows 10 issue.
1. Log on to your Windows 10 local admin account.
2. Now, press the Windows key and type PowerShell, then click on Open.
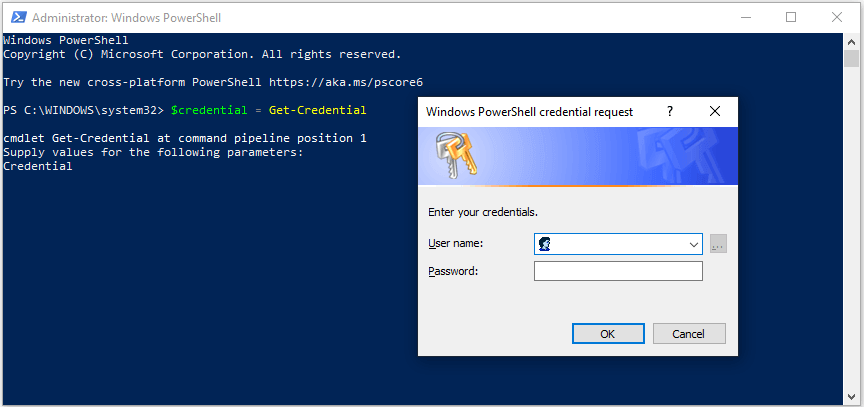
3. Now, type $credential = Get-Credential command and hit Enter key.

4. Then, type your domain account password credentials and click on OK.
5. Then, type Reset-ComputerMachinePassword -Credential $credential command and press the Enter key.

6. Now, exit PowerShell and reboot the PC.
7. Then, log on to Windows 10 domain account and check if you can fix domain trust relationship PowerShell.
Method 4: Add Domain Controller to Credential Manager
With this method, you can fix the discussed issue by adding a domain controller account in Credential Manager. Follow the steps as instructed in Windows 10 PC.
1. Log on to your Windows 10 local admin account.
2. Now, hit the Windows key and type Credential Manager. Then, click on Open.

3. Then, click on Windows Credentials as depicted.

4. Then, click on Add a Windows Credential link as depicted.

5. Now, type the Internet or network address, along with your Username and Password credentials and click on OK.

6. Now, close all the Credential Manager windows and reboot your computer.
7. Finally, Log on to your Windows 10 domain user account and check if you have fixed the trust relationship issue between the workstation and domain.
Also Read: How to Fix Error 0x80300024
Method 5: Reset Account Password
If you are using Windows Server 2003 and Windows Server 2008 R2, continue reading this method. Users using other versions of server OS, please skip to the next troubleshooting method. In this method, you will learn how to reset the machine password on Windows Server 2008 R2. Resetting the password will help you fix the trust issue in most advanced cases.
1. Logon to your domain admin account and hit the Windows key.
2. Press the Windows key, type cmd and click on Open as depicted.

3. Now, type netdom resetpwd /s:server /ud:domain\User /pd:* command window and hit Enter key.
Note: Here s is the domain server name, domain is domain name and user is the conflicting user account.

4. Now, close all the windows and restart the PC.
5. Then, log on using domain user account and check if you have fixed the trust relationship between this workstation and the primary domain failed no local admin issue.
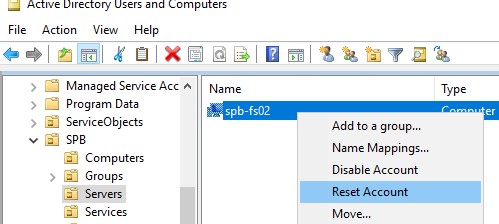
Method 6: Reset Account
Another simple and potential troubleshooting method that will help you fix the trust relationship between this workstation and the primary domain failed no local admin issue is resetting your computer account using a tool that is integrated with Active Directory Domain Services.
1. Press and hold Windows + R keys together to open the Run dialog box.
2. Now, type dsa.msc in the box and hit Enter key to open Active Directory User and Computers.

3. Now, expand to your domain, for example, techcult.com
4. Then, double-click on Computers and navigate to your conflicting user account that causes the problem.
5. Now, right-click on this user account and select Reset Account.
6. Confirm the prompt by clicking on Yes followed by OK and close the Active Directory User and Computers windows.
7. Finally, restart the PC and log on to your domain user account.
Also Read: Fix Device Not Migrated Error on Windows 10
Method 7: Perform System Restore
If there are any incompatible Windows update components in your computer, your PC will not work as usual it does. So, restore your computer to a state where everything was working fine. Here are some instructions to restore your PC to fix the trust relationship between this workstation and the primary domain failed Windows 10 issue. To do so, follow our guide on How to use System Restore on Windows 10 and implement the instructions as demonstrated.

After restoring your Windows 10 PC, check if can use your Windows machine connected to the domain without any errors.
Recommended:
- Fix Samsung Internet Keeps Opening By Itself
- Fix Windows Store Error Code 0x80073CF3
- Fix Not Enough Storage is Available to Process this Command
- Fix Private Internet Access Won’t Connect in Windows 10
We hope that this guide was helpful and that you could fix the trust relationship between this workstation and the primary domain failed issue in your device. Let us know which method worked for you the best. If you have any queries/suggestions regarding this article, then feel free to drop them in the comments section.
Microsoft’s Active Directory services manages all users, controllers and other resources on the Windows server domain. It uses username, passwords and Secure Shell keys to identify the directory objects.
You will encounter the “Trust relationship between this workstation and the primary domain failed” error if the private secret key on the PC is different from that of the primary AD server. This results in the user not being able to access the Windows Server Domain.
It usually happens because of duplicate computers or Domain Controller objects. However, it can also occur because of many other reasons.
In this article, we explain all the possible reasons and how you can troubleshoot them.
Causes for Trust Relationship between This Workstation and the Primary Domain Failed
Here are the potential causes for the “trust relationship between this workstation and the primary domain failed” issue:
- Presence of another machine with the same name on the AD domain.
- Computer not active on the domain for longer than the domain’s secret key reset period.
- Performing system restore to a restore point created before the domain’s key was reset.
- Cloning the computer without running Sysprep (sysprep removes a domain-joined computer from the domain).
- Difference of time between the client and the domain.
- Improper DNS settings on client.
- Corruption of AD’s credentials on the local drive.
- Issues with the Domain Controller.
Fixes for Trust Relationship between This Workstation and the Primary Domain Failed
There are many possible solutions you can perform from the local computer. But for others, you need to use the Domain Controller (DC) or a PC with RSAT tools.
If you don’t have access to the DC, contact the system administrator to ask them to perform the relevant troubleshooting methods.
Also, keep in mind that you need to log in to your local administrator (not domain user) account before performing the solutions from the workstations.
Sync Time and Date
The first thing you should do is set correct date and time. If there’s more than 5 minutes of difference between the Domain Controller and the workstations, the users can’t authenticate to the DC services.
To resolve this issue, you need to sync the times properly. Automatically syncing the time with the internet on the DC as well as your local machine should be enough in most cases.
If there’s still some discrepancy, you need to adjust a Group Policy Object (GPO) on the Domain Controller. The process is as follows:
- Open the Group Policy Management Editor.
- Go to Computer Configuration > Policies > Windows Settings > Security Settings > Account Policies > Kerberos Policy.
- Double-click on Maximum tolerance for computer clock synchronization.

- Increase the time and click OK.

Modify Domain Name
One possible quick fix is to modify the domain name from FQDN to NETBIOS name. This refreshes your workstation on the domain without having to disconnect and reconnect it. However, it doesn’t work for public domains and only works within a NETBIOS Active Directory.
Changing the domain name from NETBIOS name to FQDN is also a good solution if you are connected to a public domain and there are many servers with the same domain name. Adding the suffix helps you connect to the exact domain you want.
Here are the necessary steps for this method:
- Press Win + R to open Run.
- Enter
sysdm.cplto load the System Properties. - Inside Computer Name, select Change.

- Add or remove the suffix (such as
.local,.net, etc.) on the Domain name and click OK.

Restart your PC and check if the issue reoccurs. If it does, or you encounter other errors, revert the domain name and move on to the successive solutions.
Rejoin to Domain
Another way to resolve this issue is to unjoin your computer to the Domain and rejoin it again. Doing so removes any previous credentials your PC had stored and allows you to store the valid secret key after rejoining.
Here’s how you can rejoin your workstation to the Domain:
- Open System Properties and go to Computer Name.
- Select Change.
- Check Workgroup and enter any name you want.

- Click OK and then OK again.
- Restart your PC and go through the same steps till you reach Computer Name/Domain Changes.
- This time, check Domain and type the Domain name.
- Click OK and enter the credentials.

Restart your computer and check if the issue remains.
If it does, you need to clear the log files and try again.
- First, disconnect your PC from the internet.
- Delete the log files inside
C:\ProgramData\Microsoft\Windows Server\Logs. - If you are using a third-party connector software to connect to the domain, uninstall it.
- Rejoin your PC to the domain using the above steps.
Verify DHCP Configuration
Improper DHCP configuration can also cause this issue. You need to make sure that the DHCP allocates IP addresses that are within the scope of your domain server’s IP address. For instance, if your configured network is 10.0.0.1/24, the start and end IP addresses for the DHCP should be 10.0.0.x.
To check and alter the DHCP configuration,
- Open Run and enter
dhcpmgmt.mscon the Domain Controller server. - Go to your server and expand IPv4 > Scope > Address Pool.
- Check the Start and End IP Addresses.
- Right-click on Scope and select Properties.

- Change the Start and End IP Addresses as required.

Then, open your router’s portal on a web browser and navigate to its DHCP settings. See if all the settings are correct and make the necessary changes.
Save Domain Controller to Credential Manager
You should also try saving the domain credentials to the credential manager. You will encounter the trust failed error when there any errors while manually entering the credentials.
If you save the credentials to the Credential Manager, you will be able to enter the domain environment without having to enter your password every time.
Follow the steps below to perform this solution:
- Open Run and enter
control /name Microsoft.CredentialManager. - Select Windows Credentials > Add a Windows credential.

- Enter the domain name, domain username and password and click OK.

Confirm to Active Directory Domain Services Port Requirements
The trust relationship will also fail if the Firewall doesn’t have the proper ports open to allow the workstations to communicate with the Domain Controller. So you need to make sure all the relevant ports are open. You can refer to the Microsoft documentation on configuring a firewall for Active Directory domains and trusts to learn the necessary process.
Recreate Computer Object on Active Directory
If the Active Directory has removed your machine, you can’t access the Domain even if your PC shows it is a part of the domain.
So, you need to check if it is the case and if yes, recreate your computer on AD. Here’s how you can do so:
- Open Run (Win + R).
- Type
powershelland press Ctrl + Shift + Enter. It loads the Elevated Windows PowerShell. - Enter the command
$env:computernameto get your hostname. - Then, type
Get-ADComputer <Host Name>and press Enter to check if your computer exists on the AD. Make sure to use your own host name. - If it doesn’t, enter the following command while replacing the values depending on your situation:
New-ADComputer -Name "Host Name" -SamAccountName "Host Name" -Path "OU=ApplicationServers,OU=ComputerAccounts,OU=Managed,DC=USER02,DC=COM
Test and Repair Computer Secure Channel
You need to check if your workstation’s secret key is the same as that of your computer account in the Domain Controller. One way you can do so from the local machine is by using the Test-ComputerSecureChannel PowerShell cmdlet.
This is the best solution if your issues is due to the presence of another host machine with the same name on the DC.
Here are the necessary steps for the process:
- Open Run (Win + R).
- Type
powershelland press Ctrl + Shift + Enter. It loads the Elevated Windows PowerShell. - Enter the command
Test-ComputerSecureChannel - Verbose - If it finds any issues, run
Test-ComputerSecureChannel -Repair

Restart your PC, log in to the domain user account and check if the issue persists.
Reset Credentials
If the private credentials on your workstation is different from that of the AD Domain Controller, the most convenient fix is to reset your credentials. In this method, your system uses the cached domain credentials to re-establish the trust.
You can use the Reset-ComputerMachinePassword cmdlet on Windows PowerShell for this purpose.
- Open the Elevated Windows PowerShell on your local administrator account.
- Enter the command
$credential = Get-Credential - Type
Reset-ComputerMachinePassword -Credential $credentialand press Enter.
Restart your PC, log in to the domain user account and check if you still encounter this issue.
Enable Caching of Domain Credentials
Some of the above methods use the Cached domain credentials to establish trust. So, they only work if you have cached credentials. Otherwise, the Domain Controller admin needs reset your local machine or its password.
You should enable the caching process to make it easier to troubleshoot this issue in case it happens again in the future. Here’s how you can do so:
- Enter
secpol.mscon Run. - Go to Security Settings > Local Policies > Security Options.
- Double-click on Interactive logon: Number of previous logons to cache.

- Set the logons cache to any number you want. The possible values range from 0 to 50.

You can also use the registry editor to make this change. To do so,
- Open Run and enter
regedit. - Navigate to
Computer\HKEY_LOCAL_MACHINE\Software\Microsoft\Windows NT\CurrentVersion\Winlogon. - Double-click on CashedLogonsCount and change the Value Data according to your preference.


Disable Startup Recovery
Windows has a recovery feature that automatically restores the system after a power failure. In such scenario, the automatic recovery may revert the domain’s secret key that is stored in your PC.
So, you can enable the boot policy to ignore all such failures to disable the feature. Here’s how you can do so:
- Open Command Prompt as an admin.
- Enter the following commands:
bcdedit /set recoveryenabled nobcdedit /set bootstatuspolicy ignoreallfailures
However, keep in mind that this feature is there for your system’s protection. So, we don’t recommend disabling it unless you have to.
Change Machine Account Password Age
If you have to keep the workstation away from the Domain Controller (i.e., avoid logging in to the domain) for long intervals, you will need to troubleshoot the trust issue every time.
In such scenarios, it’s better extend the age of the password to prevent such issues.
Here’s how you can do so:
- Enter
secpol.mscon Run. - Go to Security Settings > Local Policies > Security Options.
- Double-click on Domain member: Maximum machine account password age.
- Set the maximum age according to your need. You can set any value between 0 and 999.
You can also use the registry editor to make this change. To do so,
- Open the Registry Editor by entering
regediton Run. - Navigate to
Computer\HKEY_LOCAL_MACHINE\SYSTEM\CurrentControlSet\Services\Netlogon\Parameters - Double-click on MaximumPasswordAge and change the Value Data according to your preference.
If you are using Provisioning Services to stream software form vDisks, you also need to change the password age from its console.
- Open the Provisioning Server Console on the DC.
- Open the Domain and expand Sites > Site > Servers.
- Right-click on your server and select Properties.
- Go to the Options tab.
- Change the number of days and click Ok.


You can also disable the process of password change altogether by enabling the DisablePasswordChange registry value or Domain member: Disable machine account password changes group policy object. However, we don’t recommend this practice as it may compromise the your privacy.
Change Machine Password From Domain Controller
On the Domain Controller’s side, changing or resetting the password for the client workstations should fix the credential difference issue. There are many ways to do so, such as:
Using Active Directory
- Open Active Directory Users and Computers.
- Expand the domain and select Users.
- Right-click on the user account you need to reset and select Reset Password.

- Set up a new password and keep confirming till you are done.

Using Netdom Utility
- Log in to the Windows server (Domain Controller) using your admin account.
- Open the Elevated Command Prompt and enter the command:
netdom resetpwd /s:<server> /ud:<domain\user> /pd:*
Don’t forget to replace <server> and <domain\user> accordingly.
Ask the domain user to restart their PC and log in to their domain account with a new password.
Using Nltest Utility
- Open the Elevated Command Prompt on the Windows server.
- Enter the command
nltest /sc_change_pwd:<AD DS domain name>while replacing <AD DS domain name> with the name of the workstation.
Reset Computer Account
Another possible way to resolve this issue by resetting the workstation from the Domain Controller. It provides the same effect as unjoining and rejoining the computer to the DC.
- Open Run.
- Enter
dsa.mscto open the Active Directory User and Computers. - Go to your domain and expand
Computers. - Right-click on the domain user’s computer and select
Reset Account.
- Click
Yesand thenOK.

Ask the domain computer’s user to restart their PC and log in using the domain account.
Check Domain Controller Health
It is also possible for this error to occur die to issues with the Domain Controller itself. You can run the dcdiag command on the server’s CLI to check the Domain Controller’s health.
The result of this command should point you to any potential issues with the DC. First, run dcdiag /fix and see if it helps. If not, apply the steps in the successive solutions depending on your problem.
Remove Duplicate Domain Controller SID
In normal cases, a domain will only have unique SIDs for its Domain Controller. However, in some scenario, it is possible for there to be duplicate SIDs. The trust relationship can fail in such cases if the workstation tries to connect to the wrong account.
You need to check and remove the duplicate Domain Controller in such scenario. To do so,
- Open Run and enter
ntdsutil. - On the Ntdsutil CLI, enter
security account management. - Enter
connect to server <your server name>. - Enter the command
check duplicate sid. - If there are duplicates, enter
cleanup duplicate sid. - Enter
quittwice to close the CLI.
After removing the duplicate SIDs, recreate the deleted accounts on the Active Directory.
Clean Up Server Metadata
If you forcibly removed an Active Directory Domain Services without cleaning up its metadata and created another Domain with the same name, workstations attempting to connect to this domain will also experience this issue.
There are many ways to clean up server metadata. But the easiest is to use the Ntdsutil command. Here are the necessary steps:
- Open Run and enter
ntdsutil. - On the Ntdsutil, enter
metadata cleanup. - Enter
remove selected server <server name>while replacing with the name of the server that you deleted.
- Enter
quitorqafter the process completes to close the CLI.

Remove Lingering Objects and Enable Strict Replication Consistency
Lingering objects are the objects that the Domain Controller admins have deleted on the controller. If the DC goes offline for a long time, it is possible for its Active Directory to retain the object other DCs have deleted.
After the DC goes online, these lingering objects can also replicate to the other controllers, causing many issues, including the trust relationship failed error.
You need to remove the lingering objects to resolve the issue. You should also enable Strict Replication Consistency to prevent the replication of lingering objects. Here’s how you can execute both processes:
- Open the Elevated Command Prompt on the server.
- Enter the following commands:
repadmin /showrepl <ServerName>repadmin /removelingeringobjects <ServerName> <ServerGUID> <DirectoryPartition> /advisory_moderepadmin /removelingeringobjects <ServerName> <ServerGUID> <DirectoryPartition>repadmin /regkey <DC_LIST> +strict
The first three commands review and remove the lingering objects and the last command enables Strict Replication Consistency. You can also enable this value form inside the Computer\HKEY_LOCAL_MACHINE\SYSTEM\CurrentControlSet\Services\NTDS\Parameters registry path.
Demote and Re-promote Domain Controller
If the above methods do not resolve the issue on the Domain Controller, you need to demote and re-promote it to reset the controller. First, demote the Domain Controller using the steps below:
- Enter
dsa.mscon Run. - Go to your domain and expand Domain Controllers.
- Right-click on the domain and select Delete.
- Check Delete this Domain Controller anyway and select Delete.


If you are on a Windows server earlier than 2008, you need to clean up the server metadata. On later versions, this process happens automatically if you are using this method.
Note: If you want to demote the DC permanently, you need to use a different method. Please refer to the Microsoft documentation on Demoting Domain Controllers and Domains to learn the necessary steps.
After that, run DCPromo (Domain Controller Promoter) and follow the on-screen instructions to re-promote the DC.
Troubleshoot USN Rollback
This issue can also occur if you roll back a Windows Server DC with an image-based installation of the OS on the server. This issue is called a USN rollback and it causes the changes you make on one DC to not replicate on others.
You can’t tell if any causative problems we mentioned in the previous sections occurred after a USN rollback. It is because the other DCs believe themselves to have the most updated database. So they don’t update the passwords that originate from the rolled-back DC.
You can check if a USN rollback has occurred from the Dsa Not Writable registry entry inside Computer\HKEY_LOCAL_MACHINE\System\CurrentControlSet\Services\NTDS\Parameters. If it shows 4 or 0x4, it indicates the USN rollback.
To troubleshoot this issue, You need to perform the following operations:
- Demote the Domain Controller and shut down its server.
- Clean up metadata if necessary.
- Transfer FSMO roles to another Domain Controller, if applicable.
- Restart the DC that experienced the rollback and transfer back the FSMO roles.
You can also restore the Domain Controller back to the state before the rollback if you have a system state backup.
When you log on to a computer in a domain environment, you might encounter the problem that the trust relationship between this workstation and the primary domain failed. To help you resolve this problem, MiniTool summarized some reported solutions and displayed them in this post.
Nowadays, many users employ Domain infrastructure to manage client and server machines. To achieve that, they need a server to act as Active Directory Domain Services (ADDS) and Domain Name Services (DNS). Then, they need to join all the machines in the network to the domain and create domain users accounts for every user.
However, some issues might occur while logging on to a computer in this domain. Today, we will talk about one of these issues that has been reported by plenty of users: The trust relationship between this workstation and the primary domain failed.

This trust relationship failed issue could occur on both client and server operating system. If you are experiencing this problem, don’t miss this article where you can get 4 solutions. The screenshots in this post are from a Windows 10 computer, but you can try these solutions on your own computer with similar steps. Let’s check them one by one.
Solution 1: Reconnect the Computer to The Domain
This is a recommended solution from Microsoft and you can feel free to have a try. Here’s a simple guide.
Step 1: Log on to your computer with a local administrator account.
Step 2: Right-click This PC and choose Properties. Then, choose Advanced system settings in the left pane to open System Properties window.
Step 3: Switch to Computer Name tab and click Change button. In the Computer Name/Domain Changes window, check Workgroup under the Member of heading and type a workgroup name. Click OK to confirm.
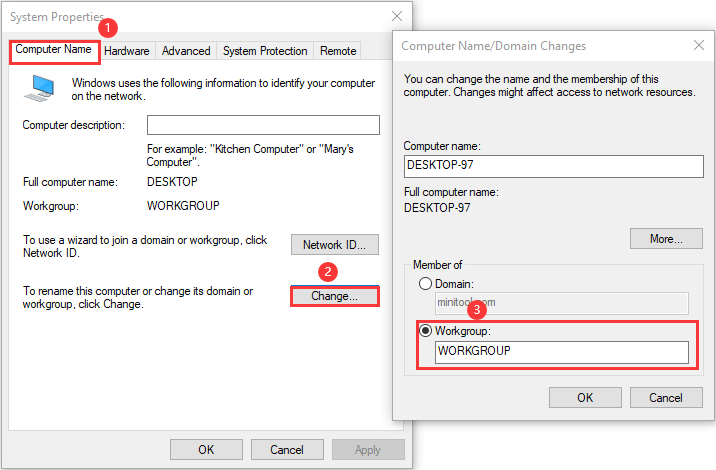
Step 4: Enter the name and password of an account with permission to remove this computer from the domain. Click OK and restart your computer as prompted.
Step 5: Log on to your computer with a local administrator account and enter Computer Name/Domain Changes window again.
Step 6: Check Domain under Member of section this time, type the name of the domain and click OK. Then, you should also enter the account and password of a domain administrator account and click OK to confirm.
After that, you can restart your computer and log on with your domain user account. The trust relationship failed issue should have been resolved.
Solution 2: Reestablish Trust
If the trust relationship between the workstation and the primary domain failed, perhaps you can reestablish trust between the domain controller and client. Just follow the steps below:
Step 1: Right-click the Start button and choose Windows PowerShell (Admin). Click Yes button to continue.
Step 2: Type the command $credential = Get-Credential and press Enter.
Step 3: A windows will pop up requiring you to enter your credentials. Just input the user name and password of the domain administrator account and click OK.
Step 4: Input the command Reset-ComputerMachinePassword -Credential $credential and press Enter.
Once it’s done, exit the tool and restart your computer. Now, you can use domain user account to log on your device and check if trust relationship failed issue is fixed.
Solution 3: Add Domain Controller to Credential Manager
Some users have removed the problem by adding domain controller to the Credential Manager. You can also have a try by following the given instructions below.
Step 1: Open Control Panel.
Step 2: Navigate to User Accounts > Credential Manager.
Step 3: Choose Windows Credentials and click Add a Windows credential.
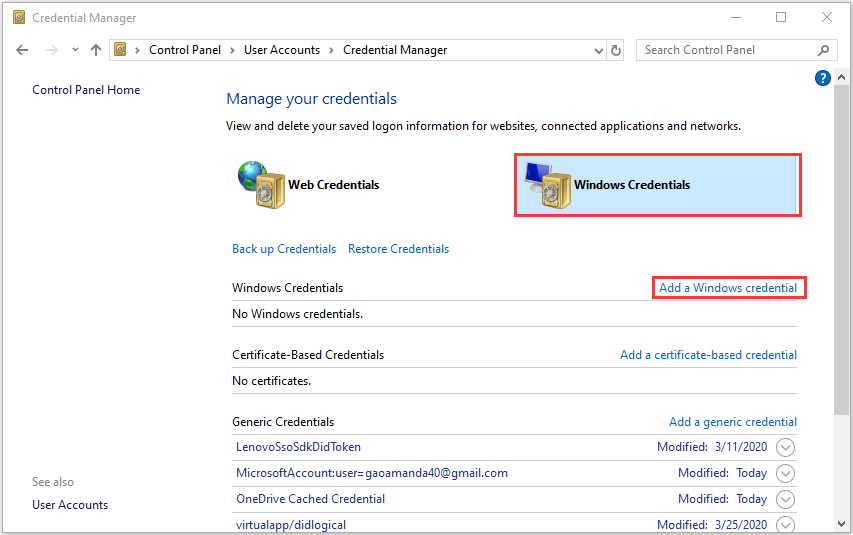
Step 4: In the new interface, enter the address of the website or network location and your credentials. Note that the credentials (username and password) should be abled to used to access the location. Then, click OK button to save the changes.
After that, restart your computer and you should be able to log on to your computer in the domain environment without problem.
Solution 4: Reset Computer Account
Finally, you can try resetting the account of the computer which gives the trust relationship between the workstation and the primary domain failed error message. The steps are listed below:
Note: This method only works for Windows Servers with Active Directory Domain Services.
Step 1: Open Run dialog, input dsa.msc and click OK to open Active Directory User and Computers window.
Step 2: Double-click the domain name to expand it and choose Computer.
Step 3: In the right pane, right-click the computer account that failed to connect to the domain and choose Reset Account.
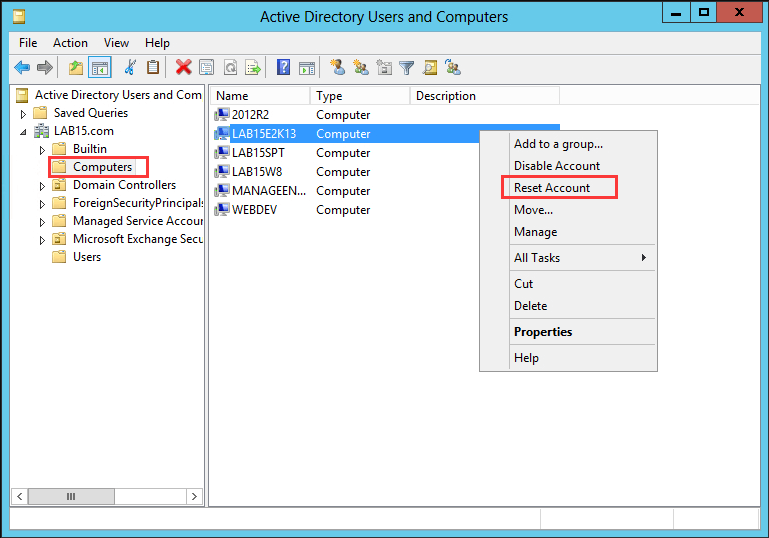
Step 4: Click Yes to confirm the operation.
Done! You can restart your computer now and check if your computer can connect to the domain.
Several users are facing a problem when logging in to client and server operating system. The issue occurs when they are using Domain infrastructure. The error message is – “The trust relationship between this workstation and the primary domain failed”.
This error code doesn’t allow users to log into the machine in the domain environment in Windows. The problem might occur due to malfunction in a user account, incorrect relationship between client and domain server, and more. Go through the quick navigation links below and follow the ways to solve them. See – How to Fix Network Connection Problems in Windows 10 All in One.
The trust relationship between this workstation and the primary domain failed
Here is how to fix The trust relationship between this workstation and the primary domain failed in Windows –
Way-1: Log into computer with a new domain administrator account.
Changing the name and workgroup of computer does a trick many times and solves the issue. You need to rejoin the client machine from a domain in this process. Follow the steps –
- Click Search from the taskbar.
- Type – advanced system settings.
- Hit – Enter.
- System Properties window will appear; click on the Computer Name tab.
- Click on Change to add machine to Workgroup.
- Type the name of the Workgroup.
- Select – OK.
- You will come across a pop-up saying – You must restart your computer to apply these changes. Click on ‘OK’.
- Select – Restart now.
- After the system is restarted, type the domain Administrator account and password.
- The issue should be resolved.
Way-2: Add the domain controller to Credential Manager
This way includes the steps to add domain controllers account to Windows Credential. On several occasions, this change fixes the trust relationship between workstation and domain problem. Follow the guidelines –
- Ensure to have signed in to Windows 10 with the local Administrator account.
- Press – Win + S.
- Type – control panel.
- Hit – Enter.
- Click on – Credential Manager.
- On the next window, click on Windows Credentials.
- Select – Add a Windows credential link.
- Type the Internet or network address, User name, and Password.
- Click – OK.
- Exit Credential Manager.
- Restart the computer.
- Sign in to Windows 10 using the domain user account and check if the error still persists.
Way-3: Correct DHCP configuration to fix The trust relationship between this workstation and the primary domain failed error in Windows
After adding a DHCP server you need to again configure the DHCP pool. In this process, you have to assign IP Addresses to hosts remaining in the network. Here are the instructions –
- Press Winkey and R.
- Type dhcpmgmt.msc.
- Hit – Enter.
- Once the DHCP Management Tool is open, navigate to – com\IPv4\Scope.
- Here, you can notice that the DHCP is not set up correctly. Enter the correct network address and configure DHCP in right way.
- Exit the management tool and restart the machine.
Furthermore, you can set up the same DHCP configuration via TP-Link router. If you haven’t knowledge about how to access your router, go through the guide for the Router.
- Launch any browser.
- In the address bar, type IP address of the router.
- On the Router page, select LAN under Network tab.
- Now click on DHCP.
- Check the DHCP configuration if it is correct. Check the IP address is ok. If anything is wrong, correct it and close the browser.
Way-4: Fresh Set up the trust using Windows PowerShell
To reestablish trust between the domain controller and client, Windows PowerShell is a handy utility. So go ahead with the steps –
- Make sure you have logged into Windows 10 with local Administrator account.
- Press – Winkey.
- Type – PowerShell.
- From the results section, right-click on PowerShell.
- Select – Run as Administrator.
- Click on Yes on the User account control prompt.
- Once PowerShell is there, type – $credential = Get-Credential.
- Press – Enter.
- Enter domain admin account credentials.
- Click OK
- Now type – Reset-ComputerMachinePassword -Credential $credential.
- Hit – Enter.
- Close the Windows PowerShell and restart the computer.
- See if the error is fixed.
Way-5: Reset the Account Password via Netdom.exe
In case you are running Windows Server 2008 R2 or Windows Server 2003 following steps will help –
- As in the above ways Log into Windows Server through domain Administrator account.
- Press Windows and R.
- Type – cmd.
- Press – Ctrl+Shift+Enter.
- Click Yes on the confirmation prompt.
- Copy-paste – netdom resetpwd /s:server /ud:domain\User /pd:* (note that s is server name, domain is domain name, and user is user account).
- Hit – Enter.
- Exit the Command Prompt.
- Go to the Windows client machine and restart.
- Now, sign in to the Windows machine using domain user account.
Way-6: Reset Domain Controllers Account
Trust relationship problem in domain machine might be solved using reset computer account via Active Directory User and Computers tool which is incorporated into servers with Active Directory Domain Services role.
- Press Windows and R.
- Type dsa.msc.
- Hit – Enter.
- As Active Directory User and Computer appear, expand the domain name.
- Select – Computer.
- Go to the computer account that fails to connect to a domain.
- Right click on computer.
- Select – Reset Account.
- Click on Yes.
- Next, click on OK.
- Close the Active Directory User and Computers.
- Reboot the computer and it should work.
Way-7: Run System Restore
When facing The trust relationship between this workstation and the primary domain failed issue, System Restore will help you to bring the system to the time and date when there were no issues. This way error The trust relationship between this workstation and the primary domain failed error can be easily solved using this tool. So follow the steps –
- Click – Start.
- Type – rstrui.
- Press – Enter.
- On the System Restore wizard, select Choose a different restore point.
- Click Next.
- Select and highlight the appropriate point.
- Click on Next.
- Review the selections and click on Finish.
- Select Yes on the prompt.
Methods list:
Way-1: Log into computer with a new domain administrator account.
Way-2: Add the domain controller to Credential Manager
Way-3: Correct DHCP configuration
Way-4: Fresh Set up the trust using Windows PowerShell
Way-5: Reset the Account Password via Netdom.exe
Way-6: Reset Domain Controllers Account
Way-7: Run System Restore
That’s all!!