
THIS IS NOT A TORRENT! You still need the physical games installed on your PC for the patch to work properly. I would recommend installing either The Sims: Complete Collection, or The Sims, The Sims: Deluxe, The Sims: Double Deluxe, or The Sims: Mega Deluxe: and the remaining expansion packs for the patch to work properly.
Patch
installation and use is done at your own risk. I will not be held responsible
for corrupted or inoperable gameplay caused by the installation, use, or
modification of the Windows 10 Patch.
The games needed:
The Sims, The Sims: Livin’ Large, The Sims: House Party, The Sims: Hot Date, The Sims: Vacation, The Sims: Unleashed, The Sims: Superstar & The Sims: Makin’ Magic
This is a patch designed to to remove the disk protection from The Sims 1: Complete Collection. It works by making the game able to run without a disk in the disk drive. With Windows 10, the disk protection renders the game useless.
The original designer of this patch is unknown. I am the distributor of this patch. It originally appeared on The Sims Forums in 2015. I have taken the liberty of typing up a Readme and creating some videos to help with the installation process.
The Sims: Complete Collection is a game made by Will Wright, developed by Maxis, and published by Electronic Arts.
www.youtube.com/user/SariaFan93

31st Jan 2025 Update
This guide was created for owners of the original disc copies of The Sims and its expansion packs.
The easiest way to play The Sims on Windows 10/11 is to purchase The Sims Legacy Edition, released by EA, which has been created to play on Windows 10/11 and includes all expansions.
You can purchase this here or on the EA App – simply enter the promo code “BEYONDSIMS” at the point of purchase on the EA App/Website to support us!
Tutorial for Original Disc Copies of The Sims
With The Sims recently celebrating its 21st anniversary at the time of originally writing this tutorial, I have been in a nostalgic mood and re-discovering older Sims titles. And that has included going back to where it all started!
The Sims was released in 2000 and was compatible with Windows 95, 98 and ME machines. Even Windows XP wasn’t around when it launched. With hardware and software moving so far ahead since, it’s natural that the game now has some compatibility issues.
This guide should help you overcome common problems when installing the game and help you get The Sims 1 working as well as possible on newer computers running Windows 11, Windows 10, Windows 8 and even Windows 7.
Contents
- Step 1 – Installing the The Sims 1 and Expansions Correctly
- Step 2 – Installing Windows 11/10/8/7 Patch (Optional, But Recommended)
- Step 3 – Configuring Compatibility Settings
- Step 4 – Set Screen Resolution and Play in Windowed Mode
- Troubleshooting – Resolving common errors
- Windows 11 Fix / Game Not Launching
- Getting the Autorun/Game Launcher to Work
- Manually Launching Setup/Setup is Not Starting
- Setup having trouble shutting down autoplay program
- InstallShield iKernel.exe Error
- Performance Issues/Crashing When Playing

Step 1 – Installing The Sims 1 and Expansions Correctly
It is important that you install all of the packs that you own in the order that they were released – otherwise you will have to jump through all sorts of hoops to get the game working which will involve uninstalling and reinstalling things!
I know we are all looking for things to do to pass time but, for the sake of your time and sanity, refer to the list below to see the order you should install your games. If you follow this, you will find that your installation process is fairly smooth and means you’ll get to play with all of the expansions.
As The Sims 1 was released so long ago, it isn’t available for download from official sources, so you’ll need to rely on all of your CDs! Now, if you do not have a DVD drive on your computer then you will need to purchase an external USB one. These are fairly inexpensive to purchase from somewhere like Amazon or a computer retailer.
If you are having any problems with getting the setup started or problems getting the game to run, which is highly likely on newer operating systems, then I recommend scrolling down to the troubleshooting section! It’s highly likely you’ll need to manually launch the setup for each game you install.
Install your games in the following order:
| The Sims (or The Sims Double/Triple Deluxe, which includes Livin’ Large) | |
| The Sims Livin’ Large / Livin’ It Up | |
| The Sims House Party | |
| The Sims Hot Date | |
| The Sims Vacation/On Holiday | |
| The Sims Unleashed | |
| The Sims Superstar | |
| The Sims Makin’ Magic |
Step 2 – Installing Windows 11/10/8/7 Patch (Optional, But Recommended)
This step is completely optional and we are not responsible for monitoring content on third-party websites or downloads. We will not be held responsible for corrupted or inoperable gameplay caused by the installation, use, or modification.
A Simmer by the name of SariaFan93 has created a very helpful Windows 10/8/7 patch which will help you get the game working on newer machines and allows you to play without the disc present.
Please note this patch will only work with all expansions installed, or The Sims Complete Collection, and must be installed from the physical discs.
- Go to the directory where you have installed The Sims (this is typically C:\Program Files (x86)\Maxis\The Sims)
- Find Sims.exe and rename this to Sims.old – do not delete this
- Download the new Sims.exe file by clicking here
- Move the new Sims.exe file you have downloaded to the directory where you have installed The Sims (this is typically C:\Program Files (x86)\Maxis\The Sims)
- Right click on Sims.exe and add a shortcut to your desktop for easy access to launch the game
In the unlikely event you encounter any problems, you can delete the new Sims.exe file from your Sims installation directory, and rename Sims.old file back to Sims.exe if needed.
Step 3 – Configuring Compatibility Settings
Before you launch the game, it is important that you configure the appropriate compatbility settings for The Sims 1 to ensure the game runs as well as possible!
- Go to the directory where you have installed The Sims (this is typically C:\Program Files (x86)\Maxis\The Sims)
- Right click on Sims.exe and click on properties
- Click on the “Compatibility” tab at the top
- Tick the box beside “Run this program in compatibility mode for:” and select “Windows 7”
- Tick the box beside “Run as administrator”
- If you haven’t done this already, right click on Sims.exe and add a shortcut to your desktop for easy access to launch the game
Step 4 – Set Screen Resolution and Play in Windowed Mode
The Sims will open in full screen and at 800×600 resolution by default. Follow the instructions below to set it to run at 1024×768 and to open in windowed mode, if you wish.
- Right click the shortcut to Sims.exe on your desktop
- In the “Shortcut” tab, add the following to the end of the Target text field: -w -r1024x768
- -w makes the game start in Windowed Mode – do not add this if you want to play in full screen
- -r1024x768 makes the game open in a resolution of 1024×768, the maximum supported resolution for The Sims 1
- Press OK to save the changes
Congratulations! You should now be able to launch and play The Sims 1 on Windows 10, Windows 8 and Windows 7 machines. All you have to do now is click on the shortcut on your desktop to get started!
You may still experience some issues such as performance or crashes, due to the age of the game, but these steps should give you the best chance of having a good experience.
Remember to always save regularly in the event the game were to crash, and to enjoy re-discovering the game that started it all!
Troubleshooting – Resolving common errors
Before you can even get the game to install and play the game, you may hit some errors. These steps should help you troubleshoot some of the common errors faced.
This section has been recently updated with a fix for Windows 11 operating systems / newer graphics cards!
Windows 11 Fix / Game Not Launching
A Windows 11 update in late 2022 caused The Sims 1 to stop working for many users. This section should help you get the game working again – and may work on older operating systems too if you have a newer graphics card.
- Download the latest stable version of dgVoodoo2 – this will be in a .zip format
- Open the zip file and extract “dgVoodooCpl.exe” to the directory where you have installed The Sims (typically C:\Program Files (x86)\Maxis\The Sims).
- Within the same zip file, go into the folder MS -> x86 and copy the .dll files to the directory where you have installed The Sims
- If prompted by UAC for permission to copy, or if you are asked if you want to over write any files, press allow.
- Go to the directory where you have installed The Sims and double click on “dgVoodooCpl.exe”
- Click on the “DirectX” tab and configure the following settings:
- Set the video card setting to “dgVoodoo Virtual 3D Accelerated Card”
- Uncheck the “dgVoodoo Watermark” setting
- Press “Apply” and close the dgVoodoo application
- Try launching The Sims and it should now work – this may overwrite your preferred resolution settings but the game will be playable.
dgVoodoo has many settings you can further experiment with to get the best results for your computer if needed.
Getting the Autorun/Game Launcher to Work
You only need to follow this step if you are experiencing problems with The Sims game launcher, which traditionally opens automatically every time you insert a disc to help you get the game installed or launch it.
On some newer devices, this can cause a problem where nothing happens or you get an error message from windows saying something needs to close. If you are unable to get the launcher working, try the following steps.
Manually Launching Setup / Setup is Not Starting
If you are trying to launch the setup to install the game and nothing is happening, or the autorun/game launcher is still not working, then the following section will help you.
- Go to This PC/My Computer
- Right click on the DVD Drive and click open in new window.

- Double click on the Setup folder
- Right click on Setup.exe and Run as administrator
- The Setup should now open and allow you to install the game – repeat this for every expansion you install
Setup having trouble shutting down autoplay program
If you get the following error appear when you try to launch the setup file, this is because the game launcher (start.exe) is running in the background, even if it hasn’t launched itself on your screen.
To fix this, open task manager, go to “processes”, find “start.exe” and end the task.
If you re-launch the setup, it should now work as expected.
InstallShield iKernel.exe Error
If you get the InstallSheild iKernel.exe error when you try to start installation of a Sims expansion, it’s a quick and easy fix.
- Go to C:\Program Files (x86)\Common Files
- Delete the InstallShield folder
- If it can’t be deleted because something is using it, restart your computer and repeat the above steps
- Try installing the expansion again – it should now work
Performance Issues/Crashes When Playing
If you are experiencing bad or varying levels of performance when playing The Sims, or perhaps it stops responding when you are playing, try the following tips:
Play in windowed mode – Whilst playing in full screen may be a more immersive experience, particularly as resolutions on newer devices are much larger than 1024×768, it can lead to lower frame rates and the game to run slower. By playing in windowed mode, this mostly seems to resolve itself and you should experience better performance.
Avoid clicking out of the game when loading – When you first launch The Sims, the game will go through quite a few screens to setup things like other neighbourhoods, magic, pets, etc. Whilst it’s tempting to leave this running in the background to complete, if you are playing in windowed mode, it may freeze and stop responding!
To stop this, avoid clicking out of the game when it is loading and make sure you keep The Sims open. This should prevent the game from crashing on most occasions. And, as always, SAVE REGULARLY!!
If you are looking for ways to get The Sims 1 to work on Windows 10, you’ve come to the right place. The game was one of the first games to use the PC platform, and sold over a million copies in many countries. Older games are best kept for future generations, and getting Sims 1 to work on Windows 10 is a great way to do just that. However, before you attempt to download the game to your PC, you should first check that your computer is compatible with it.
To start the game, first you need to make a desktop shortcut for it. Once you do this, you should then change its compatibility settings. You must be running Windows 7 or Windows XP Service Pack 2. After you have done this, run the game as an administrator. To change the game’s settings, make sure you add -w -r1024x768 to the target. The goal is to force the game to run in windowed mode.
Can You Still Play the Sims 1?
If you’ve been wondering if you can still play the Sims on Windows 10, you’re not alone. The game is still supported on Windows 10 as well as Windows 8 and 7. However, there are some common problems you may run into when playing the game. Here are some tips to help you fix any problems you’ve encountered with the game. Firstly, you should check your graphics settings.
Before starting the game, make sure the compatibility mode is set to 64-bit. This will prevent the game from freezing. To do this, you should first back up the original.exe file. Then, rename the new file by adding.old to it. Once this has been done, you should be able to start playing the game in a windowed mode. Alternatively, you can run the game as administrator and add -w -r1024x768 to the target file.
While the Sims game was released over 20 years ago, it’s still highly popular today. Although the game may be outdated, it’s still compatible with many modern operating systems, including Windows 10. Fortunately, there’s no need to give up hope – it’s entirely possible to play the Sims 1 on Windows 10 and Windows 8.
Can You Play Sims 1 on Windows 11?
If you’re still looking for a way to play The Sims on your PC, you’ve come to the right place. It’s possible to play The Sims 1 on Windows 11! The game’s compatibility with newer operating systems is one of the greatest challenges of retro gaming, but it is possible to play this beloved game on your PC if you’re running Windows 10. To get started, follow these simple steps:
If you’re unsure of what the exact requirements are, you can look at the compatibility section of the Sims 3 and SIMS 4 websites. Windows 11 has 64-bit support, so if you’re running an older version of the operating system, you should upgrade. If you’re using an older version of Windows, however, you can try running the game in compatibility mode by right-clicking the Steam icon and choosing Properties. Then, under the Compatibility tab, click the Apply or OK button.
Unlike most PCs, The Sims game requires some special hardware. Windows 11 is compatible with most PCs, but some features require specific hardware. Fortunately, most Windows 10 PCs can be upgraded to Windows 11 if they have the necessary hardware. In fact, the upgrade roll-out is expected to continue until 2022, so it’s worth checking your compatibility with your system first. This should ensure you’re able to play The Sims on your PC.
How Do You Set up the Sims 1?
First, install the game on your computer by creating a shortcut to the game launcher on your desktop. If you’re using a newer device, you may have to change the compatibility settings. If you’re running XP Service Pack 2, you’ll need to be running Windows 7 or XP Service Pack 2. Then, open a command prompt as administrator, and type sims.exe -w -r1024x768 to force the game to run in windowed mode.
After you’ve followed these steps, you can now launch The Sims. During the initial setup, the game will go through the usual setup screens. In windowed mode, you may experience freezes. To prevent freezing, try not to close the game after it finishes loading. Keep it open so that the game doesn’t crash. You’ll also want to avoid closing the game while it loads, as this can result in game crashes.
Why is My Sims Game Not Opening?
If your game is not opening on your computer, you may encounter a few launching issues, which you can easily resolve. Follow the guide below to fix this issue. There are some things you should check when you experience a problem with your game, so that you can enjoy it to the fullest. Read the entire guide and do not be afraid to ask for help if you can’t figure out the problem.
The first step in troubleshooting this problem is to check whether your game has the latest updates. If you’ve recently updated your game, you may encounter such problems. Another possible cause for a malfunctioning game is the faulty installation of the game’s software. To fix this issue, you can perform a clean boot, which is a system-wide procedure that will restore your game to its default state.
If these steps fail to work, you may need to uninstall the game. Make sure to remove any game packs or add-ons you may have purchased. Lastly, you can try to update your graphics driver using Windows Update’s Optional Updates feature. If you are unable to download a graphics driver, you can try downloading it from the manufacturer’s website. You can also update your display drivers using Device Manager.
Can You Get Sims 1 on Origin?
One of the most popular games of all time is The Sims, which was released over 20 years ago. Getting the game to run on a modern computer, however, is a little tricky. The DRM that came with the game is no longer compatible with modern operating systems. Thankfully, there are several ways to get The Sims 1 on your PC. Listed below are the ways to get The Sims 1 onto your Windows PC.
Before you can install The Sims, you must make a desktop shortcut for it. To do this, you will need to change your compatibility settings. You’ll need Windows 7 or XP Service Pack 2. To make the game run in windowed mode, you will need to run the game as an administrator. If you don’t know how to do this, check the game’s compatibility page for information.
Is the Sims 1 on Steam?
Electronic Arts’ new video game franchise, “The Sims,” has been making a splash in the PC gaming scene. Similar to Origin, Steam lets gamers purchase and manage the lives of virtual people. The Sims series has surpassed 20 million players, and Electronic Arts continues to release expansions and content packs for the game. It is also available on other digital platforms, such as the Xbox One and PlayStation 4.
Players can choose to control the behavior of Sims, which can include instructing them to interact with objects and go on vacation. Sims can also have house guests, based on the game files of other Sims in their neighborhood. Although the player cannot directly interact with visiting Sims, it is important to maintain a good social life in order for your Sim to become popular. If you leave your Sims alone for too long, they will develop overdue bills and lose their property.
Earlier versions of the Sims games offered pre-made characters and the option to create more. The game’s interface allows players to create a “family” of up to eight members. The player gives the character’s first name, optional biography, gender, age, and skin tone. They can also select a specific body and head. The Sims can have a specific personality, though these options are not customizable after the player has moved onto a lot.
Can You Play Sims 1 Online?
Can You Play The Sims 1 Online on Windows 10? Yes, it’s possible! While the official release of the game isn’t available online, there are ways to play The Sims 1 on a Windows 10 PC. Here are some of them. Firstly, you’ll need a DVD drive. You can purchase an external USB DVD drive for a reasonable price. If you don’t have one, you can always download one.
The game has many advantages. You can control your Sims’ behaviors by instructing them to interact with objects, animals, or people. They can also receive house guests, based on other Sims’ game files. However, you can’t control who they visit. The interaction with other Sims is the key to developing their social life and gaining popularity. Whether you’re playing the original game on Windows 10, or an online version, the experience is similar.
The Sims game has been available for years, but has had a lot of issues with installation. Windows 10 is not one of them. The game’s latest update, called “The Sims Complete Collection,” is much easier to install than the individual games. However, it won’t work on a game that’s not compatible with your operating system. If you do have a compatible game, you can try playing The Sims 4 on Windows 10.
Learn More Here:
1.) Android Help Center
2.) Android – Wikipedia
3.) Android Versions
4.) Android Guides
I finally decided to bust out and install my original Sims Collection on Windows 10, and boy was I in for a brutal night. Due to a complex technical issue I know nothing about, it has become nearly impossible to play older games like The Sims on Windows 10.
After about 3 hours of trying random “fixes” found online, it was bits and pieces from here and there that ended up making the game work for me. In this post I will detail the steps I took to get my game working nicely, so hopefully it works for you too!
❗ WARNING: SimsVIP does not assume liability should any 3rd party downloads cause harm to your PC or game. Download and install patches and fixes at your own risk.
❗ WARNING: I have not played long enough to know if there are any issues or other types of problems post-fix. I’ve messed around in game for a few hours and everything seems to be working great on my end. User experience may vary.
❗ NOTE: The instructions in this tutorial worked on my two PC’s, but may not work for you. There is no guarantee that you’ll be able to play the game.
❗ NOTE: I installed The Sims Complete Collection, so this tutorial may only work for this game and no other. However, other players have reported success with individual discs, The Sims Deluxe, Double Deluxe, and Mega Deluxe.
If you have been hit with the dreaded “Please login with administrator privileges and try again” error message, this tutorial will help you bypass it in order to play.
Install and Play The Sims on Windows 10
- Install all discs included with the game version you own.
- Go to C: > Program Files (x86) > Maxis > The Sims. Once you open the final folder, scroll all the way down to the bottom and find the Sims.exe file. Right click the icon and select “Rename”. Rename the file Sims.old (I left it as is in this folder going forward)
- Download this file from YouTuber SariaFan93 if not for them, I would have never found the correct link to this patch.
- Move the Sims.exe file you just download from the above link into C: > Program Files (x86) > Maxis > The Sims. If for some reason you are not able to move it in there, download the file again, move it in, and rename it to Sims.exe.
- Right click the Sims.exe file you just added to The Sims folder and add a shortcut to your Desktop. This allows for easy access and startup.
- Right click the shortcut on your desktop and click the “Compatibility” tab. From there, click on “Change settings for all users” at the bottom. When the screen pops up, select the first drop down box under “Compatibility Mode” and choose Windows 7. Also be sure that “Run this program as an Administrator” is selected as well!
- Select “Apply” and then “Ok”. This will bring you back to the first screen. Now, select the “Shortcut” tab to the left. In the “Target” section, paste the following at the end of the text: -w -r1024x768 This will enable windowed mode and the larger resolution.
HUGE THANKS to WinMacSims3 for this tip!
❗ If you run into any issues with this section of the tutorial, and your game does not load up in full screen, check out the suggestions and helpful tips in this thread.
“You can also run the game using the Run prompt (Windows Key + R). The first runs it in 1024×768, second is windowed at 800×600, and third is windowed at 1024×768
Sims.exe -r1024x768
Sims.exe -w
Sims.exe -w -r1024x768″You can also paste the 3 alphanumeric prompts in the “Target” box too.
- Once again, click “Apply” and “Ok” to close this box. Now at this point you should be able to start up the game and play on your screen (test this to make sure). The one issue with this configuration is that the it causes the UI to break.
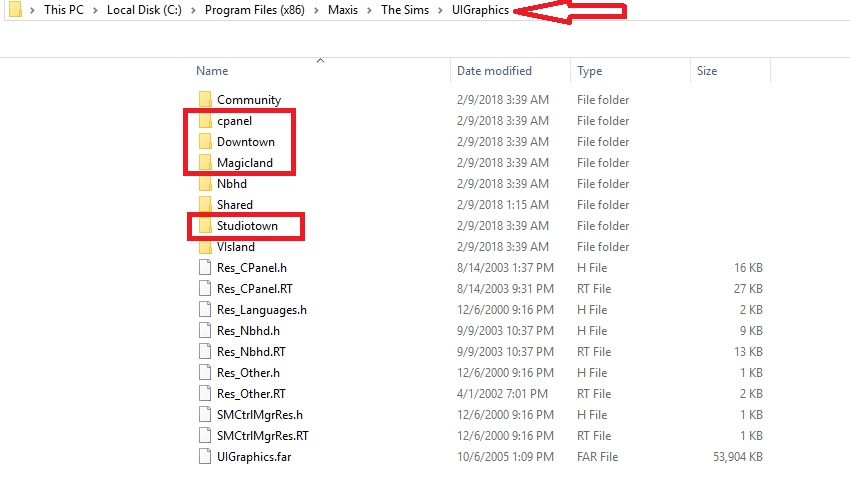
- The next part of this tutorial requires you to install a UI Fix so that you can play without the headaches causes by the broken UI. Head over to this link and download the altered UIGraphics Folder provided by reddit user Albuph. This will fix the UI bugs.
- Once you download this folder, you will need to merge it with the existing UIGraphics folder. Go to C: > Program Files (x86) > Maxis > The Sims and open the existing UIGraphics folder. Move the contends of the altered UIGraphics file you downloaded into this folder. Your UIGraphics folder should now contain 4 new folders inside.
❗ If for some reason you have an issue with full screen not working, see the following suggestion by SimsVIP reader Isabelle.
I had huge troubles getting the game to go into full screen mode. It turned out that since my computer has both a NVIDIA and an Intel graphics card the Intel card tells the game to keep the ratio (1024×768). I used -r1024x768 in the “Target” area.
I right clicked on the desktop and clicked on the Intel graphic settings, I then clicked on “Monitor” and changed the “Scaling” from “Keep ratio” to “Scale to full screen”. Now it works! My computer is in Swedish so everything may not be called as I’ve called it above. I hope this will help!
That’s it! At this point, use the shortcut on your desktop to start up the game. If a prompt comes up asking if you want to allow an “unknown” publisher to make changes to your account, select Yes and jump into the game!
Keep in mind that when you load up the game or visit new/different neighborhhods, the neighborhood screen will look small and seem a tad out of place. Once you select a home, move in a family, or zoom in, the game will go into full screen mode.
You may also have some excess grey or black borders on the outer edges of the screen, but again, that will go away once you zoom in.
This is everything I did in order to get the game to work on Windows 10. Like I said earlier, this may or may not necessarily work for you, but since it took me 3 hours to even get this game to work, I wanted to share in the event it helps you too!
FYI: I am using Windows 10 Pro. For information on my PC specs, see here.
WARNING – Back up all of your game saves prior to installing Windows 10 as an added precaution.
(I didn’t because I’m too impatient a person and I never said I was bright. Luckily my files were fine, but that doesn’t mean everyone’s will be. There’s a lot of file transferring involved in the upgrade installation process, so there’s countless ways things could go wrong. So in the words of Prince Royce – Baby back, back, back it up.)
The day has finally come for the new, shiny Windows 10 release. While most seemed to be undaunted by the update, simmers everywhere feared for their games. We’ve been through this many times before. A new operating system has every chance to break our beloved games. And how could we survive without the ability to go back and play The Sims, even though it was released over 15 years ago? It’s aged very well, might I add. So before everyone jumped on the opportunity to download the new OS at the first chance they got, many wavered for fear of losing their games forever.
But have no fear! I’m here to confirm that every game from The Sims Complete Collection to Sims 4 and everything in between (looking at you Medieval) runs just as well on Windows 10 as they did before the update.
NOTE: The following results are from my laptop specifically. Other’s results may vary. I have, however, seen several people across the web verify they work for them as well.
I assume it’s safe to say if the games work on your computer now, they’ll work the same after you install Windows 10 as well. Possibly even better than before.
Below is some information specific to running each series.
The Sims Complete Collection
Please be aware users have had difficult times installing The Sims games for many years now as technology continues to change and improve. Most of those issues, however, seem to stem from the original copies and not The Sims Complete Collection. The way they repackaged all of the games together for the collection must have changed the way the games install, so users have an easier and more successful time installing it compared to the individual games. Again, your results may vary depending on your rig.
One of the most common issues with The Sims, no matter what version you have, is the black box glitch. When you initially run the game in windowed mode, you’re graced with this wonderful black box that covers the game screen. It looks like below.

This box covers anything and everything on the screen, so even if you put a window over The Sims window, the black box will cover everything. The way to remove this box is to press CTRL + ALT + DEL on your keyboard. This will bring up a new window with several options. Don’t click any of them, exit the screen instead. Once you exit, the black box will be gone and you’ll see your game.

Sadly, without modding, the screen size is not adjustable and what you see is what you get. Modding is also not a perfect solution as it causes some wonky issues with the UI. Your other option is to play full screen, which also has a major con – when you get in game, you have to stay there. If you ALT + TAB to view a different window and then return to the game, it will completely freeze a few moments later and you’ll have to force close it.
So when playing The Sims, you have two choices: Play in the small windowed mode, or play full screen and make sure you never switch tabs.

The only issue I faced with Sims 2 Ultimate Collection on Windows 10 was that it reverted my custom GraphicsRules file, so I ran into the same graphics issues many people suffered on Windows 8.1. This was a quick fix as all I needed to do was remake the custom file using a program specifically built for that. It can be found HERE.
After reinstating that custom file, everything was smooth sailing. The game actually runs faster now than it did in Windows 8.1.
The Sims 3, The Sims Medieval,
The Sims 4
Windows 10 doesn’t change anything about these games or what you need to do to play them flawlessly. They all more recent releases, so they play nicely with updated tech. If you run into any issues trying to play any of these, it’s most likely not a Windows 10 specific issue.
As usual, your results may vary, but like Sims 2, these games actually run faster and smoother for me on Windows 10 than they did on Windows 8.1.
I hope this has eased some of your uneasiness in deciding whether or not Windows 10 is for you.