
Все способы:
- Способ 1: Обновление операционной системы
- Способ 2: Запуск в режиме совместимости
- Способ 3: Замена конфигурационного файла
- Способ 4: Установка пользовательского патча
- Способ 5: Переустановка / обновление драйвера видеокарта
- Способ 6: Переустановка игры
- Способ 7: Восстановление системных файлов
- Способ 8: Восстановление системы
- Вопросы и ответы: 2
Важно! В этой статье рассказывается о методах устранения неисправности, связанной с частыми вылетами Sims 2. Если ваша проблема заключается в ошибках при запуске игры, обратитесь за помощью к другому материалу на нашем сайте. В нем приводится множество способов устранения неполадок этого типа.
Подробнее: Как запустить Sims 2 в Windows 10
Способ 1: Обновление операционной системы
Перед внесением правок в компоненты игры и операционной системы рекомендуется проверить наличие обновлений и при обнаружении установить их. Разработчики Windows 10 постоянно улучшают совместимость со старыми играми, поэтому инсталляция патча способна устранить проблему с вылетами. Если вы не знаете, как обновить ОС до последней версии, обратитесь за помощью к тематической статье на нашем сайте.
Подробнее: Обновление Windows 10 до последней версии
Обратите внимание! Некоторые пользователи жалуются на ошибку, возникающую во время инсталляции обновлений. Если и вы столкнулись с такой проблемой, перейдите по ссылке ниже к статье с описанием возможных неисправностей и способами их устранения.
Подробнее: Что делать, если обновления не устанавливаются в Windows 10
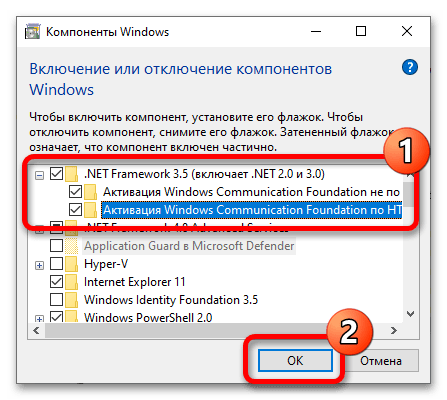
Проблема с вылетами может быть связана с плохой совместимостью игры, так как выходила она во времена, когда Windows 10 еще не существовало. Поэтому для устранения множества неисправностей рекомендуется воспользоваться специальным средством операционной системы, которое в автоматическом режиме проанализирует файлы Sims 2 и подберет наиболее подходящую конфигурацию для корректной работы.
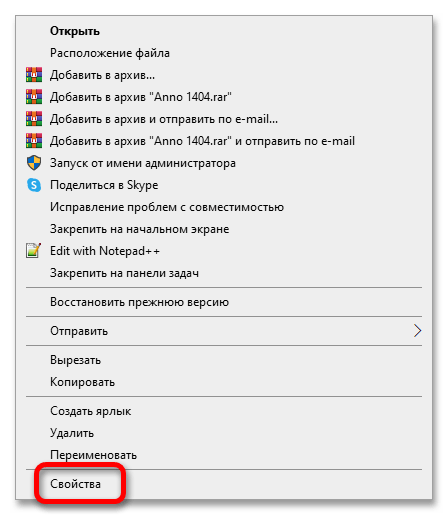
- Перейдите в свойства ярлыка игры. Для этого щелкните по нему правой кнопкой мыши и в появившемся контекстном меню выберите пункт «Свойства».
- В открывшемся окне проследуйте во вкладку «Совместимость» и нажмите по кнопке «Запуск средства устранения проблем с совместимостью».
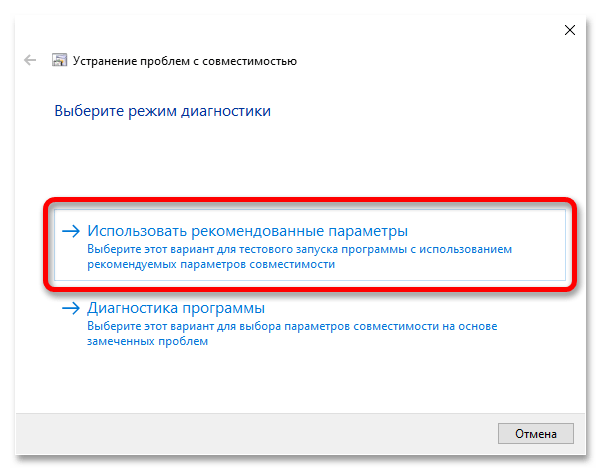
- В появившемся приветственном окне утилиты кликните по пункту «Использовать рекомендованные параметры».
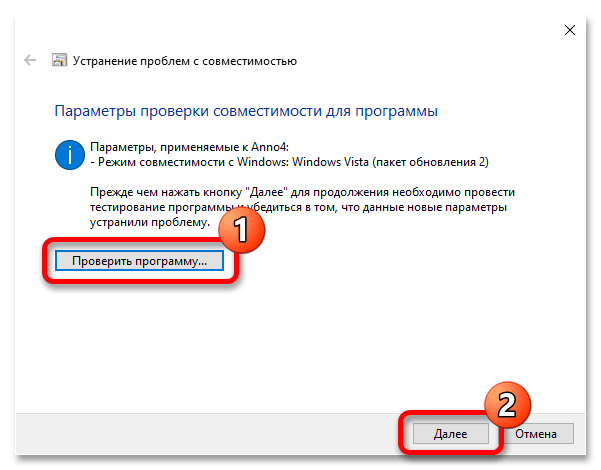
- Нажмите по кнопке «Проверить программу». Сразу после этого будет осуществлен запуск исполняемого файла игры, продолжайте играть в нее. Если спустя время ошибка не появилась, значит, средство устранения неполадок подобрало верные параметры совместимости. Выйдите из Sims 2 и щелкните по кнопке «Далее».

Примечание! Если проблема с вылетом не была устранена, все равно щелкните по кнопке «Далее».
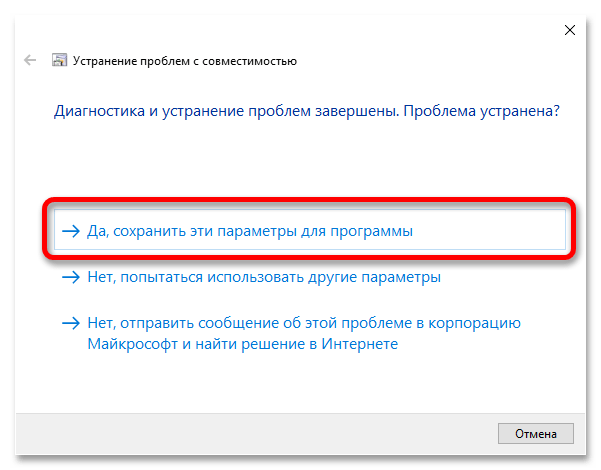
- Если в процессе игры вылета не было, ответьте на поставленный вопрос, выбрав вариант «Да, сохранить эти параметры для программы». После этого «Средство устранения неполадок» можно закрыть и продолжать играть в Sims 2.
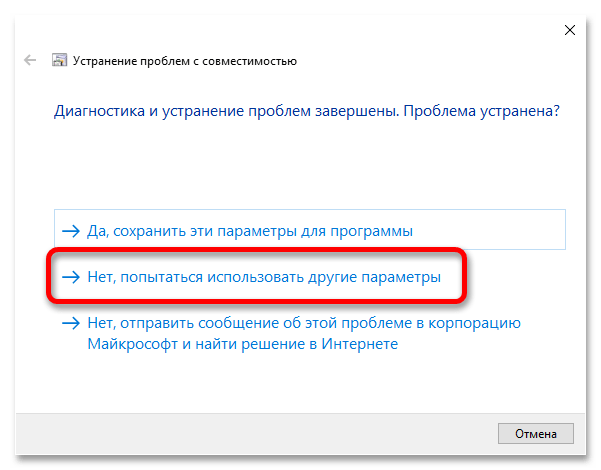
Если неисправность не была устранена и вылет произошел, щелкните по варианту «Нет, попытаться использовать другие параметры».
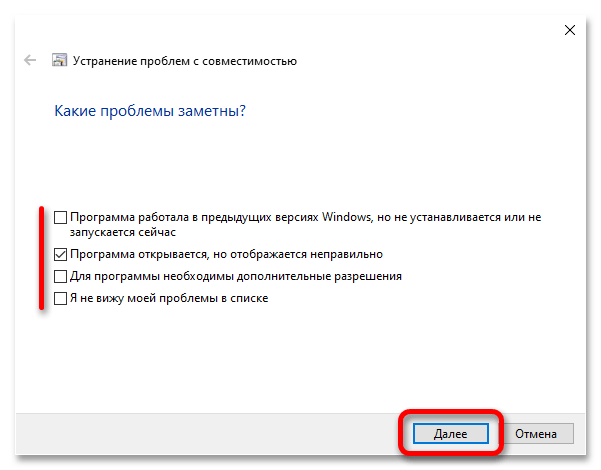
- На экране появится список с разным описанием проблемы. Поставьте отметки напротив тех пунктов, которые соотносятся с работой вашей игры. Затем щелкните по кнопке «Далее».
- Вернувшись в уже знакомое окно, снова кликните по кнопке «Проверить». Далее действуйте аналогичным образом, как было описано в пунктах №4-6 этой инструкции, только на этот раз при необходимости выберите из списка другие варианты ответов.


Способ 3: Замена конфигурационного файла
Sims 2 может некорректно работать с современными разрешениями мониторов, проявляется это в неправильном отображении некоторых элементов интерфейса и периодических вылетах при переходе в различные меню и во время загрузки локаций. Решением проблемы будет замена конфигурационного файла. Предварительно скачайте его с нашего облачного хранилища, щелкнув по кнопке ниже.
Скачать конфигурационный файл с Яндекс.Диска
Примечание! Файл находится в ZIP-архиве, поэтому перед выполнением дальнейшей инструкции извлеките его. Для этого вы можете воспользоваться как штатными средствами операционной системы, так и программным обеспечением от сторонних разработчиков. При необходимости ознакомьтесь с тематической статьей на нашем сайте, перейдя по ссылке ниже.
Подробнее: Как распаковать ZIP-архив в Windows 10
Файл содержит параметры игры, изначально настроенные для корректной работы в Windows 10. Но по умолчанию в нем указано разрешение 1920 на 1080 пикселей. Если у вас монитор соответствует этим значениям, значит, можете пропустить начало приведенной далее инструкции и перейти сразу к ее последнему пункту. В противном случае необходимо открыть конфигурационный файл в «Блокноте» и изменить параметры разрешения.
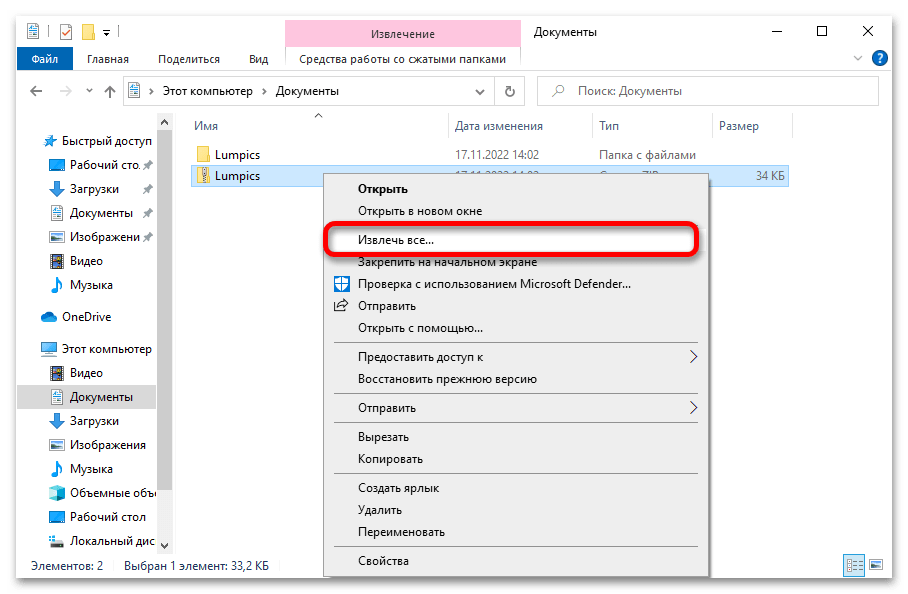
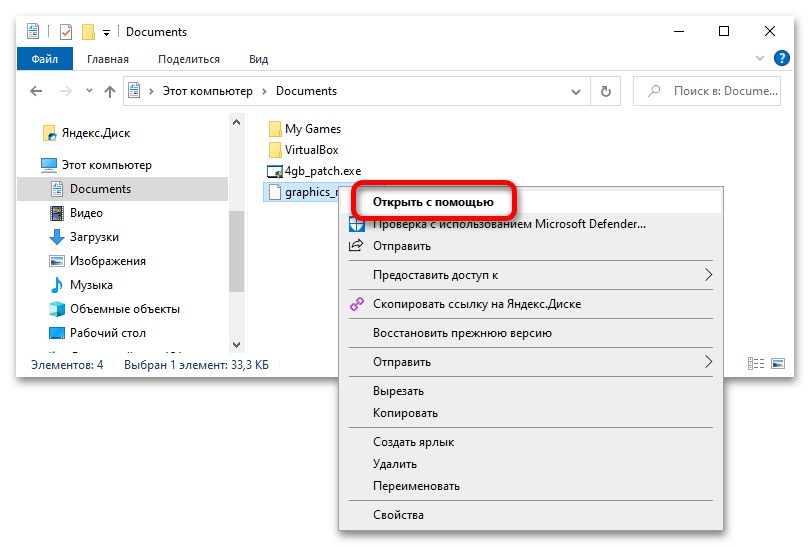
- Перейдите в папку, в которую вы извлекли содержимое архива. Откройте контекстное меню конфигурационного файла, нажав по нему правой кнопкой мыши, и выберите пункт «Открыть с помощью».
- В появившемся диалоговом окне найдите в списке приложение «Блокнот». Выделите его и щелкните по кнопке «ОК». Также рекомендуется установить отметку напротив пункта «Всегда использовать это приложение для открытия .sgr файлов», чтобы в будущем не пришлось выполнять эти же действия с другими подобными файлами.
- В открывшемся окне Блокнота необходимо найти блок параметров, отвечающих за разрешение экрана в игре. Для удобства рекомендуется воспользоваться функцией поиска. Для этого разверните меню «Правка», расположенное в верхней части интерфейса, и выберите пункт «Найти». Также вы можете для этого воспользоваться сочетанием клавиш Ctrl + F.
- В появившемся окне введите в поле «Что» указанную ниже строку, после чего нажмите по кнопке «Найти далее».
option ScreenModeResolutionКликайте по ней до тех пор, пока не увидите в основной части «Блокнота» то же содержимое, что показано на изображении ниже. Если вы случайно его пролистаете, переведите переключатель в блоке «Направление» в положение «Вверх»и снова начните кликать по кнопке «Найти далее».
- Перед вами будет располагаться четыре блока со значениями разрешения, которые соответствуют выбранным параметрам качества графики. Рекомендуется установить напротив всех строк разрешение вашего экрана, чередуя значения по горизонтали и вертикали, как это сделано на изображении ниже.

После этого сохраните изменения, воспользовавшись комбинацией клавиш Ctrl + S.
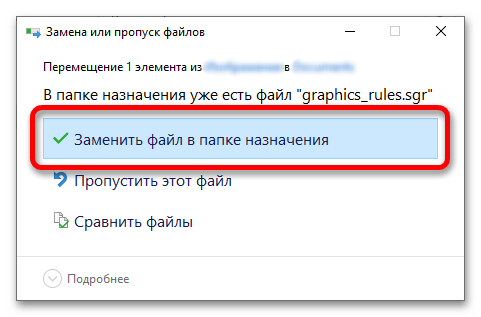
- Теперь необходимо скопировать измененный конфигурационный файл во все соответствующие директории игры. Их список вы можете видеть ниже. Заметьте, что путь начинается непосредственно с корневой папки Sims 2.
The Sims 2\Apartment Life\TSData\Res\Config
The Sims 2\Best of Business\EP3\TSData\Res\Config
The Sims 2\Best of Business\SP5\TSData\Res\Config
The Sims 2\Best of Business\SP7\TSData\Res\Config
The Sims 2\Bon Voyage\TSData\Res\Config
The Sims 2\Double Deluxe\Base\TSData\Res\Config
The Sims 2\Double Deluxe\EP2\TSData\Res\Config
The Sims 2\Double Deluxe\SP4\TSData\Res\Config
The Sims 2\Free Time\TSData\Res\Config
The Sims 2\Fun with Pets\EP4\TSData\Res\Config
The Sims 2\Fun with Pets\SP1\TSData\Res\Config
The Sims 2\Fun with Pets\SP9\TSData\Res\Config
The Sims 2\Glamour Life Stuff\TSData\Res\Config
The Sims 2\Seasons\TSData\Res\Config
The Sims 2\University Life\EP1\TSData\Res\Config
The Sims 2\University Life\SP6\TSData\Res\Config
The Sims 2\University Life\SP8\TSData\Res\ConfigПримечание! Если какой-то папки вы не найдете, пропустите ее. Это означает, что у вас просто не установлено соответствующее дополнение к игре.
При копировании файла в целевую директорию у вас на экране каждый раз будет появляться диалоговое окно с предупреждением, что такой объект там уже есть. Каждый раз кликайте по пункту «Заменить файл в папке назначения».


Способ 4: Установка пользовательского патча
Исполняемый файл Sims 2 был создан, когда на рынке компьютерной техники еще не было 64-битных процессоров, поэтому в нем нет строк кода, обеспечивающих совместимость с оперативной памятью объемом 4 ГБ и больше. По этой причине в игре могут случаться внезапные вылеты, особенно сильно это проявляется на обширных локациях с большим количеством игровых персонажей. Чтобы устранить эту проблему, необходимо инсталлировать в корневую директорию специальный патч, который внесет правки в исполняемый файл Sims 2, но предварительно скачайте его с официального сайта разработчика.
Скачать патч с официального сайта
После разархивации перейдите в папку с этим файлом и выполните следующие действия:
- Запустите исполняемый файл инсталлятора патча двойным нажатием левой кнопки мыши. При необходимости в появившемся диалоговом окне дайте свое согласие на выполнение программы.
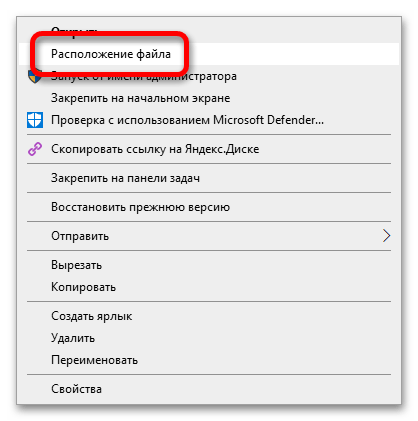
- В открывшемся окне файлового менеджера перейдите в корневую директорию игры и выберите ее исполняемый файл. Затем нажмите по кнопке «Открыть».
- Сразу после этого появится диалоговое окно с сообщением о том, что все прошло успешно. Закройте его, нажав по кнопке «ОК».
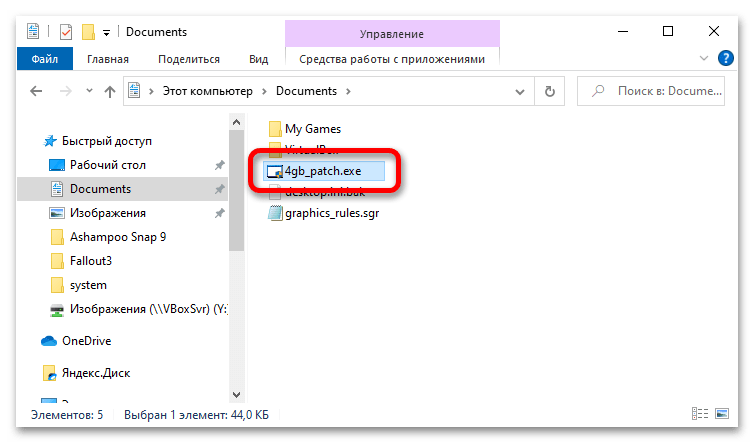

Примечание! Если вы не знаете, где находится корневая директория игры с исполняемым файлом, откройте ее через контекстное меню ярлыка на рабочем столе. Вызовите его нажатием правой кнопки мыши, после чего выберите пункт «Расположение файла».
Способ 5: Переустановка / обновление драйвера видеокарта
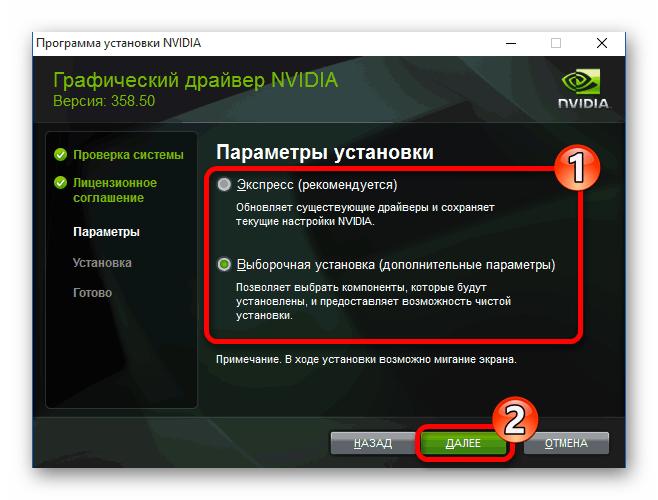
Для корректной работы игр в операционной системе должна быть установлена актуальная версия драйвера видеокарты. Если вы давно не обновляли его, следует проверить наличие апдейтов. Руководство по выполнению этой процедуры будет отличаться в зависимости от компании производителя графического чипа. У нас на сайте есть отдельные статьи, посвященные этой теме, в которых вся процедура подробно описывается, воспользуйтесь соответствующей ссылкой ниже.
Подробнее: Как обновить драйвер видеокарты NVIDIA / AMD
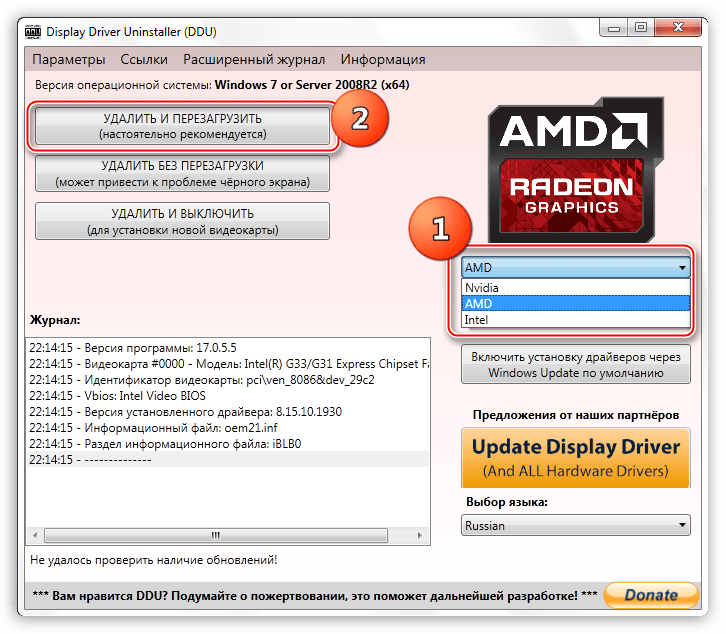
Если проблемы с Sims 2 начали появляться относительно недавно, а до этого времени все было в порядке, есть вероятность, что драйвер видеокарты повредился. В таком случае его обновление не поможет, потребуется совершить полную переустановку. Эту процедуру можно условно разделить на два этапа: удаление и инсталляция. Подробнее об этом рассказывается в другой статье на нашем сайте.
Подробнее: Как переустановить драйвер видеокарты
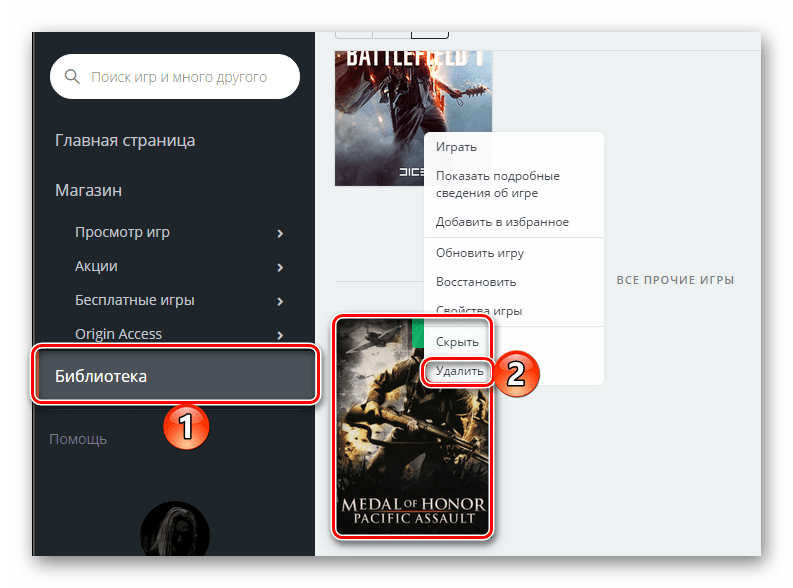
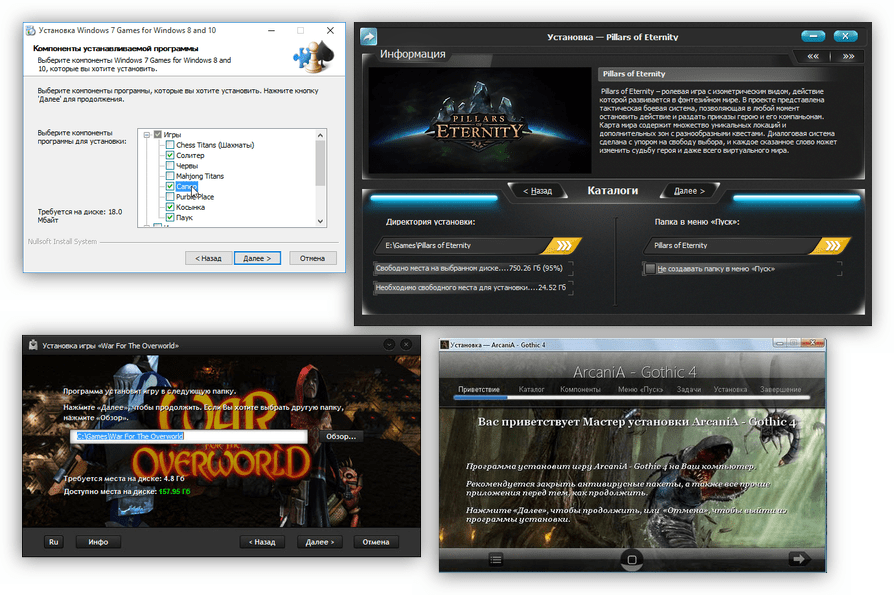
Способ 6: Переустановка игры
В процессе работы за компьютером по тем или иным причинам могли случайно повредиться файлы игры, что и вызвало проблемы с внезапными вылетами. В таком случае необходимо восстановить все данные. Сделать это можно путем переустановки Sims 2, но прежде игру следует полностью удалить с компьютера. Для этого рекомендуется воспользоваться ее деинсталлятором или специальным программным обеспечением от стороннего разработчика. Подробнее об этом рассказывается в другой статье на нашем сайте, при необходимости ознакомьтесь с ней.
Подробнее: Удаление игр на компьютере с Windows 10
Если вы скачивали установщик Sims 2 из интернета, перед повторной инсталляцией рекомендуется прочитать тематическое руководство на нашем сайте. В нем поэтапно рассказывается о том, как инсталлировать программы и игры в операционной системе.
Подробнее: Руководство по установке программ на компьютер
Способ 7: Восстановление системных файлов
В процессе работы за компьютером повредиться могли не только игровые файлы, но и системные. Это также становится причиной внезапных вылетов в играх. Если такие проблемы вы замечали не только в Sims 2, то для их решения необходимо попробовать восстановить данные на диске операционной системы. Для этого следует воспользоваться специальной консольной утилитой Windows 10, которая производит эту процедуру в автоматическом режиме, достаточно будет ее запустить с соответствующими параметрами. На нашем сайте есть отдельная статья, в которой об этом рассказывается подробнее. При необходимости вы можете ознакомиться с ней, перейдя по ссылке ниже.
Подробнее: Восстановление целостности системных файлов в Windows 10

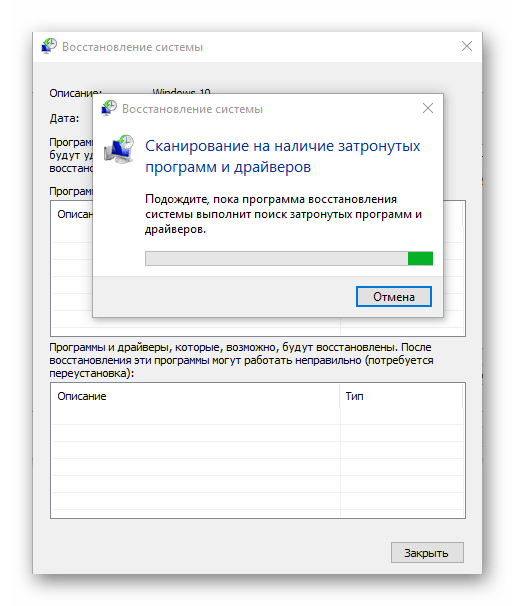
Способ 8: Восстановление системы
Если долгое время с игрой Sims 2 все было в порядке, а внезапные вылеты стали беспокоить вас относительно недавно, устранить неисправность можно путем отката операционной системы до точки восстановления. Важным фактором здесь является ее наличие. В случае удовлетворения этого требования, произведите процедуру по восстановлению. При необходимости обратитесь за помощью к другому материалу на нашем сайте, посвященному этой теме.
Подробнее: Как откатить Windows 10 до точки восстановления
Наша группа в TelegramПолезные советы и помощь

When I switched over to Windows 10, I was so upset that I couldn’t get the game to run smoothly. My graphics were flashing pink or blue, and I would crash every time I tried to take my Sim to a different lot. If you’re having the same problem, it’s an easy fix! You just need to install the 4GB patch. And if that doesn’t work, there are several other things you can try listed below. This article contains EVERYTHING I KNOW about getting your game to work on Windows 10.
Last updated: 02/16/2021 (Updated with DXVK fix)
Increasing Available Memory
A windows update in late 2017 or early 2018 caused this bug to start happening to everyone playing The Sims 2. But the good news is it isn’t hard to fix.
The Sims 2 is an old game and it only uses 2GB of your available memory. You need a special patch for the game to access 4GB in Windows 10. When installed properly, you won’t run out of memory while you play and your game won’t crash and your graphics won’t flash pink anymore.
Here’s a step-by-step guide to help you get your game running again with no crashes and no flashing graphics.
Step 1: Inspect Your Config Log
First, I’ll show you how to make sure this is what’s causing your problem. And when we’re done, I’ll show you how to make sure it really worked.
Open up your Documents folder and navigate to the following path:
Documents > EA Games > The Sims 2 Ultimate Collection > Logs
NOTE: If you don’t have the UC, the path will be the same. It will just say “The Sims 2” only instead of “The Sims 2 Ultimate Collection.”

Find the log file that looks like the one above. It will be the name of your computer followed by -config-log.
Open the file. It will look like this:

Look for the rows that say “Memory” and “Free Memory.” If your game is only using 2GB, it will say 2048 here instead of 4096.
NOTE: I have already installed the patch in my game, so that’s why the memory shows 4096 in this screenshot.
If your log file says 2048 MB, installing the 4GB patch will fix the problem. Congratulations! Let’s fix it!
Step 2: Download the 4GB Patch
Visit the NTCORE website to download the 4GB patch.

Unzip the .exe file onto your desktop or anywhere you like. You can delete it after you install the patch, so it doesn’t really matter.
Step 3: Install the Patch
Now pay attention, because you have to install it properly or it won’t work.
Double click on the .exe file after you download and unzip it.
Your file explorer will then open up. Navigate to the following location:
Windows (C:) > Program Files (x86) > Origin Games > The Sims 2 Ultimate Collection > Fun with Pets > SP9 > TSBin

If you have the disc version of the game instead of the UC, navigate to this location:
Windows (C:) > Program Files (x86) > EA Games > The Sims 2 Mansion and Garden Stuff > TSBin
NOTE: If you don’t have Mansion and Garden Stuff, navigate to the TSBin of the most recent expansion pack you have.
Select the .exe of your game in this folder, and then click “Open.” You should get a pop-up that looks like this:
Click OK and the box will disappear.
A backup .exe file should have been created in your TSBin folder. That’s normal, so don’t worry about it. This means your game is successfully patched.
Step 4: Make Sure it Worked
- Load your game and allow it to load to the neighborhood selection screen (at least). This will update your config log.
- Close your game and return to your desktop.
- Open up your config log from your documents folder again (as in step 1). It should now say 4096 in the memory line.
- Congratulations! The Sims 2 will now run on Windows 10 and your days of crashing and flashing pink graphics are over.
Troubleshooting
If you’re still having issues after applying the patch, there are a few more things you can try. The Sims 2 is picky with modern graphics cards.
The 4GB Patch Won’t Apply (Memory Does Not Change in Log)
Recently a Patron of mine was having trouble getting the 4GB patch to apply. We tried literally everything I could think of and her memory would not change in the Config Log. I have had several comments and emails about this too.
Here’s how we fixed it and got her playing right away.
Drag the .exe file from your TS Bin to your desktop and apply the 4GB patch there. Check your log file to make sure it applied. Your memory should be updated. Then you can use the shortcut you just created on your desktop to play the game.
Moving the .Exe File – DISC VERSION ONLY!
If you have the disc version of the game, it might be necessary to move the .exe file to another folder. I have no idea why this is necessary for some computers and not others. If nothing else works, try this!
Make a backup of your folders before you do this in case you screw something up. I warned you. Also, please note if you have the Ultimate Collection this will not work for you!
The patch will automatically apply to the TSBin. Cut and paste the Sims2EP9.exe file into the CSBin.

The CSBin directory is shown above. If this doesn’t work for you, move the .exe file back into TSBin (or restore from backup) and try something else.
Graphics Rules Maker
Everyone using Windows 10 to play The Sims 2 should use the graphics rules maker.

This program is easy to install and makes “rules” for the game to follow so that it recognizes your graphics card. This will allow you to play in 1920 x 1080 resolution and make your game look the best it possibly can. See the creator’s website for further instructions. Make sure to read everything to ensure your settings are correct.
Direct X 9.0 Error After Using Graphics Rules Maker
If you get a Direct X or Access Violation error trying to run your game after using Graphics Rules Maker, you need to download a separate fix.
There’s one version for UC and one version for discs. There are fixes available for both Nvidia and Radeon graphics cards. Read the instructions carefully before installing.
My Game Won’t Start
If you’re game doesn’t start at all after applying the patch and using the graphics rules maker, you most likely need to delete your cache files. Navigate to:
C:\Users\YourName\Documents\EA Games\The Sims™ 2 Ultimate Collection
You will see two files in this folder at the very bottom:
- Accessory.cache
- Groups.cache

Delete both of them and start your game again. Don’t worry! This is completely safe and your game will generate new cache files after you start it up.
To prevent having to do this again, see the instructions here for making your cache files read-only. You will never have to delete them again. If you don’t do this, you may have to delete the files again the next time your game doesn’t start. No big deal, but a little annoying.
My Memory Still Won’t Update (DISC VERSION)
If you’ve made it all the way to the end of this tutorial and your memory STILL doesn’t update, there is one more fix that seems to work for even the most severe cases. You need to use a No-CD crack. (Don’t worry it’s perfectly legal since you own the discs.)
- Replace your .exe file with the more flexible version found on this page: http://www.leefish.nl/mybb/showthread.php?tid=7800&pid=40665#pid40665
- Click on the “No CD Hack for M&G” to download.
- Rename Sims2EP9.exe to Sims2EP9.___exe.
- Copy the new .exe file you downloaded into your CSBin folder (where the original is).
- Apply the patch to the new .exe file and try again. You may need to apply the patch on the desktop and then move to CSBin if that doesn’t work.
NONE OF THIS WORKS! MY GAME IS STILL CRASHING! (DXVK Fix)
If you’ve exhausted every other option, there’s one more thing you can try. Don’t ask me how or why this works, but it seems to do the trick when none of the other options work. When Mr. Pleasant couldn’t play Sims 2 on his new computer, this was the only thing that stopped the crashing and purple soup.
I have removed my instructions from this guide, as they have become outdated. Instead, see THIS DOCUMENT with current instructions for using the DXVK Fix, plus more advanced troubleshooting options.
If I find more information that might help, I will add it to this article in the future. If these fixes work for you (or if you have any problems), leave a comment below and let me know!
Readers help support Windows Report. We may get a commission if you buy through our links.
Read our disclosure page to find out how can you help Windows Report sustain the editorial team. Read more
Sims 2 is a sequel to the bestselling computer game ever. It was released in 2004 for Microsoft Windows and can be played on mobile platforms as well.
Anyone who has played it knows how addictive it can get. But there are times when you have problems that hinder you from enjoying the game, like when Sims 2 crashes or doesn’t launch or freezes altogether.
Users have reported their Sims 2 crashing at the loading screen, on startup, or during play. This article takes you through what you can do when Sims 2 keeps crashing in Windows 10.
Why does my Sims 2 game crash?
One of the reasons for this is that games that were working in previous operating systems, may or may not work in Windows 10 owing to compatibility issues. However, it may also occur due to file or driver corruption, or when you’ve not updated your drivers or graphics card.
Note: If you’re playing off a disc, these games use Safedisc which isn’t supported on Windows 10. Check if you can get digital versions of the games you can download and play.
How do I stop my Sims 2 from crashing?
1. Restart your computer or device
Sometimes when Sims 2 is crashing in Windows 10, it can be due to a temporary issue that can be fixed by restarting your computer or device. This resets anything running in the memory that can cause the game to crash.
Ensure there’s nothing open or unsaved before you continue as this will automatically close any open applications. To do this, click Start>Power>Restart. Once your computer restarts, sign back in and see if your game works.
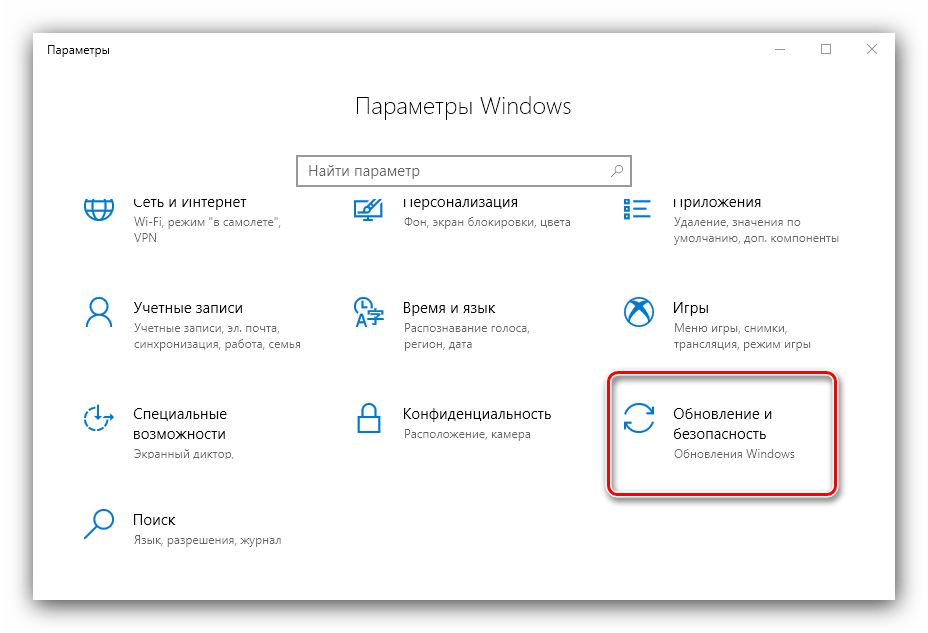
2. Check for Windows updates
- Press Windows + I to open Settings, and click on Update & Security.

- Now, click on Check for updates on the right.
- If an update is listed after the scan, click on Download & install to get it.


Updating the OS also helps when The Sims 2 is not working on Windows 11.
3. Reinstall the driver
Driver files should be uninstalled before you update to newer drivers, or when removing an older graphics card and replacing it with a new one.
- Press Windows + R to open Run, type control in the text field, and hit Enter.

- Click on Uninstall a program.

- Right-click the graphics card driver you’re using and select Uninstall
- Confirm that you wish to continue with the uninstall
- A prompt will appear asking if you want to delete all saved profiles. Clicking Yes will delete all its software and saved profiles. Clicking No will remove its software but the profile files are saved on your hard disk.
- Once driver files have been uninstalled, restart your computer to complete the uninstallation
- Turn on your computer and reinstall your graphics card driver


You can also downgrade the graphics drivers and see if it helps when Sims 2 is crashing in Windows 10.
3.1 Update drivers automatically
Downloading and updating drivers manually may damage your system by choosing and installing the wrong versions. To prevent that from the start, we strongly suggest doing it automatically by using specialized driver updating software.
4. Check if your computer meets the system requirements for the game
Some games have specific minimum system requirements for Windows 10 to play them seamlessly. Check if your computer or device can run the game without problems.
- Microsoft talks about lawsuit against AI hackers over explicit image abuse
- File sharing in Microsoft 365 just got smarter with Hero Links
- OneNote new UI update gives you more canvas space and cleaner layout
- The latest Edge update fixes Microsoft Editor issue & a Chronium vulnerability
5. Sign in as a different user
Sometimes when Sims 2 is crashing in Windows 10, it can be due to corrupted profile data on your computer or device.
1. Click Start
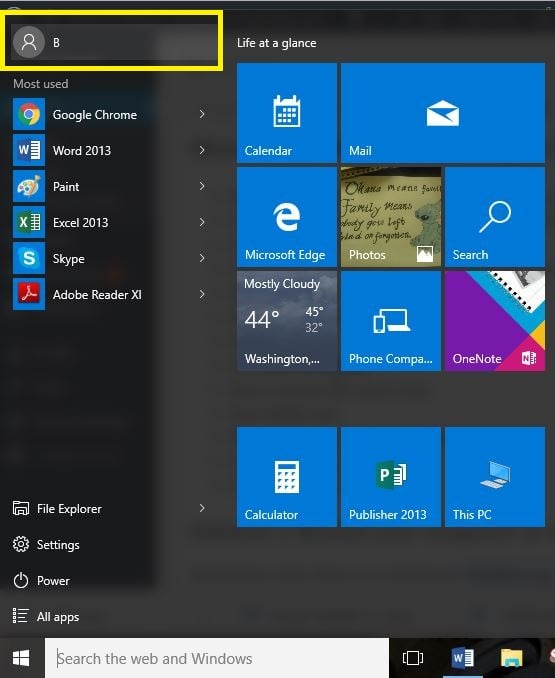
2. Click on your account name at the top left corner and click Sign Out
3. Click Switch account
4. Sign in with the other account and restart the game to see if it works
6. Repair or reinstall the game
Game files can get corrupted or altered if there’s malware in your computer, or you’re running a game modification on it. This solution will remove and replace the files that run the game. Some games even repair original files without you having to completely remove the game.
How to reinstall the game from Microsoft Store
- Click Start
- Select All apps.

- Find the game in the list of application
- Right click the game and select Uninstall
- Follow the steps to uninstall it
- Reinstall the game by opening the Store app and select profile button

- Click My Library
- Find the game and click Download


Reinstall from a different location
- Click Start
- Select Settings
- Type Programs and Features and select it from the search results.

- Find your game in the list of available programs and apps
- If it supports repair, the Repair function will appear as an option on the list of games. Select it to access the in-game repair process. Some games support repair through Uninstall/Change options.
- Select Uninstall or Remove and follow the instructions to remove the game
- Insert the media you used to install the game and follow the instructions

7. Reset the game
This helps restore corrupted game installation files.
- Click Start
- Select Settings
- Select System.

- Select Apps and Features.

- Find the game and click on Advanced options
- Click Reset
- Restart your computer to effect the changes


8. Run DISM tool
The Deployment Image Servicing and Management (DISM) tool, helps fix Windows corruption errors when Windows Updates and service packs fail to install due to corruption errors, like if you have a damaged system file.
- Click Start
- In the search field box, type CMD
- Click Command Prompt in the search results list.
- Type Dism /Online /Cleanup-Image /ScanHealth to scan for missing components
- Type Dism /Online /Cleanup-Image /CheckHealth to check for missing or broken files
- Type Dism /Online /Cleanup-Image /RestoreHealth to scan and correct any causes of the Windows 10 desktop is slow to load issue
- Press Enter
Once the repair is complete, reboot your computer and check if the problem persists, after which you can run an SFC scan as described in the next solution.
Note: The DISM tool usually takes 15 minutes to complete, however, sometimes it may take longer. Do not cancel when it is running.
9. Use System File Checker to repair damaged files
This checks or scans all protected system files, and then replaces the incorrect versions, with the genuine, correct Microsoft versions.
Here’s how to do this:
- Click Start
- Go to the search field box and type CMD
- Right click Command Prompt and select Run as Administrator.
- Type sfc/scannow.

- Press Enter
- Restart your computer and try to install updates again.

10. Clear the Windows Store cache
- Press Windows + R to open Run, type wsreset.exe, and hit Enter.
- Waif for the reset process to complete. Ideally, it shouldn’t take more than a few seconds.

11. Perform a System restore
- Click Start
- Go to the search field box and type System Restore
- Click Create a restore point in the list of search results
- Enter your administrator account password or grant permissions if prompted to
- In the System Restore dialog box, click System Restore then Choose a different restore point
- Click Next
- Click a restore point created before you experienced the problem
- Click Next
- Click Finish
Has any of these solutions helped fix the Sims 2 crashing in Windows 10 issue? Let us know by leaving a comment in the section below.
Milan Stanojevic
Windows Toubleshooting Expert
Milan has been enthusiastic about technology ever since his childhood days, and this led him to take interest in all PC-related technologies. He’s a PC enthusiast and he spends most of his time learning about computers and technology.
Before joining WindowsReport, he worked as a front-end web developer. Now, he’s one of the Troubleshooting experts in our worldwide team, specializing in Windows errors & software issues.
The Sims 2 original base game and expansion packs (from CD/DVD or ISO images) installed on Windows 7, 8, 10 cause a lot of issues.
The Sims 2 Ultimate Collection from Origin, it may solve some issues, but it do not allow me installing AnyGameStarter to create content compatible with base game or specific expansion packs only.
In the end, I went to buy an older laptop on which I can install Windows XP and play my favorite game.
Detailed problems
In 2016 replaced my 7-year old desktop with Windows XP with a new computer (Intel i5 6500 3.20 GHz, 16 GB RAM, IntelHD on-board graphics card). I installed Windows 10 on it and immediately I installed The Sims 2 (on D:\Games, not on C:\Program Files), and I had a major disappointment:
1. First problem noticed is that water is not textured. I read that this issue is common for on-board graphic cards. I bought in 2017 a NVidia GeForce GTX 1050 TI and solved water texture but not the next problems. I edited Graphics Rules.sgr to be able to play in higher resolution.
Side note: The Sims 3 works fine on on-board graphics card.
2. Doing normal things like putting a lot from house bin on map, create a family, move family into lot, saving lot after being played for some time, have about 25% chances to crash the game. Sometimes it give message “The Sims 2 has crashed” and other times game simply close with no message.
I tried to add Sims2Pack files (housing lots built by me, no custom content), only the ones requiring base game only could be installed, any one that required expansion packs failed, despite that I had all expansion packs installed. PackageInstaller window also display strange numbers.
Someone advised me to use Clean Installer, it allowed me to install Sims2Pack files requiring expansion packs, but the game wasn’t designed to work without any third-party utilities?
3. When tried to load a large neighborhood the game crashed with no error message (example Starling Springs a city built on my old Windows XP computer without problems).
4. When I installed AnyGameStarter, it messed up Documents folder path, all other games saves no longer worked and when I tried to play them (for example GTA San Andreas), it created new saves C:\Users\Teoalida\Documents\AnyGameStarter\AnyGame1\Documents\GTA San Andreas User Files (or something like, can’t remember exactly because I reinstalled Windows after this, uninstalling AnyGameStarter did not fixed the problem). This did not happened on Windows XP.
5. When I tried to create a The Sims 2 base game only via AnyGameStarter, it says that CD/DVD is not inserted into drive, despite that it is inserted. Same thing happened when I tried to install only base game. I love creating base game content.
6. I installed VMWare virtual machine with Windows XP and tried to install The Sims 2 + AnyGameStarter, I was able to start base game with the DVD in drive, I was able to open large neighborhoods like StarlingSprings without crashing, I was also able to install Sims2Pack files that require expansion packs (so all above problems are related to Windows 10 incompatibility). But the virtual machine runs so slow making game unplayable, and also with graphical bugs: in neighborhood view the ground is flashing purple, in lot view the walls are flashing red.
7. I tried to make another virtual machine with Windows 7 and tried to install The Sims 2, but not able to run it, it give “Runtime Error! R6025 pure virtual function call”. I do not know if the virtual machine cause this error and if the game may be theoretically playable on Windows 7 like on XP.
On both Windows 10 computer and Windows 7 virtual machine I get messages that this application has known compatibility issues. I tried to run in compatibility mode with every possible OS, without success.
Solution
Every time I want to play The Sims 2 had to plug in my old computer with Windows XP, but doing this, it become impossible to do anything else, if a customer call me to do some professional work I need to leave game, turn off the old computer, plug in the new computer, realize that customer tired of waiting and is no longer interested in my services, turn off new computer, plug in old computer and return to game, etc… a big fucking hassle!
HP was one of the latest laptop manufacturers which offered support for Windows XP until xx70 series in 2012). I started looking on OLX and bought an HP EliteBook 8770w for $500 purposely to install Windows XP to play The Sims 2 while doing my professional work on my desktop. A high-end laptop with 1920×1080 screen to make nice screenshots in game (all my friends wondered why I pay such huge price for a 6-year old laptop that is nearly 5 kg).
I did a test, installed Windows 7 and ran into same problems #2, #3, #5 like on Windows 10 desktop. Then I installed Windows XP and The Sims 2 works PERFECTLY! I also installed Windows 10 (dual boot) so I can use laptop for other stuff (sometimes having 2 computers on desk help me doing certain tasks faster).
On desktop with Windows 10 I also installer The Sims 2 Ultimate Collection so I can take screenshots in 4K resolution (3840×2160) because I bought a 4K monitor in July 2018 ($600).
I still would like to see solutions to make The Sims 2 discs version (NOT Ultimate Collection) to work properly on Windows 10.
This article was first posted on https://modthesims.info/t/showthread.php?t=614858 in 2018.
Note from other user: If you have not done the 4GBT patch you still need to. http://modthesims.info/t/610641 And possible memory allocation while you are at it.
Are you frustrated because The Sims 2 keeps crashing on your PC? Don’t worry, you’re not alone, and we’re here to help! This guide will walk you through easy steps to get your game running smoothly again, so you can enjoy building your dream world without interruptions.
Solution 1: Restart the PC
When you experience not opening on Windows 11 or any bug in The Sims 2, it’s recommended to start by restarting the computer before attempting any other fixes.
This is because restarting the computer can resolve any temporary errors caused by outdated cookies and cache or conflicts with other software on your system by simply restarting Windows 11.
Solution 2: Run the Program as an Administrator (Permanently) PC
When running TS2 on PC, there may be times when you need to give the program administrative privileges in order to access certain features or settings and in our case to get rid of not loading.
One way of doing it is by simply right-clicking on the program and selecting “Run as administrator”, but it may not always be enough, as you may need to grant these privileges permanently in order to avoid constantly having to repeat the process.
Here’s how to run a program as an administrator permanently on Windows 11:
- Go to the folder/Application
- Right-click on it
- A menu will open
- Select Properties
- A new window will open
- Navigate to the “Compatibility Tab“
- Under the Settings heading
- Find “Run this Program as an administrator“

- Check the box for this option
- Click “Apply“
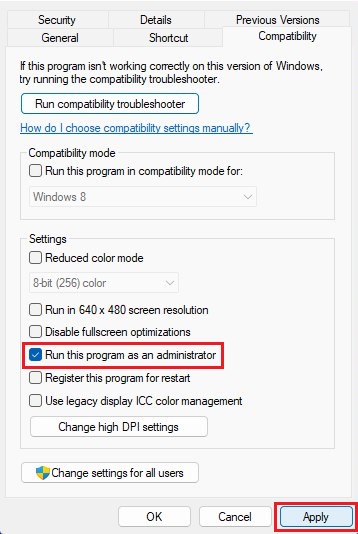
Now your program successfully Runs as an Administrator on Windows 11/10 (Permanently) and you can easily open the program without repeating the steps.
Solution 3: Update TS2
For critical errors like not loading, publishers release updates for an optimized and smooth gaming experience. It’s wise to check for any update released before troubleshooting other possible issues.
Playing with outdated versions can also lead to technical glitches, compatibility issues, or even missing out on new content. Here’s how to keep any game updated using its dedicated launcher:
Open the Game Launcher and from its settings locate “Update” Options. Either enable automatic updates or do a manual update if there are any. Restart the Launcher and check if you are still facing black screen on startup.
Solution 4: Close Intensive/Unwanted Programs Or Settings
Your game/PC can be set to maximum performance, try running the game on lower settings to consume fewer resources. This can include:
- A lower resolution(From 4k to 1080p or 1080p to 720p)
- A lower frame rate (try playing at 60Hz)
If there are too many programs running in the background, using too much internet/RAM/Disk can cause The Sims 2 not loading on Windows 11.
Closing unwanted programs will help you eliminate the not loading issue on your PC as your game would be able to get the required resources from Windows 11/10.
- Press Ctrl + Shift + ESC keys to open Task Manager
- Now check which program is using more Resources, usually indicated by a darker background
- Right-click on that program and select End task

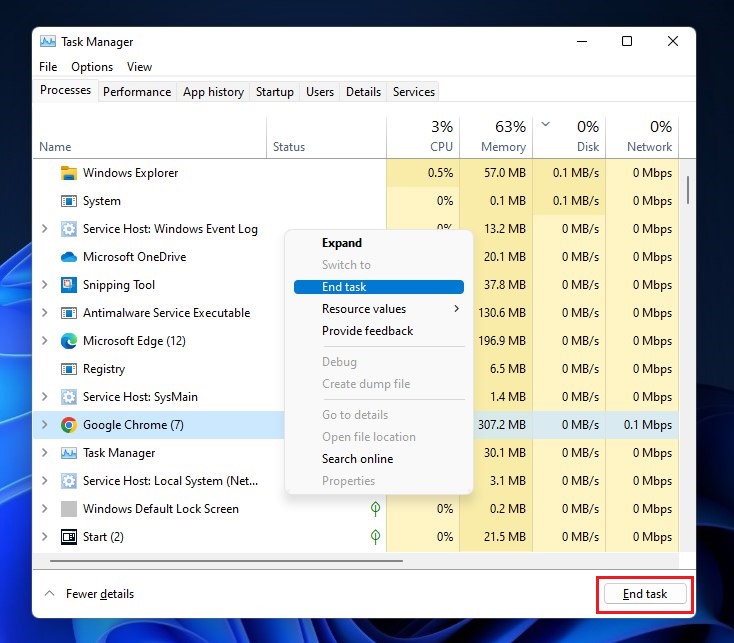
Now check if the black screen is solved or not.
Solution 5: Try Enabling/Disabling VPN while playing The Sims 2
Still running into black screen on startup error on Windows?
If you’ve got a VPN on, try turning it off to see if it makes a difference. If it’s off, switch it on and check again. But heads up! Don’t jump between too many regions; you don’t want to get blocked.
Remember, the right VPN can be a game-changer.
Solution 6: Add Game Exceptions on Antivirus PC
Sometimes antivirus thinks game files are bad guys and stops them, causing the not loading.
To fix this, tell your antivirus that The Sims 2 files are cool by adding them to the “exceptions” list. This way, you can play without the antivirus messing things up!
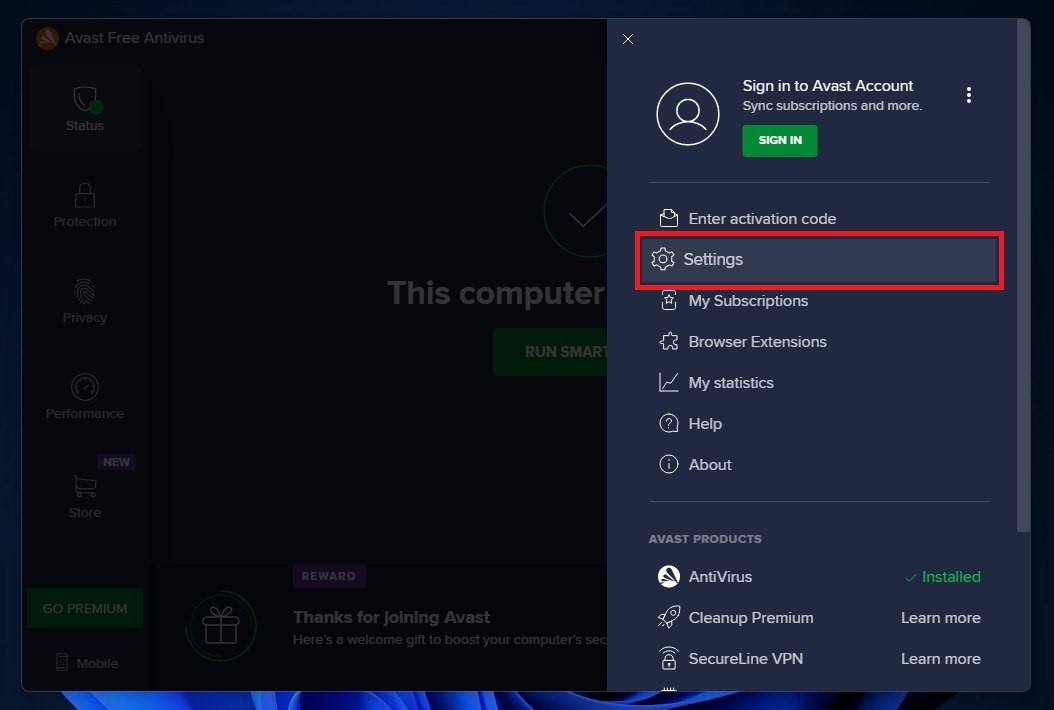
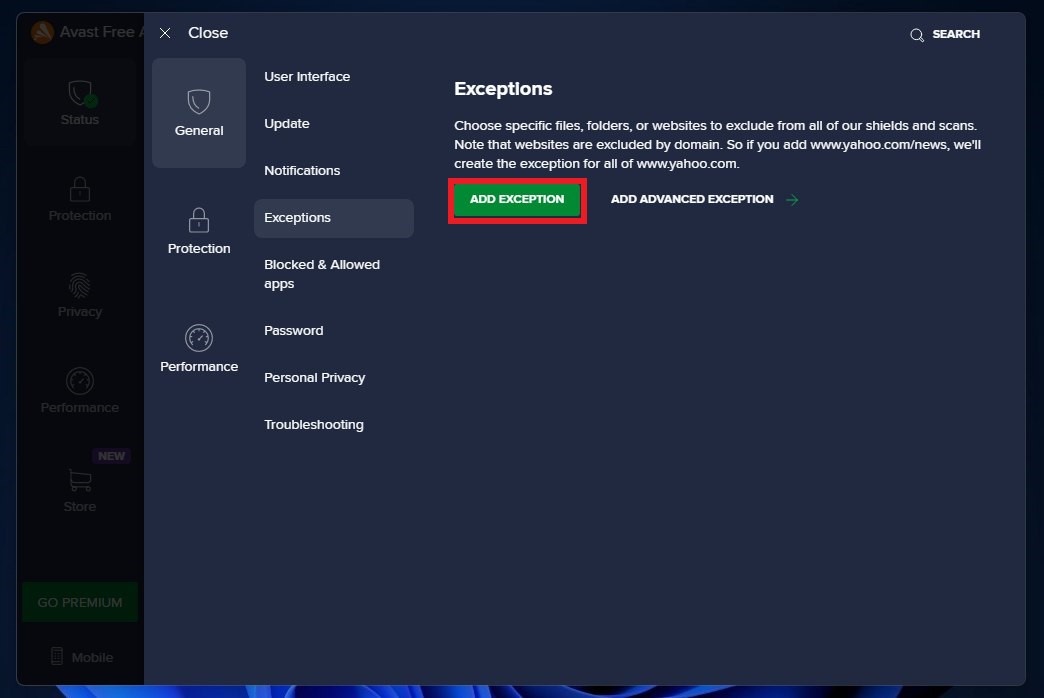
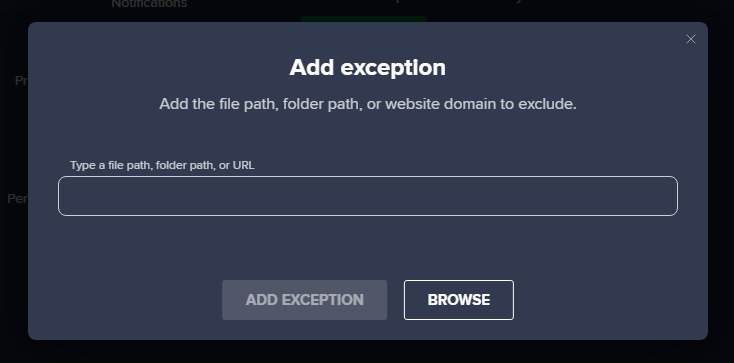
Follow the steps below to add an exception on Antivirus (This guide is for Avast, and would be similar for other antiviruses):
- Launch Avast on your PC.
- Select Menu at the top-right corner of Avast.
- Choose Settings from the menu.

- From the left sidebar, choose General > Exceptions

- Click ADD EXCEPTION and then type the URL you want to add to it.
- Click ADD EXCEPTION to save the URL and check if you can access the URL

If you are still facing Avast Blocking Websites, continue to the next solution.
Solution 7: Check if Windows or Any Driver is Outdated
Sometimes compatibility issues can be a reason for continuous TS2 not opening on Windows.
Often, it’s all about the updates. First off, head to your Windows settings and see if there’s an update waiting. While you’re on this updating spree, dive into your device manager and update your Wi-Fi drivers and update graphics drivers making sure they are on the latest versions.
These updates can make a big difference, fixing a lot of errors.
Solution 8: Contact The Sims 2 Support
Tried everything and that game error’s still bugging you?
As a last resort, head to the TS2’s official website and click ‘Support’ or ‘Contact’. Send them an email, jump into live chat, or post in their official forums.
Share what’s happening and any error messages. Remember to double-check you’re on the official site. Sometimes, reaching out is the best way to get back to gaming!
Stay smart and game on!
With these easy fixes, you should be able to keep The Sims 2 running without a hitch. Remember, gaming is all about fun, so if one solution doesn’t work, try another until your game is crash-free. If you’re still having trouble, reaching out to The Sims 2 support might be your best bet. Happy simming!
Hi! I’m Sophia from France. 🇫🇷 I got my first PlayStation as a gift and saved up big time for my fav, the PS2! 🎮 Now, I write super cool guides and articles about it on thecpuguide.com. Let’s game on! 🌟