
-> I was working on an Always On failover issue. Always on Availability group was failing over everyday anytime between 22:00 to 23:00.
-> Below messages were found in Event viewer logs,

Log Name: Application
Source: MSSQL$SQL01
Date: 6/01/2020 10:29:21 PM
Event ID: 41144
Task Category: Server
Level: Error
Keywords: Classic
User: N/A
Computer: JBSERVER1.JBS.COM
Description:
The local availability replica of availability group ‘JBAG’ is in a failed state. The replica failed to read or update the persisted configuration data (SQL Server error: 41005). To recover from this failure, either restart the local Windows Server Failover Clustering (WSFC) service or restart the local instance of SQL Server.

Log Name: System
Source: Microsoft-Windows-FailoverClustering
Date: 6/01/2020 10:29:18 PM
Event ID: 1561
Task Category: Startup/Shutdown
Level: Critical
Keywords:
User: SYSTEM
Computer: JBSERVER1.JBS.COM
Description:
Cluster service failed to start because this node detected that it does not have the latest copy of cluster configuration data. Changes to the cluster occurred while this node was not in membership and as a result was not able to receive configuration data updates.
Guidance:
Attempt to start the cluster service on all nodes in the cluster so that nodes with the latest copy of the cluster configuration data can first form the cluster. This node will then be able join the cluster and will automatically obtain the updated cluster configuration data. If there are no nodes available with the latest copy of the cluster configuration data, run the ‘Start-ClusterNode -FQ’ Windows PowerShell cmdlet. Using the ForceQuorum (FQ) parameter will start the cluster service and mark this node’s copy of the cluster configuration data to be authoritative. Forcing quorum on a node with an outdated copy of the cluster database may result in cluster configuration changes that occurred while the node was not participating in the cluster to be lost.

Log Name: System
Source: Service Control Manager
Date: 6/01/2020 10:29:21 PM
Event ID: 7024
Task Category: None
Level: Error
Keywords: Classic
User: N/A
Computer: JBSERVER1.JBS.COM
Description:
The Cluster Service service terminated with the following service-specific error:
A quorum of cluster nodes was not present to form a cluster.

Log Name: System
Source: Microsoft-Windows-FailoverClustering
Date: 7/01/2020 11:45:47 AM
Event ID: 1146
Task Category: Resource Control Manager
Level: Critical
Keywords:
User: SYSTEM
Computer: JBSERVER2.JBS.COM
Description:
The cluster Resource Hosting Subsystem (RHS) process was terminated and will be restarted. This is typically associated with cluster health detection and recovery of a resource. Refer to the System event log to determine which resource and resource DLL is causing the issue.

Log Name: System
Source: Microsoft-Windows-FailoverClustering
Date: 6/01/2020 10:28:25 PM
Event ID: 1135
Task Category: Node Mgr
Level: Critical
Keywords:
User: SYSTEM
Computer: JBSERVER2.JBS.COM
Description:
Cluster node ‘JBSERVER1’ was removed from the active failover cluster membership. The Cluster service on this node may have stopped. This could also be due to the node having lost communication with other active nodes in the failover cluster. Run the Validate a Configuration wizard to check your network configuration. If the condition persists, check for hardware or software errors related to the network adapters on this node. Also check for failures in any other network components to which the node is connected such as hubs, switches, or bridges.
-> Below messages were found in Cluster.log
[System] 00002420.00002004::2020/01/01-00:40:48.745 DBG Cluster node ‘JBSERVER3’ was removed from the active failover cluster membership. The Cluster service on this node may have stopped. This could also be due to the node having lost communication with other active nodes in the failover cluster. Run the Validate a Configuration wizard to check your network configuration. If the condition persists, check for hardware or software errors related to the network adapters on this node. Also check for failures in any other network components to which the node is connected such as hubs, switches, or bridges.
[System] 00002420.00002004::2020/01/01-00:40:48.746 DBG Cluster node ‘JBSERVER2’ was removed from the active failover cluster membership. The Cluster service on this node may have stopped. This could also be due to the node having lost communication with other active nodes in the failover cluster. Run the Validate a Configuration wizard to check your network configuration. If the condition persists, check for hardware or software errors related to the network adapters on this node. Also check for failures in any other network components to which the node is connected such as hubs, switches, or bridges.
[System] 00002420.00004598::2020/01/01-00:40:48.809 DBG The Cluster service was halted to prevent an inconsistency within the failover cluster. The error code was ‘1359’.
[System] 00002420.0000438c::2020/01/01-00:40:49.173 DBG The cluster Resource Hosting Subsystem (RHS) process was terminated and will be restarted. This is typically associated with cluster health detection and recovery of a resource. Refer to the System event log to determine which resource and resource DLL is causing the issue.
[System] 00002420.00005e5c::2020/01/01-00:40:49.174 DBG The cluster Resource Hosting Subsystem (RHS) process was terminated and will be restarted. This is typically associated with cluster health detection and recovery of a resource. Refer to the System event log to determine which resource and resource DLL is causing the issue.
-> The messages indicate that the Always On Availability group failover may be due to a network issue. I requested help from my networking team and was advised that there were no network issues.
-> I configured verbose logging for Always On Availability group using this article and generated cluster.log when the issue happened next time.
-> I started a continuous ping with a timestamp embedded into it till the issue occurred next time using below powershell command. From JBSERVER1, I started pinging JBSERVER2, JBSERVER3, File share witness server. From JBSERVER2, I started pinging JBSERVER1, JBSERVER3, File share witness server. From JBSERVER3, I started pinging JBSERVER1, JBSERVER2, File share witness server.
ping.exe -t JBSERVER1|Foreach{"{0} - {1}" -f (Get-Date),$_} > C:\temp\ping\JBSERVER1.txtping.exe -t JBSERVER2|Foreach{"{0} - {1}" -f (Get-Date),$_} > C:\temp\ping\JBSERVER2.txtping.exe -t JBSERVER3|Foreach{"{0} - {1}" -f (Get-Date),$_} > C:\temp\ping\JBSERVER3.txt-> The issue happened next day and below is the SQL Server error log details,
2020-01-06 22:28:16.580 spid22s The state of the local availability replica in availability group ‘JBAG’ has changed from ‘PRIMARY_NORMAL’ to ‘RESOLVING_NORMAL’. The state changed because the local instance of SQL Server is shutting down. For more information, see the SQL Server
2020-01-06 22:29:02.950 spid47s The state of the local availability replica in availability group ‘JBAG’ has changed from ‘RESOLVING_NORMAL’ to ‘SECONDARY_NORMAL’. The state changed because the availability group state has changed in Windows Server Failover Clustering (WSFC). For
-> I checked the ping results,

-> I provided these results to the Network team and requested the reason why there is a “Request timed out” if there are no network issues.
-> While the Network team was investigating I requested my Infrastructure team to check if the network card and firmware drivers were up to date. I got an update that they were latest.
-> I also wanted to ensure Anti-virus software is not a problem. Hence wanted to uninstall and verify. But this request was denied.
-> In the meantime, Application team requested for any temporary workaround or fix till the network team complete their troubleshooting.
-> I advised them that we can increase the values of below properties till we get to the root cause of network issue. I have clearly advised the application team that the default values for below properties are the recommended values and changing these to a higher value as recommended below can increase the RTO (Recovery Time Objective) as there will be a delay in failover in case of a genuine server/SQL down scenario. It just masks or delays the problem, but will never completely fix the issue. The best thing to do is find out the root cause of the heartbeat failures and get it fixed. Application team understood the risk and accepted to increase the values as it will be temporary.

PS C:\Windows\system32> (get-cluster).SameSubnetDelay = 2000PS C:\Windows\system32> (get-cluster).SameSubnetThreshold = 20PS C:\Windows\system32> (get-cluster).CrossSubnetDelay = 4000PS C:\Windows\system32> (get-cluster).CrossSubnetThreshold = 20-> You can check what these values are before and after the change using below command,
PS C:\Windows\system32> get-cluster | fl *subnet*-> This gave us some temporary relief. After 1 week, Infrastructure team have advised that there was a VM level backup happening at that time everyday through Commvault which may/can freeze the servers for 4 or 5 seconds. It seems like they have suspended it as it was not required anymore.
-> Same time, Network team advised that they have fixed the network issue and updated us to monitor.
-> I changed SameSubnetDelay, SameSubnetThreshold, CrossSubnetDelay, CrossSubnetThreshold to its default value. There were no issues after this. Everyone were happy!
Thank You,
Vivek Janakiraman
Disclaimer:
The views expressed on this blog are mine alone and do not reflect the views of my company or anyone else. All postings on this blog are provided “AS IS” with no warranties, and confers no rights.
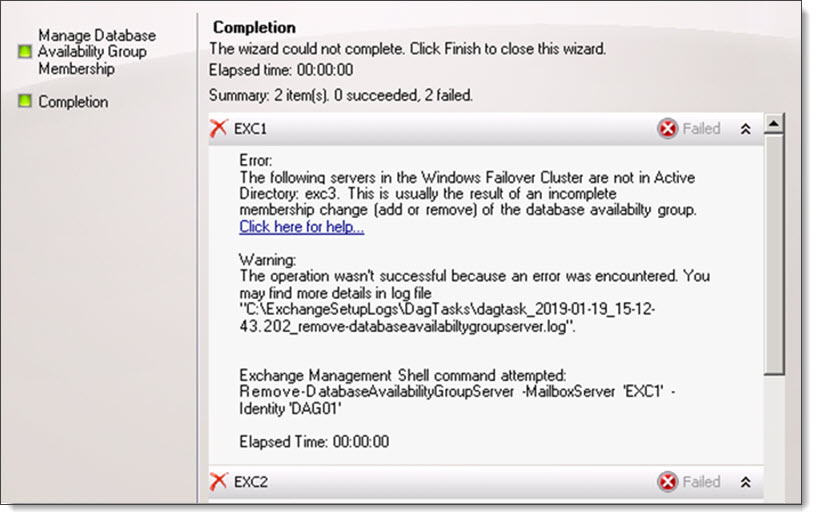
The following servers in the Windows Failover Cluster are not in Active Directory: <server name>. This is usually the result of an incomplete membership change (add or remove) of the database availability group.
I ran into this error recently while trying to remove two Exchange 2010 members from a database availability group (DAG).
The error stated that a member of the DAG, a server named EXC3, did not exist in Active Directory. This was odd because queries to the Exchange 2010 management tools only returned two Exchange servers–EXC1 and EXC2.
We further confirmed that there was no computer account for EXC3 in Active Directory Users and Computers. We did, however, see remanents of EXC3 in ADSI Edit.
Talking with our customer we discovered that there had been a third Exchange server, named EXC3, that had crashed and was never recovered.
To verify the status of all nodes in your database availability group, open PowerShell and import the Windows Failover Clustering cmdlets with Import-Module.
C:\> Import-Module FailoverClusters
Next, run the Get-ClusterNode cmdlet. This will retrieve the status of all our nodes.
 C:\> Get-ClusterNodeName                                                  State
----                                                  -----
EXC1                                                     Up
EXC2                                                     Up
EXC3                                                   Down
In the example above, we can see EXC1 and EXC2 are operational, whereas EXC3 is offline.
Because EXC3 no longer exists (and the fact we plan to collapse the entire DAG anyway) we can forcibly evict the failed node. To do this issue the following command.
 C:\> Get-ClusterNode -Name "EXC3" | Remove-ClusterNodeRemove-ClusterNode
Are you sure you want to evict node EXC3
[Y] Yes [N] No [S] Suspend [?] Help (default is "Y"): Y
You will be prompted to confirm. Press enter to accept the default action of “Yes”.
If we repeat the first Get-ClusterNode command we will only have the two operation cluster nodes remaining.
 C:\> Get-ClusterNodeName                                                  State
----                                                  -----
EXC1                                                     Up
EXC2                                                     Up
With no more failed nodes we can remove the two operational nodes using either the Exchange 2010 management console or PowerShell.
Have you run into this error while add or remove members to a DAG? What did you do to fix it? Drop a comment below or join the conversation on Twitter
Gareth is a former Microsoft MVP (2016-2024) specializing in Exchange and Office 365. Gareth previously contributed to the Office 365 for IT Pros book, which is updated monthly with new content. Find Gareth on LinkedIn, X, or, Facebook.
Reader Interactions
15:42 on May 28, 2017
Tags: cannot join server to failover cluster, cluster service, failover cluster, server 2008r2, server 2012r2, server 2016 ( 2 )
Well here was an interesting one, I build two brand new cluster nodes and attempted to create cluster but when I selected the two nodes the UI proved an error with “The Computer “NAME” is Joined to the cluster”

The problem was that the Cluster Service was set to Automatic.

Change the service to disabled and you are all set!
#cannot-join-server-to-failover-cluster, #cluster-service, #failover-cluster, #server-2008r2, #server-2012r2, #server-2016
If you don’t know StarWind iSCSI SAN product and you currently handling clusters that require a shared storage (not necessarily Windows), I highly recommend to take a look around to this the platform. To summarize, StarWind iSCSI SAN represents a software which allows you to create your own shared storage platform without requiring any additional hardware.
I created a post a while ago about “Five Easy Steps to Configure Windows Server 2008 R2 Failover Cluster using StarWind iSCSI SAN” to explain how can a Failover Cluster can be easily configured with the help of StarWind iSCSI SAN. Since there has been some changes in the latest releases of Windows Server and StarWind iSCSI SAN has a brand new v8 of its platform, I thought it would be a good idea to create a new article to achieve an easy way to create our own cluster.
As I did, for the previous post, the main idea about this article is to show a simple step-by-step process to get a Windows Server 2012 R2 Failover Cluster up and running, and without requiring to use an expensive shared storage platform to complete it. The steps involved are:
- Review and complete pre-requisites for the environment.
- Install StarWind iSCSI SAN software.
- Configure and create LUNs using StarWind iSCSI SAN.
- Install Failover Cluster feature and run cluster validation.
- Create Windows Server 2012 R2 Failover Cluster.
1. Review and Complete Pre-Requisites for the Environment
Windows Server 2012 introduced some changes into the Failover Cluster scenarios, even though those are important and improved changes, the basic rules of Failover Cluster has not changed. Here are the requirements for a Windows Server 2012 R2 Failover Cluster.
Requirements for Windows Server 2012 R2 Failover Cluster
Here are the requirements in Windows Server 2012 R2 for Failover Clusters:
- Two or more compatible servers: You need hardware that is compatible with each other, highly recommended to always use same type of hardware when you are creating a cluster. Microsoft requires for the hardware involved to meet the qualification for the “Certified for Windows Server 2012 logo”, the information can be retrieved from the Windows Server catalog.
- A shared storage: This is where we can use StarWind iSCSI SAN software.
- [Optional] Three network cards on each server, one public network (from which we usually access Active Directory), a private for heartbeat between servers and one dedicated to iSCSI storage communication. This is actually an optional requirement since using one network card is possible but not suitable in almost any environment.
- All hosts must be member from an Active Directory domain. To install and configure a cluster we don’t need a Domain Admin account, but we do need a Domain account which is included in the local Administrators of each host.
Here are some notes about some changes introduced in Windows Server 2012 regarding requirements:
We can implement Failover Cluster on all Windows Server 2012 and Windows Server 2012 R2 editions, including of course Core installations. Previously on Windows Server 2008 R2 the Enterprise or Datacenter Edition were necessary.
Also the concept for “Active Directory-detached cluster” appears in Windows Server 2012, which means that a Failover Cluster does not require a Computer object in Active Directory, the access is performed by a registration in DNS. But, the cluster nodes must still be joined to AD.
Requirements for StarWind iSCSI SAN Software
Here are the requirements for installing the component which will be in charge of receiving the iSCSI connections:
- Windows Server 2008 R2 or Windows Server 2012
- Intel Xeon E5620 (or higher)
- 4 GB of RAM (or higher)
- 10 GB of disk space for StarWind application data and log files
- Storage available for iSCSI LUNs: SATA/SAS/SSD drive based arrays supported. Software based arrays are not supported in iSCSI.
- 1 Gigabit Ethernet or 10 Gigabit Ethernet.
- iSCSI ports open between hosts and StarWind iSCSI SAN Server. The iSCSI ports are 3260 and 3261 for the management console.
General Recommendations for the Environment
In this scenario, there are several Microsoft and StarWind recommendations we must fulfill in order to get the best supportability and results. Keep in mind that each scenario could require different recommendations.
To mention some of the general recommendations:
- NIC Teaming for adapters, except iSCSI. Windows Server 2012 improved significantly the performance and of course supportability of network adapters teaming and is highly recommended to use that option for improved performance and high-availability. But we must avoid configure teaming on iSCSI network adapters.
Microsoft offers a very detailed document about handling NIC teaming in Windows Server 2012: “Windows Server 2012 NIC Teaming (LBFO) Deployment and Management” and also check this article “NIC Teaming Overview”.
- Multi-path for iSCSI network adapters. iSCSI network adapters prefer handling MPIO instead of NIC teaming, because in most scenarios the adapter throughput is not improved and moreover there could be some increases in response times. Using MPIO is the recommendation with round-robin.
- Isolate network traffic on the Failover Cluster. It is almost mandatory that we separate iSCSI traffic from the rest of networks, and highly recommended to isolate the rest of traffic available. For example: Live Migration in Hyper-V clusters, management network, public network, or Hyper-V replica traffic (if the feature is enabled in Windows Server 2012).
- Drivers and firmware updated: Most of hardware vendors will require prior to start any configuration, like a Failover Cluster, to have all drivers and firmware components updated to the latest version. Keep in mind that having different drivers or firmware between hosts in a Failover Cluster will cause to fail the validation tool and therefore the cluster won’t be supported by Microsoft.
- Leave one extra LUN empty in the environment for future validations. The Failover Cluster Validation Tool is a great resource to retrieve detailed status about the health of each cluster component, we can run the tool whenever we want and it will not generate any disruption. But, to have a full “Storage Validation” it is required to have at least one LUN available in the cluster but not used for any service or application.
For more information about best practices, review the following link: “StarWind High Availability Best Practices”.
One important new feature introduced by StarWind iSCSI SAN v8 is the use of Log-Structured File System (LSFS). LSFS is a specialized file system that stores multiple files of virtual devices and ensures high performance during writing operations with a random access pattern. This file system resolves the problem of slow disk operation and writes data at the speed that can be achieved by the underlying storage during sequential writes.
At this moment LSFS is experimental in v8, use it carefully and validate your cluster services in a lab scenario if you are planning to deploy LSFS.
2. Install StarWind iSCSI SAN software
After we reviewed and verified the requirements, we can easily start installing StarWind iSCSI SAN software, which can be downloaded in trial-mode. This represents the simplest step in our list, since the installation does not have any complex step.
In the process, the Microsoft iSCSI service will be required to add to the server and the driver for the software.
After the installation is complete we can access our console and we will see as a first step necessary is to configure the “Storage pool” necessary.
We must select the path for the hard drive where we are going to store the LUNs to be used in our shared storage scenario.
3. Configure and create LUNs in StarWind iSCSI SAN
When we have the program installed, we can start managing it from the console and we will see the options are quite intuitive.

We are going to split the configuration section in two parts: Hosting iSCSI LUNs with StarWind iSCSI SAN and configuring our iSCSI initiator on each Windows Server 2012 R2 host in the cluster.
Hosting iSCSI LUNs with StarWind iSCSI SAN
We are going to review the basic steps to configure the StarWind iSCSI to start hosting LUNs for our cluster; the initial task is to add the host:
3.1 Select the “Connect” option for our local server.
3.2 With the host added, we can start creating the storage that will be published through iSCSI: Right-click the server and select “Add target” and a new wizard will appear.
3.3 Select the “Target alias” from which we’ll identify the LUN we are about to create and then configure to be able to cluster. The name below will show how we can identify this particular target in our iSCSI clients. Click on “Next” and then “Create”.
3.4 With our target created we can start creating “devices” or LUNs within that target. Click on “Add Device”.
3.5 Select “Hard Disk Device”.
3.6 Select “Virtual Disk”. The other two possibilities to use here are “Physical Disk” from which we can select a hard drive and work in a “pass-through” model.
And “RAM Disk” is a very interesting option from which we can use a block of RAM to be treated as a hard drive or LUN in this case. Because the speed of RAM is much faster than most other types of storage, files on a RAM disk can be accessed more quickly. Also because the storage is actually in RAM, it is volatile memory and will be lost when the computer powers off.
3.7 In the next section we can select the disk location and size. In my case I’m using E:\ drive and 1GB.
3.8 Since this is a virtual disk, we can select from either thick-provision (space is allocated in advance) or thin-provision (space is allocated as is required). Thick provisioning could represent, for some applications, as a little bit faster than thin provisioning.
The LSFS options we have available in this case are: “Deduplication enabled” (procedure to save space since only unique data is stored, duplicated data are stored as links) and “Auto defragmentation” (helps to make space reclaim when old data is overwritten or snapshots are deleted).
3.9 In the next section we can select if we are going to use disk caching to improve performance for read and writes in this disk. The first opportunity we have works with the memory cache, from which we can select write-back (asynchronous, with better performance but more risk about inconsistencies), write-through (synchronous, slow performance but no risk about data inconsistency) or no cache at all.
Using caching can significantly increase the performance of some applications, particularly databases, that perform large amounts of disk I/O. High Speed Caсhing operates on the principle that server memory is faster than disk. The memory cache stores data that is more likely to be required by applications. If a program turns to the disk for data, a search is first made for the relevant block in the cache. If the block is found the program uses it, otherwise the data from the disk is loaded into a new block of memory cache.
3.10 StarWind v8 adds a new layer in the caching concept, using L2 cache. This type of cache is represented in a virtual file intended to be placed in SSD drives, for high-performance. In this section we have the opportunity to create an L2 cache file, from which again we can select to use it as write-back or write-through.
3.11 Also, we will need to select a path for the L2 cache file.
3.12 Click on “Finish” and the device will be ready to be used.
3.13 In my case I’ve also created a second device in the same target.
Configure Windows Server 2012 R2 iSCSI Initiator
Each host must have access to the file we’ve just created in order to be able to create our Failover Cluster. On each host, execute the following:
3.14 Access “Administrative Tools”, “iSCSI Initiator”.
We will also receive a notification about “The Microsoft iSCSI service is not running”, click “Yes” to start the service.
3.15 In the “Target” pane, type in the IP address used for the target host, our iSCSI server, to receive the connections. Remember to use the IP address dedicated to iSCSI connections, if the StarWind iSCSI SAN server also has a public connection we can also use it, but the traffic will be directed using that network adapter.
3.16 Click on “Quick Connect” to be authorized by the host to use these files.
Once we’ve connected to the files, access “Disk Management” to verify we can now use these files as storage attached to the operating system.
3.17 And as a final step, just using the first host in the cluster, put “Online” the storage file and select also “Initialize Disk”. Since these are treated as normal hard disks, the process for initializing a LUN is no different than initializing a physical and local hard drive in the server.
Now, let’s take a look about the Failover Cluster feature.
4. Install Failover Cluster feature and Run Cluster Validation
Prior to configure the cluster, we need to enable the “Failover Cluster” feature on all hosts in the cluster and we’ll also run the verification tool provided by Microsoft to validate the consistency and compatibility of our scenario.
4.1 In “Server Manager”, access the option “Add Roles and Features”.
4.2 Start the wizard, do not add any role in “Server Roles”. And in “Features” enable the “Failover Clustering” option.
4.3 Once installed, access the console from “Administrative Tools”. Within the console, the option we are interested in this stage is “Validate a Configuration”.
4.4 In the new wizard, we are going to add the hosts that will represent the Failover Cluster in order to validate the configuration. Type in the server’s FQDN names or browse for their names; click on “Next”.
4.5 Select “Run all tests (recommended)” and click on “Next”.
4.6 In the following screen we can see a detailed list about all the tests that will be executed, take note that the storage tests take some time; click on “Next”.
If we’ve fulfilled the requirements reviewed earlier then the test will be completed successfully. In my case the report generated a warning, but the configuration is supported for clustering.
Accessing the report we can get a detailed information, in this scenario the “Network” section generated a warning for “Node <1> is reachable from Node <2> by only one pair of network interfaces. It is possible that this network path is a single point of failure for communication within the cluster. Please verify that this single path is highly available, or consider adding additional networks to the cluster”. This is not a critical error and can easily be solved by adding at least one new adapter in the cluster configuration.
4.7 Leaving the option “Create the cluster now using the validated nodes” enabled will start the “Create Cluster” as soon as we click “Finish”.
5. Create Windows Server 2012 R2 Failover Cluster
At this stage, we’ve completed all the requirements and validated our configuration successfully. In the next following steps, we are going to see the simple procedure to configure our Windows Server 2012 R2 Failover Cluster.
5.1 In the “Failover Cluster” console, select the option for “Create a cluster”.
5.2 A similar wizard will appear as in the validation tool. The first thing to do is add the servers we would like to cluster; click on “Next”.
5.3 In the next screen we have to select the cluster name and the IP address assigned. Remember that in a cluster, all machines are represented by one name and one IP.
5.4 In the summary page click on “Next”.
After a few seconds the cluster will be created and we can also review the report for the process.
Now in our Failover Cluster console, we’ll get the complete picture about the cluster we’ve created: Nodes involved, storage associated to the cluster, networks and the events related to cluster.
The default option for a two-node cluster is to use a disk as a witness to manage cluster quorum. This is usually a disk we assign the letter “Q:\” and does not store a large amount of data. The quorum disk stores a very small information containing the cluster configuration, its main purpose is for cluster voting.
To perform a backup for the Failover Cluster configuration we only need to backup the Q:\ drive. This, of course, does not backup the services configured in the Failover Cluster.
Cluster voting is used to determine, in case of a disconnection, which nodes and services will be online. For example, if a node is disconnected from the cluster and shared storage, the remaining node with one vote and the quorum disk with also one vote decides that the cluster and its services will remain online.
This voting is used as a default option but can be modified in the Failover Cluster console. Modifying it depends and is recommended in various scenarios: Having an odd number of nodes, this case will be required to use as a “Node Majority” quorum; or a cluster stretched in different geographically locations will be recommended to use an even number of nodes but using a file share as a witness in a third site.
For more information about quorums in Windows Failover clusters, review the following Microsoft TechNet article: “Configure and Manage the Quorum in a Windows Server 2012 Failover Cluster”.
More Resources
To review more information about Windows Server 2012 R2 clusters and StarWind iSCSI SAN review the following links and articles:
- “What’s New in Failover Clustering in Windows Server 2012 R2”
- “Failover Clustering Hardware Requirements and Storage Options”
- “Validate Hardware for a Failover Cluster”
- “Deploy a Hyper-V Cluster”
- “Use Cluster Shared Volumes in a Failover Cluster”
- “Network Recommendations for a Hyper-V Cluster in Windows Server 2012”
- “Cluster-Aware Updating Overview”
- “StarWind Software Technical Papers”
Today I was facing an error where a two-node failover cluster on Windows 2012 R2 could not be built. The Cluster Creation Wizard was sitting at ‘Forming cluster “<Clustername>”‘ for around two minutes, without any noticable progress. After some time it stated that ‘The operation is taking longer than expected’ – haha, not that I noticed by myself…
Finally the following error dialog showed up:

Fantastic info – nothing one can work with. Reviewing the offered report did not shed any light either, so I needed to investigate myself.
Reviewing the Windows System eventlog told me, that ‘The Cluster Service terminated unexpectedly’ some times in a row and, prior to that, ‘The Cluster service is shutting down because quorum was lost’. What the…? I did not have any cluster setup on the machine, so where does this quorum come from?
Next thing I did was to review the cluster logfile using PowerShell. All interesting things happend within the last five minutes, so there is no need to get older information.
Get-ClusterLog -TimeSpan 5
This creates the file
%systemroot%\cluster\Reports\Cluster.log
holding a bunch of debug information. Somewhere in the middle of this logfile I stumbled upon the following lines:
INFO [CLI] Flags set, account configured
INFO [CLI] Initializing security
INFO [CLI] Notifying credentials to CAM, creation flags 0, control flags 7
INFO [CAM] Setting CurrentUser CLIUSR, Dom <Host> (Proc 3108)
INFO [CAM] New Process, old 1844
INFO [CAM] Creating new token when CNL credentials are set
INFO [CAM] LsaLogon: c000015b
ERR [CAM] Error in creating first token: -1073741477
INFO [CAM] Obtaining current CNL SID
INFO [CAM] CAMTranslateNameToSID - Looking up local name
INFO [CAM] CAMTranslateNameToSID - Finished looking up local name
INFO [CLI] LsaCallAuthenticationPackage: -1073741477, 0 size: 0, buffer: HDL( 0 )
WARN [CLI] Credentials Failed to notify CAM
INFO [CLI] Initializing token
INFO [CAM] GetCNOToken: LUID 0:0, token: 7cbbe500, DuplicateHandle: c0000008
INFO [CLI] LsaCallAuthenticationPackage: -1073741816, 0 size: 0, buffer: HDL( 0 )
INFO [CLI] ExportState - Initializing blob from pwd
ERR mscs::QuorumAgent::FormLeaderWorker::operator (): (c0000008)' because of 'status'
INFO [RGP] node 1: Tick
INFO [RGP] sending to all nodes 1: 201(1 2) => 201(1 2) +() -() [()]
INFO [RGP] node 1: received new information from 1 starting the timer
INFO [NM] Received request from client address fe80::4ca1:9c44:759:6f28.
INFO [RGP] node 1: Tick
Something told me, that this might have been an issue with someones user-rights and as I worked as a local administrator with elevated rights, this should not have been the reason why. A quick DuckDuckGo’ing for ‘Credentials Failed to notify CAM’ showed a lot of interesting articles, but none of them was of big help.
So my next stop was the Windows Security eventlog. It turned out that there were about four failed logon attempts while the cluster was formed. The event id for failed logons is 4625, just in case you want to verify.

The interesting parts are ‘Logon Type’ and the ‘Account Name’. Microsoft defines Logon Type 8 as ‘NetworkCleartext’, so this seems to have something to do with network access restrictions or similar. The other thing is the Account Name: CLIUSR. I was not even aware that such an account exists, why and where it is used and why it will logon to my machine when I form a cluster.
Once again, DuckDuckGo’ing for ‘CLIUSR’ led me to a very interesting blog-post by the Windows Server Core Team. It turned out, that the ‘CLIUSR’ is a user account local to every cluster node, which is used by the cluster for internal management purpose. It is initially created when joining a node to a cluster, is fully self-managed by the cluster(-node) and even regular password rotation is implemented. It belongs to the local Users group only. Thats all fine for me, but I still don’t know why the user is denied Logon Type 8.
Back on the server I opened secpol.msc and navigated to Local Policies / User Rigths Assignment. Most of the settings here were defined by GPO, so I needed to create a new GPO for my cluster nodes to be able to change the settings.
The first setting I changed was ‘Access this computer from the network’ (SeNetworkLogonRight). In Windows 2012 R2 this settings defaults to
Administrators
Backup Operators
Users
Everyone
but for security reason ‘Users’ and ‘Everyone’ have been removed from it. I just added them back and tried to create my cluster again – success!
This is actually fine, because now I am able to do my clustering stuff. However, the user rights have been modified for hardening reason and I did not want leave it like this. So the next step was to find a working combination of user rights that are both secure and allow my cluster setup to work properly.
One thing I knew was, that all cluster-nodes need to be able to access each other, authenticating with their computer accounts. So I created a global group in AD, joined both nodes as members and assigned this group the ‘Access this computer from the network’ right on both nodes. After that a reboot was required for the group memebership to take effect.
To avoid eventlog errors 1228 and 1196 it is necessary to add the ‘Cluster’ computer account to the above group, too.
For the ‘CLIUSR’ I needed a different approach as it is a normal user account which is managed by the cluster service. That means it will get a “standard” SID during creation, which will be different on every cluster node. Setting it by GPO will only work if the user exists when the GPO is applied, creating unnecessary failures in eventlog otherwise. As I still had two “future” cluster-nodes that did’t have this user created, that was not an option.
‘CLIUSR’ is a member of the local ‘Users’ group, but assigning this group the ‘Access this computer from the network’ right will also assign it to ‘Authenticated Users’ and ‘Domain Users’, which will render my previous hardening settings useless.
The only option was to find a group the ‘CLIUSR’ belongs to, without using the local Users group. Luckily, Microsoft has implemented the concept of special identities, which can best be described as “groups containing users depending on their circumstances”.
Microsoft provides a great article of well-known SIDs that also includes special identities.
One of those special identities is the ‘LOCAL_ACCOUNT’ group (S-1-5-113) which automatically includes all users that are defined on the local system. Assigning this group the ‘Access this computer from the network’ made my cluster setup work without any issues.
This might not be the ideal solution, but in my setup it’s better to allow some local accounts to access the machine than allowing access for everyone.