
Тестирование уязвимостей важно для владельцев веб-сайтов и серверов. Важно понимать, насколько они защищены от действий вероятных злоумышленников, особенно от популярного метода взлома путем перебора паролей (Brute Force). Один из популярных инструментов для этого – программное обеспечение THC-Hydra.
Установка THC-Hydra
В ПО встроены функции перебора паролей с прямым обращением к серверу. Такой подход дает возможность заодно проверить настройку брандмауэра, блокируются ли хакерские запросы к серверу или пропускаются, определяется ли тип атаки. Перечень поддерживаемых сервисов включает веб-приложения, FTP, SSH и другие протоколы соединения через интернет.
Процедура инсталляции из официального репозитория выглядит просто:
$ sudo apt install hydra – в системе Ubuntu.
$ sudo yum install hydra – то же, но в Red Hat или CentOS.
По приведенной команде будет скачана последняя стабильная версия программы. Если же хочется получить наиболее свежий релиз, пусть и в стадии бета-тестирования, придется устанавливать его вручную. Так, исходник THC-Hydra 8.4 скачивается командой:
$ wget https://github.com/vanhauser-thc/thc-hydra/archive/v8.4.tar.gz
Следующие действия включают распаковку, компиляцию и установку приложения:
$ tar xvpzf thc-hydra-v8.4.tar.gz

$ cd thc-hydra-v8.4

$ ./configure

$ make

$ sudo make install
Рабочие файлы программы копируются в директорию /usr/local. Это удобнее, чем затем искать их по всему накопителю. Пользователю предоставляется выбор – использовать приложение через консоль или установить графическую оболочку. Второй вариант активируется командами:
$ cd hydra-gtk

$ ./configure

$ make

$ sudo make install
Они вводятся в командную строку после перехода в каталог hydra-gtk. Оконный интерфейс особо не востребован, в большинстве случаев достаточно консоли, чтобы воспользоваться всем имеющимся в программе функционалом.
Комьюнити теперь в Телеграм
Подпишитесь и будьте в курсе последних IT-новостей
Подписаться
Основы работы в THC-Hydra
В командной строке управление настройками утилиты осуществляется при помощи определенного синтаксиса. Пользователю достаточно разобраться, когда и какие команды нужно вставлять в строку вместе с основной.

Общий формат выглядит так:
$ hydra опции логины пароли -s порт адрес_цели модуль параметры_модуля
Опциями меняются глобальные параметры, ими же задаются списки логинов и паролей для перебора. Также указывается IP-адрес удаленного хоста, который будет подвергаться проверке «атакой». Перечень основных опций представлен ниже:
- -R – повторно запустить незавершенную сессию;
- -S – подключаться с использованием протокола SSL;
- -s – вручную указать порт подключения к серверу;
- -l – указать определенный логин пользователя;
- -L – подключить файл со списком логинов;
- -p – внести конкретный пароль;
- -P – использовать пароли из текстового файла;
- -M – атаковать цели, указанные в списке;
- -x – активировать генератор паролей;
- -u – включается проверка одного пароля для всех логинов;
- -f – закрыть программу, если обнаружена правильная связка «логин-пароль»;
- -o – сохранить результаты сканирования в указанный файл;
- -t – принудительно задать количество потоков;
- -w – указать время, которое проходит между запросами (в секундах);
- -v – включить режим подробного вывода информации;
- -V – выводить тестируемые логины и пароли.
Программа поддерживает более 30 видов запросов, среди них есть POP3, SMTP, FTP, CISCO, ICQ, VNC, TELNET. Всего одним инструментом легко обеспечить проверку всей инфраструктуры – от хостинга и облачного хранилища до сервера, используемого для развертывания учетных программ класса ERP.
Далее рассмотрим наиболее востребованные функции приложения.
Как пользоваться THC-Hydra
Простейший вариант использования THC-Hydra – найти в интернете стандартные списки для Brute Force, подключить их при помощи опций и ждать результата. Также понадобятся данные сервера, на который будет осуществляться атака. Перечни паролей подходят и от других программ вроде John the Ripper.
Перебор пароля FTP
По протоколу FTP осуществляется подключение к файловой системе удаленных серверов в режиме «как на локальном компьютере». Поэтому это один из первых каналов взаимодействия с удаленным ресурсом, который рекомендуется проверять на защищенность. Запускается тестирование для FTP командой:
$ hydra -l admin -P john.txt ftp://127.0.0.1
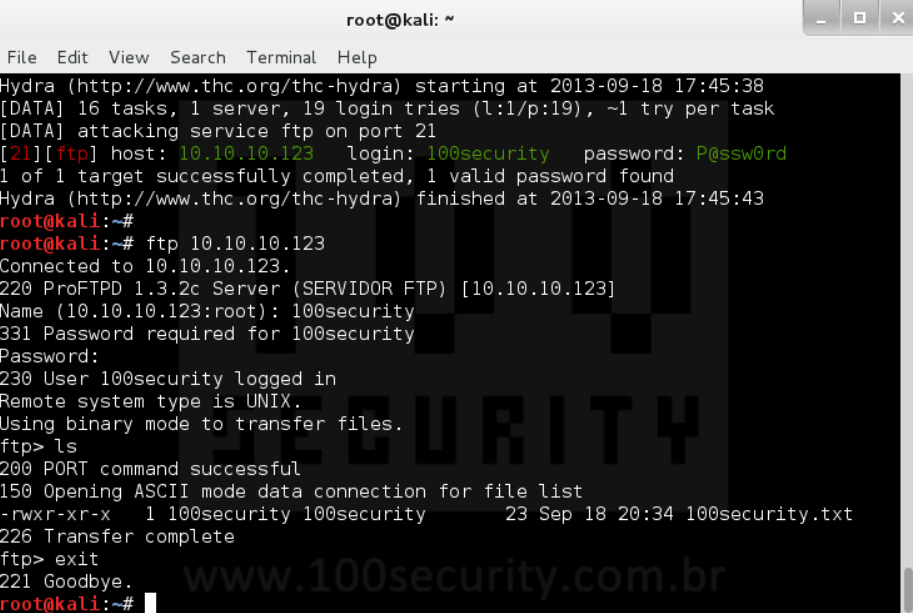
Опция –l здесь задает логин пользователя, а –P подключает файл со списком вероятных паролей. За ними указывается путь к файлу, протокол и IP-адрес целевого хоста. После нажатия клавиши Enter программа начинает перебор со скоростью 300 шт. в минуту. Если реальный пароль достаточно сложный, результата придется ждать долго.
Чтобы сделать подбор более информативным, достаточно в командную строку внести опции –v и –V. Также есть возможность указать не один IP-адрес, а целую сеть или подсеть. Выполняется это при помощи квадратных скобок. Команда будет выглядеть так:
$ hydra -l admin -P john.txt ftp://[192.168.0.0/24]
Если есть заранее известный список IP-адресов, по которым требуется провести тестирование, он подключается в виде текстового файла:
$ hydra -l admin -P john.txt -M targets.txt ftp
Метод перебора с автоматической генерацией пароля подключается на основе заданного набора символов. Тогда вместо списка задается опция –x, а после нее вставляется строка с параметрами. Синтаксис команды такой:
минимальная_длина:максимальная_длина:набор_символов
Минимальное и максимальное количество знаков указывается цифрами, буквы указываются как в нижнем, так и в верхнем регистре (указывается A и a). Плюс рекомендуется добавлять цифры от 1 до 9 – в этом случае будет охвачен весь диапазон, кроме спецсимволов. Выглядеть строка будет следующим образом:
$ hydra -l admin -x 4:4:aA1. ftp://127.0.0.1
В приведенном примере программа будет подбирать пароль размером в 4 символа, состоящий из букв обоих регистров и цифр. Есть альтернативное написание, где протокол подключения указан в конце, после IP-адреса:
$ hydra -l admin -x 4:4:aA1 -s 21 127.0.0.1 ftp
Пароли по протоколам SSH, TELNET и схожих по назначению тестируются тем же образом, только в строке указывается соответствующая им команда.
Перебор пароля аутентификации HTTP
При работе с сетевым оборудованием, которое использует аутентификацию на основе HTTP, нужно использовать те же опции, которые описывались выше. Строка запуска приложения выглядит так:
$ hydra -l admin -P ~/john.txt -o ./result.log -V -s 80 127.0.0.1 http-get /login/
В приведенном примере программа будет подбирать пароль из подключенного файла-списка к логину admin. Метод подключения – HTTP-GEN, IP-адрес целевого хоста – 127.0.0.1, порт – 80. Результаты будут выгружены в файл result.log.
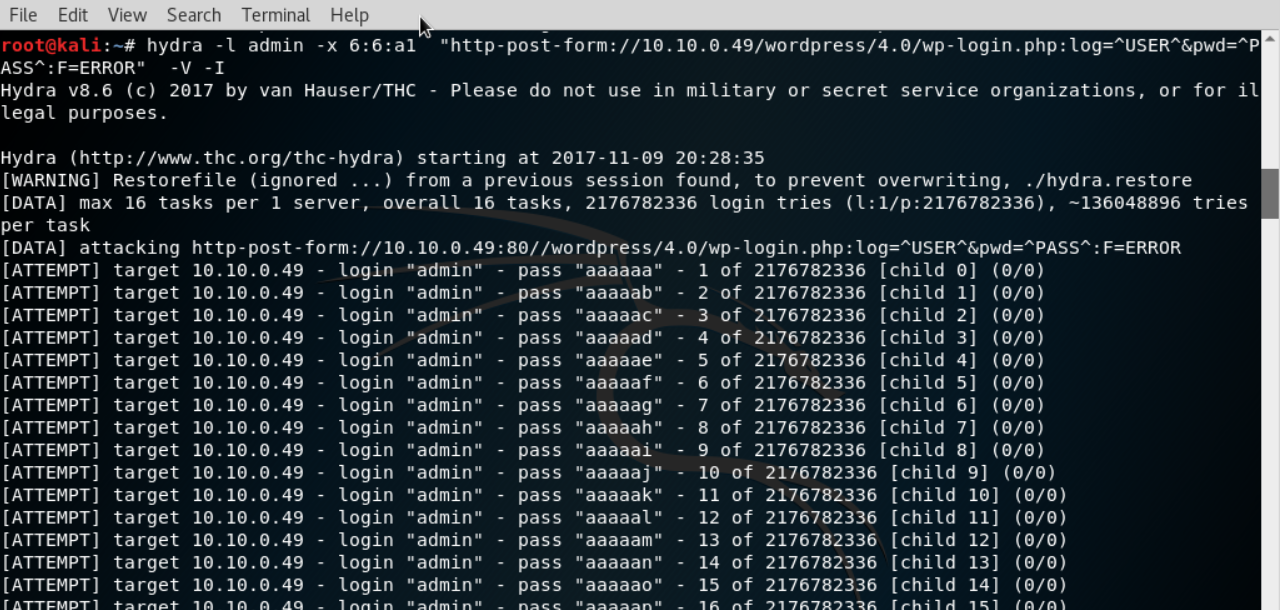
Перебор паролей веб-форм
Несколько сложнее запускается перебор для веб-форм. Здесь сначала понадобится выяснить, какие формы передаются на сервер, а какие обрабатываются на уровне локального компьютера. Поможет в этом исходный код, который легко просмотреть функциями браузера. Там нужно «подсмотреть» протокол, используемый для подключения. Например, на приведенном скрине это метод POST.
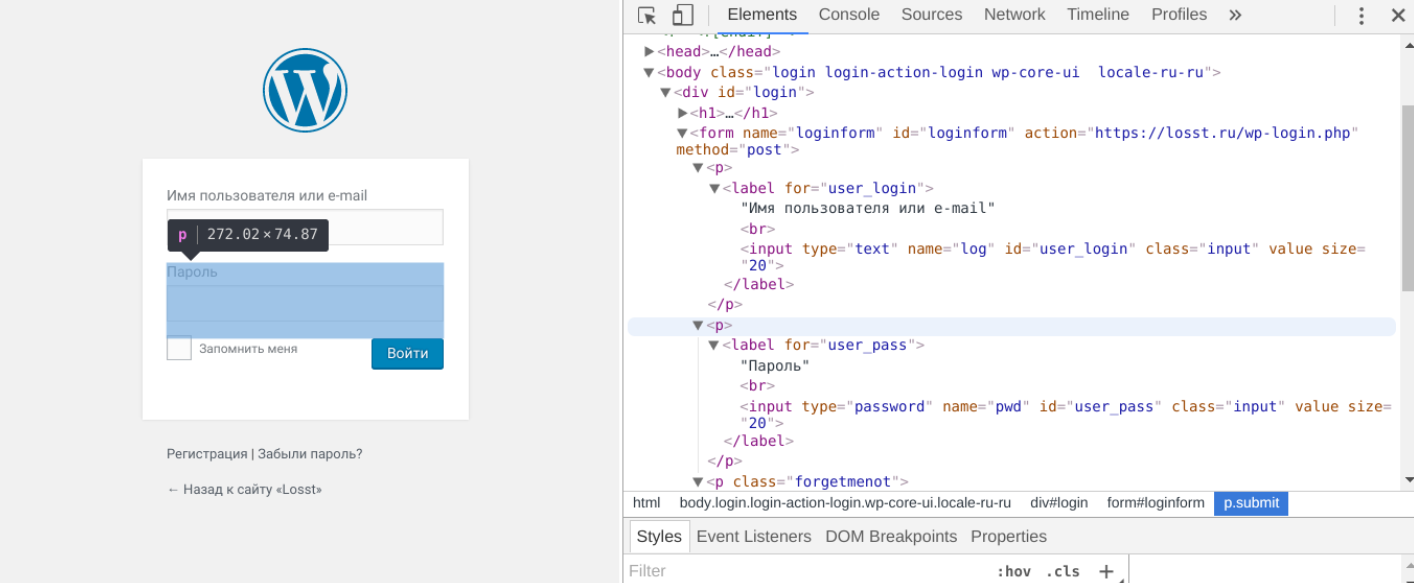
Получается, что в командной строке нужно указывать опцию http-post-form. Синтаксис параметров в этом случае будет выглядеть так:
адрес_страницы:имя_поля_логина=^USER^&имя_поля_пароля=^PASS^&произвольное_поле=значение:строка_при_неудачном_входе
Строка запуска:
$ hydra -l user -P ~/john.txt -o ./result.log -V -s 80 127.0.0.1 http-post-form "/wp-admin:log=^USER^&pwd=^PASS^:Incorrect Username or Password"
Переменные ^USER^ и ^PASS^ принимают значения, взятые из указанного файла (логин и пароль соответственно). В этом режиме скорость перебора выше – обычно она достигает 1000 паролей в минуту.
Выводы
Мы рассмотрели основные методы сканирования защиты серверов в программе Hydra. Графическая оболочка (xHydra) упрощает применение утилиты, когда приходится постоянно тестировать различные хосты, но при «одиночном» запуске обычно достаточно консоли.
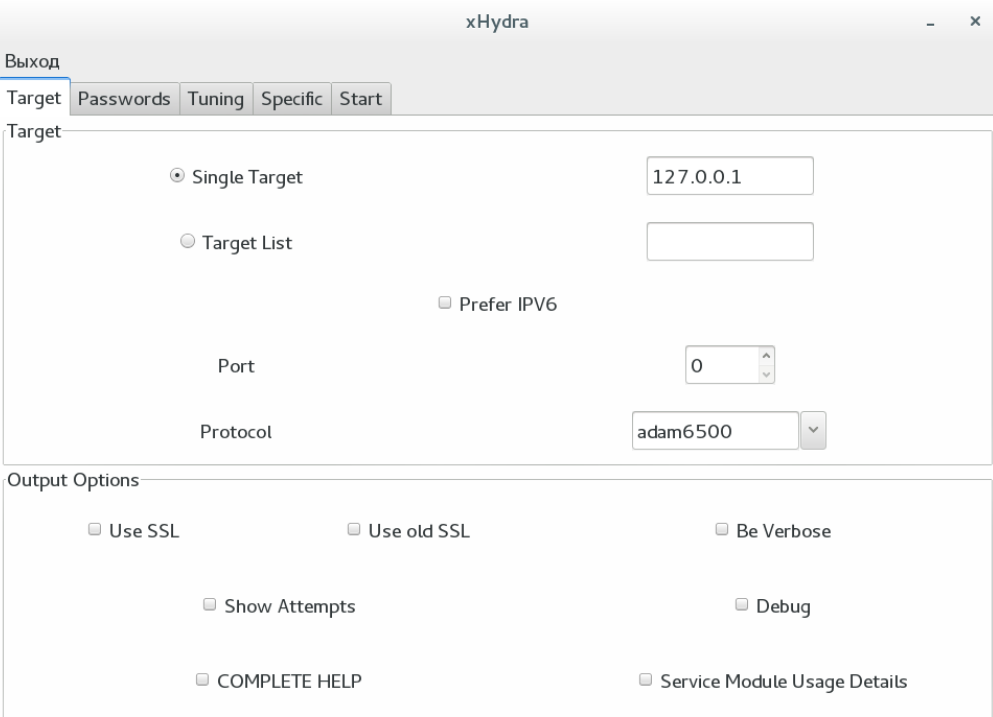
В графическом интерфейсе имеется несколько вкладок:
- Target – цель атаки;
- Passwords – списки паролей;
- Tuning – дополнительные настройки;
- Specific – настройки модулей;
- Start – запуск и просмотр статуса.
Освоиться легко, но важно помнить, что использование приложения вне собственной компании, в частном порядке, может оказаться преступлением. Поэтому не стоит соглашаться на просьбы «проверить» безопасность на чужом сайте. Все должно проводиться официально.
Provide feedback
Saved searches
Use saved searches to filter your results more quickly
Sign up
Appearance settings
Reading Time: 3 minutes
Hydra, or THC-Hydra, is a powerful password-cracking tool widely used by ethical hackers and cybersecurity professionals for penetration testing. Its versatility and ability to work across multiple protocols make it a critical tool in testing the robustness of systems against brute force and dictionary attacks. Although Hydra is natively designed for Linux-based systems, it can be installed and used on Windows through methods like Windows Subsystem for Linux (WSL) or by using compatibility layers such as Cygwin.
In this guide, we’ll cover step-by-step instructions on how to install Hydra on Windows, including setup requirements and troubleshooting tips.
What is Hydra?
Hydra is a network login cracker capable of brute force and dictionary attacks across a wide range of protocols, such as SSH, FTP, HTTP, RDP, and more. It is an open-source tool developed by The Hacker’s Choice (THC) and is widely used for:
- Password auditing
- Penetration testing
- Network security assessments
However, it is essential to use Hydra ethically and only on systems for which you have explicit permission to test.
Methods to Install Hydra on Windows
Installing Hydra on Windows requires a workaround since it does not natively support the Windows operating system. The most common methods are:
- Using Windows Subsystem for Linux (WSL)
- Using Cygwin
- Using a Pre-Compiled Binary with Linux Emulation Tools
Method 1: Installing Hydra Using WSL
Windows Subsystem for Linux (WSL) allows you to run a Linux distribution natively within Windows, making it the most seamless way to install Hydra.
Step 1: Install WSL
- Open PowerShell as Administrator and run:
wsl --install
This command installs WSL along with the default Ubuntu Linux distribution. If WSL is already installed, ensure it is updated:wsl --update - Restart your system if prompted.
- Once installed, open the Ubuntu terminal from the Start Menu.
Step 2: Update and Install Dependencies
In the Ubuntu terminal, update the system and install the required dependencies for Hydra:
|
sudo apt update && sudo apt upgrade —y<br>sudo apt install build—essential libssl—dev libssh—dev libidn11—dev \<br>libpcre3—dev libgpg—error—dev libgcrypt20—dev git —y |
Step 3: Clone and Compile Hydra
- Clone the Hydra repository from GitHub:
git clone https://github.com/vanhauser-thc/thc-hydra.git - Navigate to the cloned directory:
cd thc-hydra - Compile Hydra by running:
./configure make - (Optional) Install Hydra system-wide:
sudo make install
Step 4: Verify the Installation
Run the following command to check if Hydra is installed correctly:
This displays Hydra’s help menu, confirming that the installation was successful. You can now use Hydra directly within the Ubuntu terminal on WSL.
Method 2: Installing Hydra Using Cygwin
Cygwin is a compatibility layer that provides a Linux-like environment on Windows. This method is suitable if you do not want to use WSL.
Step 1: Download and Install Cygwin
- Visit the Cygwin website and download the Cygwin setup executable.
- Run the installer and select a download mirror.
- During installation, add the following development packages:
- gcc-core (C compiler)
- make (build automation tool)
- libssl-dev (SSL library development files)
- libpcre-devel (PCRE library development files)
- git (version control system)
Step 2: Clone and Compile Hydra
- Open the Cygwin terminal.
- Clone the Hydra repository:
git clone https://github.com/vanhauser-thc/thc-hydra.git - Navigate to the Hydra directory:
cd thc-hydra - Compile Hydra:
./configure make - (Optional) Install Hydra system-wide:
make install
Step 3: Verify Installation
Run the following command to verify Hydra’s installation:
If the help menu appears, Hydra has been successfully installed.
Method 3: Using a Pre-Compiled Binary
This method involves downloading a pre-compiled Hydra binary and using tools like MinGW or a Linux emulation layer.
Step 1: Download a Pre-Compiled Binary
Look for a trusted source offering pre-compiled Hydra binaries for Windows. Always verify the authenticity of the binary to avoid security risks.
Step 2: Run Hydra Using a Linux Emulator
Use tools like MinGW or Cygwin to run the binary, as it requires a Linux-like environment to execute.
Troubleshooting Common Issues
1. Missing Dependencies
If you encounter errors during the ./configure or make process, ensure all required dependencies are installed. Use:
|
sudo apt install libssl—dev libssh—dev libidn11—dev —y |
2. Permission Denied
Run commands with administrator privileges or use sudo in WSL and Cygwin to resolve permission issues.
3. Hydra Command Not Found
Ensure Hydra is added to your PATH or run it directly from the installation directory:
4. Compilation Errors
Compilation errors can occur if the required libraries are not installed or compatible. Ensure you are using the latest version of Hydra and your environment is properly configured.
Uninstalling Hydra
If you need to remove Hydra from your system, follow these steps:
For WSL Installations:
- Navigate to the Hydra directory in the Ubuntu terminal:
cd thc-hydra - Run:
sudo make uninstall
For Cygwin Installations:
- Delete the Hydra directory:
rm -rf /path/to/thc-hydra
Conclusion
Although Hydra is not natively supported on Windows, it can be installed and used effectively through WSL, Cygwin, or other compatibility tools. WSL is the most efficient and recommended method due to its native integration with Windows and seamless Linux compatibility.
Always use Hydra responsibly and within legal and ethical guidelines. With the right setup, you can leverage Hydra’s powerful capabilities for ethical hacking, password auditing, and penetration testing on your Windows system.
Disclaimer: This post may contain affiliate links. If you make a purchase through one of these links, Cyberly may earn a small commission at no extra cost to you. Your support helps us continue providing free tutorials and content. Thank you!
THC-Hydra Windows Install Guide
Ok So I had a difficult time as a beginner installing hydra so I’ll be helping
you today installing THC-Hydra in this Tutorial.
Step 1: Download the Cygwin that corresponds to your system.
DOWNLOAD
Note: you can find out if your system is either 64 or
32 bit by right clicking «Computer» in the start menu.
Step 2: Install Cygwin by clicking on your what you’ve downloaded from the
Cygwin website. Press next on everything until when asked for what server to
download from, click on anyone (I don’t think it matters which one you choose).
Stop again when you need to select packages and move to step 3.

Step 3: Press the + button besides the «Default» package (only
package that should be there) and a list of packages should show up; find the
package «devel» under the «Default» package and change
where it says «default» besides each package’s name to
«Install» only to the devel package by clicking on where it says
«default» besides devel.

Note: The «default» package I talk about sitting at the top is
not the same as the «default» installation besides each package.
Step 4: Click next, select the required packages option, go on and finish your
download
Step 5: Not really a step but you should have a Cygwin terminal on your desktop
and if not go to the install destination (usually «C:\Cygwin» or
«C:\Program Files\Cygwin») and right click the batch file labeled
Cygwin and press «Create Shortcut» and move the shortcut into
wherever you find the most convenient to have it at.
Note: You will be using the Cygwin terminal every time you want to use
hydra.
IMPORTANT, ONLY FOR 64-BIT USERS:
1. Go into the folder where Cygwin was installed
2. Go into the folder inside the Cygwin installation folder named
«bin»
3. Right Click on a file in «bin», Go to properties and copy the
location (Ex. C:\Program Files\Cygwin\bin) which is essentially the location of
the bin folder.
4. Go to «Control Panel\System and Security\System»
5. Click Advanced System Setting located to your left
6. Sitting at the bottom right of the screen that just popped up press the
Environment Variables button
7. On the second box of text titled System Variables scroll down until you find
the variable «Path»
8. Click the variable «Path» and click the edit button
9. Don’t mess with anything in the text box just type this besides all the
already written shit in the text box «;[Bin location Here]»
10. Press Ok
Now that we have finished installing Cygwin we can get to the fun part and
install Hydra
Step 1: Download Hydra from either directly
DOWNLOAD
Step 2: Unzip the file using a program such as Winrar (can be downloaded at www.rarlab.com) to your desktop.
Step 3: Move the file from your desktop into your main drive «C:»
Step 4: Open the Cygwin terminal which if you listened to me you made a
shortcut to already.
Error Note: If it says «cannot find mintty would you like to browse for
it» then browse to your installation folder, go to bin and look
alphabetically for mintty until you find it.
Step 5: search for cmd at the start menu (if you can’t it’s placed in «C:\Windows\System32\cmd»)
when you do find it right click it and click «run as administrator»
Step 6: type «NetSh Advfirewall set allprofiles state off» to turn
off your firewall off. manually turn off your other antiviruses such as Norton
or McAfee
Note: I understand this might sound crazy but when you’re installing a
hacking software you don’t anti-hack softwares running.
Now you can test Cygwin out by issuing a few commands that you wouldn’t normally have use to in Windows that are common Linux commands. Here is a quick view of: «pwd», «cd /», «ls», «ps»:

Step 7: on Cygwin terminal type
«cd /cygdrive/c/hydra-8.1.tar»

Once this is successful there should be yellow text besides your user name
saying «/cygdrive/c/hydra-8.1.tar»

Step 8: Type «./configure»
wait until it stops saying anything and then wait 2/3 minutes to make sure it
stopped.

step 9: Type «make»
wait until it stops saying anything and then wait 2/3 minutes to make sure it
stopped.

Step 10: Type «make install»
wait until it stops saying anything and then wait 2/3 minutes to make sure it
stopped.

Step 11: I hope by now everything has gone fine and Cygwin should be letting
you input but just close it if you’re done.
Step 12: Now right click your Cygwin shortcut, go into properties and make the
start in «C:\hydra-8.1.tar» and rename it hydra
Step 13: Turn your firewall back on by typing this in the admin cmd «NetSh
Advfirewall set allrprofiles state on» but make sure that it doesnt
intervene with hydra, google how to exclude programs from firewall and if you
have a antivirus same goes.
In this blog, we will learn about the Hydra tool, which comes under vulnerability analysis, which is one of the principles of Cyber Security. We will see all the commands of Hydra Tool and perform some basic practicals, so you can easily understand its use. So let’s get started with the blog.
Table of Contents
- Introduction
- Ways to Use Hydra Tools
- Hydra CLI (Command Line Interface):
- Hydra GUI (Graphical User Interface):
- Advantages of Hydra Tool
- Disadvantages of Hydra Tool
- Installation
- Hydra Tool Syntax
- Syntax Break Down
- 1) Target IP Address
- 2) Find a Protocol
- 3) Check for Destination Port
- 4) Check for Module Options
- 5) Options
- Recent Articles on Computer Networks
- Related Articles on Linux
Introduction
The Hydra tool, also known as THC-Hydra, is a popular and powerful cybersecurity tool used for penetration testing and network security assessments.
It is primarily designed for performing brute-force attacks against various types of authentication protocols to test the strength of passwords and identify vulnerabilities in systems.
Hydra supports a wide range of network protocols and services, including HTTP, HTTPS, FTP, SMTP, SNMP, Telnet, SSH, and many others. It allows security professionals and ethical hackers to automate the process of systematically attempting different username and password combinations to gain unauthorized access to a target system.
Hydra CLI (Command Line Interface) and Hydra GUI (Graphical User Interface) are two different versions of the Hydra cybersecurity tool that provide different user interfaces for performing password cracking and brute-force attacks.
Hydra CLI (Command Line Interface):
It is the command-line version of the Hydra tool. It is a text-based interface that allows users to interact with Hydra using command-line instructions. This version of Hydra is preferred by experienced cybersecurity professionals and penetration testers who are comfortable working with command-line tools.
Using Hydra CLI, users can specify the target service, protocols, usernames, passwords, and various options for conducting brute-force attacks. They can configure parameters such as the number of parallel connections, timeout values, delays between attempts, and retry attempts.
Hydra CLI is highly versatile and can be scripted or automated to perform extensive password-cracking tests against multiple targets. It provides detailed output, logs, and reports to analyze the results of the attacks.
Hydra GUI (Graphical User Interface):
Hydra GUI is a graphical front-end interface for the Hydra tool. It provides a visual interface with menus, buttons, and forms that make it easier for users who prefer a graphical environment. Hydra GUI simplifies the process of configuring and launching brute-force attacks without the need for typing command-line instructions.
With Hydra GUI, users can set up target services, protocols, username and password lists, and various attack options using graphical controls. It offers a more user-friendly experience, especially for those who are less familiar with command-line tools or prefer a visual interface.
The Hydra GUI version may have additional features, such as password list management, session saving/loading, and result visualization, to enhance the usability and convenience of the tool.
Both Hydra CLI and Hydra GUI serve the same purpose of password cracking and brute-force testing, but they offer different interfaces to cater to different user preferences and levels of expertise. Users can choose the version that best suits their needs and comfort level with command-line or graphical interfaces.
The Hydra cybersecurity tool offers several advantages that make it a popular choice for penetration testers and security professionals:
A) Versatile and Extensible:
Hydra supports a wide range of protocols and services, making it a versatile tool for conducting brute-force attacks on various authentication mechanisms such as HTTP, FTP, Telnet, SMTP, SSH, and more. It can be extended with additional modules to support new protocols and services.
B) Logging and Reporting:
Hydra generates detailed logs and reports during the attack, enabling users to analyze the results and identify potential vulnerabilities. This information helps in understanding the security posture of the target system.
C) Open Source and Active Community:
Hydra is an open-source tool, which means it benefits from the contributions and support of a vibrant community of developers and security professionals. This ensures continuous improvements, bug fixes, and the availability of documentation and resources.
D) Penetration Testing and Vulnerability Assessment:
Hydra is widely used for authorized penetration testing and vulnerability assessments. By identifying weak or easily guessable passwords, it helps organizations proactively identify and rectify security flaws, ultimately enhancing the overall security of their systems and networks.
E) Educational Purposes:
Hydra can also be used as an educational tool for learning about password security, authentication mechanisms, and the importance of strong passwords. It helps users understand the risks associated with weak credentials and reinforces best practices for securing systems and services.
While the Hydra cybersecurity tool offers several advantages, it also has certain limitations and potential disadvantages:
A) Legal and Ethical Considerations:
The primary disadvantage of Hydra, or any similar tool used for password cracking and brute-force attacks, is the potential for misuse. Using Hydra without proper authorization and in an unauthorized manner is illegal and unethical. It is essential to obtain explicit permission and adhere to legal and ethical guidelines when conducting security assessments.
B) Time-Consuming and Resource-Intensive:
Brute-force attacks can be time-consuming, especially when dealing with long and complex passwords. The time required to crack passwords depends on various factors such as password strength, target system defenses, network latency, and computational resources available.
C) Relies on Known Usernames and Passwords:
Hydra relies on having a list of potential usernames and passwords to attempt during the attack. If the list does not include the correct credentials, or if the target system has implemented security measures like account lockouts or rate-limiting, Hydra’s effectiveness may be reduced.
D) Detection by Intrusion Detection Systems (IDS):
Brute-force attacks can trigger intrusion detection systems or raise suspicion due to the high volume of login attempts. Sophisticated target systems may have mechanisms in place to detect and block such attacks, reducing the effectiveness of Hydra.
Installation
The above command will install the Hydra Tool in your system.
$ hydra -v

Hydra v9.0 (c) 2019 by van Hauser/THC - Please do not use in military or secret service organizations, or for illegal purposes.
The above command will help you to check whether the Hydra tool is properly installed and not, It also gives the version of the tool.
hydra [some optional command options] protocol://target:port/module-optionsExample:
hydra ftp://192.168.0.1:22 -l admin -P list.txtHere,
192.168.0.1 -> target system IP.
22 -> Port on which the FTP server is used.
-l: Tells about the user.
-P: Tells about the password.
Syntax Break Down
1) Target IP Address
How we can provide a target system in the command?
A) Single Target:
Eg: 192.168.0.1
B) Give the range of IP or Subnet:
Eg: 192.168.0.1/24
C) Make a text file and include all the IPs in it:
It can be in single or give the port number in which the port is running.
Eg:
192.168.0.1
192.168.0.1:22
2) Find a Protocol
Now, you have to choose which service you have to brute force like ssh, FTP, MySQL, etc.
3) Check for Destination Port
Now, check the service you have selected is running on which port number.
4) Check for Module Options
The HTTP headers typically include fields such as “User-Agent,” “Accept,” “Content-Type,” and many others. These headers convey various types of information between the client and server during an HTTP request or response.
Eg: http-get
A= auth-type
H= User-Defined Header
S= Check for Text in HTTP Response
5) Options
When using the Hydra tool, there are various options available to customize and configure the brute-force attack. Here are some common options used with Hydra:
a) -l or -L:
Specifies the username or username list to use during the attack. You can provide a single username -l or a file containing a list of usernames with -L.
b) -p or -P:
Specifies the password or password list to use during the attack. Similar to usernames, you can provide a single password with -p or a file containing a list of passwords with -P.
3) -s or -S:
Specifies the target service or protocol to attack. For example, you can use -s http for HTTP, -s ftp for FTP, or -s smtp for SMTP.
4) -t:
Sets the number of parallel tasks/connections to use. You can specify the number of simultaneous attempts Hydra should make against the target system.
5) -m:
Specifies the module or login protocol to use. Hydra supports multiple protocols like HTTP, FTP, SSH, etc. The "-m” option allows you to select a specific protocol module.
6) -o:
Specifies the output file to which the results will be saved.
7) -w:
Sets a time delay (in seconds) between each attempt. This can help avoid triggering intrusion detection systems or rate-limiting mechanisms.
 -V:
-V:
Shows the output on the screen.
Recent Articles on Computer Networks
- Introduction to Computer Networking | What is Computer Network
- What are Topology & Types of Topology in Computer Network
- What is FootPrinting in Cyber Security and its Types, Purpose
- Introduction to Cloud Computing | What is Cloud Computing
- Distributed Shared Memory and its advantages and Disadvantages
- What is VPN? How doe VPN Work? What VPN should I use?
- What is an Internet and How the Internet Works
- What is a Website and How Does a Website or web work?
- Introduction to Virus and different types of Viruses in Computer
- What is TCP and its Types and What is TCP three-way Handshake
- What is UDP Protocol? How does it work and what are its advantages?
- What is an IP and its Functions, What is IPv4 and IPv6 Address
- What is MAC Address and its Types and Difference MAC vs IP
- What is ARP and its Types? How Does it Work and ARP Format
- Sessions and Cookies and the Difference Between Them
- What is ICMP Protocol and its Message Format?
Related Articles on Linux
- What is Linux Operating System | Introduction to Linux
- Directory in Linux Define | Linux Directory & its Commands
- Explain the chmod command in Linux | Linux chmod command
- Linux User Management || User Management in Linux
- Linux Computer Network Advanced Command | Network Command
- Redirection in Linux I/O| Linux I/O Redirection