
Overview
This page describes how to use the TFTP client on Windows OS. The screenshots on this page are for Windows 10, but the same applies to Windows 11.
You can use the TFTP client on Windows 10. You do not need to bother installing a TFTP client application. However, it is not enabled by default. Follow the steps below to enable the TFTP client on Windows 10.
- Open [Windows Features]
- TFTP Client checked and enabled
- Allow TFTP on Windows Firewall
The screenshots of the following steps are for Windows 10; they are almost the same for Windows 11.
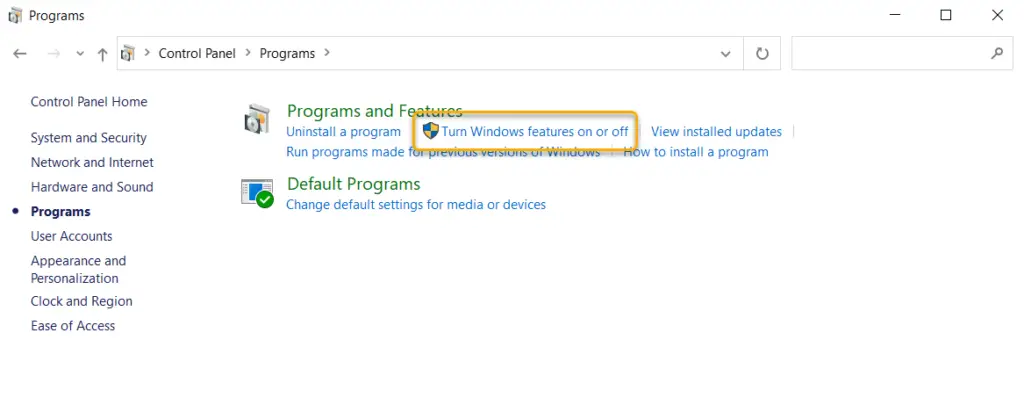
Open [Windows Features]
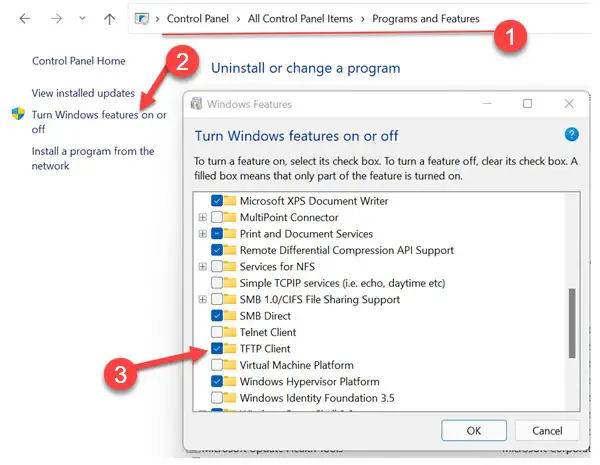
To enable the TFTP client, do so from the [Windows Features] dialog box. To open [Windows Features], click [Control Panel] -> [Programs] -> [Turn Windows Features on or off].
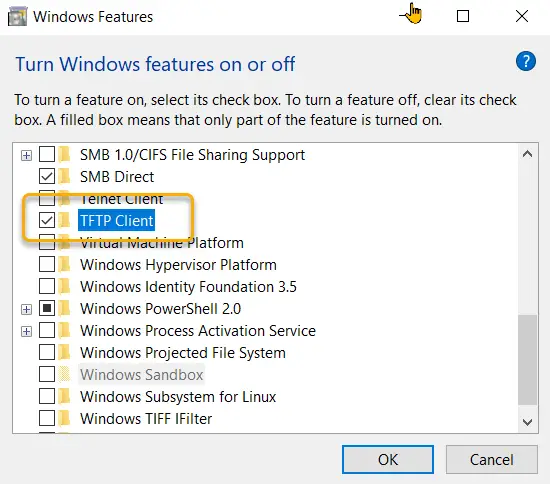
TFTP Client checked and enabled
On [Windows Features] dialog box, check [TFTP Client] and click [OK] to enable the TFTP client. If prompted for a reboot, reboot the system.
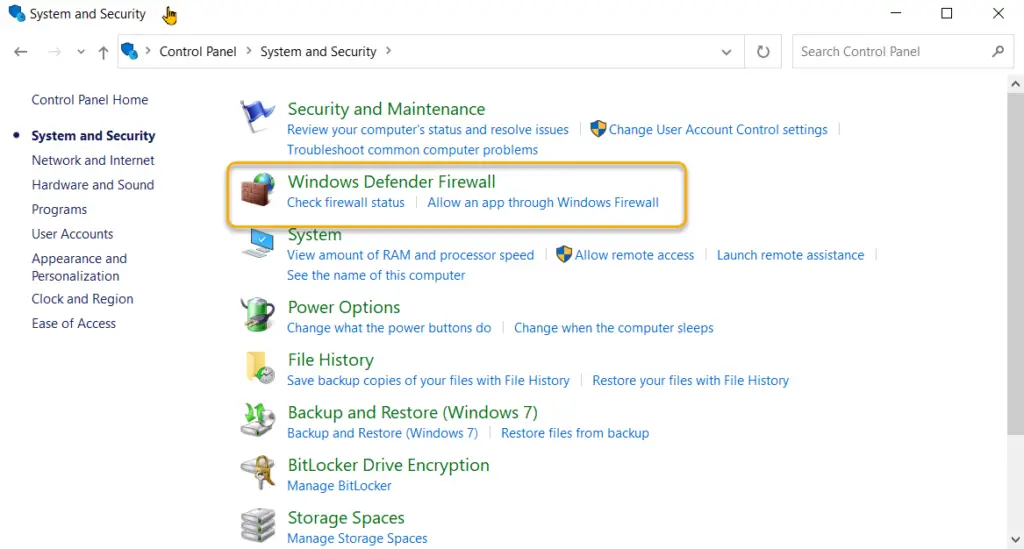
Allow TFTP on Windows Firewall
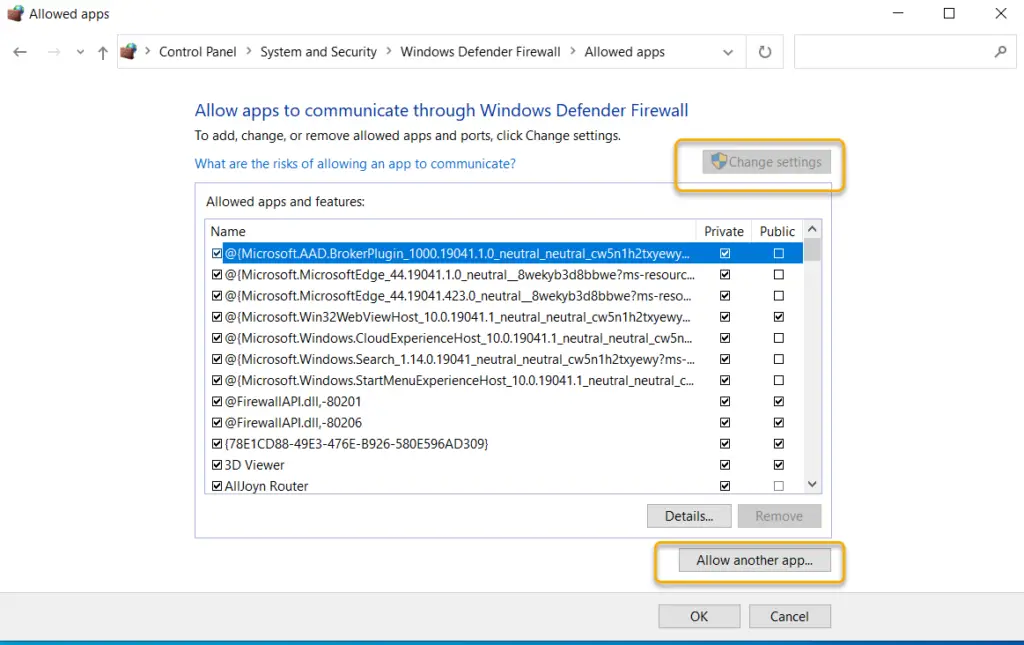
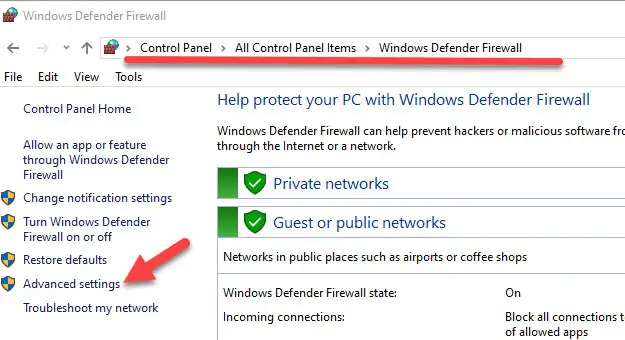
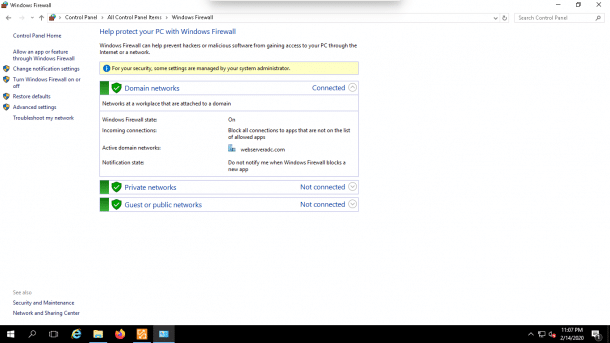
Firewall conditions must be added for TFTP file transfers with an enabled TFTP client. Click on [Control Panel] -> [System and Security] -> [Windows Defender Firewall].
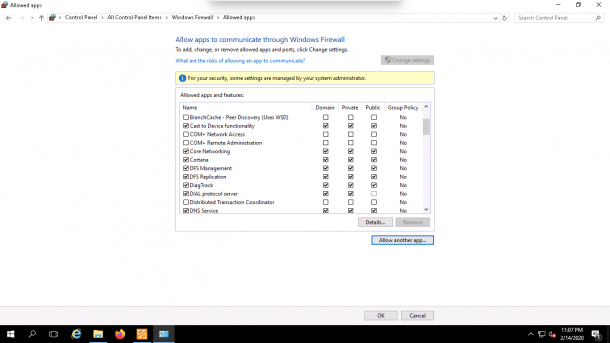
Click [Allow an app or feature through Windows Defender Firewall].
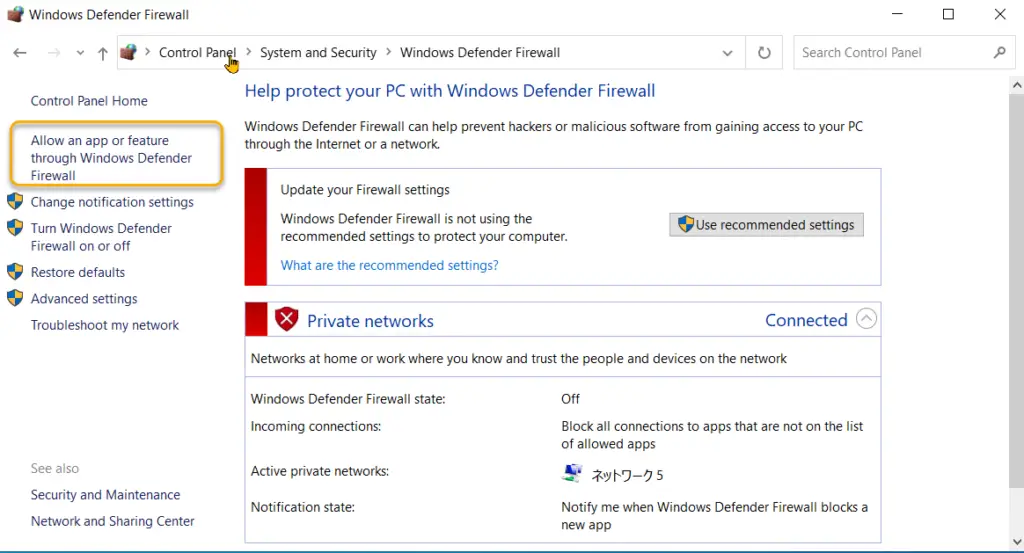
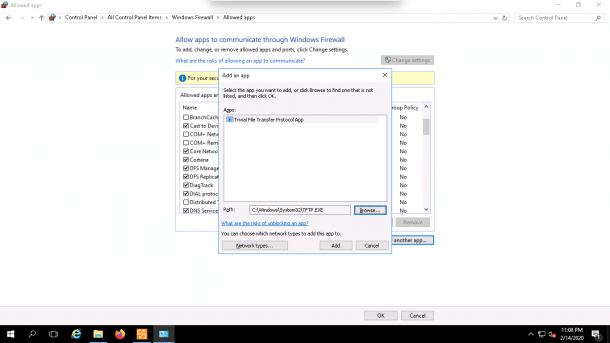
By clicking on [Change settings], [Allow another app] will become active.
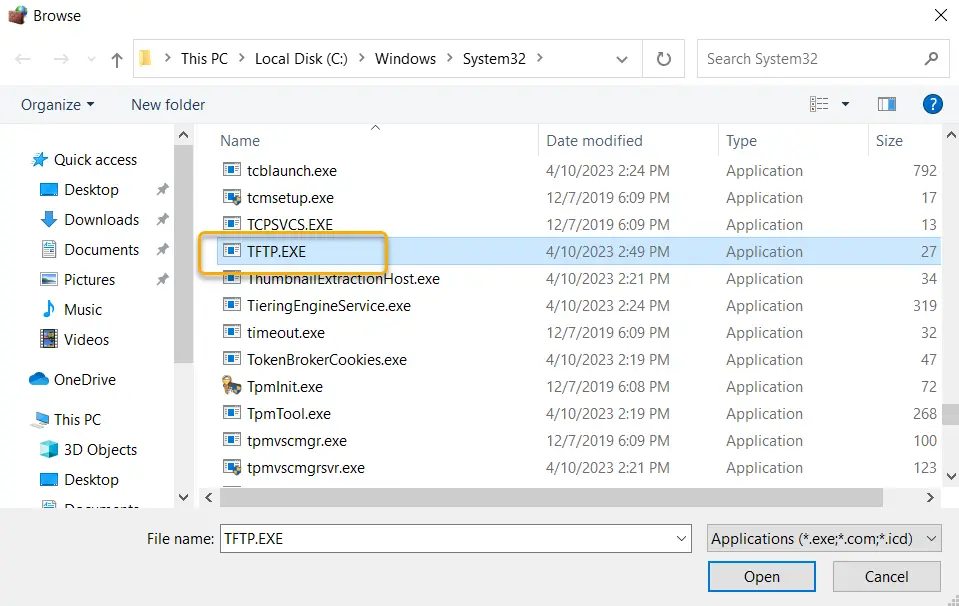
From [Browse], specify the path to TFTP.EXE. TFTP.EXE is located under Windows\System32.

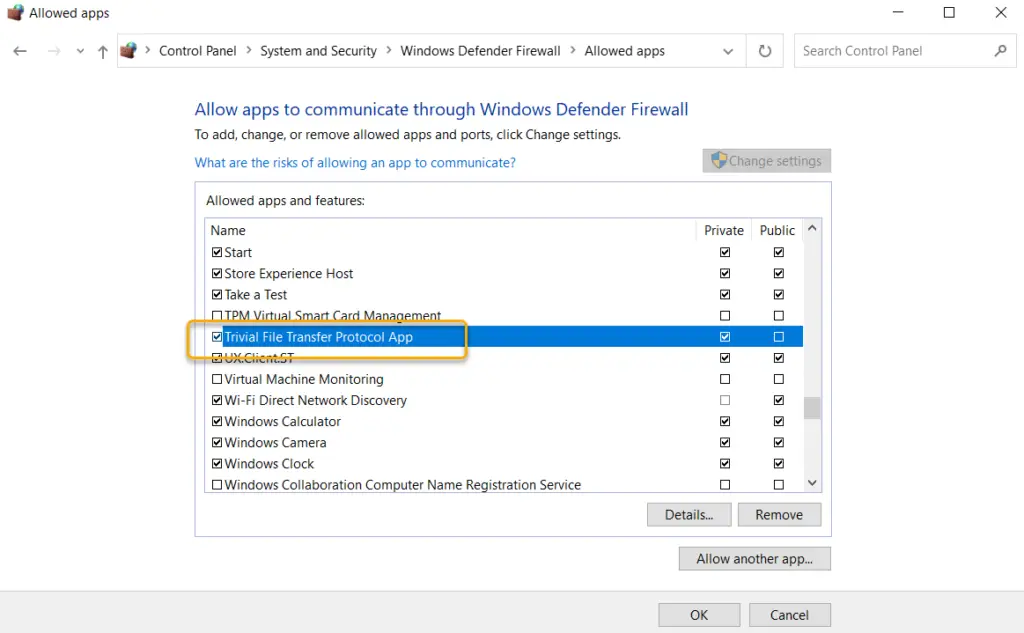
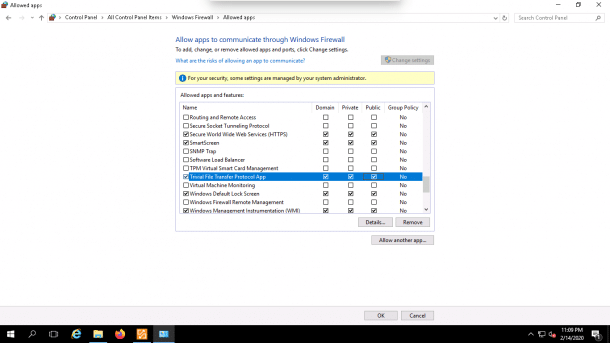
It is OK if [Trivial File Transfer Protocol App] is added to [Allowed apps and features].
If you are using firewall software other than Windows Firewall, please allow TFTP in that firewall software.
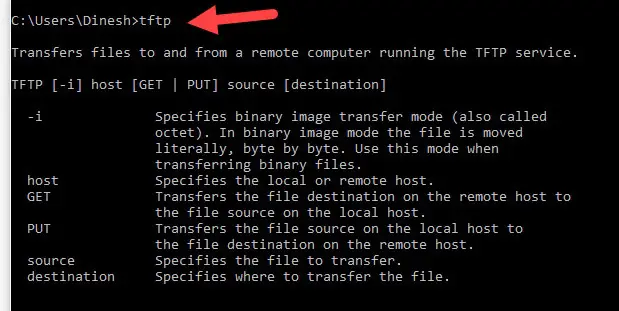
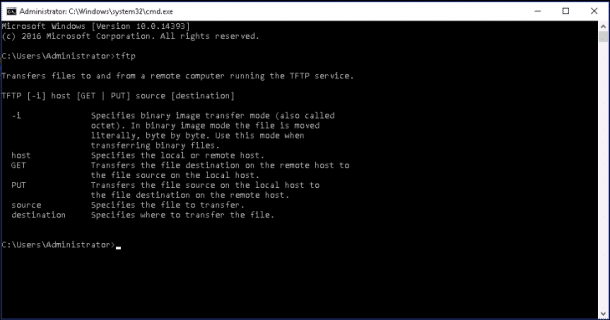
Once the TFTP client is enabled, you can transfer files via TFTP using the tftp command on the command prompt. tftp command format can be found in the help. Below is the help for the tftp command.
C:\Users\Gene>tftp

Transfers files to and from a remote computer running the TFTP service.

TFTP [-i] host [GET | PUT] source [destination]

  -i              Specifies binary image transfer mode (also called
                  octet). In binary image mode the file is moved
                  literally, byte by byte. Use this mode when
                  transferring binary files.
  host            Specifies the local or remote host.
  GET             Transfers the file destination on the remote host to
                  the file source on the local host.
  PUT             Transfers the file source on the local host to
                  the file destination on the remote host.
  source          Specifies the file to transfer.
  destination     Specifies where to transfer the file.
For example, to transfer the file “c1841-ipbase-mz.124-12a.bin” with the TFTP server IP address of 192.168.1.111, enter the following command.
C:\Users\gene>tftp -i 192.168.1.111 get c1841-ipbase-mz.124-12a.bin
Transfer successful:  15788240 bytes in 49 second(s)、322208 bytes/s
The downloaded file is stored in the current directory of the command prompt.
Summary
Points
- TFTP clients can be added from [Windows features].
- Once the TFTP client is enabled, the tftp command is available at the command prompt.
Enabling TFTP on Windows 10 is fairly straightforward and involves a few simple steps. The Trivial File Transfer Protocol (TFTP) is a simple protocol used for transferring files, and it’s especially useful for booting devices over a network. To get started, you’ll need to access the Windows Features settings and enable the TFTP Client option.
Enabling TFTP on Windows 10 allows you to transfer files over a network with ease. Below are the steps to enable this feature.
Step 1: Open Control Panel
The first step is to open the Control Panel on your Windows 10 system.
You can quickly access the Control Panel by typing “Control Panel” into the search bar located next to the Start menu. Click on the Control Panel app from the search results to open it.
Step 2: Navigate to Programs
Step 2 is to click on “Programs” in the Control Panel.
Once inside the Control Panel, you’ll see a list of options. Find and select “Programs” to proceed. This is where you’ll find options to manage installed programs and features.
Step 3: Access Windows Features
Step 3 is to click on “Turn Windows features on or off”.
Look for the option labeled “Turn Windows features on or off” under the Programs and Features section. Clicking this will open a new window with a list of Windows features you can enable or disable.
Step 4: Enable TFTP Client
Step 4 is to find and check the box next to “TFTP Client”.
Scroll through the list of features until you find “TFTP Client.” Check the box next to it to enable the feature. Press OK to confirm your selection.
Step 5: Restart Your Computer
Step 5 is to restart your computer for changes to take effect.
After enabling the TFTP Client, restart your computer to apply the changes. This ensures that the TFTP Client is fully operational when you need it.
After completing these steps, TFTP will be enabled on your Windows 10 machine. You’ll be able to transfer files using this protocol, making network file transfers more straightforward and efficient.
Tips for Enabling TFTP on Windows 10
- Ensure your firewall settings allow TFTP traffic to avoid interruptions in file transfers.
- Use TFTP for small file transfers as it is not designed for large data due to its simplicity.
- Keep your system updated to ensure compatibility and security when using TFTP.
- Consider additional security measures, as TFTP does not encrypt data during transfers.
- Familiarize yourself with the command line interface for executing TFTP commands.
Frequently Asked Questions
What is TFTP used for?
TFTP is used for transferring small files, such as configuration files, across a network. It’s often utilized in network booting and transferring firmware updates to routers and switches.
Is TFTP secure?
TFTP does not have built-in security features, so data transferred is not encrypted. It’s recommended to use it within a secure, trusted network environment.
Can I disable TFTP after enabling it?
Yes, you can disable TFTP by unchecking the TFTP Client option in the Windows Features menu following the same steps you used to enable it.
What is the difference between TFTP and FTP?
TFTP is simpler and does not require authentication, unlike FTP, which is more complex and provides user authentication and encryption features.
Why is TFTP preferred for network booting?
TFTP is preferred for network booting due to its lightweight nature, which simplifies the process of transferring boot files quickly with minimal overhead.
Summary
- Open Control Panel.
- Navigate to Programs.
- Access Windows Features.
- Enable TFTP Client.
- Restart Your Computer.
Conclusion
Enabling TFTP on Windows 10 is a handy process if you need a simple way to transfer files across a network, especially in environments where speed and efficiency are key. This protocol is like the reliable old bicycle of data transfers – not fancy, but it gets the job done. While it lacks the bells and whistles of modern protocols like FTP or SFTP, its straightforwardness is its charm, making it a preferred choice for network booting and quick file transfers.
If you’re dealing with network hardware or need to deploy configurations across multiple devices, enabling TFTP can significantly streamline your workflow. Remember, though, it is not a secure method on its own, so always be aware of your network’s security. As always, make sure your system is up-to-date to avoid any unforeseen hiccups.
For further reading, consider exploring more about network management protocols and how they can serve your specific needs. Whether you’re a tech enthusiast or a professional managing a network, TFTP on Windows 10 is a tool you might find useful. Don’t hesitate to dive deeper into the world of file transfer protocols to find the best fit for your needs.
Matt Jacobs has been working as an IT consultant for small businesses since receiving his Master’s degree in 2003. While he still does some consulting work, his primary focus now is on creating technology support content for SupportYourTech.com.
His work can be found on many websites and focuses on topics such as Microsoft Office, Apple devices, Android devices, Photoshop, and more.
In most cases, we do not need to install TFTP Client on a Windows computer. This is because the TFTP (Trivial File Transfer Protocol) is a very simple file transfer protocol that has less security (or no security). This makes it unsafe for day-to use except for certain special situations.
TFTP is mostly used to move the backup/restore configurations and transfer the OS/boot images to network devices where the internet or USB drive access is not available. For example, upgrading the OS of CISCO or Fortigate devices can be done only via Telnet or SSH (no web access) by using TFTP.
Though we rarely use it on Windows client OS, installing a TFTP client on Windows 10 or Windows 11 will be helpful to test and confirm that the TFTP server is working well and ready to transfer data over the network.
In this guide, we will install/enable the built-in Windows TFTP client and test whether it can send and receive data through this protocol.

Installing a TFTP client on a Windows 11 computer is almost identical to Windows 10. The below screenshots are suitable for all Windows clients and Server Operating Systems.
1) Make sure that you have administrative access to enable the feature.
2) Go to the Control panel and click on ‘Programs & Features’.
3) Click on ‘Turn Windows features on or off’ then tick the ‘TFTP Client’ as shown below.
4) Press OK and wait for the installation to complete.
How to Verify that Windows TFTP Client Installed Successfully?
It is like a telnet client, when the feature has not been installed on a computer, the relevant commands will return an unknown command error.
For example, before installing the TFTP client, if you open a command prompt and type ‘tftp’, it will return the below message.

When it is installed, the same command will give the below output.
That was a clear indication that the Windows TFTP client is installed on your computer correctly.
How to Check a TFTP Server from Windows 10/11 Client
Let’s assume that the TFTP server setup is done correctly and the network security firewall is accepting incoming and outgoing traffic in the server.
Once we installed the client on Windows PC, we need to allow TFTP traffic in the Windows firewall or third-party firewall/anti-virus solution.
- You can altogether disable the Windows firewall to test it.
- Allow the TFTP program or port number in the firewall.
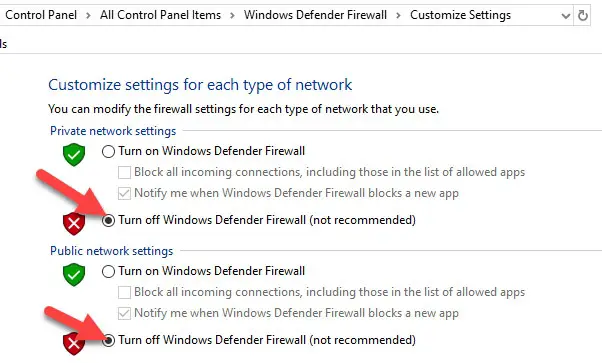
How to Completely switch off the Windows Defender Firewall to allow TFTP
5) Visit the control panel, and enable the ‘Large Icons’ view. This will show the all Control panel icons.
6) Click on ‘Windows Defender Firewall’ and open ‘Turn Windows Defender Firewall on or off.’
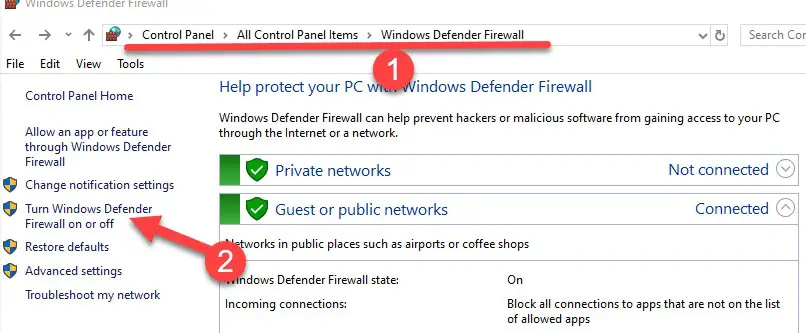
7) Depending on the connectivity type, you can turn off the Windows firewall. If you are not sure about it, then turn off both (Private and Public network settings). This will entirely turn off the network protection. It is highly recommended to put back the settings once the TFTP test is completed.
If you are not convinced about switching off the full Windows firewall, then follow the below step to allow particular TFTP traffic only.
How to Enable only TFTP Traffic in Windows Firewall
It can be done in two ways.
- Allow the TFTP application
- Allow the TFTP protocol.
Enable TFTP Application.
This method depends on which program you are using to connect the TFTP server. In our case, we are using the built-in Windows TFTP client. So, we need to allow the appropriate .exe file through the Windows firewall. If you are using any other third-party tools, you need to call those .exe files as shown below.
 Go to the same Windows defender firewall settings in Windows 10 or Windows 11. Click on ‘Allow an app or feature….’ Option.
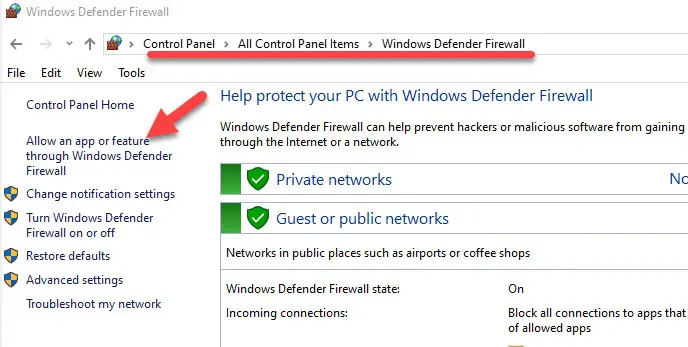
9) Mostly you will not find the TFTP app on this list. Click on the ‘Change Settings’ button at the top right, ‘Allow another app.’
10) Browse the TFTP.exe, which is located under the system32 folder. If you are using any third-party TFTP clients; you need to browse the particular exe file from its location.
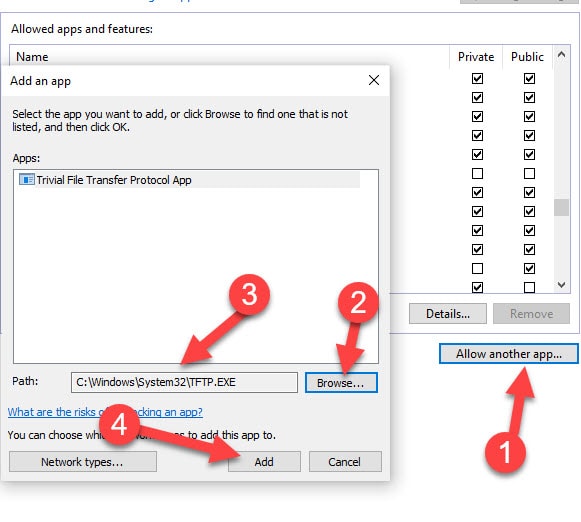
11) Click add to give the exception in the Windows. In this way, the Windows defender firewall will allow incoming and outgoing traffic of the TFTP.exe program without any restriction.
Allow TFTP Protocol in Windows 10/11 Firewall
Let’s assume you use multiple tools and programs which use the TFTP protocol. It is not advisable to follow the earlier step and add each program to the firewall. Instead of that, we can add the common TFTP protocol.
TFTP uses TCP port 69. We will simply enable this port for incoming and outgoing traffic.
12) In the usual Windows defender firewall settings page, click on ‘Advanced Settings.’
13) In the ‘Inbound Rules’ create a new rule.

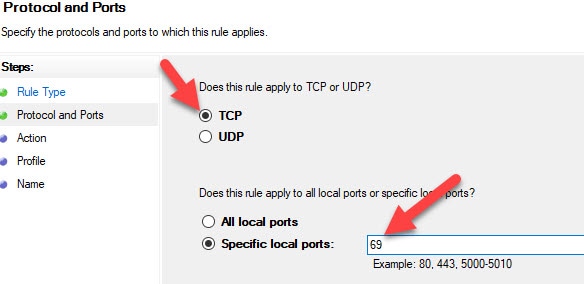
14) Select ‘Port’ and enter 69 as TCP port.
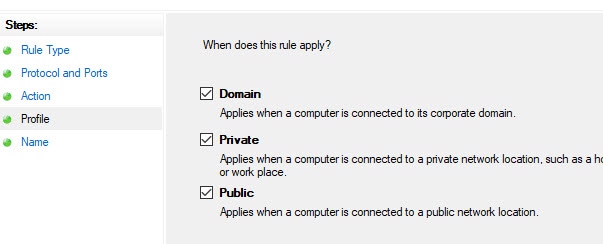
15) Make sure that ‘Allow the connection‘ is selected on the next screen. Also, select all 3 network types.
16) Give a name to the rule and press OK.
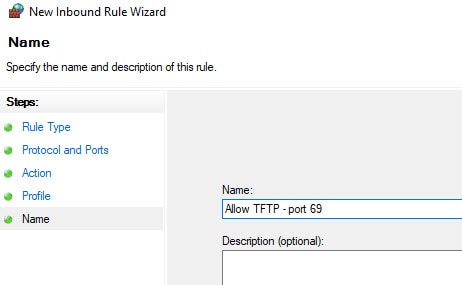
17) Make sure it is enabled and listed in ‘Inbound Rules’.
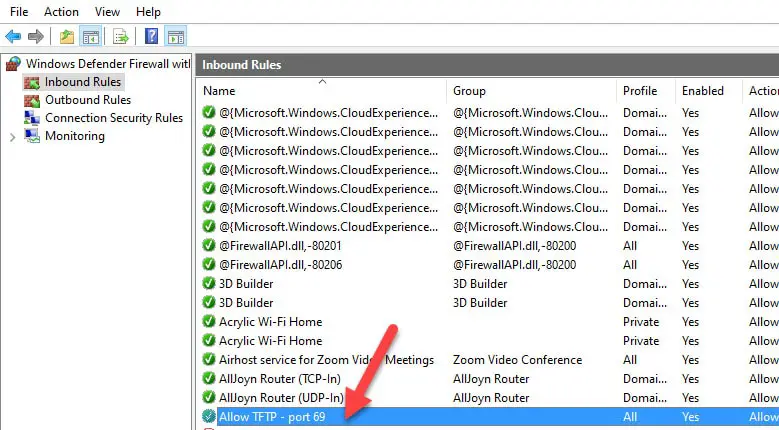
18) Repeat the same steps in ‘Outbound Rules’
With these above steps, your Windows 10/11 PC is ready to use the TFTP client.
Test Windows TFTP Client on Windows 10/11
Let’s assume that the TFTP server setup is done and files are available at the correct location. Before you download a file from the TFTP server, you must know the right file name with the extension.
In this example, I’m going to download a file called ‘tftp.zip’ from server 192.168.1.244. We use the GET command to download a file.
Type the below command in the command prompt (you must have a working network communication with the server, the ping command is handy to confirm the connectivity)
Tftp -i [server IP address] GET [file name with the expension]
The below message indicates that the file transfer is successful. The file will be downloaded at the location where you execute the command. In this case, it is C:\Users\Dinesh folder.

To upload a file using the TFTP client, use the following command. We use the PUT command to upload a file.
Tftp -i [server IP address] PUT [path of the file with the expension]
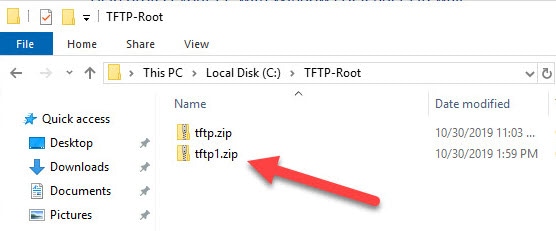
The below command output shows the successful file upload to the server by the Windows TFTP client. The file will be uploaded to the root of the TFTP server. We do not have any option to change the upload location.

As I’m using the Solarwind TFTP server in this example, the above command uploaded the file to this root location.
There you go, we learned how to install the built-in TFTP client on Windows 10/11 and how to ensure it works fine by modifying the firewall settings. Also, we showed the simple steps to upload and download a file using the TFTP client.
В данной статье показаны действия, с помощью которых можно включить компонент TFTP Client в операционной системе Windows 10, Windows 8.1 и Windows 7
TFTP (Trivial File Transfer Protocol — простой протокол передачи файлов) используется главным образом для первоначальной загрузки по сети операционных систем бездисковых рабочих станций, для обмена файлами с удаленным компьютером, на котором запущена служба TFTP, а так же для загрузки обновлений и конфигураций сетевых устройств (модемов, маршрутизаторов, систем хранения данных и т.п.). TFTP, в отличие от FTP, не содержит возможностей аутентификации (хотя возможна фильтрация по IP-адресу) и основан на транспортном протоколе UDP.
По умолчанию компонент TFTP Client в операционных системах Windows 10, Windows 8.1 и Windows 7 отключён, но при необходимости можно легко включить его используя любой из способов, которые представлены далее в этой инструкции.
Содержание
- Как включить TFTP Client в окне «Компоненты Windows»
- Включение TFTP Client в командной строке
- Всключение через Windows PowerShell
Как включить TFTP Client в окне «Компоненты Windows»
Чтобы включить компонент TFTP Client, нажмите сочетание клавиш + R, в открывшемся окне Выполнить введите (скопируйте и вставьте) OptionalFeatures и нажмите клавишу Enter↵.

В открывшемся окне «Компоненты Windows» установите флажок компонента TFTP Client и нажмите OK.

Через непродолжительное время Windows применит требуемые изменения и компонент TFTP Client будет включен.

Включение TFTP Client в командной строке
Вы можете включить или отключить компонент TFTP Client в командной строке используя DISM.
Чтобы включить компонент TFTP Client, запустите командную строку от имени администратора и выполните следующую команду:
Dism /online /Enable-Feature /FeatureName:TFTP

Чтобы отключить компонент TFTP Client, запустите командную строку от имени администратора и выполните следующую команду:
Dism /online /Disable-Feature /FeatureName:TFTP

Всключение через Windows PowerShell
Также включить или отключить компонент TFTP Client можно в консоли PowerShell.
Чтобы включить компонент TFTP Client, откройте консоль Windows PowerShell от имени администратора и выполните следующую команду:
Enable-WindowsOptionalFeature –FeatureName «TFTP» -Online

Чтобы отключить компонент TFTP Client, откройте консоль Windows PowerShell от имени администратора и выполните следующую команду:
Disable-WindowsOptionalFeature –FeatureName «TFTP» -Online

После включения компонента TFTP Client можно использовать утилиту tftp.exe для выполнения необходимых задач.

Если компонент TFTP Client отключен, то при вводе команды tftp в консоли командной строки вы увидите сообщение о том что:
«tftp» не является внутренней или внешней
командой, исполняемой программой или пакетным файлом.

Используя рассмотренные выше действия, можно включить или отключить компонент TFTP Client в операционной системе Windows 10, Windows 8.1 и Windows 7
TFTP stands for “Trivial File Transfer Protocol” is a simple and lightweight protocol for transferring files over the network.
TFTP runs on UDP port 69 and does not use any security during the file transfer, thus its really only good for transferring files within your LAN. It is commonly used in the place where security is not important and it has limited features compared to other file transfer protocols (FTP/FTPS/SCP).
Generally, TFTP is used to boot operating systems over the network. CISCO devices also use the TFTP protocol to store configuration files and images and move them to and from switches, routers and firewalls.
It is very useful for electronics circuit boards and microprocessors to download firmware into the chipset and its also used for transferring boot files and updating NVRAM. It does not provide authentication and no command structure like FTP, SFTP and SCP.
TFTP cannot list directory and there is no error recovery like TCP and nor does it allow you to delete or rename files.
TFTP is used for its simplicity as it is specifically designed to read and write files without establishing a connection between the client and the server.
It is very useful for thin clients, terminals and disk-less workstations with no room to install their own operating systems.
TFTP protocol also allows the network clients to automatically obtain the IP address of the TFTP server thus making TFTP not only easy to implement but also provide a better way for file transfers.
However, sending or receiving sensitive files via the TFTP without authentication or encryption is very risky.
In this tutorial, we’ll learn how to setup a TFTP server and a TFTP Client on Windows a system and also learn how to configure your Firewall to allow file transfer between the TFTP server and the TFTP client.
Install TFTP Server Windows
First, you will need to download the SolarWinds TFTP server.
Download: https://www.solarwinds.com/free-tools/free-tftp-server/registration
Once downloaded, extract the downloaded file and double click on the installer to start the installation, you should see the following screen:
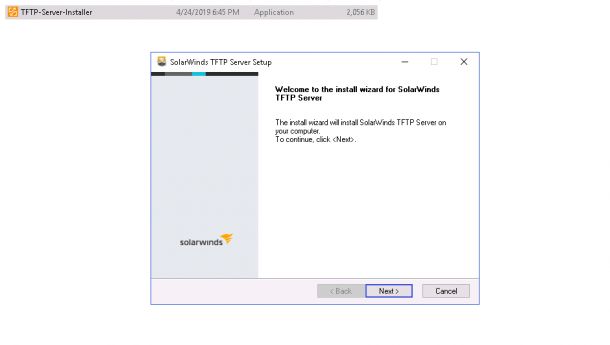
Click on the Next button.
You will be redirected to the License agreement page as shown below:
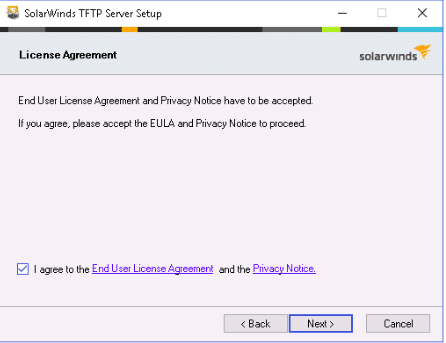
Accept the License agreement and click on the Next button.
You will be asked to provide the location of the TFTP server as shown below:
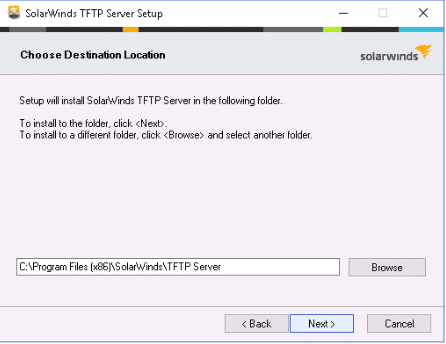
Click on the Next button to continue with the default location.
You should see the following page:
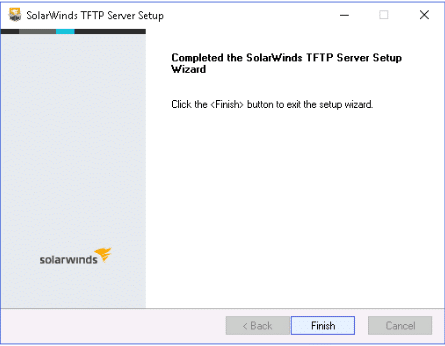
Click on the Finish button to complete the installation.
After installing the TFTP server, you will need to configure it.
You can follow the below steps to configure the TFTP server:
Configure TFTP Server
1. Open the TFTP Server from the Start Menu as shown below:
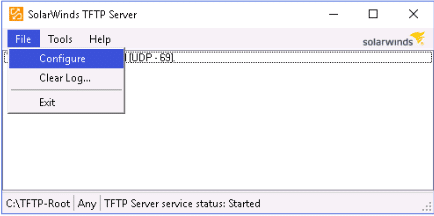
2. Click on the File => Configure button as seen in the above Screenshot.
You should see the following screen:
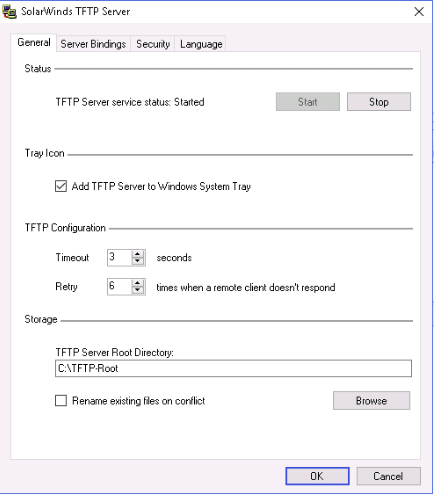
3. As seen in the screenshot above, Select the TFTP Server Root Directory field and provide the TFTP root directory, then click on the Security tab.
You should see the following screen:
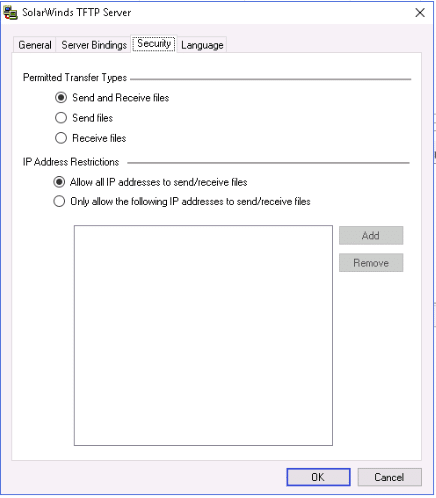
4. In the Permitted Transfer Types section, check the box “Send and Receive files” and “Allow All IP address to send/receive Files” and click on the OK button to finish the configuration.
Once you are finished, you can proceed to the next step.
Install TFTP Client
At this point, the TFTP server is installed and configured.
Now, you will need to install a TFTP Client on the Client computer.
You can install the TFTP Client on the client computer by following the below steps:
1. Click on the Start Menu and click on Control Panel.
2. Click on the Programs and Features => Turn Windows features on or off. This will open the Windows Features dialog box.
3. Scroll down until you see the TFTP Client check box and CHECK it as shown below:
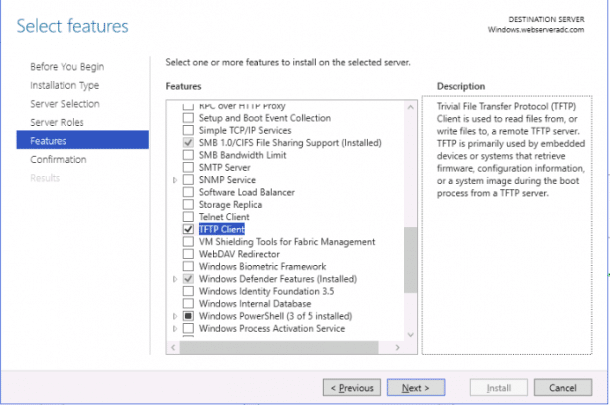
4. Click on the OK button to start the installation process of the TFTP client.
This process will take some time to finish the installation. Once you are finished, you can proceed to the next step.
Configuring Firewall to Allow TFTP
Before using the TFTP client, you will need to turn off the Windows Firewall or configure the Firewall to allow the inbound/outbound transfer of files using the TFTP client.
You can follow the below steps to add an exception for the TFTP connections:
1. Go to the Start Menu and open the Control Panel as shown below:
2. Click on the Windows Firewall to open the firewall as shown below:
3. In the left-pane, click on the “Allow an app or feature through Windows Firewall“.
You should see the following page:
4. Click on the Allow an app or feature through Windows Firewall at the bottom. You should see the following page:
5. Click on the Browse button and specify the TFTP.EXE path and click on the Add button.
You should see the following page:
6. You should see that the Trivial File Transfer Protocol App should be highlighted.
7. Now, click on the OK button to finish the process.
At this point, your client computer is configured to allow PUT and GET command against your TFTP server.
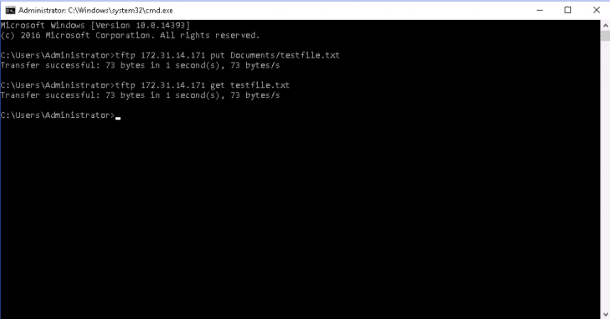
Transfer File with TFTP Client
You are now ready to transfer file using the TFTP client.
Go to the TFTP client computer, open the command line interface and run the following command:
tftp
You should see all the options available with tftp command in the following page:
If you want to send a file to the TFTP server, use the following syntax:
tftp your-tftpserver-ip put location-of-the-file
For example, to send the file named testfile.txt located in Documents directory to the TFTP server run the following command:
tftp 172.31.14.171 put Documents/testfile.txt
Once the file transfers successfully, you should see the following output:
Transfer successful: 73 bytes in 1 second(s), 73 bytes/s
If you want to transfer file from the TFTP server to your local computer, use the following syntax:
tftp your-tftpserver-ip get location-of-the-file
For example, transfer the file named testfile.txt from the TFTP server to your local computer run the following command:
tftp 172.31.14.171 get testfile.txt
Once the file transfers successfully, you should see the following output:
Transfer successful: 73 bytes in 1 second(s), 73 bytes/s
Example Screen:
You can also transfer the files over the internet using the Public IP address of the TFTP server – Please remember, there is not encryption or any security when sending over the Internet!
Conclusion
In the above guide, we’ve learned how to install and configure the TFTP server and Client on Windows system.
You can now easily transfer files to and from your TFTP server for FREE.
Please Feel free to ask us any questions below in the comments, we’ll try to answer them immediately!