
To test an SMB connection using PowerShell, you can utilize the `Test-Connection` cmdlet or `net use` command, which verifies connectivity to a specified server or share.
Here’s a code snippet to perform this check:
Test-Connection -ComputerName "ServerName" -Count 2 -Port 445
Or, to check access to a specific share:
net use \\ServerName\ShareName
Understanding SMB
What is SMB?
The Server Message Block (SMB) protocol is a network communication protocol primarily used for providing shared access to files, printers, and other resources within a network. Widely utilized in Windows environments, SMB allows applications and users to read and write to files and request services from server programs, regardless of the underlying network architecture.
Common use cases for SMB include:
- File sharing, enabling multiple users to access the same documents on a centralized server.
- Printer sharing, allowing users to send print jobs to shared printers over the network.
Over the years, several versions of SMB have been released, with significant improvements in performance, security, and functionality. Understanding these versions—especially SMB 1.0, SMB 2.0, and SMB 3.0—is vital for effective network management and security.
The Role of PowerShell in Network Administration
PowerShell is an incredibly powerful scripting language and automation tool for system administrators. It simplifies various tasks, allowing users to automate repetitive processes and manage configurations efficiently. With its rich set of cmdlets, PowerShell makes it easy to perform network operations, such as testing SMB connections.
By utilizing PowerShell for network tasks, administrators can:
- Save time by automating routine checks.
- Reduce errors through scripting.
- Enhance their ability to diagnose and resolve issues quickly.
Test LDAP Connection PowerShell: A Quick Guide
Preparing Your Environment
System Requirements
To effectively test SMB connections in PowerShell, you need a system with:
- Windows operating system, ideally Windows 10 or Windows Server 2016 and later.
- PowerShell version 5.1 or higher, which comes bundled with these systems.
Ensuring that you have the appropriate permissions is equally critical. You should have administrative access to the local machine and the remote machine you’re attempting to connect to.
Enabling SMB
Before testing SMB connections, ensure that the protocol is enabled on your systems. SMB can be enabled through the following steps:
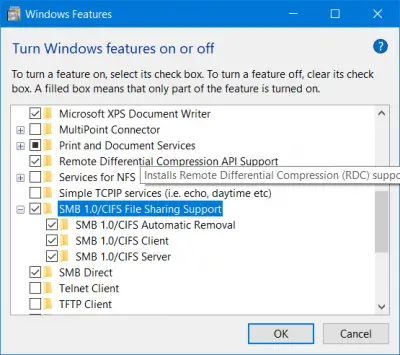
- Open the Windows Features dialog by navigating to Control Panel > Programs > Turn Windows features on or off.
- Look for SMB 1.0/CIFS File Sharing Support and SMB Direct, depending on the version you want to enable.
- Check the boxes to enable the features and restart your system when prompted.
Be aware that some configurations, such as local firewalls, can block SMB connections. Make sure that the appropriate ports (especially TCP 445) are open to allow SMB traffic.
Test WinRM Connection in PowerShell: A Quick Guide
Testing SMB Connections Using PowerShell
Basic Testing with Test-Connection Cmdlet
One of the simplest ways to test a connection to a remote machine is by using the Test-Connection cmdlet. This cmdlet sends ICMP echo requests (similar to the traditional `ping` command) to check status without testing the SMB protocol directly.
Here’s how to use it:
Test-Connection -ComputerName <ServerName>
This command will return results indicating whether the target machine is reachable.
Using the Test-SmbConnection Cmdlet
What is Test-SmbConnection?
The Test-SmbConnection cmdlet is specifically designed to verify SMB connections. It checks not just connectivity, but also the status of shared resources, making it a crucial tool for diagnosing SMB-related issues.
Syntax of Test-SmbConnection
Understanding the parameters and options of the Test-SmbConnection cmdlet is essential. Key parameters include:
- -ComputerName: The name or IP address of the server you’re testing.
- -Credential: This option allows you to specify user credentials for authentication.
- -Share: Use this parameter to test a specific shared resource.
Examples
To perform a simple test of an SMB connection to a share, use:
Test-SmbConnection -ComputerName <ServerName> -Share <ShareName>
Replace <ServerName> and <ShareName> with the actual server name and share you wish to access.
If authentication is required, you can retrieve credentials like this:
$cred = Get-Credential
Test-SmbConnection -ComputerName <ServerName> -Share <ShareName> -Credential $cred
By running these commands, you will receive output indicating whether the connection was successful, along with details such as the SMB dialect in use.
Troubleshooting SMB Connection Issues
Common Errors
When testing SMB connections, you may encounter errors, such as:
- Access Denied: Signifies insufficient permissions or incorrect credentials.
- Network Path Not Found: Indicates potential issues with the target server or network configuration.
Diagnosing Issues with PowerShell
PowerShell can be invaluable in diagnosing connection problems. Start by checking your client configuration:
Get-SmbClientConfiguration
This command will display your SMB client settings, which might help identify configuration-related issues.
Additionally, verify your firewall settings to ensure that SMB traffic is permitted:
Get-NetFirewallRule -DisplayName "SMB-In-TCP"
Look specifically for rules that may block SMB traffic and adjust them accordingly.
Mastering Test-Connection in PowerShell: A Simple Guide
Best Practices for Testing SMB Connections
Regular Testing Procedures
Routine tests are crucial for maintaining network health. Schedule periodic tests of your SMB connections to catch potential issues early. The recommended frequency often hinges on the intensity of your network use and any recent changes to your environment.
Keeping Your Environment Updated
Always ensure that both your Windows OS and PowerShell are up-to-date. Regular updates improve security and performance, and outdated systems may be targets for vulnerabilities that could impact SMB connections.
Mastering Get-WmiObject in PowerShell: A Quick Guide
Conclusion
Testing your SMB connections with PowerShell is a straightforward yet essential task for maintaining a healthy network environment. By using the Test-SmbConnection cmdlet, you can quickly verify connectivity and troubleshoot issues, empowering you to keep your shared resources accessible and secure. For any questions or to share feedback about your experiences with SMB and PowerShell, don’t hesitate to reach out!
Understanding Microsoft.PowerShell.Commands.Internal.Format.FormatStartData
Additional Resources
For further exploration of SMB and PowerShell, consider checking official Microsoft documentation and other educational resources, such as online courses and books, to deepen your knowledge and skills.
SMB or Server Message Block Protocols are used to connect your computer to an external server. Windows ships with support of these protocols but they are disabled in the OOBE. Currently, Windows 11/10 supports SMBv1, SMBv2, and SMBv3 as well. Different servers, depending upon their configuration, require a different version of SMB to get connected to a computer. But in case you are using Windows 8.1 or Windows 7, you can check if you have it enabled too. That’s what we are going to do today.
If you are on Windows 11/10 or Windows 8.1 you should not be disabling SMB v3 or SMB v2 because, in addition to the above problems, you might face the following issues too which come with disabling SMB v3:
- Transparent Failover – clients reconnect without interruption to cluster nodes during maintenance or failover
- Scale Out – concurrent access to shared data on all file cluster nodes
- Multichannel – aggregation of network bandwidth and fault tolerance if multiple paths are available between client and server
- SMB Direct – adds RDMA networking support for very high performance, with low latency and low CPU utilization
- Encryption – Provides end-to-end encryption and protects from eavesdropping on untrustworthy networks
- Directory Leasing – Improves application response times in branch offices through caching
- Performance Optimizations – optimizations for small random read/write I/O.
If you have Windows 7, you should not be disabling SMB v2. This is due to the following reasons:
- Request compounding – allows for sending multiple SMB 2 requests as a single network request
- Larger reads and writes – better use of faster networks
- Caching of folder and file properties – clients keep local copies of folders and files
- Durable handles – allow for connection to transparently reconnect to the server if there is a temporary disconnection
- Improved message signing – HMAC SHA-256 replaces MD5 as the hashing algorithm
- Improved scalability for file sharing – the number of users, shares, and open files per server greatly increased
- Support for symbolic links
- Client oplock leasing model – limits the data transferred between the client and server, improving performance on high-latency networks and increasing SMB server scalability
- Large MTU support – for full use of 10-gigabyte (GB) Ethernet
- Improved energy efficiency – clients that have open files to a server can sleep.
Methods to check what version of SMB is installed on the Server
We will be using the following methods to check what version of SMB is installed on your computer:
- The PowerShell Method.
- The Registry Editor Method.
1] The PowerShell Method
If you wish to check what version of SMB you are running, you can just type in the following in the cmdlet for PowerShell:
SMB v1 Windows 11/10 and Windows 8.1
Get-WindowsOptionalFeature –Online –FeatureName SMB1Protocol
SMB v2 Windows 11/10 and Windows 8.1
Get-SmbServerConfiguration | Select EnableSMB2Protocol
SMB v1 Windows 7
Get-Item HKLM:\SYSTEM\CurrentControlSet\Services\LanmanServer\Parameters | ForEach-Object {Get-ItemProperty $_.pspath}
SMB v2 Windows 7
Get-ItemProperty HKLM:\SYSTEM\CurrentControlSet\Services\LanmanServer\Parameters | ForEach-Object {Get-ItemProperty $_.pspath}
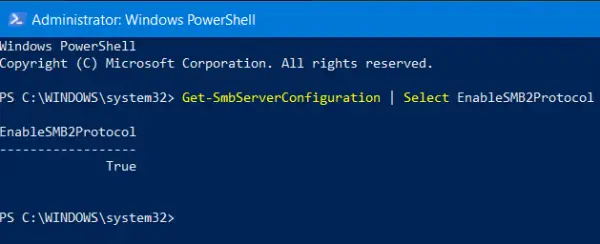
If it returns the value as True, it is enabled, else is disabled.
2] The Registry Editor Method
Type regedit in Start Search and hit Enter. Once Registry Editor opens, navigate to the following key-
HKEY_LOCAL_MACHINE\SYSTEM\CurrentControlSet\Services\LanmanServer\Parameters
Now if you have the DWORDs named as SMB1 or SMB2, check their Value Data.
If it is set to 0, it is disabled.
And in any other case, it is enabled.
Methods to check what version of SMB is installed on Clients
We will be using the following methods to check what version of SMB is installed on your computer,
- The PowerShell Method.
- The Group Policy Editor Method.
1] The PowerShell Method
So, if you wish to check what version of SMB you are running, you can just type in the following in Command Prompt with Administrator Level privileges,
SMB v1 Windows 11/10 and Windows 8.1
sc.exe qc lanmanworkstation
SMB v2 Windows 11/10 and Windows 8.1
sc.exe qc lanmanworkstation

2] The Group Policy Editor Method
It is worth noting that this method will not work on Windows 11/10 Home or the equivalent edition of Windows 8 or Windows 7.
Open Run box, type gpedit.msc and hit Enter to open the Local Group Policy Editor. Navigate to the following path:
Computer Configuration > Windows Settings
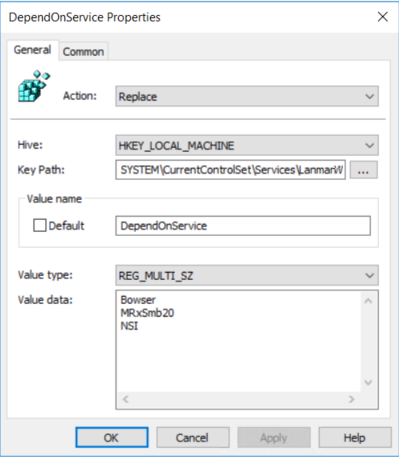
Under Registry, look for Registry Item with the following Properties,
Action: Update
Hive: HKEY_LOCAL_MACHINE
Key Path: SYSTEM\CurrentControl\services\mrxsmb10
Value Name: Start
Value type: REG_DWORD
Value Data: 4
If the Value Data is set to 4, SMB is Disabled.
Related read: Why and how to disable SMB1 on Windows?
There are several commands and operations that you can use in PowerShell to troubleshoot a Windows file server that is using the Server Message Block (SMB) protocol. Here are some you might find useful:
1. Test SMB Connection:
You can use the `Test-NetConnection` cmdlet to test the SMB connection. This command can check for a TCP/IP connection to a specified port, like 445 for SMB.
Test-NetConnection -ComputerName FileServerName -Port 445
Replace `FileServerName` with the actual name or IP address of your file server.
2. Test Network Path:
You can use the `Test-Path` cmdlet to see if a particular network path is accessible.
Test-Path \\FileServerName\Share
Replace `\\FileServerName\Share` with the actual UNC path of the share on your file server.
3. Get SMB Connections:
You can use the `Get-SmbConnection` cmdlet to get the status of the SMB connections.
Get-SmbConnection
4. Get SMB Session:
You can use the `Get-SmbSession` cmdlet to retrieve the sessions on the SMB server.
Get-SmbSession
5. Get SMB Open File:
You can use the `Get-SmbOpenFile` cmdlet to retrieve the files currently open by SMB clients.
Get-SmbOpenFile
6. Get SMB Share:
You can use the `Get-SmbShare` cmdlet to get the shares on the SMB server.
Get-SmbShare
7. Get SMB Share Access:
You can use the `Get-SmbShareAccess` cmdlet to get the access control entries for the shares on the SMB server.
Get-SmbShareAccess -Name ShareName
Replace `ShareName` with the actual name of your share.
Please note that many of these commands require administrative privileges, so make sure to run PowerShell as an administrator.
These are just some of the commands you can use to troubleshoot an SMB file server. The exact commands you’ll need to use will depend on the nature of the problem you’re experiencing.
Provide feedback
Saved searches
Use saved searches to filter your results more quickly
Sign up
There are several different versions (or dialects) of the SMB protocol that were introduced with different versions of Windows:
SMB 1 — Windows 2000
SMB 2 — Windows Server 2008 and Windows Vista SP1
SMB 2.1 — Windows Server 2008 R2 and Windows 7
SMB 3.0 — Windows Server 2012 and Windows 8
The version of SMB used between two computers will be the highest dialect supported by both.
This means if a Windows 8 machine is talking to a Windows 8 or Windows Server 2012 machine, it will use SMB 3.0. If a Windows 10 machine is talking to Windows Server 2008 R2, then the highest common level is SMB 2.1.
To check which SMB version is being used over a connection between two computers, run the following PowerShell command:
Get-SmbConnection
which will show the SMB connections and the dialect that is being used.
PS C:\Windows\system32> Get-SmbConnection
ServerName ShareName UserName Credential Dialect NumOpens
———- ——— ——— ———- ——- ———
ser08r2 c$ SAVILLTEC… SAVILLTEC… 2.10 1
serv01 c$ SAVILLTEC… SAVILLTEC… 3.00 1
ser2016 softsh SAVILLTEC… SAVILLTEC… 3.00 1
To check if encryption is enabled or not over a connection you can use this command:
PS C:\Users\Administrator> Get-SmbConnection | Select-Object -Property *
ContinuouslyAvailable : False
Credential : domain\administrator
Dialect : 3.00
Encrypted : False
NumOpens : 3
ServerName : server1
ShareName : test
UserName : SERVER1\Administrator
PSComputerName :
CimClass : ROOT/Microsoft/Windows/SMB:MSFT_SmbConnection
CimInstanceProperties : {ContinuouslyAvailable, Credential, Dialect, Encrypted…}
CimSystemProperties : Microsoft.Management.Infrastructure.CimSystemProperties
Once you know a connection to a share in SMB3 is encrypted you know all traffic will be encrypted between the two computers over that share, including ViceVersa and VVEngine. There are no special settings needed in ViceVersa or VVEngine.