
Multiple methods to Open Memory Diagnostic on Windows 10 are available in this article. Run command, Control Panel, PowerShell, etc. help to easily launch this tool.
Windows Memory Diagnostic runs a broad memory test to assess if the Random access memory is faulty. This is a fast and easy working tool but before running you need to know the way to open it. If your system is malfunctioning because of bad memory, the Windows Memory Diagnostics tool will automatically recognize the same. The tool asks the user to create a scheduled memory test, which happens during the subsequent restart.
6 Ways to Open Memory Diagnostic tool in Windows 10
Here is How to Open Memory Diagnostic tool in Windows 10 –
Method-1: Open by Searching
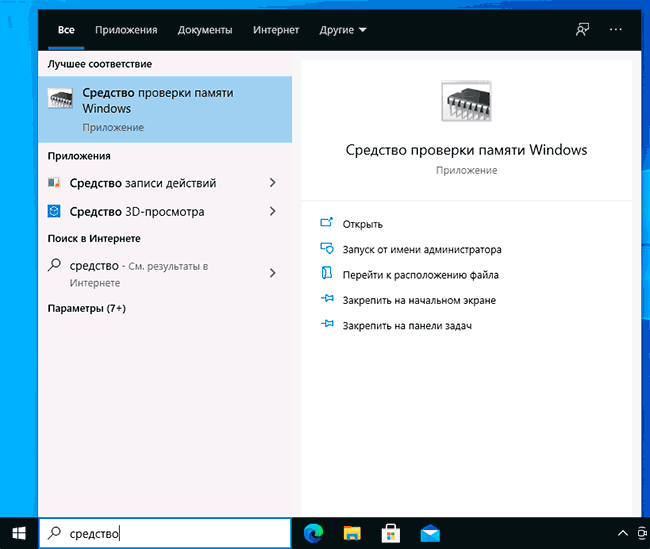
Step-1: In the Search Box, type Memory Diagnostic and hit the Enter key.
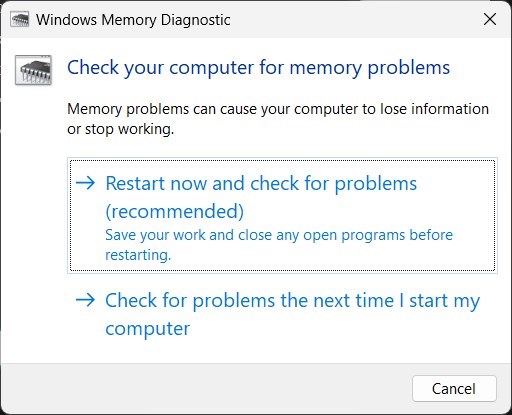
Step-2- Select ‘Restart now and check for problems’ on the dialog.
Method-2: Through Run Command
Step-1: Open Run by pressing the keys Windows + R, type mdsched, and click OK.
Method-3: By means of Windows Settings
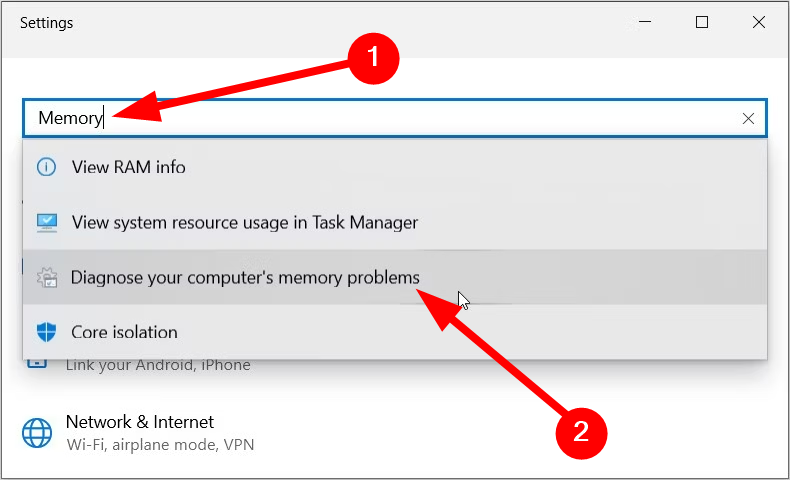
Step-1: Press Win+I to open Windows Settings and type memory in the search box.
Step-2: Select Diagnose your computer’s memory problems from the resulting dropdown.
Method-4: Using Control Panel
Step-1: Click on taskbar search, paste %SystemRoot%\system32\control.exe, and then press Enter to open Control Panel.
Step-2: Select Windows Tools from the applet.
Step-3: Scroll down to the bottom and double-click on Windows Memory Diagnostic.
Method-5: Via Command Prompt
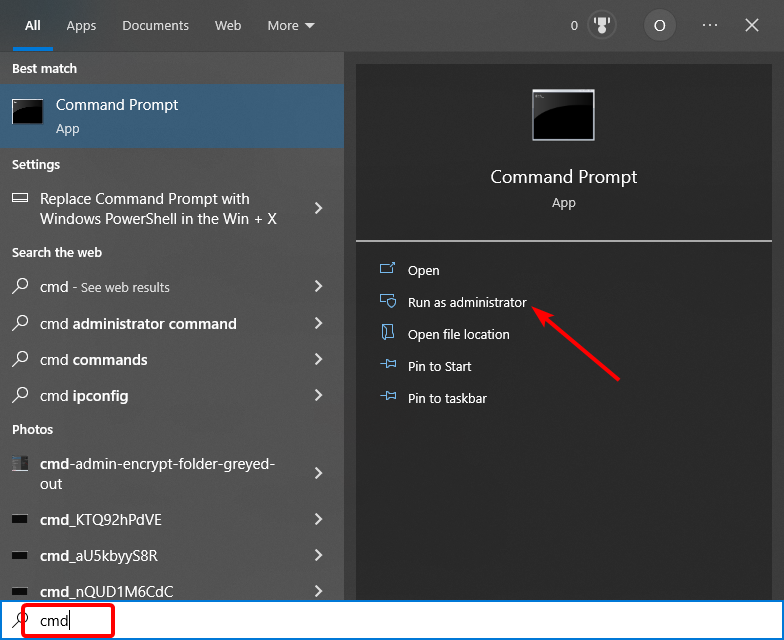
Step-1: To Launch elevated Command prompt, type “cmd.exe” in the search bar on the taskbar.
Step-2: While you are viewing “Command Prompt” (Desktop app) under Best match on the top, right-click and select “Run as administrator”.
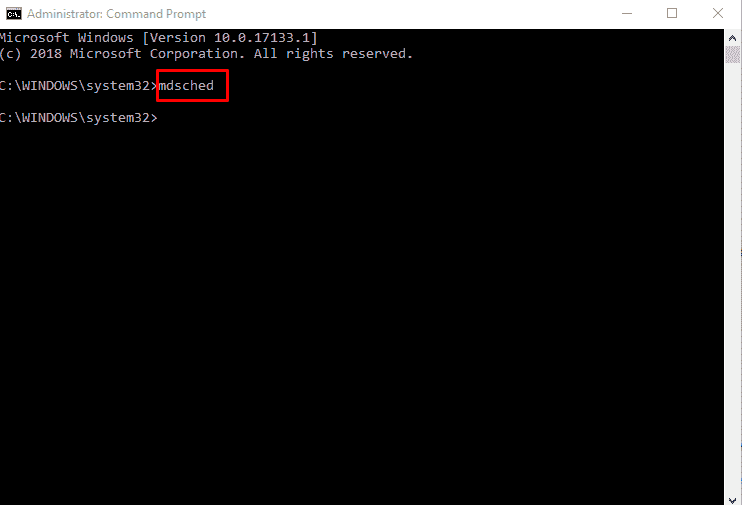
Step-3: On the command prompt, type mdsched.exe and then press Enter.
Method-6: with help of Windows PowerShell
Step-1: Type “powershell” in the search field and right-click on the result. Select Run as administrator from the list on the menu.
Step-1: Copy mdsched.exe, paste it into Windows PowerShell, and then press the Enter key.
These are the 6 ways to Open Memory Diagnostic Tool in Windows 10.
Methods:
Method-1: By searching
Method-2: through Run command
Method-3: By means of Windows Settings
Method-4: Using Control Panel
Method-5: Via Command Prompt
Method-6: with help of Windows PowerShell
That’s all!!
Если сбои системы, синие экраны BSoD или иные проблемы при работе Windows 10, 8.1 или Windows 7 наводят вас на мысли о том, что имеются какие-либо проблемы с оперативной памятью компьютера, может иметь смысл выполнить её проверку, а начать можно со встроенного средства диагностики проверки памяти Windows.
В этой инструкции подробно о способах запустить средство проверки памяти средствами Windows, причём даже в тех случаях, когда вход в систему невозможен, а также о возможных вариантах действий в случае, если в результате теста средство диагностики памяти сообщает о том, что были обнаружены проблемы оборудования. На схожую тему: Устранение неполадок Windows 10.
- Способы запуска средства проверки памяти
- Использование средства и просмотр результатов
- Обнаружены проблемы оборудования в средстве диагностики памяти
- Видео инструкция
Как запустить средство проверки памяти в Windows 10 и предыдущих версиях системы
В случае, если операционная система запускается, вход в неё и работа возможны, вы можете использовать один из следующих вариантов запуска средства проверки памяти:
- Найти нужный пункт в разделе «Средства администрирования Windows» меню «Пуск».
- Нажать клавиши Win+R на клавиатуре, ввести mdsched.exe и нажать Enter.

- Открыть панель управления, выбрать пункт «Администрирование» и запустить «Средство проверки памяти Windows».
- Использовать поиск в панели задач Windows 10, начав вводить «Средство проверки памяти». Или встроенные средства поиска в предыдущих версиях ОС.

- Вручную запустить файл C:\Windows\System32\MdSched.exe

Если же ситуация осложняется тем, что Windows не запускается, вход в неё невозможен, либо сразу после него происходят сбои, можно использовать следующие способы запуска средства диагностики оперативной памяти:
- Загрузить компьютер или ноутбук с загрузочной флешки с Windows 10 или другой версией Windows, можно и с загрузочного диска. На экране программы установки нажать клавиши Shift+F10 (Shift+Fn+F10 на некоторых ноутбуках), ввести mdsexe в открывшейся командной строке и нажать Enter. После выбора в утилите проверки пункта «Выполнить перезагрузку и проверку», загружайте компьютер не с флешки, а с обычного загрузочного HDD или SSD.

- Средство проверки памяти можно запустить из среды восстановления Windows 10 — нажав кнопку «Дополнительные параметры» на синем экране с ошибкой или, находясь на экране блокировки Windows 10 (с выбором имени пользователя) нажать по изображенной справа внизу кнопке «Питания», а затем, удерживая Shift, нажать «Перезагрузка». В среде восстановления выбираем «Поиск и устранение неисправностей» — «Дополнительные параметры» — «Командная строка». А в ней, как и в предыдущем случае используем команду mdsched.exe.

- Если у вас есть подготовленный диск восстановления Windows, запуск можно осуществить, загрузившись с него.


Использование средства проверки памяти Windows и просмотр результатов

После запуска средства проверки памяти вам будет предложено перезагрузить компьютер, после согласия, процесс будет выглядеть следующим образом:
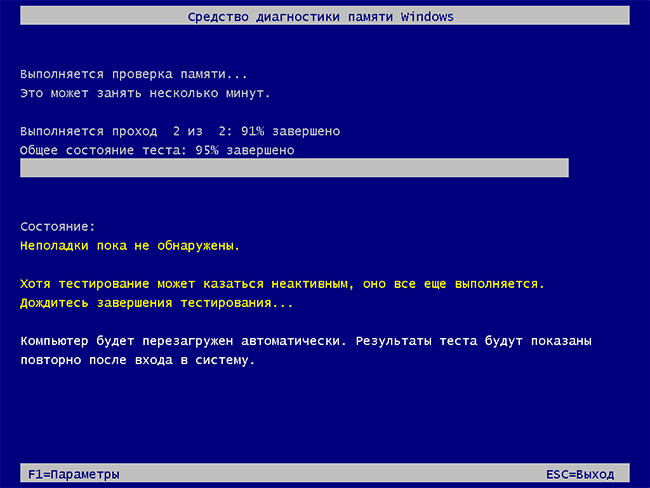
- Начнётся проверка оперативной памяти, которая может занять продолжительное время. Может показаться, что средство диагностики зависло: на всякий случай подождите в такой ситуации 5-10 минут. Если же действительно произошло зависание, не исключено что есть проблемы с оборудованием, вероятно — с оперативной памятью, но не обязательно.

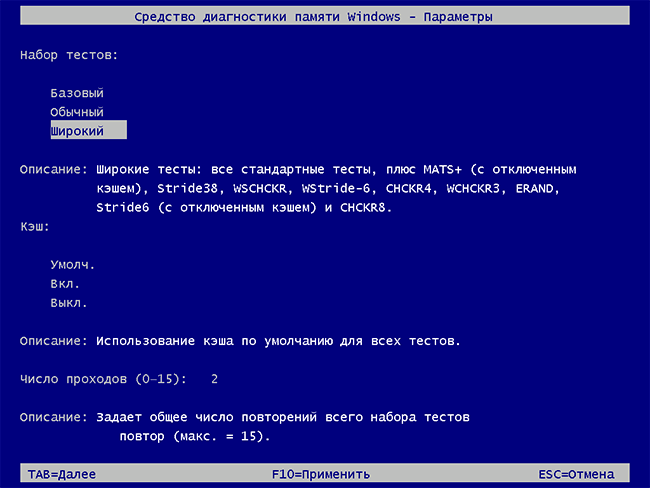
- Если в ходе проверки нажать клавишу F1 (или Fn+F1, если F1 не срабатывает), вы попадёте в настройки средства диагностики памяти Windows. Здесь можно выбрать набор тестов (по умолчанию — обычный), использование кэша, и число проходов. Переключение между разделами настроек выполняется клавишей Tab, изменение параметров — стрелками и вводом цифр (для числа проходов), применение параметров — клавишей F10. После изменения настроек тест перезапускается.
- В ходе проверки вы будете видеть информацию вида «Неполадки пока не обнаружены» или «Были обнаружены проблемы оборудования».
После завершения проверки компьютер будет автоматически перезагружен. Дальнейшие шаги — просмотр результатов.
- После перезагрузки в случае Windows 10 вы можете увидеть уведомление в области уведомлений, сообщающее о результате проверки памяти. Но оно отображается не всегда.
- Можно зайти в просмотр событий, для этого нажимаем Win+R, вводим eventvwr.msc и нажимаем Enter. Там открываем раздел «Журналы Windows» — «Система», находим пункты, где в столбце «Источник» указано MemoryDiagnostics-Results и просматриваем результаты.


Учитывайте, что ошибки, «вылеты», синие экраны и зависания не всегда связаны с проблемами оперативной памяти: если средство диагностики показывает, что всё в порядке, есть и иные возможные причины: отключенный файл подкачки, проблемы с HDD или SSD (или с их подключением, например — неисправный кабель), сторонние антивирусы или, наоборот, вредоносные программы, неправильная работа драйверов оборудования.
Что делать, если были обнаружены проблемы оборудования в средстве диагностики памяти
К сожалению, средство диагностики не сообщает о том, какие именно проблемы были обнаружены в ходе проверки, а лишь рекомендует обратиться к производителю оборудования. Что можно сделать:
- Отключить любые опции ускорения памяти (изменение частоты, таймингов и другие) при наличии соответствующих опций в БИОС или ПО производителя материнской платы или ноутбука.
- Попробовать проверить планки памяти по одной, в других слотах на материнской плате для того, чтобы выяснить, появляются ли проблемы только с одним конкретным модулем памяти или в одном конкретном разъеме.
- Использовать другие утилиты для проверки оперативной памяти при необходимости.
- Прочитать документацию к материнской плате ПК — возможно, это какая-то несовместимость с памятью с конкретными характеристиками (если вы недавно добавили новые модули памяти или только что самостоятельно собрали компьютер).
- Иногда может помочь обновление БИОС.
Видео инструкция
Если вы разобрались, чем была вызвана именно ваша проблема, буду благодарен комментарию к статье: возможно, для кого-то он окажется полезным.
- Open Command Prompt and run this command to see the total installed RAM, capacity, speed, and type:
wmic MEMORYCHIP get BankLabel, DeviceLocator, MemoryType, TypeDetail, Capacity, Speed - You can also check RAM using systeminfo command:
systeminfo |find “Available Physical Memory” - To visually check RAM, open Task Manager and navigate to Performance > Memory for real-time RAM details.
RAM is one of the most crucial factors influencing the speed of your computer. When you notice that your system is running slowly even though you are using a good system and a fast SSD drive, you should probably examine the amount of RAM on your system.
Table of Contents
What is RAM/Memory?
Random Access Memory, or RAM, is a type of memory that is used by processors to run the data and information this is currently being used by the system. Examples of these include running operating system files, device drivers, application data, etc.
As soon as the computer is powered off, the data in the RAM is erased. This is because RAM is a volatile memory, which loses its data as soon as it loses power.
Let us now continue to see how to check the different RAM-related details on your computer.
Check Complete RAM Details using WMIC Command
Using the WMIC cmdlet, you can obtain some information about the RAM on your computer, such as its capacity, speed, which bank it is installed in, etc. Here is how:
-
Launch the Command Prompt with elevated privileges.
-
Command Prompt will now open. Type in the following command and then hit Enter:
wmic MEMORYCHIP get BankLabel, DeviceLocator, Capacity, Speed
Get RAM details from Command Prompt The three columns will be shown in front of you. The BankLabel column will tell you which slots the RAM chips are installed in. The Capacity column will tell you the size of each module in bytes. The DeviceLocator is another entity that tells which slots the RAM chips are installed in.
-
You can also get more information through the WMIC cmdlet, such as its MemoryType and TypeDetail. To do this, enter the following command:
wmic MEMORYCHIP get BankLabel, DeviceLocator, MemoryType, TypeDetail, Capacity, Speed
Get additional RAM details from Command Prompt MemoryType tells you the type of your physical memory. In this case, we get 24 which means DDR3. The value comes from the TypeDetail member of the Memory Device structure in the SMBIOS information. We got “128” which says my RAM TypeDetail is synchronous.
-
To get complete details about the memory modules, run the following command:
wmic memorychip list fullThis command may not give you a user-friendly list of details but it will give you complete details about the hardware.


Moreover, you can also use the following list of switches to obtain other information about the memory:
- Attributes
- BankLabel
- Capacity
- Caption
- ConfiguredClockSpeed
- ConfiguredVoltage
- CreationClassName
- DataWidth
- Description
- DeviceLocator
- FormFactor
- HotSwappable
- InstallDate
- InterleaveDataDepth
- InterleavePosition
- Manufacturer
- MaxVoltage
- MemoryType
- MinVoltage
- Model
- Name
- OtherIdentifyingInfo
- PartNumber
- PositionInRow
- PoweredOn
- Removable
- Replaceable
- SerialNumber
- SKU
- SMBIOSMemoryType
- Speed
- Status
- Tag
- TotalWidth
- TypeDetail
- Version
Get RAM Details using SystemInfo Command
Here is another way to find the RAM details for your system through the SystemInfo command. This method also gives you similar information to the WMIC cmdlet.
-
To find the total physical memory of your system, enter the following command. This command easily displays the total amount of memory that is on your system.
systeminfo | findstr /C:"Total Physical Memory"
Get Total Physical Memory -
If you want to get the information about the available memory of your system then run the following command and immediately get the results:
systeminfo |find "Available Physical Memory"
Get Available Physical Memory


Get RAM Details using PowerShell
If you want to get complete RAM details, you can use the following PowerShell command:
Get-WmiObject Win32_PhysicalMemory | Format-List *
This command will give you a wealth of information about your memory, as in the image below.

How do you see how much RAM is in your computer?
You can easily check the details of RAM in Windows 10 using Task Manager. The task manager performance tab shows the majority of memory details including the total amount of RAM, how much is in use, committed/cached and paged/non-paged amount of RAM, RAM speed and frequency, form factor, hardware reserved, and even how many slots are being used in the system.
To check how much RAM you have on your computer, open the Task Manager by pressing Ctrl + Shift + Esc keys and go to the Performance tab. Select Memory from the left-hand pane. The right-hand pane will open RAM details.

If the RAM usage is more than 90%, you should think of upgrading the RAM capacity in your system, reducing the memory load, and bringing it below 80% for optimal performance.
To check how much RAM you have using the command line, open Command Prompt and run the following command:
wmic MEMORYCHIP get BankLabel, Capacity
This will show the RAM capacity of all RAM modules separately and in bytes.
To check the total RAM capacity in your system, run the following command in Command Prompt:
systeminfo | find "Total Physical Memory"
This will show you the total physical memory installed in Megabytes.
If you are using PowerShell, you can run the following command to get the RAM size:
Get-WmiObject Win32_PhysicalMemory | Select-Object Capacity
Check Installed and Available RAM/Memory from System Information
System Information is a tiny applet in the Windows operating system that displays the different information about the computer as a whole. It gives both hardware and software information. It can be used to find out what amount of RAM is on your computer, and how much of it is available for you to use. Here is how:
-
Type in msinfo32 in the Run Command box to open System Information.
Open System Information -
Now you will find the following information on the starting page under the System Summary category:
- Installed Physical memory
- Total Physical memory
- Available Physical Memory

Memory details

Check RAM/Memory Size using DirectX Diagnostics Tool
The DirectX diagnostic tool is a built-in tool in the Windows operating system used to check and troubleshoot video or sound-related hardware problems. With that, it also displays other hardware information, such as the amount of RAM installed on your PC. Here is how to check your RAM details using the DirectX diagnostic tool:
-
Open the tool by typing in dxdiag in the Run Command box.
Open the DirectX diagnostic tool -
Under the System tab, you should be able to see Memory,

Memory details using DirectX diagnostic tool

How to Check RAM Speed?
Windows 10 Task Manager gives the option to check RAM speed with ease.
To check RAM speed, open the Task Manager by pressing Ctrl + Shift + Esc keys and go to the Performance tab. Select Memory from the left-hand pane. On the right-hand page, you should see the Speed of RAM in MHz.

Please note that if you have multiple RAM modules, Windows 10/11 will report the operating RAM speed which is the lowest of all installed modules. If you want to check the speed of each individual module, just hover your mouse cursor over the slots used. This will show a pop-up with the speed of each module.

To check RAM speed using the command line, open Command Prompt and run the following command:
wmic MEMORYCHIP get BankLabel, Speed
This will show the speed of all installed RAM modules.
If you are using PowerShell, you can run the following command to check the speed of RAM modules:
Get-WmiObject Win32_PhysicalMemory | Select-Object Speed
How do you check what type of RAM you have? DDR3 or DDR4?
Unfortunately, the Task Manager doesn’t give very useful information about the RAM type. We can use PowerShell commands to accurately determine the RAM type.
To check the RAM type from the command line, open PowerShell and run the following command:
Get-WmiObject Win32_PhysicalMemory | Select-Object SMBIOSMemoryType
This command will give you a number. This number corresponds to the appropriate RAM type. Here are the codes and their corresponding RAM types:
| Code | RAM Type |
| 26 | DDR4 |
| 25 | DDR3 |
| 24 | DDR2-FB DIMM |
| 22 | DDR2 |
For more information on these codes, you can refer to Microsoft documentation here.
You can also use the WMIC MEMORYCHIP command in Command Prompt to check the memory type:
wmic memorychip get memorytype
Please note that wmic MEMORYCHIP is an old command and does not always detect the correct RAM type. If you see 0 as a memory type code, it means the MEMORYCHIP command was not able to determine the RAM type.
Using commands is a very convenient, time-saving method for any task. It is as simple as typing a command and getting the task done. Use the commands I described above to get detailed information about your RAM. Upgrade the RAM if your system is slow or has insufficient RAM so that all operations will be performed smoothly and rapidly.
Frequently Asked Questions (FAQs)
When should I upgrade my RAM?
If you believe that your computer is now running slower than before, then check to see how much RAM is in use. If it is continuously consuming nearly 80-90% of your total RAM, then it is time to change, or maybe upgrade your current RAM modules.
What is the maximum amount of RAM I can put in my computer?
The maximum amount of RAM your system supports is usually limited by your hardware; the motherboard to be precise. Therefore, we recommend that you read your motherboard’s manual before upgrading your RAM capacity. Moreover, the operating system also limits the amount of RAM.
However, modern operating systems support sufficient amounts of RAM capacity as long as it is a 64-bit OS.
Reading time7 min
Views23K
Read this article to find out how to find specifications for the system memory installed on your computer, including information about its manufacturer, part number, serial number, effective speed, capacity, form factor, type etc.

Introduction
There are many scenarios when the ability of Windows 10 to supply specifications data on installed computer hardware may come in handy. Getting to know the detailed information on system memory (also known as random-access memory, or RAM) can sometimes be very useful in helping you to take the correct decision if any problems arise. For example, if a computer works slowly because it has to run memory-intensive applications or games, then adding more system memory may give it a considerable boost. Knowing certain peculiarities and required standards of the system memory can help you decide on the correct capacity, speed and brand of RAM to buy a piece of compatible hardware for an upgrade.
If you are having issues with system memory, knowing the information on its manufacturer, part number and serial number will help you to contact the tech support and solve the problem. At least, you will be able to find a memory module of the same type which, as you already know, is fully compatible with your PC. Besides, when you are configuring memory settings in the basic input / output system (BIOS) or in the unified extensible firmware interface (UEFI), a chance to have a look at memory information can help you to understand if a particular configuration was applied correctly.
Whatever might be your reasons, Windows 10 can provide you with all the information you may need; what is more, it saves you the trouble of having to open the computer case or install third-party tools, which may trigger a conflict of interest or cause compatibility issues.

In this tutorial, we will try to show you how to find specifications for the system memory installed on your computer, including information about its manufacturer, part number, serial number, effective speed, capacity, form factor, type etc.
A brief note: Despite the fact that Windows 10 lets users see detailed information on the system memory in their devices, some data may be unavailable due to peculiarities of specific hardware.
How to get detailed information on system memory with the command prompt console

If you suspect that Task Manager displays inaccurate or wrong information on your RAM specifications, or if you need to learn more detailed data such as serial number, part number, manufacturer etc on every memory module, Windows 10 is here to help you find all that information by using a certain set of system commands.
To start searching and find specific data on memory modules installed on your desktop PC or laptop, you need to use the functions of the command prompt with administrator rights in Windows 10. There are a few ways to open the Command Prompt application, the rich functionality of which we are going to explore today.
Click the Search button, shaped as a magnifying glass and located on the Taskbar next to the Start button, and open the search panel. There, type command prompt or cmd. The Best match section will show you the app you are looking for. Right-click on it and select Run as administrator from the context menu.

Identify the manufacturer
Here is what you do to identify the manufacturer company (brand or trademark) that produced the RAM modules installed on your PC.
Open the Command Prompt with administrator rights using the way you prefer.
To find out the manufacturer’s name, type the following command and press the Enter key (make sure there are no quotation marks):
wmic memorychip get devicelocator, manufacturer

Read the RAM module manufacturer name under the column Manufacturer.
Identify the part number
To find data on the part number that the manufacturer assigned to a specific RAM module, here’s a simple sequence of steps to take.
Use any method you prefer to open the command prompt console with extended rights.
In the window that appear, type the command to run (without quotation marks) and press the Enter key.
wmic memorychip get devicelocator, partnumber

Under the column PartNumber you will see the product identifier you are looking for.
Note: If the speed of data processing and overall performance of your computer is decreasing, upgrading your RAM modules might be one of the best way to solve the issue. Using modern memory sticks, you can add high-quality components to your machine, with a pleasant bonus of higher bandwidth and advanced settings at an affordable price.
Check the serial number of your memory module
Take these steps to find out the serial numbers for every memory stick currently installed in your computer:
Open Command Prompt with administrator rights using any way you prefer.
In the corresponding line, type the command for identification of RAM serial number (make sure there are no quotation marks) and hit the Enter key to begin.
wmic memorychip get devicelocator, serialnumber

Hint: In the command for identification of the serial number, you can replace the part devicelocator by banklabel to see the serial number of the physical label of the bank where the memory is installed on the motherboard.

The result will be displayed in the Command Prompt window under the column SerialNumber.
Identify RAM capacity
In Windows 10 you can use a variable set of commands to find out total capacity for every RAM module, and for the entire system memory.
Discover capacity of each RAM module
To learn capacity of each memory stick in your configuration, take a few steps.
Open Command Prompt with administrator rights, using any method you prefer.
In the program’s window, type the following command for displaying the memory capacity, and then press the Enter key to run it (make sure the command doesn’t contain any quotation marks).
wmic memorychip get devicelocator, capacity

The total capacity of RAM installed on your computer will be shown under the column Capacity.
Note: The memory module capacity is represented in bytes, so to understand the figure properly you need to convert it into gigabytes (divide the value shown in the Command Prompt window by 1073741824, which is how many bytes are there in one gigabyte).
Displaying total amount of RAM
In addition, you can quickly learn the total size of system memory on your computer by taking another sequence of simple steps.
Open Command Prompt with administrator rights.
When the corresponding window opens, type the following command to see the total system memory size installed on your computer with Windows 10, and press the Enter key to run the command (remove any quotation marks).
systeminfo | find “Total Physical Memory”

Note: If the total memory size is not displayed, try a similar command:
systeminfo | findstr /C:”Total Physical Memory”
With every command, make sure there are no quotation marks.
The total size of physical system memory (in megabytes) available on this computer will be shown in the corresponding line.
Check RAM speed
To find out the speed that the memory modules are operating at, here are the steps to use:
Open the Command Prompt console with administrator rights in any way you prefer.
Type the command to determine the RAM speed and press Enter on your keyboard (make sure there are no quotation marks):
wmic memorychip get devicelocator, speed

In the corresponding Speed column, the program will display the speed of your memory modules (in MHz).
Check RAM type
To check the system memory type (generation) in Windows 10, take these steps:
Open Command Prompt with administrator rights, using any method you prefer.
In the corresponding line, type the following command to determine the memory type and press Enter on your keyboard (make sure there are no quotation marks):
wmic memorychip get devicelocator, memorytype

The MemoryType column will contain a digit from zero to twenty-five that denotes a certain memory type. For example, if you see 24 in the column, it means this computer is using DDR3memory modules.
Also, you may see zeroes in the MemoryType column: it means the Windows system tool wmic.exe cannot identify the memory generation properly (it may happen if you’re using DDR4 modules), as such values are not provided in the specifications.
The comprehensive list of supported memory types
Below, find the comprehensive list of file types that can be identified by this command:
- 0: Unknown.
- 1: Other.
- 2: DRAM.
- 3: Synchronous DRAM
- 4: Cache DRAM.
- 5: EDO.
- 6: EDRAM.
- 7: VRAM.
- 8: SRAM.
- 9: RAM.
- 10: ROM.
- 11: Flash.
- 12: EEPROM.
- 13: FEPROM.
- 14: EPROM.
- 15: CDRAM.
- 16: 3DRAM.
- 17: SDRAM.
- 18: SGRAM.
- 19: RDRAM.
- 20: DDR.
- 21: DDR2.
- 22: DDR2 FB-DIMM.
- 24: DDR3.
- 25: FBD2.
Check RAM form factor
The word “form factor” (standard size) suggests certain standard dimensions of a memory module which also includes additional characteristics such as the module shape. By form factor, there are twenty-five types of system memory. However, the two most widespread categories are DIMM and SODIMM.
To find out if your RAM sticks are DIMM or SODIMM, follow these steps:
Use your preferred method to open Command Prompt with administrator rights.
In the window Administrator: Command Prompt, type the following command to identify the memory form factor and press the Enter key (make sure there are no quotation marks):
wmic memorychip get devicelocator, formfactor

If the result in the FormFactor column is 8, then your computer is using DIMM modules (the default option for desktop computers). Otherwise, if the command displays the number 12, then your computer is using SODIMM modules (the typical choice for laptops).

The comprehensive list of supported memory form factors
Here is the list of form factors that this command can identify:
- 0: Unknown.
- 1: Other.
- 2: SIP.
- 3: DIP.
- 4: ZIP.
- 5: SOJ
- 6: Proprietary.
- 7: SIMM.
- 8: DIMM.
- 9: TSOP.
- 10: PGA.
- 11: RIMM.
- 12: SODIMM.
- 13: SRIMM.
- 14: SMD.
- 15: SSMP.
- 16: QFP.
- 17: TQFP.
- 18: SOIC.
- 19: LCC.
- 20: PLCC.
- 21: BGA.
- 22: FPBGA.
- 23: LGA.
- 24: FB-DIMM.
Displaying all RAM details
The commands described above allow you to identify the most important data about memory modules. However, if you want to find all the information, here’s what you do:
Open Command Prompt with administrator rights in any way you prefer.
In the corresponding line, type the following command to display all memory details and press Enter to run it (don’t forget to remove any quotation marks):
wmic memorychip list full

View all the available information for each RAM module installed on your computer.
(Optional) if the list of data is too big and you don’t actually need all that stuff, type the following command to view only the necessary things and press Enter (everything should be typed into one line; remember to remove the quotation marks):
wmic memorychip get devicelocator, manufacturer, partnumber, serialnumber, capacity, speed, memorytype, formfactor

Now you can view the memory information you prefer.
Conclusion
Using the steps described in this article, you’ll get an impressive amount of data on the RAM modules installed on your computer. These hints will come in handy when troubleshooting PC issues, tweaking configuration (e.g. when overclocking), or when you’re planning to upgrade your system memory to improve overall computer performance.
See the full article with all additional video tutorials
Readers help support Windows Report. We may get a commission if you buy through our links.
Read our disclosure page to find out how can you help Windows Report sustain the editorial team. Read more
Memory problems are the worse on your PC as they can slow down your PC and impact its performance. In such a case, running the Memory Diagnostic Tool on your Windows PC is advisable to fix any memory-related issues.
While this tool is a saver, users can run into trouble opening this tool. So, in this guide, we will share many quick methods to run a memory test on Windows 10 using the Memory Diagnostic tool. So, let us get right into it.
- Press the Win key to open the Start menu.
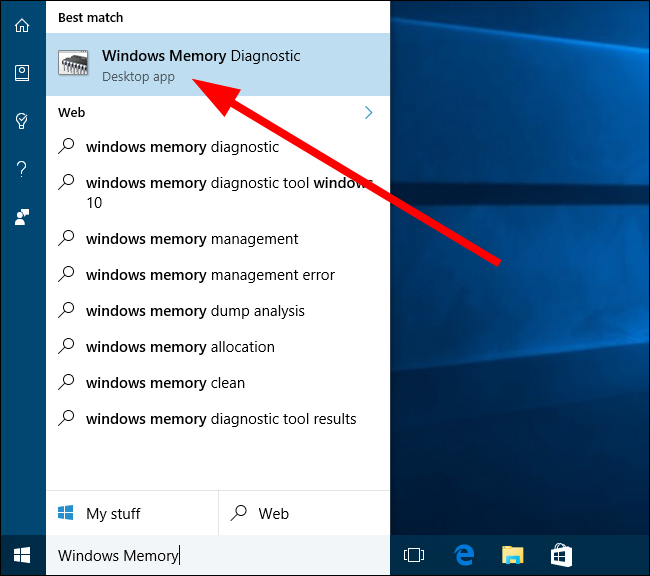
- Type Windows Memory Diagnostic and open it.

- You can select from the two below options:

- Restart now and check for problems (recommended)
- Check for problems the next time I start my computer
- The tool will find any issues and fix the problem.
This is the easiest way to access the Windows Memory Diagnostic tool on your Windows 10 PC. But, of course, you can also follow the same steps for Windows 11.
2. Use Windows Search
- Press the Win + S keys to open the Windows Search.
- Type Windows Memory Diagnostic and open it.
- Select from the two below options:
- Restart now and check for problems (recommended)
- Check for problems the next time I start my computer
- The tool will find any issues and fix the problem.
To run the memory test on Windows 10, you can also run the Windows Memory Diagnostic tool from the Windows Search.
- Recent Windows 11 update lets you disable profanity filter in voice typing
- Meta under fire after AI chatbot caught having sexual talks with minors
3. Use the Command Prompt
- Press the Win key to open the Start menu.
- Open Command Prompt as an admin.

- Type the below command to run the Windows Memory Diagnostic tool and hit Enter.
MdSched
- Choose any of the two below options:
- Restart now and check for problems (recommended)
- Check for problems the next time I start my computer
- The tool will find any issues and fix the issue.
Command Prompt is another way to help you run a memory test on Windows 10. This method could come in handy when your PC isn’t booting.
In that case, you can access the recovery mode, open the command prompt, and run the tool to fix memory issues.
4. Use the system settings
- Press the Win + I keys to open the Windows Settings.
- Type memory in the search field and click on Diagnose your computer’s memory problems option.

- Select any of the two below options:
- Restart now and check for problems (recommended)
- Check for problems the next time I start my computer
- The tool will find any issues and fix the issue.
As the name suggests, Windows Settings includes all the settings you can tweak on your PC. Using the Memory Diagnostic Tool from settings, you can also run the memory test on your Windows 10 PC.
5. Use the Control Panel
- Press the Win key to open the Start menu.
- Open Control Panel.

- Click View by and select Small icons.

- Select the Administrative Tools option.
- Choose Windows Memory Diagnostic.

- Click any of the two below options:
- Restart now and check for problems (recommended)
- Check for problems the next time I start my computer
- The tool will find any problems and fix the issue.


Control Panel is another option for running the memory test on Windows 10 using the Diagnostic Tool.
6. Use File Explorer
- Open the File Explorer.
- In the address bar, type MdSched and hit Enter.
- Choose any of the two below options:
- Restart now and check for problems (recommended)
- Check for problems the next time I start my computer
- The tool will find any problems and fix the issue.
7. Use the Task Manager
- Press the Ctrl + Shift + Esc buttons to open the Task Manager.
- Click on the File tab.
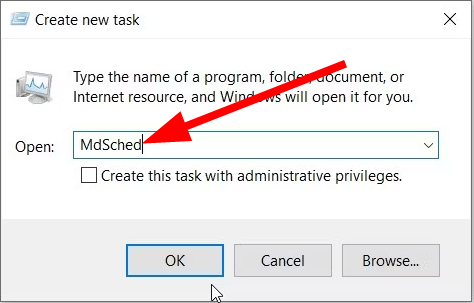
- Select the Run new task option.
- Type MdSched and press Enter.

- Select any of the two below options:
- Restart now and check for problems (recommended)
- Check for problems the next time I start my computer
- The tool will find any problems and fix the issue.
It is a bit complicated to run the memory test on Windows 10; however, it can come in handy when all you have access to is the Task Manager.
8. Use the Run dialogue
- Press the Win + R key to open the Run dialogue.
- Type MdSched and press Enter.
- You can choose from any of the two below options:
- Restart now and check for problems (recommended)
- Check for problems the next time I start my computer
- The tool will find any problems and fix the issue.
That is it from us in this guide. Our guide explains what you can do if the Memory Diagnostic Tool gets stuck on your PC.
If you are getting a hardware problem with the Memory Diagnostic Tool, then you can refer to the solutions in our guide to fixing the issue.
For users facing the Memory Refresh Timer error on their Windows PCs, we have a guide that explains a bunch of solutions to resolve the problem.
Let us know in the comments below which of the above methods you used to run a memory test on your Windows 10 PC.
Sagar Naresh
Sagar is a web developer and technology journalist. Currently associated with WindowsReport and SamMobile. When not writing, he is either at the gym sweating it out or playing country music on his guitar.
He is an avid traveler and has been to 15 countries, going to more places soon. TRAVEL and WORK is his mantra for a peaceful life.