
Несмотря на то, что в Windows 11 нет встроенного интерфейса просмотра индекса производительности системы, который присутствовал в «семёрке», инструменты оценки всё ещё присутствуют в системе и дают нам возможность узнать результат.
В этой простой инструкции способы посмотреть индекс производительности системы Windows 11 используя лишь встроенные средства ОС или с помощью простой сторонней утилиты. Учитывайте, что относиться к вычисленному индексу серьёзно и делать какие-то выводы на его основе не стоит.
Запуск анализа производительности
Прежде чем мы сможем узнать индекс производительности системы, потребуется запустить встроенный тест: если ранее он выполнялся автоматически, то в Windows 11 это может не происходить.
Для выполнения анализа используйте следующие шаги:
- Запустите командную строку, лучше (но не обязательно) сделать это от имени администратора, подробнее: Как запустить командную строку от имени администратора в Windows 11. В Windows PowerShell команда также будет исправно работать.
- Введите команду
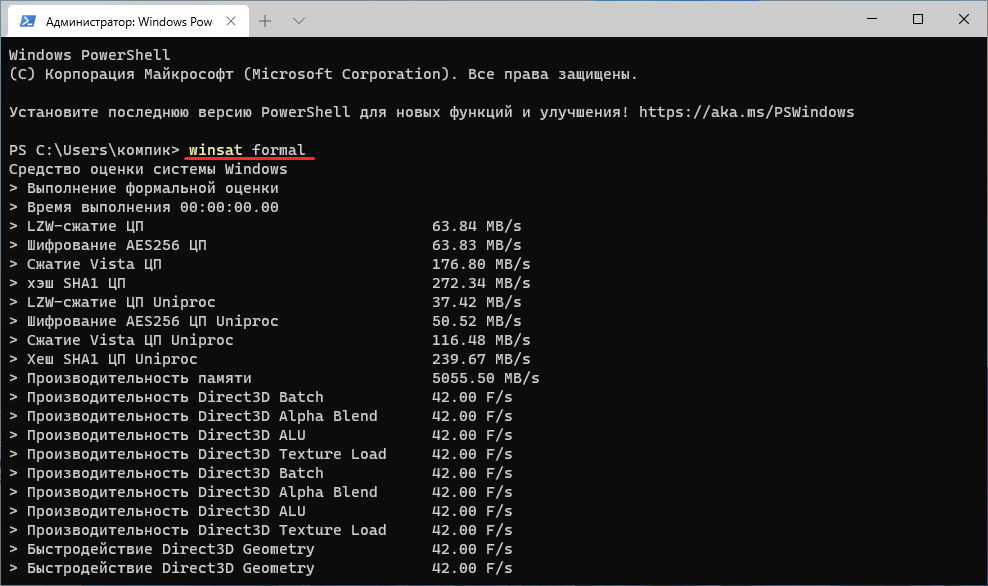
winsat formal -restart clean
и нажмите Enter.

- Дождитесь завершения оценки производительности системы.

Теперь в файлах системы будут сохранены данные проведённого встроенного теста, на основании которого и высчитывается индекс производительности системы, а у пользователя есть возможность посмотреть полученные результаты.
Узнаем индекс производительности Windows 11
Для того, чтобы узнать вычисленный индекс производительности системы можно использовать несколько способов.
Просмотр средствами системы
Первый, не предполагающий использования каких-либо сторонних инструментов — команда PowerShell:
- Запустите Windows PowerShell. Можно использовать поиск в панели задач, а можно нажать правой кнопкой по кнопке «Пуск» и открыть «Терминал Windows», по умолчанию в нём открывается окно PowerShell.
- Введите команду
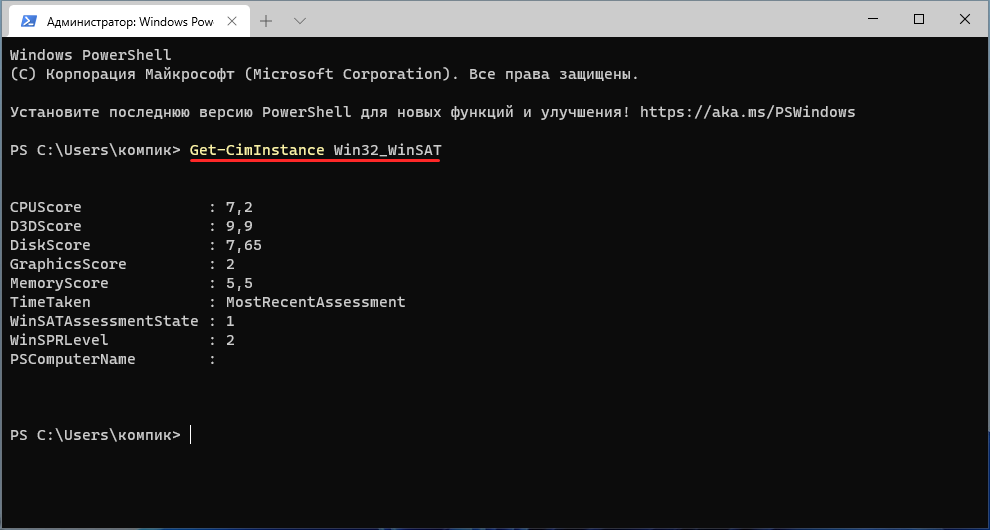
Get-CimInstance Win32_WinSAT
- После выполнения команды вы получите список рассчитанных индикаторов производительности. Наименьшее из значений (без учета пункта WinSATAssesmentState) и будет индексом производительности, оно же отображается в пункте WinSPRLevel.


Перевод каждого из пунктов в отчёте в соответствии с тем, как они были представлены в предыдущих версиях системы:
- CPUScore — процессор
- D3DScore — графика для игр и 3D приложений (на современных системах почти всегда максимум, независимо от видеокарты)
- DiskScore — производительность диска HDD или SSD
- GraphicsScore — графика рабочего стола
- MemoryScore — оперативная память
Эти же данные можно посмотреть вручную, заглянув в папку
C:\Windows\Performance\WinSAT\DataStore
и открыв файл
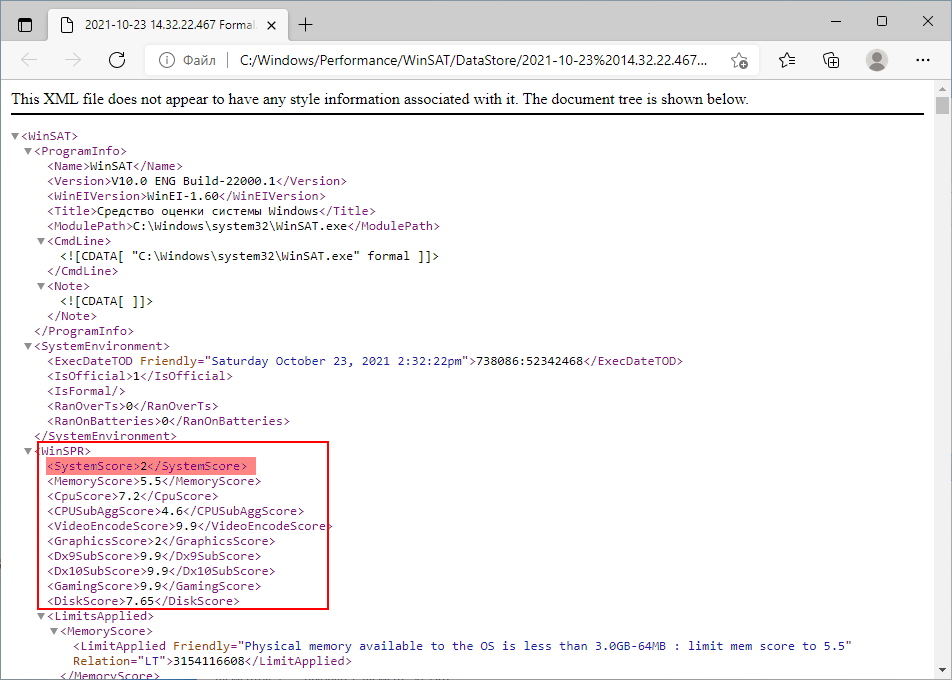
Formal.Assessment (Recent).WinSAT.xml
с помощью любого текстового редактора или браузера.

Внутри этого xml-файла в разделе WinSPR представлены все указанные данные, а общий индекс производительности виден в разделе SystemScore.
Утилита Winaero WEI Tool
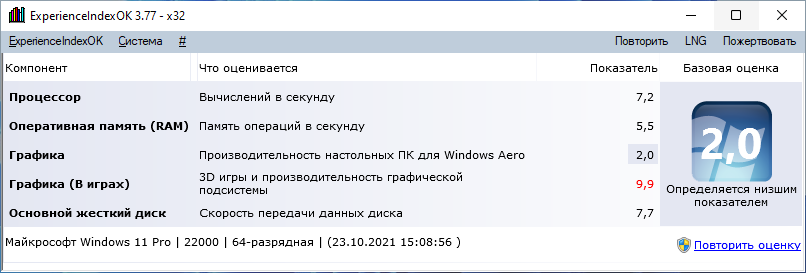
Небольшая сторонняя бесплатная программа позволяет посмотреть индекс производительности Windows 11 в более знакомом графическом интерфейсе: данные она берёт из того же системного файла, а при желании, с помощью этой же программы можно перезапустить тест производительности (Re-run the assessment).

Официальная страница, где можно скачать Winaero WEI Tool — https://winaero.com/download-winaero-wei-tool/ (будьте внимательны, текстовая ссылка на загрузку находится ближе к концу страницы).
Видео инструкция
Напомню то, о чём уже шла речь выше: полученный индекс производительности системы производится по шкале, которой уже много лет, и может быть не вполне объективным для современных систем.
В Windows 8.1 разработчики Microsoft решили скрыть встроенный бенчмарк «Индекс производительности», так как он оказался невостребованным пользователями. Удалять его полностью, однако, разработчики не стали, посчитав, что он ещё может пригодиться тестировщикам и системным администраторам. С того времени ничего не изменилось, и «Индекс производительности» по-прежнему остаётся доступным в Windows, включая последнюю версию операционной системы. Что же, давайте посмотрим, как в новой Windows 11 можно просмотреть показатели этого компонента.
{banner_google1}
Для получения индекса производительности в Windows 11 можно воспользоваться консолью PowerShell. Запустите через меню Win + X Терминал, лучше всего от имени администратора и выполните в нём (вкладка PowerShell открывается по умолчанию) команду Get-CimInstance Win32_WinSAT.
В результате в прямо в консоль будут выведены следующие данные:
• CPUScore — индикатор производительности процессора
• D3DScore — индикатор производительности графики для игр и 3D-программ.
• DiskScore — индикатор производительности жёсткого диска.
• GraphicsScore — индикатор производительности графики рабочего стола.
• MemoryScore — индикатор производительности оперативной памяти.
• WinSPRLevel — средний индекс производительности, как раз то, что и нужно было получить.
Данные индекса производительности хранятся в особом XML-файле Formal.Assessment (Initial).WinSAT, располагающемся в папке C:\Windows\Performance\WinSAT\DataStore.

{banner_google1}
Если в указанном расположении файл отсутствует, его нужно будет сгенерировать командой winsat formal, выполненной в запущенном от имени администратора Терминале Windows 11.
После того как команда отработает, закройте консоль, перейдите в папку с отчётом и откройте приложением по умолчанию. В качестве последнего Windows 11 предлагает использовать браузер. Обратите внимание на содержимое тега WinSPR (он находится вначале файла), значение индекса производительности будет указано во вложенных тегах SystemScore.
Наконец, для получения индекса производительности в Windows 11 вы можете воспользоваться бесплатной портативной утилитой WEI Tool. Эта тулза считывает данные файла Formal.Assessment (Initial).WinSAT и выводит их в своём окне в наглядном удобочитаемом виде. Если файл отсутствует, утилита покажет индекс производительности 0.0, что понятно, так как данные брать неоткуда. В этом случае выполняем оценку производительности нажатием в окне WEI Tool ссылки «Re-run the assessment», что соответствует выполнению команды winsat formal.

WEI Tool — не единственный сторонний инструмент для получения индекса производительности в Windows 8.1, 10 и 11, есть ещё такая утилита как ExperienceIndexOK, работающая по тому же принципу, что и WEI Tool.
А вообще, придавать особое значение индексу произвольности, полученному средствами Windows, не стоит: они слишком поверхностные и слишком общие, чтобы на их основании делать какие-то выводы.
Windows 11 is the latest version of Windows that has been released by Microsoft. It comes with several exciting features, and it is meant to provide a seamless user experience. However, some users might experience lag and slow performance when using it. This is where checking your computer speed comes in.
Checking your computer speed helps you determine the factors that contribute to its slow performance. It helps you identify whether it’s a hardware or software issue, and you can then take the necessary steps to rectify the situation. In this article, we will look at four methods that you can use to check your computer speed in Windows 11.
Video Tutorial:
What’s Needed
To check your computer speed in Windows 11, you need the following:
– A Windows 11 computer
– Internet connectivity
– Keyboard and mouse or touchpad
What Requires Your Focus?
When checking your computer speed in Windows 11, you need to focus on the following:
1. Start with the basics: Ensure that your computer is not overheating, and that all the cables and wires are properly connected.
2. Identify the possible causes of slow performance: This could be due to malware, outdated drivers, insufficient RAM, or outdated software.
3. Determine which method to use: There are several methods that you can use to check your computer speed in Windows 11, and you need to choose the most appropriate one based on your situation.
Here are four methods that you can use to check your computer speed in Windows 11:
Method 1: Using Windows Task Manager
Windows Task Manager is a built-in utility in Windows computers that lets you monitor the performance of your computer. Here’s how to use it:
1. Press Ctrl + Shift + Esc to open Task Manager.
2. Click on the Performance tab.
3. You will see a graph that shows you the usage of your CPU, Memory, Disk, and Wi-Fi. This will give you an idea of which component is causing your computer to slow down.
4. Click on the Details tab to see which processes are using up your CPU and memory the most.
Pros:
– It’s already built-in in Windows 11
– It’s straightforward to use
Cons:
– It doesn’t give you an in-depth analysis of your computer speed
– It doesn’t provide you with a benchmark score
Method 2: Using Windows Performance Monitor
Windows Performance Monitor is a more advanced tool that provides an in-depth analysis of your computer’s performance. Here’s how to use it:
1. Type «Performance Monitor» in the search bar and click on it.
2. Click on «+» to add counters.
3. Select the counter category you want to add. For example, «Memory» or «CPU.«
4. Select the specific counter you want to monitor. For example, «Available MBytes» or «% Processor Time.«
5. Click on «Add» and repeat steps 3-5 for other categories/counters that you want to monitor.
6. After adding all the counters you want, click on «OK.«
7. Wait for the Performance Monitor to gather data.
8. You can then analyze the data and identify which component is causing your computer to slow down.
Pros:
– Provides an in-depth analysis of your computer speed
– You can customize which counters to monitor
Cons:
– It can be overwhelming for beginners
– You need to have an understanding of system performance counters
Method 3: Using UserBenchmark
UserBenchmark is a third-party software that tests the performance of your computer against other similar systems. Here’s how to use it:
1. Download and install UserBenchmark.
2. Run the program and click on «Run.«
3. Wait for the benchmark process to complete.
4. You will then be provided with a performance score for your computer, and you can compare it with other similar systems.
Pros:
– Provides an objective benchmark score
– Easy to use
Cons:
– It can be time-consuming
– It doesn’t provide any in-depth analysis
Method 4: Using PassMark PerformanceTest
PassMark PerformanceTest is another third-party software that provides an in-depth analysis of your computer’s performance and an objective benchmark score. Here’s how to use it:
1. Download and install PassMark PerformanceTest.
2. Run the program and click on «Run Benchmark.«
3. Wait for the benchmark process to complete.
4. You will then be provided with a performance score for your computer, and you can compare it with other similar systems.
Pros:
– Provides an objective benchmark score
– Provides an in-depth analysis of your computer’s performance
Cons:
– It’s not a free software
– It can take some time to complete the benchmark process
Why Can’t I Check My Computer Speed In Windows 11?
There are several reasons why you might not be able to check your computer speed in Windows 11:
1. Malware: Malware can significantly slow down your computer’s performance, and it might prevent you from using certain tools to check your speed.
2. Incompatible software: Some software might not be compatible with Windows 11, and attempting to run it might cause your computer to crash or freeze.
3. Hardware issues: If your computer’s hardware is damaged or faulty, it might prevent you from using certain tools to check your speed.
Fixes:
1. Scan your computer for malware and remove any threats that are found.
2. Ensure that all your software is up-to-date and compatible with Windows 11.
3. Check your computer’s hardware components to ensure that they are functioning correctly.
Implications and Recommendations
Checking your computer speed is an essential task that helps you identify the factors that contribute to its slow performance. By using one of the methods discussed in this article, you can determine whether your computer is experiencing a hardware or software issue, and you can then take the necessary steps to rectify it.
Some recommendations for maintaining your computer speed include:
1. Regularly scan your computer for malware and remove any threats that are found.
2. Keep your software up-to-date and ensure that it’s compatible with Windows 11.
3. Regularly clean your computer’s hardware components to prevent dust and debris from affecting their performance.
FAQs
Q: Can I check my computer speed using an online tool?
A: Yes, there are several online tools that you can use to check your computer speed. Some popular ones include Speedtest.net and Fast.com.
Q: What should I do if my computer speed is slow?
A: You can try the following steps to improve your computer’s speed:
– Uninstall any unnecessary software
– Perform a disk cleanup
– Increase your computer’s RAM
– Upgrade your hard drive to an SSD
Q: How often should I check my computer speed?
A: It’s recommended that you check your computer speed at least once every three to six months. This helps you identify any issues before they become more significant problems.
Q: Will checking my computer speed affect my computer’s performance?
A: No, checking your computer speed should not affect your computer’s performance. It’s a passive task that runs in the background and does not require a lot of resources.
Q: How can I prevent my computer from overheating?
A: You can prevent your computer from overheating by doing the following:
– Ensure that it’s placed on a flat and stable surface
– Keep it in a well-ventilated area
– Use a cooling pad or a fan to dissipate heat
– Clean the dust and debris from your computer’s fans and heatsinks regularly
In Conclusion
Checking your computer speed is an essential task that helps you identify the factors that contribute to its slow performance. By using the methods discussed in this article, you can determine whether your computer is experiencing a hardware or software issue, and you can then take the necessary steps to rectify it. Remember to regularly scan your computer for malware, keep your software up-to-date, and ensure that your computer’s hardware components are functioning correctly to maintain its speed.
Windows Performance Monitor is an excellent tool for testing the system performance. It can generate detailed reports that include many useful diagnostics that can help troubleshoot everyday system issues.
The computer performance benchmark test enables users to assess the computer’s performance and troubleshoot issues that may be hidden deep inside. This will provide better guidance if you need to change your hardware configuration or software only.
This will also give you a better understanding of how fast your PC can run for a specific task. For example, gaming graphics score will tell you which types of games you can play on your system without any issues.
Performance monitor features diagnostics and performance reports. Speaking specifically about performance reports, the Windows 11/10 Performance Test report includes the following:
- Summary which includes the general performance of CPU, Disk, Network, and Memory.
- Diagnostics results.
- Detailed stats for CPU.
- Detailed stats for Network.
- Detailed stats for Disk. (primary hard disk score + connected storage devices)
- Report Statistics.
Table of Contents
In this article, we will discuss creating useful performance reports for the Windows operating system. This will help us troubleshoot our daily system issues.
Apart from the Performance Monitor Tool, there are also other methods to determine how your system works, which are discussed further down this post.
Create a System Performance Report in Windows 11/10
Windows includes two built-in data sets, which can be run to create a general report of different system metrics.
- System Diagnostics
- System Performance
Let’s generate a system performance report.
-
Type in perfmon in the Run Command box.
Run Performance Monitor (perfmon) -
From the left pane, expand “Data Collector Sets” and then expand “System.”

Expand directories -
Now right-click System Performance and then click Start from the context menu.
Starting System Performance Data Set to generate report -
The data set will run for 60 seconds. You can continue your work in the meantime. After one minute, a new report will be published under Reports >> System >> System Performance, which you can now access.

Windows Performance Test Report


This will give you an overview of how the system is running. For example, if you see in the Summary section, you will know about the top process, which is using the most CPU, the top apps, which are using network bandwidth, and also the top outbound and inbound IP addresses. The summary will also tell you about the apps, which take up a lot of memory.
For troubleshooting, check which system resources are being used more than usual. For example, if the disk is being choked, go to the Disk details section below and check which files and processes use the most disk time. The disk breakdown will tell you which processes consume the most disks.
Create a Custom Performance Report in Windows 11/10
If you have specific requirements, you can also create custom reports in Performance Monitor. To create a custom report, you will need to create a custom data collector set.
-
Type in perfmon in the Run Command box.
Run Performance Monitor (Perfmon) -
In the left pane, expand “Data Collector Sets,” right-click User Defined, and then expand New and click Data Collector Set.

New custom data collector set -
Give a name to your data collector set, select the “Create manually (Advanced)” radio button, and then click Next.
Name your data collector set -
On the next screen, select the type of data to include in the monitoring and report and click Next.
Type of data to include in data set -
Now click Add and add performance counters specific to your requirements. Click OK when done.

Add performance counters of your choice Click Next on the Create new Data Collector Set wizard.
-
Now select the event trace providers you want to enable. Leave it black if you don’t know about this. Click Next when done.

Event trace providers -
You can also add registry keys to the performance report to monitor. Once done, click Next.
Monitoring registry in performance test -
Now add your report saving location and click Next.
Save your performance report data -
You can also select the user under which this performance counter should run. Once done, click Finish.
Note: You must log in as an administrator to run performance reports.
Select user to run task as -
You will now see the custom Performance Data Set on the left pane under User Defined. Right-click on it and then click Start from the context menu.
Starting Custom Performance Data Set to generate report If you want to stop the data collector setting, right-click it and select Stop.
-
This will create a new report under Reports >> User Defined.
Custom Performance Report


The Windows Performance Monitor tool is helpful, especially for IT admins and support staff. They can easily run the performance report while the user is working on his or her computer, and then see what is going wrong.
If you are on a Microsoft domain network, the performance monitor tool can also be run on remote computers. You just have to run the performance monitor as a domain admin and select the computer on which you want to run the reports.

Check Windows Experience Index Score for Windows 11/10
The Windows Experience Index is a built-in Windows tool that scores the different hardware and software components of your system that defines how each of them will perform.
Previously, Microsoft provided a GUI-based app for this, but it was removed from Windows 11. You can still generate a report using the Windows Command Prompt.
Before we show you how to generate a Windows Experience Index report, it is important to understand what the score ranges mean. The report individually rates the following system components:
- System
- Memory
- CPU
- Video encoding
- Graphics
- Direct X
- Gaming
- Disk
The table below illustrates what the different scores mean and how capable the component is.
| Base score up to | Description |
| 2.0 | Suitable for basic computer tasks |
| 3.0 | Suitable for Aero and basic level Windows 7 features |
| 5.0 | Suitable for new Windows 7 features and multi-tasking |
| 7.0 | Suitable for high-end and graphics-intensive experiences |
| 10.0 | Suitable for graphics-intensive and heavy workloads |
Let us now show you how to generate the Experience Index in Windows 11 or 10.
Run computer performance benchmark test using Command Prompt
Windows System Assessment Tool (WinSAT) is a tool built into Windows (Windows Vista to Windows 11) that measures the system performance capabilities and reports them as Windows Experience Index (WEI) score on a scale of 1.0 to 9.9 (9.9 being the best performance possible).
Let’s check out how to run the WinSAT tool in any Windows version, from Windows Vista to Windows 11.
-
Open Command Prompt with elevated privileges (run as administrator) and then run the following cmdlet:
winsat formal
Run winsat formal cmdlet This will now begin generating a report. Please wait for the process to be completed.
-
Once the command is successfully and completely executed, navigate to the following location using File Explorer:
C:\Windows\Performance\WinSAT\DataStore
-
Here, look for a file with the date you ran the test on, having a similar syntax to this one, and double-click it:
[date of test] [some numbers] Formal.Assessment (Recent).WinSAT.xml

Open the report Note: If asked to select an app to open the XML file, choose a supported web browser.
-
The report will now open inside a browser. The Windows Experience Scores are usually listed near to the top of the report, under the heading “<WinSPR>”

See Windows Experience Index scores


This will give you an understanding of the individual components and where you need to improve. For example, if you find that the score for memory is unsatisfactory, then you can add more RAM modules to improve it.
Generate a system performance report using Windows PowerShell
Alternatively, you can also run a cmdlet in Windows PowerShell to see the Windows Experience Index. Please note that this method does not generate a detailed report, but only displays the scores inside the PowerShell window, which will be lost when you close it.
-
Open PowerShell with administrative rights and run the following cmdlet:
Get-CimInstance Win32_WinSat
Run winsat in PowerShell -
You can now see the Windows Experience Index scores for the different system components, as in the image above.

The 2 command-line methods discussed above generate reports for all components. However, if you want to run specific scans, you can use the cmdlets given in the table below instead:
| Commands | Description |
| winsat formal | Runs the full assessment. |
| winsat dwmformal | Runs only the Desktop Windows Manager assessment which generates the graphics score. |
| winsat cpuformal | Runs only the CPU assessment to generate the processor score. |
| winsat memformal | Runs only the memory assessment to generate the memory (RAM) score. |
| winsat graphicsformal | Runs the graphics assessment to generate the gaming graphics score. |
| winsat diskformal | Runs the disk assessment to generate the primary hard disk score. |
| winsat cpu | Tests the processor. |
| winsat mem | Tests the memory. |
| winsat disk | Tests connected storage devices. |
| winsat d3d | Assesses the Direct 3D application abilities. |
| winsat media | Tests media capabilities. |
| winsat mfmedia | Windows Media Foundation assessment. |
| winsat features | Runs the features assessment. |
| winsat dwm | Runs the Desktop Windows Manager assessment. |
| winsat prepop | Pre-populates WinSAT assessment results. |
Using WinAero Windows Experience Index Tool
Since Microsoft has deprecated the Windows Experience Index tool, WinAero has made a similar tool that you can run on your PC to check the performance of the individual components. The look and feel of the tool are almost like the original Microsoft WEI tool.
Click on the given link below to download the WinAero WEI tool:
Download WinAero WEI Tool
When downloaded, extract the contents and run the WEI application which will instantly show the WEI score.

Closing Words
Getting a detailed report on your system’s hardware and other components helps you proactively mitigate any issues. For example, you can improve your graphics card before running a graphics-intensive game or app.
Have you ever run a Windows Performance Test? Is it helpful in troubleshooting your everyday computer problems?
Applies ToWindows 11
Приложение «Проверка работоспособности ПК» предоставляет вам актуальные сведения о работоспособности вашего устройства с Windows, помогает выполнять действия для повышения производительности устройства и устранять неполадки с производительностью. Оно периодически обновляется на основе отзывов пользователей, чтобы вы могли использоваться все возможности своего компьютера с Windows.

Как открыть приложение «Проверка работоспособности ПК»
В Windows воспользуйтесь поиском на панели задач для поиска по запросу Проверка работоспособности ПК, а затем выберите это приложение в списке результатов.
Если доступно обновление для приложения «Проверка работоспособности ПК», вы можете быстро установить его для получения последней версии.
Если у вас не установлена Проверка работоспособности ПК, ее можно установить, перейдя на страницу https://aka.ms/GetPCHealthCheckApp и следуя инструкциям по скачиванию и установке приложения.
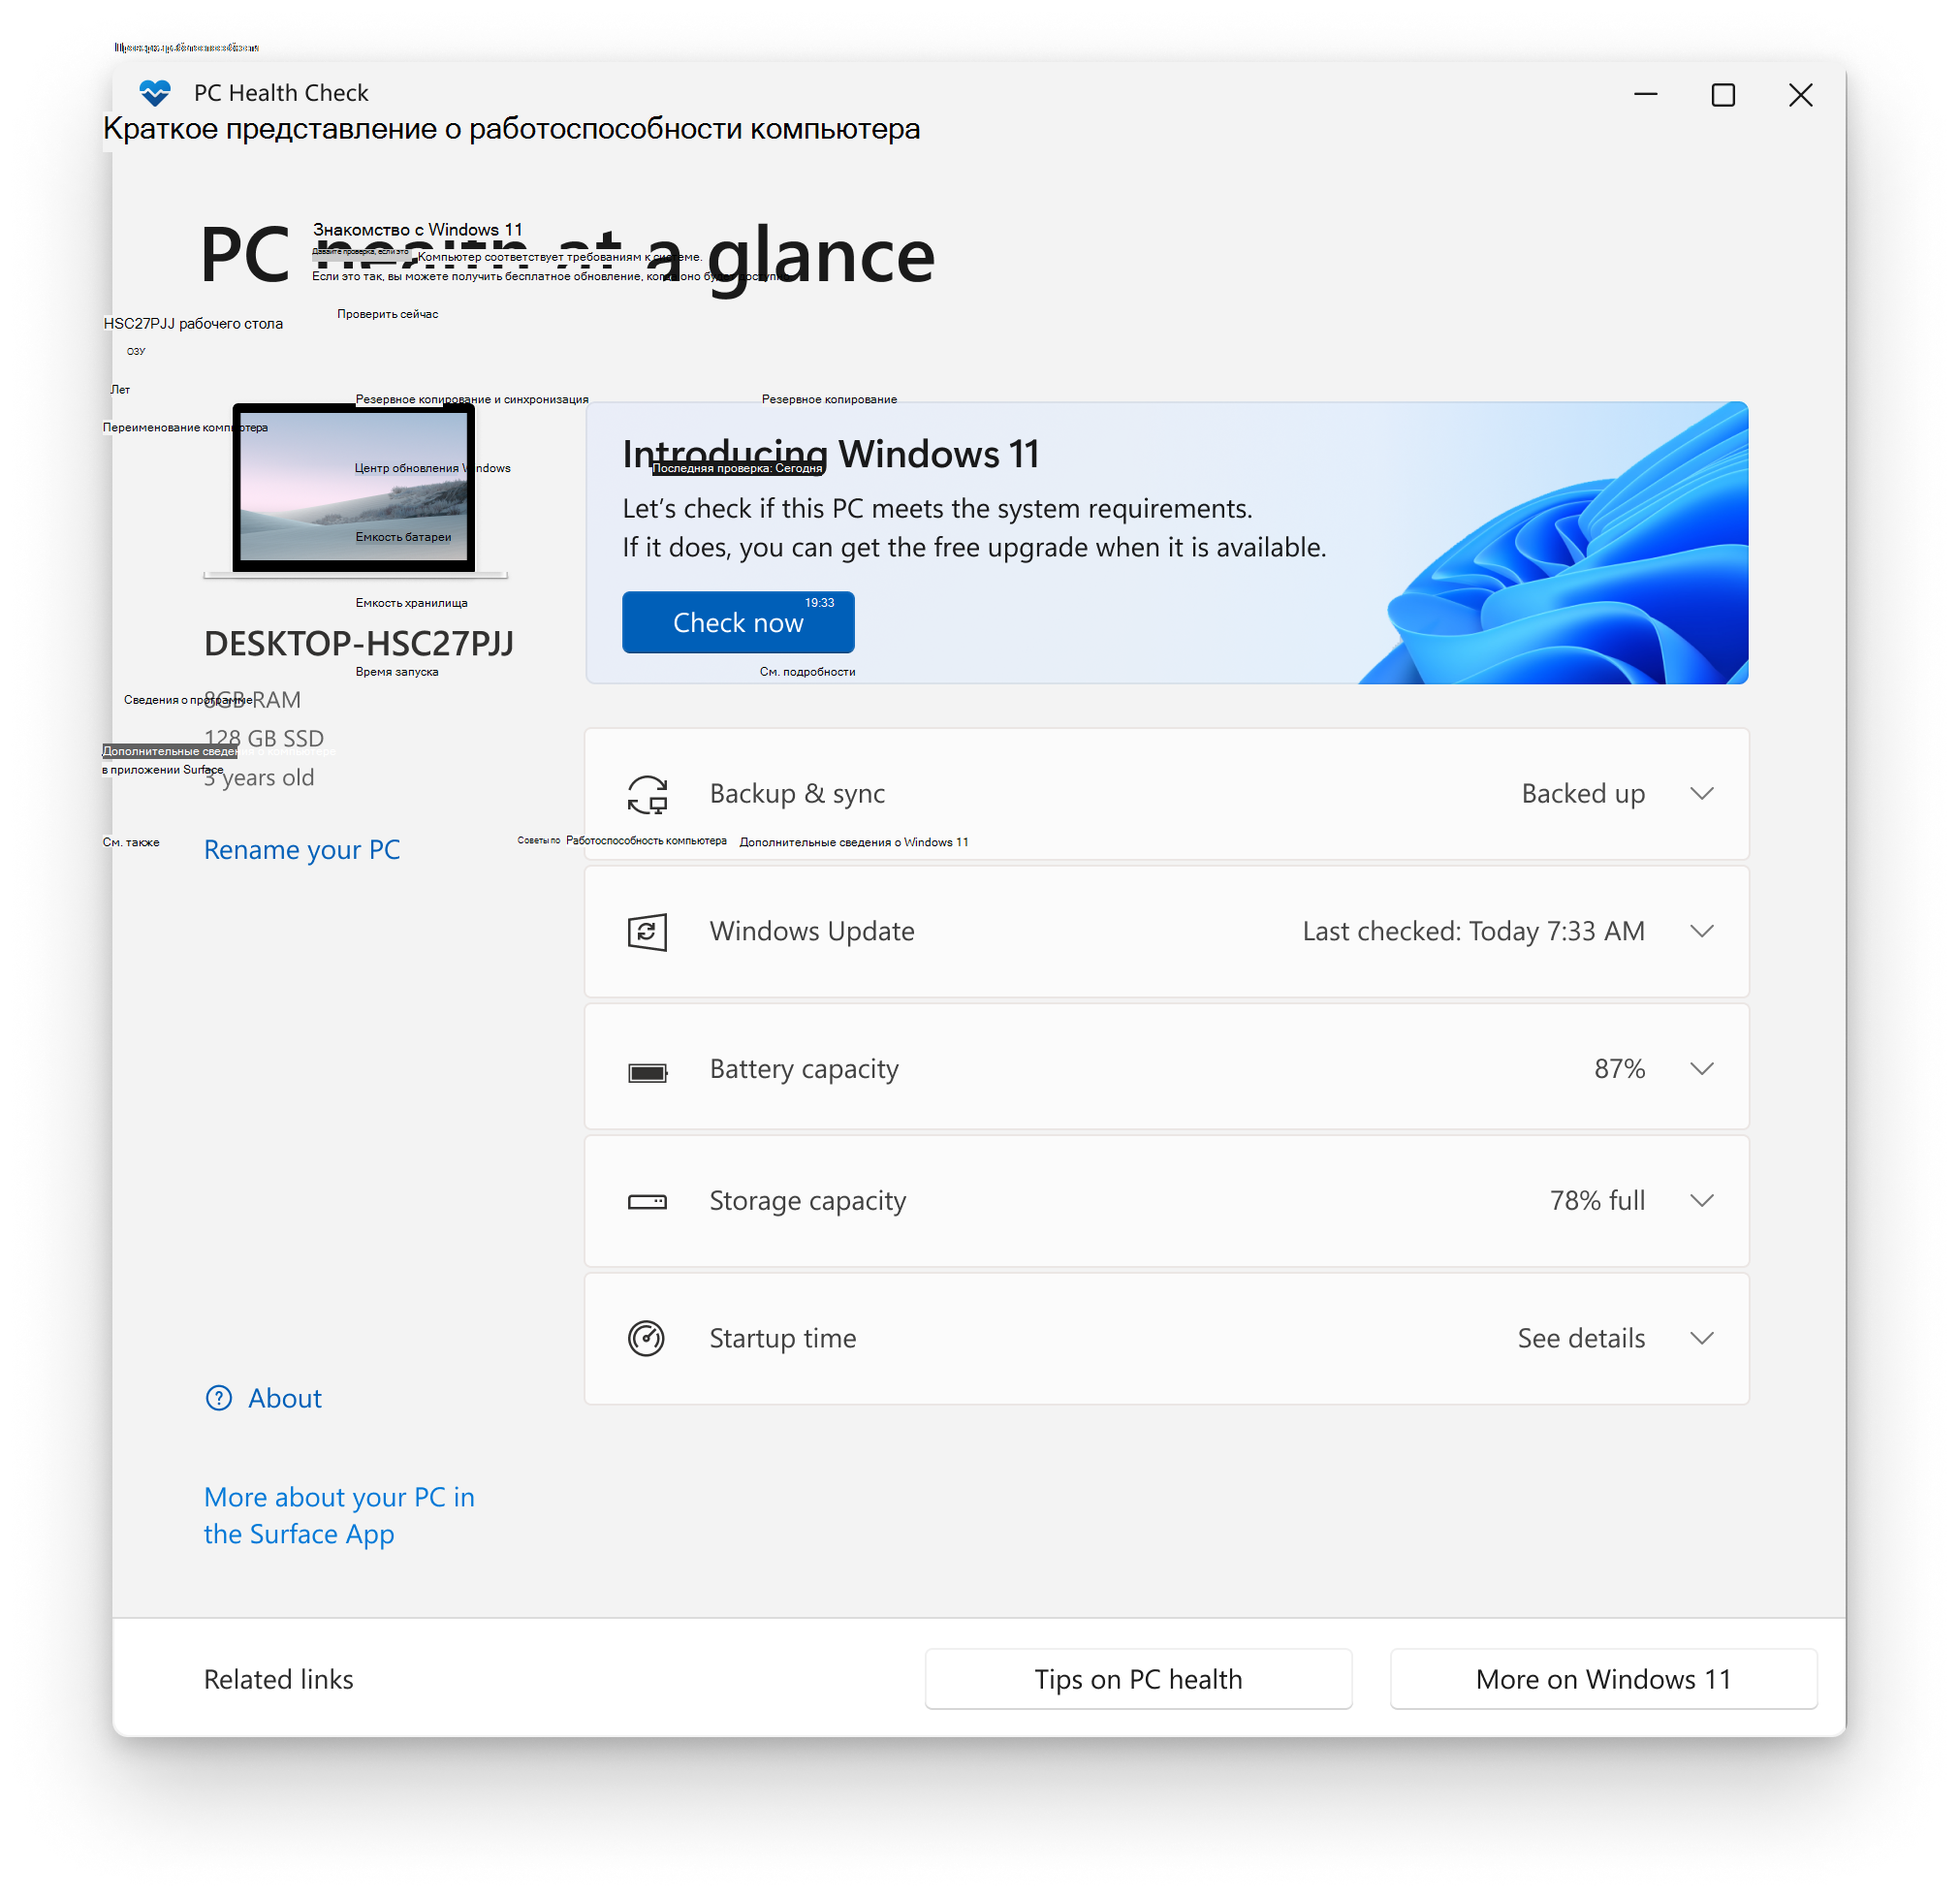
Вот некоторые действия, которые можно выполнить в приложении «Проверка работоспособности ПК» в Windows:
Если вы в настоящее время используете Windows 10, приложение «Проверка работоспособности ПК» обеспечивает комплексную проверку вашего устройства, чтобы убедиться, что оно соответствует минимальным системным требованиям Windows 11. Вы получите сведения о том, почему ваше устройство соответствует или не соответствует требованиям, а также информацию о том, что можно сделать, если устройство не соответствует требованиям.
Выберите Проверить сейчас, чтобы проверить, можно ли запустить Windows 11 на вашем устройстве.
Примечание: Если на вашем устройстве обнаружена проблема совместимости, которая нарушила работу с Windows 11, мы временно отложим обновление, пока проблема не будет устранена. Ограничения по обеспечению совместимости помогают предоставить наилучшие возможности при обновлении, а производительность не будет нарушена, если критически важные приложения или драйверы еще не совместимы.
Войдите в свою учетную запись Майкрософт или создайте новую для синхронизации ваших настроек на устройствах, например паролей, параметров браузера Microsoft Edge, таких как избранное, списки для чтения, темы и т. д.
Вы также можете создать резервные копии своих фотографий и файлов в OneDrive. После этого они будут защищены и доступны на всех ваших устройствах.
Регулярные обновления Windows помогают обеспечить бесперебойную работу и безопасность устройства. Если ваше устройство не обновлено или требует внимания, приложение «Проверка работоспособности ПК» сообщит вам об этом.
Выберите Открыть Центр обновления Windows, чтобы перейти непосредственно к Центру обновления Windows в параметрах.
В этом разделе приложения «Проверка работоспособности ПК» вы можете получить сведения о показателях работы ваших батарей по сравнению с их исходной емкостью для устройств с одной или двумя батареями. Емкость батареи будет доступна для устройств старше 3 лет.
Выберите См. советы по экономии заряда, чтобы ознакомиться с действиями для улучшения работы батареи.
Узнайте, сколько места используется для основного диска устройства, который содержит ваши файлы, приложения и Windows. Вы увидите процент заполнения вашего диска.
Разверните этот раздел приложения, чтобы узнать, сколько свободного места осталось. Выберите Управление параметрами хранилища, чтобы включить Контроль памяти или получить другие рекомендации по очистке.
Получите сведения о времени запуска вашего устройства, а также о том, что влияет на это время. Выберите Управление автозапуском программ, чтобы просмотреть и изменить приложения, запускаемые автоматически.
Вы можете найти дополнительные сведения о своем устройстве под его изображением, включая возраст устройства и объем хранилища. Выберите Переименовать компьютер, чтобы присвоить устройству другое имя.
Диспетчер ПК
|
В этом случае также может оказаться полезным приложение «Диспетчер ПК». Для получения дополнительных сведений см. Диспетчер ПК (Майкрософт). Примечание: Диспетчер ПК (Майкрософт) доступен не во всех регионах. |
Статьи по теме
-
Подготовка к обновлению до Windows 11
-
Как проверить, соответствует ли ваше устройство системным требованиям Windows 11 после изменения оборудования устройства
Нужна дополнительная помощь?
Нужны дополнительные параметры?
Изучите преимущества подписки, просмотрите учебные курсы, узнайте, как защитить свое устройство и т. д.