
What is Tesseract OCR?
Tesseract is an open-source software library, released under Apache license agreement. It was originally developed by Hewlett Packard in 1980s. It is a text recognition tool primarily used for identifying and extracting texts from images. Tesseract OCR provides a command prompt interface for performing this functionality.
How to Download Tesseract OCR in Windows
- Download Tesseract Installer for Windows
- Install Tesseract OCR
- Add installation path to Environment Variables
- Run Tesseract OCR
1. Download Tesseract Installer for Windows
To use Tesseract command on Windows, we first need to download Tesseract OCR binaries .exe Windows Installer.
There are many places where people can download the latest version of Tesseract OCR. Once such place is from UB Mannheim, which is forked from tesseract-ocr/tesseract (Main Repository).

Tesseract Wiki
Download the tesseract-ocr-w64-setup-5.3.0.20221222.exe (64 bit) Windows Installer.
Tesseract can be installed in Python prompt on macOS using either of the commands below:
brew install tesseractsudo port install tesseract2. Install Tesseract OCR
Next, we’ll install Tesseract using the .exe file that we downloaded in the previous step. Launch the .exe installer to start Tesseract installation.
Installer Language
Once the unpacking of the setup is completed, the installer’s language data dialog will appear. You can install Tesseract to use multiple languages by selecting additional language packs, but here we’ll just install the language data for the English language.
Tesseract Installer
Click OK and the Installer language for Tesseract OCR is set.
Tesseract OCR Setup
Next, the setup wizard will appear. This Setup Wizard will guide the Tesseract installation for Windows.

Tesseract OCR Setup Wizard
Click Next to continue the installation.
Accept License Agreement
Tesseract OCR is licensed under Apache License Version 2.0. As it is open source and free to use, you can redistribute and modify versions of Tesseract without any loyalty concerns.

Tesseract OCR is licensed under Apache License v2.0. Please accept this license to continue with the installation.
Click I Agree to proceed to installation.
Choose Users
You can choose to install Tesseract for multiple users or for a single user.

Choose to install Tesseract OCR for the Current User (you) or for all user accounts
Click Next to choose components to install with Tesseract.
Choose Components
From the components list to install, ScrollView, Training Tools, Shortcuts creation, and Language data are all selected by default. We will keep all of the default selected options. You can choose any or skip any component based on the needs. Usually all are necessary to install.

Here, you can choose to include or exclude Tesseract OCR components. For the best results, continue the installation with the default components selected.
Click Next to choose installation location.
Choose Installation Location
Next, we’ll choose the location to install Tesseract. Make sure you copy the destination folder path. We will need this later to add the installation location to the machine’s path Environment Variable.

Select a install location for the Tesseract OCR library, and remember this location for later.
Click Next to further setup the installation of Tesseract.
This is the last step in which we will create shortcuts in Start menu. You can name the folder anything but I’ve kept it the same as default.

Choose the name of Tesseract OCR’s Start Menu Folder
Now, click Install and wait for the installation to complete. Once the installation is done, following screen will appear. Click Finish and we are done with installing Tesseract OCR in Windows successfully.

Tesseract OCR Installation is now complete.
3. Add Installation Path to System Environment Variables
Now, we will add the Tesseract installation path to Windows’ Environment Variables.
In the Start menu, type «environment variables» or «advanced system settings«

The Windows System Properties Dialog Box
System Properties
Once the System Properties dialog box opens, click on the Advanced, and then click the Environment Variables button, located towards the bottom right of the screen.
The Environment Variables dialog box will be presented to you.
Environment Variables
Under System variables, click on the Path variable.

Accessing the Windows’ System Environment Variables
Now, click Edit.
Add Tesseract OCR for Windows Installation Directory to Environment Variables
From the Edit environment variable dialog box, click New. Paste the installation location path which was copied during the second step, and click OK.

Edit Windows’ Path System Environment Variable by adding an entry that includes the Absolute path to the Tesseract OCR installation
That’s it! We have successfully downloaded, installed, and set the environment variable for Tesseract OCR in Windows machine.
4. Run Tesseract OCR
To check that Tesseract OCR for Windows was successfully installed and added to Environment Variables, open Command prompt (cmd) on your Windows machine, then run the «tesseract» command. If everything worked fine, then a quick explanation usage guide must be displayed with OCR and single options such as Tesseract version.

Run the tesseract command in Windows Commandline (or Windows Powershell) to make sure that the above installation steps were done correctly. The console output is the expected result of a successful Windows installation.
Congratulations! We have successfully installed Tesseract OCR for Windows.
IronOCR Library
IronOCR is a Tesseract-based C# library that allows .NET software developers to identify and extract text from images and PDF documents. It is purely built in .NET, using the most advanced Tesseract engine known anywhere.
Install with NuGet Package Manager
Installing IronOCR in Visual Studio or using Command line with the NuGet Package Manager is very easy. In Visual Studio, navigate to the Menu options with:
Tools > NuGet Package Manager > Package Manager Console
Then in Command line, type the following command:
This will install IronOCR with ease and now you can use it to extract its full potential.
You can also download other IronOCR NuGet Packages for different platforms:
- Windows: https://www.nuget.org/packages/IronOcr
- Linux: https://www.nuget.org/packages/IronOcr.Linux
- MacOs: https://www.nuget.org/packages/IronOcr.MacOs
- MacOs ARM https://www.nuget.org/packages/IronOcr.MacOs.ARM
IronOCR with Tesseract 5
The below sample code shows how easy it is to use IronOCR Tesseract to read text from an image and perform OCR using C#.
string Text = new IronTesseract().Read(@"test-files/redacted-employmentapp.png").Text;
Console.WriteLine(Text); // Printed text
string Text = new IronTesseract().Read(@"test-files/redacted-employmentapp.png").Text;
Console.WriteLine(Text); // Printed textDim Text As String = (New IronTesseract()).Read("test-files/redacted-employmentapp.png").Text
Console.WriteLine(Text) ' Printed text$vbLabelText $csharpLabel
If you want more robust code, then the following should help you in achieving the same task:
using IronOcr;

var Ocr = new IronTesseract();
using (var Input = new OcrInput()){
    Input.AddImage("test-files/redacted-employmentapp.png");
    // you can add any number of images
    var Result = Ocr.Read(Input);
    Console.WriteLine(Result.Text);
}
using IronOcr;
var Ocr = new IronTesseract();
using (var Input = new OcrInput()){
Input.AddImage("test-files/redacted-employmentapp.png");
// you can add any number of images
var Result = Ocr.Read(Input);
Console.WriteLine(Result.Text);
}Imports IronOcr
Private Ocr = New IronTesseract()
Using Input = New OcrInput()
Input.AddImage("test-files/redacted-employmentapp.png")
' you can add any number of images
Dim Result = Ocr.Read(Input)
Console.WriteLine(Result.Text)
End Using$vbLabelText $csharpLabel
Input Image

Sample input image for IronOCR processing
Ouput Image
The output is printed on the Console as:

The console returned from the execution of IronOCR on the sample image.
Why Choose IronOCR?
IronOCR is very easy to install. It provides a complete and well-documented .NET software library.
IronOCR achieves a 99.8% text-detection accuracy rate without the need for other third-party libraries or webservices.
It also provides multithreading support. Most importantly, IronOCR can work with well over 125 international languages.
Conclusion
In this tutorial, we learned how to download and install Tesseract OCR for Windows machine. Tesseract OCR is an excellent software for C++ developers but however it has some limits. It is not fully developed for .NET. Scanned image files or photographed images need to be processed and standardized to high-resolution, keeping it free from digital noise. Only then, Tesseract can accurately work on them.
In contrast, IronOCR can work with any image provided whether scanned or photographed, with just a single line of code. IronOCR also uses Tesseract as its internal OCR engine, but it is very finely tuned to get the best out of Tesseract especially built for C#, with a high performance and improved features.
You can download the IronOCR software product from this link.
Tesseract is an open source text recognition (OCR) Engine, available under the Apache 2.0 license. It can be used directly, or (for programmers) using an API to extract printed text from images. It supports a wide variety of languages.
Tesseract doesn’t have a built-in GUI, but there are several available from the 3rdParty page.
Installation
There are two parts to install, the engine itself, and the traineddata for the languages.
Tesseract is available directly from many Linux distributions. The package is generally called ‘tesseract’ or ‘tesseract-ocr’ — search your distribution’s repositories to find it.
Packages for over 130 languages and over 35 scripts are also available directly from the Linux distributions. The language traineddata packages are called ‘tesseract-ocr-langcode’ and ‘tesseract-ocr-script-scriptcode’, where langcode is three letter language code and scriptcode is four letter script code.
Examples: tesseract-ocr-eng (English), tesseract-ocr-ara (Arabic), tesseract-ocr-chi-sim (Simplified Chinese), tesseract-ocr-script-latn (Latin Script), tesseract-ocr-script-deva (Devanagari script), etc.
** FOR EXPERTS ONLY. **
If you are experimenting with OCR Engine modes, you will need to manually install language training data beyond what is available in your Linux distribution.
Various types of training data can be found on GitHub. Unpack and copy the .traineddata file into a ‘tessdata’ directory. The exact directory will depend both on the type of training data, and your Linux distribution. Possibilities are /usr/share/tesseract-ocr/tessdata or /usr/share/tessdata or /usr/share/tesseract-ocr/4.00/tessdata.
Training data for obsolete Tesseract versions =< 3.02 reside in another location.
Platforms
If Tesseract is not available for your distribution, or you want to use a newer version than they offer, you can compile your own.
Ubuntu
You can install Tesseract and its developer tools on Ubuntu by simply running:
sudo apt install tesseract-ocr
sudo apt install libtesseract-dev
Note for Ubuntu users: In case apt is unable to find the package try adding universe entry to the sources.list file as shown below.
sudo vi /etc/apt/sources.list

Copy the first line "deb http://archive.ubuntu.com/ubuntu bionic main" and paste it as shown below on the next line.
If you are using a different release of ubuntu, then replace bionic with the respective release name.

deb http://archive.ubuntu.com/ubuntu bionic universe
Debian packages
- Tesseract 4
- Tesseract 5
- Tesseract 5 (devel)
Raspbian packages
- Tesseract 4
- Tesseract 5
- Tesseract 5 (devel)
Ubuntu packages
- Tesseract 4
- Tesseract 5
- Tesseract 5 (devel)
Ubuntu ppa
- Tesseract 4
- Tesseract 5
- Tesseract 5 (devel-daily)
RHEL/CentOS/Scientific Linux, Fedora, openSUSE packages
- Tesseract 4
- Tesseract 5
See Installation on OpenSuse page for detailed instructions.
AppImage
Instruction
- Download AppImage from releases page
- Open your terminal application, if not already open
- Browse to the location of the AppImage
- Make the AppImage executable:
$ chmod a+x tesseract*.AppImage - Run it:
./tesseract*.AppImage -l eng page.tif page.txt
AppImage compatibility
- Debian: ≥ 10
- Fedora: ≥ 29
- Ubuntu: ≥ 18.04
- CentOS ≥ 8
- openSUSE Tumbleweed
Included traineddata files
- deu — German
- eng — English
- fin — Finnish
- fra — French
- osd — Script and orientation
- por — Portuguese
- rus — Russian
- spa — Spanish
snap
For distributions that are supported by snapd you may also run the following command to install the tesseract built binaries(Don’t have snapd installed?):
sudo snap install --channel=edge tesseract
The traineddata is currently not shipped with the snap package and must be placed manually to ~/snap/tesseract/current.
macOS
You can install Tesseract using either MacPorts or Homebrew.
A macOS wrapper for the Tesseract API is also available at Tesseract macOS.
MacPorts
To install Tesseract run this command:
sudo port install tesseract
To install any language data, run:
sudo port install tesseract-<langcode>
List of available langcodes can be found on MacPorts tesseract page.
Homebrew
To install Tesseract run this command:
The tesseract directory can then be found using brew info tesseract,
e.g. /usr/local/Cellar/tesseract/3.05.02/share/tessdata/.
Windows
Installer for Windows for Tesseract 3.05, Tesseract 4 and Tesseract 5 are available from Tesseract at UB Mannheim. These include the training tools. Both 32-bit and 64-bit installers are available.
An installer for the OLD version 3.02 is available for Windows from our download page.
This includes the English training data.
If you want to use another language, download the appropriate training data,
unpack it using 7-zip, and copy the .traineddata file into the ‘tessdata’ directory, probably C:\Program Files\Tesseract-OCR\tessdata.
To access tesseract-OCR from any location you may have to add the directory where the tesseract-OCR binaries are located to the Path variables, probably C:\Program Files\Tesseract-OCR.
Experts can also get binaries build with Visual Studio from the build artifacts of the Appveyor Continuous Integration.
Cygwin
Released version >= 3.02 of tesseract-ocr are part of Cygwin
The latest version available is 4.1.0. Please see announcement.
MSYS2
Install tesseract-OCR:
pacman -S mingw-w64-{i686,x86_64}-tesseract-ocr
and the data files:
pacman -S mingw-w64-{i686,x86_64}-tesseract-data-eng
In the above command, “eng” may be replaced with the ISO 639 3-letter language code for supported languages. For a list of available language packages use:
pacman -Ss tesseract-data
Other Platforms
Tesseract may work on more exotic platforms too. You can either try compiling it yourself, or take a look at the list of other projects using Tesseract.
Running Tesseract
Tesseract is a command-line program, so first open a terminal or command prompt. The command is used like this:
tesseract imagename outputbase [-l lang] [-psm pagesegmode] [configfile...]
So basic usage to do OCR on an image called ‘myscan.png’ and save the result to ‘out.txt’ would be:
Or to do the same with German:
tesseract myscan.png out -l deu
It can even be used with multiple languages traineddata at a time eg. English and German:
tesseract myscan.png out -l eng+deu
Tesseract also includes a hOCR mode, which produces a special HTML file with the coordinates of each word. This can be used to create a searchable pdf, using a tool such as Hocr2PDF. To use it, use the ‘hocr’ config option, like this:
tesseract myscan.png out hocr
You can also create a searchable pdf directly from tesseract ( versions >=3.03):
tesseract myscan.png out pdf
More information about the various options is available in the Tesseract manpage.
Other Languages
Tesseract has been trained for many languages, check for your language in the Tessdata repository.
It can also be trained to support other languages and scripts; for more details see TrainingTesseract.
Development
Tesseract can also be used in your own project, under the terms of the Apache License 2.0. It has a fully featured API, and can be compiled for a variety of targets including Android and the iPhone. See the 3rdParty page for a sample of what has been done with it. Note that as yet there are very few 3rdParty Tesseract OCR projects being developed for Mac (with the only one being Tesseract macOS.md), although there are several online OCR services that can be used on Mac that may use Tesseract as their OCR engine.
Also, it is free software, so if you want to pitch in and help, please do!
If you find a bug and fix it yourself, the best thing to do is to attach the patch to your bug report in the Issues List
Support
First read the documentation, particularly the FAQ to see if your problem is addressed there.
If not, search the Tesseract user forum or the
Tesseract developer forum, and if you still can’t find what you need, please ask us there.
To install Tesseract OCR on Windows, follow these detailed steps to ensure a smooth setup process. First, download the Tesseract installer from the official repository. You can find the latest version at Tesseract at UB Mannheim. Once downloaded, run the installer and follow the prompts to complete the installation. Make sure to note the installation path, as you will need it later.
Setting Up Environment Variables
After installation, you need to add Tesseract to your system’s PATH. This allows you to run Tesseract commands from any command prompt window. To do this:
- Right-click on ‘This PC’ or ‘My Computer’ and select ‘Properties’.
- Click on ‘Advanced system settings’.
- In the System Properties window, click on the ‘Environment Variables’ button.
- In the Environment Variables window, find the ‘Path’ variable in the ‘System variables’ section and select it, then click ‘Edit’.
- Click ‘New’ and add the path to the Tesseract installation directory (e.g.,
C:\Program Files\Tesseract-OCR). - Click ‘OK’ to close all dialog boxes.
Verifying the Installation
To verify that Tesseract has been installed correctly, open a command prompt and type:
`tesseract --version`
If installed correctly, you should see the version of Tesseract displayed in the command prompt.
Using Tesseract OCR
Now that Tesseract is installed, you can start using it to perform OCR on images. The basic command structure is:
tesseract <image_file> <output_file>
For example, to extract text from an image named image.png and save it to output.txt, you would run:
tesseract image.png output
This command will create a file named output.txt containing the extracted text.
Additional Configuration
For better accuracy, you may want to configure Tesseract with language packs. You can download additional language data files from the same repository. Place these files in the tessdata folder within your Tesseract installation directory. To specify a language, use the -l option:
tesseract image.png output -l <language_code>
For example, to use Spanish, you would use -l spa.
Conclusion
By following these steps, you should have Tesseract OCR installed and ready to use on your Windows machine. This powerful tool can help you extract text from images efficiently, making it a valuable addition to your software toolkit.
В одном из своих проектов мне потребовалось распознавание символов и мой выбор остановился на tesseract ocr. На Хабре уже была подобная статья, но на данный момент она не актуальна, во время установки не получилось в точности повторить инструкции автора. В данной статье рассказывается о процессе установке Tesseract OCR под MinGW.
На данный момент разработкой tesseract ocr занимается компания Google, это может означать, что библиотека будет развиваться в ближайшем времени. Я постараюсь описать процесс установки максимально подробно, начиная с установки MinGW.
Установка MinGW
Для начала нам нужно установить MinGW, его можно скачать с официального сайта проекта. Во время установки необходимо выбрать следующие опции:
- C++ Compiler
- MSYS Basic System
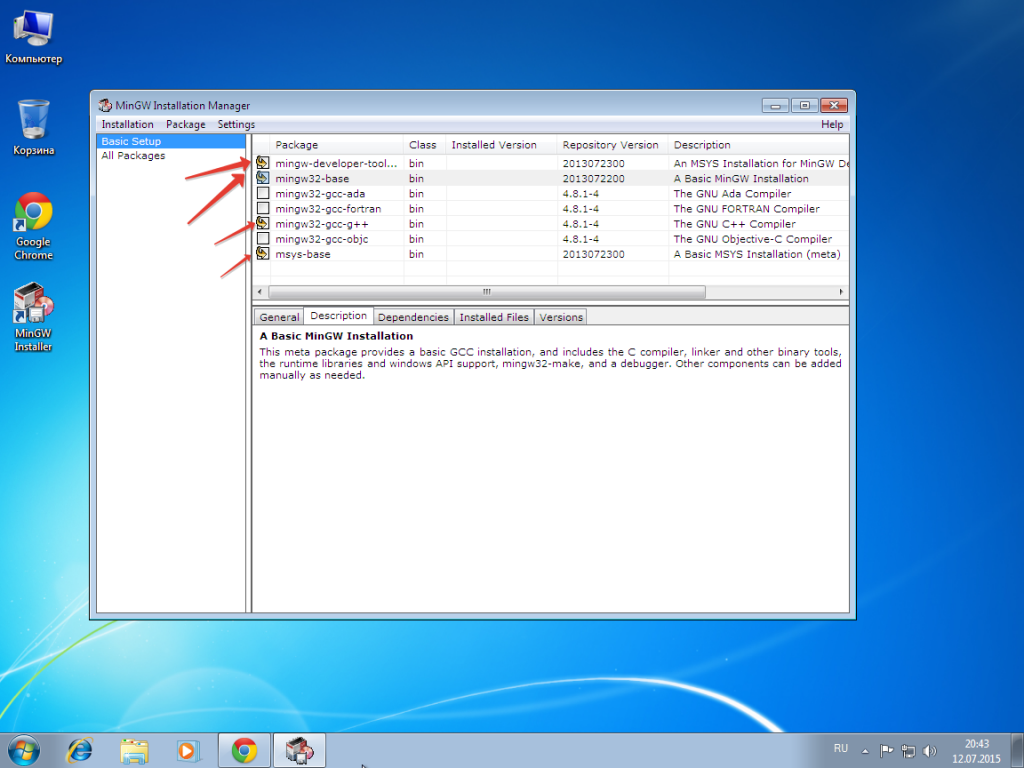
Шаг 1. установка MinGW:
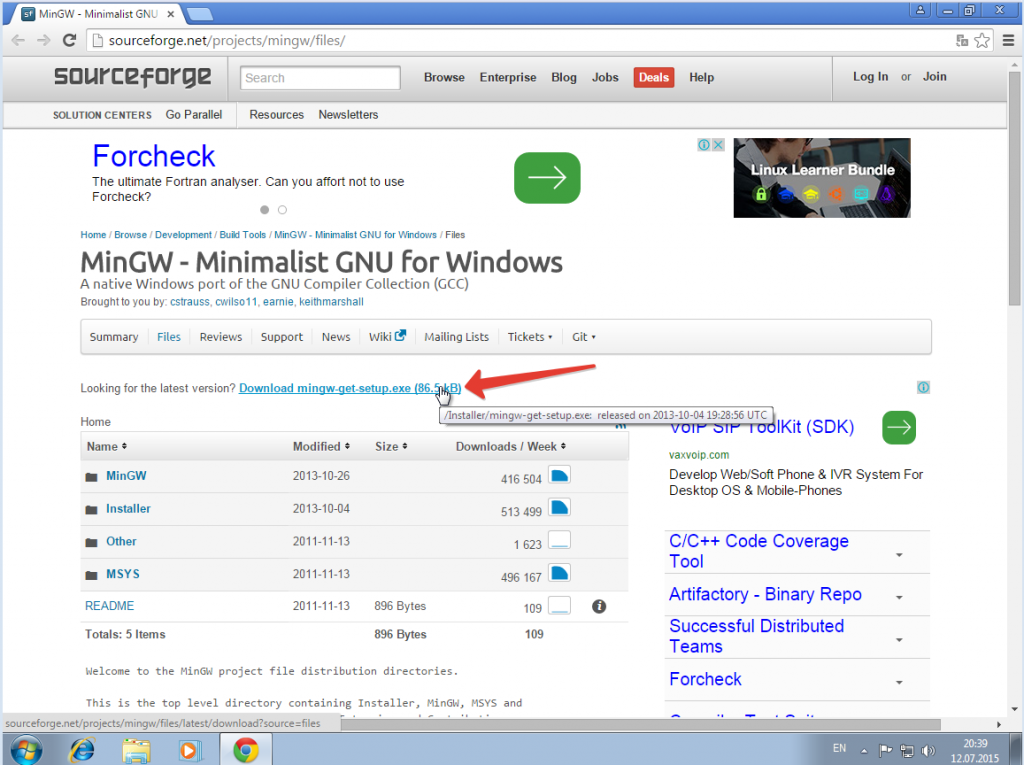
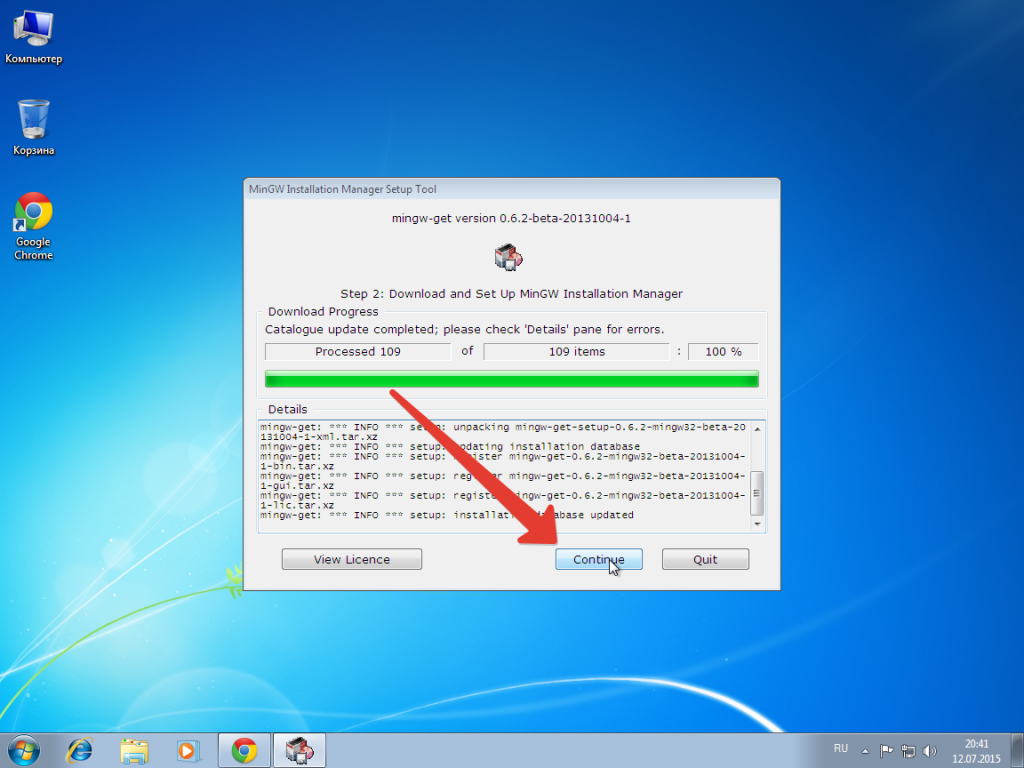
Не забываем отметить нужные нам опции: C++ Compiler и MSYS Basic System.
Дальше переходим в раздел Installation и выбираем Apply Chanages.
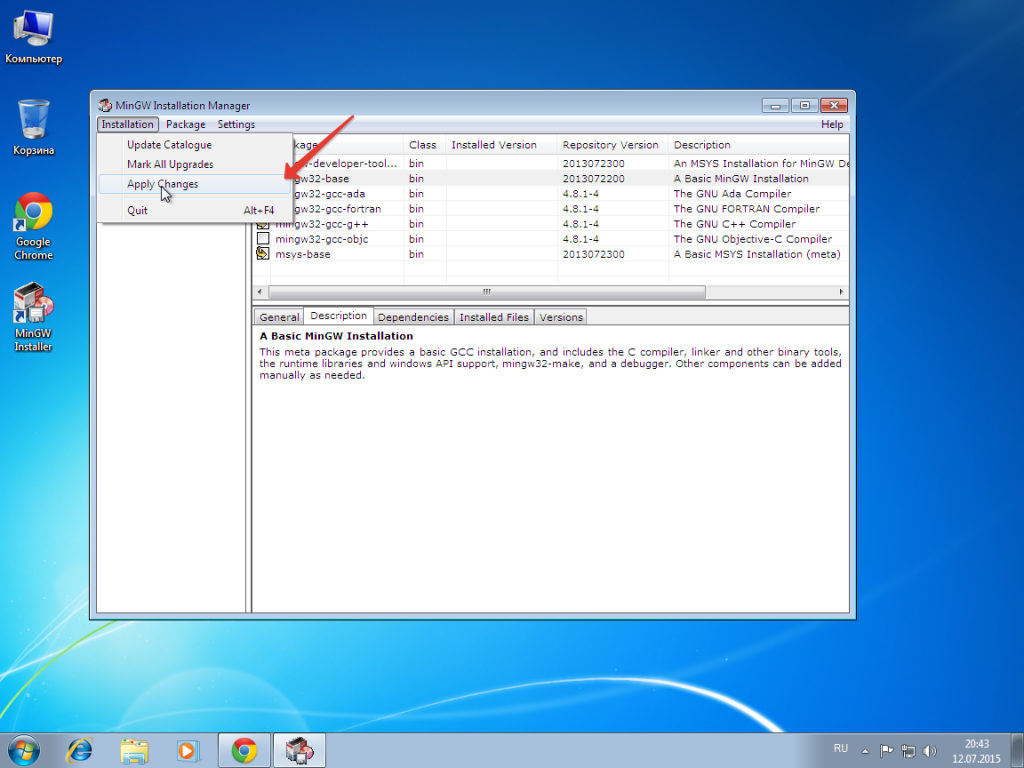
Далее выбираем для установки выбранный пакетов Apply.

Дожидаемся конца установки пакетов MinGW и нажимаем Close.
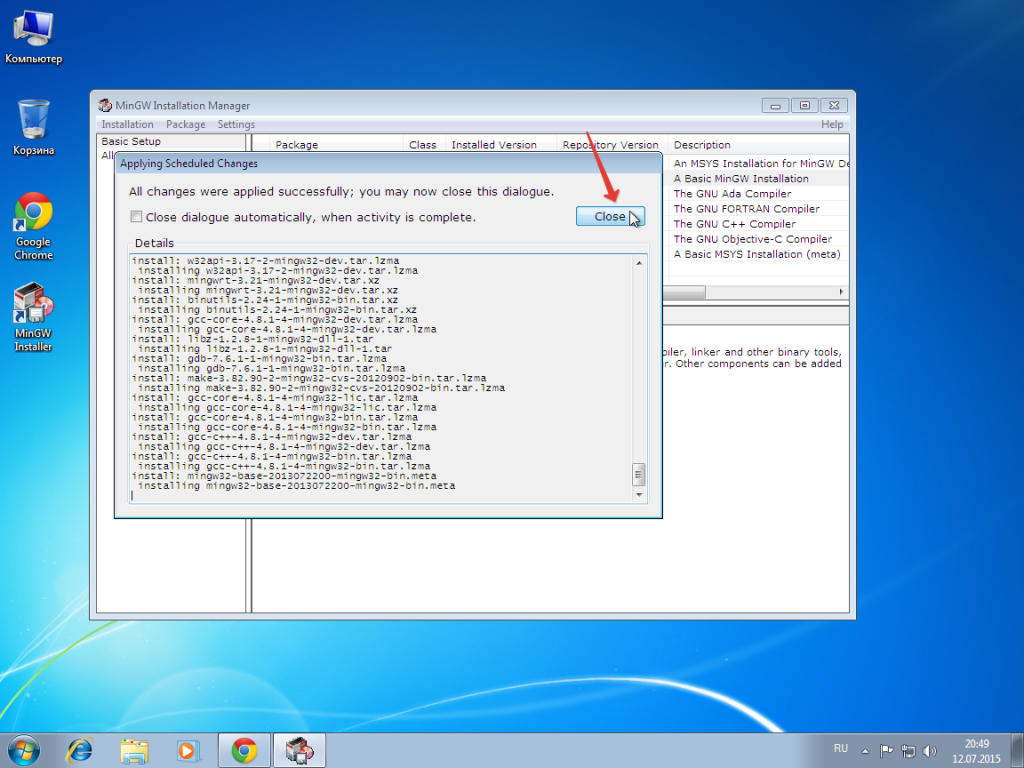
После выполнения данных действий инсталлятор можно закрыть.
Перед началом установки дополнительных пакетов, нам нужно добавить директорию MinGW в PATH.
Для этого переходим в свойства системы.

Далее переходим в Дополнительные параметры системы -> Переменные среды -> Создать.
В имя переменной вводим PATH. в Значение переменной вводим путь до папки с mingw, в нашем случае это C:\MinGW\bin.

Теперь нам нужно установить несколько пакетов с помощью MinGW Shell, которые нам понадобятся при сборе библиотеки Tesseract OCR.
Для открытия MinGW Shell переходим в папку C:\MinGW\msys\1.0 и запускаем бинарный файл msys.bat

В открывшуюся консоль вводим следующую команду:
mingw-get install mingw32-automake mingw32-autoconf mingw32-autotools mingw32-libz
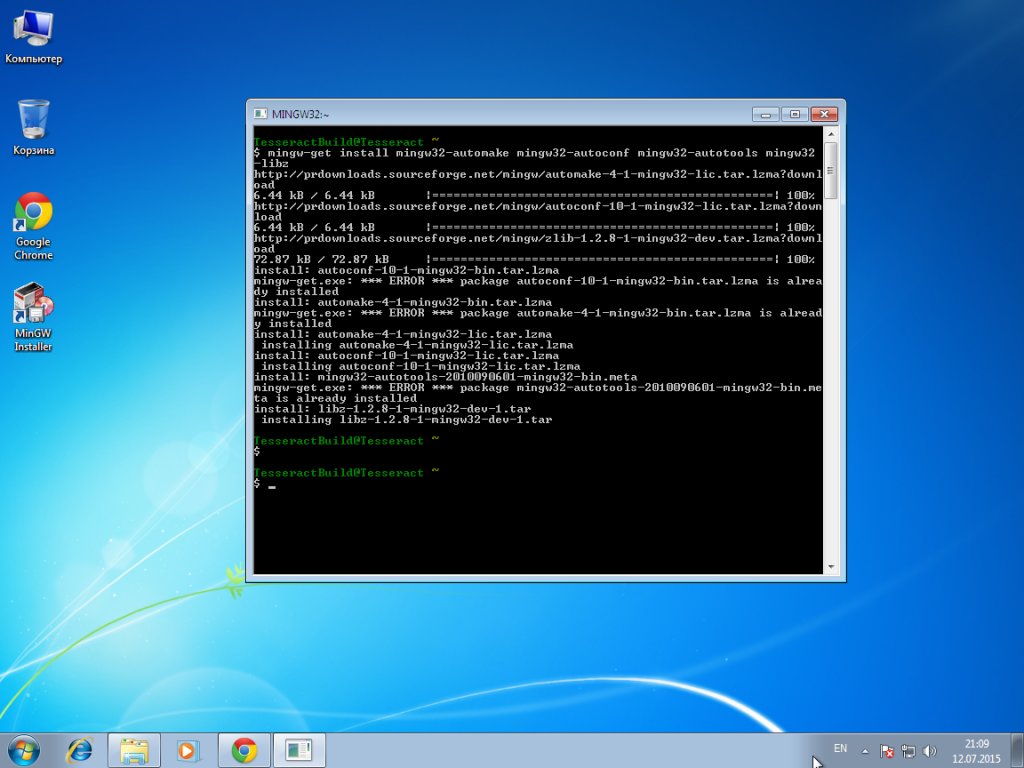
В данном случае нам сказали, что у нас уже установлены данные пакеты, ничего страшного, это нормально.
Важный пункт! Нам необходимо примонтировать папку с нашим MinGW в MinSYS.
Для этого выполним следующие действия:
Создайте файл C:\MinGW\msys\1.0\etc\fstab что бы смонтировать каталог C:\MinGW на точку монтирования /mingw:
#Win32_Path     Mount_Point
c:/MinGW        /mingw

Отлично, после создания fstab необходимо перезапустить MinGW Shell, достаточно просто закрыть и заново открыть msys.bat.
Установка библиотеки Leptonica
После настройки MinGW нам необходимо установить библиотеку Leptonica. Tesseract ocr для работы с изображениями использует библиотеку Leptonica, но перед её установкой нам необходимо установить несколько вспомогательных библиотек:
- libJpeg
- libPng
- libTiff
Установка LibJpeg
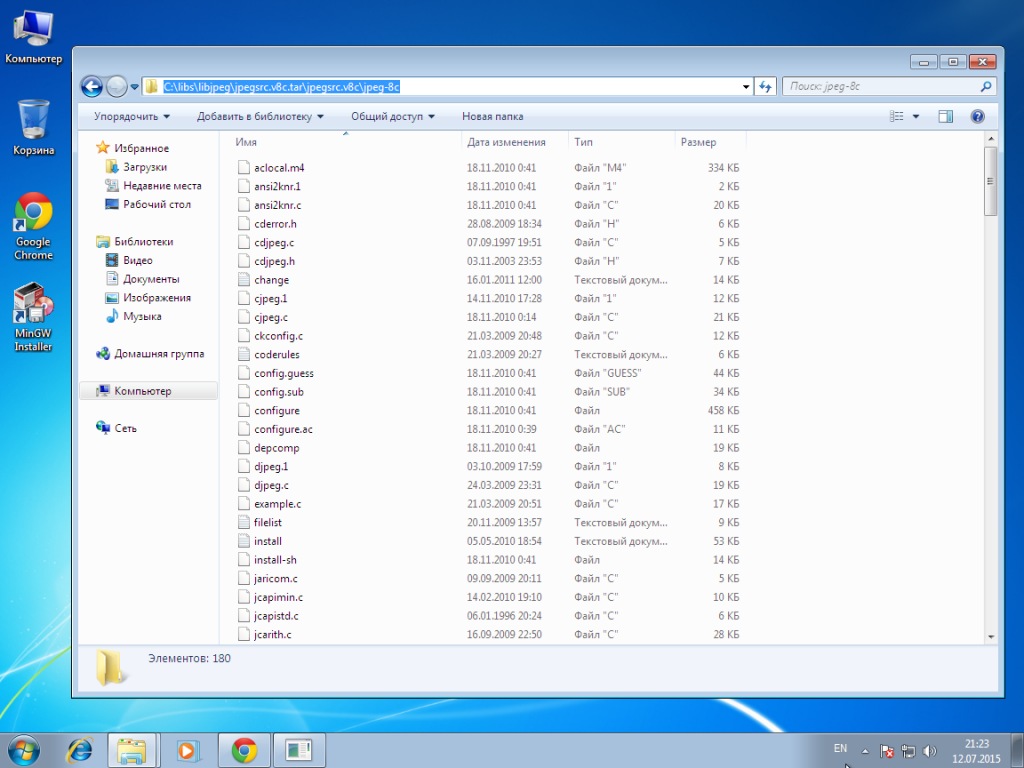
Для начала создадим каталог в котором будем хранить наши библиотеки, к примеру C:\libs\. В данном каталоге создадим подпапку libjpeg для хранения библиотеки. Теперь когда мы подготовили наше рабочее место, можно скачать LibJpeg с официального сайта и распаковать в нашу папку C:\libs\libjpeg.
После распаковки у меня получился следующий путь до папки libjpeg: C:\libs\libjpeg\jpegsrc.v8c.tar\jpegsrc.v8c\jpeg-8c.
Теперь нам необходимо собрать и установить библиотеку, для этого переходим в MinGW Shell и вводим следующие команды:
cd /C/libs/libjpeg/jpegsrc.v8c.tar/jpegsrc.v8c/jpeg-8c/
./configure CFLAGS='-O2' CXXFLAGS='-O2' --prefix=/mingw
make
make install
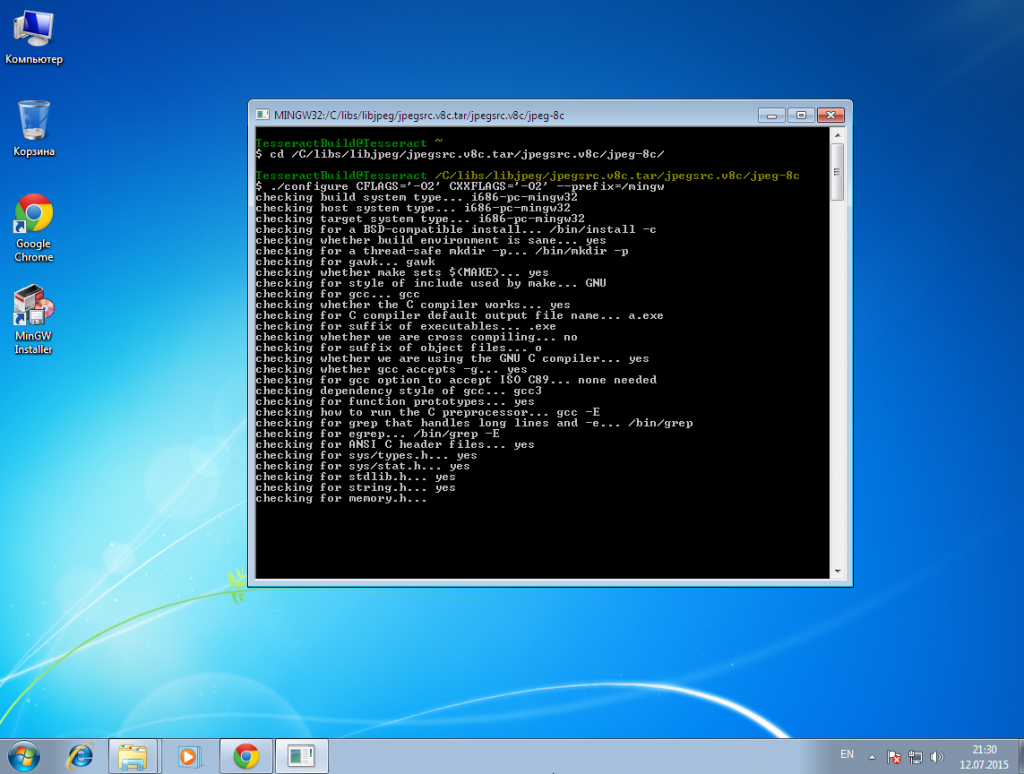
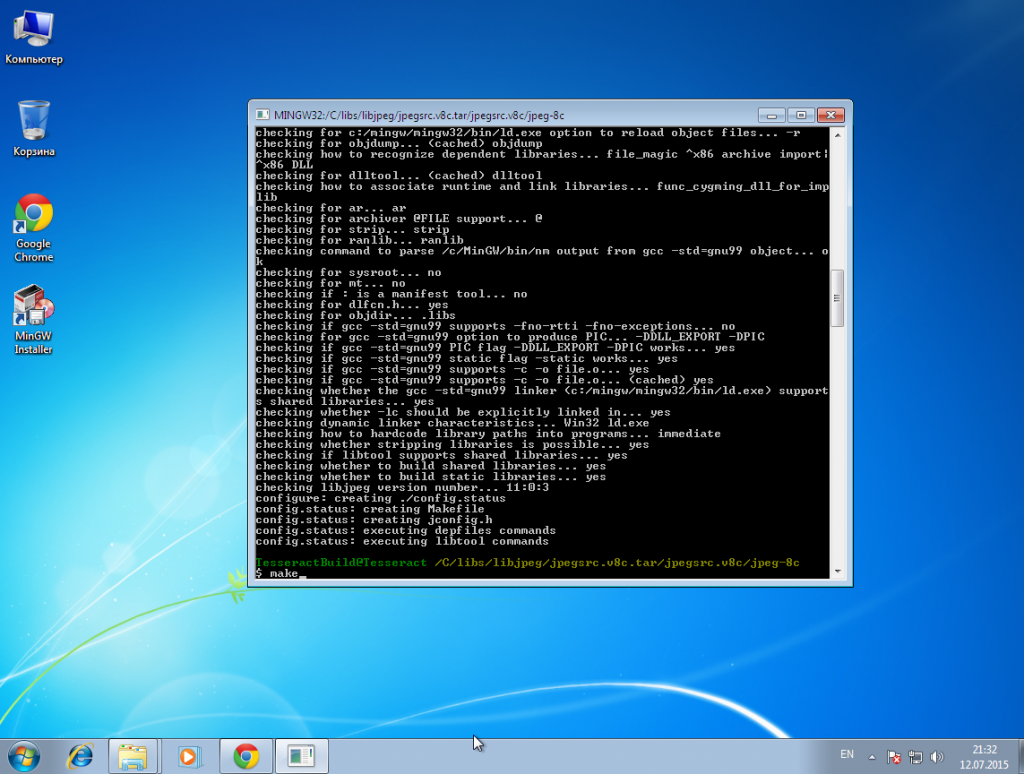
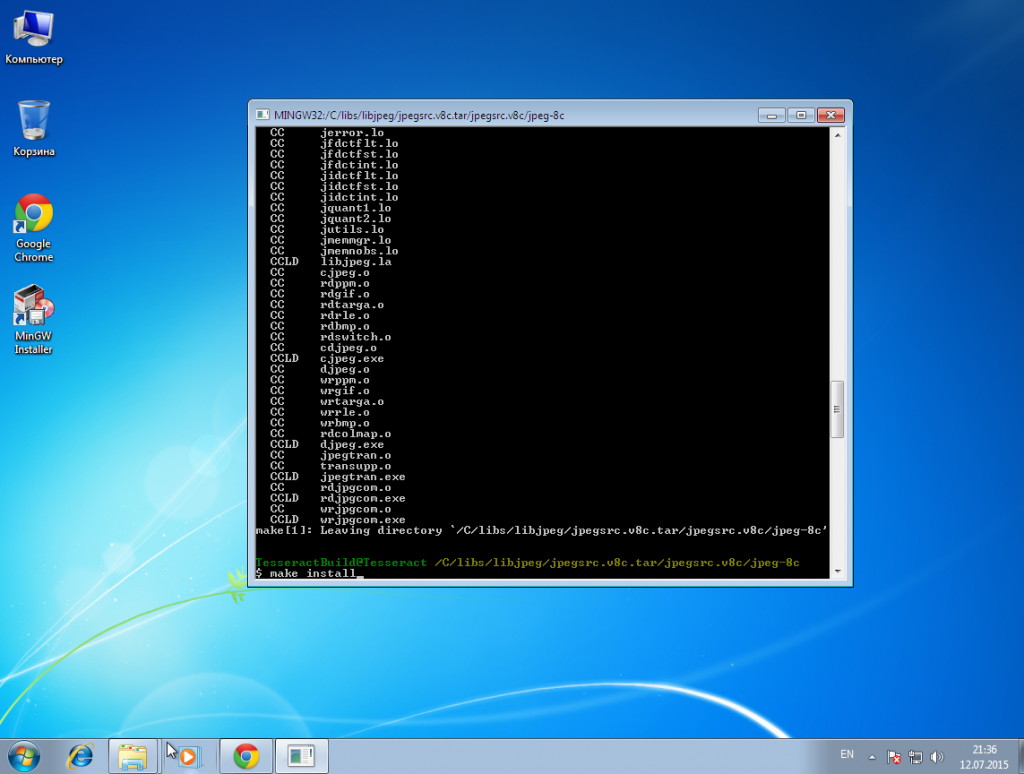
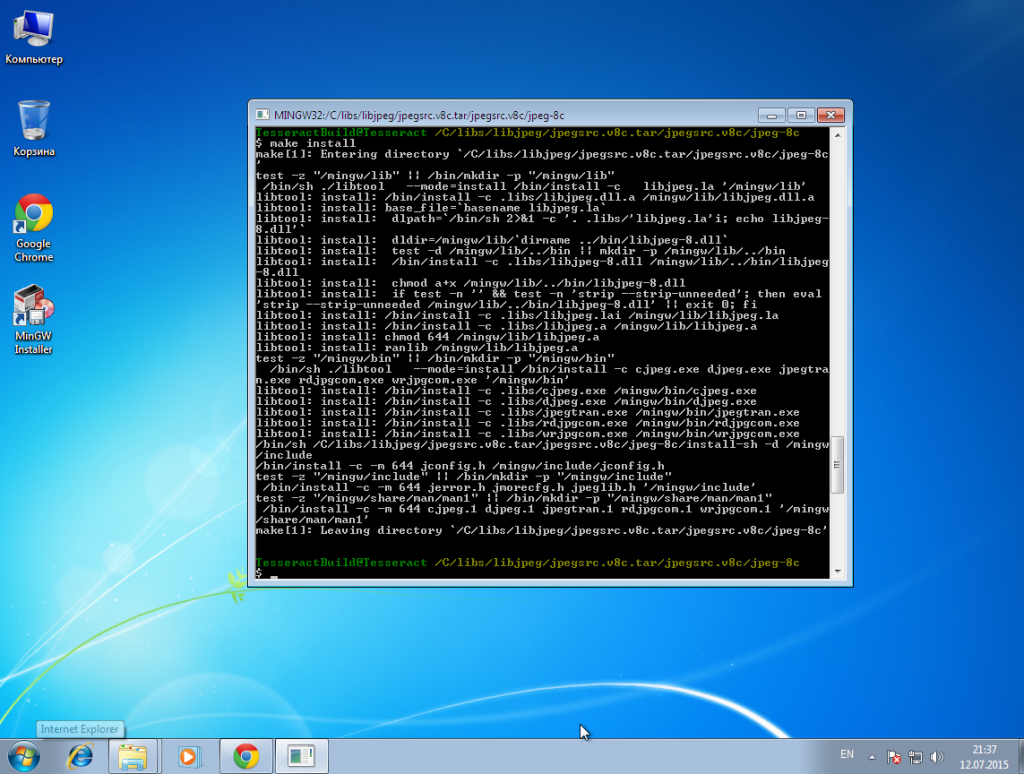
Отлично на этом этапе установка libJpeg завершена.
Установка libPng
Скачиваем архив с исходными кодами с официального сайта проекта и распаковываем в каталог C:\libs\libpng. Возвращаемся в MinGW Shell, процедура установки данной библиотеки будет идентичная установки libJpeg. После распаковки у меня получился следующий каталог: C:\libs\libpng\libpng-1.5.4.tar\libpng-1.5.4
cd /C/libs/libpng/libpng-1.5.4.tar/libpng-1.5.4/
./configure CFLAGS='-O2' CXXFLAGS='-O2' --prefix=/mingw
make
make install
Сборка libTiff
Архив с исходным кодом можно скачать с ftp сервера проекта. Распаковываем архив в C:\libs\libtiff. Сборка данной библиотеки аналогична сборки предыдущих двух библиотек.
После распаковки получился следующий путь: C:\libs\libtiff\tiff-3.9.5.tar\tiff-3.9.5.
cd /C/libs/libtiff/tiff-3.9.5.tar/tiff-3.9.5/
./configure CFLAGS='-O2' CXXFLAGS='-O2' --prefix=/mingw
make
make install
Сборка Leptonica
После установки всех дополнительных библиотек мы переходим к сборе Leptonica. Для начала нам нужно скачать Leptonica 1.71, это важно, нам нужна именно версия 1.71. Как показали тесты, если взять версию выше или ниже, сам tesseract ocr не будет собираться. Но в этой версии есть один баг, который нам предстоит исправить. Для начала скачаем архив с исходными файлами с официального сайта. Распакуем скаченный архив в папку C:/libs/leptonica/. После распаковки у меня получился следующий путь: C:\libs\leptonica\leptonica-1.71.tar\leptonica-1.71.
Следующим шагом будет сборка библиотеки, она ни чем не отличается от сборки предыдущих библиотек:
cd /C/libs/leptonica/leptonica-1.71.tar/leptonica-1.71/
./configure CFLAGS='-O2' CXXFLAGS='-O2' --prefix=/mingw
make
make install
Отлично. Переходим к сборке Tesseract OCR.
Сборка Tesseract OCR
После успешной сборки Leptonica можно приступать к сборке Tesseract OCR. Скачиваем архив с исходным кодом с официального сайта. Распаковываем скаченный архив с исходным кодом Tesseract OCR в папку C:\libs\tesseract. После распаковки у меня получился следующий путь: C:\libs\tesseract\tesseract-ocr-3.02.02.tar\tesseract-ocr-3.02.02\tesseract-ocr.
Собираем наш Tesseracr OCR.
cd /C/libs/tesseract/tesseract-ocr-3.02.02.tar/tesseract-ocr-3.02.02/tesseract-ocr
./configure CFLAGS='-D__MSW32__ -O2' CXXFLAGS='-D__MSW32__-O2' LIBS='-lws2_32' LIBLEPT_HEADERSDIR='/mingw/include' --prefix=/mingw
make
make install
Процесс сборки Tesseracrt занимает достаточно много времени, пока можно сходить выпить чаю.
Заголовочные файлы tesseract ocr будут лежать в C:\MinGW\include\tesseract, заголовочные файлы Leptonica в C:\MinGW\include\leptonica, все библиотеки в C:\mingw\lib.
Для успешной работы будущих программ следует скачать и установить SDK Tesseract ocr с официального сайта.
Осталось исправить маленькие баги, который появляется после установки Tesseract OCR.
Для этого переходить в папку с заголовочными файлами Tesseract OCR C:\MinGW\include\tesseract.
Комментируем в файле platform.h повторное объявление типа BLOB. Должно получиться нечто следующее:
/*typedef struct _BLOB {
unsigned int cbSize;
char *pBlobData;
} BLOB, *LPBLOB;*/
Комментируем объявление класса PBLOB в baseapi.h.

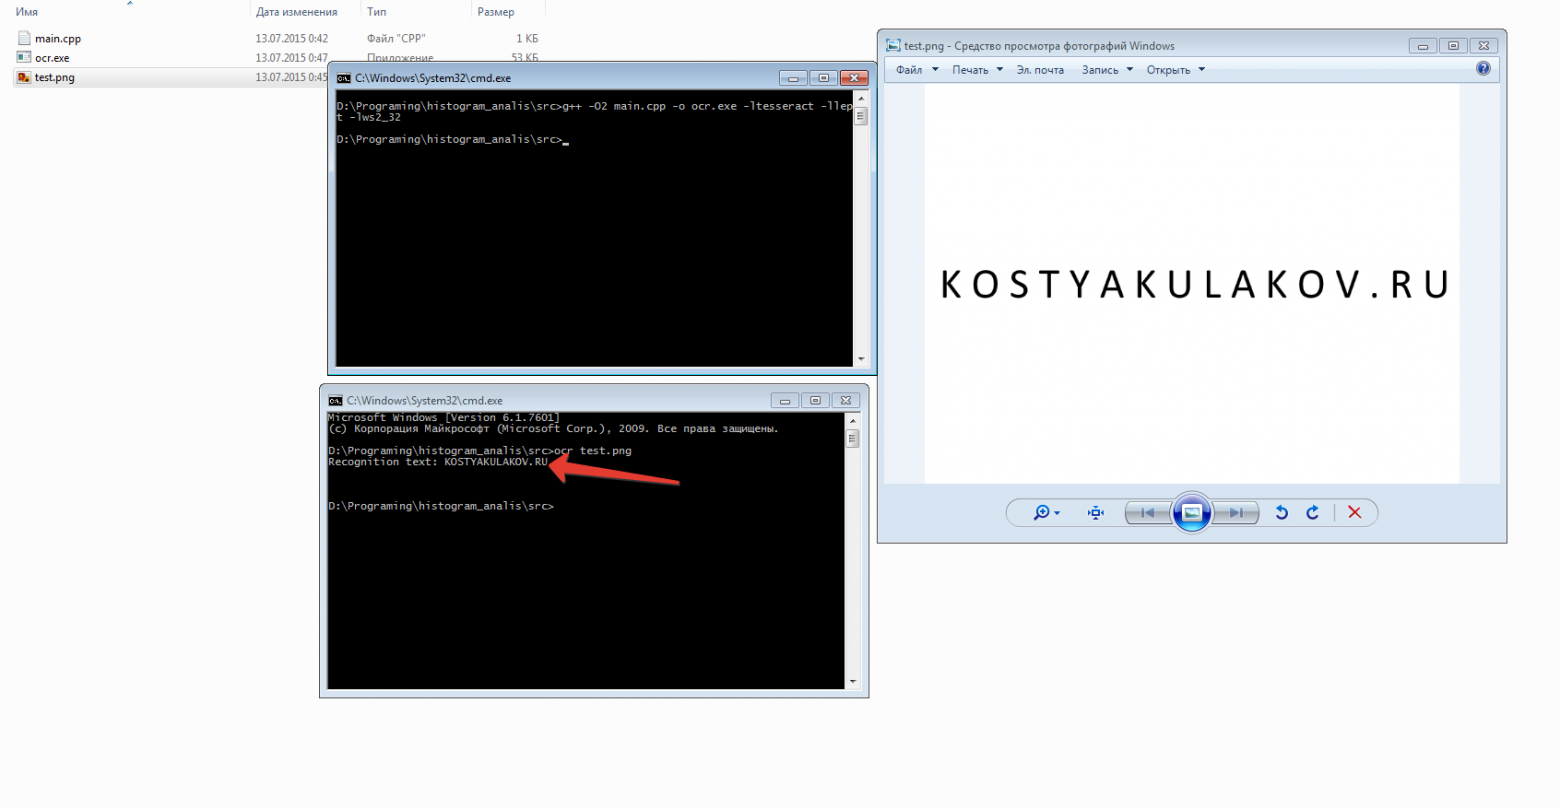
Приложение для тестирования Tesseract OCR
После установки tesseract ocr его можно протестировать, напишем простенькое приложение на C++.
#include <tesseract/baseapi.h>
#include <leptonica/allheaders.h>
#include <string>
#include <iostream>

int main(int argc, char* argv[])
{
	tesseract::TessBaseAPI ocr;
	ocr.Init(NULL, "eng");

	if(argc > 1)
	{
		PIX* pix = pixRead(argv[1]);
		ocr.SetImage(pix);
		std::string result = ocr.GetUTF8Text();

		std::cout << "Recognition text: " << result << std::endl;
	}
	else
		std::cout << "Drag and drop image file to program for recognition" << std::endl;

	return 0;
}
Собрать приложение можно из командной строки:
g++ -O2 main.cpp -o ocr.exe -ltesseract -llept -lws2_32
Tesseract OCR is a very popular open source for recoginzing characters from images. In this tutorial, we will introduce how to install it and use it to extract text from images on windows 10. You can do like us by following our steps.
Download Tesseract OCR
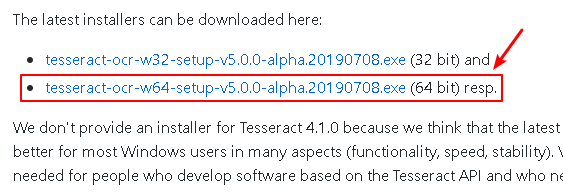
You can download Tesseract OCR at here.
You should select 64 bit version.
Install Tesseract OCR
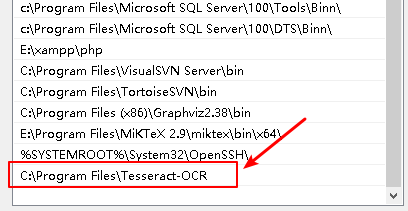
In this tutorial, we install it to C:\Program Files\Tesseract-OCR, however, i sugguest you to install it to other directroy with no empty space, such as C:\Tesseract-OCR.
Add Tesseract OCR to system environment
You should add the installation path of Tesseract OCR to system environment.
Then the installation of Tesseract-OCR is completed on win 10.
Check Tesseract-OCR is installed correctly
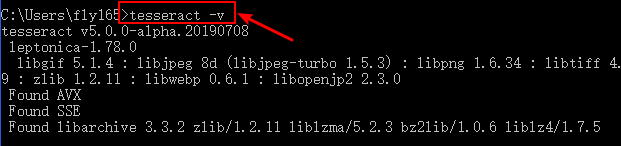
Open cmd prop and run tesseract -v.
If you see the result like this, you have installed Tesseract-OCR successfully.
You can use command: tesseract file_iamge_name output_filename to extract text in image to output_filename.txt.
For example:
tesseract f:\test2.png f:\2
Then you will find a file called 2.txt on f disk. The content of it is text extracted from test2.png.