
Опытные технари общаются с компьютером не мышкой и экранным интерфейсом, а с помощью клавиатуры. Когда знаешь, какие команды отдать компьютеру, написать их на клавиатуре намного быстрее, чем ковыряться в меню.
Текстовые команды компьютеру чаще всего дают через командную строку. В Mac OS для этого есть приложение Terminal. И есть его младший брат с наворотами: iTerm2. Вот что он может и в чём смысл.
👉 Для начала советуем почитать о командной строке в современных компьютерах.
Кому подходит
✅ iTerm2 подходит опытным тестировщикам, веб-разработчикам и всем, кто проводит много времени в терминале — здесь удобно работать с множеством вкладок, автоматизировать рутинные команды и находить регулярные выражения.
✅ iTerm2 подходит новичкам, которые только знакомятся с командами терминала или изучают систему контроля версий Git для командной работы — визуальное оформление помогает не запутаться в проектах со сложной структурой.
✅ iTerm2 подходит любителям скоростного кодинга — тем, кому приходится писать большие объёмы кода или кто учится это делать. Терминал предлагает программируемые горячие клавиши для ускорения разработки. Ещё на эту тему читайте: горячие клавиши и Vim.
❌ iTerm2 однозначно не подходит тем пользователям, у которых нет времени на его изучение и настройку.
Как установить и настроить
Шаг 1. Перейдите на iterm2.com, скачайте терминал и установите его как обычную маковскую программу. iTerm2 распространяется бесплатно, но к сайту прикручены донаты — по желанию вы можете отблагодарить разработчиков за их труд.
👉 iTerm2 не совместим с Windows, Linux и ранними версиями macOS. Нужна OS X 10.14 или более новая версия.

Шаг 2. Устанавливаем оболочку Oh My Zsh — специальное расширение, которое позволяет менять оформление iTerm2. Для установки вам необходимо скопировать следующую строку, вставить её в терминал и нажать на Enter:
sh -c "$(curl -fsSL
 https://raw.github.com/ohmyzsh/ohmyzsh/master/tools/install.sh)"
После загрузки нажмите «Y», Enter и введите пароль от своего мака — Oh My Zsh заменит стандартную оболочку терминала, установит стандартную тему и включит подсветку синтаксиса. Можно оставить так или полностью изменить оформление.
👉 Техдокументация с описанием возможностей Oh My Zsh.

Шаг 3. Откройте репозиторий Oh My Zsh и посмотрите список тем, встроенных в оболочку по умолчанию, — таких, которые можно изменить одной командой без скачивания дополнительных компонентов. Для примера выберем тему Apple. Открываем iTerm2 и пишем команду для перехода к файлу настройки терминала:
open ~/.zshrc
Появится текстовый документ, в котором нужно найти строчку «ZSH_THEME =»Пишем название выбранной темы»». Закрываем файл и перезагружаем iTerm2.

После выбора темы можно поменять цветовую схему, контрастность и все цветные элементы синтаксиса. Для этого наведите мышкой на меню → выберите iTerm2 → Preferences → Profiles → Colors. Для изменения цветовой схемы кликните на Colors Presets; для изменения шрифтов перейдите на вкладку Text.

Дальнейшие шаги для тех, кому не подошли стандартные темы Oh My Zsh.
Шаг 4. Установите дополнительные шрифты, которые понадобятся для работы с внешними темами. Чтобы всё настроить — добавьте в iTerm2 такую команду:
cd ~/Downloads/
git clone https://github.com/powerline/fonts.git
cd fonts
./install.sh
У внешних тем для iTerm2 есть техническая документация, рекомендованные настройки и шрифты. В некоторых версиях операционной системы внешние темы устанавливаются с дефектом и часть текстовой информации искажается — вместо букв появляются знаки вопроса и неразборчивые символы. Иногда это происходит даже тогда, когда вы полностью соблюдаете прописанные настройки.
Чтобы исправить дефект — откройте вкладку Text и замените рекомендованный шрифт на какой-то другой. Перезапустите терминал и проверьте изменения. Если ничего не поменялось и другие шрифты не работают — придётся менять тему.
Шаг 5. Загрузите менеджер пакетов Homebrew, который предотвращает ошибки при установке внешних тем. Для загрузки менеджера пакетов вставьте команду:
/bin/bash -c "$(curl -fsSL
https://raw.githubusercontent.com/Homebrew/install/HEAD/install.sh)"/bin/bash -c "$(curl -fsSL https://raw.githubusercontent.com/Homebrew/install/HEAD/install.sh)"
Шаг 6. После установки дополнительных шрифтов и менеджера пакетов в iTerm2 можно загружать внешние темы. Есть несколько способов, и простой выглядит так:
- Выберите тему и найдите её репозиторий на гитхаб.
- Прочтите документацию и найдите команду git clone — это строка для загрузки темы. Её нужно скопировать и вставить в терминал.
- Откройте файл настройки терминала и в строчке ZSH_THEME пропишите название темы.
- Перезагрузите iTerm2.
Не все внешние темы получится установить. Иногда они повреждены, не содержат всех загрузочных файлов или их просто не найти на гитхабе.
👉 Другие способы установки внешних тем в iTerm2.
Вам может быть интересно:
Как начать пользоваться
iTerm2 можно разделить на множество окон по горизонтали или вертикали и работать сразу в нескольких независимых сессиях.

Если случайно закроете терминал, то у вас будет пять секунд на отмену действия — нажимаете комбинацию клавиш Command+ Z, и сессия восстанавливается.
Комбинация Command+Shift + H позволяет посмотреть, кто и когда вставлял в терминал какой-то текст — информация сортируется по объёму и времени копирования. Обычный буфер обмен отслеживает только последнее действие.

Можно включить левую боковую панель и упорядочить расположение вкладок — это упрощает навигацию и позволяет видеть несохраненные изменения. Если в какой-то вкладке будут несохранённые изменения, то в боковой панели на ней засветится синий круг. Для большей наглядности вкладки можно раскрасить разным цветом, каждая из которых будет соответствовать своему проекту.

Если для проекта понадобятся картинки, то их можно вставить в терминал:
- Перейдите в меню и нажмите iTerm2.
- Выберите Install Shell Integration и установите расширение: Continue → Dowload and Run Installer → Continue.
- Перезапустите iTerm2.
Остаётся прописать команду и путь в выбранной картинке — мы расположили картинку на рабочем столе и сохранили её под названием Test.
Прописываем путь к картинке:
cd Desktop/
Открываем картинку в терминале:
imgcat Test.jpg

iTerm2 может отображать дополнительные параметры вроде состояния батареи, часов, состояния оперативки и другую вспомогательную информацию — это позволяет раскрыть терминал на всю ширину окна и не тратить время на переключение между вкладками. Опция называется Configure Status Bar:
- Перейдите в меню и нажмите iTerm2 → Preferences → Profiles → Session.
- Поставьте галочку напротив пункта Status bar enabled.
- Выберите нужные параметры и сохраните изменения.
Если изменения не появятся — перезапустите терминал.


Что дальше
Почитайте официальную документацию и настройте терминал под себя.
Если возникнут проблемы с настройкой и ответа не будет в документации — полистайте баг-трекер или сообщите разработчикам об ошибке.
Если захочется нестандартную тему — поищите на iterm2colorschemes.com.
Ещё рекомендуем интервью с Анной Леоновой — студенткой московской школы программирования, которая пользуется iTerm2 в качестве основного инструмента.
Текст:
Александр Бабаскин
Иллюстратор:
Даня Берковский
Basic terminal setup on Windows and macOS
Table of Contents
- Windows 10
- Enabling WSL
- Update to WSL2
- Installing Linux
- Installing a better Windows Terminal
- Installing ZSH
- Installing of additional configurations for ZSH management
- Installing NVM
- Visual Studio Code Windows
- WebStrom Windows
- macOS
- Installing iTerm2 and enabling zsh
- Zsh configuration and nvm installation
- Visual Studio Code and WebStorm on macOS
- Connecting to GitHub with SSH
Windows 10
You need at least 2004 version of Windows 10. To check windows version, click Windows + R key and type:
winver
Enabling WSL
This feature is disabled by default and you must activate it:
- You can do this with PowerShell (with administrator privileges):
$ dism.exe /online /enable-feature /featurename:Microsoft-Windows-Subsystem-Linux /all /norestart
$ dism.exe /online /enable-feature /featurename:VirtualMachinePlatform /all /norestart
- Or change it manually in:
Control-Panel -> Programs -> Turn Windows feature on or off, and click the "Windows subsystem for linux" and "Virtual Machine Platform" buttons.
Then restart your computer to finish installing the requested changes.
Update to WSL2
In order to update WSL you need to download the Linux kernel update package. After installing the add-on, go into PowerShell and paste:
wsl --set-default-version 2
With this command, all our new distributions will be installed with version two.
Installing Linux
Download the Linux distro of your choice from the Microsoft Store. My choice here is Ubuntu. Once installed, hit the ‘Launch’ button. This will trigger an installation, which will take another couple of minutes. Once the installation is complete, you’ ll get ask you to create a root account. Fill that in, and your Linux installation will be complete. Then I recommend that you update your terminal packages with the command:
Installing a better Windows Terminal
I recommend downloading Windows Terminal, this is a new terminal developed by Microsoft that supports a whole host of goodness and makes this feel more like iTerm and other modern day terminal applications.
If you decide to install this terminal, I recommend changing the default PowerShell terminal to Ubuntu bash:
Settings (CTRL + ,) -> Copy Ubuntu guid and replace "default Profile" and then restart the terminal.
Installing ZSH
Then we will install zsh with the command:
It will ask you if you want to make it the default shell, go with yes. If for some reason, it doesn’t ask you, you can run (only if you have Windows 10 Fall Creator Update ):
sudo chsh -s $(which zsh)
This is better than editing the ~/.bashrc file because it causes bash to be run first and then zsh (this extends the entire console startup process).
Once set zsh to the default shell, restart the terminal and choose configuration type options — recommended 2).
Installing of additional configurations for ZSH management
Finally, we’ll go ahead and setup zsh. Personally, I use a very nice slimzsh plugin.
If you opted for slimzsh you may notice that its appearance is not the same as on Mac, for this we need to open ~/.zshrc and modify:
prompt adam1 -> prompt pure
For a more aesthetic edition of the syntax, I recommend that you read the pure documentation, which is used in slimzsh.
Installing NVM
Nvm is a version manager for node.js, designed to be installed per-user, and invoked per-shell. Use its documentation to install it.
Remember after installing it to the ~/.zshrc file you need to add the following code:
export NVM_DIR="$([ -z "${XDG_CONFIG_HOME-}" ] && printf %s "${HOME}/.nvm" || printf %s "${XDG_CONFIG_HOME}/nvm")"
[ -s "$NVM_DIR/nvm.sh" ] && \. "$NVM_DIR/nvm.sh" # This loads nvm
Visual Studio Code Windows
To work with the Linux subsystem in Visual Studio Code you need to:
- Install the Remote — WSL extension
- Configure terminal using
settings.json
"terminal.integrated.defaultProfile.windows": "Ubuntu (WSL)"
More information in the link.
WebStrom Windows
To work with the Linux subsystem in WebStorm it is enough to add the Node.js interpreter based on WSL in the Settings dialog (Ctrl+Alt+S), go to Languages & Frameworks | Node.js.
More information in the link.
macOS
Installing iTerm2 and enabling zsh
I recommend that you download iTerm2 it is a very good open source replacement for the standard Apple terminal. It is highly customizable and comes with lots of useful features.
If you decide to install this terminal, open it up and if your default shell is bash change it to zsh with the command:
Zsh configuration and nvm installation
The zsh configuration for macOS is identical to that for Windows with the Linux subsystem. The same goes for NVM and any other tools you’ll want to install.
The only difference is that after installing slimzsh you don’t need to change the «prompt» and NVM usually automatically adds configuration options in the ~/.zshrc file after installation.
Visual Studio Code and WebStorm on macOS
Most often you don’t need to do anything on macOS. Just launch the editor and start writing code 😀
Connecting to GitHub with SSH
I highly recommend using SSH keys to connect to Github, as they are a very good method of securing your repository and are much less likely to cause strange errors.
You will ask what? For example, after configuring WSL, I always had trouble logging in and kept getting error:
fatal: Authentication failed for (url project)
That’s why I chose to use SSH keys instead of standard HTTPS or a personal access token.
Уровень сложностиПростой
Время на прочтение3 мин
Количество просмотров8.6K
iTerm2 — это популярный эмулятор терминала для macOS. В этой статье я хочу поделится своим опытом его использования. Я не фанат работы с OS через консоль и если есть возможность сделать что-то через удобный GUI — я выберу этот вариант, но есть ряд задач которые я делаю в терминале, например:
-
Запуск скриптов для рабочих проектов
-
Использование пакетного менеджера Homebrew
-
Работа со CLI-утилитами
В первую очередь терминал для меня — это конечно запуск рабочих скриптов. Не самая крупная задача и долгое время мне хватало стандартного терминала macOS, но со временем я стал обращать внимание, что я держу открытыми несколько окон терминала в каждом из которых запускаю всего пару команд и было бы очень удобно переключаться не между окнами терминала, а между табами в одном окне. Оказалось, что эту задачу прекрасно решает iTerm2. Он не только позволяет открывать несколько сессий терминала в разных вкладках, но и поддерживает кучу расширений и разные темы оформления. Я потратил вечерок на настройку, которая сделала мою работу в терминале еще чуть удобнее и визуально приятнее, и хочу ей поделится.
Установка iTerm2
Процесс простой. Установить iTerm2 можно двумя способами:
-
Скачать образ с официального сайта
-
Использовать Homebrew
Первый вариант удобен тем, что не нужно ничего дополнительно устанавливать кроме самого iTerm2. Скачал, установил, пользуешься. Из коробки все уже настроено неплохо. Но так как я решил заморочиться с дополнительной настройкой, и мне для этого потребуются дополнительные пакеты, то я выбрал второй вариант. Итак, устанавливаю пакетный менеджер Homebrew командой:
/bin/bash -c "$(curl -fsSL https://raw.githubusercontent.com/Homebrew/install/HEAD/install.sh)"И обязательно добавляю Homebrew в переменную PATH, выполнив еще пару команд:
echo 'eval "$(/opt/homebrew/bin/brew shellenv)"' >> $HOME/.zprofile
eval "$(/opt/homebrew/bin/brew shellenv)"
Теперь устанавливаю iTerm2:
brew install iterm2Запускаю свежеустановленный новый терминал, который из коробки выглядит почти так же как стандартный.


Oh My Zsh и Powerlevel10k
Добавлю в него красок и функциональности. Для этого я буду пользоваться фрейворком для конфигурации zsh Oh My Zsh. Говорят, что он делает работу терминала медленнее. Но конкретно в моем случае — я не заметил какого-то дискомфортного снижения скорости открытия окон терминала или выполнения команд, но вот настройка с его довольно удобная.
Устанавливаю OhMyZsh очередной командой в терминале:
sh -c "$(curl -fsSL https://raw.githubusercontent.com/ohmyzsh/ohmyzsh/master/tools/install.sh)"И сразу же добавляю ультра удобную тему powerlevel10k:
brew install powerlevel10k
echo "source $(brew --prefix)/share/powerlevel10k/powerlevel10k.zsh-theme" >> ~/.zshrc
И все готово. Запускаю iTerm2 снова и попадаю в меню настройки темы powerlevel10k.

Тут уже каждый настраивает на свой вкус (если что-то пошло не так или потом захочется перенастроить — эту настройку можно будет вызвать заново). После настройки еще раз перезапускаю iTerm2 и мой результат выглядит так:

Плагины
Но это еще не все. Как я уже говорил у iTerm2 есть возможность устанавливать расширения. И парочка из них мне показалась очень полезными:
-
zsh-autosuggestions — автодополнение вводимых команд
-
zsh-syntax-highlighting — подсветка синтаксиса
Копирую их такими командами из гит-репозитория
git clone https://github.com/zsh-users/zsh-autosuggestions ${ZSH_CUSTOM:-~/.oh-my-zsh/custom}/plugins/zsh-autosuggestions

git clone https://github.com/zsh-users/zsh-syntax-highlighting.git ${ZSH_CUSTOM:-~/.oh-my-zsh/custom}/plugins/zsh-syntax-highlighting
Редактирую файл .zshrc, добавив их названия в строку с плагинами:
plugins=(git zsh-autosuggestions zsh-syntax-highlighting)Перезапускаю терминал и проверяю, что новые плагины работают

Добавим цвета
И остается еще одно маленькое, но очень полезное для меня, улучшение — я хочу чтобы каждая новая вкладка была своего цвета (случайного). Такой плагин я найти не смог, а потому сделал сам. Для этого так же нужно изменить файл .zshrc, добавить в конец такой код:
PRELINE="\r\033[A"

function color {
    echo -e "\033]6;1;bg;red;brightness;$((1 + $RANDOM % 255))\a"$PRELINE
    echo -e "\033]6;1;bg;green;brightness;$((1 + $RANDOM % 255))\a"$PRELINE
    echo -e "\033]6;1;bg;blue;brightness;$((1 + $RANDOM % 255))\a"$PRELINE
}

color
Получаю вот такой эффект:

Заключение
После настройки iTerm2 стал моим идеальным инструментом для работы в консоли: быстрым, умным и красивым. Чтобы в будущем не проходить всю настройку в ручную, я автоматизировал настройки скриптом ссылка на github.
Надеюсь, эта статья вдохновит вас на эксперименты с терминалом. Настраивайте его под свои задачи и получайте удовольствие от работы!
There are some fantastic tools that your Mac needs to greatly boost it’s usability and power.
Two big hitting “after market” applications are iTerm2 and Homebrew – we’ll cover iTerm2 in this post and you can read about Homebrew for Mac here… If you spend any time using a terminal, iTerm2 will become your hands-down favorite across all platforms!
Our favorite feature is the ability to split your one window into multiple terminal session panes!
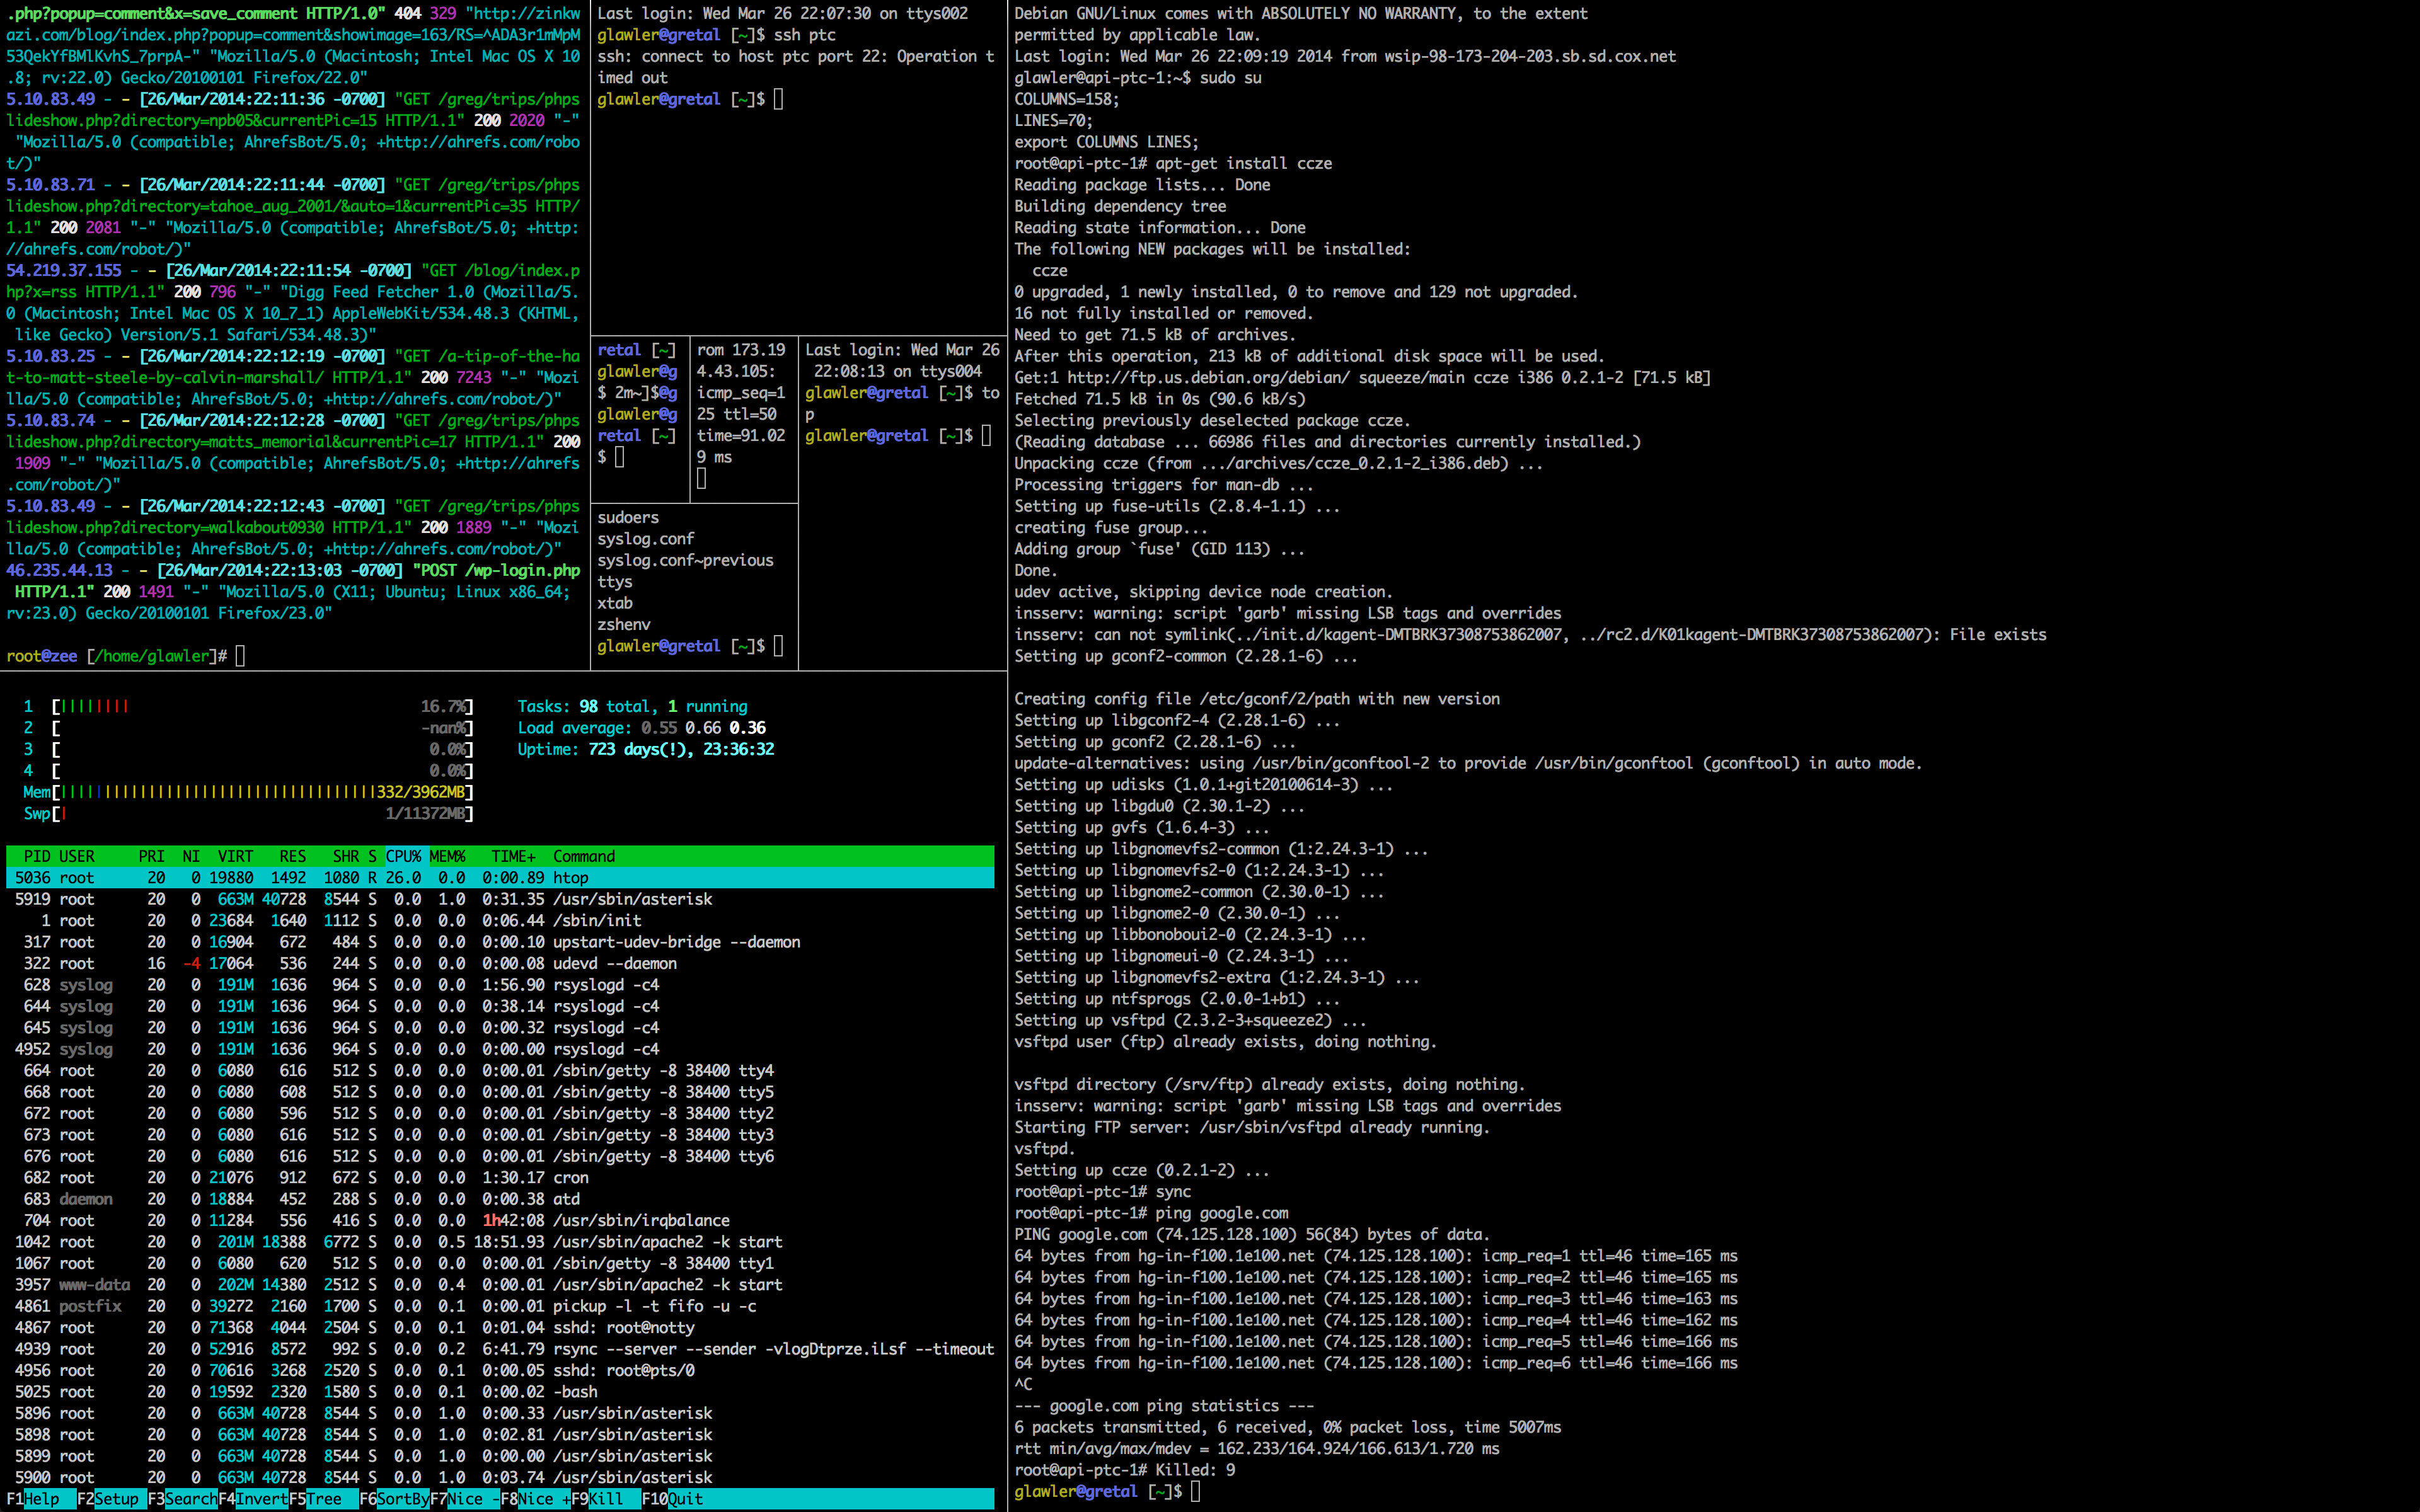
Screenshot of iTerm2 in the classic Fibonacci spiral configuration.
iTerm2 is a powerful alternative for the Terminal application that comes with Mac OS X. iTerm2 has some great features like auto updates, unlimited history, mouse-less copy, instant replay and tabs but far and above the best feature is the ability to split your one window into multiple panes! Split panes allows you to divide your single iTerm2 terminal window both vertically and horizontally into as many sessions as you need. Running iTerm2 in full screen mode is pure joy!
Download the latest version of iTerm here…
iTerm2 will become your hands-down favorite terminal across all platforms…
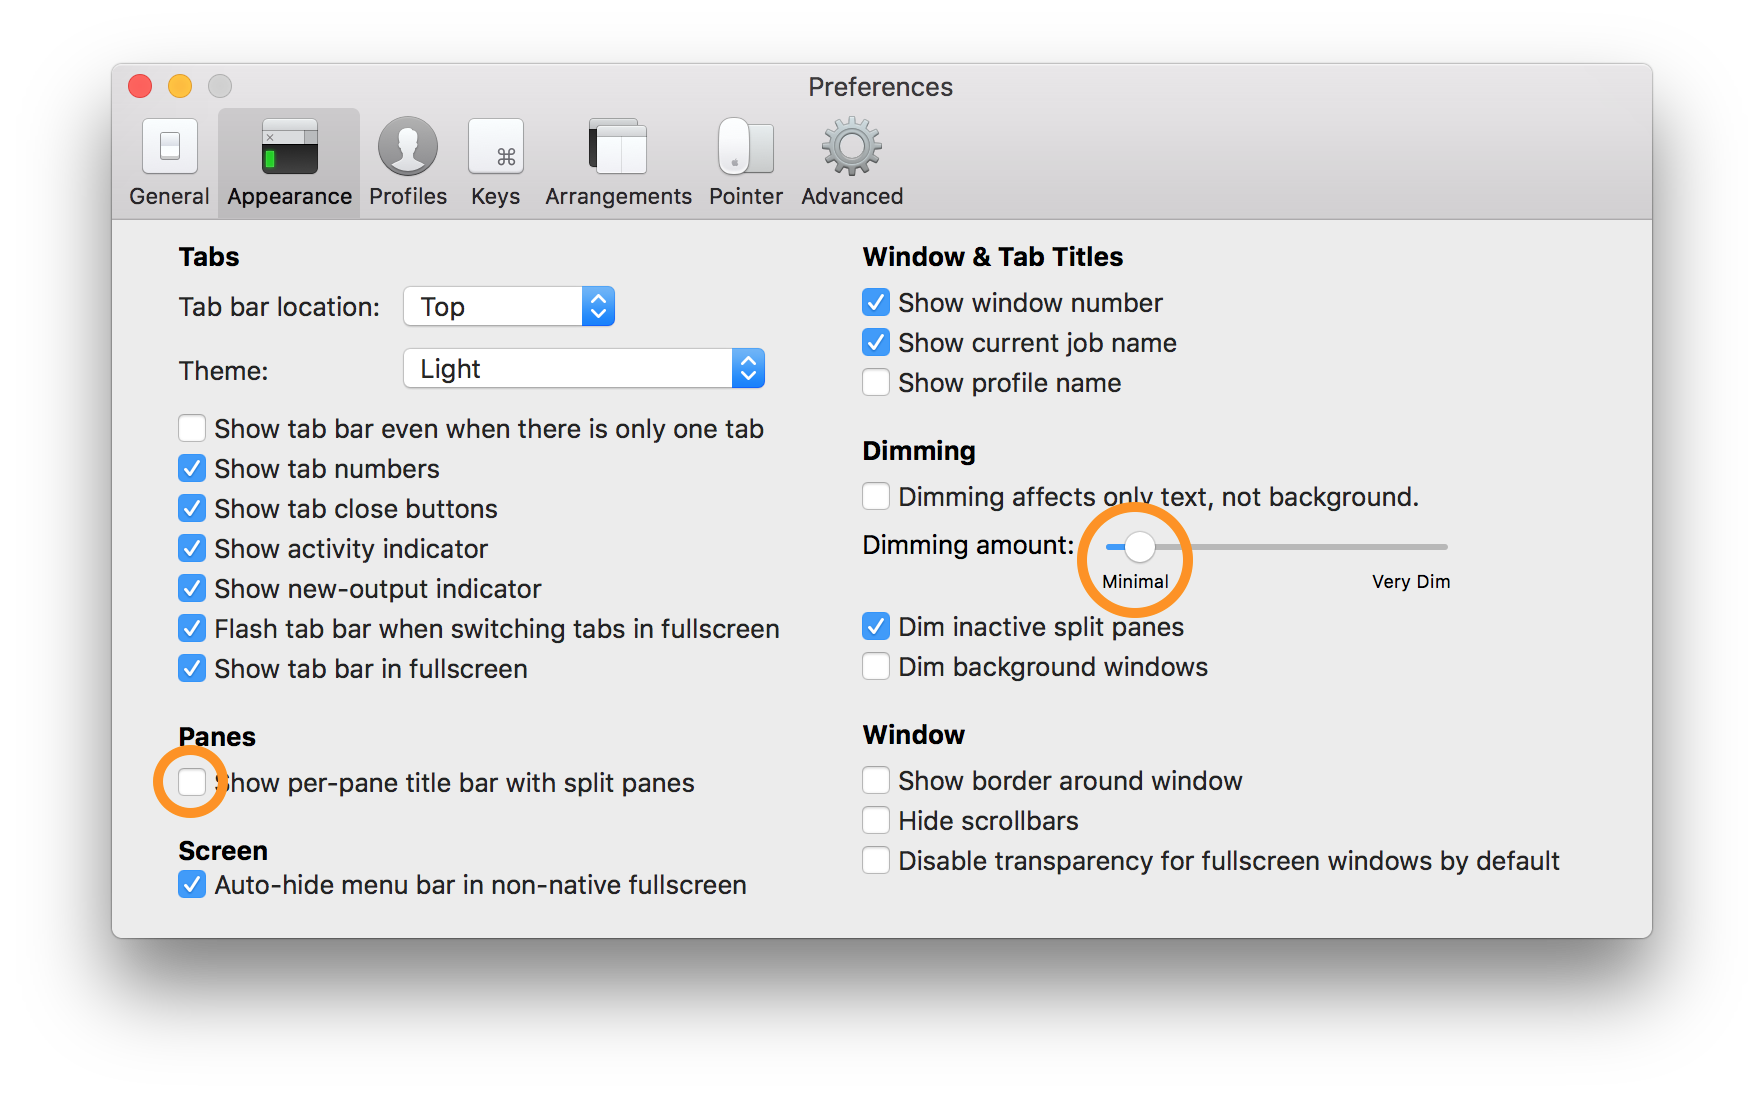
Setup
After you download and install iTerm, there are a couple of minor configuration changes that you’ll need to make to boost the amazingness.
- Uncheck Show per-pane title bar with split panes
- Dimming amount: Move slider most of the way to the left
Keyboard shortcuts to split the window into multiple bash sessions:
- To split your terminal vertically: Command + shift + D
- To split your terminal horizontally: Command + D
- This allows you to fit all your active sessions into panes in same screen or tab, making good use of that giant glossy real estate!
Other useful features and settings
- Maximize the currently active pane: Command + shift + enter (repeat to return to return to multi pane)
- Move focus between panes: Option + command + arrow key
- Move to other tabs: Command + arrow
- New pane directory: Preferences -> Profiles -> General -> Reuse previous session’s directory
- Scrollback buffer: Preferences -> Profiles -> Terminal -> Unlimited Scrollback
- Silence annoying bell: Preferences -> Profiles -> Terminal -> Silence Bell
Video of iTerm2 in action.
Now head over to read about the next tool that your Mac needs: Homebrew package manager for Mac OS
Enjoy!
— 11 min read

Table of Content
A terminal emulator is a software application that allows users to access and interact with a command-line interface on their computer. It emulates the functionalities of a physical computer terminal, enabling users to execute commands, run programs, and perform various tasks through a text-based interface.
While macOS comes with a built-in terminal emulator called Terminal, some users may prefer alternative terminal emulators for various reasons. One common reason is to gain additional features and functionalities that may not be available in the default macOS Terminal.
These alternative terminal emulators often offer advanced features like customizable themes, split panes, synchronized input, enhanced search capabilities, and more, providing a more flexible and efficient command-line experience.
In this post, you will find the best open-source and free terminal emulator and shell alternatives for macOS.
1- iTerm
iTerm2 is a powerful and versatile application for Mac users, offering advanced features and functionalities that enhance productivity and provide a great user experience. It introduces customizable themes, split panes, synchronized input, and more, revolutionizing the way you interact with your command line interface.
iTerm Key Features
- Split Panes
- Hotkey Window
- Search
- Autocomplete
- Copy Mode
- Paste History
- Instant Replay
- Configurability
- Unixyness
- 24-bit Color
- Readability
- Mouse Reporting
- Notification Center Support
- Global Search
- Tagged Profiles
- Multi-Lingual
- Triggers
- Smart Selection
- Shell Integration
- Automatic Profile Switching
- Inline Images
- Timestamps
- Password Manager
- Advanced Paste
- Annotations
- Badges
- Captured Output
2- Contour
Contour is a modern and fast terminal emulator with features such as GPU-accelerated rendering, font ligatures support, Unicode and high-DPI support, and vertical line markers for easy navigation in history. It is available on Linux, OS/X, FreeBSD, and Windows.
Key Features
- Available on all 4 major platforms, Linux, OS/X, FreeBSD, Windows.
- GPU-accelerated rendering.
- Font ligatures support (such as in Fira Code).
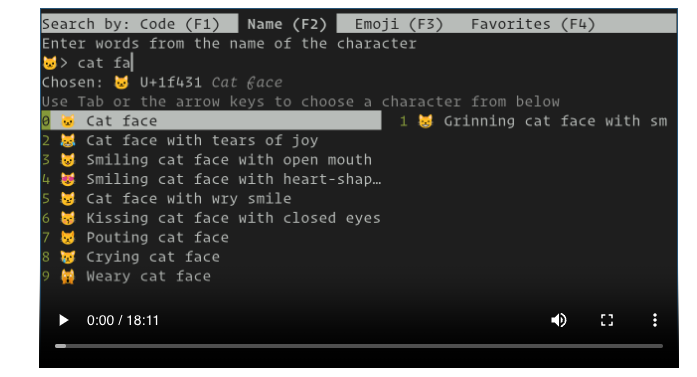
- Unicode: Emoji support (-: 🌈 💝 😛 👪 — including ZWJ, VS15, VS16 emoji

- Unicode: Grapheme cluster support
- Bold and italic fonts
- High-DPI support.
- Vertical Line Markers (quickly jump to markers in your history!)
- Vi-like input modes for improved selection and copy’n’paste experience and Vi-like scrolloff feature.
- Blurred behind transparent background when using Windows 10 or KDE window manager on Linux.
- Blurrable Background image support.
- Runtime configuration reload
- 256-color and Truecolor support
- Key binding customization
- Color Schemes
- Profiles (grouped customization of: color scheme, login shell, and related behaviors)
- Synchronized rendering (via SM ? 2026 / RM ? 2026)
- Text reflow (configurable via SM ? 2028 / RM ? 2028)
- Clickable hyperlinks via OSC 8
- Clipboard setting via OSC 52
- Sixel inline images
- Terminal page buffer capture VT extension to quickly extract contents.
- Builtin Fira Code inspired progress bar support.
- Read-only mode, protecting against accidental user-input to the running application, such as Ctrl+C.
- VT320 Host-programmable and Indicator status line support.
- and much more …

GitHub — contour-terminal/contour: Modern C++ Terminal Emulator
Modern C++ Terminal Emulator. Contribute to contour-terminal/contour development by creating an account on GitHub.
GitHubcontour-terminal
3- Lilt:
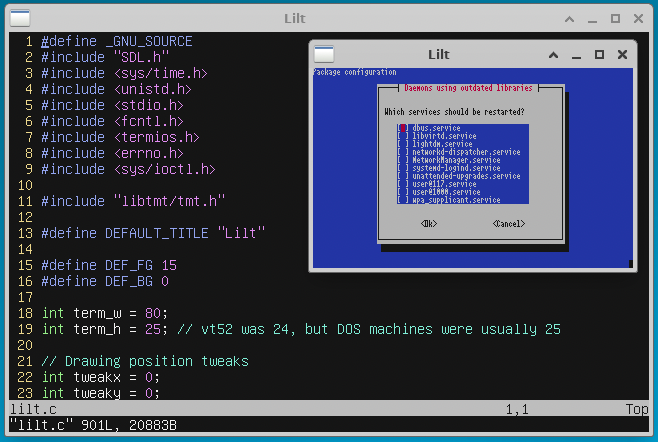
Lilt is a graphical terminal emulator that emulates an ANSI terminal with extensions such as xterm-style window title setting and mouse clicking. It uses Rob King’s Tiny Mock Terminal Library (libtmt) for escape sequence parsing and SDL1.2 for rendering and input.
Key Features
- Very simple/lightweight
- Nice default font and color scheme
- All resources get compiled into the binary
- Good enough emulation for vim, tmux, dialog, etc.
- X10/1002/1006 mouse support (works in vim and tmux)
- Simple dependencies (just SDL and the libtmt repository)
- Good for constrained systems (uses vfork() for systems with no MMU, uses only a single thread, comes with a tiny font)
- Comes with a converter for PSF fonts
Lilt should be fairly portable. It currently has been tested with Linux and macOS (see the «Building for macOS» section for more on the latter).
GitHub — MurphyMc/lilt: The Lilt terminal emulator — a simple and portable terminal emulator for Linux, macOS, and other Unix-like systems
The Lilt terminal emulator — a simple and portable terminal emulator for Linux, macOS, and other Unix-like systems — GitHub — MurphyMc/lilt: The Lilt terminal emulator — a simple and portable termi…
GitHubMurphyMc
4- Kitty
Kitty is a fast, feature-rich, cross-platform, GPU-based terminal emulator. It offloads rendering to the GPU for lower system load and uses threaded rendering for minimal latency. It supports graphics, ligatures, emoji, hyperlinks, and control from scripts or the shell.
It can be extended with kittens using Python and has programmable tabs, splits, and multiple layouts. It also allows browsing history and editing or downloading remote files in SSH sessions.
GitHub — kovidgoyal/kitty: Cross-platform, fast, feature-rich, GPU based terminal
Cross-platform, fast, feature-rich, GPU based terminal — GitHub — kovidgoyal/kitty: Cross-platform, fast, feature-rich, GPU based terminal
GitHubkovidgoyal
5- Alacritty
Alacritty is a fast, cross-platform, OpenGL terminal emulator that offers sensible defaults and extensive configuration options. It integrates with other applications to provide a flexible set of features and high performance. Currently in beta, it is already widely used by many as a daily driver.
GitHub — alacritty/alacritty: A cross-platform, OpenGL terminal emulator.
A cross-platform, OpenGL terminal emulator. Contribute to alacritty/alacritty development by creating an account on GitHub.
GitHubalacritty
6- Tabby
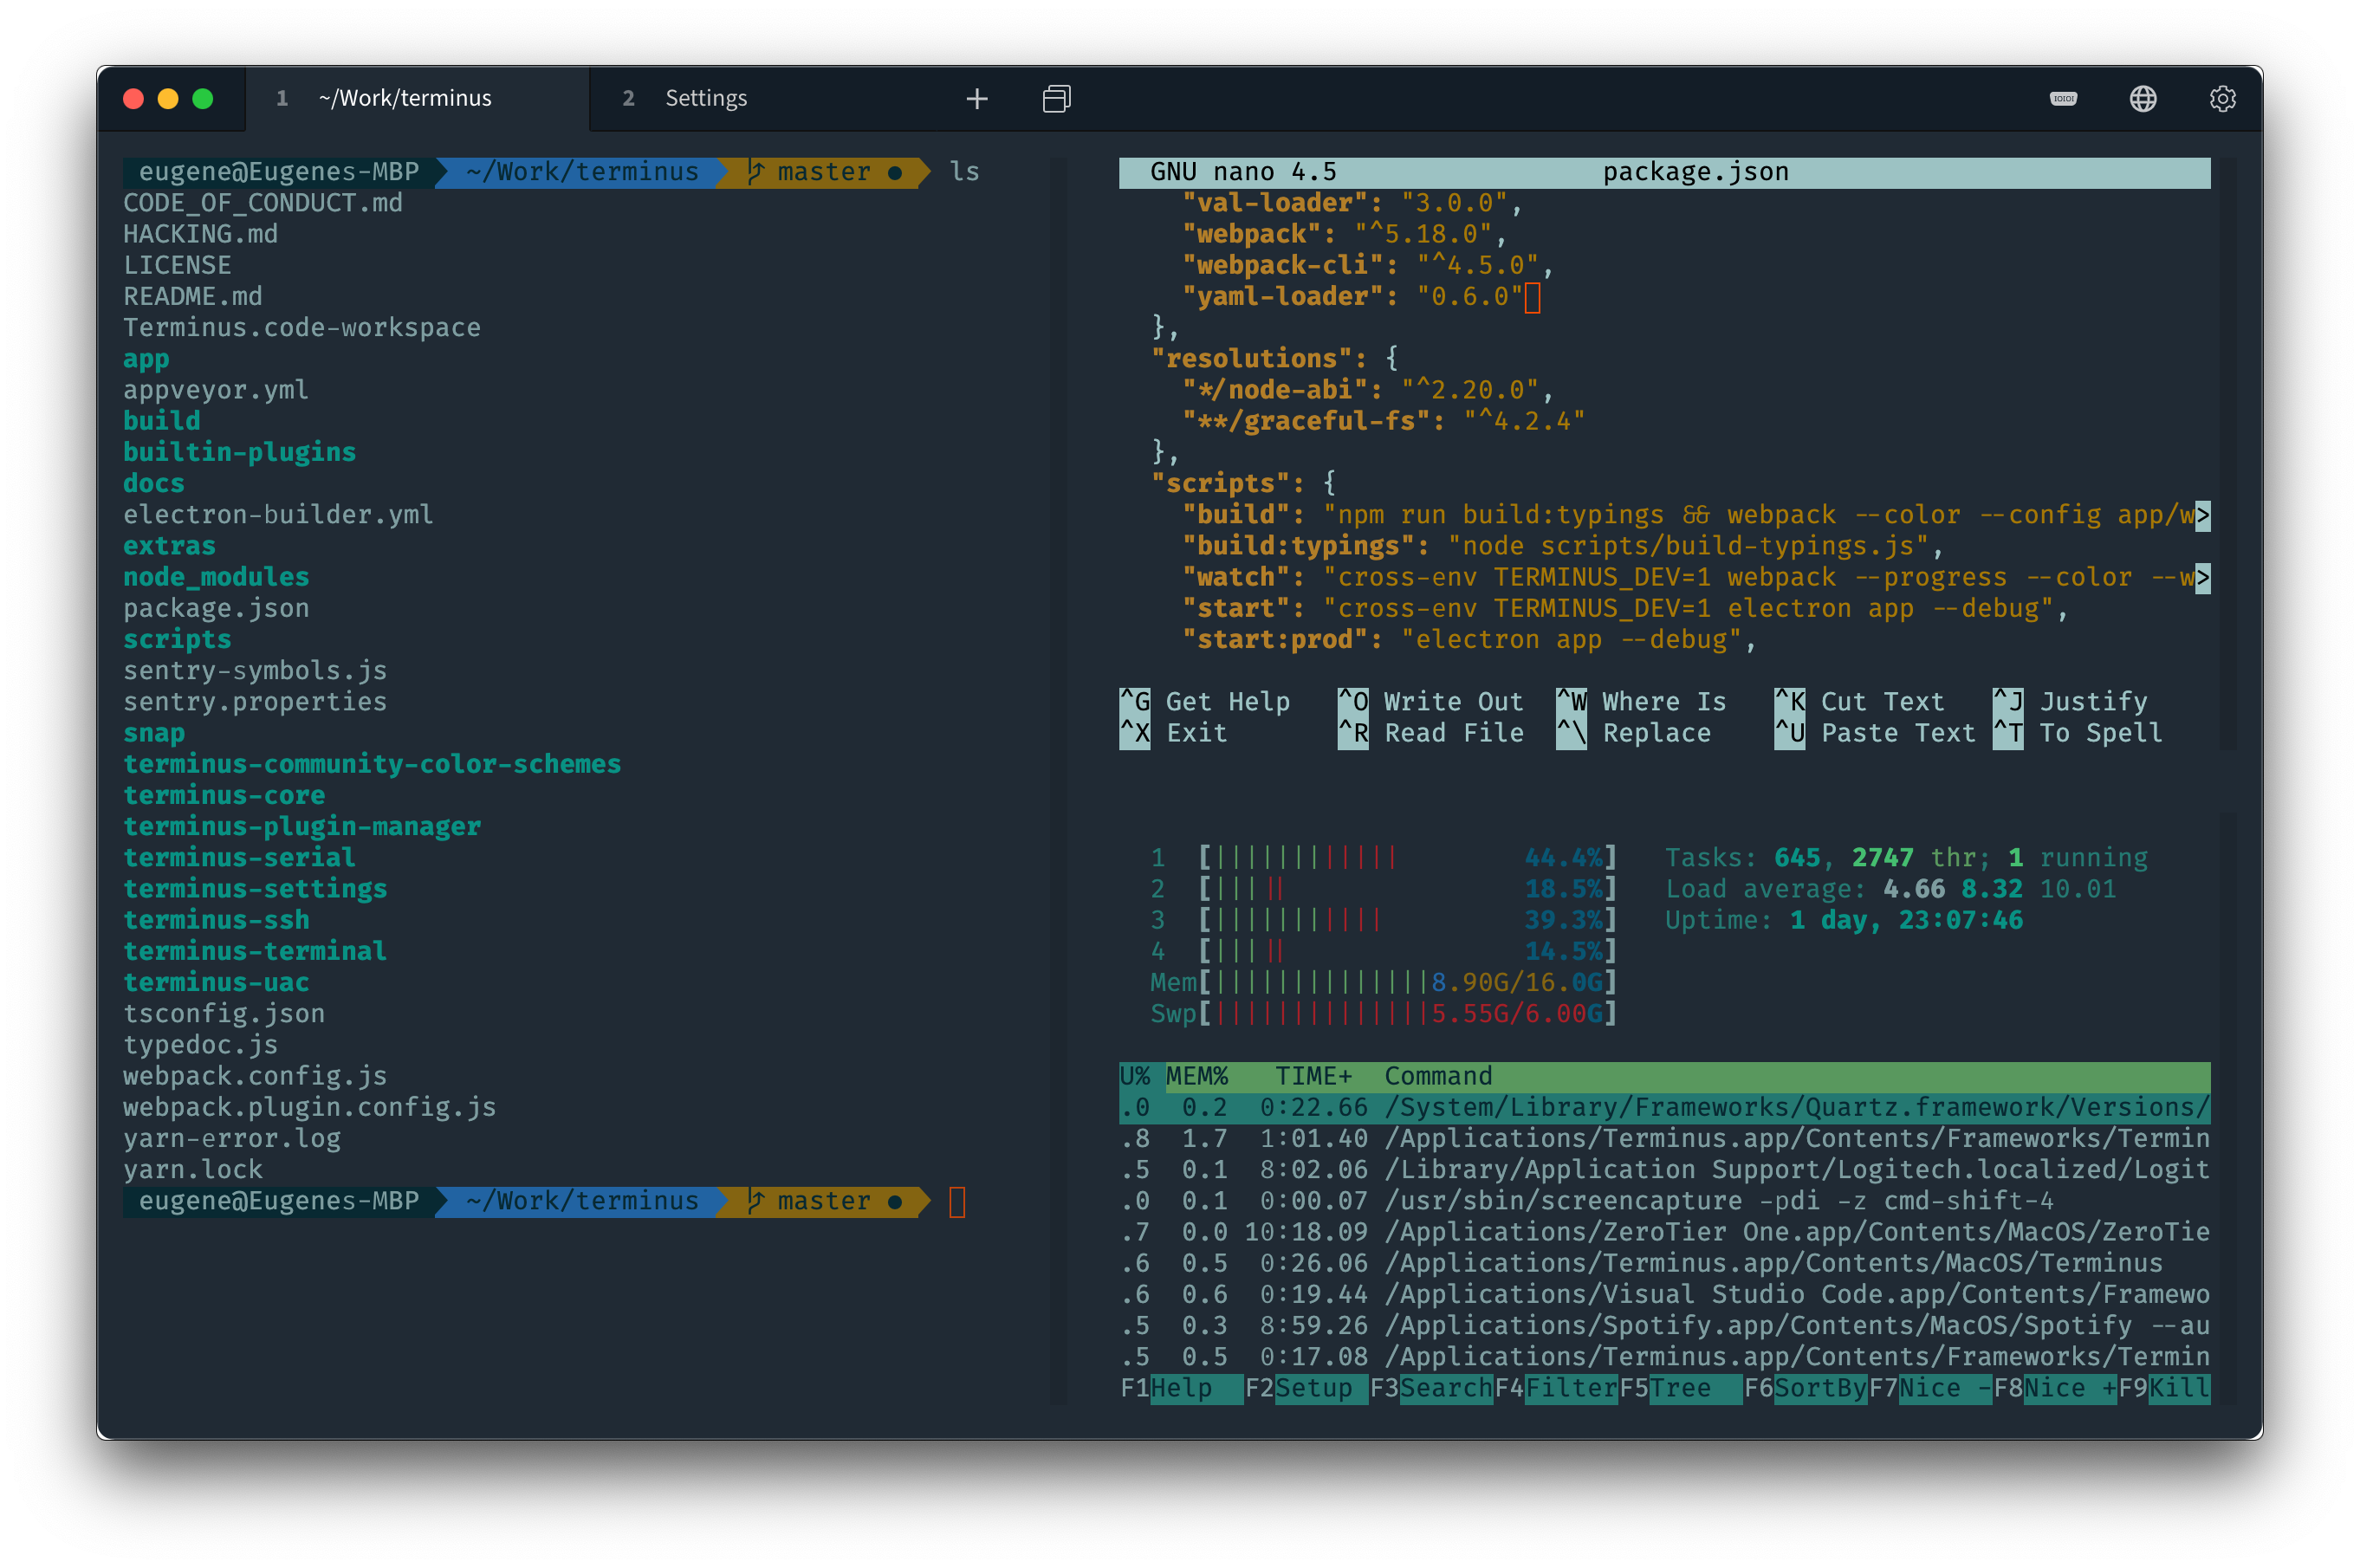
Tabby (formerly Terminus) is a versatile terminal emulator, SSH and serial client for Windows 10, macOS, and Linux. It offers integrated SSH and Telnet client, serial terminal, theming and color schemes, and fully configurable shortcuts.
Features
- Integrated SSH and Telnet client and connection manager
- Integrated serial terminal
- Theming and color schemes
- Fully configurable shortcuts and multi-chord shortcuts
- Split panes
- Remembers your tabs
- PowerShell (and PS Core), WSL, Git-Bash, Cygwin, MSYS2, Cmder and CMD support
- Direct file transfer from/to SSH sessions via Zmodem
- Full Unicode support including double-width characters
- Doesn’t choke on fast-flowing outputs
- Proper shell experience on Windows including tab completion (via Clink)
- Integrated encrypted container for SSH secrets and configuration
- SSH, SFTP and Telnet client available as a web app (also self-hosted).
- A V220 terminal + various extensions
- Multiple nested split panes
- Tabs on any side of the window
- Optional dockable window with a global spawn hotkey («Quake console»)
- Progress detection
- Notification on process completion
- Bracketed paste, multiline paste warnings
- Font ligatures
- Custom shell profiles
- Optional RMB paste and copy-on select (PuTTY style)
GitHub — Eugeny/tabby: A terminal for a more modern age
A terminal for a more modern age. Contribute to Eugeny/tabby development by creating an account on GitHub.
GitHubEugeny
7- Archipelago
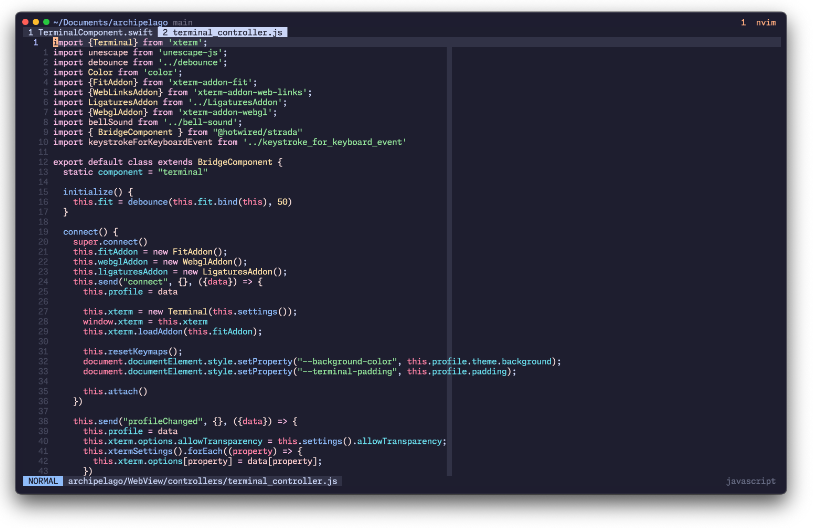
Archipelago is a minimalist open-source terminal emulator inspired by Hyper. It aims to provide a fast and reliable terminal experience, addressing issues such as slow performance and overlapping buffers that were present in Hyper. The project utilizes Xterm.js to solve these problems and create a better terminal emulator.
GitHub — npezza93/archipelago: An open-source terminal emulator built on web technology
An open-source terminal emulator built on web technology — GitHub — npezza93/archipelago: An open-source terminal emulator built on web technology
GitHubnpezza93
8- cool-retro-term

cool-retro-term is a terminal emulator that replicates the appearance of old cathode tube screens. It is visually appealing, customizable, and lightweight. It is based on the QML port of qtermwidget and is compatible with Linux and macOS, requiring Qt5.
GitHub — Swordfish90/cool-retro-term: A good looking terminal emulator which mimics the old cathode display…
A good looking terminal emulator which mimics the old cathode display… — GitHub — Swordfish90/cool-retro-term: A good looking terminal emulator which mimics the old cathode display…
GitHubSwordfish90
9- Warp
Warp is an advanced, Rust-based terminal with AI integrated, empowering you and your team to accelerate software development. Crafted by developers, for developers.
Warp: Your terminal, reimagined
Warp is a modern, Rust-based terminal with AI built in so you and your team can build great software, faster. Now available on MacOS.
Warp logopyronaurAutomattic
10- Hyper
Hyper is a remarkable and open-source project that passionately strives to deliver an exceptional and customizable experience for command-line interface enthusiasts. Our unwavering commitment lies in prioritizing speed, stability, and the creation of a robust API for extension authors.
Hyper: A terminal built on web technologies (Free program)
Features * Fast * Beautiful colors and design * Dozens of themes * Several useful plugins * Easy to configure * Developer friendly * Emoji Support Install on macOS You can install it on macOS using Homebrew Cask brew install —cask hyper Platforms macOS Windows and Linux License MIT License Tags terminal,terminal emulator,ssh,command-line,cl,

MEDevel.comHmza

GitHub — vercel/hyper: A terminal built on web technologies
A terminal built on web technologies. Contribute to vercel/hyper development by creating an account on GitHub.
GitHubvercel
11- MacTerm
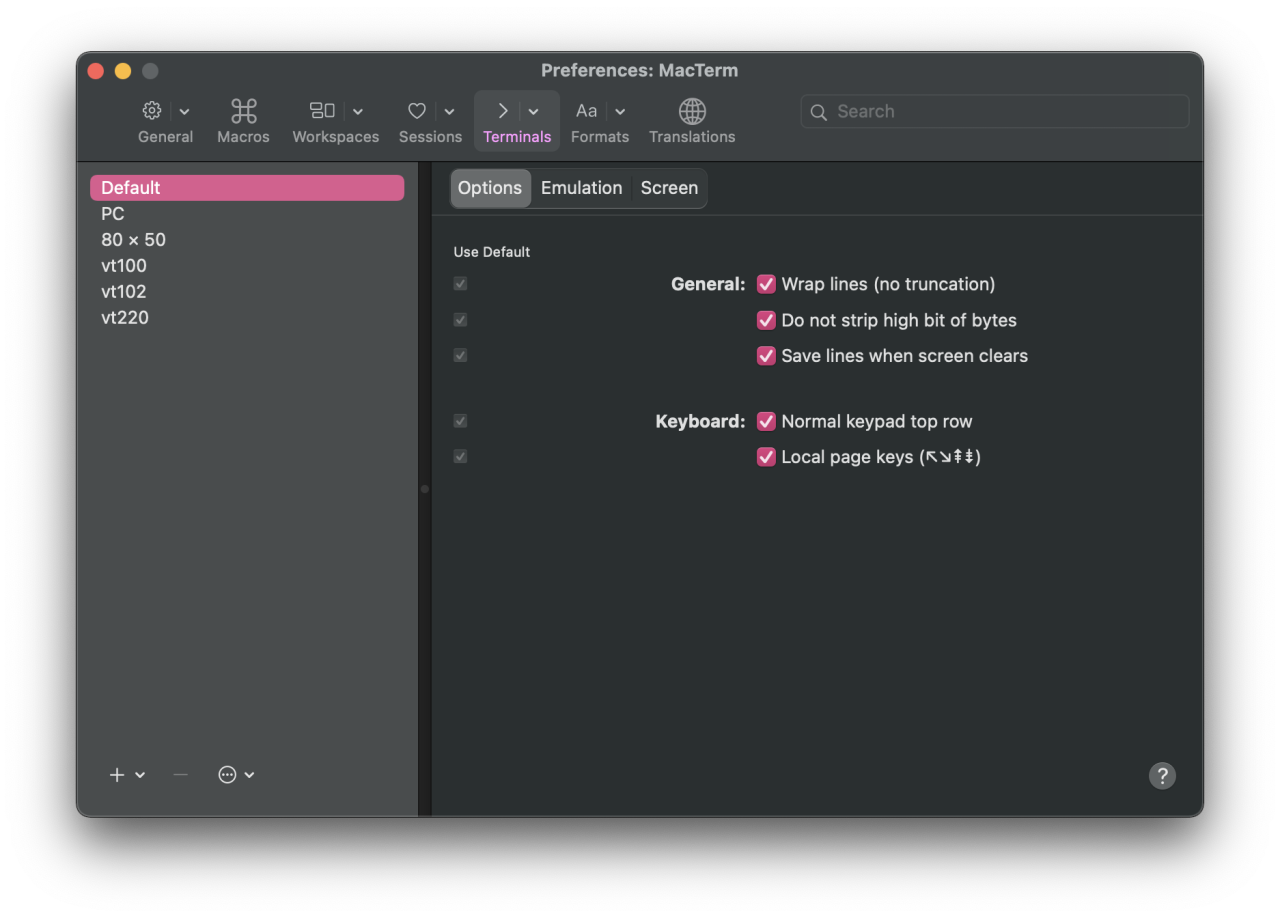
Macterm is a powerful replacement for macOS Terminal, supporting 24-bit color, graphics protocols, and iTerm2 image sequences and color schemes. Version 5.0 alpha is currently in development and can be built from GitHub. It is a terminal emulator for macOS with 24-bit color and graphics capabilities.
MacTerm — Terminal Replacement for macOS / OS X
A powerful replacement for the macOS / OS X Terminal, with 24-bit color and graphics features.
Terminal Replacement for macOS / OS X
12- wayst terminal
wayst is a free and open-source terminal emulator for Wayland and X11 with OpenGL rendering and minimal dependencies. It is currently in alpha stage, so expect bugs.
Features
- Unicode support
- Text reflow
- 24-bit colors
- Dynamic colors
- All text properties (squiggly underline, blinking, overline etc.)
- Resizable font
- Subpixel antialiasing
- Mouse reporting
- Scrollback
- Mouse text selection
- Clipboard
- Configurable keybindings
- Clickable links, OSC 8 links
- Command history and marks*
GitHub — 91861/wayst: A simple terminal emulator
A simple terminal emulator. Contribute to 91861/wayst development by creating an account on GitHub.
GitHub91861
13- Go2Shell
Go2Shell is a tool that opens a terminal window to the current directory in Finder. It supports various terminal applications, has separate icons for different versions of Finder, and offers features like tabs, Retina display support, and easy installation.
Go2Shell — ZipZapMac
ZipZapMac presents Go2Shell MacOS X application. Opens a terminal window to the current directory in Finder
ZipZapMac
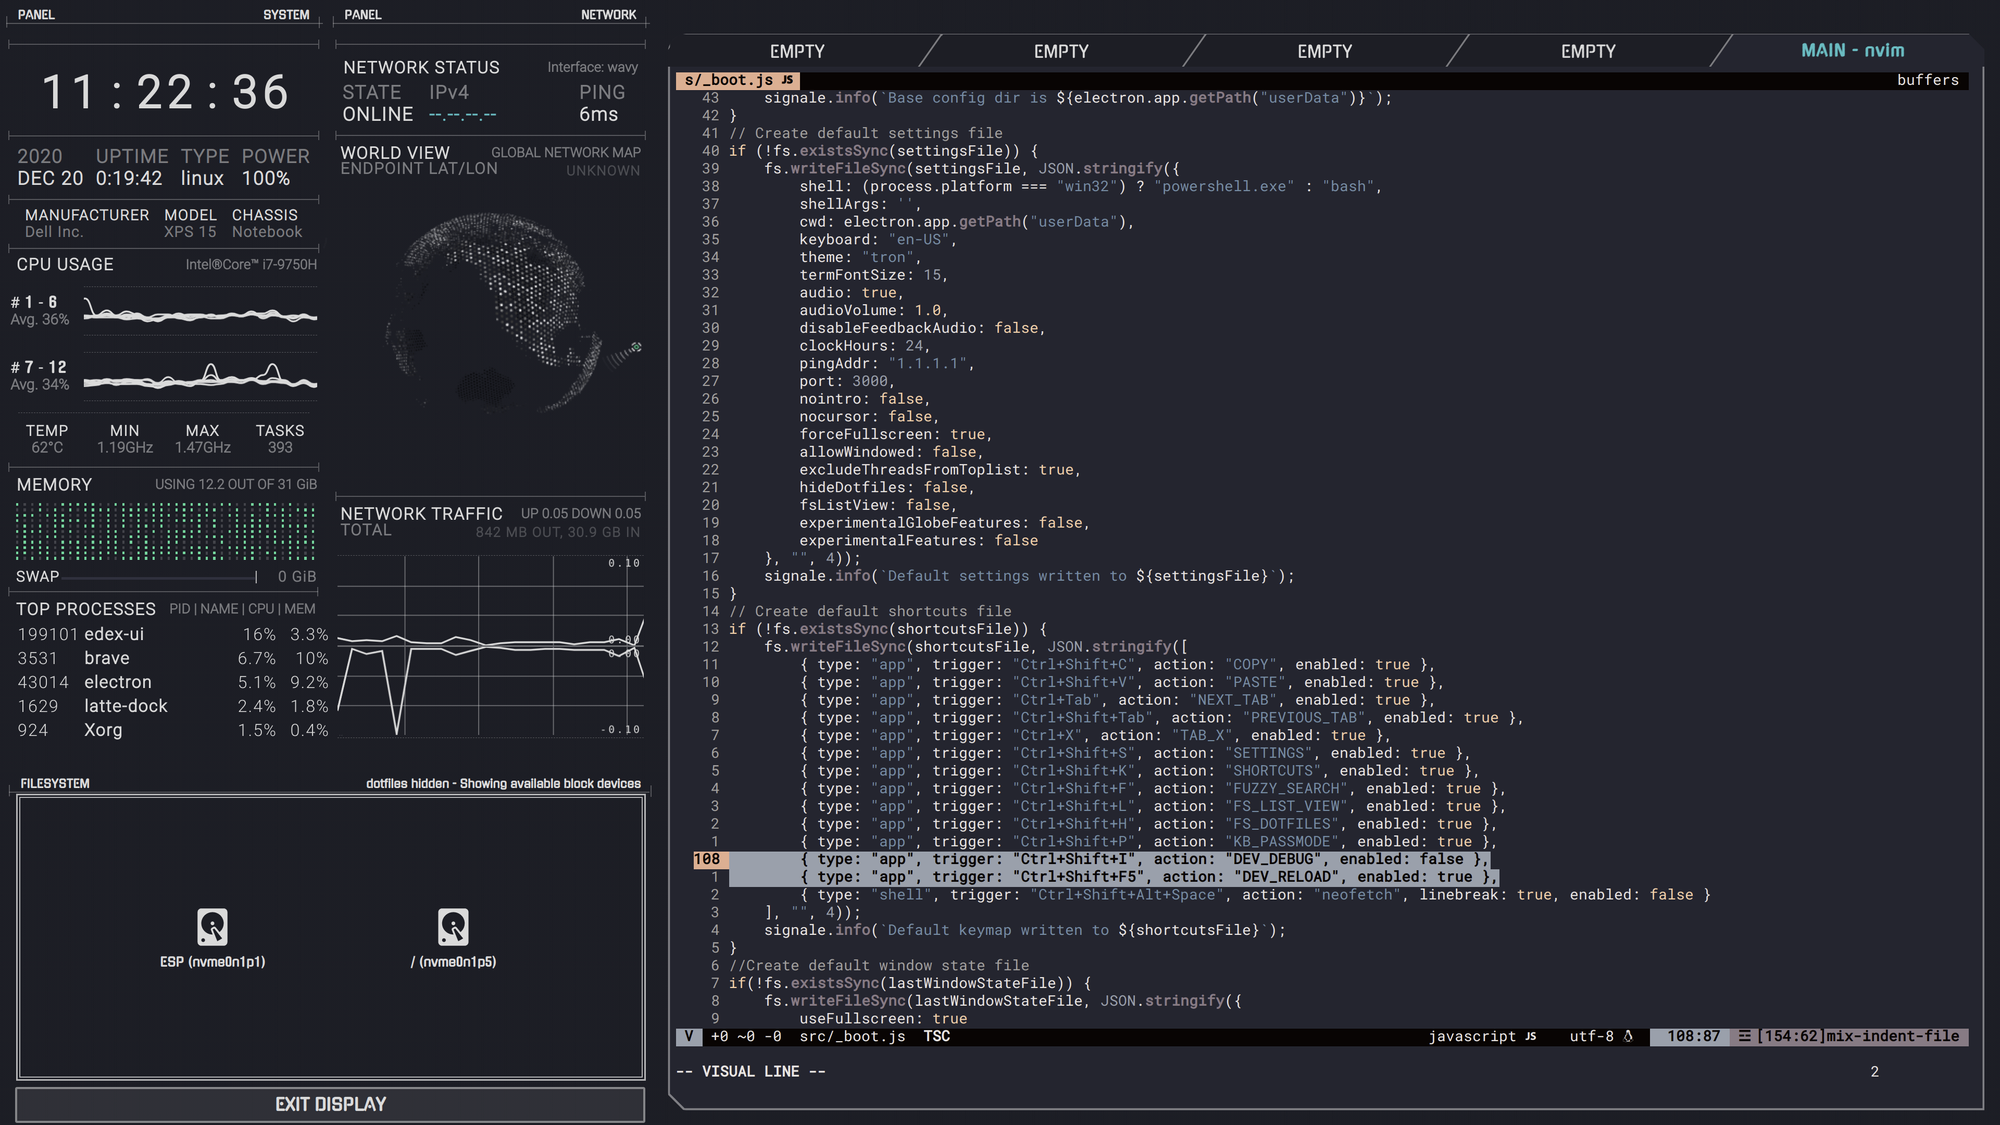
14- eDEX-UI
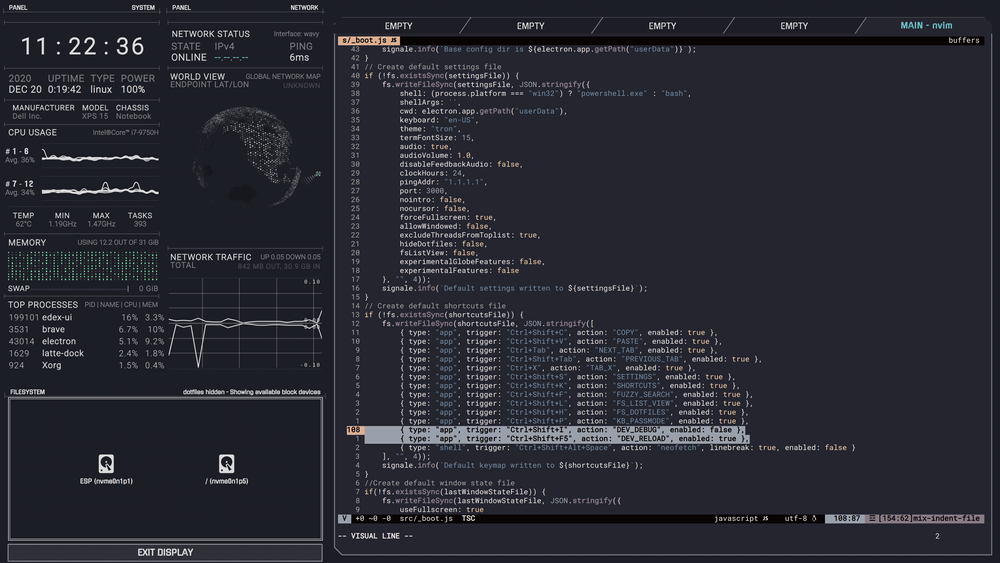
eDEX-UI is a cross-platform terminal emulator and system monitor inspired by TRON Legacy, offering a futuristic and functional user interface. It aims to make science-fiction user experiences accessible and prioritizes functionality and usability in real-life scenarios.
eDEX-UI: Converts Your View Into a Sci-fi Tron Legacy Functional Terminal
cross-platform, customizable science fiction terminal emulator with advanced monitoring & touchscreen support.
MEDevel.comHmza
GitHub — GitSquared/edex-ui: A cross-platform, customizable science fiction terminal emulator with advanced monitoring & touchscreen support.
A cross-platform, customizable science fiction terminal emulator with advanced monitoring & touchscreen support. — GitHub — GitSquared/edex-ui: A cross-platform, customizable science fiction te…
GitHubGitSquared
15- Photon
Photon is a free and simple terminal built with Electron and React, designed for developers as a cross-platform terminal emulator.
GitHub — TeamDock/photon: A simple terminal using Electron
A simple terminal using Electron. Contribute to TeamDock/photon development by creating an account on GitHub.
GitHubTeamDock
16- Uniterm2
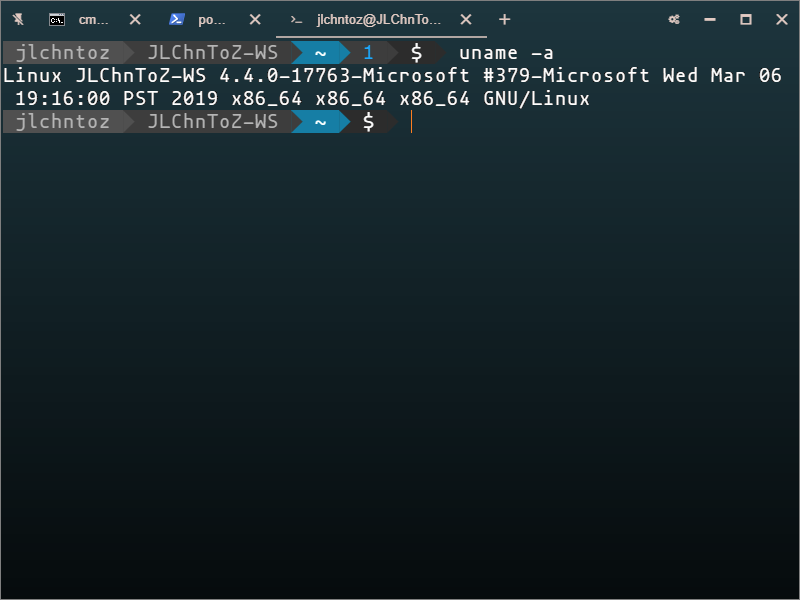
Uniterm2 confidently builds upon its predecessor, Uniterm, to provide an enhanced pseudo terminal emulator experience. Powered by xterm.js and written in TypeScript, Uniterm2 boasts numerous improvements over its predecessor.
These improvements include the removal of the built-in MinSH component, seamless file dropping support, powerline decorations, and a flexible modding mechanism. Both Uniterm and Uniterm2 offer cross-platform compatibility, seamless integration with Windows Subsystem for Linux, and are proudly open source.
GitHub — JLChnToZ/uniterm: 🚧Universal Terminal Emulator, might be a great toy terminal front-end for geeks.
🚧Universal Terminal Emulator, might be a great toy terminal front-end for geeks. — GitHub — JLChnToZ/uniterm: 🚧Universal Terminal Emulator, might be a great toy terminal front-end for geeks.
GitHubJLChnToZ
17- termscp (rust)
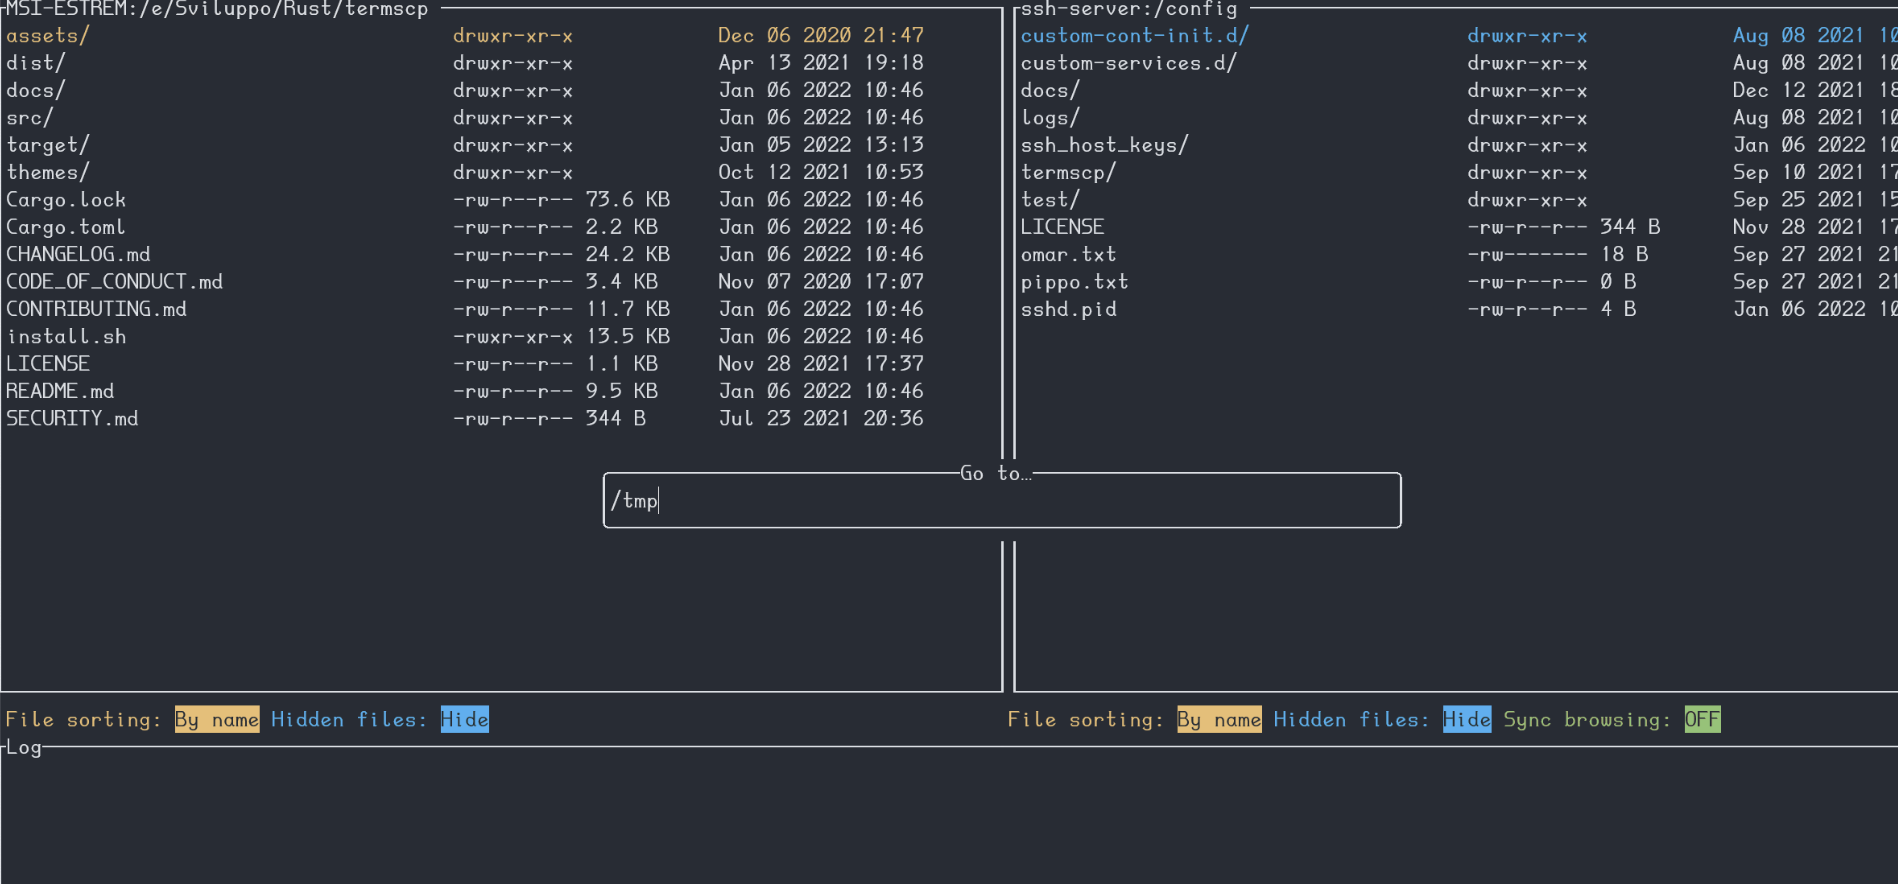
Termscp is an incredibly feature-rich terminal file transfer and explorer, offering comprehensive support for SCP/SFTP/FTP/S3. Essentially, it is a remarkable terminal utility equipped with a user-friendly TUI, enabling seamless connection to remote servers for effortless retrieval and uploading of files, as well as effortless interaction with the local file system.
It is fully compatible with Linux, MacOS, FreeBSD, NetBSD, and Windows platforms.
Features
- 📁 Different communication protocols
- SFTP
- SCP
- FTP and FTPS
- S3
- SMB
- 🖥 Explore and operate on the remote and on the local machine file system with a handy UI
- Create, remove, rename, search, view and edit files
- ⭐ Connect to your favourite hosts through built-in bookmarks and recent connections
- 📝 View and edit files with your favourite applications
- 💁 SFTP/SCP authentication with SSH keys and username/password
- 🐧 Compatible with Windows, Linux, FreeBSD, NetBSD and MacOS
- 🎨 Make it yours!
- Themes
- Custom file explorer format
- Customizable text editor
- Customizable file sorting
- and many other parameters…
- 📫 Get notified via Desktop Notifications when a large file has been transferred
- 🔭 Keep file changes synchronized with the remote host
- 🔐 Save your password in your operating system key vault
- 🦀 Rust-powered
- 👀 Developed keeping an eye on performance
- 🦄 Frequent awesome updates
GitHub — veeso/termscp: 🖥 A feature rich terminal UI file transfer and explorer with support for SCP/SFTP/FTP/S3/SMB
🖥 A feature rich terminal UI file transfer and explorer with support for SCP/SFTP/FTP/S3/SMB — GitHub — veeso/termscp: 🖥 A feature rich terminal UI file transfer and explorer with support for SCP…
GitHubveeso