
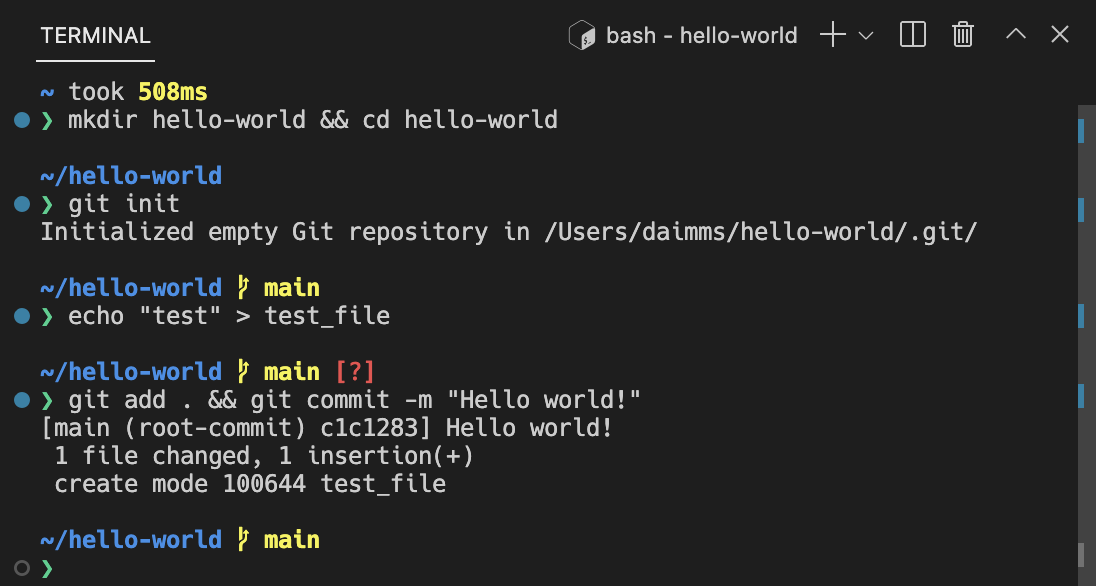
Visual Studio Code includes a full featured integrated terminal that starts at the root of your workspace. It provides integration with the editor to support features like links and error detection. The integrated terminal can run commands such as mkdir and git just like a standalone terminal.
You can open a terminal as follows:
- From the menu, use the Terminal > New Terminal or View > Terminal menu commands.
- From the Command Palette (⇧⌘P (Windows, Linux Ctrl+Shift+P)), use the View: Toggle Terminal command.
- In the Explorer, you can use the Open in Integrated Terminal context menu command to open a new terminal from a folder.
- To toggle the terminal panel, use the ⌃` (Windows, Linux Ctrl+`) keyboard shortcut.
- To create a new terminal, use the ⌃⇧` (Windows, Linux Ctrl+Shift+`) keyboard shortcut.
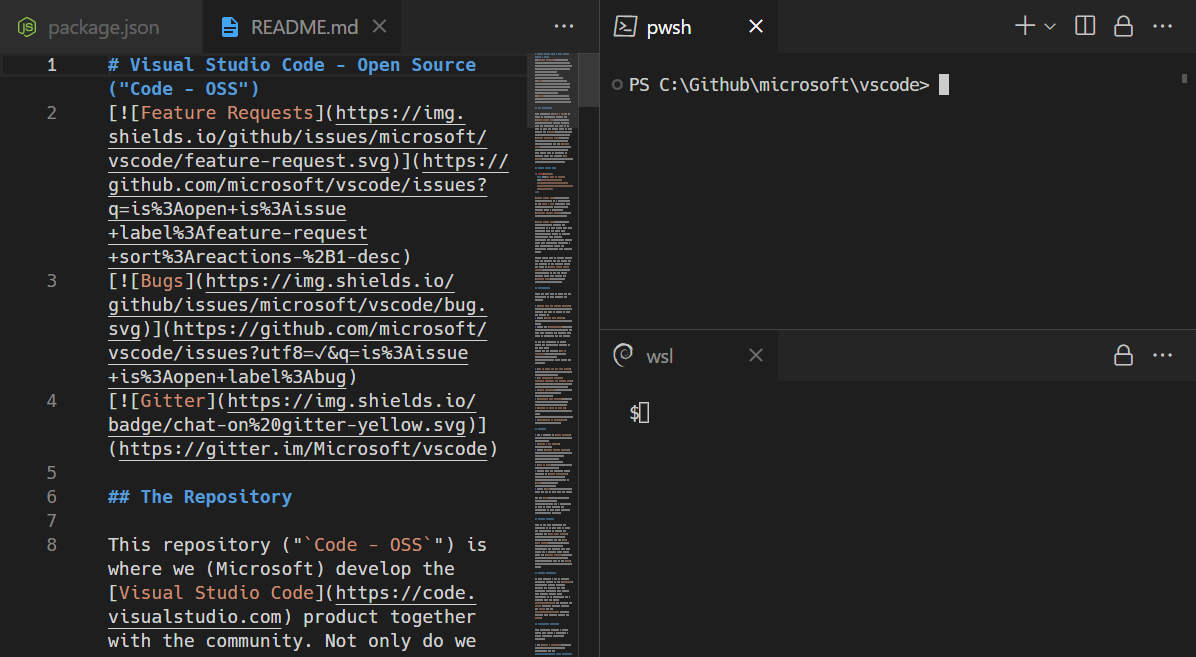
VS Code’s terminal has additional functionality called shell integration that tracks where commands are run with decorations on the left of a command and in the scrollbar:
Note: If you prefer to work outside VS Code, open an external terminal with the ⇧⌘C (Windows, Linux Ctrl+Shift+C) keyboard shortcut
Terminal shells
The integrated terminal can use various shells installed on your machine, with the default being pulled from your system defaults. Shells are detected and presented in the terminal profiles dropdown.
You can learn more about configuring terminal shells in the terminal profiles article.
Managing terminals
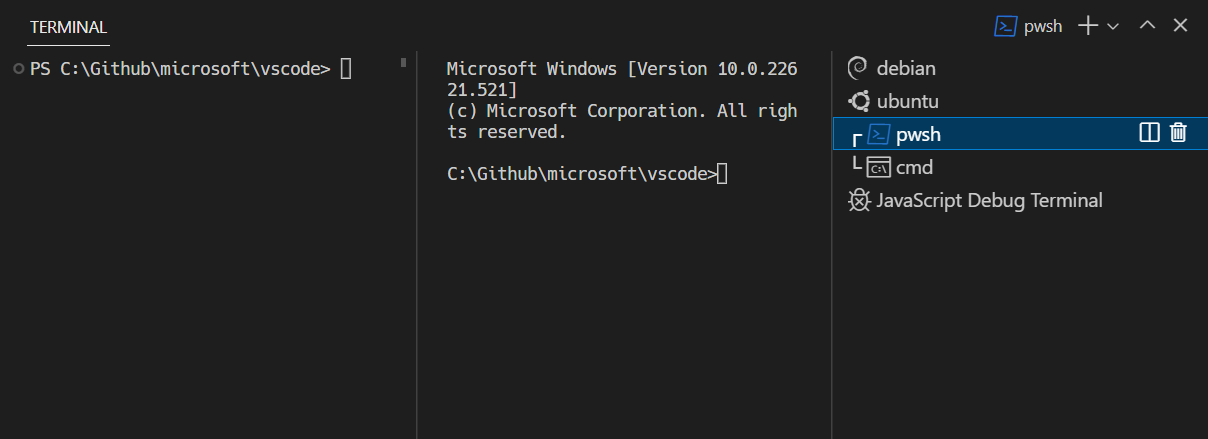
The terminal tabs UI is on the right side of the terminal view. Each terminal has an entry with its name, icon, color, and group decoration (if any).
Add terminal instances by selecting the + icon on the top-right of the TERMINAL panel, selecting a profile from the terminal dropdown, or by triggering the ⌃⇧` (Windows, Linux Ctrl+Shift+`) command. This action creates another entry in the tab list associated with that terminal.
Remove terminal instances by hovering a tab and selecting the Trash Can button, selecting a tab item and pressing Delete, using Terminal: Kill the Active Terminal Instance command, or via the right-click context menu.
Navigate between terminal groups using focus next ⇧⌘] (Windows, Linux Ctrl+PageDown) and focus previous ⇧⌘[ (Windows, Linux Ctrl+PageUp).
Icons may appear to the right of the terminal title on the tab label when a terminal’s status changes. Some examples are a bell (macOS) and for tasks, displaying a check mark when there are no errors and an X otherwise. Hover the icon to read status information, which may contain actions.
Groups (split panes)
Place multiple terminals side-by-side and create a group by splitting a terminal:
- Hover over a entry in the list of terminals on the right and select the inline split button.
- Right-click the context menu and selecting the Split menu option.
- Alt and click on a tab, the + button, or the single tab on the terminal panel.
- Trigger the ⌘\ (Windows, Linux Ctrl+Shift+5) command.
Tip: The working directory for the new terminal depends on the terminal.integrated.splitCwd setting.
Navigate between terminals in a group by focusing the previous pane, ⌥⌘← (Windows, Linux Alt+Left), or the next pane, ⌥⌘→ (Windows, Linux Alt+Right).
Dragging and dropping tabs in the list rearranges them. Dragging a tab into the main terminal area allows moving a terminal from one group to another.
Moving a terminal into its own group can be done with the Terminal: Unsplit Terminal command through the Command Palette or in the right-click context menu.
Terminals in editor area
You can open terminals in the editor area (terminal editors) with the Terminal: Create New Terminal in Editor Area command, the Terminal: Create New Terminal in Editor Area to the Side command, or by dragging a terminal from the terminal view into the editor area. Terminal editors are presented like regular editor tabs:
You can have terminal editors on either side or arranged in multiple dimensions using the editor group layout system, e.g. PowerShell and WSL terminals stacked to the right of file editors:
The terminal.integrated.defaultLocation setting can change the default view or editor area terminal location.
Navigating the buffer
The content in the terminal is called the buffer, with the section right above the bottom viewport being called «scrollback». The amount of scrollback kept is determined by the terminal.integrated.scrollback setting and defaults to 1000 lines.
There are various commands available to navigate around the terminal buffer:
- Scroll up a line — ⌥⌘PageUp (Windows Ctrl+Alt+PageUp, Linux Ctrl+Shift+Up)
- Scroll down a line — ⌥⌘PageDown (Windows Ctrl+Alt+PageDown, Linux Ctrl+Shift+Down)
- Scroll up a page — PageUp (Windows, Linux Shift+PageUp)
- Scroll down a page — PageDown (Windows, Linux Shift+PageDown)
- Scroll to the top — ⌘Home (Windows Ctrl+Home, Linux Shift+Home)
- Scroll to the bottom — ⌘End (Windows Ctrl+End, Linux Shift+End)
Command navigation is also available (see shell integration):
- Scroll to the previous command — ⌘↑ (Windows, Linux Ctrl+Up)
- Scroll to the next command — ⌘↓ (Windows, Linux Ctrl+Down)
Scrolling will happen instantaneously, but can be configured to animate over a short duration with the terminal.integrated.smoothScrolling setting.
Links
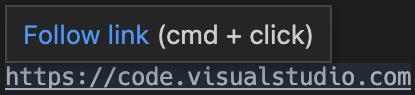
The terminal features sophisticated link detection with editor integration and even extension contributed link handlers. Hover over a link to display an underline, then hold the Ctrl/Cmd key and click.
These built-in link handlers are used in the following priority order:
-
URIs/URLs: Links that look like URIs, such as
https://code.visualstudio.com,vscode://path/to/fileorfile://path/to/filewill open using the standard handler for the protocol. For example,httpslinks will open the browser.
-
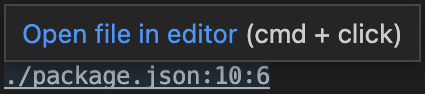
File links: Links to files that have been verified to exist on the system. These will open the file in a new editor tab and support many common line/column formats such as
file:1:2,file:line 1, column 2.
-
Folder links: Links to folders are similar to file links but will open a new VS Code window at the folder.
-
Word links: Fallback link type that uses the terminal.integrated.wordSeparators setting. The setting defines word boundaries and make nearly all text into words. Activating a word link searches the workspace for the word. If there is a single result it will open, otherwise it will present the search results. Word links are considered «low confidence» and will not show an underline or tooltip unless you hold the Ctrl/Cmd key. They also have limited support for line and column suffixes.

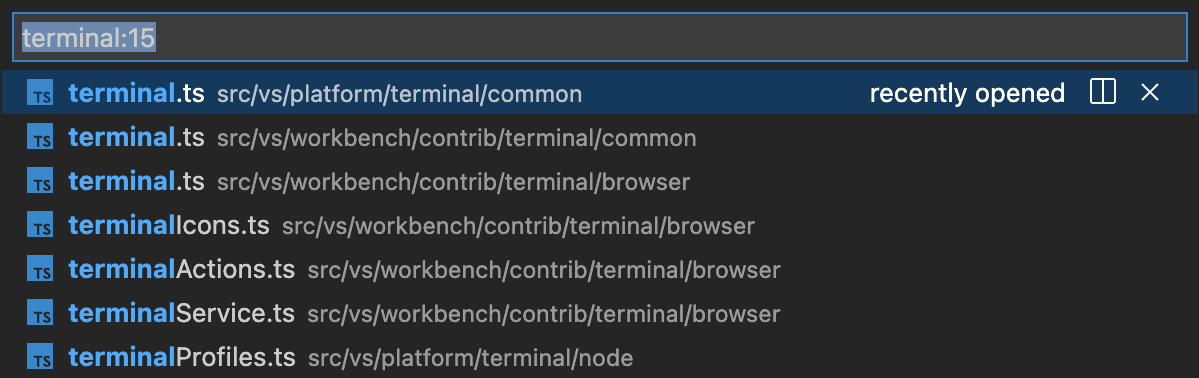
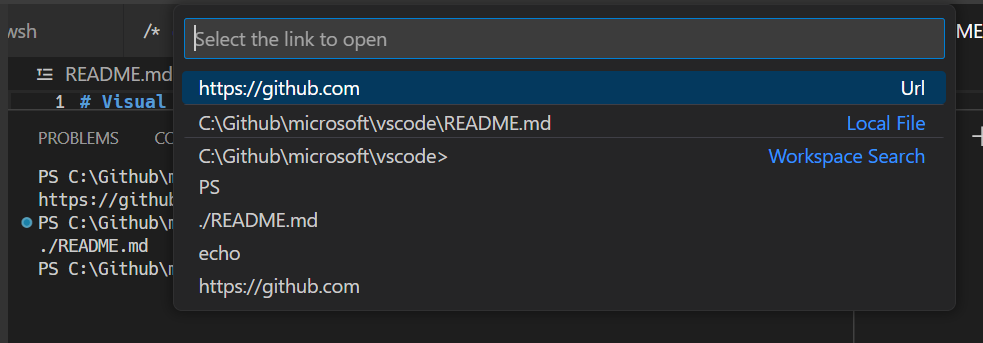
The Open Detected Link command (⇧⌘G (Windows, Linux Ctrl+Shift+G)) can be used to access links via the keyboard:
Tip: If link verification causes performance issues, like in high latency remote environments, disable it via the terminal.integrated.enableFileLinks setting.
Extensions handling links
Extensions can contribute link providers which allow the extension to define what happens when clicked. An example of this is the GitLens extension detecting Git branch links.
Keyboard accessibility
Links are keyboard accessible through several commands that open links based on the type of link.
- Terminal: Open Last Local File Link — Opens the most recent local file link. No default keyboard shortcut.
- Terminal: Open Last URL link — Opens the most recent URI/URL link. No default keyboard shortcut.
- Terminal: Open Detected Link… — Opens a searchable Quick Pick with all detected links, including word links. The default keyboard shortcut is Ctrl/Cmd+Shift+O, which is the same as the Go to Symbol in Editor keyboard shortcut.
Copy & paste
The keyboard shortcuts for copy and paste follow platform standards:
- Linux: Ctrl+Shift+C and Ctrl+Shift+V; selection paste is available with Shift+Insert
- macOS: Cmd+C and Cmd+V
- Windows: Ctrl+C and Ctrl+V
Copying is done automatically on selection when terminal.integrated.copyOnSelection is enabled.
By default, there is a warning when pasting multiple lines, which can be disabled with the terminal.integrated.enableMultiLinePasteWarning setting. This is only done when the shell does not support «bracketed paste mode». When that mode is enabled, the shell is indicating that it can handle multiple line pasting.
Using the mouse
Right-click behavior
The right-click behavior differs based on the platform:
- Linux: Show the context menu.
- macOS: Select the word under the cursor and show the context menu.
- Windows: Copy and drop selection if there is a selection, otherwise paste.
This can be configured using the terminal.integrated.rightClickBehavior setting. The options are:
default— Show the context menu.copyPaste— Copy when there is a selection, otherwise paste.paste— Paste on right-click.selectWord— Select the word under the cursor and show the context menu.nothing— Do nothing and pass event to terminal.
Reposition the cursor with Alt
Alt and left-click will reposition the cursor to underneath the mouse. This works by simulating arrow keystrokes, which may not work reliably for some shells or programs. This feature can be disabled with the terminal.integrated.altClickMovesCursor setting.
Mouse events mode
When applications running in the terminal turn on mouse events mode, such as Vim mouse mode, mouse interaction is sent to the application instead of the terminal. This means that clicking and dragging will no longer create a selection. Terminal selection can be forced by holding the Alt key on Windows and Linux, this can also be done with the Option key on macOS but requires enabling the terminal.integrated.macOptionClickForcesSelection setting first.
Find
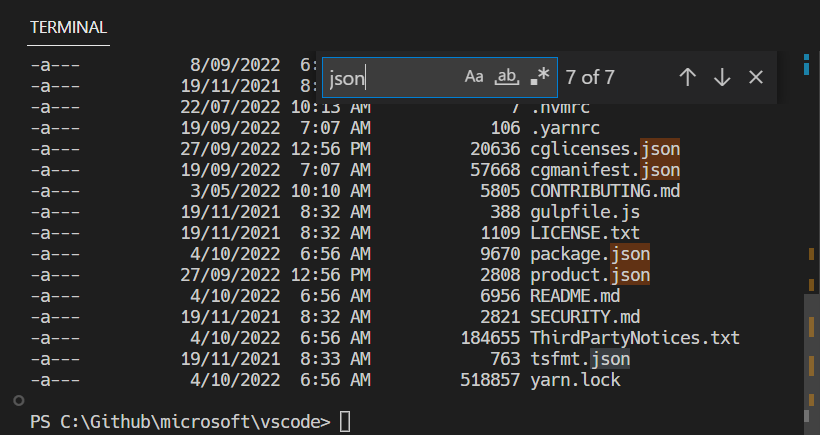
The integrated terminal has find functionality that can be triggered with ⌘F (Windows, Linux Ctrl+F).
Tip: Ctrl+F can be sent to the shell by removing the
workbench.action.terminal.focusFindcommand from commands to skip shell.
Run selected text
To use the runSelectedText command, select text in an editor and run the command Terminal: Run Selected Text in Active Terminal via the Command Palette (⇧⌘P (Windows, Linux Ctrl+Shift+P)), the terminal will attempt to run the selected text. If no text is selected in the active editor, the entire line that the cursor is on will run in the terminal.
Tip: Also run the active file using the command
workbench.action.terminal.runActiveFile.
Maximizing the terminal
The terminal view can be maximized by clicking the maximize panel size button with the upwards chevron icon. This will temporarily hide the editors and maximize the panel. This is useful to temporarily focus on a large amount of output. Some developers use VS Code as a standalone terminal by opening a new window, maximizing the panel, and hiding the side bar.
Note that the panel can only be maximized if its alignment option is set to Center.
Select all
There is a Terminal: Select All command, which is bound to Cmd+A on macOS, but does not have a default keyboard shortcut on Windows and Linux as it may conflict with shell hotkeys. To use Ctrl+A to select all, add this custom keyboard shortcut:
{
  "key": "ctrl+a",
  "command": "workbench.action.terminal.selectAll",
  "when": "terminalFocus && !isMac"
},
Drag and drop file paths
Dragging a file into the terminal will input the path into the terminal, with escaping to match the active shell.
Automating terminals with tasks
The Tasks feature can be used to automate the launching of terminals, for example, the following .vscode/tasks.json file will launch a Command Prompt and PowerShell terminal in a single terminal group when the window starts:
{
  "version": "2.0.0",
  "presentation": {
    "echo": false,
    "reveal": "always",
    "focus": false,
    "panel": "dedicated",
    "showReuseMessage": true
  },
  "tasks": [
    {
      "label": "Create terminals",
      "dependsOn": [
        "First",
        "Second"
      ],
      // Mark as the default build task so cmd/ctrl+shift+b will create them
      "group": {
        "kind": "build",
        "isDefault": true
      },
      // Try start the task on folder open
      "runOptions": {
        "runOn": "folderOpen"
      }
    },
    {
      // The name that shows up in terminal tab
      "label": "First",
      // The task will launch a shell
      "type": "shell",
      "command": "",
      // Set the shell type
      "options": {
        "shell": {
          "executable": "cmd.exe",
          "args": []
        }
      },
      // Mark as a background task to avoid the spinner animation on the terminal tab
      "isBackground": true,
      "problemMatcher": [],
      // Create the tasks in a terminal group
      "presentation": {
        "group": "my-group"
      }
    },
    {
      "label": "Second",
      "type": "shell",
      "command": "",
      "options": {
        "shell": {
          "executable": "pwsh.exe",
          "args": []
        }
      },
      "isBackground": true,
      "problemMatcher": [],
      "presentation": {
        "group": "my-group"
      }
    }
  ]
}
This file could be committed to the repository to share with other developers or created as a user task via the workbench.action.tasks.openUserTasks command.
Working directory
By default, the terminal will open at the folder that is opened in the Explorer. The terminal.integrated.cwd setting allows specifying a custom path to open instead:
{
  "terminal.integrated.cwd": "/home/user"
}
Split terminals on Windows will start in the directory that the parent terminal started with. On macOS and Linux, split terminals will inherit the current working directory of the parent terminal. This behavior can be changed using the terminal.integrated.splitCwd setting:
{
  "terminal.integrated.splitCwd": "workspaceRoot"
}
There are also extensions available that give more options such as Terminal Here.
Fixed dimension terminals
The Terminal: Set Fixed Dimensions command allows changing the number of columns and rows that the terminal and it’s backing pseudoterminal uses. This will add scroll bars when necessary, which may lead to an unpleasant UX and is generally not recommended, but it is a common ask on Windows in particular for reading logs or long lines when paging tools aren’t available.
You can also right-click on a terminal tab and select Toggle Size to Content Width (⌥Z (Windows, Linux Alt+Z)) to resize the number of terminal columns to the largest wrapped line in the terminal.
Next steps
The basics of the terminal have been covered in this document. Read on to find out more about:
- Terminal Inline Chat — AI-powered suggestions right in your terminal.
- Tasks — Tasks let you integrate with external tools and leverage the terminal heavily.
- Mastering VS Code’s Terminal — An external blog with plenty of power user tips for the terminal.
- Explore terminal commands by browsing the keyboard shortcuts within VS Code (Preferences: Open Keyboard Shortcuts then search on ‘terminal’).
Common questions
I’m having problems launching the terminal
There’s a dedicated troubleshooting guide for these sorts of problems.
How do I create an Admin terminal?
The integrated terminal shell is running with the permissions of VS Code. If you need to run a shell command with elevated (administrator) or different permissions, use platform utilities such as runas.exe within a terminal.
You can learn more about customizing terminals via terminal profiles in Configuring Profiles.
Can I add a keyboard shortcut for the Explorer’s Open in Integrated Terminal command?
You can open new terminals for specific folders from the Explorer via the Open in Integrated Terminal context menu command.

By default, there is no keyboard shortcut associated with Open in Integrated Terminal but you can add your own via the Keyboard Shortcuts editor (⌘K ⌘S (Windows, Linux Ctrl+K Ctrl+S)) to add a keyboard shortcut to your keybindings.json.
The keybindings.json example below adds the keyboard shortcut Ctrl+T for openInTerminal.
{
  "key": "ctrl+t",
  "command": "openInTerminal",
  "when": "filesExplorerFocus"
}
Why is nvm complaining about a prefix option when the integrated terminal is launched?
nvm (Node Version Manager) users often see this error for the first time inside VS Code’s integrated terminal:
nvm is not compatible with the npm config "prefix" option: currently set to "/usr/local"
Run `npm config delete prefix` or `nvm use --delete-prefix v8.9.1 --silent` to unset it
This is mostly a macOS problem and does not happen in external terminals. The typical reasons for this are the following:
npmwas globally installed using another instance ofnodethat is somewhere in your path (such as/usr/local/bin/npm).- To get the development tools on the
$PATH, VS Code will launch a bash login shell on startup. This means that your~/.bash_profilehas already run and when an integrated terminal launches, it will run another login shell, reordering the$PATHpotentially in unexpected ways.
To resolve this issue, you need to track down where the old npm is installed and remove both it and its out-of-date node_modules. Find the nvm initialization script and run which npm before it runs, which should print the path when you launch a new terminal.
Once you have the path to npm, find the old node_modules by resolving the symlink by running a command something like this:
ls -la /usr/local/bin | grep "np[mx]"
This will give you the resolved path at the end:
... npm -> ../lib/node_modules/npm/bin/npm-cli.js
... npx -> ../lib/node_modules/npm/bin/npx-cli.js
From there, removing the files and relaunching VS Code should fix the issue:
rm /usr/local/bin/npm /usr/local/lib/node_modules/npm/bin/npm-cli.js
rm /usr/local/bin/npx /usr/local/lib/node_modules/npm/bin/npx-cli.js
Why does macOS make a ding sound when I resize terminal split panes?
The keyboard shortcuts ⌃⌘← and ⌃⌘→ are the defaults for resizing individual split panes in the terminal. While they work, they also cause a system «invalid key» sound to play due to an issue in Chromium. The recommended workaround is to tell macOS to no-op for these keyboard shortcuts by running this in your terminal:
mkdir -p ~/Library/KeyBindings
cat > ~/Library/KeyBindings/DefaultKeyBinding.dict <<EOF
{
  "@^\UF700" = "noop:";
  "@^\UF701" = "noop:";
  "@^\UF702" = "noop:";
  "@^\UF703" = "noop:";
  "@~^\UF700" = "noop:";
  "@~^\UF701" = "noop:";
  "@~^\UF702" = "noop:";
  "@~^\UF703" = "noop:";
}
EOF
I’m having problems with the terminal rendering. What can I do?
By default, the integrated terminal will render using GPU acceleration on most machines. Typically when there are rendering problems it’s an issue of something in your hardware/OS/drivers not playing nicely with the GPU renderer. The first thing to try is to disable GPU acceleration, trading off rendering speed for DOM-based rendering, which is more reliable:
{
  "terminal.integrated.gpuAcceleration": "off"
}
See the GPU acceleration section for more information.
I see 1~ or [201~ when I paste something
This normally means that the program/shell running inside the terminal requested to turn on «bracketed paste mode» but something doesn’t support it properly. To work around this, you could run printf "\e[?2004l" to disable it for that session or add the following to your ~/.inputrc file:
set enable-bracketed-paste off
Alternatively, bracketed paste mode can be forced to ignore the shell’s request by turning it off with this setting:
{
  "terminal.integrated.ignoreBracketedPasteMode": true
}
Ctrl+A, Ctrl+R output ^A, ^R on zsh
This can happen if zsh is in Vim mode instead of Emacs mode, due to setting $EDITOR or $VISUAL to vi/vim in your init scripts.
To work around this, you have two options:
- Ensure that you don’t set
$EDITORtovi(m). However, this isn’t an option if you want your Git editor to work. - Add
bindkey -eto your init script to set Emacs explicitly.
How can I configure Cmd+. to map to Ctrl+C like macOS’ built-in terminal?
The macOS default terminal uses Cmd+. to perform the same as Ctrl+C. To get this behavior in VS Code, add this custom keyboard shortcut:
{
  "key": "cmd+.",
  "command": "workbench.action.terminal.sendSequence",
  "when": "terminalFocus",
  "args": { "text": "\u0003" }
}
Why are the colors in the terminal not correct?
One of our accessibility features we enable by default is to ensure a minimum contrast ratio of at least 4.5 is met for the foreground text. This feature ensures that text is readable regardless of the shell and theme used which is not possible otherwise. To disable this feature, you can set:
"terminal.integrated.minimumContrastRatio": 1
See the minimum contrast ratio section for more information.
05/08/2025
Visual Studio Code includes a fully featured integrated terminal. You can use it to run commands like echo, ls, and git, just like a standalone terminal. The terminal in VS Code also provides integration with the editor to support features such as links to workspace files and error detection.
The terminal can use various shells installed on your machine. A shell is a program that interprets and executes the commands by interacting with the operating system. Examples of shells include Bash, Zsh, and PowerShell.
This tutorial guides you through the basics of using the terminal in Visual Studio Code.
Run your first command in the terminal
While you’re writing code, you might have to run shell commands to build, test, or deploy your application. The terminal in VS Code enables you to run these commands without leaving the editor.
To get started with the terminal:
-
Start VS Code and open a folder or workspace.
-
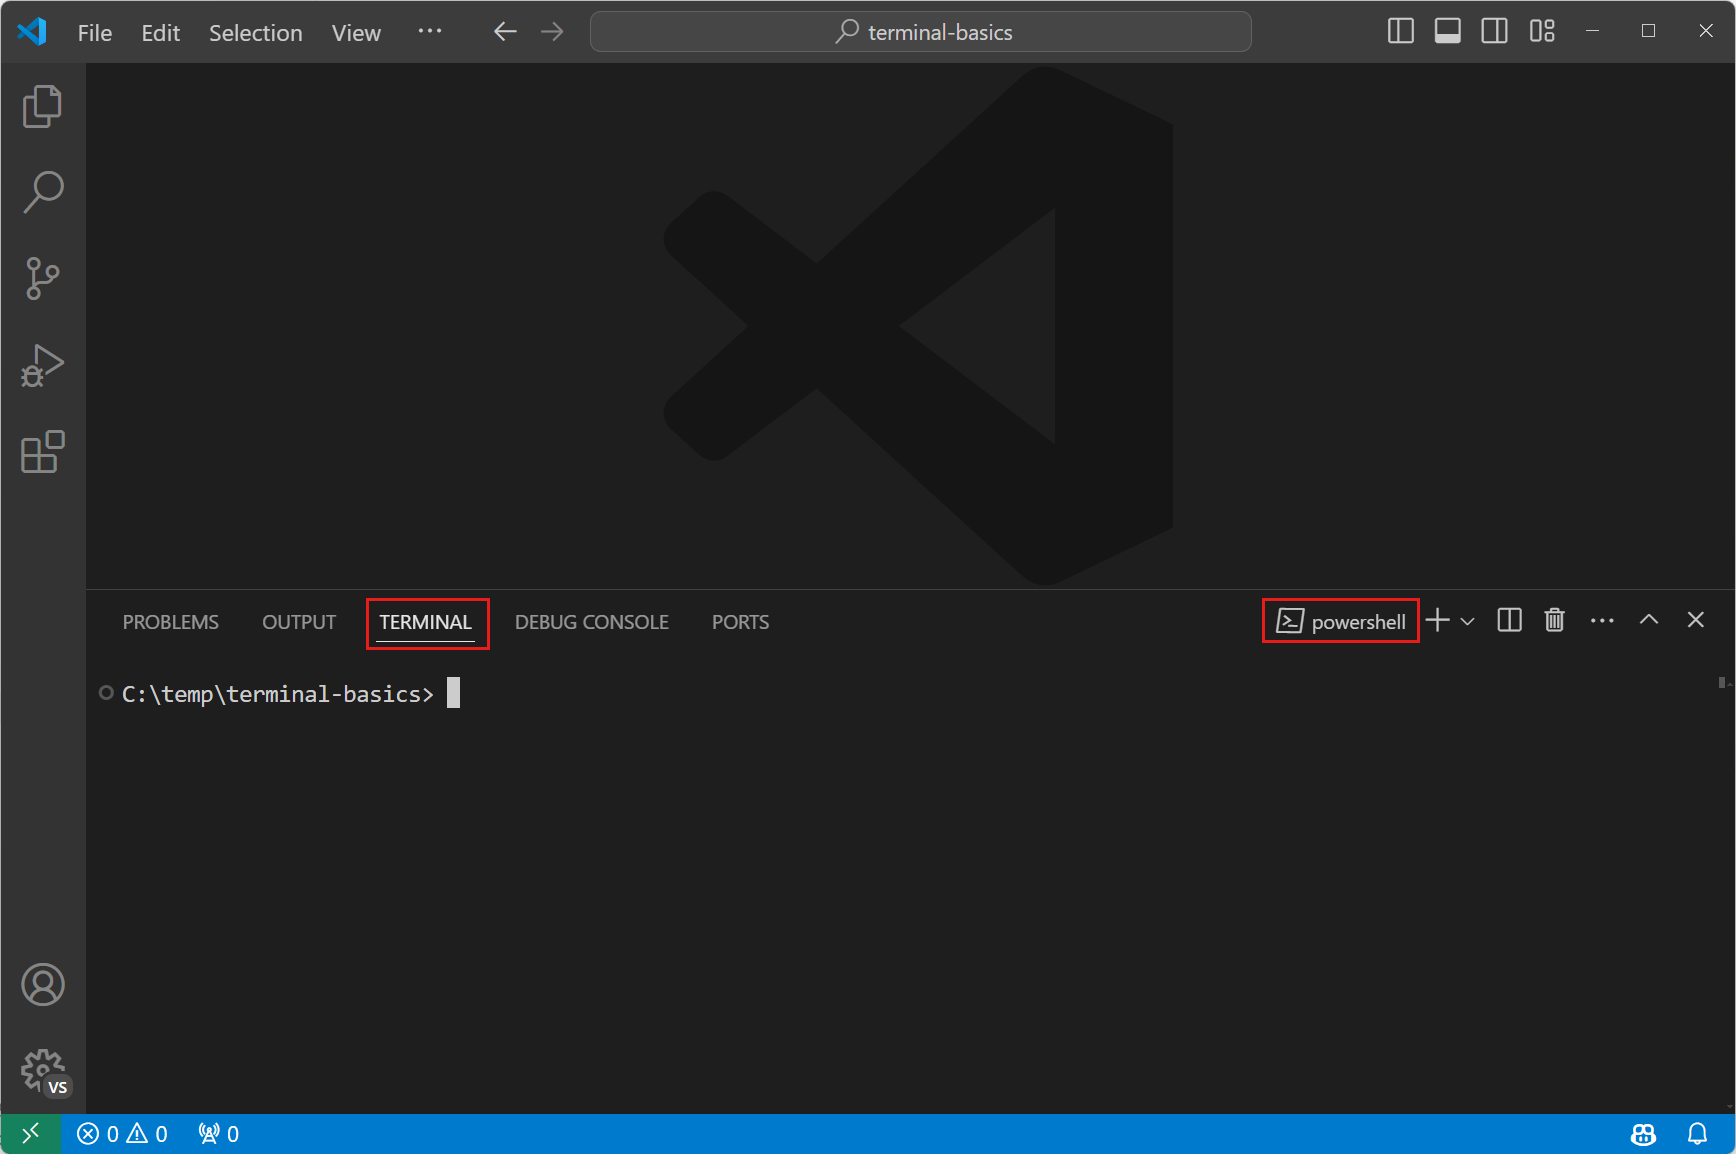
Open the terminal by selecting View > Terminal from the menu bar, or by pressing the ⌃` (Windows, Linux Ctrl+`) keyboard shortcut.
Based on your operating system configuration, the terminal opens with a default shell like Bash, PowerShell, or Zsh. The shell’s working directory starts at the root of the workspace folder.
-
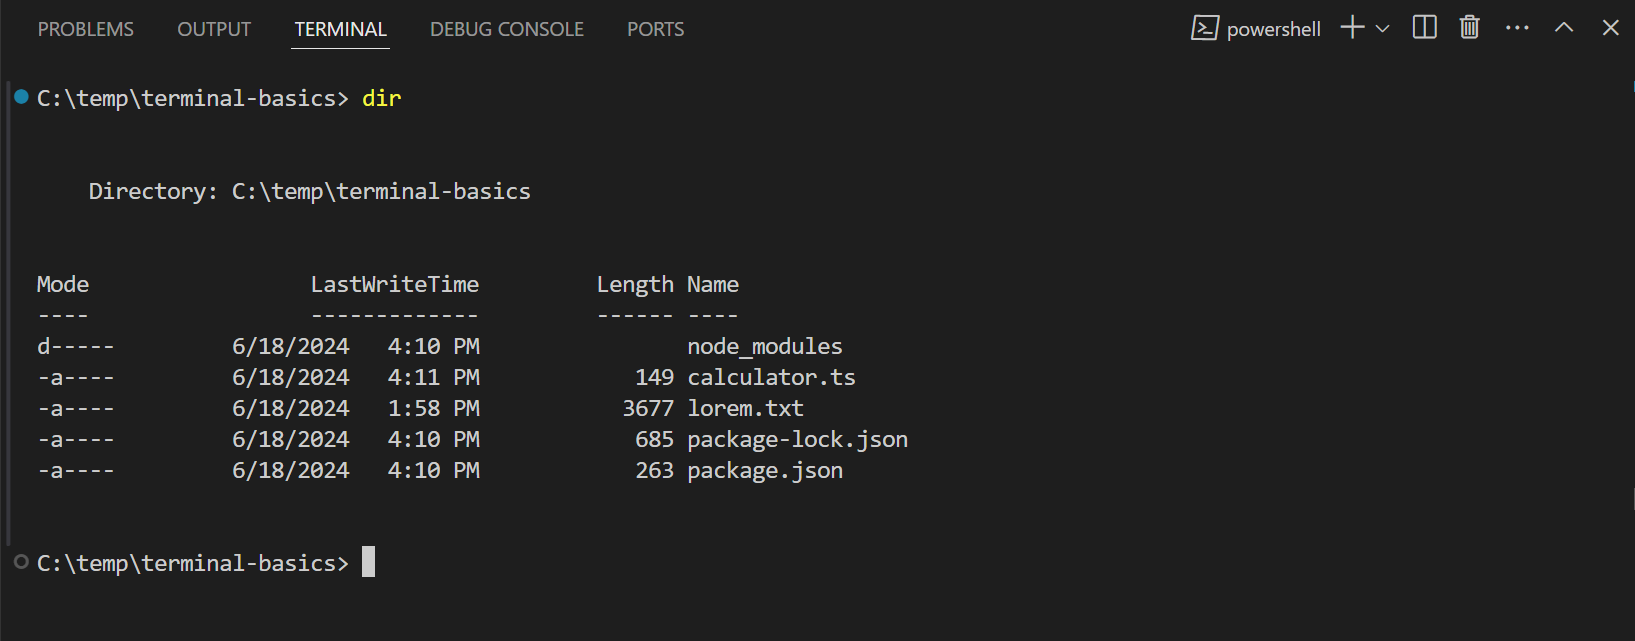
Enter a basic command like
lsto list the files in the current directory.The terminal displays the output of the command, similar to a standalone terminal, except that you stay within the editor.
Tip: You can enlarge the terminal by dragging the terminal panel’s border or by selecting the
^icon to maximize the panel.
Interact with command output
The terminal in VS Code also provides features to interact with command output. Commands often output file paths or URLs that you might want to open or navigate to. For example, a compiler or linter might return an error message with a file path and line number. Instead of searching for that file, you can select the link in the terminal output to open the file directly in the editor.
Let’s see how you can interact with the command outputs in the terminal:
-
Open the terminal where you previously ran the
lscommand. -
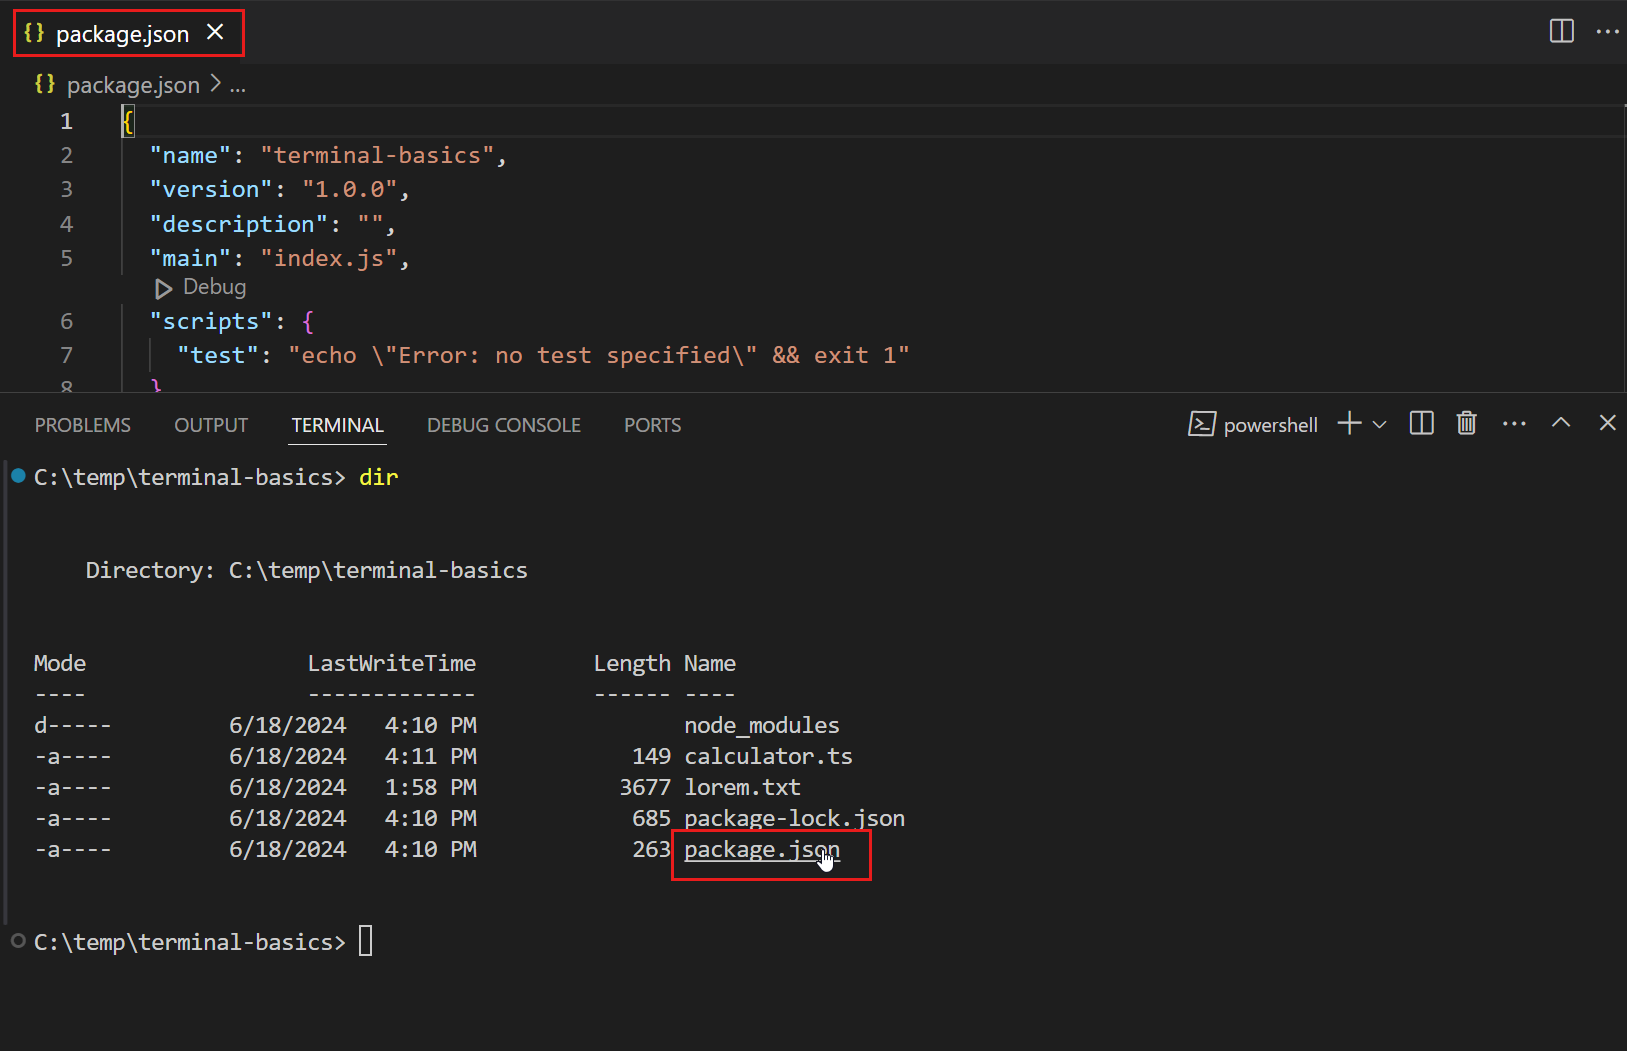
In the terminal, hold the Ctrl/Cmd key, hover over a file name, and then select the link.
Notice that when you hover over text in the output, it changes into a link. When you select a file name, VS Code opens the selected file in the editor.
All text in the terminal output is clickable. If you select a hyperlink in the terminal, it opens the link in the default browser. For other text, VS Code tries to search the workspace for files that contain the text.
-
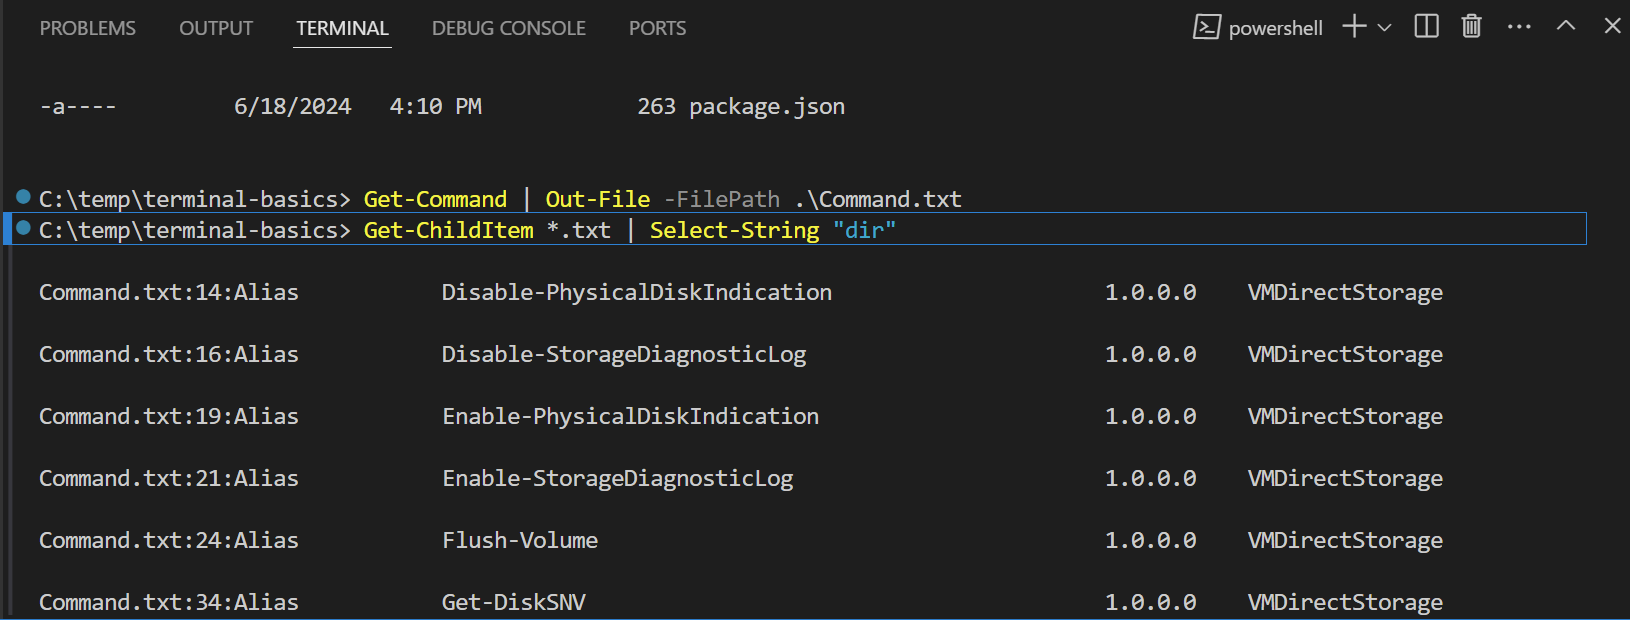
Run the following command to create a
Command.txtfile that contains a list of available shell commands.-
PowerShell
Get-Command | Out-File -FilePath .\Command.txt -
Bash / Zsh
ls -l /usr/bin > Command.txt
-
-
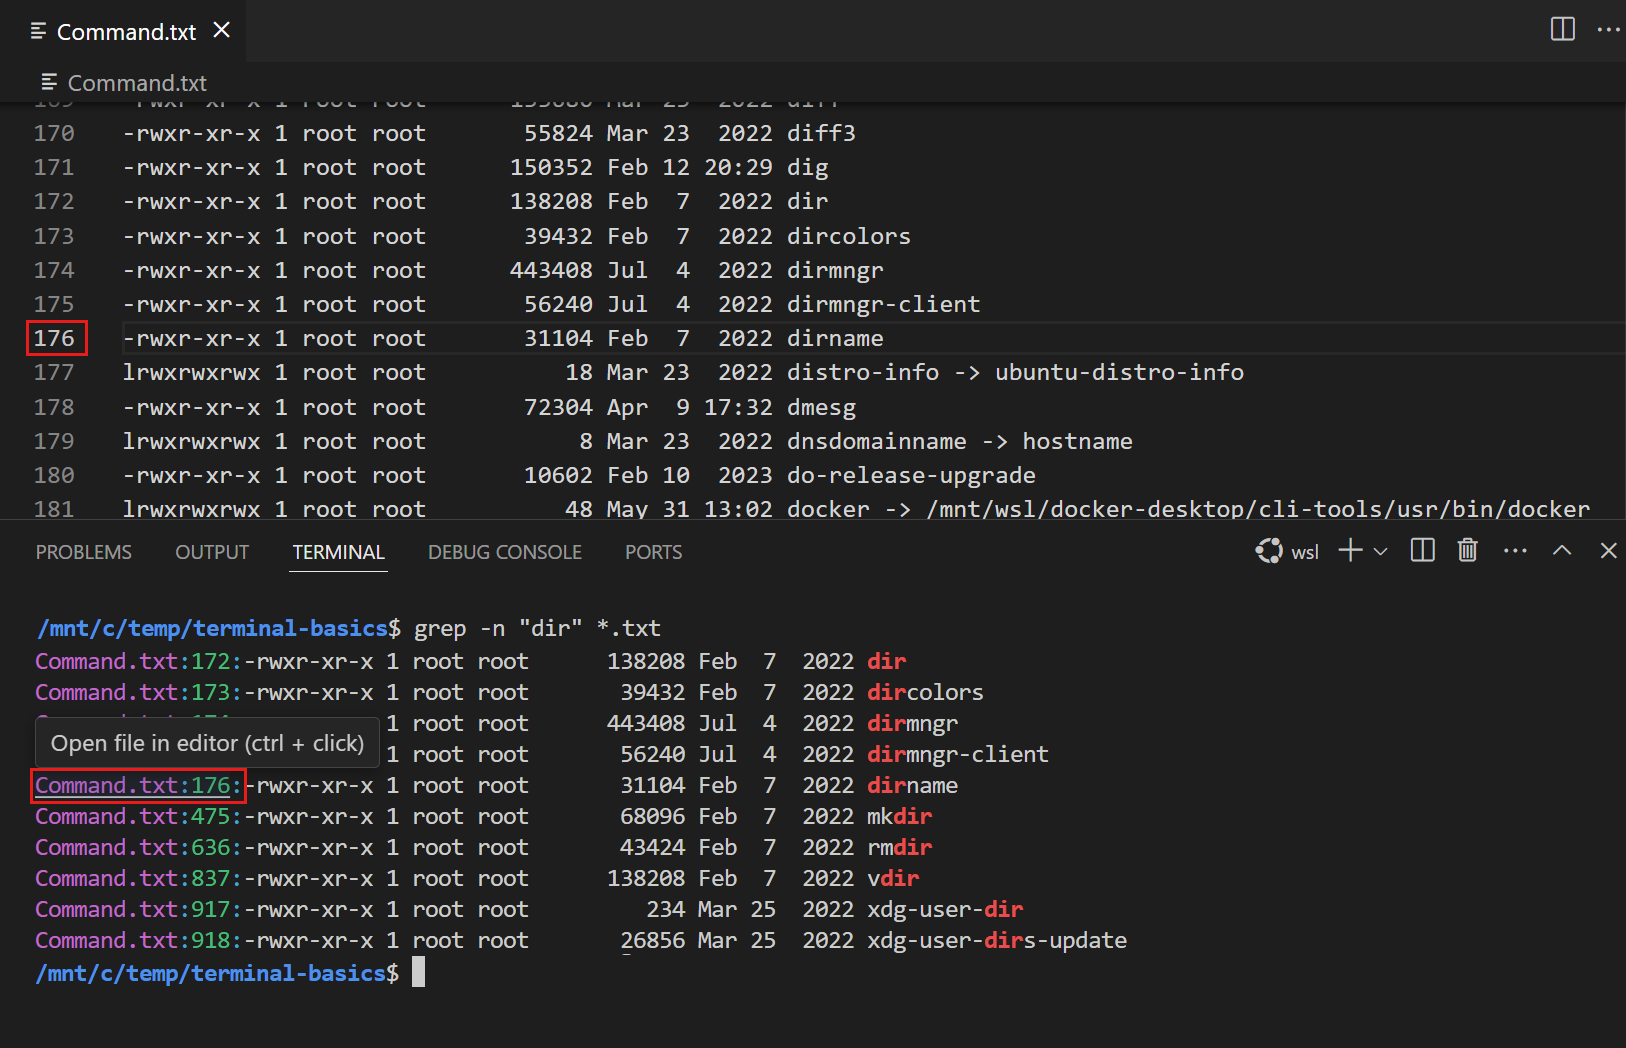
Enter the following command to search for a command in the
Command.txtfile.-
PowerShell
Get-ChildItem *.txt | Select-String "dir" -
Bash / Zsh
grep -n "dir" *.txt
Notice that the command output contains the file name and the line number where the search result is found. The terminal identifies this text as a link.
-
-
Select one of the links to open the file in the editor at that specific line in the file.
Learn more about the different types of links in the terminal.
Navigate to previous commands
As you work in the terminal, you might need to review a previous command and its output, or maybe you want to rerun a command. You can quickly navigate to the previous commands by using keyboard shortcuts.
To navigate to previous commands:
-
Open the terminal you used previously.
-
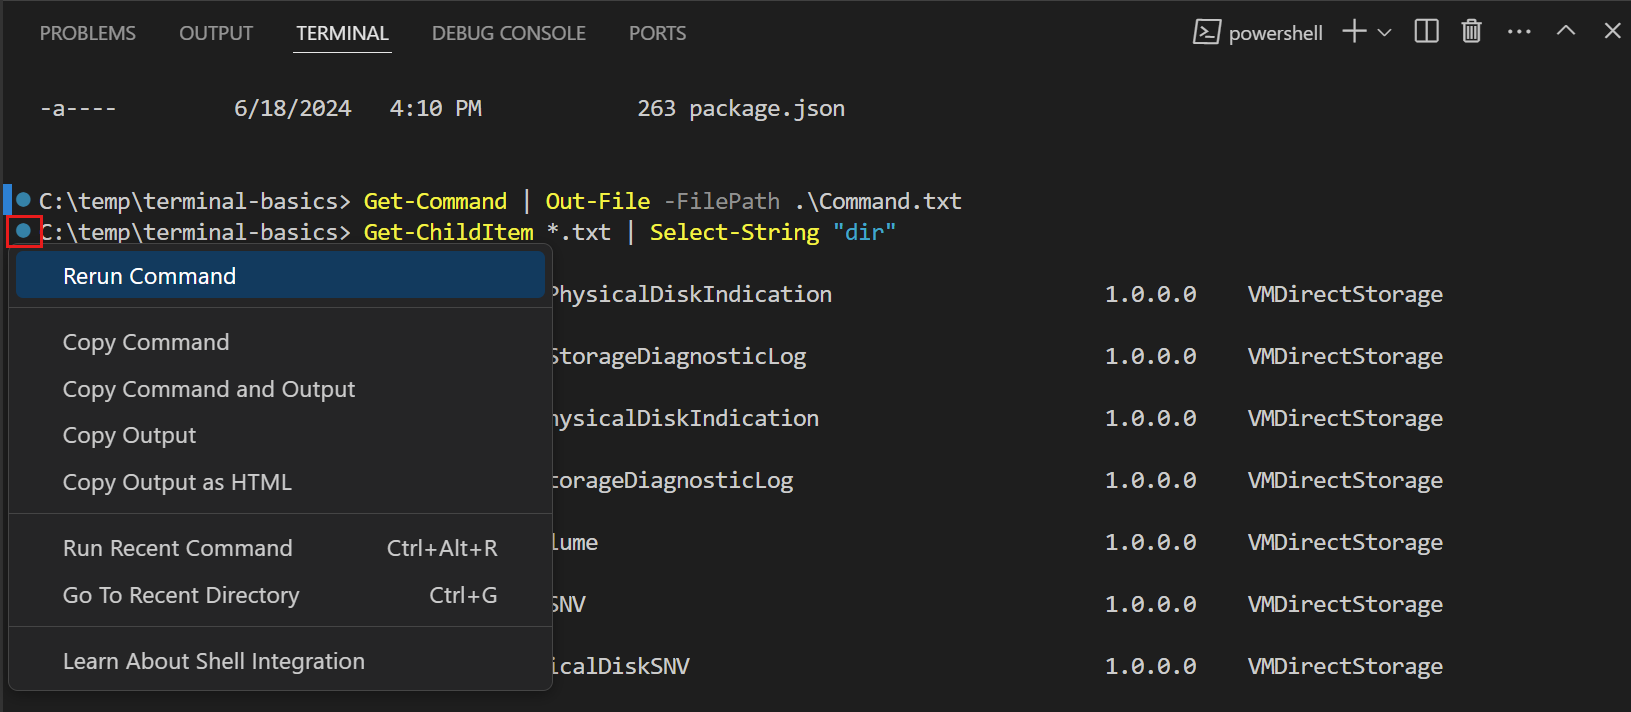
Press the ⌘↑ (Windows, Linux Ctrl+Up) keyboard shortcut to scroll to the previous command in the terminal history.
Notice that the terminal scrolls to the previous command and highlights it.
If you press ⌘↑ (Windows, Linux Ctrl+Up) multiple times, the terminal scrolls further through the command history. You can use the ⌘↓ (Windows, Linux Ctrl+Down) keyboard shortcut to navigate in the other direction.
-
You might see a circle icon in the gutter next to a previously run command. Select the circle icon, and then select Rerun Command to run the command again.
Learn more about navigating through the command history.
Run commands in another shell
The terminal supports having multiple terminals open at the same time. For example, you could dedicate one terminal to run Git commands and another terminal to run build scripts. You can also run commands in different shells based on your preference.
To add a new terminal in a different shell:
-
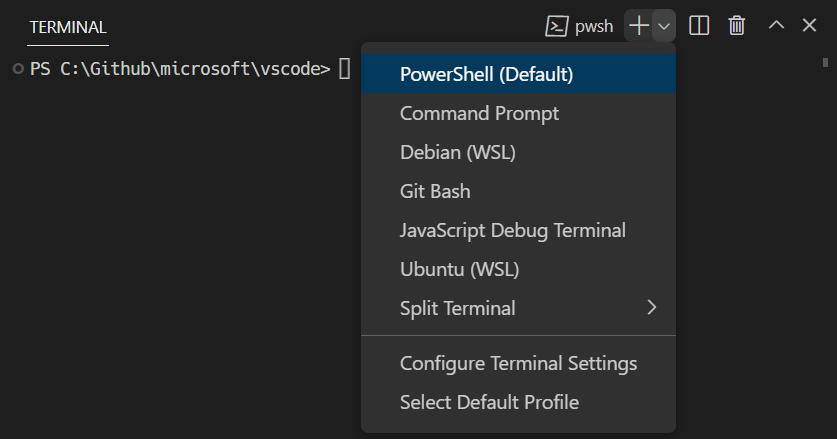
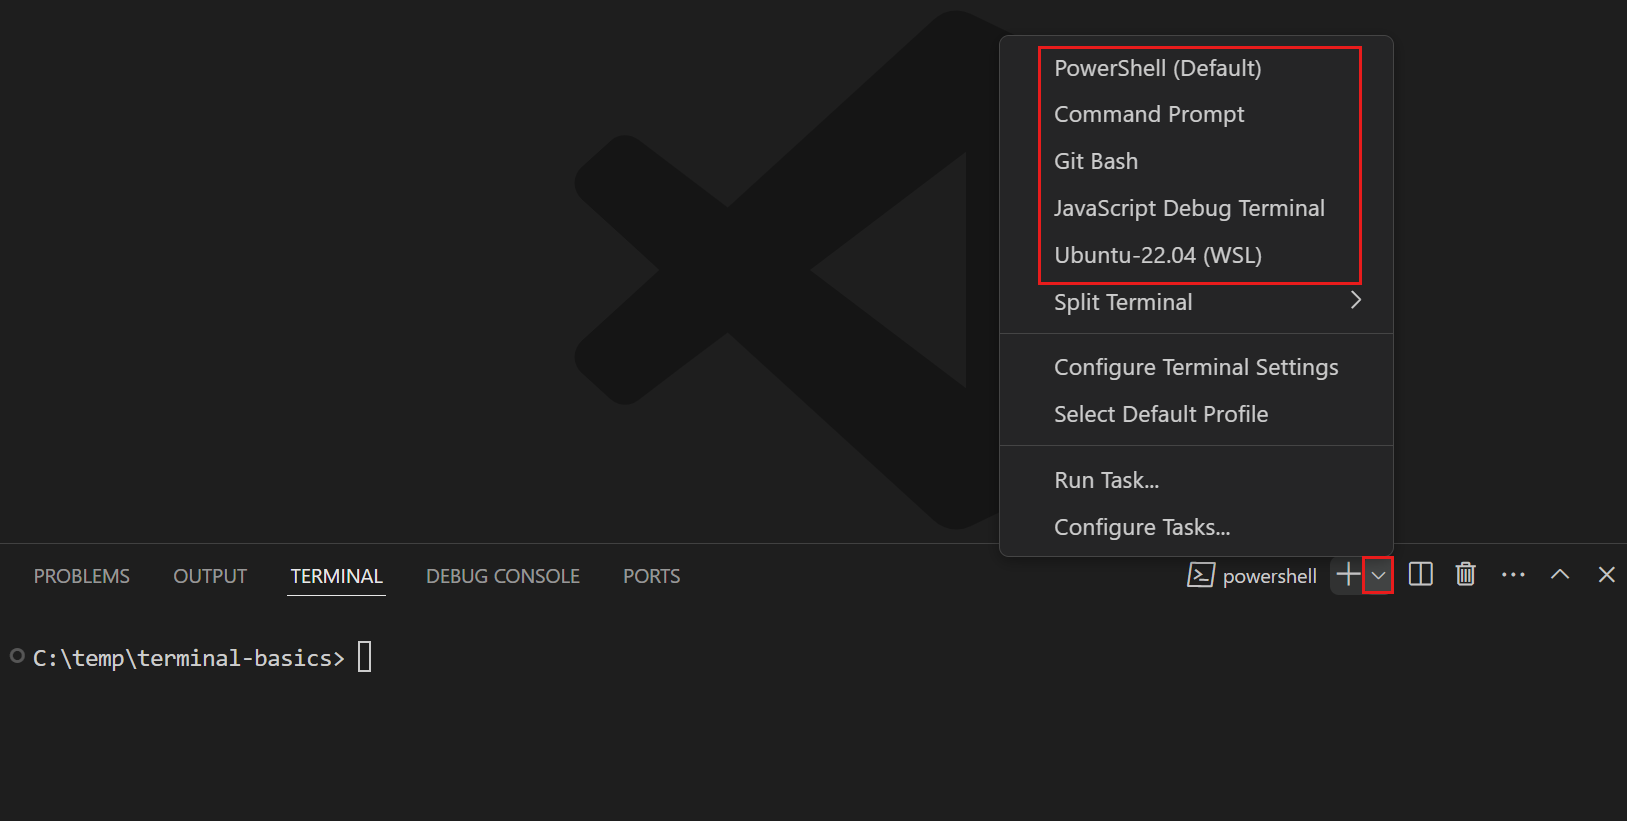
Select the
˅icon in the terminal panel to open the terminal dropdown, and then select from one of the available shells.Note: The available shells depend on the shells installed on your machine.
A new terminal opens with the selected shell, where you can enter commands like you did previously.
Tip: You can also select the
+icon to create a new terminal for the default shell, use the ⌃⇧` (Windows, Linux Ctrl+Shift+`) keyboard shortcut, or select Terminal > New Terminal from the menu bar. -
You can view the open terminals from the list in the terminal panel.
To switch to another terminal, select it from the list of terminals.
Tip: You can rename a terminal in the list by right-clicking on it and selecting Rename.
-
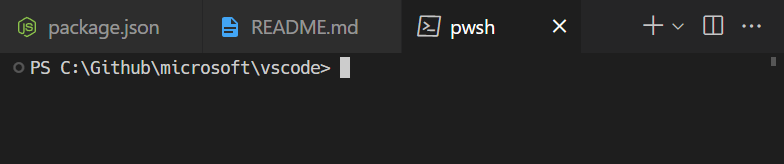
Drag a terminal from the terminal list into the editor area.
The terminal is moved to an editor tab, where you can arrange it like other editor tabs. For example, you can drag the terminal tab out of the VS Code window to make it a floating window. Learn more about custom layouts.
-
Select the trashcan icon when hovering over the terminal list to close an open terminal.


Learn more about managing terminals.
Next steps
In this tutorial, you learned how to get started with the terminal in VS Code. Here are some more topics to explore:
- Learn the fundamental concepts and features of the terminal
- Explore how to create and manage terminal profiles
- Discover various ways to customize the appearance and behavior of the terminal
05/08/2025

«Learn how to open the terminal in Visual Studio Code (VS Code) using various methods, such as the menu bar, keyboard shortcuts, command palette, and sidebar icon. This guide also covers customizing the terminal and working with multiple terminals within VS Code.»
By CodeWithHarry
Updated: 5 April 2025
Visual Studio Code, popularly known as VS Code, is a versatile code editor used by developers all around the world. One of its standout features is the integrated terminal, which allows you to run commands directly within the editor. Here’s a step-by-step guide on how to open the terminal in VS Code.
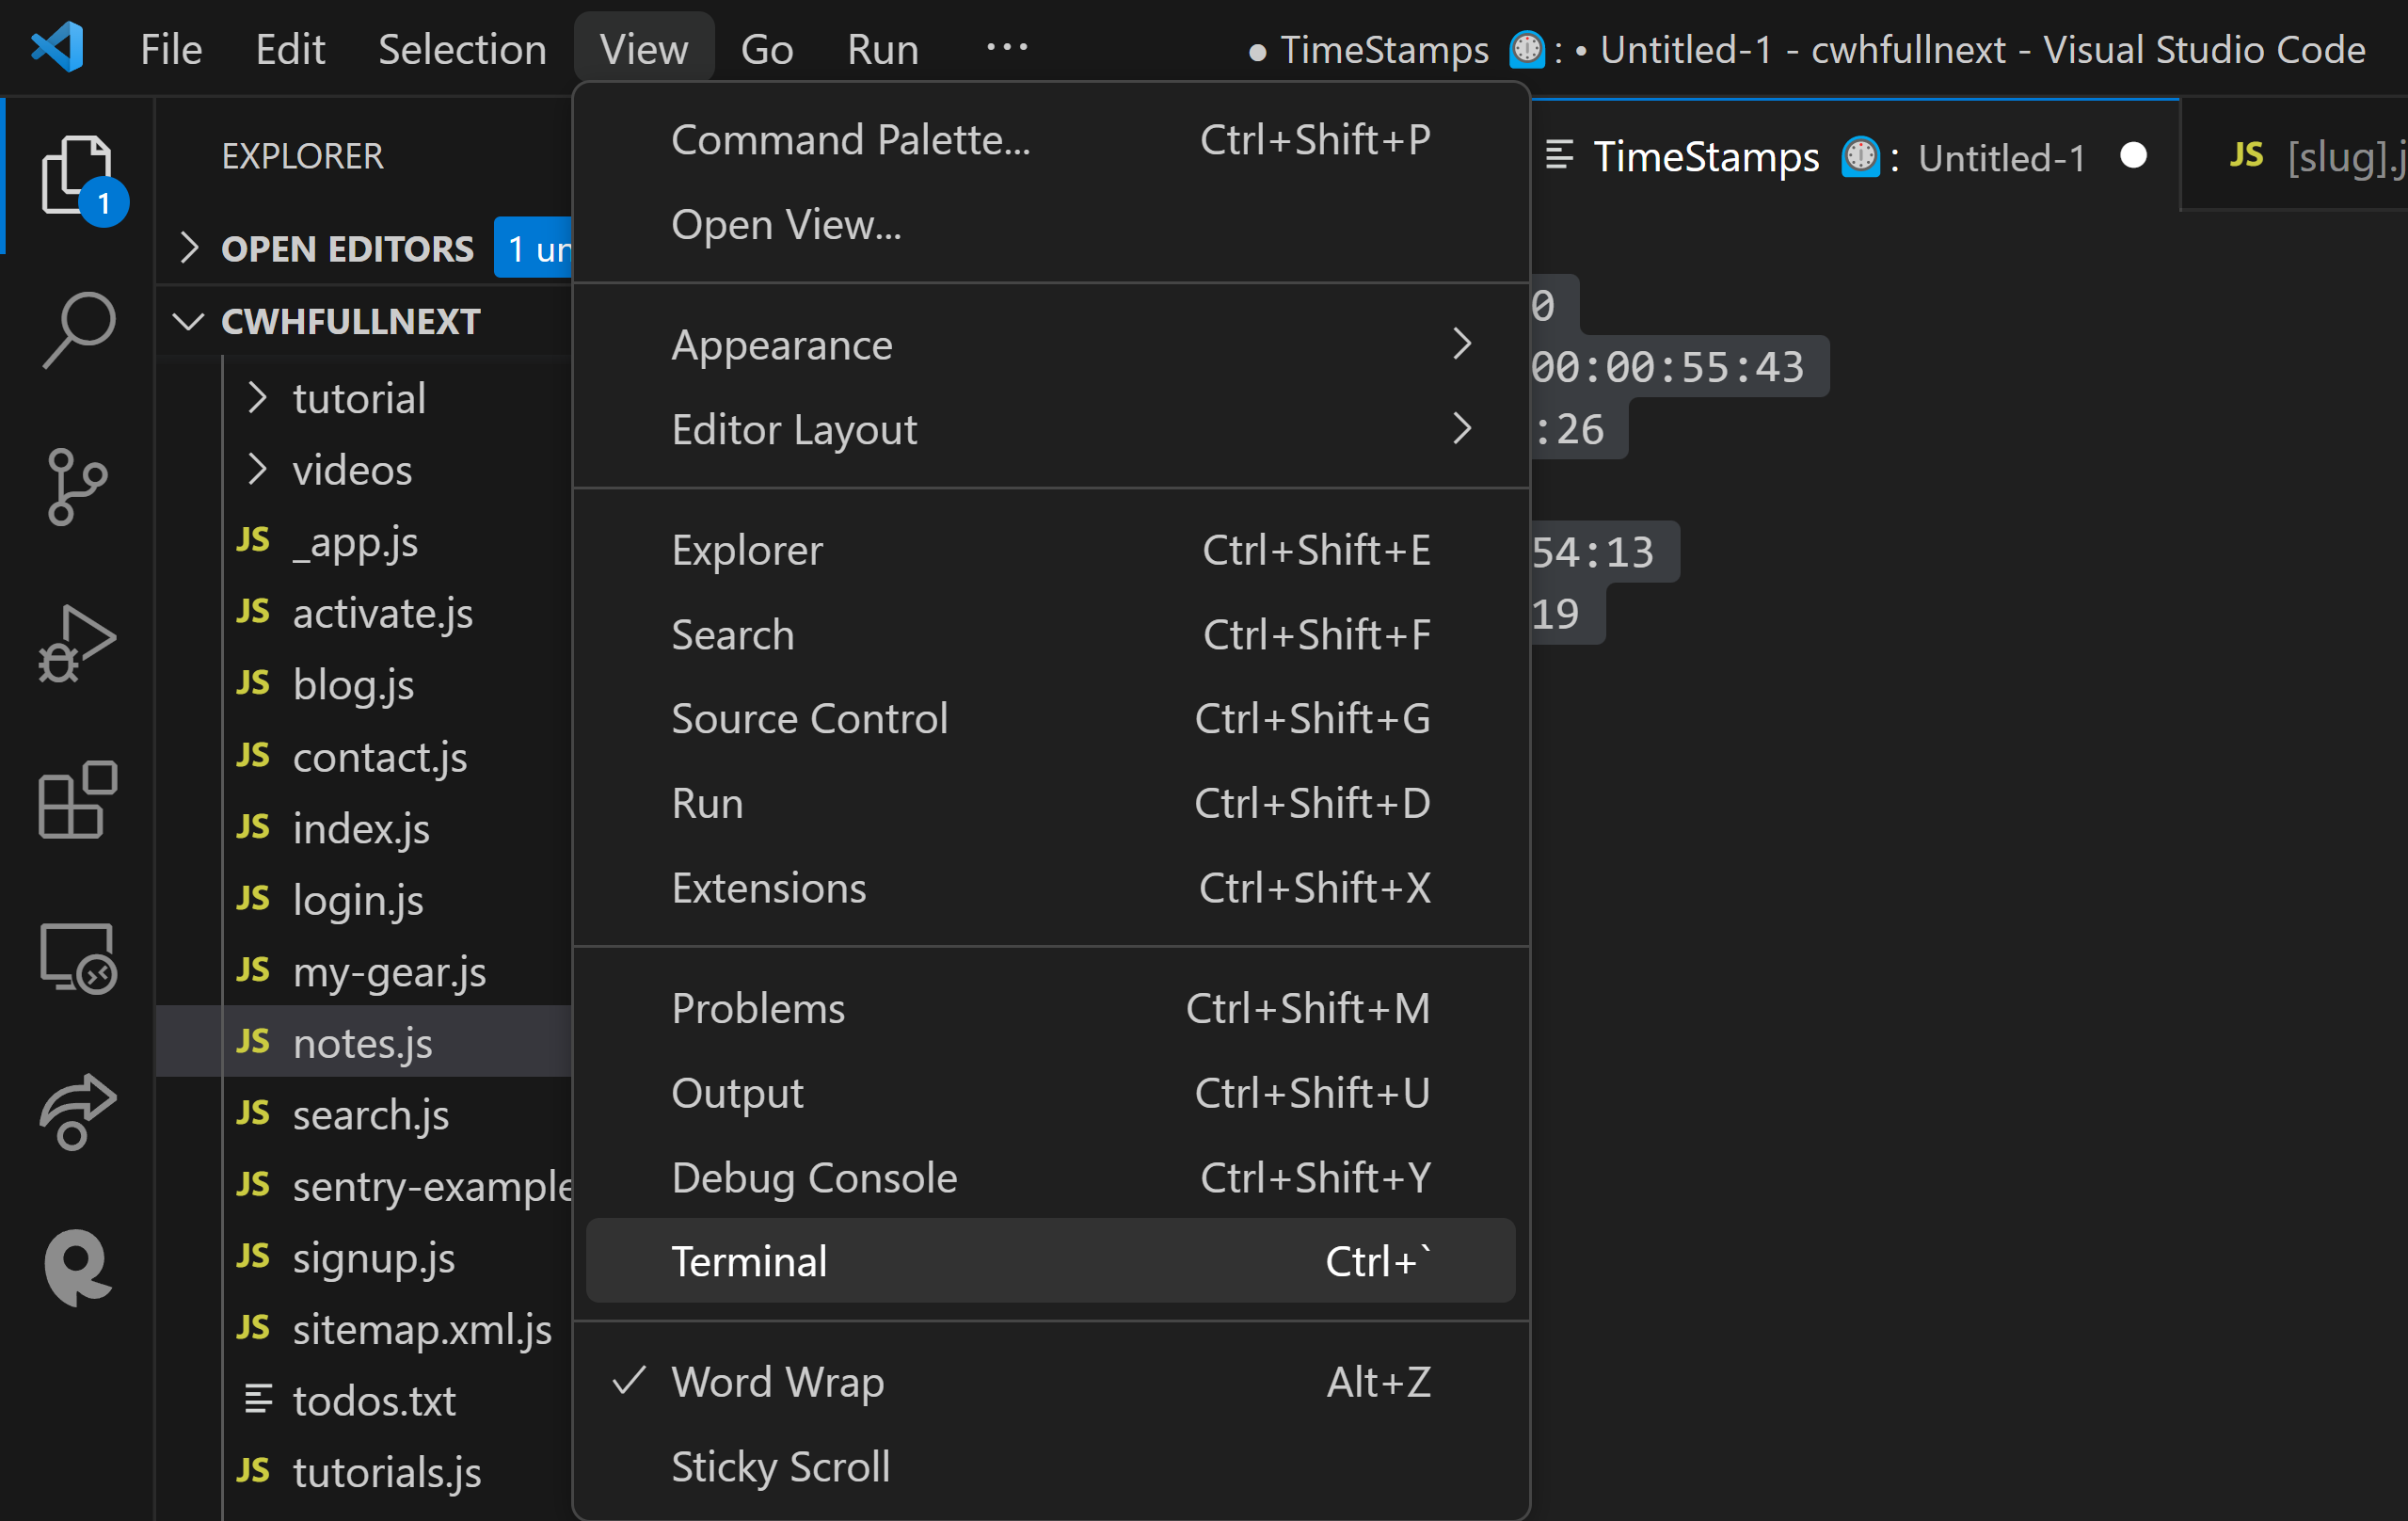
1. Using the Menu Bar
a. Click on the «View» option in the menu bar at the top of the window.
b. Select «Terminal» from the dropdown list, or press Ctrl + (backtick) on your keyboard.
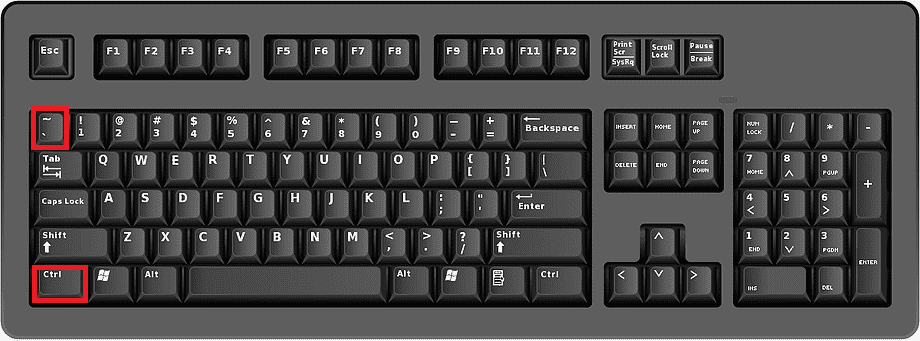
2. Using Keyboard Shortcuts
On most operating systems, you can open the terminal by pressing Ctrl + (backtick). Here are some specific shortcuts for different operating systems:
- Windows/Linux:
Ctrl +(backtick) - Mac:
Cmd +(backtick)
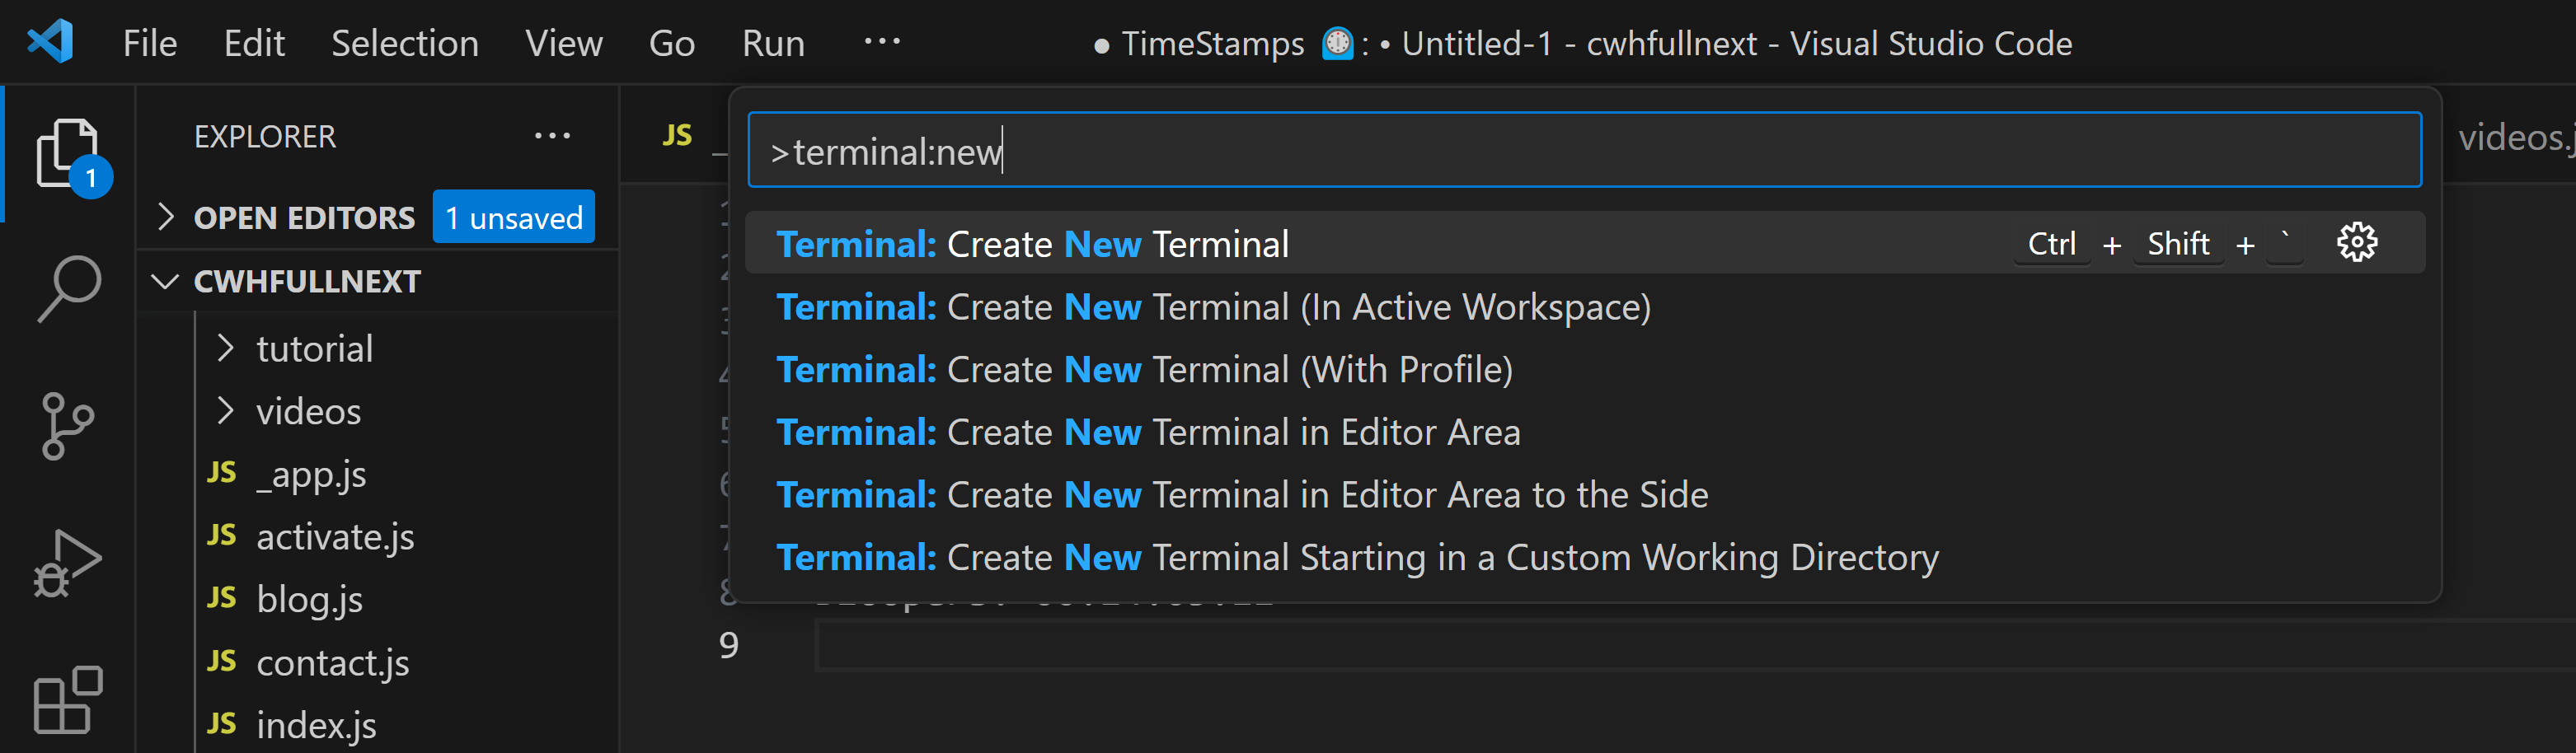
3. Using the Command Palette
a. Open the Command Palette by pressing F1 or Ctrl + Shift + P.
b. Type «Terminal: New Terminal» and select the corresponding command from the list.
4. Using the Icon in the Sidebar
a. Look for the terminal icon on the sidebar. It might be located at the bottom or on the side, depending on your version and settings.
b. Click the icon to open the terminal pane.
5. How to Open a Terminal as a Tab in VS Code?
VS Code provides a convenient way to work with multiple terminal instances by allowing you to drag and drop your terminal towards the opened files. This action will open the terminal as a tab within the editor’s interface.
To make use of this feature, simply:
a. Open a terminal within VS Code using any of the methods mentioned earlier.
b. Click and drag the terminal towards the section where your opened files are displayed.
c. Release the mouse, and the terminal will appear as a tab alongside your files.
You can repeat these steps to open as many terminal tabs as you like, offering you a more organized and efficient workspace, especially when working on complex projects requiring multiple terminals.
Your browser does not support the video tag.
Conclusion
The integrated terminal in VS Code is a powerful tool that streamlines the development process. It’s easily accessible through various methods, allowing you to execute commands without leaving your coding environment. Spend some time exploring the terminal’s features and customizations, and it may quickly become an essential part of your workflow.
Tags
howtoopentheterminalinvisualstudiocode
Opening a terminal in VSCode is essential for efficient workflow and streamlined development. Visual Studio Code, developed by Microsoft, offers an integrated terminal feature that allows developers to perform command-line operations directly within the editor.
This functionality is crucial for running terminal commands, scripting, and even debugging.
You might find it challenging to locate or activate the terminal window, despite its importance in your daily coding tasks. By the end of this article, you’ll know precisely how to open the terminal in VSCode using various methods, configure its settings, and harness its features to improve your productivity.
We’ll cover the following:
- Accessing the Integrated Terminal
- Keyboard Shortcuts
- Customization and Configuration
- Advanced Terminal Features
Understanding how to use this powerful tool within your code editor will elevate your coding efficiency and effectiveness. Let’s dive in and make your coding experience in Visual Studio Code as seamless as possible.
How to Open Terminal in VSCode: Quick Workflow
Opening Terminal in VSCode
1. Using the Menu Bar
- Open VSCode.
- Navigate to the top menu bar and select View.
- Click on Terminal. This will open the terminal at the bottom of the window.
2. Using Keyboard Shortcuts
- Windows/Linux: Press `Ctrl + “ (the backtick key, usually located under the Escape key).
- macOS: Press `Cmd + “ to open the terminal.
3. Using Command Palette
- Press
Ctrl + Shift + P(orCmd + Shift + Pon macOS) to open the command palette. - Type Toggle Terminal and press Enter. This will also open the terminal.
4. Using Right-Click Menu
- In the file explorer or within an editor window, right-click on any file or empty space.
- Select Open in Integrated Terminal to open a terminal in that specific context.
Additional Features
- You can create a new terminal instance by pressing
Ctrl + Shift + `` (orCmd + Shift + “ on macOS) or by selecting Terminal > New Terminal from the menu. - The integrated terminal supports various shells, including Command Prompt, PowerShell, and Bash, depending on what is installed on your system.
These methods provide flexibility for developers to efficiently execute commands directly within their coding environment, enhancing productivity and workflow management.
Getting Started with the Integrated Terminal in Visual Studio Code
Opening the Terminal in VS Code
To open the terminal in VS Code, head over to the View option in the menu bar. You’ll see a dropdown; just click on Terminal. This will immediately bring up the integrated terminal at the bottom of your editor window.
Keyboard Shortcuts for Quick Access
For those who prefer speed:
- Windows/Linux: Press
Ctrl +. - Mac: Press
Cmd +.
Accessing the Terminal through the Command Palette
Another efficient method is to use the Command Palette. Here’s how:
- Open the Command Palette by pressing
F1orCtrl + Shift + P. - Type “Terminal: New Terminal” and hit enter. Your terminal opens instantly.
Sometimes the simplest methods are the best. Look to the sidebar on the left, and you’ll find an icon resembling a terminal.
- Click on this terminal icon.
- It’s that easy.
Setting Up the Terminal for First-Time Use
Choosing a Default Shell
When you open the terminal for the first time, you’ll want to choose your default shell. You can opt for:
- Bash
- PowerShell
- Zsh
Each shell comes with its own set of features tailored to different needs.
Adjusting Terminal Appearance and Settings
For a more comfortable and personalized experience, dive into the terminal settings:
- Adjust font size and color schemes.
- Choose a terminal background that doesn’t strain your eyes.
Customizing the Default Terminal Configuration
To further personalize your VSCode terminal:
- Define specific shells for different tasks.
- Set environment variables.
- Save custom configurations that help streamline your workflow.
Utilizing the Terminal Interface
Running Commands in the Terminal
Basic commands to familiarize with
The terminal is an essential part of any development workflow. Knowing the basics helps a lot.
- ls: Lists files and directories.
- echo: Prints text to the terminal.
These are just the start. Master them to navigate your projects effortlessly.
Running code-specific commands for various languages
Every language has its own set of commands.
- Python: Run scripts using
python filename.py. - JavaScript: Use
node filename.jsto execute JavaScript files.
Switch between them based on your project’s requirements.
Saving commonly used commands for quick access
You can save a lot of time by remembering frequently-used commands. Create aliases for them.
- alias in bash profiles
- Custom scripts in package.json
These tricks make running repeated tasks quick and easy.
Interacting with Command Output
Navigating terminal output to access links
While running scripts or commands, you’ll often see output that contains links or file paths.
- Error links: Clickable and take you to the error location.
- File paths: Navigate directly by clicking.
This makes debugging much faster.
Using clickable file paths to quickly open files in VS Code
See a file path in your terminal? Click on it. It opens directly in Visual Studio Code. No need to manually search through folders. This speeds up your workflow significantly.
Configuring link settings to open web URLs directly from the terminal
Configure your terminal to open web URLs instantly.
- Adjust link settings in settings.json.
- Add extensions that enhance this capability.
Perfect for quickly checking documentation or running web projects.
Navigating Terminal History
Using shortcuts to scroll through command history
Easily navigate your past commands without retyping.
- Ctrl + Up: Scroll up through the history.
- Ctrl + Down: Scroll down.
Quickly access previously executed commands.
Re-running previous commands quickly
Need to run the same command again? Hit “up arrow” and you’re there.
- Hit Enter to run it again.
- No time wasted, efficiency increased.
Customizing command history for faster access
Make your command history work for you. Adjust settings to remember more commands.
- Configure history size.
- Ignore repetitive commands.
These little tweaks make a big difference in usability.
Opening and Managing Multiple Terminals
Creating Additional Terminal Instances
Adding a new terminal in the default shell
Opening multiple terminals can seriously streamline your workflow. In Visual Studio Code, add a new terminal by clicking the + icon in the terminal panel. Each session will open in your default shell, whether that’s Bash, PowerShell, or Zsh.
Switching between open terminals from the terminal panel
Managing multiple sessions is easy. Use the dropdown menu in the terminal panel to switch between terminals. Each terminal will be neatly listed, allowing you to jump from one to another without a hitch.
Benefits of using multiple terminals for specific tasks
Different tasks often require different environments. Maybe you’re running a Node.js server in one terminal and using Git commands in another. Having separate terminals allows you to keep these operations isolated yet easily accessible.
Opening a Terminal as a Tab
Step-by-step instructions to drag the terminal to the editor area
Sometimes, you need more screen real estate. Drag the terminal from its default docked position to the editor area. This action transforms the terminal into a full-fledged tab, giving you more room to work and monitor outputs.
Using tabs to organize multiple terminals alongside code files
Tabbed terminals shine in complex projects. Arrange your terminals next to code files, making it easier to debug issues or cross-reference documentation. Tabs keep everything within reach, eliminating the need to constantly switch windows.
Advantages of tabbed terminals for complex projects
When dealing with complex workflows, tabs become indispensable. Imagine debugging a Python script while monitoring logs and pushing changes to Git—all without ever leaving VSCode. Tabs simplify these daunting tasks into manageable steps.
Running Commands in Different Shells
Accessing different shells based on project needs
Certain projects might call for different shell environments. Perhaps Bash is excellent for UNIX-based tasks, while PowerShell suits Windows-specific operations. Open a new terminal and specify the shell type right from the get-go.
Switching shells within a terminal window
Flexibility is key. If you need to switch shells mid-session, you can do this without closing your terminal window. Command options in the terminal panel let you change the shell type on the fly, adapting to your immediate requirements.
Configuring specific terminals for language environments or frameworks
Tailor your terminals to specific project needs. Configure one terminal for JavaScript, complete with Node.js settings, and another for Python with all necessary virtual environments. Terminal profiles and VS Code extensions make these configurations easy to manage and switch between.
Advanced Features and Customizations for the Integrated Terminal
Customizing Terminal Appearance and Layout
Modifying font size, color schemes, and terminal background
Make the terminal truly yours. Change font size to ease eye strain. Adjusting color schemes helps distinguish between different types of output.
Choose a terminal background that suits your workspace. Dark mode? Light mode? Customize it.
Setting up multiple terminal profiles for varied workflows
Need different setups for different tasks? Set up multiple terminal profiles. Each profile can have its own shell, environment variables, and starting directories. Jump from developing in Python to debugging Node.js in a snap.
Saving appearance settings for different projects
Save time by storing your appearance settings per project. Once configured, every project opens with its custom setup.
Configuring Default Terminal Settings
Editing settings.json to specify the default terminal shell
Tinker with the settings.json file. Specify which shell you want as your default. Bash, PowerShell, Zsh—whatever fits your workflow best.
Personalizing the startup directory and shell
Configure where your terminal opens. Set the default starting directory to your project’s root or any folder you often use.
Saving configuration settings to sync across devices
Work on multiple machines? Save your terminal configurations and settings to sync across all devices. Never redo the same customization twice.
Custom Keybindings for Terminal Actions
Setting up shortcuts for frequently used terminal commands
Creating custom shortcuts can save a lot of time. Assign keys for commands you use often. Run scripts, start servers, or open files—all with a press of a button.
Defining custom keybindings for navigating and toggling terminals
Move between terminals effortlessly. Set up keybindings to switch, split, or toggle terminals.
Modifying or resetting keybindings as needed
Don’t stick with a setup that doesn’t work. Modify your keybindings whenever you need. If things get messy, reset to default and start fresh.
Integrated Terminal for Version Control and Task Management
Using Git Commands within the Integrated Terminal
Running essential Git commands (e.g., commit, push, pull)
Directly within the terminal, Git commands become second nature. Run git commit -m "Your message", git push, or git pull seamlessly. No need to switch out to another application.
Managing branches and repositories directly from the terminal
Efficiently navigate branches. Create new ones with git branch new-feature, switch with git checkout new-feature, and delete with git branch -d old-feature. Repository management has never been easier.
Integrating Git workflows into the terminal for seamless version control
All Git workflows, right at your fingertips. Merge, rebase, stash changes without leaving VSCode. Keep everything streamlined within your development environment.
Automating Repetitive Tasks with Task Runner
Setting up Task Runner for automated tasks in VS Code
Automate those repetitive, mundane tasks. The Task Runner in VSCode allows you to set up scripts for common operations. Integrated directly, you run processes without a second thought.
Running and managing tasks directly within the terminal
Kick off tasks directly from the terminal. Whether you’re compiling, running tests, or deploying, manage it all within the single interface.
Build once. Run many.
Using Task Runner for debugging, compiling, and deployment
Debug like a boss. Compile with ease. Deploy smoothly. Task Runner simplifies these tasks, making them more predictable and manageable. Debugging becomes as simple as typing npm run debug.
Debugging and Development Capabilities with the Integrated Terminal
Using the Terminal for Debugging
Running debugging sessions within the terminal
Fire up your debugging session right in the terminal. Type in your commands and set breakpoints. You aren’t just looking at static code—you’re interacting with it. It’s real-time. Dynamic.
Inspecting variables and troubleshooting errors directly in the terminal
When errors pop up, scrutinize variables as you go. console.log()? Sure, but you can dive deeper. Inspect, modify, and play around with values directly within the terminal. Find the bug. Squash it.
Leveraging the terminal alongside VS Code’s integrated debugger
Combine the terminal’s raw power with VS Code’s integrated debugger. Step through your code, watch variables, and control execution—all while running terminal commands. It’s like having a Swiss Army knife of debugging.
Running Development Scripts and Managing Dependencies
Using npm/yarn commands to manage dependencies and packages
Managing dependencies is a breeze. Use npm install or yarn add to pull in packages. Update with a single command. Terminal becomes your command center, orchestrating your project’s dependencies without a glitch.
Setting up and running development scripts within the terminal
Scripts are your best friends. Need to start a server? Type npm run dev. Want to build? npm run build gets it done. Set everything up in your package.json, and let the terminal handle the rest. Smooth. Efficient.
Configuring environment variables for project-specific needs
Different projects, different environments. Easily configure environment variables for each project. Modify your .env file, or set variables directly in the terminal. Tailor your setup to your project needs.
Integrating External Tools within the Terminal
Working with Docker, linters, and code formatters from the terminal
Docker. Linters. Code formatters. All from one place. Open the terminal and execute docker-compose up to spin up your containers. Simplify your code quality checks with linters by running eslint . or flake8. Format with Prettier or Black.
One terminal. Infinite possibilities.
Accessing system-level commands and API utilities
Sometimes you need to go deeper. Execute system-level commands or call API utilities right from the terminal. Want to check system updates? Run sudo apt update if you’re on Linux. Need to ping an API? Use curl or httpie for quick tests.
Total control at your fingertips.
Enhancing functionality with third-party tools
Third-party tools can take your terminal to the next level. Tools like ngrok can expose your localhost to the web. Or use jq for parsing JSON with ease. Integrate these tools for an even more powerful workflow.
Elevate your development game.
Installing and Using Extensions to Expand Terminal Capabilities
Exploring VS Code extensions to customize terminal features
The VS Code marketplace is your playground. Search for extensions to customize and supercharge your terminal. Want a different shell? Install an extension. Need terminals with tailored configurations? There’s an extension for that too.
Customize to your heart’s content.
Using terminal-specific extensions for improved workflow
Extensions like Shell Launcher allow you to open different shells quickly. Want to split your terminal and run multiple sessions side by side? Try Terminals Manager. These tools improve your workflow by reducing context-switching.
Efficiency redefined.
Finding and installing recommended extensions for terminal use
Need recommendations? Start with GitLens for seamless Git integration. Use Path Intellisense for improved path auto-completion. Explore the marketplace, read reviews, and find extensions that fit your needs.
How do I open the terminal in VSCode?
To open the terminal in Visual Studio Code, you can either use the shortcut Ctrl + ` (backtick) or navigate to the menu and select View > Terminal. This will open the integrated terminal at the bottom of the editor, allowing you to execute command-line operations directly.
What keyboard shortcut opens the terminal?
The keyboard shortcut to open the terminal in Visual Studio Code is Ctrl + ` (backtick) on Windows/Linux and Cmd + ` on macOS.
This shortcut quickly toggles the terminal view, making it easy to switch between your code and terminal operations without disrupting your workflow.
How can I open multiple terminals in VSCode?
To open multiple terminals, click the split terminal button on the terminal panel’s right side or use the shortcut Ctrl + Shift + 5.
You can run different command-line interfaces simultaneously, such as PowerShell and Git Bash, enhancing your development productivity within the same environment.
Can I customize my terminal settings in VSCode?
Yes, you can customize terminal settings by navigating to File > Preferences > Settings and searching for “terminal”.
Options include setting the default shell, font size, cursor style, and more to tailor the terminal to your preferences and needs, making it an integral part of your VSCode environment.
How do I change the default terminal shell?
To change the default terminal shell, go to File > Preferences > Settings and search for “terminal.integrated.shell”.
Select the shell path, such as bash, PowerShell, or Command Prompt, and restart the terminal. This ensures you’re using your preferred shell for command-line tasks.
Is there a way to quickly toggle the terminal on and off?
You can quickly toggle the terminal on and off using the Ctrl + ` shortcut, which opens and closes the integrated terminal within your workspace.
This convenience helps maintain focus by allowing you to seamlessly switch between writing code and executing terminal commands.
If you can’t see the terminal option, it might be hidden or disabled. Navigate to View > Appearance and ensure “Show Panel” is checked.
Additionally, updating Visual Studio Code to the latest version can resolve issues related to missing features, enhancing your development experience.
How do I open a specific terminal, like Git Bash or PowerShell?
To open a specific terminal, configure the default shell in File > Preferences > Settings. Search for “terminal.integrated.shell”, and set the path to Git Bash or PowerShell. After configuration, new terminal instances will use the specified shell, aligning with your workflow requirements.
Can I dock the terminal in a different position in VSCode?
Yes, you can dock the terminal in different positions. Right-click the terminal tab and choose Move Panel Right or Move Panel Below. This flexibility allows you to align the terminal with your preferred layout, improving your workspace organization and overall coding efficiency.
How do I use terminal commands in VSCode without leaving my editor?
Open the integrated terminal using Ctrl + ` and type your commands directly. The integrated terminal supports various shells and command-line interfaces, allowing you to execute tasks such as running scripts, version control, and environment setup without leaving the Visual Studio Code interface.
Conclusion
How to open terminal in VSCode is a fundamental skill that enhances productivity and streamlines the development process in Visual Studio Code. By mastering the shortcuts like Ctrl + `, navigating through the View > Terminal option, and customizing your terminal settings, you can seamlessly integrate terminal usage into your daily coding routine.
Key Takeaways:
- Quick Access: Use the Ctrl + ` shortcut for swift terminal toggling.
- Customization: Adjust terminal settings and default shell through File > Preferences > Settings for a personalized experience.
- Multiple Terminals: Easily manage multiple terminal tabs and split terminals with Ctrl + Shift + 5.
- Terminal Positioning: Right-click to relocate the terminal pane to suit your workflow.
Understanding these fundamental tips will optimize how you execute command-line operations, whether it’s using Git commands, running scripts, or navigating your workspace settings. Incorporate these practices and transform your coding environment within VSCode.
Enhance your coding efficiency by leveraging the integrated terminal features now, ensuring a more effective and streamlined development experience.
If you liked this article about how to open terminal in VSCode, you should check out this article about how to install VSCode on Ubuntu.
There are also similar articles discussing how to connect VSCode to GitHub, how to preview Markdown in VSCode, how to change Python interpreter in VSCode, and how to run Python in VSCode.
And let’s not forget about articles on how to debug Python in VSCode, how to indent multiple lines in VSCode, how to use Prettier in VSCode, and how to open settings.json in VSCode.
- Author
- Recent Posts
Bogdan is a seasoned web designer and tech strategist, with a keen eye on emerging industry trends.
With over a decade in the tech field, Bogdan blends technical expertise with insights on business innovation in technology.
A regular contributor to TMS Outsource’s blog, where you’ll find sharp analyses on software development, tech business strategies, and global tech dynamics.
Apr 07, 2024
By Team YoungWonks
*
Introduction to Visual Studio Code
Visual Studio Code (VS Code) has established itself as a highly regarded and widely used integrated development environment (IDE) that empowers developers on a global scale. Its integrated terminal is a prominent feature, facilitating the seamless execution of command-line tasks directly within the editor environment. In this detailed blog, we will explore different ways to open the terminal in VS Code across various operating systems. Whether you’re using Windows, macOS, or Linux, we’ll provide step-by-step instructions and insightful tips to ensure a smooth and efficient terminal experience within VS Code.
How do I open a terminal in VS Code on Microsoft Windows?
Opening the terminal in Visual Studio Code (VS Code) is a fundamental step for developers working on various projects. The integrated terminal in VS Code allows you to execute command-line tasks directly within the editor environment, enhancing your workflow and productivity.
Opening the terminal in Visual Studio Code (VS Code) on Windows is a straightforward process that can greatly enhance your coding experience. Whether you’re working with HTML, Node.js, APIs, or other technologies, opening the terminal in VS Code provides a seamless experience for executing terminal commands and managing your projects efficiently.
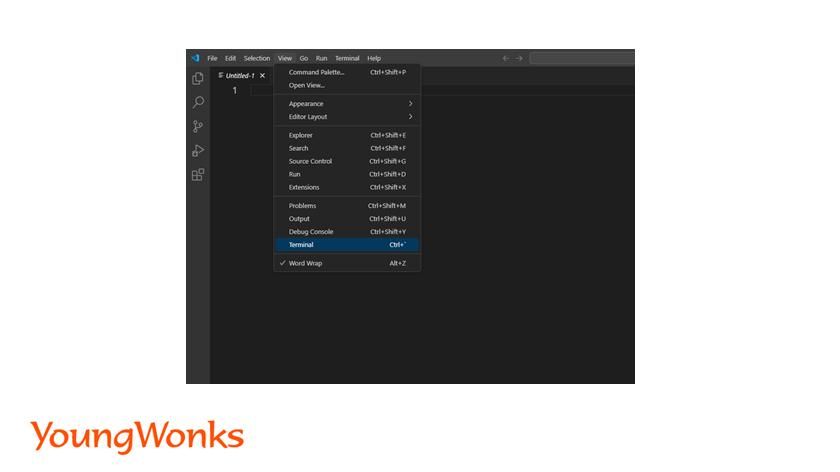
Using the Menu Bar
To begin, open VS Code on Windows 10/11 and navigate to the menu bar at the top. From there, select the «View» option and then click on «Terminal».
Once the terminal window appears, you can start using it to run commands and scripts in various languages such as Bash, Python, JavaScript, Java, TypeScript, and more. Whether you’re working with APIs, managing GitHub repositories, or executing CLI commands, the integrated terminal in VS Code provides a seamless environment for your development tasks.
Using Keyboard Shortcut
The quickest way to open the terminal in VS Code on Windows is by using the keyboard shortcut:
Ctrl + ` : Pressing Ctrl and the backtick key simultaneously opens the terminal.
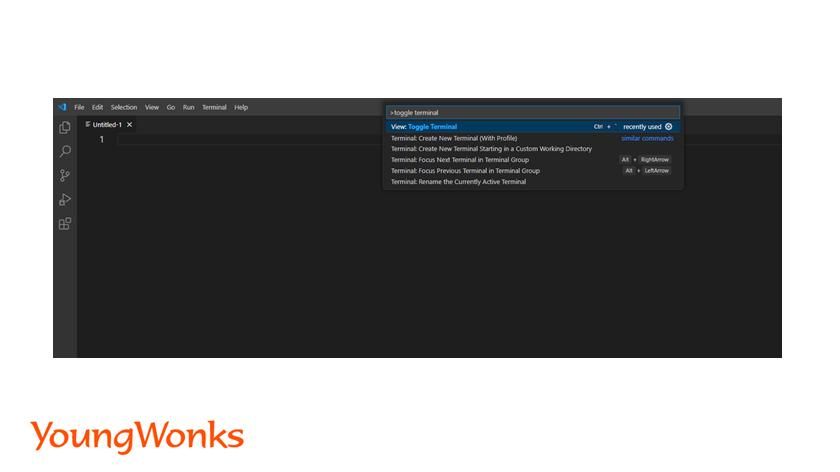
Using Command Palette
Another method is through the command palette:
- Press Ctrl + Shift + P to open the command palette.
- Type «toggle terminal» and press Enter to open the terminal.
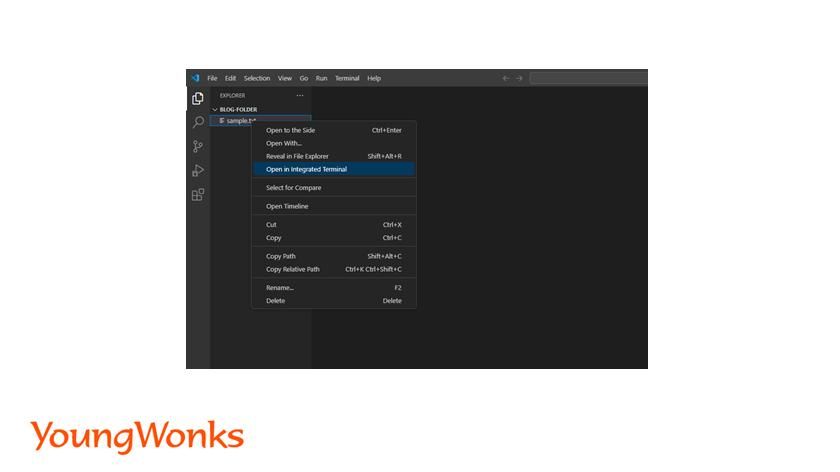
Using Right-Click Menu
You can also access the terminal via the right-click menu within the workspace:
- In the file explorer or editor, right-click on any file or empty space.
- Select «Open in Integrated Terminal» to open the terminal in the current workspace.
How do I open a terminal in VS Code on macOS?
The following are the different ways to open a terminal in VS Code on macOS.
Using the Menu Bar
Navigate to the menu bar at the top. From there, select the «View» option and then click on «Terminal».
Using Keyboard Shortcut
On macOS, use the following keyboard shortcut:
Cmd +` : Press Command and the backtick () key simultaneously to open the terminal.
Using Command Palette
You can also open the terminal through the command palette:
- Press Cmd + Shift + P to open the command palette.
- Type «toggle terminal» and press Enter/Return to open the terminal.
Using Right-Click Menu
Alternatively, access the terminal via the right-click menu:
- In the file explorer or editor, right-click on any file or empty space.
- Select «Open in Integrated Terminal» option to open the terminal in the current workspace folder.
How do I open a terminal in VS Code on Linux?
The following are the different ways to open a terminal in VS Code on Linux.
Using Keyboard Shortcut
For Linux users, the keyboard shortcut is:
Ctrl + `: Press Ctrl and the backtick key simultaneously to open the terminal.
Using Command Palette
Access the terminal through the command palette:
- Press Ctrl + Shift + P to open the command palette.
- Type «toggle terminal» command and press Enter to open the terminal.
Using Right-Click Menu
You can also open the terminal via the right-click menu within the workspace:
- In the file explorer or editor, right-click on any file or empty space.
- Select «Open in Integrated Terminal» option to open the terminal in the current workspace.
Additional Tips and Tricks
The following are some additional tips and tricks in VS Code.
Default Terminal Configuration
In Visual Studio Code (VS Code), you have the flexibility to customize your default terminal settings according to your preferences. This customization can be achieved by configuring the «terminal.integrated.shell» setting in the settings.json file. By specifying your preferred shell or command-line environment, you can streamline your workflow and enhance your development experience within VS Code.
Integrated Git Terminal
One of the key advantages of VS Code’s integrated terminal is its seamless integration with Git commands and version control operations. Whether you’re committing changes, pushing code to repositories, or managing branches, the integrated terminal offers a convenient and efficient way to execute Git commands directly within the editor environment. This integration eliminates the need to switch between different applications or command-line interfaces, allowing for a more cohesive and productive development process.
Custom Keybindings for Terminal Actions
VS Code allows you to create custom keybindings tailored to your specific needs, including actions related to opening the terminal or performing other tasks quickly. By defining personalized keybindings, you can optimize your workflow and streamline common actions within the terminal environment. Whether it’s assigning shortcuts for terminal toggling, executing scripts, or navigating through command history, custom keybindings enhance efficiency and make your development tasks more accessible.
Debugging and Development Capabilities
The integrated terminal in VS Code serves as a versatile tool for various debugging and development tasks. You can use the terminal for debugging purposes, such as running debugging sessions, inspecting variables, and executing debugging commands. Additionally, the terminal provides functionality for running scripts, managing dependencies using package managers like npm or yarn, and performing system-level tasks. This versatility makes the integrated terminal a central hub for executing command-line operations and enhances your ability to troubleshoot, test, and optimize your code seamlessly within VS Code.
Additional Tips
- Customizing Terminal Appearance: VS Code allows you to customize the appearance of the terminal, including font size, color schemes, and terminal profiles. You can modify these settings in the VS Code settings.json file or through the terminal settings interface.
- Integrated Debugger: Utilize the integrated debugger in VS Code alongside the terminal for debugging tasks. You can set breakpoints, inspect variables, and step through code seamlessly within the integrated terminal environment.
- Task Automation with Task Runner: Take advantage of the Task Runner in VS Code to automate repetitive tasks using scripts or commands in the terminal. This feature enhances workflow automation and efficiency.
- Integrating External Tools: Integrate external tools and utilities with the VS Code terminal to extend functionality. For example, you can integrate linters, code formatters, package managers, and version control systems seamlessly within the terminal environment.
- Multi-Terminal Support: VS Code supports multiple terminal instances simultaneously. You can open multiple terminal tabs or split the terminal window to work on different tasks concurrently, improving multitasking capabilities.
- Customizing Terminal Keybindings: Customize keybindings specific to terminal actions in VS Code. Define shortcuts for opening/closing terminals, switching between terminal tabs, running scripts, and other terminal-related tasks for enhanced productivity.
- Accessing Shell Commands: Easily access shell commands and utilities directly from the terminal in VS Code. This includes executing system-level commands, managing files and directories, and interacting with external APIs.
- Utilizing Integrated Tools: Leverage integrated tools and frameworks such as npm, yarn, Git, and Docker directly from the terminal in VS Code. This streamlines development workflows by providing quick access to essential tools and commands.
- Terminal Persistence: VS Code retains terminal sessions across sessions, allowing you to resume previous terminal sessions and history. This feature ensures continuity and saves time by preserving your terminal environment between VS Code sessions.
- Exploring VS Code Extensions: Explore and install VS Code extensions that enhance terminal functionality. Extensions such as terminal themes, terminal keymap customizations, and terminal workflow enhancements offer additional capabilities and customization options.
Enhance Your Coding Skills with YoungWonks
For those interested in taking their coding skills to the next level, Coding Classes for Kids at YoungWonks offer a comprehensive curriculum designed to engage young minds in the thrilling world of technology. Specifically, for enthusiasts wanting to master one of the most versatile and popular programming languages, our Python Coding Classes for Kids provide a solid foundation and advanced knowledge in Python programming. Meanwhile, students looking to develop comprehensive web applications can benefit greatly from our Full Stack Web Development Classes, which cover everything from frontend to backend development.
Conclusion
In conclusion, acquiring proficiency in opening the terminal in Visual Studio Code (VS Code) is paramount for unlocking a smooth and effective development experience. By delving into tutorials and exploring different methods such as utilizing keyboard shortcuts, leveraging command prompt functionalities, and employing right-click options across various operating systems including Windows, macOS, and Linux, developers can swiftly access the integrated terminal within VS Code.
Additionally, comprehending the additional tips and tricks, such as customizing default terminal settings, harnessing the integrated Git terminal for version control tasks, crafting custom keybindings for terminal actions, and utilizing the terminal for debugging operations and development tasks, elevates productivity and simplifies command-line tasks within the VS Code environment.
Ultimately, the integrated terminal within VS Code emerges as a potent asset that empowers developers to execute command-line tasks, manage dependencies, debug code, and perform diverse development tasks seamlessly, rendering it an indispensable component of the contemporary development workflow. Mastering these techniques not only enhances efficiency but also enriches the overall development journey within Visual Studio Code, tailored to suit your system and specific needs.
*Contributors: Written by Alisha Ahmed; Edited by Rohit Budania; Lead image by Shivendra Singh
This blog is presented to you by YoungWonks. The leading coding program for
kids and teens.YoungWonks offers instructor led one-on-one online classes and in-person classes with 4:1
student teacher ratio.Sign up for a free trial
class by filling out the form below:
By clicking the «Submit» button above, you agree to the privacy policy