
Вступление (лирическое)
Привет, Хабр!
Для меня, автоматизатора-линуксоида, использвание Windows на основной рабочей станции первое время было просто болью и страданием. Но с этим я ничего поделать не мог: корпоративные стандарты и софт, кторый работает только на Windows. В попытке найти золотую середину, я прошёл три стадии. Сначала я только изредка переключался на винду по необходимости. Затем виртуалка на virtualbox-е с X-server-ом. После этого захотелось хоть чуть-чуть того консольного комфорта, который был на линуксе (я использовал Terminator в качестве основного терминала).
После яростного гугления и установки всех эмуляторов терминала под Windows, которые только удалось найти, оказалось, что нет ни одного хоть немного подходящего мне. А хотелось, чтобы вёл себя терминал максимально приближенно к линуксовым вариантам. Например, естественно нужны табы, сплит, выделение текста с прокруткой (когда нужно выделить больше чем один экран), копирование текста в буфер сразу при выделении и т.д.
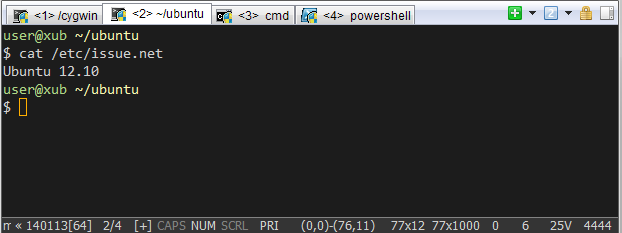
В итоге я получил «комбайн» как на скриншоте ниже. О том, как это настроить, можно узнать, заглянув под кат.
До того, как получить результат, я даже всерьёз задумался о своём велосипеде (портирование, написание своего). Но лень и здравый смысл взяли свое…
В процессе поиска хорошего терминала, я наткнулся на хабра-топик: Альтернативный терминал для Windows. ConEmu — приложение действительно классное, но оно не для тех, кто долгое время использовал линукс-терминалы. Затем я наткнулся на Mintty (был установлен вместе с Cygwin). Программка отличная, ведёт себя максимально близко к таким терминалам как Gnome-terminal и Terminator, но нет табов.
Оказалось, что вышеупомянутый ConEmu умеет запускать GUI-приложения внутри своих табов! И тут искра надежды начала разгораться… Но хватит лирики, пора приступить к делу!
Установка нужных программ
ConEmu ставим отсюда: code.google.com/p/conemu-maximus5
Mintty я ставил вместе с Cygwin: cygwin.com/install.html
Настройка
В ConEmu идём в Settings->Tasks и, нажимая плюсик, добавляем нужные таски как на скриншоте:
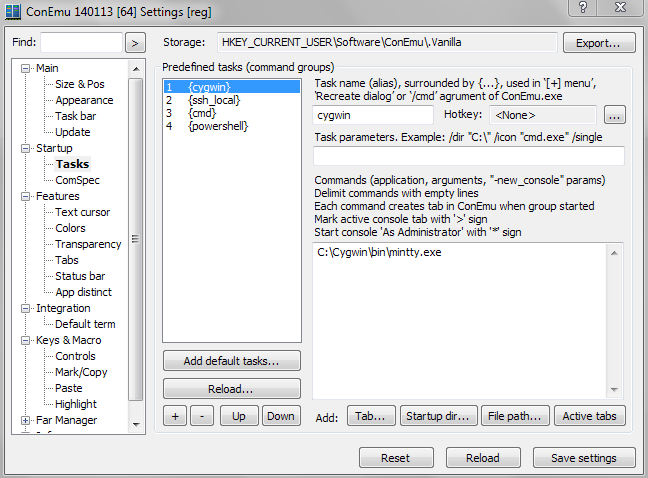
В нашем случае это:
| Имя таска | Команда |
| cygwin | C:\Cygwin\bin\mintty.exe |
| ssh_local | C:\Cygwin\bin\mintty.exe D:\Work\VMssh.bat |
| cmd | cmd |
| powershell | powershell |
Осторожно! Адский CMD!
VMssh.bat:
@ECHO OFF
SET VMNAME=xubuntu

CALL D:\Work\VMstart.bat %VMNAME%

ssh user@localhost
Вызывает скрипт старта виртуалки, VMNAME заменить на нужное.
VMstart.bat:
@ECHO OFF

SET VMNAME="%1"
SET isVMRun=

IF [%1] == [] (
  echo Empty parameter VMNAME. Usage: %0 [name of vm]
  EXIT /B 1
)

FOR /F %%i IN ('VBoxManage list runningvms') DO SET isVMRun=%%i

IF NOT "%isVMRun%" == "%VMNAME%" (
 Vboxmanage startvm %VMNAME% --type headless
)
Проверяет запущена ли виртуалка и если нет, то запускает её. Таким образом, мне не нужно помнить запущена ли виртуалка, запускать отдельно VirtualBox и делать дополнительные клики.
Немного «свистелок»
Xoria-like тема для Mintty (~/.minttyrc):
ForegroundColour=208,208,208
BackgroundColour=28,28,28
CursorColour=255,175,0
IMECursorColour=128,224,160
Black=12,12,12
BoldBlack=10,10,10
Red=215,135,135
BoldRed=223,135,135
Green=175,215,135
BoldGreen=175,223,135
Yellow=247,247,175
BoldYellow=255,255,175
Blue=135,175,215
BoldBlue=135,175,223
Magenta=215,175,215
BoldMagenta=223,175,223
Cyan=175,215,215
BoldCyan=175,223,223
White=230,230,230
BoldWhite=238,238,238
BoldAsFont=no
Font=Consolas
FontHeight=11
CursorType=block
FontSmoothing=full
Term=xterm-256color
Scrollbar=none
Locale=
Charset=
Общая рабочая папка (файлы доступны на винде и на виртуалке) — нужно настроить в VirualBox-e следующим образом:
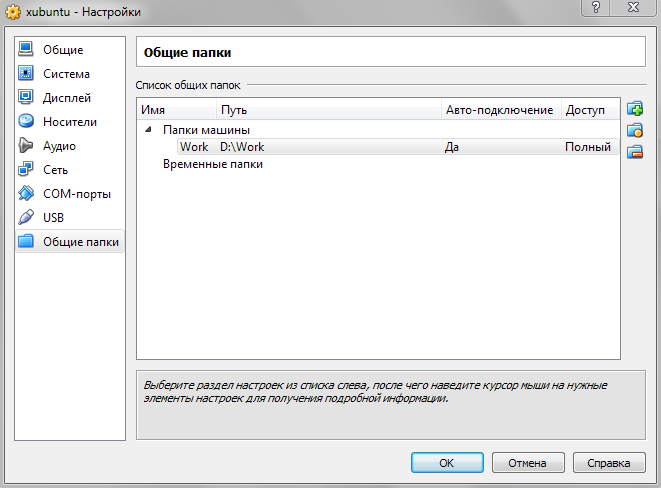
Также нужно прописать в fstab на виртуалке, чтобы автоматиечски монтировалось при старте.
Заключение
В результате я получил терминал, в котором хоть как-то можно жить. Я ни в коем случае не претендую на исключительность этого решения, но надеюсь кому-то пригодится. Отдельный плюс такого решения — общий текстовый буфер и общие папки. Таким образом, работаем с линукс-виртуалкой так же как и с остальными табами в терминале.
Скрипты и конфиг mynttyrc закинул на git-hub: github.com/morkot/windows-terminal-mutant.git
Для тех, кому не нужны GUI-табы и кто использует tmux, есть статья моего коллеги примерно на ту же больную тему: habrahabr.ru/post/196128.
Особая благодарность хабраюзеру Maximus5 за отличный Windows терминал ConEmu!
Introduction
We tend to work with the terminal a lot and some of our workstations run Windows.
In the past your Windows SSH client of choice would probably have been Putty.
Nowadays a command line SSH client can be installed as a feature in Windows, and before that there were versions of it compiled for Windows anyway.
It’s true that Powershell offers a unified environment of powerful commandlets for all of your administrative tasks but sometimes you’d just rather have the likes of grep or sed available.
Git for Windows and Cmder
One nice alternative command line comes with Git for Windows which not only comes with Git as you would expect, but also more GNU tools (including grep) and a bash environments
There’s a terminal emulator called Cmder that not only fits really well with Git for Windows but actually provides a package with Git for Windows in it (they call it the «Full» version).
It’s simple, looks good, provides tabbed consoles and allows for splitting panels. See it in action here:
If you installed the full package you should have immediate access to various GNU programs ported to Windows.
For the sake of completeness, let’s quickly present another popular terminal emulator: Hyper — Electron-based so quite memory-hungry but with GPU acceleration, tons of options and pretty fast overall.
The Windows Subsystem for Linux (WSL)
Git for Windows sets you up with bash but what if you want to use zsh or install packages as if you were really running Linux?
This is possible through a recent feature called WSL which basically allows binaries compiled for Linux to run on Windows. It’s kind of a reverse Wine, if you will.
The general performance of binaries is pretty much native, but all the IO system calls have to be translated first and depending on what you’re doing the slowdown can be significant although overall I have to say it’s quite impressive.
A few possible use cases for WSL
WSL makes legacy solutions like Cygwin completely obsolete.
With it you could easily:
- Run a fully featured zsh terminal with Ohmyzsh;
- Install the Linux version of Docker, which is much faster and predictable than the current version intended for Windows;
- Install and run classic Linux services on demand such as MySQL, PostgreSQL, Redis, Apache+PHP, … (Though you may run into compatibility issues for some very specific use cases);
- Make use of a package manager with the entire chosen distribution library of packages available for you to install — For instance a lot of infosec tools usually run on Linux;
- Start an SSH server on any Windows machine for remote access (WSL does not have Windows administrative access, though);
- Pipe Linux binaries output into Windows binaries or vice versa, all of the executables from your Windows PATH environment variable are also available in WSL;
- Run GUI applications from Linux without using a virtual machine and X redirections inside SSH;
- Use Dev. environment like Node or PHP without their Windows quirks — For instance the differing syntaxes to delcare and use environment variables.
How to install WSL
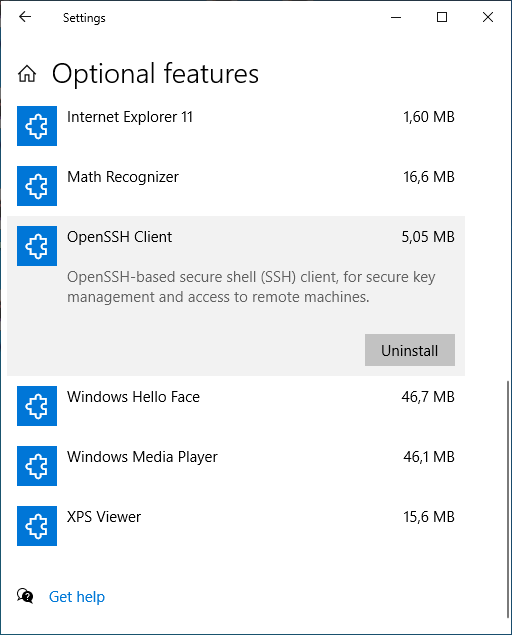
It has to be enabled as a Windows feature first.
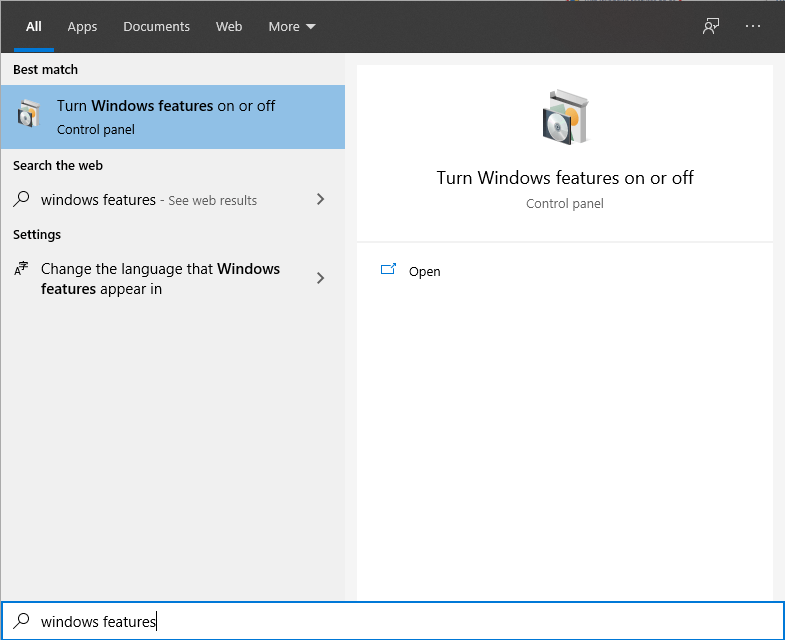
I usually just type «feature» in the start menu to find the Windows Features list.
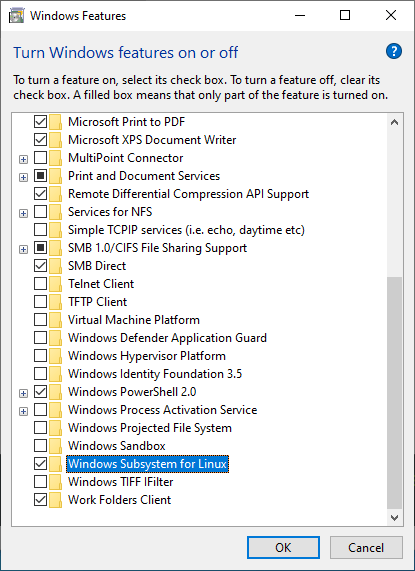
Find and install WSL from it then reboot when asked:
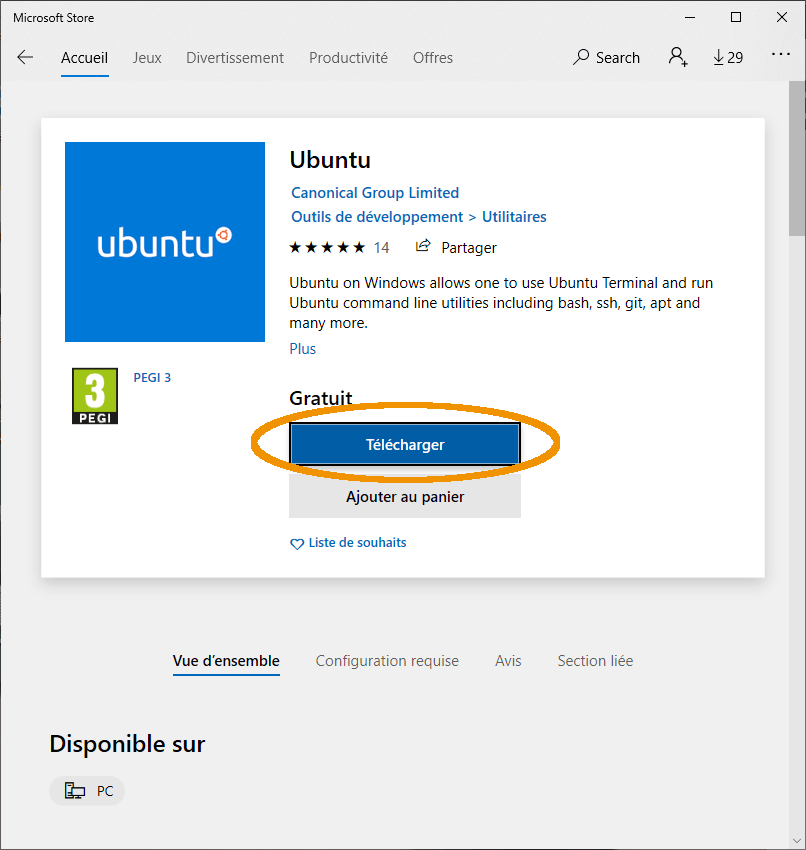
When that’s done you have to install one of the Linux distributions that are available from the Windows Store.
As we’re most familiar with the Debian world we like to pick and install Ubuntu:
Getting a WSL terminal from Cmder
Cmder should have a new possible «Task» in your settings. For instance you could modify the «startup» task to always get into a WSL terminal:
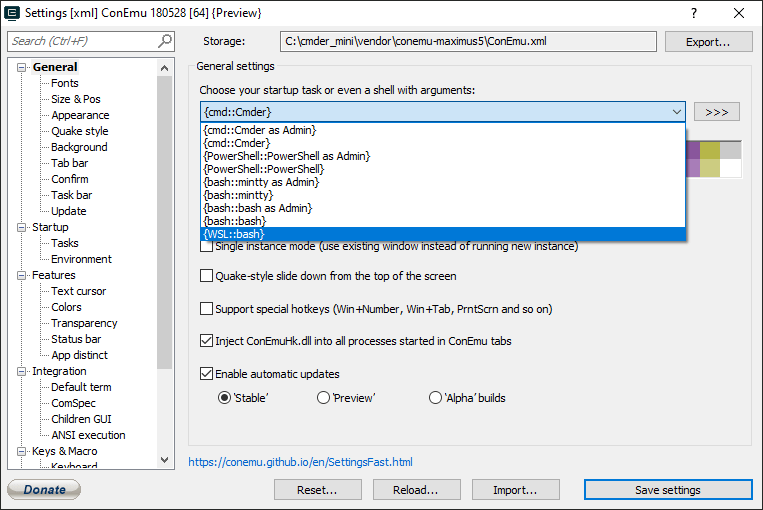
Or you could start a new tab (with Ctrl+T) and pick the WSL task for that tab.
Using the Windows Terminal (preview)
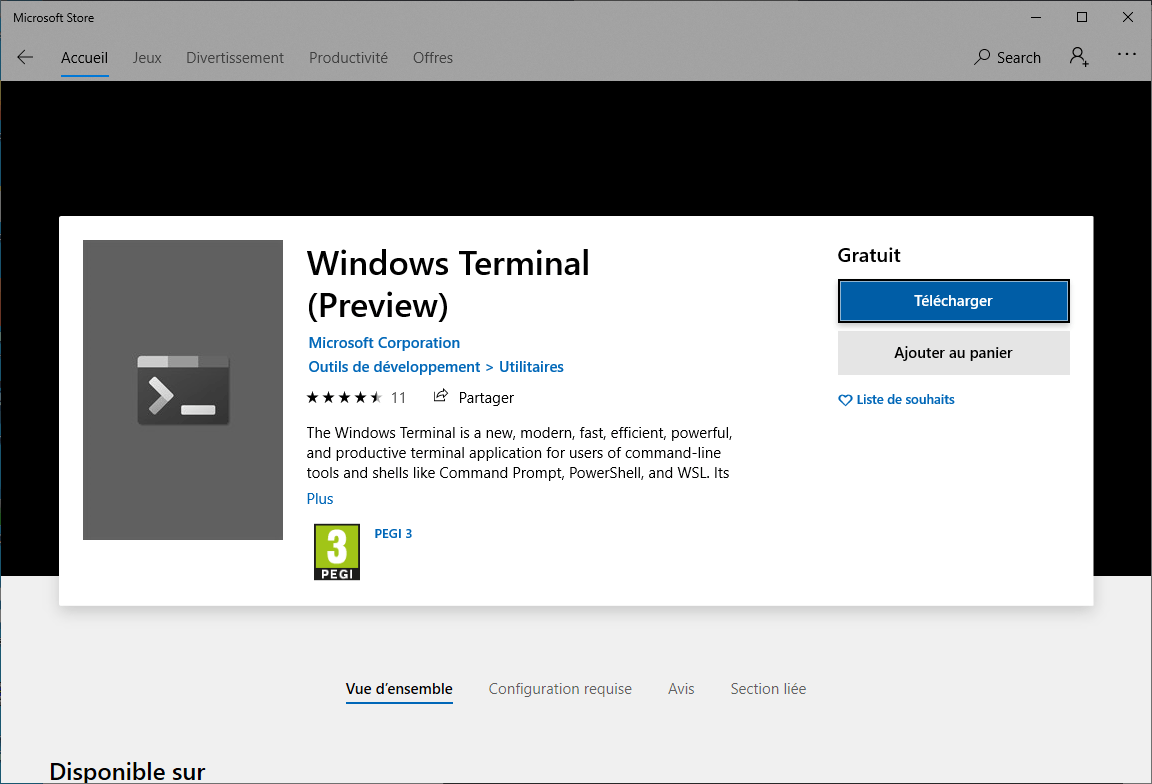
There is a promising terminal emulator available through the Windows Store (for free of course) called «Windows Terminal (preview)».
I think the strange title might indicate they could make it preinstalled with Windows in the future as a replacement for the old cmd.
Let’s find and download it from the store:
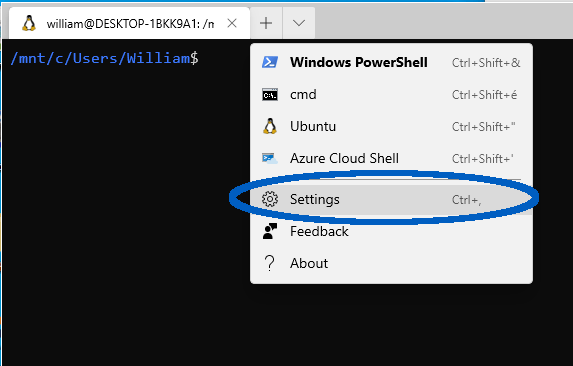
Starting the program should create a tab with a Powershell session.
From there, you can click the «+» icon and start a «Ubuntu» terminal.
To make it the default session being started, you can edit the app settings:
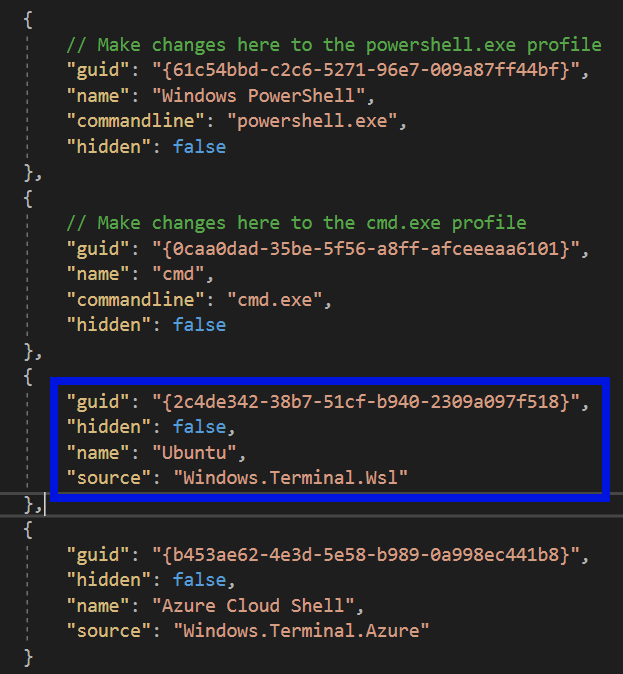
That should open a text editor showing you the config file in JSON format.
All the available terminal types are in the «profiles» array. Just find the one that matches Ubuntu, and copy its guid:
Paste the guid as the value for the «defaultProfile» key which should be somewhere near the top of the file.
There are many more options you can add in the specific profile section for Ubuntu to customize the terminal.
I’m currently using these settings:
{
  "guid": "{2c4de342-38b7-51cf-b940-2309a097f518}",
  "hidden": false,
  "name": "Ubuntu",
  "source": "Windows.Terminal.Wsl",
  "useAcrylic": true,
  "acrylicOpacity": 0.8,
  "fontFace": "Fira Code",
  "fontSize": 14,
  "historySize": 8000,
  "background": "#333333",
  "colorScheme": "Campbell"
}
Which requires installing the Fira Code font first. Just put in «Consolas» or remove the line altogether for the default font.
The useAcrylic setting creates a background with an effect in the style of Windows Aero graphics.
There are a few pre-existing color schemes. E.g. you should be able to try out these ones:
- Campbell
- One Half Dark
- One Half Light
- Solarized Dark
- Solarized Light
Accessing your Windows files and apps
All the Windows drives should be mounted in /mnt:
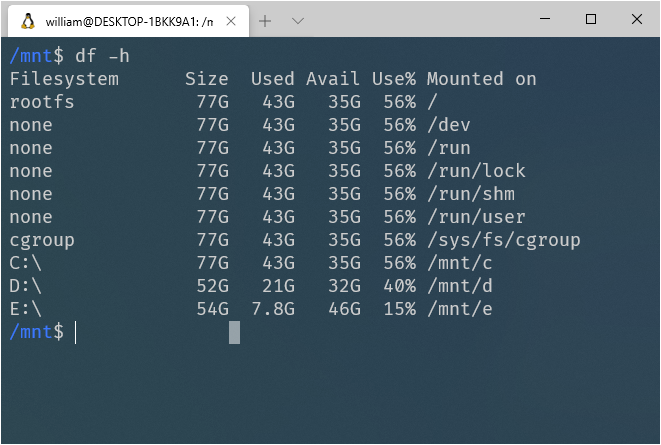
As noted before, WSL may not have access to places that require Windows administrative privileges, whether you use sudo or not.
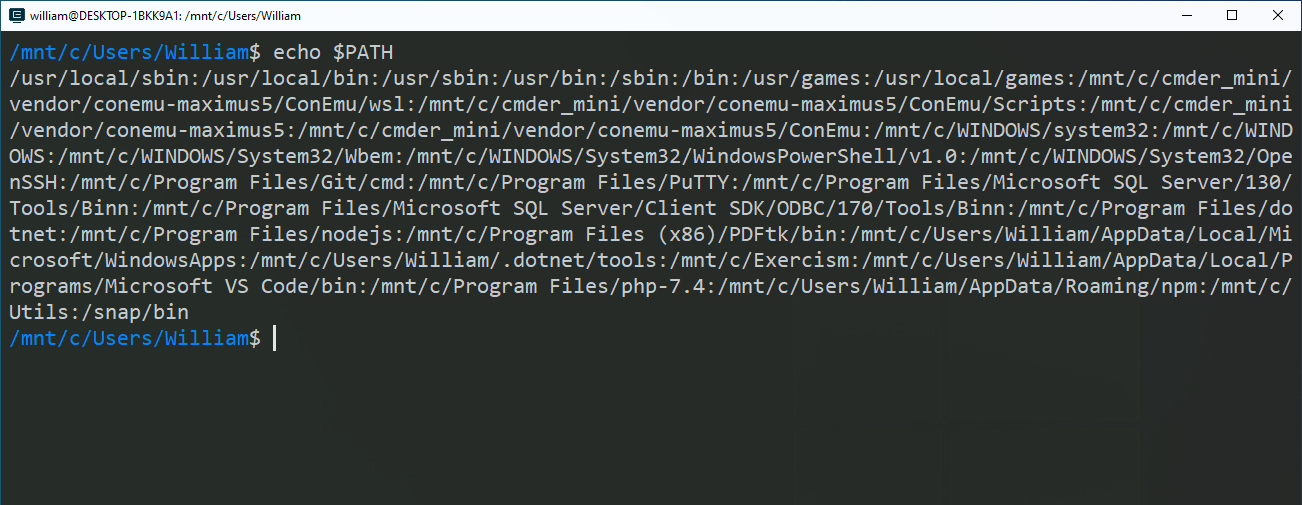
To start a Windows program that’s in the Windows PATH from WSL, you can just type the exectuable name and add «.exe» and it should work.
For instance, to open a file explorer in the current directory from WSL, you can just type:
explorer.exe .Your bash profile will use a PATH variable that is the concatenation of the Ubuntu and Windows PATHs:
Running Linux services
From an Ubuntu terminal session you are now able to install packages using apt.
You will have to use sudo with the password you provided during the installation of the Ubuntu package from the Windows store.
For instance you could install a MariaDB server like so:
sudo apt update
sudo apt install mariadb-server-10.1
There is no easy way to make it start with a Windows session, you will have to manually start it using /etc/init.d or:
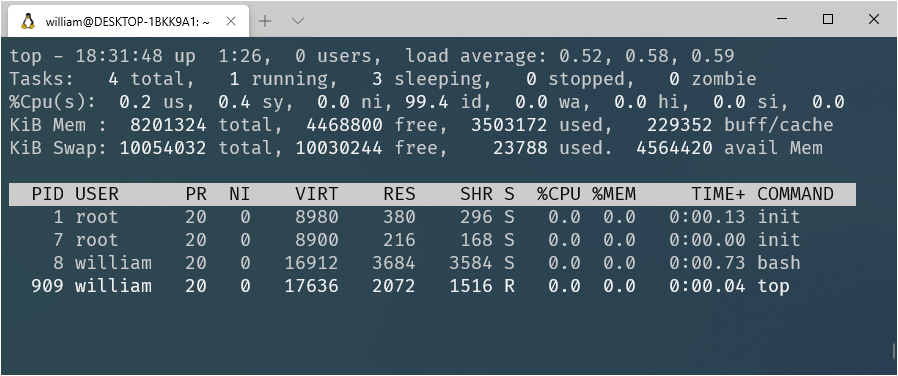
sudo service mysql startAny running Linux program will show up in the Windows task manager alongside all of your Windows processes.
From WSL itself you can only see the Linux processes:
One of the really interesting use cases mentioned earlier was Docker.
You could follow the procedure from here and get access to even more services through Docker.
Conclusion
The possibilities offered by WSL are huge. There are downsides of course but it’s certainly an incredible tool for anyone working with Windows on a daily basis.
The performance of binaries that aren’t specifically IO bound is also quasi native, which is really nice.

Introduction:
You may have used the linux terminal once, currently have a linux OS running on your computer or new to the term «Linux» and haven’t used the OS (operating system) before because you use a Mac or Windows but curious as to how it works, what it looks like, how to interract with it and the likes, this article is just exactly what you need.
This article will focus on how you can install a «Linux Terminal» into your Windows OS which will thereby enable you to use «Linux Terminal Commands» to perform tasks, script processes and so on without having to install a whole Linux OS just to do basic and complex linux processes or tasks. In addition, this causes no issues in our Windows Operating System and it is safe to say:
The Installation of a Linux Terminal into your windows OS causes no harm whatsoever to your Computer or Files. Infact, latest releases of the Windows OS such as 11 and 10 (The versions i have tried it in) are in support of it as you will see later in the article
What is WSL?
WSL simply means Windows Subsystem For Linux and it is a functionality being provided by Windows themselves but hidden to most basic Windows users. This is what I am referring to when I said installing the linux terminal into Windows. Yes.. Yes.. Yes.. and I know some of us are already saying «I know how to do it». 🙂🙂
If you are still reading this then you are interested in knowing how it works. Now that you know what we are about to do, Let’s not waste any more time and let’s dive right in.
System Requirements for WSL:
To run WSL here are the system requirements needed.
-
Windows Version: WSL is available on Windows 10 and later versions, including Windows Server.
-
64-bit Windows: WSL requires a 64-bit version of Windows.
Windows Build Version: Different versions of WSL have different requirements: -
Virtualization: WSL 2 requires virtualization technology to be enabled in the BIOS/UEFI settings of your computer.
-
Hardware Virtualization: Your CPU should support hardware virtualization
-
Minimum RAM: While there isn’t a strict minimum, having at least 2GB of RAM is recommended for smooth operation.
-
Disk Space: The space required depends on the Linux distribution you install, but you should have a minimum of 1GB of free space.
Let us Install:
The very first step in the installation process is to open up your Windows Start Menu and search for «Turn Windows Features On or OFF» and click on it.
Search Windows Features:

Now that you have clicked on it, you should be presented with a window that look like the image below. Scroll down till you find the option for «Windows Subsystem for Linux». Turn it On.
Activate WSL:

We now have the option turned on. The next step will be to restart your computer and open your windows powershell as an administrator.
in the powershell, type in this command: wsl --install -d Ubuntu
Note: For advanced and Experienced users, after the -d you can specify any Linux Distro of choice. Example:
wsl --install -d Debianand to get a list of avaiable Distros to install, use this command:wsl --list --online
Here is a Visual:
Install The Terminal and follow the installation guide
At this point if you followed the installation process from the promt, you should have no issues.
you can now start your Linux terminal by calling the bash shell from your powershell using bash or by calling wsl -d (Distro name)
Starting your terminal

Congratulations
You have now installed the a linux terminal on your Windows OS without the need for downaloading a whole Linux OS.
Spread the information 💡💡
Windows Terminal with Bash (or ZSH) and Starship
Jealous of Linux users?
Want an awesome-looking CLI on Windows?
Follow this guide to get a final result like this.

Install Windows Terminal
First of all you need a terminal capable of rendering fonts properly.
Install Windows Terminal from the Microsoft Store or from their GitHub repository.
Install Git Bash
Next you need bash. I personally use Git Bash as it comes with Git preinstalled.
Install Git and make sure to include the Git Bash in the installation process.
Install a Suitable Font (Required)
Go to Starship’s installation guide and follow the steps for installing a font. I recommend FiraCode Nerd Font Mono.

This step is not optional.
Configure Windows Terminal
In your Windows Terminal, open up the settings.json.


Set defaultProfile to the following.
"defaultProfile": "{00000000-0000-0000-0000-000000012345}",
Add the following profile to profiles.list.
Set fontFace to the name of the font you installed.
{
	"acrylicOpacity": 0.75,
	"background": "#000000",
	"closeOnExit": true,
	"colorScheme": "GitBash",
	"commandline": "\"%PROGRAMFILES%\\git\\bin\\bash.exe\" --login -i -l",
	"cursorColor": "#FFFFFF",
	"cursorShape": "bar",
	"fontFace": "FiraCode Nerd Font Mono",
	"fontSize": 10,
	"guid": "{00000000-0000-0000-0000-000000012345}",
	"historySize": 9001,
	"icon": "%userprofile%\\.config\\terminal.ico",
	"name": "Git Bash",
	"padding": "0, 0, 0, 0",
	"snapOnInput": true,
	"useAcrylic": true
},
Set schemes to the following.
"schemes": [
	{
		"name": "GitBash",
		"background": "#000000",
		"black": "#0C0C0C",
		"blue": "#6060ff",
		"brightBlack": "#767676",
		"brightBlue": "#3B78FF",
		"brightCyan": "#61D6D6",
		"brightGreen": "#16C60C",
		"brightPurple": "#B4009E",
		"brightRed": "#E74856",
		"brightWhite": "#F2F2F2",
		"brightYellow": "#F9F1A5",
		"cyan": "#3A96DD",
		"foreground": "#bfbfbf",
		"green": "#00a400",
		"purple": "#bf00bf",
		"red": "#bf0000",
		"white": "#ffffff",
		"yellow": "#bfbf00",
		"grey": "#bfbfbf"
	}
]
Save the file. If you get a warning or error it’s alright. Just make sure the data entered doesn’t get changed.
Download the Windows Terminal icon and place it in C:/Users/Username/.config named terminal.ico.
Install Starship
Reopen Starship’s installation guide if you closed it.
Reopen your Windows Terminal. It should open straight to Git Bash.
Run the shell command the guide gives you to install Starship, but add -- --bin-dir ~/.config/starship to the end of the command to install it in C:/Users/Username/.config/starship.

Installing ZSH (Optional)
Installing ZSH requires downloading ZSH from here and extracting the contents into C:/Program Files/Git.
The easiest way to extract the archive is by using PeaZip.
You can use vanilla ZSH or almost any framework you choose, but I recommend Zsh IMproved FrameWork.
Adding Starship (and ZSH)
Bash
In C:/Users/Username/.bashrc, add the following to the end.
eval "$(starship init bash)"
ZSH
In C:/Users/Username/.bashrc, add the following to the end.
if [ -t 1 ]; then
exec zsh
fi
In C:/Users/Username/.zshrc, add the following to the end.
eval "$(starship init zsh)"
Personal Final Touches
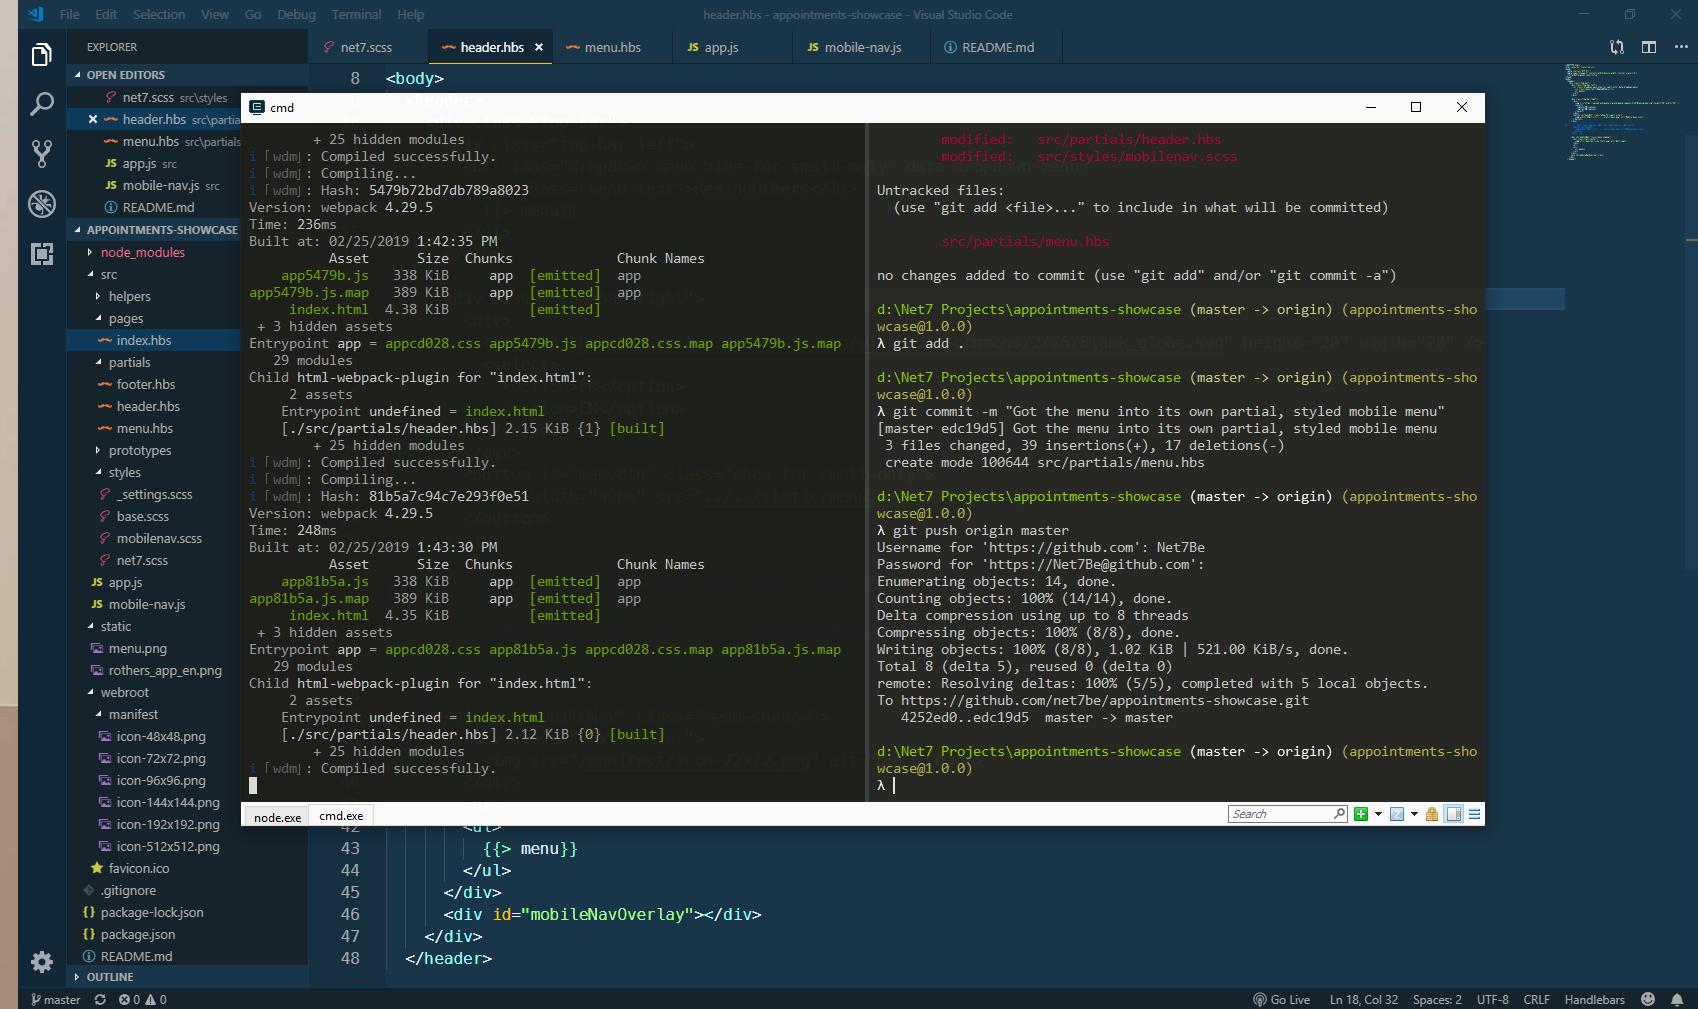
Configure your VSCode to run Git Bash by default instead of Powershell, use the font you installed, and use UTF-8 encoding.
Download Article
Turn your Windows PC into a Linux-style terminal
Download Article
- Installation and Setup
- Using Cygwin
- Helpful Terminal Commands
- Video
- Q&A
|
|
|
|
Cygwin is a free command line interface that allows you to install Linux software and use Linux commands on Windows without having to install Linux. While Cygwin may be unfamiliar to first-time users, it can become second nature with a little practice. Read on to learn how to install Cygwin, use the terminal, install and update software packages, and run basic Linux commands on Windows.
Using Cygwin: The Basics
Install Cygwin to use Linux software and commands on Windows. The setup wizard installs a terminal app and basic tools, and you can install additional packages like Python or Ruby. Once installed, open «Cygwin64 Terminal» to access the CLI.
-

- Go to https://www.cygwin.com and click Install Cygwin in the left column. Click the setup-x86_64.exe link to download the installer to your PC.
- Once downloaded, double-click the downloaded file and click Next to start the setup wizard. Choose «Install from Internet» and click Next to run the Cygwin installer.
-
For most users, leaving the default installation directory (c:\cygwin\) and the other default settings is fine. You can also choose to install for All Users here or Just Me.
- Click Next to continue.
-
This is where Cygwin will store the packages you download. Any temporary directory will work.
- Like Linux, you can install software in Cygwin from packages. Instead of using a package manager like Apt or Yum, you’ll use the graphical package installer in the setup wizard.
-
Alternatively, if you use a proxy server to access the internet, enter that information now.
-
You will now be presented with a list of Cygwin mirrors. You can choose any mirror, as they all contain the same software. If the installation takes too long, you can always return to select another mirror.[1]
-
Only the software in the «Base» category is installed by default.[2]
This includes common Linux tools like the bash shell, coreutils, gzip, tar, and necessary Cygwin libraries. To install other software, such as Python or Ruby, you’ll need to select «Install» from its corresponding menu.- You can rerun the installer anytime to install and update packages.
-
This installs Cygwin and all the software you’ve selected. This process can take a while, depending on what you’re installing.
- Once the installation is complete, you’ll be asked if you want to add Cygwin’s icons to your desktop and the Start menu. It’s usually a good idea to at least add Cygwin to the Start menu so you can find it easily.


-
To get to the terminal, just click the Cygwin64 Terminal in the Start menu. This opens a basic bash shell and prompt, just like in Linux.
-
The search and comparison tools are some of the most basic commands you can use in Cygwin. To find a file, you can input the following command:
$ find . -name EXAMPLE. This will show you all of your files with that name. However, it is case-sensitive. -
If you would like to find certain text within a file, you need to incorporate the «grep» command. Thus, to find all instances of «EXAMPLE,» you would need to input
$ grep 'EXAMPLE' EXAMPLE.txt. This will provide you with all the instances of the text «EXAMPLE» within the EXAMPLE.txt file. However, this particular command is case-sensitive. To find all instances of «EXAMPLE» regardless of case, continue to the next step. -
To find text regardless of case, simply add
-iafter thegrepcommand. It should look something like this:$ grep -i 'EXAMPLE' EXAMPLE.txt. -
If you would like to compare two files, you can easily do so by entering the
diffcommand. Simply input the command followed by the names of the two files you wish to compare:diff EXAMPLE.txt PRACTICE.txt. This will then present you with the two files, one after another. -
If you want to update or download more Cygwin-compatible software, just run the installer again (the file you downloaded). If it’s been a while since you installed it, you can get the latest version from https://www.cygwin.com/install.html.[3]
- Run the installer and go through the basic installation steps until you get to the «Select Packages» screen.
- Search for a package to update or install, then select Install or Reinstall.
- Complete the installer to install or update your packages.


-
Some basic Linux commands you can use in Cygwin are listed in the table below, alongside their corresponding commands in Windows.
Action Windows Cygwin list directory dir ls clear console cls clear copy file(s) copy cp move file(s) move mv delete file(s) del rm create directory md mkdir remove directory rd rm -rf change current directory cd cd search find grep display/output text echo echo

Add New Question
-
Question
How do I launch a program?
Fouzi Bounezef
Community Answer
To start a program as an administrator, you must right click the window with the option to run as administrator.
-
Question
How can I use micro for writing program in Cygwin?
The syntax of a program varies by language, so that’s not directly possible to answer. As far as micro goes, the only thing you need to know is to press Ctrl and S to save a new file, and Ctrl and Q to exit. Use the «arrow» keys on your keyboard to navigate through a file.
-
Question
How to save the section of my work in Cygwin and restore it to continue?
Cygwin is just an API compatibility layer and environment. An answer to your question is very application-dependent.
See more answers
Ask a Question
200 characters left
Include your email address to get a message when this question is answered.
Submit
Video
Thanks for submitting a tip for review!
References
About This Article
Article SummaryX
1. Download the installer from http://cygwin.com.
2. Run the installer.
3. Select software packages to install.
4. Follow the on-screen instructions.
5. Enter Unix commands at the prompt.
Did this summary help you?
Thanks to all authors for creating a page that has been read 220,627 times.