
Теневое копирование — это служба, делающая копии файлов на дисках в заданные периоды времени. Она позволяет также делать копии независимо от того используется файл или нет. Благодаря этому она позволяет быстро просмотреть состояние папки на предшествующий момент времени или, при необходимости, восстановить случайно удаленные файлы независимо от их наличия в корзине. Необходимо понимать, что теневое копирование не отменяет необходимость резервного копирования, а служит лишь дополнением к нему.
Для включения этой функции достаточно выполнить следующие операции: Открыть свойства соответствующего диска и перейти на закладку “Теневые копии”.
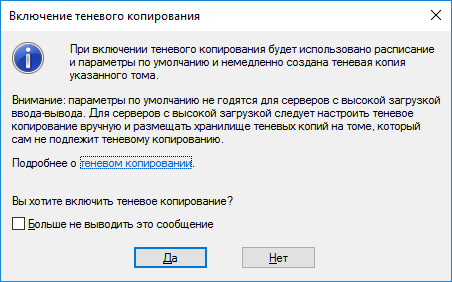
Встать на соответствующий диск и нажать “Включить”.
Система выдаст дополнительную информацию, предупредит что будет снята первая копия и что расписание резервного копирования будет изменено, а также запросит подтверждение операции.
После этого теневые копии активируются, при желании можно изменить их параметры, например расписание, либо отключить, а также принудительно создать соответствующими кнопками.
Теперь у каждой папки и файла на закладке “предыдущие версии” есть информация о теневых копиях откуда можно просмотреть содержимое папки на предшествующий период или восстановить файл.
Для того чтобы восстановить файл или папку, надо открыть его свойства и перейти на закладку “предыдущие копии”, выбрать нужную версию файла и нажать кнопку “восстановить”, также можно посмотреть содержимое файла или папки нажав кнопку “открыть”.
Так эта закладка выглядит для файла
А так для папки
На этом настройка теневого копирования томов на Windows Server 2016 окончена. В нашей базе знаний вы найдете еще множество статей посвящённых различным аспектам работы в Windows, а если вы ищете надежный виртуальный сервер под управлением Windows, обратите внимания на нашу услугу — Аренда виртуального сервера Windows.
Последнее обновление: 01.11.2023
Средняя оценка: 5,0, всего оценок: 5
Спасибо за Вашу оценку!
К сожалению, проголосовать не получилось. Попробуйте позже
Windows Server 2019 offers a wide range of security options. However, data backup and restore are the most sensitive. Because a failure in data availability can have serious consequences for the organization. For both the user and the administrator. With this intention, the system makes use of the Volume Snapshot System. With this intention, the system makes use of the Instant Volume System. This feature first appeared in Windows Server 2003. Consequently, Windows Server 2019 uses this technology to use the Volume Shadow Copy function. In this way, it is possible to back up the system without affecting its performance. Therefore, system security is enhanced by being able to safely restore data. This allows you to create backups to return to a previous point or restore the system. See how to enable shadow copies in windows server 2019/2016.
Activating Volume Shadow Copy in Windows Server 2019/2016
In the first place, it is necessary to open the disk manager by pressing the Win+X combination.
Then select the partition where the server is installed. Then, right-click on it and enter Properties.

Now, go to the Shadow Copies tab and then click on Enable.
In the next window, press Yes to confirm the creation.

After confirmation, we see how a restore point has been created in the selected unit. Please click on Settings.
Within this table you can see the following parameters:
- To know which is the volume where the backup will be made
- Setting a maximum copy size
- Set a custom schedule on which to back up
Within this section, it will be possible to define the following:
- Define the exact date and time of each backup
- Define the programming frequency
- Define how often the copy will be made
- Activate which days the copy will be made

In this way, it is possible to enable the shadow copies in Windows Server 2019/2016. Now it is possible to increase the security in the system. This is all for now. Before saying goodbye, I invite you to see our post about creating a local account on Windows 10.
— Advertisement —
Everything Linux, A.I, IT News, DataOps, Open Source and more delivered right to you.
Subscribe
«The best Linux newsletter on the web»
Прочитано: 9 133
Порой сталкиваешься на рабочем месте, что к тебе как к системному администратору обращается пользователь с просьбой восстановить файл который он редактировал весь день, а потом вернулся к рабочему месту, но весь его труд утерян. Да, на его совести тот момент если он отошел от своего компьютера и не заблокировал вручную экран (приучаю нажимать сочетание клавиш: Win + L), а таймаут выставленный групповой политикой еще не активировался. Использовать такую отговорку, что можно восстановить файл(ы) только из вчерашнего бекапа — ну это не профессионализм. Вот в этом случае каждый системный администратор должен совершенствоваться и знать, что система Windows имеет такую важную настройку как использование «Теневых копий».
За основу функции/настройки теневого копирования отвечает служба теневого копирования (Volume Shadow Copies, VSS). Служба VSS применяется ко всему логическому диску и создаем снимок всех находящихся на нем файлов. После через запланированные промежутки времени отслеживает изменения и снова создает снимок.
Покажу на примере, как такая настройка «Теневые копии» включается и что она дает обычному пользователю.
Есть файловый сервер под управлением Windows Server 2016 Standard (на заметку: настройка «Теневые копии» работает и на Server 2008 R2,Server 2012/R2).
На заметку: логический диск с общими папками должен располагаться не на системном диске и не на диске с бекапами — это мое мнение.
На заметку: при использовании настройки «Теневые копии» следует под общие папки (файловый ресурс) заложить большой логический диск для хранения снимков. Если используется система виртуализации Hyper-V или ESXi то проблем с его расширением быть не должно и отрепетирована процедура его расширения.
На логическом диске D: создана папка с именем fileserver и настроена как общая с отключенным наследованием.
Запускаю оснастку «Управление компьютером»:
Win + R → control.exe — Просмотр: Категория — Мелкие значки — «Администрирование» – «Управление компьютером» – «Служебные программы» – и на «Общие папки» через правый клик мышью выбираю «Все задачи» – «Настроить теневые копии», выделяю том, в моем случае том D:\ и нажимаю «Настроить».
В данных настройках задается максимальный размер использования теневой копии, но не менее 300 МБ. По умолчанию хранилище теневых копий занимает 10 % от размера диска, а в снимках хранятся только изменения, а не сами изменившиеся файлы. Если места не достаточно, то при создании нового снимка старые снимки удаляют.
Как выбрать какой размер задать, прикинем, всего файлов под файловый ресурс 50 Gb, то я бы выбрал 50% от размера диска или: Максимальный размер: => не ограничен.
После нажимаю «Расписание» чтобы указать как часто будут делаться теневые копии. Если обратить внимание на рекомендацию, то не следует указывать создание одной теневой копии в час, вот только здесь уже каждый системный администратор должен все правильно взвесить как отразится потеря данных на продуктивной работе организации. Т.к. у меня жесткий диск под 2Tb, а данных всего 500Gb, то я делаю под себя следующее расписание:
Нажимаю «Дополнительно…»
- Дата начала: текущая дата
- Повторять задание: отмечаю галочкой
- Каждые: 2 часа
- Выполнять: в течение: 10 час
и получается расписание: Каждые 2 часа с 09.00 по 10 час начиная с текущей даты и каждый день.
В процессе эксплуатации я подкорректирую данное расписание.
и нажимаю кнопку Ok окна настройки расписания для тома D:\ – кнопку OK окна «Параметры» и выделив том D:\ нажимаю «Создать» тем самым создаю теневую копию текущего диска.
Из представленного выше скриншота видно, что текущий снимок занимаем целых 2.5G, так что об выделяемом размере под теневые копии каждый должен смотреть самостоятельно.
Также функцию теневые копии можно включить если перейти из оснастки «Управление компьютером» – «Запоминающие устройства» – «Управление дисками» – через правый клик по тому D: вызвать «Свойства» и перейдя во вкладку «Теневые копии».
Если сымитировать добавление файлов и последующее нажатие создания снимка можно будет видеть как изменяется размер и количество теневые копий в оснастке тома:
Итак копии имеются, объясняю пользователю что он может сделать сам на своем рабочем месте если что-то у него пропало.
Под Windows 10 Pro:
Шаг №1: Перейти на файловый ресурс
Шаг №2: По каталогу (или по файлу) внутри которого располагаются его файлы нажать на нем через правый клик мышью перейти на меню «Восстановить прежнюю версию» после чего на вкладку «Предыдущие версии».
Шаг №3: Тут он увидит сделанные снимки и открывая последний ориентируясь на дату и время будут открываться экраны с файлами/или файл за указанный временной промежуток при нажатии на кнопку «Открыть» или через правый клик мышью по нему «Изменить» ту версию где результаты его работы самые последние.
Шаг №4: После чтобы его восстановить нужно либо когда файл найден и открыт сделать «Файл» – «Сохранить как» и сохранить в ту директорию где он был затерев не актуальный или же нажать кнопку «Восстановить» и воспользоваться мастером восстановления:
Нажимаю «Восстановить» и получаю сообщение «Файл был успешно переведен в предыдущее состояние».
Шаг №5: Пользователь возвращается к редактированию на том месте файл(ы) которого были восстановлены.
Шаг №6: После этого момента пользователь становится чуть счастливее от того что теперь он сам может это делать и ему не надо писать заявку на helpdesk или подходить к Вам лично.
На заметку: Не советую включать теневые копии на системном диске, т. к. обновления, логирование и многое другое будет все заполоняется никому не нужными снимками и расходуемым местом. Возьмите за правило, один логический диск под систему, другой под данные.
На заметку: если выключить «Теневое копирование тома» в свойства диска, то все снимки будут удалены, а файлы будут оставлены как есть.
На заметку: Теневые копии — это не то же самое что и резервная копия, так что не советую полностью на них надеяться, ведь это всего лишь дельта изменения от первого и последующих снимков, а бекап — это наше все.
Итого, я для себя оформил те моменты с которыми сталкиваешься когда задействуешь «Теневые копии» для тома и что пользователь может сам сделать в случае проблемы с потерей файла(ов).
На этом я прощаюсь, если что будет интересного я дополню данную заметку, а пока собственно и всё, с уважением автор блога Олло Александр aka ekzorchik.
What Are Shadow Copies?
A shadow copy is a snapshot of a set of data, such as a file or folder.
Shadow copies provide the capability to recover files and folders based on snapshots of storage drives.
After a snapshot is taken, you can view and potentially restore previous versions of files and folders from that snapshot.
A shadow copy does not make a complete copy of all files for each snapshot.
Instead, after a snapshot is taken, Windows Server 2016 tracks changes to the drive. A specific amount of disk space is allocated for tracking the changed disk blocks. When you access a previous version of a file, some of the content might be in the current version of the file, and some might be in the snapshot.
On this post this time, lets go through a very easy step how you can implement & configure shadow copies in Windows Server 2016.
1 – For this Shadow Copies Demo, i will be using my C: drive which located in my DC-CLOUD server.

2 – In the Shadow Copies interface, click drive C:, and then click Enable.

3 – In the Enable Shadow Copies interface, click Yes.

4 – In the drive Shadow Copies interface, click Settings.

5 – In the Settings interface, click Schedule.

6 – In drive C:\ interface, change Schedule Task to Daily, change Start time to 3:00 AM, and then click Advanced.

7 – In the Advanced Schedule Options interface, select Repeat task, and then set the frequency to every 1 hours, then Select Time, and then change the time value to 2:58 AM.

8 – Click OK, and then in Settings interface, type 500 in Use limit: box and then click OK.

9 – Switch back to the Shadow Copies interface. It should be opened on the Shadow Copies tab and then click Create Now

10 – under Shadow copies of selected volume notice that you should have new date & time for shadow copies.
11 – to simulate the shadow copies function, lets Delete the Note.txt file.

12 – In File Explorer, right-click the Office File folder, and then click Properties.

13 – In the Office Files Properties dialog box, click the Previous Versions tab.
– then click the most recent folder version for Office Files and then click Open.

14 – Confirm that Note.txt is in the folder, right-click Note.txt, and then click Copy.

15 – lastly, in the other File Explorer window, right-click the Office Files folder, and then click Paste.


that’s all for now.., any Doubts type a commend.. 🙂
Shadow Copy is a feature of Windows Server 2016 that allows users to create point-in-time copies of files and folders. This feature is useful for backing up data, restoring deleted files, and recovering from system crashes.
However, Shadow Copy can also be a source of security vulnerabilities if not properly configured. In this article, we will discuss 8 best practices for using Shadow Copy on Windows Server 2016. We will cover topics such as setting up Shadow Copy, configuring security settings, and monitoring Shadow Copy performance.
1. Use the Shadow Copy Storage Area on a Separate Volume
When you use the Shadow Copy Storage Area on a separate volume, it helps to ensure that your data is safe and secure. This is because if something happens to the original volume, such as a disk failure or corruption, then the shadow copy will still be available for recovery. Additionally, using a separate volume also allows you to configure different settings for the shadow copy storage area, such as setting up quotas or limiting the amount of space used by the shadow copies. Finally, having the shadow copy stored on a separate volume can help improve performance since the system won’t have to access both volumes at the same time.
2. Do Not Store the Shadow Copy Storage Area on the System Drive
The Shadow Copy Storage Area is where the shadow copies of files are stored. If this area is on the same drive as the system, then it can be affected by any changes to the system or other applications running on the server. This could lead to corruption of the shadow copy data and cause problems with restoring files from a previous version.
By storing the Shadow Copy Storage Area on a separate drive, you ensure that it will not be affected by any changes to the system or other applications running on the server. This helps protect your data and ensures that you can restore files from a previous version if needed.
3. Enable Shadow Copies for Shared Folders Only When Necessary
Shadow Copies can take up a lot of disk space, and if you enable it for all Shared Folders on your server, then the amount of disk space used could quickly become unmanageable.
Therefore, it’s important to only enable Shadow Copies for those Shared Folders that need them. For example, if you have a folder with sensitive data that needs to be backed up regularly, then enabling Shadow Copies would be beneficial. However, if you have a folder with non-sensitive data that doesn’t need to be backed up, then there is no need to enable Shadow Copies.
4. Use Multiple Shadow Copies of Shared Folders to Preserve More Data
When you create a single shadow copy of a shared folder, it will only capture the data that was present at the time the shadow copy was created. If any changes are made to the files in the shared folder after the shadow copy is taken, those changes won’t be captured by the shadow copy.
By creating multiple shadow copies of the same shared folder, you can ensure that more of your data is preserved and protected. This way, if something happens to the original files, you’ll have multiple versions of the data stored in different shadow copies, giving you access to older versions of the data.
5. Set the Schedule for Creating Shadow Copies of Shared Folders
Shadow copies are a great way to protect your data from accidental deletion or corruption, but they can also take up valuable disk space.
By setting the schedule for creating shadow copies of shared folders, you can ensure that the system is only taking snapshots at times when it won’t interfere with other operations. This will help keep your server running smoothly and efficiently while still providing the protection you need. Additionally, you should make sure to regularly review the settings to ensure that the schedule is still appropriate for your environment.
6. Limit the Size of the Shadow Copy Storage Area
Shadow Copies are stored in the Volume Shadow Copy Service (VSS) storage area, which is a limited resource. If too much data is stored in this area, it can cause performance issues and even prevent backups from completing successfully.
To limit the size of the VSS storage area, you should set up a schedule to delete old shadow copies on a regular basis. This will ensure that only the most recent versions of files are being backed up, while freeing up space for new ones. Additionally, you should also consider setting up quotas to limit how much disk space each user or group can use for their shadow copies. By doing so, you can make sure that no single user or group consumes an excessive amount of resources.
7. Create and Restore Shadow Copies of Shared Folders Using PowerShell
Using PowerShell to create and restore shadow copies of shared folders allows you to automate the process, making it easier to manage. It also ensures that all changes are tracked and logged, so you can easily identify any issues or discrepancies. Additionally, using PowerShell for this task helps ensure that your backups are secure and reliable. Finally, it’s a great way to save time and resources since you don’t have to manually create and restore shadow copies.
8. Delete Unnecessary Shadow Copies of Shared Folders
Shadow copies are a great way to back up data, but they can take up a lot of disk space. If you don’t delete the unnecessary shadow copies, your server will eventually run out of storage space and become unstable.
To avoid this problem, make sure to regularly check for any unnecessary shadow copies of shared folders on your server. You can do this by using the Shadow Copy GUI in Server 2016 or by running the command line tool vssadmin list shadows. Once you’ve identified any unnecessary shadow copies, you can delete them with the command line tool vssadmin delete shadows.