
Темы для кнопки ПУСК
В этом разделе сайта собрана коллекция скинов для кнопки ПУСК. В любой версии системы Windows стандартная кнопка ПУСК имеет логотип компании. И всё бы ничего, но эмблема Windows уже приелась многим пользователям. Если Вы относите себя их числу, то Вам непременно нужно ознакомиться с этим разделом сайта. Здесь Вы найдёте скины для кнопки ПУСК, которые немного преображают обычную стартовую кнопку, а также скины, которые меняют её до не узнаваемости. С помощью нового скина для кнопки ПУСК Вы всегда сможете настроить оформление системы так, что все его элементы будут перекликаться между собой и создавать гармоничный стиль.
- Home
- Explore
- CursorFX cursors
- Curtains
- DeskScapes wallpapers
- IconPackager themes
- Icons
- Rainmeter
- Screenshots
- SoundPackager
- Start Menu Buttons
- Wallpapers
- WindowBlinds skins
- Winstep
- View Gallery List
- Explore All
- Customize
CursorFX is a utility which allows you to have much more flexibility in the cursors
you use to interact with Windows. CursorFX users can create and use cursors that
look and feel far superior to anything you’ve ever seen before! Best of all, it’s
really easy to create your own super-charged cursors!Publisher: Stardock Corporation Developer: Stardock Corporation Genre: Object Desktop Website |
Download
| PurchaseCustomize Windows with additional styles beyond light and dark mode
Publisher: Stardock Corporation Developer: Stardock Corporation Genre: Object Desktop Website
| Download
| PurchaseStardock DeskScapes extends Windows 10 with the ability to run spectacular animated wallpapers (Dreams) on your desktop. Choose your Dream from our extensive library to personalize your pc.
Publisher: Stardock Corporation Developer: Stardock Corporation Genre: Object Desktop Website |
Download
| PurchaseIconPackager is a program that allows users to change nearly all of their Windows
icons at once by applying «packages» of icons. A package of icons contains
icons to replace most of the common icons on your Windows PC.Publisher: Stardock Corporation Developer: Stardock Corporation Genre: Object Desktop Website |
Download
|
PurchaseIcons
Icons for applications and folders.
Rainmeter allows you to display customizable skins on your desktop, from hardware usage meters to fully functional audio visualizers.
You are only limited by your imagination and creativity.Rainmeter is open source software distributed free of charge under the terms of the GNU GPL v2 license.
Website | Download
Show off your favorite desktop configuration by uploading a screenshot of your desktop!
SoundPackager brings customization of your auditory experience to Object Desktop!
Users can now choose from «sound packages» to enhance their Windows desktop
experience. Over 30 different system sounds are supported; unique new Stardock Design
sound packages are included with the package.Publisher: Stardock Corporation Developer: Stardock Corporation Genre: Object Desktop Website |
Download
|
PurchaseMicrosoft Windows® 8 is shipped without the «Start» menu. Stardock heard the cries from Windows 8
users. We put the «Start» menu back in Windows 8. We accurately recreated the most used desktop
feature billions of users depend on every day and packed it with additional functionality.Publisher: Stardock Corporation Developer: Stardock Corporation Genre: Object Desktop Website |
Download
| PurchaseThe finest collection of desktop backgrounds on the Internet!
Publisher: Stardock Corporation Developer: Stardock Corporation Genre: Object Desktop WindowBlinds changes the look and feel of your Windows desktop by applying visual
styles to your entire Windows environment. When a visual style is applied, they
change nearly every elements of the Windows GUI such as title bars, push buttons,
the Start bar, menu and more.Publisher: Stardock Corporation Developer: Stardock Corporation Genre: Object Desktop Website |
Download
|
PurchaseWinstep Extreme is a powerful suite of applications that merge incredible usability and performance with breathtaking eye candy. Add your own Menus, Docks, Tabbed Docks, Taskbar and Widgets with this Windows User Interface Replacement!
Website | Download
View Gallery List
View a list of all of the different galleries available in WinCustomize, which you
can then browse individually.Explore All
Explore all available galleries on WinCustomize.
Customize This Menu
This option is only available for subscribers of WinCustomize. If you are a subscriber
it will allow you to select which categories you would like to see in this menu
from a list of all galleries available on the site. This information will be stored
on your account for all your future visits.Subscribe
- Articles
- Forums
- Shop
- Upload
- View Cart
Start Menu Buttons Gallery
Start Menu Buttons
|
Windows 7-style Start menu with Windows 8 enhancements. Start10™, the first Windows® 10 start menu alternative. |
Featured Start Menu Buttons
Popular Start Menu Buttons
Top Start Menu Buttons Skinners
themes.su оформление Windows
Кнопки «Пуск» для Windows 7/8/10/11
Кнопка «пуск» является неотъемлемой частью графического пакета Windows. При установке стандартной темы всегда возникает вопрос подобрать подходящею кнопку под стиль или например тематику оформления. Для этого и был создан отдельный раздел на нашем сайте где Вы сможете скачать бесплатно и подобрать на свой вкус новые кнопки «пуск» для Windows.
Иструкция по установке
[Guide] How to Customize the Windows 11 Start Menu
Windows 11 has introduced a redesigned Start Menu that serves as the gateway to your applications, settings, and notifications. Its fresh, modern aesthetic not only enhances your Windows experience but also provides new functionalities that allow for significant customization. This guide will walk you through various ways to tailor the Windows 11 Start Menu to reflect your personal style and preferences, ensuring that you get the most out of your computing experience.
Understanding the New Start Menu
The Start Menu in Windows 11 differs from its predecessor in both appearance and functionality. Gone is the traditional, layered layout of Windows 10. The new Start Menu is centered on the screen, with a minimalist design that features pinned applications, a recommended section, and a quick access area for your account and settings. Familiarizing yourself with its components will help you appreciate the customization options available.
Components of the Windows 11 Start Menu
-
Pinned Apps: The top section of the Start Menu is designated for pinned applications. You can quickly access your most-used programs here.
-
Recommended Section: The middle section displays recently used files and applications, giving you quick access to what you need most.
-
All Apps: By clicking the «All apps» button at the top-right corner, you can view a complete list of installed applications.
-
User Profile & Power Options: Your account picture and a power button are located in the bottom corner, providing easy access to account settings and options for shutting down or restarting your computer.
Preparing to Customize
Before diving into customization, it’s essential to take a moment to consider what you want to achieve with your Start Menu. Do you want to prioritize productivity by organizing applications effectively, or do you simply want to give it a personal touch? Knowing your objectives will guide your customization process.
Customizing the Start Menu: Step-by-Step Guide
1. Pinning and Unpinning Applications
One of the simplest ways to customize your Start Menu is by managing your pinned applications.
Pinning Apps
To pin an application to the Start Menu:
-
Use the Search Bar: Click on the Start button and start typing the name of the application you want to pin. Right-click on the application in the results, and choose “Pin to Start.”
-
From the All Apps List: Click on “All apps,” locate the application, right-click on it, and select “Pin to Start.”
Unpinning Apps
If you want to remove an application from the pinned section:
- Find the application in the Pinned Apps area, right-click on it, and select “Unpin from Start.”
Customizing which applications are visible is a straightforward way to ensure easy access to your most-used tools.
2. Organizing Pinned Apps into Folders
Windows 11 allows you to create folders on the Start Menu for better organization.
Creating a Folder
-
Drag and Drop: Simply click and hold an application icon, then drag it over another application icon. Release it to create a folder.
-
Naming the Folder: Click on the folder you created to open it, and you’ll see an option to name the folder. Choose a name that reflects the contents.
Folders can significantly reduce clutter and make finding applications faster.
3. Rearranging Pinned Apps
To further customize your Start Menu’s layout, you can easily rearrange pinned applications:
- Simply click and hold an app icon, then drag it to your desired position in the Pinned Apps section. Release it to drop it in place.
4. Accessing the Recommended Section
The Recommended section automatically suggests files and applications based on your routine usage. While you can’t control the items shown directly, there are ways to influence this section:
Removing Items
To remove an item from the Recommended section:
- Hover over the item you want to remove, click on the three-dot button (ellipsis), and select “Remove from list.”
This action helps maintain a relevant and tidy Recommended section.
5. Customizing Start Menu Settings
Windows 11 also allows some additional customization through its settings.
Access Settings
-
Open the Start Menu and select “Settings” (the gear icon) or press Windows + I to open Settings directly.
-
Navigate to “Personalization” and then click on “Start.”
-
Here, you will see options to control what folders appear on the Start Menu and options for the Recommended section, such as “Show recently added apps,” “Show most used apps,” and “Show recently opened items in Start, Jump Lists, and File Explorer.”
6. Using Folders for Better App Management
Creating folders not only saves space but also allows categorization based on your needs—be it productivity, entertainment, or utilities. Here’s how you create and manage folders in more detail:
Steps to Use Folders
-
Creating Folders: As mentioned, drag one app over another to form a folder.
-
Adding More Apps: You can add more applications to an existing folder by dragging them into it.
-
Renaming Folders: To rename a folder, open it and click on the name to edit it.
7. Personalizing Start Menu Colors and Themes
The visual aspect of the Start Menu is significant for personal expression. Windows 11 lets you customize its colors and themes to align with your personal aesthetic.
Adjusting Colors
-
Open Settings: Access Settings from the Start Menu or by pressing Windows + I.
-
Go to Personalization: Click on “Colors.”
-
Pick Your Color: You can select a light, dark, or custom theme. You can also choose accent colors that impact the Start Menu’s appearance.
8. Using Transparency Effects
For those who want a sleek look, Windows 11 provides options for transparency.
- In the Colors settings, toggle the “Transparency effects” option to on or off based on your preference.
This setting gives the Start Menu a more refined appearance, blending it with your desktop background.
9. Utilizing Widgets for Quick Information
While widgets are not directly part of the Start Menu, they can complement your experience by providing quick access to information and apps.
Accessing Widgets
-
Click the widget icon on the taskbar (next to the Start button) to explore widgets relevant to your interests—news, weather, calendar, and more.
-
You can personalize your widgets based on the information you find helpful, further enhancing the utility of your Start Menu usage.
10. Implementing Group Policy for Advanced Users
For users comfortable with technical configurations, the Group Policy Editor allows deeper customization options for the Start Menu, particularly in a professional setting.
Accessing the Group Policy Editor
-
Press Windows + R to open the Run dialog box, type
gpedit.mscand hit Enter. -
Navigate to the User Configuration section: User Configuration > Administrative Templates > Start Menu and Taskbar.
-
Here, you can configure various settings related to the Start Menu’s functionality, such as disabling specific features, customizing user interfaces, and more.
Note: Group Policy Editor is available in Windows 11 Pro, Enterprise, and Education editions.
11. Backup and Restore Customizations
As you personalize your Start Menu, consider backing up your settings.
Using the Registry Editor
-
Press Windows + R to bring up the Run dialog, type
regedit, and hit Enter to open the Registry Editor. -
Navigate to
HKEY_CURRENT_USERSoftwareMicrosoftWindowsCurrentVersionExplorerStartPage. -
Here, you can export the current settings for later restoration. Right-click on the StartPage folder to select “Export” and save it safely on your drive.
12. Troubleshooting Start Menu Issues
Customization might sometimes lead to unforeseen issues. If you encounter problems with the Start Menu after making changes, try the following:
-
Restart your computer: A simple restart can fix many glitches.
-
Run Windows Troubleshooter: Go to Settings > Update & Security > Troubleshoot. Here you can select the appropriate troubleshooter that may help with Start Menu issues.
-
Reset Start Menu settings: If all else fails, reset your Start Menu customizations by removing unnecessary folders and pinned items, returning to default settings.
Conclusion
Customizing the Windows 11 Start Menu is an engaging process that allows you to create a workspace tailored to your needs. Whether you’re looking for a functional layout, a personalized aesthetic, or improved access to your most-used applications, the options available to you are vast and versatile. By following the steps outlined in this guide, you can enhance your efficiency and enjoyment of Windows 11, making the Start Menu not just a gateway to your applications and files, but a reflection of your unique style and workflow.
Embrace the ability to customize and let your personality shine through your digital environment! As Windows evolves, so too will the possibilities of personalization—stay tuned to future updates for more innovative features.
Меню Пуск Windows 10 с настройками по умолчанию кому-то может нравиться, кому-то — нет, но почти всегда содержит массу ненужных элементов, может иметь не оптимальный вид и, о чем некоторые начинающие пользователи порой не догадываются, имеет самые различные варианты настройки.
В этой инструкции подробно о различных методах, которые позволят настроить стандартное меню Пуск в Windows 10 так, чтобы его было удобно использовать вам, а также дополнительная полезная информация, на случай, если даже после всех настроек новое меню Пуск вас не устраивает. Внимание: даже если вы не относите себя к начинающим пользователям, с большой вероятностью среди описанных ниже возможностей вы найдете что-то новое для себя.
- Изменение цвета меню Пуск (светлый, темный, на выбор, прозрачность)
- Удаление ненужных элементов из списка приложений меню Пуск
- Настройка плиток в меню Пуск (удаление, добавление, группировка и изменение размеров, создание собственных)
- Работа с контекстным меню кнопки Пуск (открывается правым кликом по кнопке или сочетанием клавиш Win+X)
- Дополнительные возможности настройки
- Как сделать меню Пуск в Windows 10 как в Windows 7
Изменение цвета меню Пуск Windows 10
По умолчанию, если вы не применяли никаких тем оформления, меню Пуск в последних версиях Windows 10 темное и с эффектами прозрачности. Всё это можно поменять.
Доступные варианты действий, касающиеся изменения цвета меню Пуск:
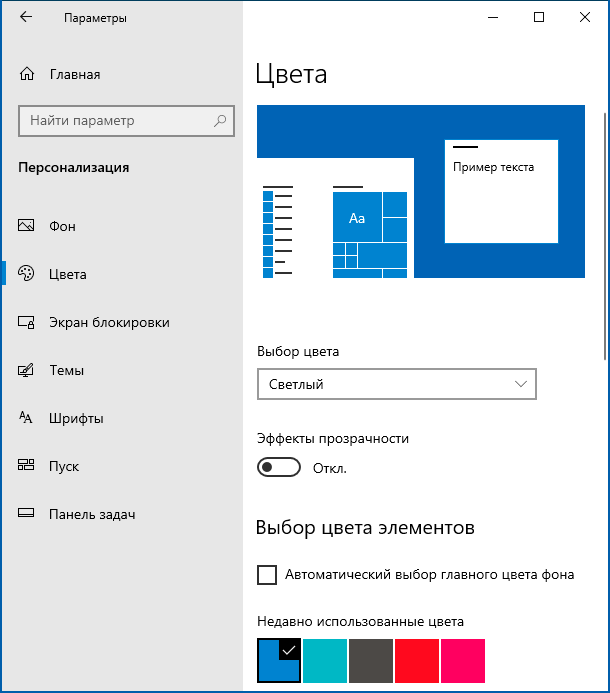
- Зайдите в Параметры — Персонализация (либо нажмите правой кнопкой мыши по рабочему столу и выберите пункт «Персонализация»). Зайдите в раздел «Цвета».

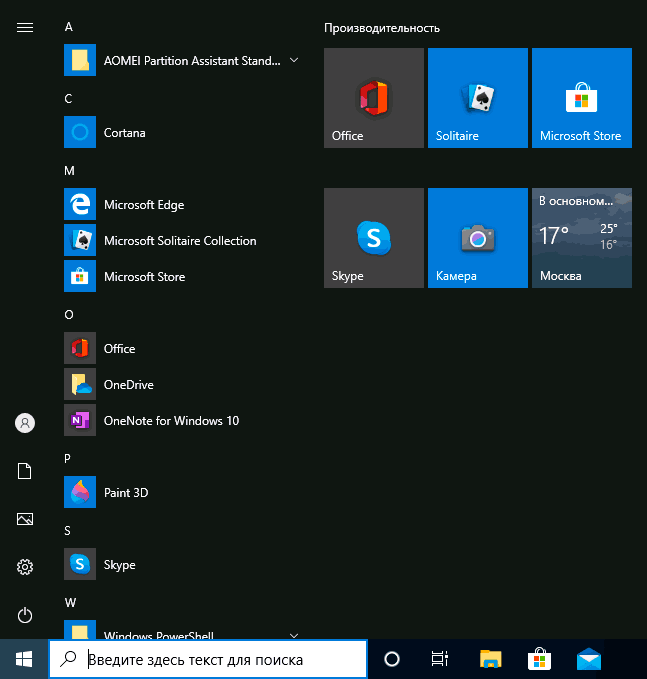
- Здесь вы можете выбрать тему оформления, которая сразу применится к меню Пуск (и не только) в разделе «Выбор цвета» — «Темный» или «Светлый». При выборе «Настраиваемый» вы можете задать темную и светлую тему отдельно для разных элементов. На изображении ниже — пример светлой темы оформления для меню Пуск.

- Чуть ниже вы можете включить или отключить эффекты прозрачности для меню Пуск и некоторых других элементов Windows 10. Некоторым без них оформление кажется лучше, попробуйте.
- Выбрав какой-либо цвет в разделе «Выбор цвета элементов» вы можете использовать его также для панели задач и меню Пуск, для этого ниже отметьте пункт «Отображать цвет элементов на следующих поверхностях — В меню Пуск, на панели задач и в центре уведомлений». Пример возможного результата на скриншоте. Примечание: пункт не активен, если у вас выбрана светлая тема оформления.

Удаление ненужных элементов из меню Пуск
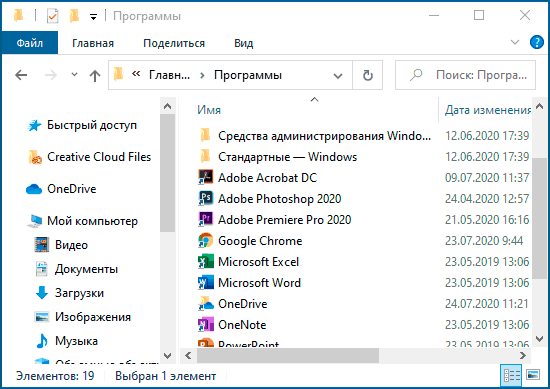
В этом разделе — про удаление ненужных программ и папок из меню Пуск в левой части, то есть из списка приложений, где часто добавляется значительное количество ярлыков, многие из которых никогда не используются.
Эти папки и ярлыки находятся в следующих папках (достаточно скопировать путь в адресную строку проводника и нажать Enter, чтобы сразу перейти в папку):
- %ProgramData%\Microsoft\Windows\Start Menu\Programs\
- %AppData%\Microsoft\Windows\Start Menu\Programs\
Ярлыки из первой папки применяются ко всем пользователям, из второй — только к текущему пользователю.
К сожалению, ярлыки некоторых приложений в этих папках вы обнаружить не сможете (они хранятся в специальной базе данных Windows 10), но, в случае если эти приложения вам не нужны, вы можете удалить их, используя стандартные средства системы или специальные программы-деинсталляторы.
Дополнительно вы можете:
- Отключить добавление вверху меню ярлыков недавно установленных программ в Параметры — Персонализация — Пуск — Показывать недавно добавленные приложения.
- Организовать ярлыки по папкам так, как удобно вам, а также, изменив их имена, изменить и их порядок в меню (в нем ярлыки расположены по алфавиту, а самыми первыми показываются те, имена которых начинаются с цифр и специальных символов).
Настройка плиток в меню Пуск
Элементы, расположенные в правой части меню Пуск Windows 10 называются Плитками. Вы можете удалять их, добавлять, изменять размеры плиток, группировать их и создавать папки.
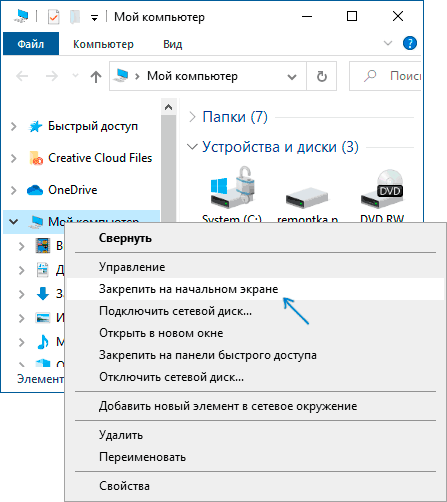
- Для добавления новой плитки вы можете нажать по программе в меню Пуск, по ярлыку или файлу .exe в любом расположении Windows 10 и выбрать пункт «Закрепить на начальном экране». Это действие доступно и для некоторых других элементов, например, для «Мой компьютер», как на изображении ниже.

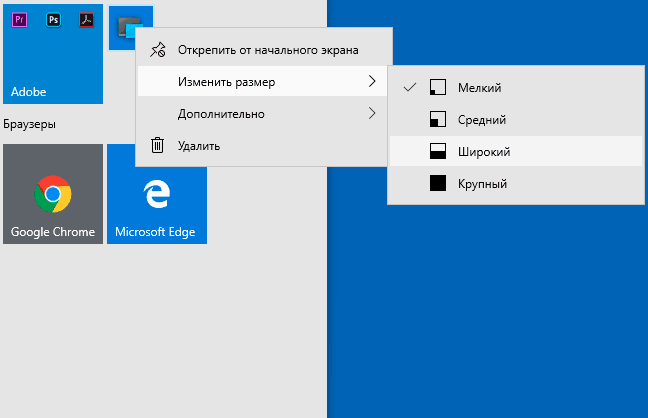
- Для того, чтобы удалить плитку с начального экрана (из правой части меню Пуск), нажмите по ней правой кнопкой мыши и выберите пункт «Открепить от начального экрана».
- Для помещения нескольких плиток в одну папку (недоступно в ранних версиях Windows 10), перетащите одну плитку на другую. Затем, при желании, добавьте больше плиток в папку и укажите имя папки.
- Для создания групп плиток перетащите одну из плиток дальше от других в свободное место вправо или вниз (зависит от ширины и высоты меню Пуск), пока не появится разделитель, отделяющий её от других плиток. Затем отпустите. Плитка окажется в отдельной группе, куда можно перетащить и другие плитки, переименовать группы, изменить их порядок (подводим указатель мыши к названию группы, тянем за две линии справа от имени).
- Некоторые плитки постоянно обновляют свое содержимое, это называется «Живые плитки». Если вы хотите отключить такое обновление, нажмите по плитке правой кнопкой мыши и в разделе «Дополнительно» отключите живые плитки.
- В контекстном меню плиток вы также можете изменить их размер и организовать их удобным для вас образом в правой части меню Пуск.

- Если вам не нужны плитки в меню Пуск, вы можете открепить их все от начального экрана, а затем изменить размер (ширину и, при желании, высоту) меню Пуск и получит результат, похожий на скриншот ниже.
Дополнительно, существуют возможности создания собственного оформления плиток в меню Пуск Windows 10 для программ, которые отображают там лишь ярлыки, подробнее об этом в инструкции Как создать свои плитки в меню Пуск Windows 10.
Работа с контекстным меню кнопки Пуск
Контекстное меню кнопки Пуск — очень полезная вещь, когда вам нужно быстро открыть какие-то часто используемые системные элементы. Открыть это меню можно, нажав правой кнопкой мыши по кнопке «Пуск» или сочетанием клавиш Win+X, где Win — клавиша с эмблемой Windows.
В самой Windows 10 есть не так много возможностей настройки этого меню: вы можете зайти в Параметры — Персонализация — Панель задач и отключить пункт «Заменить командную строку оболочкой Windows PowerShell в меню» и тогда в контекстном меню Пуск будет более часто используемая многими командная строка с возможностью запуска от имени Администратора.
Однако, при желании, вы можете настроить это меню более тщательно, об этом отдельные инструкции:
- Как редактировать контекстное меню Пуск Windows 10
- Как вернуть панель управления в контекстное меню Пуск
Дополнительные возможности настройки меню Пуск Windows 10
Среди дополнительных возможностей, позволяющих изменить вид и поведение меню Пуск в Windows 10:
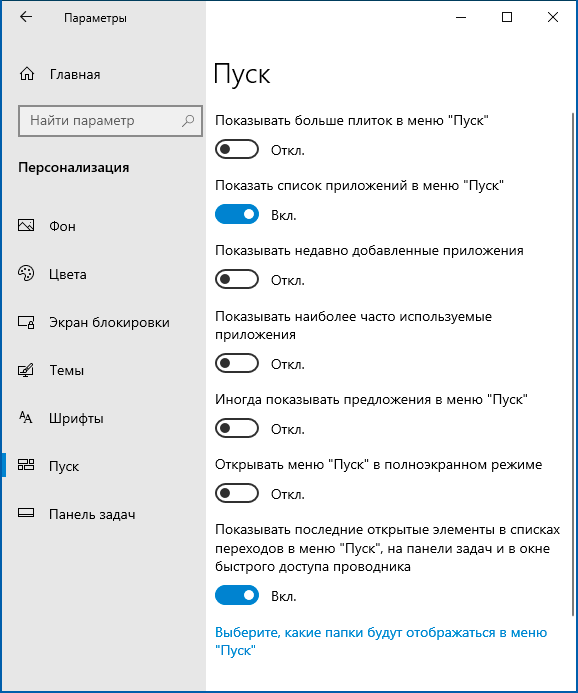
- Пункты в Параметры — Персонализация — Пуск. Большинство из них очень понятны (или можно попробовать и посмотреть на результат: например, увидеть, как именно пункт «Показать список приложений в меню Пуск» повлияет на внешний вид), но некоторым не ясен пункт «Выберите, какие папки будут отображаться в меню Пуск». Под этими папками подразумеваются папки в левом узком столбце, раскрывающиеся при наведении в последних версиях Windows 10.

- Вы можете отключить автоматическое раскрытие этого левого столбца, подробнее — Как отключить раскрывающуюся панель слева меню Пуск.
- Также могут оказаться полезными материалы: Как убрать поиск и пуск на весь экран в Windows 10, Что делать, если вместо рабочего стола плитки в Windows 10.
- Не забывайте о возможности изменения высоты и ширины меню Пуск (мышью, за край меню).
Классическое меню Пуск из Windows 7 в Windows 10
Если не под каким предлогом вы не хотите использовать новое меню Пуск в Windows 10, а хотите, чтобы оно выглядело как в Windows 7, для этого вы можете использовать сторонние программы.
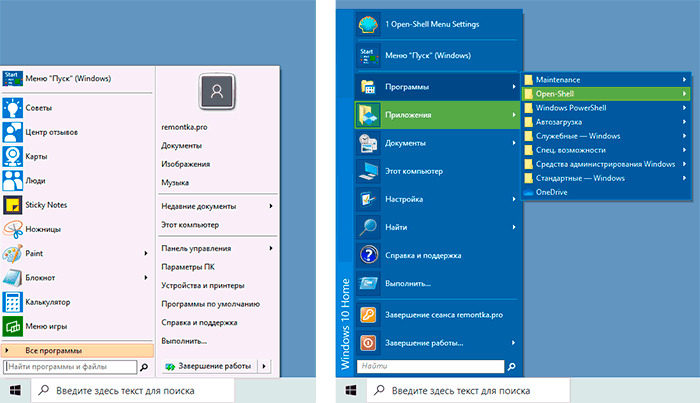
- Как сделать меню Пуск из Windows 7 в Windows 10 с помощью Open Shell (отличный бесплатный вариант).
- Классическое меню Пуск для Windows 10 (обзор нескольких программ, платных и бесплатных).
Если вы можете предложить дополнительные методы изменения внешнего вида, поведения или других аспектов работы меню Пуск в Windows 10, буду рад, если вы сможете ими поделиться в комментариях к статье: не исключено, что информация пригодится другим читателям.