
Windows Server 2008 R2 Glass Aero Theme
Our mission is to display the Windows Server 2008 R2 Aero themes. (Windows 7 style)
Topics Windows Server 2008 R2 Aero
- Stage 1 – Add Feature, Desktop Experience
- Stage 2 – Start the Services
- Stage 3 – Personalize
- Windows Server 2008 R2 Taskbar
- How to Amend Your Aero Glass Theme
♦
The Problem: You Upgrade to R2, But Have No Aero Menus or Taskbar
The problem is that the Windows Aero Theme is missing. All that you have is the old Windows Server 2008 / Vista Taskbar. There is no sign of Microsoft’s aero graphics; you get no Start orb and no see-through title bars or menus.
What you want to see is Microsoft’s wonderful glass aero theme with their glowing graphics. The very same graphics that you see in Windows 7.
Short Instructions for a Solutions
- Add Feature: Desktop Experience.
- Start an operating service called: Themes.
- Personalize your Theme.
Stage 1 – Add Feature, Desktop Experience
Open the Administrative Tools,
Call for the Server Manager:
Features, +Add Features
Now select (tick) Desktop Experience. See screenshot.
Stage 2 – Start the Services
Again, open the Administrative Tools, select Services
Scroll down to the ‘T’s. We want a service called ‘Themes’.
Change the Startup Type for Themes from Disabled to Automatic.
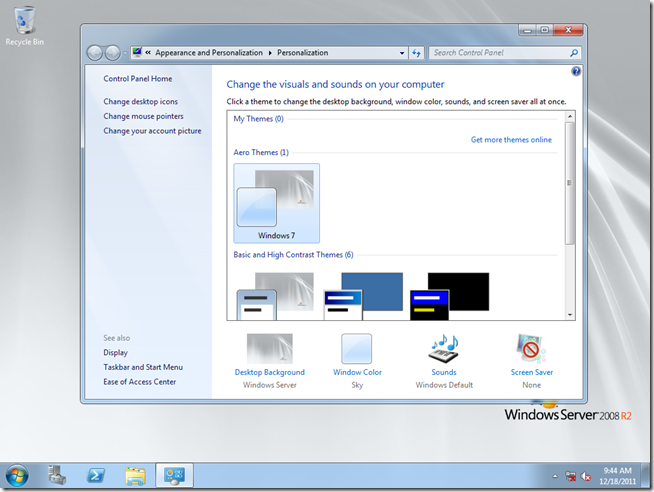
Stage 3 – Personalize
The easiest way to Personalize the Aero Themes is to right-click the Desktop and select Personalize.
Plan B, Launch the Control Panel and navigate to Appearance and Personalization.
Guy Recommends: A Free Trial of the Network Performance Monitor (NPM) v12
SolarWinds’ Network Performance Monitor will help you discover what’s happening on your network. This utility will also guide you through troubleshooting; the dashboard will indicate whether the root cause is a broken link, faulty equipment or resource overload.
Perhaps the NPM’s best feature is the way it suggests solutions to network problems. Its second best feature is the ability to monitor the health of individual VMware virtual machines. If you are interested in troubleshooting, and creating network maps, then I recommend that you give this Network Performance Monitor a try.
Download your free trial of SolarWinds Network Performance Monitor.
What To Do Once You Have Configured the Aero Graphics
- Check the Taskbar. right-click, Properties. Taskbar
- Activate ‘Jump Lists’. Right-click Properties. Check: ‘Store and display recently opened items in the Start menu and taskbar.
- Choose which programs to Pin to Start Menu.
- Review your Theme.
Windows Server 2008 R2 Taskbar – A New Way of Working
The word radical maybe a bit strong, but the W2K8 R2 (Windows 7) taskbar clearly exhibits different behaviour when accessing programs compared with W2K3 or Vista or XP. Perhaps the change is like switching from a car with a shift change gearbox to an automatic. Some people hanker for the control of manual gear selection, while others accept the efficiency of automatic changes.
The new taskbar philosophy is based around the program icon, it helps to think of any individual documents as being combined with that main icon. Observe in the screenshot below how the Word for Windows icon appears to be glowing, this is because the taskbar is trying to tell us that this program has open files. Furthermore, you can just about make out 3 shadows to the right of the Word icon. When you click on the this icon up comes a Jump List confirming that there are indeed 3 Microsoft Word files in use, in this example: Tips, Shopping now and Finance.
Previews
If you hover over a program icon which has open files then you can see a preview, this is designed to save time when searching for one of your many open documents. To get the most from this new way of working embrace the Winkey +Tab technique, and use Flip 3-D to cycle through a preview of each open program. As usual Microsoft provides at least 3 ways of doing everything, and as usual, it’s easy, satisfying and fun to learn about these new features simply by exploring on your own.
Pin to
To get the most out of the new W2K8 R2 taskbar embrace the concepts of: ‘Pin to ….’ and ‘Jump List’. Thus when you find one of your old favorite programs, just right-click its executable and choose ‘Pin to taskbar’. As for Jump List, if you click on any non-glowing icon in the taskbar you get a ‘Jump List’ with a ‘Recent’ or ‘Frequent’ menu showing you the last files that you used. Incidentally, one reason why the new taskbar behavior does not give me any problems is that I still use Alt + Tab to check my open files (See screenshot above right).
Fine-tuning the Taskbar
Returning to the taskbar, the secret of success is to fine tune the icons behavior; thus right-click the taskbar and select ‘Properties’. For instance, I prefer Small Icons, while Luddites like ‘Mad’ Mick choose the ‘Taskbar button’ option, which allows them to ‘Never Combine’ documents with their parent program. I call them Luddites because they want to revert to the old Vista ways of individual documents in the taskbar rather than embracing the new look and feel of the W2K8 R2, but hey, it’s a free country at least as far as the W2K8 R2 taskbar is concerned.
Tip: If the taskbar does not exhibit the behavior you expect, then right-click and select, ‘Lock the taskbar’, alternatively, try removing the tick.
Tip: Widen the W2K8 R2 Taskbar. Providing there is no tick next to ‘Lock the taskbar’, you can widen the band by dragging the top upwards. However, you have to be firm, this does not seem to work at first, but persevere. One reason would be you want the clock to display the day of the week.
Deleting the Taskbar: My old friend ‘Mad’ Mick has been experimenting with various alternative shells that effectively remove or hide the W2K8 R2 taskbar. The default shell is explorer.exe but you could change it (not recommended) with regedit. If you are going to do this then it’s best to get a third-party alternative shell.
HKEY_LOCAL_MACHINE\SOFTWARE\Microsoft\Windows NT\CurrentVersion\Winlogon\shell
Or for just one user here (you may need to add a Reg_SZ called shell):
HKEY_CURRENT_USER\Software\Microsoft\Windows NT\CurrentVersion\Winlogon
In summary: W W2K8 R2’s new taskbar technology displays a combination of the executable icon together with any files that you launch from that program. If an icon glows it means that program has open files, while if it does not appear highlighted then the executable is inactive. Microsoft’s mantra is to keep both the taskbar and the notification area clear of clutter, and they regard Vista’s arrangement with one icon for the program and another for its files as unnecessary.
Guy Recommends SolarWinds’ Free Network Monitor
Thus utility makes it easy to check the health of a router or firewall. Check the real-time performance, and availability statistics, for any device on your network. Get started with an extensive collection of «out-of-the-box» monitors for popular network devices. Give Network Monitor a whirl – it’s free. Download your free Network Device Monitor
How to Amend Your Aero Glass Theme
- Find the Personalize Menu. The long way is to click on the Start orb, select Control Panel, then navigate to Appearance and Personalization.
- Click on the theme to change.
- You can change the background, click Desktop Background, select the check box for the image that you want to use, and then click Save changes.
- Adjust the color of window borders. Click Window Color, click the color that you want to use, adjust the intensity, and then click Save changes.
- Even modify the the sounds for your the theme. Click Sounds, click an item in the Sound Schemes list, and then click OK.
- Add or change your screen saver, click Screen Saver, click an item in the Screen saver list, change any settings that you want to change, and then click OK.
- Please note: your modified theme will appear under My Themes as an unsaved theme.
- Footnote: As usual there is online support and ideas for custom themes.
»
Troubleshooting The Aero Graphics Desktop Experience
- Call for the Windows 7 Upgrade Advisor. My idea is to check if your graphics card supports Aero Graphics.
If you like this page then please share it with your friends
Microsoft Windows Server 2008 Topics:
• Server 2008 Home • Overview • What’s New? • Migration Advice • Editions
• Features •Resource Manager • Add Aero Themes • GP Preferences
• Network Performance Monitor • Upgrade W2k8 R2 • Windows Server 2012
Sign in to your How-To Geek account
Quick Links
One of the first thing you might want to do, once you have installed Server 2008 R2 is get the Windows Aero features back. The classic theme just does not fit everyone’s taste, so here is how to get all that Aero goodness back.
Note: The rest of this article assumes that you have completed the Installing the Windows Desktop Experience section in part 1 of the series.
Installing Drivers
Whether your graphics are powered by Intel, AMD or NVidia you are going to have to head to your manufacturers website and download the proper drivers for your device. Server 2008 R2 does in fact include video drivers, but these are basic drivers that will not let you get the Aero experience we are looking to get. Although the rest of this guide will work with out doing this step, you will only be able to get the Basic Themes, that is, no Aero features such as transparency.
Enabling Themes
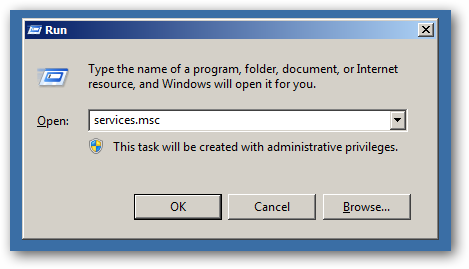
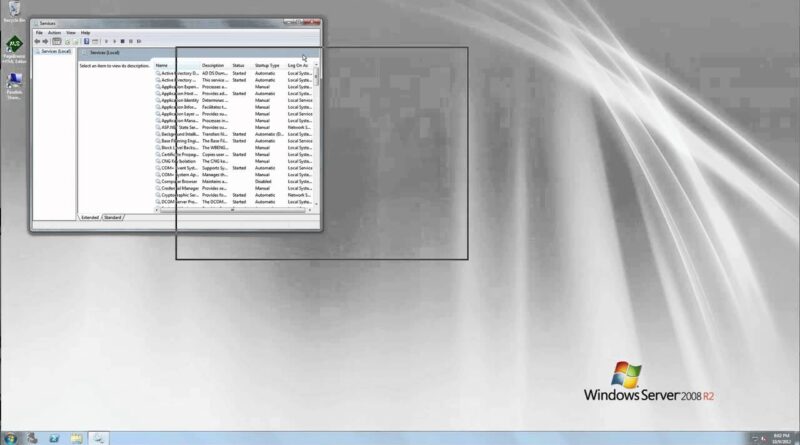
As with most things that are not required for Server 2008 R2, the components required to have non-classic themes are disabled by default. Even though we have installed the Windows Desktop Experience in the first part of the series, the components were installed but not enabled. In order to get the Themes working we have to manually set the Themes Services to start up every time Windows boots. We do this using the Services MMC, the quickest way to get there is to press the Win + R key combination, type services.msc and hit enter.
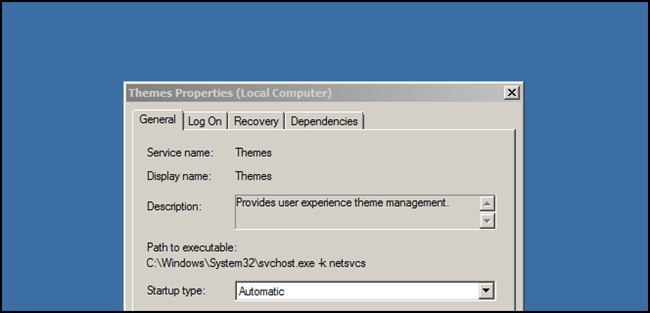
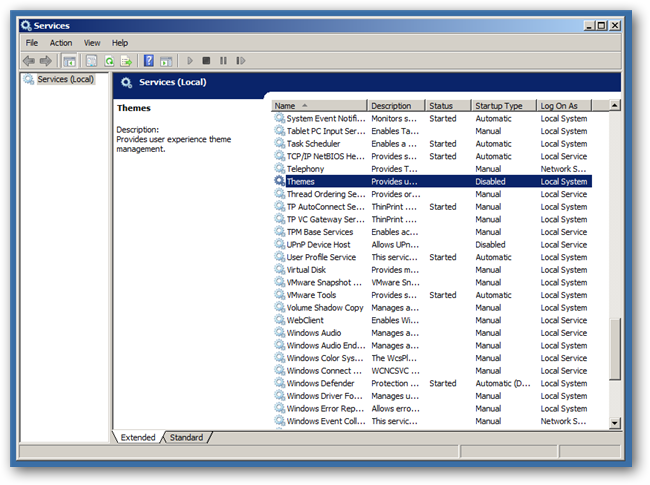
Scroll down until you get to the Themes Service
Double-click on it, to open its properties
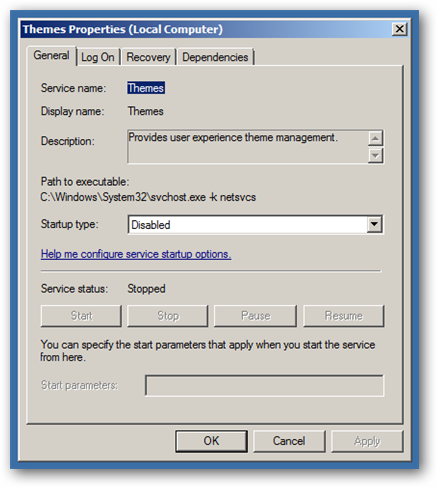
As you can see, by default, the Themes Service is disabled, so go ahead and change it to startup automatically
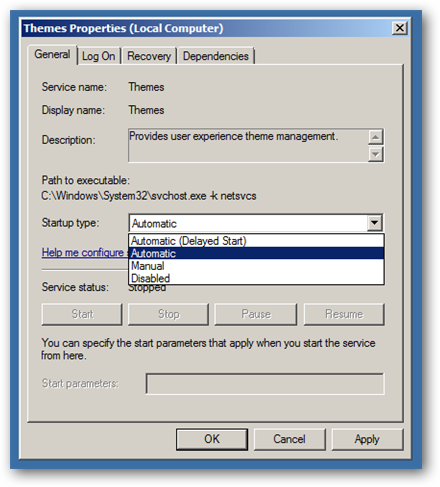
Click ok, then go ahead and reboot your PC. When its back up and running, right-click on the Desktop and select the Personalize from the context menu. Once the Personalization dialog opens select the Aero Theme.
You may think that’s all there is to it, but there is still one last thing that needs to be done. We need to optimize Windows for appearance. To do that, again, press the Win + R key combination, this time type sysdm.cpl and hit enter.
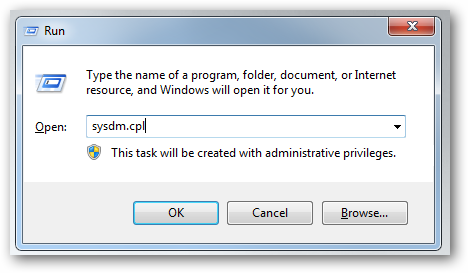
When the System Properties dialog opens, switch over to the Advanced tab and under the performance section click on the settings button.
You will need to switch the radio button over to the option that says Adjust for best appearance then click on ok.
Now you will have all the eye candy that you are used to in Windows 7. Up next, we’ll cover how to enable sound in Server 2008 and then turning on Search.
In this lesson we will learn how to add themes to our Windows Server 2008. This is useful if you use remote desktop for your clients and users. If you enjoy this …
source
windows server 2008 r2
- Unix & Linux: CentOS 7.1 – how to install gnome commander (2 Solutions!!)
- cara instal ubuntu lewat virtual box
Alice AUSTIN
Alice AUSTIN is studying Cisco Systems Engineering. He has passion with both hardware and software and writes articles and reviews for many IT websites.
You May Also Like
Leave a Reply
If you are tired of using the Windows Classic theme on your Server 2008, you can install Desktop Experience so that you can enjoy the eye candy goodness of the Vista theme. Desktop Experience will also install Windows Media Player, Windows Sidebar and photo gallery. Follow these steps to install Desktop Experience and liven up your server:
1. Click Start and select Server Manager
2. When the Server Manager window appears, go to the left pane and select Features.
3. On the right, click the Add Features link.
4. Check the Desktop Experience checkbox
5. Click Next.
6. Click Install
7. When the installation is complete, Windows will notify you that you must restart your server to complete the process.
After you have rebooted, go to Services and make sure that the Themes service is started and set to Automatically Start (thanks DTron!). After that, you are ready to change the theme on your server.
1. Right-click the desktop and select Personalize.
2. Select Theme.
3. From the Theme Settings window, use the Theme dropdown and select the Windows Vista theme.
4. Click OK.
So you go from a boring look like this:
To a much better visual experience:
Rob Rogers
Once a prolific author here on Tech-Recipes, Rob has moved on to greener pastures.
Установка тем на Windows Server 2008 R2: подробное руководство
Windows Server 2008 R2 — одна из самых популярных операционных систем для серверов. Она обеспечивает высокую стабильность и производительность, но при этом её интерфейс может показаться устаревшим для некоторых пользователей. В этой статье мы расскажем, как установить темы на Windows Server 2008 R2 и настроить интерфейс по своему вкусу.
Шаг 1: Скачайте необходимые темы для Windows Server 2008 R2
Первым шагом обновления интерфейса вашего сервера Windows Server 2008 R2 является загрузка необходимых тем. Для этого просто загрузите необходимые темы из Интернета или используйте темы по умолчанию в ОС. Многие сайты предлагают большое количество бесплатных тем для Windows Server 2008 R2, например, официальный сайт Microsoft.
Шаг 2: Установите визуальные стили на вашем сервере
Установите скачанные темы. Для этого просто дважды щелкните на файле темы, который вы загрузили с Интернета. После этого вам будет предложено выбрать загруженную тему. Найдите понравившуюся тему и нажмите кнопку «Применить». После того, как тема будет установлена, нажмите «ОК» и закройте окно. Интерфейс вашего сервера Windows Server 2008 R2 стал более стильным и современным.
Шаг 3: Измените обои рабочего стола
Для того, чтобы рабочий стол вашего сервера стал еще красивее и красочнее, измените обои рабочего стола. Для этого щелкните правой кнопкой мыши на свободной области рабочего стола и выберите пункт «Персонализация». Затем выберите «Фон рабочего стола». Выберите понравившуюся картинку из списка или нажмите «Обзор» и выберите свою собственную картинку. Нажмите «ОК».
Шаг 4: Настройте содержание меню пуск
Меню «Пуск» главный элемент управления в операционной системе Windows, включая Windows Server 2008 R2. Вы можете настроить содержание меню «Пуск» и сделать его более удобным для работы с вашим сервером. Для настройки содержания меню «Пуск» откройте его и нажмите правой кнопкой мыши на пункте меню, который вы хотите настроить. Выберите «Удалить» для удаления пунктов, которые вам не нужны, или «Закрепить» для добавления пунктов.
Шаг 5: Измените шрифты и цветовую схему
Если вам не нравится шрифт, используемый в вашей операционной системе Windows Server 2008 R2, вам можно изменить его на другой. Для этого нажмите правой кнопкой мыши на свободное место на рабочем столе и выберите «Персонализация». Затем выберите пункт «Цвет» и настройте свою цветовую схему. Здесь вы можете выбрать цвета для окон, задать цвет фона и многие другие параметры цветовой схемы. Чтобы изменить шрифт, выберите пункт «Шрифты» и выберите понравившийся шрифт.
Шаг 6: Измените стиль курсора

Интерфейс операционной системы Windows Server 2008 R2 предлагает несколько стандартных вариантов курсоров. Вы можете изменить стиль курсора, если вам не нравится его текущее отображение. Для изменения курсора нажмите правой кнопкой мыши на свободном месте на рабочем столе и выберите «Персонализация». Затем выберите пункт «Схемы указателя мыши». Здесь вы можете выбрать понравившийся стиль курсора и изменить его.

Не стоит загружать неизвестные темы, иначе вы можете заразить ваш компьютер вирусами или программными вредами.

Итог
В этой статье мы рассмотрели, как настроить интерфейс Windows Server 2008 R2, используя темы и другие визуальные настройки. Хотя Windows Server 2008 R2 не является наиболее актуальной версией системы, мы считаем, что использование персонализированного интерфейса может значительно улучшить опыт работы с этой операционной системой. Надеемся, что данное руководство было полезно для вас, и вы успели достичь вашей цели.
Установка тем на Windows Server 2008 R2: руководство по настройке
Категория: Информационные технологии
Windows Server 2008 R2 является очень популярным серверным операционным системой, используемой многими компаниями и организациями. Он может быть настроен для организации веб-сайтов и веб-приложений, виртуальных машин, хранилищ и многого другого. Популярность Windows Server 2008 R2 связана также с тем, что он поддерживает установку тем, которые могут значительно изменить внешний вид операционной системы.
Шаг 1: Найти нужную тему
Первым шагом при установке новой темы на Windows Server 2008 R2 является поиск нужной темы. Существует множество сайтов, которые предлагают бесплатные темы для Windows Server 2008 R2. Найти эти темы можно с помощью любого поисковика. Однако при выборе темы следует учитывать, что она должна быть совместима с Windows Server 2008 R2 и не содержать вредоносного кода.
Шаг 2: Установка темы

После того, как была найдена нужная тема, можно приступать к ее установке. Для установки темы следует выполнить следующие действия:
- Скачайте тему на компьютер. Обычно темы поставляются в архивах.
- Разархивируйте файлы темы в любую папку на жестком диске сервера.
- Нажмите правой кнопкой мыши на рабочем столе и выберите «Настроить», чтобы открыть окно «Персонализация».
- Выберите желаемую тему из списка тем, которые появятся в этом окне.
- Нажмите кнопку «Применить», чтобы установить выбранную тему.
Шаг 3: Настройка темы

Некоторые темы для Windows Server 2008 R2 могут содержать дополнительные настройки, которые можно изменить. Чтобы изменить настройки темы, следует выполнить следующие действия:
- Нажмите правой кнопкой мыши на рабочем столе и выберите «Настроить», чтобы открыть окно «Персонализация».
- Нажмите ссылку «Окно цвета и внешнего вида».
- Выберите опцию «Дополнительные настройки» внизу окна.
- Измените желаемые настройки, такие как цвета кнопок окна, цвета текста и т.д.
- Нажмите кнопку «Применить», чтобы сохранить изменения настроек.
Общий итог
Установка тем на Windows Server 2008 R2 может значительно изменить внешний вид операционной системы, что может быть полезно для пользователей, которые проводят много времени перед компьютером.
Чтобы установить тему, следует найти нужную тему, скачать ее, разархивировать и настроить ее с помощью окна «Персонализация». Некоторые темы могут содержать дополнительные настройки, которые можно изменить, чтобы получить желаемый результат.
Важно помнить о безопасности и проверять каждую тему на наличие вредоносного кода перед ее установкой.
Установка тем на Windows Server 2008 R2: Полное руководство
Установка тем на Windows Server 2008 R2 может помочь вам оформить ваш сервер в соответствии с вашими предпочтениями. Это может улучшить визуальный опыт пользователя и сделать работу более приятной. В этом руководстве мы расскажем вам, как установить темы на Windows Server 2008 R2.
Шаг 1: Скачивание темы
Первым шагом является загрузка темы. Вы можете найти множество тем на Интернете. Убедитесь, что тема совместима с вашей версией операционной системы.
Шаг 2: Разархивирование темы
После загрузки темы вы можете разархивировать ее в любую папку на вашем сервере.
Шаг 3: Установка темы

Чтобы установить тему, необходимо следовать следующим инструкциям:
- Нажмите правой кнопкой мыши на рабочий стол и выберите «Настройки персонализации».
- Выберите «Темы».
- Выберите «Установить тему» и найдите тему, которую вы загрузили.
- Выберите тему и нажмите «Применить».
Шаг 4: Настройка темы

После установки темы вы можете изменить ее настройки, чтобы она лучше соответствовала вашим потребностям. Некоторые темы могут иметь дополнительные настройки, которые вы можете настроить. Чтобы настроить тему, выполните следующие действия:
- Откройте «Настройки персонализации».
- Выберите «Темы».
- Выберите тему и нажмите «Дополнительные настройки темы».
- Настройте тему согласно своим предпочтениям.
Шаг 5: Сохранение темы
После настройки темы сохраните ее, чтобы изменения сохранились. Чтобы сохранить тему, выполните следующие действия:
- Откройте «Настройки персонализации».
- Выберите «Темы».
- Выберите тему и нажмите «Сохранить тему».
Итог
Установка тем на Windows Server 2008 R2 – это простой процесс, который может значительно улучшить визуальный опыт пользователя. Следуя этому руководству, вы можете установить и настроить тему на своем сервере за короткое время.