
Загляните в BIOS/UEFI, используйте стороннее приложение или утилиту для настройки процессора
Что нужно знать
В Windows 11 нет встроенного прибора для измерения температуры процессора, но ее можно проверить в UEFI или с помощью сторонних приложений.
Использование UEFI: «Настройки» > «Система» > «Восстановление» > «Перезагрузить сейчас». Нажмите «Устранение неполадок» > «Дополнительные параметры» > «Параметры прошивки UEFI», затем перезагрузите.
В этой статье мы расскажем, как проверить температуру процессора в Windows 11.
Как посмотреть температуру процессора в Windows 11
В Windows 11 нет встроенного прибора для проверки температуры процессора, но ее можно проверить в UEFI или BIOS перед запуском Windows. Если необходимо отслеживать температуру процессора во время работы Windows 11, можно воспользоваться сторонним приложением, например Speccy, или утилитой от производителя процессора, графического процессора или периферийного устройства.
Некоторые периферийные устройства, например игровые мыши и гарнитуры, содержат программное обеспечение, позволяющее проверять и отслеживать температуру процессора и графического процессора в режиме реального времени. Такое ПО обычно предназначено для управления конкретным периферийным устройством, но оно может быть полезно и для проверки температуры процессора без установки дополнительного ПО. Intel и AMD также предоставляют инструменты для проверки температуры процессора, которые обычно поставляются в комплекте с утилитами для разгона. Например, вы можете проверить температуру процессора с помощью утилиты Extreme Tuning Utility от Intel и приложения Ryzen Master от AMD.
Проверка температуры процессора с помощью UEFI
UEFI и BIOS – это типы микропрограмм, которые отвечают за запуск компьютера перед началом работы Windows 11. Каждый компьютер имеет либо UEFI, либо BIOS, и обычно в них можно проверить температуру процессора, поэтому этот способ подойдет вам, если вы не хотите устанавливать дополнительное программное обеспечение и у вас нет приложения, способного отображать температуру процессора.
Недостатком этого метода является то, что доступ к UEFI или BIOS возможен только в процессе загрузки, до запуска Windows 11, поэтому с его помощью нельзя узнать температуру процессора во время работы, игры или выполнения других ресурсоемких задач, которые могут привести к нагреву процессора.
Внимание: Температура процессора не всегда отображается в BIOS или UEFI. Если в вашем случае она не отображается, необходимо перезапустить Windows 11 и проверить температуру с помощью стороннего приложения.
Вот как проверить температуру процессора с помощью UEFI или BIOS:
1. Откройте «Настройки» и нажмите «Система».
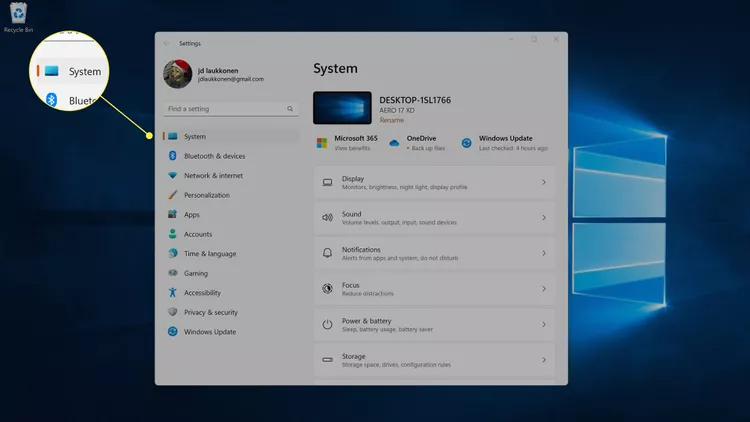
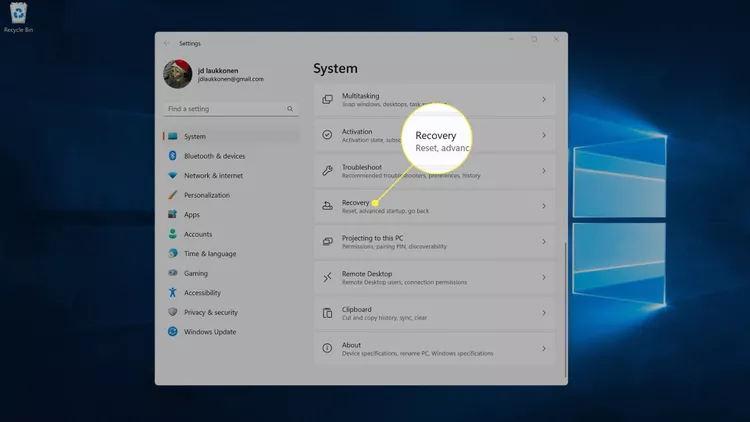
2. Нажмите «Восстановление».
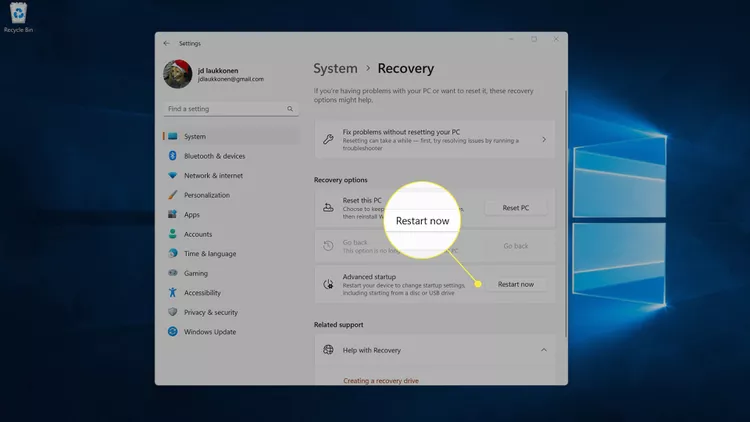
3. В параметрах восстановления нажмите «Перезагрузить сейчас».
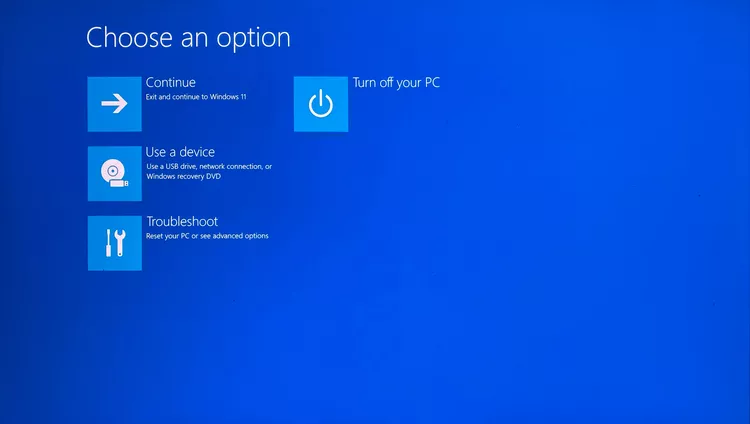
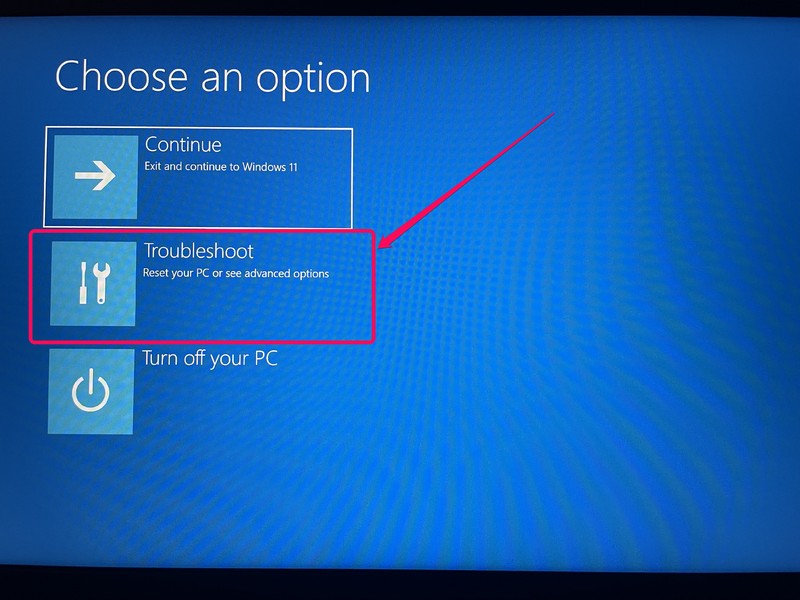
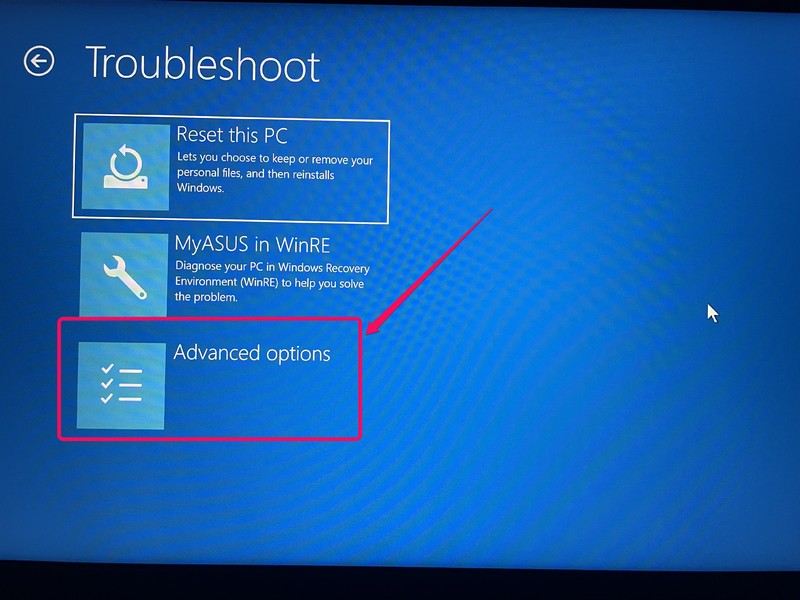
4. Компьютер перезагрузится. При появлении экрана параметров запуска нажмите «Устранение неполадок».
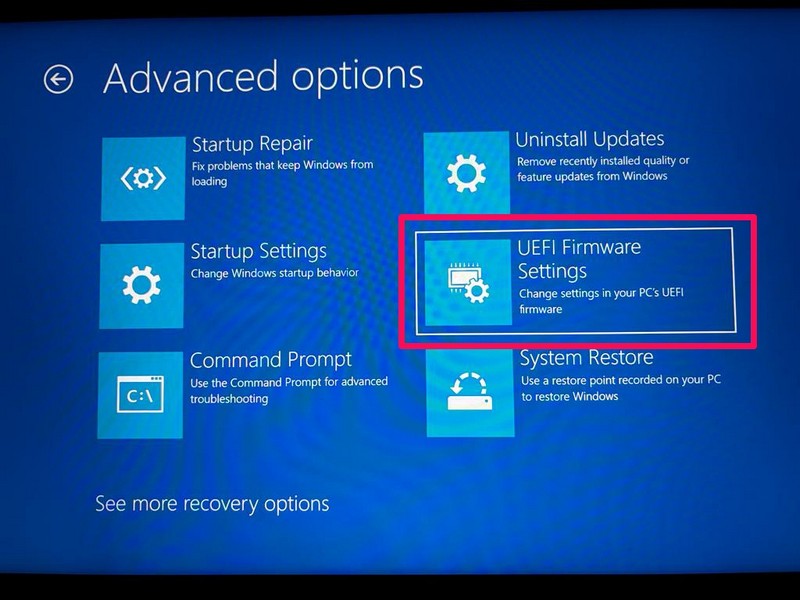
5. Щелкните «Дополнительные параметры».

6. Щелкните «Параметры прошивки UEFI».
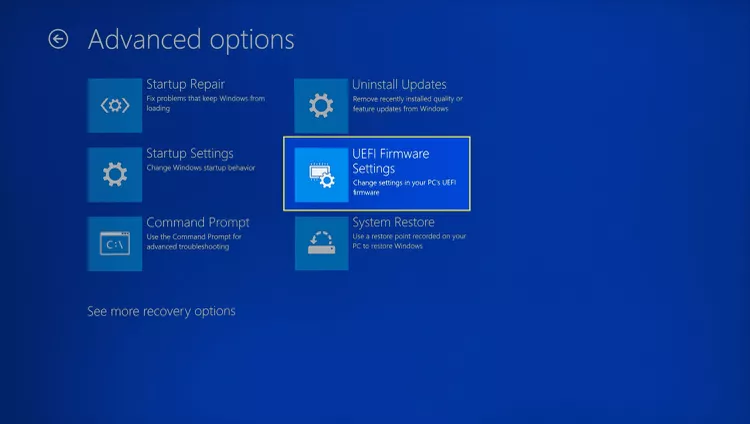
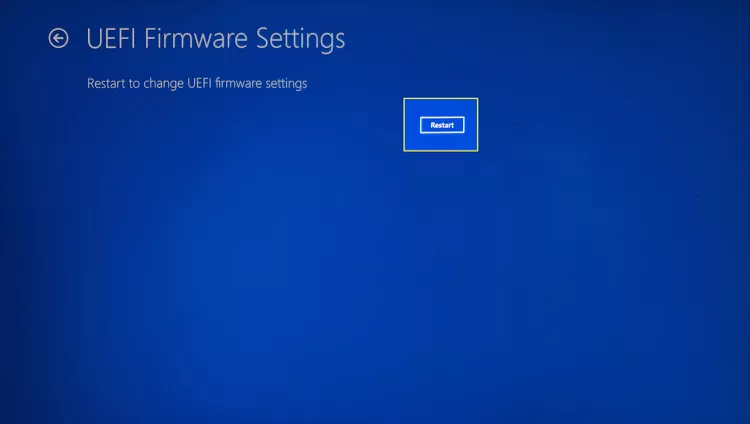
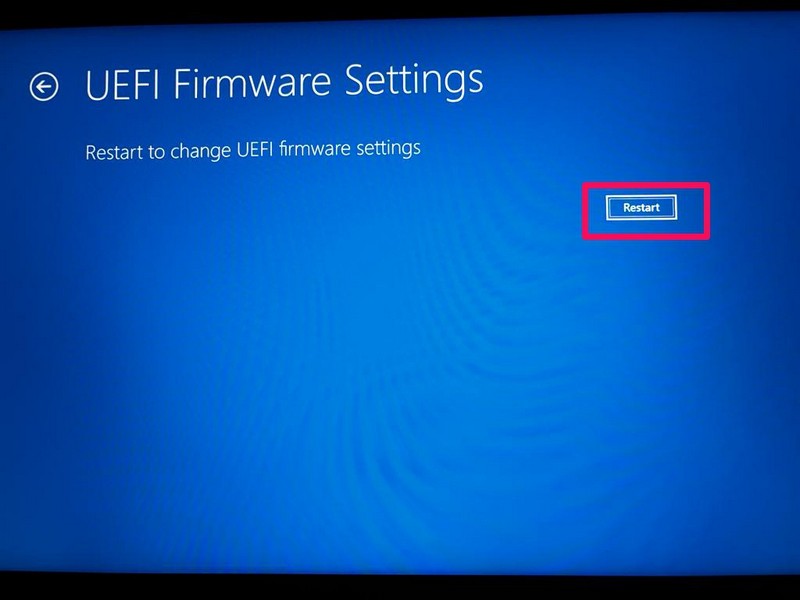
7. Нажмите кнопку «Перезагрузка».
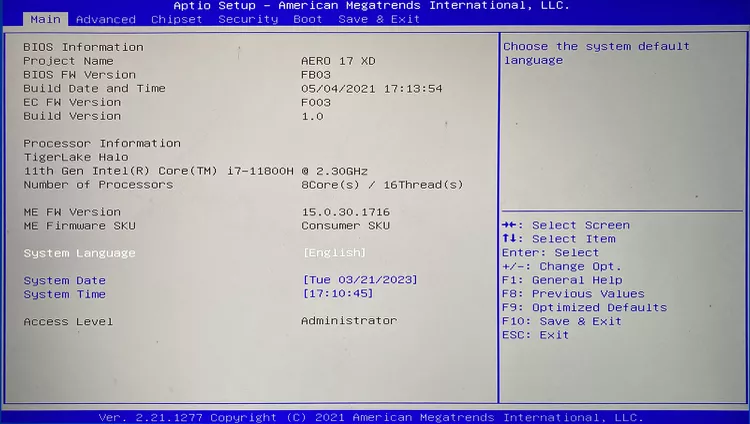
8. Когда компьютер перезагрузится и загрузится главный экран UEFI, найдите пункт CPU Core Temperature. Если температура процессора не отображается на главном экране, перейдите к пункту меню «Advanced», «Power» или «H/W Monitor» с помощью клавиш со стрелками и выберите его, нажав клавишу Enter.
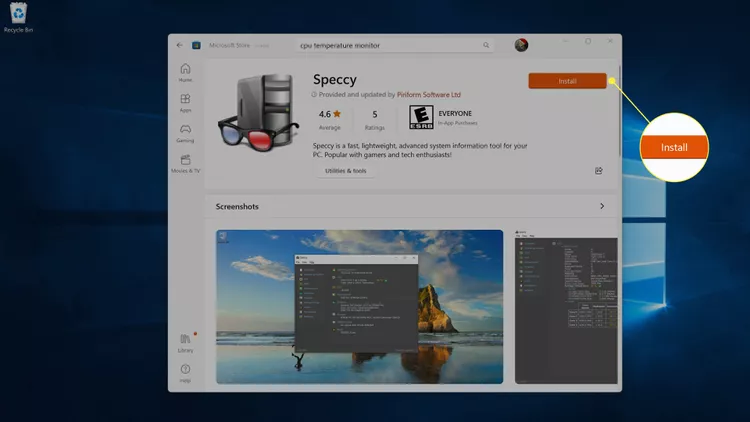
Как посмотреть температуру процессора в Windows 11 с помощью Speccy
Существует множество приложений, которые могут отображать температуру процессора в Windows 11, но Speccy – это популярный вариант с высоким рейтингом, доступный прямо в Microsoft Store.
Вот как проверить температуру процессора в Windows 11 с помощью Speccy:
1. Загрузите и установите Speccy из Магазина Windows.
2. Откройте Speccy и нажмите «CPU» в меню слева для получения дополнительной информации.
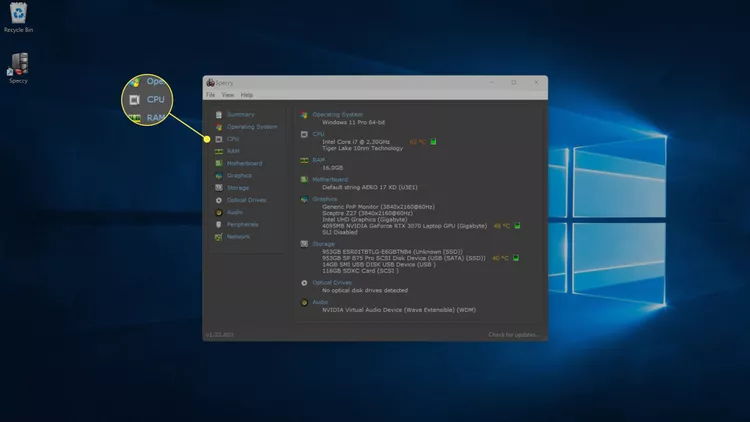
Примечание: Вы также можете посмотреть общую температуру процессора, отметив раздел «CPU» на вкладке «Summary».
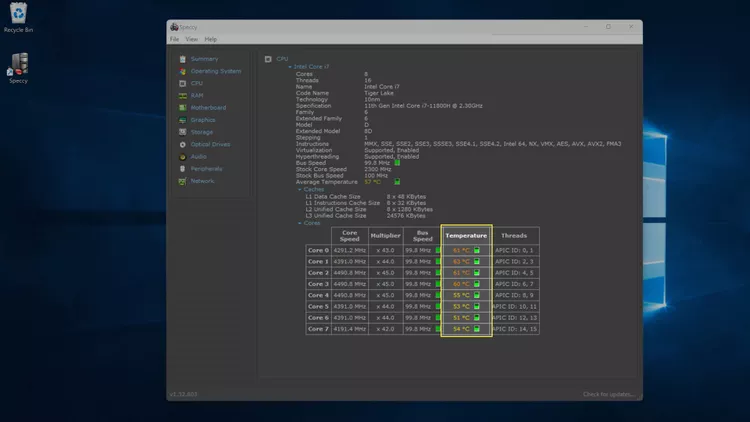
3. На вкладке CPU можно увидеть температуру каждого отдельного ядра процессора.
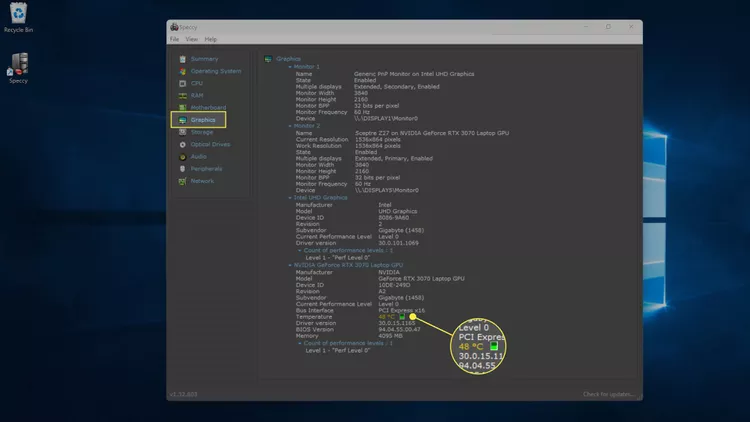
4. Для просмотра температуры графического процессора можно также перейти на вкладку «Graphics».
Как посмотреть температуру процессора в Windows 11 с помощью других приложений
Если у вас есть игровая мышь, клавиатура или гарнитура с приложением для настройки или мониторинга, оно может отображать температуру процессора. У компаний Intel и AMD есть приложения, используемые для разгона процессора, и они могут отображать температуру процессора.
Примечание: В следующих примерах показано, как посмотреть температуру процессора в Windows 11 с помощью Extreme Tuning Utility от Intel и iCue от Corsair. Если у вас процессор AMD или игровая периферия другого производителя, то приложения будут выглядеть иначе.
Вот как определить температуру процессора в программах Extreme Tuning Utility от Intel и iCue от Corsair:
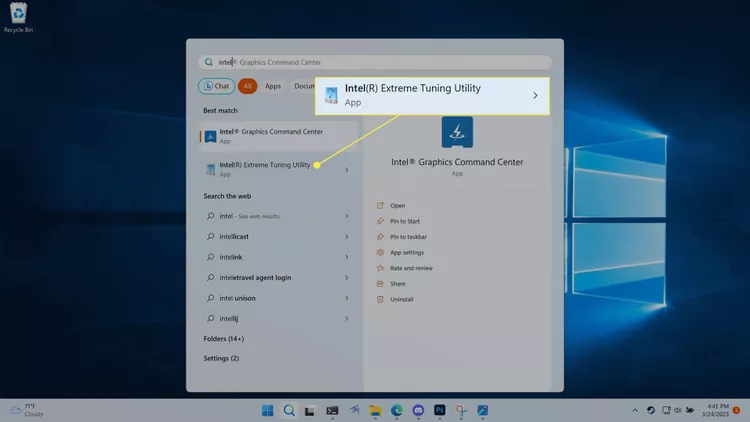
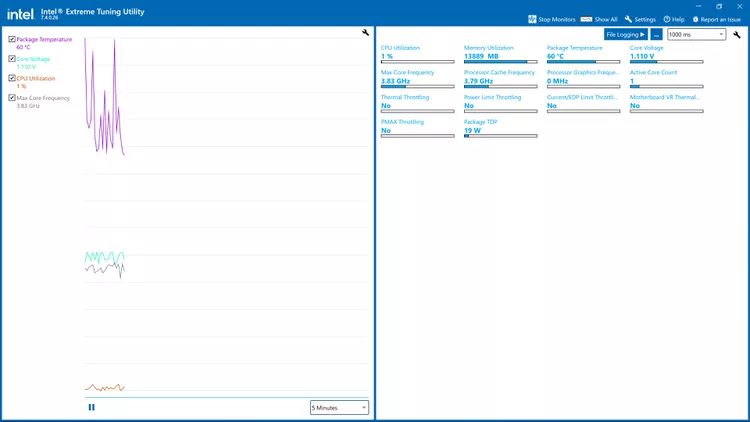
1. Щелкните лупу на панели задач и введите «Intel». Затем в появившихся результатах поиска выберите «Intel Extreme Tuning Utility».
2. Щелкните «System Information» и найдите в правом нижнем углу пункт «Package Temperature» (Температура корпуса). Можно также щелкнуть «Monitoring», чтобы получить список всех мониторов.

3. На экране «Monitoring» представлен список всех доступных мониторов, а также температура процессора.
4. В других приложениях сторонних разработчиков, включая iCue, необходимо открыть приложение, а затем выбрать пункт «Dashboard» или «Monitors».
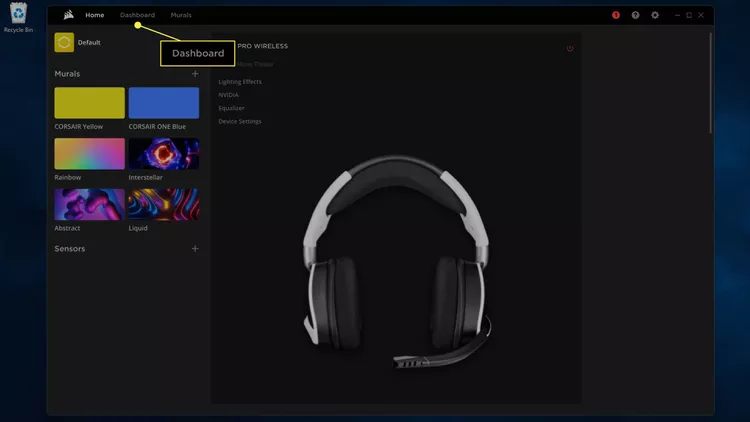
5. Здесь можно увидеть температуру каждого отдельного ядра и температуру графического процессора.
FAQ
Какова оптимальная температура для процессора?
Температура процессора зависит от его типа, но можно ожидать, что температура простоя (без работающих ресурсоемких приложений) будет составлять около 38°C. Многие процессоры после определенной отметки, например, 100°C запускают тепловое регулирование, что может повлиять на производительность компьютера. Проверьте характеристики вашего процессора, чтобы узнать его обычную рабочую температуру.
Как снизить температуру процессора?
Для предотвращения перегрева процессора можно воспользоваться недорогими способами: убедиться, что вентиляционные отверстия в корпусе не засорены, и выключить неиспользуемые программы. В качестве альтернативы можно установить что-то вроде системы водяного охлаждения.
Whether building a customized desktop PC or using a ready-made laptop, checking the CPU temperature is one of the best ways to check for issues that might cause slowdowns on Windows 11. Various CPU cooling and ventilation issues can throttle performance to prevent overheating, but you might not know it’s happening unless you dig into the details.
Unfortunately, despite its importance, CPU temperature readings are not readily available when using default tools in Windows. Checking your graphics card temperature on Windows 11 is more straightforward, but processors aren’t so lucky. There are several methods for checking your temps, and I’ll explain each in order of simplicity (and they’re all totally free.)
Check CPU temp with HWMonitor
HWMonitor
✅ Great for: Any desktop or laptop with a functional CPU temperature node.
❌ Not so great for: Devices with admin-restricted software installations.
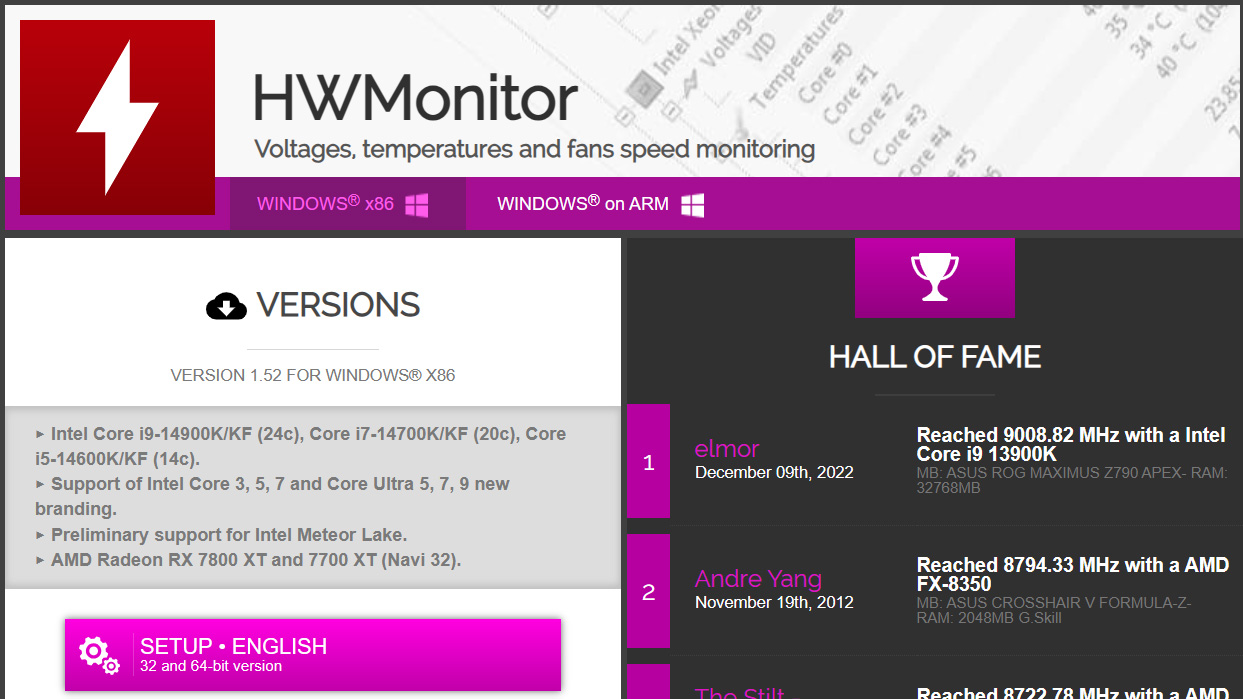
Probably the most common method used by custom desktop PC builders, downloading a lightweight and free app to check your CPU temperatures is also the most straightforward route. I regularly recommend the free HWMonitor app from CPUID to anyone who wants to diagnose high temperatures quickly.
It offers more than a simple CPU readout and might look intimidating when opened for the first time. Not to worry, I’ll explain precisely what to look for. First, let’s get HWMonitor downloaded and install it.
- Navigate to the HWMonitor page of CPUID’s official website.
- Click ‘Setup • English‘ underneath the ‘Versions‘ submenu.
- Click ‘Download now!‘ on the following page.
- Open your downloads folder and run the ‘hwmonitor_x.xx.exe‘ installer.
- Install HWMonitor and decide if you want a desktop shortcut.
- Run HWMonitor and expand its window to a comfortable size.
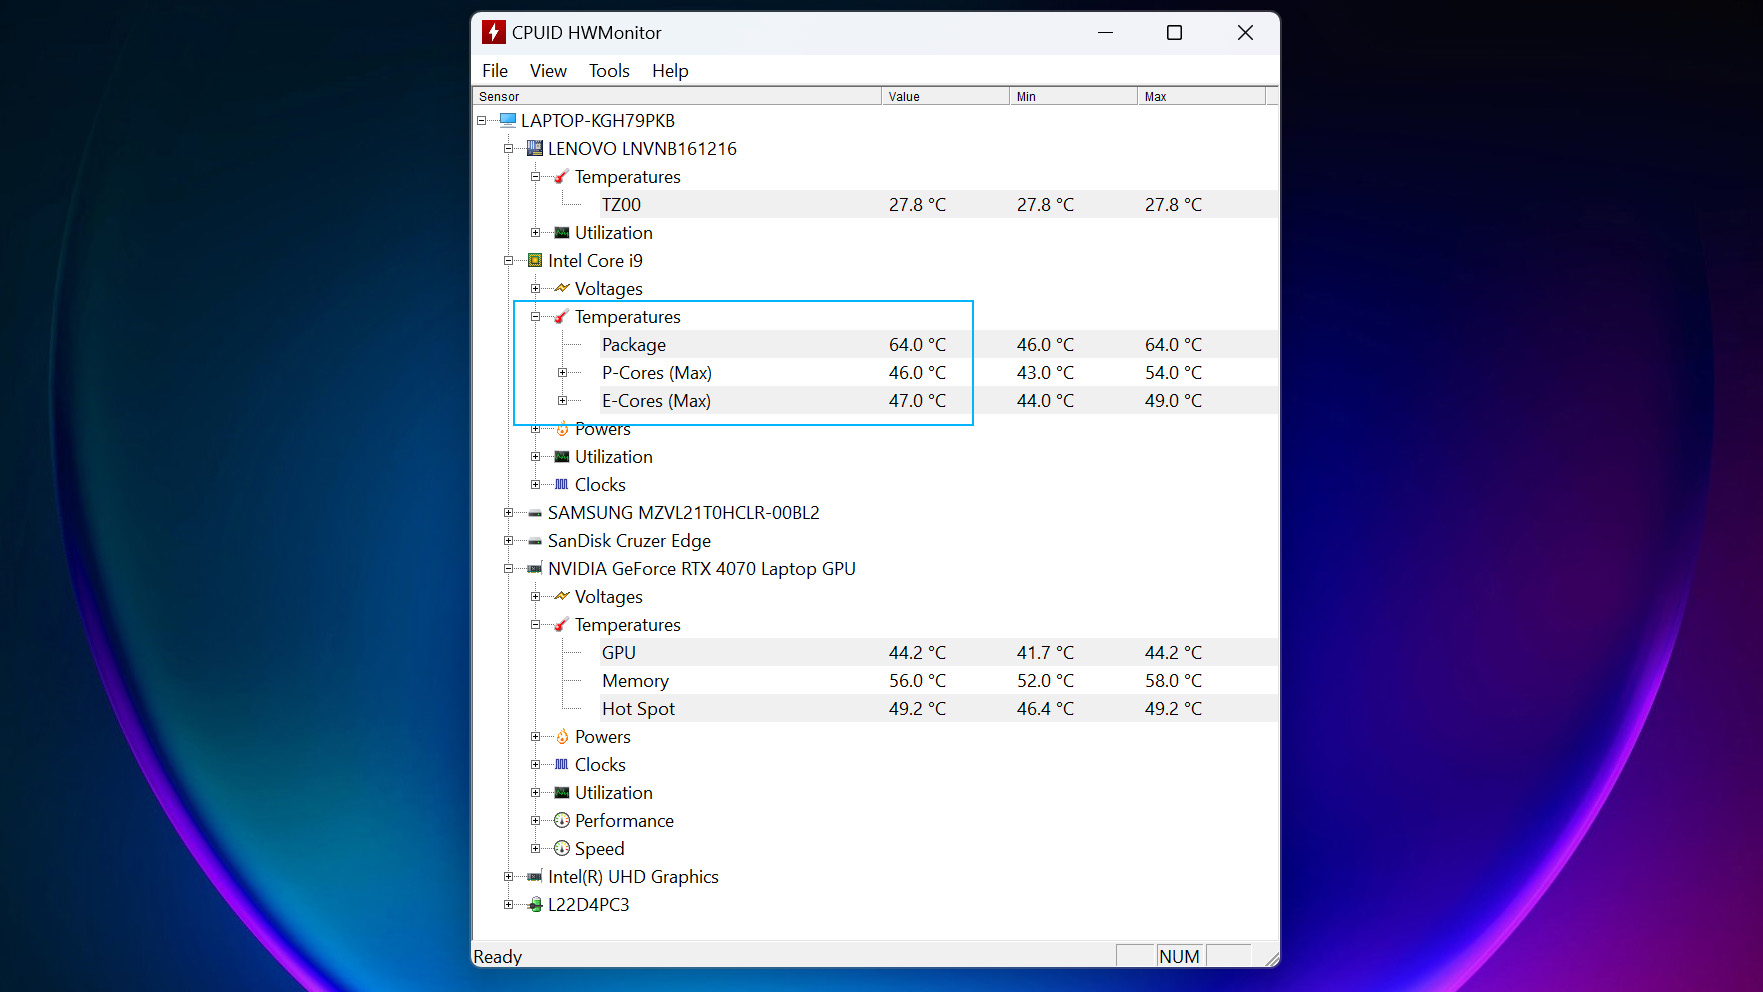
You’ll be presented with a list of every component HWMonitor can detect, alongside a temperature readout from the internal nodes. Look for your processor by identifying its icon (a miniature CPU with golden pins) and the matching model/brand name. In my example, the Intel Core i9 submenu has a ‘Temperatures‘ subsection, showing the current value with minimum and maximum readings detected since the app opened.
Other temperature readings, including some from the motherboard and graphics card, can help you diagnose potential CPU-specific overheating issues. If your components are within a similar range for their Celsius readouts, you likely have a general venting problem. However, if only your CPU is reading a high temperature, your culprit is probably a faulty CPU cooler or damaged thermal paste. Anything below 85°C is generally acceptable under stress, depending on your system.
Check CPU temp with companion apps
Companion apps
✅ Great for: Custom-made or pre-built gaming desktops and laptops.
❌ Not so great for: OEM business-grade laptops.
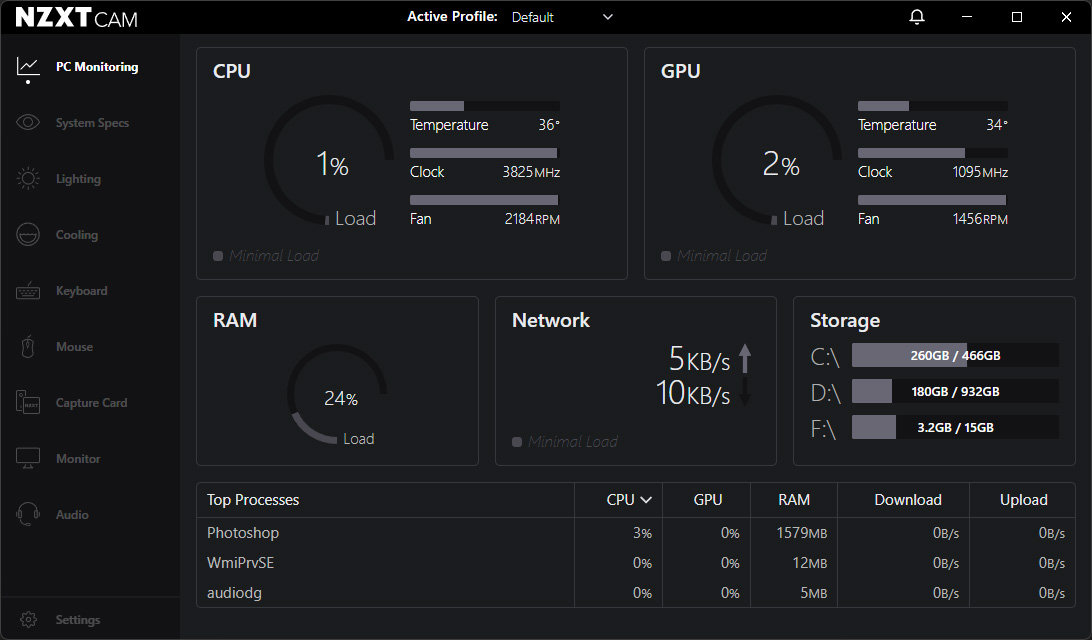
Another method that leans towards desktop PCs for its usefulness, but does have some carry-over into gaming laptops is taking advantage of companion apps from various component manufacturers.
All the latest news, reviews, and guides for Windows and Xbox diehards.
For example, ASUS ROG devices usually have Armoury Crate pre-installed, its first-party software suite designed to tweak performance with the side effect of showing live temperature readings.
Many companion apps are cross-compatible with other branded hardware, so you don’t necessarily have to pair them perfectly. It’s perfectly fine to install NZXT CAM and use it to check temperatures, even if you don’t use its parts. I use an NZXT-branded PC case and the CAM software to control my RGB fans, tying their colors to the CPU/GPU temps (green is good, red is too hot.)
Branded companion apps
- ASUS: ROG Armoury Crate
- Cooler Master: MasterPlus+
- Corsair: iCUE
- MSI: Afterburner
- NZXT: CAM
Each branded companion app has its own documentation, so the steps for accessing CPU temperatures differ. However, the purpose is generally the same; despite some variants like MSI Afterburner having a GPU focus, it still offers CPU temps. Naturally, this isn’t particularly well-suited to business-focused laptops from Dell and HP. However, the software should still work perfectly fine if you don’t mind installing free software designed for gamers.
Check CPU temp in your BIOS
Booting to BIOS
✅ Great for: Desktop computers with gaming-centric motherboards.
❌ Not so great for: Laptops and office-centric desktop PCs.
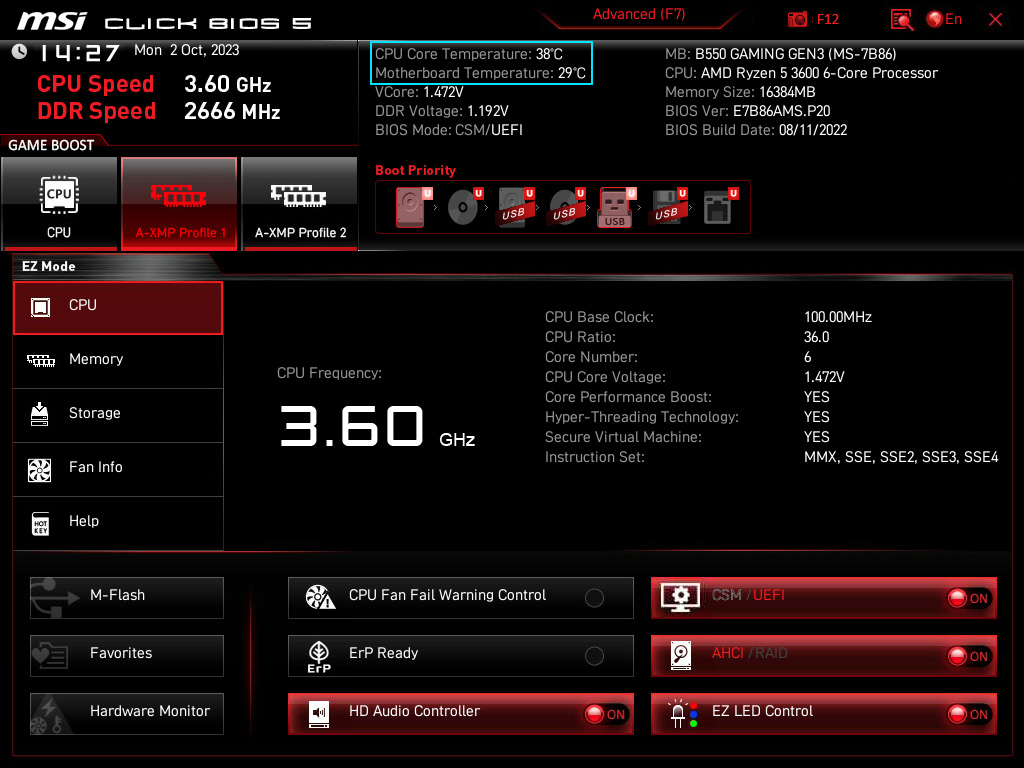
Every computer has a motherboard, connecting each component and allowing your CPU to communicate with everything needed for Windows 11 to boot. If you’re using a gaming PC, whether homemade or pre-built, you can likely see your CPU temperature (and often a secondary motherboard node reading) within the BIOS before Windows starts.
Since your BIOS handles firmware, it’s operating behind everything else. Checking temperatures here is the perfect way to tell if Windows 11 is causing unusually high readings or if the problem runs deeper. Most BIOS screens look similar, differing in visual luxuries depending on the brand and motherboard category, but all can be accessed in mostly the same way.
How to access your BIOS
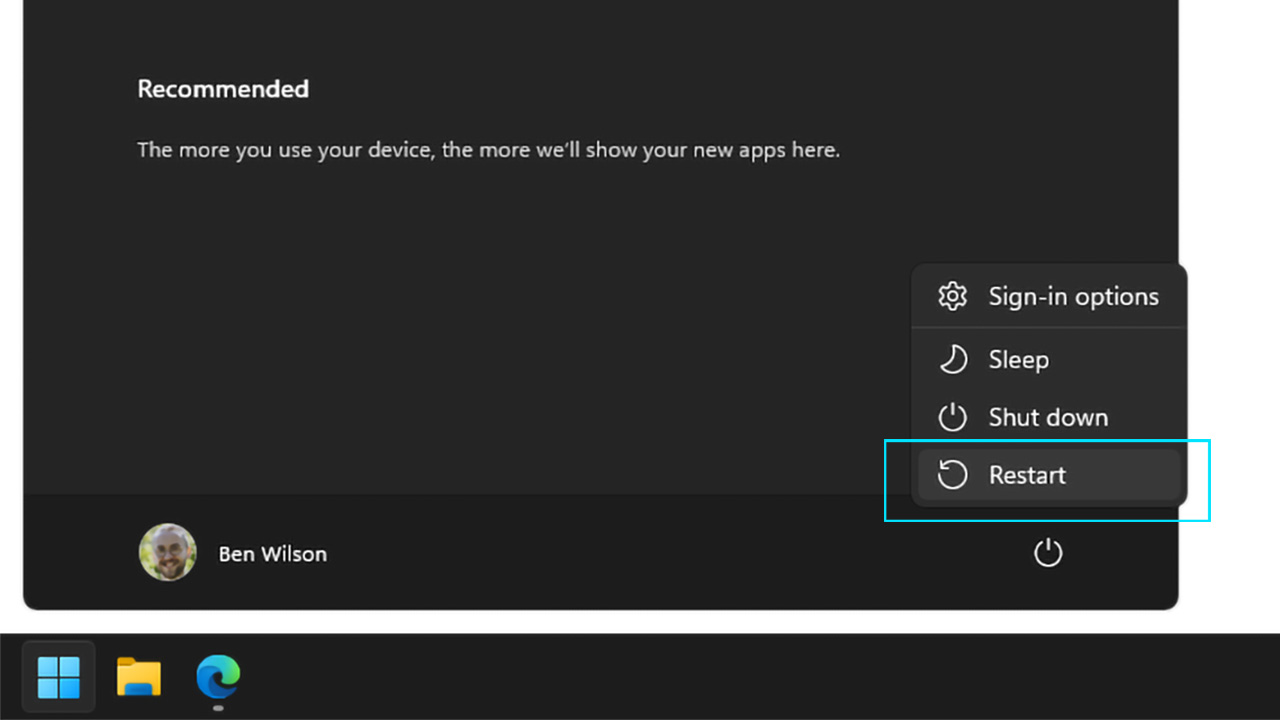
- Open the Start menu and left-click the Power icon.
- Hold down Left Shift on your keyboard and click Restart.
- Continue to hold Left Shift while your computer reboots.
There are multiple methods to enter UEFI BIOS on devices running Windows 11. Typically, pressing a particular Function (F1 — F12) ‘ESC’ or ‘Delete’ key will trigger the BIOS if you press it before Windows boots. Still, it’s not uncommon to miss this short window due to slow-acting monitors failing to display the correct key in time. Stick to the above method and hold the Left Shift key as your computer restarts, and you’re presented with the following choices.
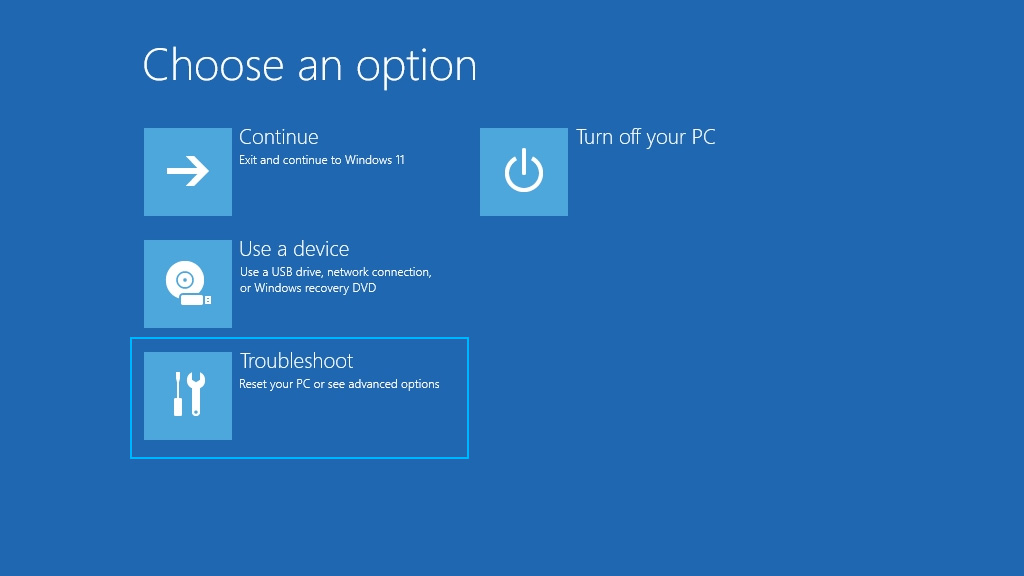
- Click the Troubleshoot option.
- On the following screen, click Advanced options.
- On the Advanced options screen, click UEFI Firmware Settings.
- Click Restart for the last time.
Your device will reboot, but you don’t have to hold the Left Shift key this time (or any other key, for that matter.) Once you’re in the BIOS menu, your CPU temperature (sometimes listed with different names like CPU core) might be immediately visible on the homepage. Otherwise, you’ll need to search for it.
If you can’t see any temperatures, navigate the available menus with the arrow keys on your keyboard and enter the submenus with the return key (unless specified otherwise.) Search for tools with names like ‘hardware monitor‘ or ‘status‘ to find a Celsius readout of your processor, often alongside a motherboard temperature (or system temperature.)
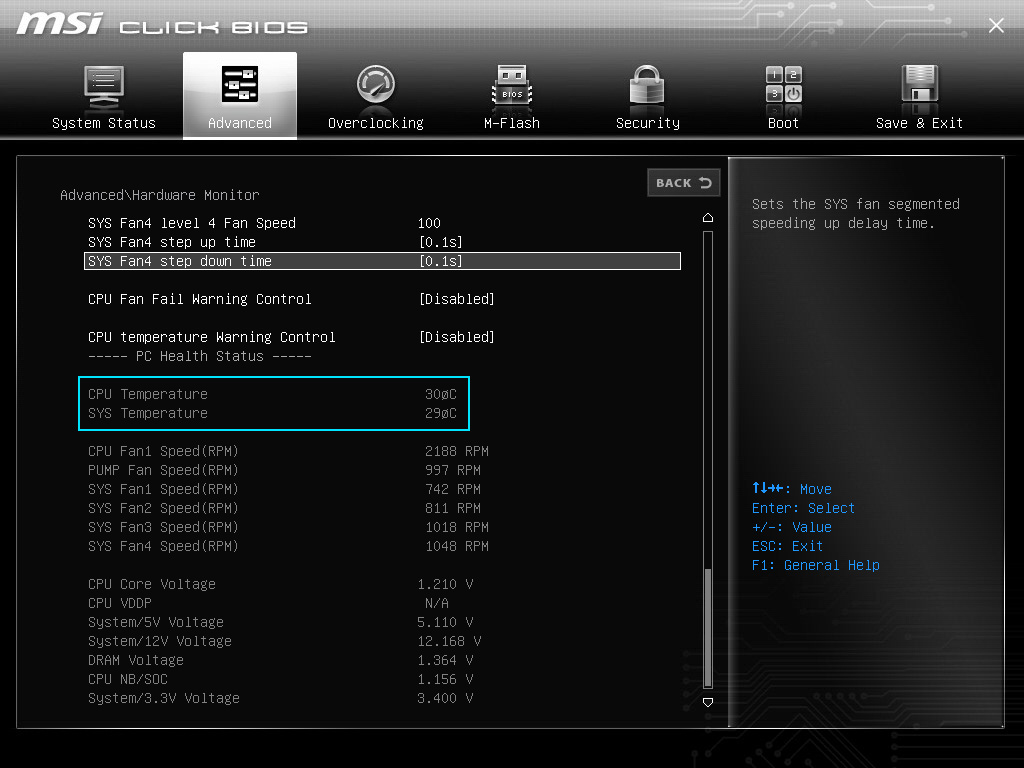
If your BIOS shows a separate motherboard temperature reading from your CPU, this is another way to tell if something is wrong with your cooling solution. When both readings are a close match, or at least within a few degrees of each other, this usually means the temperature inside your PC case or laptop chassis is consistent. However, high CPU and low motherboard/system temperatures generally point towards CPU cooler issues.
Check your thermal paste and that you didn’t accidentally leave a ‘remove me’ sticker on the cooling plate of a desktop CPU cooler (don’t be embarrassed; it happens to the best of us.)
More resources
For more helpful articles, coverage, and answers to common questions about Windows 10 and Windows 11, visit the following resources:
- Windows 11 on Windows Central — All you need to know
- Windows 10 on Windows Central — All you need to know
Ben is a Senior Editor at Windows Central, covering everything related to technology hardware and software. He regularly goes hands-on with the latest Windows laptops, components inside custom gaming desktops, and any accessory compatible with PC and Xbox. His lifelong obsession with dismantling gadgets to see how they work led him to pursue a career in tech-centric journalism after a decade of experience in electronics retail and tech support.
Время на прочтение1 мин
Количество просмотров16K
Издание Neowin сообщило, что в Windows 11 появились виджеты для мониторинга показателей CPU, GPU, потребления оперативной памяти и других параметров. Виджеты стали частью недавно представленного приложения Dev Home.

На прошлой неделе Microsoft анонсировала приложение Dev Home, которое должно объединить в себе повседневные инструменты разработчиков. С помощью виджетов, к примеру, можно отслеживать статистику GitHub. Теперь же стали доступны виджеты для отслеживания параметров ПК.
Приложение Dev Home можно установить из официального магазина Microsoft Store, репозитория GitHub или с помощью пакетного менеджера winget, используя команду winget install --id Microsoft.DevHome -e. У проекта открытый код, и Microsoft призывает сторонних разработчиков присоединиться к развитию Dev Home.
После установки необходимо вызвать панель виджетов с помощью сочетания клавиш Win + W и выбрать необходимые виджеты из коллекции Dev Home. Сейчас с помощью Dev Home можно отслеживать параметры процессора, видеокарты, сети, оперативной памяти, выводить связку SSH-ключей и использовать инструменты GitHub. В будущем Microsoft планирует расширить библиотеку.

Также журналисты издания отметили, что виджеты пока могут работать нестабильно. К примеру, они часто пропадают с доски, перестают отвечать или обновляться. Сам инструмент DevHome находится в бета-тесте. Ожидается, что к моменту полноценного релиза разработчики исправят ошибки.
Если эта публикация вас вдохновила и вы хотите поддержать автора — не стесняйтесь нажать на кнопку
When you work on your Windows 11 PC or laptop, you already know that the CPU inside the computer is mainly doing all the heavy lifting. However, what you might not know is that much like the GPU, the CPU cores inside your Windows 11 PC or laptop also get hot, depending on your usage. Although it is not that important to keep an eye on the CPU temperature in Windows 11 for casual users, it is an essential task for those who run AAA games on their PC or laptop for long hours or overclock their CPUs.
So, if you are looking for effective ways to check the CPU temperature of your Windows 11 PC or laptop, this article should help. In this in-depth guide, we have listed a few ways to check the CPU temperature in Windows 11. Check out the following sections for all the details!
Check CPU Temperature in Windows 11
Now, when it comes to checking the real-time temperature of the CPU in Windows 11, there is no official way to do it. Unlike how you can check the temperature of the GPU inside your Windows 11 PC or laptop from the Performance tab in the Task Manager, you will not be able to check the CPU temperature from there.
To check the CPU temperature on your Windows 11 PC or laptop, you will have to use some advanced methods that we have listed in this article. We have also provided easy-to-follow, step-by-step guides for each of the methods to help you check the CPU temperature of your Windows 11 PC or laptop.
With that said, check out the methods to check the CPU temperature in Windows 11 right below.
1. On BIOS or UEFI Screen in Windows 11
One of the ways to check the CPU temperature in Windows 11 is via the BIOS or UEFI screen. Although it can be a bit complex for a casual user to check the temperature of the CPU using this method, this is the only way to check the CPU temperature in Windows 11 without using any third-party application.
Now, we have tried our best to help you check the CPU temperature via the BIOS or UEFI screen on your Windows 11 PC or laptop. However, it is worth mentioning that you will need to restart your PC or laptop. So, if you are reading this article on the Windows 11 PC or laptop on which you want to check the CPU temperature, we’d suggest you open this guide on a smartphone or tablet to follow the steps properly.
With that said, check out the steps right below to check the CPU temperature from the BIOS or UEFI screen on your Windows 11 PC or laptop:
1. Use Windows + I to open the Settings app on your Windows 11 device.
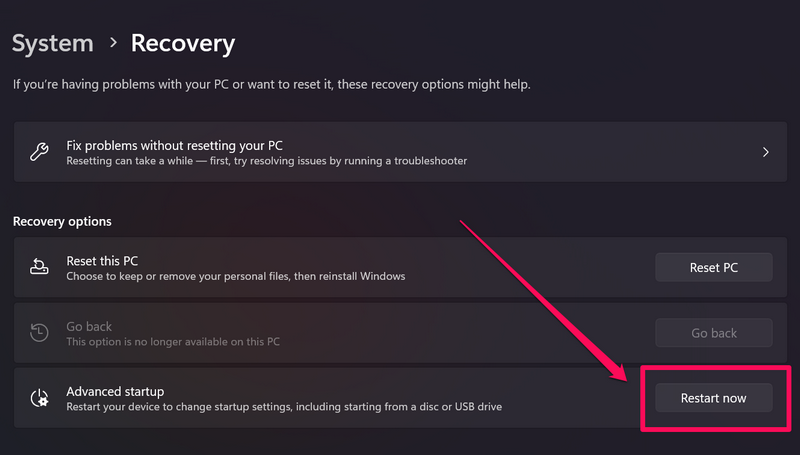
2. Under the System tab on the left navigation bar, click the Recovery option on the right pane.

3. On the following page, click the Restart now beside the Advanced startup option under the Recovery options section.
4. Now, your Windows 11 PC or laptop will restart directly on the Advanced startup screen. Here, select the Troubleshoot option.
5. Next, select Advanced Options from the menu.
6. On the following page, select the UEFI Firmware Settings option.
7. Click on Restart when prompted, and your PC or laptop will boot up right on the BIOS or UEFI screen.
8. If you have the latest UEFI user interface, you will be able to check the CPU temperature of your Windows 11 PC or laptop right on the home screen.
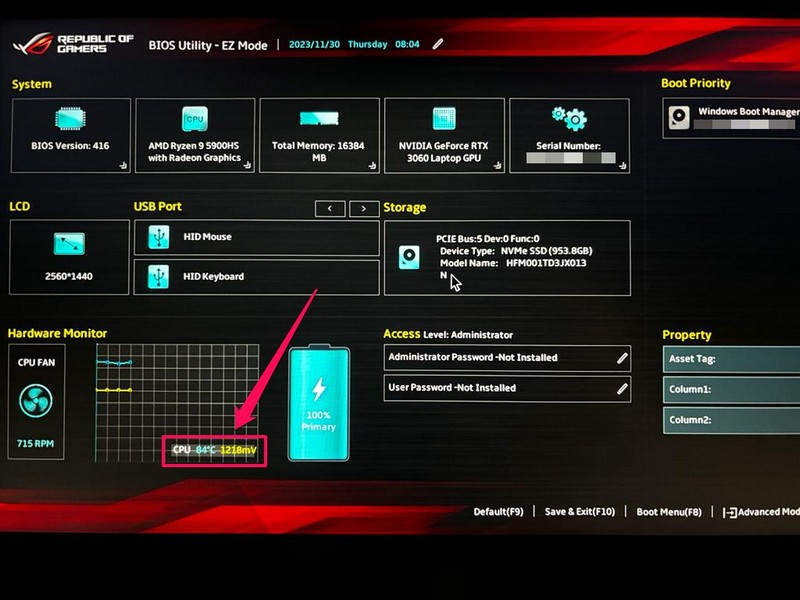
9. However, if your Windows 11 device opens the legacy BIOS screen, you will have to go to the Power or H/W Monitor tab to check the CPU temperature.
So, this is how you can check the CPU temperature of your Windows 11 PC or laptop from the BIOS/ UEFI screen on your PC or laptop. If you do not want to go through the hassle of using Advanced startup to check the CPU temperature on your Windows 11 device, you can use third-party apps.
2. Using Third-Party Apps in Windows 11
Apart from checking the CPU temperature from the BIOS/ UEFI screen in Windows 11, you can also use a few third-party applications to do so. Although we have used HWinfo to demonstrate the method of checking the CPU temperature in Windows 11, you can use other apps such as CoreTemp, HWMonitor, or Open Hardware Monitor. All of these apps show close-to-accurate temperatures of the CPU cores in Windows 11 and offer many other features that you can explore.
With that said, check out the steps below to use the HWinfo app to check the CPU temperature on your Windows 11 PC or laptop:
1. Go to this link to download the HWinfo app on your Windows 11 device.
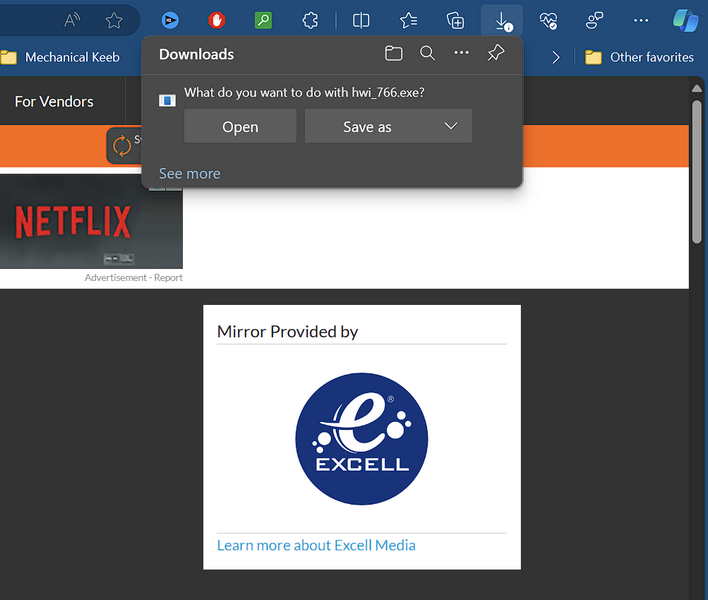
2. After downloading the HWinfo .exe file, run it on your PC or laptop and follow the on-screen instructions to install the program.
3. After the installation is complete, run the HWinfo app on your device.
4. On the startup page, make sure the checkbox for the Sensors-only option is checked. Then, click the Start button to launch the program.

5. Now, in the following window, you can check the CPU temperature of your Windows 11 PC or laptop under the CPU [0]: {CPU Name}: Enhanced section.

6. You can also click the arrow beside the Core Temperatures option to check the temperatures of individual cores of the CPU unit.
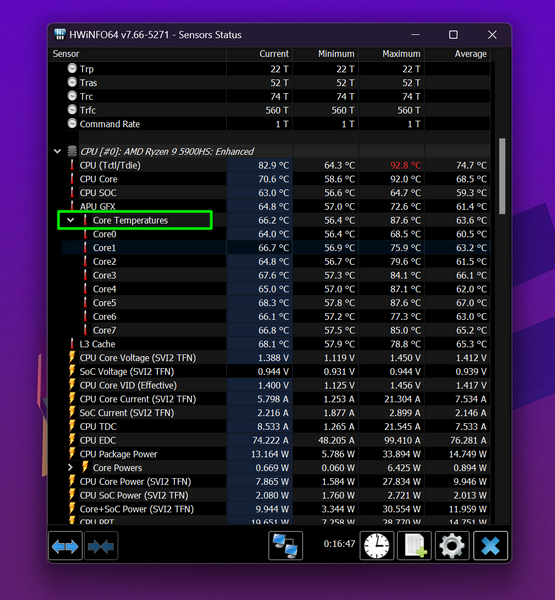
Apart from showing the real-time temperature of the CPU of your Windows 11 PC or laptop, the HWinfo app offers various other hardware-monitoring features that you can use. Explore all the options within the app to check out all the features.
3. Using AMD Ryzen Master or Intel XTU
Now, whether you are using a Ryzen CPU or an Intel one, both AMD and Intel’s free overclocking utility programs – AMD Ryzen Master and Intel Extreme Tuning Utility, let users check the CPU temperature of their Windows 11 PCs and laptops.
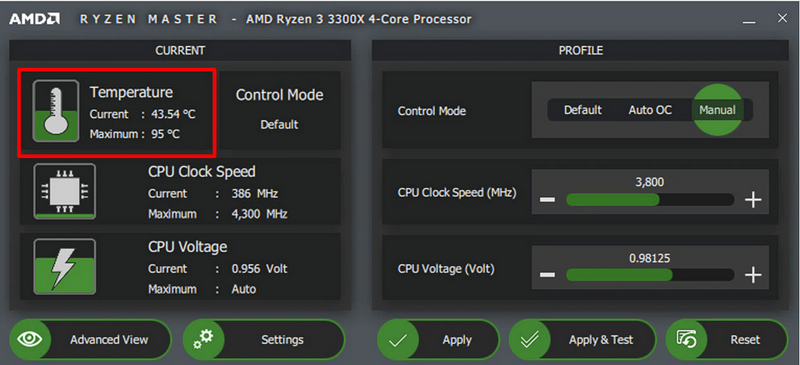
So, if you are rocking a Ryzen 2000 series or newer desktop processor, you can get the AMD Ryzen Master utility from its official download page, install it, and launch it to check the CPU temperature on your Windows 11 PC.
You can check the CPU temperature of your device under the CURRENT section in Basic View.
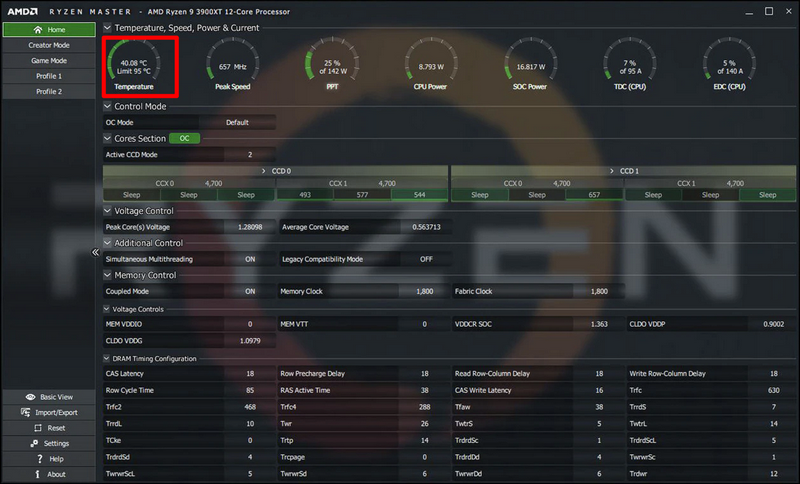
In the Advanced View page in Ryzen Master, you can check the CPU temperature in the Home tab, under the Temperature, Speed, Power & Current section at the top.
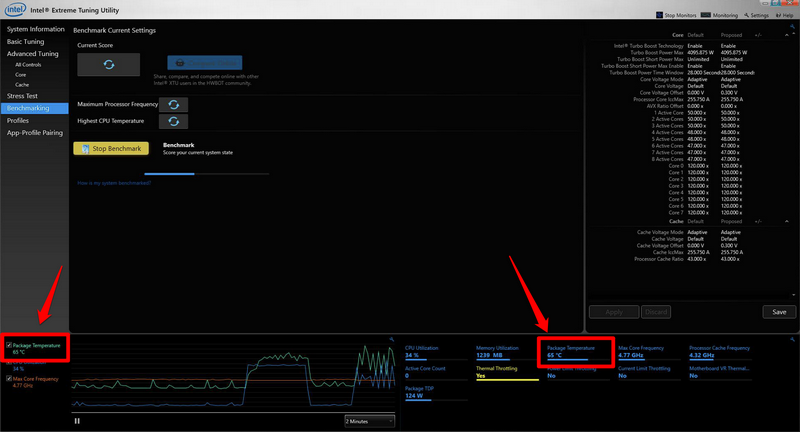
In case you are using an Intel CPU on your Windows 11 PC, you can get the Intel XTU tool from its official download page, install it, and then launch it to check the CPU temperature of your device. Once you launch the Intel XTU tool, you will be able to see the CPU temperature under the Package Temperature options.
So yeah, this is how you can use the free overclocking utility from AMD and Intel to check the CPU temperature in Windows 11.
4. Using OEM Apps
Last but not least, one of the easier ways to check the CPU temperature is via OEM software that comes pre-installed with most Windows 11 laptops. Many manufacturers like ASUS, Razer, and Acer deliver their Windows 11 laptops with their own utility programs to allow users to monitor and customize their user experience.
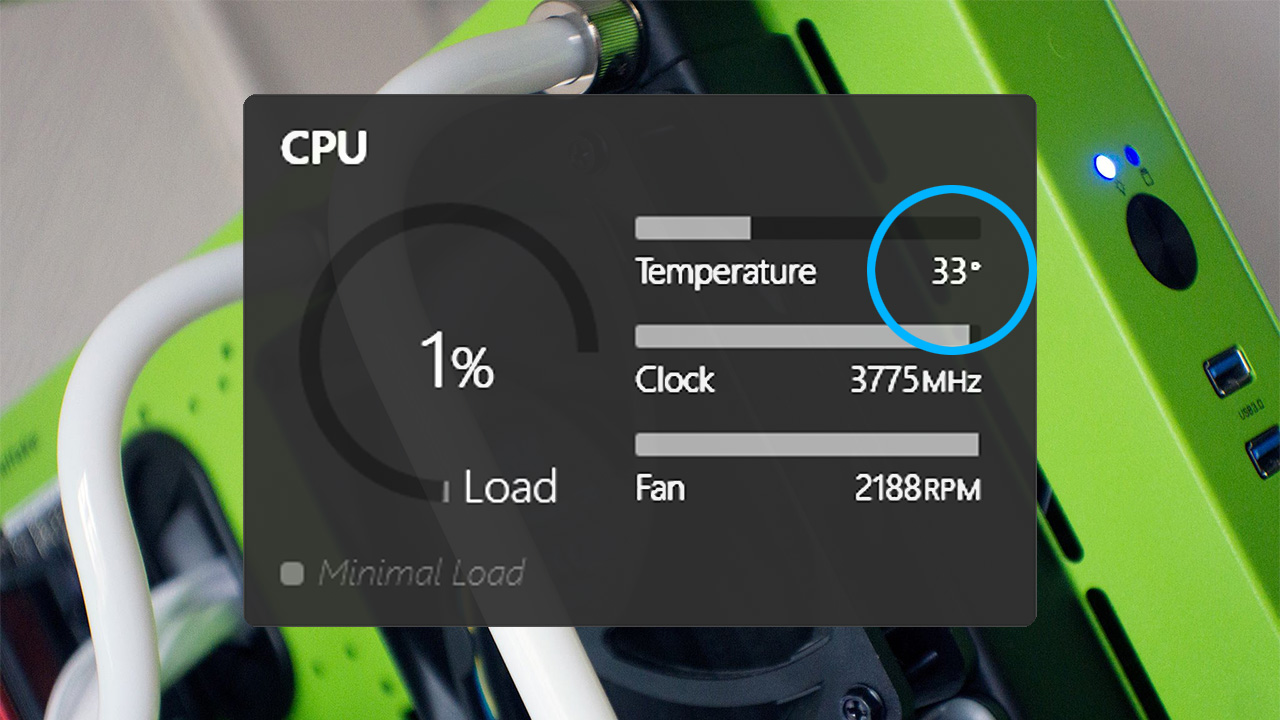
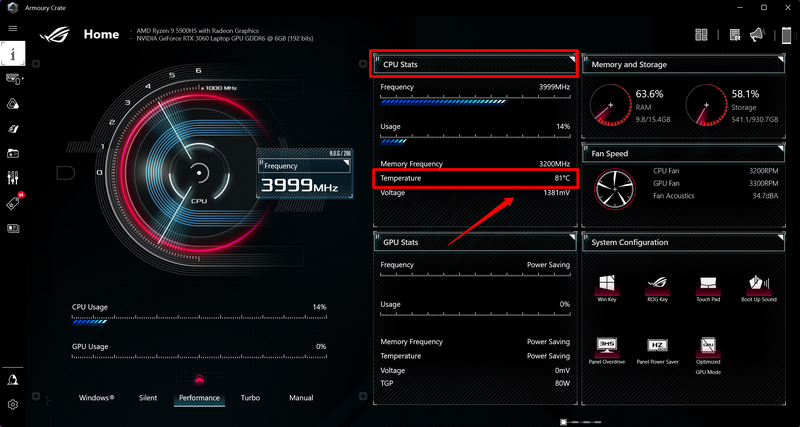
For instance, my ASUS ROG laptop comes with the Armory Crate software that offers various features, including real-time temperature monitoring for CPU and GPU. So, if you have a ROG or TUF laptop from ASUS, you can launch the Armory Crate tool on your device and check the CPU temperature under the CPU Stats section along with other information such as the CPU frequency and usage.
Other than the Armory Crate program, you can also use the NitroSense tool that comes pre-installed on Acer Windows 11 laptops to check the CPU temperature.
FAQs
How to check CPU temperature in Windows 11?
Although there is no official way tool to check the CPU temperature in Windows 11, one can check it on the BIOS/ UEFI screen or using third-party apps like CoreTemp, HWinfo, HWMonitor, and others.
What is the ideal CPU temperature in Windows 11?
The ideal CPU temperature of your Windows 11 PC or laptop should be somewhere between 45-degree to 60-degree Celcius (104-degree to 140-degree Fahrenheit) during regular usage, and between 70-degree to 80-degree Celcius (158-degree to 176-degree Fahrenheit) during heavy usage and gaming.
What is a dangerous CPU temperature in Windows 11?
Although there is no official specification for a dangerous CPU temperature range, one should keep in mind that the CPU temperature of their Windows 11 PC or laptop should not go above 85 degrees Celcius (185 degrees Fahrenheit).
Wrapping Up
So, there you have it! This was our take on how to check the CPU temperature in Windows 11. While checking the CPU temperature might not be important all the time, it is best to keep an eye on it when you are using CPU-heavy apps or playing AAA games for long hours on your Windows 11 PC or laptop.
Hence, we hope this article helps you check the CPU temperature on your Windows 11 PC or laptop. If it did, don’t forget to let us know in the comments below.
Это пока предварительная версия, но установить и использовать их могут все желающие.
- В конце мая 2023 года компания Microsoft добавила в предварительную версию приложения Microsoft Dev Home для Windows 11 набор виджетов для мониторинга состояния процессора, памяти и видеокарты. Одним из первых на это обратил внимание сайт Neowin.
- Среди прочего, виджеты позволяют получать информацию о текущей загрузке и тактовой частоте процессора, температуре видеокарты и скорости подключения к сети.
- На странице с виджетами также есть возможность быстро закрывать запущенные процессы, например, которые сильнее всего нагружают процессор.
- Для того, чтобы установить виджеты для мониторинга производительности в Windows 11, необходимо скачать приложение Dev Home Preview из Microsoft Store. После этого требуется нажать комбинацию клавиш Win + W и установить нужные элементы.
- Судя по первым отзывам пользователей Windows 11, виджеты для мониторинга процессора, видеокарты, памяти и подключения к сети не всегда работают стабильно. Тем не менее уже текущая версия виджетов позволяет следить за работой компонентов ПК.
Нативную поддержку архивов RAR и 7z в Windows 11 введут для всех пользователей в сентябре 2023 года
А позже в 2024-м её расширят.
3 ответа на пост