
Некоторые владельцы ноутбуков с Windows 11 могут заметить, что иногда изображение на экране становится неестественным: тусклым и с низкой контрастностью, а затем само возвращается в норму. Чаще это происходит при питании от батареи и заметно при переключении между окнами или программами и рабочим столом: в ситуациях, когда изображение на экране меняется.
В этой простой инструкции о том, чем вызвано такое поведение яркости и контрастности в Windows 11 и как его отключить, если оно мешает комфортной работе.
Яркость с учетом содержимого
За описанный выше эффект снижения яркости и контрастности при переключениях в интерфейсе Windows с последующим возвращением в исходное состояние отвечает опция «Яркость с учетом содержимого». Эффект её применения может выглядеть примерно как на изображении ниже (но это имитация, получить фактический вид с помощью скриншота не получится):

Эта опция в Windows 11 призвана экономить заряд батареи ноутбука за счет адаптивного изменения яркости и контрастности в зависимости от текущего изображения на экране.
В случае, если «по мнению» системы текущее изображение позволяет снизить яркость и контрастность, они будут снижены, но при переключении на другое окно, изображение или элемент интерфейса возврат к исходному состоянию происходит не моментально, а потому пользователи могут замечать, что картинка «какая-то не такая».
Не могу оценить, насколько в действительности эта функция способна сэкономить заряд, а потому для себя решил её отключить. Если вы тоже хотите это сделать, шаги будут следующими:
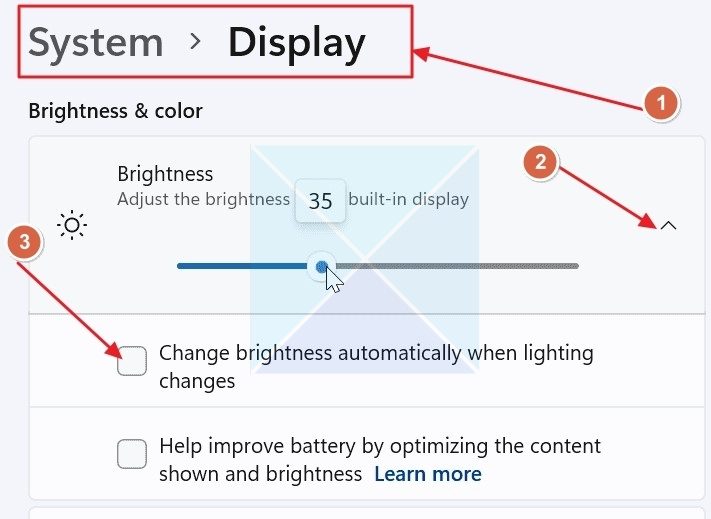
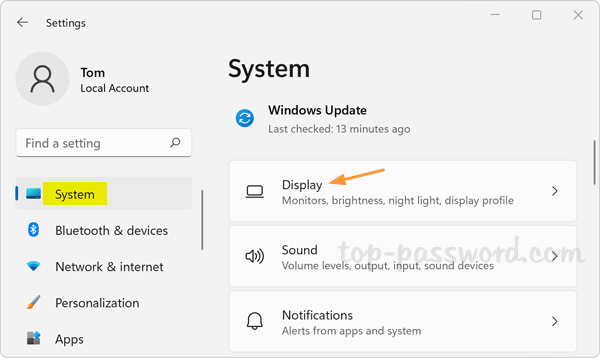
- Нажмите правой кнопкой мыши в пустом месте рабочего стола и выберите «Параметры дисплея» в контекстном меню. Либо зайдите в Параметры — Система — Дисплей.
- Раскройте пункт «Яркость» и отключите опцию «Изменять яркость с учетом содержимого».


В том же разделе настроек вы можете сделать так, чтобы опция работала только при питании от батареи, либо независимо от текущего источника питания.
Дополнительная информация
Приведенный выше параметр меняет не только яркость, но и контрастность. Если же меняется только яркость экрана, обычно причину вы можете найти в следующих настройках:
- Параметры — Система — Питание и батарея — Экономия заряда — Уменьшать яркость экрана в режиме экономии заряда.
- Иногда в фирменном ПО производителя ноутбука могут быть настройки адаптивной яркости в зависимости от внешнего освещения.
- Если снижение яркости происходит в играх, а у вас установлена видеокарта AMD, проверьте настройки дисплея в параметрах игр в AMD Software Adrenalin Edition, не включена ли там опция Vari-Bright.
В случае, если ваша ситуация с изображением на экране ноутбука отличается от описанной в статье, вы можете задать вопрос в комментариях ниже, я постараюсь подсказать решение или изложить свои предположения о возможных причинах.
Download Windows Speedup Tool to fix errors and make PC run faster
Sudden, unexpected changes in your screen brightness while trying to work or relax can be frustrating. Users with Windows 11 PCs have constantly reported the issue of screen brightness changing unexpectedly. In this article, we will see what you can do if the screen brightness keeps changing on your Windows 11/10 computer.

What causes screen brightness to change automatically?
The primary culprit is the Adaptive Brightness feature, which uses the ambient light sensor to detect the light in your surroundings and adjust the screen brightness accordingly. Other reasons include the usual suspects of Power management on your Windows PC. Integrated graphics settings can also interfere with the screen brightness and change automatically depending on the power source.
In this section, we will look at several fixes for the issue where your screen brightness keeps changing in Windows 11/10. Here’s all that’s covered:
- Turn off adaptive brightness
- Turn off Intel Display Power Saving Technology
- Turn off battery saving for Intel or AMD graphics
Before you begin, make sure that you have updated your Graphics Driver.
1] Turn off adaptive brightness
The Adaptive brightness feature in Windows uses the ambient light sensor to detect the light in the surroundings and adjust the brightness accordingly. Sometimes, the feature can unnecessarily change the brightness, or you might need to turn it off to keep your screen brightness stable:
- Open Windows settings by pressing the Windows+I keys on your keyboard.
- In the Windows settings, head over to the System section from the left pane and open Display.
- Find the Brightness option and expand it.
- Find the Change brightness automatically when the lighting changes option and uncheck the box before it.
Read: How to manage Power Management Settings in Windows.
2] Turn off Intel Display Power Saving Technology

Suppose you are on an Intel CPU and have integrated Intel graphics. In that case, Intel Display Power Saving Technology is turned on by default, automatically adjusting the screen brightness to save power.
- Open the Intel UHD Graphics Control Panel application on your PC.
- In the application, open the Power.
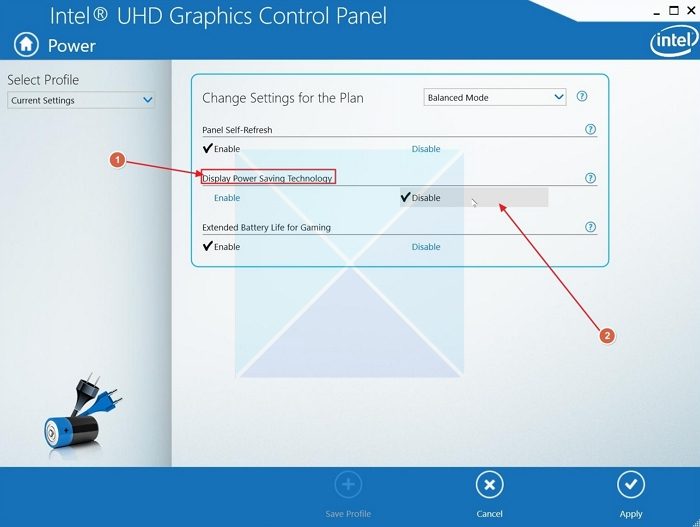
- Find the Display Power Saving Technology option and click the Disable button below.
3] Turn off battery saving for Intel or AMD graphics
Intel and AMD, with their graphics control software, offer similar functionality and varying brightness according to the battery state of your PC. You need to turn the options off to prevent brightness from changing automatically.
Intel
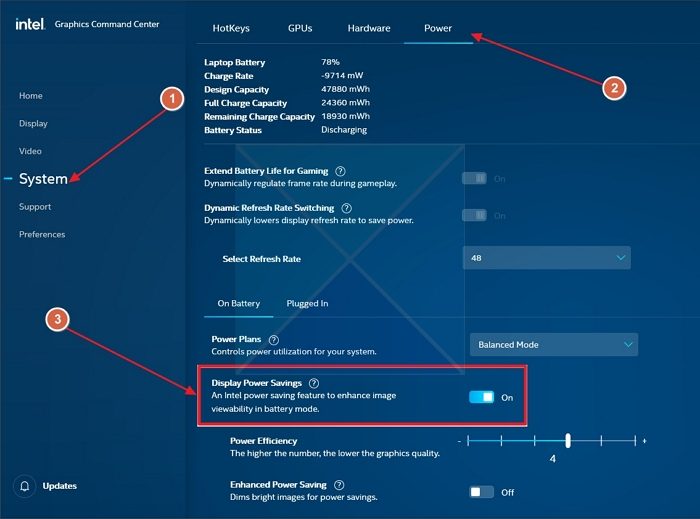
- Open the Intel Graphics Command Center application.
- Head to the System section from the left pane and open the Power tab from the top bar.
- Scroll down to find the battery options, and open On Battery.
- Toggle the Display Power Savings option off.
AMD
- If you are on AMD CPU and graphics, open the AMD Software: Adrenalin Edition.
- Now, open the Gaming Tab from the Topmost bar, and then open the Display section from the bar below it.
- Find the Varibright option and toggle it off.
We hope you found the article helpful and were able to fix the issue of screen brightness changing automatically in Windows 11.
Read: Improve Battery Life when watching Movies and Videos on Windows
Is adaptive brightness available for all Windows laptops?
Adaptive Brightness is not available for all Windows laptops. This feature works with an ambient light sensor, which detects light in the surroundings and adjusts the brightness accordingly. An ambient light sensor is generally found in high-end or 2-in-1 laptops.
Does keeping the laptop plugged in preserve battery health?
Keeping the laptop plugged in always does not necessarily preserve its battery health and can even lead to faster deterioration. A battery can go through only a finite number of charge and discharge cycles. Both Microsoft and Apple have advised against keeping the laptop always plugged in. For optimum battery health, keep it between 20-80% charged.
Anand Khanse is the Admin of TheWindowsClub.com, a 10-year Microsoft MVP (2006-16) & a Windows Insider MVP (2016-2022). Please read the entire post & the comments first, create a System Restore Point before making any changes to your system & be careful about any 3rd-party offers while installing freeware.
December 31, 2021 updated by
Leave a reply »
Windows 11 laptop changes brightness depending on the screen content? Screen begins to dim and brighten on its own based on the light of surrounding? To fix such problems, you need to turn off adaptive brightness and change Battery Saver setting in Windows 11.
Part 1: Turn off Adaptive Brightness
Press the Windows key + I together to open the Settings app. With the System category selected on the left, click on Display on the right.
Click the small arrow beside the “Brightness” slider to expand it.

Uncheck the “Change brightness automatically when lighting changes” box to prevent Windows 11 from automatically adjusting the screen brightness based on the light around you, or uncheck the “Help improve battery by optimizing the content shown and brightness” box if you don’t want your screen to change brightness based on content that’s displayed on your screen.

Can’t find such settings? You may need to disable adaptive brightness in BIOS Setup. For Dell Latitude 3520, enter BIOS and go to the Display tab, then disable the Ecopower option.
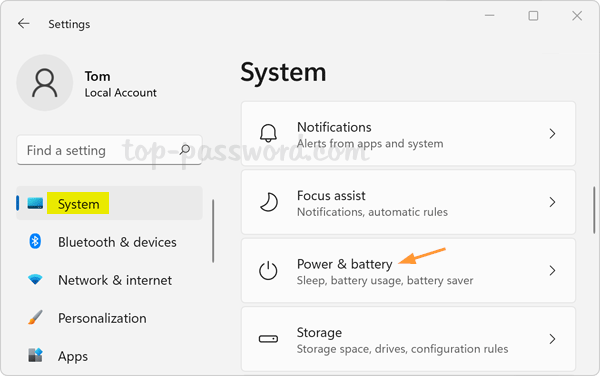
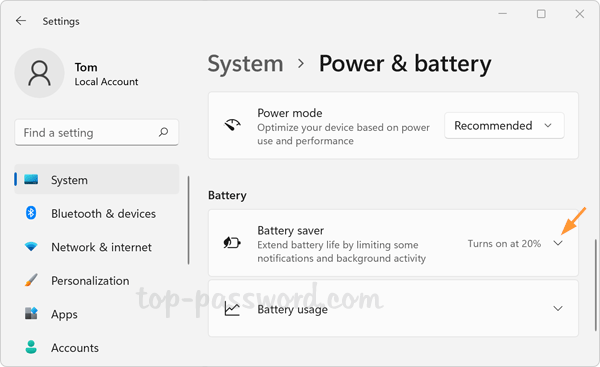
Part 2: Prevent Windows 11 from Decreasing Brightness While in Battery Saver
Press the Windows key + I together to launch the Settings app. With the System category selected on the left, click on Power & battery on the right.
Under the “Battery” section, Click the small arrow beside “Battery saver” to expand it.
Turn off the option “Lower screen brightness while using battery saver“.
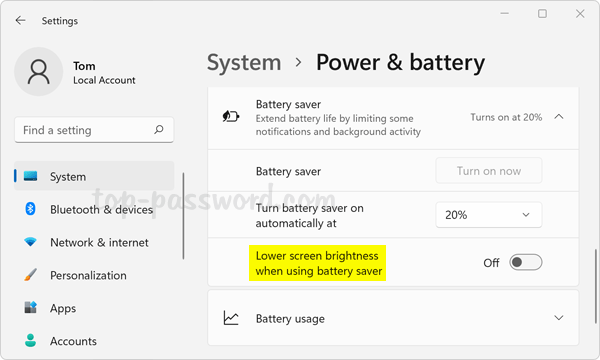
From now on, your computer will not automatically decrease the screen brightness while in battery saver.
- Previous Post: 5 Quick Ways to Open File Explorer in Windows 11
- Next Post: 2 Methods to Switch from Light Mode to Dark Mode in Windows 11
You are here:
Home » Windows 11 » 4 Ways To Disable Automatic Brightness In Windows 11
Is your Windows 11 computer constantly changing the screen brightness? Don’t want Windows 11 to automatically adjust the display brightness? This guide will tell you how to disable the adaptive or automatic screen brightness in Windows 11.

Why does Windows 11 automatically change the display brightness?
The ambient light sensor in your Windows 11 device measures the light surrounding your device and automatically adjusts the screen brightness. As you might know, this is not new. These days, all smartphones automatically adjust the screen brightness.
In addition to the ambient light sensor, your graphics driver or graphics support software might constantly change the screen brightness to save power and extend the battery life.
Why disable the automatic screen brightness feature?
A large percent of PC users like to manually adjust the screen brightness. Moreover, the screen brightness and contrast automatically set by the ambient light sensor or graphics software might not be ideal for many users.
Following are the four ways to disable the automatic screen brightness in Windows 11.
Tip: If you are on Windows 10, read our how to disable automatic screen brightness in Windows 10 guide.
Method 1 of 4
Disable automatic brightness via Settings app in Windows 11
Step 1: Open the Settings app. On the left side, click on System to open the System category page.
Step 2: Now, on the right side, click on Display to see the Display page.

Step 3: Click on Brightness to expand the same.

Step 4: Deselect the option labeled Help improve battery by optimizing the content shown and brightness option. That’s it!

If available, also turn off the Change brightness automatically when lighting changes option.
If one or none of the options are available on your PC, move to the next method.
NOTE: Needless to say that these options will not be visible when you have connected your device to an external monitor.
Method 2 of 4
Disable automatic brightness via Intel Graphics Command Center
NOTE: Use this method only if the Intel Graphics Command Center app is installed on your PC. If you have AMD graphics instead, refer to the directions in Method 3 (scroll down to see).
When turned on, the Intel Display Power Savings option saves the power and extends the battery life by decreasing the backlight intensity. When you disable this feature, the battery life might take a slight hit.
Step 1: Use the search functionality to open Intel Graphics Command Center app.
Step 2: On the left side, click on System. On the right side, click on the Power tab to switch to the same.

Step 3: Under the On battery section, turn off the Display Power Savings option and select the Maximum performance from the drop-down menu next to the Power Plans option.

Method 3 of 4
Disable automatic brightness via AMD Radeon Settings
Step 1: Open AMD Radeon Settings.
Step 2: Check if the Vari-Bright option is turned on. If yes, please turn off the same.
Method 4 of 4
Disable adaptive brightness in BIOS/UEFI settings
Many computers have the option to turn on/off the adaptive screen brightness in the BIOS/UEFI. If none of the methods mentioned above helped you turn off the auto-brightness, you can check if your PC has this option in the BIOS.
Step 1: Restart your computer and access BIOS/UEFI settings. The instructions to access BIOS/UEFI vary by manufacturer. So, search the web for instructions.
Step 2: Check each tab in the BIOS/UEFI settings for an option called Dynamic Backlight Control or Dynamic Brightness Control. Turn off the same.