
- Publication date
-
2005
- Topics
- Windows XP Royale Theme, Windows, XP, Royale, Theme, Windows XP, Desktop, Desktop Theme
- Language
- English
- Item Size
- 712.1K
The Theme that came with Windows XP Media Center Edition and Windows XP Tablet PC Edition 2005.
Extract the files to C:\WINDOWS\Resources\Themes\
- Addeddate
- 2019-03-26 04:30:33
- Identifier
- WindowsXPRoyaleTheme
- Identifier-ark
- ark:/13960/t85j5375r
- Scanner
- Internet Archive HTML5 Uploader 1.6.4
plus-circle Add Review
plus-circle Add Review
comment
Reviews
(7)
There are 7 reviews for this item. .
44,928
Views
85
Favorites
7
Reviews
DOWNLOAD OPTIONS
download 1 file
ITEM TILE download
download 1 file
PNG download
download 1 file
TORRENT download
download 1 file
ZIP download
download 9 Files
download 8 Original
SHOW ALL
IN COLLECTIONS
Windows Desktop Themes
Uploaded by
Brett34
on
Provide feedback
Saved searches
Use saved searches to filter your results more quickly
Sign up
Appearance settings
Windows XP Media Center Edition has a really pretty theme called Royale. This theme is absent from earlier versions such as XP Home Edition, which I use.
Happily, you can download the Royale theme and apply it to XP Home Edition.
I followed the How to Install Royale Theme for Winxp! video from YouTube and it worked but left out a lot of details. So I wrote this detailed step-by-step guide.
Download Royale
- Go to Royale Theme for WinXP — Official, from Softpedia.
- Click the “Softpedia Secure Download (US)” link.
- Save the file anywhere on your computer. The file is called
Royale_theme.zip.
Wait until the file has downloaded before continuing.
Install Royale
- Find the
Royale_theme.zipfile on your computer. - Open it. (Do not Extract it.)
- Run the
Royale Theme for XP.exeprogram. This launches the Royale — Installshield Wizard installer:- At the first page, make sure Save files in folder is set to
C:\WINDOWS. This is the default. Do not change it. This caught me out. - Click Next.
- The files are now being installed.
- Once installed, you’ll see the final page of the wizard.
- Click the Finish button.
- At the first page, make sure Save files in folder is set to
- The files are now installed but there’s more you need to do.
The files are installed to C:\WINDOWS\Resources\Themes. A new folder is created at C:\WINDOWS\Resources\Themes\Royale.
Applying Royale
- Right-click your desktop.
- Select the Properties item.
- This shows the Display Properties window.
- Open the Theme dropdown list by clicking on it.
- Select the Royale item. This list is not alphabetically ordered, which caught me out.
- Click the Apply button.
- A box in the middle of the screen will ask you to wait while the style is applied. Be patient.
- Once the box goes away, the theme has been applied. You’ll notice everything now looks different.
- Click the OK button. There may be another wait.
Congratulations! Royale is now your theme!
Fixing Menu Titles
You might some applications now have white boxes around some menu titles while others use a rough-looking 3D effect. This sometimes happens in the XP Home Edition themes, too. Happily, a fix is at the bottom of Royale Theme Problem — White Menu Bar Background.
Here is a more carefully written version of the fix:
- Right-click your desktop.
- Select the Properties item.
- This shows the Display Properties window.
- Select the Appearance tab by clicking on it.
- Open the Windows and buttons dropdown list by clicking on it.
- Select Windows Classic Style by clicking on it.
- Open the Windows and buttons dropdown list again.
- Select Windows Media Center Style by clicking on it.
- Click the Apply button.
- A box in the middle of the screen will ask you to wait while the style is applied. Be patient.
- Click the OK button. There may be another wait.
The menus now display correctly!
Choosing Desktop Background
The theme applies its own desktop background. I prefer a solid colour for my desktop. Here’s how to do that:
- Right-click your desktop.
- Select the Properties item.
- This shows the Display Properties window.
- Select the Desktop tab by clicking on it.
- In the Background list, scroll to the top.
- In the Background list, select the (None) item.
- Open the Color picker by clicking it.
- Select a colour:
- If you like the colour it is already showing, go to step 11.
- You can select one of the basic colours from the picker.
- Or, click the Other button to create your own colour:
- The Color window will be displayed.
- You can create a colour in several ways.
- The current colour is displayed in the Color|Solid box.
- Play around until you get a colour which looks nice.
- Click the OK button.
- You are returned to the Display Properties window.
- The Color picker shows the colour you chose.
- Click the Apply button.
- A box in the middle of the screen will ask you to wait while the style is applied. Be patient.
- Click the OK button. There may be another wait.
The background you selected is now applied.
Saving the Changes
If you made of the changes listed above, here’s how to save them. This lets you switch between themes more easily because your customisations have been saved.
- Right-click your desktop.
- Select the Properties item.
- This shows the Display Properties window.
- The Theme dropdown should say Royale (Modified).
- Click the Save As button.
- This displays the Save As window:
- Choose a folder to save your theme. My Documents is a sensible choice.
- Tye a name for the theme into the File name box. I suggest
Username Royale. - Click the Save button.
- You are returned to the Display Properties window.
- Click the OK button. There may be a wait.
Your theme changes are now saved!
Restoring Mouse Themes
Royale also set my pointer to use the old 2D white style. I prefer the silver 3D style.
Here’s how I put it back using the Classic Start menu and Classic View Control Panel:
- Open the Start menu.
- Click the Settings item and select Control Panel.
- The Control Panel window is shown.
- Double-click the Mouse item.
- The Mouse Properties window is shown.
- Select the Pointers tab by clicking on it.
- In the Scheme frame, open the dropdown list.
- Click a theme, such as 3D-White (system scheme).
- You will see a preview to the right of this frame. A list of previews is shown below, in the Customise list.
- If you don’t like how it looks, return to step 7.
- If you like it, press the OK button.
The new look for your mouse is now saved.
Restoring Custom Sounds
If you created a custom sound theme, I hope you saved it! Royale applies its own sound, so navigating around your computer and the web produces pointless “click” sounds.
Putting this right is simple using the Classic Start menu and Classic View Control Panel:
- Open the Start menu.
- Click the Settings item and select Control Panel.
- The Control Panel window is shown.
- Double-click the Sounds and Audio Devices item.
- The Sounds and Audio Devices Properties window is shown.
- Select the Sounds tab by clicking on it.
- Open the Sound Scheme dropdown list.
- Click a scheme. I had previously saved a Ben’s Sounds scheme, so I selected that.
- There is a Program Events list near the bottom of the window:
- Events which cause a sound will have a speaker icon displayed next to them.
- Select one of these items by clicking on it.
- The Sounds section at the bottom of the window becomes available.
- Click the Play sound button to hear what the sound is like. (This button is a black triangle pointing to the right, like a video player or a music centre.)
- To stop an event making a sound, open the Sounds dropdown list and select the (None) item at the top.
- The Browse button lets you select a sound from your computer.
- If you edited a scheme and want to save it:
- Click the Save As button.
- Enter a name of the scheme. To replace an existing scheme, use exactly the same name.
- When you are done, click the OK button.
Your sound scheme is now up and running. No more annoying clicks!
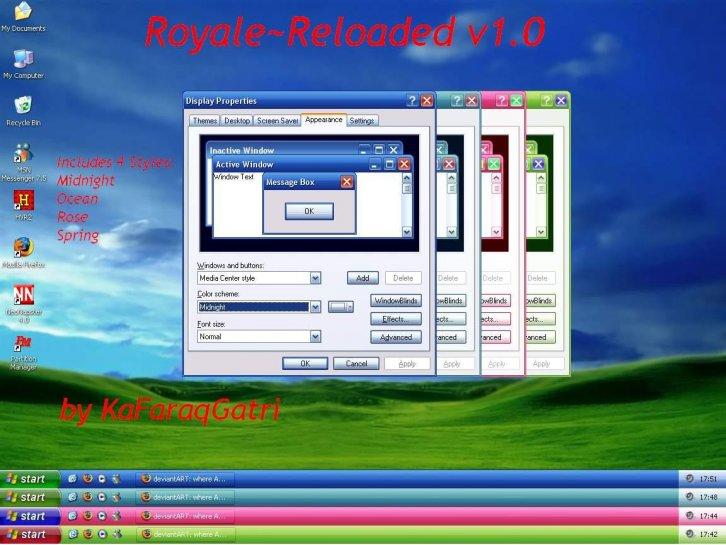
Если Вы любите самостоятельно настраивать оформление компьютера, то эта тема для Вас. Тема имеет 4 цветовые схемы. Разработчиком они были названы как «Полночь», «Океан», «Роза» и «Весна». Каждый подстиль имеет несколько цветов, которые создают общее красочное оформление. Особенностью этой темы является, то, что при смене цветового решения меняется и цвет кнопок – они получает оттенок одного из основных цветов.
Перед установкой на Windows XP темы «Royale-Reloaded», подробно читайте инструкцию, а неопытным пользователям рекомендуем создать ТОЧКУ ВОССТАНОВЛЕНИЯ. Обращаем Ваше внимание на тот факт, что для некоторых тем оформления потребуется отдельно скачивать иконки, курсоры и прочие дополнительные элементы интерфейса.
КАК СКАЧАТЬ с сайта
Change the aspect of your Windows for a more elegant one
Royale Remixed is a theme for Windows XP that allows you to change all aspects of the system giving it a visual style similar to Windows Vista. All the system bars transform from blue or grey to a really nice black.
The quality of this theme is enormous because there are very few details that have been left about how they were. Furthermore, Royale Remixed installs three color schemes for the design, Royale Noir, Royale Zune, and the original Royale. All of them, except Royale, have dark tones and small aesthetic variations.
Give XP an elegant touch
The Royale color scheme is very similar to the well-known Windows XP Media Center Edition but with certain differences regarding the mouse cursor and other details.
The theme is very easy to install, we’ll simply have to make sure that we launch the SP3 UxTheme Patcher, a kind of patch that allows us to use designs that haven’t been signed by Microsoft on Windows, after this, we’ll be able to install and select these themes from the visualization options.
So now you know, if you want to give your Windows XP an elegant touch, get hold of Royale Remixed.
Requirements and additional information:
- It’s necessary to have SP3 UxTheme Patcher to be able to install this theme and software compatible with RAR files.