
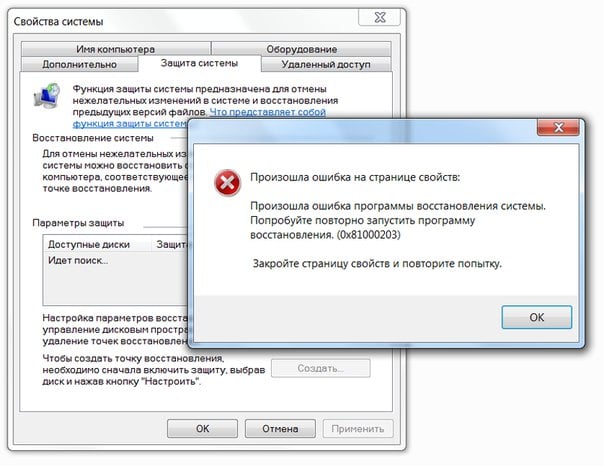
Некоторые пользователи Windows 10 сталкиваются с ошибкой 0x81000203 при выполнении восстановления. Данная ошибка может возникать из-за вмешательства стороннего программного обеспечения в работу Windows, из-за прекращения работы требуемых для восстановления служб и многое другое. Помимо прочего, эту ошибку также можно увидеть во время обновления Windows.
Не повезло и самим наткнуться на ошибку 0x81000203 на своем компьютере? Что же, тогда продолжайте читать, ведь сегодня мы покажем, как избавиться от этой ошибки и восстановить свою Windows без каких-либо проблем.
Избавляемся от ошибки 0x81000203
Решение №1 Перезапуск необходимых служб
Вам нужно убедиться, что службы, участвующие в процессе восстановления, работают в вашей системе. Подобная ошибка как раз возникает тогда, когда одна из необходимых служб не работает. Итак, нажмите на клавиатуре Windows+R, чтобы вызвать окошко «Выполнить». Пропишите в этой окошке значение services.msc и нажмите Enter.
Открыв перед собой список всех служб, найдите службу под названием «Теневое копирование тома» и дважды кликните на нее левой кнопкой мыши. Выставьте в ниспадающем меню типа запуска значение «Автоматически» и запустите службу, если в этом есть необходимость. Тоже самое проделайте со службами «Планировщик заданий» и «Программный поставщик теневого копирования (Microsoft)».
После перезагрузите компьютер и проверьте наличие ошибки 0x81000203.
Решение №2 Задействование Командной строки
Некоторым пользователям удалось избавиться от этой ошибки, выполнив в Командной строке определенный набор команд. Нажмите на клавиатуре Windows+X и выберите из списка пункт «Командная строка (администратор)». Далее выполните все следующие команды:
- reg delete “HKLM\\SOFTWARE\\Policies\\Microsoft\\Windows NT\\SystemRestore” /v “DisableSR” /f
- reg delete “HKLM\\SOFTWARE\\Policies\\Microsoft\\Windows NT\\SystemRestore” /v “DisableConfig” /f
- reg add “HKLM\\Software\\Microsoft\\Windows NT\\CurrentVersion\\SPP\\Clients” /v ” {09F7EDC5-294E-4180-AF6A-FB0E6A0E9513}” /t REG_MULTI_SZ /d “1” /f
- schtasks /Change /TN “Microsoft\\Windows\\SystemRestore\\SR” /Enable
- vssadmin Resize ShadowStorage /For=C: /On=C: /Maxsize=25GB
- sc config wbengine start= demand
- sc config swprv start= demand
- sc config vds start= demand
- sc config VSS start= demand
Перезагрузите свой компьютер и попробуйте провести восстановление Windows еще раз. Ошибка 0x81000203 могла исчезнуть.
Решение №3 Пересоздание репозитория WMI
Еще один метод, который помогает некоторым пользователям в борьбе с ошибкой 0x81000203. Для начала вам необходимо перейти в безопасный режим без поддержки сетевых драйверов, а затем открыть Командную строку.
Открыв Командую строку, пропишите в ней net stop winmgmt и нажмите Enter. Данное действие остановит работу службы «Инструментарий управления Windows». Далее перейдите в директорию C:\Windows\System32\wbem и переименуйте папку repository в repositoryold.
Перезагрузите свой компьютер и снова откройте перед собой Командную строку. Выполните в ней следующие две команды:
- net stop winmgmt
- winmgmt /resetRepository
Еще раз перезагрузите компьютер и проверьте, можете ли вы создать точку восстановления.
Решение №4 Удаление стороннего ПО
Время от времени программное обеспечение от стороннего производителя может мешать нормальной работе системы Windows. Мы рекомендуем поудалять со своего компьютера все действительно ненужные программы. В первую же очередь избавьтесь от всяких приложений, которые обещают, например, на 3000% ускорить работу компьютера. Потом снова попытайтесь восстановить Windows и проверьте наличие ошибки 0x81000203.
Решение №5 Восстановление системы в безопасном режиме
Также вы можете попробовать провести восстановление своей системы в безопасном режиме. В некоторых случаях процессу восстановления могут препятствовать даже системные драйвера или службы, но в безопасном режиме вам ничего не должно помешать.
Надеемся, что данная статья была полезна в решении ошибки 0x81000203.
Provide feedback
Saved searches
Use saved searches to filter your results more quickly
Sign up
Способ 1: Редактор локальных политик
Уведомление об отключении восстановления системы администратором обычно является прямым следствием отключения данной функции имеющим администраторские права пользователем либо сторонним программным обеспечением, чаще всего твикерами. В Windows 10 Pro и выше включить функцию восстановления можно в «Редакторе локальных групповых политик».
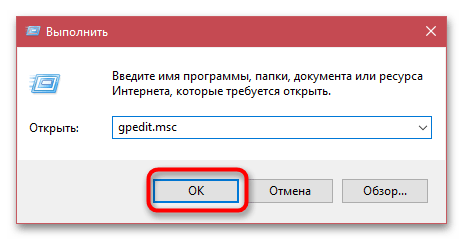
- Запустите «Редактор локальных групповых политик» командой
gpedit.msc, выполненной в окошке быстрого запуска, вызванного нажатием клавиш Win + R. - В левой колонке разверните ветку «Конфигурация компьютера» → «Административные шаблоны» → «Система» → «Восстановление системы» и откройте двойным кликом свойства политики «Отключить восстановление системы» в правой колонке.
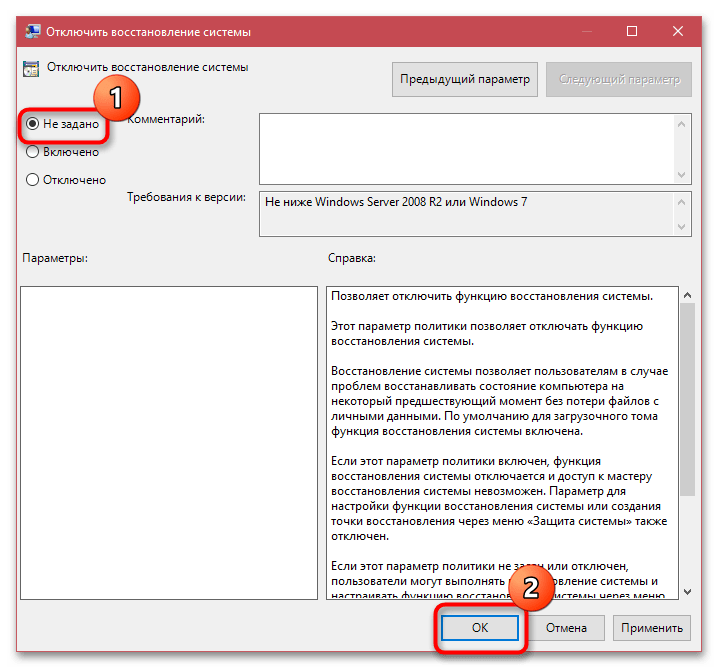
- Активируйте радиокнопку «Не задано» или «Отключено» и сохраните настройки.

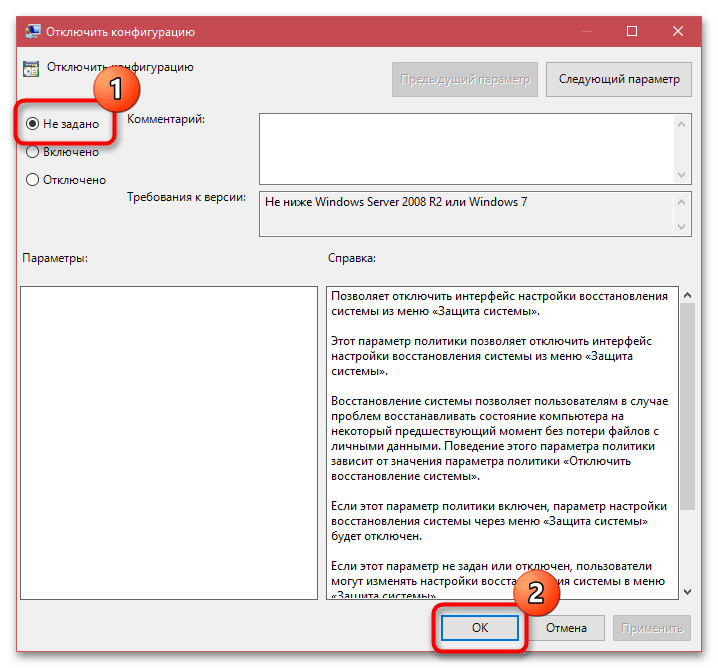
Обратите также внимание на политику «Отключить конфигурацию». Если она включена, точно так же установите для нее значение «Не задано» либо «Отключено».
Способ 2: Редактор реестра
В Windows 10 Home «Редактор локальных политик» по умолчанию отключен, поэтому для активации функции восстановления системы следует использовать «Редактор реестра».
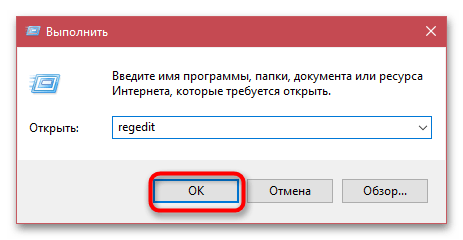
- Запустите «Редактор реестра» командой
regedit, выполненной в диалоговом окошке, открытом через Win + R. - В левой колонке разверните ветку
HKLM\SOFTWARE\Policies\Microsoft\Windows NT\SystemRestore. - В правой колонке кликните по параметру «DisableSR» и измените значение с «1» на «0». Если в правой колонке также присутствует параметр «DisableConfig» со значением «1», тоже измените его на «0». Как вариант, можно удалить параметры или весь подраздел «SystemRestore».

В случае применения твика реестра настройки вступят в силу после перезагрузки компьютера, в результате чего функция восстановления системы вновь станет доступной.
Наша группа в TelegramПолезные советы и помощь
-
my dear friend you can request moderator to remove the comment via clicking on report of your own comment u like to be removed with a concrete evidenced reason :
i mostly write «Out of Topic» as a reason & whenever i login again viola comment is removed.
-
I will always review additional info. But it will be more for purism than for real, additional effect.
Telemetry is already effectively disabled, and I left only what should be left (ie. device drivers update, root certificates update, time sync, digital license activation).
Some parts of the above (linked source) however are bad for me. Ie. I prefer my Toggle Windows Update script than disabling Windows Update forever.
Windows Update could be useful, not just for updating Windows, but also for other Microsoft software (Office, SQL Server, etc).
Toggle Windows Update does its job, so your OS will never be updated without your consent, but you can still temporary re-enable this function. -
I have been running 22H2 slimmet last 3 days and its still not activated, and found out that I cant activate office 2021 pro plus retail key on this slimmet version. Guess its time to quit and go back to LTSC 2021 again.
-
- May 11, 2011
- 988
- 3,126
- 30
Strange, because here everything is activated. See attached images.
-
I have the same problems with my second created ISO, the system is running since one or two weeks, still not activated! Windows Update is toggled on, but it tells me all the time, Activation Server unreachable!
The first ISO I created, self-activated within minutes.
Edit: I create today a new one and test it again…
-
I have now tested the newest version of this script.
Speed/feel of this Windows 10 reminds me of those first Insider versions of Win10(before Appx and other stuff). In my small test, every app I opened started immediately and this Windows was installed in VirtualBox.
I will probably test this with real hardware, just to feel the difference. I just have to decide which of these computers is good candidate for this.
-
- May 11, 2011
- 988
- 3,126
- 30
I used 19045.2364.221202-0057.22H2_RELEASE_SVC_PROD1_CLIENTPRO_OEMRET_X64FRE_PT-BR.ISO as source
renamed to Windows10_x64_19045.2486_PRO_VOL_EN-US.ISO so that the script recognizes it
and activation with MAS.Script tweaks:
— set DisableSearchIndexing=1
— set DisableSearchService=1
— set SplitInstallWim=0
— disabled (commented) «Disable MSHTA and WebView» (for Windows Post Install to run)
Only that!attachment used script
Attached Files:
-
Hi, would older games that run smoothly on Windows 7 be able to run just as smoothly in Slimdown10? For example, Command and Conquer Generals, Zero Hour, Civilization 5
-
@Sirmoya that depends on your hardware before anything else. Then come graphics APIs and general optimizations. Then you can think about whether a handful of extra services are causing your gaming performance to tank.
-
I have 2 big and 1 small problem after using this script.
Recommended settings.
1. I can’t connect via — ethernet — via cable.
The latest drivers are installed — they work perfectly on other systems — you don’t need to do anything.
Here they show connection — but no internet access.
After wi-fi it works — but it doesn’t interest me — after the cable I have 2x faster speed.
2. Bluetooth — does not work — it seems to show that everything works — but it does not search for devices — and displays an error.
3. Small — but a bit cosmetic — you can’t set the avatar from the system level.I was full of hope that this would be my main system — because otherwise you work great and it’s very fast.
But if I want to download more large files — I have to switch to another system — where I don’t have these problems.
Same if I want to watch a movie — with my bluetooth headphones — I have to switch to another system.
So for now this system has 2 major flaws that disqualify it. -
-
The changes look good.
But those of us who already have Windows 10 installed (I’m using it for the second day thanks to your script — version 1.24), how to add these innovations from the script (with all the listed points you wrote) to a currently installed Windows 10 without a new installation of Windows 10 is required (without the need to create a new iso file using the iso file script, then save the flash drive, install Windows 10, then install the necessary programs, drivers, specific settings?!)
My question is with Windows 10 installed how do we take advantage of the innovations at the points you wrote to get these innovations into our current installation?
-
In the new version, I can’t install the nvidia driver from the exe file.
The file is unpacked and the installer does not open.
Bluetooth still doesn’t work. -
1. Install March 2023 cumulative update (KB5023696) either manually or via Windows Update.
2. Copy Slimdown10\hotfixes\WindowsUpdate\Toggle_WindowsUpdate.cmd to your C:\Windows folder and replace the old version.
3. If your Windows Update is currently enabled, run Toggle Windows Update to disable it.
If your Windows Update is currently disabled, run Toggle Windows Update twice to re-disable it correctly.4. Import registry settings, by running these commands either manually or create a shell script (eg. tweaks.cmd)
REM ==== Disable pre-release features or settings ====
reg add "HKLM\SOFTWARE\Policies\Microsoft\Windows\PreviewBuilds" /v "EnableConfigFlighting" /t REG_DWORD /d 0 /f
reg add "HKLM\SOFTWARE\Policies\Microsoft\Windows\PreviewBuilds" /v "EnableExperimentation" /t REG_DWORD /d 0 /f

REM ==== Disable Windows Error Reporting logs ====
reg add "HKLM\SOFTWARE\Policies\Microsoft\Windows\Windows Error Reporting" /v "LoggingDisabled" /t REG_DWORD /d 1 /f

REM ==== Disable IE11 proxy autodetection ====
reg add "HKCU\Software\Microsoft\Windows\CurrentVersion\Internet Settings\Connections" /v "DefaultConnectionSettings" /t REG_BINARY /d "3c0000000f0000000100000000000000090000003132372e302e302e3100000000010000000000000010d75bde6f11c50101000000c23f806f0000000000000000" /f
reg add "HKCU\Software\Microsoft\Windows\CurrentVersion\Internet Settings\Connections" /v "SavedLegacySettings" /t REG_BINARY /d "3c000000040000000100000000000000090000003132372e302e302e3100000000010000000000000010d75bde6f11c50101000000c23f806f0000000000000000" /f

REM ==== Explorer Tweaks
reg add "HKCU\SOFTWARE\Microsoft\Windows\CurrentVersion\Policies\Explorer" /v "ClearRecentDocsOnExit" /t REG_DWORD /d 1 /f
reg add "HKCU\SOFTWARE\Microsoft\Windows\CurrentVersion\Policies\Explorer" /v "NoResolveTrack" /t REG_DWORD /d 1 /f
reg add "HKCU\SOFTWARE\Microsoft\Windows\CurrentVersion\Policies\Explorer" /v "NoResolveSearch" /t REG_DWORD /d 1 /f

REM === Do not send KMS activation state to Microsoft ===
reg add "HKLM\SOFTWARE\Policies\Microsoft\Windows NT\CurrentVersion\Software Protection Platform" /v "NoGenTicket" /t REG_DWORD /d 1 /f

REM === Additional OneDrive privacy setting ====
reg add "HKLM\SOFTWARE\Policies\Microsoft\OneDrive" /v "PreventNetworkTrafficPreUserSignIn" /t REG_DWORD /d 1 /f

REM === Disable Windows Defender SmartScreen far all IE11 security zones ===
reg add "HKLM\SOFTWARE\Policies\Microsoft\Windows\CurrentVersion\Internet Settings\Zones\0" /v "2301" /t REG_DWORD /d "3" /f
reg add "HKLM\SOFTWARE\Policies\Microsoft\Windows\CurrentVersion\Internet Settings\Zones\1" /v "2301" /t REG_DWORD /d "3" /f
reg add "HKLM\SOFTWARE\Policies\Microsoft\Windows\CurrentVersion\Internet Settings\Zones\2" /v "2301" /t REG_DWORD /d "3" /f
reg add "HKLM\SOFTWARE\Policies\Microsoft\Windows\CurrentVersion\Internet Settings\Zones\3" /v "2301" /t REG_DWORD /d "3" /f
reg add "HKLM\SOFTWARE\Policies\Microsoft\Windows\CurrentVersion\Internet Settings\Zones\4" /v "2301" /t REG_DWORD /d "3" /f

REM === Disable autocorrection ====
reg add "HKCU\SOFTWARE\Microsoft\Input\Settings" /v "EnableHwkbTextPrediction" /t REG_DWORD /d 0 /f
reg add "HKCU\SOFTWARE\Microsoft\Input\Settings" /v "EnableHwkbAutocorrection2" /t REG_DWORD /d 0 /f
reg add "HKCU\SOFTWARE\Microsoft\Input\Settings" /v "InsightsEnabled" /t REG_DWORD /d 0 /f
reg add "HKCU\SOFTWARE\Microsoft\Input\Settings" /v "MultilingualEnabled" /t REG_DWORD /d 0 /f
reg add "HKCU\SOFTWARE\Policies\Microsoft\Control Panel\International" /v "TurnOffAutocorrectMisspelledWords" /t REG_DWORD /d 1 /f
reg add "HKCU\SOFTWARE\Policies\Microsoft\Control Panel\International" /v "TurnOffHighlightMisspelledWords" /t REG_DWORD /d 1 /f
reg add "HKCU\SOFTWARE\Policies\Microsoft\Control Panel\International" /v "TurnOffInsertSpace" /t REG_DWORD /d 1 /f
reg add "HKCU\SOFTWARE\Policies\Microsoft\Control Panel\International" /v "TurnOffOfferTextPredictions" /t REG_DWORD /d 1 /f

REM ==== Disable Dr Watson ====
reg add "HKLM\SOFTWARE\Microsoft\Windows NT\CurrentVersion\AeDebug" /v "Auto" /t REG_SZ /d "0" /f
if exist "%windir%\SysWOW64" reg add "HKLM\SOFTWARE\Wow6432Node\Microsoft\Windows NT\CurrentVersion\AeDebug" /v "Auto" /t REG_SZ /d "0" /f

REM ==== Additional IE11 settings ====
reg add "HKCU\Software\Microsoft\Internet Explorer\Main" /v "Disable Script Debugger" /t REG_SZ /d "yes" /f
reg add "HKCU\Software\Microsoft\Internet Explorer\Main" /v "Show image placeholders" /t REG_DWORD /d 0 /f
reg add "HKCU\Software\Microsoft\Internet Explorer\Main" /v "Enable AutoImageResize" /t REG_SZ /d "no" /f
reg add "HKCU\Software\Microsoft\Internet Explorer\Main" /v "NotifyDownloadComplete" /t REG_SZ /d "no" /f
reg add "HKCU\Software\Microsoft\Internet Explorer\Download" /v "CheckExeSignatures" /t REG_SZ /d "no" /f
reg add "HKCU\Software\Microsoft\Internet Explorer\Download" /v "RunInvalidSignatures" /t REG_DWORD /d 1 /f
reg add "HKCU\Software\Microsoft\Internet Explorer\Main\FeatureControl\FEATURE_LOCALMACHINE_LOCKDOWN" /v "iexplore.exe" /t REG_DWORD /d 0 /f
reg add "HKCU\Software\Microsoft\Internet Explorer\Main\FeatureControl\FEATURE_LOCALMACHINE_LOCKDOWN\Settings" /v "LOCALMACHINE_CD_UNLOCK" /t REG_DWORD /d 1 /f
reg add "HKCU\Software\Microsoft\Windows\CurrentVersion\Internet Settings" /v "EnableNegotiate" /t REG_DWORD /d 0 /f
reg add "HKCU\Software\Microsoft\Windows\CurrentVersion\Internet Settings" /v "EmailName" /t REG_SZ /d "[email protected]" /f
reg add "HKCU\Software\Microsoft\Windows\CurrentVersion\Internet Settings" /v "MigrateProxy" /t REG_DWORD /d 1 /f
reg add "HKCU\Software\Microsoft\Windows\CurrentVersion\Internet Settings" /v "ProxyEnable" /t REG_DWORD /d 0 /f
reg add "HKCU\Software\Microsoft\Windows\CurrentVersion\Internet Settings" /v "PrivDiscUiShown" /t REG_DWORD /d 1 /f
reg add "HKCU\Software\Microsoft\Windows\CurrentVersion\Internet Settings" /v "WarnOnPost" /t REG_BINARY /d 00000000 /f
reg add "HKCU\Software\Microsoft\Windows\CurrentVersion\Internet Settings" /v "WarnOnZoneCrossing" /t REG_DWORD /d 0 /f
-
Which file exactly ? Give me more details so I could reproduce.
Your Bluetooth issues are caused by this line inside Slimdown10.cmd file:set "DisableServices=%DisableServices%,CDPSvc,CDPUserSvc,NcbService"
Solutions:
1. Remove above line from Slimdown10.cmd when building ISO.
2. Use Devices and Printers in Control Panel to pair new bluetooth devices instead of Settings UWP app.
It will work regardless of CDPSvc, CDPUserSvc and NcbService services.3. Run below commands to restore services startup settings and reboot your system:
reg add "HKLM\SYSTEM\CurrentControlSet\Services\CDPSvc" /v "Start" /t REG_DWORD /d "2" /f
reg add "HKLM\SYSTEM\CurrentControlSet\Services\CDPUserSvc" /v "Start" /t REG_DWORD /d "2" /f
reg add "HKLM\SYSTEM\CurrentControlSet\Services\NcbService" /v "Start" /t REG_DWORD /d "3" /f
-
It is not powershell script. I have not used powershell anywhere.
Use classic Command Prompt (ie. cmd.exe) not powershell.reg delete "HKLM\SOFTWARE\Policies\Microsoft\Windows NT\SystemRestore" /v "DisableSR" /f reg delete "HKLM\SOFTWARE\Policies\Microsoft\Windows NT\SystemRestore" /v "DisableConfig" /f
-
I did it via Command prompt.
I’m still new and it’s clear to me that I need to ask more to know exactly what and where to do.
When trying to manually download through Windows update it showed an error saying it couldn’t connect — I didn’t take a picture because it’s in another language and you wouldn’t understand. But for myself, I understand that even if I activate Windows update — nothing downloads and an error occurs, regardless of retry or more attempts.
Thanks.
-
Have you used the new version of Toggle Windows Update tool and is your Windows Update in enabled state ?
Have you rebooted your system ?
I have checked it on Win10 22H2 and Windows Update works correctly.

Auto Mode – and defaults…
- Start – Runs all checked options in sequence, avoiding as many prompts as possible that you would otherwise have when running an item individually.
- You can re-order the sequence the options appear and execute in by using the UP / DN buttons.
- Save Profile – saves the checked sequence as a profile which can be loaded with the drop down box on the right.
- Reboot on Auto Mode Finish – this option of course restarts Windows when Auto Mode has completed.
Windows Repair
- Remove Policies – This deletes all registry values relating to Windows group policy settings – often used by malware. In a domain environment, this is safe to use, but on a subsequent login you may want to do a gpupdate /force to refresh all policies on the computer that are *supposed* to be there.
- Windows Update Services – Attempts to repair the Automatic Updates and BITS services for Windows Update to function properly. Performs the following operations:
- Stops WUAUSERV and BITS services
- Deletes the following files: (the paths below reflect WinXP, which slightly differs in Vista/7 but d7 compensates of course)
- %allusersprofile%\Application Data\Microsoft\Network\Downloader\qmgr0.dat
- %allusersprofile%\Application Data\Microsoft\Network\Downloader\qmgr1.dat
- On WinXP, performs these commands:
- rundll32.exe setupapi.dll,InstallHinfSection DefaultInstall 132 C:WINDOWS\inf\au.inf
- rundll32.exe setupapi.dll,InstallHinfSection DefaultInstall 132 C:WINDOWS\inf\qmgr.inf
- Deletes directory %windir%\SoftwareDistribution
- Registers the following files:
- wuapi.dll
- wuaueng.dll
- atl.dll
- wucltui.dll
- wups.dll
- NOTE: TONS MORE .DLL files have been added to the regsvr32 list, too many to list here!!!
- Restarts the BITS and WUAUSERV services
- WMI/WMEB/DCOM – Performs the following operations:
- Stops WinMgmt service
- Runs %windir%\system32\wbem\winmgmt.exe /kill
- Deletes %windir%\system32\wbem\repository
- Registers all WBEM DLLs and EXEs in the %windir%\system32\wbem directory
- On Vista/7, runs %windir%\system32\wbem\winmgmt /salvagerepository
- On XP, runs %windir%\system32\rundll32.exe wbemupgd, UpgradeRepository
- On XP, reinstalls WBEM via this command: %windir%\system32\rundll32.exe setupapi,InstallHinfSection WBEM 132 %windir%\inf\wbemoc.inf
- Restarts the WinMgmt service
- Safe Mode Services – Rebuilds/rewrites the list of services in the registry that should start in safe mode.
- Security Center – Repairs Windows Security Center by re-writing the appropriate registry values, setting permissions, and ensuring the service can start.
- Windows Defender – Repairs Windows Defender on Vista/7 by re-writing the appropriate registry values, setting permissions, and ensuring the service can start.
- System Restore – Performs the following functions:
- Deletes reg value DisableConfig in HKLM\SOFTWARE\Policies\Microsoft\Windows NT\SystemRestore
- Deletes reg value DisableSR in HKLM\SOFTWARE\Policies\Microsoft\Windows NT\SystemRestore
- (On WinXP) – %windir%\system32\rundll32.exe setupapi.dll,InstallHinfSection DefaultInstall 132 C:WINDOWS\inf\sr.inf
- Installer Service – Repairs the Windows Installer service blasting it with a number of fixes such as re-writing registry keys, assigning the appropriate permissions to registry keys and files, and re-registering related .DLL files.
- Fix Shell Execute – Import default values for the shell to launch EXE, COM, BAT, CMD, SCR, and REG files. These locations in the registry are HKCR\xxx\Shell\Open\Command where xxx = exefile, comfile, etc.
- Rebuild Icon Cache – Attempts to fix issues with icons by rebuilding the icon cache. Attempts to refresh icons after this, however refreshing icons doesn’t always work properly, so a reboot or logoff/on may be required for the full effect.
- Clear Print Spooler – Deletes everything inside the print spooler, clearing out past print jobs, and restarts the spooler service.
- Fix Device Manager – This option fixes Device Manager’s Non-Plug and Play category when missing due by re-writing the appropriate registry keys. Often these keys are deleted by malware.
- Repair Permissions – Set default permissions on Windows directories and registry keys by running these commands:
- Uses subinacl.exe to repair permissions. This is a LONG process. Old code below was removed for Vista/7 due to Microsoft recommendation to no longer use those methods on modern versions of Windows.
- OLD CODE – secedit /analyze /db %windir%\sectest.db /cfg %windir%\inf\defltwk.inf /log %windir%\security\logs\secanalyze.log
- OLD CODE – secedit /configure /db %windir%\sectest.db /cfg %windir%\inf\defltwk.inf /log %windir%security\logs\secrepair.log
- OLD CODE – secedit /configure /cfg %windir%\repairsecsetup.inf /db secsetup.sdb /verbose
- Uses subinacl.exe to repair permissions. This is a LONG process. Old code below was removed for Vista/7 due to Microsoft recommendation to no longer use those methods on modern versions of Windows.
- RegSvr32 IE8 DLLs – Attempts to repair misc issues with IE8 by re-registering all associated DLL files. May also work with other versions of Internet Explorer.
- RegSvr32 ALL DLLs – This will re-register ALL .DLL and .OCX files in your Windows\System32 (and SysWow64 on 64bit OSes) – use this as a last ditch effort to repair issues.
- Caveats: This is a brute force approach, registering all DLL/OCX files with regsvr32.exe and the /s (silent) parameter. Some DLL files however will fail to register this way and require special parameters such as /I, /I:A, etc. and registering them without these parameters may actually corrupt the registration. There are several WMI and Internet Explorer related DLLs which require special parameters, so it’s a best practice that AFTER running this repair, you also then run the Regsvr32 IE8 DLLs (doesn’t really matter the IE version from 8 and up) and the WMI/WBEM/DCOM repairs. This will then properly register the files associated with WMI and IE in case damage was caused by this function.
- System File Checker – Does different things depending on the OS.
- On Windows XP, performs the following commands.
- sfc /purgecache
- sfc /scannow
- On Vista/7 – launches the SFC wrapper form, enabling you to customize SFC parameters to scan only or scan and repair, scan only one file or all files, and scan online AND OFFLINE Windows installations. During Auto Mode, only the full sfc /scannow is run.
- On Windows XP, performs the following commands.
Networking
- Examine Hosts File – Brings up d7’s Hosts file window, allowing examination of the hosts file. Optionally you can replace it with a default hosts file, or with a custom hosts file of your own (when located in 3rd Party Tools dir.)
- Clear Proxy Settings – Now works with Firefox!
- Release / Renew IP – Performs the following commands:
- ipconfig /release all
- ipconfig /renew all
- Reset Networking Interfaces – Performs the following commands:
- Deletes/Recreates Winsock registry keys on Windows XP.
- netsh winsock reset
- netsh winsock reset catalog
- netsh interface ip reset c:int-resetlog.txt
- netsh interface reset all
- netsh interface ip delete arpcache
- ipconfig /flushdns
- ipconfig /registerdns
- ipconfig /release all
- ipconfig /renew all
- Repair Windows Firewall – Performs the following commands:
- %windir%\system32\rundll32.exe setupapi.dll,InstallHinfSection Ndi-Steelhead 132 %windir%\inf\netrass.inf
- Reset Windows Firewall – Resets all firewall settings to defaults.
- Deletes registry key HKLM\SOFTWARE\Policies\Microsoft\WindowsFirewall
- netsh firewall reset
- MS FixIt for Winsock – This is a FixIt from Microsoft that is supposed to fix issues with the Winsock. It works on all platforms.
Windows Installer
- Download 4.5 – This downloads the latest version of the Windows Installer service for reinstall.
- (x64 only) Error 1719 Fix – This is for Windows installer error 1719 that appears in the event logs on x64 based systems when trying to install certain applications. The fix basically writes a DWORD 0 to the registry value WOW64, in the location HKLM\SYSTEM\CurrentControlSet\Services\MSIServer. Running the fix a second time will undo the fix, writing back a 1 as the value.
Adobe Flash
- Repair Adobe Flash –
- Attempts to repair permissions on all keys related to Flash, so it can install and/or function properly.
- There is a flag in the registry that can disable Flash from working inside IE, whether it is installed properly or not. This attempts to remove the restriction, by deleting the following registry key: HKLM\SOFTWARE\Microsoft\Internet Explorer\ActiveX Compatibility\{D27CDB6E-AE6D-11CF-96B8-444553540000}
Misc
- FixAMD – This function disables IntelPPM Driver. This preventative fix is for Blue Screens related to the intel power management service after swapping an Intel to an AMD platform motherboard, or installing XP SP3 on an AMD based PC with Intel PPM service enabled.
- Disable SAV Uninst PW – Attempts to disable the password prompt when uninstalling Symantec Anti-Virus Corporate.
- Optical Drive Filters (Open in Regedit) – Opens in regedit the location where you can modify optical drive filters, of course. That is: HKLM\SYSTEM\CurrentControlSet\Control\Class\{4D36E965-E325-11CE-BFC1-08002BE10318}
Removed – Options removed because they exist elsewhere in d7:
- PIO/DMA Mode Fix – A fix that is also run if you click on the PIO mode alert on the info tab, this fix attempts to reset the counters on all storage devices on the system which determine what mode Windows places the device in (e.g. PIO or DMA modes). The idea is that over time, especially optical drives when dealing with bad disks and there are a lot of read/write attempts and errors, Windows lowers the DMA level of the device – the more time and errors, the lower the level until eventually the device is put in PIO mode. This fix attempts to resolve this condition.
- Deletes the following registry values in HKLM\SYSTEM\CurrentControlSet\Control\Class\{4D36E96A-E325-11CE-BFC1-08002BE10318} for EACH child device when the MasterDeviceTimingMode value is set to 0:
- MasterIdDataChecksum
- SlaveIdDataChecksum
- MasterDeviceTimingModeAllowed
- UserMasterDeviceTimingModeAllowed
- SlaveDeviceTimingModeAllowed
- UserSlaveDeviceTimingModeAllowed
- Also under the same conditions, writes a value of 1 to the ResetErrorCountersOnSuccess value.
- NOTE that performing this fix on a system that doesn’t need it, will cause NO ADVERSE BEHAVIOR. So go ahead and do it anyway!
- Deletes the following registry values in HKLM\SYSTEM\CurrentControlSet\Control\Class\{4D36E96A-E325-11CE-BFC1-08002BE10318} for EACH child device when the MasterDeviceTimingMode value is set to 0: