
UUID: Windows-10
Last edited:
10 months ago
2024-07-03, 13:09
Last commit: [deb84404] Remove unnecessary permissions and update scripts (#813)
Simple theme to emulate Win10 on your Cinnamon machine.
Windows 10 theme for Cinnamon
GTK theme based on the appearance of Win32 apps on the Windows 10 platform using the default color scheme. There is also a dark version available.
Preview
Upstream Maintainer : Elbullazul
Upstream Repo : B00merang Theming
Cinnamon Spices Maintainer : Smurphos
Supported platforms
- Cinnamon
- Gnome
- LXDE/Openbox
- MATE
- Xfce
Manual installation
Go to releases, download the latest .zip file and extract it to the themes directory i.e. /home/USERNAME/.themes
Пользователей, недавно сменивших Windows на Linux, порой мучает ностальгия по привычному интерфейсу. Да и тем, чей компьютер в течение долгих работает под управлением Linux Mint, может стать интересно превратить её в другую ОС, по крайней мере визуально.
Специально для таких случаев были созданы темы, имитирующие интерфейс других операционных систем, в частности Microsoft Windows. Наиболее популярные из них — темы Windows XP, 7 и 10.
Содержание статьи
- Темы Windows для Linux Mint
- Меню Windows в Linux Mint
- Выводы
1. Windows XP
Эта тема относится к стандартным темам Linux Mint. Установить её можно, открыв путь: Меню → Параметры → Темы → Добавить/Удалить. В списке тем она называется Mint-XP.
В сравнении с темами Windows 7 и Windows 10 тема Windows XP Linux Mint выглядит наиболее приближённо к оригиналу. Во многом такой эффект достигается за счёт хорошей прорисовки панели задач и подбора цветовой схемы. Если дополнить тему обоями, по умолчанию использовавшимися в Windows XP, внешний вид рабочего стола Linux Mint мало чем будет отличаться от его аналога в Windows.
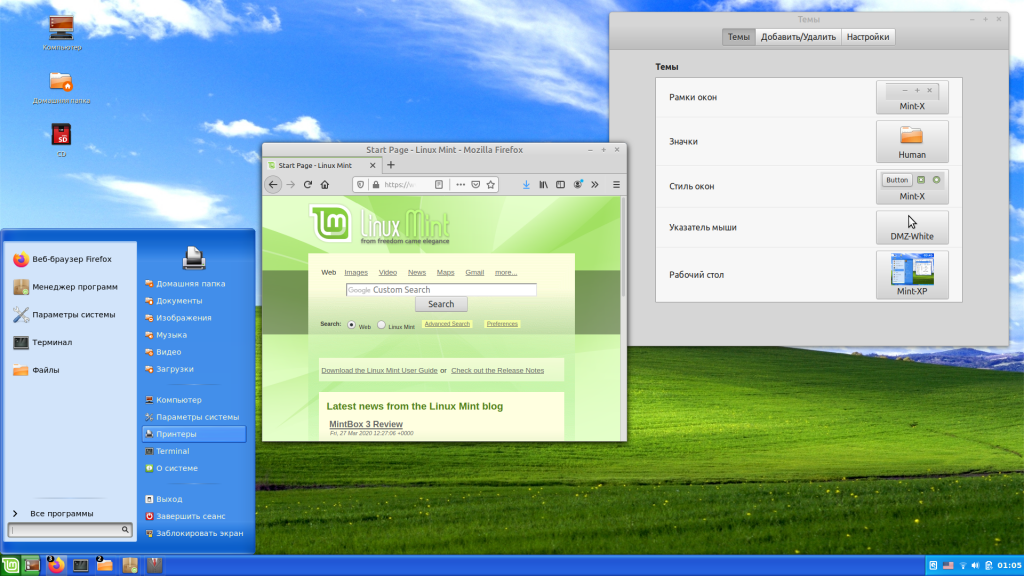
Впрочем, у пользователей Linux Mint Cinnamon 19.3 могут возникнуть проблемы с установкой обоев — предложенный автором темы стиль окон блокирует любые попытки сменить фон. Чтобы решить эту проблему, следует вместо стиля окон Mint-XP выбрать один из стандартных.
2. Windows 7
Тему Windows 7 для Linux пытались создать многие дизайнеры. Наилучшей схожести с прототипом удалось добиться команде B00merang-Project. Особой похвалы заслуживают рамки окон.
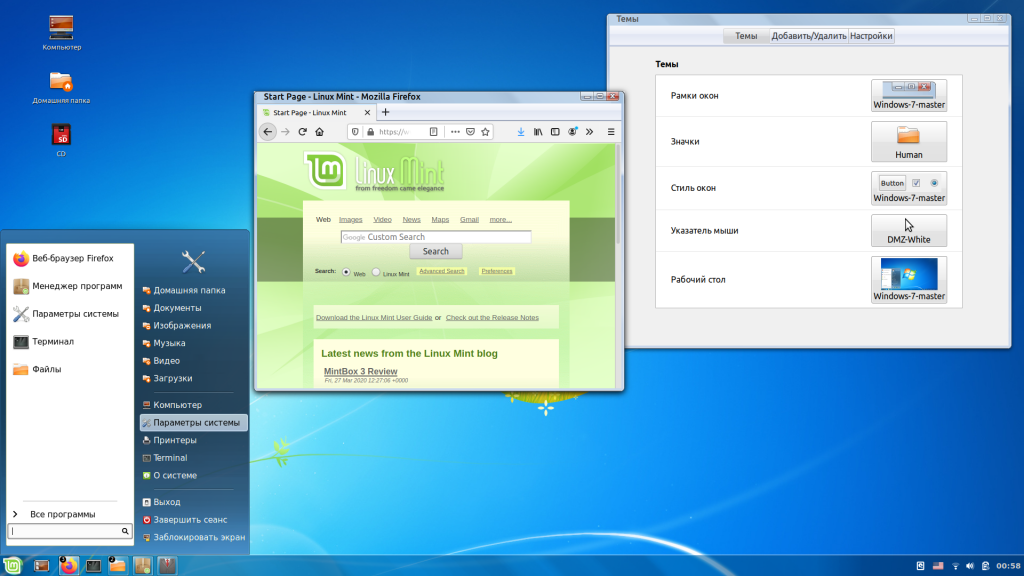
К сожалению, в перечне стандартных эта тема отсутствует. Windows 7 тема Linux Mint доступна для загрузки по ссылке. Полученный архив следует распаковать, а его содержимое переместить в папку /home/USERNAME/.themes.
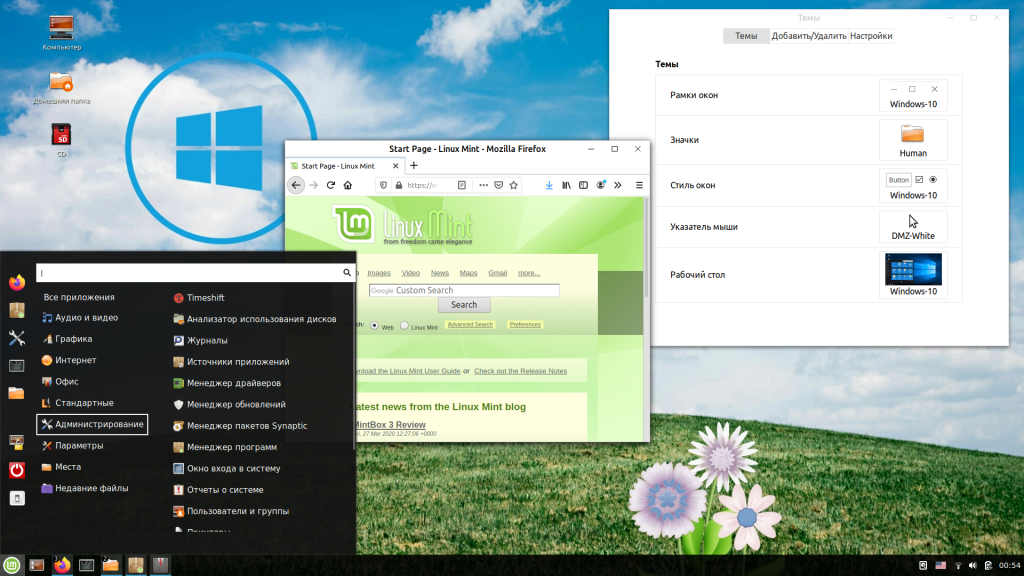
3. Windows 10
В списке стандартных тем присутствует также тема windows linux mint под названием Windows 10 Light Theme. Почему она так называется понять сложно. Оформление основных элементов интерфейса имеет мало общего с оригинальным дизайном Windows 10.
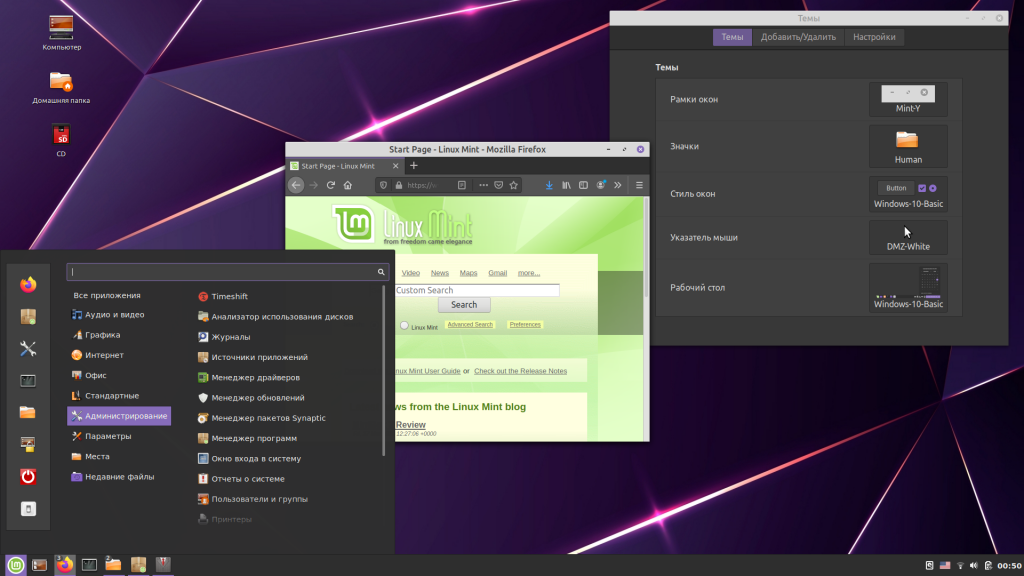
Пользователям, желающим придать своему рабочему столу схожесть с MS Windows 10, стоит обратить внимание на тему от уже упомянутого B00merang-Project. Она тоже неидеальна, но это лучшее, что имеется на данный момент (ссылка).
Меню Windows в Linux Mint
Даже если установить в Linux Mint Cinnamon тему Windows, меню останется прежним. Это не критично для Windows 10, а вот для Windows XP и Windows 7 желательно приблизить вид меню к оригинальному путём замены апплета Меню на CinnVIIStark Меню.
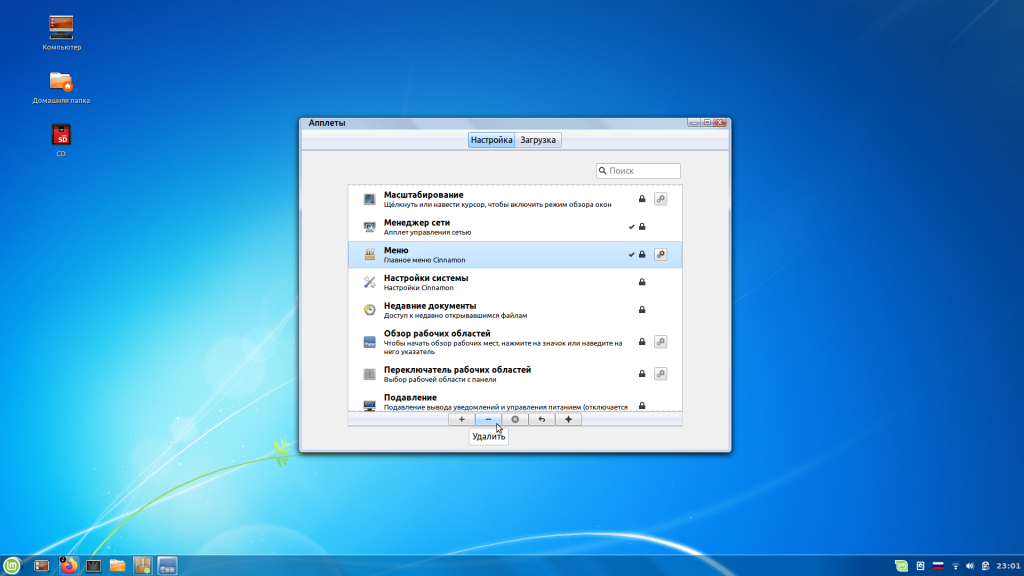
Сделать это несложно — достаточно навести курсор на Панель задач, щёлкнуть правой кнопкой и выбрать пункт Апплеты. На вкладке Настройка найти в списке строку-пункт Меню и выделить её, щёлкнув на нем левой кнопкой. Затем удалить эту строку-пункт Меню, воспользовавшись кнопкой «—» внизу. После этого перейти на вкладку Загрузка, найти в списке CinnVIIStark Меню и нажать на стрелку справа от названия.
Когда апплет загрузится, вернуться на вкладку Настройка, отыскать в списке CinnVIIStark Меню и выделить его, щёлкнув левой кнопкой мыши на названии. Далее добавить этот апплет, нажав на «+» внизу.
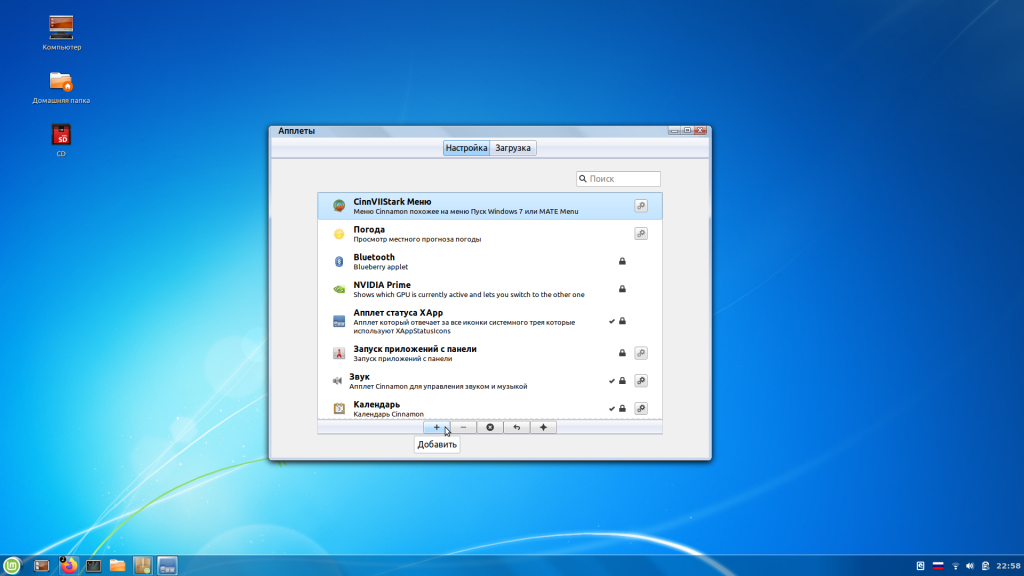
Если на Панели задач появился значок нового меню, значит, всё сделано правильно. Останется только переместить его на его привычное место — в левый угол. Для этого следует навести курсор на Панель задач, щёлкнуть правой кнопкой и включить режим редактирования панели. Потом захватить мышкой значок меню, перетащить туда, где ему положено быть, и выключить режим редактирования панели.
Выводы
Сымитировать интерфейс Windows в операционной системе Linux Mint Cinnamon гораздо проще, чем кажется большинству пользователей. В этой статье мы собрали три лучшие темы Windows Linux Mint. Если у вас остались вопросы об установке тем, задавайте их в комментариях.
Статья распространяется под лицензией Creative Commons ShareAlike 4.0 при копировании материала ссылка на источник обязательна.
Об авторе
Больше восьми лет назад мною было принято решение объявить бойкот оконной монополии и установить на свой компьютер Ubuntu. С тех пор это моя основная ОС. Иногда в порядке эксперимента «подселяю» к ней собратьев из семьи Linux. Увлекаюсь фотографией и горным туризмом. В свободное от работы время пишу статьи для losst.ru.
В данной инструкции приведены возможности изменения темы оформления, значков и курсора Windows 10 в дистрибутивах Linux/Ubuntu.
В основном это нужно тем пользователям, которые не так давно перешли на Linux и хотели бы иметь рабочий стол похожий на привычный Windows.
Хочу сразу оговориться, что за мою более чем семилетнюю практику в Linux, я перепробовал множество дистрибутивов и пришёл к выводу, что лучше всего использовать тот интерфейс дистрибутива, который установлен по умолчанию, т. к. он лучше всего отточен разработчиками.
Но не буду никого осуждать или отговаривать от преобразования своего рабочего места, как говорится, каждый выбирает свою рубашку, которая ближе к его телу.)
Итак, приступим.
Примечание. Все действия по установке будут происходить в терминале с копированием и выполнением соответствующих команд. Поэтому в дальнейшем я не буду каждый раз повторять, что нужно открыть терминал для выполнения команд.
1. Установка тем оформления приложений Windows.10.
Выполните следующие команды, выбрав для своей системы 32 или 64-bit:
Для систем 32-bit:
cd /tmp; wget https://github.com/Elbullazul/Windows-10/releases/download/v0.9.6/windows-10-tp_0.9-6.i386.deb; sudo dpkg -i windows-10-tp_0.9-6.i386.deb
Для систем 64-bit:
cd /tmp; wget https://github.com/Elbullazul/Windows-10/releases/download/v0.9.6/windows-10-tp_0.9-6.amd64.deb; sudo dpkg -i windows-10-tp_0.9-6.amd64.deb
А также необходимо установить пакет gtk2-engines-murrine, иначе все окна приложений будут выглядеть как в Windows 95.
sudo apt-get install gtk2-engines-murrine
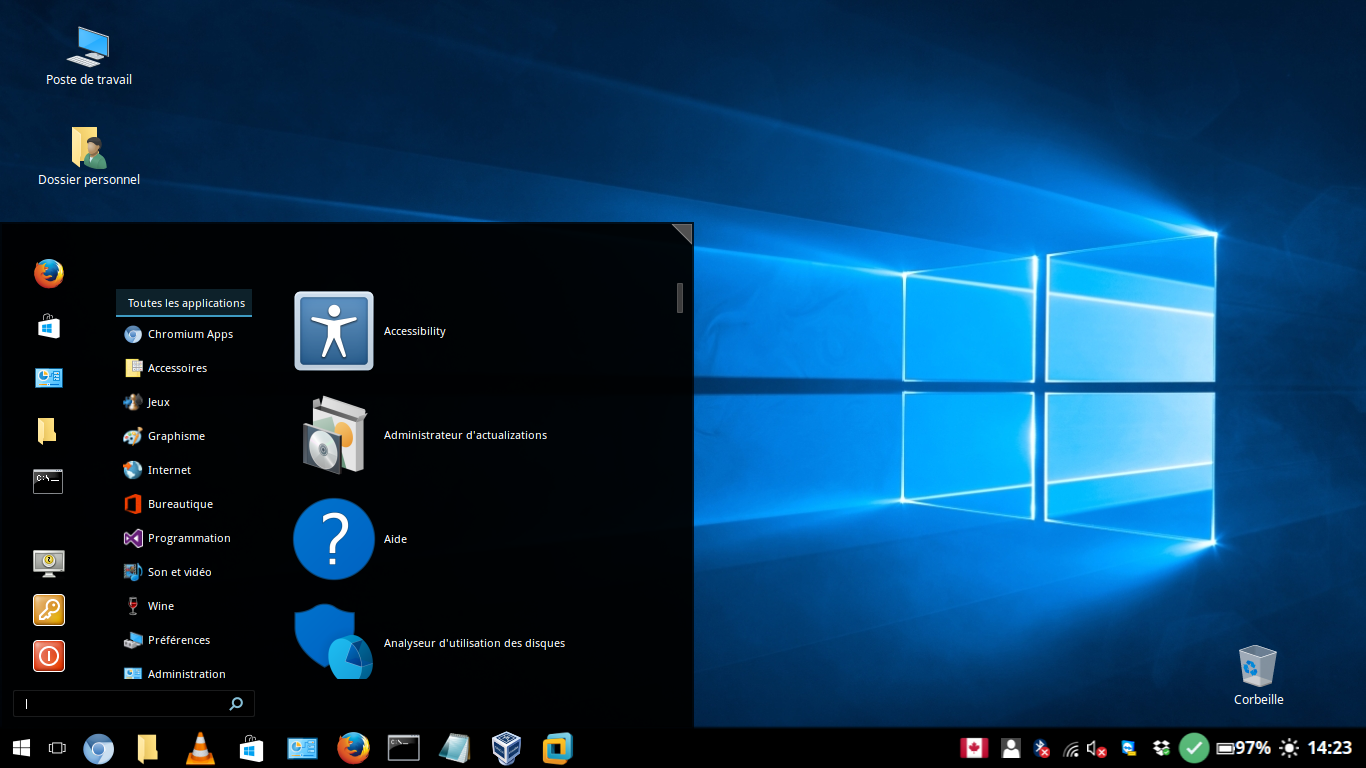
По окончании установки, откройте приложение для изменения Внешнего вида своего дистрибутива (в Ubuntu — это Unity Tweak Tool) и активируйте светлую или тёмную тему Windows 10:


2. Установка темы значков Windows.10

Выполните следующие команды для систем 32 и 64-bit:
cd /tmp; wget https://github.com/Elbullazul/Windows-10/releases/download/v0.9.6/Windows.10.Icons.v0.4.1.zip; unzip Windows.10.Icons.v0.4.1.zip
sudo mv Windows\ 10\ Icons /usr/share/icons
Для активации темы значков также воспользуйтесь приложением для изменения Внешнего вида своего дистрибутива:

3. Установка темы курсора Windows
Выполните эти команды:
cd /tmp; wget http://gnome-look.org/CONTENT/content-files/175016-PRA.tar.gz; tar -xvf 175016-PRA.tar.gz
sudo mv PRA /usr/share/icons
Активация курсора Windows:

Чтобы курсор правильно отображался на рабочем столе и приложениях, необходимо отредактировать файл index.theme. Выполните команду на открытие файла:
sudo gedit /usr/share/icons/default/index.theme
Примечание. В команде на открытие файла index.theme нужно изменить gedit на название текстового редактора, установленного по умолчанию в вашей системе. Например в KDE — kate; в Xfce — mousepad и т.д.
И измените на PRA. Как на нижнем снимке:

Сохраните текущий файл и закройте редактор.
Удаление тем оформления, значков и курсора Windows 10.
Если вы решили удалить трансформационный пакет Windows 10, выполните следующее:
Удаление тем:
sudo rm -rf /usr/share/themes/Windows\ 10\ Dark
sudo rm -rf /usr/share/themes/Windows\ 10\ Light
Удаление значков:
sudo rm -rf /usr/share/icons/Windows\ 10\ Icons
Удаление курсора:
sudo rm -rf /usr/share/icons/PRA
Удачи.
Cinnamon-theme-Windows-10
A custom Windows 10 theme for the Cinnamon enviornment/Linux Mint.
Getting Started
Install.sh coming soon
-
Clone to local machine:
git clone https://github.com/mdgiii/Cinnamon-theme-Windows-10.git. -
(Optional) Open the «Themes» configuration tool, if you haven’t before, to create the
/.themesand/.iconsfolders. -
Copy the contents of the wallpapers folder to the
/Picturesfolder in your home folder. -
Right-click on your favorite wallpaper and click «Set as Wallpaper».
-
Copy the icons folder to the
/.iconsfolder in your home folder. -
Copy the theme folder to the
/.themesfolder in your home folder. -
Open the «Themes» configuration tool and select the option for «Win10-«.
Customization
If you don’t like the orange color on the Cinnamon menu, I’ve got good news. You can change the color!
-
Open
/Win10-theme/cinnamon/cinnamon.csswith your favorite text editor. -
Open the find and replace dialog
-
The color that you are looking to replace is
#ff7500. -
Save file and restart Cinnamon.
Disclaimer
None of the files found here are mine. I just pieced together different themes into one to create one theme that I enjoy.
Quick Links
-
Method 1: Get a Windows 10 GTK Theme
-
Method 2: Use a Community Theme Pack
-
Why Clone Windows 10 With Linux?
Summary
- For GTK Linux desktop environments, download the B00merang Windows 10 theme pack and icon pack and add their contents to themes and icons folders, respectively. Enable them using your theme manager.
- For all desktops, alternatively use a community theme pack to automate the installation process, but be aware that it may not be an exact replica of Windows 10.
Want to use a Linux desktop but don’t want to lose Windows 10’s familiar look and vibe? Most desktop environments come with unique layouts and themes by default, but with a bit of effort, you can convert it to a spitting image of the Windows 10 desktop.
Method 1: Get a Windows 10 GTK Theme
The method that works on many desktop environments is to simply download a Windows 10 theme pack and icon pack designed for GTK desktops and drop them into the proper folders. We’ll demonstrate this with Cinnamon (on Linux Mint 23.3, specifically), but it’ll also work on GNOME, Xfce, LXDE, and MATE.
Step 1: Download and Install the Theme
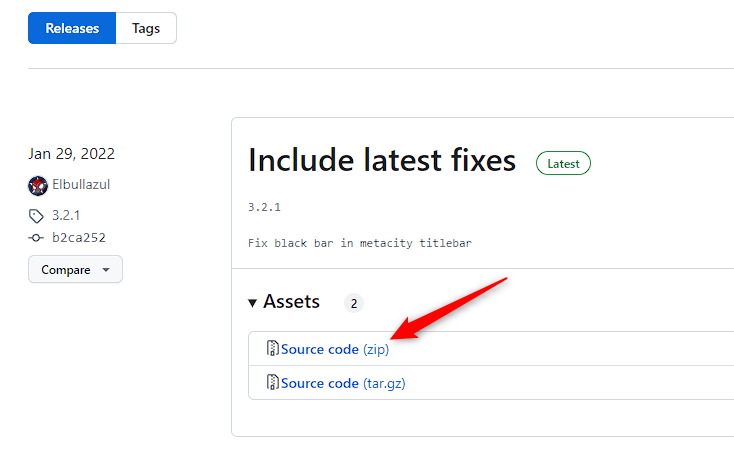
The best source for Windows 10 GTK theming files is the B00merang Project’s GitHub release page. That is the light version, and though we’ll use it as an example in this guide, you can grab the Windows 10 dark variant if you prefer.
In the latest release card (3.2.1 at the time of writing), download your Windows 10 theming by clicking «Source Code (ZIP).»
When the ZIP file download completes, you’ll need to extract the contents. For a quick command line solution, first run this command in your home directory to create the folder in case it doesn’t already exist:
mkdir -p ~/.themes
Follow that with the unzip command to decompress it and drop it in the themes folder:
unzip Downloads/Windows-10-3.2.1.zip -d ~/.themes
Just tweak the directory path and name for the file if yours is different. This will cause the files to be extracted into your Downloads directory.
Want to use the desktop interface instead of the command line? Just open your file browser and look for the downloaded ZIP file. It should be named something like «Windows-10-3.2.1.zip». Double-click it to open the extraction dialog, which will look different depending on your distribution and DE. Regardless, there should be a noticeable «Extract» button for you to click. In our example, it’s in the top-left corner of the dialog.
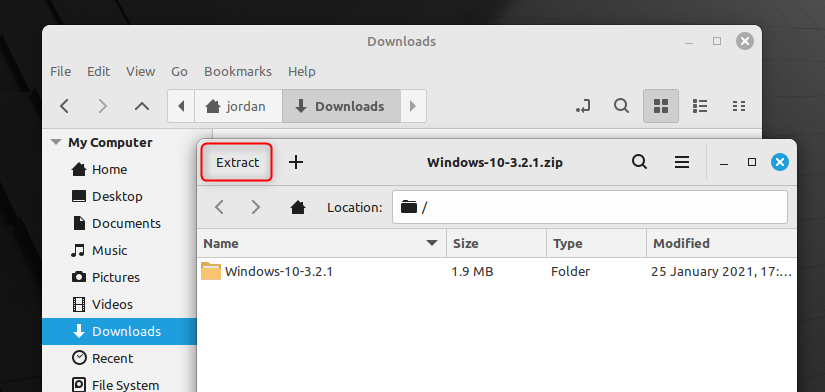
You’ll be prompted to choose an extraction location, and, for simplicity, we’ll leave it at the default: the Downloads folder where we found the ZIP file.
Once extraction has finished, locate the extracted directory in your file explorer, likely also called «Windows-10-3.2.1». Copy the directory, and with it in your clipboard, move back to your home folder.
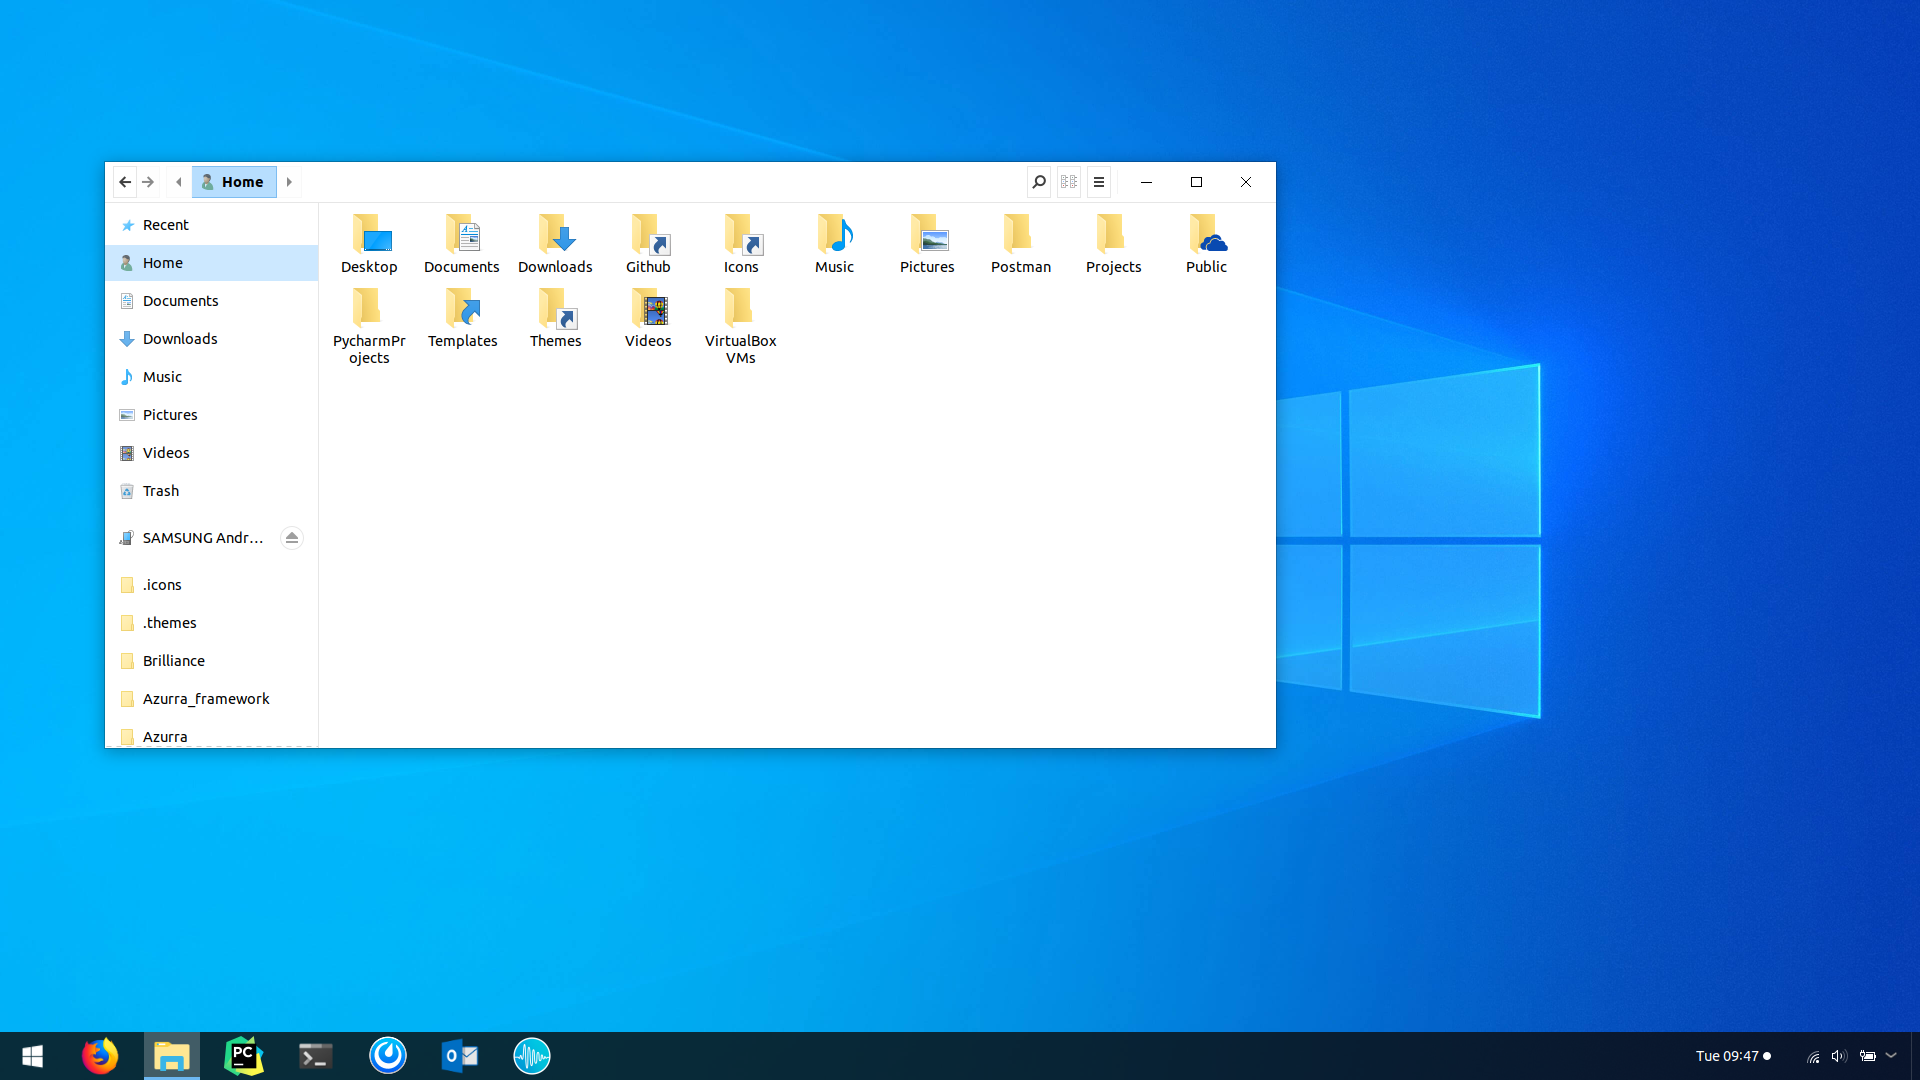
At this point, you’ll need to make hidden files visible in your file browser. You can usually find this setting in the View drop-down menu, as is the case in Nemo.
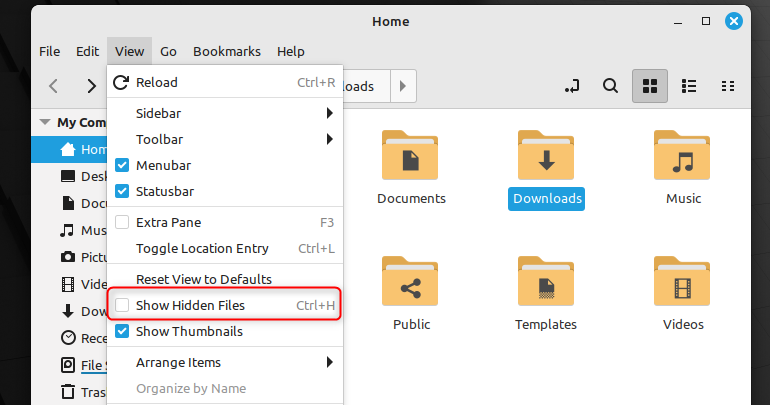
You should now see several folders that weren’t there before and whose names start with a period like «.local». You need the «.themes» folder, but in our version of Linux it didn’t exist yet, so we just made one.
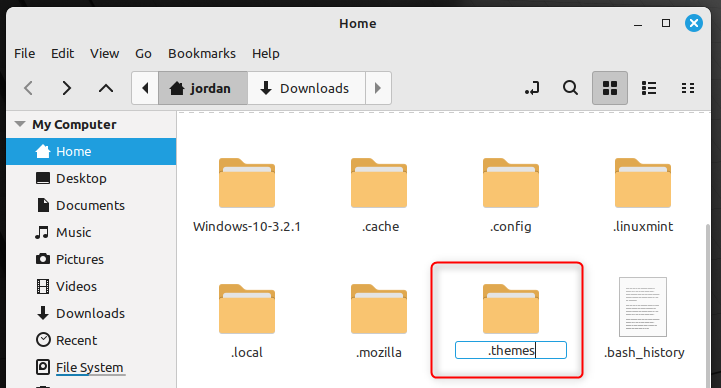
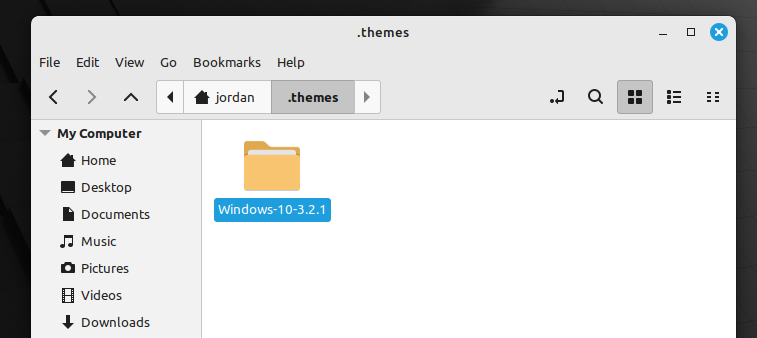
After creating the .themes folder, open it and paste your theme folder there by either right-clicking and selecting «Paste» or using the keyboard shortcut Ctrl+V.
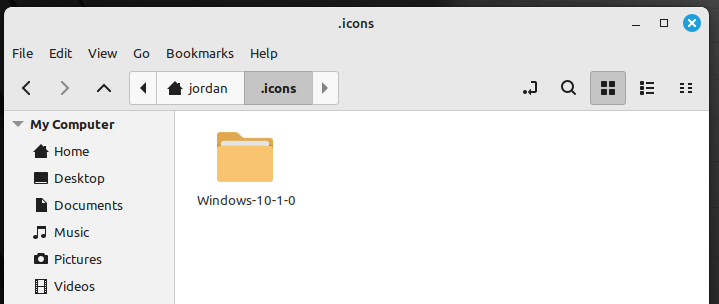
Step 2: Download and Install the Icon Pack
The basic theme package contains what you need to get the overall design of Windows 10, but if you want those illustrious icons, you need to get and install those separately.
They’re available from the same project, but in a separate icons repository. Again, download the ZIP file for the latest release and unzip it like you did the theme pack. Copy the unzipped contents, and this time paste it into the .icons folder in your home directory. On my system, the folder already existed, but you may have to create it yourself.
Step 3: Enable Your Windows 10 Theme
With your theme and icons in place, it’s time to paint the town Windows. Open your DE’s settings and look for its theming preferences, likely called «Appearance» or, in the case of Cinnamon, «Themes.»
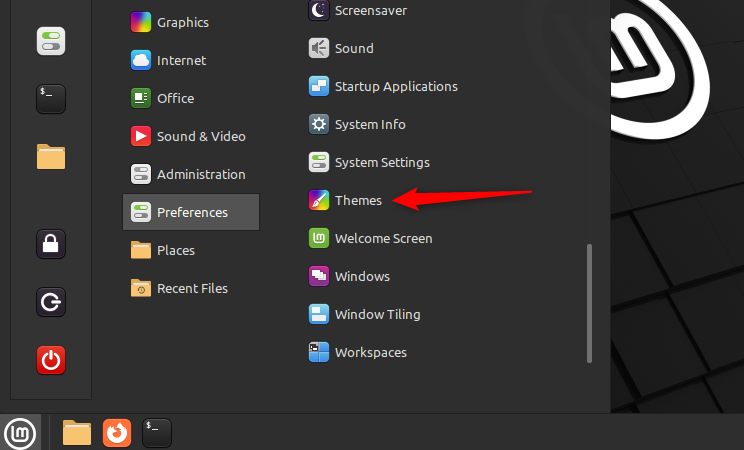
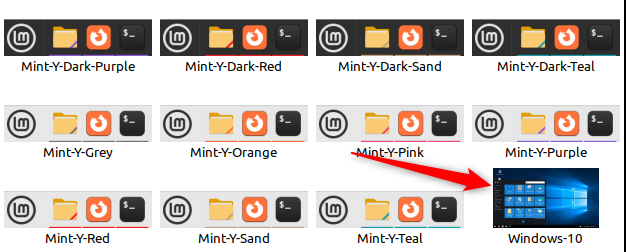
Then we need to choose the Windows 10 theme for every category available. To get this ability in Cinnamon, I needed to click «Advanced Settings.»

Again, the interface will look different depending on precisely your distro and DE. But in Cinnamon, there are three categories you can change to Windows: Applications, Icons, and Desktop. Click the button in each category to open the options.
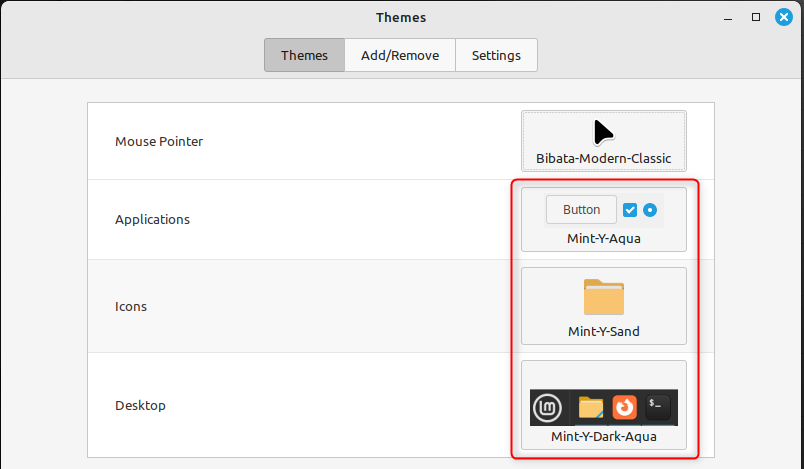
You might need to scroll to reveal it, but there will be an option named Windows-10-1.2.3 (or whatever theme or icon version you downloaded is named).
The finishing touch is of course the classic Windows 10 background. There’s a large collection of the older ones on Imgur. I wanted the lighter blue version of the glass pane one, which I found at 4K Wallpapers.
We’re now looking a lot better, but some things are a bit off. The taskbar in particular doesn’t look quite right. Keep in mind these themes can only go so far in cloning Windows 10. If you’re willing to explore your desktop settings, though, there are often settings that will get you closer to 2017-era Windows nirvana.
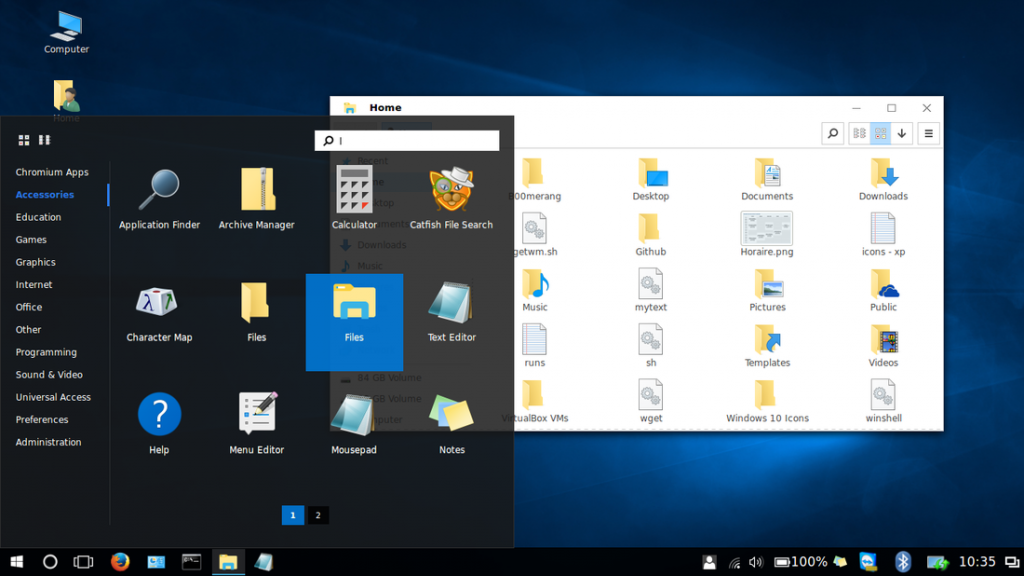
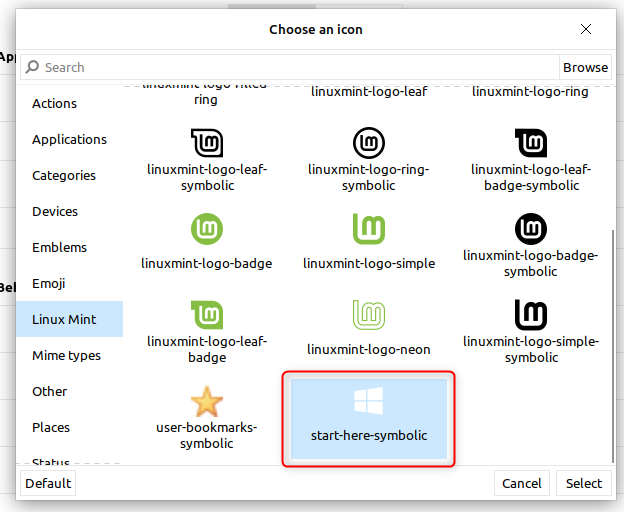
For example, in Cinnamon, I can replace the Mint logo in the Start menu by right-clicking it and choosing Configure > Appearance > Icon.
If I want to see window titles in open taskbar apps, I can right-click any app icon and go to Applet Preferences > Configure > Panel > Button Label, then select «Window Title.»

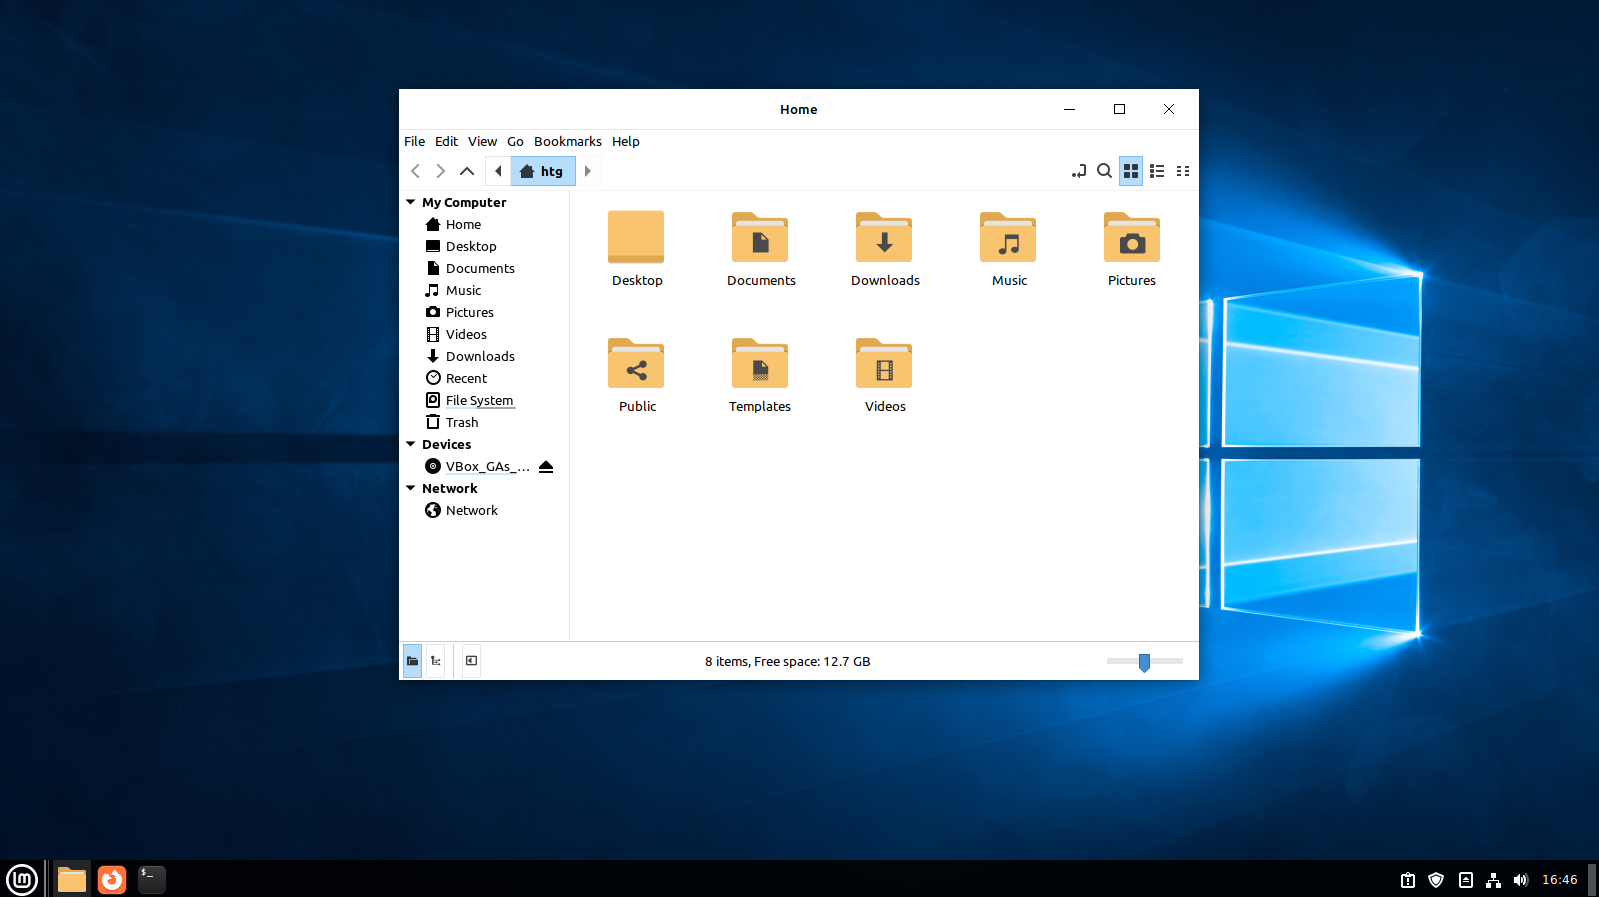
And I can also get the My Computer icon and others on my desktop. If you right-click anywhere on the desktop and choose Customize > Desktop Settings. Just toggle on the ones you want. (Note that «Home» is what you’d call the «User’s Files» on Windows.)

Now my Cinnamon desktop is looking pretty good.

Some desktop environments have a built-in tool for finding and installing themes built and shared by community members. In my experience, these tend to be hit-and-miss. They may not be as perfect a reproduction as you hope for, so you may end up needing manual tweaks anyway. Icons may be missing. Updates to the desktop environment itself can break the theme, too, forcing you to further tweak or undo the theming altogether.
That said, they can save you from the hassle of downloading, unzipping, and properly installing the themes; the community theme typically automates that. In fact, they sometimes just download the same theme pack I showed you how to download manually. So, when they work, community themes can be awesome. Plus, this can work on desktop environments that don’t support GTK theming, like KDE Plasma.
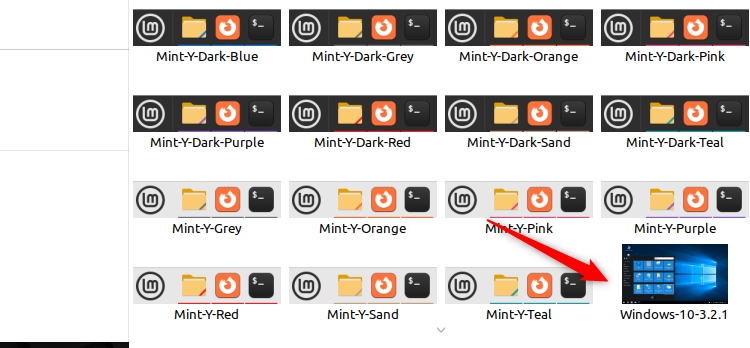
Thism of course, will look different depending on your desktop environment, but on Cinnamon, you can go to Themes > Add/Remove and type «windows 10» into the search bar to find a community-uploaded theme. Click the download button next to the one you want.
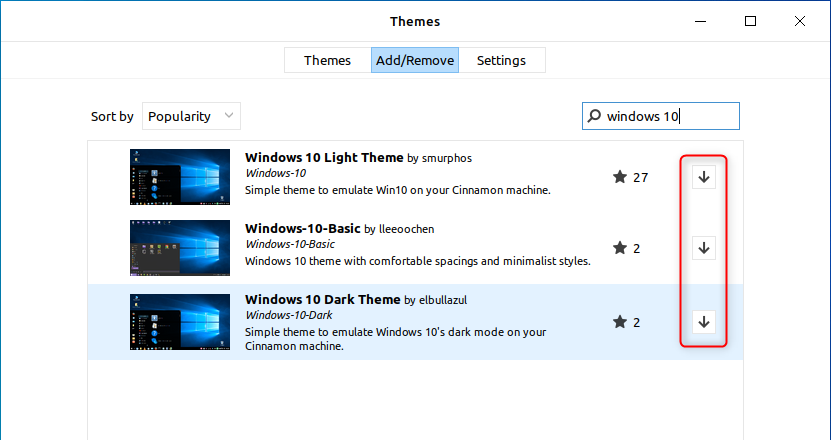
Once you’ve downloaded the theme, you’ve then got to go back to the Themes tab and activate it. You may have to scroll to find it.
Select it and, if all went well, you’ve got your Windows 10 theme.
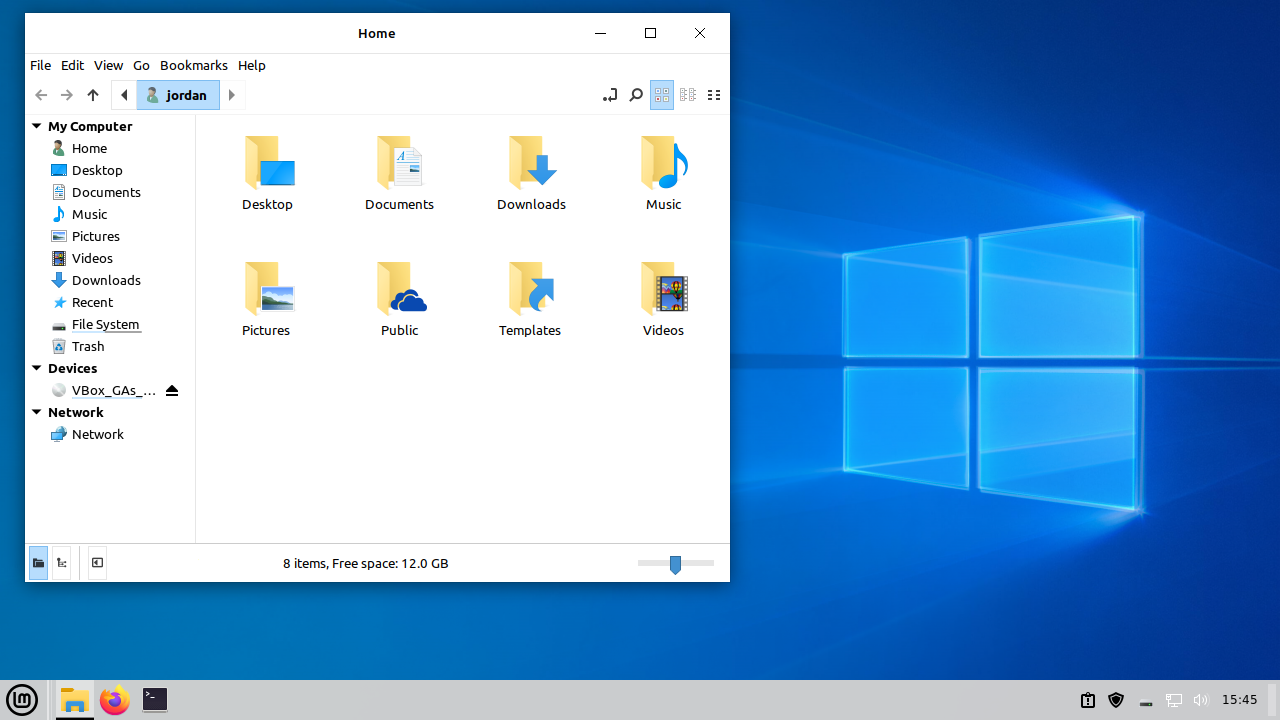
I added a classic Windows 10 background myself. As you can see, though, there are none of those recognizable icons. At least on Cinnamon, you’ll have to manually install them, which I walked through above. You may want to make the extra tweaks I outlined above too.
Why Clone Windows 10 With Linux?
For me, the unconventional interface some desktop environments bring is part of the appeal of switching to Linux. Not everyone is like me, though, and you may want to switch to Linux without your PC desktop world turned upside down. Even if you are like me, this is still a great trick to know if you’re replacing an installation of Windows with Linux on the PC of a friend or relative who doesn’t want to put up with Windows’ annoyances anymore.
There’s also the nostalgia factor. While Windows 10 isn’t exactly a vintage look yet, it’s already being slowly replaced via Windows 11 upgrades. As time goes on, and Microsoft stops supporting Windows 10 altogether, this kind of theming will get even more niche.